

Page 1

INSTRUCTION
MANUAL
Important
- Please read these instructions fully before operating or maintaining your electric chainsaw
ELECTRIC CHAINSAW
2300W
CS2300
These instructions contain important information that will help you get the best
from your electric chainsaw, protecting your power tool investment.
AFTERSALES SERVICE
01904 727505
MON-FRI 9am-5pm SAT/SUN 11am-4pm
www.spearandjackson-power.com
Page 2

2
AFTER SALES SUPPORT 01904 727505 www.spearandjackson-power.com
THANK YOU!
Dear Customer,
Thank you for choosing a Spear and Jackson electric chainsaw.
Spear and Jackson was founded in 1760 in the city of Shefeld, which is world
famous for the production of steel, cutlery and garden and hand tools.
Through continuous innovation and the use of new technologies and materials,
Spear and Jackson has gained an enviable reputation as a supplier of reliable,
high performance and high quality products designed to make your work in the
garden as easy and enjoyable as possible.
We are so condent in the quality of our products we provide a 2 year guarantee
on our garden power tools. We offer 12 month extended warranty for all registered
garden power tools. Simply register your product within 28 days of purchase via www.
spearandjackson-power.com to extend the standard manufacturer’s warranty with
an additional 12 months. After registering your product, your garden power tool will
be covered for parts and labour for 3 years from the date of purchase, subject to the
terms of the guarantee. If you do not wish to register your product within 28 days,
your product is guaranteed for 2 year after date of purchase. It’s important to retain
your proof of purchase.
We want you to get the best out of your products. Our easy-to-read instruction
manual guides you with best practice use and maintenance tips. You can also visit
www.spearandjackson-power.com for online help, general tips and useful videos
about your garden product. However, if you prefer to speak to one of technicians
please call 01904 727505, Mon-Fri 9am-5pm and Sat-Sun 11am-4pm, we can
solve around 80% of questions directly over the phone.
We hope you enjoy your product and looking forward to any feedback, as this allows
us to develop even better products for the future.
FREE EXTENDED WARRANTY
7 DAYS A WEEK TECHNICAL SUPPORT
Page 3

3www.spearandjackson-power.com AFTER SALES SUPPORT 01904 727505
CONTENTS
Safety Information 04
Description of symbols 04
General safety
05
Personal safety
05
Electrical safety
06
Operational safety
06
Maintenance
08
Intended use
08
Box Content / Parts 09
Preparation 10
Tensioning the saw chain 10
Chain lubrication
11
Check the power supply
12
Switching on/off
14
Checking the chain brake
14
Operation 16
Overcutting 16
Undercutting
17
Cutting logs
17
Limbing
18
Pruning
18
Felling trees
19
Maintenance 21
General 21
Replace the chain
21
Chain sharpening
22
Cleaning the guide bar and lubricating the sprocket nose
23
Check the chain bar
23
UK plug
24
Storing
24
Transport
24
Disposal
25
Technical Data 26
Troubleshooting 27
Guarantee 28
EC DECLARATION OF CONFORMITY 29
Page 4
AFTER SALES SUPPORT 01904 727505 www.spearandjackson-power.com
Please read these instructions fully before operating or maintaining your machine
4
SAFETY INFORMATION
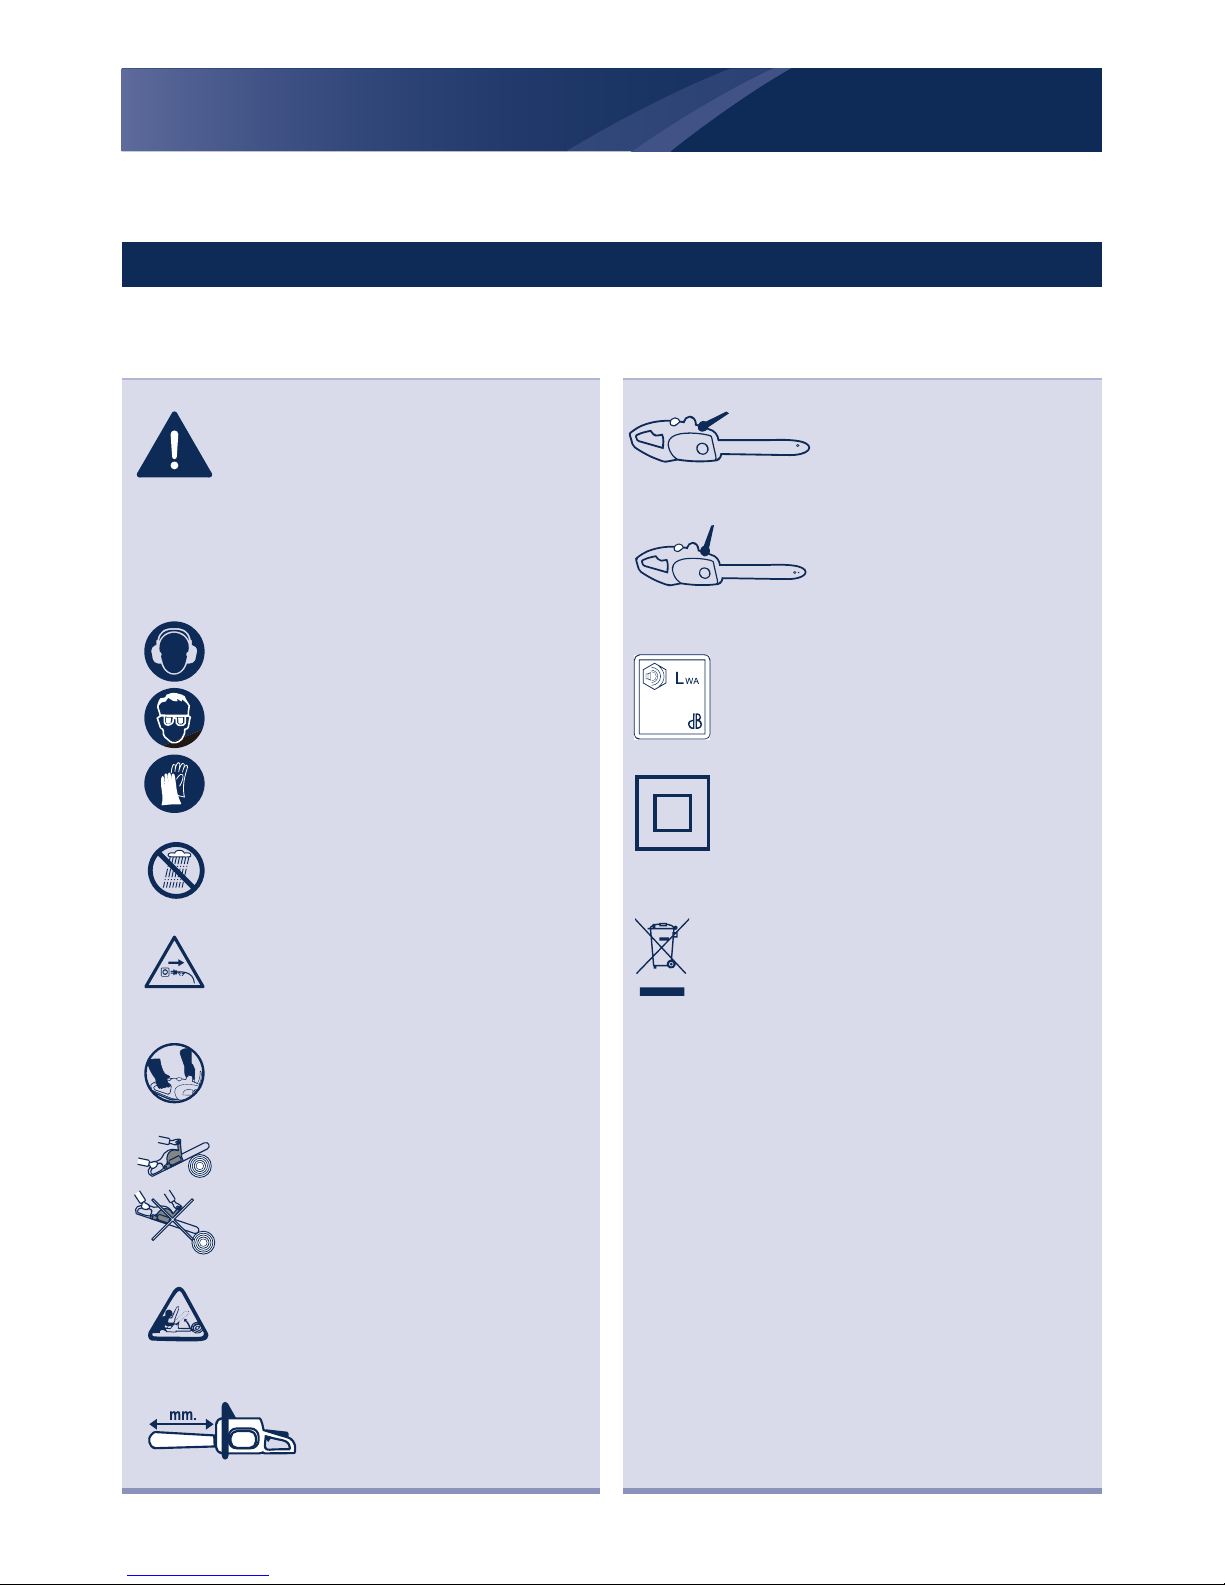
The following warning symbols appear throughout
this manual and indicate the appropriate
safety measures you should take when operating and maintaining the electric chainsaw.
WARNING!
This is a warning symbol. This
symbol is used throughout the user
guide whenever there is a risk of
personal injury. Ensure that these
warnings are read and understood
at all times..
Wear hearing protection
Wear eye protection
Wear protective gloves
Do not expose and operate the tool
in rain.
Remove the plug from the mains
immediately if cable is damaged or
cut.
Hold the chain saw with both
hands.
Correct way of operation.
Caution! kick-back! Be careful of
kick-back of the machine during
work.
Maximum cutting length
350mm
DESCRIPTION OF SYMBOLS
Brake is engaged and
product can not be started
or run.
Brake is disengaged and
product can be operated.
Guaranteed sound power level
Double insulation
Recycle unwanted materials
instead of disposing of them
as waste. All tools, hoses and
packaging should be sorted,
taken to the local recycling
centre and disposed of in an
environmentally safe way.
110
Page 5

www.spearandjackson-power.com AFTER SALES SUPPORT 01904 727505
Please read these instructions fully before operating or maintaining your machine
5
IMPORTANT!
The chain is designed exclusively for
sawing wood. You may only fell trees if
you have received the appropriate training.
The manufacturer cannot be held liable for
damage caused by improper or incorrect
usage.
Please note that our equipment has not
been designed for use in commercial, trade
or industrial applications. The warranty
will be void if the machine is used in
commercial, trade or industrial businesses
or for the equivalent purposes
Read the instructions carefully. Be familiar
with the controls and the proper use of
the equipment. Always ensure anyone
intending to operate this electric chainsaw
is fully conversant with the content of this
assembly manual prior to assembling,
maintaining or operating the chainsaw.
Keep this operating and maintenance
manual in a safe place for future reference.
Never allow children or people unfamiliar
with these instructions to use the electric
chainsaw. Local regulations can restrict the
age of the operator.
This appliance is not intended for use by
persons (including children) with reduced
physical, sensory or mental capabilities,
or lack of experience and knowledge,
unless they have been given supervision or
instruction concerning use of the appliance
by a person responsible for their safety.
Do not touch the saw chain.
WARNING!
Use appropriate tool. This device is only
intended for sawing wood for domestic
purposes in residential gardens. You may
only fell trees if you’ve received appropriate
training. Do not force small tools or
attachments to do the job of a heavy duty
tool.
Use personal protective equipment (PPE).
Always wear eye protection and ear
protection. Protective equipment such
as dust mask, chainsaw trousers, nonskid safety shoes, hard hat, or hearing
protection used for appropriate conditions
will reduce personal injuries.
Dress appropriately. Use safety footwear,
snug-fitting clothing, protective gloves as
well as eye, hearing and head protection
devices. Wear non-slip footwear when
working outdoors and protective hair
covering to keep long hair out of the way.
Stay alert, watch what you are doing and
use common sense when operating a
power tool. Do not use a power tool while
you are tired or under the influence of
drugs, alcohol or medication. A momentary
lapse of concentration while operating
power tools may result in serious personal
injury.
Prevent unintentional starting. Ensure
the switch is in the off-position before
connecting to power source and/or battery
pack, picking up or carrying the tool.
Carrying power tools with your finger on the
switch or energizing power tools that have
the switch on invites accidents.
Keep all parts of the body away from the
GENERAL SAFETY PERSONAL SAFETY
SAFETY INFORMATION
Page 6

AFTER SALES SUPPORT 01904 727505 www.spearandjackson-power.com
6
SAFETY INFORMATION
Please read these instructions fully before operating or maintaining your machine
cutting saw chain. Make sure the switch
is off when clearing jammed material. A
momentary lapse of concentration while
operating the chainsaw may result in
serious personal injury.
Do not overreach and do not cut over
shoulder height. Keep proper footing and
balance at all times. This enables better
control of the power tool in unexpected
situations.
Power tool plugs must match the outlet.
Never modify the plug in any way. Do
not use any adapter plugs with earthed
(grounded) power tools. Unmodified plugs
and matching outlets will reduce risk of
electric shock.
Avoid body contact with earthed or
grounded surfaces, such as pipes,
radiators, ranges and refrigerators. There
is an increased risk of electric shock if your
body is earthed or grounded.
Do not expose power tools to rain or wet
conditions. Water entering a power tool will
increase the risk of electric shock.
Do not abuse the cord. Never use the
cord for carrying, pulling or unplugging the
power tool. Keep cord away from heat, oil,
sharp edges or moving parts. Damaged
or entangled cords increase the risk of
electric shock.
When operating a power tool outdoors,
use an extension cord suitable for outdoor
use. Use of a cord suitable for outdoor use
reduces the risk of electric shock.
If operating a power tool in a damp
location is unavoidable, use a residual
current device (RCD with a tripping current
of 30mA or less) protected supply. Use
of an RCD reduces the risk of electric
shock. NOTE! The term residual current
device (RCD)”may be replaced by the term
“ground fault circuit interrupter (GFCI)” or
“earth leakage circuit breaker (ELCB)”.
Keep work areas clean. DO NOT start
cutting until you have a clear work area,
secure footing, and a planned retreat path
from falling trees or branches. Cluttered or
dark areas invite accidents.
Consider work area environment. Do not
expose your tool to high humidity or rain.
Do not use your tool in damp and wet
conditions. Keep the work area well lit.
Keep all bystanders, children, and pets at
least 50 feet away. The operator or user
is responsible for accidents or hazards
occurring to other people or the property.
Do not operate power tools in explosive
atmospheres, such as in the presence of
flammable liquids, gases or dust. Power
tools create sparks which may ignite the
dust or fumes.
Be certain the parts are fully tightened
before operating the tool. Check it
periodically for tightness during use to
avoid serious injury.
Risk of cut. Do not touch or try to stop the
cutting saw chain when it is moving.
Disconnect plug from the tool when not in
use or when servicing or cleaning.
Check for damaged parts. Before further
use, carefully check the tool for damage.
ELECTRICAL SAFETY
OPERATIONAL SAFETY
Page 7

www.spearandjackson-power.com AFTER SALES SUPPORT 01904 727505
7
SAFETY INFORMATION
Please read these instructions fully before operating or maintaining your machine
Check for alignment of moving parts,
binding of moving parts, breakage of parts,
mounting and any other condition that may
affect its operation.
Do not use the tool if any parts are
damaged or defective. Have any damaged
or defective parts repaired or replaced by
an authorized service agent. Never attempt
any repairs yourself.
Grip the tool securely. Always hold the tool
securely in both hands while working with
it.
Keep handle dry, clean and free from oil
and grease. Slippery handles do not allow
for safe handling and control of the tool in
unexpected situations.
Keep the cable away from the cutting area.
During operation, the cable may be hidden
in shrubs and can be accidentally cut by
the saw chains.
Do not overload the tool. Only work in the
performance range stated. Do not use
tools that do not have sufficient power
for heavy jobs. Do not use the tool for
any use other than that intended by the
manufacturer.
Do not operate a chainsaw while climbing
in a tree. Operation of a chainsaw while up
in a tree may result in personal injury.
Always keep proper footing and operate
the chainsaw only when standing on a
fixed, secure and level surface. Slippery
or unstable surfaces such as ladders may
cause a loss of balance or control of the
chainsaw.
When cutting a limb that is under tension,
be alert for spring back. When the tension
in the wood fibers is released, the spring
loaded limb may strike the operator and/or
throw the chainsaw out of control.
Use extreme caution when cutting brush
and saplings. The slender material may
catch the saw chain and be whipped
toward you or pull you off balance.
Follow instructions for lubricating, chain
tensioning and changing accessories.
Incorrectly tensioned or lubricated chain
may either break or increase the chance for
kickback.
Cut wood only. Do not use chainsaw for
purposes not intended. For example; do
not use the chainsaw for cutting plastic,
masonry or non-wood building materials.
Use of the chainsaw for operations different
than intended could result in a hazardous
situation.
Maintain a firm grip with thumbs and
fingers encircling the chainsaw handles,
with both hands on the saw and position
your body and arm to allow you to resist
kickback forces. Kickback forces can
be controlled by the operator, if proper
precautions are taken. Do not let go of the
chainsaw.
Kickback may occur when the nose or
tip of the guide bar touches an object or
when the wood closes in and pinches
the saw chain in the cut. Tip contact, in
some cases, may cause a sudden reverse
reaction, kicking the guide bar rapidly back
to towards the operator.
Either of these reactions may cause you
to lose control of the saw which could
result in serious personal injury. Do not rely
exclusively upon the safety devices built
into your saw. As a chainsaw user, you
should take several steps to keep your
cutting jobs free from accident or injury.
Page 8

8
AFTER SALES SUPPORT 01904 727505 www.spearandjackson-power.com
SAFETY INFORMATION
Please read these instructions fully before operating or maintaining your machine
Carry the chainsaw by the front handle with
the chainsaw switched off and away from
your body. When transporting or storing the
chainsaw, always fit the guide bar cover.
Proper handling of the chainsaw will reduce
the likelihood of accidental contact with the
moving saw chain.
Do not use the power tool if the switch
does not turn it on and off. Any power tool
that cannot be controlled with the switch is
dangerous and must be repaired.
Disconnect the plug from the power source
before making any adjustments, changing
accessories, or storing power tools. Such
preventive safety measures reduce the risk
of starting the power tool accidentally.
Cut the wood in correct direction.
The first-time user should, as a minimum,
practice cutting logs on a saw-horse or
cradle.
Before using the chainsaw, be sure to
check the chain and bar tension. Do not
use the chainsaw if the chain and bar are
loose. Also confirm that no abnormalities
are present by first test running the tool.
Maintain tools with care. Keep tools clean
and in good condition for better and safer
performance. Follow the instructions for
maintenance and changing accessories.
Keep handles and switches dry, clean and
free from oil and grease.
Be careful in handling the tool. Keep the
blades sharp and clean to improve its
working safety and effectiveness. Follow
the manufacturer’s sharpening and
maintenance instructions for the saw chain.
Decreasing the depth gauge height can
lead to increased kickback.
Store idle power tools out of the reach
of children and do not allow persons
unfamiliar with the power tool or these
instructions to operate the power tool.
Power tools are dangerous in the hands of
untrained users.
Only use replacement bars and chains
specified by the manufacturer. Use only
suitable bar (Oregon 140SDEA074) and
chain (Oregon 91PJ051X).
Have your tool repaired by an authorized
service agent. This tool is manufactured
in accordance with the relevant safety
regulations. To avoid danger, electrical
appliances must only be repaired by
qualified technicians.
The product is designed for domestic
purpose sawing in residential gardens
only. The saw is not designed for any
other types of application (e.g. cutting of
brickwork, plastic or food). Observe the
technical data for the maximum cutting
capacity. Do not work exceeding the stated
maximum capacity.
This product is intended for private use
only, not for any commercial applications.
It may not be used for any purposes other
than those described.
Attachments must be used according to
the respective functions and in accordance
with this instruction manual.
MAINTENANCE
INTENDED USE
Page 9
9
www.spearandjackson-power.com AFTER SALES SUPPORT 01904 727505
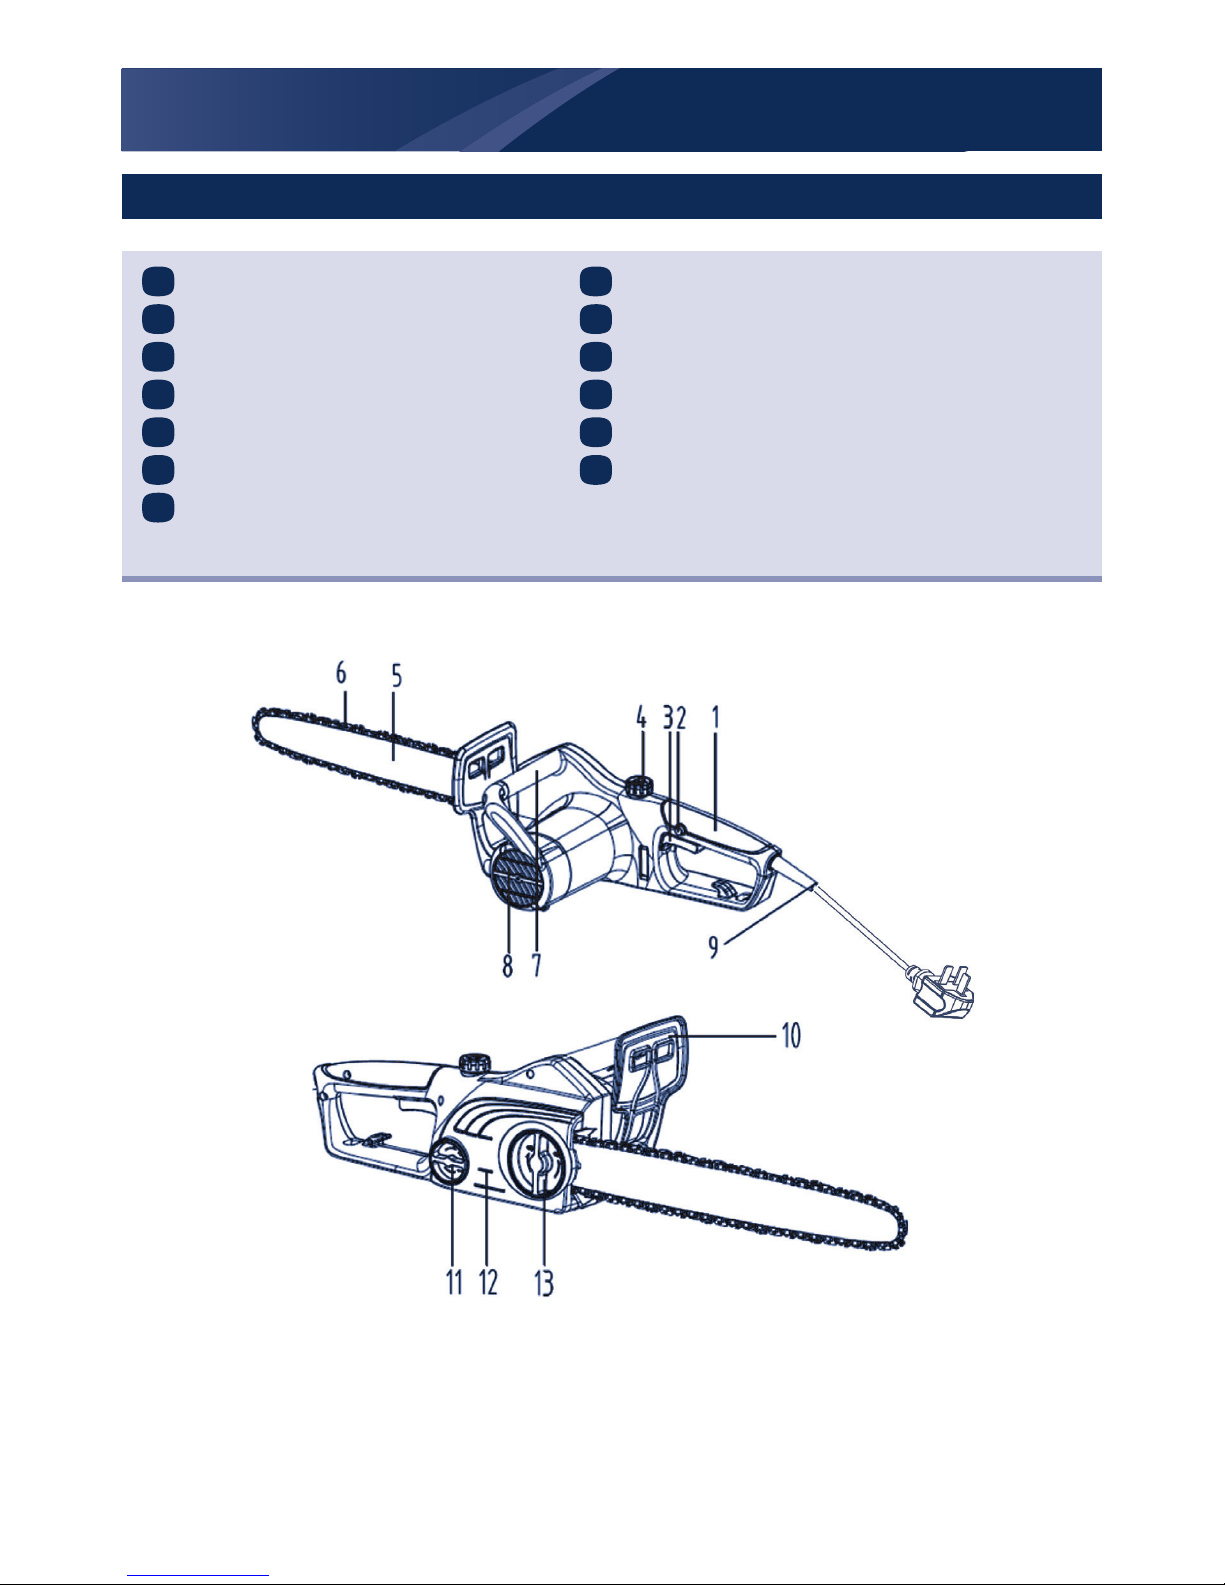
BOX CONTENT
PLEASE NOTE: THIS PRODUCTS REQUIRES CHAIN LUBRICATION OIL,
AVAILABLE IN MOST DIY STORES.
PARTS
Rear handle
Safety lock-off button
Trigger
Oil Filler cap
Chain bar
Chain
Front handle
1 8
2 9
3 10
4 11
5 12
6 13
7
Motor and air slots
Plug and cord
Chain brake trigger
SDS tension knob
Chain cover
Clamp knob
Page 10

10
AFTER SALES SUPPORT 01904 727505 www.spearandjackson-power.com
PREPARATION
WARNING! Always wear protective gloves and
clothing when working with the chainsaw and
employ only original parts. Pull out the power plug
before doing any work on the chainsaw itself-injury
hazards!
Remove the electric chainsaw from the box and carefully
remove all packaging. Take care not to lose any instructions
which may be affixed to parts. These provide important
information which will be required while operating the electric
chainsaw.
Do not start before adding chain lubrication oil.
NOTE! Always recycle the packaging in accordance with local
recycling schemes.
Tensioning the saw chain
WARNING! An incorrectly tensioned chain may
break, derail or spring off, leading to danger or
injury. Test the electric saw before every start and
the chain tension after every hour of sawing.
i. Ensure that the chain brake has been engaged, that the
chain brake lever is pulled up against the front handle (7).
ii. Loosen the clamp knob (13) to release tension.
iii.
Adjust the SDS chain tension knob (11) in the “+”direction to
increase tension or in the “-”direction to slacken the chain.
1
i.
ii.
Disengage
Engage
Page 11

11
www.spearandjackson-power.com AFTER SALES SUPPORT 01904 727505
PREPARATION
Tighten the SDS knob (11) and lock in place with the clamp
knob (13). Ensure the chain rotates smoothly on the bar. The
chain is correctly tensioned if it does not sag underneath the
rail and can be rotated completely around with a gloved hand.
v.
When the saw chain is tensioned with 9N (approx.1kg), the
gap between the saw chain and the guide rail should never
NOTE! Do not over tension the chain as this will reduce life of
chain bar and motor. With a correctly tensioned chain you will get
good cutting performance and a longer life.
Chain lubrication
WARNING! The rail and chain must never be
without oil. Operating the electric chainsaw with
too little oil, will cause fast overheating of the chain
and bar. Smoke development or discoloration of
the bar are signs of using too little oil.
NOTE! This chainsaw is equipped with an automatic oil system.
As soon as the motor is accelerated, the oil also flows faster to the
chain bar.
Check the oil fill level and regularly top up with oil. The oil
tank holds 100 ml oil. Use chain lubrication oil with low
adhesive additive content. The type of motor oil SAE10W-30 is
recommended.
2
13
11
Max.2mm
9N
iv.
be more that 2mm.
Page 12

12
AFTER SALES SUPPORT 01904 727505 www.spearandjackson-power.com
PREPARATION
i. Unscrew the oil fill cap (4) and fill up with chain oil.
ii. Wipe off any spilled oil and close the cap again.
iii.
Switch on the chainsaw pointing it at the ground without
touching!
iv.
If an oil trace can be seen, the chainsaw is lubricating.
NOTE! Never saw when a sufficient chain lubrication is not
guaranteed. Before starting work check the oil level in the tank and
the oil feeding.
Check the power supply
WARNING! Read all of the instructions of this
manual before attempting to connect the power
supply for your tool
.
If the insulation on a power cable or extension
lead is found to be cut or damaged, do not touch
it! Disconnect the power supply immediately and
have the damaged cable replaced by authorized
service agent.
If operating the chainsaw in a damp location is
unavoidable, use a residual current device (RCD)
protected supply. Use of an RCD reduces the
risk of electric shock.
This product is designed to operate on 230-240 VAC
50Hz. The voltage and current must comply with the
information on the ratings label
3
Chain oil
Page 13

13
www.spearandjackson-power.com AFTER SALES SUPPORT 01904 727505
PREPARATION
NOTE! For extension cables up to 15metres, use a wire cross
section of 2.5 mm
2
. Use only extension cords suitable for outdoor
use, preferably with a high visibility cable colour.
Always unwind all extension cables fully, coiled cables can overheat
and reduce the efficiency of your product.
NOTE! This electric chainsaw is fitted with a non-rewireable plug.
If it is necessary to change the fuse in the plug, the fuse cover
becomes lost or damaged; the plug must not be used until a
suitable replacement is obtained. A 13amp fuse must be fitted.
i. Check before the start, whether sufficient chain oil is in the tank
ii. Make sure the on/off switch (3) and safety chain brake trigger
iii.
Double the extension cord about a foot from the end. Lead the
loop through the hole on the rear handle and hook the loop over
the cord restrainer. Gently pull on the cord to ensure that it is
iv.
Connect the cord to a suitable socket.
3
10
and, if necessary, refill with chain oil.
(10) is in its off position.
firmly attached at the handle.
Page 14

14
AFTER SALES SUPPORT 01904 727505 www.spearandjackson-power.com
PREPARATION
Switching on/off
i. Disengage the chain brake, where you shift the chain brake
ii.
Hold the electric chainsaw firmly with both hands, with the
right hand on the rear grip and the left hand on the front
handle. Thumb and finger must close securely over handles.
iii.
Switching on, activate the safety lock-off button (2) with the
right thumb and then press the On/Off switch trigger (3), the
iv.
Release the safety lock-off button(2).
v. Switching off, the power saw switches off when you release
the On/Off switch (3). Switching for continuous running
Checking the chain brake
NOTE! The motor cannot be turned on if the chain brake has
engaged. Before operation always test if the chain break is
working. Do not employ the chain brake as the way to switch off
the machine.
Disengage
Engage
4
5
3
2
trigger (10) back against the front grip (7).
electric power saw runs with highest speed.
is not possible.
Page 15

15
www.spearandjackson-power.com AFTER SALES SUPPORT 01904 727505
PREPARATION
i. Engage the chain brake by shifting the chain brake trigger
(10) forward, away from the front handle (7).
ii. Place the electric chainsaw onto a solid, flat surface. It must
not be in contact with any objects. Connect the tool to the
mains supply.
iii.
Hold the electric chainsaw firmly with both hands, with the
right hand on the rear grip and the left hand on the front
handle.
iv.
Thumb and finger must close securely over the handles.
Turn on the electric chainsaw by pressing the on/off trigger (3).
v. Activate the chain brake trigger (10) with running motor by the
left hand. Chain should stop abruptly.
vi. Once the chain brake is working properly, release the on/off
switch and the chain brake.
WARNING! If the chain brake does not function
correctly, you must not use the electric chainsaw.
A slack saw chain leads to danger of injury.
Disengage
Engage
3
10
Page 16

16
AFTER SALES SUPPORT 01904 727505 www.spearandjackson-power.com
OPERATION
WARNING! Always keep a firm grip on the tool with
both hands and watch your feet. The saw chain
must not contact either the ground or another
object during sawing through or after sawing
completion.
Make sure that the saw chain does not become jammed in the
wood. Do not let the tree trunk break or split off. If the saw chain
jams, you should not attempt to pull out the electric chainsaw
using power. There is a danger of injury here. Switch off the motor
and use a lever or wedge to free the electric chainsaw.
Consider also the precautions against kick-back.
Kick-back may occur when the nose or tip of the chain bar
touches an object, or when the wood closes in and pinches
the saw chain in the cut. If the bar tip contacts, it may cause an
extremely fast reverse reaction, kicking the chain bar up and back
towards the operator. Pinching the saw chain along the top of
the chain bar may push the chain bar rapidly back towards the
operator. Either of these reactions may cause you to lose control
of the saw, which could result in serious personal injury. Do not
rely exclusively upon the safety devices built into your saw. As a
chainsaw user, you should take several steps to keep your cutting
jobs free from accident or injury.
NOTE! With a basic understanding of kickback, you can reduce or
eliminate the element of surprise. Sudden surprise contributes to
accidents.
Overcutting
Overcutting begins on the top side of the log with the bottom of
the saw against the log. When overcutting use light downward
pressure.
Page 17

17
www.spearandjackson-power.com AFTER SALES SUPPORT 01904 727505
OPERATION
Undercutting
WARNING! Never turn saw upside down to
undercut. The saw cannot be controlled in this
position
Undercutting involves cutting on the underside of the log with
top of saw against the log. When undercutting use light upward
pressure. Hold the saw firmly and maintain control. The saw will
tend to push back towards you.
Cutting logs
i. Log is lying on the ground:
Saw through the log completely from above and ensure at the
end of the cut not to contact the ground.
ii. Log is supported at one end:
Start sawing from the bottom and work your way up (with the
upper edge of the bar) a third of the way into the diameter of the
trunk to prevent splitting. Then saw from the top downwards with
the lower edge of the bar towards the first cut to prevent the bar
from becoming jammed in the wood.
iii. Log is supported at both ends:
First cut 1/3 of a diameter from the top. Next cut from below
using the top of the bar, this will avoid pinching of the bar in wood.
Avoid touching the ground with the bar.
LOAD
Finishing cut
1 ST CUT
1/3 DIA
Log supported at one end:
LOAD
Finishing cut
1 ST CUT
1/3 DIA
Log supported at both ends
Page 18

18
AFTER SALES SUPPORT 01904 727505 www.spearandjackson-power.com
OPERATION
iv. Sawing on a support stand :
First cut 1/3 of a diameter from the blow, next cut from the top
by using the bottom of the bar. See below figure.
Limbing
Limbing is removing branches from a fallen tree.
i. Work slowly, keeping both hands on the chainsaw with a
firm grip. Always make sure your footing is secured and your
weight is distributed evenly on both feet.
ii. Leave the larger support limbs under the tree to keep the
tree off the ground while cutting.
iii. Limbs should be cut one at a time.Remove the cut limbs
from the work area often to help keep the work area clean
and safe.
iv. Branches under tension should be cut from the bottom up
to avoid binding the chain saw.
v. Keep the tree between you and the chainsaw while limbing.
Cut from the side of the tree opposite the branch you are
cutting.
Pruning
WARNING! If the limbs to be pruned are above
chest height, hire a professional to perform the
pruning.
Pruning is trimming limbs from a live tree.
i. Work slowly, keeping both hands on the chainsaw with a
firm grip. Always make sure your footing is secure and your
weight is distributed evenly on both feet.
ii. Do not cut from a ladder, this is extremely dangerous. Leave
this operation for professionals.
Limb cut
LOAD
SECOND CUT
FIRST CUT
1/3 DIAMETER
FINISHING CUT
Page 19

19
www.spearandjackson-power.com AFTER SALES SUPPORT 01904 727505
OPERATION
iii. Do not cut above chest height as a saw held higher is difficult
to control against kickback.
iv. When pruning trees it is important not to make the finishing
cut next to the main limb or trunk until you have cut off the
limb further out to reduce the weight. This prevents stripping
the bark from the main member.
v. Under buck the branch 1/3 through for your first cut.
vi. Your second cut should over buck to drop the branch off.
vii. Now make your finishing cut smoothly and neatly against the
main member so the bark will grow back to seat the wound.
Felling trees
WARNING! You may only fell trees if you have
received the appropriate training. If a tree starts
to fall in the wrong direction, or if the saw gets
caught or hung up during the fall, leave the
saw and save yourself! Never cut through to
the notch when making a backcut. The hinge
controls the fall of the tree, this is the section of
wood between the notch and backcut.
Felling a tree-when bucking and felling operations are being
performed by two or more persons, at the same time, the felling
operation should be separated from the bucking operation by
a distance of at least twice the height of the tree being felled.
Trees should not be felled in a manner that would endanger any
person, strike any utility line or cause any property damage.
If the tree does make contact with any utility line, the utility
company should be notified immediately.
Before any cuts are started, pick your escape route (or routes
in case the intended route is blocked); clear the immediate
area around the tree and make sure there are no obstructions
in your planned path of retreat. Clear path of safe retreat
approximately 135° from planned line of fall.The retreat path
should extend back and diagonally to the rear of the expected
line of fall.
Page 20

20
AFTER SALES SUPPORT 01904 727505 www.spearandjackson-power.com
OPERATION
Before felling is started, consider the force and direction of the
wind, the lean and balance of the tree, and the location of large
limbs. These things influence the direction in which the tree will
fall. Do not try to fell a tree along a line different from its natural
line of fall.
The chainsaw operator should keep on the uphill side of the
terrain as the tree is likely to roll or slide downhill after it is
felled.
Remove dirt, stones, loose bark, nails, staples, and wire from
the tree where felling cuts are to be made.
Notched Undercut. Cut a notch about 1/3 the diameter of
the tree, perpendicular to the direction of fall.Make the cuts of
the notch so they intersect at a right angle to the line of fall.
This notch should be cleaned out to leave a straight line. To
keep the weight of the wood off the saw, always make the
lower cut of the notch before the upper cut.
Felling backcut. The back cut is always made level and
horizontal, and at a minimum of 2 inch. above the horizontal
cut of the notch.
Never cut through to the notch. Always leave a band of
wood between the notch and back cut (approximately 2 in. Or
1/10 the diameter of the tree).This is called “hinge”or “hinge
wood”.It controls the fall of the tree and prevents slipping or
twisting or shoot-back of the tree off the stump.
On large diameter trees, stop the back cut before it is deep
enough for the tree to either fall or settle back on the stump.
Then insert soft wooden or plastic wedges into the cut so they
do not touch the chain. The wedges can be driven in, little by
little, to help jack the tree over.
NOTE! When bucking or felling with a wedge, it may be
necessary to remove the anti-kickback device to allow the bar
to be drawn through the cut. After the cut is complete, the tip
should be reinstalled immediately.
As tree starts to fall, stop the chain saw and put it down
immediately .Retreat along the cleared path, but watch the
action in case something falls your way. Be alert for overhead
limbs or branches that may fall and watch your footing.
Back CUT
Hinge
2 in. or 1/10 di a
notch-
approx. 1/3
diameter
of trunk
Back CUT
Hinge
NOTch
Page 21

21
www.spearandjackson-power.com AFTER SALES SUPPORT 01904 727505
WARNING! Always switch the product off and
let the product cool down before performing
inspection, maintenance and cleaning work!
This chainsaw meets all current legislation requirements, in order
to avoid injuries while repairing; every repair has to be carried
out by a qualified member of staff in an authorized service
centre.
General
i. General Clean the product with a slightly damp cloth and pH-
neutral soap. Use a brush for areas that are hard to reach.
ii. In particular clean the air vents and chain guide on the bar
after every use with a cloth and brush.
iii. Remove stubborn dirt with high pressure air (max. 3 bar).
iv. Check for worn or damaged parts. Replace worn parts as
necessary or contact the aftersales support for repair before
using the product again.
v. Regularly check for obvious defects such as loose, dislodged
or damaged cutting device, loose fixings and worn or
damaged components.
vi. Check that covers are undamaged and correctly fitted.
Carry out necessary maintenance or repairs before using the
product.
vii. Regularly apply lubricant to the chain surface.
viii. Ensure that the oil reservoir and the oil filter are clean.
Replace the chain
NOTE! It is very important for smooth and safe operation to cut
with a sharp chain. The chain needs replacing when:
- Sawdust becom
- Cutting requires extra force.
- The chainsaw does not cut straight and clean.
- Vibration increases.
MAINTENANCE
Direction of chain
Tension
pin
Page 22

22
AFTER SALES SUPPORT 01904 727505 www.spearandjackson-power.com
MAINTENANCE
i. Remove the clamp knob (13) and the chain cover
ii. Fit the chain around the bar ensuring that the direction of the
chain is as depicted in the picture on the bar. Fit the chain
on the sprocket. Adjust the position of chain tensioner so the
tensioner pin locates in the hole (A) on the bar.
iii. Adjust the tension to ensure that there is not too much
slack in the chain. Make sure the tensioner pin is located in
the assembly hole on the bar. Pay attention to the correct
direction of the saw chain.
iv. Fit the chain cover to the power unit. While lifting the tip of
guide bar, tighten the bar knob securely (clockwise). Hand
tighten only!
v. While holding up the tip of the bar, adjust the chain tension
by turning the tension knob until the chain engages in the bar
channel. When tensioned correctly it should be possible to
pull one full chain link free of the bar channel with ease.
vi. Tighten the tension knob securely finger tight. Then check
the chain for smooth rotation and proper tension while
moving it by hand. If necessary, loosen the chain cover.
vii. Tighten the clamp knob.
NOTE! A new chain will expand its length during the first
period of use. Check and re-adjust the tension frequently as a
loose chain can easily derail or cause rapid wear of itself and
the chain bar. If the saw chain is TOO LOOSE or TOO TAUT,
the Vdrive wheel, the chain bar, the chain and the crank shaft
bearing will suffer premature wear.
Chain sharpening
WARNING! Wear safety gloves when working on
the chainsaw and close to it!
Periodically sharpen the blades as follows:
i. Disconnect the cord from the mains supply.
ii. Wear protective gloves.
iii. Ensure the chain is correctly tensioned and not too loose.
Page 23

23
www.spearandjackson-power.com AFTER SALES SUPPORT 01904 727505
MAINTENANCE
iv. Engage the chain brake (10) to lock the chain on the bar
(“Engage”position) when sharpening.
v. Uses a round file for chain sharpening. Diameter equivalent to
1.1times the cutting tooth depth.
vi. File at a horizontal angle 35°to the bar.
vii. File from inside towards outside of the tooth only.
viii. Sharpen each tooth equally by using the same number of
strokes.
ix. File at an angle of 90° to the bar.
x. Check the safety depth gauge height in intervals while
sharpening. Use depth gauge measuring instrument to check
the height of the depth gauge.
Cleaning the guide bar and lubricating the sprocket nose
Regularly inspect the bearing surfaces of the guide bar for
damage, and clean them with a suitable tool.
If the saw is used intensively it will be necessary to lubricate the
return sprocket bearings regularly(once a week).To do this,first
thoroughly clean the 2mm hole at the tip of the guide bar, and then
press in a small amount of multi-purpose grease.
Check the chain bar
i. Reverse the bar occasionally to prevent partial wear.
ii. The bar rail should always have parallel internal faces (see
diagram). Check for wear of the bar rail. Apply a ruler to the bar
and the outside of a cutter. If a gap is observed between them, the
rail is normal. Otherwise, the bar rail is worn. Such a bar needs to
be corrected or replaced.
Page 24

24
AFTER SALES SUPPORT 01904 727505 www.spearandjackson-power.com
MAINTENANCE
UK plug
If you need to replace the fitted plug, then this must be replaced
using a BS1363/A Mains plug fitted with a BS1362 approved fuse
of identical value to the original fuse. Proceed as follows:
IMPORTANT: The wires in the mains lead are coloured in
accordance with the following code:
Blue – Neutral, Brown – Live
In case the colours of the wires in the mains lead don’t match the
colour marking on the terminals, please proceed as follow.
Connect the blue wire to the terminal marked N (Neutral) or
coloured black. The brown wire must be connected to the terminal
marked L or coloured red.
Storing
i. Clean the product as described above.
ii. Store the product and its accessories in a dark, dry, frostfree,
well-ventilated place.
iii. Always store the product in a place that is inaccessible to
children. The ideal storage temperature is between 10-30°C.
iv. We recommend using the original package for storage or
covering the product with a suitable cloth or enclosure to protect it
against dust.
Transport
i. Switch the product off and disconnect it from power supply before
transporting it anywhere.
ii. Always carry the product on its gripping surfaces.
iii. Protect the product from any heavy impact or strong vibrations
which may occur duri ng transportation in vehicles.
iv. Secure the product to prevent it from slipping or falling over
Page 25

25
www.spearandjackson-power.com AFTER SALES SUPPORT 01904 727505
MAINTENANCE
Disposal
Disposing of the machine
Machines which are labeled with this symbol
must not
bedisposed of in household rubbish. You must dispose of such
oldelectrical and electronic appliances separately.
Please check with your local authority about the possibilities
forcorrect disposal. You will thus help to avoid that damaging into
the environment.
Disposing of the packaging
The packaging consists of cardboard and correspondingly marked
sheets that can be recycled. Make these materials available for
recycling.
Page 26

26
AFTER SALES SUPPORT 01904 727505 www.spearandjackson-power.com
TECHNICAL DATA
Model CS2300
Motor Voltage 230-240V ~/50Hz
Power Input 2300W
Electric motor no load speed 5600/min
Chain speed 13m/s
Insulation class class II
Net weight 4.7Kg
Type of saw chain Oregon 91PJ051X(14 oa
Type of guide bar Oregon 140SDEA074(14 ba
Measured sound pressure level 94.5dB (A), k=3 dB (A)
Measured sound power level 109dB (A), k=3dB (A)
Guaranteed sound power level 110dB (A)
Vibration 3.72 m/s
2
, k=1.5 m/s
2
Part number Accessories
140SDEA074 Chain
91P051X Bar
SCS723A-1 Guard
SCS723A-2 Oil cap
visit our website for more information on accessories.
Page 27

27
www.spearandjackson-power.com AFTER SALES SUPPORT 01904 727505
TROUBLESHOOTING
No power
Check the plug socket, cable, line and plug, where
appropriate, have it repaired by a a certified electrician.
If any of the parts are defective, such as On/Off switch /
motor etc, call after sales support.
Hand guard chain break might be engaged
Please contact after sales support at 01904 727505.
Inferior cutting performance
Check if incorrectly mounted saw chain, if so, re-assemble.
Check if saw chain is blunt. Please replace the chain.
Check the chain tension (see page 21 for instructions).
Please contact after sales support at 01904 727505.
Saw runs with difficulty, chain comes off
Check the chain tension (see page 21 for instructions).
Please contact after sales support at 01904 727505.
Chain becomes hot, smoke development during
sawing, discoloration of the rail
Check lubrication oil level and where appropriate. Refill
with chain oil. Check automatic oil system and, where
appropriate, clean the oil outflow duct or have it repaired by
customer service.
Please contact after sales support at 01904 727505.
Page 28

28
AFTER SALES SUPPORT 01904 727505 www.spearandjackson-power.com
GUARANTEE
If your device develops a fault, please don’t hesitate to contact our customer service department
on 01904 727505, we can usually solve 80% of problems via telephone.
1. These guarantee terms cover additional guarantee rights and do not affect your statutory
warranty rights. All our products are covered by a two year manufacturer guarantee unless this
product was registered within 28 days of purchase via www.spearandjackson-power.com and
therefore obtained an additional 12 month warranty.
2. Claims must be accompanied by a Proof of Purchase. This must be in the form of a Sales
receipt or Bank statement and must show that the product has been purchased within the
guarantee period as described under point 1, from the retailer that it was originally bought from.
Please keep your receipt safe or staple it to the back of this manual for future reference.
3. Our guarantee covers problems caused by material or manufacturing defects, and will result in
the repair of these defects or replacement of the device with a like for like or similar article.
4. Our devices have not been designed for commercial, trade or industrial applications, any signs
of use of the equipment in these application or equivalent activities, invalidates the guarantee.
5. The following are also excluded from our guarantee:
A. Faults due to accidents, customer misuse or unauthorized repairs
B. Consumable Parts such as chain, bar, and other accessories that are compatible with the
product.
C. Failure due to lack of routine maintenance.
D. Failure as a result of not using the equipment in accordance with the manual and safety
instructions
E. The adjustment of cables, drives gears or motors.
Guarantee claims should be submitted before the end of the guarantee period, see point 1, but
a paid service exists for repairs commissioned after this period. The original guarantee period
remains applicable to the device even if repairs are carried out or parts are replaced. In such
cases, the work performed or parts fitted will not result in an extension of the guarantee period,
and no new guarantee will become active for the work performed or parts fitted.
6. Pease keep your sales receipt in a safe place. If covered by our guarantee, your device will
either be repaired under the terms of guarantee or we will send you a replacement device.
This device may be re-conditioned, like for like or an upgraded replacement.
If you have any problems or questions concerning your garden power tool, please contact our
after sales service at 01904 727505 or visit www.spearandjackson-power.com.
Page 29

29
www.spearandjackson-power.com AFTER SALES SUPPORT 01904 727505
EC DECLARATION OF CONFORMITY
We
SUMEC Hardware &Tools Co.,Ltd.
1XinghuoRD.,Nanjing,China
And our branch office
SUMECUK Co.,Ltd.
Unit A&B Escrick Business Park
Escrick,York YO19 6FD
Electric chain saw
Factory No: SCS723A
Model No: CS2300
Function: Saw Wood
Serial number: CS2300-150001-150288
EMC Directive: 2004/108/EC
Machinery Directive: 2006/42/EC
Low Voltage Directive 2006/95/CE
Noise Directive: 2000/14/EC
RoHS Directive: 2011/65/EU
WEEE Directive 2012/19/EU
Standards conform to:
EN 60745-1:2009+A11:2010
EN 60745-2-13:2009+A1:2010
EN 55014-1:2006+A1:2009+A2:2011
EN 55014-2:1997+A1:2001+A2:2008
EN 61000-3-2:2006+A1:2009+A2:2009
EN 61000-3-3:2008
EN 61000-3-11:2000
Conformity Assessment Procedure as Per AnnexⅢ,
Measured sound pressure level LpA:94.5dB(A),k=3dB(A)
Measured sound power levelLwA:109dB (A),K=3dB(A)
Guaranteed sound power levelLwA:110dB(A)
Declare that the product
Complies with the following directives:
emissions guideline:
Authorized Signatory
Date: _17-12-2015 ___________
Signature:____________________
Name: Mr. Liu Kai
General Manager
SUMEC Hardware & Tools Co.,Ltd.
 Loading...