

Page 1

®
SPEAKMAN
SEF-1800-CA, SEF-1800-CA-TW,
SEF-1800-CA-8, SEF-1800-CA-8-TW
Installation, Maintenance & Operation Instructions
EYESAVER® FAUCET
DESCRIPTION
The SEF-1800-CA Eyesaver® faucet combines a gooseneck faucet with independently operated
eyewash. The faucet features " turn Speakman Ceramic Perfect
aerated sprays and flip-top dust covers.
SPECIFICATIONS
INLET SUPPLY: 3/8” COMPRESSION WITH MALE THREADS.
OPERATION: EYEWASH AND FAUCET OPERATE INDEPENDENTLY OF EACH OTHER.
SUPPLY: "” MALE CONNECTIONS FOR HOT AND COLD INLETS.
WIDESPREAD VALVES: PERFECT® VALVES WITH 1/4 TURN CERAMIC CARTRIDGES COVERED
BY A 25 YEAR WARRANTY.
FINISH: CHROME PLATED BRASS.
FAUCET HANDLES: VANDAL-RESISTANT 4” WRIST HANDLES WITH COLOR-CODED INDEXES.
EYEWASH ACTIVATION: PULL HANDLE WITH GRAPHICS.
EYEWASH SPRAYS: AERATED SPRAYS.
FAUCET FLOW RATE: AUTOFLO® DEVICE CONTROLS FLOW TO 1.5 GPM/ 5.7 LPM.
EYEWASH FLOW RATE: 2.8 GPM AT 30 PSI. FLOWING. SEE FLOW DATA CHART FOR
ADDITIONAL INFORMATION.
COUNTER THICKNESS: UP TO 2” THICK.
CENTER DISTANCE: ADJUSTABLE CENTERS OF 6” TO 12”.
PRESSURE: 30 PSI. MINIMUM FLOW PRESSURE, 125 PSI. MAXIMUM STATIC PRESSURE.
APPROVALS: MEETS ASME A112.18.1, ANSI Z358.1 AND CSA B125.1.
VACUUM BREAKER (ST OPTION): APPROVED BY ASSE, UPC AND CSA. MEETS THE ANSI/ASSE 1035
STANDARD FOR “LABORATORY FAUCET VACUUM BREAKERS”,
CSA B64.8 AND UPC.
SHIPPING WEIGHT: 10 LBS.
®
Valves while the eyewash offers twin
SPEAKMAN®
400 Anchor Mill Rd. New Castle, DE 19720 Phone: 800-537-2107 Fax: 800-977-2747
09/19/17 speakman.com 92-SEF-1800-15
Page 2
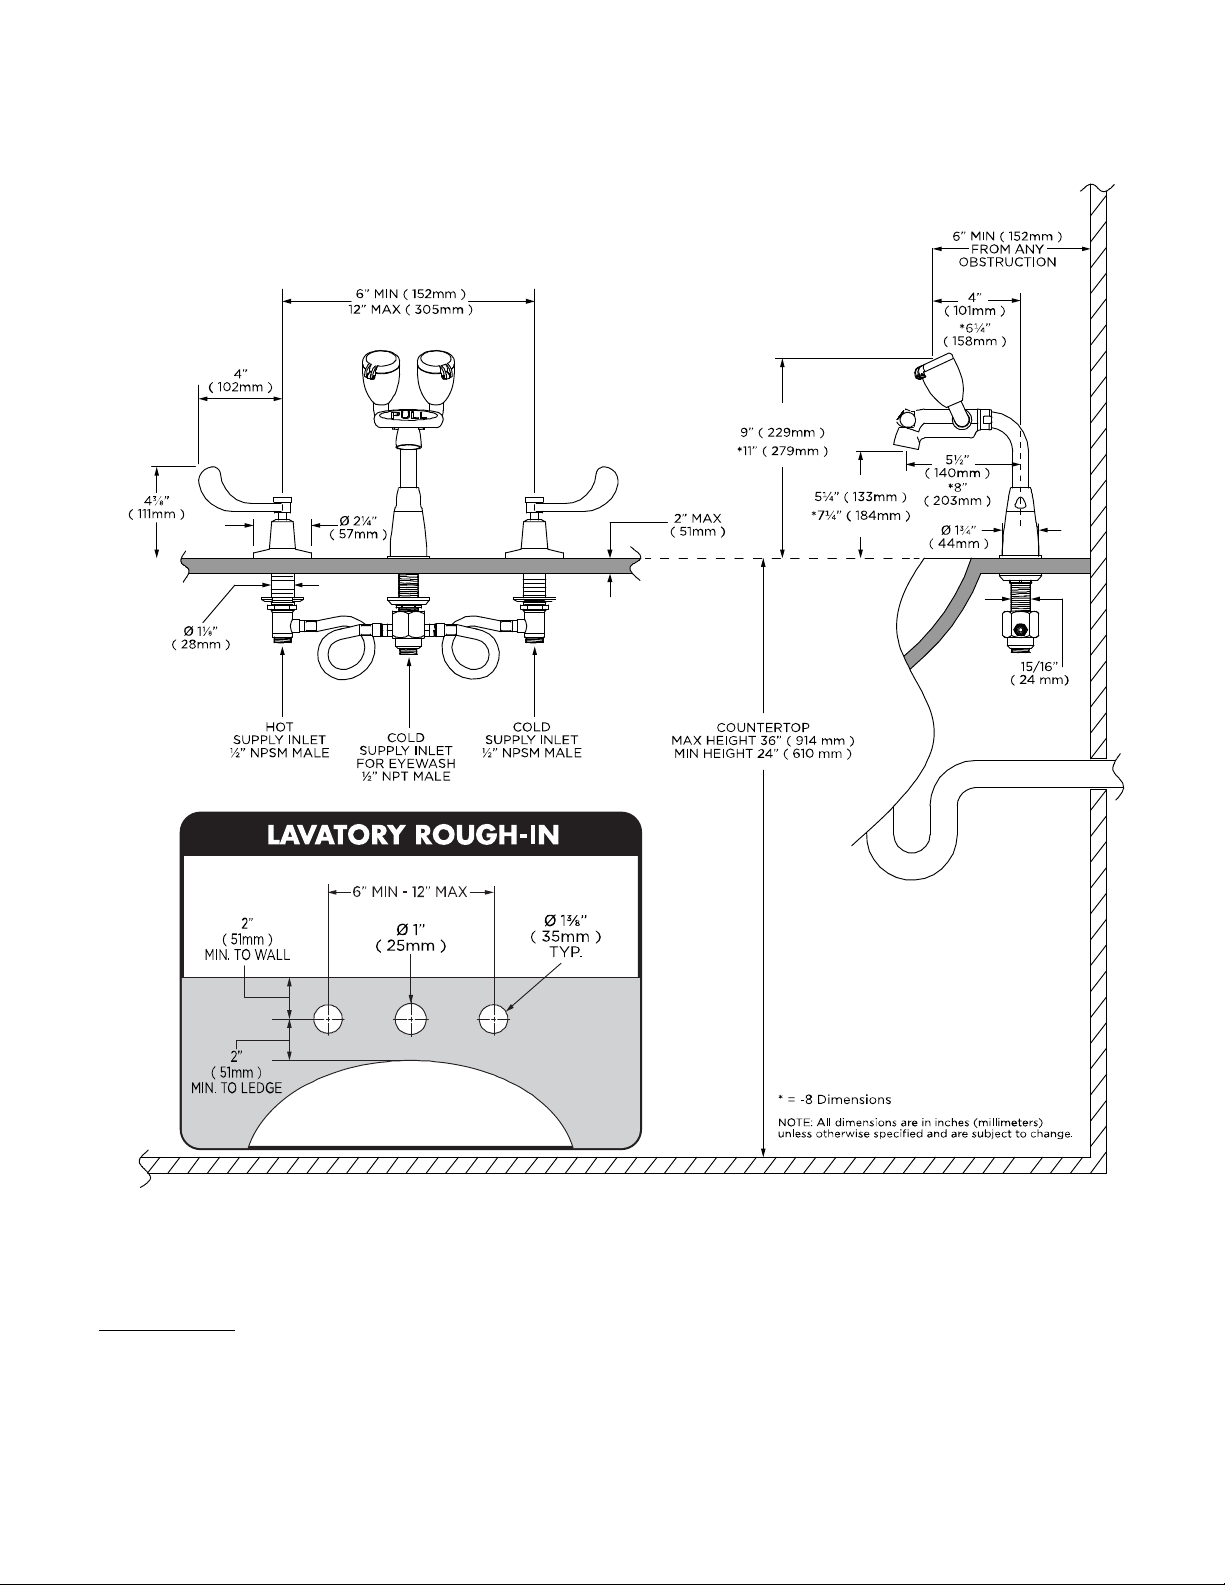
SEF-1800-CA ROUGH-IN
IMPORTANT: The supply line for plumbed units shall provide an uninterruptible supply of flushing fluid
at a minimum of 30 psi. of flow pressure. If shut off valve are installed in the supply line of the eyewash
for maintenance purposes, provisions shall be made to prevent unauthorized shut off.
SPEAKMAN®
400 Anchor Mill Rd. New Castle, DE 19720 Phone: 800-537-2107 Fax: 800-977-2747
09/19/17 speakman.com 92-SEF-1800-15
Page 3
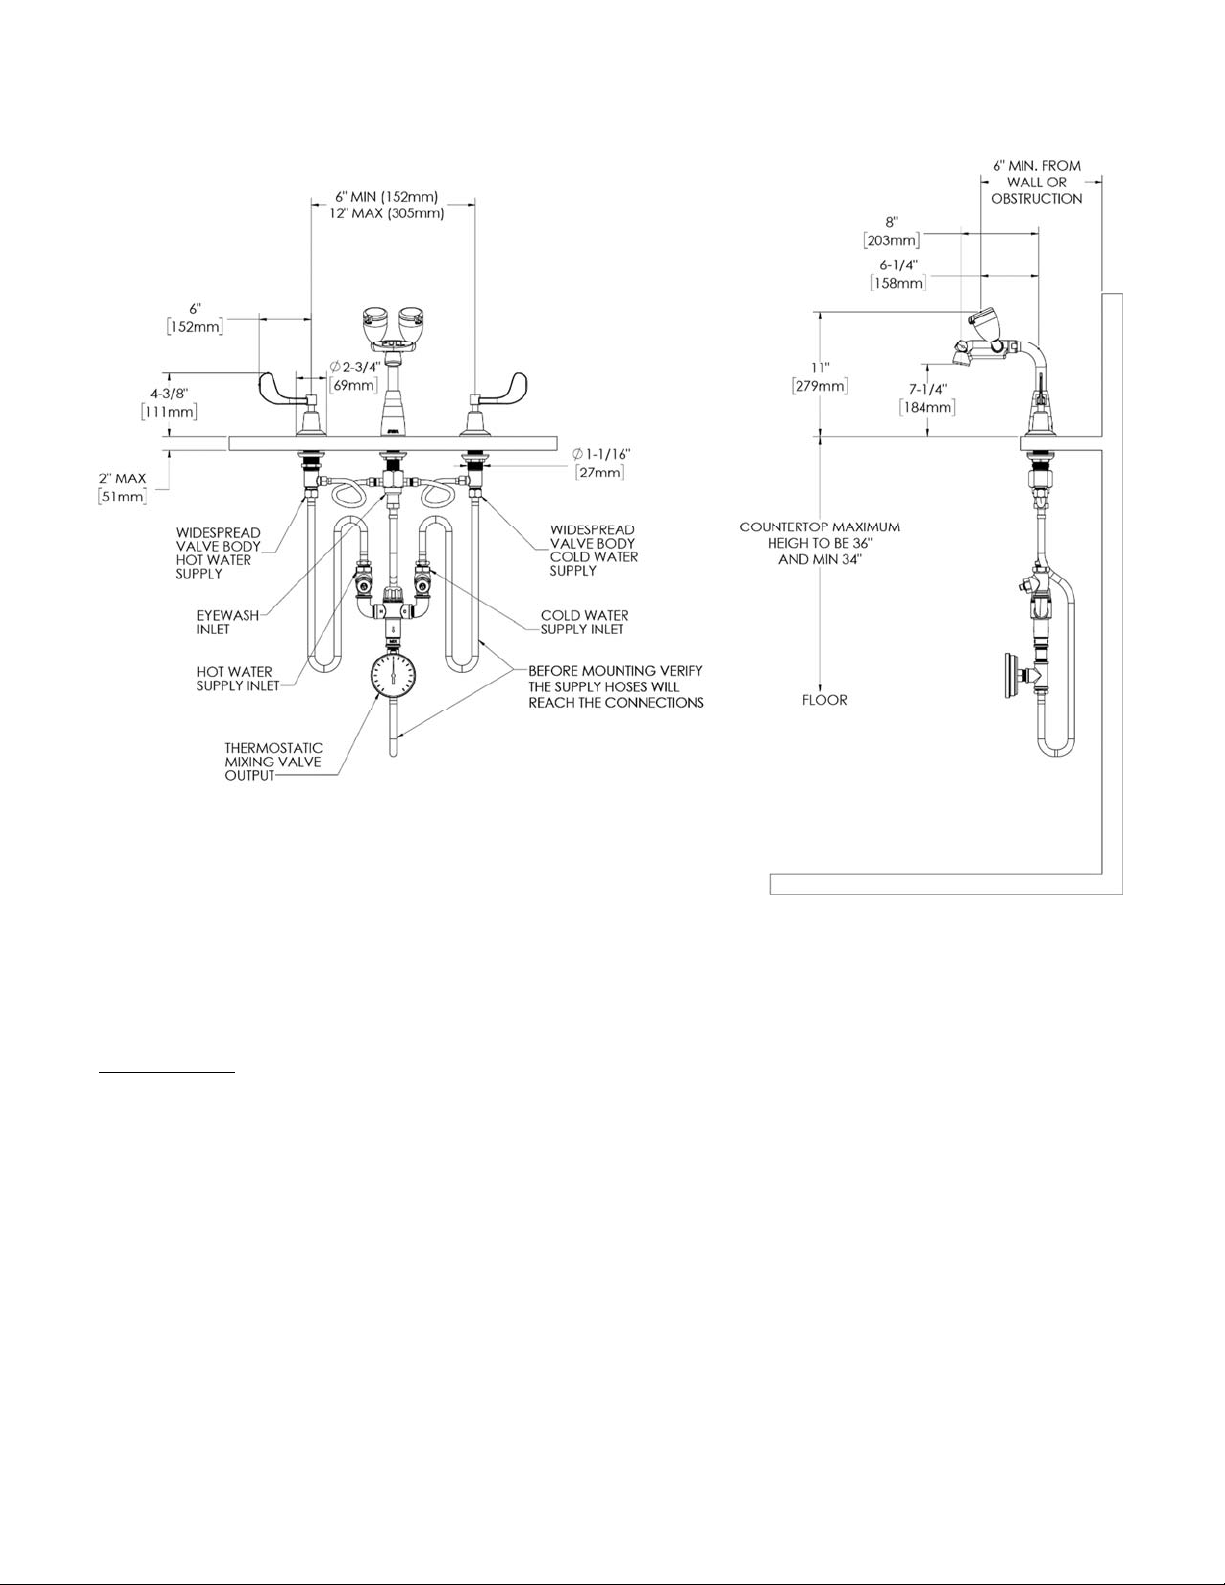
SEF-1800-CA-TW ROUGH-IN
Note: All dimensions are in inches (millimeters) unless otherwise specified and are subject to change.
IMPORTANT: The supply line for plumbed units shall provide an uninterruptible supply of flushing fluid
at a minimum of 30 psi. of flow pressure. If shut off valve are installed in the supply line of the eyewash
for maintenance purposes, provisions shall be made to prevent unauthorized shut off.
SPEAKMAN®
400 Anchor Mill Rd. New Castle, DE 19720 Phone: 800-537-2107 Fax: 800-977-2747
09/19/17 speakman.com 92-SEF-1800-15
Page 4
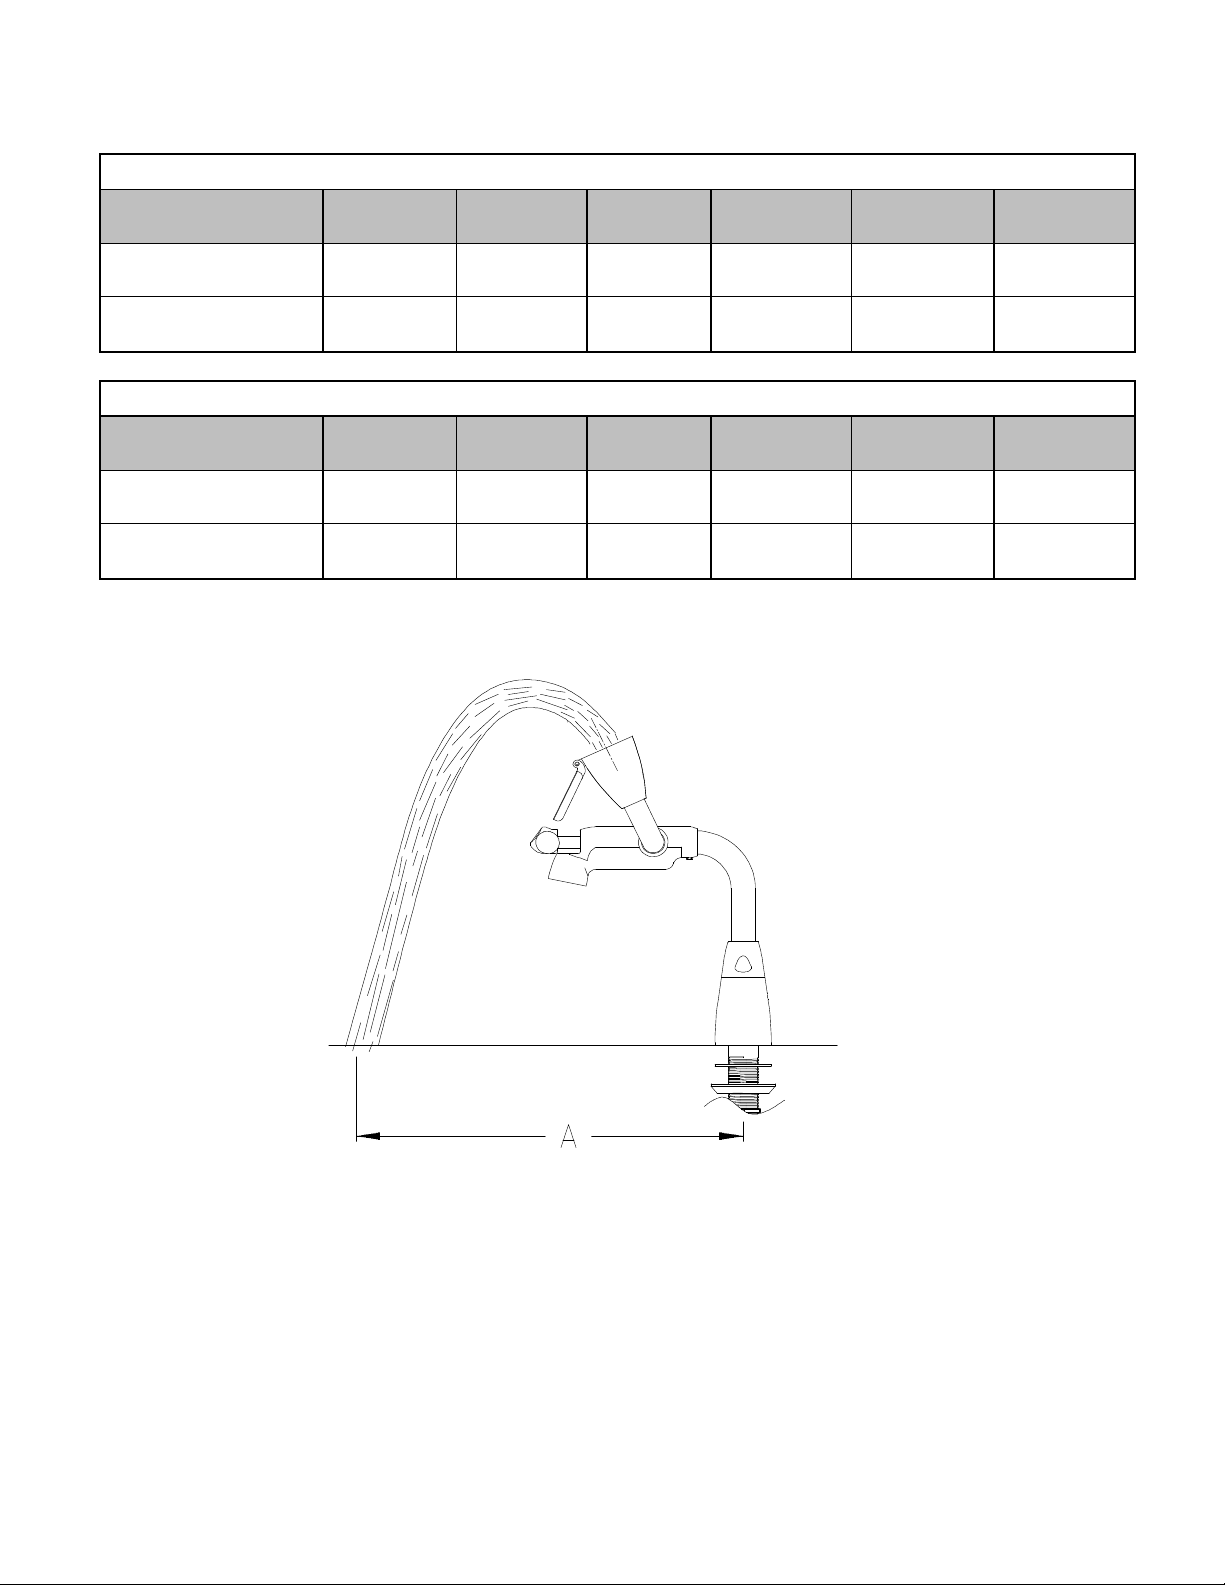
FLOW DATA:
Flowing Pressure
Flow Rate
Eyewash Distance
Plume "A"
Flowing Pressure
Flow Rate
Eyewash Distance
Plume "A"
SEF-1800-CA Spray Plume Length and Flow
30 psi 40 psi 50 psi 60 psi 70 psi 80 psi
2.07 Bar 2.76 Bar 3.45 Bar 4.14 Bar 4.83 Bar 5.52 Bar
2.8 gpm 3.1 gpm 3.1 gpm 2.9 gpm 2.9 gpm 3.0 gpm
10.6 L/min 11.7 L/min 11.7 L/min 11.0 L/min 11.0 L/min 11.4 L/min
13.5" 14.25" 14.25" 13.75" 13.75" 13.75"
34.29 cm 36.2 cm 36.2 cm 34.93 cm 34.93 cm 34.93 cm
SEF-1800-CA-8 Spray Plume Length and Flow
30 psi 40 psi 50 psi 60 psi 70 psi 80 psi
2.07 Bar 2.76 Bar 3.45 Bar 4.14 Bar 4.83 Bar 5.52 Bar
2.8 gpm 3.1 gpm 3.1 gpm 2.9 gpm 2.9 gpm 3.0 gpm
10.6 L/min 11.7 L/min 11.7 L/min 11.0 L/min 11.0 L/min 11.4 L/min
17.0" 18" 17.5" 17.0" 17.0" 17.0"
43.18 cm 45.72 cm 44.45 cm 43.18 cm 43.18 cm 43.18 cm
SPEAKMAN®
400 Anchor Mill Rd. New Castle, DE 19720 Phone: 800-537-2107 Fax: 800-977-2747
09/19/17 speakman.com 92-SEF-1800-15
Page 5
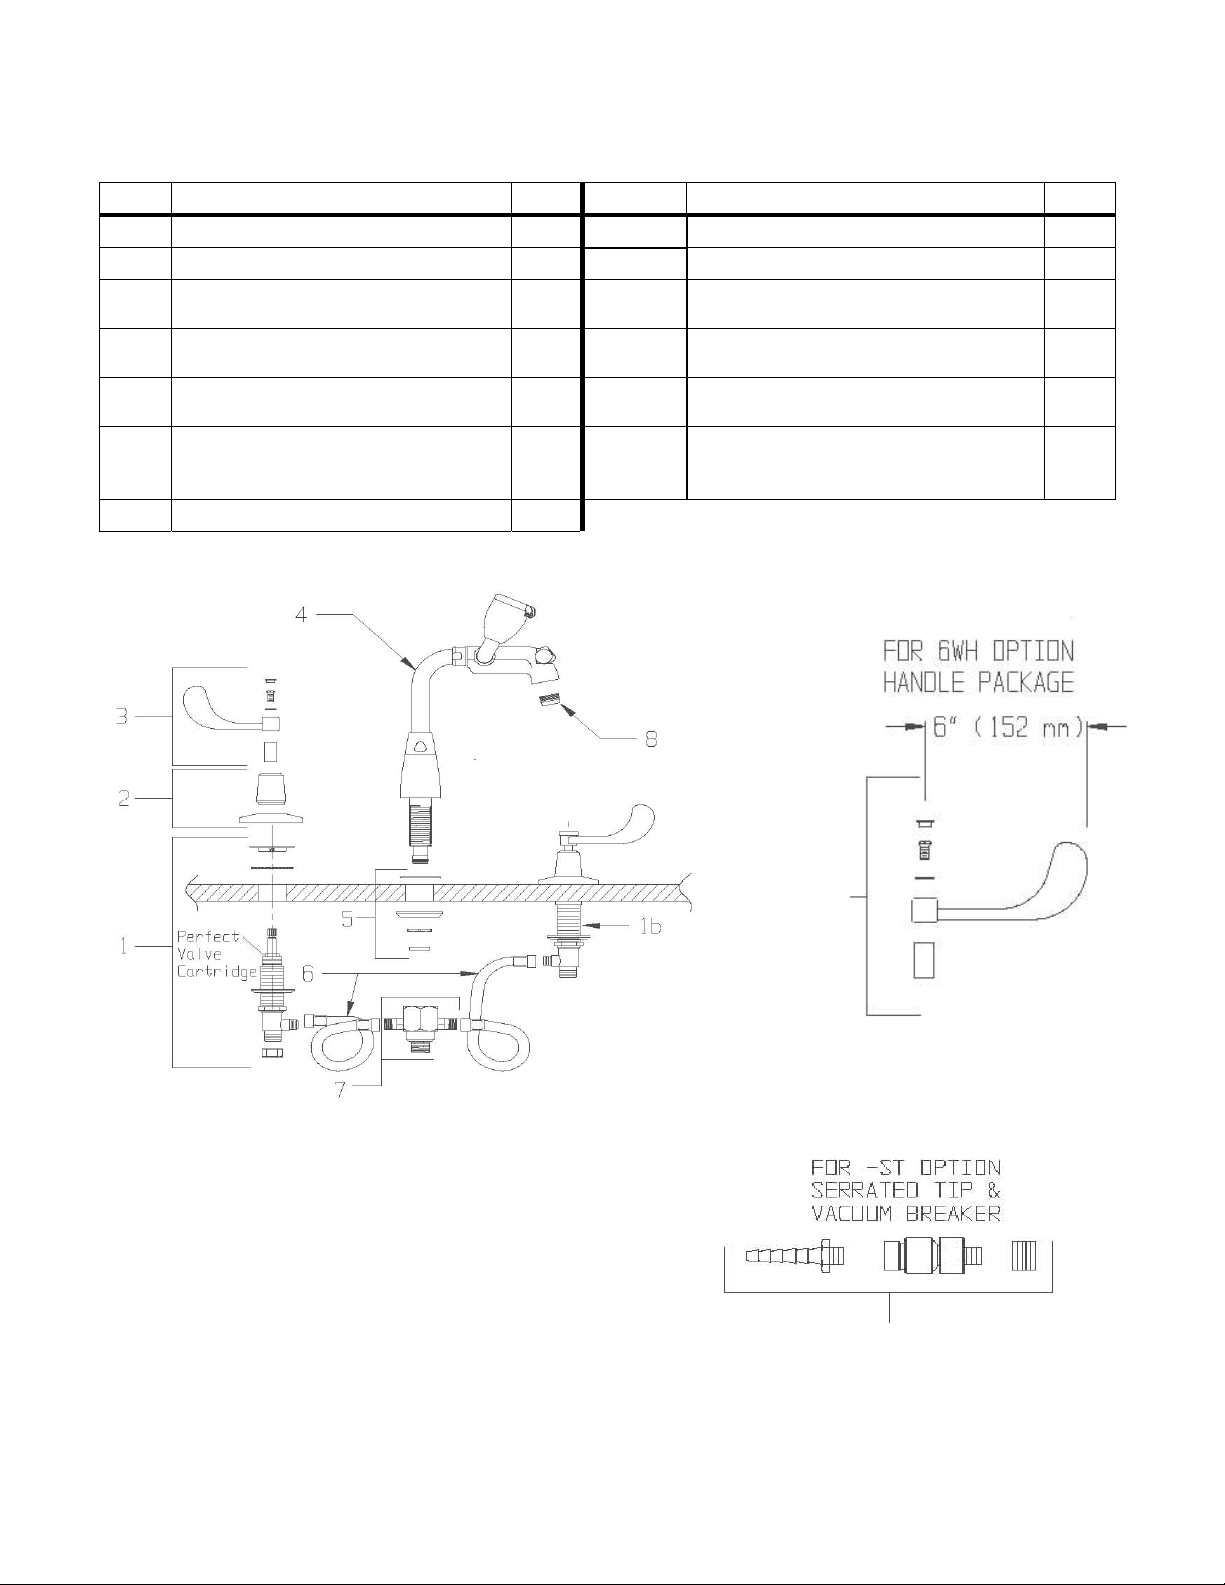
PACKING LIST
Item Description Qty. Item Description Qty.
1 Valve Body Assembly, Hot side 1
1b Valve Body Assembly, Cold side 1 8 Aerator 1
2 Trim Package 2 9
3 Handle Package 2 10
4 Gooseneck Assembly 1 11
5 Washer Bag Group 1 12
6 Valve Body Hose 2
7
Tee Assembly 1
Handle package for – 6WH
option, (replaces item 3)
Serrated Tip and Vacuum Breaker
for –ST option, (replaces item 8)
.5 gpm aerator for – BO option,
Item not shown (replaces item 8)
Laminar flow outlet for – LF
option, Item not shown (replaces
item #8)
2
1
1
1
9
10
SPEAKMAN®
400 Anchor Mill Rd. New Castle, DE 19720 Phone: 800-537-2107 Fax: 800-977-2747
09/19/17 speakman.com 92-SEF-1800-15
Page 6
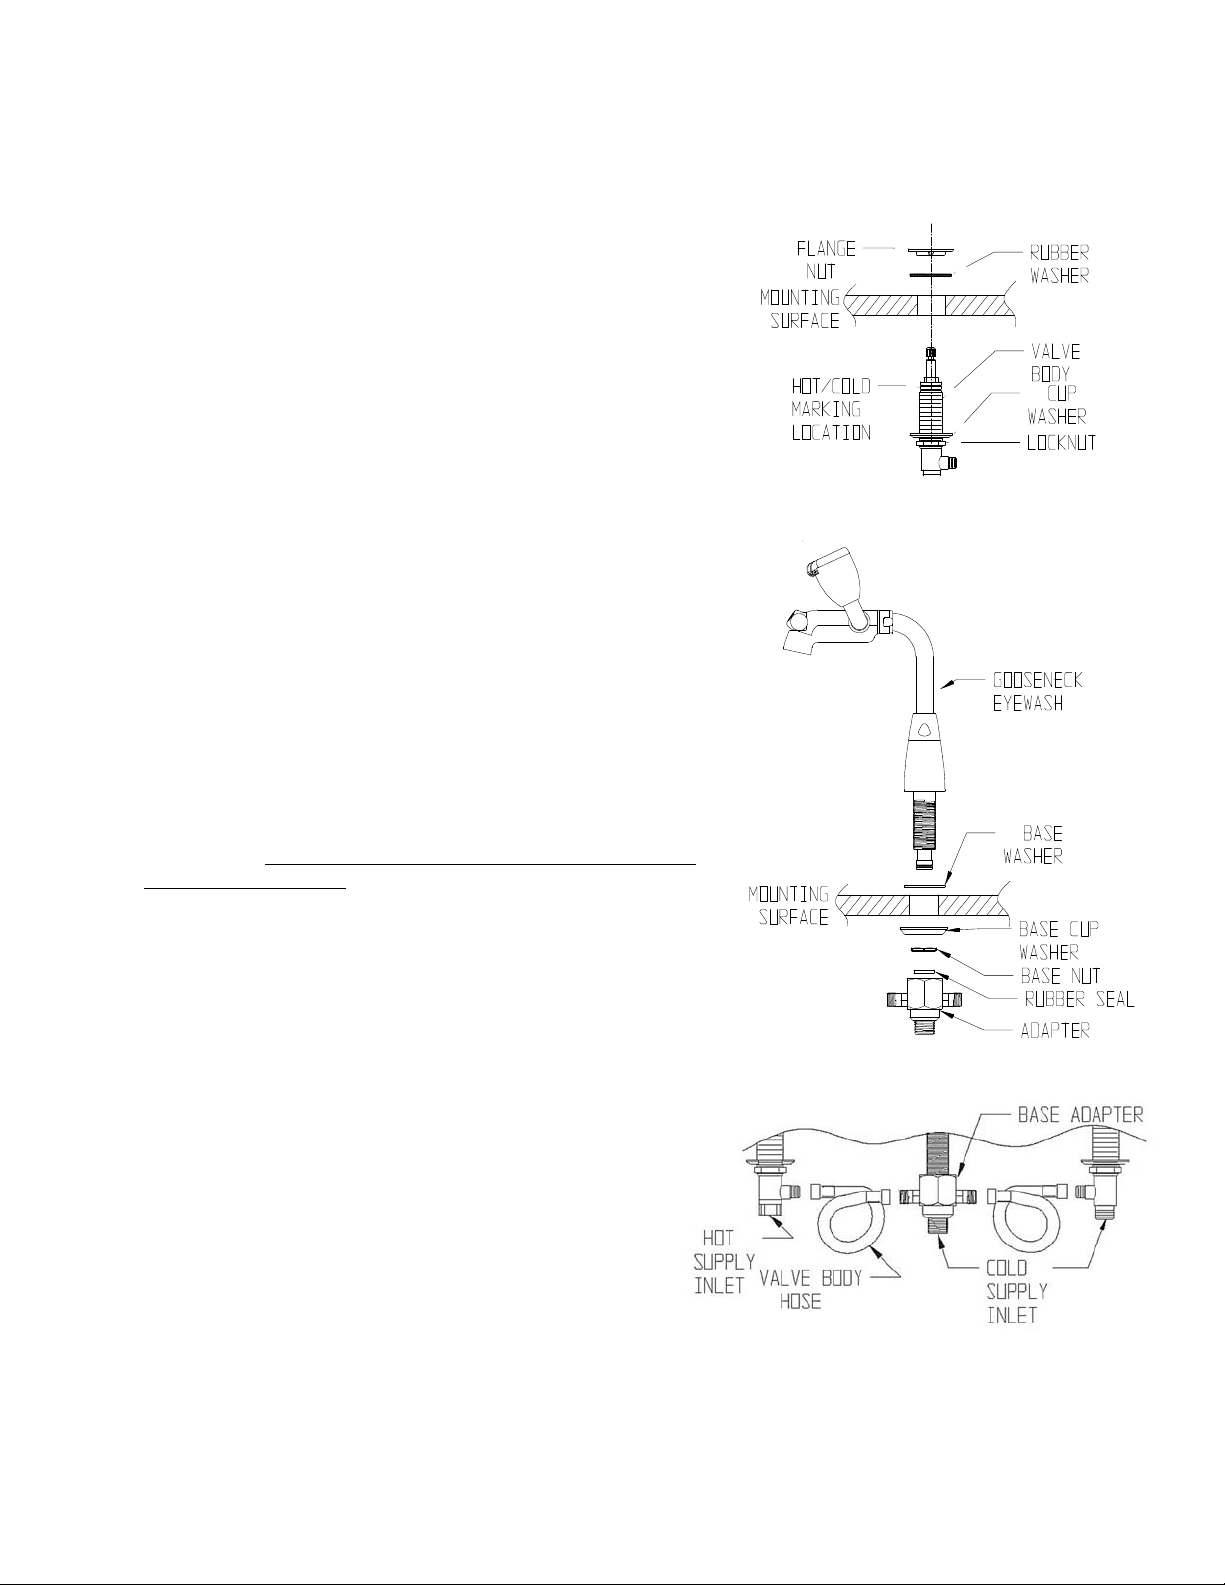
INSTALLATION
Step 1: Valve Body Mounting - The valve bodies are marked
with red marker for the hot supply and blue marker for
the cold supply.
a.
Screw locknuts down onto the valve body assemblies.
b.
Place the cup washers onto valve bodies.
c.
Working from below the sink, insert the valve body
assemblies through holes in sink or countertop. From
above sink, place rubber washers onto the valve bodies.
d.
Next, screw flange nuts onto valve bodies with flat side
up, flush with top of valve bodies and tighten flange nut
using the set-screw.
e.
From under sink, screw locknuts up hand tight. Position
bodies so that outlets are accessible and wrench tighten
locknuts while holding bodies in place.
Step 2: Gooseneck Eyewash Mounting –
a.
Slip the base washer onto the gooseneck eyewash
and slip through the center hole of the sink or countertop.
b.
The gooseneck eyewash swivels through 200° of rotation.
Position the base of the gooseneck eyewash so the
setscrew hole in the base is pointing towards the back
of the sink or countertop.
Note - For rigid gooseneck, position the gooseneck and
tighten the setscrew in the mounting base. From below
the sink slip the cup washer onto the shank and use the
nut to tighten the assembly down onto the sink or
countertop. Important- Lubricate gooseneck eyewash
shank lower O-ring.
c. Important- Next insert the rubber seal into the adapter
and screw the adapter onto the shank of the gooseneck
eyewash until it bottoms out (Tape may be applied to
the shank). If the adapter needs to be positioned for hose
attachment, it can be backed off up to a maximum
of 1 / 2 turn.
Step 3: Hose Connections -
a.
Screw valve body hoses onto the side outlets
of the valve bodies and tighten. Screw the other
end of the hoses onto base adapter.
b.
Connect the vertical inlet of the tee to the cold
water inlet supply.
c.
Connect the hot & cold water supply lines
to the inlets of the valve bodies and tighten
the coupling nuts.
400 Anchor Mill Rd. New Castle, DE 19720 Phone: 800-537-2107 Fax: 800-977-2747
SPEAKMAN®
09/19/17 www.speakman.com 92-SEF-1800-15
Page 7
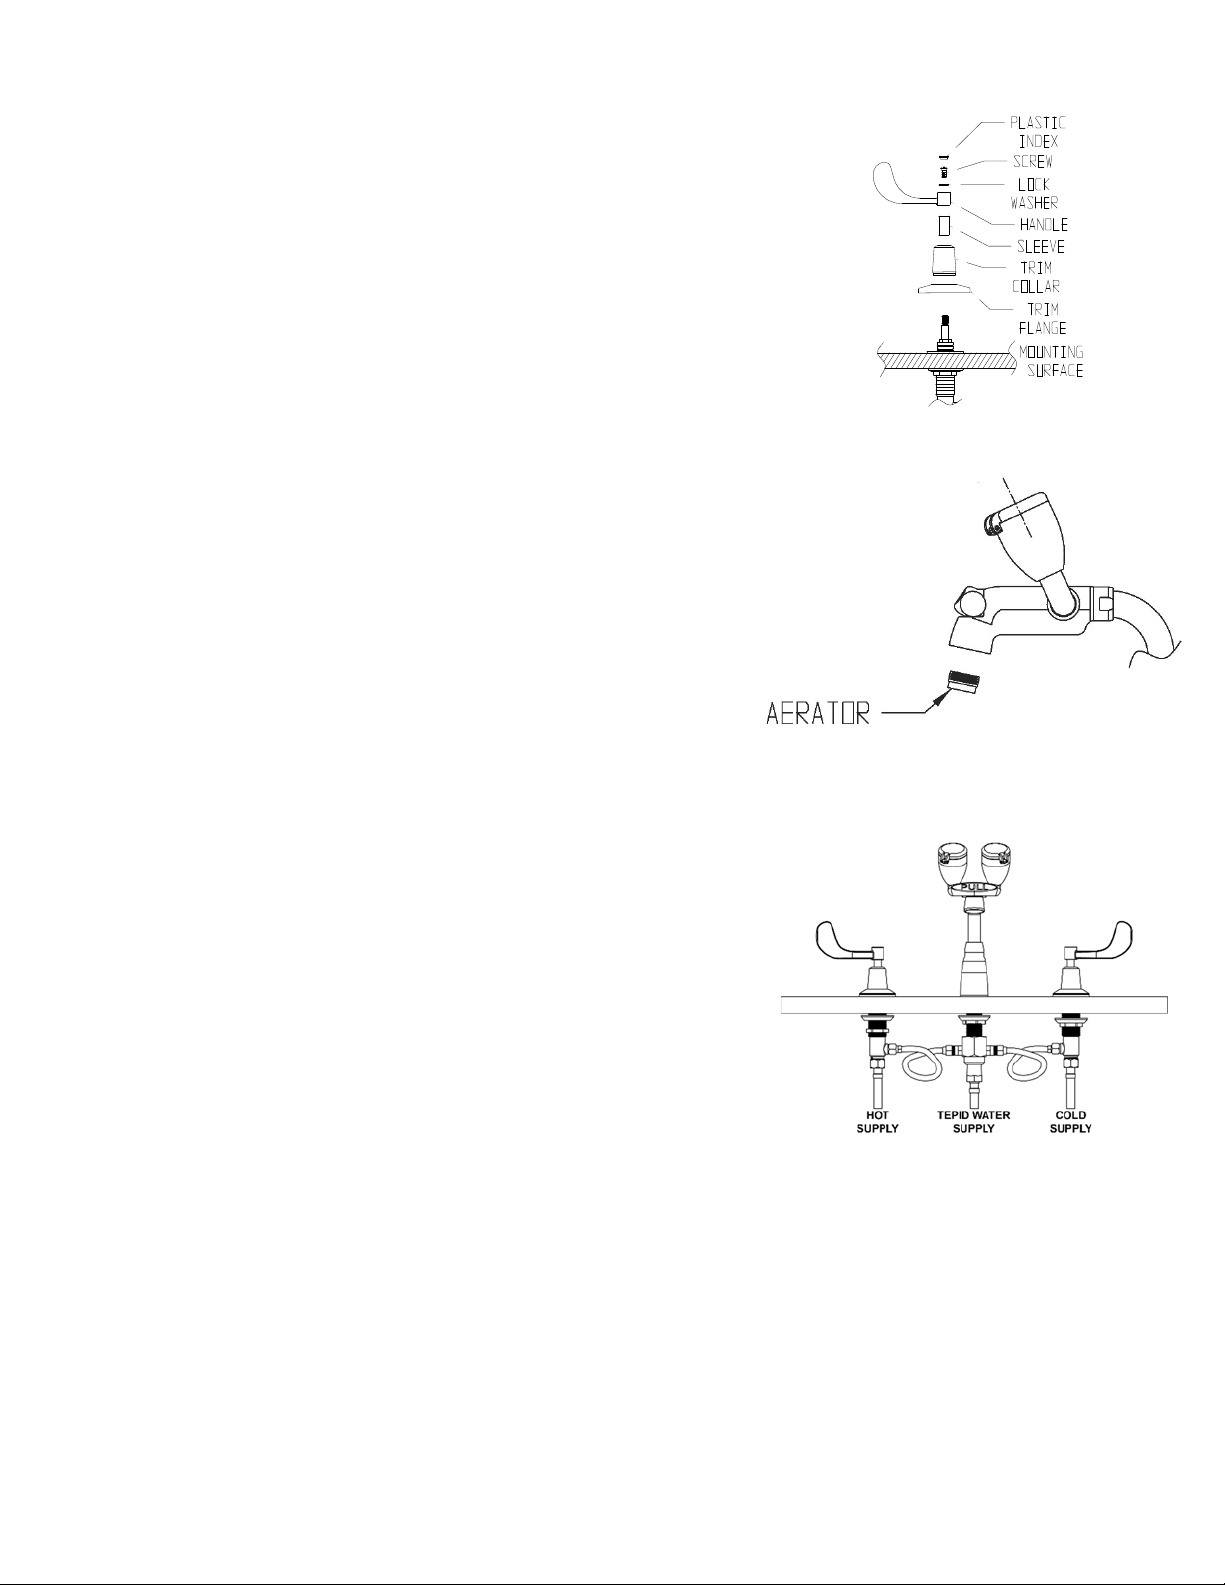
Step 4: Trim Package -
a.
From above sink, place the trim flange over the valve spindles.
b.
Screw trim collar onto the valve body and tighten. The flange should
be secure at this point. If not, back off the flange nut that was
assembled in step 1 and reassemble the trim.
c.
Slip sleeves onto valve spindles.
d.
Position the handles and secure using the lock washer and screw.
e.
Position the red index button on the handle for the hot water valve
and press into place. Position the blue index button on the handle
for the cold water valve and press into place.
Step 5: Unit Flushing -
After the assembly is complete, turn the hot and cold water
a.
supplies on and check for leaks.
b.
Activate the faucet to flush both the hot and cold sides
of fixture. Check all connections for leaks.
c.
Install the aerator into the faucet outlet.
d.
At this time activate faucet and then activate the eyewash
by pulling the handle and assure proper spray formation
and no leaks.
ALTERNATE INSTALLATION FOR DEDICATED TEPID WATER SUPPLY
The unit is designed so the eyewash has a dedicated supply line. This
allows the eyewash to have a tepid water supply. Attach
the tepid water supply to the center adapter as shown in
the figure and your cold water supply to the cold valve body.
a.
Attach the elbows, tees and pipe nipples to the hot
and cold inlet of the thermostatic mixing valve with checks.
b.
Use Teflon tape on all threaded connections.
c.
See the installation and maintenance manual provided
for the SE-370 Emergency Eye Wash Valve for the required
installation recommendations.
d.
The drawing on page 3 provides the roughing in dimensions
for mounting the unit. The valve should be mounted less than
18” from the sink surface. This allows enough clearance for the supply hoses to reach the inlets. Verify
the supply hoses reach the connections before mounting the valve.
e.
Mount the thermostatic mixing valve to the wall and fasten the valve to the wall using " pipe hangers
with wall plates (not supplied).
f.
Connect the (2) supply hoses (male end) to the mixing valve tee and wrench tighten.
Connect the other end of the hoses (with rubber washer) to the widespread valve bodies,
making sure the hot is to hot & the cold is too cold and wrench tighten.
g.
Connect the center outlet of the thermostatic mixing valve to the eyewash inlet using the TW hose
supplied and wrench tight.
h.
Connect the hot and cold water supply lines to the tees on the thermostatic mixing valve
SPEAKMAN®
400 Anchor Mill Rd. New Castle, DE 19720 Phone: 800-537-2107 Fax: 800-977-2747
09/19/17 www.speakman.com 92-SEF-1800-15
Page 8

*ADJUSTING THE TEPID WATER SUPPLY TEMPERATURE:
ANSI Z358.1-1998 requires that the delivered flushing fluid temperature shall be tepid. Also, in circumstances
where chemical reaction is accelerated by flushing fluid temperature, a medical advisor should be consulted
for the optimum temperature of each application.
IMPORTANT: The supply line for plumbed eyewash units shall provide an uninterruptible supply of flushing
fluid at a minimum of 30 psi. of flow pressure. If shut off valve is installed in the supply line of the eyewash for
maintenance purposes, provisions shall be made to prevent unauthorized shut off.
OPERATION
Faucet - Simply rotate the handles to operate the lavatory faucet.
Eyewash - The eyewash is activated by pulling the handle out. Once the eyewash is activated, the eyewash
caps will flip off and water will come out of the aerated spray heads. The eyewash will continually discharge
water until the handle is manually pushed back into the off position.
The flow of the individual spray heads is controlled by built-in flow controls. Each spray assembly is tested
and aligned in the factory.
TESTING PROGRAM
ANSI Z358.1 requires that all emergency equipment shall be tested weekly to verify proper operation and
inspected annually to assure conformance with ANSI Z358.1 requirement.
MAINTENANCE
End body valves are washer-less and require no routine maintenance. The gleaming finish of your
SPEAKMAN Eyesaver
and dry immediately with a soft, clean cloth for best results.
®
faucet can be cleaned by using mild soap and warm water. Rinse thoroughly
REPAIR PARTS LISTING
Part or
Group Number
RPG04-0316-PC 4” wrist handle group with screw and index buttons Item 3
RPG10-0070-PC Collar and flange Item 2
RPG20-2012-CA End Body Assembly (red) with mounting hardware
RPG20-2011-CA End Body Assembly (blue) with mounting hardware
RPG05-0534-CA Perfect valve cartridge only (red)
RPG05-0535-CA Perfect valve cartridge only (blue)
RPG38-0388 Yellow spray head and aerator repair parts assembly Part of item 4
RPG49-0003 Repair parts for internal seals of the gooseneck eyewash Not shown
G05-0724-PC Faucet 2.2 gpm aerator Item 8
RPG04-0366 Eyewash handle with yellow text and set screw Part of item 4
Description
Refer to Packing
List Figure
Item 1
(hot supply)
Item 1b
(cold supply)
Perfect valve cartridge
(hot supply)
Perfect valve Cartridge
(cold supply)
SPEAKMAN®
400 Anchor Mill Rd. New Castle, DE 19720 Phone: 800-537-2107 Fax: 800-977-2747
09/19/17 www.speakman.com 92-SEF-1800-15
 Loading...