

Page 1

®
SPEAKMAN
SC-7122-E
Installation, Maintenance & Operation Instructions
DOUBLE LABORATORY FAUCET
DESCRIPTION
Speakman polished chrome plated double laboratory faucet with ¼ turn ceramic valves. Brass body. 5-1/4
spread brass gooseneck, swivel or rigid. Metal handles with color coded indexes. Vandal-resistant water
conserving spray outlet device reduces flow to 0.5 GPM/1.9 LPM maximum to meet existing ASME
A112.18.1/CSA B125.1 Standard. ½”-14 NPSM male threaded flexible copper inlets.
Specifications
SUPPLY: ½-14 NPSM COMPRESSION COUPLING.
FLOW RATE: 0.5 GPM/1.9 LPM MAX.
SHIPPING WEIGHT: 4.4 LBS (SC-7122)
STATIC PRESSURE: 20-80 PSI
Installation
1. If applicable, install the anti-rotation pin into body hole and drill hole in sink/countertop (See separate
instruction/template sheet located in the hardware bag group).
2. Thread the plain end of the mounting studs (2) into the underside of the valve body and tighten with a
Phillip screwdriver. With the copper inlet tubes (2) squeezed together by hand, install the rubber
friction/seal gasket over inlet tubes and mounting studs. Make sure gasket cut outs (2) are positioned
over/around mounting studs.
3. With the tubes squeezed together, carefully place faucet in hole (1-1/4 diameter minimum) of
sink/countertop, with the mounting studs towards the back, making sure the gasket is still positioned
properly. Working from under the sink, slip the rubber gasket, then the brass hold down washer onto the
mounting studs. Make sure the washers (2) open side is facing forward for clearance of the inlet tubes.
Screw the hold down nuts (2) onto the mounting studs and hand tighten. With the faucet positioned
properly, wrench tighten nuts, using a small adjustable or ½ open-end wrench.
4. Carefully spread inlet tubes slightly apart. Hand tighten water supply lines (2) to the inlet tubes.
IMPORTANT- When tightening supply lines to the inlet tubes, hold the inlet tube fittings (2) with an
adjustable or 11/16 open-end wrench. Make sure not to twist or damage the inlet tubes. Wrench tighten
supply line connections.
5. From above the sink, install the spout. For All Swiveling Spout: Install spout assembly into the body outlet
and wrench tighten spout collar nut. Do not use the spout locking washer. For Rigid Spout: Place the
spout locking washer into the body outlet, install the spout assembly, position, and wrench tighten the
spout collar nut.
6.
Slip trim sleeves (2) onto valve spindles (2). Position handles (2) and screw onto spindles. Press index
buttons (2) into handles.
7. Turn water supplies (2) on and flush out both sides of faucet. Install outlet device (If applicable) and
check all connections for leaks.
SPEAKMAN®
400 Anchor Mill Rd. New Castle, DE 19720 Phone: 800-537-2107 Fax: 800-977-2747
4/06/17 www.speakman.com 92-SC-712X-05
Page 2
OPERATION
Simply rotate the handles ¼ turn maximum to operate the laboratory faucet.
MAINTENANCE
The faucet valve is washerless and requires no routine maintenance. The gleaming finish of your SPEAKMAN
laboratory faucet can be cleaned by using mild soap and warm water. Dry immediately with a soft, clean
cloth for best results.
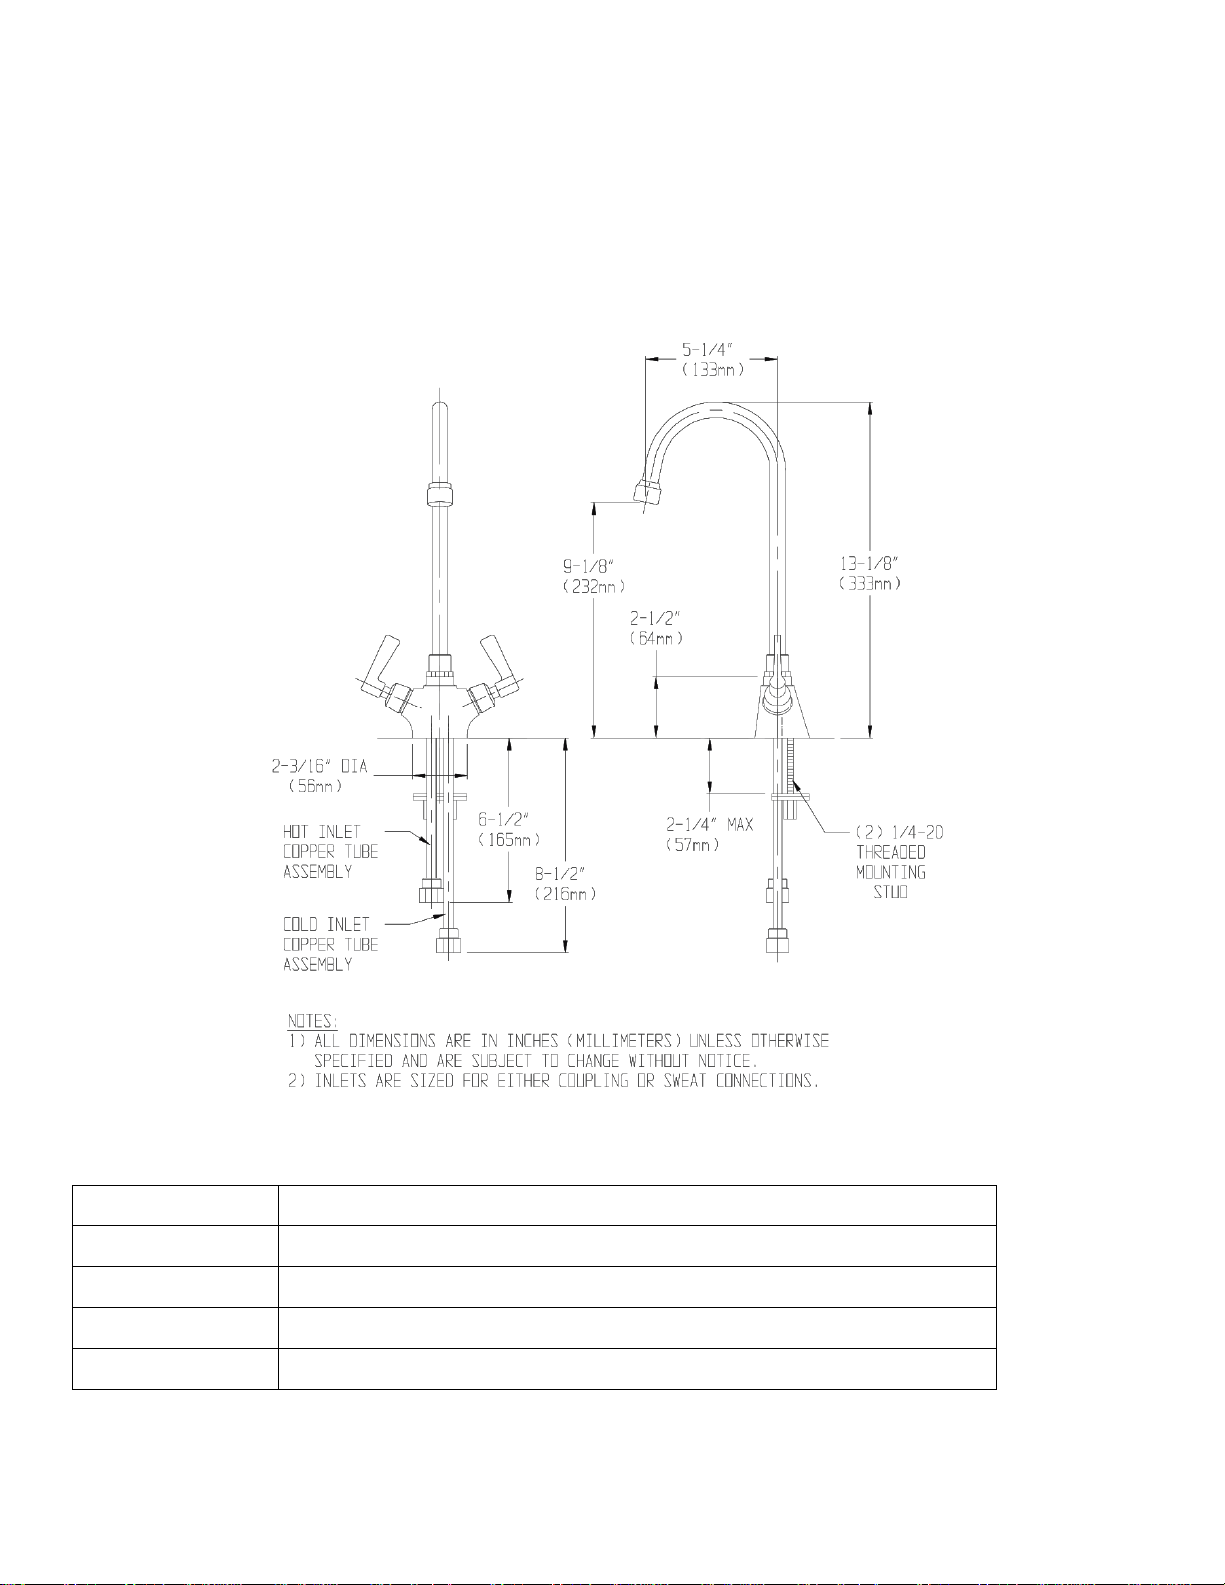
ROUGH IN DIMENSIONS
REPAIR / REPLACEMENT PARTS
PART NUMBER DESCRIPTION
RPG18-0213-CA
RPG38-0128-PC
RPG05-0532-CA
RPG05-0533-CA
PERFECT® VALVE GROUP (RED) W/TRIM SLEEVE AND SCREW
PERFECT® VALVE GROUP (BLUE) W/TRIM SLEEVE AND SCREW
STANDARD 5" SPREAD GOOSENECK ASSEMBLY
0.5 GPM SPRAY OUTLET DEVICE
SPEAKMAN®
400 Anchor Mill Rd. New Castle, DE 19720 Phone: 800-537-2107 Fax: 800-977-2747
4/06/17 www.speakman.com 92-SC-712X-05
 Loading...