

Page 1
SPEAKMAN COMPANY SAFETY PRODUCTS
SE-575-DP-237 & SE-575-DP-238
Installation, Maintenance, Operation Instructions
EYESAVER® EYE/FACE WASH & SAFE-T-ZONE® EMERGENCY SURFACE
MOUNTED WALL SHOWER
DESCRIPTION
Barrier-Free wall mounted emergency eye/face wash with drain pan for draining water. Unit supplied with plastic spray heads,
with individual flow restrictors. Unit activated by pulling handle down to open position, and is supplied with a cabinet flush
with wall to keep corridors free from obstruction. Unit also supplied with wall mounted emergency shower as described
below.
SE-575-DP-237:
Emergency deluge shower unit with wall activator. Shower is supplied with a 1” NPTF stay-open full flow ball valve that is
activated by pull handle that is mounted on wall. Shower head designed to mount flush with ceiling.
SE-575-DP-238:
Emergency deluge shower unit with wall activator. Shower is supplied with a 1” NPTF stay-open full flow ball valve that is
activated by pull handle that is mounted on wall. Shower head designed to drop down through ceiling.
SPECIFICATIONS
EYE/FACE WASH
SPRAY HEADS: (2) ABS Plastic Non-Aerated.
VALVE: Brass, Chrome-Plated.
ACTIVATOR HANDLE: Black, Nylon Plastic.
INLET: ½” NPT Female.
CABINET & DRAIN PAN: 20 Gauge (.036 thk.) 300 Series Stainless Steel with Satin Finish.
EMERGENCY SHOWER
SHOWER HEAD: Brass, 8” Diameter Polished Chrome Plated (SE-575-DP-238).
Brass, 10” Diameter Flanged Polished Chrome Plated (SE-575-DP-237).
COVER PANEL: 20 Gauge (.036 thk.) 300 Series Stainless Steel
VALVE: 1” NPT Female Brass, Chrome-Plated. Full Flow Stay-Open Ball Valve.
ACTIVATOR: Stainless Steel Lever with Black Plastic Rotating Handle.
PIPING: 1” IPS Steel Pipe Nipple & Unions.
INLET: 1” NPTF.
FLOW CONTROL: 20 GPM
SHIPPING WEIGHT: 27 lb (SE-575-DP-238)
28 lb. (SE-575-DP-237)
EMERGENCY SIGN: 7-7/8” x 12” Plastic Wall Sign.
OPTIONS
◊ AL3 (Electrical Alarm) ◊ ILS (In-line Strainer) ◊ 30GPM (30 GPM Flow Control)
◊ AL2-C1D2 (Electrical Alarm / Haz. Area) ◊ FLW (Flow Switch) ◊
◊ AL3-C1D2 (Electrical Alarm / Haz. Area) ◊ SSH (Stainless Steel Shower Head) ◊
INSTALLATION
Review and understand configuration of the unit as shown in the diagrams following in this instruction before roughing in or
installing unit.
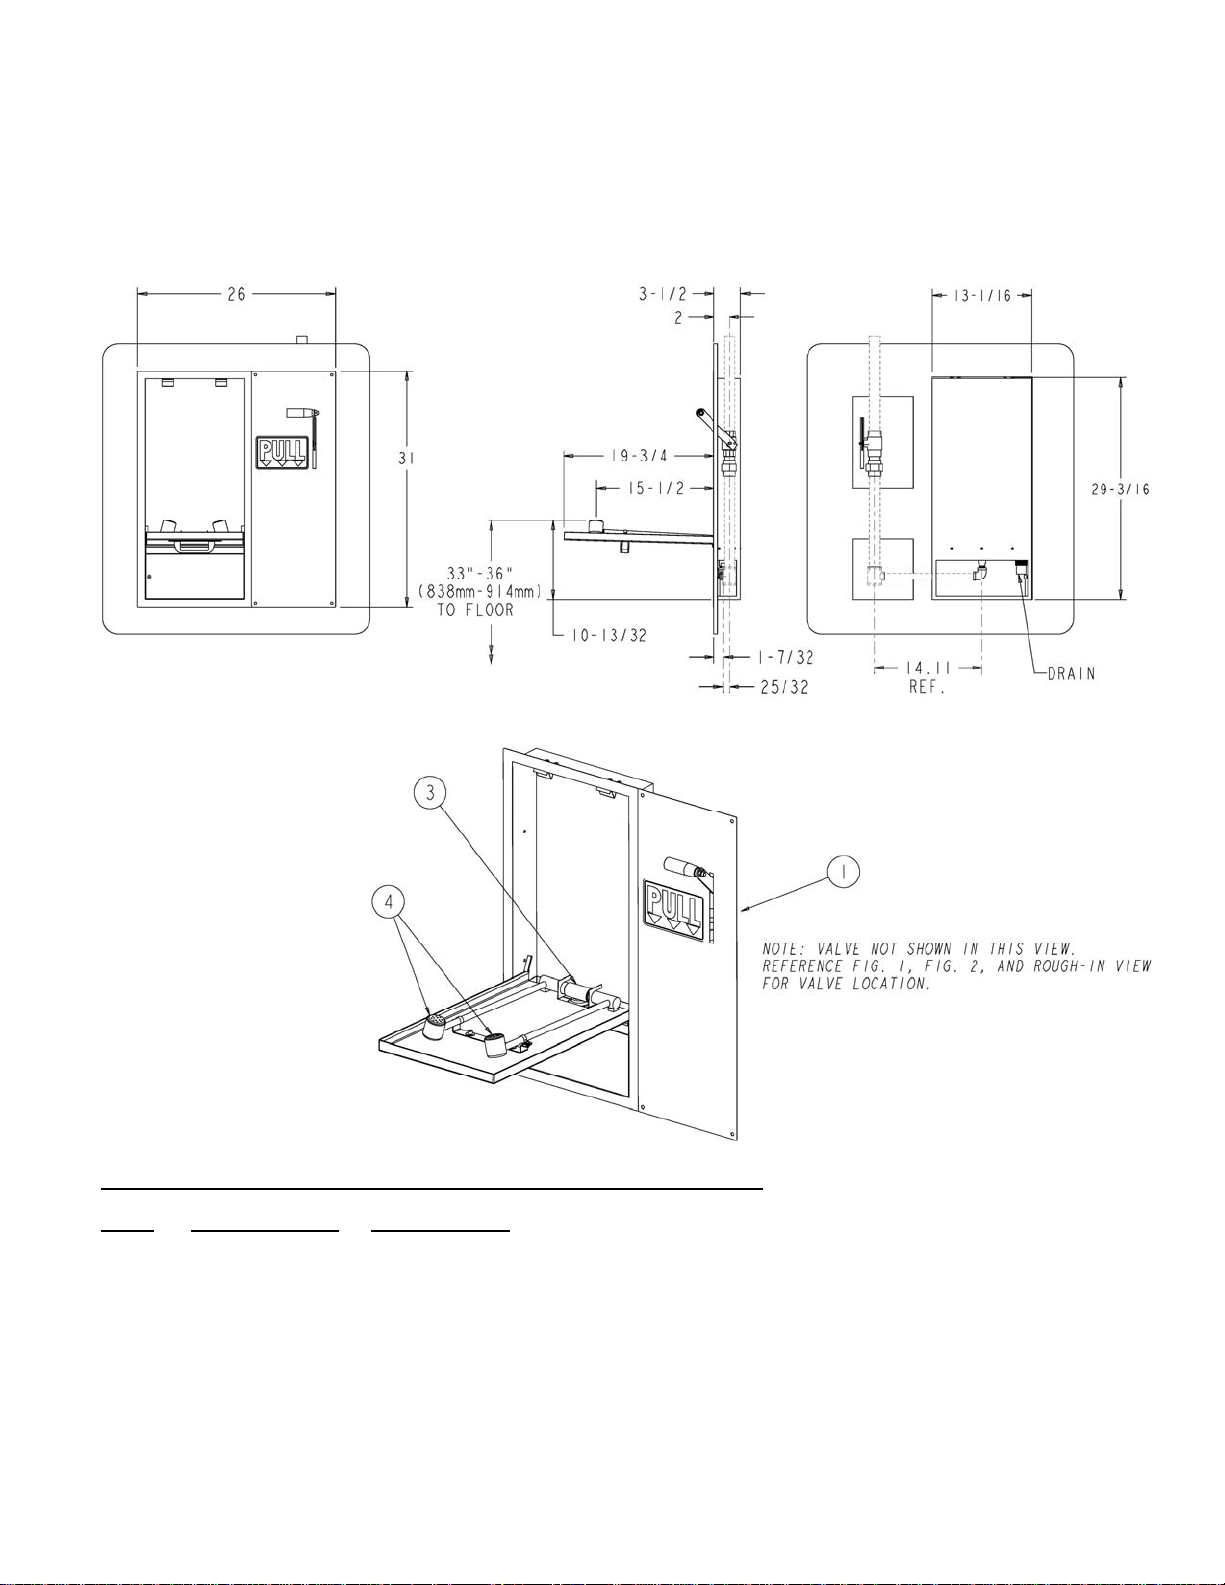
1. Once desired location & spray head height is determined cut openings in the wall for the eye/face wash & emergency
shower per the minimum dimensions shown in Fig. 1, making sure there are suitable structures (stud, etc.) on each side of
the eye/face wash opening for securing the eye/face wash cabinet to the wall.
Page 2

2. Making sure unit is level, use appropriate fasteners (4) to secure unit to wall as shown in Fig. 2A & Fig. 2B.
3. Plumb the eye/face wash & emergency shower ball valve (supplied) as shown in Fig. 2A & Fig. 2B, and the required
water supply piping (supplied by others). For smooth activation, make sure that when final union connection is made that
the stainless steel activation lever handle is as close to perpendicular to the finished wall as possible. Use pipe dope or
thread sealant on all pipe thread connections (not union connections). The eye/face wash is supplied with a ½” NPT inlet,
and requires a minimum 30 PSI flowing water pressure, and the emergency shower is supplied with a 1” NPT inlet.
Shown in fig. 1 as dotted lines is the recommended piping configuration for a single water supply inlet. NOTE: water
supply to the unit to be an uninterrupted source of potable water. Failure to use potable water can result in emergency
units producing impure or contaminated water causing possible further injury
4. This unit is supplied with a chrome plated P-trap. Connect drain tailpiece or waste an adequate drain in compliance with
local and/or national plumbing codes.
5. Assemble shower head to supply piping accordingly. Drop down design for the SE-575-DP-238, and ceiling mount for
the SE-575-DP-237. Make note that ANSI specifies that showerhead must be 82”-96” from the surface on which the
user stands. Use pipe dope or thread sealant on all pipe thread connections. See shower head differences in Fig. 3.
92-2895 Rev-1
01/07
Page 3
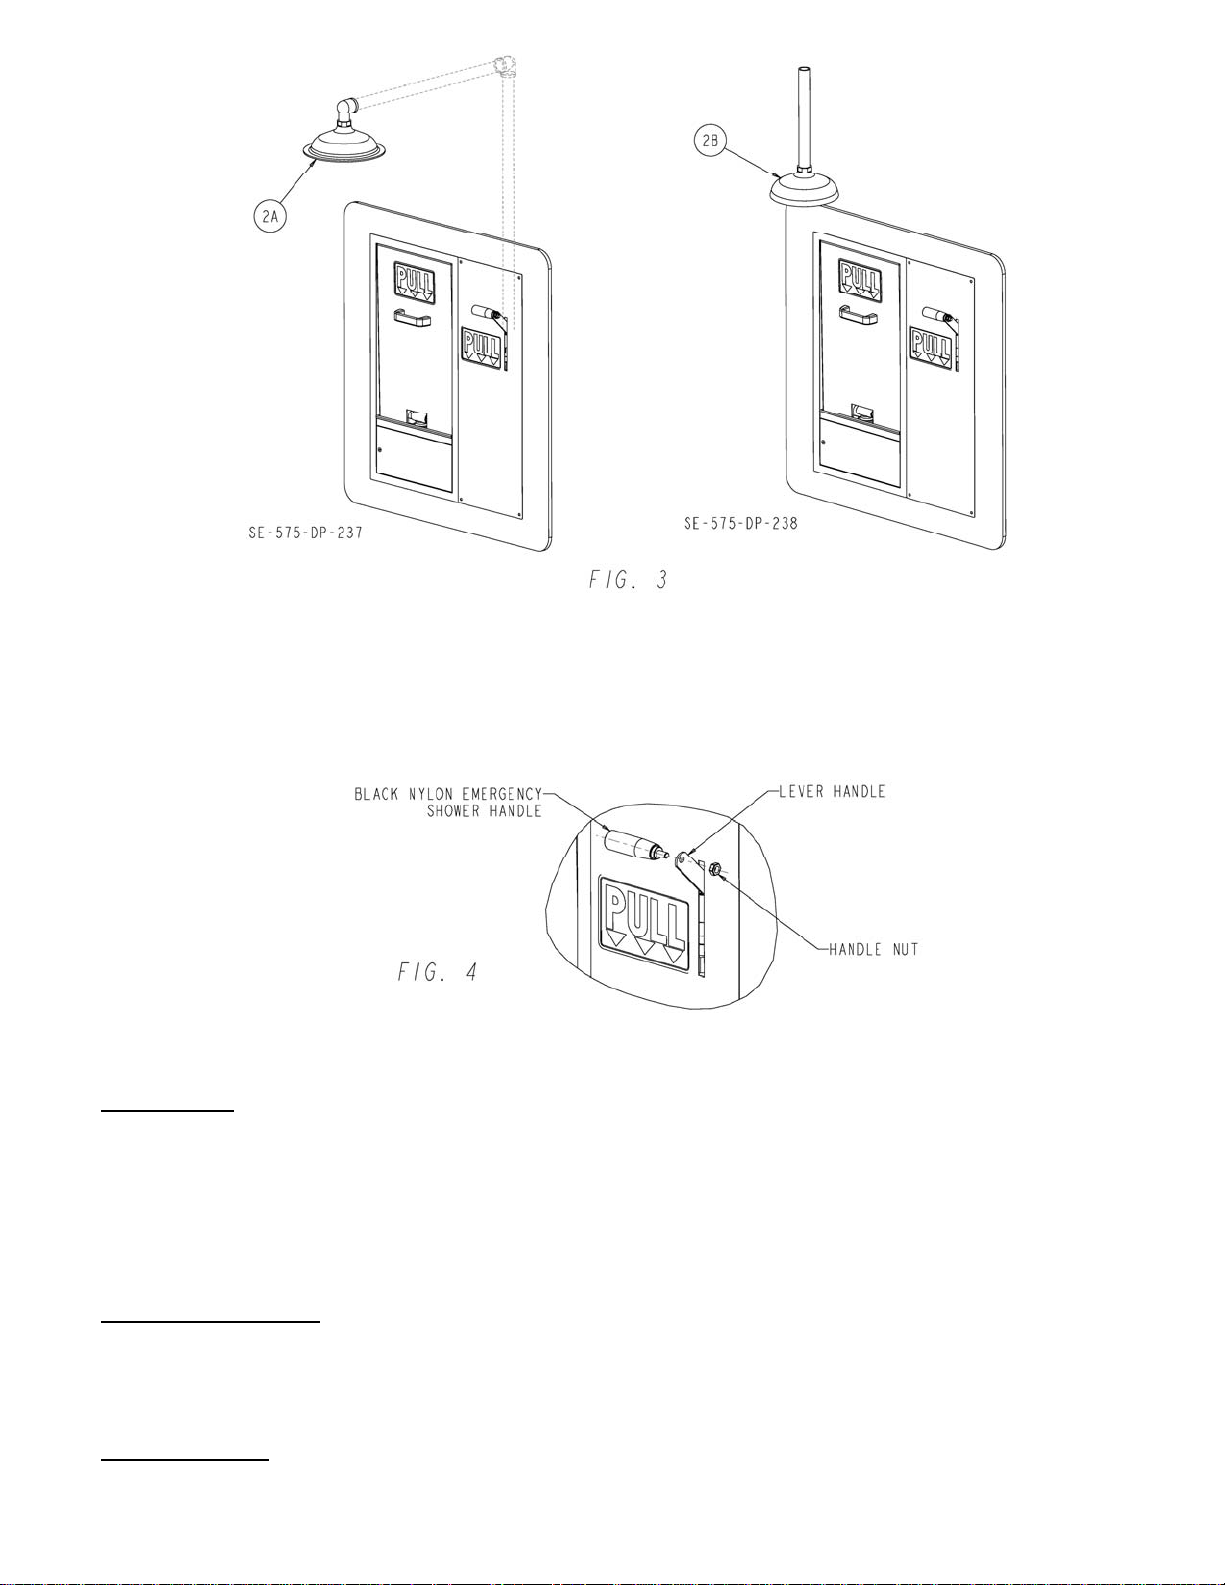
6. Once piping is complete, and all supply and drain connections are made. Assemble lever handle to valve making sure it is
oriented correctly. Place the stainless steel wall panel into position and make sure the lever handle rotates from the on &
off positions freely without dragging on wall panel. If valve operates correctly, secure the wall panel to the wall using
proper fasteners. If dragging occurs, loosen 1” union and adjust 1” ball valve so the lever handle is centered in the wall
panel slot, and any interference is eliminated.
7. Assemble the black nylon rotating handle, and 3/8-16 hex nut to the activation lever handle.
8. Turn water supply on and test the eye/face wash & shower.
OPERATION
The eye/face wash is activated by pulling the handle on the eye/face wash drain pan down to the open position. Once the
eye/face wash is activated water will discharge from the spray heads until the unit is manually shut off. To shut off, lift back
onto the upright off position.
The shower is activated by pulling/pushing the handle in the downward direction to the full open position. Once the valve is
activated the head will continue to discharge water until the valv e is manually clo sed. The unit is shut off by pulling/pushing
the handle in the upward direction to the complete off position.
TESTING PROGRAM
The American National Standards Institute (ANSI) states that all safety emergency equipment shall be activated on a weekly
basis to flush the line and verify proper operation. Speakman Company furnishes a testing record tag (91-0635) with each unit.
On this tag the date of inspection and the inspector’s initials should be noted.
MAINTENANCE
92-2895 Rev-1
01/07
Page 4
Should you need to repair components behind the wall (valve, lever handle, etc.); the cover panel is removed by following
these instructions.
1. Shut off water supply before doing any repair to this unit.
2. Position lever handle in the half-open (horizontal) position, and remove black plastic rotating handle from lever handle.
3. Remove the (4) fasteners that attach the cover panel to the wall, and slide the cover panel off. This will give you full
access to valve and lever handle inside the wall.
4. Once repair is made follow above instructions in reverse to reassemble handle and panel cover. Be sure to turn water
supply back on once repairs are final.
SE-575-DP-237 & SE-575-DP-238 REPLACEMENT/REPAIR PARTS
ITEM PART/GROUP # DESCRIPTION
1 20-0955 1” Emergency Shower Ball Valve
2A SE-890 10” Brass Shower Head for SE-575-DP-237 (shown in Fig. 3)
2B SE-800 8” Brass Shower Head for SE-575-DP-238 (shown in Fig. 3)
3 G20-2010-RCP Swing Down Eye/Face Wash Valve Assembly
4 RPG38-0416 Non-Aerated Spray Head Assembly
RPG05-0673 Internal O-rings, Screws for Eye/Face Wash Valve (not shown)
WARNING: Use only genuine Speakman parts when repairing or replacing components. To order parts call 1-800-537-2107.
01/07
92-2895 Rev-1
Page 5
FLOW DATA
EYE/FACE WASH:
FLOW PRESSURE PSI (BAR) 30 (2.07)
FLOW RATE GPM (LPM) 3.9 (15)
NOTE: This unit should be connected to an uninterrupted source of potable water, with a minimum flowing pressure of 30 PSI
and a maximum static pressure of 125 PSI.
SHOWER:
FLOW PRESSURE PSI (BAR) 20 (1.38) 60 (4.14)
FLOW RATE GPM (LPM) 20 (75) 25 (94)
Note: All units meet existing ANSI
Z358.1 Standards and OSHA Rules.
Product improvements may cause
specification and dimensional changes
without notice.
01/07
92-2895 Rev-1
 Loading...