

Page 1
®
SPEAKMAN
SC-5811, SC-5811-RCP
Installation, Maintenance & Operation Instructions
COMMANDER® CAST BRASS SERVICE SINK FITTING
DESCRIPTION
Speakman chrome plated cast brass COMMANDER service sink with PERFECT® valves. ¼ turn ceramic
cartridges covered by a 25-year Silver warranty. Integral stops. Vandal-resistant four arm handles with color
coded indexes. Cast brass nozzle with ¾” hose thread, pail hook and top brace. Brass vacuum breaker.
Brass top brace assembly with wall flange and mounting screws. Distance from finished wall to nozzle outlet
is 9”. 8” centers with +/- 1/8” adjustment. Adjustable threaded wall flanges. Vandal-resistant standard.
½” NPTF inlets. Certified to ASME A112.18.1/CSA B125.1 and ASSE-1001 standards.
SPECIFICATIONS
OUTLET SUPPLY: ¾” NH MALE.
INLET SUPPLIES: ½” NPT FEMALE.
SC-5811: Polished Chrome Plated
SHIPPING WEIGHT: 6.5 LBS.
SC-5811-RCP: Rough Chrome Plated
SHIPPING WEIGHT: 6.58 LBS.
ADD-ON KITS:
A-CK Check Valves in Swivel Assembly
A-5H 5 Ft. Vinyl Hose with Wall Hook
SEF-9200 Safety Eyewash Attachment
4in. Wrist Blade Handle Kit:
A-4WRIST
2 Chrome Plated Brass Handles,
2 Screws, 2 Lock Washers,
Red & Blue Index Buttons
INSTALLATION
NOTE: Shut off water supplies. Supply lines must have ½” NPT male threaded ends.
Screw down trim flanges onto swivel assemblies. Apply pipe sealant to threads of supply lines.
NOTE: Supply line must stick out of sink finished wall 3/8” (± 3/16”), with both being the same distance.
Screw swivel assemblies onto supply lines. Using a 3/8” square wrench, tighten and position assemblies so
they are the same distance apart as the valve body inlets.
NOTE: Swivel assemblies are machined off center for adjustment.
Screw flanges up against sink or wall. Connect brace assembly to nozzle with roll pin provided. Placing
rubber washers inside coupling nuts, position fitting up to swivel assemblies and tighten nuts with wrench.
NOTE: Finished wall must be supported where brace flange mounts. Lift brace assembly up against finished
wall. Center with nozzle and mark location of holes in brace flange. Drill starter holes for mounting screws.
Screw flange to wall using two screws provided. Turn water supplies on and check supply line connections
for leaks.
400 Anchor Mill Rd. New Castle, DE 19720 Phone: 800-537-2107 Fax: 800-977-2747
8/17/17 www.speakman.com 92-SC-5811-01
SPEAKMAN®
Page 2
OPERATION
/
Simply rotate the handles ¼ turn maximum to operate the sink fitting.
MAINTENANCE
Valves are washer less and require no routine maintenance. Your SPEAKMAN Commander sink fitting can be
cleaned by using mild soap and warm water. Dry immediately with a soft, clean cloth for best results.
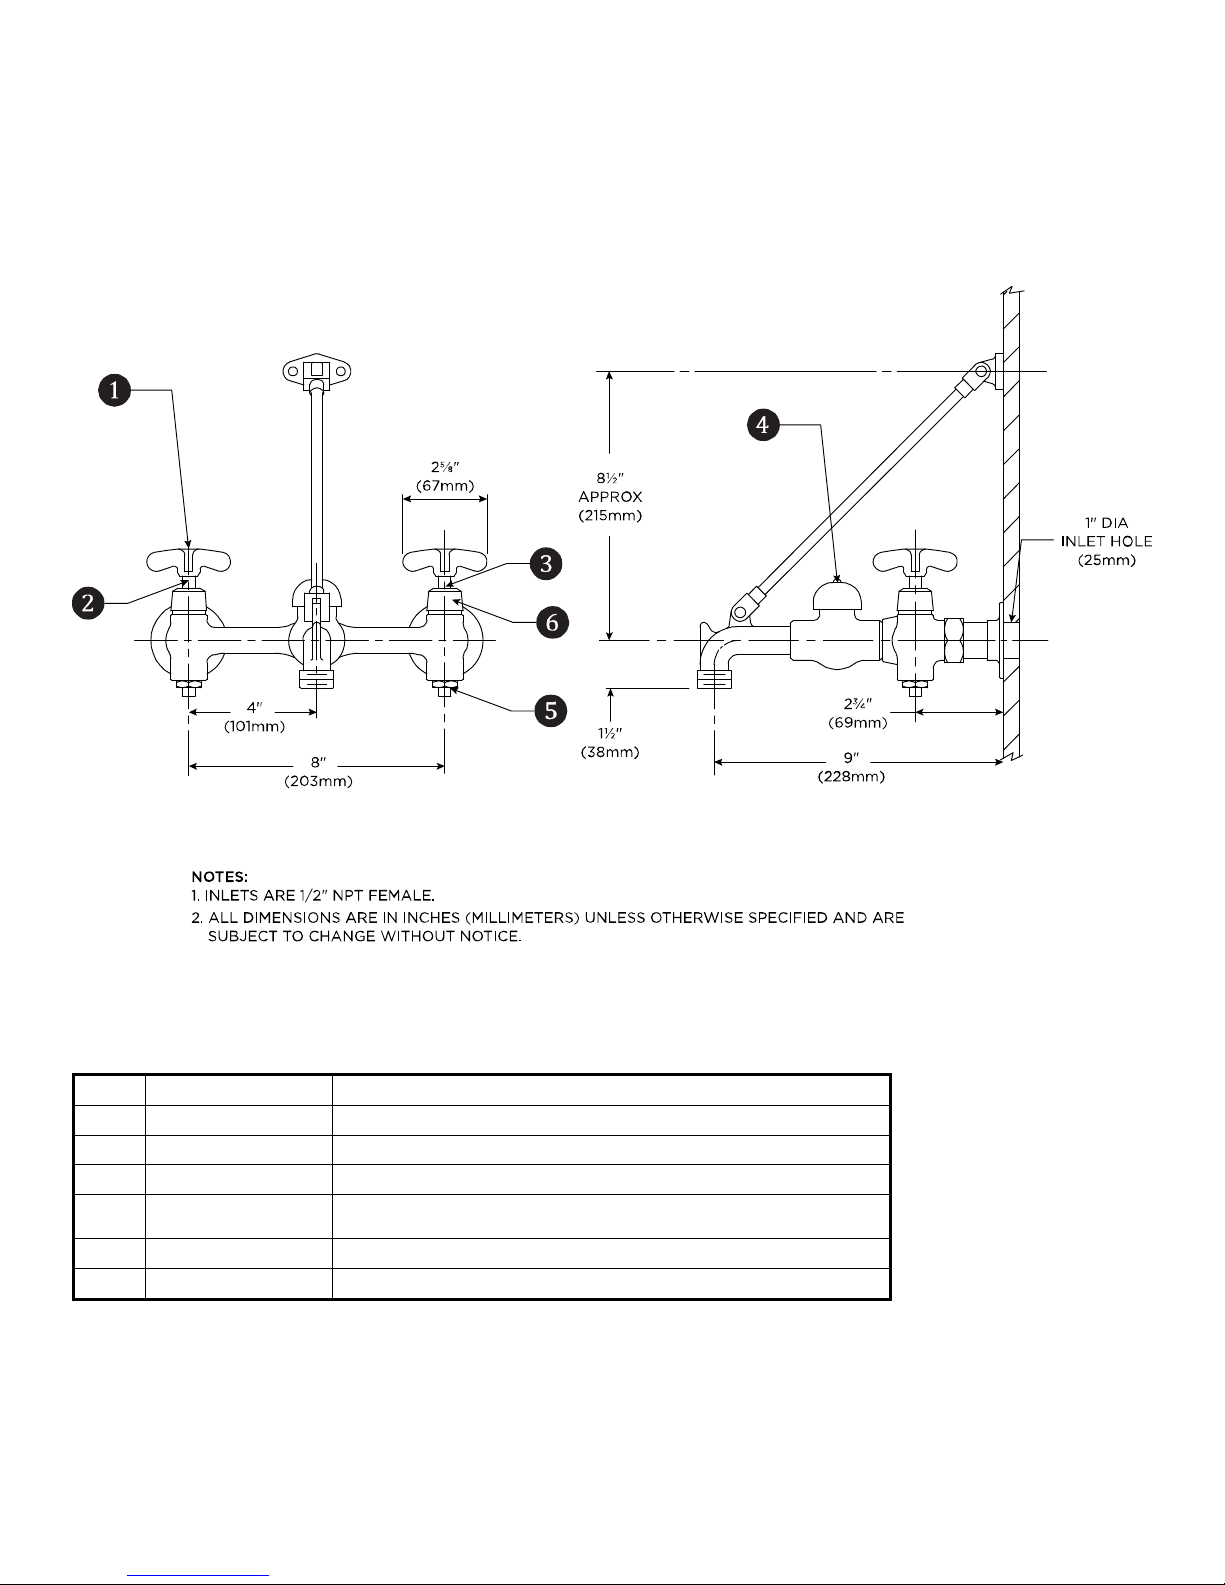
ROUGH-IN
REPLACEMENT/REPAIR PARTS
ITEM PART/GROUP # DESCRIPTION
1 RPG04-0323-PC 4 Arm Handle Repair Group w/ Screw and Index Buttons
2 RPG05-0532 Perfect Valve Group (Red) w/ Trim Sleeve and Screw
3 RPG05-0533 Perfect Valve Group (Blue) w/ Trim Sleeve and Screw
4 RPG05-0520
5 RPG03-0361-RCP Integral Stop Spindle
6 RPG02-0141-PC Trim Collar for Valve
Vacuum Breaker Repair Group w
400 Anchor Mill Rd. New Castle, DE 19720 Phone: 800-537-2107 Fax: 800-977-2747
8/17/17 www.speakman.com 92-SC-5811-01
Check Assembly, Hub,
Cap Screw, and O-Ring
SPEAKMAN®
 Loading...