

Page 1

OWNER’S MANUAL
Ruckus 8 Sub System
Landscape Speaker
Page 2
SAFETY INSTRUCTIONS
APPLICABLE FOR USA, CANADA OR WHERE
APPROVED FOR USAGE
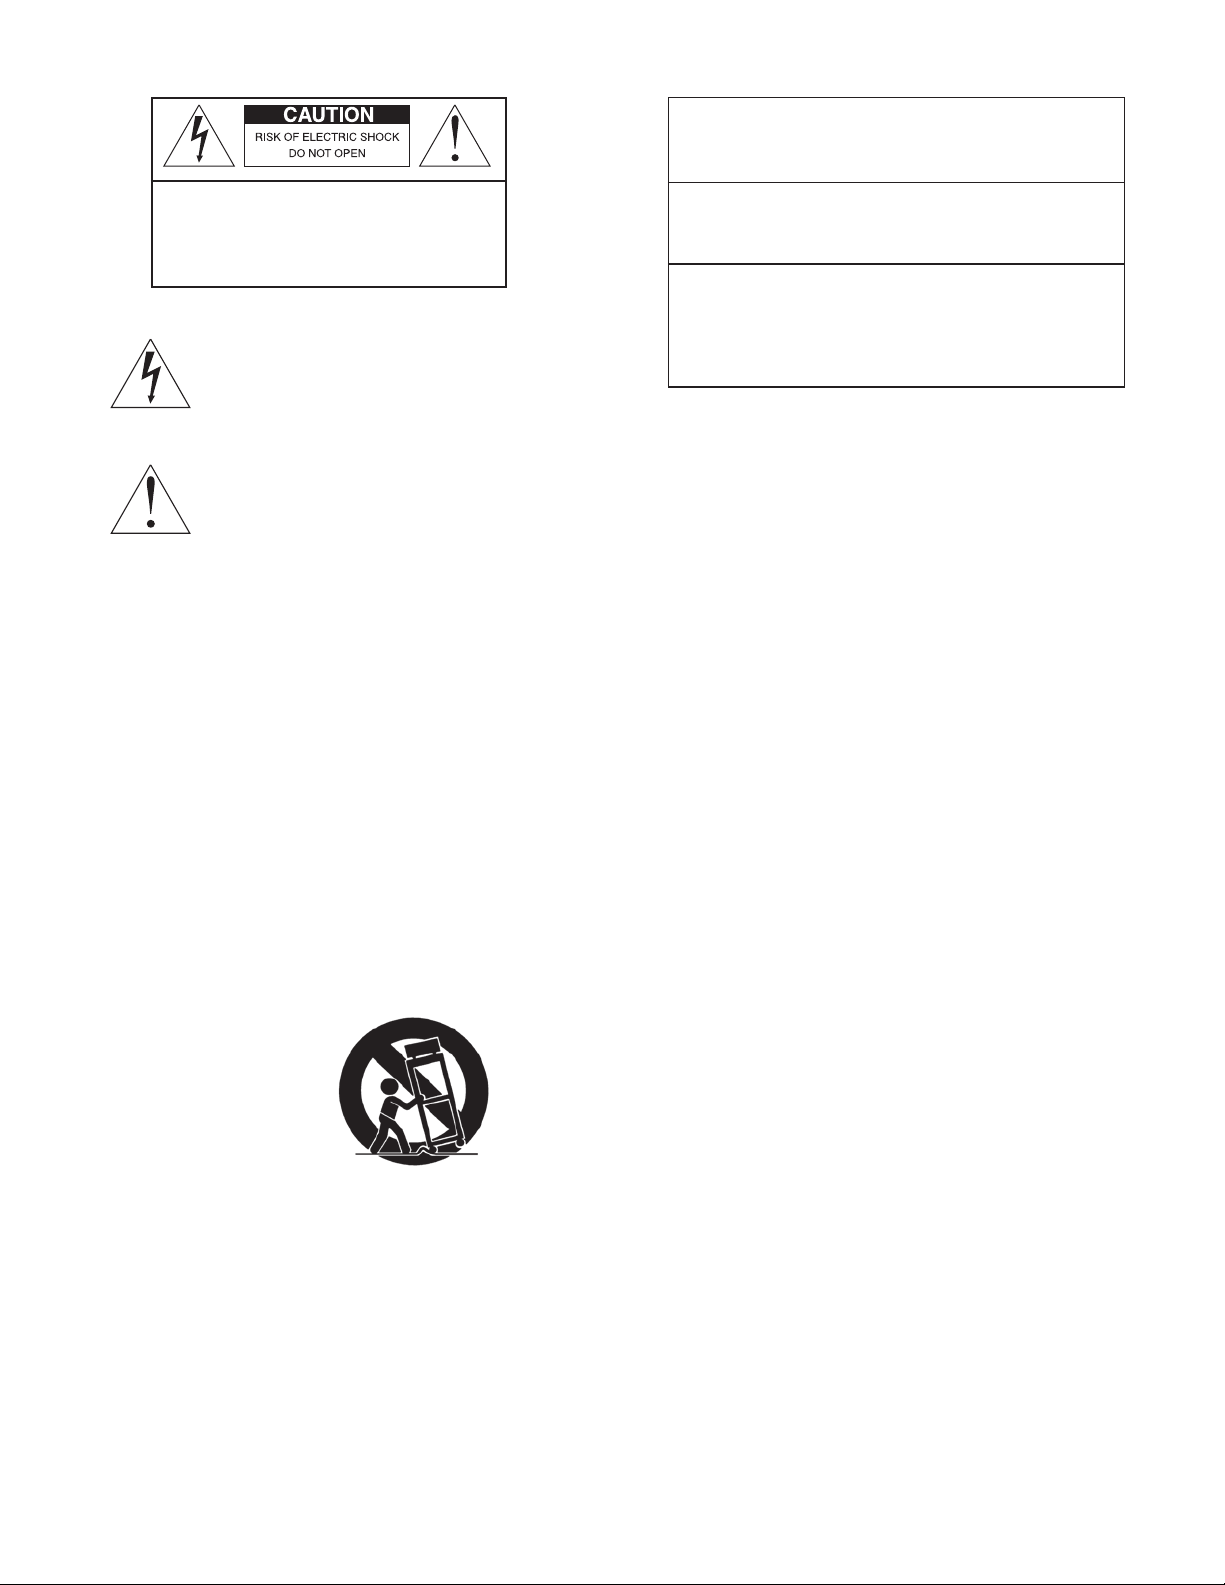
CAUTION: To reduce the risk of electric
shock, do not remove cover (or back). No
user-serviceable parts inside. Refer servicing to qualified service personnel.
• Explanation of Graphical Symbols
The lightning flash with arrowhead symbol, within
an equilateral triangle, is intended to alert you to the
presence of uninsulated “dangerous voltage” within the
product’s enclosure that may be of sufficient magnitude
to constitute a risk of electric shock to persons.
The exclamation point within an equilateral triangle
is intended to alert you to the presence of important
operating and maintenance (servicing) instructions in
the literature accompanying the appliance.
1. Read Instructions - All the safety and operating instructions
should be read before the appliance is operated.
2. Retain Instructions - The safety and operating instructions
should be retained for future reference.
3. Heed Warnings - All warnings on the appliance and in the
operating instructions should be adhered to.
4. Follow Instructions - All operating and other instructions
should be followed.
5. Water and Moisture - To reduce the risk of electric shock,
do not expose this apparatus to rain or moisture – for
example, near a bathtub, washbowl, kitchen sink, laundry
tub, in a wet basement, or near a swimming pool, etc.
6. Carts and Stands - The appliance should be used only with
a cart or stand that is recommended by the manufacturer.
CAUTION:
WIDE BLADE PLUG TO WIDE SLOT, INSERT FULLY.
TO PREVENT ELECTRIC SHOCK, MATCH
ATTENTION: POUR EVITER LES CHOCS
ELECTRIQUES, INTRODUIRE LA LAME LA PLUS LARGE
DE LA FICHE DANS LA BORNE CORRESPONDANTE
DE LA PRISE ET POUSSER JUSQU AU FOND.
10. Power Source - The appliance should be connected to a
power supply only of the type described in the operating
instructions or as marked on the appliance.
11. Power-Cord Protection - Power-supply cords should be
routed so that they are not likely to be walked on or
pinched by items placed upon or against them, paying particular attention to cords at plugs, convenience
receptacles, and the point where they exit from the
appliance.
12. Cleaning - The appliance should be cleaned only as recommended by the manufacturer.
13. Non use Periods - The appliance coupler shall remain
readily operable. The appliance coupler should be disconnected from the apparatus when left unused for a
long period of time.
14. Object and Liquid Entry - Care should be taken so that
objects do not fall into and liquids not spilled into the
inside of the appliance.
15. Damage Requiring Service - The appliance should be serviced by qualified service personnel when:
PORTABLE CART
WARNING
7. Wall or Ceiling Mounting - The appliance should be mounted to a wall or ceiling only as recommended by the manufacturer.
8. Ventilation - The appliance should be situated so that its
location or position does not interfere with its proper ventilation. For example, the appliance should not be situated
on a bed, sofa, rug, or similar surface that may block the
ventilation openings; or placed in a built-in installation, such
as a bookcase or cabinet that may impede the flow of air
through the ventilation openings.
9. Heat - The appliance should be situated away from heat
sources such as radiators, stoves, or other appliances that
prduce heat.
a. The power-supply cord or the plug has been dam
aged; or
b. Objects have fallen onto, or liquid has been spilled into
the appliance; or
c. The appliance has been exposed to rain; or
d. The appliance does not appear to operate normally or
exhibits a marked change in performance; or
e. The appliance has been dropped, or the cabinet
damaged.
16. Servicing - The user should not attempt to service the
appliance beyond those means described in the operating instructions. All other servicing should be referred to
qualified service personnel.
17. Grounding or Polarization - The precautions that should be
taken so that the grounding or polarization means of an
appliance is not defeated.
1
Page 3

INTRODUCTION
Congratulations on purchasing SpeakerCraft's Ruckus 8 Sub System landscape speakers. We would like to think of them as
simulated rocks containing speakers, not rock speakers. This is because the Ruckus Subs look more like real rocks. Thanks to
a new revolutionary process, the speaker remains completely unseen behind a grille that matches the Ruckus surface and
texture. The Ruckus Series feature a durable enclosure that will withstand rain, snow, hot sun, and even swimming pool acids.
The woofers are made from a special weatherproof nylon frame that prevents the magnet rusting. Even the wiring inside the
speakers are coated with silicone rubber to prevent corrosion. However, to be sure that you optimize the performance of
your Ruckus Series speakers, please read this manual carefully.
CAUTION
Although they are designed to withstand the elements, there are precautions you should take to optimize the long-term
performance of your speakers. Keep soil and wood chips from covering the speaker grille. If soil accumulates on the grille,
it can be rinsed away with low water pressure. Chemicals commonly used in the yard can potentially damage the rubber
parts of the speaker. Avoid spraying such chemicals onto or near the speaker. Also avoid placing the speakers where the
grille area will come in direct contact with sprinklers. The Ruckus Sub was designed to work with the Bass Power 250 amplifier or any standard stereo amp. To ensure maximum sound quality and performance, we recommend using the included
Bass Power 250 amp.
SPEAKER PLACEMENT
•TheRuckus8Subsystemisintendedtoprovidepowerfulbassinoutdoorenvironments.Inlargeoutdoorareas,itmaybe
necessary to utilize additional Ruckus Subwoofers to achieve optimal effect.
•Ifyoudesiremusicoverawidearea,itisbesttohavealargernumberofspeakersplayingatlowvolume,rather
than a few speakers playing at high volume. Keep this in mind when designing your outdoor system.
•Ideally,youshouldplacethespeakersasclosetotheprimarylisteningareaaspossible.Theperceivedvolumeofthe
speaker decreases rapidly as it is moved further from the listener.
•Directburialwireorconduitfornewyardconstructionmustberuntothelocationofthespeakers.Keepinmindthat
patios, walls and other features in your yard may be difficult to get around when wiring.
SPEAKER INSTALLATION
•EachRuckus8Subhasatwo-conductorcableexitingthebottomofthespeaker.Thiscableshouldbeconnectedtoa
similar cable run to the speaker location from your audio system. SpeakerCraft recommends using certified direct burial
cable that is ideal for this purpose. The cable can be run either directly beneath the speaker into the ground, or you
can use the notch on the bottom of the cabinet to exit the cable out the side. Caution: Use only one speaker lead
when connecting to the Bass Power 250 amplifier. Using both leads with the Bass Power 250 may result in system
damage. If using any stereo amplifier in place of the Bass Power 250 (part # AMPX67250), use one speaker lead for the
left channel and the other for the right channel.
•WhenattachingthewiretotheRuckus8speaker,itiscriticalthatahighqualityconnectionisachieved.Apoor
connection may lead to corrosion and a decline in or loss of performance. For best results, use a set of weatherproof
wirenuts. Another option is to use a watertight direct burial box or crimp or solder the wires together and use a heat shrink
tube to seal each connector.
•EachRuckus8speakerincludesanintegratedanti-theftringlocatedatthebottomofeachcabinet.Thisringwill
allow you to attach a security harness to it.
2
Page 4
AMPLIFIER PLACEMENT
DO:
•Placetheamplifierwiththefeetrestingonasolidflatlevelsurface.
•Placetheamplifierinawell-ventedareatoprovidepropercooling.Inareasthatlackproperventilation,suchastight
cabinets or racks, it may be necessary to install small fans to create air movement.
DON’T:
•Don’tblocktheventilationholesonthetoporbottomoftheamplifier.Neverplaceitoncarpetingorsimilarmaterial.
•Don’tplacetheamplifierinanyotherpositionotherthanhorizontalwiththefeetdown.Neverplaceonitssideor
resting on the back where the terminals are located.
•Don’tplacetheamplifiernearheatsources,orinanareathatitwouldbeexposedtomoistureorexcessivehumidity.
YOU SHOULD KNOW
•Thepowersupplymaycauseahumtobeheardinsomecomponentsiftheyareplacedveryclosetotheamplifier.
INSTALLATION
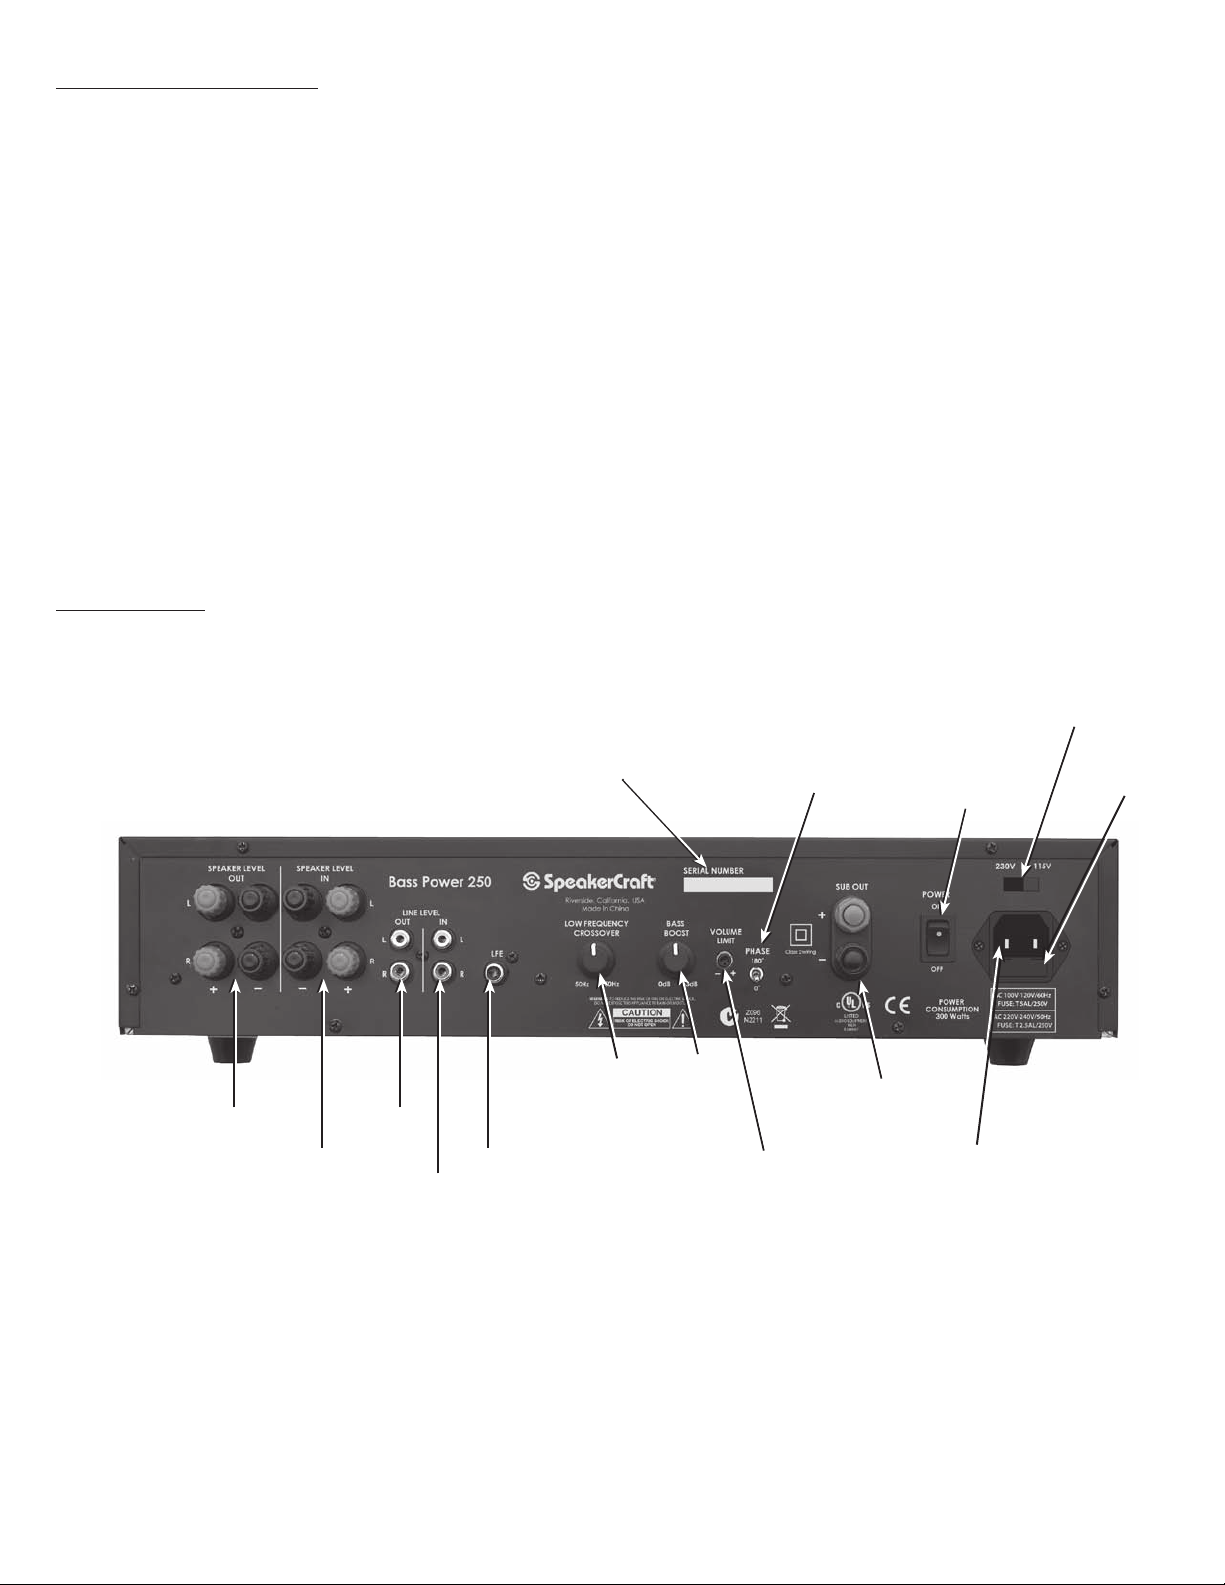
Please use Diagram 1 to familiarize yourself with the rear panel of the Bass Power amplifier.
DIAGRAM 1
Bass Power Rear Panel
Speaker Output Terminals
Speaker Input Terminals
Line
Outputs
Line Inputs
Low Pass
Crossover
LFE Input
Serial Number
Control
Bass
Boost
Control
Phase Switch
Output Terminals
Volume Limit
Control
Power Switch
Subwoofer
Dual Voltage
Switch
Fuse
IEC Power
Connector
3
Page 5

INSTALLATION
(continued)
1. Connecting the Subwoofer to the Amplifier
CAUTION: Only make connections when the amplifier is turned off.
There are 2 output terminals on the back of the amplifier, one positive and one negative. These 3-way binding post output
terminals allow for a variety of ways to connect your subwoofer wiring to the amplifier, including stripped wire, spade connectors, etc. You MUST use a minimum of 14 gauge speaker wire. Be sure all connections are solid.
2. Connecting the Audio Inputs
CAUTION: To avoid possible damage to the amplifier or subwoofer, only make connections when the amplifier is
turned off.
• LFE (Low Frequency Effects) Input - If your preamplifier or receiver has a Sub Out or LFE out, you can connect it to the
LFE input. Be aware that using the LFE input bypasses the amplifier’s adjustable low frequency (low pass) crossover.
• Line Level Inputs (Left & Right) - The line outputs from a preamplifier or receiver can be connected to the line level
inputs of the Bass Power with RCA cables. If the line level signal is also required by other equipment, you can connect the line level outs to another device. (See the Line Level Outputs section below.)
• Speaker Level Inputs (Left & Right) - These inputs can be used if your receiver does not have a subwoofer output or a
set of line output jacks. Being sure to observe proper polarity, connect the left and right pair of main speaker output
wires from your amplifier or receiver to the speaker level input terminals of the Bass Power amplifier. Then connect
a left and right pair of speaker wires from the Bass Power speaker level output to your main speaker terminals. (See
Speaker Level Outputs section below)
3. Connecting the Audio Outputs (optional)
• Line Level Outputs (Left & Right) - Sources connected to the line level inputs can be forwarded to other receivers or
amplifiers line level inputs. By doing this you can pass-on the audio signal for use by another component. Connect
RCA cables to the line level output sections of the Bass Power and the Line level inputs of a receiver or amplifier.
• Speaker Level Outputs (Left & Right) - Connect a left and right pair of speaker wires from the Bass Power speaker
output terminals to your main speakers. The main speakers will still be powered by your system's receiver or amplifier.
4. Dual Voltage Switch (See Diagram 2)
For use in the U.S., the Bass Power comes preset from the factory at 115V. For use in other countries, the voltage switch
may need to be changed to 230V. (Please note that a plug adapter or alternate power cord may be required.)
DIAGRAM 2
Dual Voltage Switch
5. Connecting the AC Power
Plug the socket of the supplied AC cord into the receptacle on the rear of the amplifier. Plug the 3-prong plug directly
into a wall outlet. If you wish to plug the amplifier into a preamplifier or receiver’s switched outlet, make sure
it is rated at least 600 watts. However, it is always safer to plug the Bass Power directly into an AC outlet.
4
Page 6
AMPLIFIER OPERATION
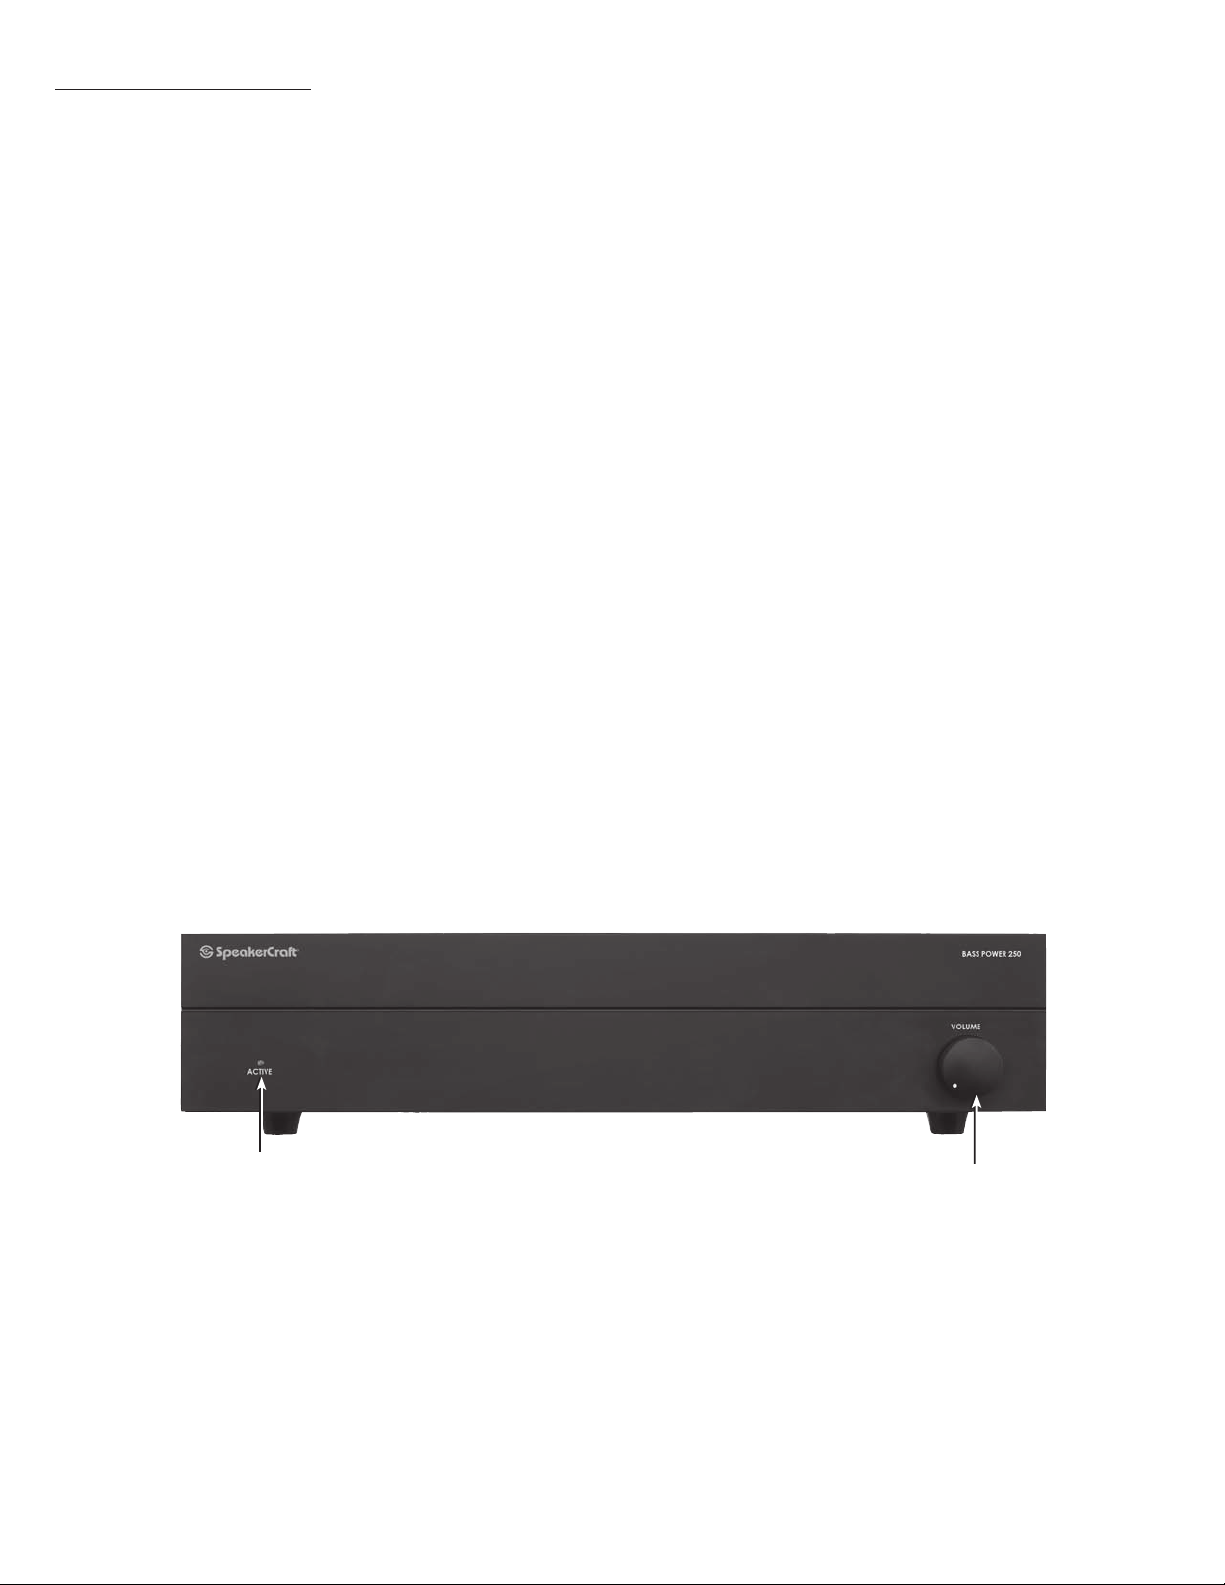
Please use Diagrams 1 & 3 to familiarize yourself with the front and rear panels of the Bass Power 250.
CAUTION: Please read all the following instructions to prevent causing damage to your system.
Front Panel Controls
• Volume Control
Use this to match the output level of the subwoofer to that of the main speakers in the system. We recommend that you play
a variety of material before selecting a setting. Start with the control turned completely counterclockwise (off) and slowly
turn it up. NOTE: Turning the volume up slowly will prevent possible damage to the woofer from the system being run too
“hot”. Very little movement of the knob is needed.
CAUTION: If a popping sound (clipping) is audible through the subwoofer, it is being over driven, reduce the volume
of the amplifier, or speaker damage may occur! (See Volume Limit Control for proper adjustment of volume settings
to avoid distortion & damage.)
• Auto Sense Power On
The Amplifier is turned on and off by sensing audio signals coming from the receiver or preamp through the input
connections. The Active LED on the front of the amplifier will be lit red until an audio signal is sensed. At the moment that an
audio signal is sensed on either the Left or Right, line level or speaker level inputs, or the LFE input, the amplifier will then turn
on and the Active LED will turn green. Once the audio signal stops, the amplifier will wait five minutes before turning off.
NOTE: The amplifier’s rear power switch must be turned on for the Audio Sense mode to operate. Once the power is
switched on, the auto sense circuitry becomes operational. If you will be away for a long period of time, you may turn
off the rear power switch or unplug the unit from the outlet if you wish.
• Protection Circuitry
If the Protection circuit in the amplifier is activated, the amplifier will turn off and the Active LED will turn red. This indicates
one of the following situations has occurred:
a. The Protection Circuit detected the amplifier was in danger of overheating and has temporarily shut down to
protect the system. The Active LED will turn green again and the amplifier will return to “Active” without any
intervention necessary.
b. A fault in the wiring, the speaker, or the amplifier may cause the amplifier to remain off. In this case, turn the rear
power switch off and then on. If the amplifier returns to the protection mode, turn the amplifier off and refer to the
troubleshooting section of this manual.
DIAGRAM 3
Bass Power Front Panel
Active LED
Volume Control
Rear Panel Controls
The following controls allow you to blend the sound wave output of the Bass Power to the output of the main speakers in
your system.
• Power Switch
The switch marked “Power” on the rear panel of the amplifier will turn off all amplifier circuitry including Auto Sense
circuitry (See Diagram 1 for reference).
• Low Frequency (Low Pass) Crossover
Use this control to adjust the upper frequency limit of the Bass Power. The purpose is to control the overlap of the Bass
Power’s upper frequencies and the main speaker’s lower frequencies. If adjusted well, this allows seamless blending of
the subwoofer with the speakers.
5
Page 7

AMPLIFIER OPERATION (continued)
• Bass Boost Control
This control allows you to increase bass response between 50 and 100Hz for certain types of audio that lacks in bass,
such as old recordings, etc.
• Phase Control
This control allows you to match the arrival times of the sound waves of the Bass Power and the main speakers to your
listening area. While the system is playing, flip the switch to the 180º and back to 0º until the bass sounds louder or less
boomy. Depending on the subwoofer placement and room acoustics, this control may have little or no effect.
• Volume Limit Control
Use this control to adjust the maximum volume setting for your Bass Power system. With the volume limit control and
front panel volume control turned all the way down (counterclockwise), turn on the subwoofer and start playing audio
through your system. Turn the system up (not the subwoofer) to the highest comfortable level – WITHOUT DISTORTION.
Now on the front panel of the subwoofer, turn up the sub woofer volume all the way. There should be no bass playing
yet. Next SLOWLY turn up the volume limit control until the subwoofer is playing at its loudest level WITHOUT DISTORTION.
Return the system volume and Bass Power front panel volume levels to normal. Now anyone can safely turn up the
subwoofer all the way without damaging the subwoofer.
TROUBLESHOOTING
The Bass Power Subwoofer System is designed to function trouble-free. Most problems occur because of operating errors. If you
have a problem, please check the troubleshooting list first. If the problem persists, contact Tech Support at 1-800-448-0976 or
e-mail us at [email protected].
The Problem Possible Causes and Solutions
No sound is heard.
A hum or buzzing sound is heard.
The amplifier will not turn on.
The Protection Circuit cuts in momentarily
and then returns to normal.
The Protection Circuit cuts in and does not
return to normal.
Audio cable to the amplifier is not connected properly. Check this and other system
component manuals to be sure of proper connections.
The cable is bad. Use another cable that you know is good.
Loose or frayed wires. Check for solid, clean connections on all speaker wire terminals.
Volume Limit Control is set too low. See Volume Limit Control for adjustment procedure.
The sound may be caused by a ground loop in the system. Try to eliminate this by reversing the AC plugs of other components in the system.
Try plugging the amplifier into another outlet.
Other causes may include faulty cables.
There may be AC power problems. Check the AC circuit and plugs. Be sure the power
switch is turned on.
Audio cable to the amplifier is not connected properly. Check this and other system
component manuals to be sure of proper connections.
The cable is bad. Use another cable that you know is good.
Loose or frayed wires. Check for solid, clean connections on all speaker wire terminals.
The circuitry in the amplifier has detected that the amplifier is in danger of overheating.
Normally, this would happen infrequently and momentarily. If it persists, the amplifier may
need to have more adequate ventilation.
Move the amplifier to a better ventilated and/or cooler location. NOTE: The amplifier
case may feel cool at the top, but still be overheating internally. Do not use the temperature at the top of the cabinet as a gauge for amplifier temperature.
There may be a fault in the wiring, the speaker, or the amplifier. Turn the power switch off
and then on again. If the amplifier immediately returns to the Protection mode, turn it off
and check all of the wiring, including all connections at the amplifier, at the subwoofer,
and any connections made to the terminals on a wall plate.
6
Page 8

SPECIFICATIONS
Speaker Type:
Woofer:
Ruckus 8 Sub System
Powered Subwoofer
Landscape Rock
8" Polypropylene Cone
Type:
Power Output:
Bass Power 250
Mono Class A-B Dedicated
Subwoofer Amplifier
250 Watts
Woofer with Rubber
Surround, and Silicone, 8"
Passive Radiator
Crossover:
Variable Low Pass Crossover
50Hz to 150 Hz, LFE 30Hz to 600Hz
Impedance:
Sensitivity:
Frequency Response:
Power Recommendation:
Dimensions (H x W x D):
Inourattempttoconstantlyimproveourproducts,featuresandspecicationsaresubjecttochangewithoutnotice.
4 Ohms
89dB
32Hz - 150kHz
200 Watts
18" x 15 3/8" x 14"
(457mm x 391mm x 356mm)
Auto Off Time:
Auto On Sensitivity:
Dimensions (H x W x D):
5 Minutes
3.0 mv
31⁄2" x 17" x 111⁄2"
(89mm x 432mm x 292mm)
(add 1/2" for feet & 4" for rear panel
connectors)
LIMITED LIFETIME WARRANTY
SpeakerCraft Inc. warrants to the original retail purchaser only that this SpeakerCraft product will be free from defects in materials and workmanship,
provided the speaker was purchased from a SpeakerCraft Authorized Dealer.
Defective products must be shipped, together with proof of purchase, prepaid insured to the SpeakerCraft Authorized Dealer from whom they were
purchased, or to the SpeakerCraft factory at the address listed on this installation instruction manual. Freight collect shipments will be refused. It is preferable to ship this product in the original shipping container to lessen the chance of transit damage. In any case, the risk of loss or damage in transit
is to be borne by the purchaser. If, upon examination at the Factory or SpeakerCraft Authorized Dealer, it is determined that the unit was defective in
materials or workmanship at any time during this warranty period, SpeakerCraft or the SpeakerCraft Authorized Dealer will, at its option, repair or replace
this product at no additional charge, except as set forth below. If this model is no longer available and can not be repaired effectively, SpeakerCraft,
at its sole option, may replace the unit with a current model of equal or greater value. In some cases where a new model is substituted, a modification
to the mounting surface may be required. If mounting sur face modification is required, SpeakerCraft assumes no responsibility or liability for such modification. All replaced parts and product become the property of SpeakerCraft Inc. Products replaced or repaired under this Warranty will be returned
to the original retail purchaser, within a reasonable time, freight prepaid.
This Warranty does not include service or parts to repair damage caused by accident, disaster, misuse, abuse, negligence, inadequate packing or
shipping procedures, commercial use, voltage inputs in excess of the rated maximum of the unit, or service, repair or modification of the product which
has not been authorized or approved by SpeakerCraft. This Warranty also excludes normal cosmetic deterioration caused by environmental conditions.
This warranty will be void if the Serial Number on the product has been removed, tampered with or defaced.
This Warranty is in lieu of all other expressed warranties. If the product is defective in materials or workmanship as warranted
above, the purchaser’s sole remedy shall be repair or replacement as provided above. In no event will SpeakerCraft be
liable for any incidental or consequential damages arising out of the use or inability to use the product, even if SpeakerCraft
Inc. or a SpeakerCraft Inc. Authorized Dealer has been advised of the possibility of such damages, or for any claim by any
other party. Some states do not allow the exclusion or limitation of consequential damages, so the above limitation and
exclusion may not apply.
All implied warranties on the product are limited to the duration of this expressed Warranty. Some states do not allow limitation on the length of an implied warranty. If the original retail purchaser resides in such a state, this limitation does not apply.
LIMITED TWO YEAR WARRANTY - Bass Power 250 Amplifier
SpeakerCraft Inc. warrants to the original retail purchaser only that this SpeakerCraft product
will be free from defects in materials and workmanship for a period of two years, provided
the product was purchased from a SpeakerCraft Authorized Dealer.
SpeakerCraft offers a variety of accessories to make your installation of this and other SpeakerCraft products easy, economical, and professional. Contact
your authorized SpeakerCraft Dealer for more information. For technical inquires, please call 1-800-448-0976 or e-mail us at [email protected].
We are available to assist you every weekday, except holidays, between the hours of 7:00 a.m. and 5:00 p.m. PST.
940 Columbia Ave., Riverside CA 92507 | USA (800) 448 0976 Fax (951) 787 8747 International +1 951 787 0543 | www.speakercraft.com
LIT31800(rev3)
 Loading...