

Page 1
Modulo Thermostat
Installation and operating instructions
Read carefully before installation,commissioning and operation
Page 2

2 3IOM 81, Issue 1 - Modulo Thermostat IOM 81, Issue 1 - Modulo Thermostat
Contents Page
1.1 | EG-Conformity 3
1.2 | General Instructions 3
1.3 | Changes to the Unit 4
1.4 | Warranty and Liability 4
1.5 | Disposal and Pollutants 4
2.1 | Specications 5
2.2 | Scope of Supply 6
3.1 | SPC Modulo Installation 7
3.2 | Sample Wiring 9
4.1 | Setup Procedure 9
| Safety Instructions 3
1
| Description SPC Modulo Thermostat 5
2
| Installation 7
3
| Setup 9
4
1. Safety instructions
1.1 EG-Conformity
By axing the CE mark to the unit the manufacturer declares that SPC Modulo Thermostat conforms to
the following relevant safety regulations:
• EU low voltage directive 2014/35/EU • EU electromagnetic compatibility directive
2014/30/EU
Conformity has been veried and the corresponding documentation and the EU declaration of
conformity are kept on le by the manufacturer.
1.2 General Instructions
Please read carefully!
These installation and operating instructions
contain basic instructions and important
information regarding safety, installation,
commissioning, maintenance and the optimal
use of the unit. Therefore these instructions
must be read and understood completely by the
installation technician/specialist and by the system
user before installation, commissioning and
operation of the unit.
This unit is an automatic, electrical SPC Modulo
Roomthermostat. Install the device only in dry
rooms and under environmental conditions as
described under “Technical Data”.
In addition, observe the applicable accident
prevention regulations, the regulations of the
Association of Electrical Engineering, the local
power supply utility, the applicable BS-EN
standards and the installation and operating
instructions for the additional system components.
Installation, electrical connection, commissioning
and maintenance of the unit may only be carried
out by specialists who possess the appropriate
training.
Users: Make sure that the specialist gives
you detailed information on the function
and operation of the unit. Always keep these
instructions in the vicinity of the unit.
The manufacturer does not take over any liability
for damage caused through improper usage or
non-compliance of this manual!
| Operation 10
5
5.1 | Overview of Temperatures & Humidity 10
5.2 | Operating Mode 10
5.3 | Menu 11
5.4 | Set Operation Hours 11
5.5 | Expert Menu 13
5.6 | Expert Menu Settings 13
5.7 | Settings Functions 14
| Appendix 1 16
6
6.1 | Setting Up Menu Lock 16
6.2 | Setting Up Interface Lock 17
Page 3
4 5IOM 81, Issue 1 - Modulo Thermostat IOM 81, Issue 1 - Modulo Thermostat
1.3 Changes to the Unit
• Changes, additions to or conversion of the unit
are not permitted without written permission
from the manufacturer.
• Any parts of the unit or accessories that are
not in perfect condition must be exchanged
immediately.
2. Description SPC Modulo
Thermostat
• It is likewise forbidden to install additional
components that have not been tested
together with the unit.
• If it becomes clear that safe operation of
the unit is no longer possible, for example
because of damage to the housing, turn the
unit o immediately.
Changes to the unit can compromise the safety and function of the unit or the entire system.
• Use only original spare parts and accessories
from the manufacturer.
• Markings made on the unit at the factory must
not be altered, removed or made illegible.
• Only the settings described in these
instructions may be set using the Unit.
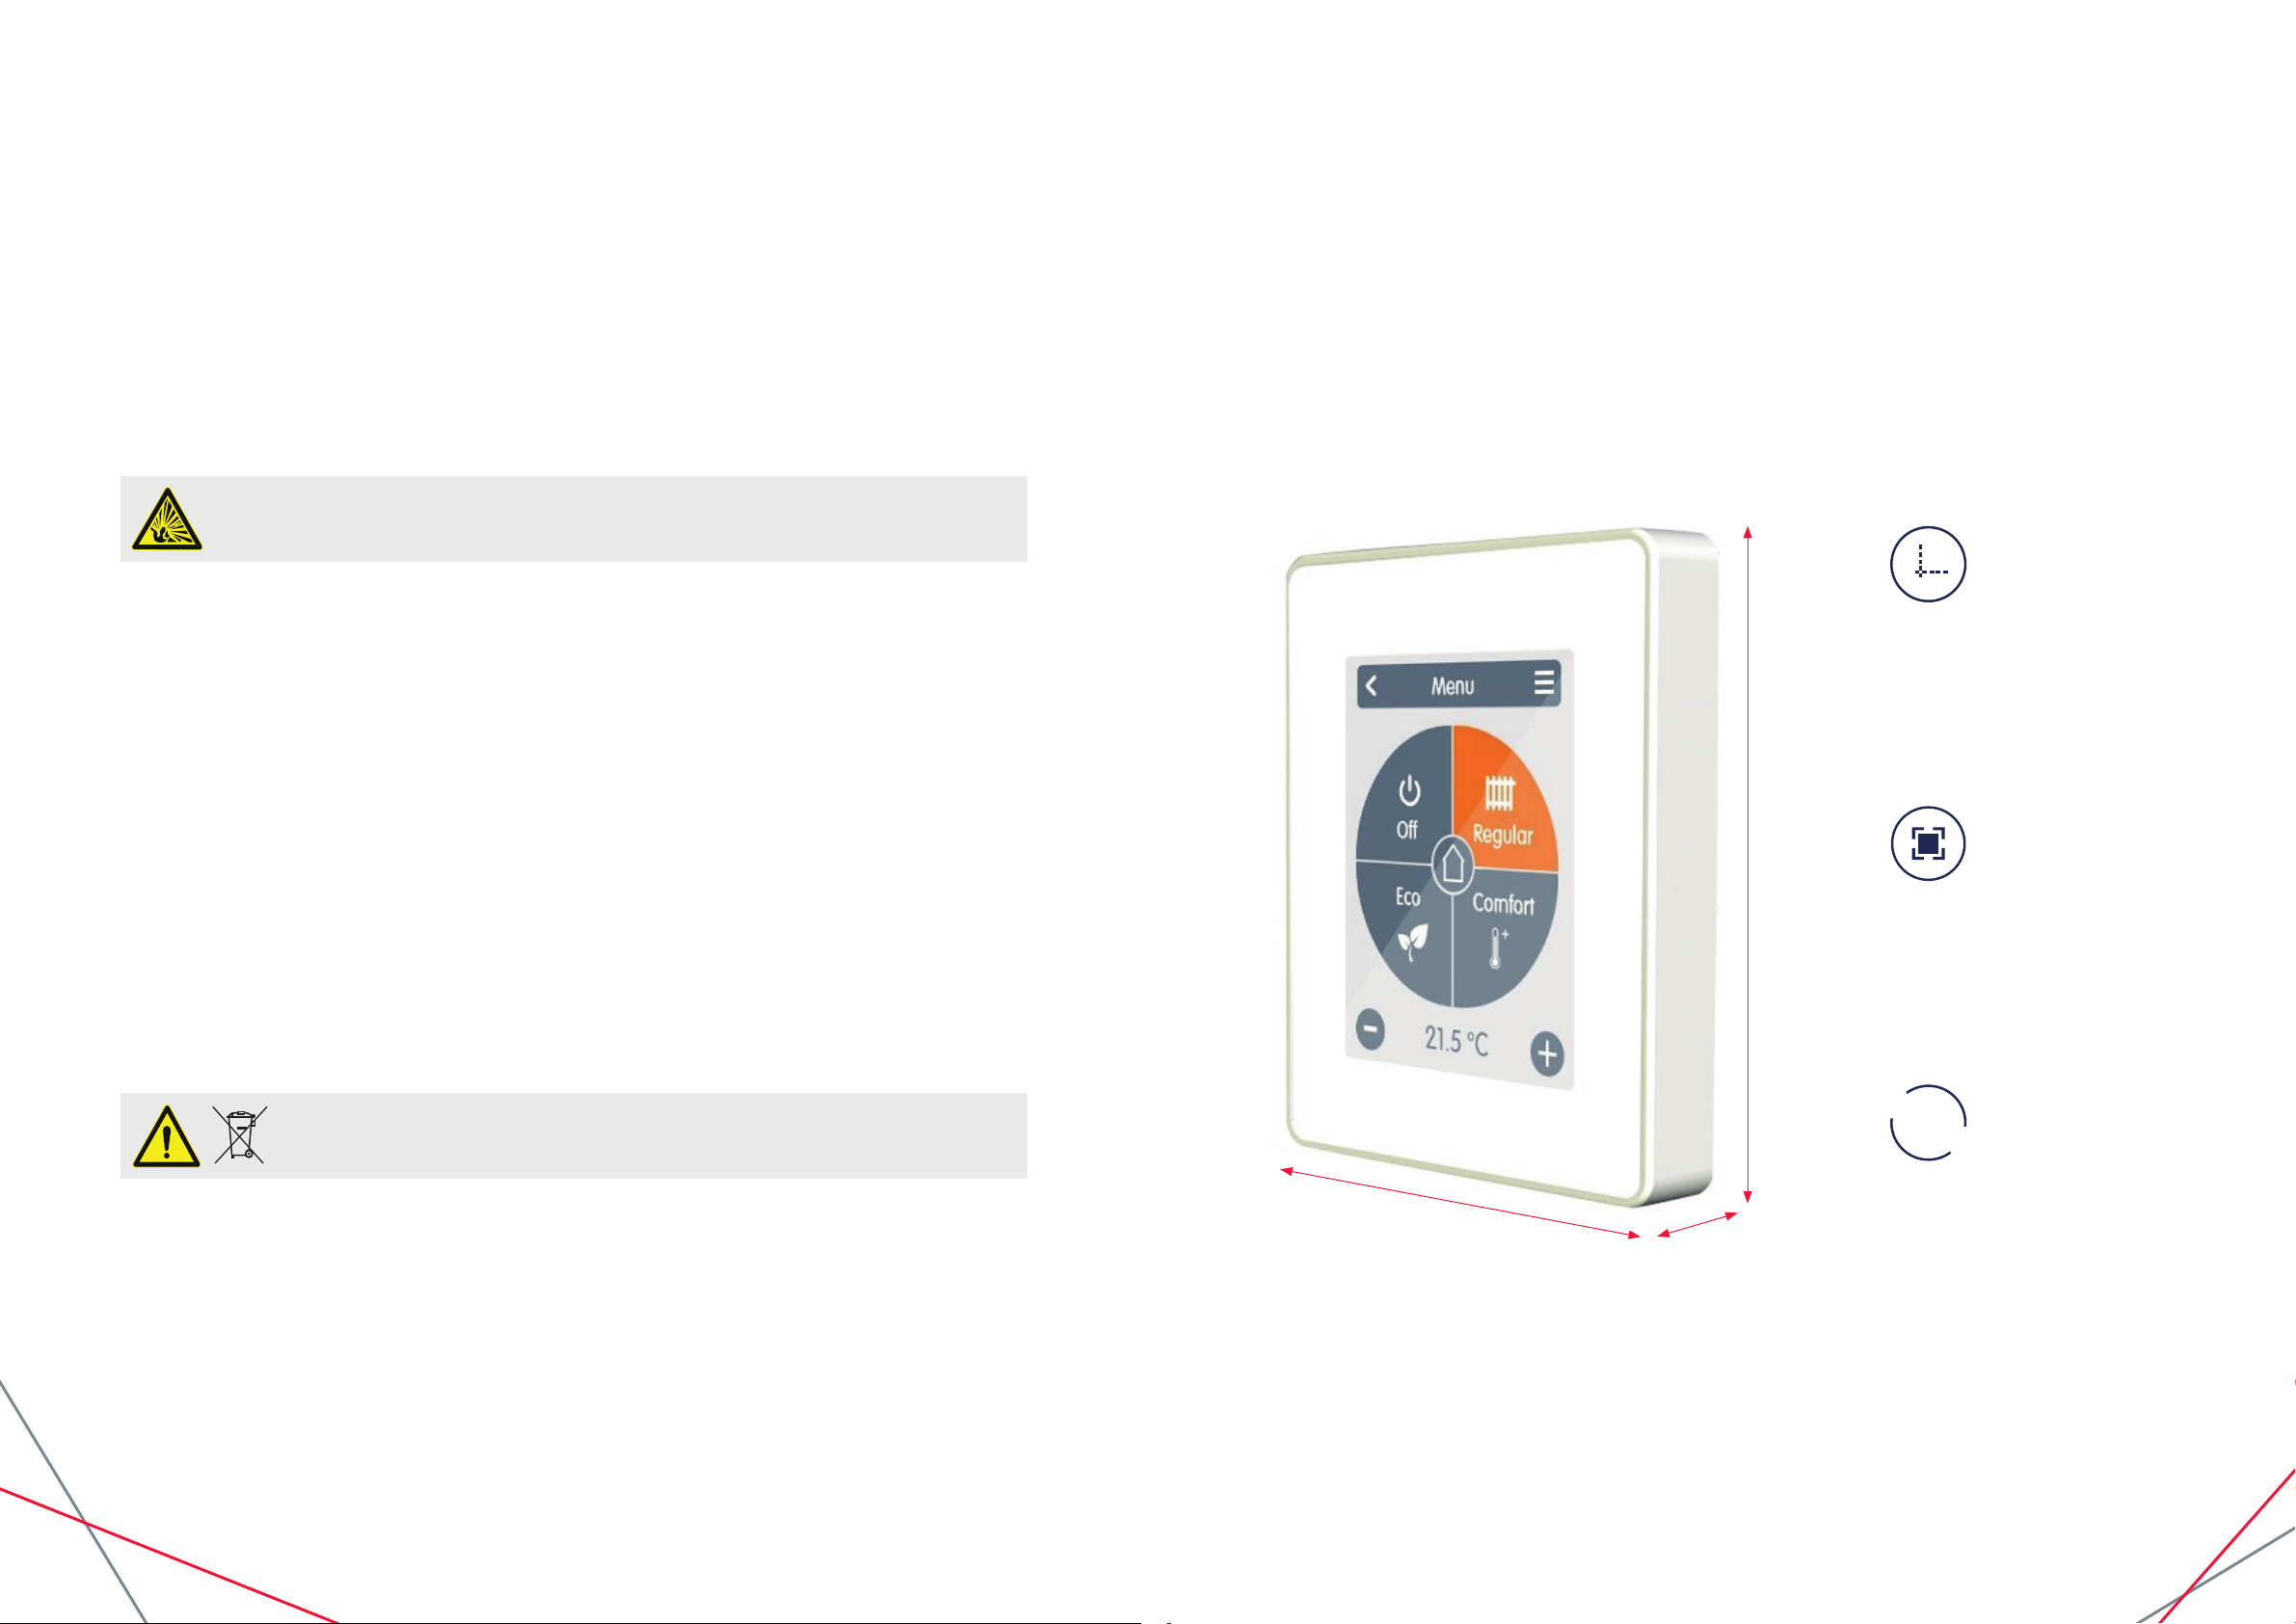
2.1 Specications
1.4 Warranty and Liability
The Unit has been manufactured and tested with regard to high quality and safety requirements.
The warranty and liability shall not include, however, any injury to persons or material damage that is
attributable to one or more of the following causes:
• Failure to observe these installation and
operating instructions.
• Improper installation, commissioning,
maintenance and operation.
• Improperly executed repairs.
• Unauthorised structural changes to the unit.
• Use of the device for other than its intended
purpose.
• Operation above or below the limit values
listed in the ‚Speci cations‘ section.
• Force majeure.
1.5 Disposal and Pollutants
The unit conforms to the European RoHS 2011/65/EU for 2011/65/EUthe restriction of the use of certain
hazardous substances in electrical and electronic equipment.
Under no circumstances may the device be disposed of with
the normal household waste. Dispose of the unit only at appropriate collection points
or ship it back to the seller or manufacturer system.
95mm
Housing
2-part, ABS plastic
75 mm x 95 mm x 30 mm
Glass front
Display
Capacitive touch panel
Colour display with 240x320 dots
2.8 inches (7 cm) diagonal
1
2
3
Operation
75mm
30mm
Intuitive user guidance
Page 4

6 7IOM 81, Issue 1 - Modulo Thermostat IOM 81, Issue 1 - Modulo Thermostat
Electrical specications:
Power supply 24VAC or 24VDC +/- 10% SELV
Power consumption max. 2,5 W
Degree of protection IP20
Protection class III
Max. cable length
0-10V Signal < 30m
Permissible Ambient Conditions
3. Installation
3.1 SPC Modulo Installation
Mount the unit at a suitable location.
during operation 0 °C - 50 °C, no moisture condensation permitted
for transport/storage 0 °C - 60 °C, no moisture condensation permitted
Measuring range Outside the measuring ranges there are larger deviations
Internal temperature sensor 0 °C - 60 °C Accuracy +/- 1 °C
Resolution 0,1 °C
Internal sensor for rel. humidity 0 % - 100 % Accuracy +/- 6 %
Resolution 0,1 %
Other Specications
Installation methods Wall installation, with/without wall socket
Real Time Clock RTC with 24 hour power reserve
2.2 Scope of Supply
• SPC Modulo Roomthermostat
• 2 screws 3,5 x 35 mm and 2 plugs 6 mm for wall installation.
• SPC Modulo Thermostat installation guide
Pay attention to suitable
environmental conditions. Direct
sunlight, sources of heat and cold,
e.g. radiators and windows
must be avoided.
Approx.
120cm - 160cm
75mm
7-10mm
Strip cables by 75 mm max.
and strip the last 7-10 mm of the wires.
Page 5

8 9IOM 81, Issue 1 - Modulo Thermostat IOM 81, Issue 1 - Modulo Thermostat
0-10V
0-10V
GND
Fan GND
Fan 0-10V
Valve 24VAC L’ / 24VDC +’
Valve 24VA N’ / 24VDC -’
Supply 24VA L / 24VDC +
Supply 24VA N / 24VDC -
Relay
24V out
L’
AC
N’
+’
DC
-’
L’
AC
N’
+’
DC
-’
Fuse
24V in
Unscrew the screw, remove the cable cover and connect the electric as described.
3.2 Sample Wiring
Ret the base and fasten with screw.
Switch on mains voltage and place
SPC Modulo in operation.
The commissioning can be
accessed in the SPC Modulo
menu under Expert at any time.
4. Setup
4.1 Setup Procedure
Install device
Install the device as described (See “ Sample wiring “ on page 6).
Set Functions
Assign a switching output to the respective function via the “Expert” menu in the “Settings” menu item
under “Functions” and parameterize it (See “Settings Functions “ on page 11).
Page 6

10 11IOM 81, Issue 1 - Modulo Thermostat IOM 81, Issue 1 - Modulo Thermostat
5.3 Menu
5. Operation
5.1 Overview of Temperatures & Humidity
It displays room temperature and humidity, If there is no activity for 60 sec, the device is automatically
switched to the overview.
Room Icon
By selecting the room icon
you will be directed to the
room temperature settings.
Room Humidity
Relative humidity.
Overview > Operating Mode > Menu
Timer
Setting of individual
heating and cooling times
for each day of the week
including a copy function
for following days.
Fan
Settings of the fan
operating mode.
Holiday
Sets the duration
and temperature for
a longer absence.
Expert
Advanced settings
for technicians.
5.2 Operating Mode
Overview > Operating Mode
Back / Forward
Navigation back to
the overview.
Room
Display of the selected room.
Reference Temperature
Setting the reference
temperature for the active
operating mode in the
displayed room.
Menu
Navigation to the
main menu.
Operating Modes
The operating mode
shown in colour is
currently active and can
be changed by selecting a
dierent mode. Manually
selected modes remain
active until the next change
of mode by the timer
program. A background
frost protection function
remains active in the
“o’’ mode.
5.4 Set Operation Hours
Overview > Operating Mode > Main Menu > Timer
Operating Modes
Selection of the operating
mode to select individual
heating or cooling sections.
Clock
Time table for selecting the
time intervals in 30-minute
steps. Touch individual
segments, or drag your
nger over complete time
intervals to colour them
according to the selected
operation mode.
Menu
Opens the copy function.
The function allows you
to copy the heating and
cooling times to the
following day,
to Monday - Friday or to
Monday - Sunday.
Back/Next Weekday:
Sellection of the day of
week which is to be set.
Page 7

12 13IOM 81, Issue 1 - Modulo Thermostat IOM 81, Issue 1 - Modulo Thermostat
Step 1
Use the arrow keys to select the desired day.
5.5 Expert Menu
Overview > Operating Mode > Main Menu > Expert
Select Language
Sets the device language.
Settings
Parameterisation of the
heating / cooling system.
Menu Lock
Activate menu lock to
protect settings with
a password.
Date & Time
Sets time and date and
automatic changeover
to local standard time
(summer/winter).
Service Values
Information about
the system.
Factory Settings
Resets the device to
factory settings.
Step 2
Select the rst heating mode (normal) - move the
index nger over the desired length of time. The
selected period will be coloured after selecting the
colour of the operating mode (normal = orange).
Set the times of the other operating modes in the
same way.
Step 3
After completing the setting of the individual
heating and cooling times, you have the option
of copying the times via the main menu
to the following day, to Monday - Friday or to
Monday-Sunday or individually for each weekday.
In the interests of ecient and energy-saving single room control, the operating times
should be set specically for each room.
5.6 Expert Menu Settings
Overview > Operating Mode > Main Menu > Expert > Settings
Functions
Management of local control
functions - thermostat and
dehumidier.
Sensor calibration
Used to adapt the
temperature and humidity
of the said local sensor for
the selected area.
Interface Mode
Switches between full and
restricted menu. Only the
reference temperature can
be set in the mode “Hide
menu” To return to “full”
mode, press and hold the
upper-right comer of the
display for 5 seconds.
Location
Set where the device is
installed (selection of the
room icon).
Display Brightness
Adjustment of
display brightness.
Page 8

14 15IOM 81, Issue 1 - Modulo Thermostat IOM 81, Issue 1 - Modulo Thermostat
5.7 Settings Functions
Overview > Operating Mode > Main Menu > Expert > Settings > Functions
Thermostat
Fan
Overview > Operating mode > Main menu > Expert > Settings > Functions > Fan
Hysteresis
Fan Mode
Minimum Speed
Medium Speed
Maximum Speed
Overview > Operating mode > Menu > Expert > Settings > Functions > Thermostat
Hysteresis
Heating hysteresis of the
thermostat function in
relation to the actual set
room temperature _
Page 9

16 17IOM 81, Issue 1 - Modulo Thermostat IOM 81, Issue 1 - Modulo Thermostat
6. Appendix 1
6.1 Setting Up Menu Lock
Expert
Select language
Date & Time
Settings
Service values
Menu lock
Factory settings
Enter password
****E
A B C D E
F G H I J
K L M N O
P Q R S T
U V W X Y
Z abc 123
!#@
Step 1
To set up the menu
lock, go into the expert
section. Click on the
‘menu lock’.
Step 3
Enter password.
Then click on the arrow.
Menu lock
Protect settings
with a password
Yes No
Confirm password
A B C D E
F G H I J
K L M N O
P Q R S T
U V W X Y
Z abc 123 !#@
****E
Step 2
Click on the ‘yes’ icon.
Step 4
Re-enter password to
conrm. Then click on
the arrow.
6.2 Setting Up Interface Lock
Expert
Select language
Date & Time
Settings
Service values
Menu lock
Factory settings
Interface Mode
Full menu or hide menu (only
actual temperature and
humidity)?
Full
Step 1
To set up the interface
lock, go into the expert
section. Click on ‘settings’.
Step 3
Default setting is on full
menu. Click on either
the ‘positive’ or ‘negative’
icon to change mode.
Settings
Functions
Location
Sensor Offset
Display Brightness
Interface Mode
Interface Mode
Full menu or hide menu (only
actual temperature and
humidity)?
Hide
Step 2
Click on ‘interface mode’.
Step 4
Once in hide mode.
Click on the arrow to
activate.
Expert
Date & Time
Service values
Menu lock
Enter password
****E
A B C D E
F G H I J
K L M N O
P Q R S T
U V W X Y
Z abc 123
!#@
Step 5
After the password has
been set via menu lock.
All options for settings
will be removed/locked
besides these three
options.
Step 7
Enter the password
to remove menu lock,
click on the arrow.
Menu lock
Protect settings
with a password
Yes No
Menu
Step 6
Step 6
To edit the settings or
19.
1ºC
remove the menu lock.
Go into ‘menu lock’, click
on the ‘no’ icon.
80.2%
Step 5
To deactivate
‘hide mode’, hold the
upper-right corner
To return to ‘full mode’,
click on expert mode, go
back to interface mode
and select ‘full’ menu.
of the display for
around 5 seconds.
ExpertFan
The password can be reset via use of the master password: [CALEON]
(square brackets and capitals required).
Page 10

Final Declaration
Although these instruction have been created with the greatest possible care, the possibility of
incorrect or incomplete information cannot be excluded. Subject as a basic principle to errors and
technical changes.
Date and time of installation:
Name of installation company:
Space for notes:
SPC House
Evington Valley Road
Leicester
LE5 5LU
T: 0116 249 0044
E: spc@spc-hvac.co.uk
spc-hvac.co.uk
IOM 81, Issue 1 - Modulo Thermostat
 Loading...