


Robot Vacuum Cleaner
BAAMBA · BAAMBA GYRO 4.0
USER GUIDE

2
PRECAUTIONS
The user manual must be provided with the smart robot vacuum cleaner so it can be used
safely.
Unplug the smart robot vacuum cleaner before performing any cleaning or maintenance.
This smart robot vacuum cleaner can be used by children 8 years of age or older and
individuals with physical, sensory or mental disabilities, or a lack of experience or
knowledge, if they are supervised or given instructions on the safe use of the smart robot
vacuum cleaner and they understand the danger entailed. Children must not play with
the smart robot vacuum cleaner or perform cleaning or maintenance tasks unsupervised.
Children must be supervised to ensure they do not play with the smart robot vacuum
cleaner.
Only the power supply cable provided with the smart robot vacuum cleaner may be used.
This smart robot vacuum cleaner is only for domestic use.
TABLE OF CONTENTS
1. Safety instructions
1.1 Recommendations for use
1.2 Safety measures
1.3 Child safety
1.4 Battery information
1.5 Usage areas
1.6 Exception clause
2. Product components
2.1 Main body and accessories
2.2 Introduction to the accessories
3. Product installation
4. Product use
4.1 Use of main body
4.2 Charging methods
4.3 User guide for the mobile app
5. Product maintenance
5.1 Daily storage
5.2 Cleaning the charging contacts
5.3 Cleaning the dust container
5.4 Cleaning the main brush
5.5 Cleaning the side brush
5.6 Cleaning the wheels
5.7 Cleaning the sensors
6. Common problems
7. Technicalspecications

3
EN
WELCOME !
In this guide you’ll nd all the information you need to get the most out of your SPC Baamba or Baamba
Gyro 4.0 smart robot vacuum cleaner.
CREATE AN ACCOUNT SPC
A ton of free advantages just a click away.
Before continuing reading this guide, we recommend visiting www.spc-universe.com, CREATING AN
ACCOUNT AND REGISTERING YOUR PRODUCT.
That way, you’ll join the SPC universe: an exclusive club for our customers with great discounts, such
as promotions to improve or update your SPC system.
Furthermore, with this account you’ll have free access to all of SPC’s services, like apps for tablets and
smartphones and our technical support section.
That’s SPC. A universe in technology.
SPC IOT: “an app for your Smart Home products”
At SPC we believe in practicality and convenience, which is why we’ve worked hard to create a new app
for controlling ALL of your SPC IoT Smart Home devices.
INTERACTION BETWEEN DIFFERENT
DEVICES AND MORE FUNCTIONALITY
Via our SPC IOT app you’ll be able to get your SPC
IOT devices to interact creating conditionals.
Do you want your living room light to turn on
when your camera detects motion?
Do you want your air conditioning to turn on when
the temperature goes up in your room?
Do you want to change the TV channel by
speaking to Alexa or Google home?
You’ll be able to nd out how to do this and a lot
more in SPC IOT app’s detailed manual.
Get access to technical support on our website
www.spc-universe.com and download it!
4
1. SAFETY INSTRUCTIONS
1.1 Recommendations for use
Before using the product, take the following safety precautions into account:
Read the instructions thoroughly. Use the product in accordance with the operating procedures.
Keep the instructions in a safe place for referring to in the future. .
If you wish to give the product to someone else, include the instructions.
Improper use can cause serious harm to individuals and damage the product.
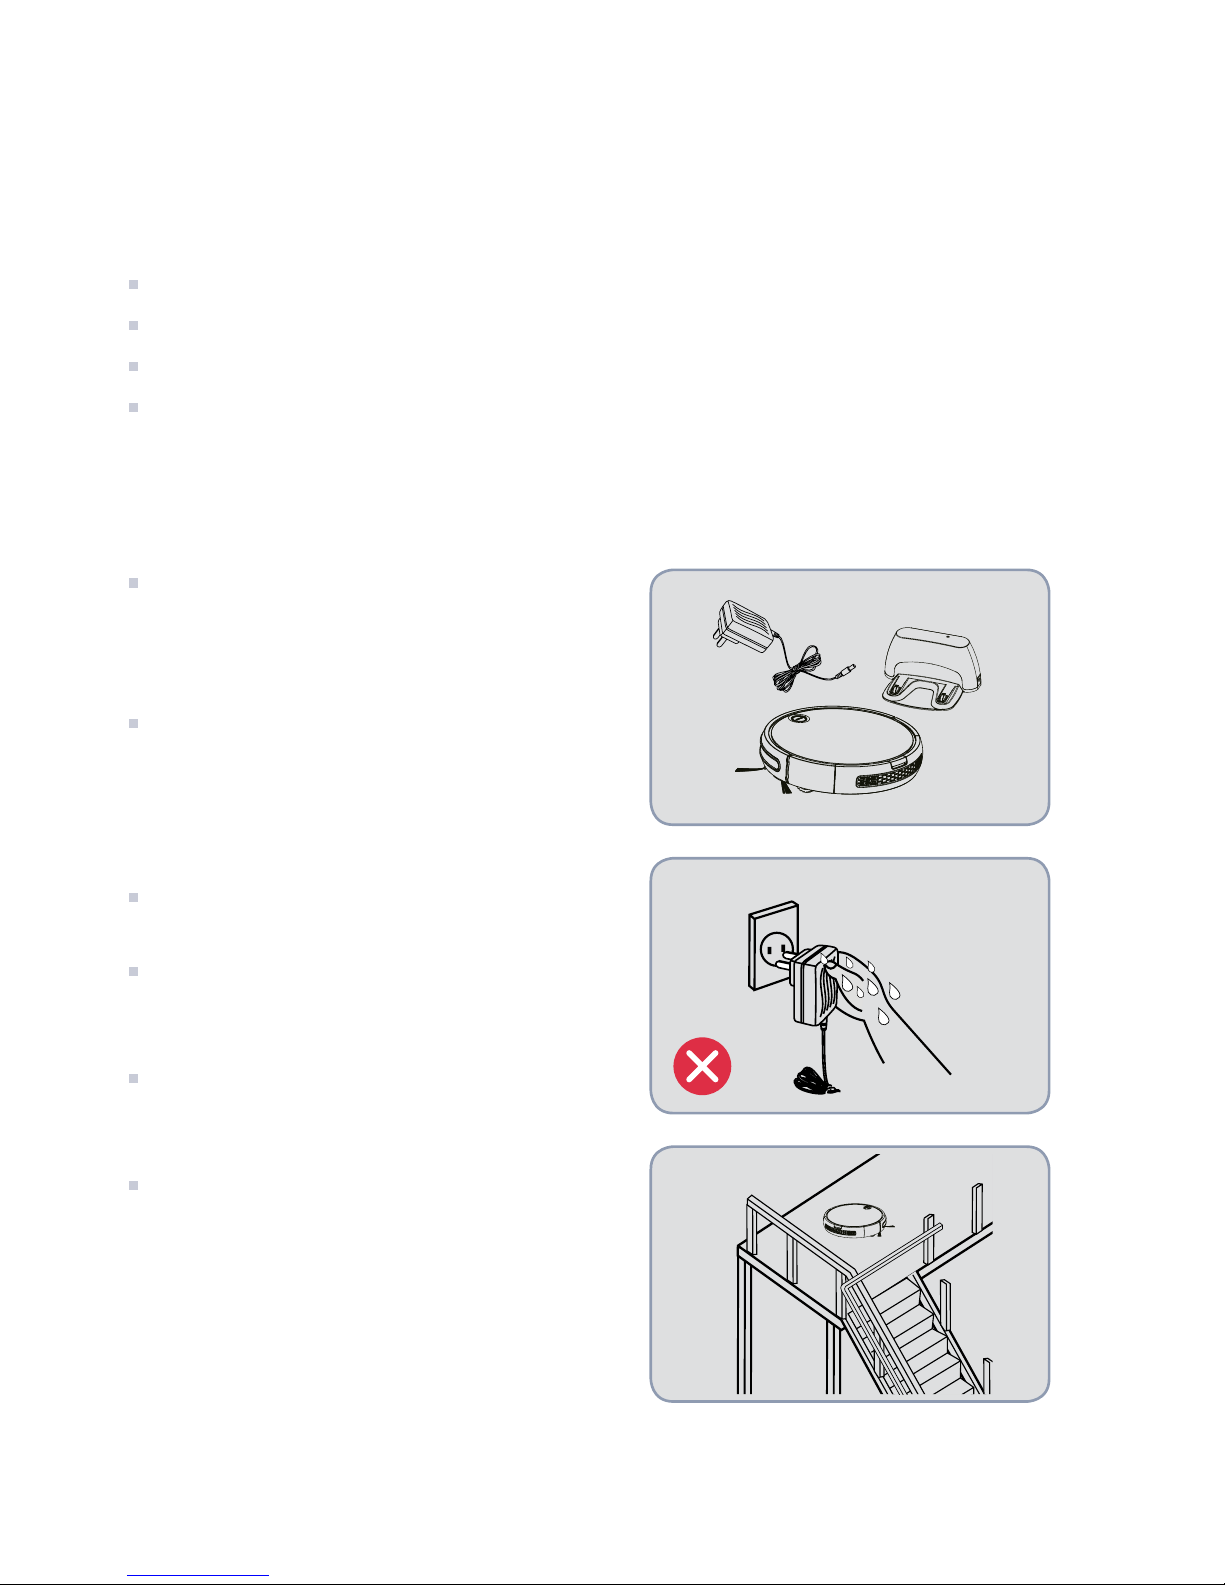
1.2 Safety measures
WARNING
Use only the original adaptor, battery and
charging base. Otherwise you will damage the
smart robot vacuum cleaner and could cause a
re due to electrical shock and high voltage.
If you nd that the main body or the accessories
are damaged, don’t use the smart robot vacuum
cleaner and get in touch with the after-sales
service. It is forbidden to disassemble, repair or
reassemble the smart robot vacuum cleaner.
Unplug the smart robot vacuum cleaner before
performing maintenance tasks.
Don’t touch the battery socket or the smart
robot vacuum cleaner with wet hands. If you do,
you could get an electrical shock.
If the main chord is damaged, contact us and
wait for a professional to replace it to avoid
damage.
To avoid the vacuum cleaner accidentally
falling and causing personal injury, do not use
this product without the magnetic boundary
marker strip or leave objects blocking the stairs.
5
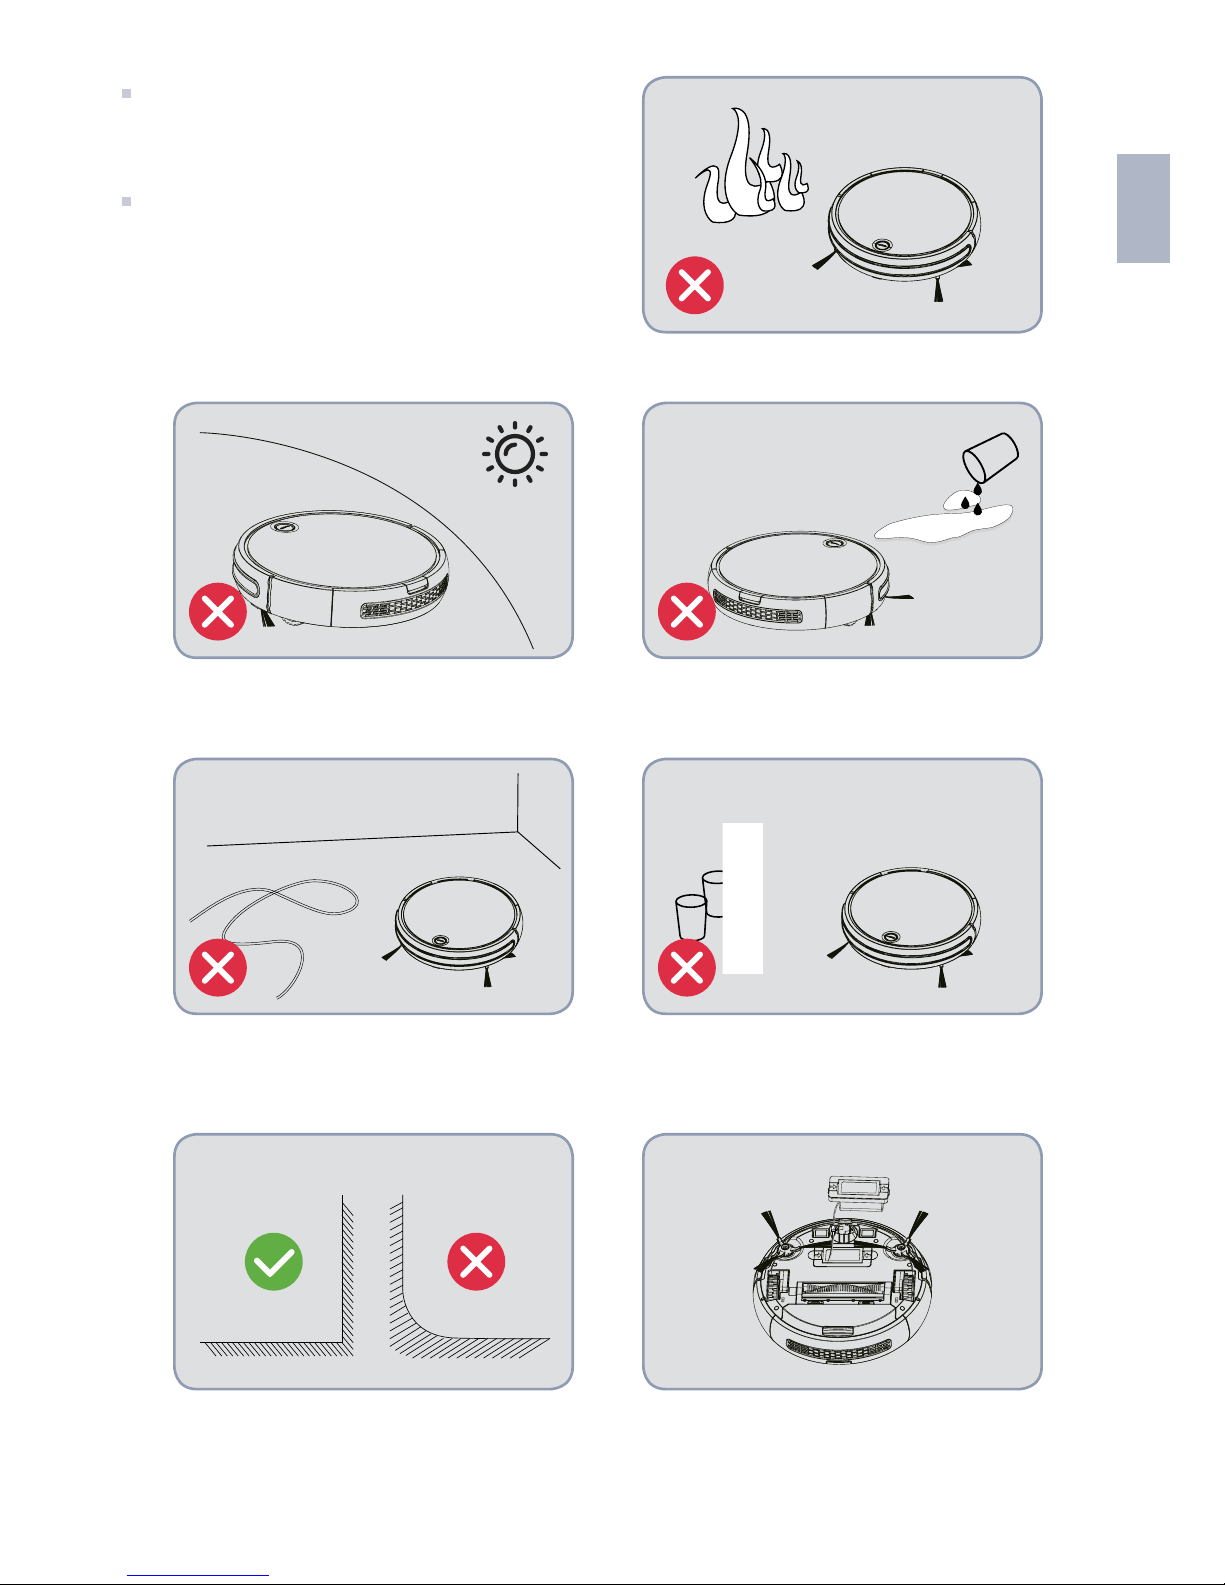
EN
Do not place the smart robot vacuum cleaner
near sources of heat or ammable, explosive or
corrosive materials.
To avoid personal injury, do not place articles of
clothing or any part of your body (hair, ngers,
etc.) in the main brush or in the wheels.
WARNING
The smart robot is only for indoor use.
Clean the chords and other components
on the oor, in case they are tangled in
the wheels or brushes.
The charging base and the space isolator
must be placed against the wall and on a
at surface. Otherwise its operation will
be affected.
Avoid water, oil or other liquids getting
into the smart robot.
Remove fragile objects.
Turn off the smart robot before removing
the battery.

6
1.3 Child safety
Children must not use this smart robot
unsupervised.
Children are forbidden from playing with plastic
bags since they could suffocate.
1.4 Battery information se debe usar con la batería original.
1. The smart robot must only be used with the original battery.
2. Unplug the smart robot before removing the battery.
3. The battery must be removed before disposing of the smart robot.
4. If you want to change the battery, get in contact with our after-sales service. Placing the wrong
battery in the smart robot can cause damage.
5. If the battery leaks, do not touch the liquid. Clean the liquid with a dry cloth and take the battery to a
recycling bin or a green point. Do not throw it out in just any given location.
Unplug the smart robot if you’re not
going to use it for a long period of time.
Do not vacuum up sharp objects with
this smart robot, i.e. glass, nails or
other materials to avoid damaging the
product.
If you unplug the charging base when it
is in operating, the smart robot will not
be able to charge.
Do not use this vacuum in damp
environments, ammable, explosive or
corrosive substances.
Danger!
Electric shock
7
EN
6. Separate the used battery from the other parts (for example, the remote control). The battery includes
dangerous substances. Recycle it according to the original regulations on environmental protection.
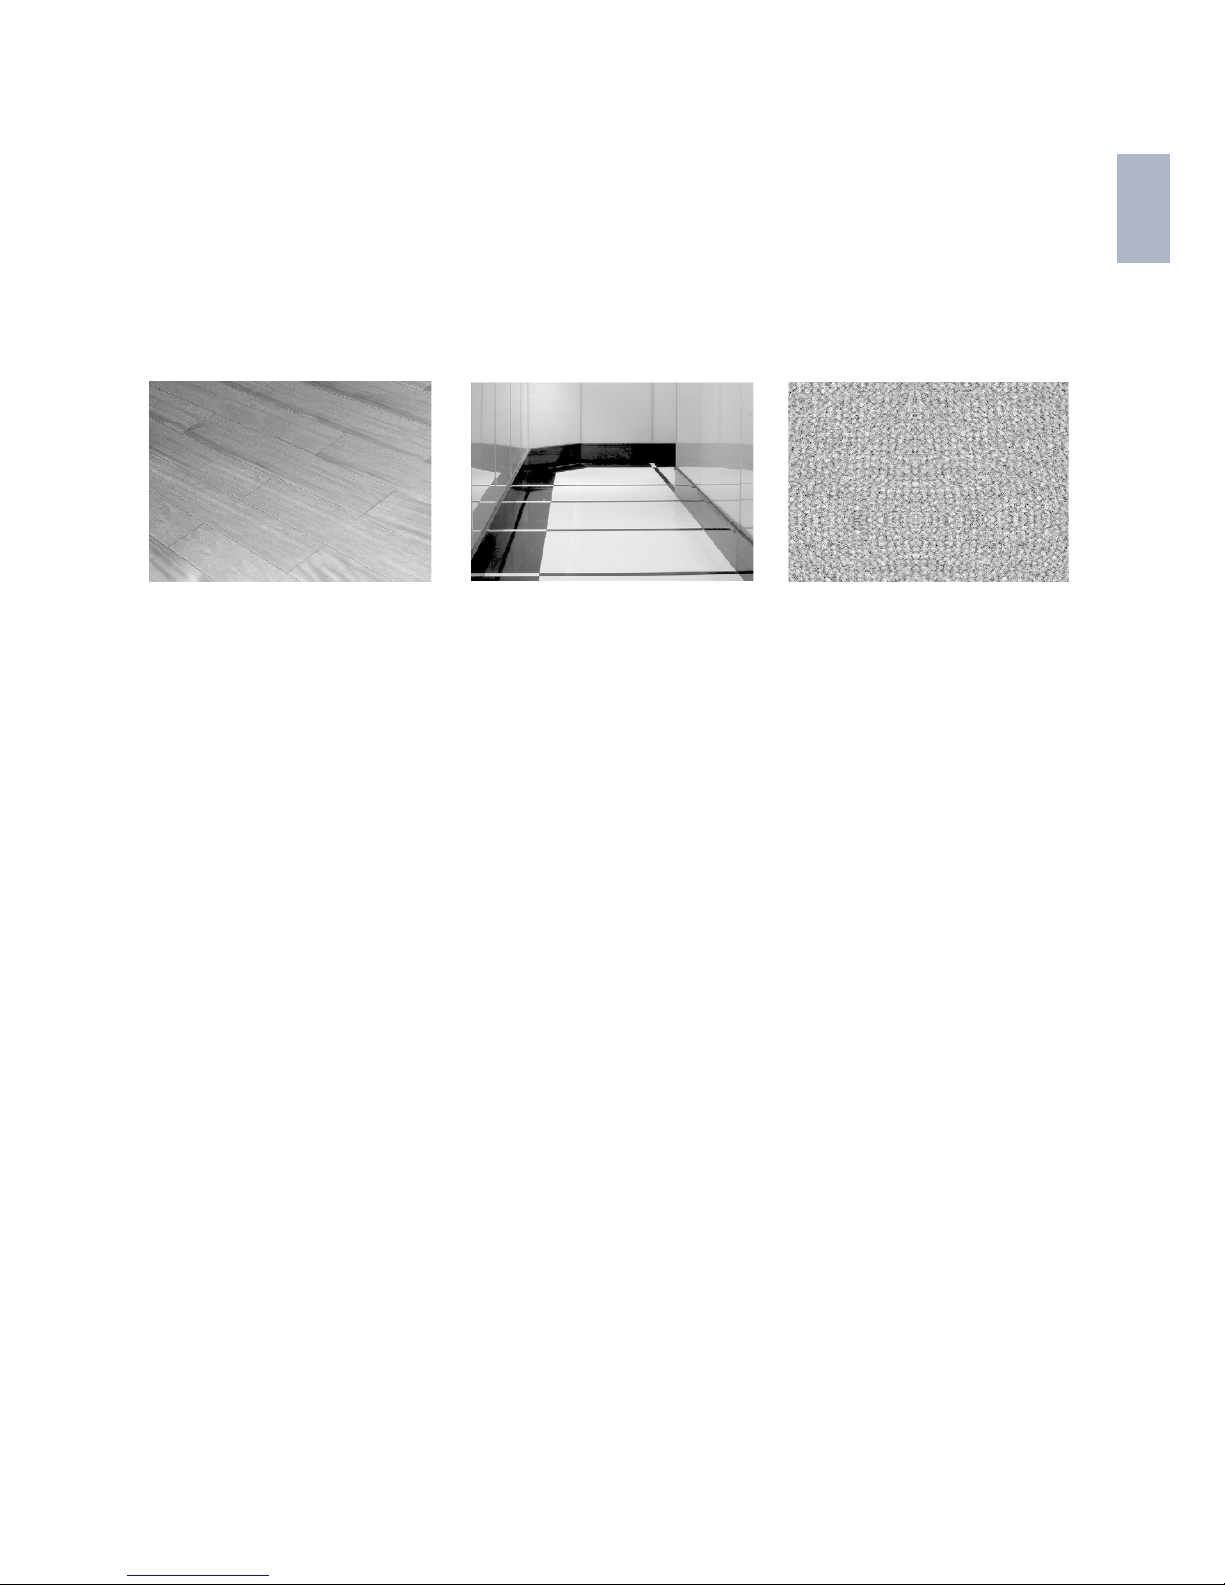
1.5 Usage areas
APPLICABLE RANGE
The vacuum can be used on the following surfaces:
1.6 Exceptions
In the following cases the product will not be repaired free of charge. The reparation will have an
additional cost:
A. The product failure has been caused by use or storage by the user which does not follow our manual.
B. The smart robot and its components are out of warranty.
C. The product failure has been caused by disassembly performed by a technician who hasn’t been
sent or authorised by our company.
D. A valid receipt of purchase is not provided.
E. The warranty card model does not correspond with the product to be repaired or it has been modied.
F. The product failure is due to causes outside the sphere of inuence, i.e. natural disasters.
G. The product failure or the damage caused to the product are a result of accidental or human factors
(for example, poor operation, contact with liquids, inappropriate insertion and extraction, scratches,
handling, bumps, incorrect input voltage, etc.).
Wood Tiled Flooring Carpet
8
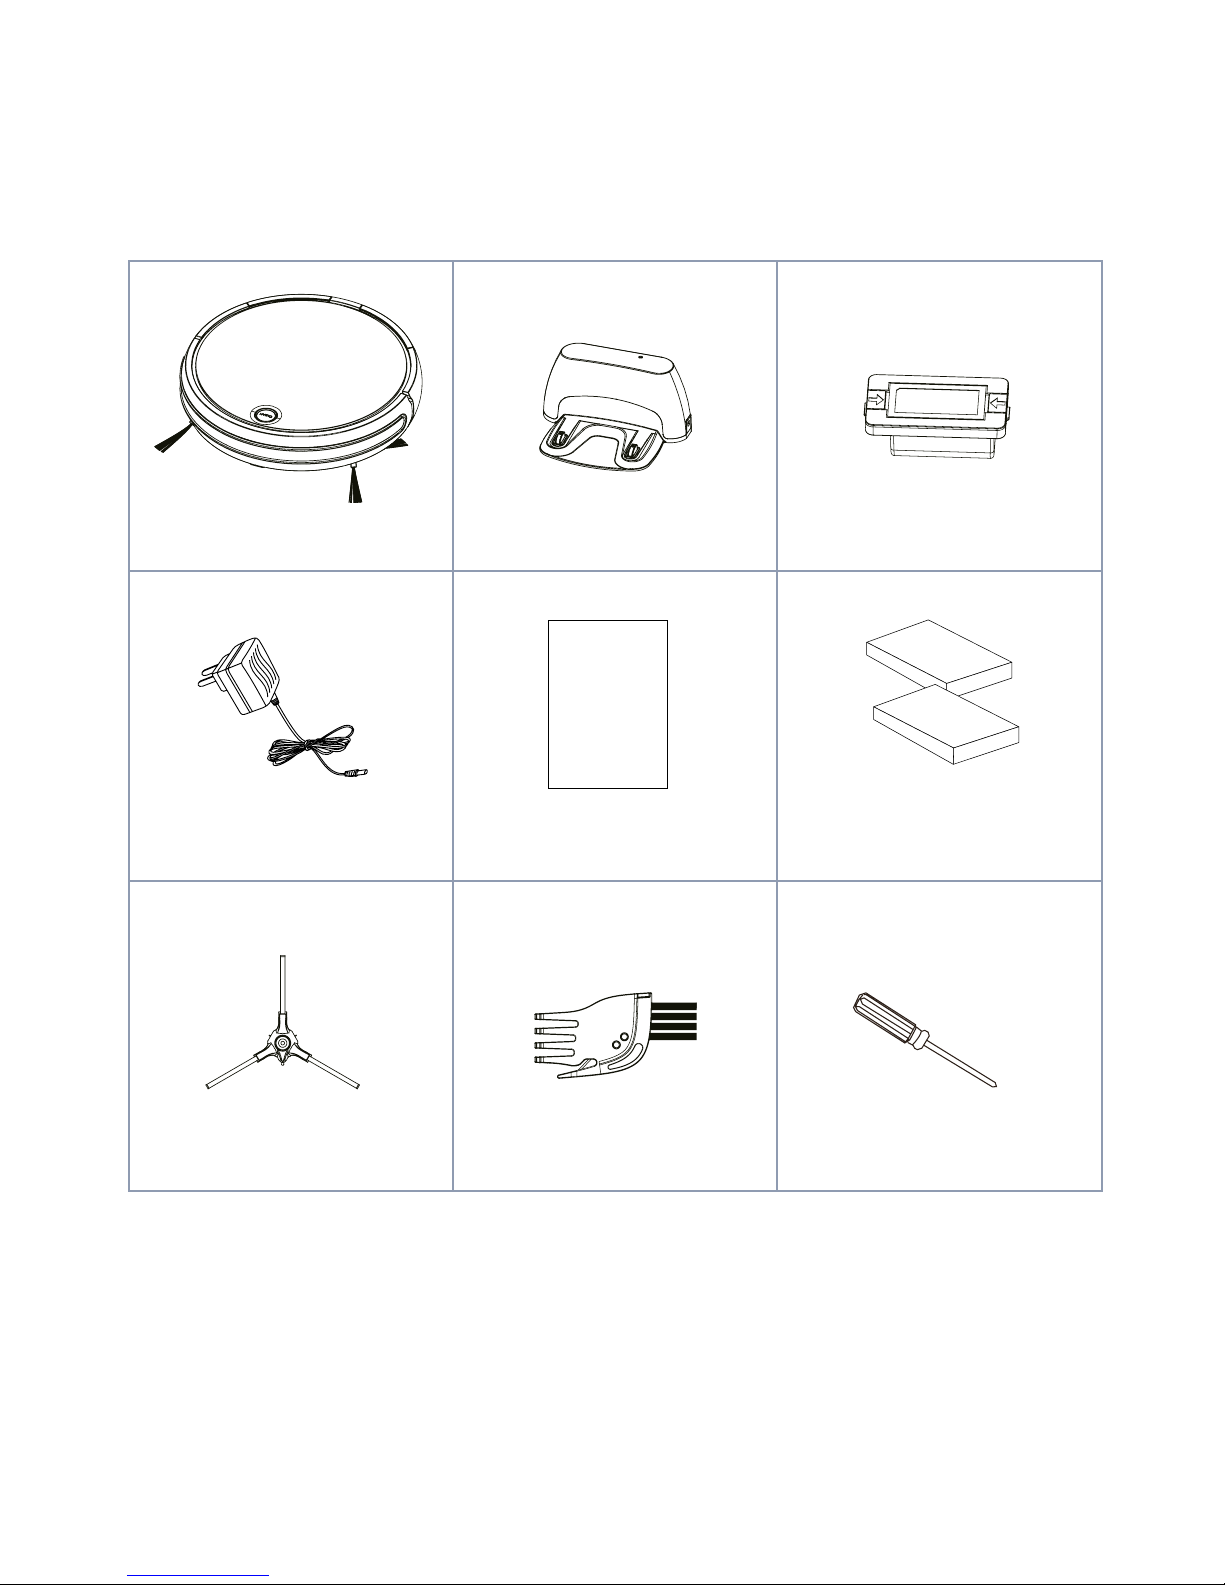
2. PRODUCT COMPONENTS
2.1 Main body and accessories
NOTES: A battery, two side brushes and a lter are mounted on the main body and two other side brushes and a lter are
located inside.
Main body
Adaptor
Side brush
Charging base
User manual Filter
Cleaning brush
Battery
Screwdriver
9
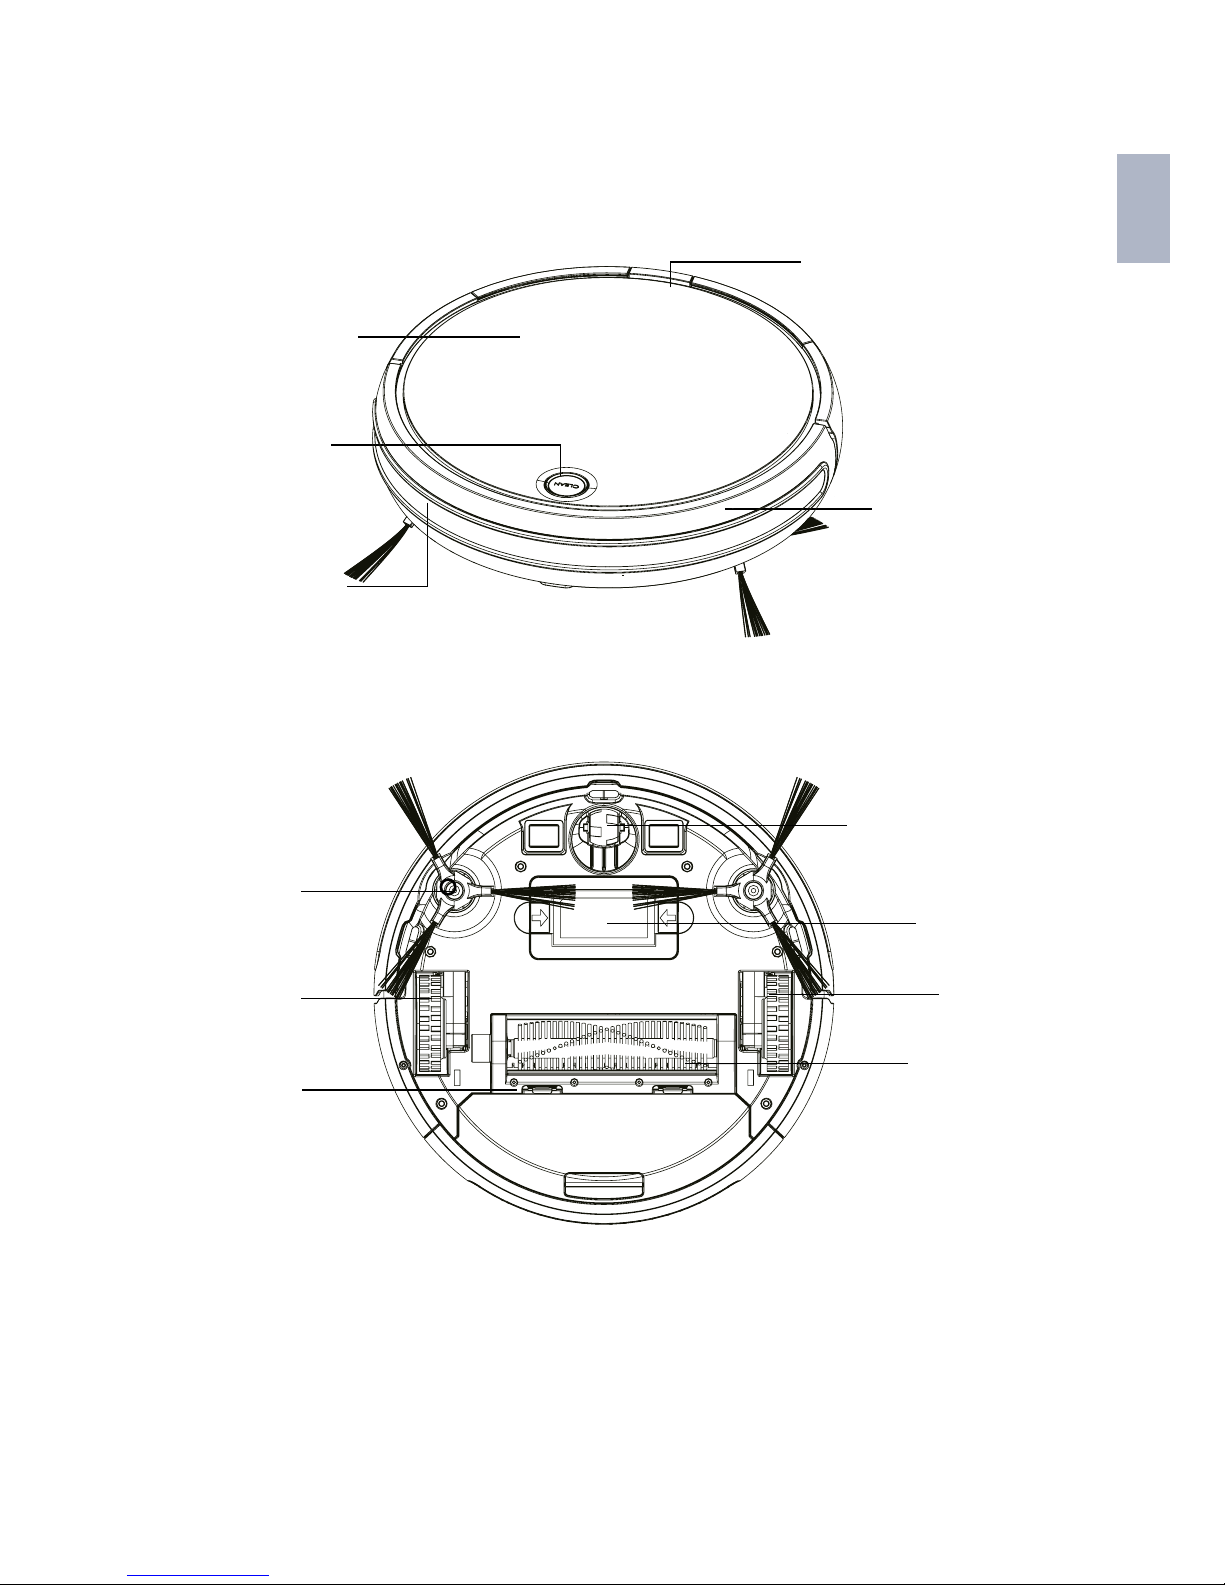
EN
FRONT IMPACT
AREA
FRONT WHEEL
LEFT WHEEL
CENTRAL BRUSH
BATTERY
TOP COVER
2.2 Introduction to the accessories
Top view
Bottom view
INDICATOR LIGHT
ON/CHARGING
CONTAINER BUTTON
SIDE BRUSH
RIGHT WHEEL
RUBBER BRUSH

10
3. PRODUCT INSTALLATION
Install the battery before using the vacuum.
1. Connect the end of the battery to the smart robot vacuum cleaner. Then, push the battery down until
it is inserted in the space designed for it.
2. Place the charging base on a smooth surface on the oor against the wall. Clean the dust and
remove any objects from the area, stick the charging based to the oor. Then, insert the adaptor into
the mains outlet.
TIPS
Insert it into the smart robot
during installation.
Pull it out in the opposite
direction to remove.
CHARGING BASE
PLUG ADAPTOR
1M
1M
3M
Danger! Electrical shock

11
EN
1. Place the charging base on a at surface on the oor, against the wall. Make sure there is nothing
blocking it within a distance of 3 metres ahead of it or a 1 meter radius around it. Do not place the
charging base on a carpet. Once the charging base is put into position it is recommended to not move
it from this location.
2. Connect the adaptor to the charging base.
4. PRODUCT USE
4.1 Use of main body
INTRODUCTION TO THE CONTROL BUTTONS
(Ref/SKU: 6401N BAAMBA)
(Ref/SKU: 6402S BAAMBA GYRO 4.0)
OPERATING MODES
Manual mode
(Ref/SKU: 6401N BAAMBA)
AUTOMATIC CLEANING
Briey press the button “
“. The indicator lights will turn on and
the smart robot vacuum cleaner will go into standby mode. Then,
press the “
“ button again and the smart robot vacuum cleaner
will automatically start to clean.
Charging button
Power on/off button
Button Power on/off
Charging button
Short press
In standby
Double click
CLEAN
INTRODUCTION TO THE BUTTONS
INTRODUCTION TO THE BUTTONS

12
AUTOMATIC CHARGING
When the vacuum is in standby mode, press the “
“ button two
times and the indicator light will ash. This means that the smart
robot vacuum cleaner is in automatic charging mode.
Manual mode (Ref/SKU: 6402S BAAMBA GYRO 4.0)
AUTOMATIC CLEANING
Briey press the button “
CLEAN
“. The indicator light will turn red
(standby mode). By pressing the button again, the indicator
light will go back to green and the vacuum will start to clean
automatically.
AUTOMATIC CHARGING
When the vacuum is in standby mode, press the “
CLEAN
“. button two
times. The indicator light will turn green and it will start to ash,
ths means that the smart robot vacuum cleaner has gone into
automatic charging mode.
INDICATOR LIGHT OPERATING GUIDE
(Ref/SKU: 6401N BAAMBA)
No. State Display Operation
1
Power off
"POWER" and "HOME"
light turned off
Press ""POWER"" for 4 seconds to
turn the device off.
2. In sleep mode, if the state of the
battery is low or the elapsed time is
greater than 8 hours, the robot will
turn off.
2
Power on
"POWER" and "HOME"
light turned on
Press "POWER" briey to go into
standby mode.
3
Cleaning "POWER" light on
Press "POWER" briey to go into self-
cleaning mode.
4
Recharge "HOME" Flashing blue
Press "HOME" briey to go into
charging mode.
5
Charging "HOME" Flashing blue

13
EN
6
"HOME" and "POWER"
Flashing blue at same
time
7
Fully charged
"HOME" Sustained
bright blue light
8
Pairing mode "HOME" Flashing blue
Press and hold "HOME" for 6
seconds to go into connection mode.
INDICATOR LIGHT OPERATING GUIDE
(Ref/SKU: 6402S BAAMBA GYRO 4.0)
No. State Display Operation
1
Power Off Lights Off
1. In standby mode, after 5 minutes
the robot will go into sleep mode.
2. In sleep mode, if the state of the
battery is low or the elapsed time is
greater than 8 hours, the robot will
turn off.
2
Power On Red light on
Press "CLEAN" briey and go into
standby mode.
3
Cleaning Green light on
Press "CLEAN" briey and go into
automatic mode
4
Recharge Flashing green
Double click on "CLEAN" and it will
go into recharge mode.
5
Charging Flashing red
6
Error
Flashing red and a
beep
7
Fully charged Lights Off
8
Pairing mode Flashing orange
Press and hold "CLEAN" for 5
seconds until the indicator light
starts to ash orange.

14
4.2 Charging methods
MANUAL CHARGING
AUTOMATIC CHARGE
1. Charging using the charging base:
To start, connect the adaptor to the charging
base. Then, connect it to the power supply.
Place the vacuum in the charging base
to charge. (The blue indicator light of the
icon indicating the charge will ash when
charging. The blue indicator light will stay
on once the smart robot vacuum cleaner
has been charged.)
AUTOMATIC CHARGE
When the smart robot vacuum cleaner has
almost run out of battery, the indicator
light will ash and the smart robot vacuum
cleaner will go into automatic charging
mode.
2. In the app, click on “CHARGE”. The
vacuum will look automatically for the
charging base.
Danger! Electrical shock

15
EN
4.3 User guide for the mobile app
NOTE
Due to software updates and other causes, this user guide will not be regularly updated. This
document is of an indicative nature only, unless otherwise stated. The statements, information
and recommendations included in this document do not constitute an express or implicit
guarantee.
Installation of the SPC IoT APP
Your device must have the Android 4.0 or IOS 7.0 operating system or higher.
Look in the market for the SPC IoT, app, download and install it. Or if you prefer, scan the QR code to
access our website where you’ll nd the links to your market.
Download and install the app.
Preparation
1. Press the “POWER” button on the main unit to go into standby mode.
2. Click on “Settings” on your mobile phone and connect to the WiFi network.
3. Find this app in the list of apps. Click to open it.

16
REGISTRATION AND ACCESS
When you open the application you’ll see the following screen. Click
on “Connect using an existing account” and you’ll be able to add the
registered account number (telephone number or email address).
Then add your password in order to login. You can also click on
“Create a new account” to register.
Since you haven’t registered yet, you have to sign up. Add your
telephone number or email address on the screen shown below and
click on “Next”.
Add the verication code and a password of your choice to complete
registration. Click on “Conrmar” to access the start page.

17
EN
If you want to use an existing account, click on “ Connect using an
existing account” on the screen shown below. To access the page
you need your password. If your password is incorrect, click on
“Have you forgotten your password?” to recover your password.
FORGOTTEN PASSWORD
If you have forgotten your password, click on “Have you forgotten
your password?” to recover your it. On the “You’ve forgotten your
password” screen, add your telephone number or email address and
click on “Next” to verify your identity.
On the screen shown below, add the verication code and the new
password. Click on “Conrm”. If you are not able to login, repeat the
process.

18
ADD DEVICE
Click on “Add device”
Select the device you wish to connect. In this case the robot vacuum.
Press and hold the power on/off button
for 6 seconds until the
indicator light ashes. Click on “Conrm”.

19
EN
Add your WiFi network’s password and click on “Conrm”.
Wait for the mobile to connect to the internet (as shown below).
When you’ve added the device successfully, click on “Done” on the
screen shown below:

20
OPERATION CONTROL SCREEN
Access the operation control screen shown below:
On the operation control screen click on “Manual” to open the
control panel. The smart robot vacuum cleaner will exit standby
mode. Click on any arrow for the robot vacuum to go into operation.
Click on the “Timer” function to adjust the time.

21
EN
Click on “Timer”. Then, click on “Add timer” to set the cleaning
schedule.
Add the settings related to the operating schedule for the robot
vacuum cleaner and click on “Save” on the screen shown below:
Click on “SPOT” so the vacuum goes into cleaning mode as shown
on the screen below:

22
Click on “CHARGE” so the smart robot vacuum cleaner searches for
the charging base and starts automatically charging.
SHARE THE DEVICE
If you want to share one of the SPC IoT devices with a family
member:
Go to the control panel of the device you wish to share from the
added devices panel.
Select the option more settings and the
options in the upper right hand corner of
the control panel.
Select the function “Share device”.

23
EN
Enter the telephone number or email
account of the person you want to share
the device with.
5. PRODUCT MAINTENANCE
5.1 Daily storage
If you are not going to use the vacuum for a long period of time,
rst charge the battery and store it in a dry place.
5.2 Cleaning the charging contacts
1. Before starting the task, turn off the power button or unplug
the chord.
2. Clean the charging contacts once a month with a dry cloth.
3. Do not use oil to clean the smart robot vacuum cleaner.
Charging
contacts

24
5.3 Cleaning the dust container
ASSEMBLY AND DISASSEMBLY OF THE DUST CONTAINER.
Press the release button on the container and keep it pressed down to release the container.
CLEANING THE CONTAINER
1. Open the lid to empty the
dust container. We recommend
periodically cleaning the
container.
3. Once you have removed the
lter, clean the dust with the
cleaning brush.
4. The container can be washed. (Note: the dust
container must be completely dry before being
reinserted.)
2. Clean the dust container with a cleaning brush.
Air: Cold
Hot

25
EN
5. Once cleaning is nished, put the lter back on the dust container. Then insert the dust
container back into the vacuum.
5.4 Cleaning the main brush
TAKE OFF THE MAIN BRUSH
CLEANING THE MAIN BRUSH AND THE RUBBER BRUSH
5.5 Cleaning the side brushes
1. Press and lift the locking
mechanism.
1. Clean the main brush and the rubber brush
regularly with the cleaning brush.
1. Remove the screws for the side brushes
with a screwdriver.
2. Remove the side brushes and remove any
hair and remaining dirt from the brushes and
the inside of the hole.
2. Remove any hair and remaining dirt from
the main brush regularly.
2. Hold and then lift the main
brush.
3. Remove the main brushes
and the scraper.

26
5.6 Cleaning the wheels
5.7 Cleaning the sensors
6. Common problems
For reference number 6401N (SPC Baamba) the error indicator light will be blue, while for reference
number 6402S (SPC Baamba Gyro 4.0), the error indicator light will be red.
Problem indicator Problem Problem description Solution
The indicator light
ashes twice and
the device makes a
sound
Left wheel failure The left wheel is
overloaded and isn't
turning.
Check if there are any
foreign materials in the
left wheel.
The indicator light
ashes 3 times and
the device makes a
sound
Right wheel failure The right wheel is
overloaded and isn't
turning.
Check if there are any
foreign materials in the
right wheel.
The indicator light
ashes 4 times and
the device makes a
sound
Power on failure The device starts to
operate and stops
after 1 second.
Place the device on the
oor again. Do not hold
it up in the air.
Clean the wheels (front, left and right) regularly with a cleaning
brush.
Once the components have been cleaned, use a dry cotton
cloth to clean the transparent plate and, by doing so, avoiding
dust accumulating on the plate, which could affect the
product’s functioning.
Slope
sensors
IR sensor

27
EN
The indicator light
ashes 5 times and
the device makes a
sound
Right wheel failure The front wheel is
jammed and cannot
turn.
Check if there are any
foreign materials in the
front wheel.
The indicator light
ashes 6 times and
the device makes a
sound
Failure when inspecting
the oor
There has been a
failure when inspecting
the oor.
Check if the sensors
on the bottom of the
device are blocked.
The indicator light
ashes 7 times and
the device makes a
sound
Low battery The battery is very low
(although not critical
yet).
Take the device to
the charging base to
recharge.
The indicator light
ashes 8 times and
the device makes a
sound
Front impact zone
failure
The impact produces a
failure on the device's
sides.
Check if the range of
impact of the device is
normal.
The indicator light
ashes 9 times and
the device makes a
sound
Main brush failure The main brush is
overloaded.
Check if there are any
foreign materials in the
main brush.
The indicator light
ashes 10 times and
the device makes a
sound
Side brush failure The side brush is
overloaded.
Check if any foreign
materials are in the
side brush.
The indicator light
ashes 11 times and
the device makes a
sound
Failure when inspecting
the wall
There is a problem
when inspecting the
wall
Check if the
transparent part of
the wall is covered
or blocked by foreign
materials.
The indicator light
ashes 12 times and
the device makes a
sound
Fan failure The fan doesn't turn. Check if the fan blades
are free or obstructed.
The indicator light
ashes 14 times and
the device makes a
sound
Charging problem The device cannot
charge or cannot
show the state of the
charging
Check if the device
is connected to the
charging base.
Recommendation: if you cannot solve the problem, get in touch with our after-sales service.

28
7. TECHNICAL SPECIFICATIONS
Body specications Accessory specications
Operating voltage 14.8V CC Adaptor
Rated capacity 24 W Output voltage 19V CC
Battery Lithium battery Output current 60 mA CC
Battery capacity 2600mAh
Charging time 4-5 hours Charging base
Usage time 90-120 min Input voltage 19V CC
Working temperature
range
-20 °C ~ 50 °C
Working humidity
range
≤ 80%RH
Sound ≤ 70 dB
Net weight 4.6Kg
Dimensions Φ326*79mm
Copyright © 2018 SPC
www.spc-universe.com
The information contained in this manual cannot be transferred, reproduced or
distributed under any circumstances without written permission from SPC.
TRADEMARKS
SPC is a registered trademark of Smart Products Connection S.A.
NOTE: SPC reserves the right to modify the information in this manual at any time, which, has
been carefully designed, although all of the information and recommendations provided in it do not
constitute any guarantee.

29
EN

spc-universe.com
SPC. 18/07/1c
 Loading...