

Page 1
268-1300-9901 CIMARRON
INSTALLATION INSTRUCTIONS (PG 1/3)
SAVE THESE INSTRUCTIONS
WARNING! LUMINAIRES require high current and voltage. HID LAMPS used in luminaires generate intense light and high
temperatures. HID LAMPS may emit UV and IR radiation. LAMPS may contain MERCURY (Hg), LEAD (Pb) and other potentially
dangerous and/or toxic materials. If lamp is marked it contains mercury and is subject to disposal laws. See www.lamprecycle.org.
HID LAMPS may rupture unexpectedly.
Hg
WARNING!
do so may increase the
gear burnouts do not cause a hazard and use only in environments for which the product is specifically marked.
WARNING!
harm. Thoroughly wash hands after installing, handling, cleaning, or otherwise touching this product.
Fixtures must be grounded and installed in accordance with the National Electrical Code and all local codes. Failure to
RISK OF PERSONAL INJURY, PROPERTY DAMAGE, FIRE AND DEATH.
This product contains chemicals known to the State of California to cause cancer, birth defects, and/or other reproductive
Install and use so lamp and control
CAUTION! Follow ALL luminaire and lamp manufacturer's recommendations, product markings, instructions, restrictions and
warnings regarding lumninaire and lamp operation, burning position, cycling and lamp replacement. Luminaire label shows electrical,
environmental and lamp requirements.
possible nuisance smoke.
All electrical work must be done by a qualified electrician.
Turn off electric power to all affected circuits and allow to cool before servicing.
A regularly scheduled maintenance program should be established to retain optimum light output and reduce heat retention. Dusting
with a soft, clean, dry cloth is normally sufficient for the reflector. Any accumulation of dust or dirt should be removed regularly from both
sides of the lens during relamping. Use only a mild soapy solution, DO NOT use alkaline or acid cleaners on reflector surfaces.
Carefully read these instructions before installing product. If you do not understand these instructions, before starting any work, contact
your Hubbell Lighting distributor or techsupport@hubbell-ltg.com or (864) 678-1000
Give instructions to facility owner/manager for future reference.
STOP USING WHEN LAMP FAILS.
Continued operation will result in control gear damage and
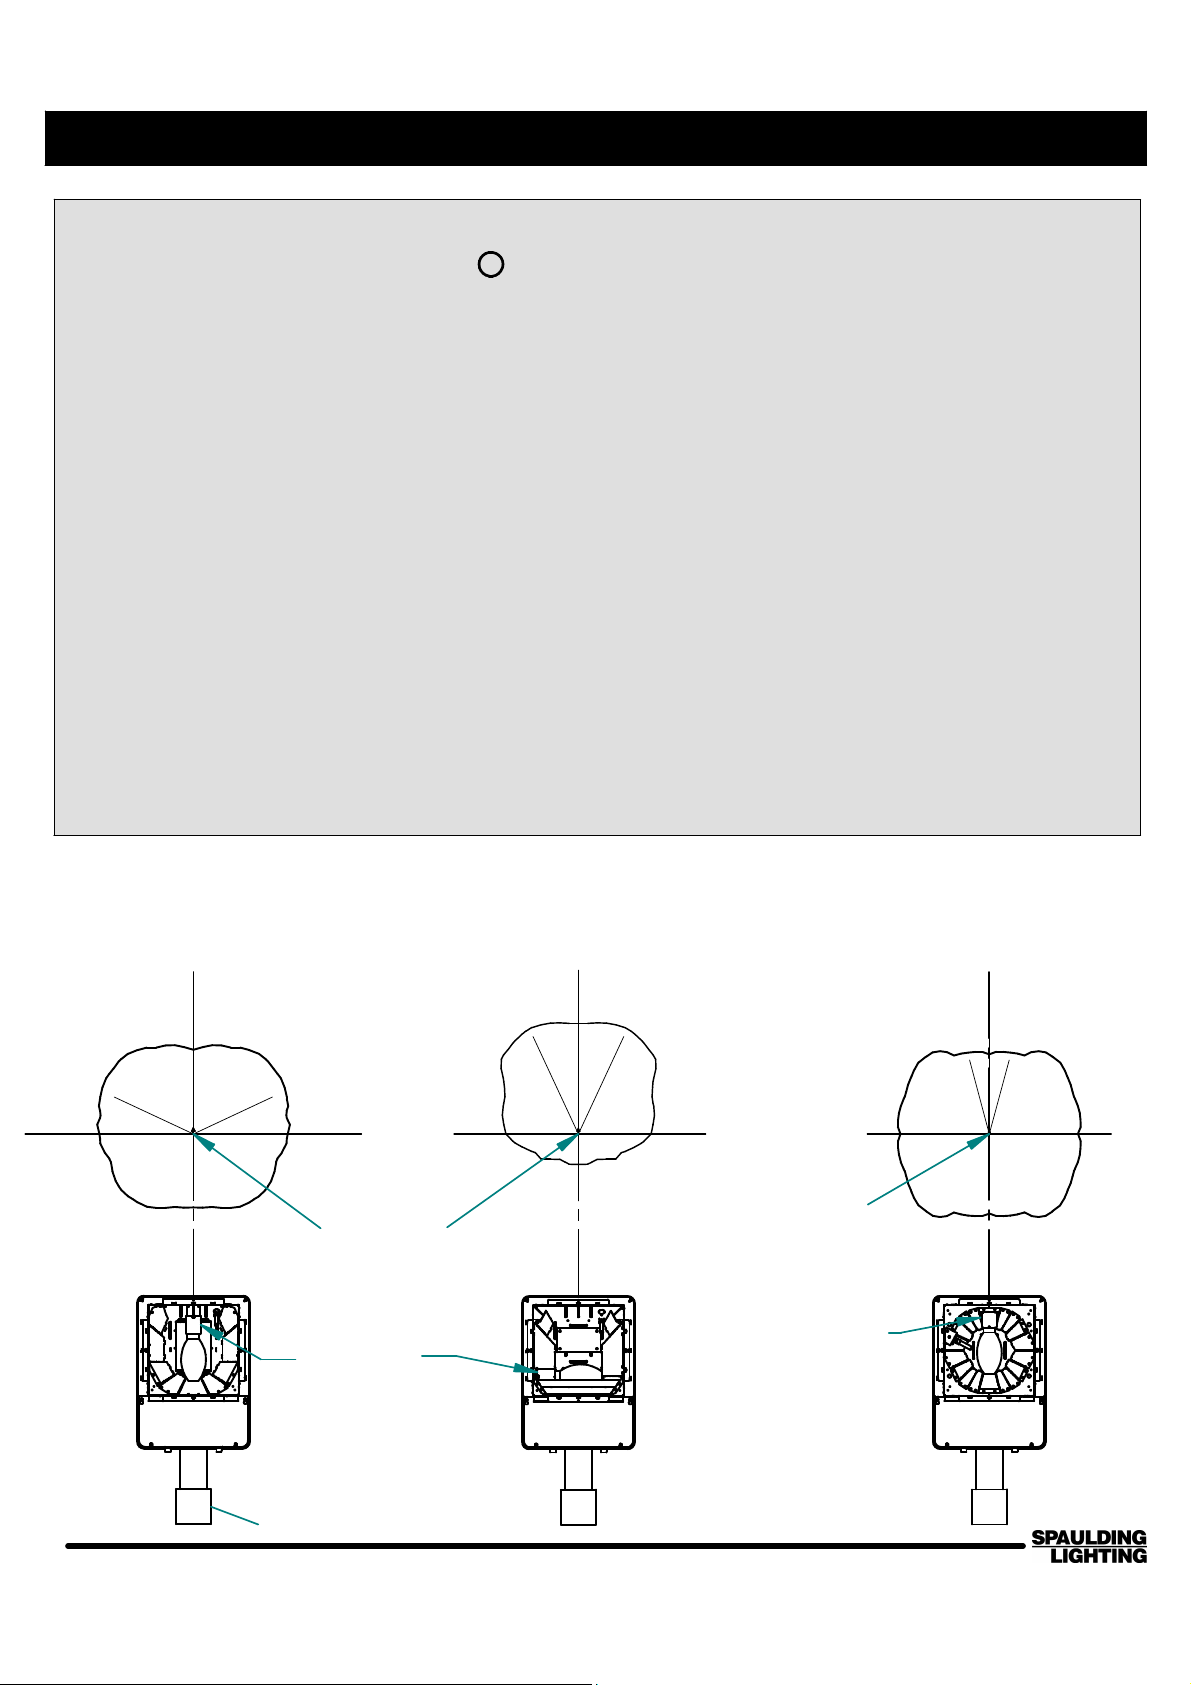
CIMARRON HIGH PERFORMANCE REFLECTOR OPTION
OPTICAL DISTRIBUTIONS
STREET
SIDE
TYPE III
LAMP SOCKET
POLE
LAMP CENTER
TYPE IV
TYPE V
LAMP CENTER
LAMP SOCKET
701 Millennium Boulevard Greenville, SC 29607 (864) 678-1000
www.spaulding-ltg.com
Page 2

268-1300-9901 CIMARRON INSTALLATION INSTRUCTIONS (PG 2/3)
SAVE THESE INSTRUCTIONS
WARNING: DISCONNECT POWER BEFORE INSTALLATION
OR MAINTENANCE
HEX NUT
SQ. POLE COVER
THREADED ROD
COVER
LOCKWASHER
FLAT WASHER
GASKET
RETAINER WASHER
EXTRUDED ARM
CAST ADPTOR
ROUND
POLE
NUT PLATE
SQUARE
POLE
ARM
FIGURE 1
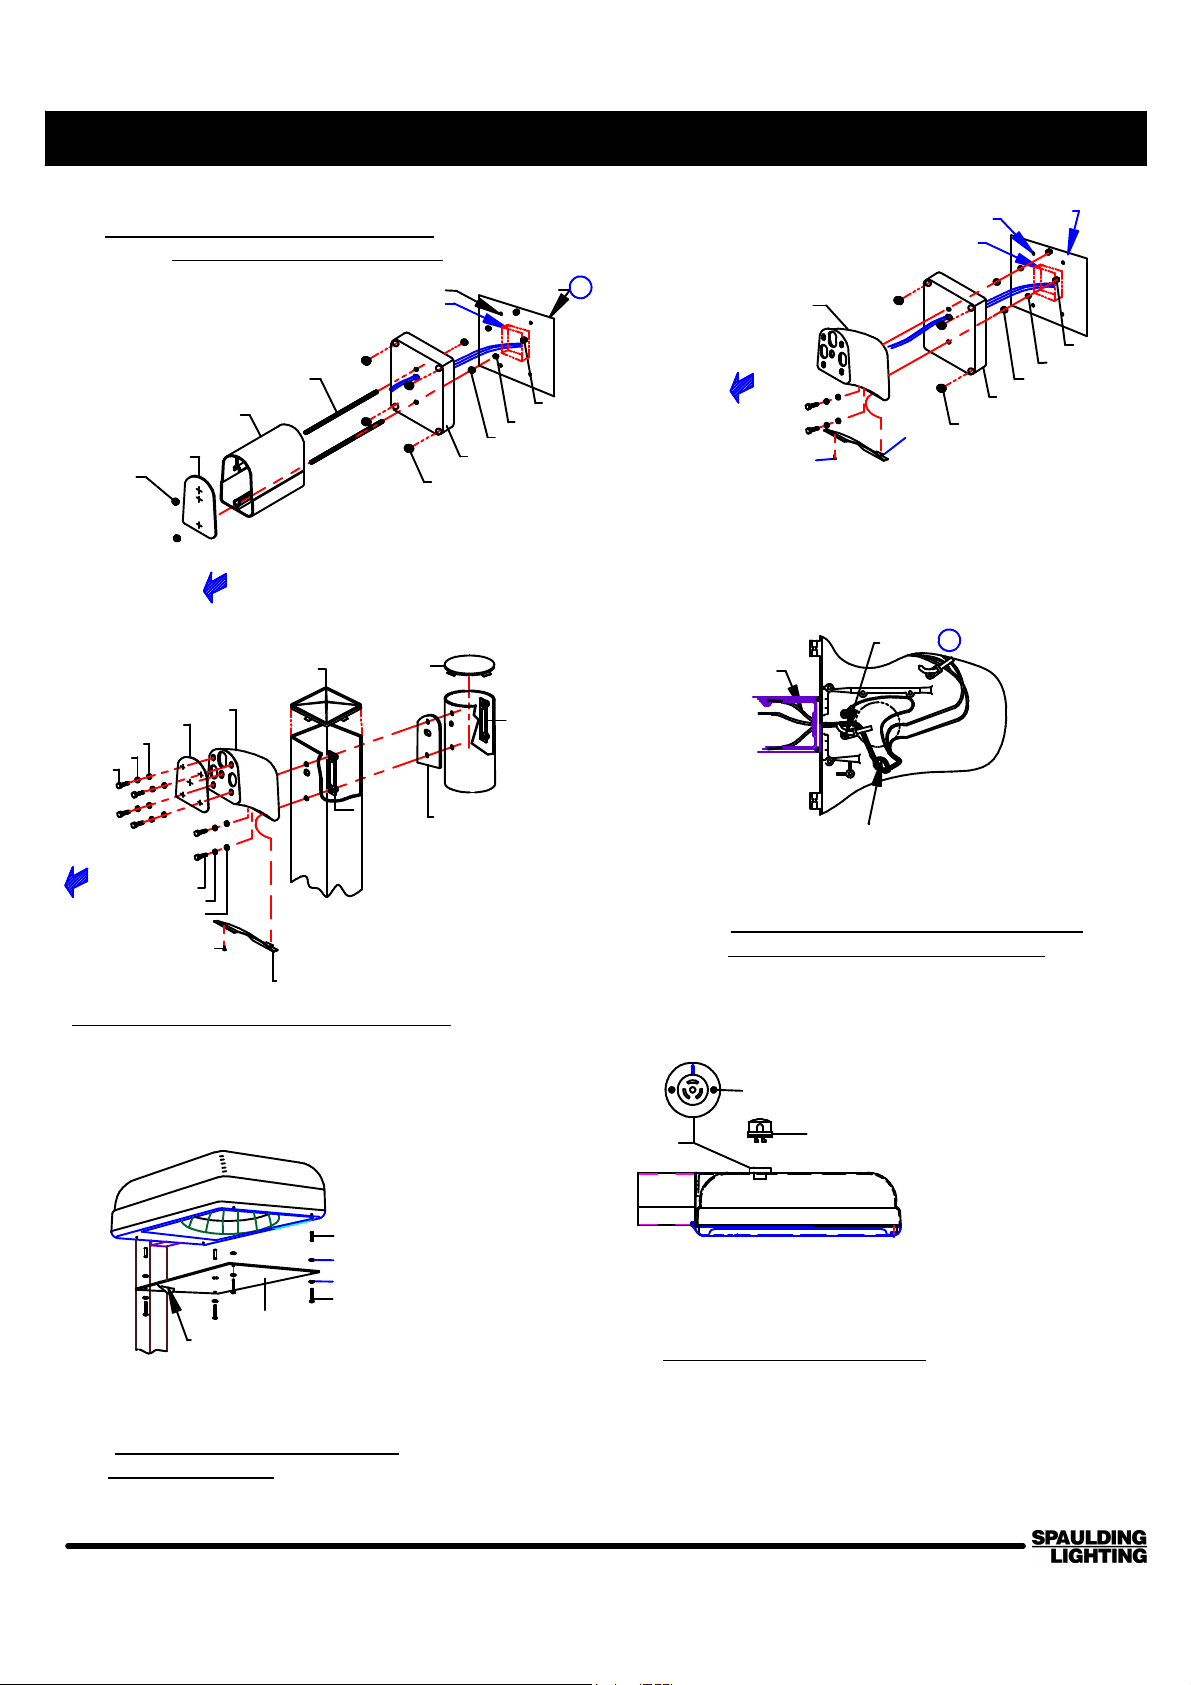
STRAIGHT SQUARE AND ROUND POLES
TO
HOUSING (3-HOLE
(PATTERN END)
ARM MOUNTING INSTALLATION FOR SQUARE AND ROUND POLES
HOUSING PREPARATION
FOR EXTRUDED STRAIGHT ARM
REMOVE HOLE PLUG
CIMARRON
(LUMINAIRE)
STRAIGHT
SQUARE
POLE
(SHOWN)
EXTRUDED STRAIGHT ARM
FOR CURVE CAST ARM
DO NOT REMOVE HOLE PLUG.
HOUSING
GASKET
SUPPLY
HEX NUT
LOCKWASHER
FLAT WASHER
K
(BY OTHERS)
FIGURES 2
LUMINAIRE TO ARM
701 Millennium Boulevard Greenville, SC 29607 (864) 678-1000
THREADED ROD
ARM
WIRES
HAND
HOLE
CURVE CAST ARM
BASE COVER
(SHIPPED WITH
POLE HARDWARE
KIT)
www.spaulding-ltg.com
Page 3
268-1300-9901 CIMARRON INSTALLATION INSTRUCTIONS (PG 3/3)
SAVE THESE INSTRUCTIONS
DRILL
E. WALL MOUNT INSTALLATION (FIGURE 3 AND 4)
NOTE: Fixture weight is approximately 60 pounds.
(4) HOLES
J-BOX
TEMPLATE
RETAINER WASHER
FLAT WASHER
LOCKWASHER
HEX BOLT
HOUSING (4-HOLE
(PATTERN END)
GASKET
TO
CAST ARM
GASKET
HEX BOLT
LOCKWASHER
FLAT WASHER
SCREW
THREADED ROD
ARM
HOUSING (3-HOLE
(PATTERN END)
POLE COVER
DRILL (4) HOLES
POLE COVER
NUT PLATE
FIGURE 5
CURVED ARM MOUNT
SQUARE AND ROUND POLES
COVER
J-BOX
HOLE PLUG
FIGURE 3
WALL MOUNT
CAST ADPTOR
TEMPLATE
HEX NUT
LOCKWASHER
FLAT WASHER
CAST WALL BRACKET
NUT PLATE
ROUND POLE
H
CAST ARM
TO
HOUSING (4-HOLE
(PATTERN END)
SUPPLY
WIRES
SCREW
WIRE
TIE
COVER
GRN
CAST WALL BRACKET
HOLE PLUG
FIGURE 4
CURVED WALL MOUNT
U
HEX NUT
LOCKWASHER
FLAT WASHER
FIGURE 6
KNOT
NOTE: SUPPLY VOLTAGE MUST
MATCH BALLAST
** SECURE SUPPLY WIRES TO NYLON TIE DOWN
INSIDE BALLAST AREA
TRAY REMOVED
K. WIRING: POWER MUST BE OFF. (WIRING MUST BE
PERFORMED BY A QUALIFIED ELECTRICIAN.)
J. LUMINAIRE INSTALLATION TO CURVE ARM (FIGURE 5)
TUBULAR SPACER
FLATWASHER
FLATWASHER
SCREW
FIGURE 7
CONTACT
PAPER
POLYCARBONATE
SHIELD
VANDAL SHIELD
L. VANDAL SHIELD INSTALLATION TO FLAT
GLASS UNIT (FIGURE 7)
701 Millennium Boulevard Greenville, SC 29607 (864) 678-1000
NORTH
SCREW
RECEPTACLE
PHOTOCONTROL
M. PHOTOCONTROL SWITCH (FIGURE 8)
NOTE: THE LIGHT WILL NOT OPERATE WITHOUT
A PHOTOCONTROL SWITCH OR A SHORTING CAP
IN PLACE. DO NOT LEAVE RECEPTACLE OPEN TO
THE ELEMENTS.
www.spaulding-ltg.com
FIGURE 8
PHOTO CONTROL
 Loading...