


Man15HOL- M3 R1.0
S P A T I A L
H O L O G R A M
SERIES LOUDSPEAKERS
®
M 4
user manual

L U M I N A
H O L O G R A M
Congratulations on your purchase of the Hologram M4 Loudspeaker System. The
Hologram is designed to provide the most lifelike music presentation possible and
to be effective in a wide range of room environments. Years of engineering
development and decades of experience has culminated in the Hologram design,
and we hope it brings you many years of listening satisfaction. Please read through
this manual prior to unpacking the speaker, and contact the factory with any questions
or concerns.
Clayton Shaw | President
SPATIAL AUDIO LLC
Page 02
Table of contents:
1. Unpacking
2. Setup
3. Hook up
4. Positioning
5. Specifications
6. Product Warranty
S P A T I A L ®

L U M I N A
H O L O G R A M
1. Unpacking
One Hologram M4 is packed in each shipping carton.
a) Cut the sealing tape on the top lid.
b) Flip the carton over with the flaps open.
c) Slide the carton completely off the speaker.
d) Lift off the top foam cap. Flip and remove other cap.
e) Remove plastic oversack.
2. Setup
Page 03
a) Mount support legs. Legs are located in the foam packing, along with
floor spikes and Allen wrench. The mounting bolts are already screwed
into the bottom of the speaker. Unscrew them and insert the support leg
and secure the bolt with moderate force.
b) Walk or lift speaker into listening position. Attach speaker cables to input
binding posts.
c) Footer installation:
1) Carpeted surface - after final positioning, insert included floor spikes.
2) Hard floor surface - Install soft feet before positioning.
3. Hook up
All Hologram models employ standard twin 5-way binding post input
terminals for connection to audio power amplifiers. Spade, banana and
bare wire speaker wire connections are compatible. Make sure that the
screw down nuts are firmly tightened for a high quality and dependable
connection.
S P A T I A L ®
L U M I N A
H O L O G R A M
4. Positioning
Locating the Hologram in the optimum position requires some experimentation within
a set of general guidelines. Open-baffle (OB) speakers load the room differently than
enclosed box speakers in a number of ways. Bass increases rather than decreases as
the speaker is moved away from the front wall. Directional bass does not excite room
modes in the horizonal and vertical dimensions, thereby reducing room excitation by
2/3rds. The upper bass, lower midrange is tuned by adjusting the distance from the side
walls.
NOTE: At least 24 hours of warm up are required in order to make informed decisions
about placement through listening. Bass will fill out and deepen, treble will smooth out
and soundstage open up. Use a tape measure to make adjustments. Differences of an
inch or less between right and left speakers is audible.
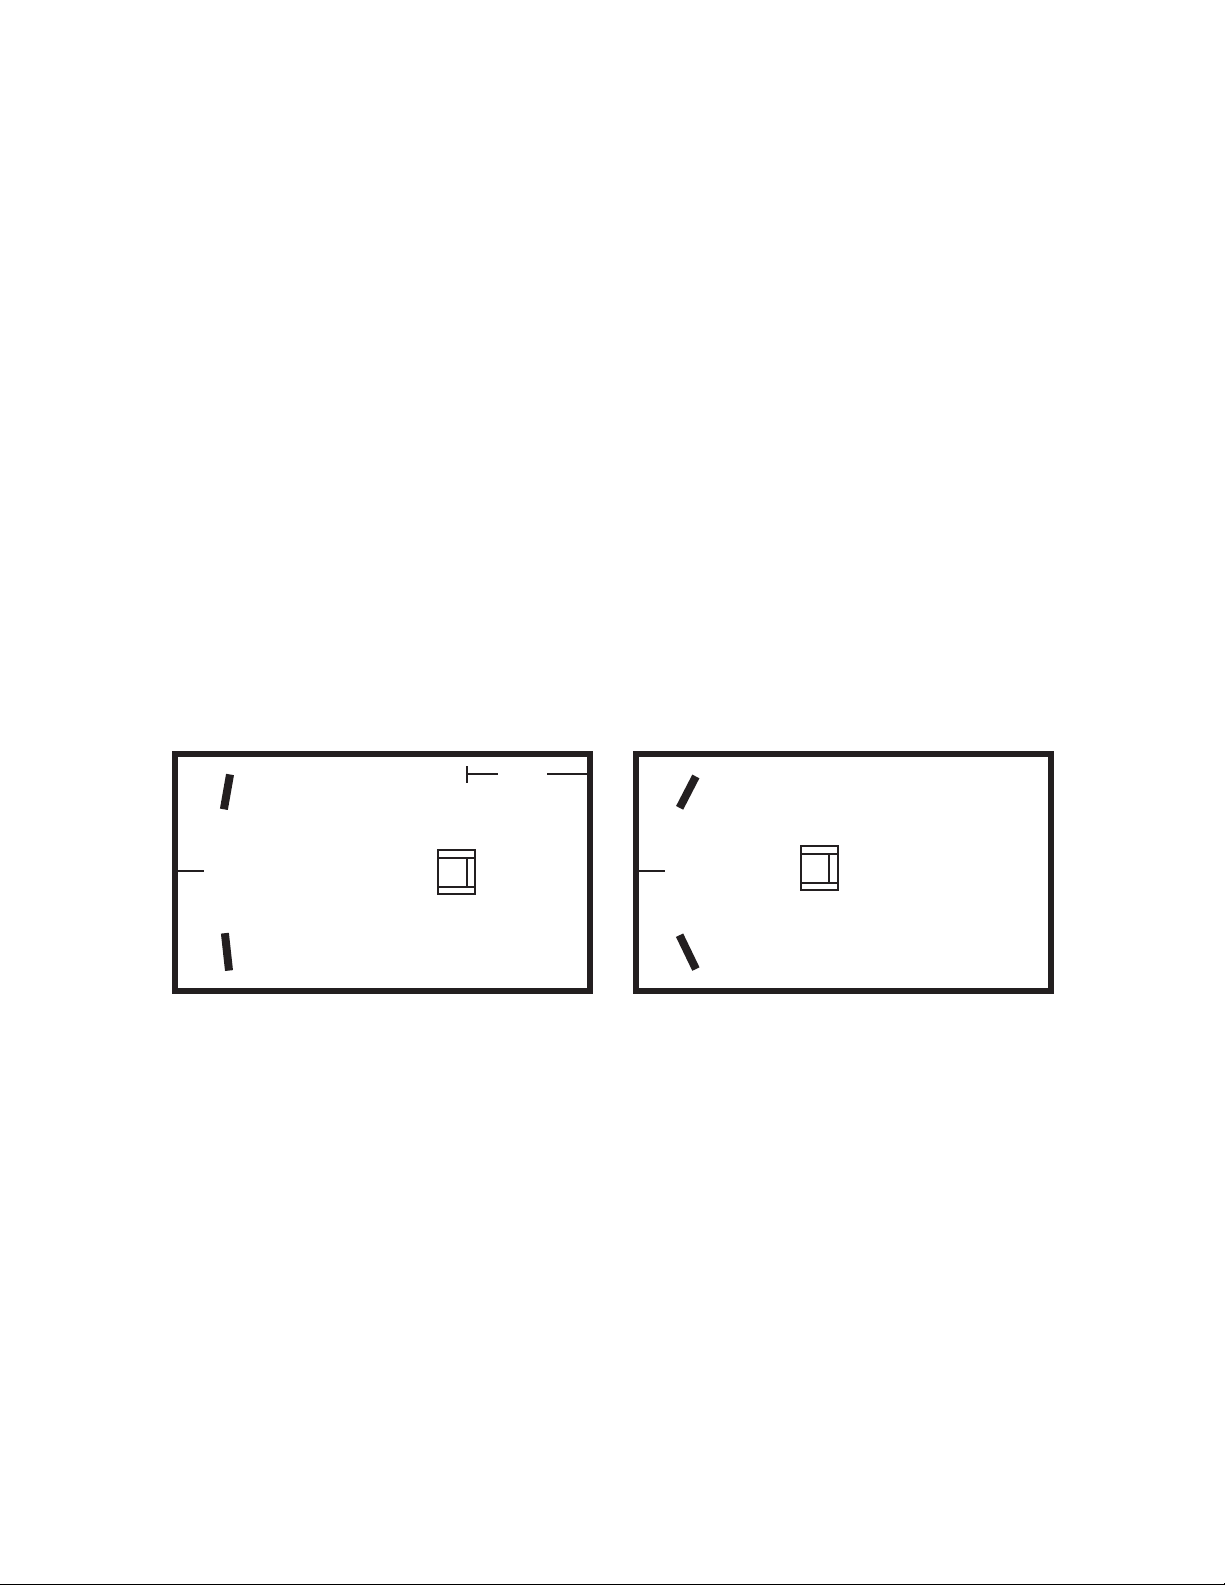
A. Choose Layout Plan - either Nearfield or Farfield as shown below in Figures 1 & 2.
For Farfield layouts, use the Rule of Thirds approach and place the listening seat 1/3rd
of room length from the rear wall as shown in Figure 1.
Page 04
1/3
Equilateral Triangle
18” to 36”
Far field layout
Figure 1
18” to 36”
increase toe-in angle
Near field layout
Figure 2
B. Intially, set up both speakers at 30” distance from front wall and toe in to where the
speakers are angled in roughly 22 degrees (horizontal design axis) using a tape measure.
Listen for an hour or so to get a baseline for how they sound.
C. Then move closer and farther from front wall between 24 and 48 inches - moving
both speakers equally. Find the best combination of deep bass output and soundstage
presentation. Change toe in in small increments to find best imaging/soundstaging.
D. Experiment with distance from side wall if possible to find best lower midrange
integration. Closer placement to side wall increases level in the 200 to 800Hz range.
E. Let the speakers run-in for a few weeks and then revisit positioning to fine tune. Toe-in
adjustments allow the tuning of imaging and soundstage parameters. After final positioning
is determined, use the tape measure to accurately match left and right channels.
Measurement points are the two front corners of the top of speaker from the front wall.
This techique takes toe-in angle into account. Call the factory for additional assistance.
S P A T I A L ®

L U M I N A
H O L O G R A M
5. Specifications
MODEL M4
Type: 2-way point source, open-baffle dipole with controlled directivity
Transducers: Two 12 inch woofer/mid units with pulp composite cone
One Wide bandwidth compression driver with Ferrofluid damping
Electrical: Passive crossover @800Hz - Hologram interface technology
Frequency Range: 45Hz to 20kHz +/- 3dB in-room
Sensitivity: 93dB 4Ω @1M averaged across 200Hz to 5kHz
Impedance: 4Ω nominal, 3Ω minimum
Dispersion Pattern 80˚Horizontal -6dB standard (+/- 40˚) broadband
Power: 200 Watts RMS max, 10 Watts RMS min into 4Ω load
Dimensions: 36 x 14 x 3 inches plus magnets 45 lbs Net
Shipping: 48 x 19 x 14 inches 55 lbs Gross
Page 05
6. Warranty
Hologram model loudspeakers carry a 20 year limited warranty against manufacturing defects
and materials failures. User induced damage, shipping damage, and misuse are not covered.
Owner is responsible for freight costs if warranty or non-warranty returns are made. Spatial Audio
reserves the right to choose the best course of action deemed to resolve the issue, whether repair or
replacement of component parts or complete loudspeaker assemblies. Contact Spatial immediately
in the event of freight damage.
S P A T I A L ®
 Loading...