

Page 1

Operating Manual
PremiumEdition | Wood burning fireplace
Page 2

PREFACE - QUALITY PHILOSOPHY
You have decided in favour of a SPARTHERM fireplace - thank you for your confidence in our company.
In a world of surplus and mass production, our company stands for the values
expressed by our owner, Gerhard Manfred Rokossa:
“High technical quality combined with contemporary design and service to our customers, to their satisfaction and for their word-of-mouth recommendation to others.”
Together with our specialist retail partners, we offer you first-class products that
will touch your customers emotionally, and will inspire feelings such as a feeling
of security, safety and comfort. To achieve this, we recommend that you read the
operating instructions carefully in order to get a quick and comprehensive overview
of your fireplace insert.
In addition to information on use, these operating instructions also include important
details on care and operation to guarantee your safety and to maintain the value of
your fireplace insert as well as useful tips and guidance. In addition, we show you
how to operate your fireplace insert in an environmentally aware manner.
For further enquiries, please contact your specialist dealer / fireplace installer.
We wish you a great deal of pleasure with your fireplace insert!
As well as a lovely fire at all times.
Your Spartherm Team
G.M. Rokossa
GB 2
Page 3

CONTENTS OF OPERATING INSTRUCTIONS
GB
1. Certified quality 4
1.1 Closing function of the fire door 4
1.1.1 Conversion of closing function on the fire door 5
1.2 The Clean Air Act 1993 and Smoke Control Areas 5
2. Fuel 5
2.1 Wood 5
2.1.1 C O2 neutrality 5
2.1.2 Types of wood 6
2.1.3 Quantities of wood 6
3. Burning 7
3.1 Initial start-up 7
3.2 Heating and firing 8
3.2.1 Ignition (down burnup) 8
3.3 Firing/adding wood 10
4. Technical information 11
4.1 Heating during the transition period 11
4.2 Operation with open combustion chamber door 11
4.3 Combustion air – recirculating air – fresh air 11
4.4 Fire safety 11
4.4.1 Special fire safety precautions relating to floor
coverings in the fireplace vicinity 12
4.4.2 Special precautions for the fire protection of adjacent
components constructed of flammable materials 13
4.5 Glass cleaning on sliding doors 13
4.5.1 Glass cleaning of Premium fire places (2-sided) 14
4.5.2 Glass cleaning of Premium fire places (3-sided) 14
4.5.3 Glass cleaning of standard fireplaces with
vertically-oriented sliding doors 15
4.5.4 Glass cleaning of standard fireplaces with
round or angled vertically sliding doors 16
4.5.5 Glass cleaning of standard fireplaces with
angled doors (the 3-sided Arte model) 16
5. Service and maintenance 18
5.1 Type plate 18
5.2 Ash pan and grate 18
5.3 Windoww 19
5.4 Cleaning and maintenance 19
5.5 SmartClose door lock 19
6. Help 20
7. General warranty conditions 22
7.1 General 22
7.2 Warranty period /scope 22
7.3 Warranty extension to 10 years for the initial purchasers
of the fireplace insert body 23
7.4 Warranty exclusion 23
7.5 Warranty conditions 23
7.6 The warranty becomes void upon: 23
7.7 Services in the event of a warranty claim 24
7.8 Information on the warranty promise Section 477
of the German Civil Code (BGB) 24
7.9 Liability 24
7.10 Exclusion period 24
7.11 Place of fulfilment, jurisdiction and applicable law 25
Notes 26
GB 3
Page 4

1. CERTIFIED QUALITY
OUR FIREPLACE INSERT S ARE CERTIFIED WITH A CE MARK IN ACCORDANCE WITH THE TYPE TEST DEFINED IN DIN EN 13229. DECLARATION
OF PERFORMANCE IS AVAILABLE AND CAN BE VIEWED AT
WWW. SPARTHERM.COM
The locking mechanism on the model with self-closing door must not be
tampered with. Interference with the mechanism renders both the warranty
and operating licence invalid. The warranty and operating licence are also
rendered invalid if the customer modifies the technology of any other area of
the fireplace insert. The desired model should be clarified with you by your
specialist dealer before you place an order.
These operating instructions comply with the provisions outlined in EN 18896
‘Solid-fuel fireplaces’. National and regional regulations, methods of installation or materials may deviate from this version, intended only as an example,
and must be observed in all cases. Our fireplace inserts are fire areas for
sustained fires, i.e. the regular adding of fuel enables them to remain lit for
extended periods. Our fireplace inser ts are not suitable for continuous fires,
i.e. ones where regular adding of fresh fuel is not required.
Naturally, our fireplace inserts are subject to our own in-house quality criteria,
from the incoming goods inspection through to final inspection prior to leaving
the factory.
1.1 CLOSING FUNCTION OF THE FIRE DOOR
No self-closing door function: multiple occupancy is not permitted, i.e. the fire
area must be connected to its own stack or chimney.
Note: when a stack or chimney has multiple fireplaces connected to it, it must
be constructed and designed in the appropriate manner.
A distinction to make is between fire places with open or closed chimneys. An
‘open chimney’ in Germany is not subject to the emission requirements defined
in 1.BImSchV, but can only be used ‘occasionally’. The manufacturer defines
the operating method for the fire area and also determines if the device can be
operated properly in an ‘open’ situation and can therefore be considered to be
an ‘open chimney’: open operation is permitted, according to the manufacturer
if the open fireplace/chimney is only used on an occasional basis. On the
other hand, the manufacturer does not permit continuous operation of an open
chimney. The manufacturer does permit operation with a closed chimney: no
restriction on operation.
Note: the old terms of ‘Type A1’ or ‘Bauart A’ that originated in the now obsolete standard DIN 18895 often gave rise to confusion between the aforementioned features, and therefore no longer apply today.
Without exception, Spartherm fireplace inser ts must be operated in a closed
manner (intended use), i.e. with the exceptions of adding fuel or cleaning, the
doors on the fireplace inser t must remain closed at all times.
Separately inspected fireplace inserts for operation with an open
fire door are highlighted in the technical data for the separate,
enclosed installation manual for fireplace inserts.
The suitability of a fire area for multiple occupancy (i.e. two or more fireplaces
being connected to the same stack or chimney) depends upon whether or not
the door is self-closing:
Self-closing door function: fire area is suitable for multiple occupancy (as
described above).
When operating in a single-occupancy chimney (i.e. one fire area
per chimney or stack) the operator is free to choose between a
self-closing fireplace insert or one on which the fire door does not
have a self-closing fire door. The operator is always responsible
for ensuring that the fire door closes in the intended manner when
the fireplace insert is in operation, and this requirement must be
observed at all times.
GB 4
Page 5

GB
1.1.1 CONVERSION OF CLOSING FUNCTION ON THE
FIRE DOOR
Vertically-oriented Spartherm fireplace inserts are supplied without a
self-closing loading door, while fireplace inserts with hinged doors are produced with a self-closing loading door. On vertically-oriented sliding fireplace
inserts without self-closing fire doors, the type of door closing mechanism can
be converted into a self-closing one by removing the door counterweights.
Folding fireplace inserts with self-closing fire doors can be converted into
inserts without self-closing fire doors by relieving tension on the door closing
springs.
For the correct conversion procedure for each type of door closing mechanism,
please refer to the relevant installation manual for fireplace inserts.
1.2 THE CLEAN AIR ACT 1993 AND SMOKE CONTROL
AREAS
Under the Clean Air Act local authorities may declare the whole or part of the
district of the authority to be a smoke control area. It is an offence to emit
smoke from a chimney of a building, from a furnace or from any fixed boiler
if located in a designated smoke control area. It is also an of fence to acquire
an “unauthorised fuel” for use within a smoke control area unless it is used in
an “exempt” appliance (“exempted” from the controls which generally apply in
the smoke control area).
In England appliances are exempted by publication on a list by the Secretary
of State in accordance with changes made to sections 20 and 21 of the Clean
Air Act 1993 by section 15 of the Deregulation Act 2015. Similarly in Scotland
appliances are exempted by publication on a list by Scottish Ministers under
section 50 of the Regulatory Reform (Scotland) Act 2014.
In Wales and Northern Ireland these are authorised by regulations made by
Welsh Ministers and by the Department of the Environment respectively.
Further information on the requirements of the Clean Air Act can be found
here: https://www.gov.uk/smoke-control-area-rules
Your local authority is responsible for implementing the Clean Air Act 1993
including designation and supervision of smoke control areas and you can
contact them for details of Clean Air Act requirements
Spartherm appliances that have been recommended as suitable for use in
smoke control areas are identified by a suffix P3 in the model name. These
models are recommended for use in smoke control areas when burning solel
dry woodlogs. Wood briquettes must not be burnt with these appliances in
smoke control areas.
2. FUEL
2.1 WO OD
2.1.1 C O
Wood has no debts to nature. The foundation ‘Wald in Not’ [‘Forest in Distress’]
formulated this very aptly as follows: ‘Wood is stored solar energy’. It is produced sustainably in our forests from solar energy, carbon dioxide, water and
dissolved nutrients. Heating with wood therefore means heating according to
the cycle of nature. With the help of the energy of the sun and through the
growth of trees in our forests, the carbon dioxide released by combustion is
stored back in the trees’ timber. This timber is then available again as raw
material (also refer to www.wald-in-not.de).
Conclusion: When wood burning, nature remains in balance. German Law legislates for the sustainable management of forests. It therefore makes sound
economic and ecological sense to burn wood in this manner.)
-NEUTRALITY
2
GB 5
Page 6

2.1.2 TYPES OF WOOD
The different types of wood all contain roughly the same amount of heat
energy per net kg of wood mass. However, each type of wood has a different
volume for a given weight because the cellular structure of the wood varies in
terms of cell size and density. This fact is depicted in the technical values by
raw density. In this case, the wood does not contain any water, and wood is
weighed by the 1 m
3
.
• The wood should be stored in a protected, dry and well ventilated place.
• If the wood is too wet, it will not provide such effective heating, the chimney will soot up and the window will soil more rapidly.
• No open operation with conifer timber containing resin. These types of
wood tend to produce sparks.
Our fireplace inserts are designed for operation with firewood and wood briquettes in acc. with DIN 51731. The use of other fuels is not permitted.
The best wood for star ting a fire are those with a low density because they
light easier, whereas for adding more fuel to an existing fire, wood with a
higher density is more suitable.
Wood hardness Type of wo od* Gross de nsit y in kg/m
Softwood Poplar 370
Spruce 380
Fir 380
Pine 430
Hardwood Beech 580
Ash 580
Oak 630
* Other do mestic type s of wood can be used to o, but they are not re adily available com mercially, nor in
large quantities.
3
Due to the fact that operation of a fireplace insert, depending on the design
of the tiled stove or plaster stove(e.g. used for heating, as an oven or for
ducted hot air and other uses), involves different requirements for operation
(the amount of fuel to add, the refuelling interval, etc.), you should obtain
advice and guidance from the fireplace installer before using your fireplace
insert for the first time.
Here are a few tips and items of information:
• The best fuel is air-dried, untreated firewood with a residual humidity of
≤ 18 % .
Never any under circumstances should you burn any of the following:
• wet timber, bark offcuts, nut shells or similar woody plant parts
• MDF or coated board materials
• paper, paperboard and old clothes
• plastics and foams
• wood treated with a timber preserving agent
• solid or liquid non-wood materials
• flammable liquids
2.1.3 QUANTITIES OF WOOD
Nominal heat output* Wood feed quantity** Images
in kW in kg/h
5,0 - 6,9 1,5 - 2,3
7,0 - 9,9 2,3 - 3,3
10,0 - 12,9 3,3 - 4,3
13,0 - 15,9 4,3 - 5,3
16,0 - 21,0 5,3 - 7,2
* Please re fer to the t ype plate for the ap plicab le nominal h eat outp ut, e.g. for t he Varia mo del rang e.
** The ac tual quan tity of w ood dep ends on the type of w ood and it s related proper ties.
GB 6
Page 7

GB
Wood feed quantity based on the example
of the Varia 1V-51-4S
Nominal h eat outp ut 11.0 kW
Wood feed q uantit y 3.3 - 4.3 kg/h (± 3 0%)
We always recommend that you
burn split firewood in your fireplace insert. Triangular-section
firewood made of beech with a
radius of 10 cm and a length of
33 cm weighs about 2.0 kg. The
circumferential edge dimension should be approx. 30 cm. The wood feed
quantity can vary by ± 30%.
Note: on larger fireplace inserts with a combustion chamber width of approx.
60 cm, the firewood can also be about 50 cm in length.
If the quantity added is exceeded consistently by more than 30 %, this can
damage the fireplace insert or the chimney. If the quantity of wood drops too
far below the recommended level, low combustion room temperature can lead
to poor burn-up and to sooting up of the window. Please do not drop more than
30% below the recommended quantity of wood. Af ter setting up the fireplace
insert, only light a moderate fire initially. This enables you to avoid cracks in
the combustion chamber covering (which may still contain residual humidity
before the first firing). The amount burned should be increased gradually over
3 to 5 firings to about 30% above nominal heating capacity.
3. BURNING
3.1 INITIAL START-UP
• Check to ensure that all of the documents and accessories enclosed with
the fireplace insert are removed from the combustion chamber.
• The enclosed heat-resistant glove is only intended to provide protection
from the heat when using the operating handle, the ‘cold hand’ and the
damper lever. The glove is not fire-proof.
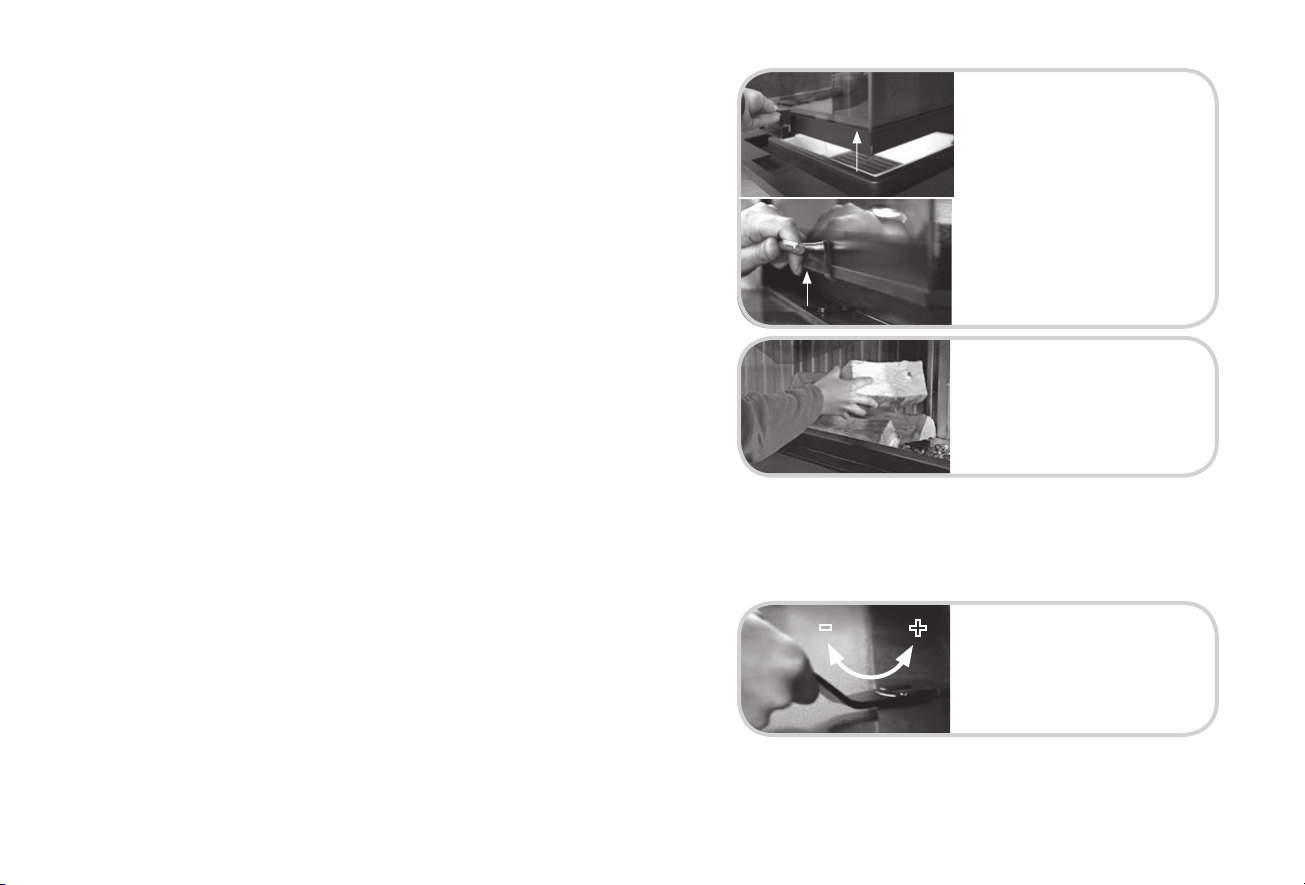
• Combustion air, depending on the type of fireplace insert, is either regulated by means of the ‘cold hand’ (see chapter „3.2 Heating and firing“) or
without tools, using the telescopically extending operating handle.
Examp le for an air re gulatio n lever use d withou t tools wi th a Premium insert
Examp le on Varia A Sh-4 S-2 wit h telesc opicall y extend ing air adju stment lever (damp er)
• Read the operating instructions thoroughly to learn details about fuels and
other relevant topics (see chapter „2.1 Wood“).
• Initial start-up (commissioning) should be performed in consultation with
the fireplace installer who constructed the fireplace unit, or (better) with
his on-site assistance. All cladding parts must be completely dried to prevent cracks or damage.
• If you have no external combustion air inlet, ensure you have a sufficient
supply of air to the installation space to prevent any negative pressure from
occurring in that space, and to ensure that no flue gases enter the space.
CAUTION! On controlled ventilation systems, bathroom ventilation systems
and fume extractor fans without a recirculating mode, there is also a risk
of negative pressure (vacuum)!!!
• Note contents of chapter „3.2 Heating and firing“.
GB 7
Page 8
• During this first burn, unpleasant odours may be produced. This is because
the anti-corrosion coating inside the combustion chamber is burning into
the steel surface. This is not a health hazard, but it does smell unpleasant.
Ensure sufficient ventilation in the installation space.
- W ith Premium inser ts push the door u pwards for
opening using the foldaway handle.
CAUTION! During a burning operation, the surfaces of the window
panes and cladding components can become very hot: Risk of burn
injuries!
3.2 HEATING AND FIRING
A good combustion requires correctly prepared fuel, the correct combustion
temperature for each burn-up phase and a suitable supply of ox ygen to enable the system to function in an environmentally friendly and energy-ef ficient
manner.
3.2.1 IGNITION (DOWN BURN)
Principle: This firing method is a simple and effective way to reduce the
emissions from fire areas. The stack of wood burns downwards, from top to
bottom. With this firing method, all gases pass through the hot combustion
zone (flames) above the stack, enabling complete combustion to take place.
The wood further down is heated up gradually, gas flows outwards and burns
in the hot combustion zone. The result is combustion that runs much more
uniformly than when setting a fire from the bottom of the stack of wood.
Caution: The important thing about this process is that it prevents
rapid burn-up in a downwards direction. The lighting of firewood in
fire areas, and the correct stacking of that firewood together with
initial observation of the fire in respect of finding the most suitable
setting for combustion air all requires a certain level of experience.
Procedure:
1. Open the combustion chamber door (swivel or slide upwards).
Premium insert
- Vertically-oriented sliding equipment - do not
close do or comple tely, but ins tead leav e a gap
of 3 - 5 cm.
Standard insert
2. Start by stackin g wood cro sswise o n the ash
left on t he grate. U se the thic ker firew ood at
the bot tom, with progres sively thinner woo d
towards the top of the stack.
Depending on the length of firewood and the dimensions of the combustion
chamber, narrow fireplace inserts are filled with firewood that points towards
the front. Wide fireplace inserts are filled with the longitudinal side facing forwards, i.e. with the firewood arranged sideways. Note the wood feed quantities
defined in chapter „2.1.3 Quantities of wood”.
-
+
3. Open the com bustio n air inlet fu lly. Using th e
‘cold hand ’, turn the actuating lev er into init ial
combustion position (+).
4. For the highest layer, sufficiently thin kindling is laid. Softwood is recommended here (e.g. fir)
GB 8
Page 9

Two or three st arting aids (e.g. wood wool
impregnated with wa x) are pl ace bet ween the
layers of initial firewood.
5. Light a mat ch and ignite the sta rting a ids
with it.
The quantity of kindling should be selected to enable high temperatures to be
reached, which enables the chimney to develop a draught quickly.
6. T hen close the doo r. Depend ing on vacuum in
Premium fireplace insert
the chimney, it may prove helpful to leave the
door on th e fireplace inser t about 3 cm open
to enable the fire to light properly
8. Once the upper, thinner firewood has been burned completely, and the fire
reaches down to the next layer, you must reduce the flow of combustion air.
8a. Fo r this, the actuati ng lever is mo ved into
about middle posi tion (primar y air clos ed).
If the fla mes now be come weak, open the
actuating lever slightly further (turn clockwise (+)).
8b. Or close ev en further (t urn anticlock wise (-)) if
the fire grows very q uickly.
During this phase it may be advisable to regulate the volume of air several
times. With a little experience with the characteristics of your own fireplace
insert, you will soon find the correct setting accurately.
9. Once the fire h as reache d the lowest layer of
firewoo d, the air flow can be re duced ev en
further.
GB
Standard fireplace insert
After 3-5 minutes, close the door on the fireplace insert.
7. The initial wood now ignites r apidly a nd the
upper, thinner stick s of firewo od star t to burn
brightl y. You should now c lose the f ire door
completely.
GB 9
10. The fuel will bu rn down to a p ile of hot
embers.
Page 10

11. Provi ded that t here are su ffici ent hot emb ers,
you can co ntinue adding fresh firewoo d.
After adding firewood, the combustion air must once again be opened fully
in order to burn the additional wood rapidly. This causes high combustion
temperatures to be reached again almost immediately, the key to complete and
environment-friendly combustion.
Depending on the type and quantity of wood, remaining embers and chimney
draught, this reheating phase may take about 5 minutes, until the combustion
air, in a way similar to that described in Point 8, can be restricted.
12. If no more fi rewood is t o be added , the actu ating leve r can be clo sed completely using the
‘cold hand’ as soon as t here are on ly a few
remaining hot embers.
• When adding fresh firewood, completely cover the hot embers.
• Depending on how much firewood you add, you may move the actuating
lever completely to the right for a few minutes until that fresh firewood is
burning brightly.
• After adding fresh firewood, never choke off the flow of combustion air.
Risk of explosion!
• Never repeatedly put more than the recommended amount of wood onto
the fire.
• This also applies whenever the fireplace system is not operational
• Never close the actuating lever completely during the burn-up process
(risk of explosion).
The end of t he burning proces s is achieve d when
the wood h as burned complet ely, and no smo ldering or incomplete combustion can occur. Now
the actuating leve r can be clo sed (lef t position).
End of the combustion process!
3.3 FIRING/ADDING WOOD
• Depending on weather condition, move the actuating lever more of less
into centre position or slightly above it (closing the supply of air). This
always depends on experience and on prevailing conditions on location.
• Do not open the doors forcefully or gases may enter your living room
through a suddenly produced negative pressure. At first, open the door
slowly and only a crack.
• Putting fresh firewood onto hot embers prevents the possible release of
smoke when the door is opened.
• Typical intervals for adding firewood are 30 to 60 minutes approx., which
ensures that the fireplace inser t can be operated continuously.
4. TECHNICAL INFORMATION
4.1 HEATING DURING THE TRANSITION PERIOD
The basic requirement for correct fireplace system function is the draught
produced by your chimney (pressure head). This is dependent on the outside
temperature and therefore, to a large extent, on the season. Higher ambient
temperatures during the shoulder seasons (spring and fall) can lead to weaker
draughts and consequently, poorer combustion or more smoke production.
What can you do to help prevent this?
• Empty the ash can and grate before lighting a fire. Place grate with
embossed engraving facing downwards.
• If the chimney draught is less than this, a larger ‘initial burn’ should be
GB 10
Page 11

GB
created. Obtain the advise of your fireplace installer or chimney sweep.
• Once the fire has started, shift the air supply lever as far to the right
(maximum air flow) as necessary . The fire must be provided with sufficient
combustion air to stabilize the draught, but not so much that the wood
burns away too quickly.
• As combustion begins to die back, do not be tempted to shift the actuating
lever too far to the left, as this can cause the column of stable air in your
chimney to collapse and the fire to smolder in the fireplace insert.
• If combustion air is closed off too soon, and if the embers are completely
covered when new firewood is added, this can cause explosive combustion
(i.e. an explosion)!
• To prevent the bed of embers piling up to high, the ash should carefully be
removed to prevent the grate from clogging up and to enable combustion
air to flow into the fire without obstruction.
4.2 OPERATION WITH OPEN DOOR
• Open operating mode is only permitted if the fireplace unit was inspected
and approved for this purpose. The technical data in the installation manual (separate attachment) provide this information.
• In acc. with BlmSchV (Bundes Immissions Schutz Verordnung) open fire
areas can only be operated in Germany on an occasional basis.
• Fireplace systems may only be operated in open mode when supervised, in
order to reduce the risk of fire due to flying sparks or hot embers.
• During open mode operation, only burn normal firewood, i.e. avoid conifer
wood that contains resin.
4.3 COMBUSTION AIR – RECIRCULATING AIR –
FRESH AIR
• The combustion air line must always be unobstructed.
• To prevent a buildup of heat in the device, the existing air outlet grilles or
openings must be clear and open when a fire is being lit.
• In the area of direct radiation from a fireplace insert, a minimum distance
of 80 cm must be maintained, measured from the front edge of the fire
area opening, and no objects made of combustible materials must be set
up (also refer to chapter ‘10 Technical Data’ in the related installation
manual for fireplace inserts).
• Objects made of combustible materials must not be placed on free surfaces of the fire area.
• No devices that generate a vacuum on the same floor / same combination
of rooms (e.g. extractor fans in the kitchen). This would entail a risk of
smoke ingress in the living room.
• Outside the area of direct radiation, do not place any combustible objects
or materials on the chimney cladding within a distance of 5 cm if the surface temperature reaches or may reach >85 °C.
• Please note that any fireplace gets ver y hot indeed when in operation.
heat-resistant glove provided and the ‘cold hand’ operating handle.
• In Germany, all fireplaces must be operated in acc. with BlmSchV
legislation.
4.4 FIRE SAFETY
4.4.1 SPECIAL FIRE SAFETY PRECAUTIONS RELATING
TO FLOOR COVERINGS IN THE FIREPLACE
VICINITY
Floor coverings that are not fireproof (e.g. carpets and parquet flooring etc.)
must be protected from spark emission using a covering made from non-flammable materials (e.g. refractory glass, natural stone, tiles, slabs, marble,
granite or other mineral-based construction materials). If this material is
metal, it must be at least 1 mm thick.
The flooring must be fastened down and secured against sideward movement.
The spark protector must face forwards and be the same height as the fire
area base (height of fire table) H plus 300 mm, but at least a total of 500 mm
in length.
GB 11
Page 12
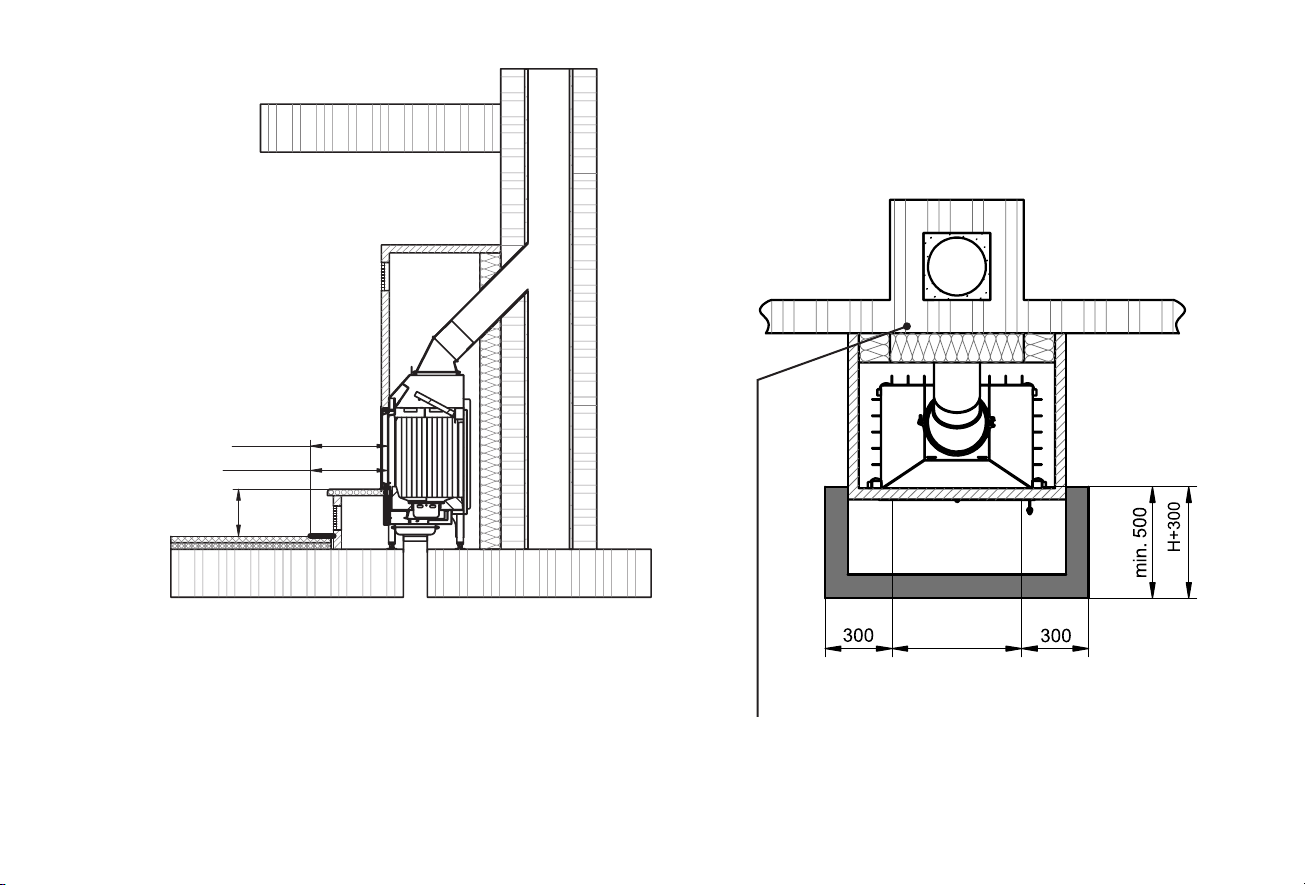
min. 500
bzw. H+300
resp.
H
In addition, this area, starting from the direct radiant area, from the effective
combustion chamber opening must be protected out to 300 mm to left and
right (see Fig.).
resp.
The figure illustrates a typical installation situation showing
a Varia 1V-51-4 S and this ap plies for e ach firep lace unit .
GB 12
Width of opening
The figur e illustr ates a ty pical installat ion situ ation sho wing a
Varia 1V-51-4 S and this ap plies for e ach firep lace unit .
The extent and manner to and in which the sides of your fireplace insulate the
installation location are things you must discuss with your fireplace installer
and chimney sweep.
Page 13

GB
4.4.2 SPECIAL PRECAUTIONS FOR THE FIRE PROTECTION OF ADJACENT COMPONENTS CONSTRUCTED OF FLAMMABLE MATERIALS
1. A distance of at least 5 cm has to be maintained between built-in furniture
(e.g. cupboards) and the fireplace cladding.
2. A clearance of at least 1 cm is recommended for components with small
contact areas (wall, floor or ceiling cladding). Wallpapers are not considered
to be combustible construction materials.
3. A clearance of at least 80 cm must be maintained between the front and
sides of the firebox opening and all flammable fixtures or built-in furniture
units, unless stated otherwise in component-specific safety instructions.
4. When arranging ventilated thermal radiation protection down both sides (S),
a distance of just 40 cm is suf ficient. The ventilated distance to the radiant
heat protecting device must be (S) at least 2 cm.
1cm
2
5cm
1
1cm
2
80 cm
3
(S)
40 cm
4
2cm
80 cm
This Figure shows a t ypical instal lation si tuatio n for a Varia
2R-8 0h-4 S and this a pplies to every fir eplace in sert.
2. A clearance of at least 1 cm is recommended for components with small
contact areas (wall, floor or ceiling cladding).
3. A clearance of at least 80 cm must be maintained between the front and
sides of the firebox opening and all flammable fixtures and built-in furniture
items, unless stated otherwise in component-specific safety instructions.
4. When arranging ventilated thermal radiation protection down both sides (S),
a distance of just 40 cm is suf ficient. The ventilated distance to the radiant
heat protecting device must be (S) at least 2 cm.
4.5 GLASS CLEANING CLEANING THE GLASS
4
40 cm
2cm
(S)
The figure illustrates a typical installation situation showing
a Varia 1V-51-4 S and this ap plies for e ach firep lace unit .
80 cm
3
GB 13
CERAMIC PANES ON SLIDING DOORS
All cleaning of the glass ceramic pane must be carried out while it is cold
(fireplace unit not burning and cooled down, no hot ash in the combustion
chamber).
Page 14

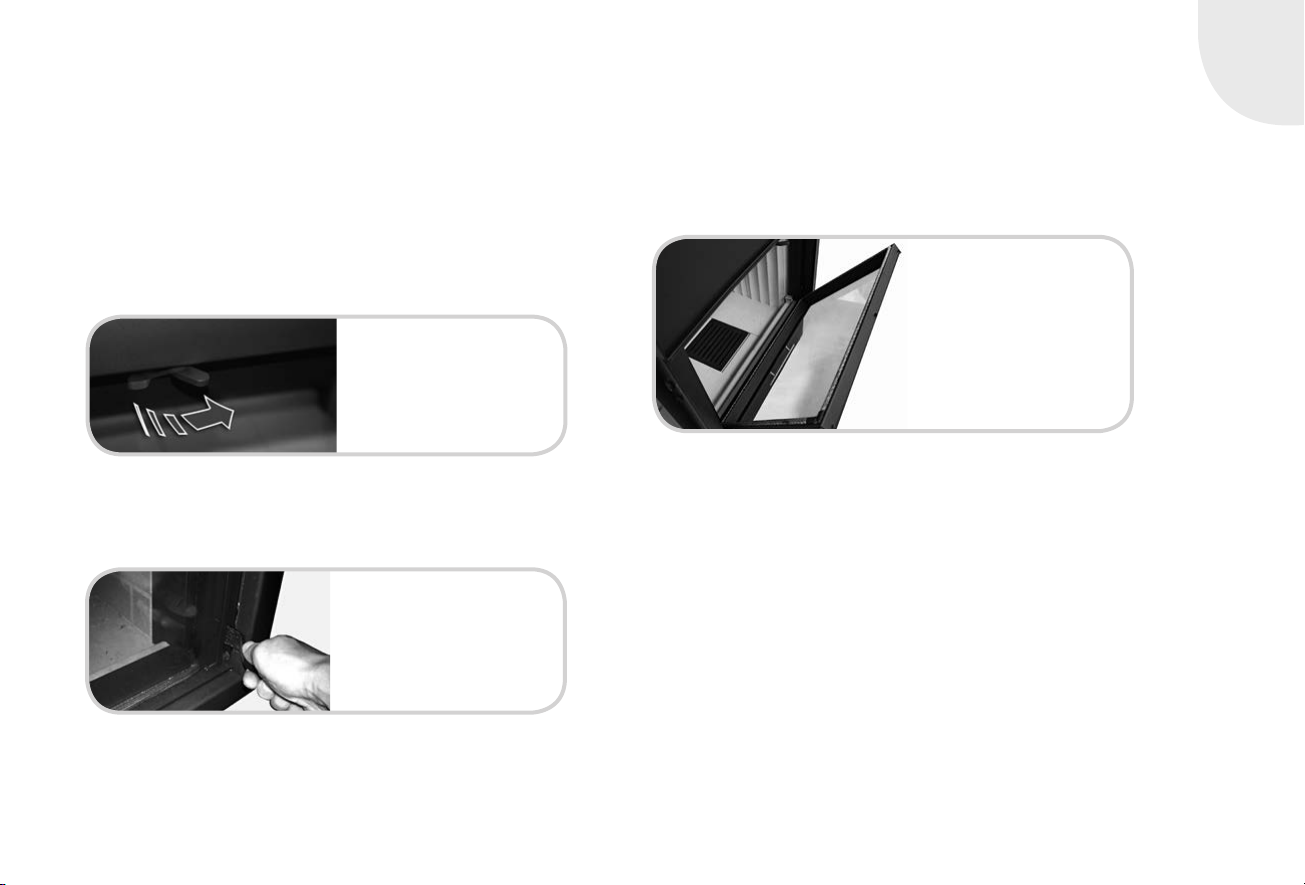
4.5.1 LASS CLEANING OF PREMIUM FIRE PLACES
(2-SIDED)
4.5.2 GLASS CLEANING OF PREMIUM FIRE PLACES
(3-SIDED)
1. Push door completely downwards!
2. Unlock A+B completely by moving the levers.
3. Tilt side glass for cleaning.
1. Push door completely downwards!
2. Unlock A+B completely by moving the levers.
3. Tilt side glass for cleaning.
When closing proceed in reverse order.
When closing proceed in reverse order.
GB 14
Page 15
GB
4.5.3 CLEANING OF VERTICALLY-ORIENTED SLIDING
DOORS
Cleaning should be carried out when cold and in accordance with the following
versions.
Opening of the fire door:
1. Close the firebox door (pull it fully downwards!).
2. Move the ‘cold hand’ from the lef t-hand side to the central locking position
above the firebox door.
Undo the l ock by rot ating it cl ockwi se.
3. The door can now be tilted up. Observe the specific instructions relating to
the Linear 3S and Linear 4 S or Prestige version!
Linear 3S-Ausführung:
1. Move the ‘c old hand’ t o the right- hand
side of the d oor and, p ositio ning it on
the lock , turn the l ock fully downwar ds.
2. Press the ‘cold hand’ downwards at, at the same time, use the other hand
to hold up the fire door. That enables the door to tilt slightly. Now remove
the ‘cold hand’ from the support to prevent damage to the bench and to
prevent injuries. Now tilt the door fully upwards until it rests against its stop.
Linear 4S or Prestige versions::
1. With one hand on the door handle, gently tip the fire door downwards, at
the same time supporting it with the other hand.
The glass window can now be cleaned in accordance with the operating
instructions.
Now open t he door f ully
until it rests again st its stop.
Closing the fire door:
1. Carefully close the fire door.
2. Move the lock above the door using the ‘cold hand’, turning the lock fully
backwards to its limit position. This is important since otherwise the lock
can scrape against the hood and the door will not seal properly
3. Test the function of the door by sliding it upwards and re-check the upper
lock to ensure that the locking mechanism is fully closed, i.e. at its limit
position.
Cauti on: When openi ng and clos ing the do or, only touc h the doo r frame.
Never exert pressure on the window panels. (risk of
breakage!)
GB 15
Page 16

4.5.4 CLEANING OF ROUND OR ANGLED VERTICALLY
SLIDING DOORS
Close the firebox door (pull it fully downwards). Place the ‘cold hand’ on the
sliding rail lock above the firebox door. (Caution! One-sided or two-sided,
depending on model)
With a clockwise turning motion, you slide the retaining bolt on the lock
through 90 degrees to the front (below the door cover).
Turn the lock ing mecha nism clockwise in
order to lo ck the slid ing rails.
Closing the firebox door:
1. Close the firebox door carefully and keep it lightly pressed in.
2. Move the ‘cold hand’ to the right-hand side of the door and, positioning it
on the lock, turn the lock fully downwards.
3. Turn the locking mechanism anti-clockwise in order to free the sliding rails.
4. Test the function of the door by sliding it upwards and re-check that the
locking mechanism is fully closed, i.e. at its limit position.
After cleaning, re-close the firebox door, replace the ‘cold hand’ on the square
nut, close the door by pressing on the frame (not on the glass) and lock it by
turning the ‘cold hand’ fully downwards. Do not forget to reset the slide rail
locking mechanism.
4.5.5 CLEANING ANGLED DOORS
(THE 3-SIDED ARTE MODEL)
Cleaning must always be executed in a cooled-down state!
Move the ‘cold hand’ to t he right- hand side
of the doo r on the supp ort /loc k and turn i t
fully upwards.
Swing th e door open for cleaning purp oses.
GB 16
Opening of the fire door:
1. Close the firebox door (slide it fully downwards!).
2. Swivel out the locking mechanism on the sliding rail lock using the ‘cold
hand’ above the firebox door, to right and left. The door is now locked in
its lowest position.
There is a se cond bo lt on the op posite
side.
Page 17

GB
3. Unlock the side door locks by hand or with the help of the ‘cold hand’ using
a turning movement, paying attention to the sequence of actions!
First unfasten the lower fastening
Then turn and open the upper opening.
4. Swivel the fireplace doors to left and /or right. The glass window can now be
cleaned in accordance with the operating instructions.
Only touc h the fram e of the doo r
2. Lock the top and bottom door locks by hand or with the help of the ‘cold
hand’. Remove the ‘cold hand’. Important: First fasten the top lock, then
the bottom one.
3. Turn the locks on the sliding rails above the door back to their limit stops.
Caution: When opening and closing the door, only grip the door
frame. Never exert pressure on the window panels. (risk
of breakage!)
Closing the firebox door:
1. Close the firebox door carefully, lifting the door slightly while doing so and
pressing it against the fixed-position glass element.
GB 17
Page 18

5. SERVICE AND MAINTENANCE
5.4 CLEANING AND MAINTENANCE
CAUTION! Never clean your fireplace insert while it is hot or warm.
5.1 TYPE PLATE
The type plate can be found on your warranty certificate and on your fireplace
insert below the ash pan and/or the ash box. It includes technical data and
information. The type plate must not be removed as it confirms the testing of
the device and is required for the acceptance procedure and annual inspections by the chimney sweep.
5.2 ASH PAN AND GRATE
• Clean and empty the grate and ash pan at regular intervals, adapted to
suit your use of the fireplace. CAUTION! Ash can keep embers hot for up
to 24 hrs.
• The ash cone in the ash pan must not reach or block the slots in the grate.
• Always have the engraved side of grate facing downwards, located in the
recess in the bottom of the fireplace insert.
5.3 WINDOW
The way to ensure that your window panel remains soot free for as long as
possible is
• to use dry firewood (chapter „2.1.2 Types of wood“).
• to control combustion through adjustments to the flow of combustion air
(chapter „3. Burning“).
• to keep the fireplace insert at the highest possible combustion temperature
• to have the correct amount of draught in the chimney
• to add the right amount of wood for the operating range.
Gradual sooting up of the window is entirely normal and does not constitute
grounds for a complaint. Clean the inside of the window regularly using the
window cleaning agent provided to prevent particles of soot from burning in too
much (after approx. 8-12 operating hours)!
GB 18
The fire area, the hot gas draught and the flue should be cleaned at regular
intervals. Specifically, whenever there is any extended interruption in operation of the fireplace, ensure that the chimney is not blocked.
For other conditions, refer to table:
What How often What wi th?
Outsid e of firepl ace inser t and
heating chamber
Glass pa ne based on fire
Decor finishes in
chrome or gold
Stainless steel surfaces as required Stainl ess stee l cleaning p roduct and a
Painted surfaces as required Damp cloth w ithout c leaning ag ent with
Hot air gri lle as required Duster or vacuum cleaner
Ash pan an d grate as required Empty b y hand or usi ng special ash
Air spac e below ash p an as required Vacuum clea ner or ash ex tractor
Adapter between fireplace
insert and chimney
as required,
min. once a ye ar
behaviour, for
optimum visibility, we
recomme nd after 8 -12
hours of operation
as required Use dilut e soapy lye and sof t cloth. Do
as required
min. once a ye ar
Brush, va cuum clea ner or
ash extractor
You can easil y clean th e glass panel
with a commercially available cleaning
agent for fireplace glass.
Use dry cloth to wi pe. No sco uring.
Please do avoid that e xcess cle aning
agent ente rs bet ween doo r frame and
glass pan el. This mi ght cause t he
hardening of the sealing compound
between glass pa nel and do or frame. A
hardened sealing compound might lead
to damages of door and glass.
Suitab le cleanin g agents f or firepl ace
glass are available at your specialist
dealer.
not use abr asive age nts. Do n ot polish!
soft cloth.
abrasive substances.
extractor
Brush, ash extractor
Page 19
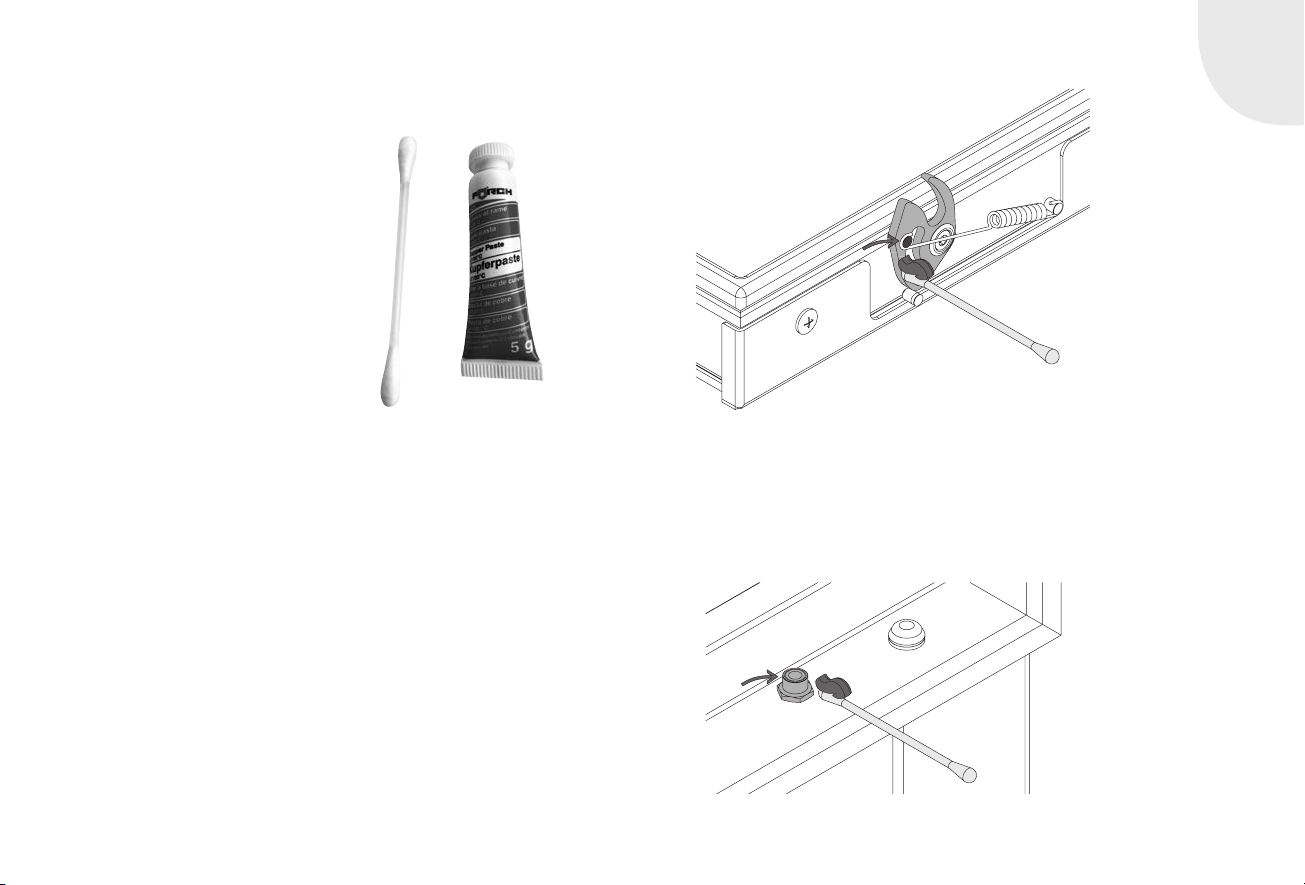
5.5 SMART CLOSE DOOR LOCK
Fireplace inserts with SmartClose door
locking mechanisms must be lubricated
at regular intervals to assure problem-free operation (once per heating
season). Upon delivery, the package
includes a tube of special stove lubricating compound.
This lubricating compound is applied to
facilitate ease of movement of heavy fire
doors, and to prevent noise caused by
opening and closing those fire doors.
The lubricating compound must be
applied at least once a year to the spring
connection on the SmartClose and its associated roller. Fireplaces used frequently or very frequently, it may be necessary to shorten this lubrication
interval. Depending on the type of fireplace insert, the door lock springs may
be located below and/or above the fire door. In order to lubricate the lock, you
may use a standard cotton swab as an aid.
To apply the lubricant compound, proceed as follows:
Open and secure the fire door; Apply a lit tle lubricant compound to the cotton
swab and use it to coat the spring support on the door lock; Turn the locating
roller on the body of the stove during this application process. Open and close
the fire door a few times and, if necessary, apply the lubricant compound
once again.
GB
Caution: Ensure that no copper lubricant compound makes contact
with cladding parts or similar items! Remove dirt and grime
straightaway with a cotton cloth. Never operate the equipment during intervening periods.
GB 19
Page 20

6. HELP
Problem Cause, explanation Chapter, note Solution
Glass becomes
sooted heavily,
rapidly and
unevenly.
Fire is dif ficult to
ignite
You did not use t he corre ct combu stion ma terials . 2. Use natural, bulk y bits of t imber com pliant wi th BImS chV §3 (G erman le gislati on).
The ambie nt temperature is a bove about 15°C. The we ather co ndition s are unfav orable
(e.g. fog). T hese weat her cond itions o ccur mos t frequen tly in spr ing and fall .
There is a temperature inversion. That means that the upper layers of the atmosphere
are warmer than the lower layers.
The comb ustion a ir controller is not f ully open ed. 3. 2.1 Move the a ir actuat ing lever in to its far r ight-hand position.
The external com bustio n air line is no t free. 4.3 Clean the comb ustion air line.
Combus tion air is t oo heavil y restri cted. T his means t hat soot ac cumulate s quickl y,
within jus t half an hour. (it is nor mal for the fireplac e unit to become prog ressively dirt ier
from operation. W hen driv ing, a car window bec omes dir ty, too! )
The seat ing of a gask et / door se al is not perfect . - Check all s eals, e.g. o pen the fir e door and p ress the s eal fully i nto the do or profil e.
The wood is not dry e nough. 2.
Not enou gh wood ha s been added. (an insu fficient amoun t of wood ca n result in temperatures in the stove not being high e nough).
The chimney draught i s too strong / too wea k. -
You did not use t he corre ct combu stion ma terials . 2. Use na tural, bu lky bit s of timber c omplian t with BI mSchV § 3 (Germ an legislation).
The wood is not dry e nough. 2.
The wood too thick . 2.
A sufficient air supply is not assured. 3. For heatin g or for adding more fir ewood, m ove the act uating le ver fully to t he right .
The ambie nt temperature is a bove about 15°C. The we ather co ndition s are unfav orable
(e.g. fog). T his is refer red to as an interve ning peri od.
There is a temperature inversion. That means that the upper layers of the atmosphere
are warmer than the lower layers.
The comb ustion a ir controller is not f ully open ed. 3. 2.1 Move the ai r actuating lever int o its far r ight-han d positi on.
The external com bustio n air line is no t free. 4.3 Clean the combusti on air line.
The chimney is not fre e. - Inform the ch imney swee p.
There is not enough vacuum in the c himney. -
4.1
4.1
3. 2.1
2.1. 3 The prope r amount of w ood per ho ur can be fo und in the te chnical d ata.
4.1
4.1
Fill the fireplace w ith a small amount of fu el and light it with th e damper fully open
(max. air flow).
Fill the fireplace w ith a small amount of fu el and light it with th e damper fully open
(max. air flow).
Check th e position of the ai r lever and, if nece ssary, open up the c ombustion air fl ow rate
fully to br ing the fire place uni t up to oper ating temperatur e.
Measure the residual humidi ty in the wo od used w ith a humidi ty detector. The re commended residual humidity is 20% or less.
Obser ve the sit uation. T he draught charac terist ics can be a ffect ed by the prevailing
weather p atter n. If the gla ss cont inues to so ot up badly, inform your c himney swe ep.
Measure the residual humidi ty in the wood used w ith a humidi ty detector. The re commended residual humidity is 20% or less.
Use small -sized timber to ligh t the fire. F or firewo od, use on ly split wo od that is n ot
thicker t han about 8 cm at its th ickest point. Th e optimum length of fi rewood is approximately 20 - 25 cm. In the c ase of prolonged he ating, do not add too much wood.
Instead , it is bet ter to add sm aller qua ntities of wood.
Fill the fir eplace wi th a small am ount of fue l and light it w ith the da mper full y open
(max. air flow).
Fill the fir eplace wi th a small am ount of fue l and light it w ith the da mper full y open
(max. air flow).
Light a sma ll fire in the f ireplac e, following advic e from your f ireplac e instal ler or
chimney sweep.
GB 20
Page 21

Problem Cause, explanation Chapter, note Solution
Smoke escapes
when adding wood
Excessively rapid
burn-up / r ate of
wood consumption
is too high.
Air-ext racting e quipmen t is switch ed on, e.g. kitchen ex tractor fan. 3 .1 Ensure that all air-extracting equipment is switched off.
Wood added prematurely, on top of unburned wood. 3.3 Do not a dd fresh f irewood u ntil ther e is a bed of hot e mbers in t he combus tion chamber.
The chimney is not fre e. - Inform the c himney swe ep.
Your fireplace has not already reached its operating temperature. 3 .2.1
The door has been opened too wide. 3.3 Open the doo r slowly a nd carefully.
The diame ter of your s tack of wo od is too sm all. 2.1 .3 T he ideal diameter f or a stack of wood is about 25 cm.
The chimney draught i s too strong. -
The comb ustion a ir flow has n ot been reduced. 3 .2.1 Le ave the act uating lever in abou t its cent er posit ion.
Ever since the initial blaze, t he fire doo r has been s lightly o pen. 3. 2.1 Close the f ire door !
The reco mmended w ood feed r ate has no t been obs erved. 2.1. 3
Burn dow n remaining wood unt il it forms a b ed of hot emb ers, the n add smalle r pieces
of firewood.
Inform t he chimney s weep. Perhaps incr ease com bustion air flow to c ountera ct chok ing
action.
The prop er amount o f wood fee d per hour fo r your stove can be fou nd in the tec hnical
data.
GB
GB 21
Page 22

7. GENERAL WARRANTY CONDITIONS
The warranty applies to products purchased af ter 1 July 2016 (proof of
purchase).
7.1 GENERAL
Spartherm Feuerungstechnik GmbH / the “manufacturer” offers end customers
/ consumers as well as their dealers and intermediaries a temporary warranty
of durability for the products it produces in accordance with the conditions and
scope described below.
The manufacturer warranty offered shall apply without prejudice to mandatory statutory liability provisions, e.g. product liability law, in cases of intent
or gross negligence or as a result of injury to life, limb or health caused by
Spartherm or its vicarious agents. This applies in addition to the statutory
warranty which the seller is obliged to guarantee its consumer.
A consumer as defined by this manufacturer warranty is any natural person
who is the owner of the product and who has not purchased the product to
resell it or to install it at third-party premises within the scope of commercial
or self-employment activities. The initial purchaser is the consumer who firstly
bought the product from Spartherm Feuerungstechnik GmbH, a dealer or
another natural person or corporate entity who, within the scope of commercial or self-employment activities, resells or installs the product.
Spartherm produces high-quality products according to state-of-the-art
technology. The materials used have been carefully selected and - like the
production process - are subject to on-going quality control. Specialist knowledge is required when assembling and installing the products. Our products
must, therefore, only be installed and started up by specialist technical staff,
in compliance with current statutory provisions.
7.2 WARRANTY PERIOD/SCOPE
The general warranty terms apply exclusively within Germany and the European Union.
Spartherm guarantees that its products are free from material defects,
production and design errors. Claims for compensation for consequential
losses or on the basis of product liability only apply in accordance with legal
provisions. Within the scope of this warranty, defects that have been shown
to be due to a material defect or a production/design error shall be remedied
A warranty period of 5 years as of the date of purchase by the initial
purchaser, and a maximum of 6 years after production, shall apply to the
following products.
• Fireplace insert body
• Fireplace body
• Fireplace cassette body
• Fireplace door body
A 24-month warranty period is offered as of the date of purchase by the
initial customer for the following products:
• Vertical sliding technology
• Control elements such as handles, actuating levers, shock absorbers
• Electric and electronic components such as fans, speed regulators, original parts
• All purchased articles and safety equipment
Spartherm offers a 6-month warranty as of the date of purchase by the
initial customer for
• Wearing parts in the fire area such as the fireclay, vermiculite, fire grates,
seals and glass ceramic.
The warranty period is not extended as a result of the provision of services
within the scope of this warranty, unless the product has been replaced
completely.
GB 22
Page 23

GB
7.3 WARRANTY EXTENSION TO 10 YEARS FOR THE
INITIAL PURCHASERS OF THE FIREPLACE INSERT
BODY.
Spartherm Feuerungstechnik GmbH has extended the warranty time of the
body of fireplace insert for initial purchasers from 5 to 10 years. This requires,
however, that the fireplace insert is registered online using the serial number
within six months of purchase on the homepage w ww.spar therm.com/Service/
7.4 WARRANTY EXCLUSION
The following in particular is excluded from the warranty:
• Product wear
• Fireclay/vermiculite
These are natural products that are subject to expansion and shrinking each
time they are heated. This can cause cracks to appear. The combustion chamber linings will remain fully functional, provided they are still in position and
are not broken.
The surfaces:
• Discolouration of the coating or galvanic surfaces due to excessive thermal
loading or overheating.
The vertical sliding mechanism:
• Failure to comply with installation guidelines, resulting in overheating of
the guide rollers and bearings.
The seals:
• Reductions in sealing strength due to seal hardening as a result of thermal
loading.
The viewing panes:
• Contamination due to soot or other burnt-on residue of combustion mate-
rials and visual deterioration due to thermal loading.
• Incorrect transportation and/or incorrect storage.
• Inappropriate or careless handling of fragile components, such as glass
or ceramics.
• Incorrect handling and/or use
• Lack of maintenance
• Incorrect installation or connection of the appliance
• Failure to observe the installation and operating instructions
• Technical changes to the device by third parties Furthermore
The warranty does not cover:
• System parts which were not provided by the manufacturer
• Products containing accessories which have not been authorised by the
manufacturer
• Products which display characteristics which indicate incorrect repairs or
other interventions
7.5 WARRANTY CONDITIONS
The warranty declaration requires that the consumer/dealer accepts this warranty declaration from Spartherm in writing.
This is done via:
a) Registration within 24 months as of the date of purchase on the Spartherm
homepage; go to www.spartherm.com/Service/Extended warranty and
b) presentation of the original proof of purchase for the Spartherm product
which is covered by this warranty and
c) by written error notification/presentation of the product as well as proof of
malfunctioning within the warranty period vis-à-vis Spartherm. In particular,
proof can be provided by presenting of proof of purchase.
For this warranty to be effective, correct installation and maintenance as per
the operating instructions and the recognised rules of engineering are necessary, e.g. by a specialist company or authorised specialist and compliance
with the operating instructions and use of the products as per the technical
and care instructions from Spartherm.
Only components that have been produced or are recommended by Spartherm
may be used as spare parts.
GB 23
Page 24

7.6 THE WARRANTY BECOMES VOID UPON:
Installation, maintenance, repair and care of products by non-experts, damage
to the product caused by the seller, installer or third parties, damage which
can be attributed to normal wear or wilful damage - damage caused by negligence shall be considered contributory negligence -, incorrect installation or
commissioning, lack of or faulty maintenance or if products were/are not used
as intended. In the event of damage due to force majeure or natural disasters,
in particular, but not limited to, flooding, fires and frost damage, use of spare
parts which were neither produced nor recommended by Spartherm.
7.7 SERVICES IN THE EVENT OF A WARRANTY CLAIM
Spartherm can choose to either repair the faulty product, replace the product
or reimburse the initial purchaser/dealer the purchase price, whereby precedence should be given to repairs. As a rule and subject to prior approval
from Spartherm, the consumer shall allow the faulty product to be repaired
/ replaced on site by an expert. In such cases, the warranty shall cover free
delivery of the necessary parts. Should Spartherm decide in a written approval
to perform repair work etc. itself, it shall bear the costs for spare parts, installation and labour as well as any expenditure for transport and dispatch of the
product. The consumer must make the product accessible.
In the event of replacement, the old product shall be replaced free of charge
with a new product of the same kind, quality and type. If the product is no
longer produced at the time of notification of defects, Spartherm is entitled
to deliver a similar product. Transport / dispatch to and from Spartherm or
to the respective dealer, disassembly, reinstallation of the product and all
other special measures may only be performed subject to prior approval from
Spartherm. Should Spartherm approve the legitimate measure, then it shall
bear the costs incurred during such a measure.
Should it be determined that a product error is not covered by the warranty, the
costs of dispatch and transport of the product shall be borne by the consumer/
dealer. In addition, the consumer must bear the costs, including any labour
costs, which result from examination of the product as well as the costs of
disassembly and reinstallation of the product if such costs are incurred. If,
having been provided with information about the non-validity of the warranty
and the anticipated costs associated with repair work, the customer requests
the performance of such work, he/she must then additionally bear the costs of
the spare parts and labour costs.
7.8 INFORMATION ON THE WARRANTY PROMISE
SECTION 477 OF THE GERMAN CIVIL CODE (BGB)
The consumer’s statutory warranty claims vis-à-vis the respective seller shall
continue to apply without restrictions and are completely unrelated to this
manufacturer warranty and to whether, in the case of a warranty claim, the
described warranty was invoked or not. At his or her own discretion, the consumer can thus, either in addition to or without asserting the claims from this
warranty, exercise his or her statutory regulated rights of purchase arising
from defects of the purchased goods, in particular supplementary performance, rescission, reduction of purchase price or compensation (see Section
437 BGB) and assert the corresponding separate statutes of limitations in
Section 438 BGB vis-à-vis the seller. This warranty applies without prejudice
to mandatory statutory liability laws.
7.9 LIABILITY
The warranty declaration does not give rise to claims for compensation for
consequential damage of any kind or other claims for damages. This restriction
does not extend to the mandatory statutory provisions according to which the
manufacturer is liable above and beyond the voluntary warranty declaration.
7.10 EXCLUSION PERIOD
Limitation claims from the warranty are to be asserted immediately or at the
latest two months after the defect was detected. Upon expir y of this period,
the rights from this guarantee can no longer be asserted. Claims from this
warranty shall lapse after 6 months from the end of the warranty period.
GB 24
Page 25

7.11 PLACE OF FULFILMENT, JURISDICTION AND
APPLICABLE LAW
This warranty is subject to German law to the exclusion of the UN Convention
on the International Sale of Goods. The place of performance for obligations
arising from this warranty is Melle, Germany. As far as this is permitted,
the place of jurisdiction is the headquarters of Spartherm Feuerungstechnik
GmbH, Melle.
GB
We reser ve the right to make al terations to the t echnical data co ntained herein an d accept no liabilit y
in respec t of any errors made.
GB 25
Page 26

NOTES
GB 26
Page 27

SPARTHERM
DIE WELTMARKE FÜR IHR WOHNZIMMER
The Global brand for your living room | La référence mondiale pour votre salon | Il marchio mondiale per il vostro soggiorno
La marca mundial para su salón | Het merk van wereldformaat voor uw woonkamer | Światowa marka do Państwa salonu
Торговая марка № 1 для Вашего дома
D Ihr Fachhändler | UK Your specialist dealer | F Votre revendeur spécialisé
IT Il vostro rivenditore specializzato | E Sus comercios especializados
NL Uw vakhandelaar | PL Państwa sprzedawca | РУС Ваш дилер
Spartherm Feuerungstechnik GmbH · Maschweg 38 · D-49324 Melle
Phone +49 (0) 5422 94 41-0 · Fax +49 (0) 5422 9441-14 · www.spartherm.com
Service-Hotline 0180 594 41 94
14 Cent/Minute inkl. MwSt. aus den deutschen Festnetzen,
max. 42 Cent/Minute inkl. MwSt. aus den deutschen Mobilfunknetzen
D D
A1-SP-D/GB/FR/IT/ES/NL/PL/RU/20.000/11/2017-DC
 Loading...