

Sparky Group FB 514 Original Instructions Manual
CONCRETE GRINDER
Ташев-Галвинг ООД
www.tashev-galving.com
Original instructions
BETONSCHLEIFER
Originalbetriebsanleitung
PONCEUSE À BÉTON
Notice originale
LEVIGATRICE PER CEMENTO E INTONACO
Istruzioni originali
FRESADORA PARA HORMIGÓN
Instrucciones de uso originales
FRESA PARA CONCRETO
Instrução original para o uso
SZLIFIERKA DO BETONU
Instrukcja oryginalna
ШЛИФОВАТЕЛЬ ПО БЕТОНУ
Оригинальная инструкция по эксплуатации
ШЛІФУВАЛЬНИК ПО БЕТОНУ
Оригінальна інструкція з експлуатації
ФРЕЗА ЗА БЕТОН
Оригинална инструкция за използване
1 – 7
8 – 15
16 – 23
24 – 30
31 – 38
39 – 46
47 – 54
55 – 63
64 – 71
72 – 79
We declare under our sole responsibility that this product fulls all the relevant provisions of the following directives and the harmonized
standards: 200 6/42/ EC, 2004/108/ЕС, 2011/65/ЕС, EN 60745-1, EN 55014-1, EN 55014-2, EN 61000 -3-2, EN 61000-3- 3.
Technical le is stored at SPARKY ELTOS AG, Koubrat Str. 9, 5500 Lovetch, Bulgaria.
Hiermit versichern wir unsere persönliche Haftung, dass dieses Erzeugnis allen einschlägigen Bestimmungen folgender Richtlinien und
entsprechender harmonisierten Standards entspricht:
2006/42/EC, 2004/108/ЕС, 2011/65/ЕС, EN 60745-1, EN 55014-1, EN 55014-2, EN 61000 -3-2, EN 61000 -3-3.
Die technischen Unterlagen werden bei SPARK Y ELTOS AG, Kubrat Str.9, 550 0 Lovetch, Bulgarien, aufbewahrt.
Nous déclarons sous notre responsabilité que ce produit satisfait à l’ensemble des dispositions pertinentes de la présente directives,
respectivement aux normes harmonisées:
2006/42/EC, 2004/108/ЕС, 2011/65/ЕС, EN 60745-1, EN 55014-1, EN 55014-2, EN 61000 -3-2, EN 61000 -3-3.
Le dossier technique est conservé par SPARKY ELTOS AD, 9, rue Kubrat, Lovech, Bulgarie.
Noi dichiariamo sotto la nostra personale responsabilità, che questo prodotto è in conformità a tutte le disposizioni pertinenti della
presente direttive e norme armonizzate:
2006/42/EC, 2004/108/ЕС, 2011/65/ЕС, EN 60745-1, EN 55014-1, EN 55014-2, EN 61000 -3-2, EN 61000 -3-3.
Il fascicolo tecnico viene custodito presso la SPARKY ELTOS, 5500 Lovech, via Kubrat n. 9, Bulgaria
Declaramos bajo nuestra exclusiva responsabilidad que este producto está conforme con todas las disposiciones aplicables de la
presente directrices aplicables y las correspondientes normas armonizadas:
2006/42/EC, 2004/108/ЕС, 2011/65/ЕС, EN 60745-1, EN 55014-1, EN 55014-2, EN 61000 -3-2, EN 61000 -3-3.
El expediente técnico está archivado en SPARKY ELTOS SA, C/ Kubrat, 9, 5500 Lovech, Bulgaria.
Declaramos assumindo a nossa responsabilidade pessoal que este produto está conforme com todas as disposições relevantes da
presente directrizes aplicáveis e respectivos estandartes harmonizados:
2006/42/EC, 2004/108/ЕС, 2011/65/ЕС, EN 60745-1, EN 55014-1, EN 55014-2, EN 61000 -3-2, EN 61000 -3-3.
O expediente técnico ca guardado na SPARK Y ELTOS SA, rua Kubrat, 9, 5500 Lovech, Bulgária
Niniejszym deklarujemy naszą osobistą odpowiedzialnością, że ten produkt spełnia wszystkie odpowiednie postanowienia następujących
dyrektyw i harmonizowanych standardów:
2006/42/EC, 2004/108/ЕС, 2011/65/ЕС, EN 60745-1, EN 55014-1, EN 55014-2, EN 61000 -3-2, EN 61000 -3-3.
Teczka techniczna przechowywana jest w SPARK Y ELTOS AG, Kubrat Str.9, 5500 Lovetch, Bułgaria
Мы заявляем со всей ответственностью, что данный продукт полностью соответствует всем соответствующим требованиям
действующих директив и гармонизированных стандартов:
2006/42/EC, 2004/108/ЕС, 2011/65/ЕС, EN 60745-1, EN 55014-1, EN 55014-2, EN 61000 -3-2, EN 61000 -3-3.
Техническое досье хранится в СПАРКИ ЕЛТОС АД, ул. Кубрат №9, 5500 Лов еч, Болгар ия.
Ми заявляємо під свою вл асну відповідальність, що даний продукт відпов ідає всім ді ючим вимогам директив і гармонізовани х
стандартів: 2006/42 /EC, 2004/108 /ЕС, 2011/65/ЕС, EN 60745-1, EN 55014-1, EN 55014-2, EN 61000- 3-2, EN 61000- 3-3.
Технічне досьє зберігаєтьс я в СПАРКИ ЕЛТОС АД, ул. Кубрат № 9, 5500 Ловеч, Болгарія.
Ние декларираме на своя лична отг оворност, че това изделие отго варя на всички прилож ими изи скв ания на следните
директи ви и харм онизирани стандарти:
2006/42/EC, 2004/108/ЕС, 2011/65/ЕС, EN 60745-1, EN 55014-1, EN 55014-2, EN 61000 -3-2, EN 61000 -3-3.
Техническото доси е се съхранява в СПАРКИ ЕЛТОС АД, ул. Кубрат №9, 5500 Ловеч, Бълг ария.
DECLARATION OF CONFORMITY
KONFORMITÄTSERKLÄRUNG
DECLARATION DE CONFORMITE
DICHIARAZIONE DI CONFORMITÀ
DECLARACIÓN DE CONFORMIDAD
DECLARAÇÄO DE CONFORMIDADE
DEKLARACJA ZGODNOŚCI
ДЕКЛАРАЦИЯ О СООТВЕТСТВИИ
ДЕКЛАРАЦІЯ ПРО ВІДПОВІДНІСТЬ
ДЕКЛАРАЦИЯ ЗА СЪОТВЕТСТВИЕ
www.sparky.eu
1305R03 142397V1
© 2011 SPARKY
1400W
FB 514
Manufacturer
SPARKY Power Tools GmbH
Leipziger Str. 20
10117 Berlin, GERM ANY
23 January 2013
Signature of authorized person
A. Ivanov
Technical director of SPARKY ELTOS AG
11
Ташев-Галвинг ООД
www.tashev-galving.com
8
2
13
7
1
9 10
3
4
12
1
5
6
2
4 5
3
A

Contents
Introduction .........................................................................................................................................................................1
Technical specications
.....................................................................................................................................................3
General power tool safety warnings ................................................................................................................................4
Concrete grinder safety warnings ....................................................................................................................................5
Know your product
.........................................................................................................................................................A/5
Operation..............................................................................................................................................................................5
Maintenance .......................................................................................................................................................................7
Warranty
..............................................................................................................................................................................7
UNPACKING
Ташев-Галвинг ООД
www.tashev-galving.com
Due to modern mass pro duction techniques, it is unlikely that your power tool is faulty or that a part is missing. If you nd
anything wrong, do not operate the tool until the parts have been replaced or the fault has been rectied. Failure to do
so could result in serious personal injury.
ASSEMB LY
The concrete grinder, packed in a metal case, is fully assembled and ready to be operated.
The concrete grinder, packed in a plastic case, is delivered assembled, the auxiliar y handle is mounted but it is not tight-
ened. Select the desired position for the auxiliary handle, and then tighten it by the wrench delivered with the machine.
Introduction
Your new SPARKY power tool will more than satisfy your expectations. It has been manufactured under stringent
SPARKY Qualit y Standards to meet superior performance criteria. You will nd your new tool easy and safe to operate,
and, with proper care, it will give you many years of dependable service.
WARNING:
Carefully read through these original instructions before using your new SPARKY power tool Take special
care to heed the Warnings. Your SPARKY power tool has many features that will make your job faster and
easier. Safety, performance, and dependability have been given top priority in the development of this tool,
making it easy to maintain and operate.
Do not dispose of electrical products together with household waste!
Waste electrical products should not be disposed of with household waste. Please recycle where facilities
exist. Check with your local authority or retailer for recycling advice.
FB 514 – Original instructions
ENVIRONMENTAL PROTECTION
The machine, accessories and packaging should be sorted for environmental-friendly recycling.
The plastic components are labelled for categorised recycling.
EN
1

DESCRIPTION OF SYMBOLS
Ташев-Галвинг ООД
www.tashev-galving.com
The rating plate on your tool may show symbols. These represent important information about the product or instructions on its use.
Double insulated for additional protection
Spindle thread: М14
Conforms to the relevant European Directives
Conforms to the requirements of Russian standards
Conforms to the requirements of Ukrainian standards
Refer to original instructions
YYYY-Www
FB CONCRETE GRINDER
Production period, where the variable symbols are:
YYYY - year of manufacture, ww - calendar week number
EN
2
FB 514

Technical specications
Ташев-Галвинг ООД
www.tashev-galving.com
Model: FB 514
▪ Power input 1400 W
▪ No load speed 10500 min
▪ Spindle thread M14
▪ Spindle thread length 20 mm
▪ Cup wheel arbour Ø22.23 mm
▪ Cup wheel maximum diameter Ø125 mm
▪ New cup wheel maximum thickness 22 mm
▪ Dust extraction port diameter Ø35 mm
▪ Overall dimensions:
Length 325 mm
Width 190 mm
Height 200 mm
▪ Weight (EPTA Procedure 01/2003) 3.1 kg
▪ Safety class (EN 60745-1) II
NOISE AND VIBRATION INFORMATION
Measured values determined according to EN 60745.
Noise emission
A-weighted sound pressure level LpA 91 dB (A)
Uncertainty КpA 3 dB (A)
A-weighted sound power level LwA 102 dB (A)
Uncertainty КwA 3 dB (A)
Wear hearing protection!
Vibration emission *
Total vibration values (vector sum in the three axes) determined according to EN 60745:
Grinding concrete
Vibration emission value ah 6,0 m/s
Uncertainty К 2,0 m/s
* The vibration emission values are determined according to 6.2.7 EN 60745-1.
2
2
-1
The vibration emission level given in this information sheet has been measured in accordance with a standardised test
given in EN 60745 and may be used to compare one tool with another. It may be used for a preliminary assessment of
exposure.
The declared vibration emission level represents the main applications of the tool. However if the tool is used for dif-
ferent applications, with different accessories or poorly maintained, the vibration emission may differ. This may signicantly increase the exposure level over the total working period.
An estimation of the level of exposure to vibration should also take into account the times when the tool is switched
off or when it is running but not actually doing the job. This may signicantly reduce the exposure level over the total
working period.
Maintain the power tool and the accessories and keep your hands warm during operation to reduce the harmful effect
of vibrations.
Dust from material such as paint containing lead, some wood species, minerals and metal may be harmful. Contact
with or inhalation of the dust may cause allergic reactions and/or respiratory diseases to the operator or bystanders.
Certain kinds of dust are classied as carcinogenic such as oak and beech dust especially in conjunction with additives
for wood conditioning (chromate, wood preservative). Material containing asbestos must only be treated by specialists.
▪ Where the use of a dust extraction device is possible it shall be used.
▪ To achieve a high level of dust collection, use vacuum cleaner for wood or for wood and/or minerals together with
this tool.
▪ The work place must be well ventilated.
▪ The use of a dust mask of filter class P2 is recommended.
Follow national requirements for the materials you want to work with.
Original instructions
3
EN

General power tool
Ташев-Галвинг ООД
www.tashev-galving.com
b) Use personal protective equipment. Always
safety warnings
WARNING! Read all safety warnings and
all instructions. Failure to follow the warnings and
instructions may result in electric shock, fire and/or
serious injury.
Save all warnings and instructions for future
reference.
The term “power tool” in the warnings refers to your
mains-operated (corded) power tool or battery-operated
(cordless) power tool.
1. WORK AREA SAFETY
a) Keep work area clean and well lit. Cluttered or
dark areas invite accidents.
b) Do not operate power tools in explosive atmos-
pheres, such as in the presence of flammable
liquids, gases or dust. Power tools create sparks
which may ignite the dust or fumes.
c) Keep children and bystanders away while op-
erating a power tool. Distractions can cause you
to lose control.
2. ELECTRICAL SAFETY
a) Power tool plugs must match the outlet. Never
modif y the plug in any way. Do not use any
adapter plugs with earthed (grounded) power
tools. Unmodified plugs and matching outlets will
reduce risk of electric shock.
b) Avoid body contact with earthed or grounded
surfaces, such as pipes, radiators, ranges and
refrigerators. There is an increased risk of electric
shock if your body is earthed or grounded.
c) Do not expose power tools to r ain or wet condi-
tions. Water entering a power tool will increase the
risk of electric shock.
d) Do not abuse the cord. Never use the cord for
carrying, pulling or unplugging the power tool.
Keep cord away from heat, oil, sharp edges or
moving parts. Damaged or entangled cords in-
crease the risk of electric shock.
e) When operating a power tool outdoors, use an
extension cord suitable for outdoor use. Use of
a cord suitable for outdoor use reduces the risk of
electric shock.
f) If operating a power tool in a damp location
is unavoidable, use a residual current device
(RCD) protected supply. Use of an RCD reduces
the risk of electric shock.
3. PERSONAL SAFETY
a) Stay alert, watch what you are doing and use
common sense when operating a power tool.
Do not use a power tool while you are tired or
under the influence of drugs, alcohol or medication. A moment of inattention while operating
power tools may result in serious personal injury.
c) Prevent unintentional starting. Ensure the
d) Remove any adjusting key or wrench before
e) Do not overreach. Keep proper footing and bal-
f) Dress properly. Do not wear loose clothing or
g) If devices are provided for the connection of
4. POWER TOOL USE AND CARE
a) Do not force the power tool. Use the correct
b) Do not use the power tool if the switch does
c) Disconnect the plug from the power source
d) Store idle power tools out of the reach of chil-
e) Maintain power tools. Check for misalignment
f) Keep cutting tools sharp and clean. Properly
g) Use the power tool, accessories and tool bits
wear eye protection. Protective equipment such
as dust mask, non-skid safety shoes, hard hat, or
hearing protection used for appropriate conditions
will reduce personal injuries.
switch is in the off-position before connecting
to power source and/or battery pack, picking
up or carrying the tool. Carrying power tools with
your finger on the switch or energising power tools
that have the switch on invites accidents.
turning the power tool on. A wrench or a key left
attached to a rotating part of the power tool may
result in personal injury.
ance at all times. This enables better control of
the power tool in unexpected situations.
jewellery. Keep your hair, clothing and gloves
away from moving parts. Loose clothes, jewel-
lery or long hair can be caught in moving parts.
dust extraction and collection facilities, ensure these are connected and properly used.
Use of dust collection can reduce dust-related hazards.
power tool for your application. The correct
power tool will do the job better and safer at the
rate for which it was designed.
not turn it on and off. Any power tool that cannot be controlled with the switch is dangerous and
must be repaired.
and/or the batter y pack from the power tool
before making any adjustments, changing accessories, or storing power tools. Such preven-
tive safety measures reduce the risk of starting the
power tool accidentally.
dren and do not allow persons unfamiliar with
the power tool or these instructions to operate
the power tool. Power tools are dangerous in the
hands of untrained users.
or binding of moving parts, breakage of parts
and any other condition that may affect the
power tool’s operation. If damaged, have the
power tool repaired before use. Many accidents
are caused by poorly maintained power tools.
maintained cutting tools with sharp cutting edges
are less likely to bind and are easier to control.
etc. in accordance with these instructions, taking into account the working conditions and
the work to be performed. Use of the power tool
for operations different from those intended could
result in a hazardous situation.
EN
4
FB 514

5. SERVICE
Ташев-Галвинг ООД
www.tashev-galving.com
a) Have your power tool serviced by a qualified
repair person using only identical replacement
parts. This will ensure that the safety of the power
tool is maintained.
Concrete grinder
safety warnings
WARNING: Before connecting a tool to a power
source be sure that the voltage supply is the same as that
specied on the nameplate of the tool.
▪ A power source with a voltage greater than that speci-
fied for the tool can result in serious injury to the user,
as well as damage to the tool.
▪ If in doubt, do not plug in the tool.
▪ Using a power source with a voltage less than the
nameplate rating is harmful to the motor.
Always wear eye and ear protection
and use a dust mask. The dust and abrasive particles
separated during operation may seriously injure your
health.
▪ Hold power tool by insulated gripping surfaces
only, when performing an operation where the
cutting accessory may contact hidden wiring or
its own cord. Cutting accessory contacting a “live”
wire may make exposed metal parts of the power tool
“live” and could give the operator an electric shock.
▪ Always switch off and unplug the power tool prior
to any adjustment, servicing or maintenance.
▪ The outer metal parts and the bits may get hot after
continuous operation.
▪ Use clamps or a vice to secure your work whenever
possible.
▪ Always switch off the machine and wait until the spin-
dle has come to a complete standstill before placing
it down.
▪ Do not force the machine: let the tool do the work at a
reasonable speed. Overloading will occur if too much
pressure is applied and the motor slows resulting in
inefficient work and possible damage to the motor.
▪ Rags, cloths, cord, string and the like should never be
left around the work area.
▪ Remove any nails, screws, etc. from the processed
surface.
▪ Before using the tool on an actual work piece, switch
on and let it run for a while. Operate the tool at least
200 mm away from your face and body.
▪ Always be sure you have a firm footing. Be sure no
one is below when using the tool in high locations.
▪ Hold the power tool firmly.
▪ Keep your hands away from rotating parts. Do not
touch the bit or the work piece immediately after op-
eration - they may be extremely hot and you may get
serious burns.
▪ The tool must be used only for its prescribed purpose.
Any use other than those mentioned in this Manual
will be considered a case of misuse. The user and not
the manufacturer shall be liable for any damage or injury resulting from such cases of misuse.
▪ To use this tool properly, you must observe the safety
regulations, the assembly instructions and the operating instructions found in this Manual. All persons who
use and ser vice the machine have to be acquainted
with this Manual and must be informed about its potential hazards. Children and frail people must not use
this tool. Children should be supervised at all times if
they are in the area in which the tool is being used. It
is also imperative that you observe the accident prevention regulations in force in your area. The same
applies for general rules of occupational health and
safety.
▪ The manufacturer shall not be liable for any changes
made to the tool nor for any damage resulting from
such changes.
Even when the tool is used as prescribed it is not possible to eliminate all residual risk factors. The following
hazards may arise in connection with the tool’s construc tion and design:
▪ Damage to hearing if effective hearing protection is
not worn.
▪ Always unplug the machine prior to any adjustment,
servicing or maintenance including replacing the accessories.
▪ The power tools must not be used outdoors in rainy
weathe r, or in mois t envi ron ment (af ter rain) or in clos e
vicinity with easily flammable liquids and gases. The
working place should be well lit.
Know your product
Before using the power tool, familiarize yourself with all
the operating features and safety requirements.
Use the tool and accessories only for the applications
intended. All other applications are expressly ruled out.
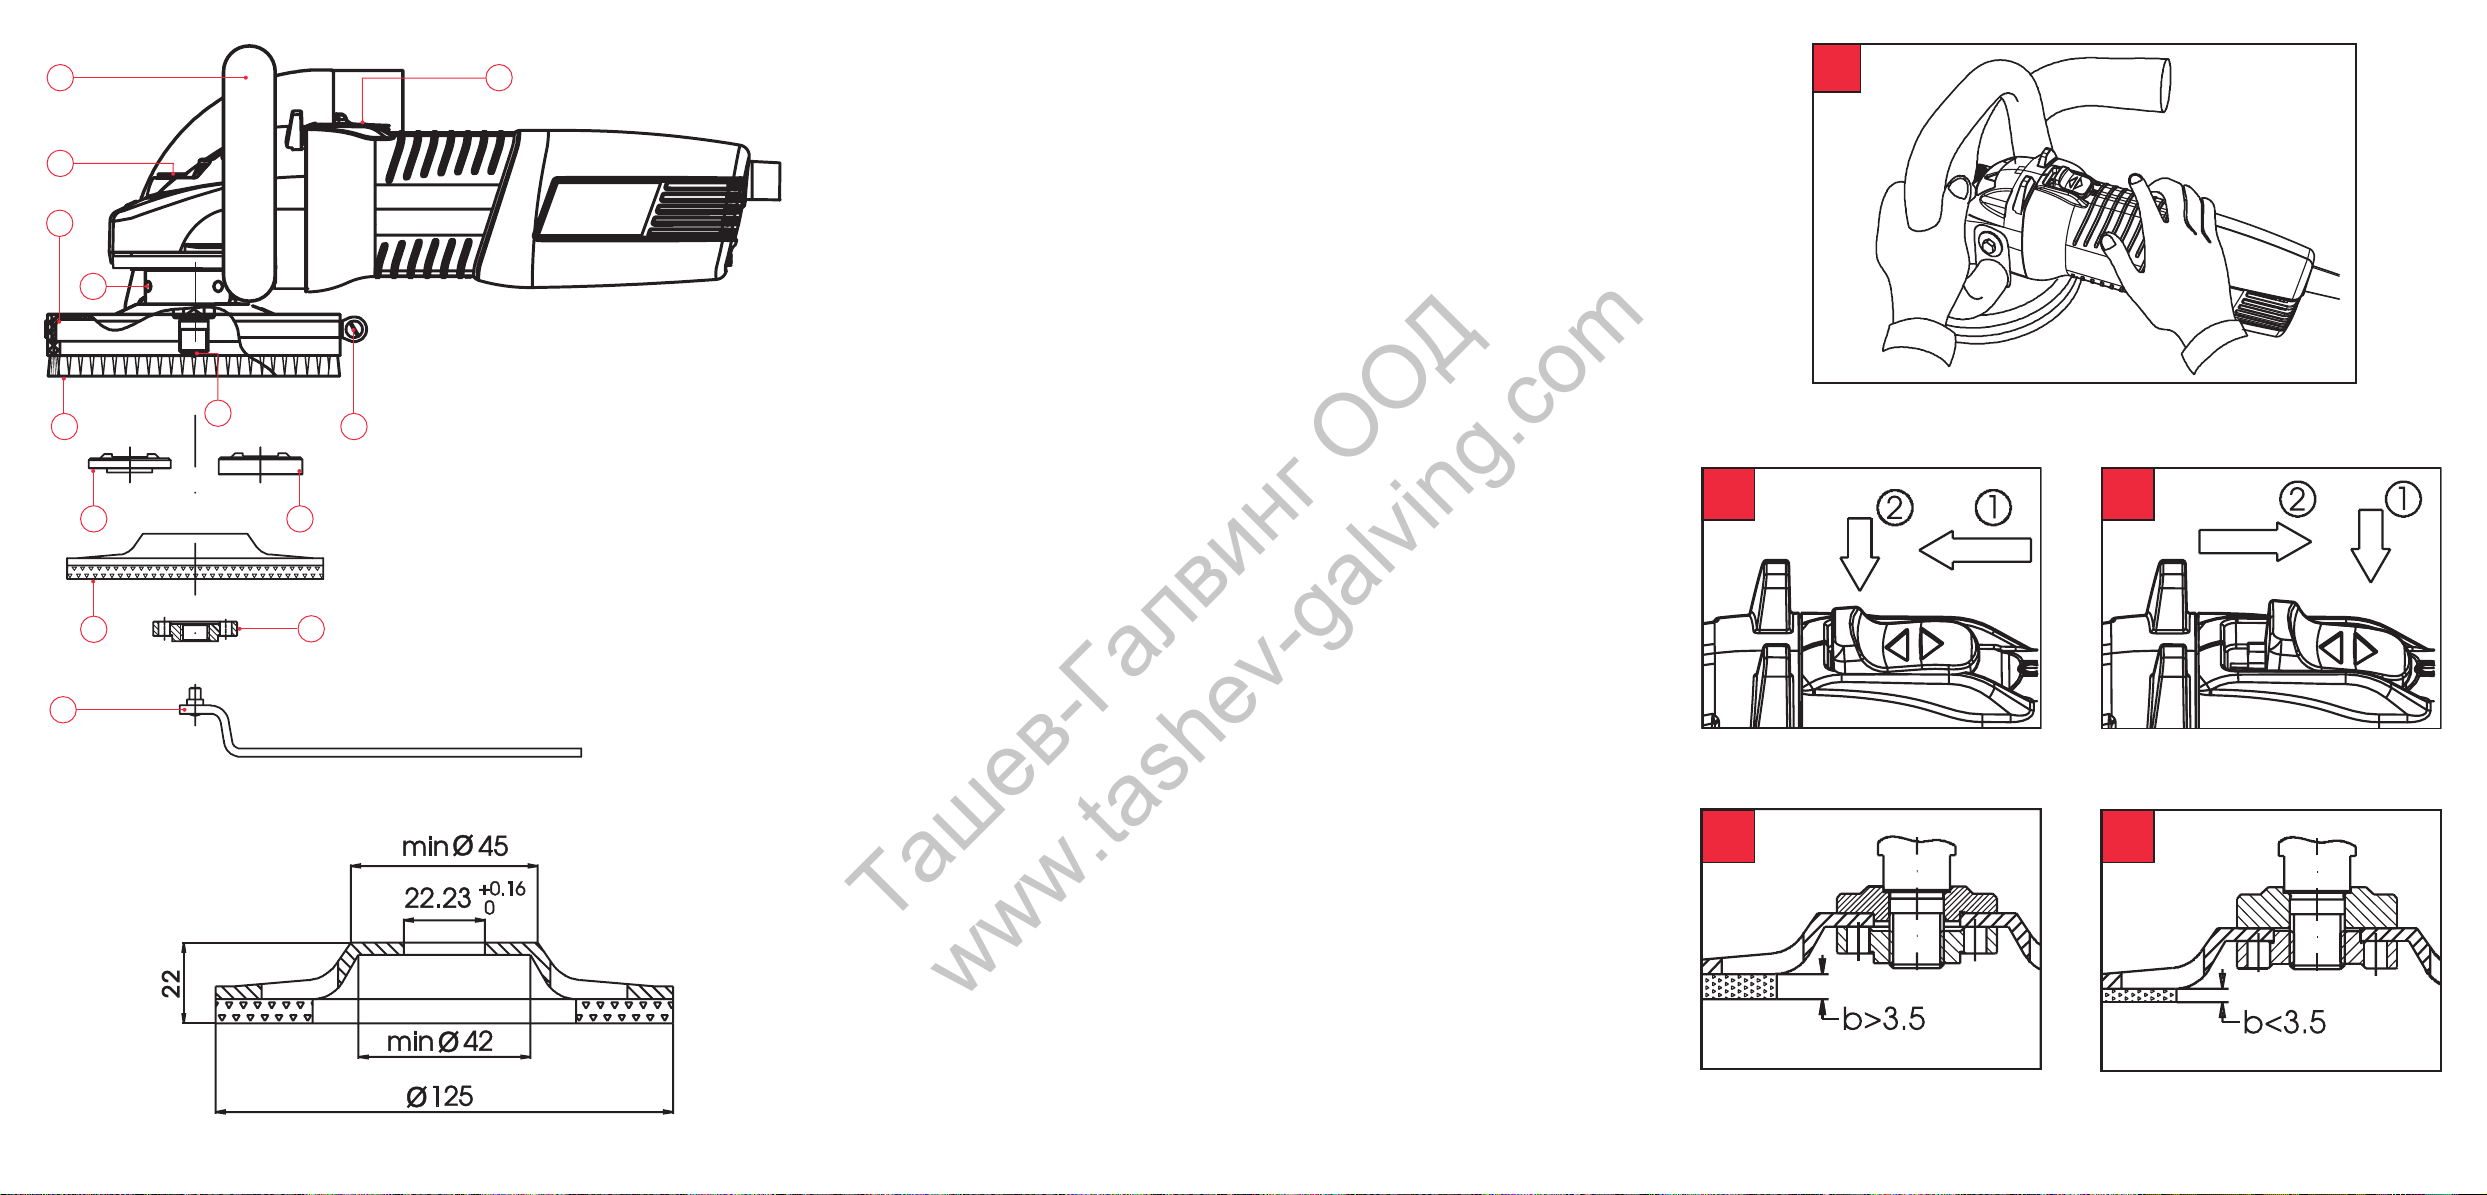
1. Spindle
2. Wheel guard
3. Base support washer
4. Diamond cup wheel
5. Flat support washer
6. Lock nut
7. ON/OFF switch
8. Spindle lock button
9. Brush shield
10. Fastening bracket
11. Auxiliary handle
12. Lock nut wrench
13. Screw
Operation
This power tool is supplied from single-phase alternating
current mains only. It is double insulated according to EN
60745-1, IEC 60745 and can be connected to grounded
or not grounded sockets. This power tool is radio sup-
pressed in compliance with EMC Directive 2004/108/
EC.
Original instructions
EN
5

This power tool is designed for rough and ne grinding
Ташев-Галвинг ООД
www.tashev-galving.com
concrete and rock material with the purpose of refurbishing before laying plaster and protective coating. The machine is designed for dry grinding only.
PRIOR TO INITIAL OPERATION
▪ Make sure the power supply voltage corresponds to
the value indicated on the name plate with technical
data of the tool.
▪ Always check the position of ON/OFF switch. The
power tool must be connected to the power supply
socket only when this switch is in OFF position.
▪ Make sure that the cord and the plug are in order. If the
replacement of the supply cord is necessary, this has
to be done by the manufacturer or his agent in order
to avoid a safety hazard.
WARNING: Always switch off and unplug the
power tool prior to any adjustment, servicing or maintenance.
▪ Always use the auxiliary handle and hold the machine
firmly with both hands for maximum control over
torque reaction or kickback upon starting. (Fig. 1)
SWITCHING ON - SWITCHING OFF
Before plugging in the tool, always check to see that the
switch trigger actuates properly and returns to the “OFF”
position when released.
1. To switch on: Push the slider of the switch slider (7)
forward until its front end sags thus xing itself. (Fig. 2)
2. To switch off: Press the back lifted end of the switch
slider (7) and release it in order to move back in its
initial position. (Fig. 3)
ELECTRONIC DEVICE
This power tool is equipped with an electronic device
featuring:
▪ Safety upon mains drop-out: In case of mains drop-
out (or temporary drop-out for time t > 0,5 s), when the
ON/OFF switch is in ON position, the machine should
not operate after supply recovering. To start operating
the machine, first switch off and then switch on the
lever of ON/OFF switch.
▪ Soft start and overload protection: This feature en-
sures starting without jerks and prevents origination
of supply voltage fluctuations;
▪ Virtually constant speed under wide range of loads;
▪ Brief overload protection: Upon major brief overloads
a current overload protection actuates, which reduces
harshly the rotation speed. To resume normal operation withdraw the machine from the material.
▪ Thermal overload protection: Upon minor long over-
loads, the thermal overload protection actuates. The
electronic device switches the machine off before the
temperature reaches critical value and the machine
switches from operating to safety mode with lower
motor speed. The normal operation is disabled. In
safety mode the motor rotates with lower speed to
facilitate cooling, but the machine is DISABLED. After
cooling down for 3 -5 minutes the machine can be op erated again. To resume operation switch the trigger
off and on again.
WHEEL GUARD
The wheel guard (2) must always be mounted on the
machine!
ASSEMBLY, REPLACING AND ADJUSTING
THE CUP WHEEL POSITION
Make sure the cup wheel diameter and thickness do not
exceed the values stated in the technical specications.
The maximum admissible speed indicated on the wheel
must not be less than the machine no load speed.
Fix the spindle (1) by pressing the lock button (8) on the
gear case.
spindle is still rotating!
With this button depressed turn the spindle till its pro-
nounced going deeper. Unscrew lock nut (6) by the lock
nut wrench (12).
In view of the cup wheel wear and in order to achieve
optimum dust extraction a possibility is provided to adjust
the cup wheel position to the wear of the cup wheel.
When placing a new cup wheel arrange the components
on the spindle in the following order: base support wash-
er (3); cup wheel (4); lock nut (6) with its at end towards
the cup wheel as shown on Fig. 4.
convex end towards the cup wheel shall make tightening the cup wheel impossible.
In case the cup wheel is half worn out or more, arrange
the components on the spindle in the following order: at
support washer (5); cup wheel (4); lock nut (6) with its
convex end towards the cup wheel as shown on Fig. 5.
end towards the cup wheel shall obstruct centring the
cup wheel thus causing excessive vibration and may
result in personal injury.
the machine with the new wheel at no load mode for
minimum 30 seconds. Vibrating or otherwise improperly rotating wheels must be replac ed immediately and
discarded.
In case of changing the cup wheel position adjust it or
replace the brush shield if necessary.
ADJUSTING (REPLACING) THE BRUSH
SHIELD POSITION
The brush shield (9) ensures decreasing the dust emission in the environment to the utmost. The brush shield
wears out along with the wheel. When replacing the
wheel if necessary change the brush as well. Loosen the
WARNING: Never press button (8) while the
WARNING: Placing the lock nut (6) with its
WARNING: Placing the lock nut with its flat
WARNING: After replacing the wheel, operate
EN
6
FB 514

screw in bracket (10) and remove the old brush. Place
Ташев-Галвинг ООД
www.tashev-galving.com
the new brush, taking care that the edge of the wheel
guard (2) contacts the brush rib. Place the bracket (10)
back and fasten it.
AUXILIARY HANDLE
The auxiliary handle (11) is fastened to the gear case
through two screws. Always use the auxiliar y handle
and hold the machine rmly with both hands. (Fig. 1)
DUST EXTRACTION
This power tool must only be used with a dust extraction
system. In addition, always wear approved dust mask.
Always make sure the vacuum cleaner that you use is
designed for extraction of masonry dust. Connect the
vacuum cleaner to the dust extraction port on the wheel
guard.
We recommend using industrial vacuum cleaner with
minimum technical parameters: airow 60 l/s and created sub-pressure (vacuum) 180 mbar.
CLEANING
For safe operation always keep the machine and its ventilation slots clean.
Regularly check to see if any dust or foreign matter has
entered the grills near the motor and around the switches. Use a soft brush and/or air jet to remove any accumulated dust. Wear safety glasses to protect your eyes
whilst cleaning.
Exterior plastic parts may be cleaned with a damp cloth
and mild detergent if necessary.
WARNING: Never use alcohol, petrol or other
cleaning agent. Never use caustic agents to clean
plastic parts.
WARNING: Water must never come into
contact with the tool.
ACCESSORIES TO BE USED WITH THIS
POWER TOOL
Diamond cup wheel Ø125 x Ø22.23 x 22 mm
WARNING! These accessories or attachments are rec-
ommended for use with your SPARK Y tool specied in
this manual. The use of any other accessories or attachments might present a risk of injury to persons. Only use
accessory or attachment for its stated purpose. If you
need any assistance for more details regarding these
accessories, ask your local SPARKY service centre.
Maintenance
WARNING: Always ensure that the tool is
switched off and unplugged before attempting to perform inspection or maintenance.
IMPORTANT! To assure product safety and reliability,
repairs, maintenance and adjustment (including brush
inspection and replacement) should be performed by
certied service centres or other qualied service or-
ganisations, always using genuine replacement parts.
Warranty
The guarantee period for SPARKY power tools is determined in the guarantee card.
Faults due to normal wear, overloading or improper handling will be excluded from the guarantee.
Faults due to defective materials implemented as well as
defects in workmanship will be corrected free of charge
through replacement or repair.
The complaints for defective SPARK Y power tools will
be recognized if the machine is sent back to the dealer
or is presented to the authorised warranty service centre
undismantled, in its initial condition.
BRUSH REPLACEMENT
This power tool is equipped with auto-stop brushes.
When the carbon brushes are worn out, the machine
switches itself off. In this case both brushes must be replaced simultaneously with genuine brushes at SPARKY
service centre for warranty and post-warranty service.
GENERAL INSPECTION
Regularly inspect all fasteners and ensure they are
properly tightened. Should any of the screws be loose,
retighten it immediately to avoid hazards.
In case the screws (13) loosen they have to be tightened
rmly. Prior to tightening you must lay thread locking ad-
hesive over each screw thread.
Re-lubricate all moving parts at regular intervals.
If the replacement of the supply cord is necessary, this
has to be done by the manufacturer or his agent in order
to avoid a safety hazard.
Notes
Carefully read the entire Original Instructions before using this product.
The manufacturer reserves the right to make changes
and improvements to the products and to alter specications without prior notice.
Specications may differ from country to country.
Original instructions
EN
7

Inhalt
Einführung ............................................................................................................................................................................8
Technische Angaben
.........................................................................................................................................................10
Allgemeine Sicherheitshinweise für Elektrowerkzeuge ....................................................................................................11
Sicherheitshinweise für Betonschleifer ..............................................................................................................................12
Bekanntmachung mit dem Elektrowerkzeug
.................................................................................................................A /13
Bedienungsanleitung ..........................................................................................................................................................13
Wartung ..............................................................................................................................................................................15
Garantie ..............................................................................................................................................................................15
AUSPACKEN
Ташев-Галвинг ООД
www.tashev-galving.com
Überprüfen Sie unmittelbar nach dem Auspacken ob sämtliche Bestandteile und das beschriebene Zubehör mitge-
liefert wurden. Sollte dies nicht der Fall sein, wenden Sie sich bitte umgehend an Ihren Fachhändler bei dem das
Elektrowerkzeug gekauft wurde. Dies trifft auch dann zu, wenn Sie den Eindruck haben mit dem Gerät ist etwas nicht
in Ordnung. Eine Nichtbeachtung dieser Empfehlung kann zu schweren Unfällen führen.
ZUSAMMENBAU
Der Betonschleifer ist vormontiert und betriebsfertig, in einer Metallgehäuse lieferbar.
Der Betonschleifer ist vormontiert und verpackt in einem Kunststoff-Gehäuse, mit angesetztem jedoch nicht fest ange-
zogenem Zusatzhandgriff lieferbar. Der Zusatzhandgriff wird nach der Wahl der gewünschten Arbeitsposition mit Hilfe
des in der Packung angelegten Schlüssels befestigt.
Einführung
Das von Ihnen erworbene Elektrowerkzeug wird Ihre Erwartungen übersteigen. Es ist gemäß den hohen Qualitätsstandards von SPARKY hergestellt, die den strengen Anforderungen des Verbrauchers entsprechen. Einfach in der
Bedienung und ungefährlich bei richtiger Handhabung, wird dieses Gerät bei bestimmungsgemäßem Gerbrauch Ihnen
lange Jahre zuverlässig dienen.
WARNUNG!
Lesen Sie die ganze Bedienungsanleitung aufmerksam durch, bevor Sie das neu erworbene SPARKY –
Elektrowerkzeug in Betrieb nehmen. Beachten Sie besonders die Texte, die mit dem Wört „Warnung“ be-
ginnen. Ihr SPARKY - Elektrowerkzeug besitzt viele Eigenschaften, die Ihre Arbeit erleichtern werden. Bei der
Entwicklung dieses Elektrowerkzeuges ist höchste Aufmerksamkeit der Sicherheit, den Betriebseigenschaften und der Zuverlässigkeit gewidmet worden, die es einfach zur Wartung und Bedienung machen.
Keine elektrischen Geräte zusammen mit dem Hausmüll wegwerfen!
Die Abfälle von elektrischen Erzeugnissen sollen nicht zusammen mit dem Hausmüll gesammelt werden.
Für eine umweltgerechte Entsorgung geben Sie Ihre alten / defekten Elektrogeräte bitte in der nächsten
kommunalen Sammelstelle ab.
DE
UMWELTSCHUTZ
Angesichts des Umweltschutzes sollten das Elektrowerkzeug, die Zubehörteile und die Verpackung einer
geeigneten Wiederverwertung zugeführt werden.
Zum sortenreinen Recycling sind die Teile, hergestellt aus Kunststoffen, entsprechend gekennzeichnet.
8
FB 514

BEDEUTUNG DER SYMBOLE
Ташев-Галвинг ООД
www.tashev-galving.com
Auf dem Typenschild des Elektrowerkzeuges sind spezielle Symbole dargestellt. Sie stellen wichtige Information über
das Produkt oder Instruktionen für seine Nutzung dar.
Doppelte Isolierung für zusätzlichen Schutz
Spindelgewinde: M14
Entspricht den einschlägigen Europäischen Richtlinien
Entspricht den Anforderungen der russischen normativen Dokumente
Entspricht den Anforderungen der ukrainischen normativen Dokumenten
Lesen Sie die Bedienungsanleitung
YYYY-Www
FB BETONSCHLEIFER
Zeitabschnitt der Produktion, wobei die variablen Symbole sind:
YYYY - Kalenderjahr der Produktion, ww - laufende Kalenderwoche
Originalbetriebsanleitung
DE
9

Technische Angaben
Ташев-Галвинг ООД
www.tashev-galving.com
Modell: FB 514
▪ Aufnahmeleistung 1400 W
▪ Leerlaufgeschwindigkeit 10500 min
▪ Anschlussgewinde der Spindel M14
▪ Gewindelänge der Spindel 20 mm
▪ Anschlussdurchmesser der Schleifscheibe Ø22.23 mm
▪ Höchster Durchmesser der Schleifscheibe Ø125 mm
▪ Höchste Dicke einer neuen Schleifscheibe 22 mm
▪ Durchmesser der Öffnung zum Anschluss der Staubabführung Ø35 mm
▪ Abmessungen:
Länge 325 mm
Breite 190 mm
Höhe 200 mm
▪ Gewicht (EPTA Procedure 1/2003) 3.1 kg
▪ Schutzklasse (EN 60745-1) II
GERÄUSCH-/VIBRATIONSINFORMATION
Messwerte ermittelt entsprechend EN 60745.
Geräuschemissionswerte
Der A-bewertete Schalldruckpegel LpA 91 dB (A)
Unsicherheit КpA 3 dB (A)
Der A-bewertete Schalleistungspegel LwA 102 dB (A)
Unsicherheit КwA 3 dB (A)
Gehörschutz tragen!
Schwingungsemissionswerte *
Schwingungsgesamtwerte (Vektorsumme dreier Richtungen) ermittelt entsprechend EN 60745: Fräsen von Beton
Schwingungsemissionswert ah 6,0 m/s
Unsicherheit К 2,0 m/s
* Messwerte ermittelt nach 6.2.7 EN 60 745-1.
-1
2
2
Der in diesen Anweisungen angegebene Schwingungspegel ist entsprechend einem in EN 60745 genormten Messver-
fahren gemessen worden und kann für den Vergleich von Elektrowerkzeugen miteinander verwendet werden. Er eignet
sich auch für eine vorläufige Einschätzung der Schwingungsbelastung.
Der angegebene Schwingungspegel repräsentiert die hauptsächlichen Anwendungen des Elektrowerkzeugs. Wenn
allerdings das Elektrowerkzeug für andere Anwendungen, mit abweichenden Einsatzwerkzeugen oder ungenügender
Wartung eingesetzt wird, kann der Schwingungspegel abweichen. Dies kann die Schwingungsbelastung über den
gesamten Arbeitszeitraum deutlich erhöhen.
Für eine genaue Abschätzung der Schwingungsbelastung sollten auch die Zeiten berücksichtigt werden, in denen das
Gerät abgeschaltet ist oder zwar läuft, aber nicht tatsächlich im Einsatz ist. Dies kann die Schwingungsbelastung über
den gesamten Arbeitszeitraum deutlich reduzieren.
Pflegen Sie das Gerät und die Einsatzwerkzeuge mit Sorgfalt. Halten Sie Ihre Hände warm während der Arbeit – dies
wird die schädliche Einwirkung erhöhter Schwingungen reduzieren.
Stäube von Materialien wie bleihaltigem Anstrich, einigen Holzarten, Mineralien und Metall können gesundheitsschädlich sein. Berühren oder Einatmen der Stäube können allergische Reaktionen und/oder Atemwegserkrankungen des
Benutzers oder in der Nähe befindlicher Personen hervorrufen.
Bestimmte Stäube wie Eichen- oder Buchenstaub gelten als krebserzeugend, besonders in Verbindung mit Zusatz-
stoffen zur Holzbehandlung (Chromat, Holzschutzmittel). Asbesthaltiges Material darf nur von Fachleuten bearbeitet
werden.
▪ Benutzen Sie möglichst eine Staubabsaugung.
▪ Um bei der Arbeit mit diesem Elektrowerkzeug ein gutes Staubabfangen zu gewährleisten, benutzen Sie einen
Staubabsauger, der für Holzstaub oder für Holz- und mineralischen Staub bestimmt ist.
▪ Sorgen Sie für gute Belüftung des Arbeitsplatzes.
▪ Es wird empfohlen, eine Atemschutzmaske mit Filterklasse P2 zu tragen.
Beachten Sie in Ihrem Land gültige Vorschriften für die zu bearbeitenden Materialien.
DE
10
FB 514

Allgemeine
Ташев-Галвинг ООД
www.tashev-galving.com
Sicherheitshinweise
für Elektrowerkzeuge
WARNUNG! Lesen Sie alle Sicherheits-
hinweise und Anweisungen. Versäumnisse bei der
Einhaltung der Sicherheitshinweise und Anweisungen
können elektrischen Schlag, Brand und/oder schwere
Verletzungen verursachen.
Bewahren Sie alle Sicherheitshinweise und
Anweisungen für die Zukunft auf.
Der in den Sicherheitshinweisen verwendete Begriff
„Elektrowerkzeug“ bezieht sich auf netzbetriebene Elektrowerkzeuge (mit Netzkabel) und auf akkubetriebene
Elektrowerkzeuge (ohne Netzkabel).
1. ARBEITSPLATZSICHERHEIT
a) Halten Sie Ihren Arbeitsbereich sauber und
gut beleuchtet. Unordnung oder unbeleuchtete
Arbeitsbereiche können zu Unfällen führen.
b) Arbeiten Sie mit dem Elektrowerkzeug nicht in
explosionsgefährdeter Umgebung, in der sich
brennbare Flüssigkeiten, Gase oder Stäube
befinden. Elektrowerkzeuge erzeugen Funken,
die den Staub oder die Dämpfe entzünden können.
c) Halten Sie Kinder und andere Personen wäh-
rend der Benutzung des Elektrowerkzeugs
fern. Bei Ablenkung können Sie die Kontrolle über
das Gerät verlieren.
2. ELEKTRISCHE SICHERHEIT
a) Der Anschlussstecker des Elektrowerkzeuges
muss in die Steckdose passen. Der Stecker
darf in keiner Weise verändert werden. Verwenden Sie keine Adapterstecker gemeinsam
mit schutzgeerdeten Elektrowerkzeugen. Un-
veränderte Stecker und passende Steckdosen
verringern das Risiko eines elektrischen Schlages.
b) Vermeiden Sie Körperkontakt mit geerdeten
Oberflächen wie von Rohren, Heizungen, Herden und Kühlschränken. Es besteht ein erhöhtes
Risiko durch elektrischen Schlag, wenn Ihr Körper
geerdet ist.
c) Halten Sie Elektrowerkzeuge von Regen oder
Nässe fern. Das Eindringen von Wasser in ein
Elektrowerkzeug erhöht das Risiko eines elektrischen Schlages.
d) Zweckentfremden Sie das Kabel nicht, um das
Elektrowerkzeug zu tragen, aufzuhängen oder
um den Stecker aus der Steckdose zu ziehen.
Halten Sie das Kabel fern von Hitze, Öl, scharfen Kanten oder sich bewegenden Geräteteilen. Beschädigte oder verwickelte Kabel erhöhen
das Risiko eines elektrischen Schlages.
e) Wenn Sie mi t einem Elek trowerkz eug im Freien
arbeiten, verwenden Sie nur Verlängerungskabel, die auch für den Außenbereich geeignet
f) Wenn der Betrieb des Elektrowerkzeuges in
3. SICHERHEIT VON PERSONEN
a) Seien Sie aufmerksam, achten Sie darauf, was
b) Tragen Sie persönliche Schutzausrüstung
c) Vermeiden Sie eine unbeabsichtigte Inbe-
d) Entfernen Sie Einstellwerkzeuge oder Schrau-
e) Vermeiden Sie eine abnormale Körperhaltung.
f) Tragen Sie geeignete Kleidung. Tragen Sie
g) Wenn Staubabsaug- und -auffangeinrichtun-
4. VERWENDUNG UND BEHANDLUNG
DES ELEKTROWERKZEUGES
a) Überlasten Sie das Gerät nicht. Verwenden Sie
sind. Die Anwendung eines für den Außenbereich
geeigneten Verlängerungskabels verringert das
Risiko eines elektrischen Schlages.
feuchter Umgebung nicht vermeidbar ist, verwenden Sie einen Fehlerstromschutzschalter.
Der Einsatz eines Fehlerstromschutzschalters vermindert das Risiko eines elektrischen Schlages.
Sie tun, und gehen Sie mit Vernunft an die Arbeit mit einem Elektrowerkzeug. Benutzen Sie
kein Elektrowerkzeug, wenn Sie müde sind
oder unter dem Einfluss von Drogen, Alkohol
oder Medikamenten stehen. Ein Moment der
Unachtsamkeit beim Gebrauch des Elektrowerkzeuges kann zu ernsthaften Verletzungen führen.
und immer eine Schutzbrille. Das Tragen persönlicher Schutzausrüstung, wie Staubmaske,
rutschfeste Sicherheitsschuhe, Schutzhelm oder
Gehörschutz, je nach Art und Einsatz des Elektro werkzeuges, verringert das Risiko von Verletzungen.
triebnahme. Vergewissern Sie sich, dass das
Elektrowerkzeug ausgeschaltet ist, bevor Sie
es an die Stromversorgung und/oder den Akku
anschließen, es aufnehmen oder tragen. Wenn
Sie beim Tragen des Elektrowerkzeuges den Finger am Schalter haben oder das Gerät eingeschaltet an die Stromversorgung anschließen, kann dies
zu Unfällen führen.
benschlüssel, bevor Sie das Elektrowerkzeug
einschalten. Ein Werkzeug oder Schlüssel, der
sich in einem drehenden Geräteteil befindet, kann
zu Verletzungen führen.
Sorgen Sie für einen sicheren Stand und halten Sie jederzeit das Gleichgewicht. Dadurch
können Sie das Elektrowerkzeug in unerwar teten
Situationen besser kontrollieren.
keine weite Kleidung oder Schmuck. Halten
Sie Haare, Kleidung und Handschuhe fern
von sich bewegenden Teilen. Lockere Kleidung,
Schmuck oder lange Haare können von sich bewegenden Teilen erfasst werden.
gen montier t werden können, vergewissern
Sie sich, dass diese angeschlossen sind und
richtig verwendet werden. Verwendung einer
Staubabsaugung kann Gefährdungen durch Staub
verringern.
für Ihre Arbeit das dafür bestimmte Elektrowerkzeug. Mit dem passenden Elektrowerkzeug
arbeiten Sie besser und sicherer im angegebenen
Originalbetriebsanleitung
11
DE

Leistungsbereich.
Ташев-Галвинг ООД
www.tashev-galving.com
b) Benutzen Sie kein Elektrowerkzeug, dessen
Schalter defekt ist. Ein Elektrowerkzeug, das
sich nicht mehr ein- oder ausschalten lässt, ist gefährlich und muss repariert werden.
c) Ziehen Sie den Stecker aus der Steckdose
und/oder entfernen Sie den Akku, bevor Sie
Geräteeinstellungen vornehmen, Zubehörteile
wechseln oder das Gerät weglegen. Diese Vor-
sichtsmaßnahme verhindert den unbeabsichtigten
Start des Elektrowerkzeuges.
d) Bewahren Sie unbenutzte Elektrowerkzeuge
außerhalb der Reichweite von Kindern auf.
Lassen Sie Personen das Gerät nicht benutzen, die mit diesem nicht ver traut sind oder
diese Anweisungen nicht gelesen haben. Elek-
trowerkzeuge sind gefährlich, wenn Sie von unerfahrenen Personen benutzt werden.
e) Pflegen Sie Elektrowerkzeuge mit Sorgfalt.
Kontrollieren Sie, ob bewegliche Teile einwandfrei funktionieren und nicht klemmen,
ob Teile gebrochen oder so beschädigt sind,
dass die Funktion des Elektrowerkzeuges beeinträchtigt ist. Lassen Sie beschädigte Teile
vor dem Einsatz des Gerätes reparieren. Viele
Unfälle haben ihre Ursache in schlecht gewarteten
Elektrowerkzeugen.
f) Halten Sie Schneidwerkzeuge scharf und sau-
ber. Sorgfältig gepflegte Schneidwerkzeuge mit
scharfen Schneidkanten verklemmen sich weniger
und sind leichter zu führen.
g) Verwenden Sie Elektrowerkzeug, Zubehör,
Einsatzwerkzeuge usw. entsprechend diesen
Anweisungen. Berücksichtigen Sie dabei die
Arbeitsbedingungen und die auszuführende
Tätigkeit. Der Gebrauch von Elektrowerkzeugen
für andere als die vorgesehenen Anwendungen
kann zu gefährlichen Situationen führen.
5. SERVICE
a) Lassen Sie Ihr Elektrowerkzeug nur von qua-
lifiziertem Fachpersonal und nur mit OriginalErsatzteilen reparieren. Damit wird sicherge-
stellt, dass die Sicherheit des Elektrowerkzeuges
erhalten bleibt.
Sicherheitshinweise
für Betonschleifer
WARNUNG: Bevor Sie das Elektrowerkzeug
ans Netz anschließen, sollten Sie sicherstellen, dass die
Netzspannung der Spannung, angegeben auf dem Typenschild, des Elektrowerkzeuges entspricht.
▪ Eine Stromquelle mit Spannung, höher als die auf
dem Typenschild angegebene Spannung, kann erns-
te Verletzung durch Stromschlag sowie auch Schädi-
gung des Elektrowerkzeuges verursachen.
▪ Falls Sie nicht sicher sind, den Stecker des Elektroge -
rätes nicht in die Steckdose stecken.
▪ Die Verwendung einer Stromquelle mit Spannung,
niedriger als die Spannung, angegeben auf dem Typenschild des Elektrowerkzeuges, wird den Motor
beschädigen.
tragen, Staubmaske verwenden. Der während der Arbeit
entstandene Staub und abrasive Teilchen können Ihre
Gesundheit schädigen.
▪ Halten Sie das Gerät nur an den isolierten Griff-
flächen, wenn Sie Arbeiten ausführen, bei denen
das Einsatzwerkzeug verborgene Stromleitungen oder das eigene Netzkabel treffen kann. Der
Kontakt mit einer spannungsführenden Leitung kann
auch metallene Geräteteile unter Spannung setzen
und zu einem elektrischen Schlag führen.
▪ Vor Durchführung von jeglichen Einstellungen,
Reparaturen oder Wartung das Elektrowerkzeug
ausschalten und den Stecker aus der Steckdose
ziehen.
▪ Nach längerem Betrieb können sich die Außenmetall-
teile und Zubehöre erwärmen.
▪ Die Maschine immer ausschalten, bevor Sie sie zur
Seite stellen.
▪ Die Maschine nicht überlasten. Mit mäßigem Druck
arbeiten. Die Überlastung ist das Ergebnis der Anwendung eines zu hohen Druckes, wobei der Motor
seine Drehung verlangsamt; das ist eine Voraussetzung für uneffektive Arbeit und eventuelle Störung
des Motors der Maschine.
▪ Nie Lappen, Schnüre oder ähnliches in der Arbeits-
zone lassen
▪ Vor der Arbeit alle Nägel, Schrauben u.a. von der zu
bearbeitenden Fläche entfernen.
▪ Immer stabile Körperhaltung halten. Wenn Sie mit
dem Elektrowerkzeug auf einer Leiter arbeiten, immer
sicherstellen, dass sich niemand darunter befindet.
▪ Bevor Sie das Elektrowerkzeug auf der zu bearbei-
tenden Fläche verwenden, lassen Sie es nach dem
einschalten eine gewisse Zeit laufen. Während des
Betriebes sollte sich das Elektrowerkzeug in einer
Entfernung von mindestens 200 mm vom Körper und
Gesicht befinden.
▪ Das Elektrowerkzeug fest in beiden Händen halten.
▪ Die Hände vor den sich drehenden Teilen schützen.
Berühren Sie nicht das Arbeitswerkzeug oder das zu
bearbeitende Werkstück sofort nach der Arbeit – sie
könnten heiß sein und Ihnen eine Hautverbrennung
zufügen.
▪ Das Elektrowerkzeug nur bestimmungsgemäß ver-
wenden. Jeder andere Gebrauch, anders als der in
dieser Instruktion beschriebenen gilt als nicht bestim-
mungsgemäß. Die Haftung für Schäden oder Verlet-
zung en in diese m Fall trägt der Betreiber und nicht der
Hersteller.
▪ Um dieses Elektrowerkzeug richtig zu verwenden,
sollten Sie die Sicherheitshinweise, die Monta-
geanweisungen und die Bedienungsanleitungen,
beschrieben in diesem Dokument, einhalten. Alle
Personen, die diese Maschine verwenden oder be-
dienen, sollten diese Instruktionen gut kennen und
über die möglichen Gefahren, verbunden mit diesem
Elektrowerkzeug informiert werden. Kindern und den
Immer Schutzbrille und Gehörschutz
DE
12
FB 514

körperlich schwachen Personen ist die Arbeit mit die-
Ташев-Галвинг ООД
www.tashev-galving.com
sem Elektrowerkzeug untersagt. Wenn sich Kinder in
der Arbeitszone befinden, sollten sie unter ständiger
Kontrolle sein. Unbedingt sind auch die Sicherheitshinweise, die in Ihrem Land gültig sind, zu beachten.
Dasselbe gilt für die Grundregeln für den professionelle Arbeitsschutz und die Sicherheitstechnik.
▪ Der Hersteller haftet nicht für vom Verbraucher vorge-
nommene Änderungen am Elektrowerkzeug oder für
Defekte, verursacht durch solche Änderungen.
Sogar wenn das Elektrowerkzeug bestimmungsgemäß
verwendet wird, ist es nicht möglich, alle anderen Risikofaktoren zu eliminieren. Es können folgende Gefahren,
verbunden mit der Konstruktion und dem Design des
Elektrowerkzeuges entstehen:
▪ Gehörstörungen, falls kein Gehörschutz getragen
wird. Schäden oder Verletzungen an den Augen
wenn keine Schutzbrille getragen wird.
▪ Vor der Durchführung von jeglichen Einstellungen,
einschl. auch Austauschs der Zubehörteile, immer
den Stecker aus dem Netz ziehen.
▪ Das Elektrowerkzeug soll nicht im Freien beim Re-
genwetter, in feuchter Umgebung (nach Regenl) oder
in der Nähe von leicht brennbaren Flüssigkeiten und
Gasen verwendet werden. Der Arbeitsplatz soll gut
beleuchtet sein.
Dieses Elektrowerkzeug ist für Grob- und Feinschleifen
vom Beton und Natursteinen zwecks Säuberung vor
dem Auslegen von Füllmassen und Schutzschichten
bestimmt. Die Maschine ist nur für Trockenschleifen bestimmt.
BEVOR SIE MIT DER ARBEIT BEGINNEN
▪ Überprüfen, ob die Spannung des Stromnetzes der
Spannung, angegeben auf dem Typenschild mit
den technischen Daten des Elektrowerkzeuges ent-
spricht.
▪ Überprüfen, in welcher Stellung sich der Ein-/Aus-
schalter befindet. Das Elektrogerät darf nur bei aus-
geschaltetem Schalter ans Netz angeschlossen und
vom Netz getrennt werden.
▪ Überzeugen Sie sich von dem ordnungsgemäßen
Zustand des Steckers und des Netzkabels. Falls das
Netzkabel beschädigt ist, soll sein Austausch durch
den Hersteller oder durch den zuständigen Kunden-
dienst vorgenommen werden, um die Austauschrisi-
ken zu vermeiden.
WARNUNG: Vor Durchführung von jeglichen
Einstellungen, Bedienung oder Wartung das Elektrowerkzeug ausschalten und den Stecker aus der Steckdose ziehen.
Bestandteile des
Elektrowerkzeugs
Bevor Sie beginnen, mit dem Betonschleifer zu arbeiten,
sollen Sie sich mit allen operativen Besonderheiten und
Sicherheitsbedingungen bekannt machen.
Das Elektrowerkzeug und seine Zubehörteile nur bestimmungsgemäß verwenden. Jede andere Anwendung
ist untersagt.
1. Spindel
2. Scheibenschutz
3. Stützscheibe
4. Schleifscheibe mit Diamantsegmenten
5. Stützscheibe mit gerader Frontäche
6. Befestigungsmutter
7. Ein- / Ausschalter
8. Drucktaster zur Verriegelung der Spindel
9. Dichtungsbürste
10. Befestigungsklammer
11. Zusatzhandgriff
12. Spezieller Schlüssel
13. Schraube
Betriebsanweisungen
Diese Elektrowerkzeuge werden mit einphasiger Wechselspannung gespeist. Sie besitzen doppelte Isolierung
entsprechend EN 60745-1 und IЕС 60745 und können
an Steckdosen ohne Schutzklemmen angeschlossen
werden. Die Funkstörungen entsprechen der EMVRichtlinie 2004/108/EG zur Elektromagnetischen Ver-
träglichkeit.
▪ Immer den zusätzlichen Handgriff verwenden und die
Maschine mit beiden Händen für maximale Kontrolle
des Rückschlages oder der Drehreaktion beim Anlas-
sen (Fig. 1) halten.
EIN - AUSSCHALTEN
Vor Anschließen der Maschine ans Netz immer überprüfen, ob der Ein- /Ausschalter richtig funktioniert und beim
loslassen in Stellung „Aus“ zurückspringt.
1. Um das Elektrowerkzeug einzuschalten, den Schieber
(7) nach vorne verschieben, bis sein Vorderteil einsinkt und sich verriegelt. (Fig. 2)
2. Um das Elektrowerkzeug auszuschalten, das hintere,
erhobene Ende des Schiebers (7) drücken und es
loslassen, bis es selbständig in die Ausgangsposition
zurück springt.(Fig. 3)
ELEKTRONIK
Das Elektrowerkzeug ist mit einer eingebauten Elektro-
nik ausgerüstet, die folgende Funktionen hat:
▪ Schutz gegen Spannungsausfall. Beim Ausfall der
Spannung des Stromnetzes für eine Dauer von unter
0. 5 s, hör t das Elek t rowe r k zeug auf zu arb e iten , sel bst
bei in Arbeitsstellung verriegeltem Ein-/Ausschalter.
Um die normale Funktion des Elektrowerkzeuges
herzustellen ist es erforderlich, den Ein-/Ausschalter
auszuschalten und dann erneut einzuschalten.
▪ Stufenloses Anlaufen und Begrenzung des Startstro-
mes. Solches Sanftanlaufen garantiert einen Start
der Maschine ohne einen Ruck und verhindert das
Entstehen von Spannungsschwankungen im Netz;
▪ Das Halten von gleichmäßigen Drehzahlen in breiten
Belastungsgrenzen;
▪ Schutz vor kurzzeitiger Überlastung. Bei großen
Originalbetriebsanleitung
13
DE

kurzzeitigen Überlastungen wird eine Stromkupplung
Ташев-Галвинг ООД
www.tashev-galving.com
betätigt, die die Drehzahl des Elektrowerkzeuges reduziert. Um den normalen Betrieb herzustellen, das
Elektrowerkzeug vom Werkstoff entfernen.
▪ Temperaturschutz. Bei kleinen, aber andauernden
Überlastungen spricht der Temperaturschutz an. Vor
Erreichen der kritischen Temperatur schaltet die Elektronik die Maschine aus und sie geht in Schutzbetrieb
über, der sich mit reduzi erter Motordrehzahl c harakterisier t. Die Maschine wird betriebsunfähig. Im Schutzbetrieb dreht sich der Motor mit reduzierter Drehzahl,
um die Kühlung zu beschleunigen, die Maschine ist
aber BETRIEBSUNFÄHIG. Die Maschine kühlt für
3-5 Minuten aus und dann ist sie wieder betriebsbereit. Um wieder in Betriebsmodus zu kommen, den
Ein- /Ausschalter aus- und dann wieder einschalten.
SCHEIBENSCHUTZ
Der Scheibenschutz (2) soll stets an der Maschine montiert werden.
MONTIEREN, AUSTAUSCH UND EINSTELLUNG
DER POSITION DER ARBEITSSCHEIBE
Stellen Sie sicher, dass der Durchmesser und die Dicke
der Scheibe nicht größer als die in den technischen Angaben angegebenen sind. Die auf der Scheibe angegebene zulässige maximale Drehzahl soll nicht kleiner als
die Leerlaufdrehzahl der Maschine sein.
Die Spindel (1) des Betonschleifers wird durch Drücken
des Druckschalters (8) , der sich auf dem Getriebegehäuse bendet, verriegelt.
WARNUNG: Drücken des Druckschalters (8)
solange sich die Spindel dreht, ist untersagt.
Beim gedrückten Druckschalter dreht sich die Spindel
bis zum eindeutigen Einsinken des Druckschalters. Die
Mutter (6) wird mit einem speziellen Schlüssel (12) gelöst.
Wegen der Abnutzung der Scheibe und zum Erreichen
des optimalen Betriebes der Staubabführung ist auch
eine Möglichkeit für Regelung der Position der Scheibe
gegeben.
Bei der Befestigung einer neuen Scheibe sollten Sie
die Elemente auf der Spindel in folgender Reihenfolge
anordnen: Stützscheibe (3), Scheibe (4) Befestigungsmutter (6) mit dem freien Teil zur Scheibe, wie auf Fig.
4 gezeigt.
WARNUNG: Das Einlegen der Mutter (6) mit
dem hervorstehenden Teil zur Scheibe macht die Befestigung der Arbeitsscheibe unmöglich.
Bei zur Hälfte oder ganz abgenutzter Scheibe die Elemente auf der Spindel der Maschine in folgender Rei-
henfolge anordnen: Stützscheibe mit gerader Frontäche (5), Scheibe (4), Befestigungsmutter (6) mit dem
hervorstehenden Teil zur Scheibe, wie auf Fig. 5 gezeigt
WARNUNG: Beim Einlegen der Mutter (6) mit
dem freien Teil zur Scheibe, diese richtig zentrieren da
es sonst starke Vibrationen geben kann, was eine Unfallvoraussetzung ist.
WARNUNG: Nach Auswechseln der Scheibe
die Maschine mit der neuen Scheibe mindestens 30
Sek. Im Leerlauf halten. Vibrierende oder sich unregelmäßig drehende Scheiben sofort auswechseln.
Bei Änderung der Scheibenposition falls erforderlich, die
Position einstellen oder die Dichtungsbürste auswechseln.
REGELUNG DER POSITION (AUSWECHSELN)
DER DICHTUNGSBÜRSTE
Die Bürste (9) dient zum Reduzieren des Staubauswurfes in die Umgebung. Sie verschleißt zusammen mit der
Scheibe. Beim Einlegen einer neuen Scheibe, falls erforderlich, auch die Dichtungsbürste auswechseln. Die
Halterschraube (10) lösen und die alte Bürste entfernen.
Neue Bürste einlegen, wobei die Kante des Schutzes (2)
an der Stützäche der Bürste anliegen soll. Der Halter
(10) wieder einlegen und festziehen.
ZUSATZHANDGRIFF
Der Zusatzhandgriff (11) ist am Getriebekasten der Maschine mittels zwei Schrauben befestigt. Immer den
Zusatzhandgriff verwenden und die Maschine stets mit
beiden Händen festhalten. (Fig. 1)
ARBEITEN MIT STAUBABFÜHRUNG
Das Elektrogerät soll nur mit Staubabführung betrieben werden. Zusätzlich Staubschutzmaske tragen. Der
Staubsauger soll für Steinstaubabsaugen geeignet sein.
Der Staubsauger wird zum Staubabführrohr des Schutzes angeschlossen. Wir empfehlen die Anwendung
eines Staubsaugers für Industriezwecke mit minimalen
technischen Angaben: Fördermenge 60 l/s und erzeugter Unterdruck (Vakuum) 180 mbar.
ZUBEHÖR, DAS MIT DIESEM
ELEKTROWERKZEUG BENUTZT WERDEN
KANN
Schleifscheibe mit abrasiven Segmenten Ø125 x
Ø22.23 x 22
WARNUNG: Für den Gebrauch Ihres Elektrowerkzeu-
ges werden die oben angegebenen Zubehöre oder Vorrichtungen empfohlen Die Anwendung von Zubehören
oder Vorrichtungen, anders als die angegebenen sind
Voraussetzung für Betriebsunfälle. Die Zubehöre und
die Vorrichtungen nur bestimmungsgemäß verwenden.
Falls Sie zusätzliche Information bezüglich dieser Vorrichtungen brauchen, sollen Sie sich an den örtlichen
SPARKY – Kundendienst wenden.
DE
14
FB 514

Wartung
Ташев-Галвинг ООД
www.tashev-galving.com
WARNUNG: Vor jeder Wartung oder Über-
prüfung das Elektrowerkzeug immer ausschalten und
den Stecker aus der Steckdose ziehen.
WICHTIG! Um einen sicheren Betrieb des Elektrowerkzeuges und seine Zuverlässig zu gewährleisten, sollten
alle Arbeiten zur Reparatur, Wartung und Regelung
(einschl. auch die Überprüfung und das Auswechseln
der Bürsten) nur in den zuständigen Kundendiensten
von SPARKY beim Verwenden von Originalersatzteilen
durchgeführt werden.
AUSWECHSELN DER KOHLEBÜRSTEN
Das Elektrowerkzeug ist mit Selbstausschaltenden Kohlebüsten ausgerüstet. Wenn die Kohlebürsten abgenutzt
sind, sollten beide Kohlebürsten gleichzeitig durch Originalbürsten im SPARKY – Kundendienst für Garantieund Außergarantiewartung ausgewechselt werden.
ALLGEMEINE ÜBERPRÜFUNG
Überprüfen Sie regelmäßig alle Befestigungselemente
um sich zu überzeugen, dass sie fest angezogen sind.
Falls einige der Schrauben lose sind, diese sofort festziehen, um Risikosituationen zu vermeiden.
Falls sich die Schrauben (13) lockern, sollen sie festgezogen werden. Vor dem Festziehen auf dem Gewinde
jeder Schraube (13) Gewindekleber auftragen.
Regelmäßig alle beweglichen Teile fetten.
Im Falle eines beschädigten Netzkabels soll der Aus-
tausch durch den Hersteller oder seinen Servicefachmann vorgenommen werden, um die Risiken die bei
einem Austausch entstehen können zu vermeiden.
REINIGUNG
Für den sicheren Betrieb die Maschine und die Belüftungsöffnungen immer sauber halten.
Regelmäßig überprüfen, ob in die Belüftungsöffnungen
des Motors oder um die Umschalter Staub oder Fremdkörper eingedrungen sind.
Weichte Bürste und/oder Druckluft für die Entfernung
des Staubes verwenden. Um die Augen während der
Reinigung zu schützen, Schutzbrille tragen.
Das Gehäuse der Maschine gegebenenfalls mit einem
weichen feuchten Tuch abwischen. Hierfür kann zusätzlich eine schwache Reinigungslösung (Spülmittel) verwendet werden.
Garantie
Die Garantiefrist der SPARKY-Elektrowerkzeuge wird
im Garantieschein bestimmt.
Schäden, die auf natürliche Abnutzung, Überlastung
oder unsachgemässe Handhabung zurückzuführen
sind, bleiben von der Garantie ausgeschlossen.
Schäden, die durch Material- und/oder Herstellerfehler
entstanden sind, werden unentgeltlich durch Ersatzlieferung oder Reparatur beseitigt.
Beanstandungen bezüglich eines beschädigten
SPARKY-Elektrowerkzeugs können nur anerkannt
werden, wenn das Gerät unzerlegt (im ursprünglichen
Zustand) dem Lieferanten oder der befugten Kundendi-
enstwerkstatt vorgelegt wird.
WARNUNG: Die Verwendung von Benzin
oder anderen Lösungsmitteln ist unzulässig. Nie ätzende Präparate für die Reinigung der Kunststoffteile
verwenden.
WARNUNG: Vermeiden Sie unbedingt das
Wasser in die Maschine (z.B. durch die Lüf tungsschlitze) eindringt.
Hinweise
Lesen Sie aufmerksam die ganze Originalbetriebsanleitung, bevor Sie mit der Benutzung dieses Produktes
beginnen.
Der Hersteller behält sich das Recht vor, Verbesserungen und Änderungen an seinen Erzeugnissen und in
den Spezikationen ohne Voranmeldung vorzunehmen.
Die Spezikationen können für die verschiedenen Län-
der unterschiedlich sein.
Originalbetriebsanleitung
15
DE

Sommaire
Introduction .......................................................................................................................................................................16
Caractéristiques techniques
............................................................................................................................................18
Avertissements de sécurité généraux pour l’outil ..........................................................................................................19
Avertissements de sécurité lors du travail avec des ponceuses à béton .................................................................... 20
Nomenclature
...............................................................................................................................................................A/21
Utilisation ............................................................................................................................................................................21
Entretien ........................................................................................................................................................................... 22
Garantie
............................................................................................................................................................................ 23
DEBALLAGE
Ташев-Галвинг ООД
www.tashev-galving.com
Grâce aux techniques modernes de fabrication, il est improbable que votre outil soit défectueux ou qu’une pièce soit
manquante. Si toutefois vous trouvez une anomalie, n’utilisez pas l’outil avant que les pièces aient été remplacées ou le
défaut corrigé. Ne pas observer cette règle pourrait causer des blessures graves.
MONTAGE
La ponceuse à béton est fournie dans une valise en métal, entièrement assemblée, prête à fonctionner.
La ponceuse à béton est fournie dans une valise en matière plastique, assemblée, la poignée supplémentaire est mise
en place sans être serrée. Placez la poignée supplémentaire dans la position qui vous convient et serrez-la à l’aide de
la clé à écrou gurant dans l’ensemble fourni.
Introduction
Votre nouvel outil a été conçu et produit selon tous les standards de qualité pour répondre aux exigences les plus élevées. Son exploitation est facile et sécurisée. Et avec une utilisation correcte il vous servira longtemps.
AVERTISSEMENT!
Lire attentivement les instructions avant d’utiliser votre nouvel outil. Prêter attention aux sections «Avertissement». Votre outil électrique possède des caractéristiques qui facilitent votre travail. Cet instrument a été
conçu et produit selon toutes les exigences de sécurité pour que son usage et son entretien soient faciles.
Ne pas jeter les outils électroportatifs avec les ordures ménagères!
Les déchets provenant d’outils électroportatif ne doivent pas être ramassés avec les ordures ménagères.
Prière de recycler sur les lieux qui y sont spécialement destinés. Contacter les autorités locales ou un
représentant pour des consultations concernant le recyclage.
FR
RESPECT DE L’ENVIRONNEMENT
Récupération des matières premières plutôt qu’élimination des déchets.
En vue à la protection de l’environnement, les appareils, comme d’ailleurs leurs accessoires et emballages,
doivent pouvoir suivre chacun une voie de recyclage appropriée. Nos pièces en matières articielles ont été
marquées en vue d’un recyclage sélectif des différents matériaux.
16
FB 514

LÉGENDE
Ташев-Галвинг ООД
www.tashev-galving.com
L’outil électrique porte une plaque décrivant les signes spéciaux. Ils apportent une information importante quant au
produit ou des instructions d’utilisation.
Double isolation pour une meilleure sécurité
Spindelgewinde: M14
Conforme aux directives européennes applicables
En conformité avec les exigences des standards Russes
En conformité avec les exigences des standards ukrainiens
Lisez les instructions d’utilisation
YYYY-Www
FB PONCEUSE À BÉTON
Période de production, où les symboles variables sont les suivants:
YYYY - année de production, ww – le numéro de la semaine du calendrier
Notice originale
17
FR

Caractéristiques techniques
Ташев-Галвинг ООД
www.tashev-galving.com
Modèle: FB 514
▪ Puissance absorbée 1400 W
▪ Vitesse de rotation à vide 10500 min
▪ Filetage de xation de l’arbre M14
▪ Longueur du letage de l’arbre 20 mm
▪ Diamètre de xation du disque de coupe Ø22.23 mm
▪ Diamètre maximal du disque de coupe Ø125 mm
▪ Epaisseur maximale d’un nouveau disque de coupe 22 mm
▪ Diamètre de l’orice de raccordement du dispositif d’élimination de la poussière Ø35 mm
▪ Dimensions:
Longueur 325 mm
Largeur 190 mm
Hauteur 200 mm
▪ Poids (procédure EPTA 01/2003) 3.1 k g
▪ Classe de protection (EN 60745-1) II
INFORMATIONS SUR LES BRUITS ET LES VIBRATIONS
Valeurs de mesure obtenues conformément à la EN 60745.
Informations sur le bruit
Le mesure réelle (A) de niveau de pression acoustique LpA 91 dB (A)
Incertitude КpA 3 dB (A)
Le mesure réelle (A) de niveau d’intensité acoustique LwA 102 dB (A)
Incertitude КwA 3 dB (A)
Porter une protection acoustique!
Informations sur les vibrations *
Valeurs totales des vibrations (somme vectorielle de trois sens) établies conformément à EN 60745:
Fraisage de béton
Valeur d’émission vibratoire ah 6.0 m/s
Incertitude К 2.0 m/s
* Les valeurs des vibrations sont déterminées conformément à la 6.2.7 EN 60745.
2
2
-1
L’amplitude d’ l’accélération indiquée dans ces instructions d’utilisation a été mesurée suivant les méthodes de mesu-
rage conformément à la norme EN 60745 et peut être utilisée pour une comparaison d’appareils. Le niveau de vibration
peut être utilisé pour faire une estimation provisoire du degré d’influence vibratoire.
Le niveau de vibration annoncé conc erne la fonction principale de l’outil. Dans des cas où l’outil est destinée à une autre
utilisation ou avec d’autres accessoires, ou s’il est mal entretenu, le niveau de vibration peut s’écarter de celui qui a été
indiqué. Si c’est le cas, le degré d’infuence peut fortement augmenter au cours de l’utilisation
Pour une estimation précise de l’influence vibratoire pendant un certain temps d’utilisation, il est recommandé de
prendre aussi en considération les espaces de temps pendant lesquels l’appareil est éteint ou sous tension, mais pas
vraiment utilisé. Ceci peut réduire considérablement l’influence vibratoire pendant toute la durée du travail.
Entretenez l’outil et ses accessoires en bon état. Gardez vos mains chaudes au cours de son utilisation – cela va diminuer les conséquences négatives lorsque vous travaillez à des hauts degrés de vibrations.
Les poussières de matériaux tels que peintures contenant du plomb, certains bois, minéraux ou métaux, peuvent être
nuisibles à la santé. Toucher ou aspirer les poussières peut entraîner des réactions allergiques et/ou des maladies
respiratoires auprès de l’utilisateur ou de personnes se trouvant à proximité.
Certaines poussières telles que les poussières de chêne ou de hêtre sont considérées cancérigènes, surtout en
connexion avec des additifs pour le traitement de bois (chromate, lazure). Les matériaux contenant de l’amiante ne
doivent être travaillés que par des personnes qualifiées.
▪ Si possible, utilisez une aspiration des poussières.
▪ Afin d’atteindre un haut degré d’aspiration de la poussière, lors du travail avec cet outil electroportatif utilisez un
aspirateur spécialement adapté pour l’aspiration de possière de bois ou pour l’aspiration de poussière de bois et /ou
poussière de minéreaux.
▪ Veillez à bien aérer la zone de travail.
▪ Il est recommandé de porter un masque respiratoire de la classe de filtre P2.
Respectez les règlements en vigueur dans votre pays spéciques aux matériaux à traiter.
FR
18
FB 514

Avertissements de sécurité
Ташев-Галвинг ООД
www.tashev-galving.com
généraux pour l’outil
3. SÉCURITÉ DES PERSONNES
AVERTISSEMENT! Lire tous les avertis-
sements de sécurité et toutes les instructions.
Ne pas suivre les avertissements et instructions peut
donner lieu à un choc électrique, un incendie et/ou une
blessure sérieuse.
Conserver tous les avertissements et toutes
les instructions pour pouvoir s’y reporter
ultérieurement.
Le terme «outil» dans les avertissements fait référence
à votre outil électrique alimenté par le secteur (avec cordon d’alimentation) ou votre outil fonctionnant sur batterie (sans cordon d’alimentation).
1. SÉCURITÉ DE LA ZONE DE TRAVAIL
a) Conserver la zone de travail propre et bien
éclairée. Les zones en désordre ou sombres sont
propices aux accidents.
b) Ne pas faire fonctionner les outils électriques
en atmosphère explosive, par exemple en présence de liquides inflammables, de gaz ou de
poussières. Les outils électriques produisent des
étincelles qui peuvent enflammer les poussières
ou les fumées.
c) Maintenir les enfants et les personnes pré-
sentes à l’écar t pendant l’utilisation de l’outil.
Les distractions peuvent vous faire perdre le
contrôle de l’outil.
2. SÉCURITÉ ÉLECTRIQUE
a) Il faut que les fiches de l’outil électrique soient
adaptées au socle. Ne jamais modifier la fiche
de quelque façon que ce soit. Ne pas utiliser
d’adaptateurs avec des outils à branchement
de terre. Des fiches non modifiées et des socles
adaptés réduiront le risque de choc électrique.
b) Eviter tout contact du corps avec des surfaces
reliées à la terre telles que les tuyaux, les radiateurs, les cuisinières et les réfrigérateurs. Il
existe un risque accru de choc électrique si votre
corps est relié à la terre.
c) Ne pas exposer les outils à la pluie ou à des
conditions humides. La pénétration d‘eau à
l’intérieur d’un outil augmentera le risque de choc
électrique.
d) Ne pas maltraiter le cordon. Ne jamais utili-
ser le cordon pour por ter, tirer ou débrancher
l’outil. Maintenir le cordon à l’écar t de la chaleur, du lubrifiant, des arêtes ou des parties
en mouvement. Des cordons endommagés ou
emmêlés augmentent le risque de choc électrique.
e) Lorsqu’on utilise un outil à l’extérieur, utiliser
un prolongateur adapté à l’utilisation extérieure. L’utilisation d’un cordon adapté à l’utilisa-
tion extérieure réduit le risque de choc électrique.
f) Si l’usage d’un outil dans un emplacement
humide est inévitable, utiliser une alimentation
a) Rester vigilant, regarder ce que vous êtes en
b) Utiliser un équipement de sécurité. Toujours
c) Eviter tout démarrage intempestif. S’assurer
d) Retirer toute clé de réglage avant de mettre
e) Ne pas se précipiter. Garder une position et un
f) S’habiller de manière adaptée. Ne pas porter
g) Si des dispositifs sont fournis pour le raccor-
4. UTILISATION ET ENTRETIEN DE L’OUTIL
a) Ne pas forcer l’outil. Utiliser l’outil adapté à
b) Ne pas utiliser l’outil si l’interr upteur ne per met
c) Débrancher la fiche de la source d’alimentation
protégée par un dispositif à courant différentiel résiduel (RCD). L’usage d’un RCD réduit le
risque de choc électrique.
train de faire et faire preuve de bon sens dans
votre ut ilisation de l’outil. Ne pas utiliser un outil lorsque vous êtes fatigué ou sous l’emprise
de drogues, d’alcool ou de médicaments. Un
moment d’inattention en cours d’utilisation d’un
outil peut entraîner des blessures graves des personnes.
porter une protection pour les yeux. Les équipements de sécurité tels que les masques contre
les poussières, les chaussures de sécurité antidérapantes, les casques ou les protections acoustiques utilisés pour les conditions appropriées
réduiront les blessures de personnes.
que l’interrupteur est en position arrêt avant
de brancher l’outil au secteur et/ou au bloc de
batteries, de le ramasser ou de le porter. Por-
ter les outils en ayant le doigt sur l’interrupteur ou
brancher des outils dont l’interrupteur est en position marche est source d’accidents.
l’outil en marche. Une clé laissée fixée sur une
partie tournante de l’outil peut donner lieu à des
blessures de personnes.
équilibre adaptés à tout moment. Cela permet
un meilleur contrôle de l’outil dans des situations
inattendues.
de vêtements amples ou de bijoux. Garder les
cheveux, les vêtements et les gants à distance
des parties en mouvement. Des vêtements
amples, des bijoux ou les cheveux longs peuvent
être pris dans des par ties en mouvement.
dement d’équipements pour l’extraction et la
récupération des poussières, s’assurer qu’ils
sont connectés et correctement utilisés. Utili-
ser des collecteurs de poussière peut réduire les
risques dus aux poussières.
votre application. L’outil adapté réalisera mieux
le travail et de manière plus sûre au régime pour
lequel il a été construit.
pas de passer d e l’état de marche à arrêt et vic e
versa. Tout outil qui ne peut pas être commandé
par l’interrupteur est dangereux et il faut le réparer.
en courant et/ou le bloc de batteries de l’outil
avant tout réglage, changement d’accessoires
ou avant de ranger l’outil. De telles mesures de
sécurité préventives réduisent le risque de démarrage accidentel de l’outil.
Notice originale
19
FR

d) Conserver les outils à l’arrêt hors de la portée
Ташев-Галвинг ООД
www.tashev-galving.com
des enfants et ne pas permettre à des personnes ne connaissant pas l’outil ou les présentes instructions de le faire fonctionner. Les
outils sont dangereux entre les mains d’utilisateurs
novices.
e) Obser ver la maintenance de l’outil. Vérifier
qu’il n’y a pas de mauvais alignement ou de
blocage des parties mobiles, des pièces cassées ou toute autre condition pouvant affecter
le fonctionnement de l’outil. En cas de dommages, faire réparer l’outil avant de l’utiliser.
De nombreux accidents sont dus à des outils mal
entretenus.
f) Garder affûtés et propres les outils permettant
de couper. Des outils destinés à couper correcte-
ment entretenus avec des pièces coupantes tranchantes sont moins susceptibles de bloquer et sont
plus faciles à contrôler.
g) Utiliser l’outil, le s accessoires et les lames etc.,
conformément à ces instructions, en tenant
compte des conditions de travail et du travail à
réaliser. L’utilisation de l’outil pour des opérations
différentes de celles prévues pourrait donner lieu à
des situations dangereuses.
5. MAINTENANCE ET ENTRETIEN
a) Faire entretenir l’outil par un réparateur qua-
lifié utilisant uniquement des pièces de rechange identiques. Cela assurera que la sécurité
de l’outil est maintenue.
Avertissements de sécurité
lors du travail avec des
ponceuses à béton
AVERTISSEMENT: Avant de bancher l’appareil
électrique dans le réseau d’alimentation électrique, assurez-vous que la tension de celui-ci est bien celle indiquée
sur la plaquette contenant l es caractéristiques techniques
de cet appareil.
▪ Une source de courant à tension plus élevés que celle
indiquée pour l’appareil peut causer à l’opérateur de
sérieux dommages dus au courant électrique et en
outre endommager l’appareil.
▪ Si vous avez des hésitations à ce sujet, ne branchez
pas l’appareil au réseau électrique.
▪ L’utilisation d’une source d’alimentation à tension plus
basse que celle indiquée sur la plaquette de l’appareil
électrique endommagera celui-ci.
Portez toujours des lunettes de
protection et une protection antibruit, de même qu’un
masque de protection contre la poussière. La poussière
et les particules abrasives qui de détachent pendant le
travail représentent un danger grave pour votre santé.
▪ Tenir l’outil uniquement par les surfaces de pré-
hension isolantes, pendant les opérations au
cours desquelles l’accessoire coupant peut être
en contact avec des conducteurs cachés ou avec
son propre câble. Le contact de l’accessoire cou-
pant avec un fil „sous tension” peut également mettre
„sous tension” les parties métalliques exposées de
l’outil électrique et provoquer un choc électrique sur
l’opérateur.
▪ Arrêtez toujours l’appareil et débranchez-le du
réseau avant d’effectuer sur celui-ci tout réglage
et opération de service ou d’entretien.
▪ A la suite d’un long travail, les parties métalliques
extérieures et les accessoires peuvent devenir très
chauds.
▪ Chaque fois que possible, utilisez des dispositifs de
fixation ou un étau pour fixer la pièce traitée.
▪ Débranchez toujours l’appareil avant de le mettre de
côté.
▪ Ne surchargez pas l’appareil: travaillez à vitesse
moyenne. La surcharge est causée par l’application
d’une pression trop forte lors de laquelle le moteur
électrique ralentit sa vitesse de rotation, ce qui crée
des conditions de fonctionnement inefficace et peut
éventuellement endommager l’appareil.
▪ Ne jamais laisser trainer dans la zone de travail des
chiffons, des fils, des ficelles, etc.
▪ Eliminez préalablement de la surface à traiter tous les
clous, les visses, etc.
▪ Avant d’utiliser l’appareil électrique sur une sur face
concrète, mettez-le en marche et laissez-le fonctionner à vide un certain temps. Pendant le travail, l’ins-
trument doit se trouver à au moins 200 mm de votre
visage et de votre corps.
▪ Tenez toujours votre corps dans un équilibre stable.
Lorsque vous travaillez avec l’appareil à un endroit
élevé, assurez-vous qu’au-dessous de vous il n’y a
personne.
▪ Tenez l’appareil fermement en mains.
▪ Veillez à ce que vos mains n’entrent pas en contact
avec les pièces en rotation. Ne touchez pas l’outil de
travail ou la pièce traitée immédiatement après le fin
du travail : ils peuvent être très chauds et vous risquez
de vous brûler.
▪ L’appareil doit être utilisé uniquement pour les travaux
pour lesquels il a été prévu. Toute autre utilisation, dif fé-
rente que celle décrite dans la présente instruction, doit
être considérée comme abusive. Le producteur décline
toute responsabilité en cas de dommage ou de bles-
sure causée par une utilisation abusive, cette respon-
sabilité étant alors entièrement portée par l’utilisateur.
▪ Afin de utiliser l’appareil correctement, vous devez res-
pecter les consignes de sécurité, les instructions concer-
nant le montage et celles concernant l’exploitation qui
figurent dans le présent document. Toute personne qui
utilise ou entretient l’appareil doit bien connaître la pré-
sente instruction et être informée sur les dangers poten-
tiels liés à son utilisation. Il est interdit aux enfants et aux
personnes n’ayant pas une force physique suffisante
d’utiliser l’appareil. Les enfant se trouvant dans la zone
de travail doivent être sous une su rveillance incesssante.
Vous devez obligatoirement respecter les consignes de
sécurité en vigueur dans votre pays. Ceci est également
valable pour les consignes concernant la salubrité du tra-
vail et la sécurité technique.
▪ Le producteur décline toute responsabilité en cas de
FR
20
FB 514

modifications apportées à l’appareil qui ont endom-
Ташев-Галвинг ООД
www.tashev-galving.com
magées celui-ci.
Même lorsque l’appareil est utilisé dans le strict respect
des consignes, il n’est pas possible d’éliminer tous les
facteurs de risque. Peuvent se produire les incidents
suivants liés à la conception et à au design de l’appareil
électrique:
▪ Des dommages à l’ouïe en cas d’utilisation de disposi-
tifs antibruit inefficaces.
▪ Un accident causé par un appareil qui n’a pas été dé-
branché; donc débranchez toujours celui-ci du réseau
avant tout réglage ou procédure d’entretien, y compris
de changement des accessoires de travail.
▪ L’appareil électrique ne doit être utilisé à l’extérieur
lorsqu’il pleut, dans un milieu humide (après la pluie)
ou à proximité de liquides et de gaz facilement inflammables. Le lieu de travail doit être bien éclairé.
Nomenclature
Avant de commencer le travail avec la ponceuse, prenez
connaissance de ces particularités et des conditions de
sécurité.
L’appareil doit être utilisé uniquement pour les travaux
pour lesquels il a été prévu. Toute autre utilisation est
strictement interdite.
1. Arbre
2. Protection du disque
3. Poulie de butée
4. Disque de la ponceuse doté de segments
à diamants
5. Poulie de butée à face droite
6. Ecrou de xation
7. Interrupteur
8. Bouton de calage de l’arbre
9. Balai d’étanchéité
10. Etrier d’attache
11. Poignée supplémentaire
12. Clé spéciale
13. Vis
Utilisation
Ces appareils électriques sont alimentés en courant alternatif monophasé. Ils possèdent une double isolation,
conformément à EN 60745-1 et IЕС 60745 et peuvent
être branchés à des prises qui ne possèdent pas de
bornes de protection. Pour ce qui est des inter férences
radio, il est conforme aux la directive sur la compatibilité
électromagnétique 2004/108/CE.
Cet appareil est destiné au ponçage brut et n de béton
et de matériaux en pierre en vue de leur nettoyage avant
d’y déposer du mastic ou des revêtements de protection.
La machine est conçue uniquement pour le ponçage à
sec.
AVANT LE DEBUT DU TRAVAIL
▪ Assurez-vous que la tension du secteur correspond
à celle indiquée sur la plaquettes contenant les don-
nées techniques sur l’instrument.
▪ Vérifiez la position de l’interrupteur. L’appareil doit être
toujours branché et débranché du secteur interrup-
teur on position OFF.
▪ Assurez-vous que le câble électrique et sa fiche sont
en parfait état. Si le câble d’alimentation est endom-
magé, il doit être remplacé par le producteur ou un
spécialiste agréé par celui-ci afin d’éviter les éven-
tuels risques liés à son remplacement.
et débranchez-le du réseau avant d’effectuer sur celuici tout réglage et opération de service ou d’entretien.
▪ Utilisez toujours la poignée supplémentaire et tenez
toujours l’appareil avec les deux mains afin de maîtri-
ser au maximum les ricochets et l’effet de contre-ro-
tation lors de la mise de l’appareil en marche. (Fig. 1)
MARCHE - ARRET
Avant de brancher l’appareil au secteur, n’oubliez jamais
de vous assurer que l’interrupteur est en bon état et qu’il
revient en position OFF chaque fois qu’il est libéré.
1. Pour mettre l’appareil en marche, il faut déplacer la
glissière (7) en avant jusqu’à ce que sa partie d’avant
d’enfonce et se bloque. (Fig. 2)
2. Pour mettre l’appareil hors fonction, enfoncez la partie arrière, surélevée, de la glissière (7), puis laissez
celle-ci revenir d’elle-même en arrière, en position
initiale. (Fig. 3)
DISPOSITIF ELECTRONIQUE
L’appareil possède un appareil électronique qui remplit
les fonctions suivantes:
▪ Protection contre une chute de tension. En cas d’inter-
ruption du courant dans le réseau d’alimentation pour
une période dépassant 0,5 s, l’instrument cesse de
fonctionner, même lorsque sa glissière est bloquée
en position de fonctionnement. Pour remettre l’appareil en fonctionnement, il est nécessaire dans ce cas
de mettre l’interrupteur en position «arrêt», puis de le
remettre en position de marche.
▪ Démarrage progressif et limitation de la force du cou-
rant de démarrage. Un tel démarrage assure une mise
en marche progressive de la machine, sans choc, et
évite l’apparition de variations de la tension dans le
réseau d’alimentation.
▪ Entretien d’une vitesse de rotation constante dans un
large diapason de charge.
▪ Protection contre une brève surcharge. En cas de
grandes et brèves surcharges est activé un court-circuiter qui réduit brusquement la vitesse de rotation de
l’appareil. Afin de rétablir le fonctionnement normal de
l’appareil, écartez celui-ci du matériel traité.
▪ Protection contre la température. En cas de sur-
charges moins grandes, mais durables entre en
action une protection contre la température. Avant
que la température atteigne une valeur critique, l’électronique arrête l’appareil, puis celui-ci passe d’un
régime de travail en un régime de protection qui se
caractérise par une vitesse limitée de rotation. Dans
ce régime, l’appareil est inapte au travail. En régime
AVERTISSEMENT: Arrêtez toujours l’appareil
Notice originale
21
FR

de protection, l’appareil fonctionne à une vitesse ré-
Ташев-Галвинг ООД
www.tashev-galving.com
duite afin que le refroidissement s’accélère, mais IL
EST INAPTE AU TRAVAIL. Au bout de 3 à 5 minutes,
l’appareil est refroidi et il est de nouveau prêt au travail. Pour le remettre l’appareil en régime de travail,
il est nécessaire de mettre l’interrupteur en position
«arrêt», puis de le remettre en marche.
PROTECTION DU DISQUE
La protection (2) du disque doit restée toujours installée
sur l’appareil!
MONTAGE, ECHANGE ET REGLAGE DE LA
POSUTION DU DISQUE DE TRAVAIL
Assurez-vous que le diamètre et l’épaisseur du disque
ne sont pas supérieurs à ceux indiqués dans la che
technique. La vitesse de rotation indiquée sur le disque
ne doit pas être inférieure à la vitesse de rotation de
l’appareil à vide.
L’arbre (1) de la ponc euse est xé par pre ssion du bouton
(8) situé sur la boîte du réducteur.
Lorsque le disque change de position, rectiez si néces-
saire sa position ou remplacez le balai d’étanchéité.
REGLAGE DE LA POSITION
(REMPLACEMENT) DU BALAI D’ETANCHEITE
Le balai (9) sert à réduire au minimum l’émission de
poussière dans l’espace environnant. Il s’use parallèlement à l’usure du disque. Lors de la pose d’un nouveau
disque, remplacez si nécessaire également le balai
d’étanchéité. Déserrez la vis de l’étrier d’attache (10) et
enlevez le balai usé. Mettez en place le nouveau balai
en veillant à ce que le bord du dispositif de protection
(2) touche l’épaulement du balai. Remettez et reserrez
l’étrier d’attache (10).
LA POIGNEE SUPPLEMENTAIRE
La poign ée supplé mentaire (11) est xée au réduct eur de
l’appareil à l’aide de deux vis. Utilisez toujours la poignée
supplémentaire et tenez toujours l’appareil avec les deux
mains. (Fig. 1)
FONCTIONNEMENT AVEC ELIMINATION DE
AVERTISSEMENT: Il est interdit de presser sur
le bouton (8) pendant la rotation.
Le bouton étant enfoncé, on tourne l’arbre jusqu’à ce
que le bouton s’enfonce de façon sensible encore plus
profondément. L’écrou (6) est dévissé à l’aide d’une clé
spéciale (12).
Compte tenu de l’usure du disque, de même que pour
obtenir une élimination optimale de la poussière, il est
possible de régler la position du disque.
Lors de la xation d’un nouveau disque, disposez les
éléments sur l’arbre dans l’ordre suivant: poulie de butée
(3); disque (4); écrou de xation (6) avec sa partie libre du
côté du disque, comme le montre la Fig. 4.
AVERTISSEMENT: La pose de l’écrou (6)
avec sa partie convexe du côté du disque rendrait
impossible la fixation du disque de travail.
Lorsque le disque est usé à moitié ou davantage, disposez les éléments sur l’arbre de la machine dans l’ordre
suivant : poulie de butée à face droite (5) ; disque (4);
écrou de xation (6) avec sa partie convexe du côté du
disque, comme le montre la Fig. 5.
AVERTISSEMENT: Lorsqu’on pose l’écrou
(6) avec sa partie libre du côté du disque, celui-ci ne
pourra pas être centré et cela mènera à de fortes vibrations, ce qui crée un danger d’accident.
AVERTISSEMENT: Après le remplacement
du disque, l’appareil devra fonctionner à vide avec le
nouveau disque durant au moins 30 secondes. Les
disques qui vibrent ou le tournent par rond doivent être
immédiatement remplacés.
LA POUSSIERE
L’appareil de doit être utilisé qu’avec le dispositif d’élimination de la poussière. Il faut en outre porter un masque
de protection contre la poussière. L’aspirateur doit pouvoir éliminer la poussière de la surface des pierres. L’aspirateur doit être relié au tuyau d’élimination de la poussière du dispositif de protection. Nous recommandons
d’utiliser un aspirateur industriel possédant les caracté-
ristiques techniques minimales suivantes: débit 60 l/s et
sous-pression (vide) de 180 mbar.
ACCESSOIRES À UTILISER AVEC LA
MACHINE
Disque de coupe à segments abrasifs Ø125 x Ø22.23
x 22
AVERTISSEMENT: Pour le travail avec votre appareil
électrique il est recommandé d’utiliser les accessoires
et dispositifs mentionnés ci-dessus. L’utilisation d’accessoires et dispositifs différents crée des conditions pouvant conduire à un accident. Utilisez les accessoires
et dispositifs uniquement comme prévu. Pour plus de
renseignements sur ces accessoires, adressez-vous au
représentant local de SPARKY.
Entretien
ration d’entretien, arrêtez l’appareil et débranchez-le
du réseau électrique.
REMPLACEMENT DES BALAIS
L’appareil est doté de balais qui se déconnectent auto matiquement. Lorsque les balais sont usés, ils doivent
être replacés tous les deux à la fois par des balais origi-
AVERTISSEMENT: Avant tout examen ou opé-
FR
22
FB 514

naux de SPARKY lors d’un entretien dans le cadre de la
Ташев-Галвинг ООД
www.tashev-galving.com
garantie ou en dehors de celle-ci.
EXAMEN GENERAL
Examinez régulièrement tous les éléments de xation
pour vous assurer qu’ils sont bien serrés. Au cas où une
vis s’est desserrée, resserrez-la immédiatement pour
éviter tout risque.
Si les vis (13) viennent à se desserrer, elles doivent être
solidement resserrées et avant de les resserrer, il faut
enduire le letage de chaque vis (13) d’adhésif pour la
xation de letages.
Lubriez régulièrement toutes les pièces mobiles.
Si le câble d’alimentation est endommagé, son remplacement doit être ef fectué par le producteur ou un spécia-
liste agréé par lui, an d’éviter tout risque.
NETTOYAGE
Pour un fonc tionnement sécurisé, veillez à la propreté de
l’appareil et de ses orices de ventillation.
Vériez régulièrement si sur la grille de ventilation située
à proximité du moteur ou autour des commutateurs ne
s’est pas déposée de la poussière ou quelque corps
étranger. Utilisez une brosse douce pour l’élimination de
la poussière. Pour protéger vos yeux, lors du nettoyage,
portez des lunettes de protection.
Si le boît ier de l’appareil a bes oin d’être nettoyé, ess uyezle avec un chiffon doux humide. Vous pouvez utiliser un
produit de nettoyage non agressif.
AVERTISSEMENT: Il est interdit d’utiliser de
l’alcool, de l’essence ou d’autres solvants. N’utilisez
jamais de produits possédant un effet agressif pour le
nettoyage des pièces en matière plastique.
Garantie
La période de garantie des outils électroportatifs
SPARKY est dénie dans le contrat de garantie.
La garantie ne couvre pas les pannes apparues suite à
l’usure naturelle, une surcharge ou une mauvaise exploitation.
Les pannes survenues pour cause de matériaux défectifs et/ou d’erreurs de fabrication seront réparées gratuitement ou le produit sera échangé.
Les réclamations pour un instrument SPARKY défectueux seront honorées si la machine est retournée au
livreur ou est présenté à un service après-vente agréé
assemblé et dans son état original (assemblée).
AVERTISSEMENT: Il est interdit de permettre
à l’eau de pénétrer à l’intérieur de l’appareil.
AVIS IMPORTANT! An d’assurer un fonctionnement
sûr et able de l’appareil, toutes les opérations de réparation, d’entretien et de réglage de celui-ci (y compris
l’examen et le remplacement des balais) doivent être
effectuées dans des centres d’entretien agréés par
SPARKY avec l’utilisation exclusive de pièces de rechange originales.
Note
Lisez attentivement toute cette instruction d’utilisation
avant de commencer à vous servir de l’outil.
Le fabricant ne se défait pas du droit d’introduire des
améliorations et des changements dans ses produits
ainsi que de changer les spécications sans avis préalable.
Les spécications peuvent dif férer selon les pays.
Notice originale
23
FR
 Loading...