

Page 1

802.1 1 g USB 2.0 WLAN
Module User Manual
802.11g
USB 2.0 WLAN Module
User Manual
Ver 3.0
1
Page 2
802.1 1 g USB 2.0 WLAN
Module
Module
Module
Module User Manual
Table of Contents
Chapter 0. Introduction .......................................................................................... 5
■ Package Contents ....................................................................................... 5
■ Form Factor ................................................................................................ 5
■ System Requirements for Configuration:................................................... 5
Chapter 1. Wireless LAN Network ........................................................................ 6
1.1 Overview.................................................................................................... 6
1.1.1 SSID.................................................................................................. 6
1.1.2 Channel ............................................................................................ 6
1.1.3 Transmission Rate (Tx Rate).......................................................... 6
1.1.4 Wireless Network Application ........................................................ 6
Ad-Hoc (IBSS) ................................................................................... 6
Access Point Mode ............................................................................ 7
Chapter 2. How to Install WLAN driver and Utility .............................................. 8
2.1 Plug your 802.11g USB 2.0 WLAN Adapter .......................................... 8
2.2 Insert the supplied Setup CD .................................................................. 8
Chapter 3. Windows XP Installation Notes.......................................................... 10
Chapter 4. How to use the WLAN Utility(Station) .............................................. 12
4.1 802.11g USB 2.0 WLAN Adapter Configuration Tools ....................... 12
4.2 Open the WLAN Utility . ....................................................................... 12
4.3 More Setting … ..................................................................................... 13
4.3.1 “General Connection Setting” group: ........................................... 14
SSID :................................................................................................ 14
Channel : .......................................................................................... 14
TX Rate : .......................................................................................... 14
Network Type :................................................................................ 14
Encryption :...................................................................................... 14
Authentication Mode : ................................................................... 14
4.3.2 Encryption Setting :....................................................................... 15
4.2.4 “Other” group: .............................................................................. 16
4.2.5 Information .................................................................................. 17
Chapter 5. How to use the WLAN Utility(Access Point) .................................... 18
5.1 Introduction.............................................................................................. 18
5.1.1 Additional Setup Requirement....................................................... 18
5.2 The 802.11g WLAN Adapter Utility Screen .......................................... 18
Chapter 6. Troubleshooting ................................................................................. 20
2
Page 3
802.1 1 g USB 2.0 WLAN
24
6.1 Problems Starting the WLAN Utility Program ....................................... 20
6.2 Problem with the Link Status.................................................................. 20
Appendix A ......................................................................................................... 21
Ad-Hoc(Peer to Peer) Mode Setup .............................................................. 21
Application:Access the Internet without an AP .............................. 21
Check whether the Setup is success................................................. 26
Application:Data sharing between computers ................................ 27
Module User Manual
3
Page 4
802.11g USB 2.0 WLAN
802.11g USB 2.0 WLAN
Tested to Comply
With FCC Standard
IMPORTANT NOTE: This module is intended for OEM integrator. The OEM integrator is still responsible for the FCC compliance
requirement of the end product, which integrates this module. 20cm minimum distance has to be able to be maintained between the
antenna and the users for the host this module is integrated into. Under such configuration, the FCC radiation exposure limits set forth for
an population/uncontrolled environment can be satisfied. Any changes or modifications not expressly approved by the manufacturer
could void the user's authority to operate this equipment. USERS MANUAL OF THE END PRODUCT: In the users manual of the end
product, the end user has to be informed to keep at least 20cm separation with the antenna while this end product is installed and
operated. The end user has to be informed that the FCC radio-frequency exposure guidelines for an uncontrolled environment can be
satisfied. The end user has to also be informed that any changes or modifications not expressly approved by the manufacturer could void
the user's authority to operate this equipment. If the size of the end product is smaller than 8x10cm, then additional FCC part 15.19
statement is required to be available in the users manual: This device complies with Part 15 of FCC rules. Operation is subject to the
following two conditions: (1) this device may not cause harmful interference and (2) this device must accept any interference received,
including interference that may cause undesired operation. LABEL OF THE END PRODUCT: The final end product must be labeled in a
visible area with the following " Contains TX FCC ID: RYK-WUB2104 ". If the size of the end product is larger than 8x10cm, then the
following FCC part 15.19 statement has to also be available on the label: This device complies with Part 15 of FCC rules. Operation is
subject to the following two conditions: (1) this device may not cause harmful interference and (2) this device must accept any
interference received, including interference that may cause undesired operation.
FCC DoC Labeling
FOR HOME OR OFFICE USE
802.1 1 g USB 2.0 WLAN
Tested to Comply
With FCC Standard
Module User Manual
FEDERAL COMMUNICATIONS COMMISSION
This device complies with Part 15 of the FCC Rules. Operation is subject to the following two conditions:(1) this
device may not cause harmful interference, and (2) this device must accept any interference received, including
interference that may cause undesired operation.
NOTE
This equipment has been tested and found to comply with the limits for a Class B digital device, pursuant to Part 15
of the FCC Rules. These limits are designed to provide reasonable protection against harmful interference in a
residential installation. This equipment generates, uses and can radiated radio frequency energy and, if not installed
and used in accordance with the instructions, may cause harmful interference to radio communications. However,
there is no guarantee that interference will not occur in a particular installation If this equipment does cause harmful
interference to radio or television reception, which can be determined by turning the equip m ent off and on, the user
is encouraged to try to correct the interference by one or more of the following measures:
-Reorient or relocate the receiving antenna.
-Increase the separation between the equipment and receiver.
-Connect the equipment into an outlet on a circuit different from that to which the receiver is connected.
-Consult the dealer or an experienced radio/TV technician for help.
Changes or modifications not expressly approved by the party responsible for compliance could void the user‘s authority to
operate the equipment.
The antenna(s) used for this transmitter must not be co-located or operating in conjunction with any other antenna or
transmitter
For product available in the USA market, only channel 1~11 can be operated. Selection of other channels is not possible.
This EUT is incompliance with SAR for general population /uncontrolled exposure limits in ANSI/IEEE C95.1-1999
and had been tested in accordance with the measurement methods and procedures specified in OET Bulletin 65
Supplement C
Prohibition of co-location
This device and its antenna(s) must not be co-located or operating in conjunction with any other antenna or
transmitter
4
Page 5
802.1 1 g USB 2.0 WLAN
Module User Manual
Chapter 0. Introduction
Thank you for using our WLAN product. This installation guide will help you install 802.11g
USB 2.0 WLAN
Module and connect to the Internet quick & easy.
■ Package Contents
1. 802.11g USB 2.0 WLAN Module
2. Quick Installation Guide
3. Manual & Driver on CD Disc
4. USB cable (Optional)
If any of the above items are missing, please contact your reseller.
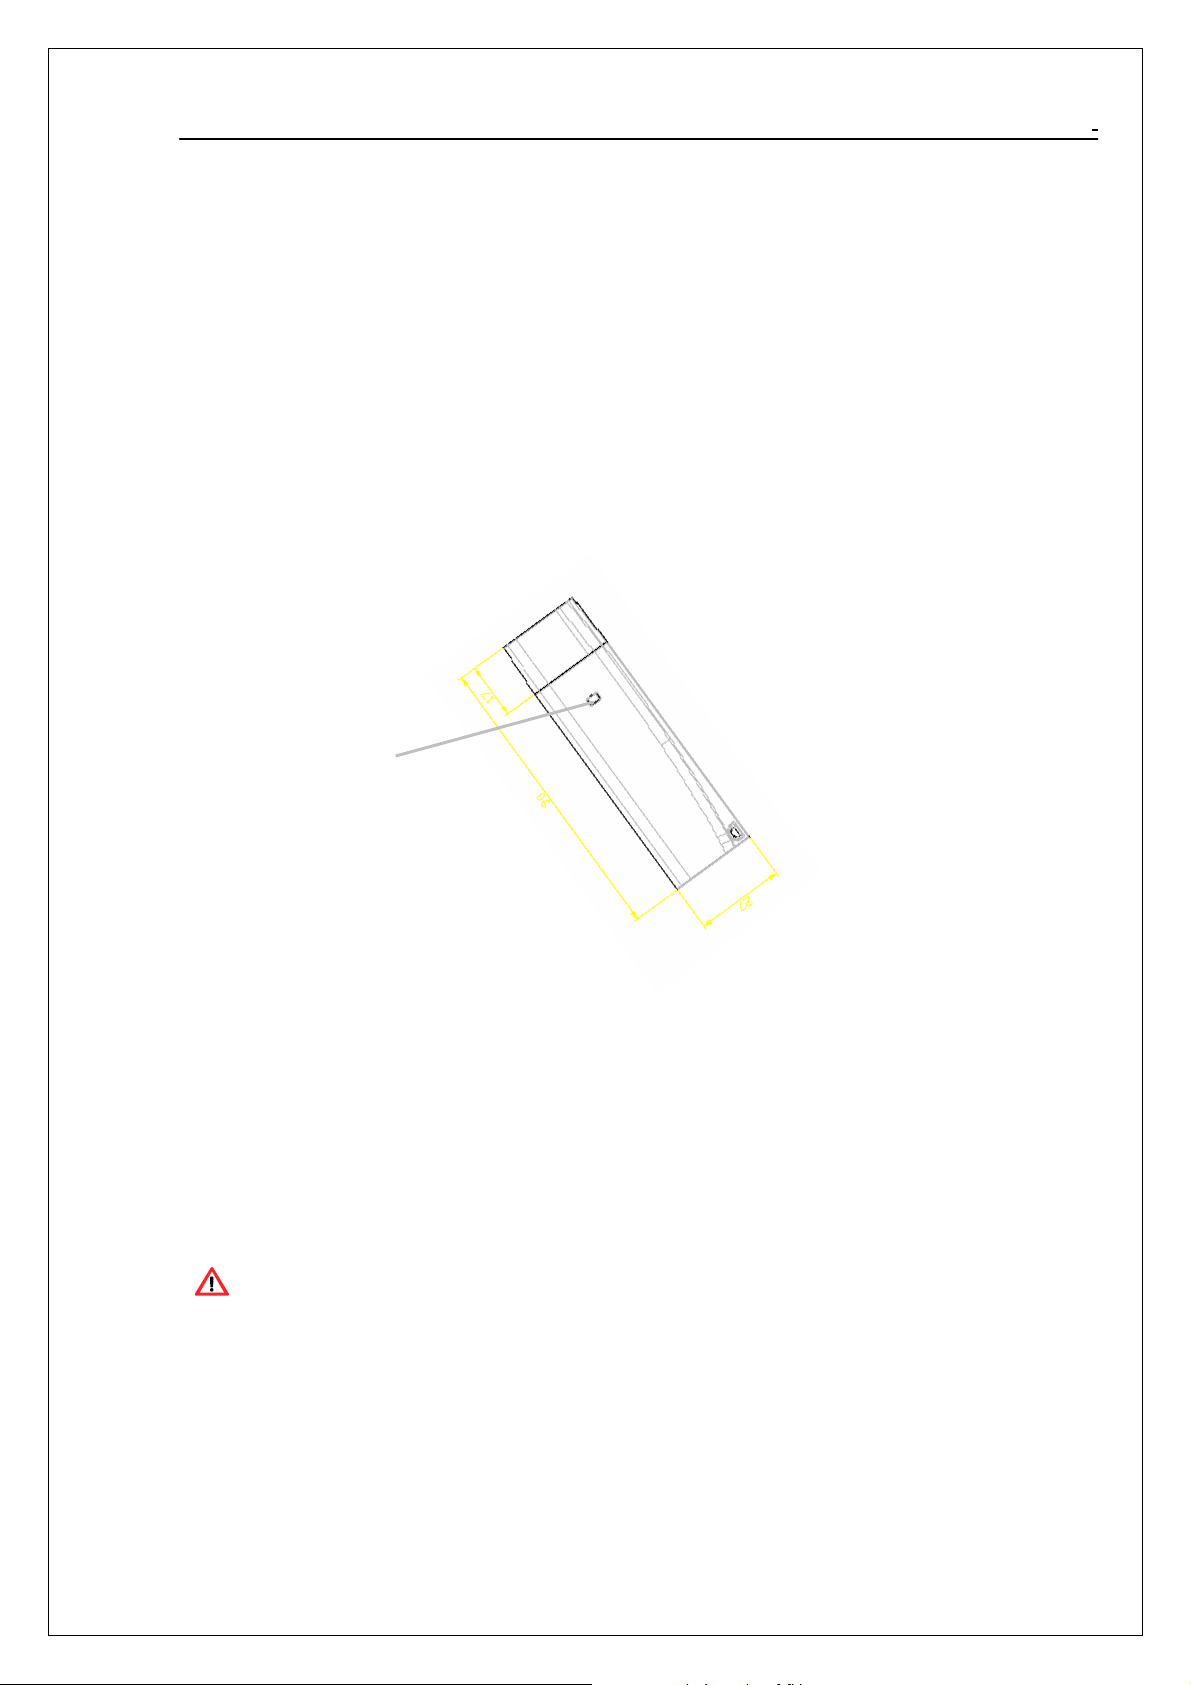
■ Form Factor
17mm
WLAN Active Led
90mm
27mm
■ System Requirements for Configuration:
A laptop or notebook computer with an available usb port(2.0 or 1.1)
Windows XP, Windows 2000, Windows Me, or Windows 98SE
At least 32 MB of memory and a 300 MHz processor
An 802.11g or 802.11b Access Point (
or another 802.11g or 802.11b wireless
Note: USB port version 2.0 is required for 11g performance. To take full advantage of this module’s
features, please upgrade the USB port on your laptop or PC to version 2.0.
for Infrastructure mode
module.
),
5
Page 6
802.1 1 g USB 2.0 WLAN
Module User Manual
Chapter 1. Wireless LAN Network
1.1 Overview
This section describes the wireless LAN network terms and applications.
1.1.1 SSID
The SSID (Service Set Identity) is a unique name shared among all wireless devices in a wireless
network. Wireless devices must have the same SSID to communicate with each other.
1.1.2 Channel
A radio frequency used by a wireless device is called a channel.
1.1.3 Transmission Rate (Tx Rate)
The 802.11g USB 2.0 WLAN Module provides various transmission (data) rate options for you to
select. Options include Auto, 1 Mbps, 2 Mbps, 5.5 Mbps, 11 Mbps, 6 Mbps, 9 Mbps, 12 Mbps, 18 Mbps,
24 Mbps, 36 Mbps, 48 Mbps, and 54 Mbps. In most networking scenarios, the factory default Auto
setting proves the most efficient. This setting allows your WLAN Module to operate at the maximum
transmission (data) rate. When the communication quality drops below a certain level, the WLAN
Module automatically switches to a lower transmission (data) rate. Transmission at lower data
speeds is usually more reliable. However, when the communication quality improves again, the WLAN
Module gradually increases the transmission (data) rate again until it reaches the highest available
transmission rate.
You can select any of the above options. If you wish to balance speed versus reliability, select 48
Mbps or 54 Mbps in a networking environment where you are certain that all wireless devices can
communicate at the highest transmission (data) rate. 1 Mbps or 2 Mbps are used often in networking
environments where the range of the wireless connection is more important than speed.
1.1.4 Wireless Network Application
Wireless LAN works in either of the two modes: ad-hoc and infrastructure. To connect to a wired
network within a coverage area using Access Points (APs), set the WLAN Module operation mode
to Infrastructure (BSS). An AP acts as a bridge between the wireless stations and the wired network.
In case you do not wish to connect to a wired network, but prefer to set up a small independent
wireless workgroup without an AP, use the Ad-hoc (IBSS) (Independent Basic Service Set) mode.
Ad-Hoc (IBSS)
Ad-hoc mode does not require an AP or a wired network. Two or more wireless stations
communicate directly to each other. An ad-hoc network may sometimes be referred to as an
Independent Basic Service Set (IBSS).
6
Page 7

802.1 1 g USB 2.0 WLAN
Module User Manual
A series of overlapping BSS and a network medium, such as an Ethernet forms an Extended Service Set
(ESS) or infrastructure network. All communication is done through the AP, which relays data packets to
other wireless stations or devices connected to the wired network. Wireless stations can then access
resource, such as the printer, on the wired network.
Ad-Hoc
(IBSS)
BSS
BSS1
BSS2
Access Point Mode
The following figure depicts a network example in which you se t the WLAN module in access point mode.
Computer 2
ESS
Computer 1
In the example, the WLAN module is installed on computer A and set to operate in access point mode.
Computer 1 shares Internet connection to the wireless LAN, so wireless computer 2 and 3 can access the
Internet.
AP MODE
7
Page 8

802.1 1 g USB 2.0 WLAN
Module
Module User Manual
Chapter 2. How to Install WLAN driver and Utility
To install the module, please read and follow the instructions below.
2.1 Insert the supplied Setup CD
Insert the supplied Setup CD into your CD-ROM drive ,
installation window as shown below. (please direct to next)
2.2 Plug your 802.11g USB 2.0 WLAN Module
Plug your 802.11g USB 2.0 WLAN
Module into a USB port on your machine.
and you’ll see the software
2.3 Once your system detects the device, the Found New Hardware Wizard dialog box appears.
Select the Recommended option and click Next to proceed.
8
Page 9

802.1 1 g USB 2.0 WLAN
Module User Manual
2.4 Your PC will recognize the device of “802.11g USB 2.0 WLAN Module”, and click “Next”
to install driver.
2.5 Finally, click the “Finish” to leave this dialogue window.
2.6 Click “Setup Driver & Tools”(Installation Windows), and choose the “default” item through
the installation process.
2.7 After successful installation, you’ll see the new icon appear in the Icon Tray.
802.11g Wireless Configuration Tool icon appears in the system tray.
Double-click the icon to launch the application and open the configuration tools dialog box to
configure your
For more details about WLAN’s configuration tools, please refer to Figure 4-1.
module.
9
Page 10

802.1 1 g USB 2.0 WLAN
Module User Manual
Chapter 3. Windows XP Installation Notes
Windows XP has a built-in configuration tool, Windows XP Wireless Zero Configuration,
available to assist you in managing your wireless networks. you use the provided 802.11g USB
2.0 WLAN
5.
When you use the Windows XP configuration tool and the WLAN Utility to configure the WLAN
Module at the same time, the WLAN Utility icon does not display or is grayed out.
To use the Wireless LAN Configuration Tool Plus under Windows XP, you need to
disable the default settings of your Windows XP Wireless Zero Configuration utility.
Follow the procedure below.
1. Right-click the Wireless LAN Configuration Tool Plus to Exit from the program. Do
Module to manage your module. To use the Zero Configuration tool, refer to Chapter
this before you try to access Windows XP Wireless Zero Configuration. See
Figure 3-1 and Figure 3-2.
Figure 3-1 Wireless LAN Configuration Tool Plus Icon
Figure 3-2 Right-click Menu of the System Tray Icon
2. Right-click the Network Connections icon in the task bar to open the Wireless
Network Connection Status dialog box. Select Properties. See Figure 3-3.
10
Page 11

802.1 1 g USB 2.0 WLAN
Figure 3-3 Wireless Network Connection Status Dialog Box
3. Choose the Wireless Networks tab in the Wireless Network Connection
Properties dialog box, and uncheck the Use Windows to configure my wireless
Module User Manual
network settings checkbox. See Figure 3-4.
Figure 3-4 Wireless Network Connection Properties Dialog Box
4. Click OK. The Windows XP Wireless Zero Configuration is now disabled.
You can now monitor and configure the
more information on the Wireless LAN Configuration Tool Plus, please refer to Figure 4-1,
Configuration Utility.
If you wish to use the Windows XP Wireless Zero Configuration, refer to Figure 3-4,
Using Wireless Zero Configuration for Managing the
module via Wireless LAN Configuration Tool Plus. For
Module.
11
Page 12

802.1 1 g USB 2.0 WLAN
Chapter 4. How to use the WLAN Utility(Station)
4.1 802.11g USB 2.0 WLAN Module Configuration Tools
If you use the WinXP OS , the “Zero Configuration” of WinXP will be disable first , then
WLAN Utility can be used.
Module User Manual
Figure 4-1
4.2 Open the WLAN Utility .
The Window is as shown in “Figure 4-1”.
The module can be set at “Station” or “Access Point” Mode from the Mode drop down menu. Station
mode is selected for the document.
- You can site survey the neighboring SSID site by pressing the “Refresh”, then sites name and
signals strength of available SSID sites are shown on the “Available Network” field.
- Double click the SSID site from “Available Network” field, and the SSID can be connected
directly.
- The information of the SSID is shown on the “ Current Network Information”.
- Show the BSSID of connecting AP on the “Link Status” filed.
- “Signal Strength” and “Link Quality” shown on diagrammatic curve, and described with
percentage.
- Record the number of Tx frames on the filed of “Tx Frame”.
- Record the number of Rx frames on the filed of “Rx Frame”.
12
Page 13

802.1 1 g USB 2.0 WLAN
Module User Manual
4.3 More Setting …
Click “More Setting"icon of Figure 4-1 to enter More Setting window (Please see Figure
4-2.)
4.3.1 “General Connection Setting" group:
- Read the current status from the group if the “Change" button is not pressed.
- Press “Change" button for modifying the status, when the modification is finished, press
“Apply" to save it. The button “Change" and “Apply" is alternately shown on the
same position.
SSID:
The SSID (Service Set Identifier), also known as the Network Name, must be unique to
distinguish itself as a particular wireless network. All wireless points in the net work area share
the same SSID. Type your network SSID in the SSID field to associate with access points or
stations within the specified wireless LAN.
Channel:
This is the radio channel used by wireless devices within the network for communication.
This command is only available while you are op
operating radio frequency channel from the pull-down menu if you are the creator of the
wireless network. If you are joining an existing network you do not need to select the channel;
configure the SSID and click Apply changes.
Note: The available channels differ from country to country. The channel number must be the same
between the entries/stations within the network, so that each station can communicate with the
other stations
TX Rate:
Select the transmission rate from “Tx Rate" drop down menu.
Network Type:
Select the
“Infrastructure" Mode from the “Network Type" drop
down menu.
Authentication:
Select from the “Authentication" drop down menu:
erating in the mode. Specify the
Open System, Shared Key, Auto, WPA, WPA PSK, WPA2, WPA2 PSK
Encryption:
Select from “Encryption" drop down menu: Disable, WEP, TKIP, AES
13
Page 14

Figure 4-2
802.1 1 g USB 2.0 WLAN
Module User Manual
4.3.2 Encryption Setting:
4.3.2.1 WEP Encryption Key Setting
Press “WEP Encryption Key Setting” to enter the “WEP Key Setting” page shown as
Figure 4-3-1.
- Press the “Change” button to modify the contents of “WEP Key setting”, when it is
finished, press “Apply” to save it. The button “Change” and “Apply” is alternately shown
on the same position.
- Select which key length 64,128 or 256 bits will be modified or used by “Key Length” item.
- Select which key set will be use by the field of “Default Key ID”
- Modify the 4 sets key depending on the selected key length on the field of “Key Value”.
The key value is used the hexadecimal format.
4.3.2.2 WPA Encryption Setting
Press “WPA Encryption Setting” to enter the “WPA Setting” page sh own as Figure 4-3-2.
- Press the “Change” button to modify the contents of “WPA setting”, when it is finished,
press “Apply” to save it. The button “Change” and “Apply” is alternately shown on the
same position.
- Select from the Protocol drop-down menu for the Protocol setting: TLS, PEAP, TTLS
- Setting “User Name”, “Password”, and “Phase2 Auth” drop-down menu per Protocol
setting.
- Pre-shared key setting: “Passphrase”, and “Key Format” select (ASCII or Hexadecimal)
- “Certificate” selection per Protocol setting.
14
Page 15

802.1 1 g USB 2.0 WLAN
Figure 4-3-1
Module User Manual
Figure 4-3-2
4.3.3 “Profile ” group:
- Select the profile(Figure 4-2) that has been saved previously from the “Profile name”
drop down .
menu, then press “Load ” button to load the status to use.
- Write the profile name on the field of “Profile name”, and press the “Save Current” button
to save the current status on the profile.
- Select the profile name that wanted to delete from the “Profile name” drop down menu,
and press “Delete” button to delete it
15
Page 16

Figure 4-4
4.2.4 “Other” group:
802.1 1 g USB 2.0 WLAN
Module User Manual
Press the “Advanced Setting” button, then the Advanced Setting page is shown as Figure
4-4.
- Select the Window User Interface by the “Language” down drop menu.
If the English item is selected, all functions of window are described with English.
Select the Traditional Chinese item, and they are described with Traditional Chinese.
- At “Power consumption Setting” group, select which power save level want to be
set by checking CAM Mode, Fast Power-Saving mode or Maximum Power-Saving
mode. The default is CAM mode. If the most save mode want to use, select the
Maximum Power-Saving mode, but it throughput is lower than CAM and Fast
Power-Saving mode. The throughput of “Fast Power-Saving mode” is better than
“Maximum Power-Saving mode”, but its power save is less than “Maximum
Power-Saving mode”.
- At “Country Roaming” group, the default depends on the region of EEPROM.
Select other region from “User Select” drop down menu, or check “World Mode”
item to set it to the word mode. When the word mode is set, it depends on the
behavior of AP. If the WLAN card is re-plug , the setting will return to default
setting.
- At “Fragmentation Threshold” bar, drop and move cursor to set the fragmentation
threshold point, the range is from 256 to 2346 bytes.
- At “RTS / CTS Threshold” bar, drop and move the cursor to set the RTS threshold
point, the range is from 0 to 2347 bytes.
- Its coming with special features and software which make it fully compatible to any
PSP. Black or Ceramic White with any firmware in it ; The modules are coming with
access point option (AP) which means that you can create AP without any additional
16
Page 17

802.1 1 g USB 2.0 WLAN
Module User Manual
software or hardware AP or wireless routers. Your PSP will find it in
INFRASTRUCTURE MODE after using option SCAN :o)) AP has WEP security,
MAC address filtering and bridge connection option!
PSP will connect to the internet if You have one and will be fully capable of any
wireless activities in a minute!!!
- Wireless Multimedia Enhancements Quality of Service support (QoS) / enhanced
power saving for Dynamic Networking
Figure 4-5
4.2.5 Information
Press the “Information” button to enter the “Information” page shown as Figure 4-5. It
includes the Driver version, Utility Version and MAC Address.
17
Page 18

802.1 1 g USB 2.0 WLAN
Module
Module User Manual
Chapter 5. How to use the WLAN Utility(Access Point)
5.1 Introduction
To set your 802.11g USB 2.0 WLAN
In Access Point mode , your 802.11g USB 2.0 WLAN
set up your wireless network without using a dedicate AP device. Up to 16 wireless station
can associate to 802.11g USB 2.0 WLAN
5.1.1 Additional Setup Requirement
To bridge wireless and wired using the 802.11g USB 2.0 WLAN
requirement must be met.
1. The 802.11g USB 2.0WLAN
network.
2. Either configure network sharing or bridge the two interfaces(Wireless & Wired) on the
computer.
3. Set the wireless station’s IP address to be in the same subnet as the computer in which
802.11g WLAN
5.2 The 802.11g WLAN
5.2.1 Select “ACCESS POINT” in the MODE field to display the screen as shown.
module is installed.
module Utility Screen
Module as an Access Point(AP) , reference
Module as an AP . this allows you to
Module.
Module, The following
Module must be installed a computer connect to the wired
5.2.2 click “More Setting…”in the 802.11g USB 2.0 WLAN Module screen to display the
screen as shown.
ACCESS POINT Mode
18
Page 19

802.1 1 g USB 2.0 WLAN
Module User Manual
19
Page 20

Chapter 6. Troubleshooting
6.1 Problems Starting the WLAN Utility Program
Cannot start the 802.11g
WLAN
Module Wireless
LAN Utility
The 802.11g WLAN Module
Utility icon does not display
6.2 Problem with the Link Status
PROBLEM CORRECTIVE ACTION
The link quality and/or signal
strength is poor all the time.
In wireless station mode, the
computer with the 802.11g
WLAN
cannot communicate with the
other computer(s).
A. Infrastructure
B.IBSS
In access point mode, the
wireless station(s) cannot
associate to the 802.11g
WLAN
Module installed
Module
Make sure the 802.11g WLAN Module is properly inserted and the LED(s) is
on.
Use the Device Manager to check for possible hardware conflicts. Click Start,
Settings, Control Panel, System, Hardware and Device Manager. Verify the
status of the 802.11g WLAN
depending on the version of Windows).
Install the 802.11g WLAN Module in another computer.
If the er ror pe rsi st s, y ou may hav e a har dwa re pro blem. In t hi s case, you shoul d
contact your local vendor.
When th e 802.11 g W ireless LA N Utility i co n does no t d isplay, yo u are using the
Windows XP wireless configuration tool at the same time. Refer to the Chapter
3 to disable the Windows XP wireless configuration tool.
Search and connect to another AP with a better link quality
using the Site Survey screen. Move your computer closer to
the AP or the peer computer(s) within the transmission range.
There may be too much radio interference (for example
microwave or another AP using the same channel) around your
wireless network. Relocate or reduce the radio interference.
Make sure that the AP and the associated computers are turned on and working
properly. Make su re the 802.11g WLAN
AP u se th e sam e SSI D . Ch a nge t he AP and t h e ass ocia ted w i rel e ss cl i ent s to us e
another radio channel if interference is high. Make sure that the computer and
the AP share the same security option and key. Verify the settings in the
Security screen.
Verify that the peer computer(s) is turned on. Make sure the 802.11g WLAN
Module computer and the peer computer(s) are using the same SS ID and
channel. Make sure that the computer and the peer computer(s) share the
same security option and key. Change the wireless clients to use another radio
channel if interference is high.
Verify that the computer with the 802.11g WLAN Module installed is turned on.
Make sure the wireless station(s) uses the same SSID as the 802.11g WLAN
Module. Make sure the wireless station(s) uses the same security option
and/or WEP keys. Verify that the wireless station(s) is not blocked in the MAC
Filter screen.
802.1 1 g USB 2.0 WLAN
Module under Network module. (Steps may var y
Module co mpute r and the associated
Module User Manual
20
 Loading...