

Page 1

802.11g WLAN/Bluetooth Combo USB Dongle User Manual
802.11g WLAN/Bluetooth
Combo USB Dongle
User Manual
Ver 1.0
1
Page 2
Page 3

802.11g WLAN/Bluetooth Combo USB Dongle User Manual
Table of Contents
Chapter 0. Introduction .......................................................................................... 5
■ Package Contents ....................................................................................... 5
■ Form Factor ................................................................................................ 5
■ System Requirements for Configuration:................................................... 5
Chapter 1. Wireless LAN Network ........................................................................ 7
1.1 Overview.................................................................................................... 7
1.1.1 SSID.................................................................................................. 7
1.1.2 Channel ............................................................................................ 7
1.1.3 Transmission Rate (Tx Rate).......................................................... 7
1.1.4 Wireless Network Application ........................................................ 7
Ad-Hoc (IBSS) ................................................................................... 8
Access Point Mode ............................................................................ 8
Chapter 2. How to Install WLAN/Bluetooth driver and Utility........................... 10
Software Setup........................................................................................ 10
Hardware Setup ............................................................................... 11
Chapter 3. Windows XP Installation Notes.......................................................... 13
Chapter 4. How to use the WLAN Utility(Station) .............................................. 15
4.1 802.11g USB 2.0 WLAN Dongle Configuration Tools ........................... 15
4.2 Open the WLAN Utility . ......................................................................... 15
4.3 More Setting …........................................................................................ 16
4.3.1 “General Connection Setting” group: ........................................... 16
SSID :................................................................................................ 16
Channel : .......................................................................................... 16
TX Rate : .......................................................................................... 16
Network Type :................................................................................ 16
Encryption :...................................................................................... 16
Authentication Mode : ................................................................... 16
4.3.2 Encryption Setting : .................................................................... 17
4.2.4 “Other” group: .............................................................................. 18
4.2.5 Information .................................................................................. 19
Chapter 5. How to use the WLAN Utility(Access Point) .................................... 20
5.1 Introduction.............................................................................................. 20
Additional Setup Requirement................................................................ 20
5.2 The 802.11g WLAN dongle Utility Screen............................................. 20
Chapter 6. How to use the Bluetooth Utility....................................................... 22
6.1 Open Bluetooth uility............................................................................... 22
3
Page 4

802.11g WLAN/Bluetooth Combo USB Dongle User Manual
6.2 Local
6.3 Remote
6.4 Bluetooth Service Buttons of Remote Device........................................ 23
6.5 Local Service List.................................................................................... 24
6.6 Bluetooth Connection Management ........................................................ 25
Find Remote Devices.............................................................................. 25
Inquire Device......................................................................................... 25
Add Device from History List ................................................................ 25
Add a New Device by Entering Device Address................................... 25
6.7 Connect and Disconnect.......................................................................... 25
Connect ................................................................................................... 25
Disconnect............................................................................................... 25
Chapter 7. Troubleshooting ................................................................................. 27
7.1 Problems Starting the WLAN Utility Program ....................................... 27
7.2 Problem with the Link Status.................................................................. 27
Bluetooth
Bluetooth
Icon Meanings ....................................................................................... 23
Icon Meanings ....................................................................................... 24
Device ........................................................................... 22
Devices...................................................................... 22
Appendix A ......................................................................................................... 28
Ad-Hoc(Peer to Peer) Mode Setup .............................................................. 28
Application:Access the Internet without an AP .............................. 28
Check whether the Setup is success................................................. 33
Application:Data sharing between computers ................................ 34
4
Page 5

802.11g WLAN/Bluetooth Combo USB Dongle User Manual
Chapter 0. Introduction
Thank you for using our WLAN/Bluetooth Combo product. This installation
guide will help you install WLAN/Bluetooth Combo product and connect to the
Internet quick & easy.
■ Package Contents
1. WLAN/Bluetooth Combo USB 2.0 Dongle
2. Quick Installation Guide
3. Manual & Driver on CD Disc
4. USB cable (Optional)
If any of the above items are missing, please contact your reseller.
■ Form Factor
High Performance Antenna
WLAN Active Led
BT Active Led
■ System Requirements for Configuration:
A laptop or notebook computer with an available usb port(2.0 or 1.1)
Windows XP, Windows 2000, Windows Me, or Windows 98SE
At least 32 MB of memory and a 300 MHz processor
An 802.11g or 802.11b Access Point (
or another 802.11g or 802.11b wireless adapter (for
mode.
)
for Infrastructure mode
Ad-Hoc, peer-to-peer networking
),
1. Note: USB port version 2.0 is required for 11g performance. To take full advantage of this
adapter’s features, please upgrade the USB port on your laptop or PC to version 2.0.
2. Remove 802.11g WLAN/Bluetooth Combo USB 2.0 Dongle
Select the icon in the system tray.
The Safely Remove Hardware pop-up menu will appear. Select to continue.
5
Page 6

802.11g WLAN/Bluetooth Combo USB Dongle User Manual
The Safely Remove Hardware window will appear. Select 802.11g USB 2.0 WLAN Dongle
and then select Stop to continue.
The Safe To Remove Hardware message balloon will appear. You may now safely unplug
your WLAN/Bluetooth Combo Products from your computer.
6
Page 7

802.11g WLAN/Bluetooth Combo USB Dongle User Manual
Chapter 1. Wireless LAN Network
1.1 Overview
This section describes the wireless LAN network terms and applications.
1.1.1 SSID
The SSID (Service Set Identity) is a unique name shared among all wireless
devices in a wireless network. Wireless devices must have the same SSID
to communicate with each other.
1.1.2 Channel
A radio frequency used by a wireless device is called a channel.
1.1.3 Transmission Rate (Tx Rate)
The WLAN/Bluetooth Combo USB 2.0 Dongle provides various transmission
(data) rate options for you to select. Options include Auto, 1 Mbps, 2 Mbps,
5.5 Mbps, 11 Mbps, 6 Mbps, 9 Mbps, 12 Mbps, 18 Mbps, 24 Mbps, 36 Mbps,
48 Mbps, and 54 Mbps. In most networking scenarios, the factory default
Auto setting proves the most efficient. This setting allows your
WLAN/Bluetooth Combo Dongle to operate at the maximum transmission
(data) rate. When the communication quality drops below a certain level, the
WLAN/Bluetooth Combo Dongle automatically switches to a lower
transmission (data) rate. Transmission at lower data speeds is usually more
reliable. However, when the communication quality improves again, the
WLAN/Bluetooth Combo Dongle gradually increases the transmission (data)
rate again until it reaches the highest available transmission rate.
You can select any of the above options. If you wish to balance speed versus
reliability, select 48 Mbps or 54 Mbps in a networking environment where
you are certain that all wireless devices can communicate at the highest
transmission (data) rate. 1 Mbps or 2 Mbps are used often in networking
environments where the range of the wireless connection is more important
than speed.
1.1.4 Wireless Network Application
Wireless LAN works in either of the two modes: ad-hoc and infrastructure.
To connect to a wired network within a coverage are a using Access Points
(APs), set the WLAN Dongle operation mode to Infrastructure (BSS). An
AP acts as a bridge between the wireless stations and the wired network.
In case you do not wish to connect to a wired network, but pref er to set up
7
Page 8
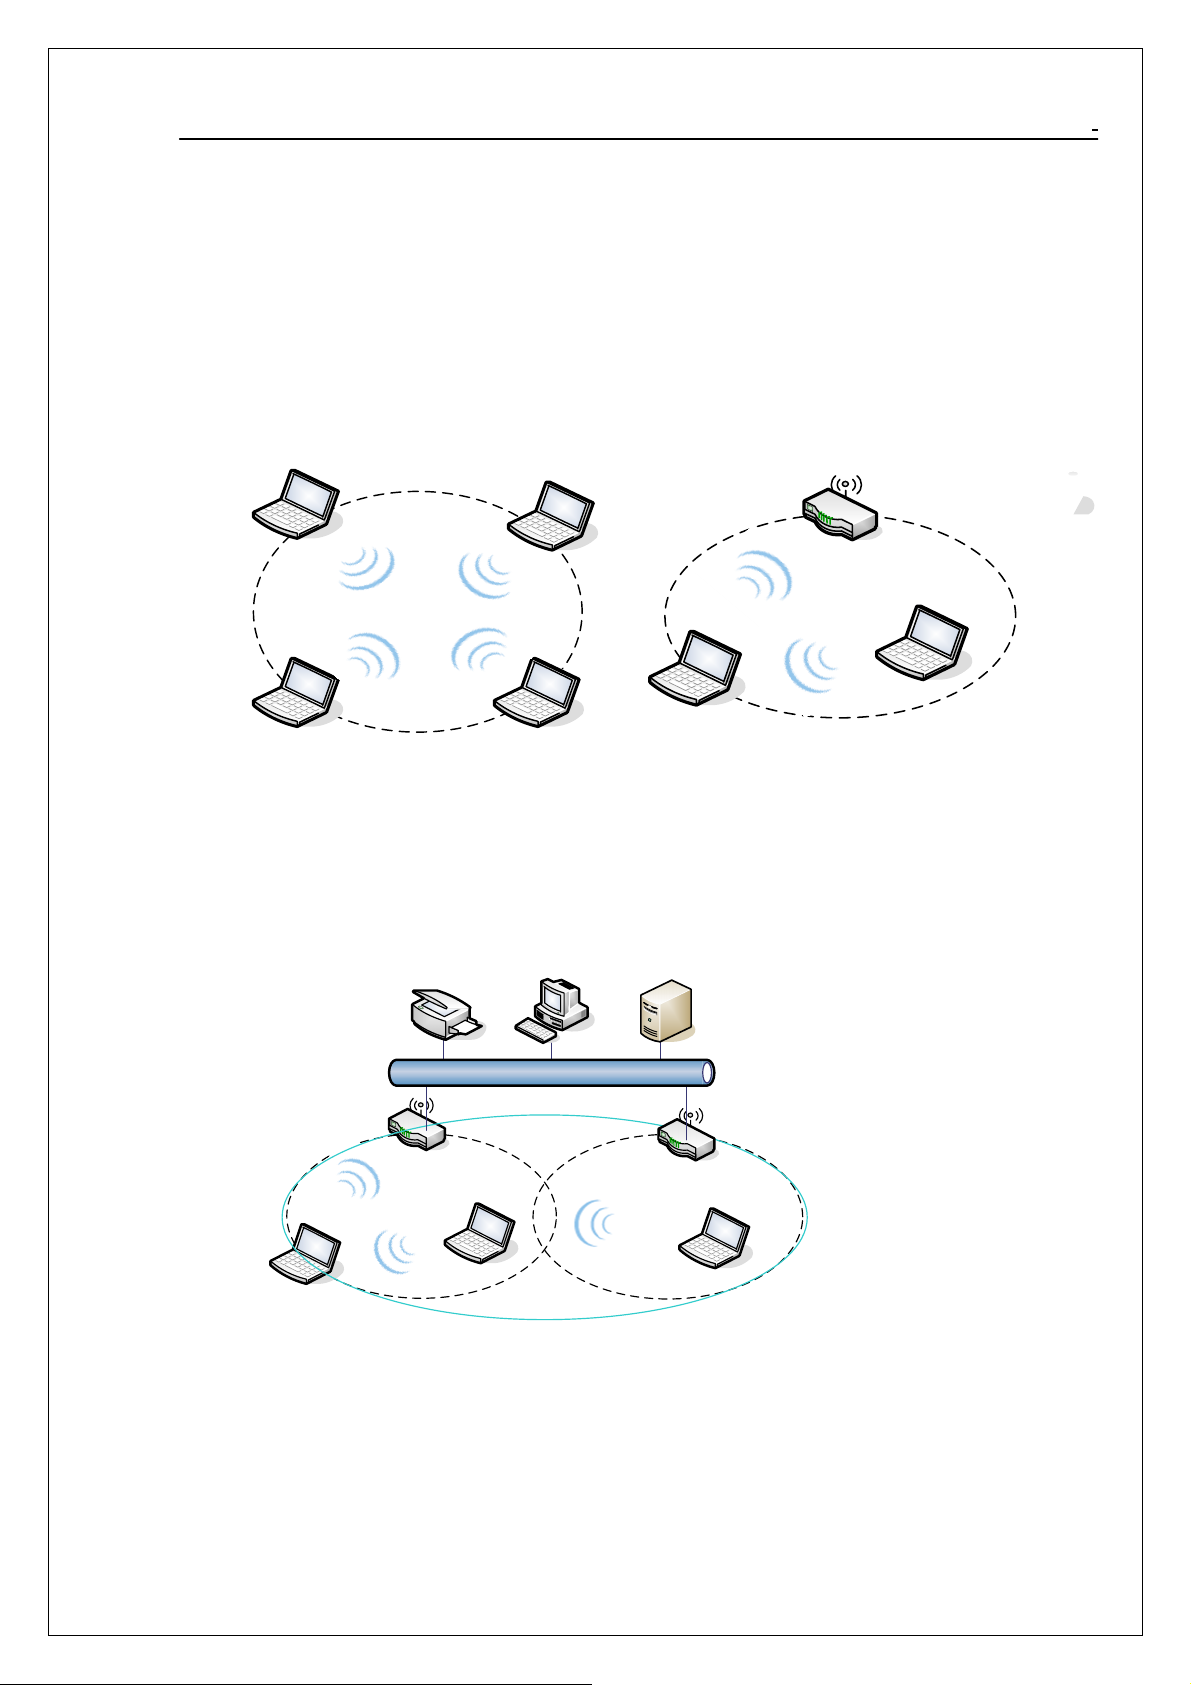
a small independent wireless workgroup without an AP, use the Ad-hoc
(IBSS) (Independent Basic Service Set) mode.
Ad-Hoc (IBSS)
Ad-hoc mode does not require an AP or a wired network. Two or more
wireless stations communicate directly to each other. An ad-hoc network
may sometimes be referred to as an Independent Basic Service Set
(IBSS).
802.11g WLAN/Bluetooth Combo USB Dongle User Manual
Ad-Hoc
(IBSS)
BSS
A series of overlapp i ng BSS and a network m e dium, suc h as an Et hernet fo rms an
Extended Service Set (ESS) or infrastructure network. All communication is done
through the AP, which relays data packets to other wireless stations or devices
connected to the wired network. Wireless stations can then access resource,
such as the printer, on the wired network.
BSS1
BSS2
ESS
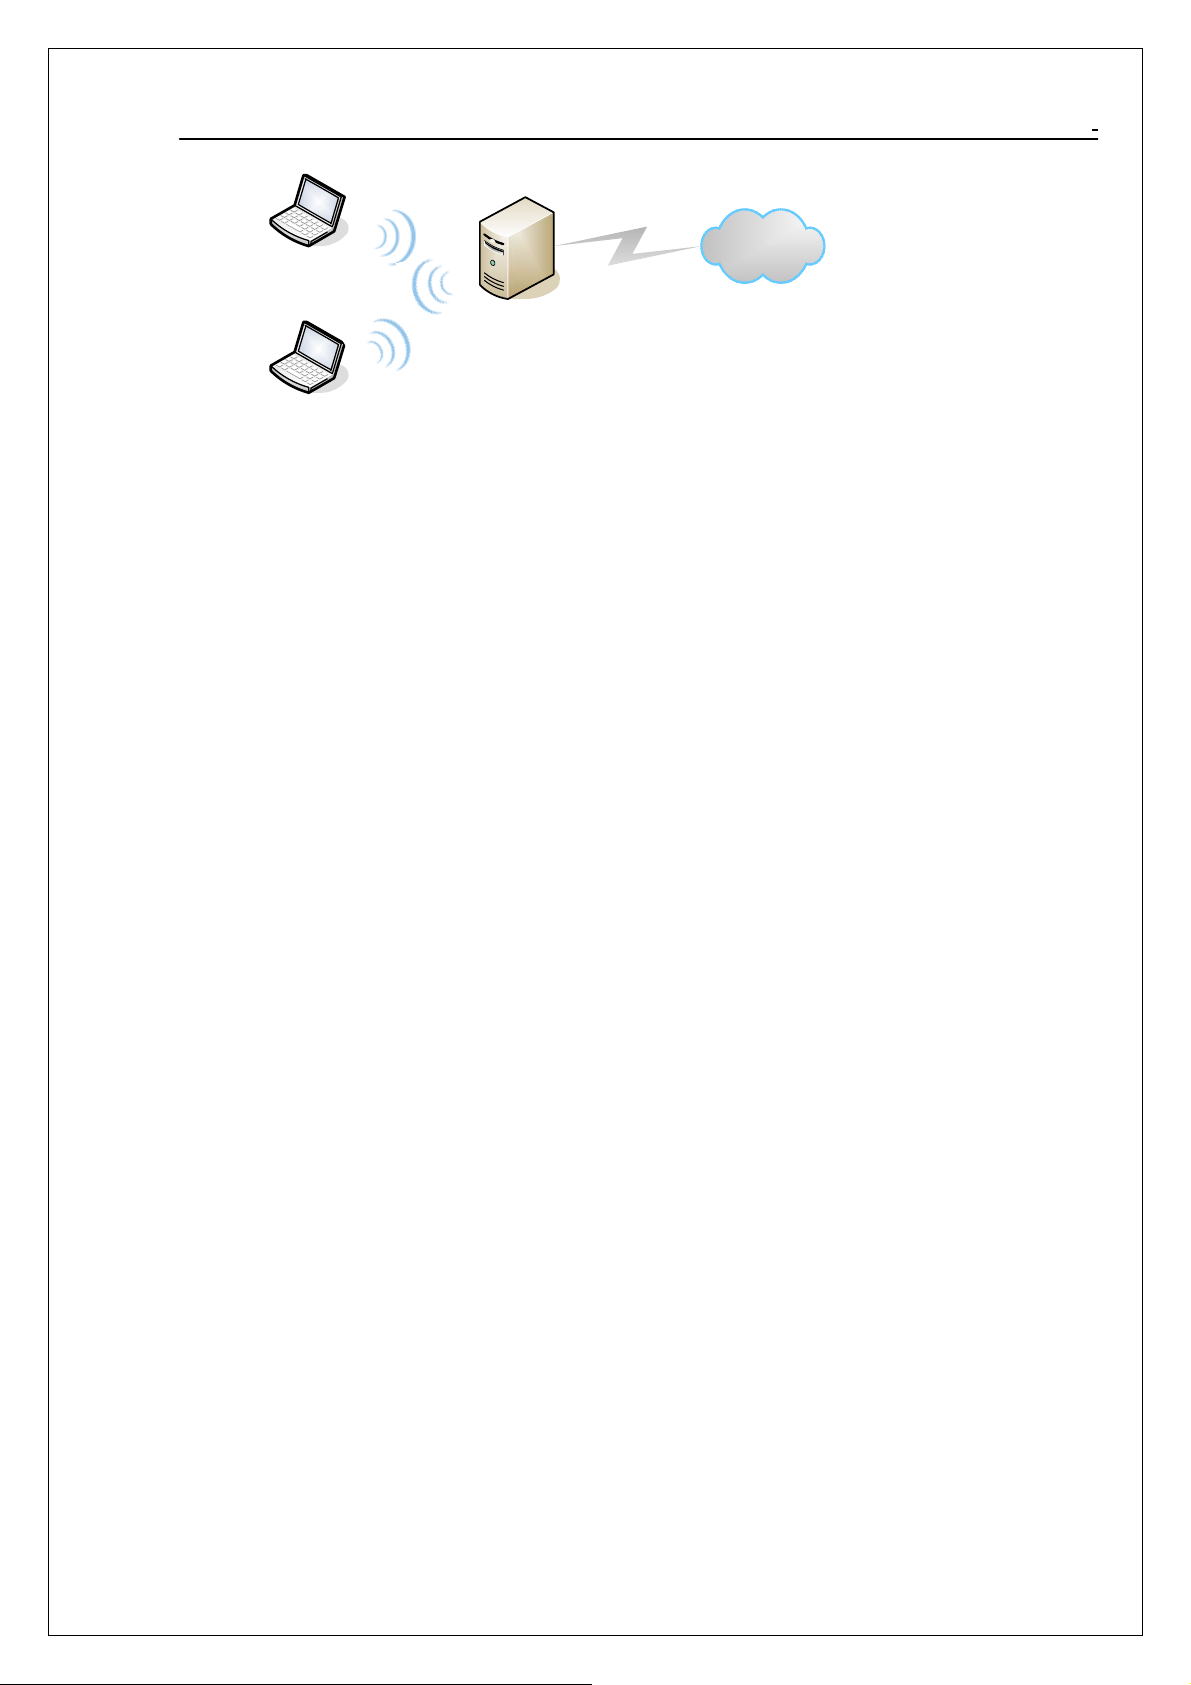
Access Point Mode
The following figure depicts a network example in which you set the
WLAN/Bluetooth Combo USB 2.0 Dongle in access point mode.
8
Page 9
802.11g WLAN/Bluetooth Combo USB Dongle User Manual
Computer 2
Computer 1
AP MODE
In the example, the WLAN/Bluetooth Combo USB 2.0 Dongle is installed on
computer A and set to operate in access point mode. Computer 1 shares Internet
connection to the wireless LAN, so wireless computer 2 and 3 can access the
Internet.
9
Page 10
802.11g WLAN/Bluetooth Combo USB Dongle User Manual
Chapter 2. How to Install WLAN/Bluetooth driver and Utility
Please read and follow the instructions below.
Software Setup
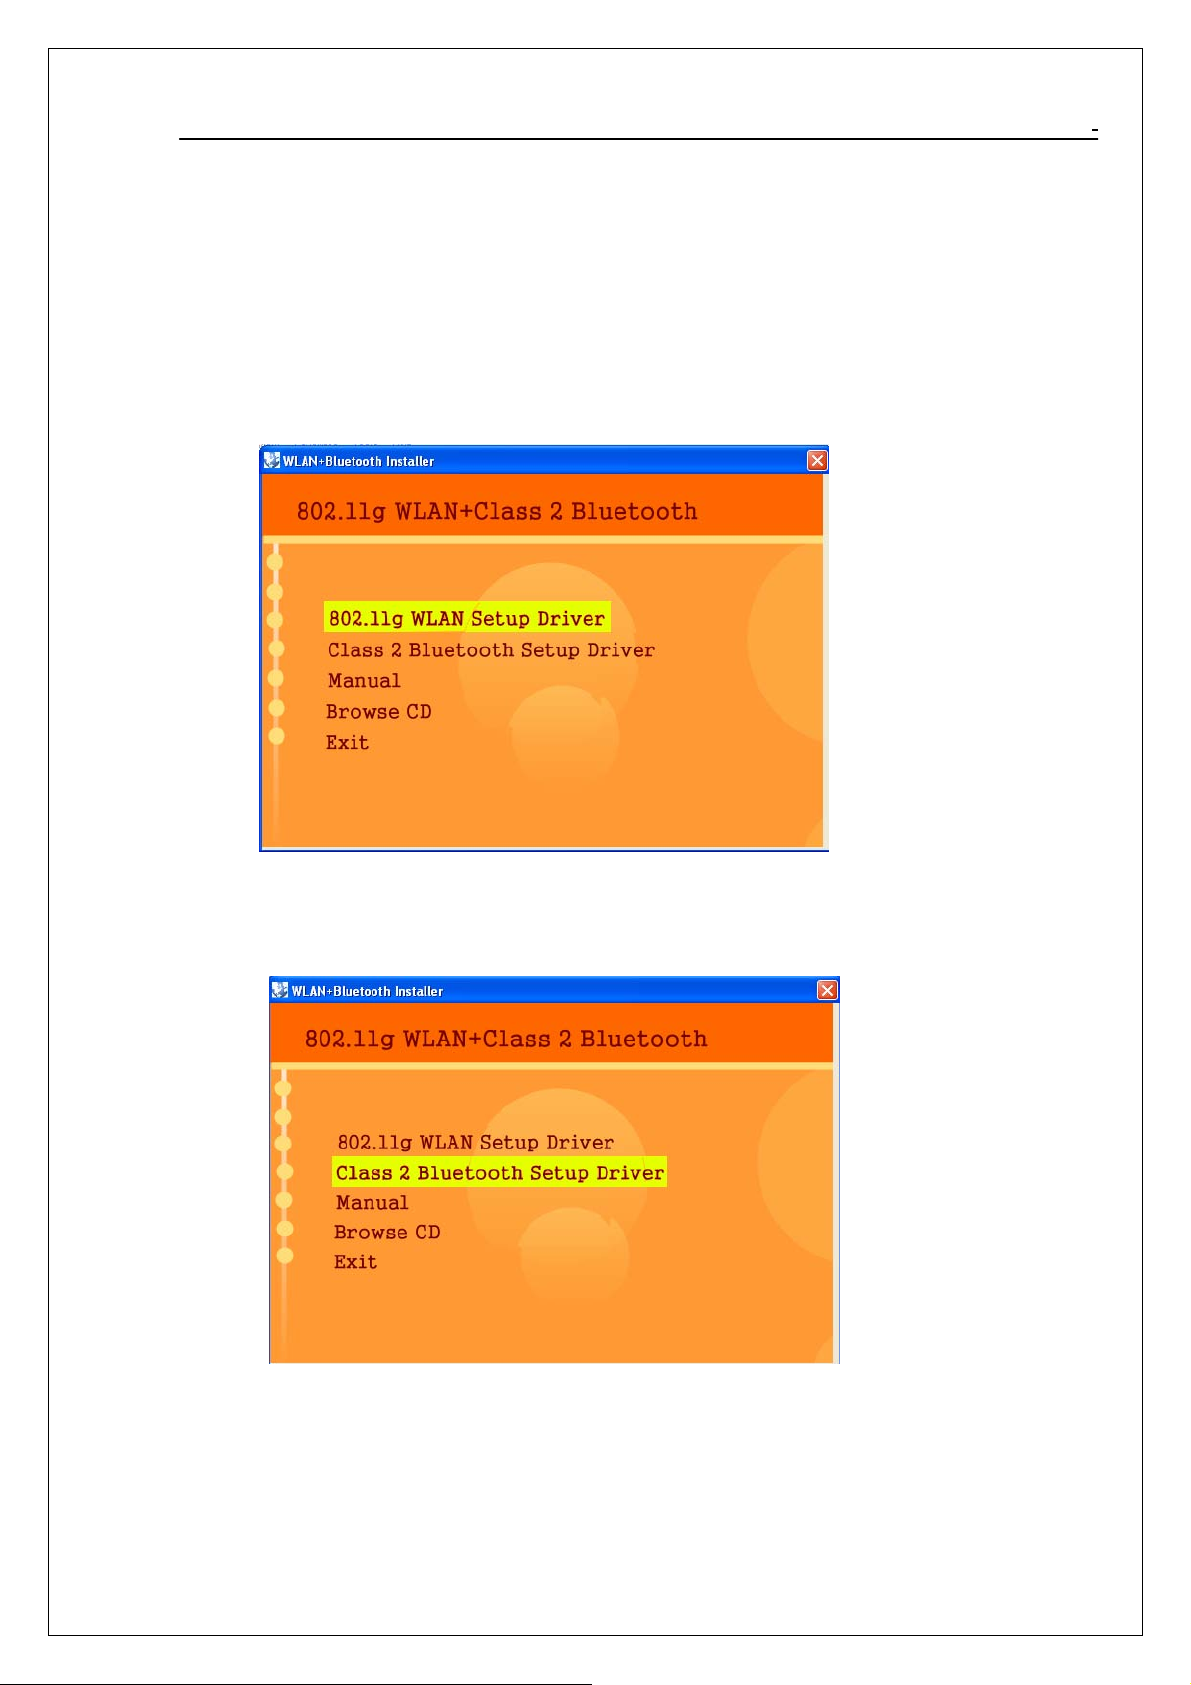
2.1 Insert the supplied Setup CD
Insert the supplied Setup CD into your CD-ROM drive , and you’ll see the
software installation window as shown below. (please direct to next)
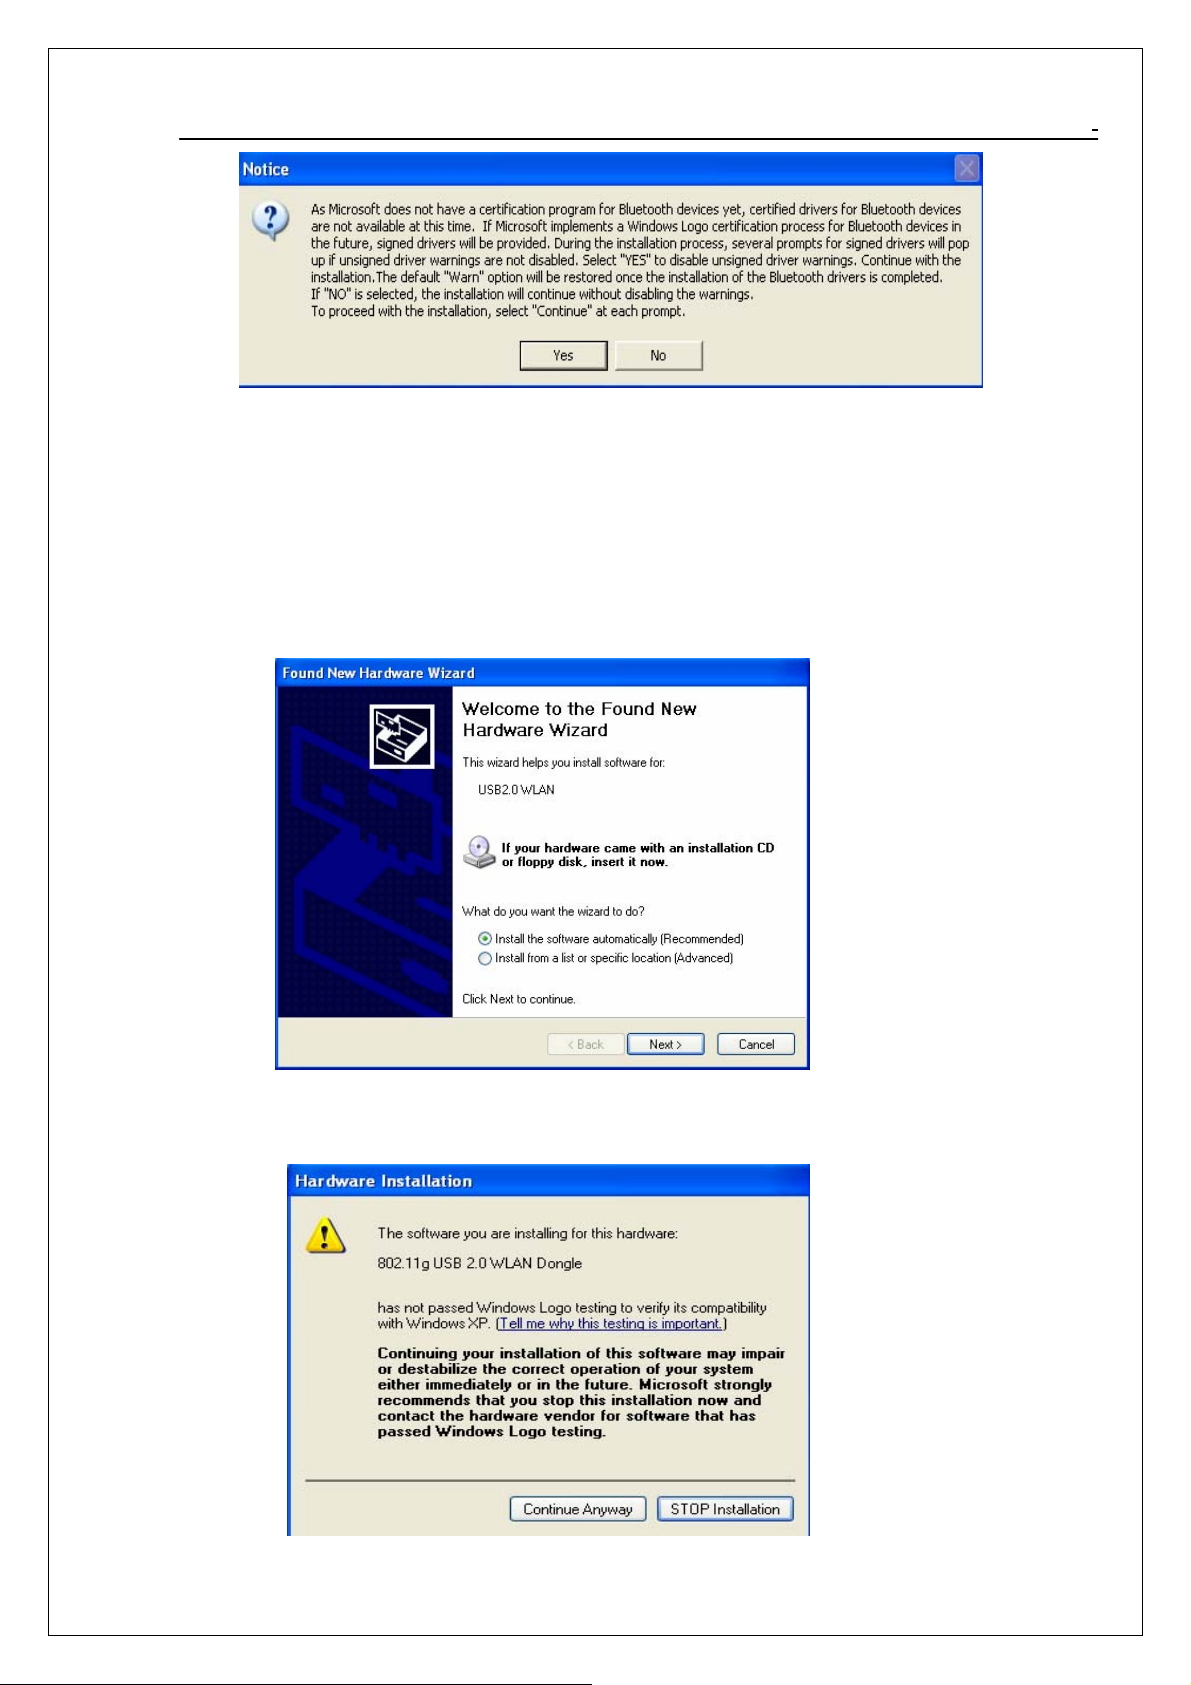
2.2 Click “Class 2 Bluetooth Setup Driver”(Installation Windows), and choose
the “default” item through the installation process.
2.3 Following screen appears , click “Yes” to countinue
10
Page 11
802.11g WLAN/Bluetooth Combo USB Dongle User Manual
2.4 Reboot Your PC
Hardware Setup
2.5 After plugging WLAN/Bluetooth Combo USB 2.0 Dongle, the USB stick, into
your PC, it will automatically find and alert a New USB Device. Click
“Next” to continue
2.4 When the following screen appears , click “Countinue Anyway” to countinue.
11
Page 12

802.11g WLAN/Bluetooth Combo USB Dongle User Manual
2.5 Your PC will recognize the device of “802.11g USB 2.0 WLAN Dongle”,
and click “Next” to install driver.
2.6 Finally, click the “Finish” to leave this dialogue window.
2.7 After successful installation, you’ll see the new icon appear in t h e Icon Tra y .
802.11g WLAN Bluetooth
Double-click the icon to launch the application and open the configuration
tools dialog box to configure your adapter.
For more details about WLAN’s configuration tools, please refer to Figure
4-1.
12
Page 13

802.11g WLAN/Bluetooth Combo USB Dongle User Manual
Chapter 3. Windows XP Installation Notes
Windows XP has a built-in configuration tool, Windows XP Wireless Zero
Configuration, available to assist you in managing your wireless networks. you
use the provided WLAN/Bluetooth Combo USB Dongle to manage your adapter.
To use the Zero Configuration tool, refer to Chapter 5.
When you use the Windows XP configuration tool and the WLAN Utility to configure the WLAN
Dongle at the same time, the WLAN Utility icon does not display or is grayed out.
To use the Wireless LAN Configuration Tool Plus under Windows XP, you need
to disable the default settings of your Windows XP Wireless Zero Configuration
utility.
Follow the procedure below.
1. Right-click the Wireless LAN Configuration Tool Plus to Exit from the
program. Dothis before you try to access Windows XP Wireless Zero
Configuration. See Figure 3-1 and Figure 3-2.
Figure 3-1 Wireless LAN Configuration Tool Plus Icon
Figure 3-2 Right-click Menu of the System Tray Icon
2. Right-click the Network Connections icon in the task bar to open the
Wireless Network Connection Status dialog box. Select Properties. See
Figure 3-3.
Figure 3-3 Wireless Network Connection Status Dialog Box
13
Page 14

802.11g WLAN/Bluetooth Combo USB Dongle User Manual
3. Choose the Wireless Networks tab in the Wireless Network Connection
Properties dialog box, and uncheck the Use Windows to configure my wireless
network settings checkbox. See Figure 3-4.
Figure 3-4 Wireless Network Connection Properties Dialog Box
4. Click OK. The Windows XP Wireless Zero Configuration is now disabled.
You can now monitor and configure th e a d apter via Wireless LAN Configuration
Tool Plus. For more information on the Wireless LAN Configuration Tool Plus,
please refer to Figure 4-1, Configuration Utility.
If you wish to use the Wi ndows XP Wi reless Zer o Configur ation, refer to Figure
3-4, Using Wireless Zero Configuration for Managing the Adapter.
14
Page 15

802.11g WLAN/Bluetooth Combo USB Dongle User Manual
Chapter 4. How to use the WLAN Utility(Station)
4.1 802.11g USB 2.0 WLAN Dongle Configuration Tools
If you use the WinXP OS , the “Zero Configuration” of WinXP will be
disable first , then WLAN Utility can be used.
Figure 4-1
4.2 Open the WLAN Utility .
The Window is as shown in “Figure 4-1”.
The adapter can be set at “Station” or “Access Point” Mode from the Mode drop down menu. Station
mode is selected for the document.
- You can site survey the neighboring SSID site by pressing the “Refresh”, then
sites name and signals strength of available SSID sites are shown on the
“Available Network” field.
- Double click the SSID site from “Available Network” field, and the SSID can be
connected directly.
- The information of the SSID is shown on the “ Current Network Information”.
- Show the BSSID of connecting AP on the “Link Status” filed.
- “Signal Strength” and “Link Quality” shown on diagrammatic curve, and
described with percentage.
- Record the number of Tx frames on the filed of “Tx Frame”.
- Record the number of Rx frames on the filed of “Rx Frame”.
15
Page 16

802.11g WLAN/Bluetooth Combo USB Dongle User Manual
4.3 More Setting …
Click “ More Setting “ icon of Figure 4-1 to enter “More setting “ window. The
window is shown as “ Figure 4-2 ”.
4.3.1 “General Connection Setting” group:
- Read the current status from the group if the “Change” button is not
pressed.
- Press “Change” button for modifying the status, when the modification is
finished, press “Apply” to save it. The button “Change” and “Apply” is
alternately shown on the same position.
SSID :
The SSID (Service Set Identifier), also known as the Network Name, must be
unique to distinguish itself as a particular wireless network. All wireless points
in the network area share the same SSID. Type your network SSID in the
SSID field to associate with access points or stations within the specified
wireless LAN.
Channel :
This is the radio channel used by wireless devices within the network for
communication. This command is only available while you are operating in
the Ad hoc mode. Specify the operating radio frequency channel from the
pull-down menu if you are the creator of the wireless network. If you are
joining an existing network you do not need to select the channel; configure
the SSID and click Apply changes.
TX Rate :
Note: The available channels differ from country to country. The chan-nel number must be the same
between the entries/stations within the network, so that each station can communicate with the
other stations
Select the transmission rate by “ Tx Rate” drop down menu.
Network Typ e :
Select the “Ad_Hoc” or “Infrastructure” Mode by the “Network Type” drop
down menu.
Encryption :
Select the “Enable WEP” or “Disable WEP” by the “Encryption” drop
down menu.
Authentication Mode :
Select the “Open System” , “Shared Key” mode or “Auto” from the
“Authentication Mode” drop down menu.
16
Page 17

802.11g WLAN/Bluetooth Combo USB Dongle User Manual
Figure 4-2
4.3.2 Encryption Setting :
Press “WEP Encryption Key Setting” to ente r the “ WEP Key Sett ing” p age
shown as Figure 4-3.
- Select the “Open System” , “Shared Key” mode or “Auto” from the
“authentication Mode” drop down menu.
- Press the “Change” button to modify the contents of “WEP Key setting”,
when it is finished, press “Apply” to save it. The button “Change” and
“Apply” is alternately shown on the same position.
- Select which key length 64,128 or 256 bits will be modified or used by
“Key Length” item.
- Select which key set will be use by the field of “Default Key ID”
- Modify the 4 sets key depending on the selected key length on the field of
“Key Value”. The key value is used the hexadecimal format.
17
Page 18

802.11g WLAN/Bluetooth Combo USB Dongle User Manual
Figure 4-3
4.3.3 “Profile ” group:
- Select the profile(Figure 4-2) that has been saved previously from the
“Profile name” drop down . menu, then press “Load ” button to load the
status to use.
- Write the profile name on the field of “Profile name”, and press the “Save
Current” button to save the current status on the profile.
- Select the profile name that wanted to delet e from the “Profile name” drop
down menu, and press “Delete” button to delete it
Figure 4-4
4.2.4 “Other” group:
18
Page 19

802.11g WLAN/Bluetooth Combo USB Dongle User Manual
Press the “Advanced Setting” button, then the Advanced Setting page is
shown as Figure 4-4.
- Select the Window User Interface by the “Language” down drop menu.
If the English item is selected, all functions of window are described
with English. Select the Traditional Chinese item, and they are described
with Traditional Chinese.
- At “Power consumption Setting” group, select which power save level
want to be set by checking CAM Mode, Fast Power-Saving mode or Maximum
Power-Saving mode. The default is CAM mode. If the most save mode want
to use, select the Maximum Power-Saving mode, but it throughput is lower
than CAM and Fast Power-Saving mode. The throughput of “Fast
Power-Saving mode” is better than “Maximum Power-Saving mode”, but
its power save is less than “Maximum Power-Saving mode”.
- At “Country Roaming” group, the default depends on the region of EEPROM.
Select other region from “User Select” drop down menu, or check “World
Mode” item to set it to the word mode. When the word mode is set, it
depends on the behavior of AP. If the WLAN card is re-plug , the setting
will return to default setting.
- At “Fragmentation Threshold” bar, drop and move cursor to set the
fragmentation threshold point, the range is from 256 to 2346 bytes.
- At “RTS / CTS Threshold” bar, drop and move the cursor to set the RTS
threshold point, the range is from 0 to 2347 bytes.
Figure 4-5
4.2.5 Information
Press the “Information” button to enter the “Information” page shown as
Figure 4-5. It includes the Driver version, Utility Version and MAC
Address.
19
Page 20

802.11g WLAN/Bluetooth Combo USB Dongle User Manual
Chapter 5. How to use the WLAN Utility(Access Point)
5.1 Introduction
To set your 802.11g USB 2.0 WLAN dongle as an Access Point(AP) ,
reference In Access Point mode , your 802.11g USB 2.0 WLAN dongle as an
AP . this allows you to set up your wireless network without using a
dedicate AP device. Up to 16 wireless station can associate to 802.11g USB
2.0 WLAN dongle.
Additional Setup Requirement
To bridge wireless and wired using the 802.11g USB 2.0 WLAN dongle, The
following requirement must be met.
1. The 802.11g USB 2.0WLAN dongle must be installed a computer connect
to the wired network.
2. Either confi g ure network sharing or bridge the t w o interfaces(Wireless &
Wired) on the computer.
3. Set the wireless station’s IP address to be in the same subnet as the
computer in which 802.11g WLAN dongle is installed.
5.2 The 802.11g WLAN dongle Utility Screen
5.2.1 Select “ACCESS POINT” in the MODE field to display the screen as
shown.
5.2.2 click “More Setting…”in the 802.11g USB 2.0 WLAN dongle screen to
ACCESS POINT Mode
display the screen as shown.
20
Page 21

802.11g WLAN/Bluetooth Combo USB Dongle User Manual
21
Page 22

802.11g WLAN/Bluetooth Combo USB Dongle User Manual
Chapter 6. How to use the Bluetooth Utility
6.1 Open Bluetooth uility
Double-click the Bluetooth icon to launch the application and open the
configuration tools dialog box to configure your adapter.
6.2 Local
The Local
user's computer that is running BlueSoleil.
Operations:
¾ Hover mouse to display the local
¾ Click on the red ball to start or stop searching for
¾ Right-click on the red ball to display a pop-up menu of related
6.3 Remote
Remote devices are other
Bluetooth
icons to indicated different types of remtoe devices..
Bluetooth
Bluetooth
(if without name).
in range.
operations (e.g., General Inquiry, My Services, Security, etc.).
Bluetooth
radio range of your local device. BlueSoleil uses different
Device
enabled device, known as "My Device", represents the
Devices
Bluetooth
Bluetooth
enabled devices that are in the
device's name or address
Bluetooth
devices
22
Page 23

802.11g WLAN/Bluetooth Combo USB Dongle User Manual
Icon Meanings
Remote devices can be in any of three states, which BlueSoleil indicates with
different colors.
z White- Idle. The normal state of the device.
z Yellow- Selected. you have selected the device.
z Green- Connected. The device is connected to your computer.
Operations Single-click on the icon to select.
• Double-click on the icon to search for the services supports by the remote
Bluetooth device .
• Right-click on the icon to display a pop-up menu of related operations (e.g. Refresh
Services, Pair Devices, Connect, etc.).
6.4 Bluetooth Service Buttons of Remote Device
Service buttons at the top of the Main Window represent a range of
Bluetooth
services
potentially supported by Remote Devices .
23
Page 24

802.11g WLAN/Bluetooth Combo USB Dongle User Manual
Icon Meanings
There are 3 states for the service icons, indicated by different colors.
• White- Idle. The normal state.
• Yellow- Available. The
Bluetooth
service is available on the selected
remote device.
• Green- Connected. The
Bluetooth
service is active in a connection with the
remote device.
Operations
• Hover your mouse over the service icon to display the name of the service.
• Single-click on the service icon to connect.
• Right-click on the service icon to display a pop-up menu of related
operations.
6.5 Local Service List
The Local Service List displays all the
Bluetooth
services supported by the
local computer. Use this screen to start/stop services.
24
Page 25

802.11g WLAN/Bluetooth Combo USB Dongle User Manual
6.6 Bluetooth Connection Management
6.6.1
Bluetooth
Connection Management includes:
Find Remote Devices
To set up a
Bluetooth
connection, the remote device must be found first. There
are 3 ways to find remote devices in BlueSoleil.
Inquire Device
1. Single-click the red ball in the main window to start inquiry.
2.
Bluetooth
devices within the radio range will be shown around the center
ball.
3. Wait for a few seconds until the names of all the devices are obtained.
Add Device from History List
The devices which had been found or connected can be added from the history
device list directly.
1. Select menu Tools | Add Device from History.... The History dialog box pops
up.
2. Select the device from the list and click button Add, the device will be
added to the main window.
Add a New Device by Entering Device Address
If the device cannot be found by Inquiring, you can enter the device address
to add the device.
1. Select menu Tools | Add New Device.... The Add New Device dialog pops up.
2. Enter the
Bluetooth
device address and click button OK, the device will
be added to the main window.
Note:
The device type will be unknown if add it by inputting its Bluetooth address.
6.7 Connect and Disconnect
Connect
1. Select a remote device and double click it to browse its services.
Bluetooth
passkey may be asked if security level of either side is set to
high and they are not paired devices.
After service browsing, the services the remote device supports are
highlighted by changing the color of the service buttons on the top of the
main window.
2. Single click one of the service button to connect.
After connection is setup, the remote device and the service button will
turn green.
Note: Users can right click the remote device icon or the service button to
pop up operation menu for connection.
Disconnect
25
Page 26

802.11g WLAN/Bluetooth Combo USB Dongle User Manual
Method 1: Select the remote device, right click the service button. On the popup menu,
select Disconnect.
Method 2: Right click the device icon. On the pop-up menu, select Disconnect | (the
connection you want to disconnect).
Method 3: For FTP and Synchronization connection, close the operation window, the
connection will be disconnected.
Method 4: Disconnect from the remote device directly.
Method 5: If the local
Bluetooth
device is removed or the remote device is powered off, all
the connections will be disconnected. If the remote device moves out of the
radio range, all the connections with the remote device will be disconnected
in 1 minute.
For more details about Bluetooth’s configuration tools, please refer file “English BlueSoleil
UserManual 1.4.pdf”(Double click)
.
26
Page 27

802.11g WLAN/Bluetooth Combo USB Dongle User Manual
Chapter 7. Troubleshooting
7.1 Problems Starting the WLAN Utility Program
Cannot start the 802.11g
WLAN dongle Wireless LAN
Utility
The 802.11g WLAN dongle
Utility icon does not display
7.2 Problem with the Link Status
PROBLEM CORRECTIVE ACTION
The link quality and/or signal
strength is poor all the time.
In wireless station mode, the
computer with the 802.11g
WLAN dongle installed
cannot communicate with the
other computer(s).
A. Infrastructure
B. Ad-Hoc (IBSS)
In access point mode, the
wireless station(s) cannot
associate to the 802.11g
WLAN dongle
Make sure the 802.11g WLAN dongle is properly inserted and the LED(s) is on.
Use the Device Manager to check for possible hardware conflicts. Click Start,
Settings, Control Panel, System, Hardware and Device Manager. Verify the
status of the 802.11g WLAN dongle under Network Adapter. (Steps may vary
depending on the version of Windows).
Install the 802.11g WLAN dongle in another computer.
If the er ror per sists , yo u ma y ha ve a ha rdw are pro ble m. In t his c ase, y ou s hou ld
contact your local vendor.
When the 802. 11g Wi re less L AN Utility icon d oes not d is play, you are using the
Windows XP wireless configuration tool at the same time. Refer to the Chapter
3 to disable the Windows XP wireless configuration tool.
Search and connect to another AP with a better link quality
using the Site Survey screen. Move your computer closer to
the AP or the peer computer(s) within the transmission range.
There may be too much radio interference (for example
microwave or another AP using the same channel) around your
wireless network. Relocate or reduce the radio interference.
Make sure that the AP and the associated computers are turned on and working
properly. Make sure the 802.11g WLAN dongle computer and the associated
AP u se th e same S SID. C hang e the A P and t h e ass o cia t ed wi r eles s c lien t s to u s e
another radio channel if interference is high. Make sure that the computer and
the AP share the same security option and key. Verify the settings in the
Security screen.
Verify that the peer computer(s) is turned on. Make sure the 802.11g WLAN
dongle computer and the peer computer(s) are using the same SS ID and
channel. Make sure that the computer and the peer computer(s) share the
same security option and key. Change the wireless clients to use another radio
channel if interference is high.
Verify that the computer with the 802.11g WLAN dongle installed is turned on.
Make sure the wireless station(s) uses the same SSID as the 802.11g WLAN
dongle. Make sure the wireless station(s) uses the same security option
and/or WEP keys. Verify that the wireless station(s) is not blocked in the MAC
Filter screen.
27
Page 28

802.11g WLAN/Bluetooth Combo USB Dongle User Manual
Appendix A
Ad-Hoc(Peer to Peer) Mode Setup
Application:Access the Internet without an AP
With existing Internet connection, another computer can access the
Internet by using AD HOC mode of 802.11g USB 2.0 WLAN dongle.
Computer 1
Computer 2
1. Check the current environment and install WLAN cards
A. Check whether “computer 1” connects to the Internet.
B. Install 802.11g WLAN dongle in “computer 1”, and “computer 2”.
2. “Computer 1” Setup
A. Click “Start” (1)-> Settings (2)->Click Network and Dial -up Connections(3)
2 3
1
B. Under Network and Dial-up Connections, there are two Connection icons;
one is the original Ethernet card, another is the new 802.11g WLAN dongle.
28
Page 29

802.11g WLAN/Bluetooth Combo USB Dongle User Manual
C. Check the status of the Connection icon. Click the Connection icon, and you
can see the device name and status under Network Connections. The name
of WLAN is “802.11g USB 2.0 WLAN Dongle”, and another one is the
original connected device
PS: (If you have more than 2 connecting devices, please un-plug the Ethernet line and the disappear Connection
icon is the original connected device.)
D. left click the original connected device, and enter into the following
window.
Click Properties (1) -> Advanced (2) -> Check “Allow Other network
to connect through this computer’s Internet connect”(3) -> OK
2
E. After finishing, the following window shows up. Please choose “Yes”, and
the computer will set your IP address in 192.168.0.1.
29
Page 30

802.11g WLAN/Bluetooth Combo USB Dongle User Manual
F. Double click the WLAN Tools icon in Icon Tray, and enter into the
“Software and Utility window”.
WLAN Tools:
Figure A1-1
G. Change to the “Ad-Hoc” mode
I. Click “ More Setting “ icon of Figure A1-1 to enter “More setting
“ window. The window is shown as “ Figure A1-2 ”.
30
Page 31

802.11g WLAN/Bluetooth Combo USB Dongle User Manual
Figure A1-2
II. Under WLAN Configuration tools click “Change” to modify the Network
Type to “Ad-Hoc” mode.
III. click “apply” to save this change. After setting, this WLAN card could
be the Gateway for other WLAN devices.
IV. Restart your computer.
2. “Computer 2” Setup
I. Double click the WLAN Configuration tools icon in the Icon tray.
II. Under Site survey window, you will see all available connecting instruments.
Double click the item with SSID named “default”.
III. Rest computer 2.
31
Page 32

802.11g WLAN/Bluetooth Combo USB Dongle User Manual
32
Page 33

802.11g WLAN/Bluetooth Combo USB Dongle User Manual
Check whether the Setup is success
Computer 1:
1. Enter into DOS MODE, and type “IPCONFIG”.
(Start -> Run -> Type cmd or command )
2. Check whether the IP address is 192.168.0.1, and the Subnet Mask is
255.255.255.0 (as shown above)
Computer 2:
1. IP address does not need to setup. The DEFAULT GATEWAY is
192.168.0.1.
2. Please follow the steps of “computer 1” to check whether the IP
address is 192.168.0.1
33
Page 34

802.11g WLAN/Bluetooth Combo USB Dongle User Manual
Application:Data sharing between computers
When user does not want to have Ethernet line or want to share resources
(including data and printers), using WLAN is the lowest cost solution!
Setup Steps:
1. Check computer 1 & computer 2 already install 802.11g WLAN dongle。
2. In computer 1:
9 Double click the WLAN icon in Icon Tray, and enter into the
“Software and Utility window”.
9 Under “Monitor window”, click “Change” to modify the Operation
Mode to “Ad-hoc” mode.
9 Change the SSID name to “Ad-Hoc”, and then click “Submit” to save
this change. After setting, this WLAN card could be the Gateway for
other WLAN devices. Please reset the computer.
3. In computer 2:
9 Double click the WLAN icon in the Icon tray.
9 Under Site survey window, you will see all available connecting
instruments. Double click the item with SSID named “Ad-Hoc”.
9 Rest computer 2.
4. After setting, computers are able to share data and resources with each
other.
(Data sharing method please refer to related OS system operating manual)
PS: If you log in a Domain in computer 1, please DO NOT long in that Domain when using computer 2. However, if you
need to use the resources in “computer 1” from “computer 2”, you need to know the password for log in that Domain in
“computer 1”.
34
 Loading...