

Page 1

Wireless MIMO Pre-N Access Point
Quick Installation Guide
Guide d’installation rapide
Anleitung zur Schnellinstallation
Guida Veloce all’Installazione
Guía rápida de instalación
Version 1.0
Page 2

Table of Contents
English
1. Before Installation...................................................................................................2
2. Hardware Installation..............................................................................................3
3. Configure your computer’s TCP/IP Settings.......................................................4
4. Configure your AP ...............................................................................................7
Français
1. Avant l’installation ...................................................................................................9
2. Installation du matériel.........................................................................................10
3. Configurez les réglages TCP/IP de votre ordinateur......................................11
4. Configurez votre AP.............................................................................................14
Deutsch
1. Vor der Installation................................................................................................16
2. Installation der Hardware.....................................................................................17
2. Installation de ........................................................................................................17
3. Konfiguration der TCP/IP-Einstellungen...........................................................18
4. Konfiguration Ihres APs .......................................................................................21
Italiano
1. Prima dell’installazione ........................................................................................23
2. Installazione dell’Hardware.................................................................................24
3. Configurazione delle impostazioni TCP/IP del computergs...........................25
4. Configurazione dell’ AP.....................................................................................28
Español
1. Antes de la instalación.........................................................................................30
2. Instalación del hardware......................................................................................31
3. Configuración TCP/IP del ordenador.................................................................32
4. Configuración del punto de acceso ...................................................................35
1
Page 3

1. Before Installation
Thank you for purchasing the Wireless 11g MIMO AP. This guide will help you
set-up and configure your AP with easy to follow installation instructions. For
more detailed or advanced settings, please refer to the User Manual on the
CD-ROM.
Package Contents
Please make sure you have the following in the box:
♦ Wireless 11g MIMO AP
♦ Quick Installation Guide
♦ User Manual CD-ROM
♦ Antenna
♦ Universal AC/DC Power Adapter
♦ RJ-45 Network Cable
2
Page 4

2. Hardware Installation
1. Power off your network devices.
2. Locate an optimum location for the AP. The best place for the AP is
usually at the center of your wireless network, with line of sight to all of
your wireless devices.
3. Adjust the antennas. Normally, the higher location of your AP will get
better the performance.
4. Using a standard Ethernet network cable, connect the AP’s Ethernet port
to your local network.
5. Connect the AC power adapter to the AP's Power port. Then connect the
other end to an electrical outlet. Only use the power adapter supplied with
the AP. Use of a different adapter may cause product damage.
6. The Hardware installation is completed. Please refer to the following
content or user guide for AP configuration.
Verify Hardware LED status
Verify the following LED lights are on:
Power: The Power LED lights up and will keep while the AP is powered
on.
WLAN: The WLAN LED flashes when there is a successful Wireless-G
connection.
LAN: The LAN LED lights up when Ethernet port of AP was connected to
LAN. When the LED is flashing that indicates the network activity over that
port.
3
Page 5
3. Configure your computer’s TCP/IP Settings
Windows 2000/XP
1. Click Start; click Settings and then click on the Control Panel.
2. Double-Click the Network Connection icon.
3. Right-Click on the Local Area Connection icon and then click on
Properties. The Local Area Connection Properties windows will appear.
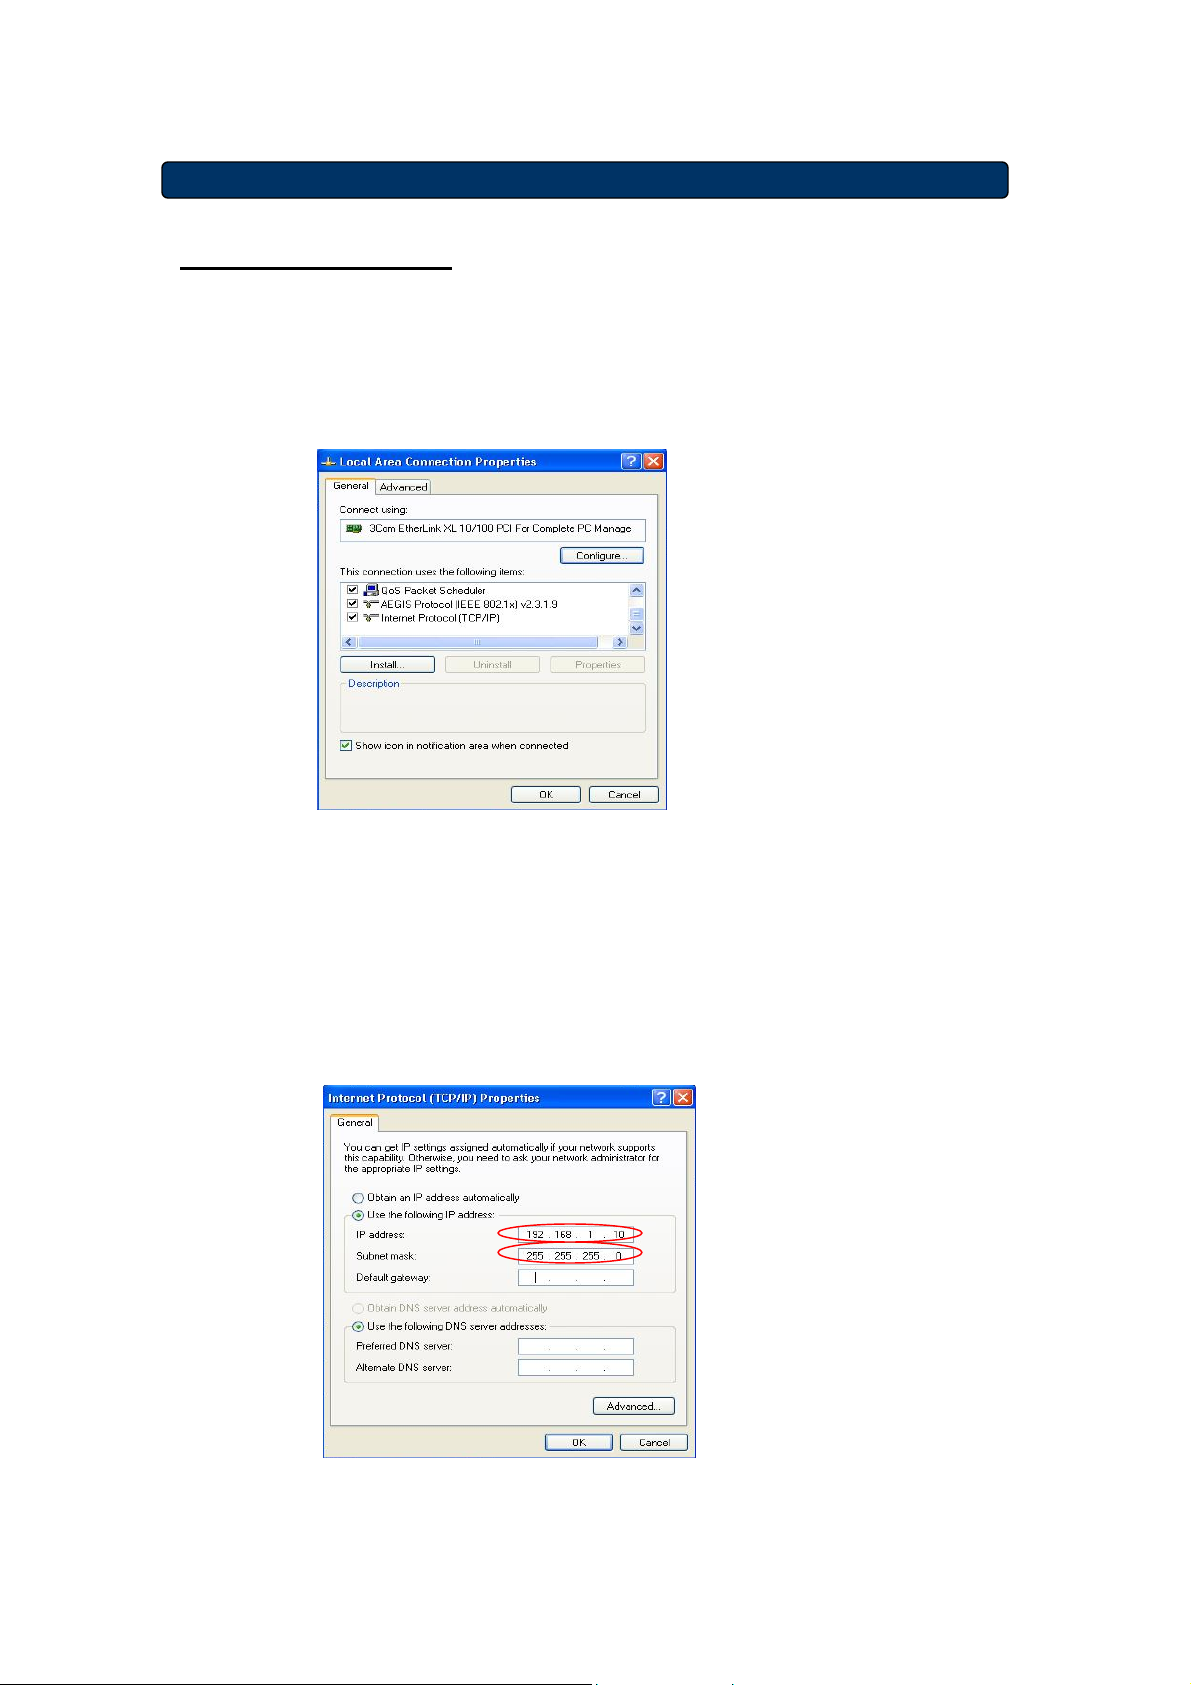
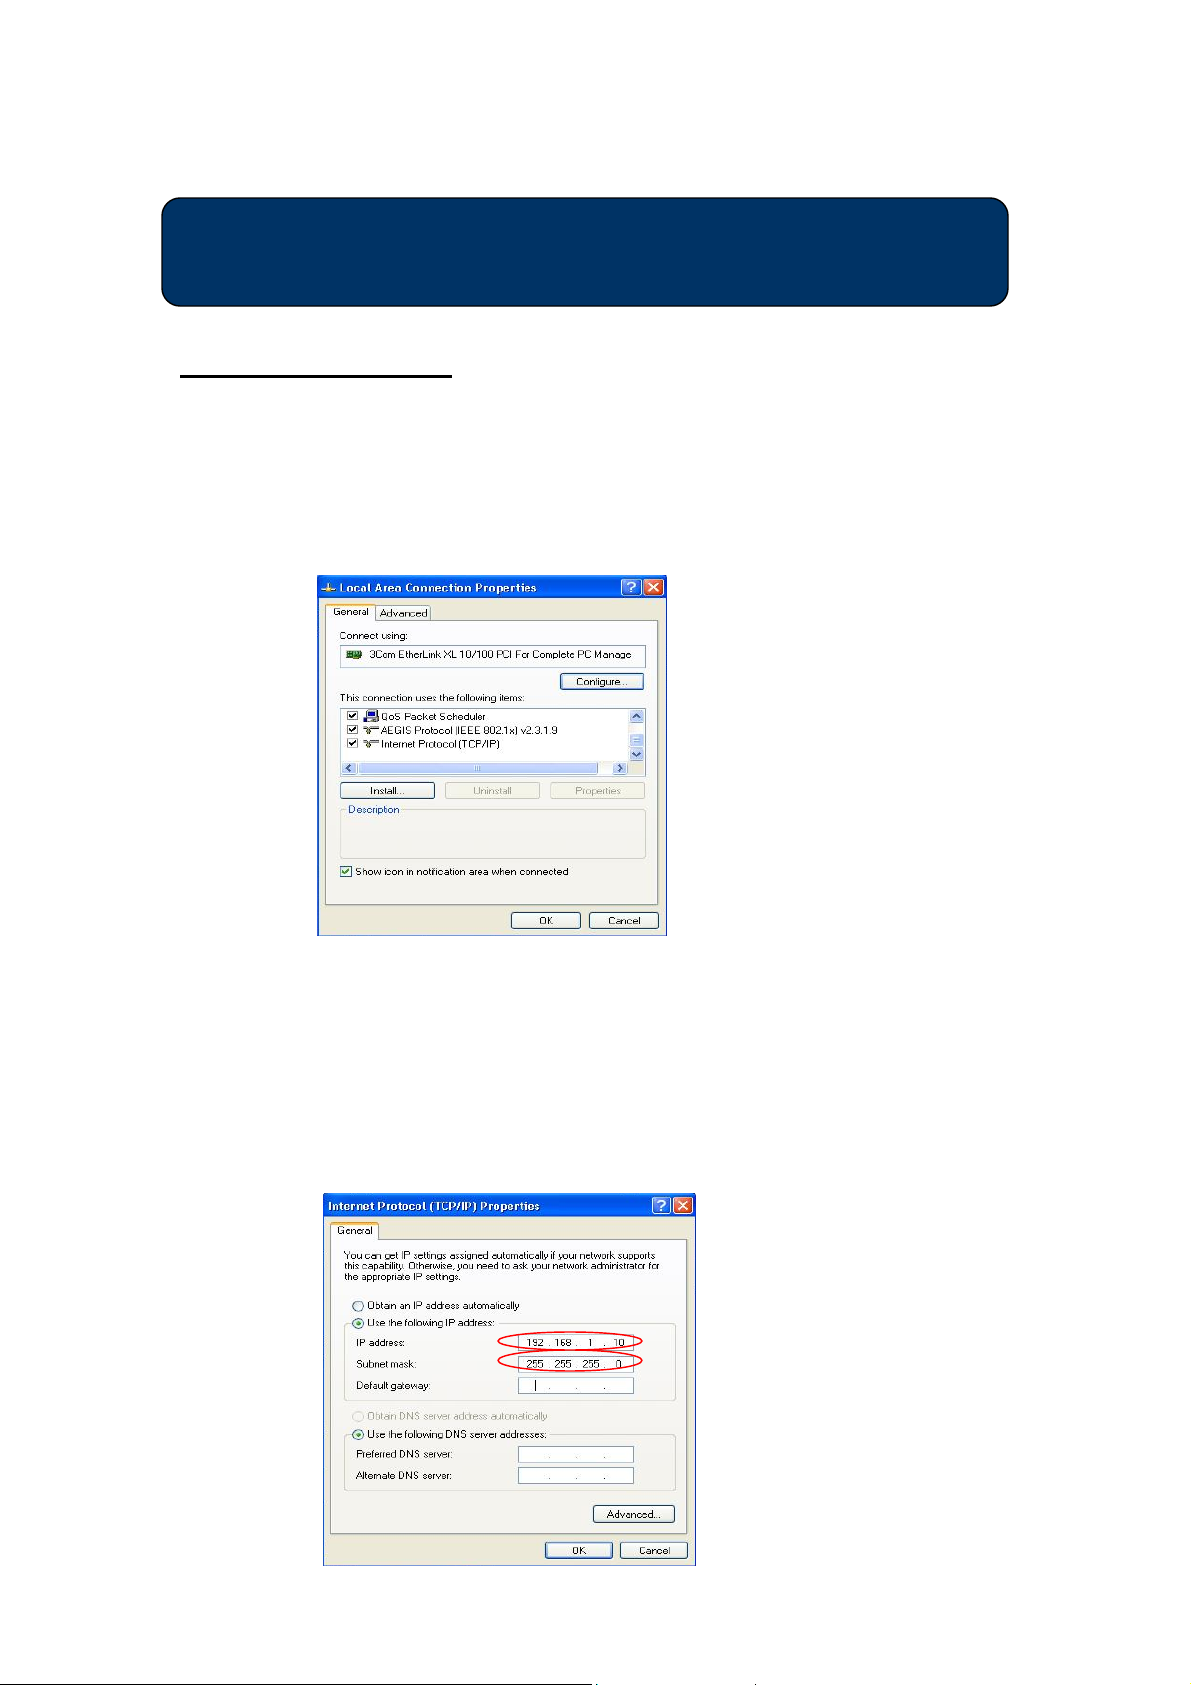
4. Under the General Configuration Tab, locate and select TCP/IP with
the corresponding network card, then click Properties. The Internet
Protocol (TCP/IP) Properties window will appear.
5. Click on Use the following IP Address and enter
IP Address: 192.168.1.10
Subnet Mask: 255.255.255.0
Default gateway: 192.168.1.1
4
Page 6
Windows 95/98/98SE/ME
1. Click Start; click Settings and then click on the Control Panel.
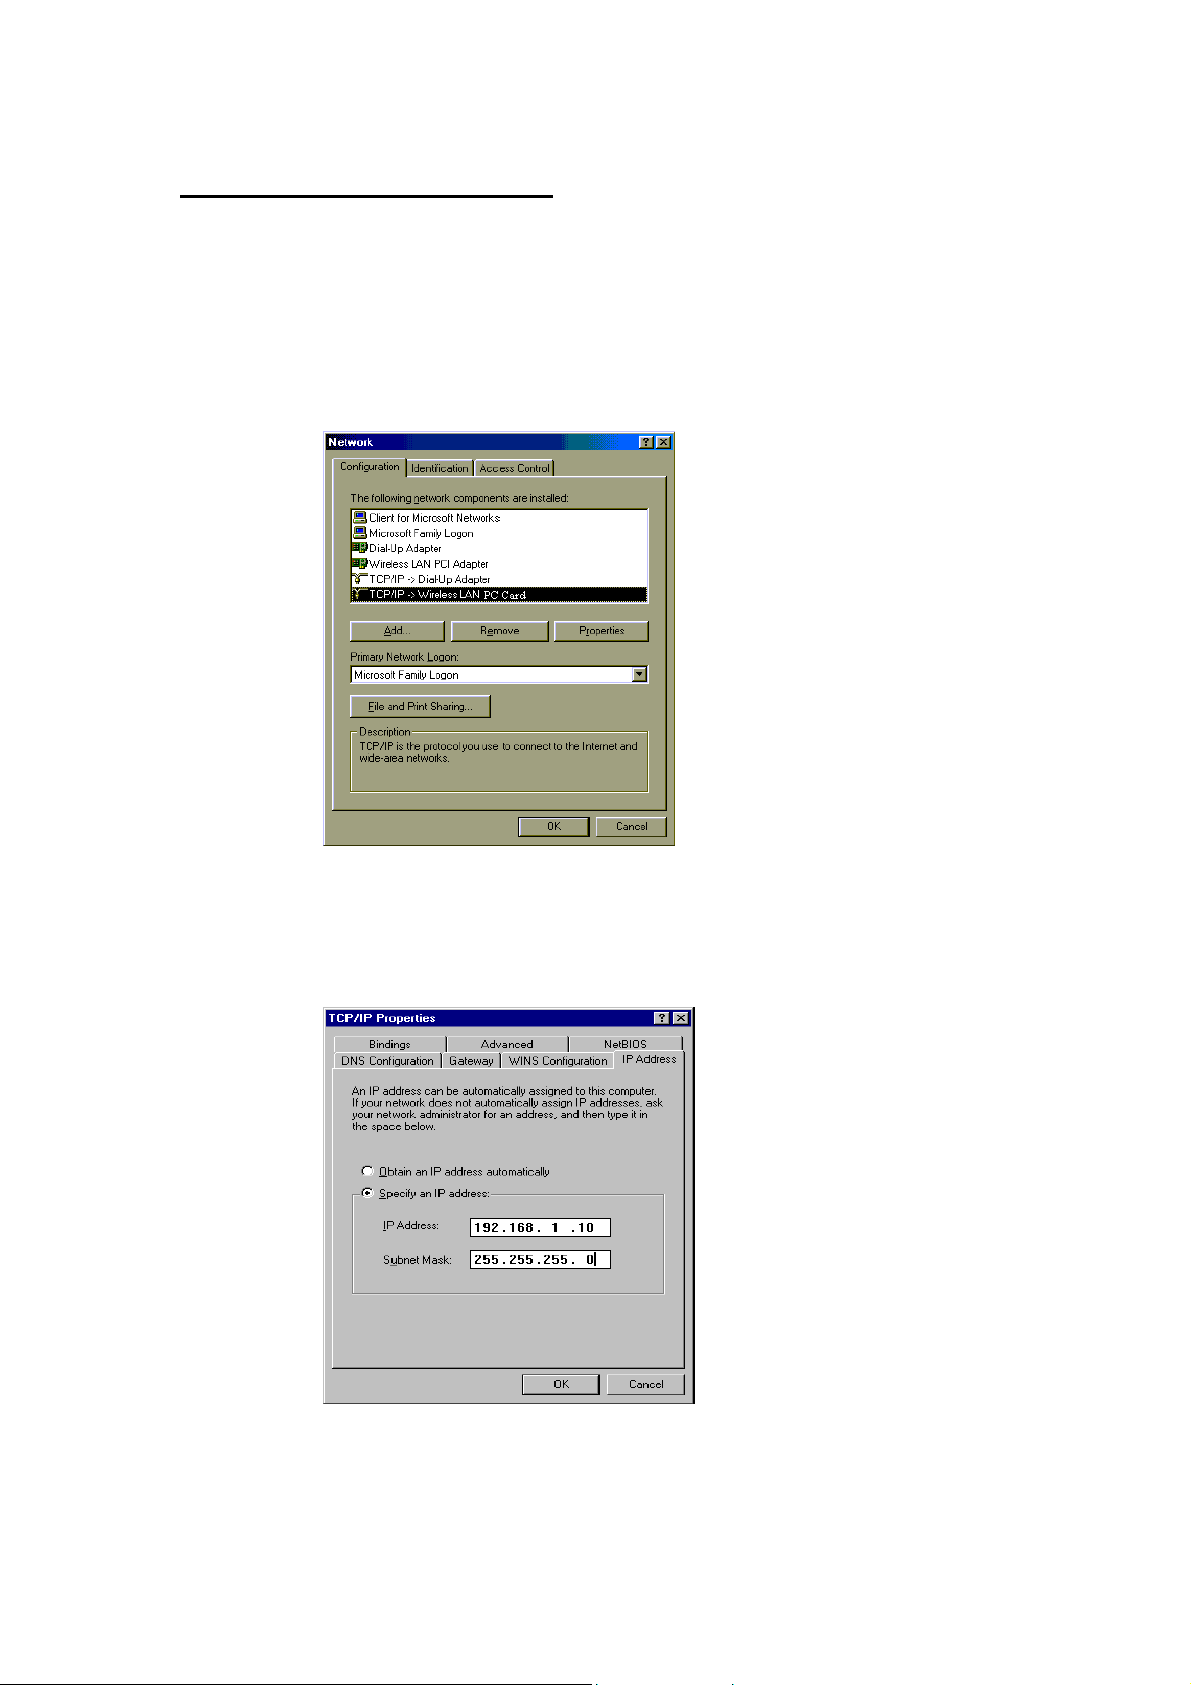
2. Double-clicked the Network icon to open the Network Properties
window.
3. Under the Configuration tab, locate and select TCP/IP with the
corresponding network card, click on the Properties button and the
TCP/IP Properties window will appear.
4. Under the IP Address tab, select Specify an IP Address and enter
IP Address: 192.168.1.10
Subnet Mask: 255.255.255.0
Then click OK on the TCP/IP properties window.
5. Click OK on the Network window.
6. In this moment, the installation may require files from your Windows
CD-ROM. Please prepare the original CD and put it into your CD-ROM
5
Page 7

device.
7. After the files load, the Windows requests you to reboot system. Click
Yes to reboot your system.
8. Now your computer is ready to access and configure the AP.
NOTE : The default IP address setting for the AP is a class C IP address (192.168.1.250 /
255.255.255.0). Please make sure that the current workstation is following the class C IP
address range, from 192.168.1.2 to 192.168.1.254
6
Page 8
4. Configure your AP
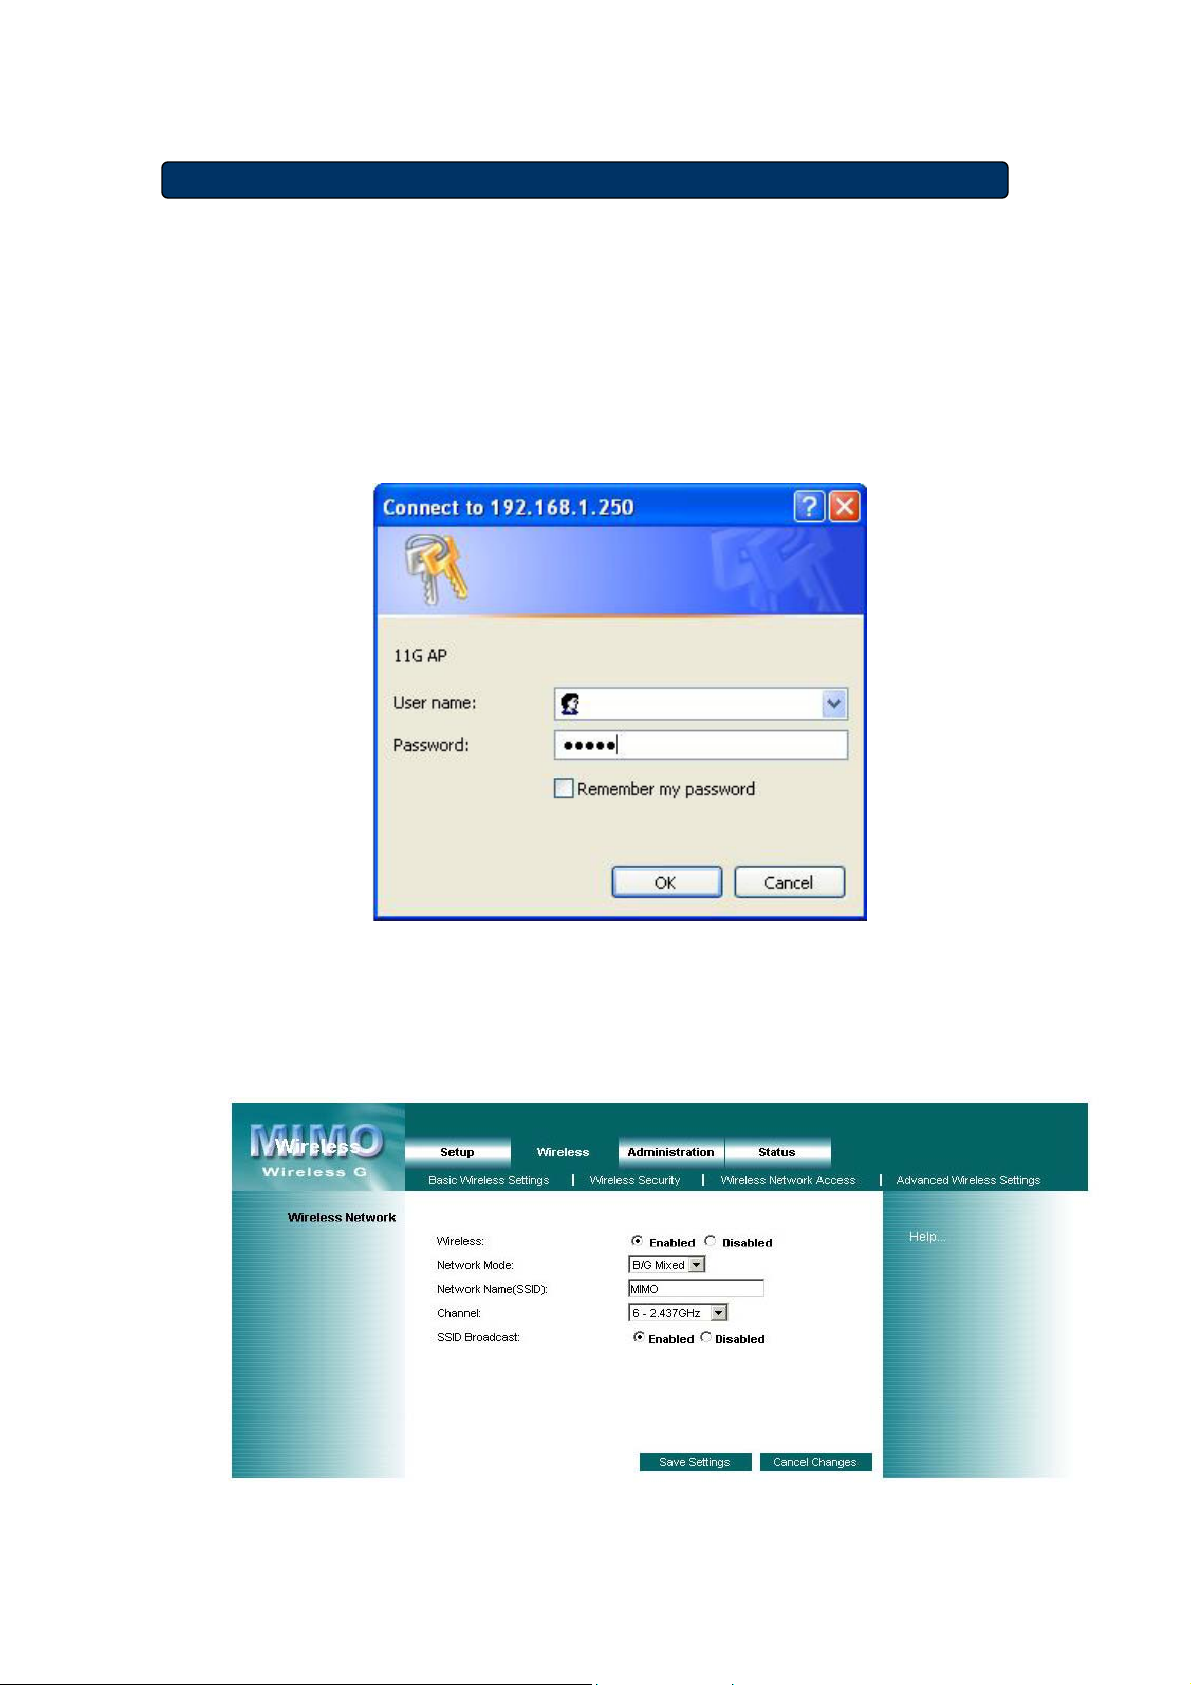
1. Open your web browser, type http://192.168.1.250 in the Address bar ,
and press Enter.
2. An authentication window will appear. Enter the username and
password, and then click OK. By default, please leave blank in
username and type admin in password.
3. Turn to the Wireless Section, here you may select a different channel,
SSID or enable Security if it is necessary.
7
Page 9

4. Click “Apply” button to finish the Setup if you have something
change. The follow screen would appear to notify you the system is
rebooting. All changes will be taken effect while reboot procedure is
completed.
5. While the AP reboot procedure is completed, you may change the
TCP/IP properties of this computer. Select the “Obtain an IP address
automatically” instead of “Use the following IP Address “ item if
your local network has DHCP server service to assign IP address for
your wireless client. This step will set your computer as DHCP client
and get IP from your DHCP server via AP.
If there is no DHCP server in your network, then you should assign
one proper IP address manually to fit your network IP subnet.
6. For DHCP client, using following command to check if your computer
already got IP address.
Win2000, WinXP: type the “ ipconfig “ on your windows
Command Prompt.
Win98, WinME: type the “ winipcfg “ on your windows MS-DOS
Prompt.
Once you got the IP address, subnet mask and default gateway, that
means your computer already connected to local network.
For detail configuration of this AP, please refer to the CD-ROM.
8
Page 10

1. Avant l’installation
Merci d’avoir acheté l’AP 11g MIMO sans fil. Ce guide vous aidera à installer et
configurer votre AP (point d’accès) avec des instructions faciles à suivre. Pour
plus de renseignements ou des réglages avancés, veuillez voir le Manuel de
l’utilisateur sur le CD-ROM.
Contenus du paquet
Veuillez vous assurer d’avoir les articles suivants dans la boîte:
♦ AP11g MIMO sans fil
♦ Guide d’Installation rapide
♦ CD-ROM du guide de l’utilisateur
♦ Antenne
♦ Adaptateur d’alimentation AC/DC
♦ Câble de réseau RJ-45
9
Page 11

2. Installation du matériel
1. Éteignez vos dispositifs de réseau.
2. Identifiez l’endroit idéal pour l’AP. Le meilleur endroit pour l’AP est
d’habitude au centre de votre réseau sans fil, avec une ligne de vue de
tous vos dispositifs sans fil.
3. Ajustez les antennes. Normalement, plus votre AP est placé en hauteur,
plus sa performance sera augmentée.
4. En utilisant un câble de réseau Ethernet, branchez le port Ethernet à
votre réseau local.
5. Branchez l’adaptateur d’alimentation à la borne d’alimentation de l’AP.
puis branchez l’autre extrémité dans une prise de courant. N’utilisez que
l’adaptateur d’alimentation fourni avec l’AP. L’utilisation d’un autre
adaptateur pourrait endommager l’AP.
6. L’installation du matériel est terminée. Veuillez voir la suite ou vous
référer au guide de l’utilisateur pour la configuration AP.
Vérifiez l’état des LED du matériel
Vérifiez que les LED suivantes sont allumées:
Power: La LED d’alimentation s’allume et le restera si l’AP est sous
tension.
WLAN: La LED WLAN clignote lorsqu’une connexion sans fil-G est en
cours.
LAN: la LED LAN s’allume lorsque le port Ethernet de l’AP a une
connexion au LAN (réseau local). Un clignotement de cette LED indique
de l’activité sur ce port.
10
Page 12
3. Configurez les réglages TCP/IP de votre
ordinateur
Windows 2000/XP
1. Cliquez Démarrer; cliquez Réglages puis cliquez sur le Panneau de
contrôle.
2. Double-clic sur l’icône Connexions de réseau.
3. Clic droit sur l’icône Connexions locales puis cliquez sur Propriétés.
La fenêtre des propriétés des connexions locales apparaîtra.
4. Sous la languette Configuration Générale, trouvez et choisissez
TCP/IP avec la carte réseau correspondante puis cliquez Propriétés.
La fenêtre de protocole Internet (TCP/IP) apparaîtra
5. Cliquez sur Utiliser l’adresse IP suivante et entrez
Adresse IP: 192.168.1.10
Masque de sous réseau: 255.255.255.0
Passerelle par défaut: 192.168.1.1
11
Page 13

Windows 95/98/98SE/ME
1. Cliquez Démarrer; cliquez Réglages puis cliquez sur le Panneau de
contrôle.
2. Double-clic sur l’icône Connexions de réseau pour ouvrir la fenêtre
des propriétés de connexions de réseau.
3. Dans la languette Configuration, trouvez et choisissez TCP/IP et la
carte de réseau correspondante, cliquez sur le bouton Propriétés et
la fenêtre de propriétés TCP/IP apparaîtra.
4. Sous la languette adresse IP, choisissez Spécifier une adresse IP et
entrez
Adresse IP: 192.168.1.10
Masque de sous réseau: 255.255.255.0
Puis cliquez OK dans la fenêtre TCP/IP.
12
Page 14

5. Cliquez OK sur la fenêtre de réseau.
6. L’installation pourrait exiger des fichiers sur le CD-ROM de Windows.
Veuillez avoir le CD Windows à portée de main et l’insérer dans votre
unité de CD-ROM.
7. Une fois les fichiers, chargés Windows demandera de redémarrer le
système. Cliquez Oui pour redémarrer le système.
8. À présent votre ordinateur est prêt à établir une connexion et
configurer l’AP.
NOTE : L’adresse IP par défaut est une adresse IP de classe C (192.168.1.250 /
255.255.255.0). Veuillez vous assurer que la st ation de travail est de clase C et que
l’adresse IP est comprise entre 192.168.1.2 et 192.168.1.254
13
Page 15

4. Configurez votre AP
1. Lancez votre fureteur Internet, et tapez http://192.168.1.250 dans la
barre d’adresse et appuyez sur Entrer.
2. Une fenêtre de vérification apparaîtra. Entrez votre nom d’utilisateur
et votre mot de passe, puis cliquez sur OK. Par défaut, n’entrez pas
de nom d’utilisateur et entrez admin pour le mot de passe.
3. Allumez la section sans fil. Ici vous pouvez choisir différents canaux,
SSID ou permettre la sécurité si c’est nécessaire.
14
Page 16

4. Cliquez sur le bouton “Appliquer” pour sauvegarder les
changements s’il y a lieu. L’écran ci-dessous apparaîtra pour vous
annoncer que le système va redémarrer. Tous les changements
seront mis en œuvre lors du redémarrage.
5. Une fois le redémarrage terminé, vous pouvez changer les propriétés
TCP/IP de l’ordinateur. Choisissez « obtenir automatiquement une
adresse IP » au lieu de « Utilisez l’adresse IP suivante » si votre
réseau local a un serveur DHCP qui attribue des adresses IP pour les
clients sans fil. Cette opération établira votre ordinateur comme client
DHCP et lui verra attribuer une adresse IP du serveur DHCP à
travers votre AP.
S’il n’y a pas de serveur DHCP sur votre réseau, vous devrez
attribuer votre propre adresse IP pour correspondre à votre sous
réseau.
6. Les clients DHCP devront utiliser les commandes suivantes pour
vérifier si votre ordinateur possède déjà une adresse IP :
Win2000, WinXP: tapez “ ipconfig “ dans votre fenêtre de
commandes DOS.
Win98, WinME: tapez “ winipcfg “ dans votre fenêtre de
commandes DOS.
Une fois que vous aurez obtenu l’adresse IP, le masque de sous
réseau et la passerelle, votre ordinateur aura une connexion au
réseau.
Pour une configuration détaillée de l’AP veuillez voir le CD-ROM.
15
Page 17

1. Vor der Installation
Vielen Dank für den Kauf von Wireless 11g MIMO AP! Die folgende Anleitung
wird Ihnen mit leicht zu befolgenden Installationsanweisungen helfen, Ihren A P
zu installieren und zu konfigurieren. Für weitere und weiterführende
Einstellungen schauen Sie bitte in die Bedienungsanleitung auf der CD-ROM.
Inhalt der Lieferung
Bitte versichern Sie sich, daß die Box folgendes enthält:
♦ Wireless 11g MIMO AP
♦ Anleitung zur Schnellinstallation
♦ Bedienungsanleitung auf CD-ROM
♦ Antenne
♦ Universeller AC/DC-Stromanschlußstecker
♦ RJ-45-Netzwerkkabel
16
Page 18

2. Installation der Hardware
1. Schalten Sie Ihre Netzwerkgeräte aus.
2. Suchen Sie einen optimalen Ort für das AP. Für gewöhnlich ist der beste
Platz für das AP das Zentrum Ihres kabellosen Netzwerkes – in
Sichtweite all der anderen Ihrer kabellosen Geräte.
3. Adjustieren Sie die Antennen. Normalerweise führt ein höherer Ort des
APs zu einem besseren Betrieb.
4. Benutzen Sie ein standardmäßiges Ethernetnetzwerkkabel und
schließen Sie den Ethernetanschluß des APs an Ihr lokales Netzwerk an.
5. Schließen Sie den AC-Stromstecker an den Stromanschluß des APs an.
Dann schließen Sie das andere an einen elektrischen Ausgang an.
Benutzen Sie dazu nur den Stromstecker, der zum AP mitgeliefert wurde.
Der Gebrauch eines anderen Steckers könnte Schäden verursachen.
6. Die Hardwareinstallation ist abgeschlossen. Bitte halten Sie sich nun an
die folgenden Anweisungen oder an die Bedienungsanleitung zu
AP-Konfiguration.
2. Installation de
Den LED-Status der Hardware überprüfen
Versichern Sie sich, daß die folgenden LED-Lichter leuchten:
POWER: Die Strom-LED leuchtet auf, wenn AP unter Strom steht.
WLAN: Die WLAN-LED flackert bei erfolgreicher kabelloser
G-Verbindung.
LAN: Die LAN-LED leuchtet auf bei Verbindung des Ethernetanschlusses
von AP mit LAN. Wenn die LED flackert, heißt das, daß die
Netzwerkaktivität über diesen Anschluß läuft.
17
Page 19

3. Konfiguration der TCP/IP-Einstellungen
Windows 2000/XP
1. Auf Startklicken; auf Settings (Einstellungen) klicken und dann auf
Control Panel (Kontrolle) klicken.
2. Doppelklick auf Network Connection (Netzwerkverbindungen).
3. Rechtsklick auf Local Area Connection (lokale Netzwerkverbindung)
klicken und dann auf Properties (Eigenschaften). Das Fenster mit den
Eigenschaften der lokalen Netzwerkverbindung wird erscheinen.
4. Unter General Configuration (Allgemein) lokalisieren und wählen Sie
TCP/IP mit der entsprechenden Netzwerkkarte und klicken dann auf
Properties (Eigenschaften). Das Fenster mit den
Internetprotokolleigenschaften (TCP/IP) wird erscheinen.
IP Addresse: 192.168.1.10
Subnet Mask (Teilnetzmaske): 255.255.255.0
Default gateway (Fehlerschnittstelle): 192.168.1.1
18
Page 20

Windows 95/98/98SE/ME
1. Auf Startklicken; auf Settings (Einstellungen) klicken und dann auf
Control Panel (Kontrolle) klicken.
2. Doppelklick auf Network (Netzwerk), um das Fenster mit den
Netzwerkeigenschaften zu öffnen.
3. Unter Konfiguration bitte TCP/IP lokalisieren und auswählen mit
Hilfe der entsprechenden Netzwerkkarte, dann auf Properties
(Eigenschaften) drücken, und das Fenster mit den
TCP/IP-Eigenschaften wird erscheinen.
4. Unter der IP-Addressenspalte Specify an IP Address (Eigenschaften
der IP-Adresse) auswählen und dann folgende Eingaben machen:
IP Addresse: 192.168.1.10
Subnet Mask (Teilnetzmaske): 255.255.255.0
Dann im TCP/IP-Eigenschaftenfenster auf OK drücken.
19
Page 21

5. Im Netzwerkfenster auf OK drücken.
6. An dieser Stelle könnte die Installation Dateien von Ihrer
Windows-CD-ROM benötigen. Bitte halten Sie die Original-CD bereit
und legen Sie sie in Ihr CD-ROM-Laufwerk.
7. Nach dem Laden der Dateien wird Windows Sie auffordern, Ihr
Betriebssystem neu zu starten. Klicken Sie auf Yes (OK), um das
System neu zu starten.Jetzt ist Ihr Computer bereit, auf den
AP-Router zuzugreifen und ihn zu konfigurieren.
ANMERKUNG : Die Fehleradresseneinstellung für AP gehört zur C-Klasse (192.168.1.250 /
255.255.255.0). Bitte versichern Sie sich, daß der aktuelle Arbeitsplatz mit der C-IP-Adresse
im Bereich von 192.168.1.2 bis 192.168.1.254 kompatibel ist.
.
20
Page 22

4. Konfiguration Ihres APs
1. Öffnen Sie Ihren Webbrowser, Typ http://192.168.1.250 in der
Addresssenliste und drücken Sie Enter.
2. Ein Authentifizierungsfenster wird erscheinen. Geben Sie den
Benutzernamen und das Paßwort ein und klicken dann OK. Falls
eine Fehlermeldung erfolgt, lassen Sie bitte den Benutzernamen frei
und geben als Paßwort admin ein.
3. Schalten Sie die Kabellos-Abt eilung ein, hier können Sie einen
anderen Kanal aussuchen, SSID oder die entsprechende
Sicherheitsstufe soweit erforderlich.
21
Page 23

4. Klicken Sie auf “Apply”, um die Installation zu beenden, falls Sie
etwas geändert haben. Der folgende Bildschirm würde erscheinen,
um Ihnen ein Rebooten des Systems anzuzeigen. Sämtliche
Änderungen warden wirksam, sobald das Rebooten abgeschlossen
ist.
5. Bei Abschluß des Rebootens von AP können Sie die
TCP/IP-Eigenschaften diese Computers ändern. Wählen Sie “Obtain
an IP address automatically” (IP-Adresse automatisch erhalten)
anstatt “Use the following IP Address “ (Nutze die folgende
Adresse), falls Ihr lokales Netzwerk über DHCP-Serverleistungen
verfügt, um die IP-Adresse für Ihren kabellosen Klienten festzulegen.
So wird Ihr Computer zum DHCP-Klienten und die IP von Ihrem
DHCP-Server via AP bekommen.
Falls es in Ihrem Netzwerk keinen DHCP-Server gibt, sollten Sie per
Hand eine passende IP-Addresse festlegen, damit Ihr Netzwerk mit
dem IP-Teilnetzwerk zusammenstimmt.
6. Für DHCP-Klienten gilt: mit dem folgenden Befehl prüfen Sie, ob Ihr
Computer bereits eine IP-Addresse besitzt:
Win2000, WinXP: geben Sie “ ipconfig “ bei Ihrer Command
Prompt (Befehlanzeige) an.
Win98, WinME: geben Sie “ winipcfg “ bei Ihrer MS-DOS-Prompt
(Anzeige) an.
Wenn Sie IP-Addresse, Teilnetzmaske und Fehlerschnittstelle haben,
ist Ihr Computer bereits mit einem lokalen Netzwerk verbunden.
Zu Details der Konfiguration dieses AP siehe bitte die CD-ROM.
22
Page 24

1. Prima dell’installazione
Noi vi siamo grati per l’acquisto del Wireless 11g MIMO AP. Questa guida vi
aiuterà ad installare e configurare il vostro AP con facilità seguendo le
istruzioni per l’installazione. Per ulteriori dettagli o impostazioni avanzate,
consultare il Manuale d’Uso sul CD-ROM.
Contenuto della confezione
Assicuratevi di avere nella scatola quanto segue:
♦ Wireless 11g MIMO AP
♦ Guida Veloce all’Installazione
♦ CD-ROM del Manuale d’Uso
♦ Antenna
♦ Adattatore di Corrente AC/DC Universale
♦
Cavo di rete RJ-45
23
Page 25

2. Installazione dell’Hardware
1. Spegnere i dispositivi di rete.
2. Trovare una posizione ottimale per l’AP. Il posto migliore per l’AP di solito
è al centro della vostra rete wireless, con in vista tutti i vostri dispositivi
wireless.
3. Regolare le antenne. Normalmente quanto più alta è la posizione dell’AP
tanto migliore è la sua prestazione.
4. Usando un cavo di rete Ethernet standard collegare la porta Ethernet
dell’Ap alla rete locale.
5. Collegare l’adattatore di corrente AC alla porta della corrente dell’AP. Poi
collegare l’altro capo ad una presa elettrica. Usare soltanto l’adattatore di
corrente in dotazione con l’AP. L’uso di un adattatore diverso potrebbe
causare un danno al prodotto.
6. L’installazione dell’Hardware è completata. Per la configurazione dell’AP
vedere il contenuto seguente o la guida per l’uso.
Verifica dello stato dei LED dell’Hardware
Verificare che le seguenti spie LED siano accese:
POWER: Il LED della corrente si accende e rimane acceso fintanto che
l’AP è acceso.
WLAN: Il LED WLAN lampeggia quando c’è un collegamento Wireless-G
riuscito.
LAN: Il LED LAN si accende quando la porta Ethernet dell’AP è stata
collegata al LAN. Quando il LED lampeggia, indica l’attività di rete
attraverso quella porta.
24
Page 26

3. Configurazione delle impostazioni TCP/IP del
computergs
Windows 2000/XP
1. Cliccare Avvia; cliccare Impostazioni e poi cliccare il Pannello di
Controllo.
2. Cliccare due volte l’icona Collegamento rete.
3. Cliccare a destra l’icona Collegametno Zona Locale e poi cliccare
Proprietà. Appare la finestra Proprietà Collegamento Zona Locale.
4. Nella Tabula Configurazione Generale, trovare e selezionare TCP/IP
con la scheda di rete corrispondente, poi cliccare Proprietà. Appare la
finestra delle Proprietà Internet Protocol (TCP/IP) .
5. Cliccare Usa il seguente Indirizzo IP e scrivere
Indirizzo IP: 192.168.1.10
Maschera Sottorete: 255.255.255.0
Gateway Predefinita: 192.168.1.1
25
Page 27

Windows 95/98/98SE/ME
1. Cliccare Avvia; cliccare Impostazioni e poi cliccare il Pannello di
Controllo.
2. Cliccare due volte l’icona Rete per aprire la finestra Proprietà Rete.
3. Nella tabula Configurazione, trovare e selezionare TCP/IP con la
scheda di rete corrispondente, cliccare il pulsante Proprietà e appare
la finestra Proprietà TCP/IP.
4. Nella tabula Indirizzo IP selezionare Specifica un Indirizzo IP e
scrivere
Indirizzo IP: 192.168.1.10
Maschera sottorete: 255.255.255.0
Poi cliccare OK nella fienstra delle proprietà TCP/IP.
5. Cliccare OK sulla finestra di Rete.
6. In questo momento l’installazione potrebbe richiedere dei file del
26
Page 28

vostro CD-ROM di Windows. Preparare il CD originale e metterlo nel
dispositivo CD-ROM.
7. Dopo che il file è stato caricato, Windows vi cheide di fare il reboot del
sistema. Cliccare Sì per il reboot del sistema.
8. Ora il vostro computer è pronto per accedere e configurare l’AP.
NOTA : L’impostazione predefinita dell’indirizzo IP per l’AP è un indirizzo IP di classe C
(192.168.1.250 / 255.255.255.0). Assicuratevi che l’attuale workstation stia seguendo la
gamma di indirizzi IP della classe C, da 192.168.1.2 a 192.168.1.254
.
27
Page 29

4. Configurazione dell’ AP
1. Aprire il web browser, scrivere http://192.168.1.250 nella barra
Indirizzo e premere Enter.
2. Appare una finestra di autenticazione. Scrivere il nome utente e la
password, e poi cliccare OK. Per predefinizione lasciare vuoto il
nome utente e scrivere admin nella password.
3. Passare alla Sezione Wireless, qui potete selezionare un canale
diverso, SSID o attivare Sicurezza se è necessario.
28
Page 30

4. Cliccare il pulsante “Applica” per finire l’installazione se avete
quanche cosa da cambiare. Appare lo schermo seguente per
informarvi che il sistema sta facendo il reboot. Tutti i cambiamenti
avranno effetto quando la procedura del reboot è completata.
5. Mentre la procedura del reboot dell’AP viene completata, potete
cambiare le proprietà TCP/IP di questo computer. Selezionare
“Ottieni un indirizzo IP automaticamente” invece della voce “Usa il
seguente Indirizzo IP “ se la vostre rete locale ha il servizio del
DHCP server per assegnare un indirizzo IP per il vostro cliente
wireless. Questo passo imposta il vostro computer come cliente
DHCP e riceve l’IP dal vostro DHCP server attraverso l’AP.
Se non c’è DHCP server nella vostra rete, dovete assegnare
manualmente un indirizzo IP adatto che vada bene sulla sottorete IP
della vostra rete.
6. Per il cliente DHCP, usando il seguente comando per controllare se il
computer ha già ricevuto un indirizzo IP.
Win2000, WinXP: scrivere la “ ipconfig “ al Comando di Richiesta
di windows.
Win98, WinME: scrivere la “ winipcfg “ alla Richiesta MS-DOS di
windows.
Quando avete ricevuto l’indirizzo IP, maschera sottorete e gateway
predefinita, significa che il vostro computer è già collegato alla rete
locale.
Per la configurazione dettagliata di questo AP, vedere il CD-ROM.
29
Page 31

1. Antes de la instalación
Gracias por comprar el punto de acceso inalámbrico 11g MIMO. Esta guía le
ayudará a configurar fácilmente su punto de acceso con unas sencillas
instrucciones de instalación. Para obtener más información o para la
configuración avanzada, por favor vea el Manual del Usuario en el CD-ROM.
Contenidos del paquete
Asegúrese de que la caja contenga lo siguiente:
♦ Punto de acceso inalámbrico 11g MIMO
♦ Guía rápida de instalación
♦ Manual del Usuario en CD-ROM
♦ Antena
♦ Adaptador de alimentación universal CA/CC
♦
Cable de red RJ-45
30
Page 32

2. Instalación del hardware
1. Apague sus dispositivos de red.
2. Ubique un lugar óptimo para el punto de acceso. El mejor lugar para el
punto de acceso es normalmente al centro de su red inalámbrica, con
una línea directa hacia todos los dispositivos inalámbricos.
3. Ajuste las antenas. Normalmente, mientras más alto se coloque al punto
de acceso, mejor será el rendimiento.
4. Conecte el puerto Ethernet de su punto de acceso a su red local,
utilizando un cable de red Ethernet estándar.
5. Conecte el adaptador de alimentación CA al puerto de alimentación del
punto de acceso. Conecte la otra punta a un tomacorriente. Use sólo el
adaptador de alimentación suministrado con el punto de acceso. Un
adaptador diferente podría causar daños al producto.
6. Ahora la instalación del hardware ha sido completada. Por favor vea los
contenidos siguientes o la guía del usuario para configurar el punto de
acceso.
Verificación del estado de los LED del hardware
Verifique que los siguientes LED estén encendidos:
POWER: El LED de alimentación se enciende y permanece encendido
mientras que el punto de acceso está encendido.
WLAN: El LED WLAN parpadea cuando hay una conexión inalámbrica G
exitosa.
LAN: El LED LAN se enciende cuando el puerto Ethernet del punto de
acceso está conectado a la LAN. Cuando el LED parpadea, se indica que
hay actividad de red en ese puerto.
31
Page 33

3. Configuración TCP/IP del ordenador
Windows 2000/XP
1. Haga clic en Comienzo; clic en Configuración y luego clic en Panel
de control.
2. Doble clic en el icono Conexión de red.
3. Haga clic con el botón derecho en el icono Conexión de área local y
luego clic en Propiedades. Aparecerá la ventana de las Propiedades
de la Conexión de área local.
4. En la viñeta Configuración general, seleccione TCP/IP con la tarjeta
de red correspondiente, y luego haga clic en Propiedades. Aparecerá
la ventana de las Propiedades del Protocolo de Internet (TCP/IP).
5. Haga clic en Usar la dirección IP siguiente y pulse Entrar
Dirección IP: 192.168.1.10
Máscara de subred: 255.255.255.0
Puerta de acceso predeterminada: 192.168.1.1
32
Page 34

Windows 95/98/98SE/ME
1. Haga clic en Comienzo; clic en Configuración y luego clic en Panel
de control.
2. Haga doble clic en el icono Red para abrir la ventana de las
Propiedades de la red.
3. En la viñeta Configuración, seleccione TCP/IP con la tarjeta de red
correspondiente, y luego haga clic en el botón Propiedades y
aparecerá la ventana de Propiedades de TCP/IP.
4. Bajo la viñeta Dirección IP, seleccione Especificar una dirección IP y
pulse Entrar
Dirección IP: 192.168.1.10
Máscara de subred: 255.255.255.0
Luego clic en OK en la ventana de propiedades de TCP/IP.
5. Clic en OK en la ventana de Red.
33
Page 35

6. En este momento, la instalación puede requerir algunos archivos de
su CD-ROM de Windows. Por favor prepare el CD original y póngalo
en su dispositivo CD-ROM.
7. Después de la carga de los archivos, Windows le solicitará reiniciar su
sistema. Haga clic en Sí para reiniciar el sistema.
8. Ahora, su ordenador está listo para acceder y configurar el
ruteador-punto de acceso.
NOTA : la dirección IP por defecto para el punto de acceso es una dirección IP de clase C
(192.168.1.1 / 255.255.255.0). Asegúrese que su orde nador siga el rango de direcciones IP
de clase C, de 192.168.1.2 a 192.168.1.254
34
Page 36

4. Configuración del punto de acceso
1. Abra su explorador de Web, teclee http://192.168.1.250 en la barra
de direcciones, y pulse Entrar.
2. Aparecerá una ventana de autentificación. Ingrese el nombre de
usuario y la contraseña, y luego haga clic en OK. Por defecto, deje el
nombre de usuario en blanco y teclee admin en la casilla de la
contraseña.
3. Diríjase a Wireless Section (Sección Inalámbrico); aquí podrá
seleccionar un canal diferente, SSID o establecer la Seguridad
(Security) si es necesario.
35
Page 37

4. Haga clic en el botón “Apply” (Aplicar) para terminar la
configuración. Aparecerá la siguiente pantalla para informar de
cualquier cambio. Todos los cambios tendrán efecto cuando se
complete el reinicio.
5. Mientras que el punto de acceso se reinicia, usted puede cambiar las
propiedades de TCP/IP de su ordenador. Seleccione “Obtener
automáticamente un dirección IP” en vez de “Usar la siguiente
dirección IP”, si su red local tiene un servicio de servidor DHCP para
asignar las direcciones IP para su cliente inalámbrico. Este paso
establecerá a su ordenador como cliente DHCP y obtendrá una
dirección IP vía el punto de acceso.
Si no hay un Servidor DHCP en su red, usted deberá asignar
manualmente una dirección IP adecuada para ajustarse a la subred
IP de la red.
6. Para el cliente DHCO, use el siguiente comando para verificar si su
ordenador ya tiene una dirección IP.
Win2000, WinXP: teclee “ ipconfig “ en la Ventana de Comando
de Windows.
Win98, WinME: teclee “ ipconfig “ en la Ventana MS-DOS de
Windows.
Una vez que obtenga la dirección IP, la máscara de subred y la
puerta de acceso por defecto, su computadora podrá conectarse a la
red local.
Para configuración detallada de este punto de acceso, vea el CD-ROM.
36
Page 38

The equipment has been tested and found to comply with FCC and CE
Rules.Operation is subject to the following two conditions:
(1) This device may not cause harmful interference.
(2) This device must accept any interference received including interference that may
cause undesired operation.
37
Page 39

Federal Communication Commission Interference Statement
This equipment has been tested and found to comply with the limits for a Class B
digital device, pursuant to Part 15 of the FCC Rules. These limits are designed to
provide reasonable protection against harmful interference in a residential installation.
This equipment generates, uses and can radiate radio frequency energy and, if not
installed and used in accordance with the instructions, may cause harmful interference
to radio communications. However, there is no guarantee that interference will not
occur in a particular installation. If this equipment does cause harmful interference
to radio or television reception, which can be determined by turning the equipment off
and on, the user is encouraged to try to correct the interference by one of the
following measures:
- Reorient or relocate the receiving antenna.
- Increase the separation between the equipment and receiver.
- Connect the equipment into an outlet on a circuit different from that to which
the receiver is connected.
- Consult the dealer or an experienced radio/TV technician for help.
This device complies with Part 15 of the FCC Rules. Operation is subject to the
following two conditions: (1) This device may not cause harmfu l interference, and (2)
this device must accept any interference received, including interference that may
cause undesired operation.
FCC Caution: Any changes or modifications not expressly approved by the party
responsible for compliance could void the user's authority to operate this equipment.
IMPORTANT NOTE:
FCC Radiation Exposure Statement:
This equipment complies with FCC radiation exposure limits set forth for an
uncontrolled environment. This equipment should be installed and operated with
minimum distance 20cm between the radiator & your body.
This transmitter must not be co-located or operating in conjunction with any other
antenna or transmitter.
The WAPR-300 ( FCC ID: RYK-WAPR300 ) is limited in CH1~CH11 for 2.4
GHz by specified firmware controlled in U.S.A.
38
 Loading...