

Page 1

Version 1.2 – JULY 2002
1
Page 2

Copyright statement
No part of this publication may be reproduced, stored in a retrieval
system, or transmitted in any from or by any means, whether electronic,
mechanical, photocopying, recording, or otherwise without the prior
writing of the publisher.
Printed in Taiwan, July 2002
Index
Wireless LAN Adapter Quick Installation Guide ----- 3
Guide d’Installation Rapide de l’Adaptateur ---------- 9
無線網路卡 快速安裝手冊 ------------------------------- 15
无线网络卡 快速安装手册 ------------------------------- 20
2
Page 3

WLAN Adapter Quick installation Guide
Note: Do not insert the SparkLAN WLAN Adapter in
your computer until you have finished installing the
Utility and Driver.
Utility and Driver Installation
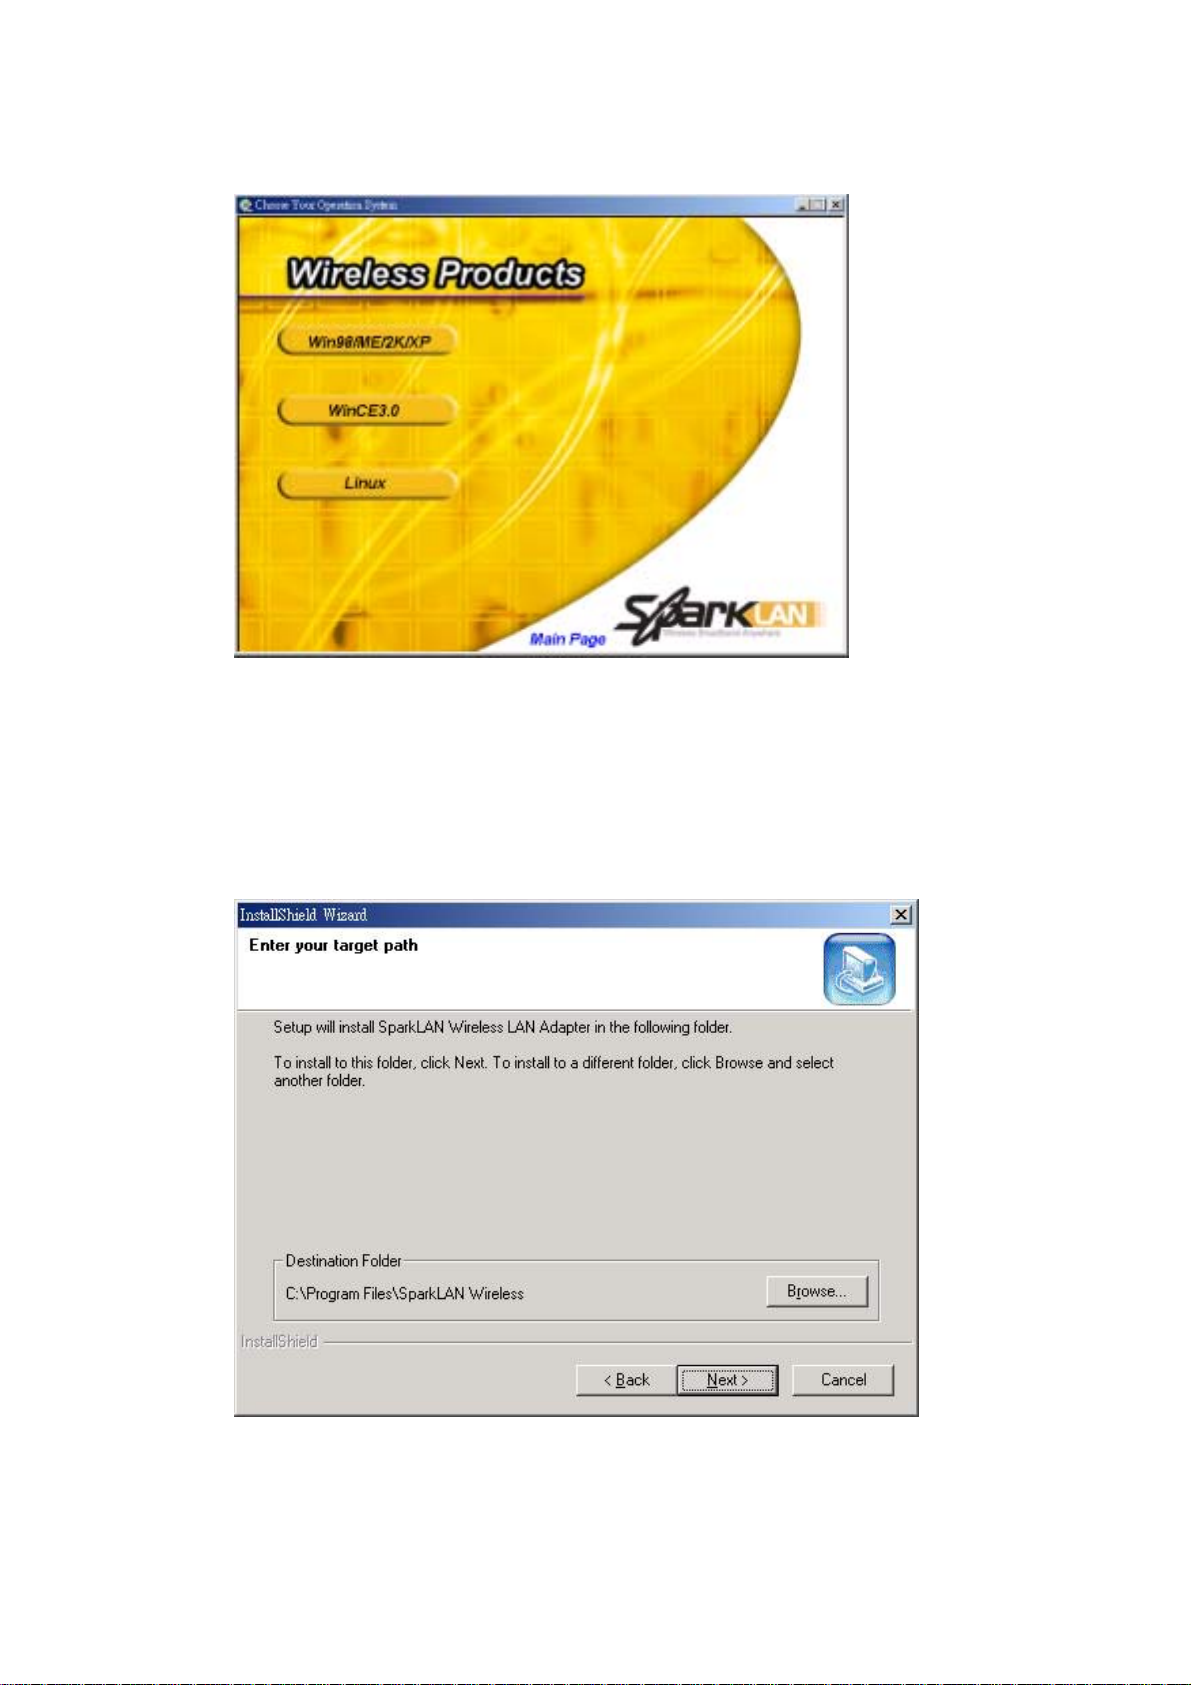
1. Turn “On” your computer. Insert the driver CD for the SparkLAN
WLAN Adapter .The screen shown below will appear.
2. Click “Install Config Utilities.”
3
Page 4

3. Click on the yellow bar with your product model name on it.
Note: Different model type has different multi-operation system
4. Click on your operation system.
For 98/2K/ME/XP.The screen shown below will appear.
Click “Next” and then follow the instructions on the screen to
5.
continue the installation.
4
Page 5

6. Click the Next button in this screen; both the driver and the
Configuration Utility are installed on your computer.
7. For installing with CE / Pocket PC2002, click on “CE”, the screen
shown below will appear.
8. Click “Next” and then follow the instructions on the screen to
continue the installation.
5
Page 6

Note: Requires CE or ActiveSync installed on the computer.
9. Click the Finish button in this screen; both the driver and the
Configuration Utility are installed on your computer.
10. When click on “Linux”, it will launch file-explore to indicate where
the driver is. Please open readme.txt file to install Linux driver.
6
Page 7

Hardware Installation
For PCMCIA or USB adapters, simply insert or connect the
adapter after running the exe file.
For PCI cards, you must shut down the computer, install the card in
an available PCI slot, and restart the operating system.
After the computer boots back up, it will detect the wireless card
and then start the New Hardware Found wizard. Respond to the
prompts displayed by the wizard, but do not check the load driver
from Specify Location check box; the operating system will find
the driver automatically.
For Windows CE, after installing the driver/utility, connect the
PDA to the cradle, and connect the cradle to the computer.
ActiveSync will load the driver to the PDA. Insert the wireless CF
card when prompted.
You can launch the Configuration Utility by clicking the left
mouse button on the Configuration Utility icon and selecting
Advanced Configuration.
Configuration Utility Icon
If the Configuration Utility icon is not displayed in the System
Tray, you can restart the Configuration Utility from the Start Menu
by selecting Programs and WLAN-Utility Configuration.
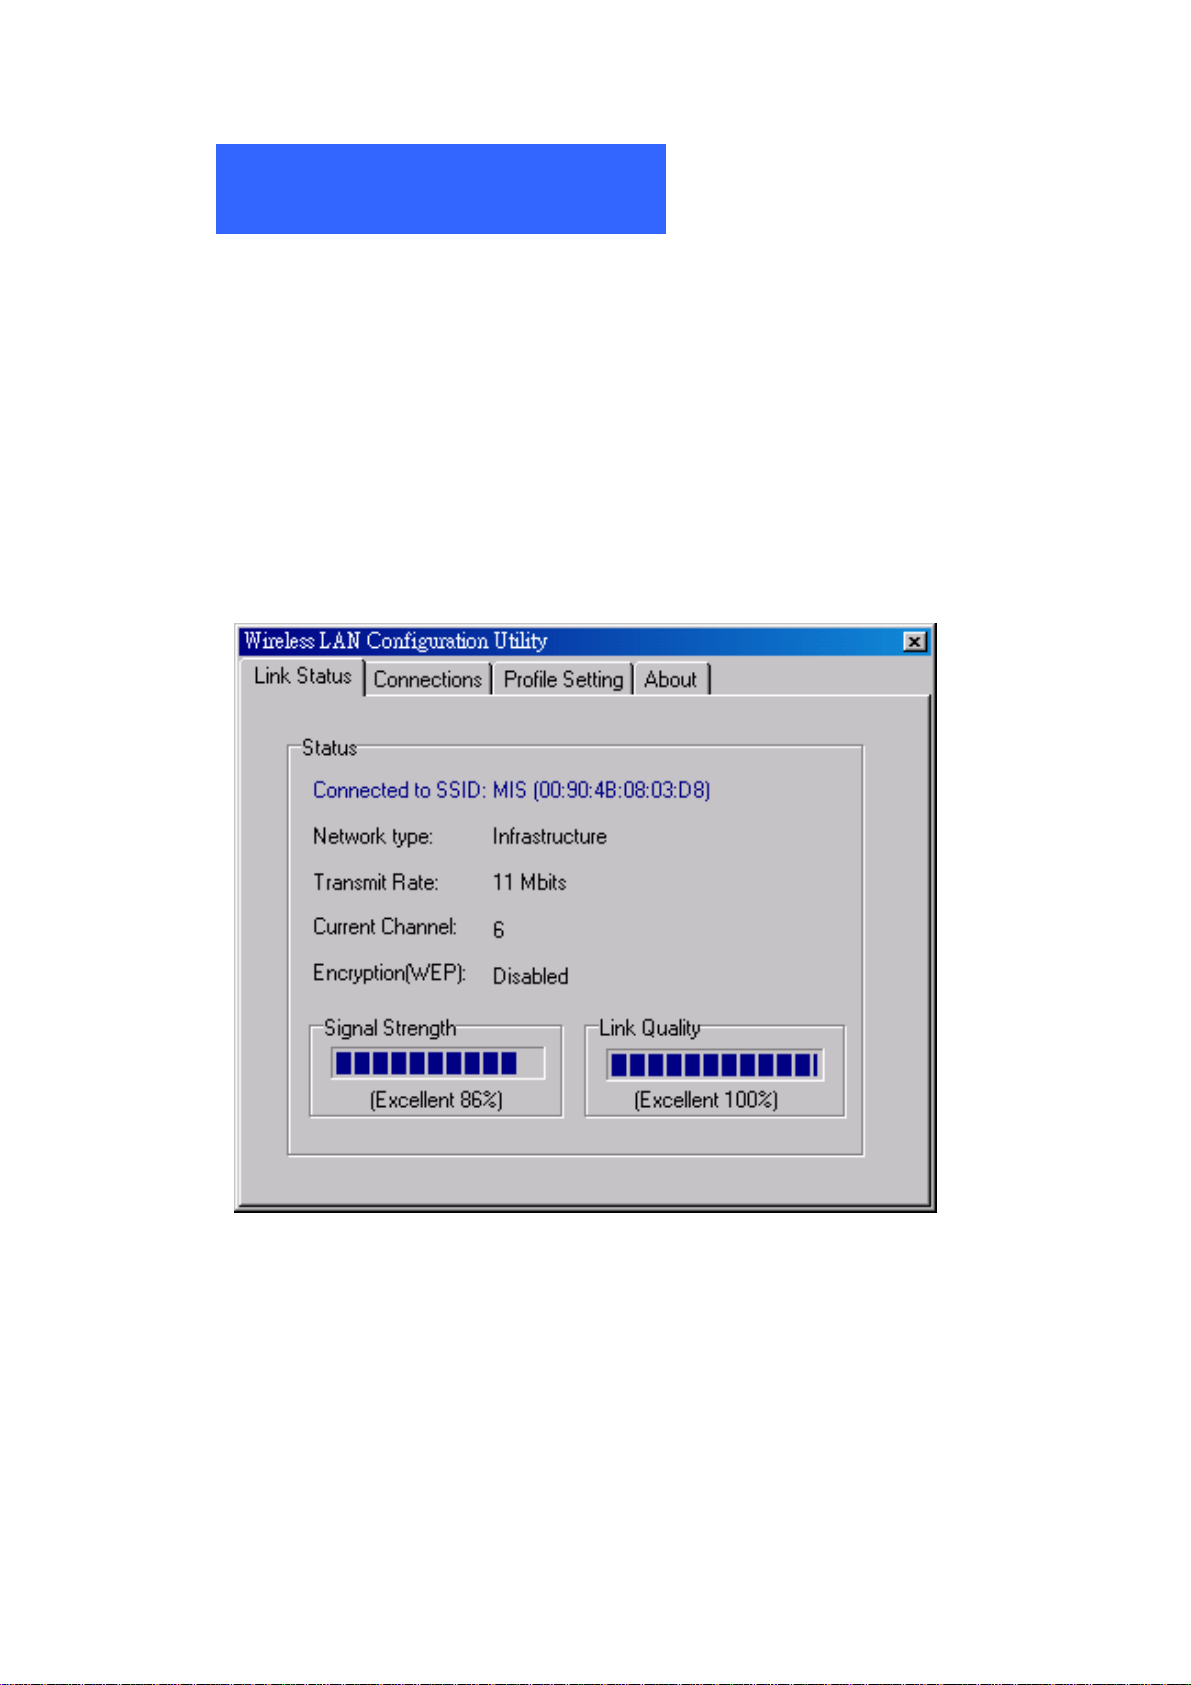
The Configuration Utility consists of window with four tabs: Link
Status Connections, Profile Setting, and About. Please find
information about these tabs in the User’s Guide (from the CD
Auto-run menu, select User’s Guide and then select the product).
7
Page 8

Wireless Network Setup
1. Peer-to-Peer: Connects with other wireless client(s). This does not
require Access Point. Please make sure the “Network Name” (SSID or
ESSID) and “Peer-to-Peer” channel are the same for all clients in the
same wireless network. Double click on the Configuration Utility icon
to open the utility. Click on “Configuration” tab and input the desired
“Network Name”. At “Network Type”, click on the drop-down arrow
and select “Peer-to-Peer”, and then at “Peer-to-Peer Channel”, use the
up/down arrows to select the channel number, and then click “Apply”.
2. Access Point: Connects to wired Ethernet network via Access Point.
Connects your Access Point to the Ethernet network connection and
configure the Access Point with desired “Network Name” (SSID or
ESSID). On the wireless client, in Utility’s “Configuration” page,
input the same “Network Name” as the Access Point. At “Network
Type”, click on the drop-down arrow, and select “Access Point”, and
then click “Apply”.
8
Page 9

Guide d’Installation Rapide de l’Adaptateur
Note: N’insérez pas l’Adaptateur WLAn SparkLAN dans
votre ordinateur tant que vous n’avez pas installé le Driver
et l’Utilitaire.
Installation du Driver et de l’Utilitaire
1. Allumez votre ordinateur. Insérez le CD du driver pour
l’Adaptateur WLAN SparkLAN. L’écran ci-dessous va alors
apparaître.
2. Cliquez sur “Installer les Utilitaires de Configuration.”
9
Page 10
3. Cliquez sur la barre jaune avec le nom de votre produit dessus.
Note: Un type de modèle différent peut avoir un système
multi-opérations différent.
4. Cliquez sur votre O/S (système d'exploitation).
Pour Windows 98/2K/ME/XP. L’écran ci-dessous va alors
apparaître.
5. Cliquez sur “Suivant/ Next” et suivez les instructions sur l'écran
pour continuer l’installation.
10
Page 11

6. Cliquez sur le bouton “Suivant/ Next” dans cet écran; le driver et
l’Utiltiaire seront installés sur votre ordinateur.
7. Pour installer avec CE/Pocket PC2002, cliquez sur “CE”, l’écran
ci-dessous va alors apparaître.
8. Cliquez sur “Suivant/ Next” et suivez les instructions sur l'écran
pour continuer l’installation.
11
Page 12

Note: Exige que CE ou ActiveSync soit installé sur votre
ordinateur.
9. Cliquez sur le bouton Terminer/Finish sur cet écran; le driver et
l’Utiltiaire seront installés sur votre ordinateur.
10. Cliquez sur “Linux” pour lancer la recherche de fichier et indiquer
où se trouve le driver. Veuillez ouvrir le fichier readme.txt pour
installer le driver de Linux.
12
Page 13

Installation du Matériel
Pour les adaptateurs PCMCIA ou USB, il vous suffit d’insérer ou
de connecter l’adaptateur en activant le fichier exe. Pour les cartes
PCI, vous devez éteindre tout d’abord l’ordinateur, installez
ensuite la carte dans le socle PCI et relancez votre système.
Après avir relancé votre ordinateur, il détectera la carte sans fil et
lancera l’Assistant Nouveau Matériel Trouvé. Répondez à l’ordre
affiché par l’assistant, mais ne cochez pas la case “Charger le
pilote depuis un emplacement défini”; le système d’opération
trouvera automatiquement le driver.
Pour Windows CE, après avoir installé le driver/utilitaire,
connectez le PDA au tapis, puis connectez le tapis à l’ordinateur.
ActiveSync chargera le driver vers le PDA. Insérez la Carte CF
Sans Fil lorsque requis.
Vous pouvez lancer l’Utilitaire de Configuration en cliquant
avec le bouton gauche de la souris sur l’icône de l’Utilitaire de
Configuration et sélectionnez Configuration Avancée.
Icône d’Utiltiaire de Configuration
Si l’icône de l’Utiltiaire de Configuration n’est pas affichée
dans la Barre des Tâches, vous pouvez relancer l’Utilitaire
de Configuration depuis le Menu Démarrer en sélectionnant
Programmes et Configuration WLAN PRISM.
L’Utiltiaire de Configuration consiste en une fenêtre avec
quatre onglets: Configuration, Cryptage, Lien et A Propos. Vous
pouvez trouver des informations concernant ces onglets dans le
Guide Utilisateur ( depuis le menu CD Auto-run, sélectionnez le
Guide Utilisateur puis sélectionnez le Produit).
13
Page 14
Programmation du Réseau
1. Peer-to-Peer: Connecte un(des) autre(s) client(s) sans fil. Aucun
besoin de Point d’Accès. Veuillez vous assurer que les chaînes “Nom
de Réseau” (SSID ou ESSID) et “Peer-to-Peer” soient bien
identiques pour tous les clients dans le même réseau sans fil. Cliquez
deux fois sur l’icône de l’Utiltiaire de Configuration pour ouvrir
l’utilitaire. Cliquez sur l'onglet “Configuration” et entrez le “Nom de
Réseau” désiré. Dans “Type de Réseau”, cliquez sur la flêche vers le
bas et sélectionnez “Peer-to-Peer”; ensuite, dans “Chaîne
Peer-to-Peer”, utilisez les flêches haut/bas pour sélectionnez le
nombre de chaînes et cliquez sur “Appliquer”.
2. Point d’Accès: Connecte sur un réseau Ethernet sans fil via un
Point d’Accès. Connectez votre Point d’Accès à la connexion du
réseau Ethernet et configurez le Point d’Accès avec le “Nom de
Réseau” (SSID ou ESSID) désiré. Sur le client sans fil, dans la page
“Configuration” de l’Utilitaire, entrez le même “Nom de Réseau”
identique à celui du Point d’Accès. Dans “Type de Réseau”, cliquez
sur la flêche vers le bas, sélectionnez “Point d’Accès” et cliquez
enfin sur “Appliquer”.
14
Page 15

無線網路卡快速安裝手冊
注意:請先行將軟體安裝完成之後,並重新啟動電腦之後,再將
無線網路卡接置你的電腦
.
組態設定程式及驅動程式之安裝
1.將電腦開機.將安裝光碟放入光碟機之中,你會看到下面的畫面,如果沒
有請執行autorun.exe程式,你會看到以下的畫面。
2.點選 “Install Config Utilities.”
15
Page 16

3.點選你所購買的無線網路產品型號.
4.選擇你要安裝的作業系統.
注意:不同的產品,所支援的作業系統會有所不同
16
Page 17

例如 98/2K/ME/XP.你會看到以下的畫面.
5.點選 “Next”後遵照畫面的指示進行安裝.
6. 點選 Finish 按鈕完成整個安裝過程,此時組態設定程式及網路卡驅動
程式已經安裝置你的電腦之中了, 此時請重新開機。
17
Page 18

硬 體 安 裝
對於 PCMCIA 或 USB 介面的網路卡而言, 僅需要在完成軟體的安裝
後,重新開機,再將無線網路卡置入你的電腦,對於 PCI 介面的無線網
路卡而言,你必須先將電腦關機,並拔掉插頭,找一個空的 PCI 插槽,置
入無線網路卡,並重新啟動你的電腦即可.
在完成重開機的手續之後,系統會偵測到發現新的硬體,此時請不要點選
由特定的地方提供驅動程式,僅需要按下一步,電腦會自行搜尋,是否有
適合的驅動程式可用,當電腦找到可用的驅動程式後,會啟動無線網路
卡,並且在電腦畫面的右下角會出現無線網路連結的圖示.
你可以點選組態設定圖示,進行相關的無線網路設定.
組態設定程式圖示
如果不能自動執行的時候請按開始>程式集>Gemtek-systems
Wireless>WLAN-Utility 來執行管理程式
組態設定程式包含有四個選項:” Link Status”,” Connections”,” Profile
Setting”, “About”, 如需進一步的相關使用說明,請參照光碟所附加之使用
手冊.
第一次使用無線控制程式時請選擇 connections 的選項,它會列出附近被
搜尋到的無線網路設備有哪些,
如果你想要連到離你最近的 AP 時請將上面的選項打勾,當網路上有多個
18
Page 19

AP 時你可以指定某台 AP 後再點選 connect 連結到指定的 AP,或是點選
refresh 重新搜尋 AP。
你可以建立不同的設定檔,增加無線網路使用的便利性
譬如你可以建立一個供辦公室使用的無線網路設定檔,回家時使用另一個供
家裡使用的無線網路設定檔。如果你的無線網路環境有啟動加密功能時,也
一併在這裡做設定,加密提供 64bit、128bit 加密,你可以採取十六進制的
方式或者是採取字串加密的方式。
19
Page 20

无线网络卡快速安装手册
注意:请先行将软件安装完成,并重新启动计算机之后,再将无
线网络卡安装进你的计算机.内
驱动程序安装及参数设定
1.将计算机开机.将安装光盘放入光驱之中,你会看到下面的画面,如果没
有请执行autorun.exe程序,你会看到以下的画面。
2.点选 “Install Config Utilities.”
20
Page 21

3.点选你所购买的无线网络产品型号.
4.选择你要安装的操作系统.
注意:不同的产品,所支持的操作系统会有所不同
21
Page 22

例如 98/2K/ME/XP.你会看到以下的画面.
5.点选 “Next”后遵照画面的指示进行安装.
6. 点选 Finish 按钮完成整个安装过程,此时参数设定程序及网络卡驱动程
序已经安装置你的计算机之中了, 此时请重新开机。
22
Page 23

硬 件 安 装
对于 PCMCIA 或 USB 接口的网络卡而言, 仅需要在完成软件的安装后,
重新开机,再将无线网络卡置入你的计算机,对于 PCI 接口的无线网络
卡而言,你必须先将计算机关机,并拔掉插头,找一个空的 PCI 插槽,置
入无线网络卡,并重新启动你的计算机即可.
在完成重开机的过程之后,系统会侦测并发现新的硬件,此时请不要点选
由指定的地方提供驱动程序,仅需要按下一步,计算机会自行搜寻,是否
有适合的驱动程序可用,当计算机找到可用的驱动程序后,会启动无线网
络卡,并且在计算机画面的右下角会出现无线网络连结的图标.
你可以点选参数设定图标,进行相关的无线网络设定.
参数设定程序图标
如果不能自动执行的时候请按开始>程序>Gemtek-systems
Wireless>WLAN-Utility 来执行管理程序
参数设定程序包含有四个选项:” Link Status”,” Connections”,” Profile
Setting”, “About”, 如需进一步的相关使用说明,请参照光盘所附加之
使用手册.
第一次使用无线控制程序时请选择 connections 的选项,它会列出附近被搜
寻到的无线网络设备有哪些,
如果你想要连到离你最近的 AP 时请将上面的选项打勾,当网络上有多个
23
Page 24

AP时你可以指定某台AP后再点选connect连结到指定的AP,或是点选refresh
重新搜寻 AP。
你可以建立不同的设定文件,增加无线网络使用的便利性
譬如你可以建立一个供办公室使用的无线网络设定文件,回家时使用另一个
供家里使用的无线网络设定文件。如果你的无线网络环境需要启动加密功能
时,也一并在这里做设定,加密提供 64bit、128bit 加密,你可以采取十六进
制的方式或者是采取字符串加密的方式。
24
 Loading...