

Page 1

Read the Full
User Manual
Page 2

RTK
mosaic-X5
Quick Start Guide
Page 3

RTK mosaic-X5 Quick Start Guide
Copyright SparkFun 2023
Page 4

Want to read this on
your computer?
Access the Quick Start Guide at:
docs.sparkfun.com/SparkFun_RTK_mosaic-X5
Page 5
WHICH SETUP SHOULD I SELECT?
Permanent Ethernet setup............................
Permanent WiFi Setup.....................................
Connect Using USB-C......................................
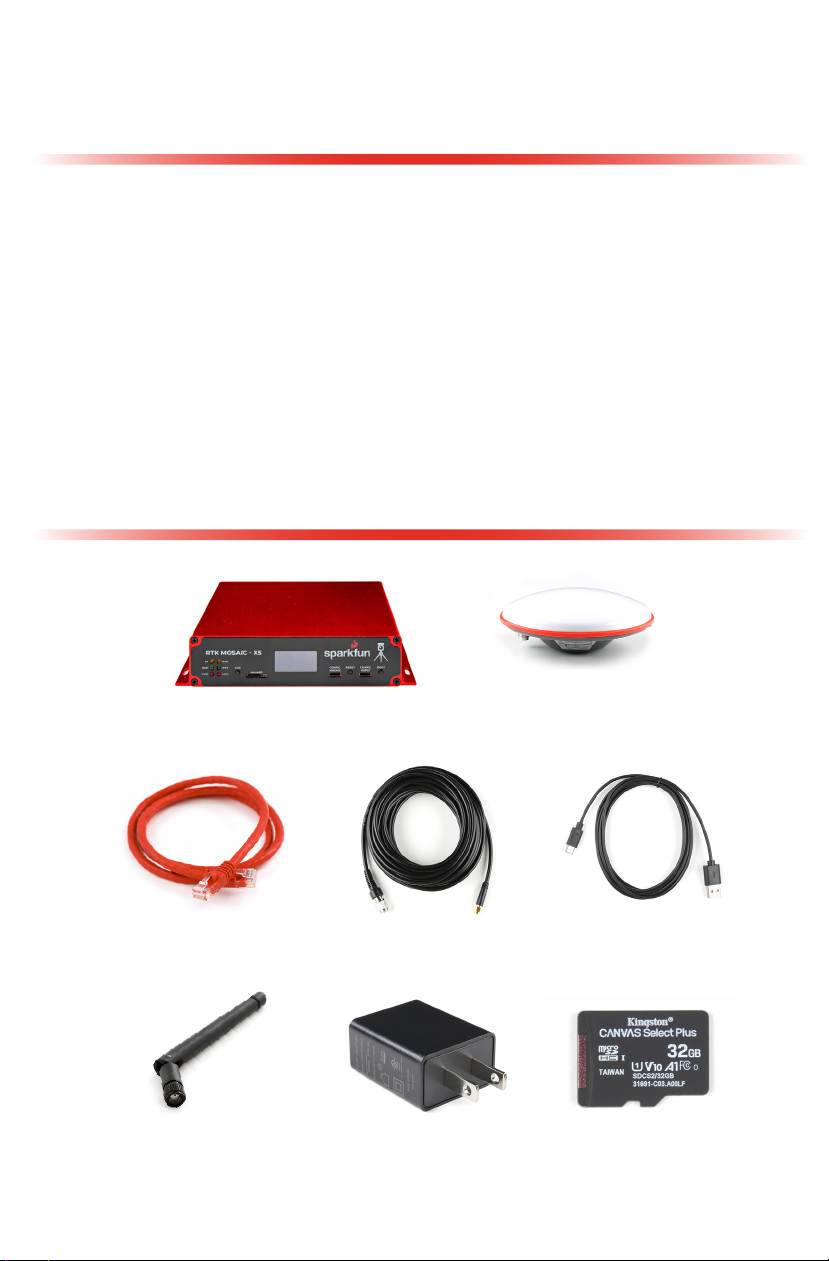
WHAT’S INCLUDED?
L1/L2/L5 GNSS
RTK mosaic-X5
(GPS-23748)
“UFO” Antenna
(GPS-21801)
1
3
7
Ethernet Cable
(CAB-08915)
WiFi Antenna
(WR L- 00145)
TNC-SMA Cable
(CAB-21740)
USB Power Supply
(TOL-11456)
USB-C Cable
(CAB-15424)
32GB microSD Card
(COM-19041)
Page 6
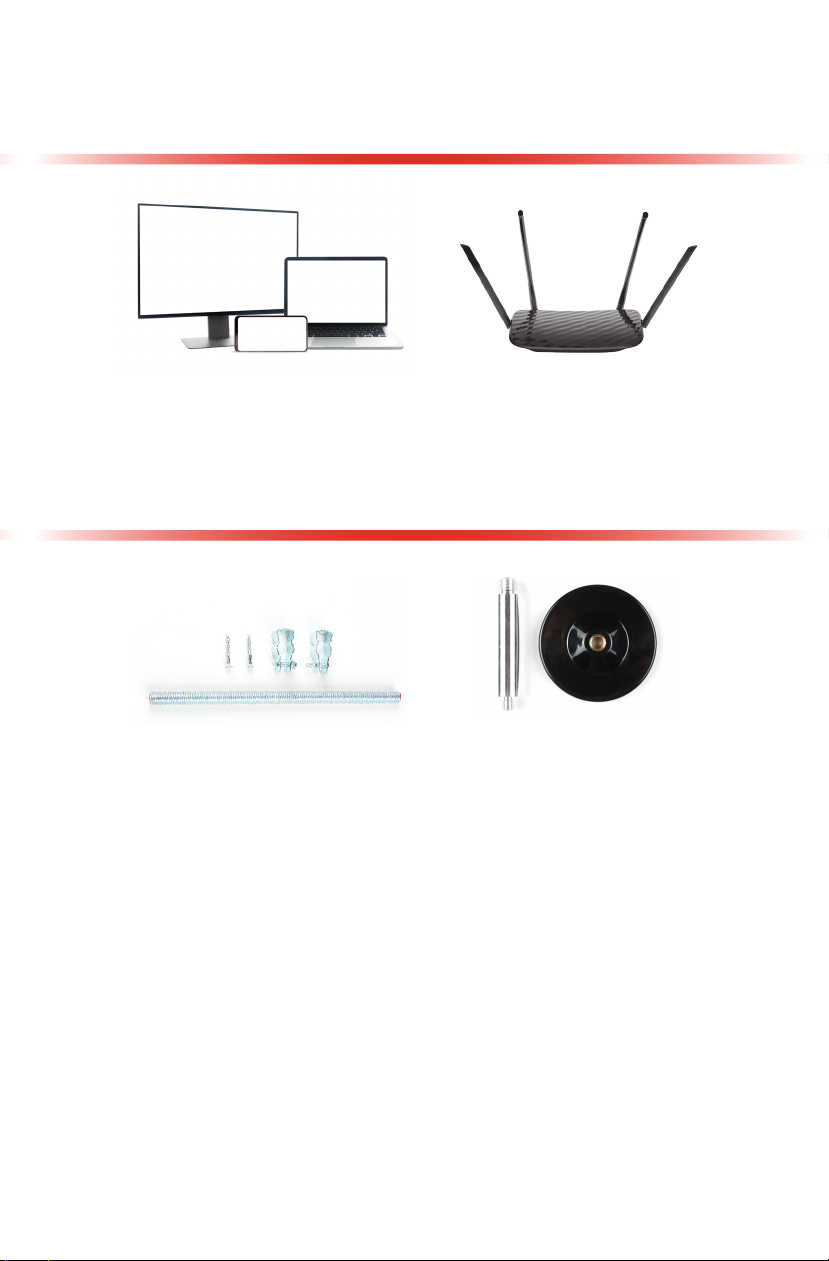
YOU WILL NEED
Computer, Phone
or Tablet
YOU MAY ALSO NEED
Antenna
Mounting Hardware
(KIT-22197)
Ethernet network
or Router
Antenna
Magnetic Mount
(PRT-2 1257)
Page 7
Getting Started
Using Ethernet
CONNECT USING ETHERNET
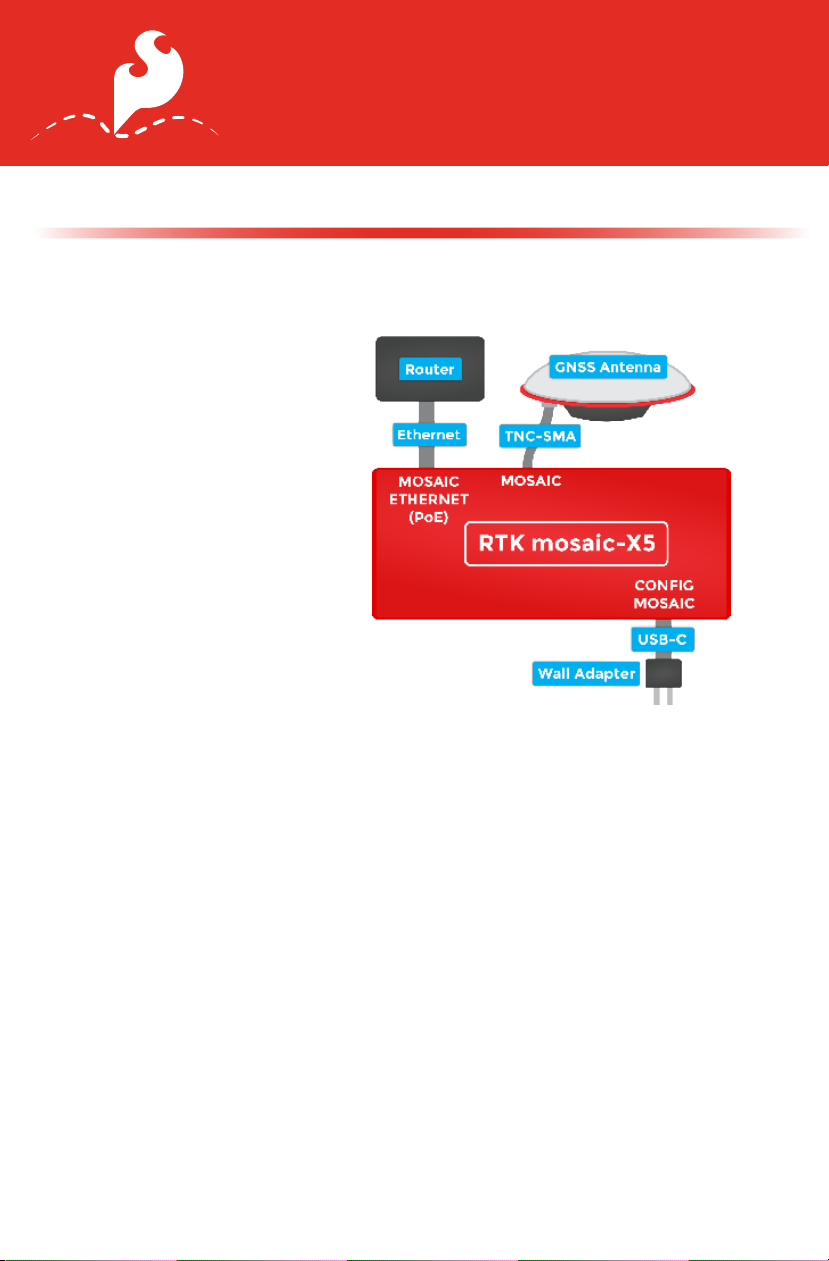
The simplest way to get your RTK mosaic-X5 up and
running is to connect
it to your Ethernet
network or an
Ethernet port on your
broadband router:
1. Connect the GNSS
antenna. Inside your
RTK mosaic-X5 kit,
you will find the L1/
L2/L5 GNSS “UFO”
antenna. It has a
TNC connection. Use
the supplied TNCSMA cable to connect the
antenna to the mosaic-X5
MOSAIC SMA connection. Make sure the antenna is
securely mounted to a structure so that it cannot be
moved and has a clear view of the sky. Any movement in
the antenna will cause inaccurate readings by RTK rovers.
2. Connect the RTK mosaic-X5 to your Ethernet
network or router. Use any Ethernet cable to connect
the MOSAIC ETHERNET (PoE) port to your network or an
Ethernet port on your router. If your router provides Powerover-Ethernet (PoE), you’re all set! You should see the red
power (PWR) LED light up and text start to scroll up the
OLED display. If your router does not provide PoE, move on
to step 3.
3. Provide power. You can power the RTK mosaic-X5
using the supplied USB power supply (5V 1A). Plug the
power supply into the wall. Use the supplied USB-C cable
1
Want to read this on your computer?
Page 8
Getting Started
Using Ethernet
to connect the power supply to either the CONFIG MOSAIC
or the CONFIG ESP32 USB-C port. It does not matter which.
You should see the red power (PWR) LED light up and text
start to scroll up the OLED display.
Once the mosaic-X5 has acquired a satellite signal and is
connected to the Ethernet network, the OLED will display
the antenna’s position as Latitude (Lat), Longitude (Long),
and Altitude (Alt), and the Ethernet IP (Internet Protocol)
network address.
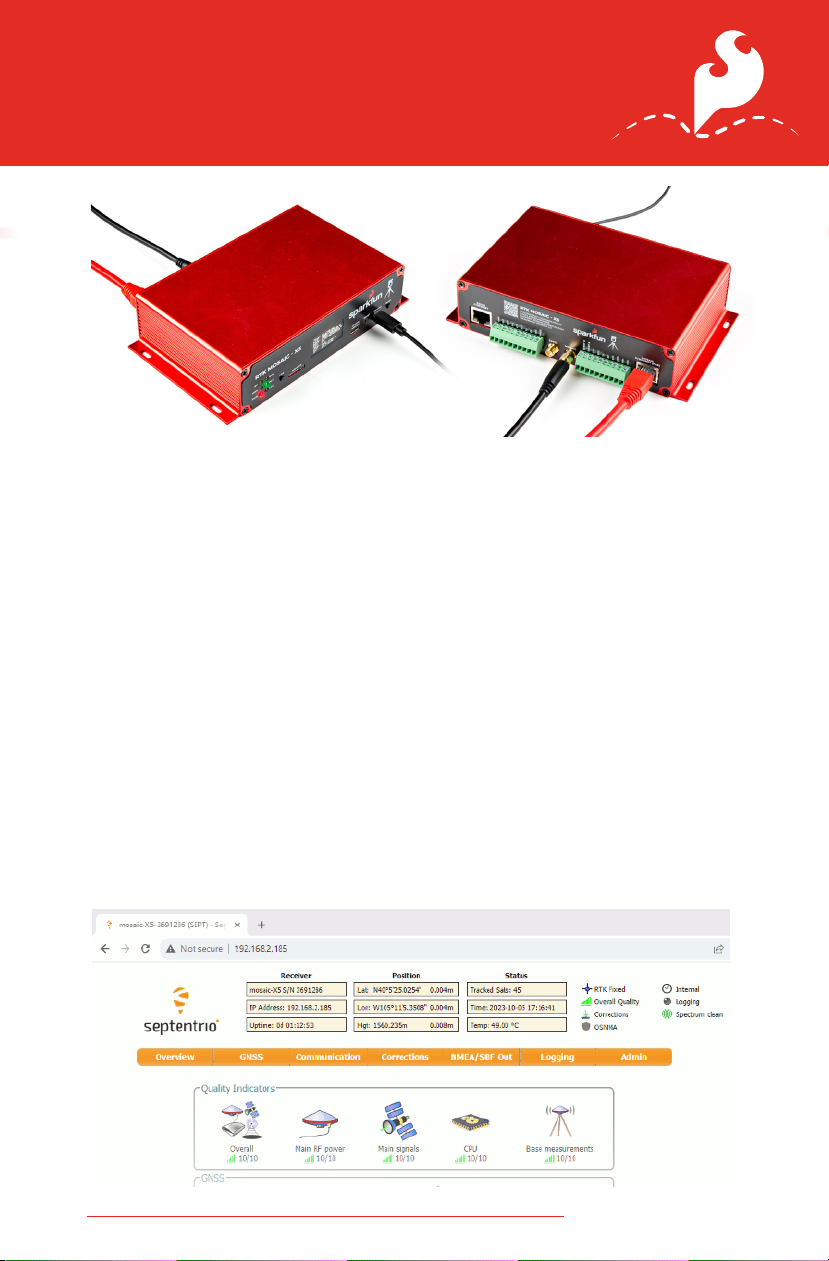
4. Connect your computer, tablet, or phone to the
same network, open a web browser and navigate to the
IP address shown on the OLED display. You should see
the mosaic-X5’s internal web page. The web page displays
a lot of helpful information and can also be used to fully
configure the mosaic-X5.
docs.sparkfun.com/SparkFun_RTK _mosaic-X5
2
Page 9
Getting Started
Using WiFi
CONNECT USING WIFI
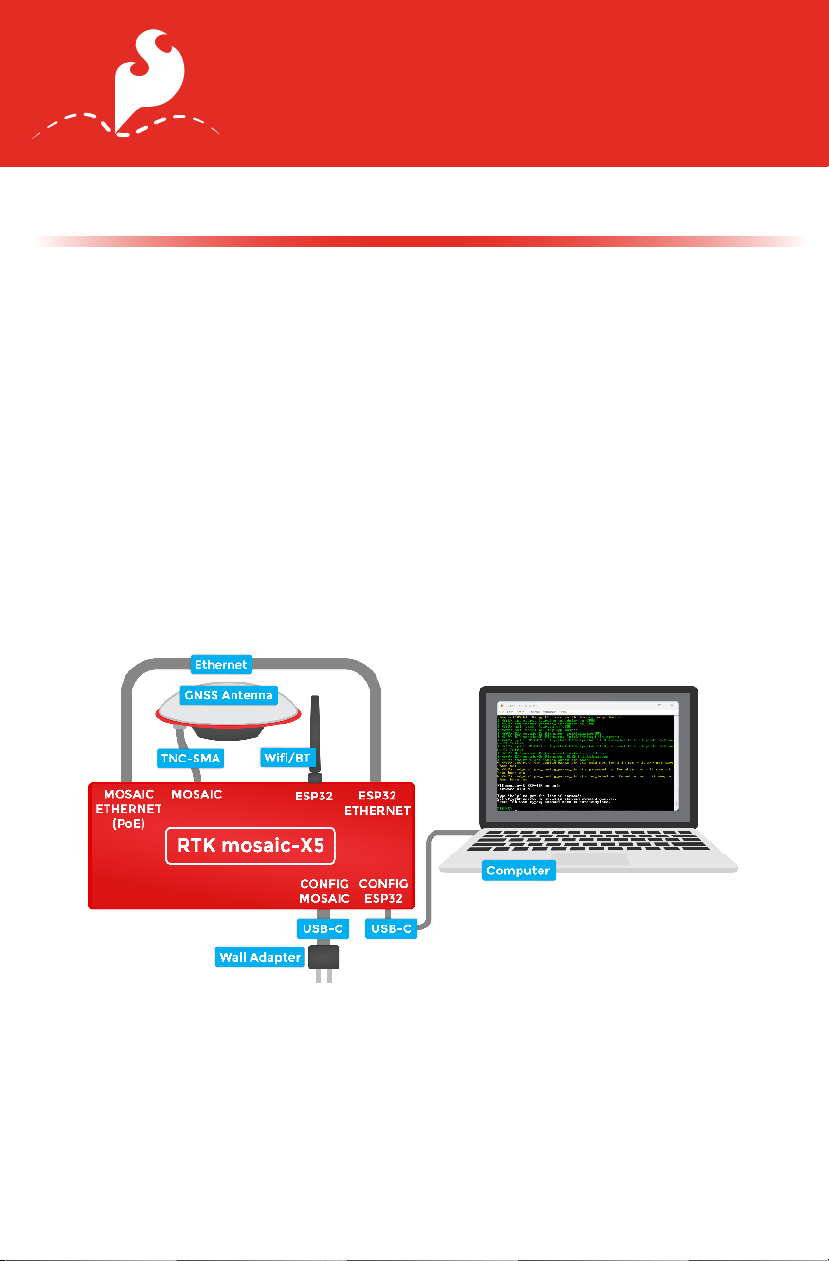
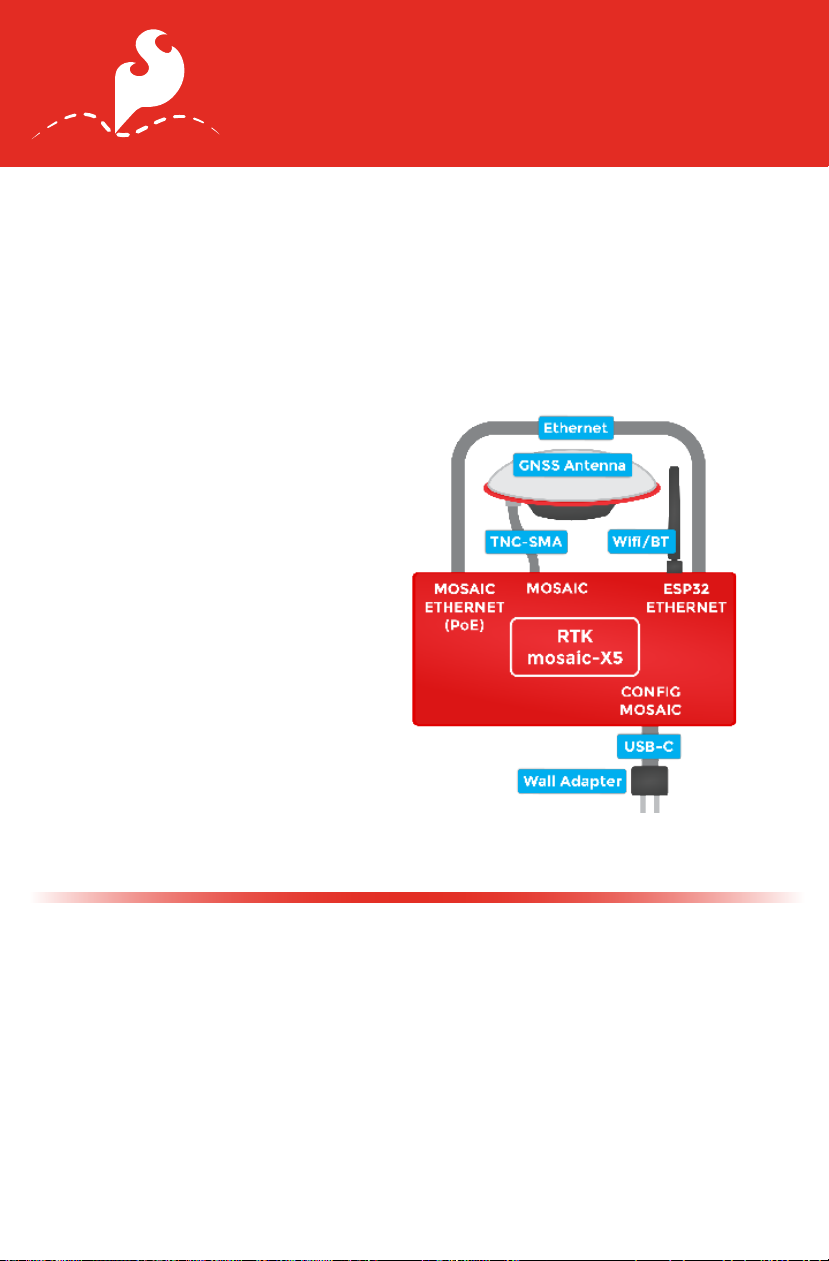
The RTK mosaic-X5 contains an ESP32-WROVER processor
which can act as a Ethernet to WiFi bridge. By linking the
MOSAIC ETHERNET (PoE) port to the ESP32 ETHERNET
port and putting the ESP32 firmware into WiFi mode, the
mosaic-X5 can join your WiFi network.
1. Connect the GNSS antenna. Inside your RTK mosaic-X5
kit, you will find the L1/L2/L5 GNSS “UFO” antenna. It has
a TNC connection. Use the supplied TNC-SMA cable to
connect the antenna to the mosaic-X5 MOSAIC SMA
connection. Make sure the antenna is securely mounted to a
structure so that it cannot be moved and has a clear view of
the sky. Any movement in the antenna will cause inaccurate
readings by RTK rovers.
2. Attach the WiFi antenna. Screw the supplied WiFi/BT
antenna onto the ESP32 SMA connection. To minimize wear
of the SMA connector, we recommend: holding the antenna
body with one hand - to prevent it rotating - while screwing
the SMA connector into place with your other hand. If
needed, fold the antenna up so the antenna body is vertical.
3
Want to read this on your computer?
Page 10
Getting Started
Using WiFi
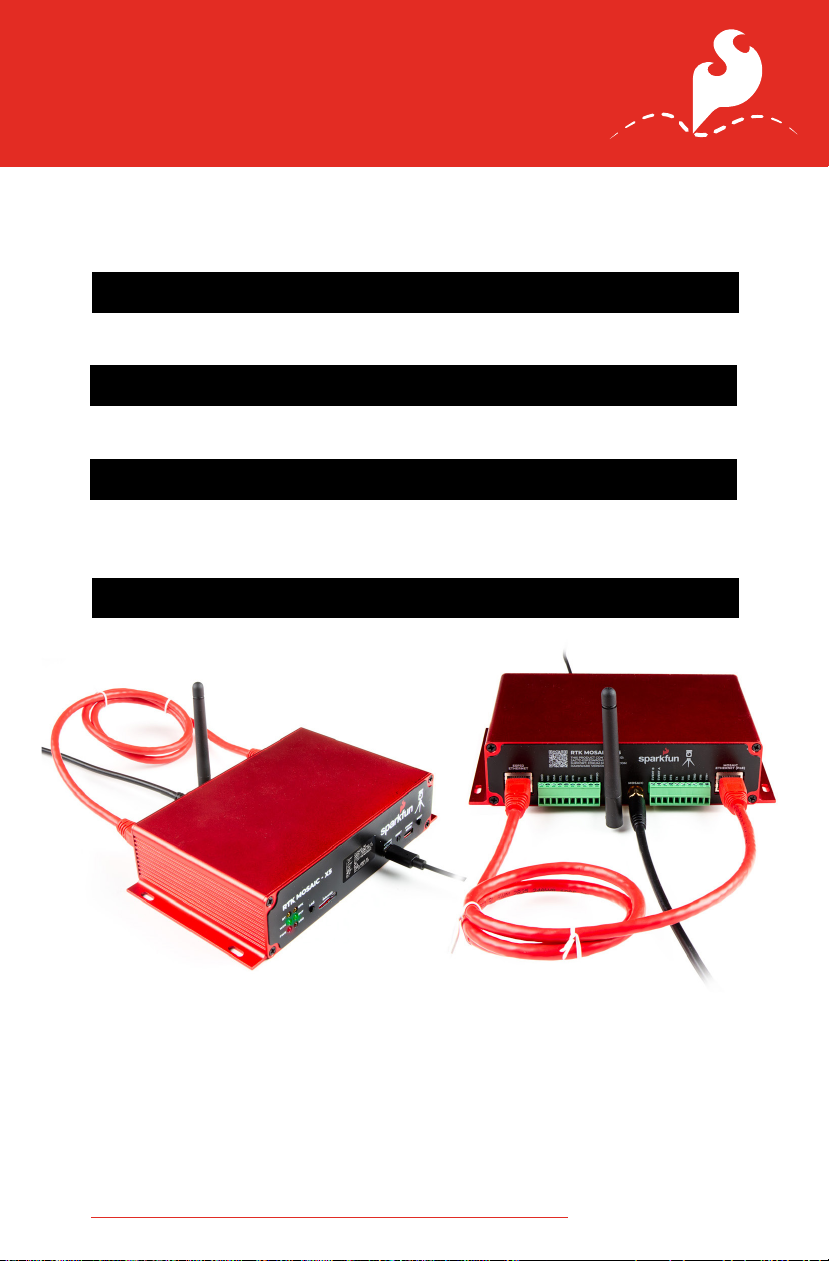
3. Connect the Ethernet ports. Connect the two ethernet
ports together using the supplied Ethernet cable. If you
don’t have the original cable, any Ethernet Cable will work. A
crossover cable is compatible but not required.
4. Connect to the CONFIG ESP32 USB port. To change
the ESP32 firmware mode, you need to connect a computer
to the CONFIG ESP32 USB-C port and use a Serial Terminal
to change the mode. You may need to install a driver first,
so that the CH340 serial interface chip is recognized.
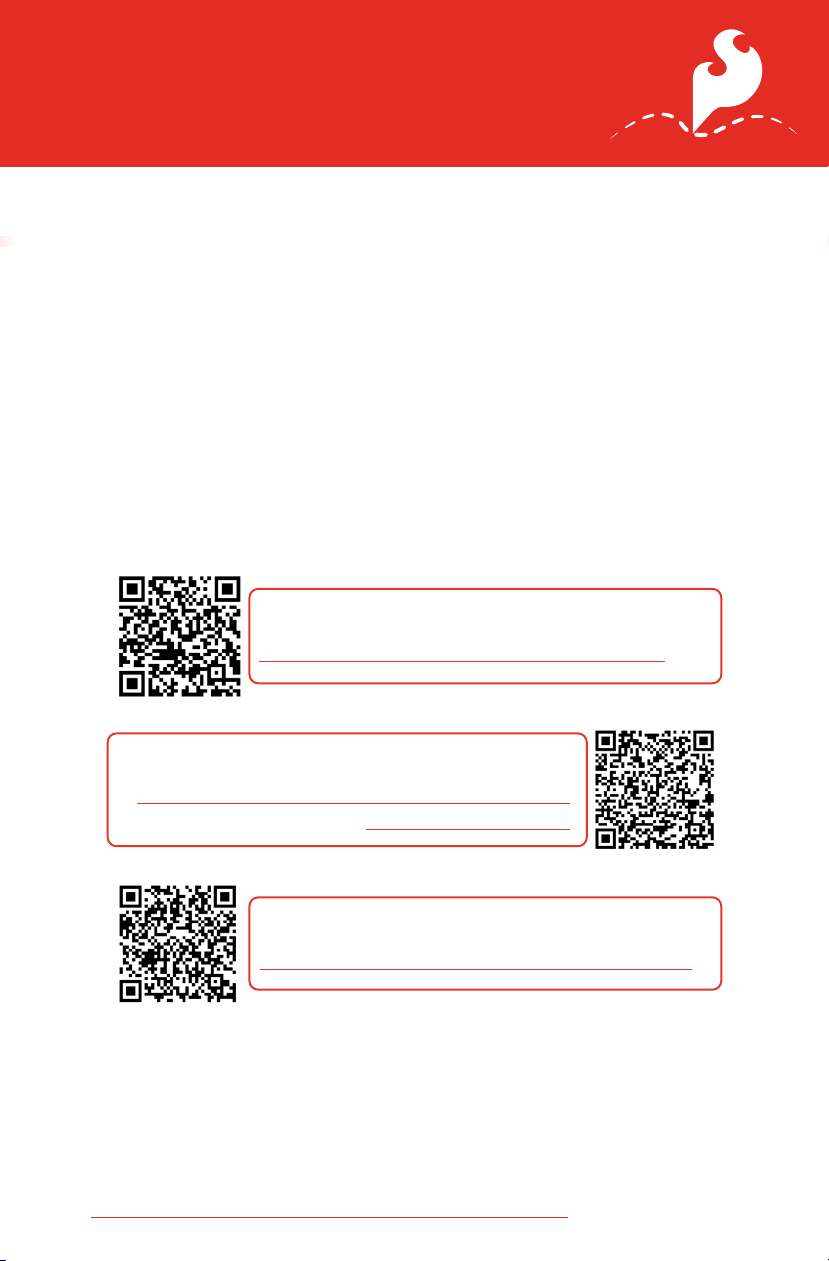
Please follow the QR codes below for more details:
CH340 Drivers
https://learn.sparkfun.com/tutorials/908
Tera Term
https://learn.sparkfun.com/terminal-basics
/tera-term-windows
Serial Terminal Basics
https://learn.sparkfun.com/terminal-basics
5. Open a Serial Terminal. If you are using Windows, we
still recommend Tera Term serial terminal but there are
plenty of alternatives. Please see our Serial Terminal Basics
tutorial for more details. Open the connection to the CH340
using 115200 baud.
docs.sparkfun.com/SparkFun_RTK _mosaic-X5
4
Page 11
Getting Started
Using WiFi
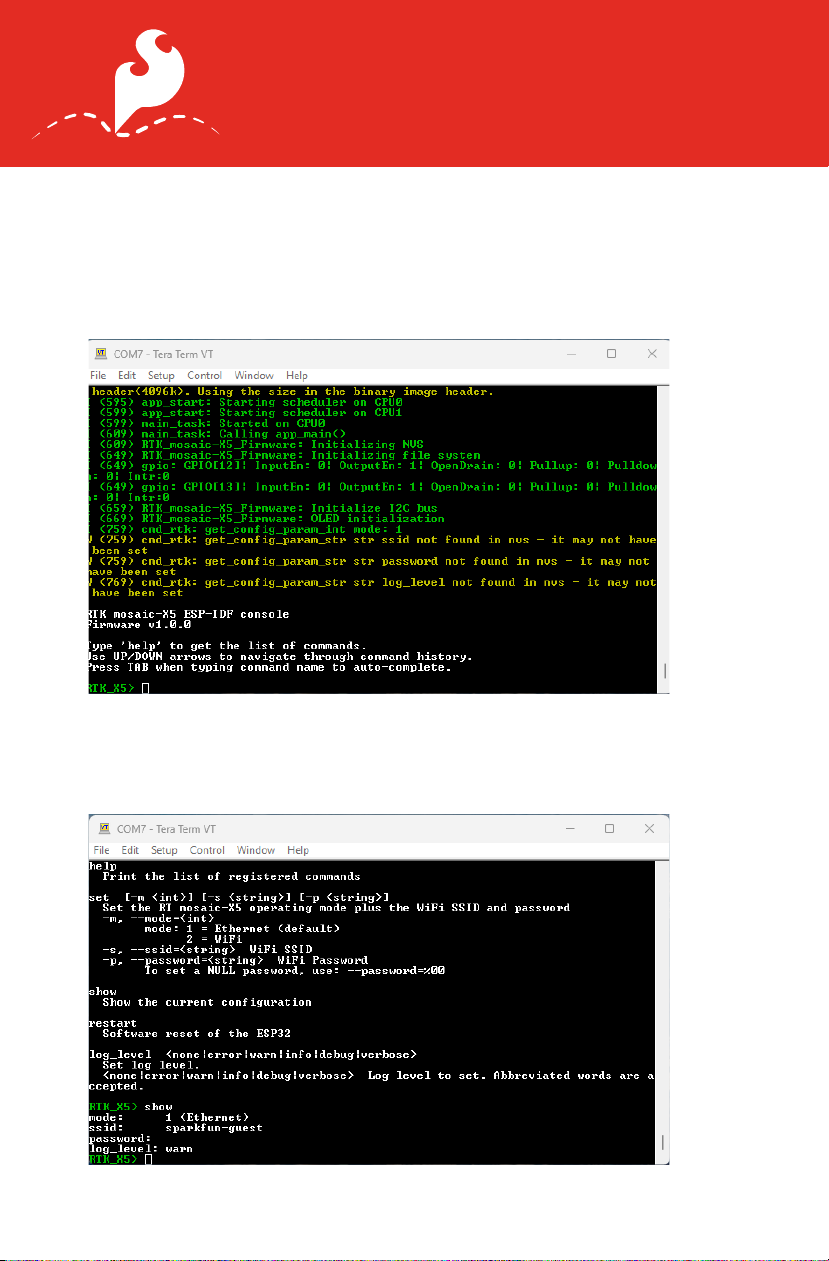
6. Put the ESP32 firmware into WiFi mode. When you
have the Serial Terminal open, you should see the RTK_X5>
console prompt. If you do not, hit Enter on your keyboard. If
needed, click the RESET pushbutton on the front of the RTK
mosaic-X5 to restart the ESP32 firmware.
Type help and hit enter to see the help.
Type show to see the current configuration:
5
Want to read this on your computer?
Page 12
Getting Started
Using WiFi
By default the firmware will be in mode 1 (Ethernet). To
change the mode to mode 2 (WiFi), type:
set -m 2
To set the WiFi SSID of the network to connect to:
set -s YOUR_SSID
Likewise, to set the WiFi password:
set -p YOUR_PASSWORD
Finally, type restart to restart the firmware with the new
settings:
restart
Once the mosaic-X5 has acquired a satellite signal and
is connected to the WiFi network, the OLED will display:
the antenna’s position as Latitude (Lat), Longitude (Long),
and Altitude (Alt), as well as the WiFi IP (Internet Protocol)
network address.
docs.sparkfun.com/SparkFun_RTK _mosaic-X5
6
Page 13
Getting Started
Using WiFi
When powering the RTK mosaic-X5 on for the first time, you
may see the firmware restart (reboot) several times while it
waits for the mosaic-X5 to initialize. This is not an error, you
do not need to be concerned.
Connect your computer, tablet or phone to the same WiFi
network. Next, navigate to the IP address shown on the
OLED display. You should see
the mosaic-X5’s internal web
page. The web page displays
a lot of helpful information
and can also be used to fully
configure the mosaic-X5.
The firmware mode, SSID,
and password are stored in
(non-volatile) memory. After
changing them, you can
disconnect the computer
and power the
RTK mosaic-X5 using the
supplied power supply.
CONNECT USING USB-C
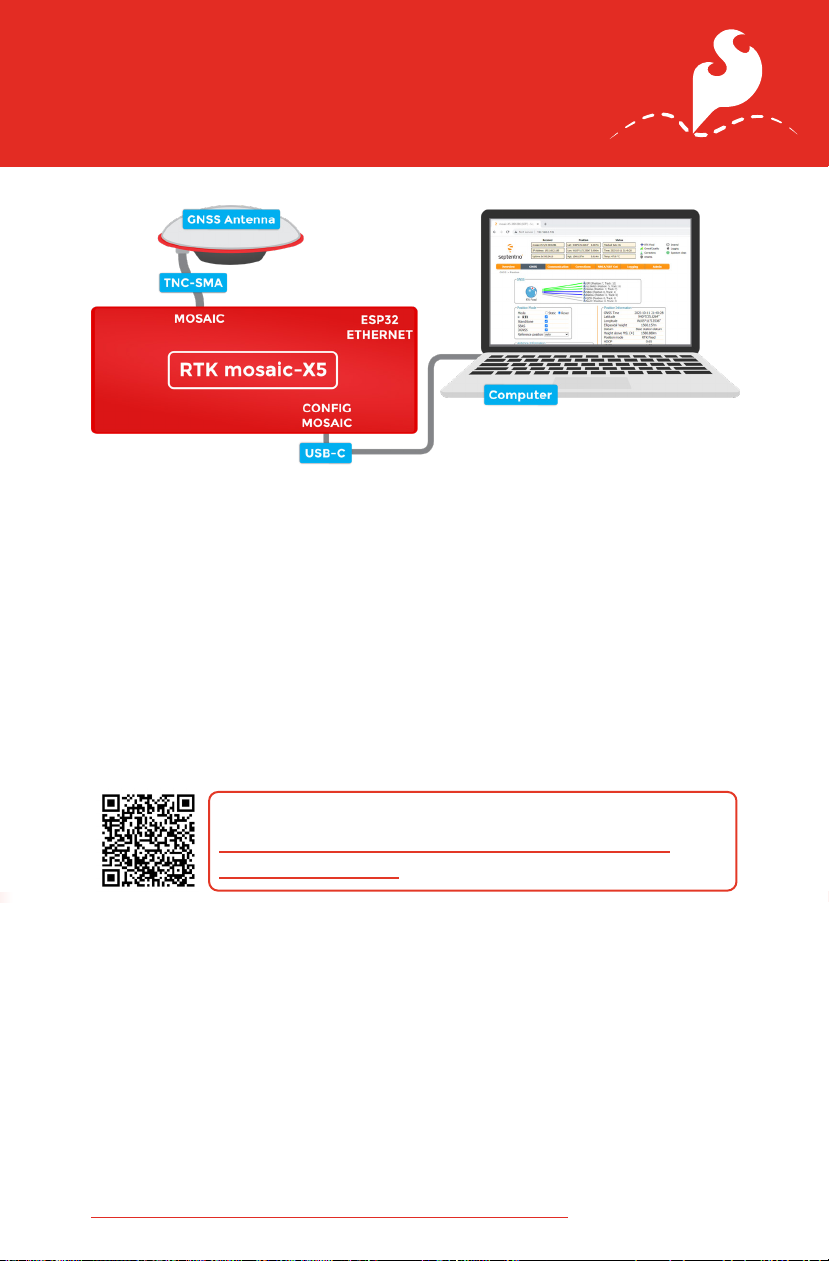
The mosaic-X5 has a built-in high-speed USB port which
supports Ethernet-over-USB. To take advantage of this
interface, you need to install the Septentrio drivers.
1. Connect the GNSS antenna. Inside your RTK mosaic-X5
kit, you will find the L1/L2/L5 GNSS “UFO” antenna. It has
a TNC connection. Use the supplied TNC-SMA cable to
connect the antenna to the mosaic-X5 MOSAIC SMA
connection.
7
Want to read this on your computer?
Page 14
Getting Started
Using USB-C
Make sure the antenna is securely mounted to a structure so
that it cannot be moved and has a clear view of the sky. Any
movement in the antenna will cause inaccurate readings by
RTK rovers.
2. Download and install Septentrio RxTools. R xTools
includes the driver for the USB-C port plus several tools
which you can use to control and configure the mosaic-X5,
forward data, log data, analyze the log files, convert the log
files to other formats, and configure the module for use with
other GIS software.
RxTools
https://www.septentrio.com/en/support/
software/rxtools
3. Connect the RTK mosaic-X5 to your computer. Use the
supplied USB-C cable to connect the CONFIG MOSAIC port
to your computer.
4. Open the X5 web page. Open a web browser on your
computer and navigate to 192.168.3.1 to view the mosaicX5’s internal web page.
You can now use the RxTools suite to take full advantage of
the sophisticated mosaic-X5.
docs.sparkfun.com/SparkFun_RTK _mosaic-X5
8
Page 15

Common Gotchas
• High-precision GNSS only works with multi-frequency
antennas. This means that GPS antenna you got in the
early 2000s with your TomTom is not going to work.
Please use the SparkFun L1/L2/L5 antenna provided in
the RTK mosaic-X5 kit.
• High-precision GNSS works best with a clear view of the
sky; it does not work indoors or near a window. GNSS
performance is generally not affected by clouds or
storms. Trees and buildings can degrade performance
but usually only in very thick canopies or very near tall
building walls. GNSS reception is very possible in dense
urban centers with skyscrapers but high-precision RTK
may be impossible.
• The mosaic-X5 reserves the IP (Internet Protocol)
subnet address 3 for its USB-C interface; this cannot be
changed. If your Ethernet or WiFi network is also using
subnet 3 (192.168.3.nnn), the mosaic-X5 may appear
to have a valid IP address but communication will
fail. Please change your Router configuration to use a
different subnet.
9
Page 16
Help & Troubleshooting
If you need technical assistance or more information
on a product that is not working as you expected, we
recommend heading on over to the SparkFun Technical
Assistance page for some initial troubleshooting.
Technical Assistance
https://www.sparkfun.com/technical_assistance
If you can’t find what you need there, the SparkFun GPS
Forum is a great place to ask questions.
SparkFun GPS Forum
https://forum.sparkfun.com/viewforum.php?f=116
If this is your first visit to our forum, you’ll need to create a
Forum Account to post questions.
Forum Account
https://forum.sparkfun.com/ucp.php?mode=register
10
 Loading...