

!
Owner’s Manual
Spark"

Contents
Welcome and Comments$ $ …………….…………………………………………… 1"
Handlebar Assembly$ $ …………….…………………………………………… 2"
Fender Assembly$ $ $ …………….…………………………………………… 2"
Front Wheel Assembly$ $ …………….……………………………………………. 3"
Chain Slap Guard Assembly$ …………….……………………………………………. 3"
Seat Assembly$ $ $ …………….……………………………………………. 4"
Pedals Assembly$ $ $ …………….……………………………………………. 4"
Battery Charge$ $ $ …………….………………………………………….… 5"
Battery Care$ $ $ $ …………….………………………………………….… 5"
LCD Display$ $ $ $ …………….………………………………………….… 6"
LCD Parameter Setting$ $ …………….………………………………………….… 7"
LCD Error Code Definition$ $ …………….………………………………………….… 9"
Cleaning and Maintenance$$ …………….………………………………………….… 10%
Tips$ $ $ $ $ …………….………………………………………….… 10%
Legal Requirement$ $ $ …………….………………………………………….… 10"
Warranty$ $ $ $ …………….………………………………………….… 11"

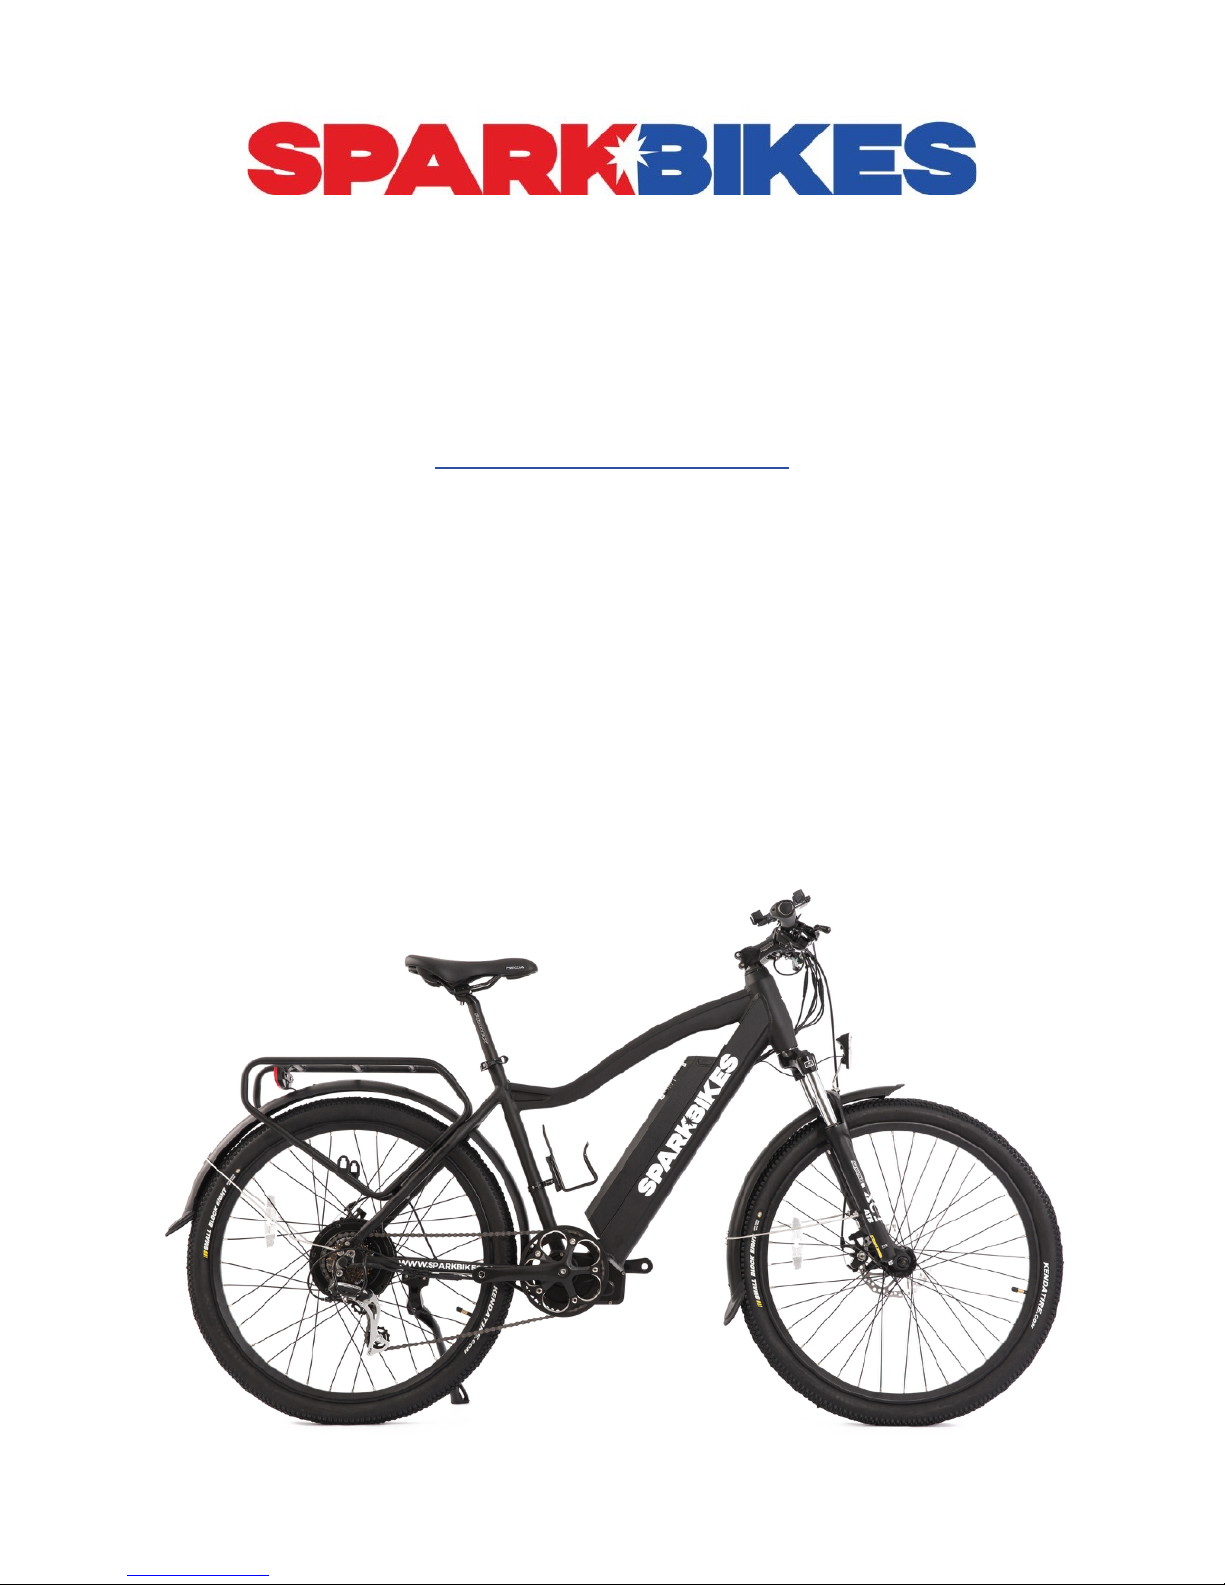
Congratulations on purchasing a Spark Bike. You have chosen a bike that will give you
a superb riding experience. "
This manual will help you install and keep your bike in its best shape ensuring that you
will enjoy every ride.
Warning
Before your first use, check that all components are properly installed and properly
functioning. Test ride your bike until you are confident that you are familiar with its power
modes, stopping function, and overall riding process. Neglecting to do so may cause
serious injury.
Spark Bikes recommends that you always wear a helmet for your own safety. Use front
and rear lights after sunset for increased visibility.
For your safety
!
If this is your first time riding an electric bike, it is highly recommended that you ride in
an open area and set your power assist level to low. Once you feel confident operating
your new bike, increase the power assist gradually. If for any reason you lost control,
apply the brake levers immediately to disconnect the motor power and stop the bike. Do
not try to stop your bike using your feet.
!
Caution
The pedal assist sensor is located at the left side of the bottom bracket where the pedal
arm is mounted. It activates the motor when you move the pedals and will cause a
sudden burst forward. Keeping your hands over the brake levers is good practice.
It is recommended that you perform regular maintenance and tune-ups to ensure that
your bike always performs well. Seek the help of a professional bike mechanic
whenever required.
1
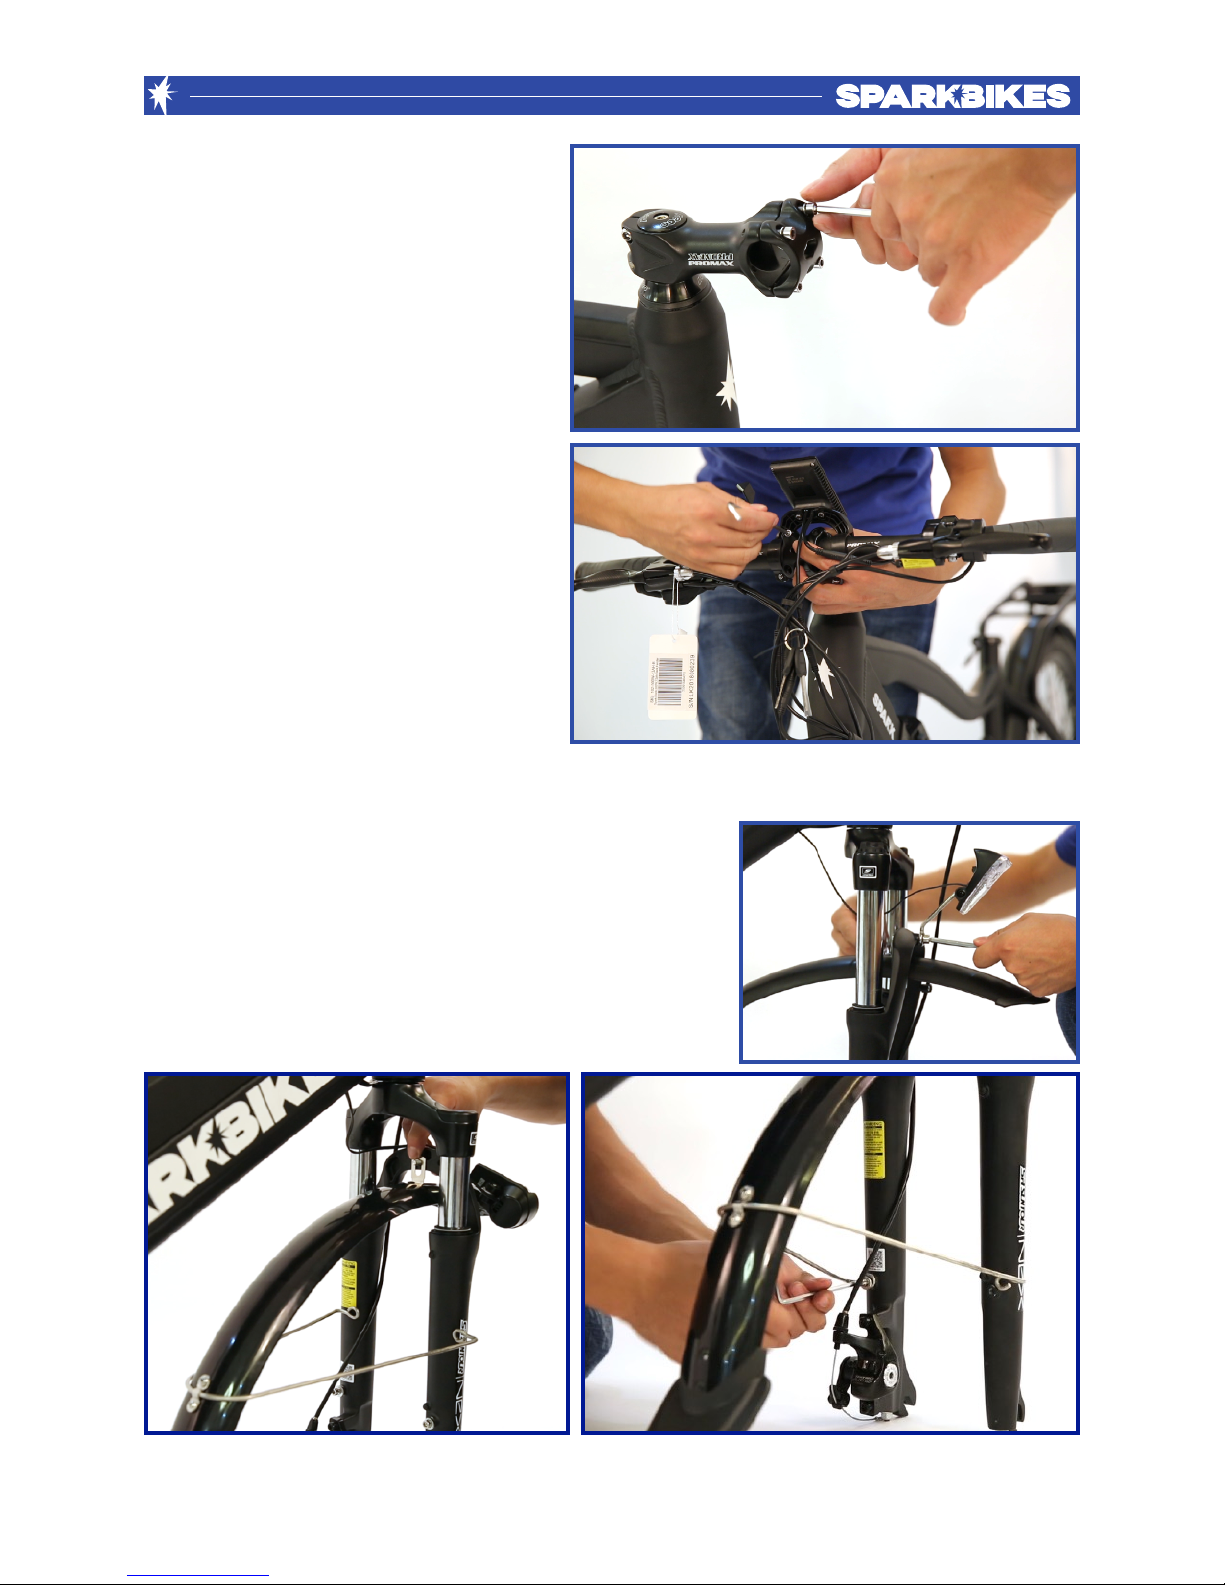
Handlebar Assembly
Required tools:
- 4mm Allen key
1) Unscrew the four bolts from the
stem and remove the cap.
"
2) Insert the handlebar and place the
cap. Screw in the bolts to tighten the
cap."
Fender Assembly
Required tools:%
- 4mm Allen key"
- 5mm Allen key
- 10mm Wrench
1) Place the fender under the fork bracket and attach
the fender hook from the back of the bracket. Insert
the bolt into the light through the fork bracket and
fender and tighten. !
2) Place the fender stays onto the designated area
and tighten."
2
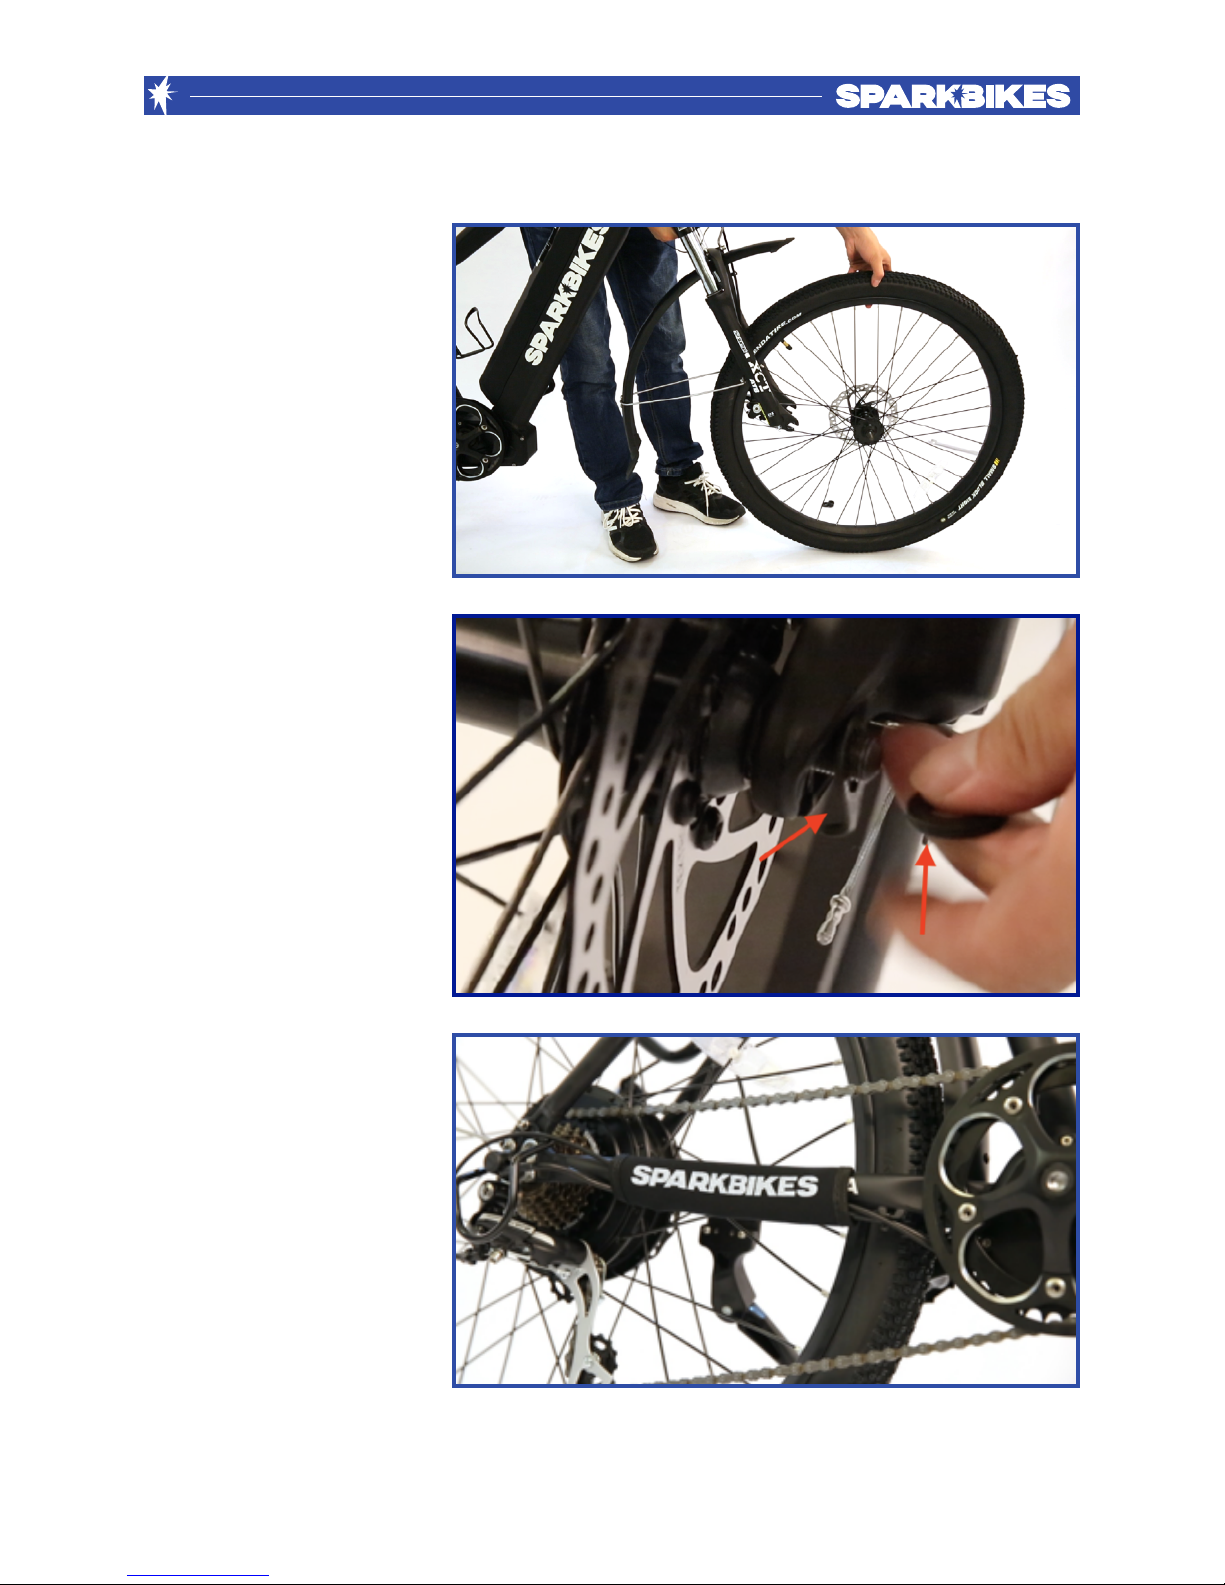
Front Wheel Assembly
Required tools:
-15mm Wrench
!
1) Remove the bolts and
washers from the wheel
axle.
2) Insert the wheel into the
fork hooks ensuring that
the disc brake rotor is
inserted into the brake
pads.
3) Insert the hook washer
pointing downward to fit
into the fork. Insert the
second washer and
tighten the nut.
Chain Slap Guard:
The chain slap guard is
made to protect the frame
and chain. It is placed on
the chain stay.
3

Seat Assembly
1) Open the lever, insert the seat
post, adjust the height, and close the
lever to lock.
2) Rotate the lever to adjust the
tightness.
To adjust the seat position loose the
bolt under the seat. You can tilt the
seat angle up and down, and move
forward or backward to fit your
comfort.
Pedals Assembly
Required tools:
-15mm wrench
Important
!
The pedals are marked with “L” to
indicate left pedal and “R” to indicate
right pedal.
1) Insert the right pedal into the right
crank, tighten the bolt clockwise. !
2) Insert the left pedal into the left
crank, tighten the bolt counterclockwise.
Warning
Inserting the pedals in the wrong position or tightening them while they are not aligned
correctly with the threads will tear and strip the the threads of the crank arm.
4

Battery Charge
Ensure that the battery is fully charged before your
first ride. The charging port is located at the bottom
end of the battery.
To charge the battery, lift the rubber lid and insert
the charging cable into the charging port. The
charger will show a red light indicating that the
battery is charging. Once fully charged the light will
turn green.
Warning
Charge the battery with the supplied charger. Do not attempt to use another charger as
it may damage the battery or risk a fire or an explosion.
Ensure that you charge your battery on a non-inflammable surface. It is recommended
that you charge your battery in an area with a smoke/fire detector in place.
Do not charge the battery in a wet and humid place or when exposed to strong sunlight.
Battery Removal
Insert the key into the battery keyway, turn the key clockwise, lift the battery lever, and
pull the battery out of its holder.
Battery Care
•
Keep the battery indoors during extreme weather.
•
Avoid storing the battery in places of high temperature or high humidity.
•
Charge the battery to 70% if not used in two months. The battery will slowly discharge
over time. When the battery reaches 20% charge it again to 70%.
To clean the battery and the battery housing use a dry rag or a slightly damp rag if
necessary. Do not spray with water as it may damage the battery or cause a short
circuit.
5

LCD Display
The LCD screen along with the control buttons are placed on the handlebar. They are
used to control various aspects including:
1. Battery Level
2. Pedal Assist Level
3. Speed and Distance
4. Switching Lights ON/OFF
Switching the Power ON/OFF
Press and hold the power button for one second. The LCD will switch ON and the bike
is ready to start. To switch OFF, press and hold the power button for one second.
Power Assist Level
The level of assist determines the motor’s
input while pedalling. There are nine levels of
power assist, 1 being the lowest, and 9 being
the highest. If you wish to ride with no power
assistance, select 0. When you switch ON
the LCD, the bike will be set automatically to
level 1. You may change the level of assist by
pressing the +(up)/-(down) button.
6

Changing the Speed Mode
When LCD is switched ON, press
the power button to change the
speed mode. The data sequence
is:
Average Speed > Max Speed >
Actual Speed > Single Trip > ODO
>Time
Battery Indicator
The battery on the display has five bars indicating the
battery power.
Switching ON/OFF the Head and Rear
Lights
To switch ON the headlight and rear light,
press and hold the +(up) button on the
controller for two seconds. To switch OFF,
press and hold the +(up) button for two
seconds.
Parameter Setting
While the LCD is on double press the power button (press interval < 0.3 seconds) to
switch to parameter setting. Once you have entered into parameter setting, press (up)/
(down) to navigate through various settings. To select the parameter you would like to
set, press the power button. To exit the parameter setting, double press the power
button.
If no action is taken for 10 seconds while on the parameter settings, you will be
redirected to the home screen.
7

The sequence of the parameter
- Data Cleanup
The symbol for data cleanup is Cr. Use the +
(up)/-(down) button to navigate between “y” for
yes and “n” for no. To confirm your selection
press the power button.
- Kilometer/Mile
The symbol for kilometer/mile is S7, press +
(up)/-(down) button to switch between kilometre
or mile. Press the power button to choose your
preference.
- Backlight Brightness
The symbol for backlight brightness is bL1,
press +(up)/-(down) to select from 1-5 from
dark to bright. Press the power button to
choose your preference.
8

- Auto OFF Time
The display switches off automatically
when not in use. The symbol for auto off
time is OFF. Press +(up)/-(down) to select
from 1 minute to 15 minutes. Press the
power button to choose your preference.
All other LCD settings are preset by Spark Bikes to technically match your bike
specifications and to ensure that Spark Bikes complies with local laws. If you require
further information on specific settings, please contact Spark Bikes.
Error Code Definition
Whenever an error is detected, the display shows the sign with the error code.
Error codes range from 21 to 30:"
9

Cleaning and Maintenance:
•
It is good practice to clean your bike after a wet ride and store in a dry place to avoid
rust.
•
When cleaning or servicing your bike, always remove the battery.
•
To increase the life of your bike, regularly lubricate your chain, shifter, and rear
sprocket.
Tips
•
Lube your chain frequently every 100 km using a special bike lube to maximize
performance and get a smooth ride.!
•
Constantly check your bike components for wear and tear. If any found, replace
immediately to avoid injury and further damaging your bike.!
•
Constantly check the bolts to ensure they are all tightened. This is essential especially
when planning on riding through rough terrain.!
•
Regularly check your brake pads. If they are damaged, cracked, or have less than
8mm of thickness they need to be replaced.!
•
Reducing pressure on the pedals while shifting gears increases the life of the chain,
chainring, and sprocket as the motor places major stress on the gears.!
•
Ensure that your tires are inflated with appropriate air pressure. It is recommended
that air pressure is 30-40 psi and 25-30 psi for fat tires. However, this may vary
depending on the riding conditions and your weight.
Legal Requirements:
Electrical bicycles are regulated, and regulations vary depending on the country/state/
province/city you live in. It is your responsibility to inform yourself of the local law
requirement and comply with it. You may contact local authorities, electrical bicycle
shops or bicycle associations to acquire further information on legal requirements.
It is important to keep a record of your serial number as this will be required by the
police in case of theft.
10

Warranty
Our bikes are built using durable frames and quality parts supplied by solid brands.
Each bike#comes with a 12-month warranty against defects from the manufacturer.
Electrical parts include the LCD screen, throttle, controller, pedal assist sensor, motor,
and battery. These parts are user-friendly and can be easily#replaced by the user. If an
electrical problem is found, our team will provide the necessary support to resolve the
problem. If the problem persists, Spark Bikes will replace the defective part free of
charge.
The warranty only covers mechanical parts that were damaged at the time of shipping
the product. The warranty does not cover mechanical#parts that are damaged as a
result of using the product, including tires, brakes, gears, pedals, and suspension.
Further, this warranty does not cover:
•
Normal wear and tear
•
Replacing headlights and rear lights!
•
Damage or failure from abuse, neglect, misuse, or accidents!
•
Damage resulting from improper charging of the battery or use of any charger not
supplied by Spark Bikes!
Installation of any electrical components not originally supplied by Spark Bikes will void
the warranty."
11

!
Notes
———————————————————————————————————————!
!
———————————————————————————————————————!
———————————————————————————————————————!
———————————————————————————————————————!
———————————————————————————————————————!
!
———————————————————————————————————————!
———————————————————————————————————————!
———————————————————————————————————————!
!
———————————————————————————————————————!
———————————————————————————————————————!
———————————————————————————————————————!
!
———————————————————————————————————————!
———————————————————————————————————————!
———————————————————————————————————————
 Loading...