

Page 1

SP-19
User's Guide
Compulite R & D
Revised March 1999
Page 2

Table of Contents
Introduction............................................................................................................................1
Front Panel.........................................................................................................................1
Back Panel..........................................................................................................................1
Optional External Devices..................................................................................................1
Function Keys ........................................................................................................................2
Starting Up.............................................................................................................................2
Service Tools Menu & Displays.............................................................................................2
Accessing Service Tools ....................................................................................................2
Service Tools display.........................................................................................................3
Run.....................................................................................................................................3
Cold Start .......................................................................................................................3
Warm Start.....................................................................................................................3
Test.....................................................................................................................................3
Test LCD display & keys ...............................................................................................4
Disk operations...............................................................................................................4
Select/deselect files........................................................................................................5
System version...............................................................................................................5
Main Menu & Displays..........................................................................................................6
Giving a Go command........................................................................................................6
Giving a Hold command ....................................................................................................7
Rstr.....................................................................................................................................7
Load ...................................................................................................................................8
Ctrl .....................................................................................................................................9
View controller levels ....................................................................................................9
Change controller levels.................................................................................................9
View running chasers...................................................................................................10
View type of controller assignment..............................................................................11
Mac...................................................................................................................................11
Starting Your Show..............................................................................................................12
Playback after warm start.................................................................................................12
Auto Run function............................................................................................................12
Editing Using the Text Keyboard.........................................................................................13
Programming the Show........................................................................................................14
Page 3

Introduction
The SP-19 is a Spark packaged in a 19 ″ rack mount. It can be used as a backup for the
Spark system or a stand-alone system. The stand-alone system can be used to playback
shows recorded on Spark or photon. When used with a Remote Control Unit, SP-19 can be
used as a full featured Spark or Photon.
The SP-19 consists of all the internal hardware of the Spark console, a 2 x 16 character
LCD display, a floppy disk drive, and 6 front panel buttons.
Front Panel
Power switch
2 x 16 LCD display
6 function buttons
Floppy drive
Text keyboard connector
Panel (CAN bus) connector
Back Panel
3 output connectors that transmit DMX512, High-End protocol, or S-Mix.
1 input connector receives DMX input or SMPTE.
Remote bus
Serial port
Parallel port
S/VGA
MIDI In/Out/Thru
Optional External Devices
External devices are supported by the SP-19.
Text keyboard
Macro Extension Keyboard
S/VGA monitor
UWR/UCR
Page 4

Function Keys
SP-19 Compulite R&D
2
Function Keys
Arrow keys - These keys traverse the display. They are used for selection. A selected item
appears between brackets.
[MENU] - This key toggles between Service Tools functions and the main Service Tools
menu or between the Main menu and A/B crossfade display
[ENTER] - Use this key to apply your selection.
Starting Up
When you power up you can either Cold Start or Warm Start SP -19/4D.
To Warm Start turn on the power switch on the front panel. Your show starts at the same
point it was when you powered down.
Cold Start clears SP- 19/4D’s memory. Cold start can only be accessed via Service Tools
(see Service Tools . There is also a Warm start option in Service Tools.
The system defaults to MIDI On.
Service Tools Menu & Displays
The Service Tools menu provides 4 basic functions:
Run
Test
Disk Operations
System Version Information
Accessing Service T ools
1. When the power is off, press and hold any 2 function buttons.
2. Turn on the power switch.
3. Release the two buttons. The system boots up. When the boot up is complete
the Service Tools menu is displayed.
Page 5

Service Tools Menu & Displays
Compulite R&D SP-19
3
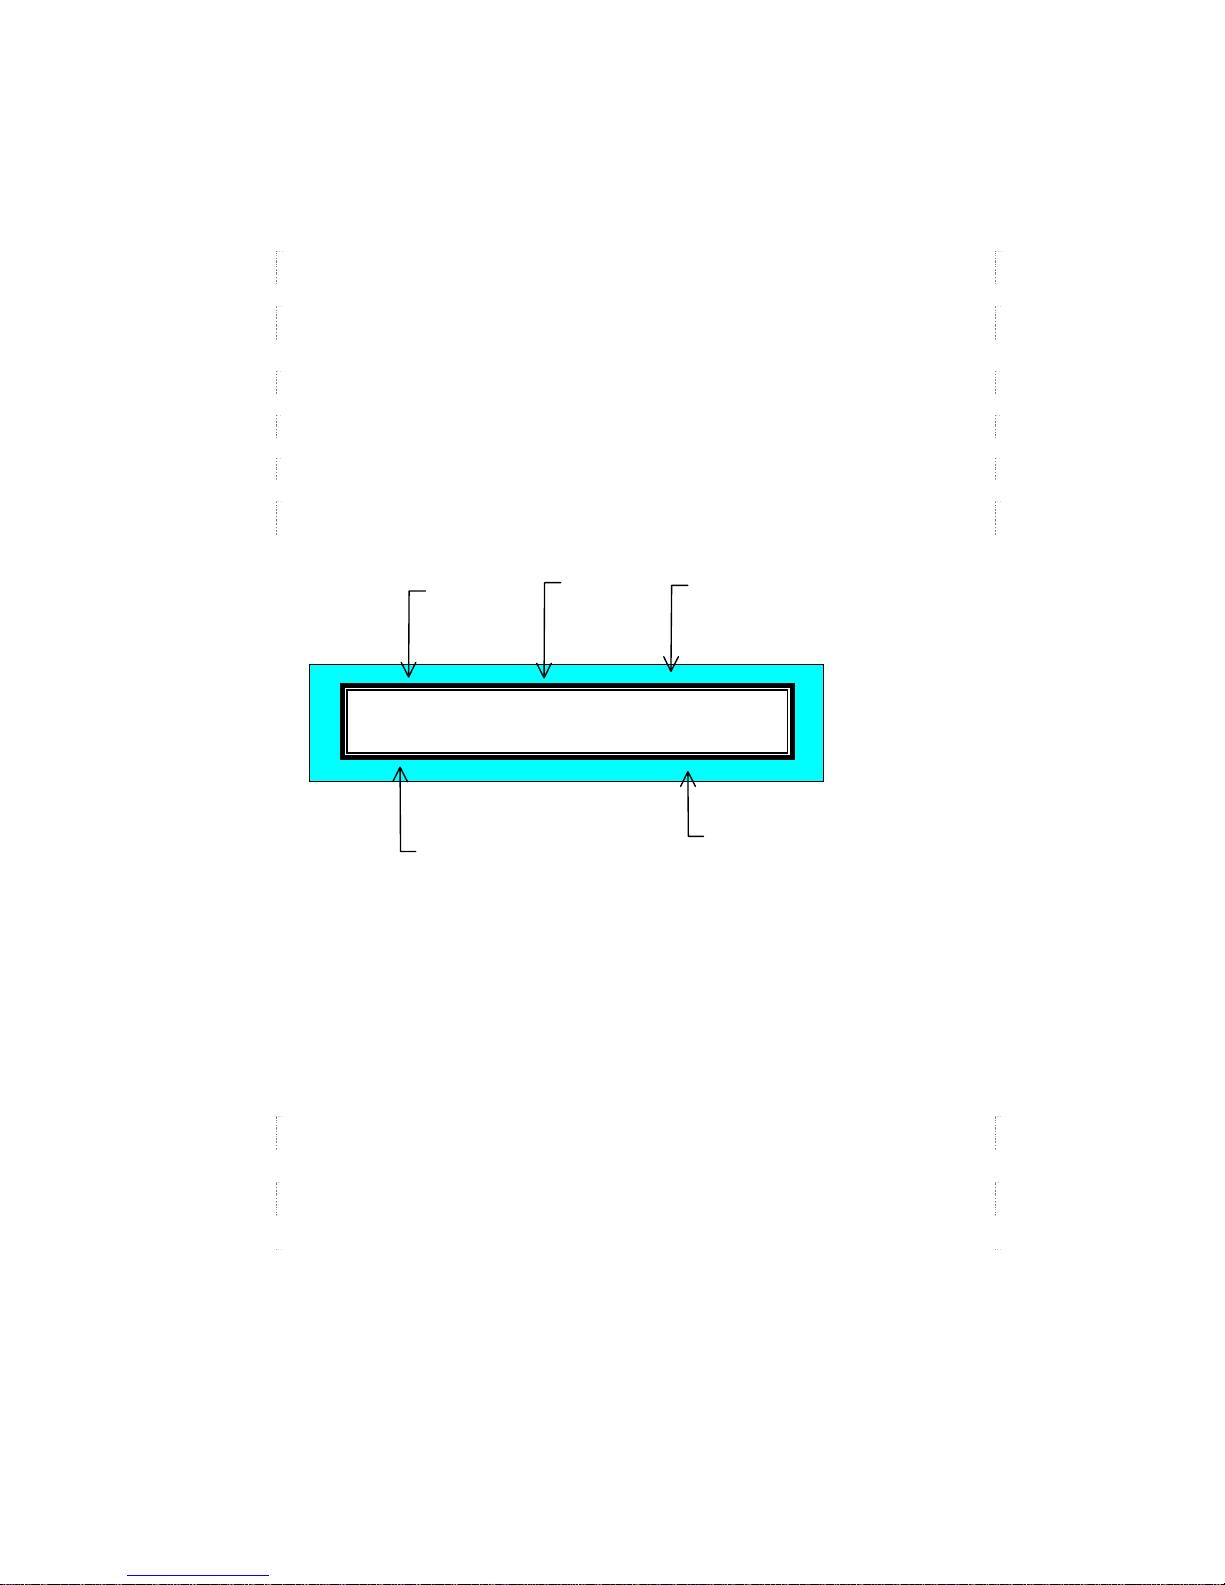
Service T ools display
Figure 1 - Service Tools menu
Run
This function accesses Cold Start or Warm Start.
Cold Start
1. If <RUN> is not selected, use the arrow keys to select it.
2. Press [ENTER]. <COLD> and WARM are displayed. The default selection is
<COLD>, which is bracketed.
3. Press [ENTER]. The current show is erased. You can proceed to load a new
show. If there is a diskette in the disk drive containing show file 999.9, this
show file is automatically loaded. (See Auto Run , page 12.
Warm Start
1. If <RUN> is not selected, use the arrow keys to select it.
2. Press [ENTER]. <COLD> and WARM are displayed. The default selection is
<COLD>, which is bracketed.
3. Press [
]. <WARM> is now selected; it appears in brackets.
4. Press [ENTER]. The system comes up exactly as it was before shut down. If
chasers are running, they come up running, if a loop was active on A/B, it will
continue, etc. The A/B X-fade exam is displayed on the LCD.
T est
This function is identical to the diagnostic function in Service Tools for the Spark console.
This is used to diagno se hardware problems.
Two Diagnostic Tests are available:
1. Keyboard - Test that the SP-19 buttons are functioning correctly. You can also test the
keys on any of the peripherals such as the Macro Extension Keyboard.
2. CRT - Test the LCD display. This also verifies the correct function of the CRT, if a
monitor is connected.
<RUN> TEST
DI
SK O
P
SYS
VER
Page 6

Service Tools Menu & Displays
SP-19 Compulite R&D
4
Test LCD display & keys
1. Use the arrow keys to select <TEST>.
2. Use the arrow keys to select either <LCD> or <KYBRD>.
3. Press [ENTER].
If you have selected <LCD>, the LCD display runs sequentially through
numbers 0 - 9 in all of the character spaces on the LCD display. If a CRT is
connected, the color test is displayed on the screen.
If you selected the <KYBRD> test, press any of the function buttons on the SP19, any of the keys on the ASCII keyboard (if connected), or other peripherals
such as the Macro Extension Keyboard. If the key is in working order, it is
displayed on the LCD display.
4. Exit and return to the main menu by pressing [MENU].
Disk operations
There are 2 disk operations available:
Load image - which is used to upgrade the software.
Load CF - which loads the configuration recorded on the diskette.
Upgrade software
1. Use the arrow keys to select <DISK OP>.
2. Use the arrow keys to select <LOAD IMF>.
3. Press [ENTER]. A list of the Service Tools image file, the system image file,
and the text file are displayed. A right arrow sign designates files selected for
loading (→). See below for selection/deselection of files.
4. Press [ENTER]. The files are loaded. The LCD display shows the progress of
the loading process.
5. When the load is complete, the display shows < BURN > and. Press [ENTER].
6. When the “burn” is complete, press [MENU] to return to the
Service Tools menu.
7. Select <RUN> and cold start the system.
Page 7

Service Tools Menu & Displays
Compulite R&D SP-19
5
Select/deselect files
1. Toggle the load designation arrow by pressing [↑] or [↓] until the file is on the
upper row of the display.
2. Press the left or right arrow key to deselect or select a file.
Load configuration
1. Use the arrow keys to select <DISK OP>.
2. Use the arrow keys to select the <LOAD CF>. The configuration files on the
diskette are now displayed.
3. Use [↑] or [↓] to select the configuration file. When it is selected, it is the only
file displayed. The file is displayed with the date on which it was recorded and
text, if present.
4. Press [ENTER].
5. Select <STORE>.
6. Cold Start the system. See Cold Start, page 3
System version
This option accesses the information displayed on the initial page of Service Tools.
1. Use the arrow keys to select <SYS VER>.
2. Press [ENTER].
3. Use [↑] or [↓] to scroll through the information.
4. Exit and return to the main menu by pressing [MENU].
Page 8

Main Menu & Displays
SP-19 Compulite R&D
6
Main Menu & Displays
The Main menu contains the following functions:
• GO - give a go command to the A/B crossfader.
• HOLD - give a hold command to the A/B crossfader.
• RSTR - restart the show from the first memory.
• LOAD - load a show from the diskette.
• CTLR - access controllers to change a controller level or view one of the 3 different
controller displays.
• MAC - access the macro list to view or operate macros.
The Main menu display looks like this:
Figure 2 - Main menu
Giving a Go command
Give the Go command to the A/B crossfader. There is no multifade option available on SP-
19.
1. Press [MENU] until the Main menu is displayed. <GO> is the default selection.
2. If <GO> is not bracketed, use the arrow keys to select. If <GO> is selected skip
this step.
3. Press [ENTER]. A crossfade is initiated on the A/B x-fader. When viewing A/B
X-fader display, the status is shown as <RUN>. See Figure 3.
<GO> HOLD RSTR
L
O
AD
C
TRL MA
C
Page 9

Main Menu & Displays
Compulite R&D SP-19
7
Giving a Hold command
Give the Hold command to the A/B crossfader.
1. Press [MENU] until the Main menu is displayed.
2. Use the arrow keys to select <HOLD>.
3. Press [ENTER]. The crossfade on the A/B X-fader halts, regardless of the
progression of the fade. This may be viewed on the A/B X-fader display. When
viewing A/B X-fader display, the status is shown as HOLD.
Figure 3- A/B crossfade display
This display shows the memory on A, the memory on B, the status of the crossfader (run or
hold), and the outp ut level of the x-fader. If the cr ossfader is running this will, of course, be
constantly changing.
Press [MENU] to toggle between the Main menu and the A/B X-fader display.
Rstr
This function restarts the show from the first memory.
1. Press [MENU] until the Main menu is displayed.
2. Use the arrow keys to select <RSTR>.
3. Press [ENTER]. The first memory is faded to the A/B crossfader.
A - #% RUN B - #%
Output Level
x-fader A
X-Fader status
Output Level
x-fader B
Memory on A
Memory on B
Page 10

Main Menu & Displays
SP-19 Compulite R&D
8
Load
This function accesses the diskette and allows you to load a new show.
If you are controlling the SP -19 using only the front panel keys, it is not possible to load a
show whose configuration is different than SP-19’s current configuration.
Always record your configuration files and load them before loading a show file. (See Load
configuration, page 5)
1. Press [MENU] until the Main menu is displayed.
2. Use the arrow keys to select <LOAD>.
3. Press [ENTER]. The files on the diskette can be viewed on the LCD display.
4. Use [↑] or [↓] to select a show file.
5. Press [ENTER].
WAIT
followed by asterisks is displayed while the show file is
being loaded. When the load is complete
DONE
is displayed.
6. Press [MENU] to return to the Main menu.
7. Use the <RSTR> function to assign the first memory to A/B and begin your
show.
8. If your show does not begin from the first memory, execute the macro you have
prepared to start the show from a memory other than the first.
Page 11

Main Menu & Displays
Compulite R&D SP-19
9
Ctrl
This function accesses the controllers. You can view and change the controller levels,
examine memory assignments on controllers, and examine chaser assignments.
There are 3 different controller displays. You can view the level of the all of the controllers,
selected controller s, running chasers, and memory assignments on controllers.
View controller levels
1. Press [MENU] to toggle to the Main display.
2. Use the arrow keys to select <CTRL>. The controller levels are now displayed.
5 controllers are displayed at a time.
3. Use [
] and [
] to view the next or previous controllers.
Figure 4 - Controller levels
Change controller levels
1. Press [MENU] until the Main menu is displayed.
2. Use the arrow keys to select CTRL.
3. Press [ENTER]. The display now shows five controllers and their current
levels.
4. Use the arrow keys to select a controller. If you want to display only the
selected controller, press [ENTER]
5. Press and hold down [↑] or [↓]. The changing controller level is shown on the
LCD display.
<1> 2 3 4 5
Controller
number
Controller
level
Page 12

Main Menu & Displays
SP-19 Compulite R&D
10
View running chasers
1. Press [MENU] until the Main menu is displayed.
2. Use the arrow keys to select CTRL.
3. Press [ENTER]. The controller level display is now on view.
4. Use the arrow keys to select a controller.
5. Press [ENTER] again.
Figure 5 - running chasers
C #% SOFT RT ##
# #
#
Controller
number
Chase mode
Chase rate
Controller
output level
Last memory
First memory
Page 13
Main Menu & Displays
Compulite R&D SP-19
11
View type of controller assignment
1. Press [MENU] until the Main menu is displayed.
2. Use the arrow keys to select <CTRL>.
3. Press [ENTER]. The display now shows five controllers and their current
levels.
4. Use the arrow keys to select a controller.
5. Press [ENTER]. The type of assignment on the selected controller is
displayed.
Assignments are:
MEM - memory
GRP - a group of channels/spots
SUB - a submaster assignment
EFF - an Effect assignment
Figure 6 - Type of controller assignment
Mac
Select and operate Macros.
1. Press [MENU] until the Main menu is displayed.
2. Use the arrow keys to select <MACRO>.
3. Press [ENTER]. The Macro list is now displayed.
4. Use the arrow keys to select a Macro.
5. Press [ENTER] to operate the selected Macro.
C # MEM #
%
TEXT
Controller
number
Type of
assignment
Memory
number
Controller
output level
Memory text
Page 14

Starting Your Show
SP-19 Compulite R&D
12
Starting Your Show
Playback after warm start
When you Warm Start the system, your show comes on at the same point it was when you
powered down.
If you want to continue the playback from that point:
1. Select <GO>.
2. Press [ENTER].
If you want to begin at the first memory, use the RSTR function. (See Rstr, page 7)
Auto Run function
Auto Run is a special function to fa cilitate loading a new show and having it start running as
soon as the load is complete.
To configure your system for this functio n go to Service Too l s/System
Configuration/Special Functions and toggle NOVRAM bit V Auto Run to ‘Yes’. (See
User’s Guide appendix on Service Tools)
For the show to load automatically, the show file must be named 999.9.
For the show to start running automatically it must contain Macro 999. Macro 999 must
give a command to start the show. Example: [MEMORY #] [GOTO].
1. Insert a diskette containing show file 999.9 into the disk drive.
2. Press and hold down any 2 function buttons.
3. Turn on the power switch.
4. Release the two buttons you have been holding.
5. If <RUN> is not selected, use the arrow keys to select it.
6. Press [ENTER]. <COLD> and WARM displayed. The default selection is
<COLD>, which is bracketed.
7. Press [ENTER]. Show 999.9 is automatically loaded.
If the show contains Macro 999 that gives a Go command, the show starts
running immediately. The A/B X-fade exam is now displayed.
If the show does not contain Macro 999 that gives a Go command you must
start the show manually.
Page 15

Editing Using the Text Keyboard
Compulite R&D SP-19
13
Editing Using the Text Keyboard
You can edit channels and record memories with channels on SP-19, using a text keyboard.
Most of the console keys are available.
The keyboard equivalents are:
a - Text
b - not used
c - Channel
d - Page Down
e - Effect
f - Full
g - Mask
h - Help
i - Teach Macro
j - Move Fade (not valid for Spar k)
k - Link
l - Loop
m - Menu
n - Snap
o - On
p - Part
q - Memory
r - Rem Dim
s - Store
t - Time
u - Page Up 2 (not valid for Spark)
v - (not used)
w - Wait
x - Exam
y - (not used )
z - Zero
E - Event
F - Frame
S - Status
T - SMPTE
Esc - Reset
@ - intensity
^ - Except
Bs - CE
spacebar - Clear
% - Flash
& - +1 store
> - →
Tab - Stage
Del - Erase
A - Step Up
B - Step Dn
D - Delta
P - Spot
R - Release
Page Up - Page Up
Page Down - Page Dn
The alphanumeric keyboard has a lock to prevent unintentional editing. Unlock the
keyboard for editing functions by pressing ALT A again. Activate the lock by pressing
ALT A again.
Page 16

Programming the Show
SP-19 Compulite R&D
14
Programming the Show
The controllers on SP-19 are forced to Full (FL). It is expedient, when beginning
programming, to put all of your controllers to Full, mimicking SP-19. This will give you a
clearer picture of the real playback moves. You might discover, for instance, that you need
macros that fade down controllers or that it is useful to assign some controllers as upper or
lower bank Submasters.
Before recording your show press [MENU] and make sure that you see the Main Menu list.
If you have left the Macro menu open, the Soft key mode is forced to macro and you will
not be able to use your controller assignments.
Since the SP-19 default is MIDI ON. You may want to program a Macro for MIDI OFF.
 Loading...