

Sparc SHD-TX2 Quick Start Manual
SPARC
SPARC SHD-TX2 QSG --- V010.05 --- QSG SHD-TX2 SPARC
SPARC
1
ENGLISH
SPARC SHD-TX2
Quick Start Guid e
The HD Radio™ Experience: Here. Now. Everywhere. | Go ahead and get started.
Your SPARC SHD-TX2
Your SHD-TX2 is a high-quality transportable radio offering the most advanced r adio reception
technology—HD Radio™ Technology. Your SHD-TX2 offers these features:
CD-like sound quality for FM | FM-like sound quality for AM
New broadcast channels and content, not avail able on a tr aditional AM/FM radio
Advanced programming information, such as Artist and Song Title
Advanced features, such as Emergency Alerts for weather, civil, and police warnings and Voice
Assist for confirmation of button control
AC or Battery Operation (batteries are not included)
Programmable Sleep Timer
International Tuning
Multilingual User Experience: English, French, Spanish, Portuguese
*NOTE: Out of the b ox , Emergency Alerts Monitoring and Voice Assist are set to OFF.
To learn more about SPARC Radios, go to www.sparcradio.com.
To learn more about H D Radio Technology, go to www.hdradio.com.
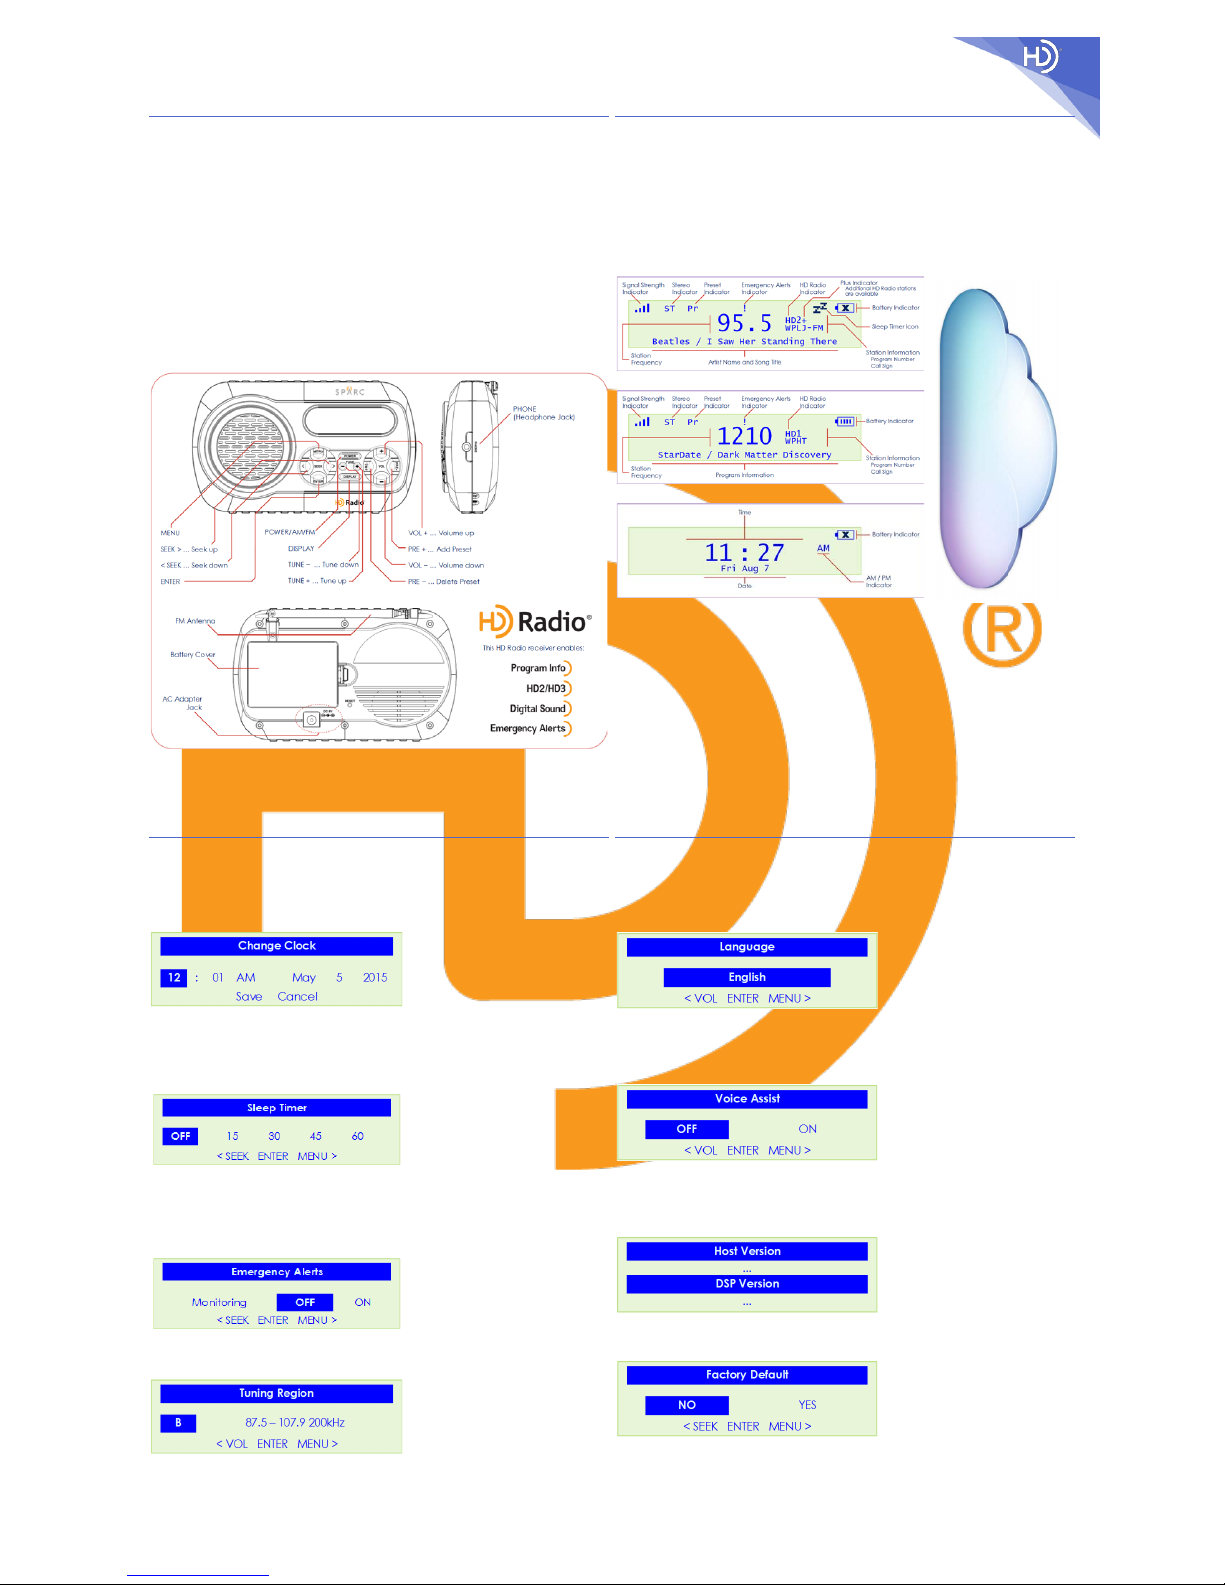
SPARC SHD-TX2: Controls and Connections
SPARC SHD-TX2
HD Radio Technology™
The HD Radio™ Experience: Here. Now. Everywhere. | Go ahead and get started.
Your SPARC SHD-TX2
Your SHD-TX2 tunes both traditional analog AM/FM an d new HD Radio digi tal Br oad c as ts. In digi tal
mode, soun d quality is improve d, new b roadcast streams (stations) , not available in analog, are
available , and advanced programming information such as Artist and Son g Title can be displayed. To
find new digital stations, go to www.hdradio.com/stations.
Primary (HD1) signals are rec eived in both analog and digital. If the digital signal is lost, the Radio will
automatically blend to the analog signal and continue to play. However, when receiving the new
additional digital signals (HD2/HD3), there is no analog signal: if the digital HD2/HD3 signal is l o st, the
Radio will mute to silence. If this happens, y ou can wait for the digital HD2/HD3 signal to return or
simply tune to another station.
FM Radio Mode (HD Ra dio Display)
AM Radio Mode (HD Radio Display)
Clock Screen (Display)
HD Radio Signal Rec eption
Reception is improved when the Radio is near windows and outside (perimeter) walls. The antenna
should be extended fully and oriented for best reception. Electrical devices like appliances, computers,
smartphones, light fixtures, light dimmers, motors, etc. may interfere with reception.
Your SHD-TX2 is equipped with an external, extendable FM antenna. Take care not to bend or break the
antenna while moving it.
The headphones serve as the FM antenna (but, only when they are plugged in).
Your SHD-TX2 is also equipped with an internal AM antenna. Re-positioning the Radio may improve
reception in AM Radio Mode.
AC P ower Supply
The AC power supply may interfere with HD Radio signal reception: uncoil the power cord and keep the
power supply away from the antenna.
SPARC SHD-TX2
Access and View the Menus | Screens
The HD Radio™ Experience: Here. Now. Everywhere. | Go ahead and get started.
MENU
Press the MENU button to access and view the menus or screens with their options and settings.
Change Clock | Sleep Timer | Emergency Alerts | Tuning Region
Change Clock Me n u
Press MENU to access and view the “Change Clock” menu.
Press <SEEK or SEEK> t o move the highlight to one of the options: HOURS, MINUTES, AM or PM, MONTH,
DAY, and YEAR.
Press VOL+ or VOL− to change th e option’s setting.
Move the highlight to the “Save” or “Cancel” option: press ENTER to save (or cancel) setting s.
Sleep Timer Menu
Press MENU to access and view the “Sleep Timer” menu.
The Sleep Timer can be set to power off the Radio after a certain interval of time.
Observe the following options: Off, 15 minu tes, 30 minutes, 45 minu tes, or 60 minutes.
Use SEEK to cycle through the options, use ENTER to confirm the set ting, and use MENU to cancel.
Powering off the Radio cancels the sleep timer.
Emergency Alert s Scr een
NOTE: Out of the box, the Emergency Alerts Monitoring feature is set to OFF .
Look for the section named: “Exploring Emer g e n cy A l erts”.
Tuning Region Menu
Press MENU to access and view the “Tuning Region” menu.
Press VOL+ or VOL− to change th e Tuning Region setting.
Press ENTER to save the Tuning Region setting.
SPARC SHD-TX2
Access and View the Menus | Screens
The HD Radio™ Experience: Here. Now. Everywhere. | Go ahead and get started.
MENU
Press the MENU button to access and view the menus or screens with their options and settings.
Language | Voice Assist | Version Number | Factory Default
Language Menu
Press MENU to access and view the “Language” menu.
Press VOL+ or VOL− to change th e language setting that appears.
When your language appears: press ENTER to save the Language setting.
Available languages: English, French (Français), Spanish (Español), and Portuguese (Português).
Voice Assist Menu
Press MENU to access and view the “Voice Assist” menu.
Press <SEEK or SEEK> t o move the highlight to one of the options: “OFF” or “ON”.
Press ENTER to save the Voice Assist setting .
NOTE: Out of the box, Voice Assist is set to OF F.
Version Number Screen
Press MENU to access and view the “Version Number” screen.
Radio will show the Host Version and the DSP Version.
Factory Default Menu
Press MENU to access and v iew the “Factory Default” menu.
Press <SEEK or SEEK> t o move the highlight to one of the options: “YES ” or “NO”.
Selecti ng “YES” will re s tore the radio to the initial factory settings.
Press ENTER to save the Factory Def au lt setting.
ENGLISH
Download your Owner’s Manual
from
www.sparcradio.com.
SPARC
SPARC SHD-TX2 QSG --- V010.05 --- QSG SHD-TX2 SPARC
SPARC
2
ENGLISH
SPARC SHD-TX2
Exploring Emer genc y A lerts
The HD Radio™ Experience: Here. Now. Everywhere. | Go ahead and get started.
What are Emergency Alerts?
Emergency Alerts (EA) is a warning s y stem used by broa dcaste rs to notify liste ners ab out potential
hazardous situations related to extreme weather, floods, infrastructure failures, amber alerts (child
abductions), and more.
The Radio must be in an HD Radio signal-reception environment so that it can receive the audio and
data services from a station that broadcasts the Emergency Alerts.
NOTE: Out of the box, the Emergency Alerts Monitoring feature is set to OFF.
When Emergency Alerts Monitoring is ON, the Radio will present the listener with audio and text-based
alerts; and, the alerts can even awaken the Radio from a standby mode.
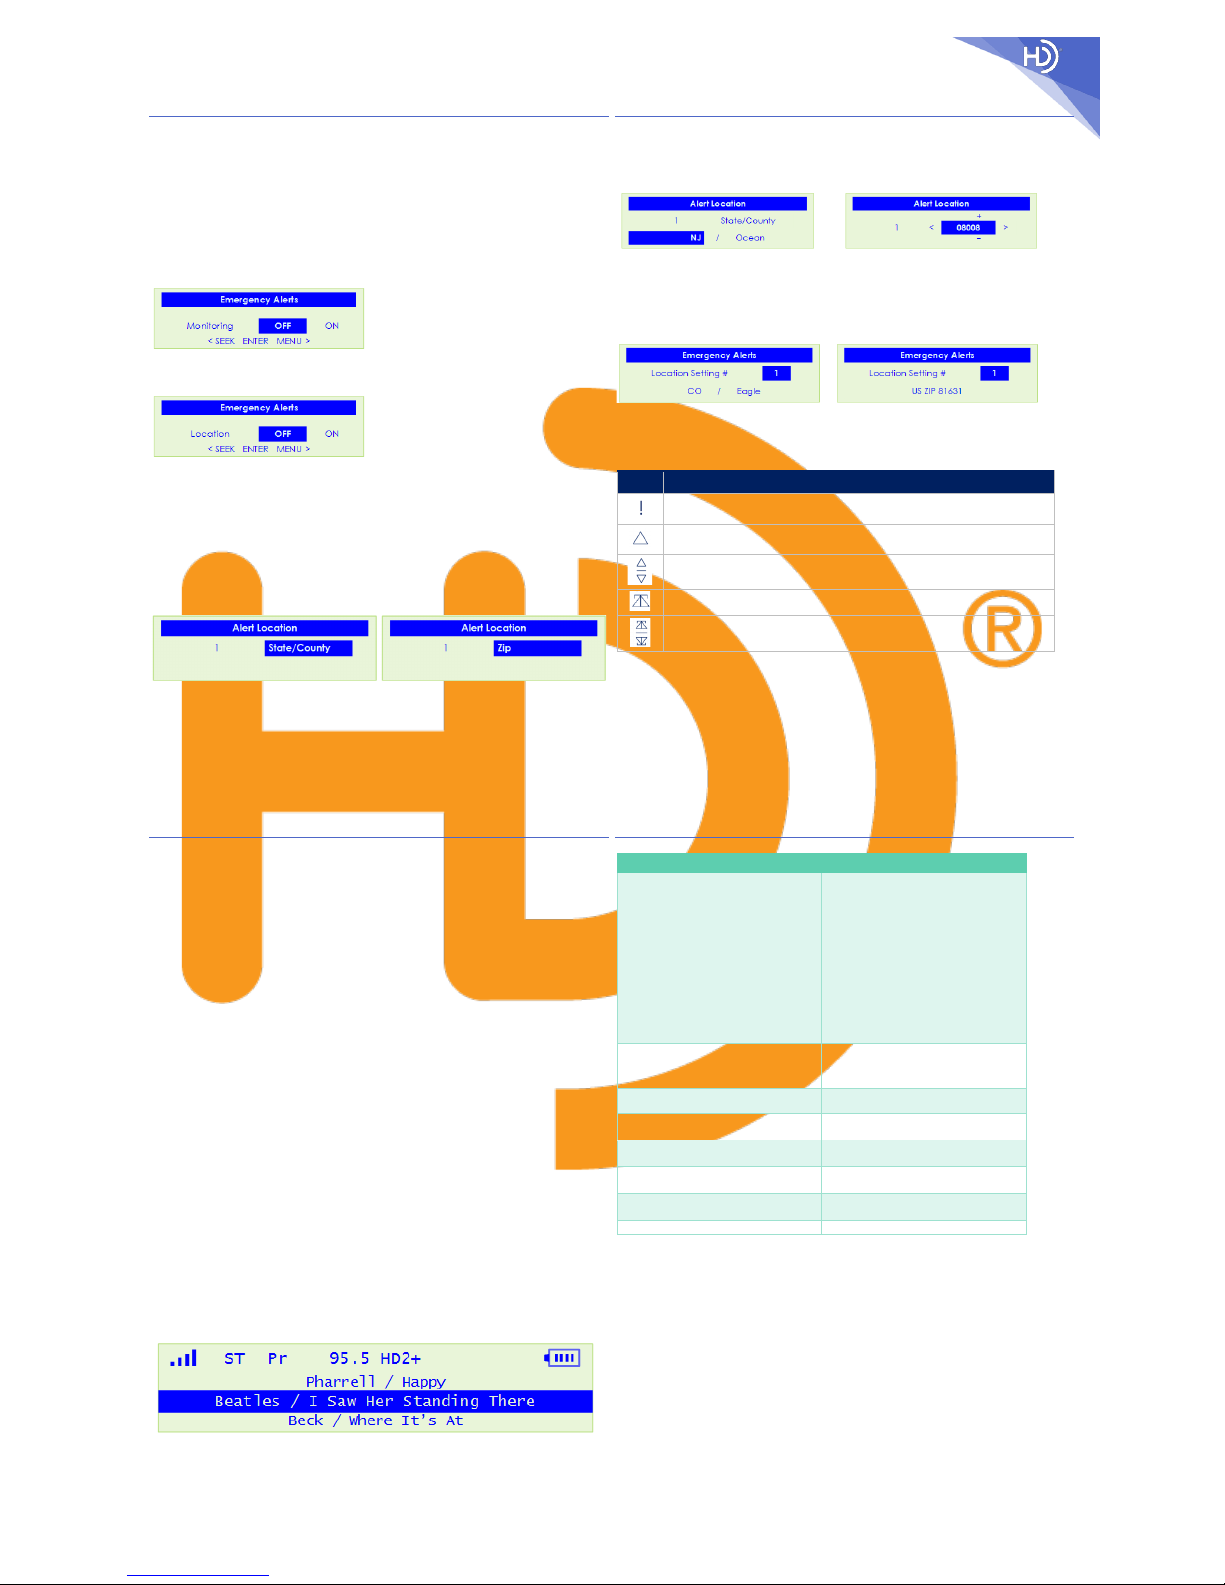
Selecting and Changing the Settings for Emergency Alerts
Press MENU to access and view the “Emergency Alerts” screen.
Press SEEK to change the setting for Emergency A l e rts Monitoring.
Press ENTER to save the choice: “On” or “Off”.
Observe the Emergency Alerts Location screen (Location setting).
Press SEEK to highlight the setting for Loc at ion : “On” or “Off”.
If you choose to have the Location setting as “Off”, then all of the alerts that are broadcast within the
Radio’s range will be received. By default, the Location setting in the Location screen for the
Emergency Alerts feature is “Off”.
If you choose to have the Location setting as “On”, then press ENTER after highlighting “ON”.
There are advantages to enabling EA locations in your Radio’s memory. For example, when the setting
for Location is enabled (“On”) and when various locations are defined in the broadcast signal but none
of your locations match any of the locations in the broadcast signal, then the Radio will not display text
alerts (and the alerts will not awaken the Radio from standby mode).
Thus, your Radio will process and present only those alerts that are relevant to your area.
The options for Alert Location include:
State/County Zip
Press VOL+ or VOL− to change the option for Aler t Location.
Press ENTER when your Alert Location option appears.
SPARC SHD-TX2
Exploring Emer genc y A lerts
The HD Radio™ Experience: Here. Now. Everywhere. | Go ahead and get started.
Selecting and Changing the Settings for Emergency Alerts
If State/County was selected:
Observe a state/county in the Alert Location
screen.
Press VOL+ or VOL− to change th e State.
Press ENTER to save.
Press VOL+ or VOL− to change th e County.
Press ENTER to save.
If Zip was selected:
Observe a US Zip code in the Aler t Location
screen.
Press VOL+ or VOL− to change th e active digit
(±).
Press <SEEK or SEEK> to move the (±) to the next
digit.
Continue to change all of the digits in the Zip.
Press ENTER to save.
Return to the Emergency Alerts Location screen which shows the saved State/County or the saved Zip.
or
Ten (10) EA Locations can be saved in your Radio’s memory.
Press VOL+ or VOL- to scroll through your saved EA Locations.
Press-and-hold the MENU button to return to Radio Mode.
Emergency Alerts (EA) Icon Guid e
Icon Icon Description
Emergency Alerts Monitoring is OFF
Solid: Indica te s that the station supports E me rgency Alerts
Blinking: Indicates that a received Emergency Alerts Message has been ignored
Alternating u p-down: Indicates that a received Emergency Alerts Message has been snoozed
Blinking: Test Emergency Alerts message is OK and has been ignored
Alternating u p-down: Test Emergency Alerts message is OK and has been snoozed
Understanding the Emergency Alerts History
Once the Radio detects an aler t, it will so und an ale rt tone, dis play the alert category (such as
Weather, Hazmat, etc.), and scroll the alert text.
Press the DISPLAY button to view the “Emergency Alerts History”: use the SEEK buttons to scroll
through the history, which contains the five most recent Emergency Alerts.
To snooze the Emergency Alert (for 10 minutes), quick-press the DISPLAY button.
To ignore the Emergency Alert (for 12 hours), press-and-hold the DISPLAY button.
SPARC SHD-TX2
Controlling the Radio with the Buttons
The HD Radio™ Experience: Here. Now. Everywhere. | Go ahead and get started.
POWER
Quick-press the POWER button to change from one tuning band to the other (AM to FM and FM to AM).
Power Off: Long press (press-and-hold) to “Power O ff”.
Power On: Long press (press-and-hold) to “Power On”.
Power Off with Emergen cy A l e rts Monitoring On: enables background scanning for Emerge n cy A lerts.
Power Off with Emergen cy A l e rts Monitoring O ff: extends battery life .
ENTER
Press to select a choice from the list or menu of options.
Press the ENTER button to save the settings and exit the menu.
MENU
Press the MENU button to access and view the menus or screens with their options and settings.
Press the MENU button to exit the menu without saving the settings.
While in any menu, press-and-hold the MENU button to exit.
TUNE+ and TUNE−
Press to tune up or down the broadcast band: your Radio will stop tuning at each station possibility.
SEEK DOWN (<SEEK) and SEEK UP (SEEK>)
Press to find next or previous “strong signal” station: use these buttons to access the “strong-signal”
stations in a given b roadcas t area.
Press <SEEK or SEEK> to highlight one of the options in the menu.
PRE+ and PRE− (Preset Stations)
Press-and-hold PRE+ to save the current station as a preset.
Press-and-hold PRE− to delete a previously stored preset.
Quick press PRE+ or PRE− to scroll through to the next or previous preset.
VOL+ and VOL−
Quick-press to adjust the volume in small increments.
Press-and-hold to adjust the volume continuously.
Press VOL+ or VOL− to change th e setting or value for the option in the menu.
DISPLAY
Press the DISPLAY button for Radio Displ ay Mod e , for Clock Display Mode , or for the Emergency Alerts
History (if alerts hav e occu r red).
If your Radio is tuned to an HD Radio station, press the DISPLAY button to view the HD Radio Station
Guide.
The HD Radio Station Gui de showcase s th e HD Radio programs th at the station is broadcasting.
SPARC SHD-TX2
Specifications
The HD Radio™ Experience: Here. Now. Everywhere. | Go ahe ad and get started.
Performance Parameters Specifications
International Tuning Regions
(AM/FM)
Frequency Ranges
Frequency Step Sizes
AM/FM Tuning Regions
Region A (Philippines, Romania):
FM: (87.5 – 108.0 MHz), 100 kHz
AM: (522 – 1620 kHz), 9 kHz
Region B (US, Mexico, Canada ):
FM: (87.5 – 107.9 MHz), 200 kHz
AM: (530 – 1710 kHz), 10 kHz
Region C (SE Asia):
FM: (87.5 – 108.0 MHz), 50 kHz
AM: (522 – 1620 kHz), 9 kHz
Region D (Brazil):
FM: (76.0 – 108.0 MHz), 100 kHz
AM: (522 – 1629 kHz), 9 kHz
Languages Available
English (Default language is E nglis h)
French (Françai s )
Spanish (Es pañol)
Portuguese (Português)
Number of Preset Stations that can be
Stored
Unlimited
Headphone Jack Type
3.5-mm, 1/8 -inch
(Headphones are not included)
Display Type
Daylight R e adable Monochro me LC D
(128 pixels by 32 pixels)
AC Adapter (Included)
Input: 100 to 240 VAC, 50/60Hz
Output: 5.98 VDC, 1 A
Battery Type and Quantity
AA-size alkaline / Three (3)
(Batteries are not included)
Speaker Output Power
1.85 watts
WARRANTY
90-day Limited Warranty | For details, visit www.sparcradio.com.
COPYRIGHT & TRAD EMA R KS
HD Radio Technology manufactured under license from iBiqu ity Digital Corporation.
U.S. and Foreign Patents apply.
HD Radio™ and the HD, HD Radio, SPARC™, and “Arc” logos are proprietary trademarks of iBiquity
Digital Corporation.
COMPLIANCE
This device complies with Part 15 of the FCC Rules.
Operation of this product is subject to the following two conditions:
[1] this device may not cause harmful interference, and
[2] this device must accept any interference received, including interference that may cause undesired
operation.
This Class B digital apparatus complies with Canadian ICES-003.
ENGLISH
 Loading...