


AUTO
PUMP
HEATER
AIR
ON
<TEMP SET>
HOLD BUTTON
TO ADJUST
PRESS BOTH
TO READ ACTUAL
HEATHEATHEATHEAT
PUMP
AUTO
AUTO
AIR
PUMP
AUTO
AUTO
AIR
ONON
User’s GuideUser’s Guide
Models Covered ByThis User’s Guide :
SP601-15
SP601-15T
SP601AU-15
SP601AU-15T
SP601-20
SP601-20T
SP601AU-20
SP601AU-20T
SP601-30
SP601-30T
SP601AU-30
SP601AU-30T
SP400P
SP400PAU-10
SP400PAU-15

Contents
1 Touch Pads......................................................................................................................................... Pg 1
2 Temperature Control............................................................................................................................ Pg 2
2.1 - Adjusting Set Temperature............................................................................................... Pg 2
2.2 - Non Default Display Value............................................................................................... Pg 2
2.3 - Heating Mode Selection(24hr circulation pump not fitted)............................................... Pg 2
3 Pump Operation.................................................................................................................................. Pg 3
3.1 - Pump 1 (Single speed pump, no 24hr circulation pump fitted)........................................ Pg 3
3.2 - Pump 1 (Single speed pump, 24hr circulation pump fitted)............................................. Pg 3
3.3 - Pump 1 (Two speed pump,no 24hr circulation pump fitted)............................................ Pg 4
3.4 - Pump 1 (Two speed pump, 24hr circulation pump fitted)................................................ Pg 4
4 Auxiliary/Air Button.............................................................................................................................. Pg 5
4.1 - Adjustable Speed Mode(SPVSB only)............................................................................. Pg 5
5 Light Operation.................................................................................................................................... Pg 6
5.1 - Adjustable Colour Mode(SPVCL only...............................................................................Pg 6
5.2 - IndicatorLlight................................................................................................................... Pg 6
6 Auto Sanitisation.................................................................................................................................. Pg 7
6.1 - No 24hr Circulation Pump Fitted...................................................................................... Pg 7
6.1.1 - Adjusting Minimum Filtration...........................................................................Pg 7
6.1.2 - Clean Up Cycle.............................................................................................. Pg 7
6.2 - 24hr Circulation Pump Fitted........................................................................................... Pg 7
6.3 - My Spa Is Too Hot In Summer......................................................................................... Pg 7
7 Sleep Timer......................................................................................................................................... Pg 8
7.1 - To Set Current Time And Day........................................................................................... Pg 8
7.2 - To Set Programs...............................................................................................................Pg 8
8 Self Diagnostic Error Codes................................................................................................................ Pg 9
Section
HEATHEAT
PUMP
AUTO
AIR
PUMP
AUTO
AIR
ONON
AUTO
PUMP
HEATER
AIR
ON
<TEMPSET>
HOLDBUTTON
TOADJUST
PRESSBOTH
TOREAD ACTUAL
The green Pump indicator light will appear on the touch padwheneverthepumpisrunning,inboth
auto and manual use mode. If this light is flashing, the spa is in Sleep Mode.
Pump LED
The red Heater indicator light will appear on the touchpad whenever the heater element is on, in
both auto and manual use mode. For safety the heater is always automatically controlled.
Usually switching on the air blower accessory will cause the heater to switch off (loadshedding).
This is inorder to keep the totalpower load to a safelevel. If this light isflashing the system hasan
error
Heat LED
(see section8).
H20 LED (24hr circulation pump fitted)
The yellow H20 light indicates if waterispresentintheheater. Ifnowaterisdetectedthenthe LED
will flash and the unit will not operate except to run the circulation pump to try to get water to the
heater. If no water reaches the heater for one minute then an H20 error will occur. If this happens
then pushing the pump button will run the circulation pump for another minute.
Page 1
Congratulations on choosing the latest Spa Power control system. This
controller makes use of the latest technology, including innovative optical and
digital sensor designs. The greater variety of optional accessories, userfriendly touchpad and reliable components provide you with the most
sophisticated controller in its class.
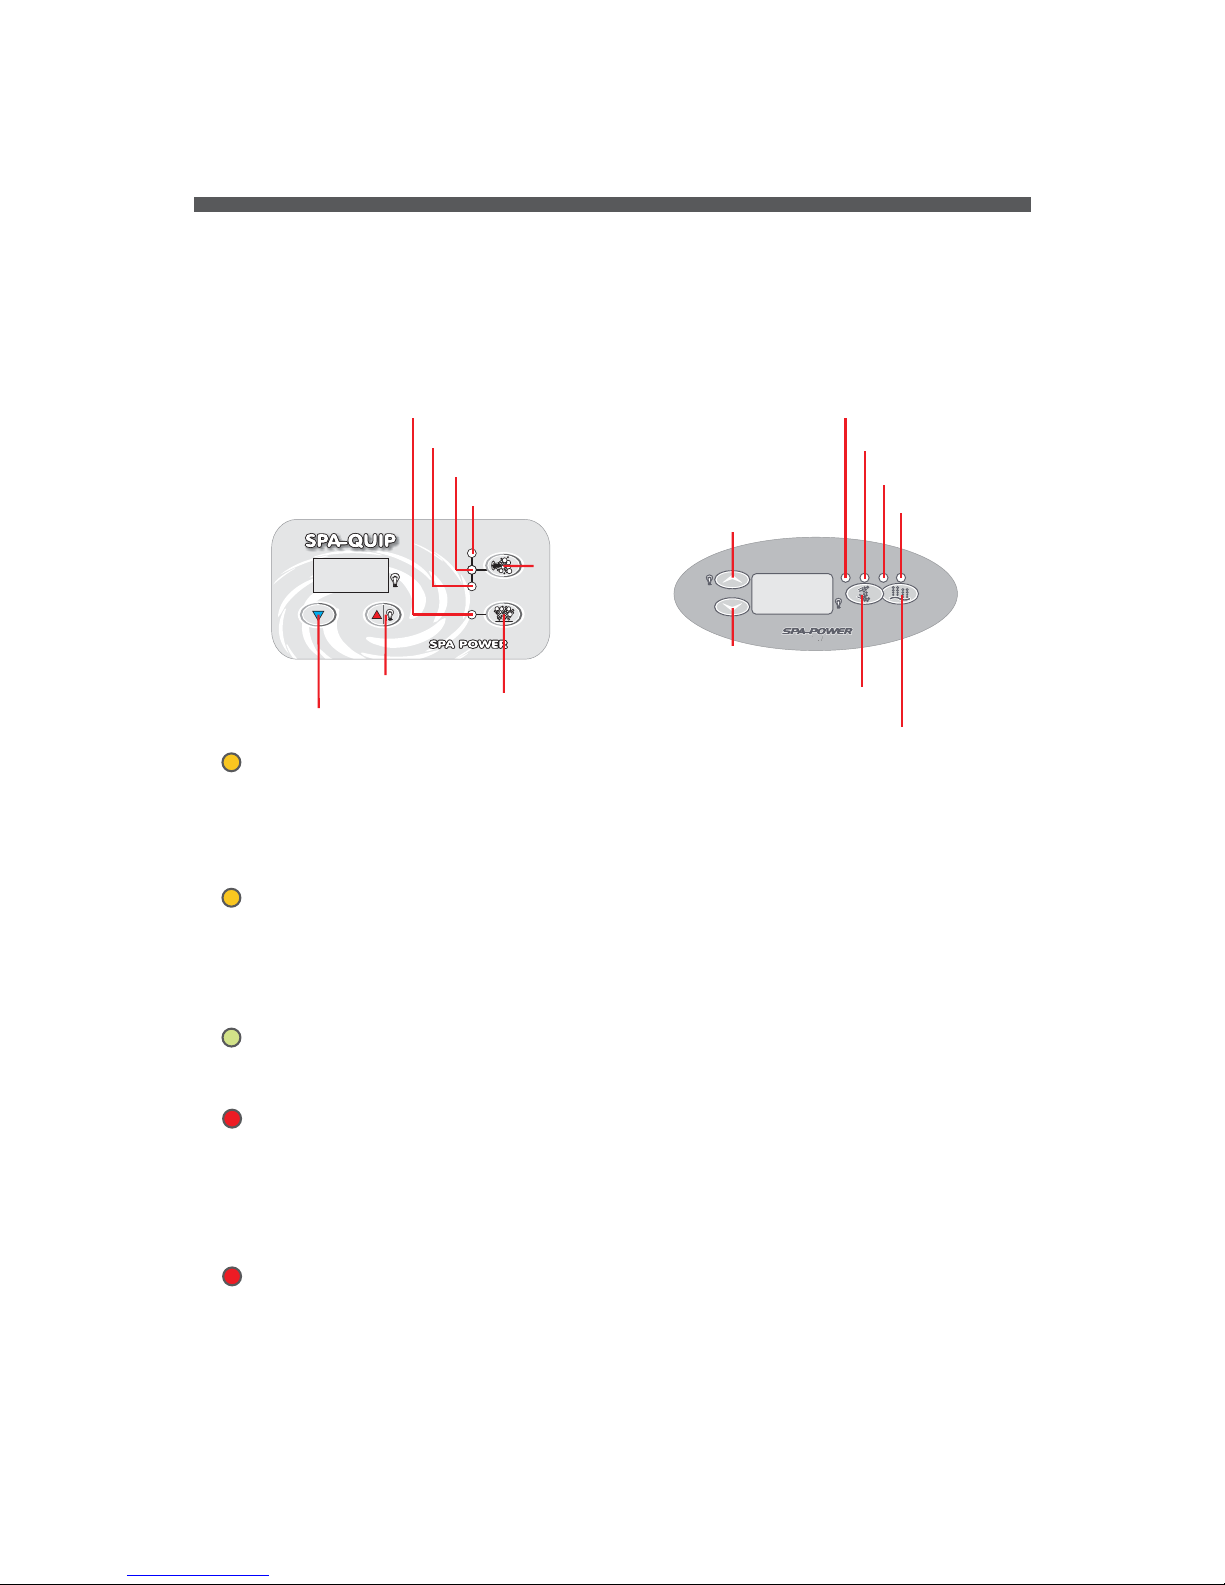
Heat LED
Pump LED
Auto/H20 LED
Aux/Air LED
Aux/Air/Pump Button
Up Button
Down Button
Heat LED
Pump LED
Auto/H20 LED
Aux/Air LED
Pump Button
Pump Button
Aux/Air/Pump Button
Up Button
Down Button
37.0
1 Touch Pads
Auto LED (No 24hr circulation pump fitted)
The yellow Auto indicator light will appear on the touch pad whenever the system is in full
automatic control mode. In this mode the system automatically activates the pump and heater to
filter the water and maintain the set water temperature. If this light is flashing the water sensor is
not detecting any water.
Aux/Air LED
The Aux/Air indicator LED will appear on the touchpad whenever the Aux/Air button is pushed
and conversly will disapear when the button is pushed again. Note: If the spa does not have a
load connected to the controller the LED will still operate as described above.
37.0
H
E
A
THEATH
E
A
THEAT
PU
M
P
PUMP
A
U
T
OAUTO
AIRAIR
PU
M
P
PUMP
A
U
T
OAUTO
AIRAIR
ONON
AUTO
PUMP
HEATER
AIR
ON
<TEMPSET>
HOLDBUTTON
TOADJUST
PRESSBOTH
TOREAD ACTUAL
H
E
A
THEATH
E
A
THEAT
P
U
M
P
PUMP
A
U
T
OAUTO
AIRAIR
P
U
M
P
PUMP
A
U
T
OAUTO
AIRAIR
ONON
AUTO
PUMP
HEATER
AIR
ON
<TEMPSET>
HOLDBUTTON
TOADJUST
PRESSBOTH
TOREAD ACTUAL
H
E
A
THEATH
E
A
THEAT
P
U
M
P
PUMP
A
U
T
OAUTO
AIRAIR
P
U
M
P
PUMP
A
U
T
OAUTO
AIRAIR
ONON
AUTO
PUMP
HEATER
AIR
ON
<TEMPSET>
HOLDBUTTON
TOADJUST
PRESSBOTH
TOREADACTUAL
Page 2
The Spa Power controller automatically controls the pump and heater to filter the water and maintain it at the
desired temperature set by the user (see below).The usercanleavethesystemtolookafterthespa and know it will
be at thecorrect temperaturewhenever he orshe wants to useit.
2 Temperature Control
2.1 Adjusting Set Temperature
UP Increase the set temperature by 0.5 C per beep (Max = 41.5 C)
oo
DOWN Decrease the set temperature by 0.5 C per beep (Min = 10.0 C)
oo
The Spa Power controller gives the user direct control of the pool temperature from the poolside control panel.
Holding down the Up or Down button will adjust the temperature set point as shown on the digital readout. There is
a slight delay before the buttons operate to reduce the risk of accidental adjustment. The pool temperature will be
maintained very closeto theset temperature.
The display normally shows the temperature set point, unless the optional in pool temperature sensor is fitted in
which case the sensed water temperature is displayed. In either case the temperature set point will be displayed
while being adjustedas describedabove.
Default Display
37.0
2.2 Non-Default Display Value
The non-default display value (either sensed water
temperature or temperature set point) can be checked if
necessary by pressingthe Up& Down buttonssimultaneously.
Press both buttons
simultaneously
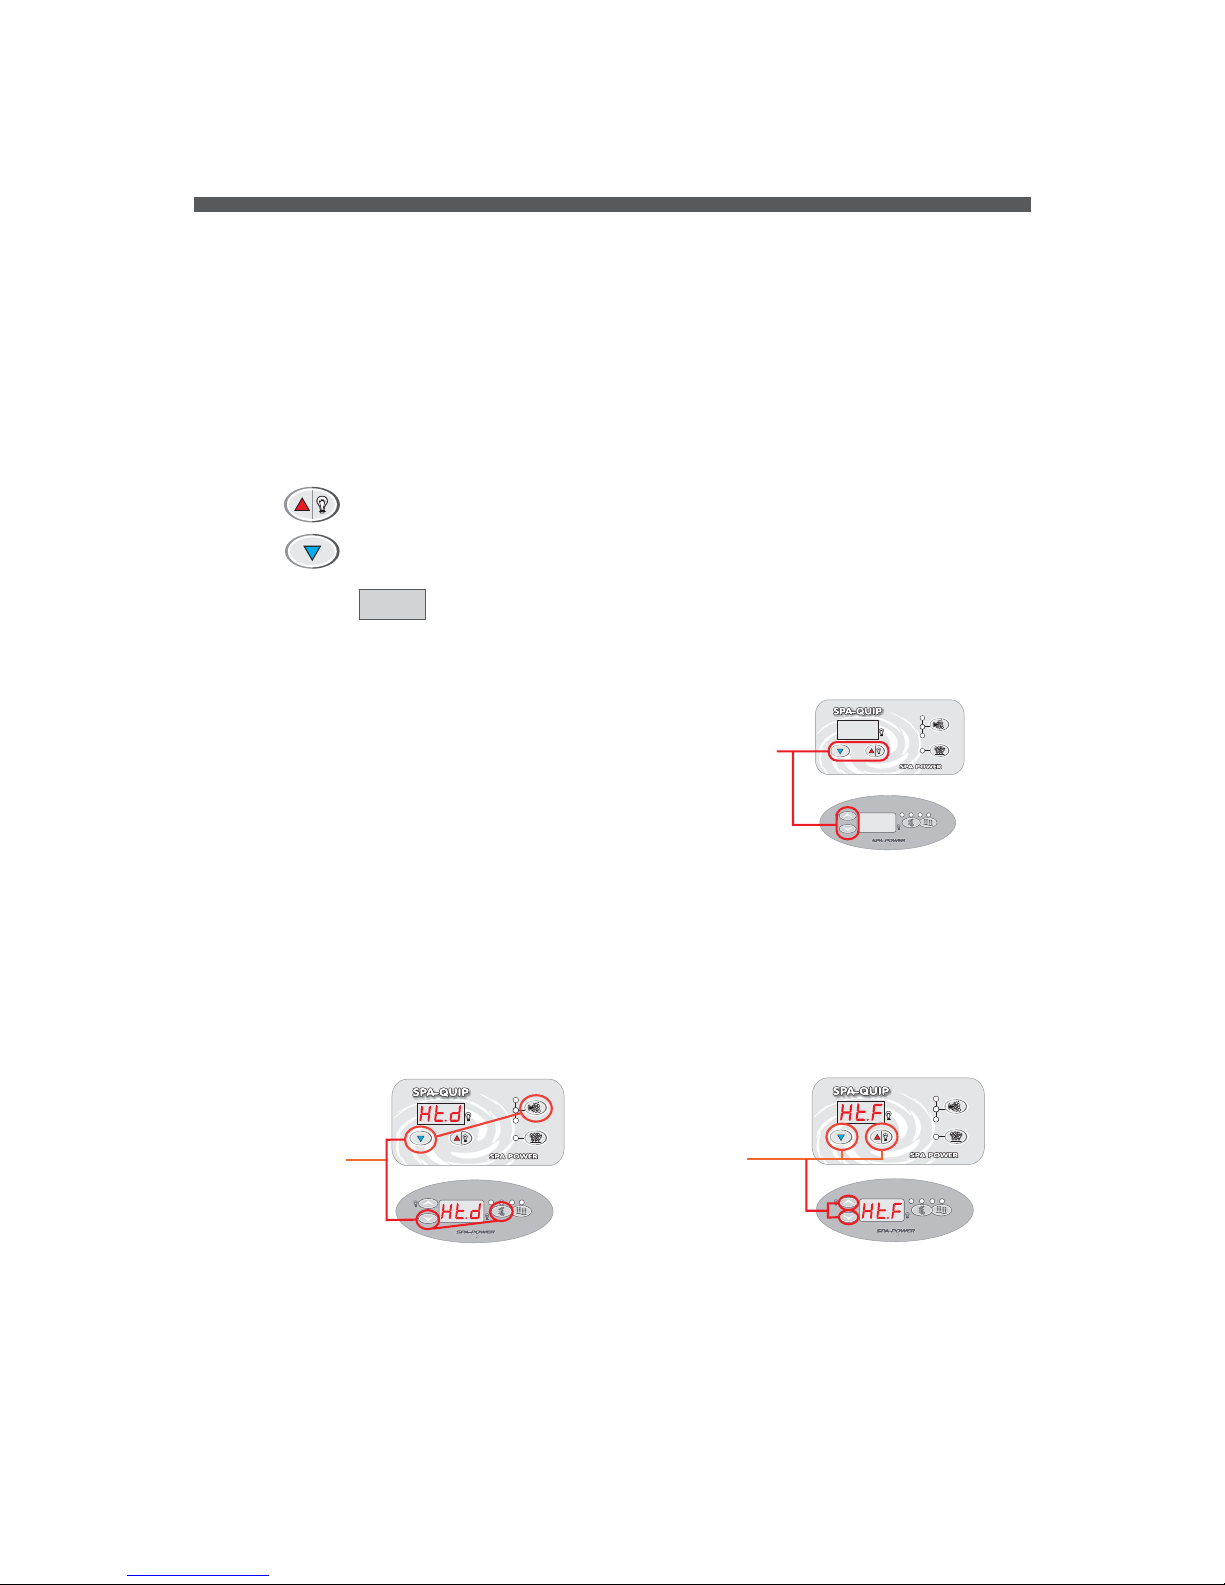
In addition to the temperature setting the user can select the preferred heating mode. The two available heating
modes are...
1/ Demand Heating (displayed as Ht.d).This is the default setting in which the pump and heater will come on
automatically whenever thetemperature dropsslightly below theset point.
2/ Filtration Only Heating (displayed as Ht.F).In thismode thepump andheater will come on automatically no more
than once per hour to filter and heat the water. This mode is provided as an option for those who prefer to limit the
natural cycling ofthe system.
To select the heating mode first press the Pump and Down buttons simultaneously to display the current heating
mode, then pressand holdthe Up orDown buttons to changemodes.
2.3 Heating Mode Selection (24hr circ pump not fitted)
Press both buttons
simultaneously
Press Up or Down
buttons to toggle
between heating
modes.
37.0
37.0

Push 3 (Auto Mode)
Push 1 (Pump on)
Push 2 (Pump off)
3 Pump Operation
Page 3
There are four possible variations of pump 1 that may have been fitted to your spa, this user guide covers all
variations of pump 1 that could have been fitted. Please read sections 3.1 through to 3.4 then follow the section
which matches your spa operation.
Note: Even if a 24hr circulation pump is fitted there is no button to control it. The 24hr circulation pump operation is
completely automatic, It only turns off in sleep mode (if optional time clock is fitted) or in an error condition.
Push 1 (Manual Mode)
Push 2 (Standby Mode)
HEATHEAT
PUMP
AUTO
AIR
PUMP
AUTO
AIR
PUMP
AUTO
AIR
PUMP
AUTO
AIR
HEATHEAT
PUMP
AUTO
AIR
PUMP
AUTO
AIR
PUMP
AUTO
AIR
PUMP
AUTO
AIR
HEATHEAT
PUMP
AUTO
AIR
PUMP
AUTO
AIR
PUMP
AUTO
AIR
PUMP
AUTO
AIR
Pump 1 is controlled by just one touch pad button pushing the pump button three times cycles its operation through
three modes Automatic, Manual and Standby. When the spa is running in automatic mode, pressing the pump
button will deactivate auto mode and set the pump running in Manual Mode. The auto LED is orange when auto
mode is enabled and off when in Manual Mode. When the pump is in standby mode all indicator LED's are off.
Pushing the pump button two times turns the pump on and then off. The pump LED is green when the pump is running and off
when the pump is off.
Notes:
1) If Pump 1is lefton, it willautomatically switchoff after 20minutes.
2) There is no direct user control over the heater. The heater may come on automatically whenever the 24hr
circulation pump ison.
3) If the heater element is on, running the pump may cause the heater to load shed and switch off. If this occurs the
heater will comeback onapproximately 5 secondsafter the pump isdeselected.
Notes:
1) If Pump 1 is left in ”Manual or “Standby” modes it will automatically revert to “Auto” mode after 90 minutes.
2) There is no direct user control over the heater. The heater may come on automatically whenever Pump 1 is on.
HEATHEAT
PUMP
AUTO
AIR
PUMP
AUTO
AIR
PUMP
AUTO
AIR
PUMP
H20
AIR
HEATHEAT
PUMP
AUTO
AIR
PUMP
AUTO
AIR
PUMP
AUTO
AIR
PUMP
H20
AIR
3.2 Pump 1 (Single speed pump, 24hr circulation pump fitted)
3.1 Pump 1 (Single speed pump, no 24hr circulation pump fitted)

3.3 Pump 1 (Two speed, no 24HR circulation pump fitted)
Page 4
Push 1 (Manual Low Speed)
Push 2 (Manual High Speed)
Push 3 (Standby Mode)
Push 4 (Auto mode)
HEATHEAT
PUMP
AUTO
AIR
PUMP
AUTO
AIR
PUMP
AUTO
AIR
PUMP
AUTO
AIR
HEATHEAT
PUMP
AUTO
AIR
PUMP
AUTO
AIR
PUMP
AUTO
AIR
PUMP
AUTO
AIR
HEATHEAT
PUMP
AUTO
AIR
PUMP
AUTO
AIR
PUMP
AUTO
AIR
PUMP
AUTO
AIR
HEATHEAT
PUMP
AUTO
AIR
PUMP
AUTO
AIR
PUMP
AUTO
AIR
PUMP
AUTO
AIR
Push 1 (Low Speed)
Push 2 (High Speed)
Push 2 (Pump off)
HEATHEAT
PUMP
AUTO
AIR
PUMP
AUTO
AIR
PUMP
AUTO
AIR
PUMP
H20
AIR
HEATHEAT
PUMP
AUTO
AIR
PUMP
AUTO
AIR
PUMP
AUTO
AIR
PUMP
H20
AIR
HEATHEAT
PUMP
AUTO
AIR
PUMP
AUTO
AIR
PUMP
AUTO
AIR
PUMP
H20
AIR
Pump 1 is controlled by just one touch pad button pushing the pump button 4 times cycles its operation through 4
modes Automatic, Manual Low Speed, Manual High Speed and Standby. When the spa is running in automatic
mode, pressing the pump 1 button will deactivate auto mode and set the pump running in Manual low speed. The
auto LED is orange when auto mode is enabled and off when in manual low speed or manual high speed. When
the pump is in standby mode all indicator LED's are off.
Notes:
1) If Pump 1 is left in ”Manual or “Standby” modes, it will automatically revert to “Auto” mode after 90 minutes.
2) There is no direct user control over the heater. The heater may come on automatically whenever Pump 1 is on.
3) If the heater element is on, running the pump in high speed may cause the heater to load shed and switch off.
Pushing the pump button three times cycles the pump through its two speeds then off. The pump LED is green
when the pump is running in low or high speed and off when pump is off.
Notes:
1) If Pump 1 is left on, it will automatically switch off after 20 minutes.
2) There is no direct user control over the heater. The heater may come on automatically whenever the 24hr
circulation pump is on.
3) If the heater element is on, running the pump in high speed may cause the heater to load shed and switch
off. If this occurs the heater will come back on approximately 5 seconds after the pump is deselected.
3.4 Pump 1 (Two speed, 24HR circulation pump fitted)

Page 5
TheAir Buttoncontrols anauxiliary airblower.It isused toturn theblower onand off, andselect different
operating modes if a SpaPower Variable-Speed Blower (SPVSB) has been fitted. 2 pushes (STD) or 4
pushes (SPVSB) of the airbutton cyclesthe blower as follows:
Note: In some spas an additionaljet pumpor pool light etc may be fitted instead of a standard air blower.
4 Auxiliary Air Button
Standard Air Blower (STD)
4.1 Adjustable Speed Mode (SPVSB only)
If a Spa Power Variable-Speed Blower is fitted, the spauser has the ability to adjust the blower speedto
any desired setting. The Up and Down buttons are used to set the desired blower speed. Note: If the
blower is in Full Speed or Oscillating modes then pushing the Up or Down button will put it into
Adjustable Speed mode and then adjustthe speed.
AIR
Light turns
to orange
Step 1) Press Air Button to set Adjustable Speed Mode
Step 2) Press Up to speed of blower
Step 3) Press Down to speed of blower
twice
increase
decrease
Push 1 - Blower ON
Push 2 - Blower OFF
Push 1 - Blower ON (Full Speed)
Push 2 - Blower ADJUSTABLE (Adjustable Speed)
Push 3 - Blower OSCILLATING (Oscillating Speed)
Push 4 - Blower OFF (Default State)
AIR
Red
Light
AIR
Orange
Light
AIR
Green
Light
AIR
No
Light
Spa Power Variable-Speed Blower (SPVSB) (if fitted)
Note: If left on, this accessory will automatically switchoff after 20minutes. If the heater element is on, switching on
this accessory maycause theheater to loadshedand switch off. Thisis to keepthe totalpower load toa safe level.

Page 6
When the light ison, shortpresses ofthe Downbutton will put the lightinto adjustablecolour mode
and then sequentially select through all the available colours. The last colour set in this mode will be
remembered the next time the lightis used.
5 Light Operation
The multi-function LightButton is used toturn thelight on and off (SPCL) and select through the
different operating modes of theSpa PowerVariableColour Light.Two short presses of the button willturn
the Spa Power Coloured Light on and off or five short presses of the button will cycle the Spa Power
VariableColoured Light as follows:
Push 1 - Light ON
Push 2 - Light ADJUST
Push 3 - Light CYCLE SLOW
Push 4 - Light CYCLE FAST
Push 5 - Light OFF
(SPCL - On) (SPVCL Colour - White)
(SPCL - Off) (SPVCLAdjustable Colour Mode)
(SPVCL Cycle through colours - slowly)
(SPVCL Cycle through colours - quickly)
(Default State)
Light Button
5.2 Indicator Light
ON
A small red dot in the bottom corner of the digital readout indicates when the
light is turned on. If left on the light will automatically switch off after 30
minutes.
Note: This is a multi-function button which performs the following -
1) Short presses ofthis buttonactivate the lightfunctions as detailed above.
2) Holding this button will beginto increasethe set temperatureof thespa.
3) When a SpaPower Variable Speed Bloweris fitted and isturned onthis button increasesthe blower speed.
5.1 Adjustable Colour Mode (SPVCL only)
Your spa may have been fitted with either of two different LED lights; a Spa Power Coloured Light
(SPCL) or a Spa power Variable Coloured Light (SPVCL). The Spa Power Coloured Light is a single
coloured light that is either on or off. The Spa Power Variable Coloured light is a light that has the
ability to change between 12 different colours and white (see below for user instructions).

HEATHEAT
PUMP
PUMP
AUTO
AIR
AIR
PUMPPUMP
AUTO
AIR
AIR
ONON
AUTO
PUMP
HEATER
AIR
ON
<TEMPSET>
HOLDBUTTON
TOADJUST
PRESSBOTH
TOREAD ACTUAL
Page 7
During warm periods of the year there may be times when the actual water temperature exceeds the desired temperature set by
the user. E.g. If the spa is set to heat to 35 C , but the actual water temperature is hotter than 35 C. Please consider this - In the
winter your spa gets coldbecause theair temperature is cold.Tocombat this we heatthe waterand keepthe spa covered whennot
in use.If the spa is turned off and the ambient temperatureis 15 C, eventually the spawater will lose heat untilit too is 15 C. Inthe
summer the same applies but in reverse - you can turn the heater down, even turn the pump off, but if the ambient daytime
temperature is 35 C- 42 C thenthe spa waterwill alsoremain atthat temperature.
Manufacturers make no attempt to supply a system that cools water. The quickest way to combat the problem is to change the
water,but even this new water will eventually heat up to the air temperature. Turnthe settemperature downso theheater does not
come on.Reduce theminimum filtration time(non circpump modelsonly) so thepump runsless. The less the pump runs themore
the water willcool. Ifthe nighttime temperatureis low, leavethe cover offthe spato let heat escape,but putit back on duringthe day
to keep heat out. If the optional timeclock is fitted increase the sleep time period otherwise turn the spa off overnight.Also make
sure the spais shaded fromdirect sunlight.
o o
o o
oo
The Spa Power controller automatically maintains the filtration/sanitising of the spa pool water. The minimum
amount of filtration time is programmable by the user and can be adjusted between0 and15 minutesper hour(0 to6
hours per day). In order to maintain correct filtration of the pool water, the controller monitors the time for which the
pump runs in normal pool operation. If the pump has only run for a short time, the system will automatically run the
pump for anadditional periodevery hour toreach the minimum filtrationtime setby theuser.
6 Auto Sanitising (Filtration)
6.1.1 Adjusting Minimum Filtration Time (No 24hr circulation pump fitted))
First push the Down andAir/Aux buttons togetherto displaythe filtrationtime settingon thedigital
readout
If desired, aclean upcycle canbe initiatedto filter the water after the spa pool has been used. This is done by simply
pushing the Pump Button to leave auto mode and switchon the pump. This willcirculate the water through
the filterfor 90minutes. After 90 minutes thesystem willreturn to auto mode and maintain the temperatureready for
the next timethe spapool is used.
6.1.2 Clean Up Cycle
6.3 My Spa Is Too Hot In Summer!
The default setting is 10 minutes per hour (= 4 hours per day). Holding down the Up Button or Down
Button will adjust the filtration time setting between 0 and 15 minutes per hour. (= 0 to 6 hrs per day).
Press both buttons
simultaneously
Press both buttons
simultaneously
6.1 No 24hr Circulation Pump Fitted
6.2 24hr Circulation Pump Fitted
The Spa Power controller continuously filters the spa pool to ensure the water is clean and crystal clear
for each and every spa use. A near silent energy efficient circulation pump constantly passes water
through the filter and since the circulation pumpruns allthe time (except for when the time clock has been
set to sleep or in an error condition) and the heater is controlled automatically there is no need for any
user controls for these features. With a 24hr circulation pump fitted there is no need to program any
filtration cycles, and the noise of alarge jetpump running during filtration has been removed.

Page 8
If the optional time clock has been fitted, sleep mode is used to disable
automatic temperature maintenance and filtration in order to silence the spa
pool during your hours of sleep. The sleep time setting is done using the digital
time clock on the front of the control box (See below for setting instructions). If
the spa is in use it will not enter sleep mode until 30 minutes after the last
manual button push, even if the clock is calling for sleep mode. The spa can
still be used manually within sleep mode times as normal. On wake up from
sleep the system will run the blower for 15 seconds to purge the blower
plumbing. This prevents any stagnant water from collecting in the pipes if the
pool is notused foran extended period.
7.1 To Set Current Time and Day
1. Press the button before use.NOTE: This isoptional. Itwill clear thecurrent timeand program settings.
2. Hold down the button andpress the button until thecorrect dayis selected. Releaseboth buttons.
3. Hold down the button andpress the button until thecorrect houris set. Releaseboth buttons.
4. Hold down the button andpress the button untilthe correctminute is set.Release bothbuttons.
5. After setting the weekdayand time,the secondswill resetautomatically and theclock willbegin keeping time.
RESET
CLOCK DAY
CLOCK HOUR
CLOCK MIN
7 Sleep Timer (Optional Timeclock)
7.2 To Set Programs
1. Press the button. "1ON" will appear at the left side of the display. This is the start time of the first programmed sleep
block (the timeyou want thespa to enterthe sleepmode).
2. Press the button to selectthe days onwhich this sleepprogram willoperate. Thereare 15 settingsto choosefrom.
3. Press the button to setthe hour ofthe desired timeto entersleep mode.
4. Press the button to setthe minutesof thedesired timeto entersleep mode.
5. Now the start time has been set,press the button again. "1OFF"will appearon thedisplay.This is theend time ofthe first
programmed sleep block(the time youwant thespa toresume normaloperation).
6. Repeat the sameprocedure (2 to4 above) untilthe "1OFF" timeis set.(
7. Your timergives you upto 8different programmableperiods. Youcan use all8 settings, oras fewas youlike.
8. To Reviewyour set programspress the button andkeep pressing itto advance througheach setting.
TIMER
DAY
HOUR
MIN
TIMER
TIMER
Be careful toset the same daysas usedin the"1ON" time).
IMPORTANT NOTE: The "MANUAL" button on the clock can be used to override the programmed sleep
settings. It is very important to ensure that the clock is set to "AUTO" so that the programmed times can
operate. Ifthe clock is manually set to ON then the poolwill stay in sleep mode and THE WATER WILL GO
COLD. If it is left in "OFF" then the pool will not enter the sleep mode. The clock does not return to "AUTO"
by itself.
NOTE: Ifthe “MANUAL” button onthe clock is used the spa will not return to theprogrammed settings until
the next programmed time after beingreturned toAuto.
MANUAL
D
A
Y
C
L
O
C
K
T
I
M
E
R
H
O
U
R
M
I
N
P
ON
9:3139
ON AUTO OFF
MON
Safety Notes
Before using ensure that the spa pool has been connected to a suitable weather protected outlet socket, equipped with a double
pole isolating switch,which is ofthe correctrating andcomplies withthe localwiring regulations.
When installing refer to your local wiring code. In particular refer toECP 2 & ECP 25 (AS / NZ) and EN 60364-4-1 & EN 60364-7-1
(EU). The system must be installed in such a way that live parts are not accessible by a person in the pool. If a supply cord is not
fitted the systemmust be permanentlyconnected tofixed wiringthrough a30mA orless RCD.
This appliance is not intendedfor use by young childrenor infirmpersons without supervision. Young children should be supervised
to ensure theydo not playwith the appliance.

H
E
A
THEATH
E
A
THEAT
P
U
M
P
PUMP
A
U
T
OAUTO
AIRAIR
P
U
M
P
PUMP
A
U
T
OAUTO
AIRAIR
ONON
AUTO
PUMP
HEATER
AIR
ON
<TEMPSET>
HOLDBUTTON
TOADJUST
PRESSBOTH
TOREAD ACTUAL
Page 9
8 Self-Diagnostic Error Codes
The Spa Power controller has extensive self diagnostic capabilities. In the event of a problem it will indicate an
error number according to the nature of the problem. The error numbers and their meanings are listed below.
Note: When inan errorstate the alarmcan be muted bypushing theAIR/AUX button.
Error 1 (H20)
With any Error 3-8, spa operation will stop and not continue until the controller is reset. The controller can
only be reset by pushing theUP, DOWN and PUMP buttons simultaneously.
The controller will remain inan error condition even when reset at mains power, controller will only continue
normal operation after the UP, DOWNand PUMP buttons are pushed simultaneously (seebelow).
Error 3
Error 4
Error 5
Error 6
Error 7
Error 8
- Prime Failed
This isnot necessarilya problem withthe controlleritself, butindicates thatno water isbeing detectedin theheater housing. Primefailed
is aspecial case in that itcan berecovered from by pushing a button.A pushof thepump button will run the pump for10 seconds to try to
get water tothe heater. If successfulnormal operation willresume. If unsuccessful,Error 1 (H20)will be indicatedon the displayagain.
- Stuck Button
This errorindicates thatone ofthe buttonsin thetouchpad is stuck or has been held down for more than one minute. This may be caused
by the pool cover pressing on the touchpad or by water getting into the touchpad or by damage to the touchpad or its cable. Try to reset
the spa. Ifthere is stilla problem thencontact your spapool supplier.
- No WaterSensor
This errorindicates a problem with theoptical water sensor in theheater.The problem may by causedby the sensor being disconnected
or by damageto the sensor. Try toreset the spa.If there isstill a problemthen contact yourspa pool supplier.
- Overtemperature
This error indicatesthat thedigital temperature sensor inthe heater orpool hasdetected a temperature of45 C or more. Thismay not bea
problem with thecontroller,it maybe caused by excessivepump use inhot weather, orpump failure.Turn off thespa and allow timefor the
water to cool.If there isstill a problemthen contact yourspa pool supplier.
- Thermal CutOut Tripped
This error indicates that the safety electromechanical over temperature cut out on the heater has operated. This is not necessarily a
problem withthe controller. It may have occurred from an air lock around theelement, hightemperatures duringshipping, orfailure ofthe
pump. This automatic cut out will only reset once the element has cooled below about 38 C. The unit must then be reset before it will
resume operation. Manuallypush the UP, DOWN andPUMP buttonssimultaneously.
- Stuck Relay
This error indicatesa problem withthe heater controlcircuitry inside theunit. Contact yourspa pool supplier.
- No Temperature Data
This error indicates a problem with the digital temperature sensor in the heater or pool wall or that both the in heater and in pool sensors
are connected. Check that only one sensor is connected and that it has not become disconnected or damaged. Try to reset the spa. If
there is stilla problem thencontact your spapool supplier.
o
o
Up Button
Down Button
Pump Button
Pump Button
Up Button
Down Button
E.6
E.6

Spa-Quip Ltd
Ph: 64 9 415 8622
Spa-Power Equipment
www.spa-quip.co.nz
service@spa-quip.co.nz
2 Rothwell Ave
North Harbour Industrial Park, Auckland NZ
Fax: 64 2 415 8621
Spa-Quip Ltd
Ph: 1300 797 828
Spa-Power Equipment
www.spa-quip.com.au
service@spa-quip.com.au
6 Lakeview Drive
Fax: 61 3 9730 9367
Scoresby, VIC 3179 Australia
SP601/400P User’s Guide .pdf
Booklet Part Number
Q916321
3rd October 2006
N376
Pb
RoHS
COMPLIANT
 Loading...