

Page 1

Instruction manual
MODEL NO: SV400G-IM
Spagna Vetro Range Hood
Burnaby, BC, Canada
www.KitchenHoods.ca
Tel:604 430 5252
Page 2

2
Warning
Keep your children out from using the range hood.
Your range hood is for domestic use only, not suitable for any
commercial usage.
Any installation work must be carried out by a qualified
electrician or competent person.
The range hood and its filter mesh should be cleaned regularly in
order to keep in good working order.
Before cleaning, always ensure that you have switched off the
hood.
Clean the range hood according to the instruction manual.
If there is any fault with your range hood, please call out service
department.
Please keep the room draughty when your range hood and gas
hob are working.
Do not exhaust the gas from range hood through the same heated
flue which is for the gas from gas hob or other kitchen appliances.
Before installation and usage, read all the instructions.
To ensure that you could get our guarantee for your range hood,
please provide the warranty card and purchase receipt , or the
guarantee will not be offered.
CAUTION: Accessible parts may become hot when used with
cooking appliances.
Page 3
3
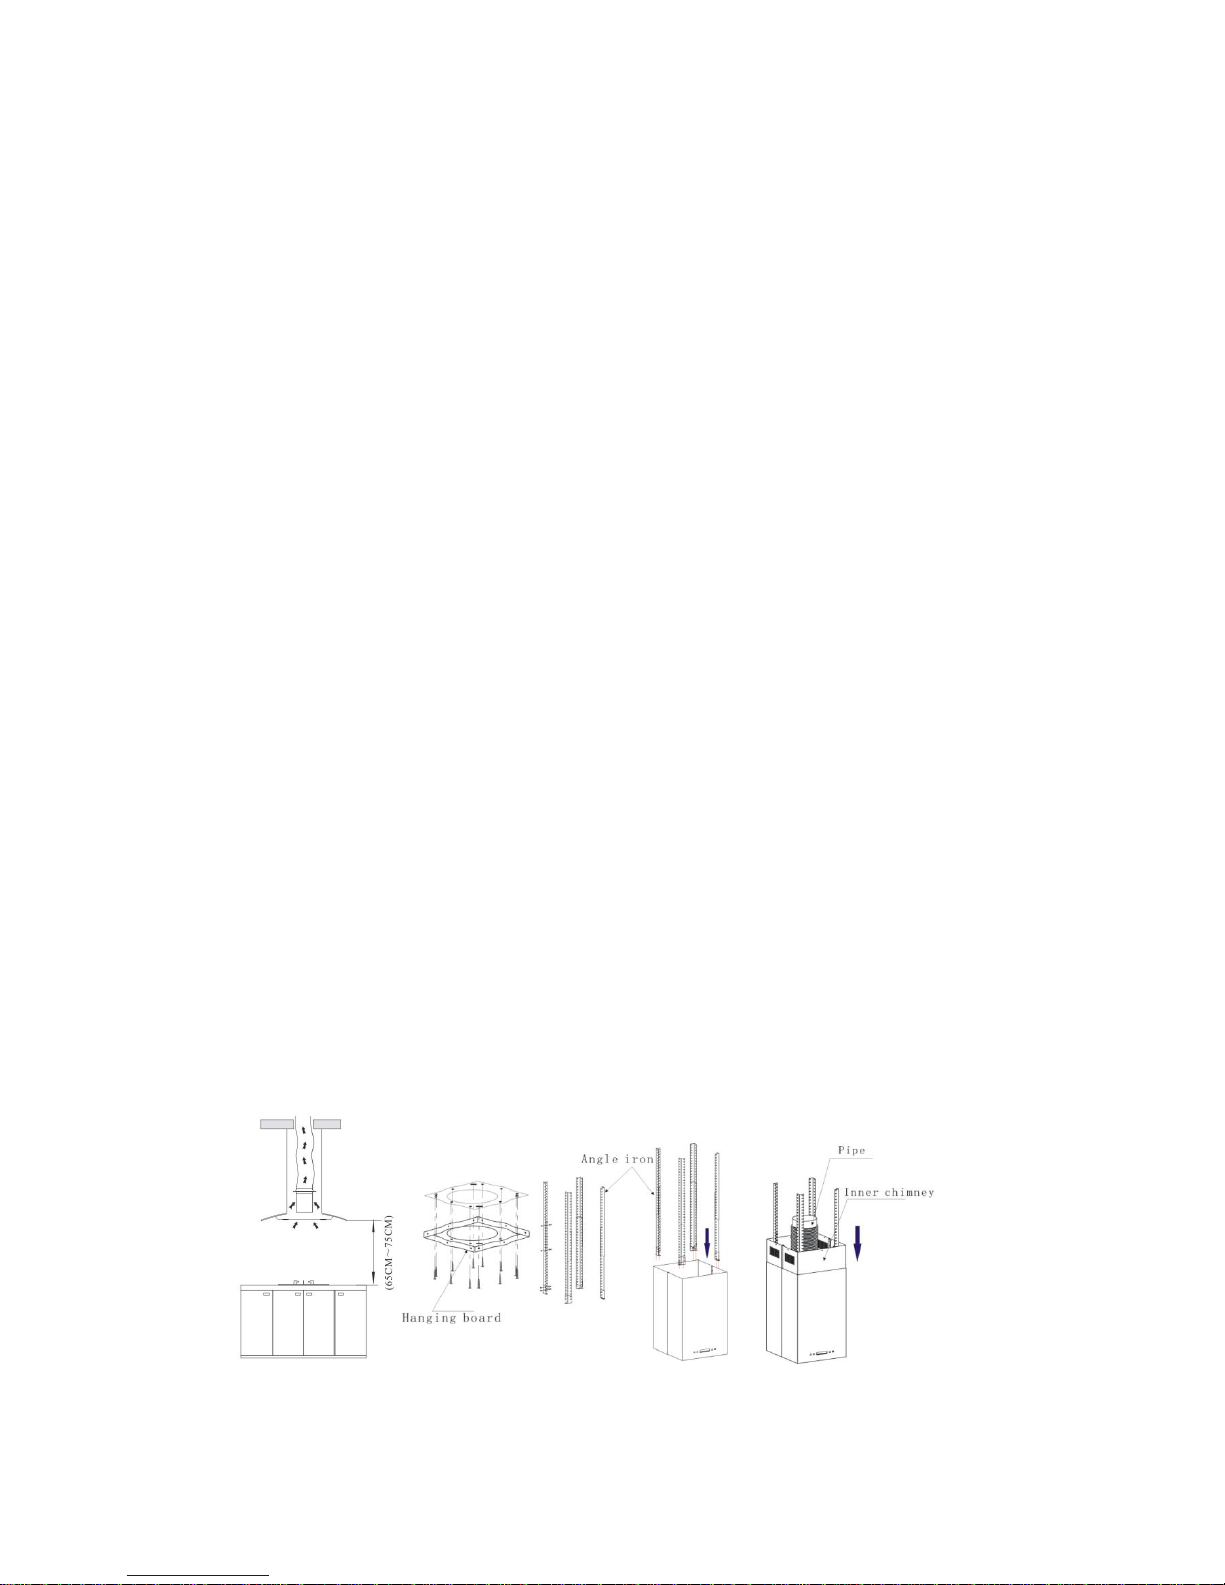
Installation
1. The range hoods should be placed at a distance of 26-30
inches from the cooking surface for best effect. See Pic 1.
2. For safety, the ceiling should be able to carry load of a 200
pounds , Drill a hole with dia 8” in the ceiling as shown on Pic
2.
3. According to the support board, drill the holes in the ceiling,
see Pic 2. Make the support board fixed on the wooden ceiling
by flat screws. According to the the size of Pic 1, calculated
the length of the angle iron, flat screws and nut with gasket
will be used to connect the angle iron and another angle iron (
the overlap length of angle iron can not be less than 4”).
4. See Pic 3, connect the angle iron and body by screw and
washer, and then, fix the outlet and put the pipe inside; make
the inner chimney into the body.
5. See Pic 4, left up the body, fix the angle iron and hanging
board by nut & screw & washer.
6. See Pic 5, make the pipe outside through the hanging board
with a Ø 7” hole; pull up the inner chimney to the hanging
board, mathen, fix the inner chimney at the hanging board.
Pic 1 Pic 2 Pic 3
Page 4

4
Pic 4 Pic 5
Pic 6
Cleaning and Maintenance
Change and clean the anti-grease filters
Tear down your range hood as per the approach
shown on Pic 6.
You can clean the filter as below:
1. Soak them about 3 minutes in hot water (40-50 degrees) with a
grease-loosening detergent then brush it gently with a soft brush.
Please do not apply too much pressure, avoid to damage it.
Page 5

5
2. It can be put into a dishwasher with detergent, set the
temperature at around 60 degrees.
Please do not use abrasive detergent because it will damage the
hood.
Make sure that the hood is switch off before cleaning.
Carbon filter installation (See Pic 7)
If the hood without extension pipe, it
should be installed carbon filter which
decrease strong smell produced by
cooking.
Normally the carbon filter should be
changed at three or six months
according to your cooking habit.
Attention: The carbon filter should be bought additionally.
Speed adjustment .See pictures
LCD Electronic button
Pic 7
Page 6

6
1. Plug the hood; LCD will display 24-hour system with blue
backlight. Backlight will be extinguished after 30 seconds
without any operation.
2. Press “ ” button once; lights will be on and LCD will show “
”. Press “ ” button again; lights will be off and “ ” on
LCD will disappear.
3. Press “ ” button once; the hood works at LOW speed and LCD
will show “ ” and “ ” button will be on. Press “ ” button
4. again; the hood works at MEDIUM speed. Press “ ” button one
more time; the hood works at HIGH speed. Press “ ” button
again; the hood works at LOW speed again and it repeat. While
pressing “ ” button; the “ ” button is always on. If you want
to stop the hood now; press the “ ” button once.
5. When the hood is not working; press “ ” button once. The hood
will work at the speed it works last time and LCD will show “
”. Press “ ” button again; the hood stop working and “ ” will
disappear from LCD.
6. When both “ ” button and “ ” button don’t work; “ ”
button is used for time-setting. Press “ ” button for 2 to 3
seconds; will be shown on LCD and flashes; which
represents hour. Press “ ” button once the number adds by 01.
Page 7

7
Continue pressing “ ” button; it will display from 13;14… until
23. When LCD shows 23; it doesn’t work by pressing “ ”
button. Press “ ” button once; the number reduces by 01. When
LCD shows 00; it doesn’t work by pressing “ ” button. After
setting hour; you can start setting minute by pressing “ ” button
again. on LCD flashes; which represents minutes. Press “ ”
button once the number adds by 01. Continue pressing “ ”
button; it will display from 01;02… until 59. When LCD shows
59; it doesn’t work by pressing “ ” button. Press “ ” button
once; the number reduces by 01. When LCD shows 00; it doesn’t
work by pressing “ ” button. After setting hour and minute;
press “ ” to confirm.
When “ ” button doesn’t work; “ ” button is used for delay timer
function. Delay timer function allows you to set the hoods
automatically power off according to the delay timer you set from 1
minute to 60 minutes. Press “ ” button once; it enters for delay
timer setting and LCD shows . Press “ ” button once the
number adds by 01. Continue pressing “ ” button; it will display
Fro ; ; … until Press “ ”
button once; the number reduces by 01. After setting delay timer you
want; press “ ” button to confirm. If you set delay timer as 05:00;
the LCD display will show from 05:00; 04:59… until 00:01 00:00.
When LCD shows 00:00; the hood will automatically power off and
Page 8

8
LCD display will only show 24-hour system with blue backlight.
After 30 seconds without operation; blue backlight will disappear.
But please note the Lamp is not under control of delay timer. Next
time; if you want to use delay timer function and you press “ ”
button without any change on time. The hood will automatically
count time down from your previous setting after 5 seconds.
www.KitchenHoods.ca
Burnaby BC
Canada
 Loading...