

Page 1

INSTALLATION &
OPERATIONAL
INSTRUCTIONS
ASME A112.19.7-2006
ANSI-Z124.1
Page 2

Page 3
INSTALLATION INSTRUCTIONS & OWNER’S MANUAL
(Refer to individual model sheets for specications)
BEFORE BEGINNING INSTALLATION, CHECK THE FOLLOWING ITEMS
AND READ THE INSTRUCTIONS CAREFULLY.
CHECK ENTIRE UNIT FOR CONCEALED DAMAGE. If there is any damage, DO NOT INSTALL!
Shipping damages must be reported to the carrier immediately. All damage must be discovered
and reported prior to installation in order to have it covered under the warranty!
COMPARE COLOR OF UNIT WITH OTHER FIXTURES. If color is not sufciently compatible with
xtures, DO NOT INSTALL!
PLANNING THE INSTALLATION
1. Make certain the oor structure is level and adequate to support installation. See oor loading in
tub specications.
2. Building codes require that a panel(s) be constructed to allow ample clearance for plumbing repairs
and pump service or removal. (Please refer to your local codes for regulations.)
3. Using the tub itself, or installation drawings, measure and mark locations for waste pipe, water
supply, wiring runs, and service access.
IMPORTANT SAFETY INSTRUCTIONS
Read and follow all instructions and save these instructions.
WARNING! Examine all plumbing for damage and water test before nal installation. If
damage has occurred, call our Technical Service Department at 877-838-9875.
WARNING! Alterations or modications of the plumbing system without expressed written
authorization will invalidate all warranty claims.
WARNING! Installation must comply with current local and state building, plumbing, and
electrical codes.
WARNING! It is the responsibility of the installer or owner to determine code requirements
prior to installation.
WARNING! Connections should be made by licensed plumbers and electrician.
IMPORTANT INSTRUCTIONS:
* Do Not lift by plumbing at any time! Lift by the tub deck.
* Tub must be supported by the suboor and bedding, not by the tub lip.
* Run pump and test all functions and plumbing prior to nishing installation.
* Run pump only when water in tub is two inches over jets.
The plumbing system on all Spa Escapes Tubs meets ETL, and ANSI standards at time of
manufacture. Any modications to the plumbing system, including the pump, will void the warranty and approvals.
IMPORTANT SAFETY INSTRUCTIONS
PERTAINING TO RISK OF FIRE, ELECTRIC SHOCK, AND INJURY.
SAVE THESE INSTRUCTIONS!
1
Page 4

READ AND FOLLOW ALL INSTRUCTIONS
1. DANGER: To reduce the risk of injury, do not permit
children to use this unit unless they are closely supervised
at all times.
2. Use this unit only for its intended use as described in this
manual. Do not use attachments not recommended by
the manufacturer.
3. Never drop or insert any object into any opening.
4. Do not operate this unit without the guard over the suction
fitting.
5. The unit must be connected only to a supply circuit that
is protected by a Ground-Fault Circuit Interrupter (GFCI).
Such a GFCI should be provided by the installer and
should be tested on a routine basis. To test the GFCI push
the test button. The GFCI should interrupt power. Push the
reset button. The power should be restored. If the GFCI
fails to operate in this manner, there is a ground current
flowing indicating the possibility of an electrical shock.
Do not use this unit. Disconnect the unit and have the
problem corrected by a qualified service representative
before using.
6. A green colored terminal (or a wire connector marked `G’,
`GR’, `GROUND’, or `GROUNDING’) is provided within
the terminal compartment. To reduce the risk of electrical
shock. connect this terminal or connector to the grounding
terminal of your electrical service or supply panel with a
continuous green insulated copper wire equivalent in size
to the circuit conductors supplying the equipment. but no
smaller than No.10 AWE (5.6mm)
7. A pressure wire connector on your bath is provided on
the exterior of the terminal box within this unit to permit
connection of a No. 8 AWE (8.4mm) solid copper bonding
conductor between this unit and all electric equipment
and exposed metal in the vicinity, as needed to comply
with local requirements.
8. SAVE THESE INSTRUCTIONS.
ATTENTION
Check tub for concealed damage.
Check color compatibility with other xtures.
Check to insure that the bath has the proper components.
Spa Escapes Tubs will not be held responsible for tub
damage or color compatibility problems after whirlpool is installed.
Spa Escapes Tubs will not be held responsible for cost
of installation or repair if an incorrect tub is installed.
Read instructions before starting installation.
2
Page 5

GENERAL NOTES
CONSTRUCTION
The tub surface is made of Lucite XL® Acrylic. The substructure
is a composite laminate constructed of fire retardant fillers.
ELECTRICAL
Factory wired for 110 Volt 20 Amps. Ground-Fault Circuit
Interrupter (GFCI) is required. The 20 Amp GFCI breaker must
not supply any other circuits or devices. If Air is added to tub,
electrical requirements is 110 Volt 30 Amps. An access panel
must be installed to permit pump service.
The unit must be connected only to a supply circuit that is
protected by a Ground-Fault Circut Interrupter (GFCI). Such a
GFCI should be provided by the installer and should be tested on
a routine basis.To test the GFCI push the test button. The GFCI
should interrupt power. Push the reset button. The power should
be restored. If the GFCI fails to operate in this manner, there is
a ground current flowing indicating the possibility of an electrical
shock. (See schematic on Pg. 5)
ELECTRICAL ROUGH-IN
WARNING: When using electrical products basic precautions
should always be followed including the following: Rough-in
wiring to equipment on a Ground-Fault Circuit Interrupter (GFCI).
The GFCI circuit breaker must not supply any other devices
or circuits. An access panel must be installed to permit pump
service.
WARNING: Failure to follow instructions exposes users to risk of
electrical shock or fire.
PLUMBING ROUGH-IN
The bath waste pipe protrudes below the base approximately one
inch. Provide supply pipe, rough-in waste and vent per local code.
NOTE: On some models, the pump may exceed beyond the
perimeter of the tub. If you have such a model, please make
allowance during installation. See Page 4.
BATH WASTE AND OVERFLOW
Read instructions enclosed with bath waste drain for proper
setting and fitting. Water tight installation of the drain is the
installer’s responsibility. The waste and overflow is not included
with the tubs unless purchased as an option. if not purchased
with the tub, you must supply and install an alternative.
IT IS THE INSTALLERS RESPONSIBILITY TO
SUPPLY ACCESS TO PUMP AND EQUIPMENT.
1. Once the tub is leveled, the tub must be supported or
stabilized with plaster or mortar. If the tub has a supporting
base, then mortar is not required.
2. For Caulking, we recommend 100% sanitary silicone rather
than latex.
3. For quieter operation, you may choose to insulate the
surrounding.
INSTALLATION
PROTECTION OF TUB
Use a section of the box, cut to size, and place in the bottom of
the tub. When possible, keep the box cover over the tub. These
steps will help protect the tub from abrasion or damage during
installation.
IMPORTANT: If installing a skirt with removable panel, read instructions for the skirt prior to rough-in. The instructions are located in the box with the skirt.
SETTING TUB IN PLACE
The tub needs to be set in mortar or plaster to level tub and prevent shifting after installation.
Apply mortar to the floor area that makes contact with the tub
base. Set tub in opening and push on bottom of tub to secure in
mortar. TUB MUST NOT “HANG” FROM LIP OF TUB! Do not
allow tub lip and edges bear any weight of the tub. Do not fill tub
with water until mortar has hardened. Seal all joints with sanitary
silicone.
Alcove Installation
Set tub in place and level. Install leveling strips to the under side
of tub lip Do not hang tub by leveling strips. Set tub in mortar and
allow to dry.
FINISHING
Before finishing with your choice of material, make sure access
entries are available to the pump, bath waste pipe, and plumbing
fixtures. Finish as desired and seal around tub, preferably with
sanitary silicone.
CLEAN PUMP SYSTEM
After tub is installed and ready to use, remove all construction
debris and clean the pump and system.
SUGGESTION: During construction, we suggest that you cover
tub to avoid use as trash receptacle.
TESTING
Connect trap to bath waste pipe. Temporarily connect garden
hose for water testing. Tub must be clean before filling. Seal drain
with plug and fill tub 2” above jet fittings. Run pump approximately
20 minutes. Check for leaks. Turn pump off and let water sit in tub
about 5 minutes. Check for leaks in return pipe and fittings. Drain
the tub and shut off circuit breaker.
NOTE: ALL TUBS ARE FACTORY TESTED FOR PROPER
WATERTIGHT OPERATION. However, the tub must be filled with
water to check for leaks that may have resulted from handling,
before finishing the tub installation. Spa Escapes Tubs is not
responsible for any defects that could have been discovered,
repaired or avoided by following this testing and inspection
procedure.
3
Page 6
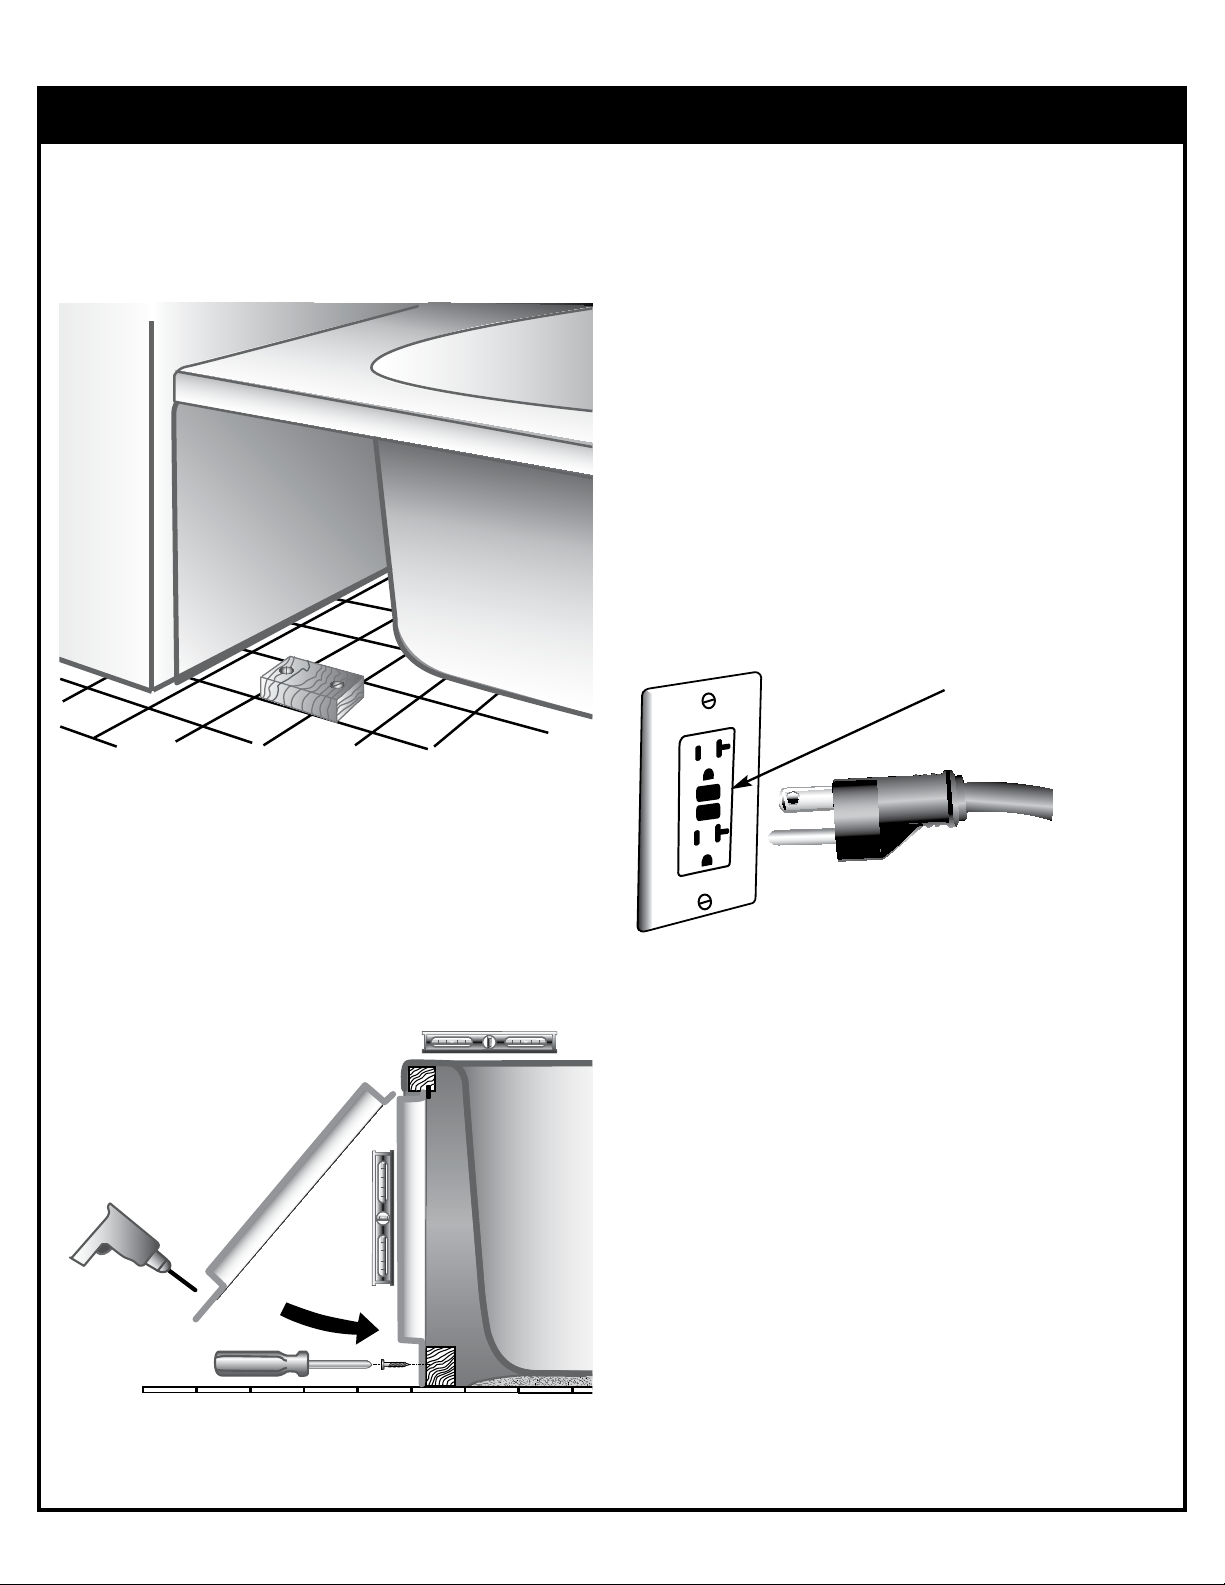
Standard GFCI 110V, 20 Amps
INSTALLATION CONTINUED
INSTALLING ONE-PIECE SKIRT
IMPORTANT - Read these instructions prior to roughing
in bath tub. Fasten 3 wooden blocks to the floor (see Fig. 1).
PLUMBING ROUGH-IN
The bath waste opening protrudes below the base approximately one inch. You may be required to cut a hole in the
subfloor to accommodate bath waste. In slab on grade or
prestressed concrete floors where cutting is not desired, the
tub may be raised up by building the platform higher and using extra mortar under the tub. If a joist must be notched,
verify that structure will not be weakened. Remove only what
is necessary. Provide supply pipe, rough-in waste and vent
per code.
PLUMBING
PVC Schedule 40 piping, self draining pump and fittings come
completely preplumbed unless requested otherwise. The
pump and whirlpool system are completely contained within
the tub perimeter. On some models, the pump may exceed
beyond the perimeter of the tub. If you have such a model,
please make allowances during installation.
INCOMING POWER
Fig. 1
Taking into consideration the shape of the skirt, which should
result in a plumb position to the tub, perpendicular to the floor
(see Fig. 2). If the skirt needs to be trimmed at bottom, or from
the side, you can do so by cutting with a circular saw (carbide
or diamond tipped). Secure in place at the bottom by attaching
screws through the panel in the wood blocks or with sanitary
silicone.
Blower Electrical Supply
ELECTRICAL
Factory wired for 110 Volt 20 Amps. Ground Fault Circuit Interrupter (GFCI) is required. The GFCI breaker must not supply
any other circuits or devices. Note: A 30 Amp circuit must be
installed to use with any permanently connected unit.
FINISHING
Before finishing with your choice of material, make sure
access entries are available to the pump, bath waste, and
plumbing fixtures. Finish as desired and seal around tub, preferably with silicone.
NOTE:
1. For Caulking, we recommend 100% sanitary silicone
rather than latex.
2. For quieter operation, you may choose to insulate the
construction area.
3. IT IS THE INSTALLERS RESPONSIBILITY TO SUPPLY
ACCESS TO PUMP AND EQUIPMENT
Fig. 2
REMINDER: During construction, we suggest that you cover
tub to avoid use as trash receptacle
4
Page 7
INSTALLATION CONTINUED
Spa Escapes TOUCH PLUS
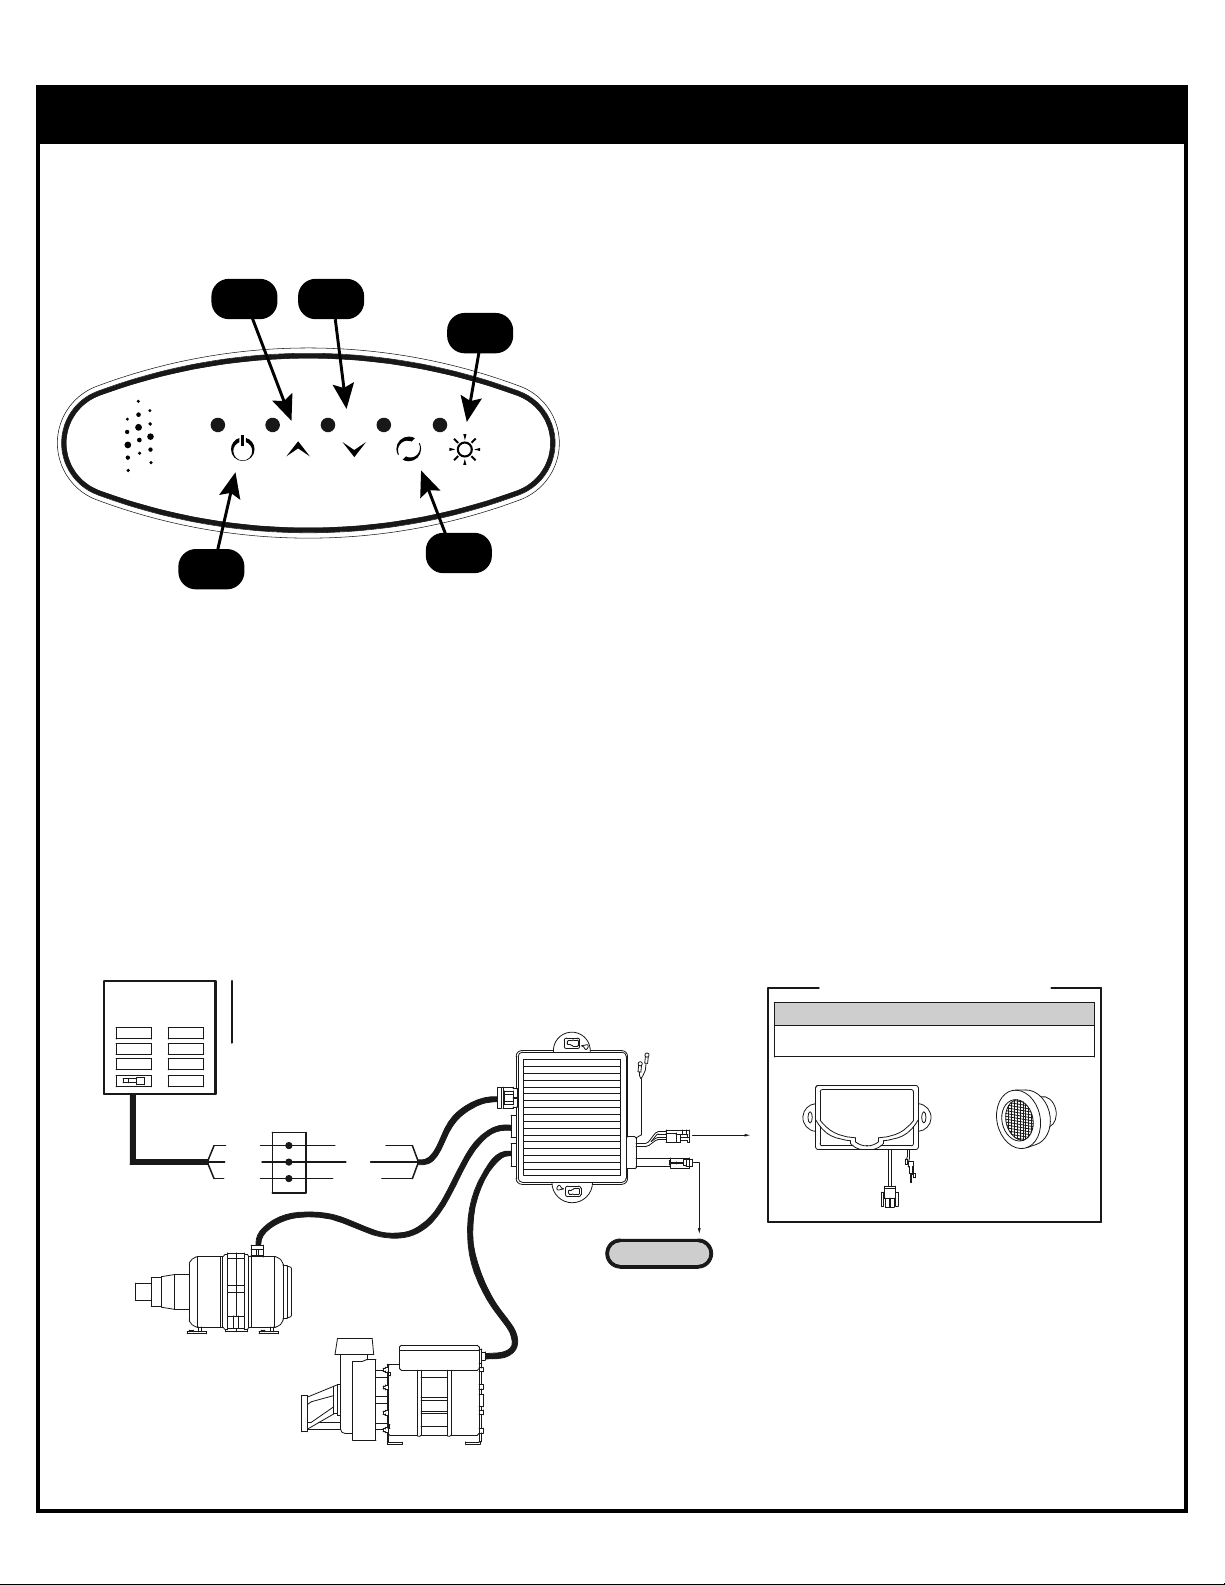
START UP AND OPERATIONAL INSTRUCTIONS
4 3
2
1
5
1. Pump On/Off:
1st Press - The pump starts.
2nd Press - The pump stops.
2. Light Button:
Operates LED lighting systems. NOT
INCLUDED WITH THIS MODEL.
3. Use Button to decrease air jet speed
while the blower is running. Press &
hold to increase the blower speed, release
pressure at the desired speed.
4. Use Button to increase air jet speed
while the blower is running. Press & hold
to lower the blower speed, release pressure
at the desired speed.
5. Blower On/Off:
1st Press-the blower starts.
2nd Press-the blower stops.
Purge Cycle:
There are two different purges: The first at 30
minutes after the tub is used and the second every
24 hours at the time determined by when power is
turned on at the breaker box.
ELECTRICAL
FEEDER
120V/60Hz
120V/60Hz Variable Blower & On/Off Pump
120V 20A
GROUND FAULT
CIRCUIT INTERRUPTER
CLASS A
JUNCTION BOX
WHITE
BLAC K
GREEN
VARIABLE BLOWER
SL0-6-75-120/60 > 11A
NEUTRAL
LINE
GROUND
1HP ON/OFF PUMP 120/60 > 7A
EVO2-T-CB/L-P1B2/12/3-WD1+VB24
CONTROL
KEYPAD
WATER DETECTORS
FOR PUMP
ATTENTION 250 mA MAXIMUM
MAXIMUM LIGHTS
6 CG AIR LT - LED09 LIGHTS
LIGHT CONTROL 9 LED LIGHT
5
Page 8
INSTALLATION CONTINUED
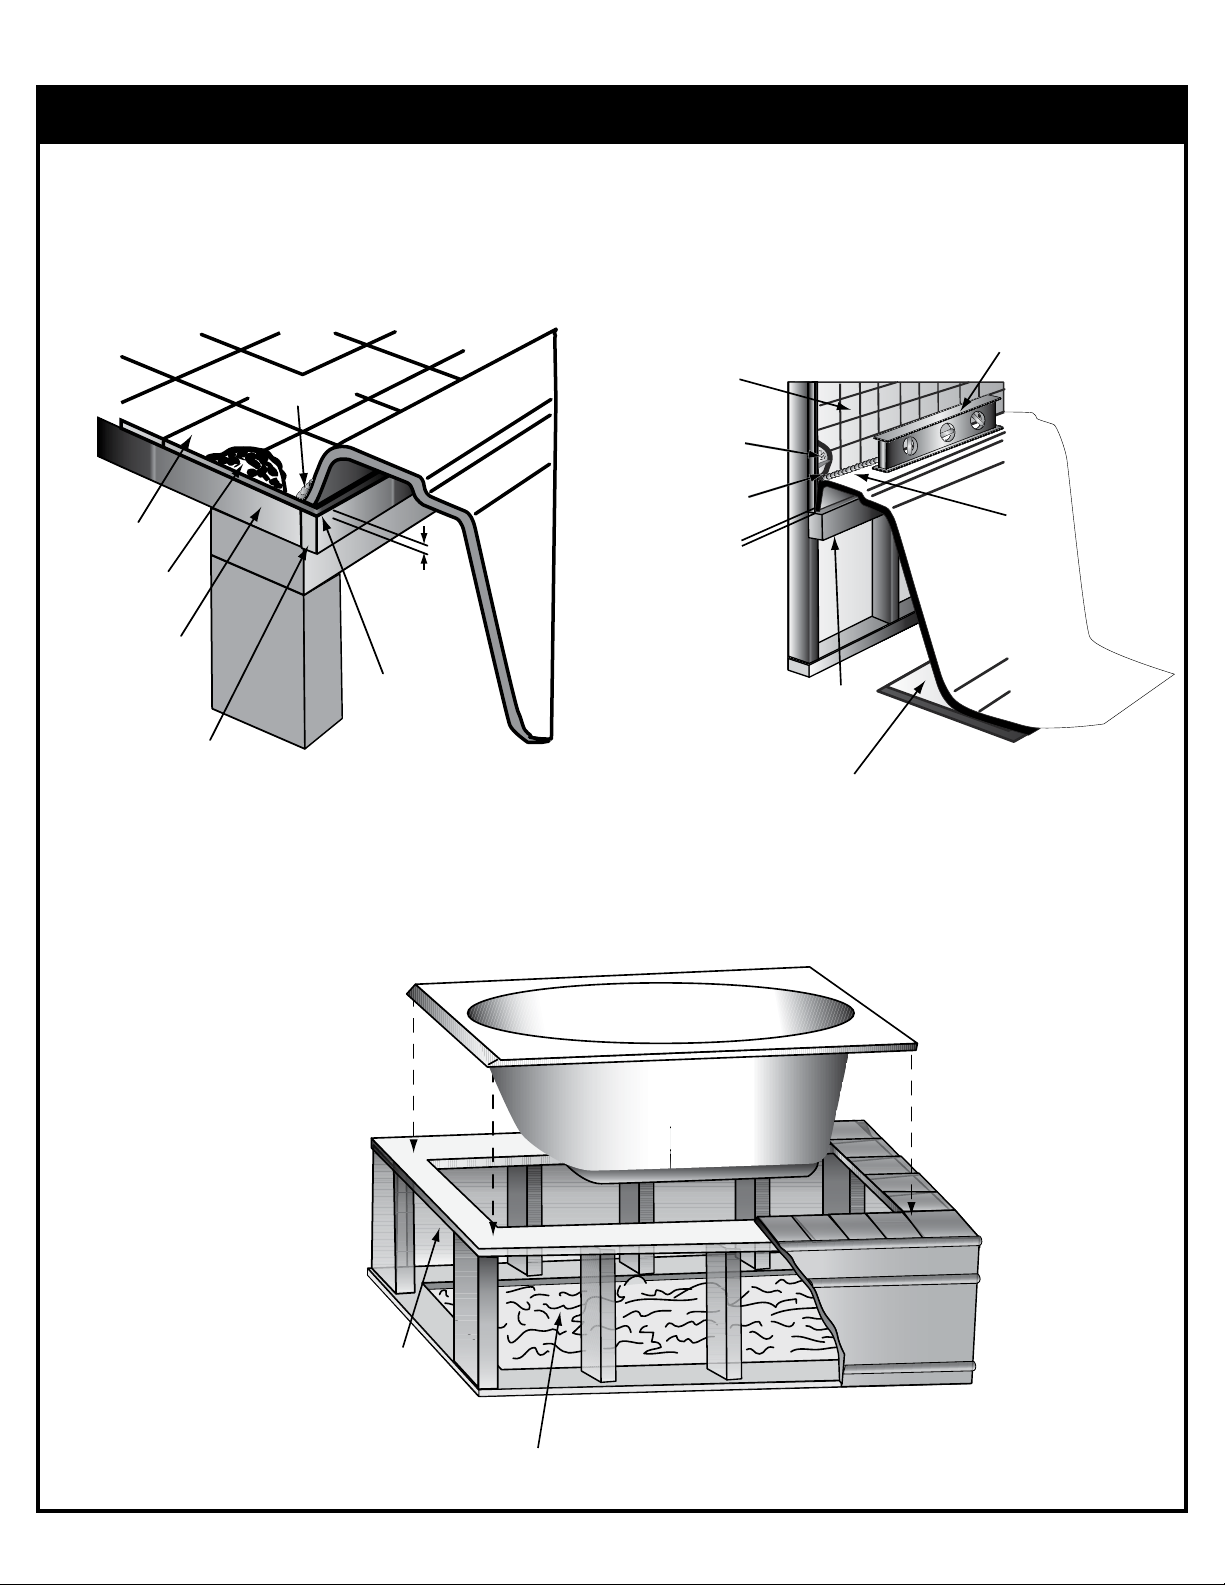
TYPICAL INSTALLATIONS
Make absolutely certain that access panels and/or service openings are properly placed and that all possible areas where
service may be required are accessible.
TUB TO BE SUPPORTED BY THE SUPPORT BASE AND BEDDING, NOT BY THE LIP OF TUB
MAKE SURE TUB IS LEVEL
SEALANT
GROUT
TILE
FLASHING
TILE
GROUT
SUB-FLOOR
FLASHING
1” x4”
(NOT FOR SUPPORT)
Note: For caulking, we highly recommend using 100% silicone rather than a latex silicone because it keeps its elasticity and
does not deteriorate.
1/8”
CLEARANCE
1/8”
1” x4”
(NOT FOR SUPPORT)
MORTAR/BASE SUPPORT
SEALANT
TUB
FOR A QUIETER WHIRLPOOL, WE SUGGEST:
a. Insulate the surround.
b. Set tub in mortar.
INSULATION
MORTAR
6
Page 9
INSTALLATION CONTINUED
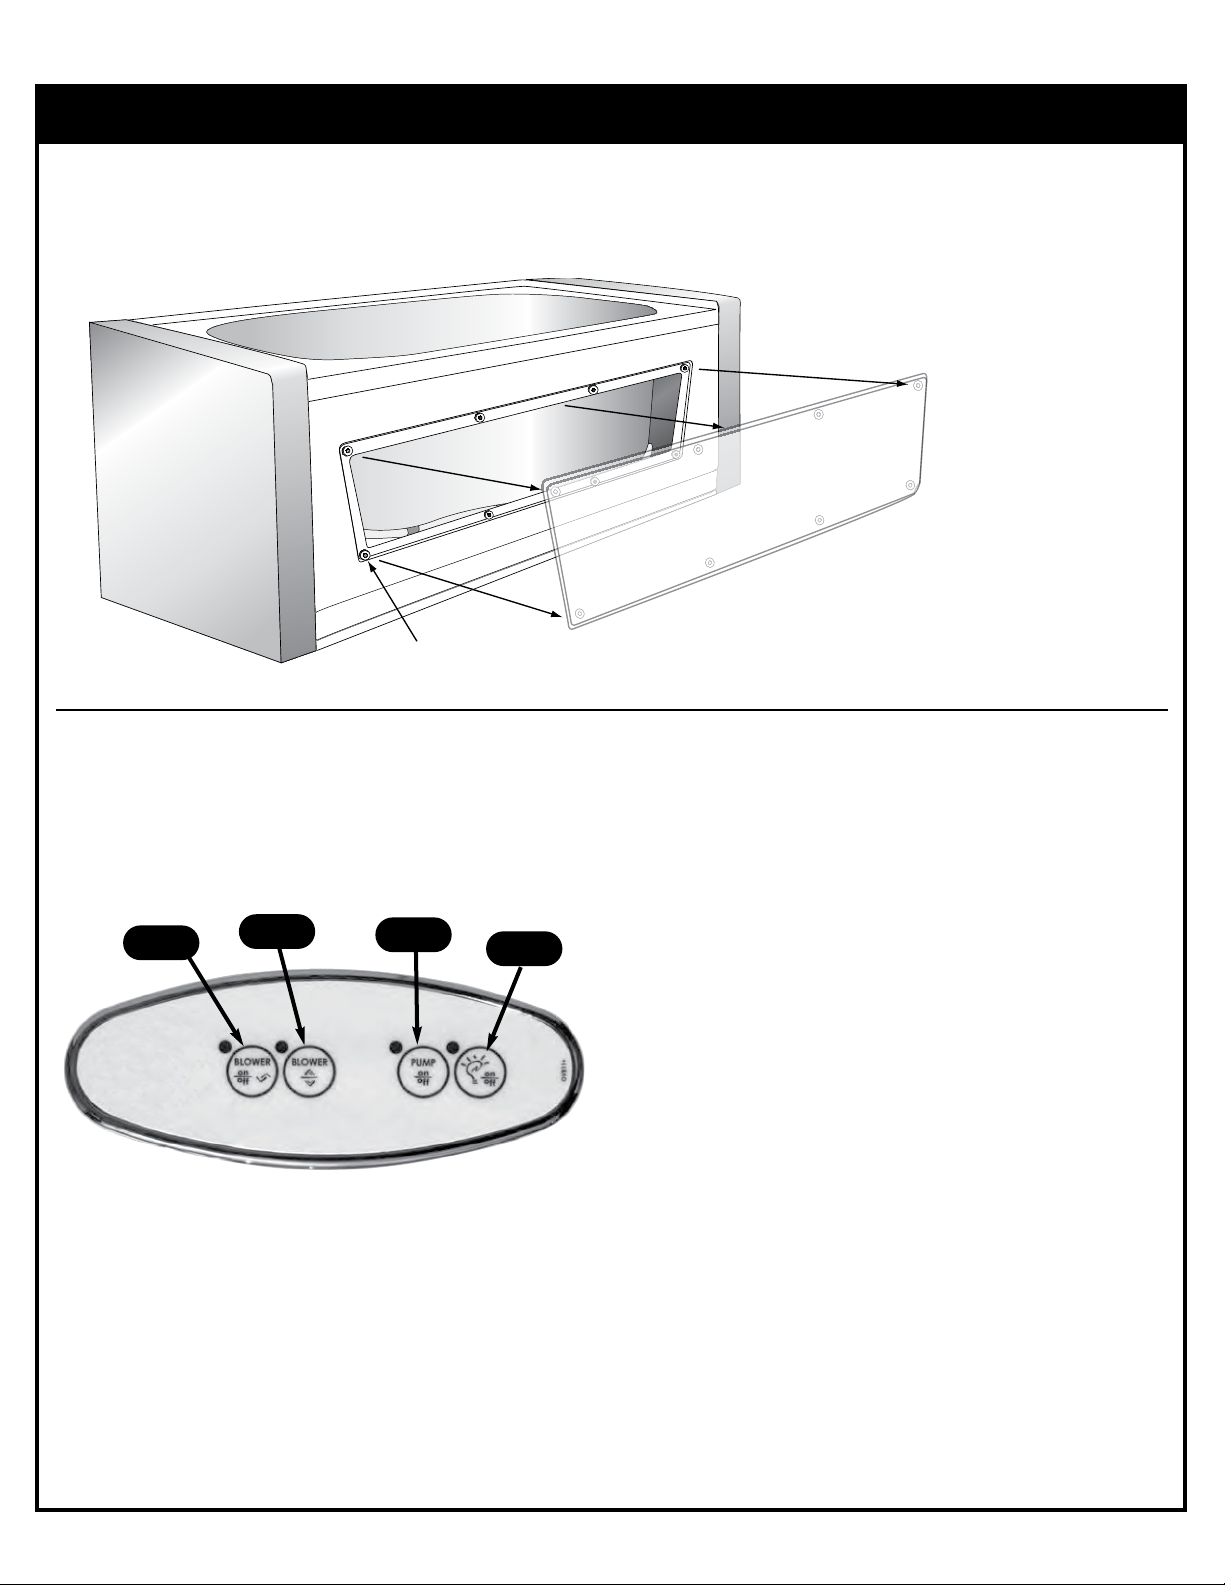
CENTER ACCESS SKIRT
Custom fitted skirt ensembles are available to provide the perfect finish for your bath and bathroom. All five (5) foot and six (6)
foot rectangular models can be fitted with a one or two piece (center access) removable front skirt.
Removable panel held in place by
strong magnets attached to tub and
tub panel and is easily detached for
MAGNET
interior tub access.
AIR TUB CONTROLS
START UP AND OPERATIONAL INSTRUCTIONS
4
1. Pump On/Off:
1st Press - The pump starts.
2nd Press - The pump stops.
2. Light Button:
Touching button controls different
settings.
3
1
2
3. Use Buttons to control up or down
while the blower is running:
1st Press- Press & hold to increase
the blower speed, release
pressure at the desired
speed.
2nd Press- Press & hold to lower the
blower speed, release
pressure at the desired
speed.
4. Blower On/Off:
1st Press-the blower starts.
2nd Press-the blower stops.
Purge Cycle:
There are two different purges: The first at 30
minutes after the tub is used and the second every
24 hours at the time determined by when power is
turned on at the breaker box.
7
Page 10
INSTALLATION CONTINUED
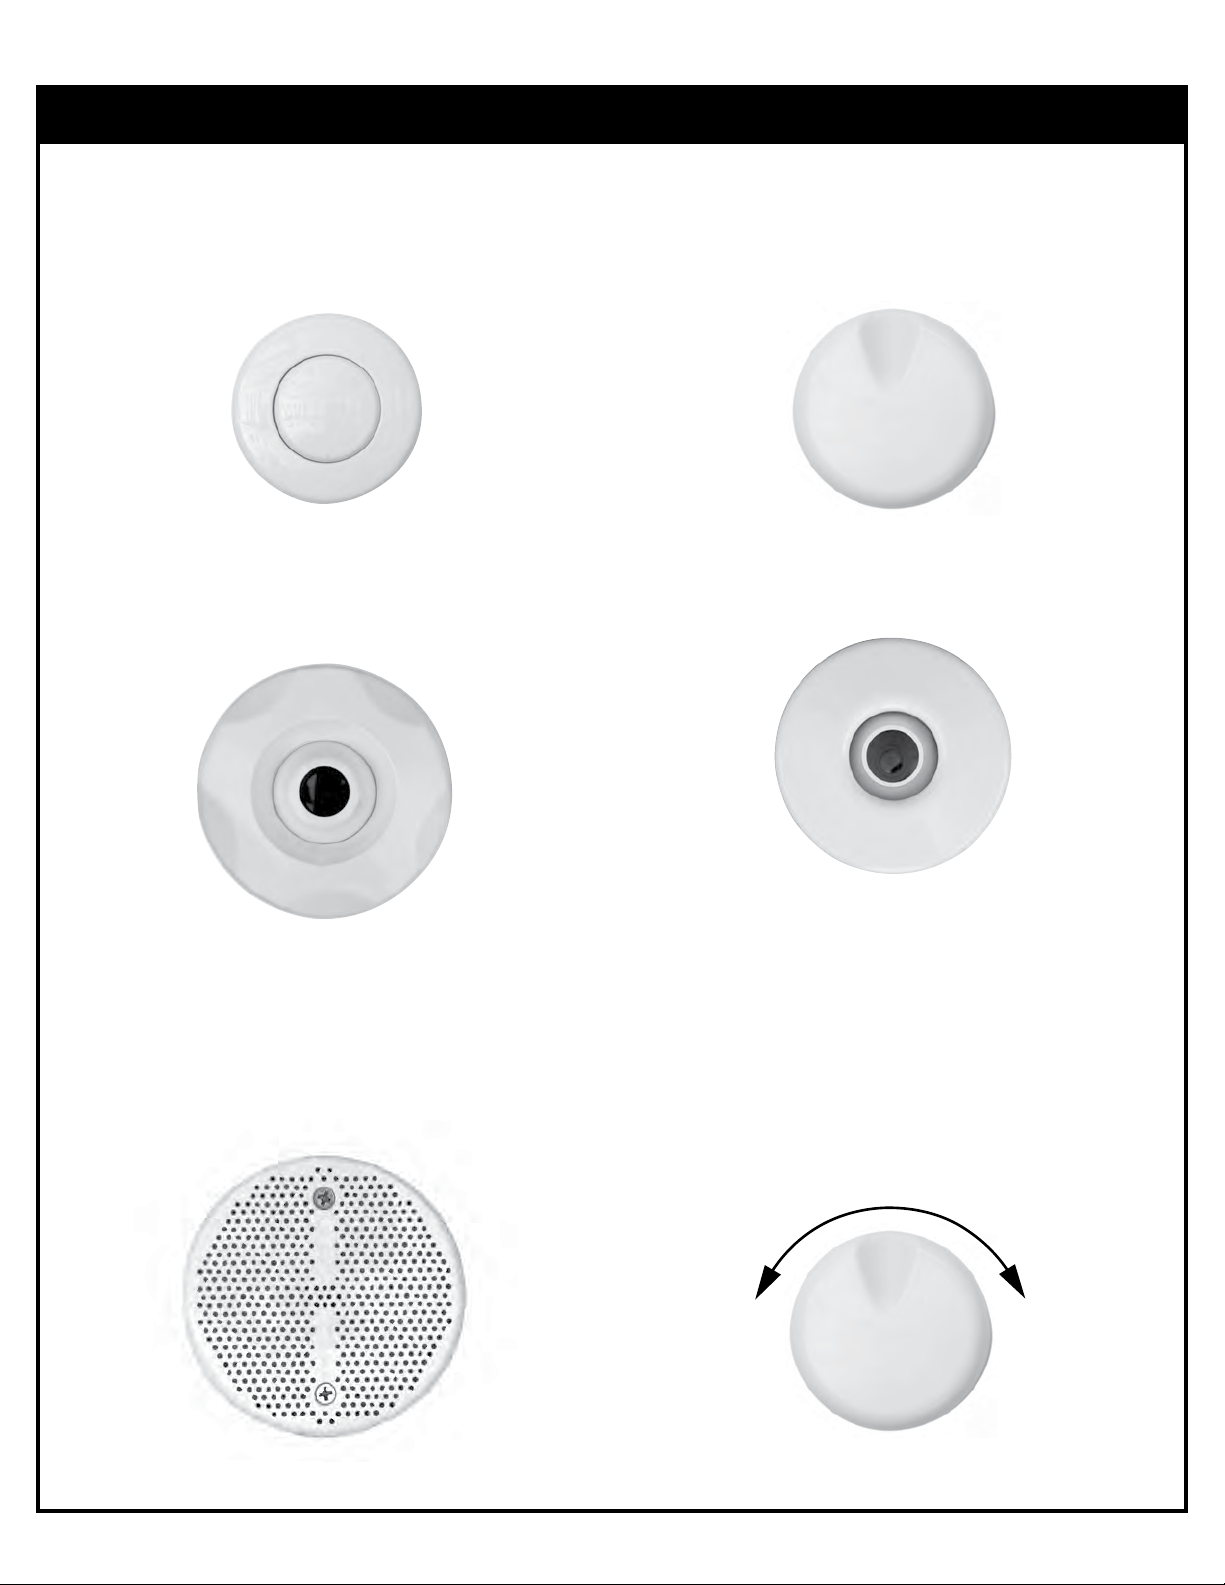
Air Button Control-Whirlpool or
Optional Combo
With our pneumatic controls, you can select your bathtub’s
pump with one finger.
Star Jet
Allows user to adjust the direction pressure, by timing clock
wise open flow, counter clockwise close flow.
Air Controls
Allows user to adjust the pressure from the jets
Builder’s Jet
Constant flowing jet without on/off flow.
Safety Suction
Inlet that allows water to return to pump (standard on all
models). If suction is blocked, the pump will automatically
shutdown.
Air Control/Turbo Boost™
The air control allows inducement of air into water stream
(increasing or decreasing Jet pressure).
The blower system is turbo charged into the water jets
resulting in increase power. Turbo boost exist only if the
blower system is on, and providing the air control is in the
open position.
C
l
o
s
e
O
n
e
p
8
Page 11
INSTALLATION CONTINUED
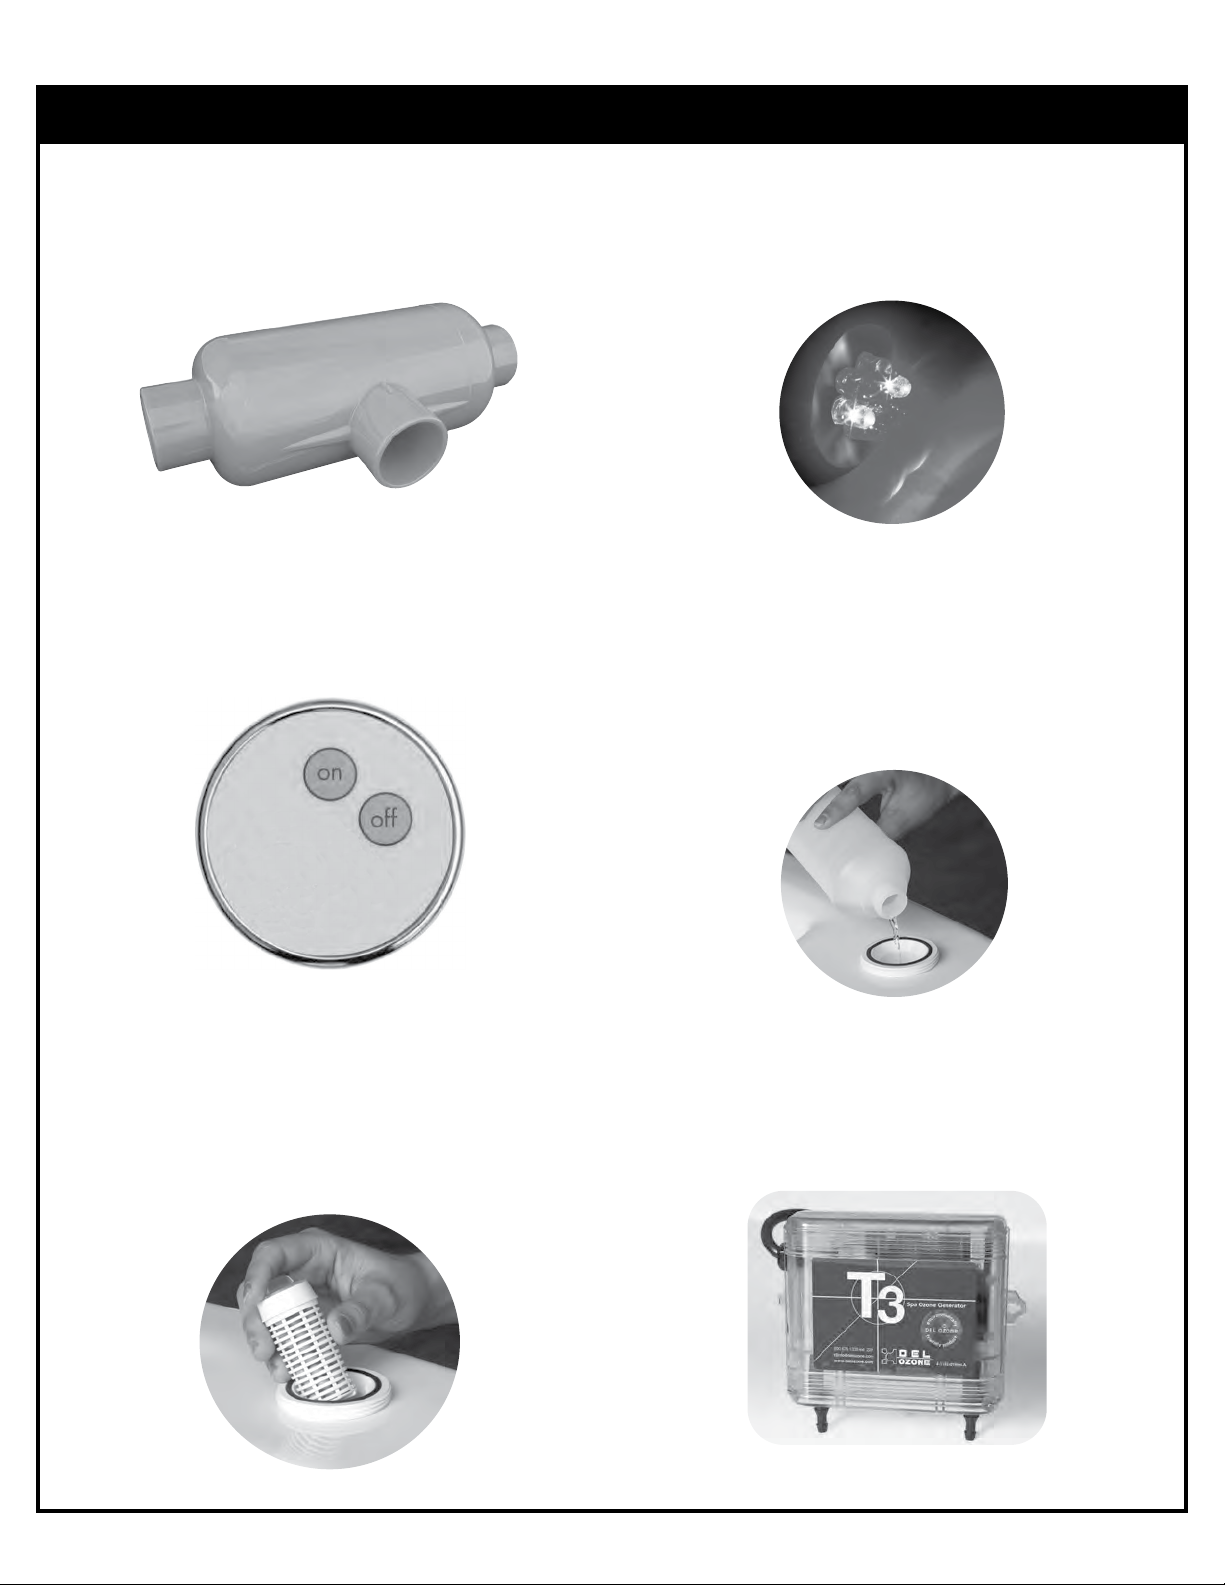
H.E.E.T.
Maintains water temperature without a heater using kinetic
energy of the water pump.
Spa Escapes Touch
This 3-in-1 switch allows the user to turn the pump on
and off. It has a 15 minute timer, and an automatic low
water sensor that shuts down the pump in a low water
level condition.
Chromatherapy
Specially designed underwater LED lights will enhance
your mood upon illumination.
E-Z Clean™
Simple but effective, offering you complete peace of
mind. Simply dilute a small amount of water with any
household antibacterial cleaning agent, drop it into the
fragrance dispenser, activate the pump and your tub is
cleaned and sanitized. Also purge cycle at 30 minutes
after tub is use, another every 24 hours.
Standard with Air Tub.
Aromatherapy
All tubs with a blower system include Spa Escapes Whirlpool
Air
Tub’s exclusive aroma therapy system standard. Open the
aroma canister, drop in your favorite fragrance - turn on the
blower system and you will experience an immediate sense
of aromatic bliss.
O
OZone™
3
An O3 ozonator is an automatic device that produces
ozone to safely and effectively sanitize your bath while in
use. Available on whirlpool and combination systems.
9
Page 12

USER MAINTENANCE
USER SHOULD periodically flush operating system (not to exceed 90 days). As a minimum, shall consist of filling and running
system and draining. Spa Escapes Tubs recommends flushing with a mild solution of water and sanitizer such as chlorine or
other commercially available whirlpool bath flushing products.
DO NOT use abrasives. They may dull or scratch surface of the acrylic.
DO NOT use oil based solvents. Clean with only a damp cloth or mild detergent or any common glass cleaner.
DO NOT use bubble bath while the whirlpool is operating.
DO NOT turn on pump without water in the bathtub. To do so may cause damage to the pump.
DO NOT alter the position of the pump. To do so may void your warranty.
NOTE: Caustic drain openers will damage the surface and the pump! Extreme heat from portable heaters
and cigarettes can damage the surface of the tub. DO NOT USE OIL BASED BATH ADDITIVES.
FOR MINOR SCRATCHES
The procedure to remove light surface scratches or burnish marks is quite easy. Simply apply rubbing compound to the affected
area and buff lightly. Then apply paste wax and gently buff again to return the original shine.
REPAIR TO THE SURFACE
Should a deep scratch or more serious damage be encountered, please call Technical Service at Spa Escapes Tubs for assistance. When calling, please have the serial number, date of purchase, and color of your tub.
CLEANING RECOMMENDATIONS
To clean the pipes and pump:
Fill the tub and pour a cup of bleach (or dishwasher soap [i.e. Cascade] if bleach is not available), run pump for five (5) minutes
and let it sit for ten (10) minutes. Run the pump for five (5) minutes, then rinse two (2) times. Wipe off the surface after the rinse
because the bleach may discolor some color trimmings.
After using bleach or dishwasher soap, you should follow this cleaning procedure:
Fill the tub with water and run the pump for 5 minutes, then rinse it 2 times. Clean with a soft damp cloth, do not use abrasive
cleaners as they may scratch and dull surface of the unit.
PRECAUTIONS
HEAT STROKE - The most susceptible people are very young, the elderly, alcoholics, and most people under the influence of
drugs.
SYMPTOMS - Hypothermia causes loss of salt, sweating, ordinary dizziness, headache, dryness of the mouth, nausea, faintness and/or unconsciousness, convulsions, flushed appearance of the skin and rapid pulse, and/or weak or shallow breathing.
TREATMENT - Place on back, head slightly elevated, apply wet cloths or ice to the head, wrap body in sheet while pouring on
small amounts of water, cool shower or bath, and get medical attention as soon as possible.
TROUBLESHOOTING
PROBLEM
Pump not starting
Pump humming but not priming
Pump not moving water
No jet pressure
Leak in plumbing
SOLUTION
Check wiring; Check the on/off switch; Check water level; Reset GFI at outlet.
Air trapped in line; Check for clogged jets. Add water, may have to open top union.
Possible obstruction in impeller. Possible frozen clutch (requires replacement).
Clogged jet; air control not open; jet not open; missing part in jet.
Call Tech Service: 866-588-8008
10
Page 13

LIMITED WARRANTY COVERAGE
READ CAREFULLY, THE WARRANTY APPLIES ONLY TO ORIGINAL OWNER
10 YEARS STRUCTURAL
BATH SHELL: Spa Escapes Tubs warrants its bath shells against
loss of water through the fiberglass laminate of the tub body as a
result of a defect in materials and workmanship, for a period of ten
(10) years from the purchase date.
10 YEARS SURFACE
The acrylic surface is warranted against blistering, cracking and
chipping resulting from a defect in the acrylic surface material for a
period of ten (10) years from the purchase date. SCRATCHES ARE
NOT COVERED UNDER WARRANTY.
1 YEAR PUMP • 1 YEAR BLOWER • 1 YEAR PARTS
PLUMBING AND EQUIPMENT
Spa Escapes Tubs warrants factory installed plumbing parts and
fittings, and electrical components to be free from defect in materials
and workmanship for a period of one (1) years from the purchase
date, a period of one (1) years from the purchase date for the pump,
and a period of one (1) years from the purchase date for the blower.
EXTENT OF WARRANTY/RESPONSIBILITY OF PURCHASER
This warranty applies only to original purchaser of the Spa Escapes
Tubs. Warranty Card must be signed and sent to Spa Escapes
Tubs within ten (10) days of purchase to activate warranty. Original
purchaser must establish, by dated sales slip, invoice or delivery
receipt, the date of purchase. The warranty applies to Spa Escapes
Tubs manufactured after October 1, 2010.
WARRANTY PERFORMANCE
In the event of any defect in workmanship or materials covered
under the terms of the “Bath Shell” warranty, Spa Escapes Tubs will
repair the defect and will be responsible for the labor cost incurred
by its agent in doing so. Travel, trip or mileage costs incurred by the
authorized agents are not covered under this warranty. Spa Escapes
Tubs, at its sole discretion, may elect to replace the defective bath.
All costs involved in replacing the unit are not covered under this
warranty.
In the event of any malfunction or defect covered under the terms of
the “Plumbing and Equipment” warranty, Spa Escapes Tubs will repair
or replace the defective item for a period of one (1) years from the
purchase date for parts, a period of one (1) years from the purchase
date for the pump, a period of one (1) years from the purchase
date for the blower. Labor cost to repair an Spa Escapes Tubs is
covered for a period of ninety (90) days and must be performed
by an authorized agent of Spa Escapes Tubs. The purchaser
is responsible to provide adequate access to the equipment and
plumbing. Any labor costs attributed to removing decking or
any other obstacle to gain easy access to the equipment or
plumbing are not covered. Travel, trip or mileage costs incurred
by the authorized agent for in-home service are not covered
under this warranty.
Written notice of any malfunction or defect must be given within ten
(10) days of the time it is discovered, to Spa Escapes Tubs, 5701 NW
35th Avenue, Miami, Florida 33142. Spa Escapes Tubs reserves the
right to inspect the malfunction or defect on location.
RESPONSIBILITIES OF OTHERS
Inspecting the unit prior to installation is the responsibility of the
installer or building contractor who acts on behalf of the user. They
are responsible for ensuring the unit is free of defect or damage.
Notices are placed on and in the unit and on the shipping carton
advising the installer of this responsibility. In the event of a problem,
the unit must not be installed. Spa Escapes Tubs is not responsible
for failures or damage that could have been discovered, repaired, or
avoided by proper inspection and testing prior to installation.
Damage occurring in transit is the responsibility of the carrier.
The user or installer MUST open the crate and inspect the unit
for damage when it is delivered. If damage is discovered, it must
be reported immediately to the seller and the carrier in writing,
and an inspection requested. Failure of the carrier to respond
should be reported to the seller and the carrier. Your freight
claims should be filed promptly thereafter.
LIMITATIONS AND EXCLUSIONS
This warranty does not cover any claim arising from abuse, misuse,
negligence, accident, improper installation or operations on the part
of the purchaser. This warranty is void if the Spa Escapes Tubs is
subject to alteration, or if repairs are attempted by anyone other than
an authorized agent of Spa Escapes Tubs. This warranty does not
extend to plumbing or components installed by dealers, installers or
by any party other than Spa Escapes Tubs.
Spa Escapes Tubs will not be liable for loss of use of the Spa
Escapes Whirlpool Bath, inconvenience, or any other incidental or
consequential costs, expense or damages. Please note that some
states do not allow the exclusion or limitation of incidental damages.
DISCLAIMER
Except as expressly provided, there shall be no warranty or obligation,
express or implied, oral or statutory. No dealer or other person has
the authority to make any warranties or representations concerning
Spa Escapes Tubs or its products. In no event shall Spa Escapes
Tubs be held responsible for any such warranties or representations.
OTHER RIGHTS
This warranty gives you specific legal rights, and you may have other
rights which may vary from state to state.
TECHNICAL SERVICE
Contact the retail seller or the local authorized warranty service
center. If you do not know who your local representatives are, contact
Spa Escapes Tubs Service Department at the address listed below,
or call 877.838.9875.
Spa Escapes Tubs • A Division of SpaWorld Corp.
5701 NW 35th Avenue, Miami, Florida 33142
11
Page 14

NOTES
12
Page 15

Page 16
IMPORTANT: READ AND SAVE THESE INSTRUCTIONS.
INSTALLER: SAVE INSTALLATION INSTRUCTIONS WITH HOMEOWNER
HOMEOWNER: KEEP INSTALLATION INSTRUCTIONS FOR FUTURE REFERENCE
Please leave owner’s manual with warranty.
If you have any problems or questions during installation,
please call technical service at
866-588-8008
Record the numbers here for handy reference:
Model No.
Serial No.
Date of Purchase
M a d e i n
U S A
Manufactured by
Spa Escapes Tubs
A Division of Spa World Corp.
5701 NW 35th Avenue
Miami, Florida 33142
Ph: 877.838.9875 • Fax: 866.560.1060
Email: [email protected]
10-1011
 Loading...