

Page 1

4021 Fax: 203830 [email protected]
www. .com
Creating Graphics & Using Mogul Media
Creating Graphics & Using Mogul Media.........................................................................................1
Manipulating Graphics .......................................................................................................................2
Preparation .............................................................................................................................................2
Frame Resolution...................................................................................................................................2
Colours ..................................................................................................................................................3
The Palette ..............................................................................................................................................3
Saving an IBall Palette in Paint Shop Pro..............................................................................................3
Loading an iBall Pa lette – “Nearest Color Matching”...........................................................................3
Loading an iBall Palette – “Dithering”..................................................................................................4
Colour Schemes .....................................................................................................................................4
Spacial Display Editor.........................................................................................................................5
Getting Started .......................................................................................................................................5
Individual Frame Settings ......................................................................................................................6
Creating a Good Advert ......................................................................................................................7
The Logo ................................................................................................................................................7
Text on the iBall .....................................................................................................................................8
Animating Your Graphics ...................................................................................................................9
Animating a sequence within Spacial Display Editor............................................................................9
Preparing an Animated Sequence Using Animation Shop ..................................................................10
Uploading ............................................................................................................................................11
Exporting to MogulMedia....................................................................................................................11
What is Mogul Media ........................................................................................................................12
How to Use Mogul Media..................................................................................................................12
Step 1 – Getting Started .......................................................................................................................12
Step 2 - Adding a new Client ...............................................................................................................12
Step 3 - Adding a group to a Client .....................................................................................................13
Step 4 - Adding GPRS Module to the group .......................................................................................13
Step 5 - Addin g a Device to the module ..............................................................................................13
Step 6 – Preparing the ball for a broadcast ..........................................................................................14
Step 7 – Uploading adverts to your demo ball, using the private advert library.................................14
Step 8 - Viewing the Content on the iBall ...........................................................................................15
Step 9 - Using your mobile phone .......................................................................................................15
SMS Instructions.................................................................................................................15
Step 10 - Clearing an Advert ................................................................................................................16
Spacewriter Ltd. Registered Office: 10 Vallance Road, Hove, East Sussex. BN3 2DA Registered in England No 3311937, VAT No UK 717 -8129-21
Page 2
2
Congratulations on becoming a distributor for the latest technological revolution in advertising media.
Your successful and profitable franchise will require a sound understanding of the best graphic design
skills for the iBall as documented throughout the following page s.
Manipulating Graphics
Preparation
We suggest to initially “crop” the graphic, which will maximise its eventual display size on the iBall.
Once the graphic is cropped, you will need to resize its height to 73 pixels or less, so that it will fit into
the iBall’s frame resolution.
Frame Resolution
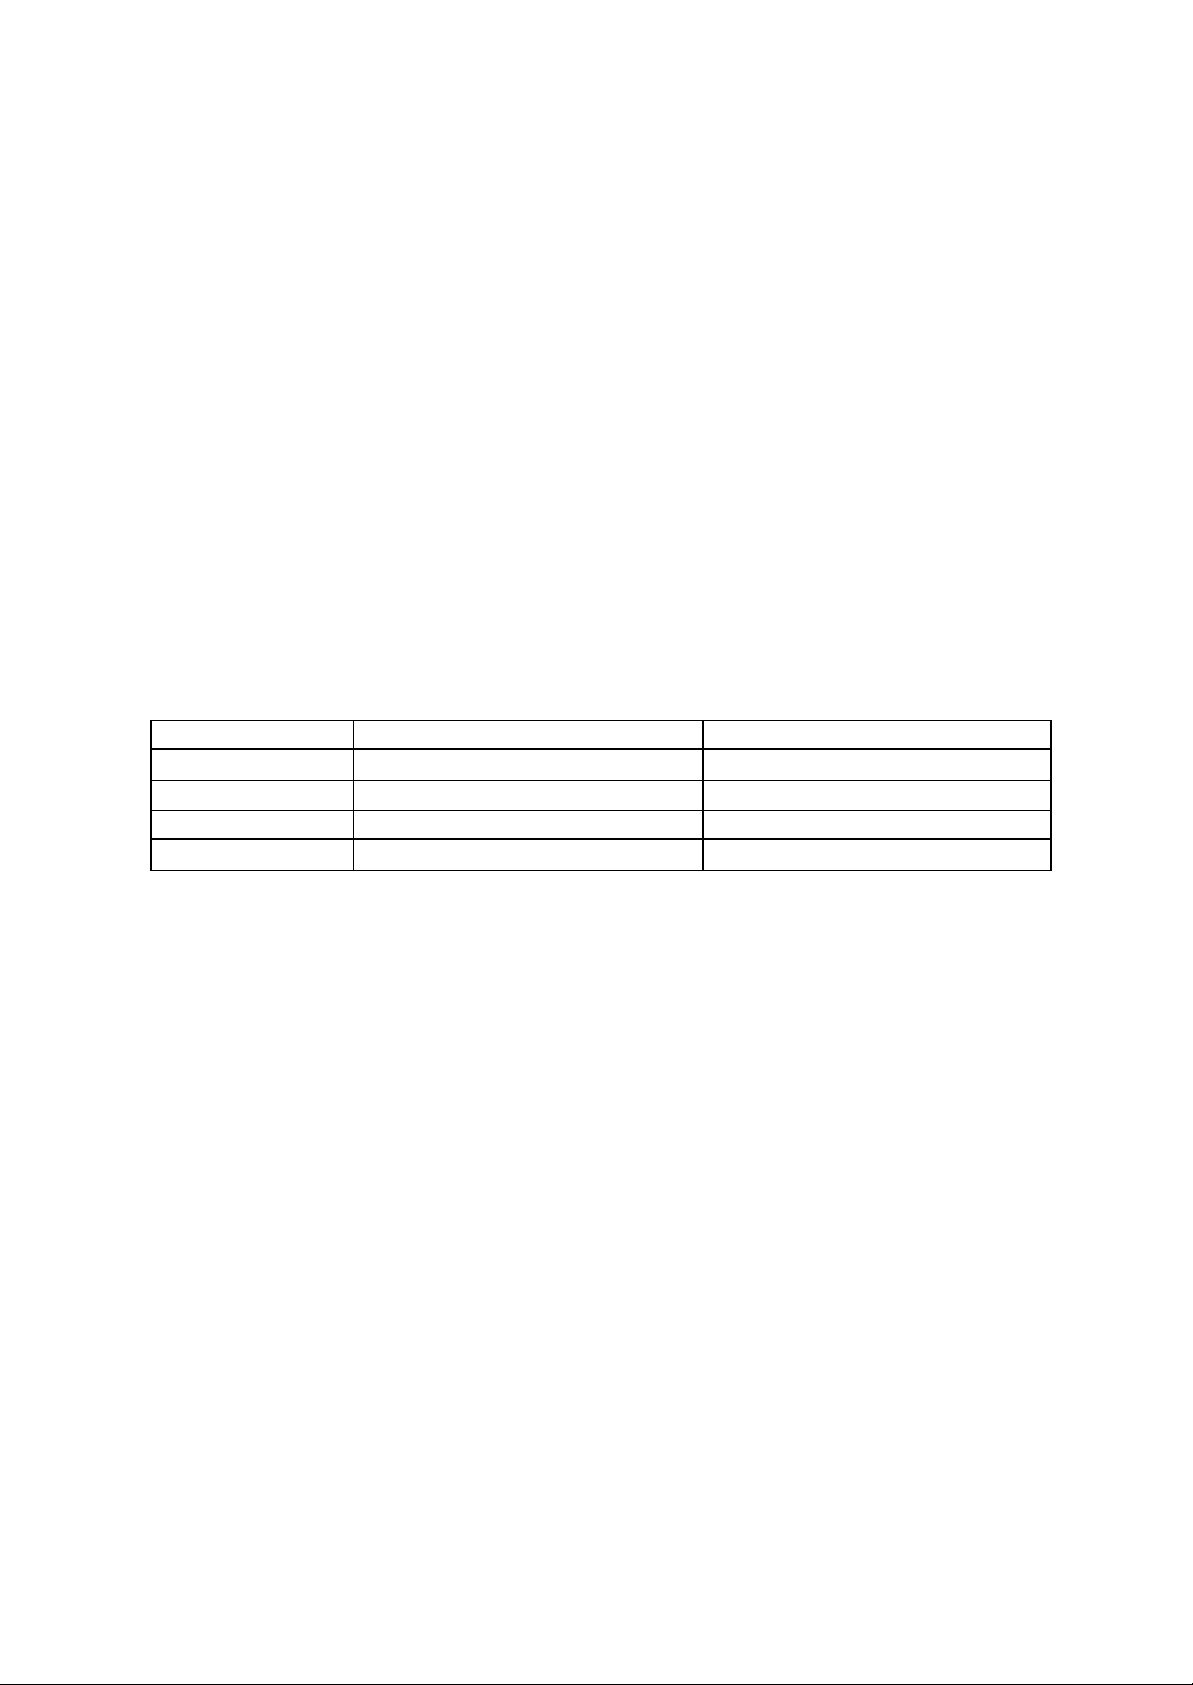
The iBall displays graphics to a height of 73 pixels which will look relatively small on your computer
screen until you zoom in. The memory space allocated to each sequence is such that a total frame
width of 2048 pixels will fill a sequence. This maximum value can be divided up between frames. The
following table shows the widths and corresponding numbers of frames that you can import into the
memory of your image pool:
Frame width Maximum frames per sequence Total Width
227 pixels 9 227 x 9 = 2043
256 pixels 8 256 x 8 = 2048
292 pixels 7 292 x 7 = 2044
341 pixels 6 341 x 6 = 2046
It is wise to use frames sparingly in order that you get the most out of each sequence of memory. For
general purpose, a frame with a 256 pixel width will accommodate comfortably a company logo,
contact details and advertising slogan, and allow 8 frames to fill the memory of a sequence.
Once the graphic is the right shape, with a height of equal to or less than 73 pixels, you will need to
assess its colours.
Page 3
3
Colours
The Palette
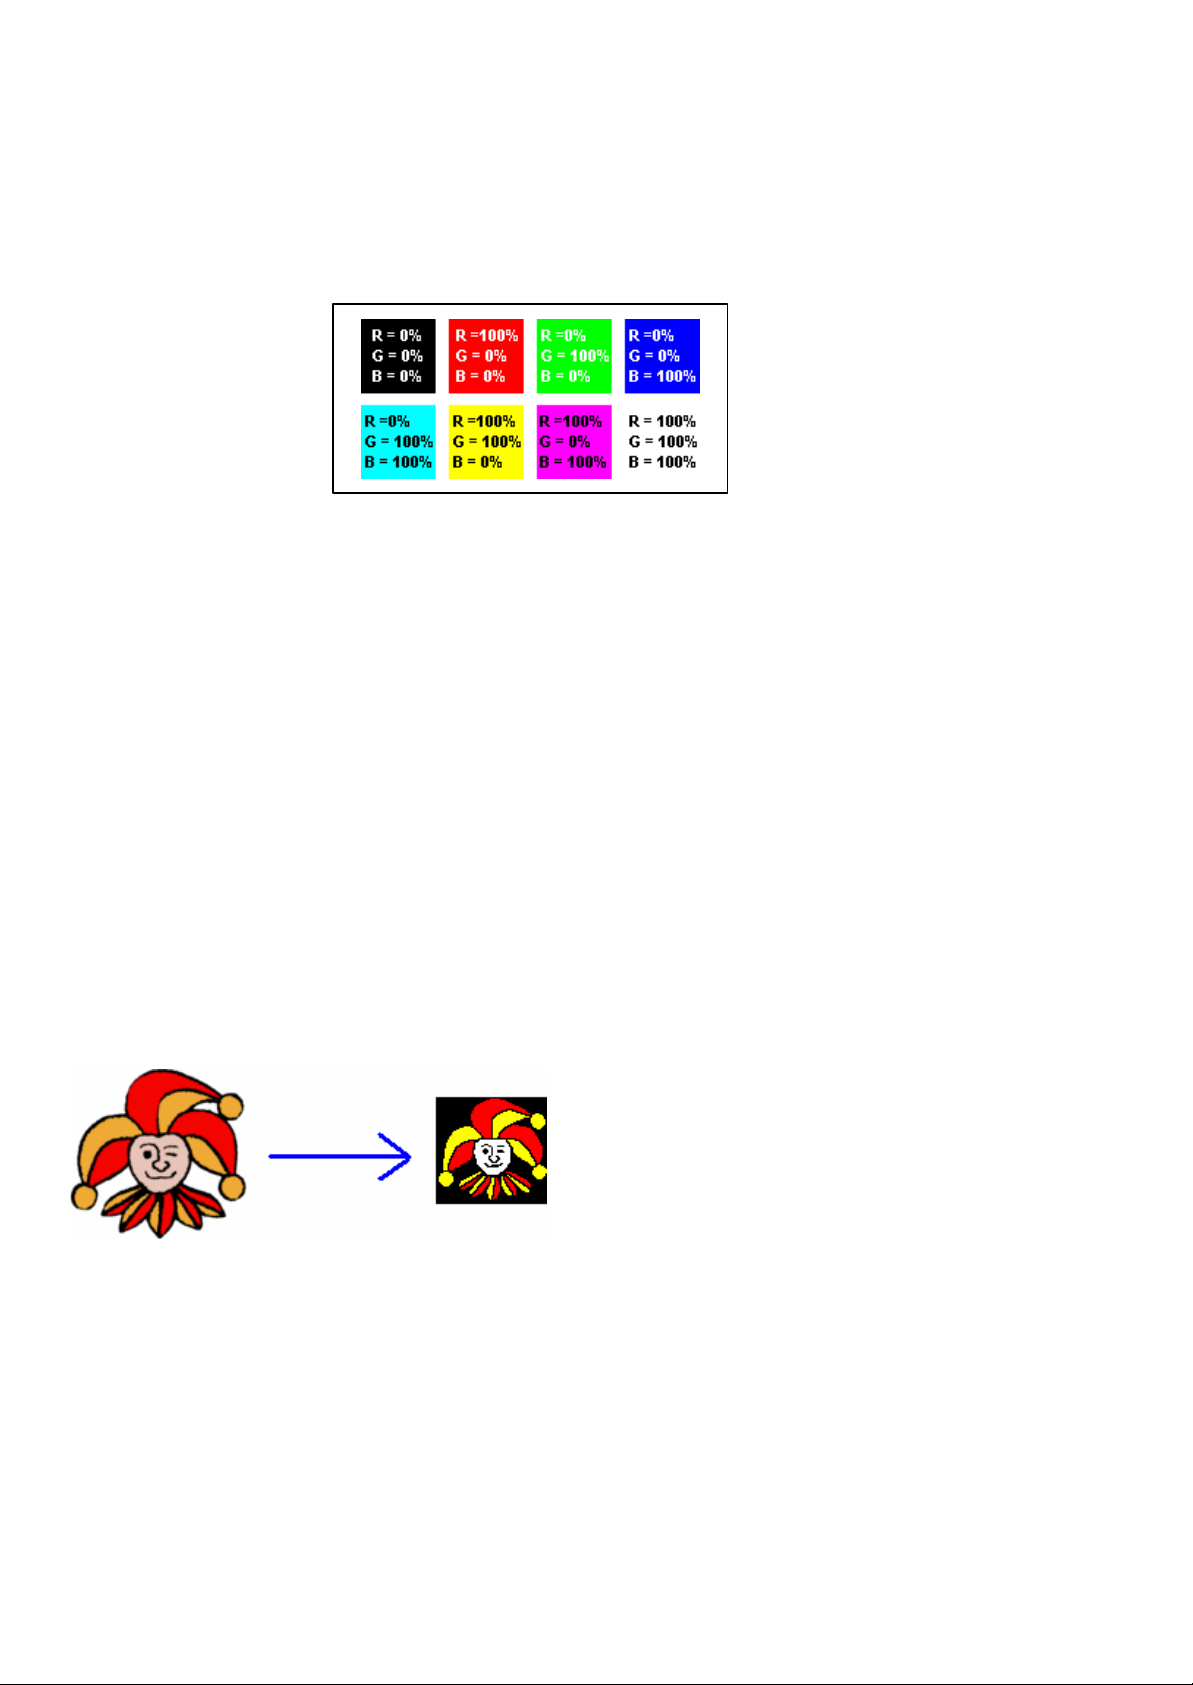
For all of your graphics and adverts to have a big impact, make use of all 8 colours shown below:
Saving an IBall Palette in Paint Shop Pro
You will firstly need to open a graphic in Paint Shop Pro containing the fundamental 8 colours shown
on the previous page which the iBall can display to be used as a reference to save the iBalls palette.
Open such a graphic and click on “Colors” and “Decrease color depth to 16 colors (4 bit)”. The option
to save the palette will now be available to you. Save the palette as “IBall 8 colours”. You will now be
able to translate any graphic into the 8 colours displayed by the iBall using either of the following two
techniques
Loading an iBall Palette – “Nearest Color Matching”
Graphics which originally have few colours and especially “blocks” of colours translate well onto the
iball with a “nearest color matching” conversion to its 8 colours. Open the graphic, and click “colors”,
“load palette” and select the “IBall colors” file. Clicking on “nearest color matching” will have the
following effect:
Page 4
4
Loading an iBall Palette – “Dithering”
Depending on the detail of shading of the original graphic, more advanced techniques may be
necessary to create the desired effect using the iBalls 8 colours. “Dithering” can be used to get the best
from the iBall’s colour range. Load the palette in the same was as above, however, this time select
“error diffusion dithering”.
Before loading the palette in either of these ways, you may have to set the brightness and contrast to
affect how the image translates into the iBall’s colour range.
Colour Schemes
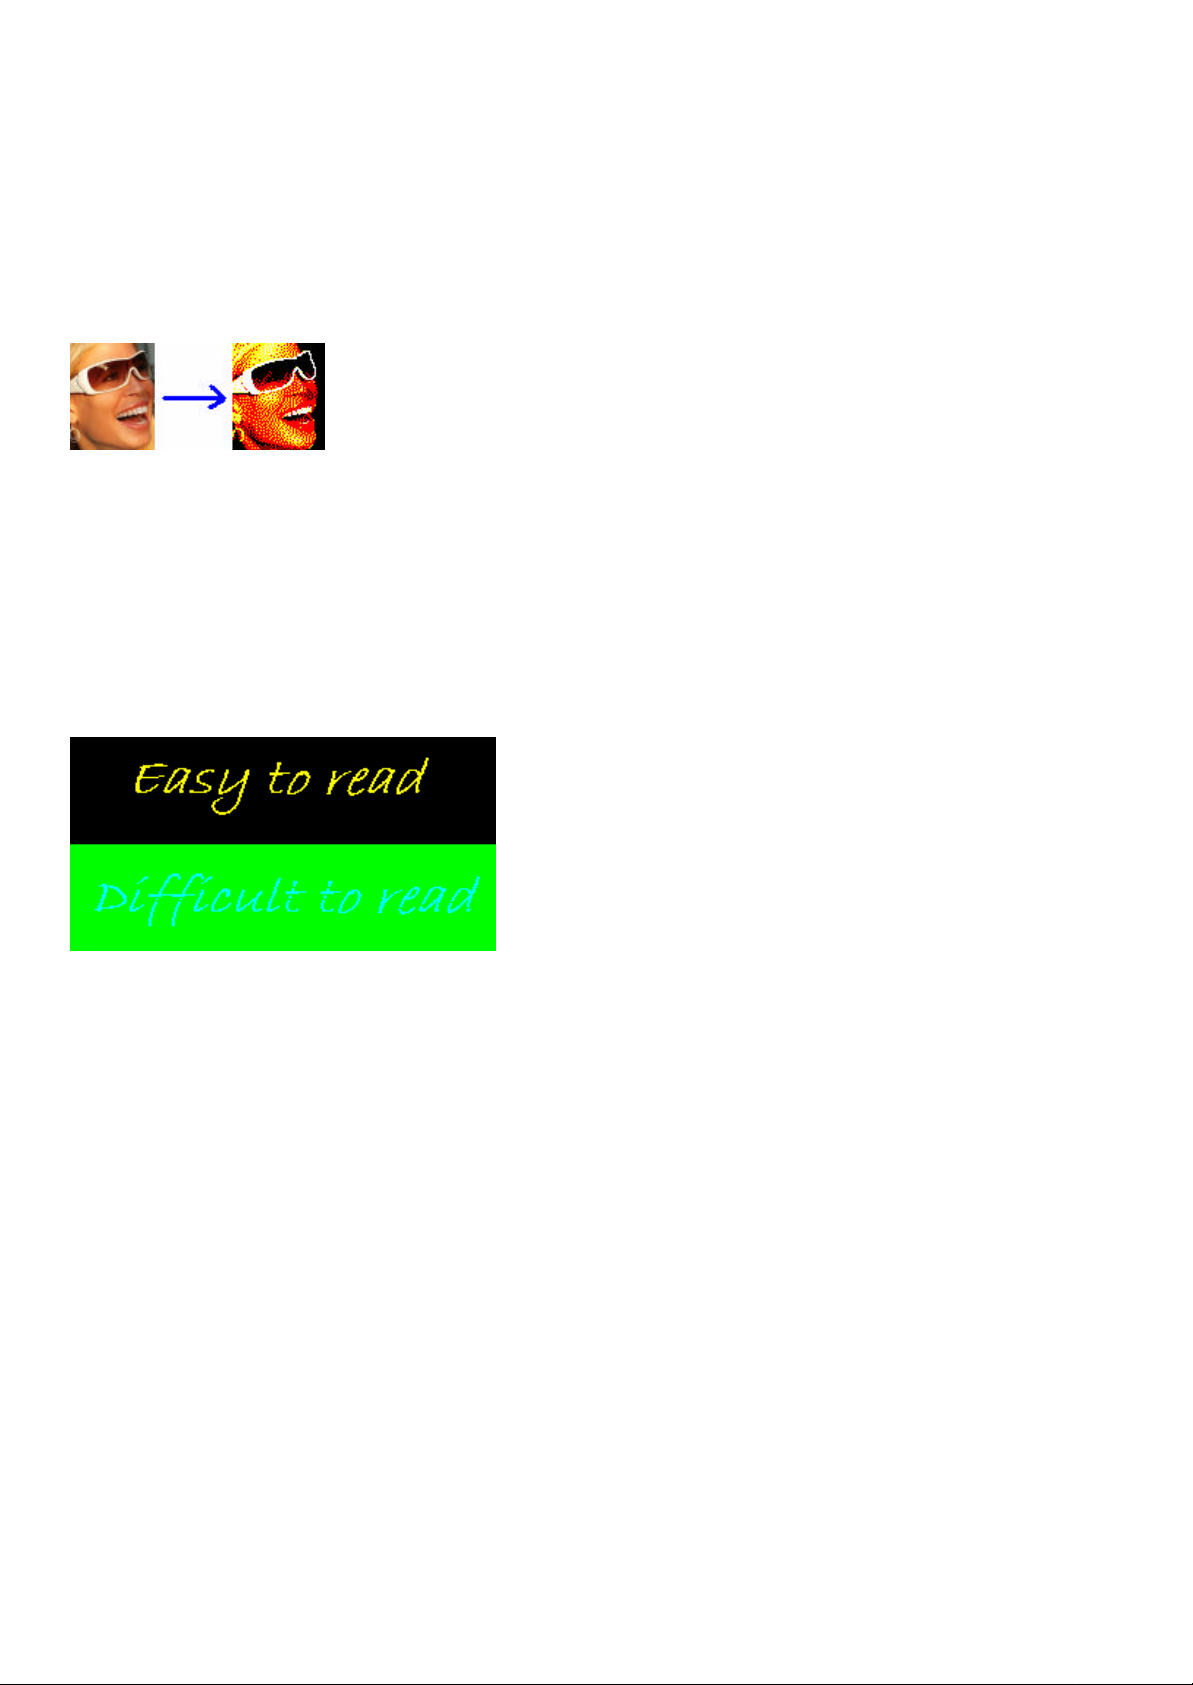
Now that the graphic has 8 colours, we suggest that it be cropped onto a black background. Graphic s
and text on a black background stand out more strikingly on the iBall and are more easily viewable, as
illustrated below:
With experience, you will notice that lighter colours are more apparent in the foreground, that is, on top
of the darker colours. Bordering text with darker colours as well as using darker colours to outline the
key elements of graphics will also make a higher impact on the viewer.
Page 5
5
Spacial Display Editor
Getting Started
Once your i Ball is setup with the provided “Spacial Display Editor” software, you will see on the left of
the screen that it has four banks of memory, each containing 16 sequences. By clicking “File” to create
a “New Zone”, the banks and their sequences will be available for you to store your graphics. We
suggest making a unique folder which will store all of the zone files.
If you have prepared your advert as an AVI video file, it is possible to use the animation importer button
to capture the AVI frames into a sequence:
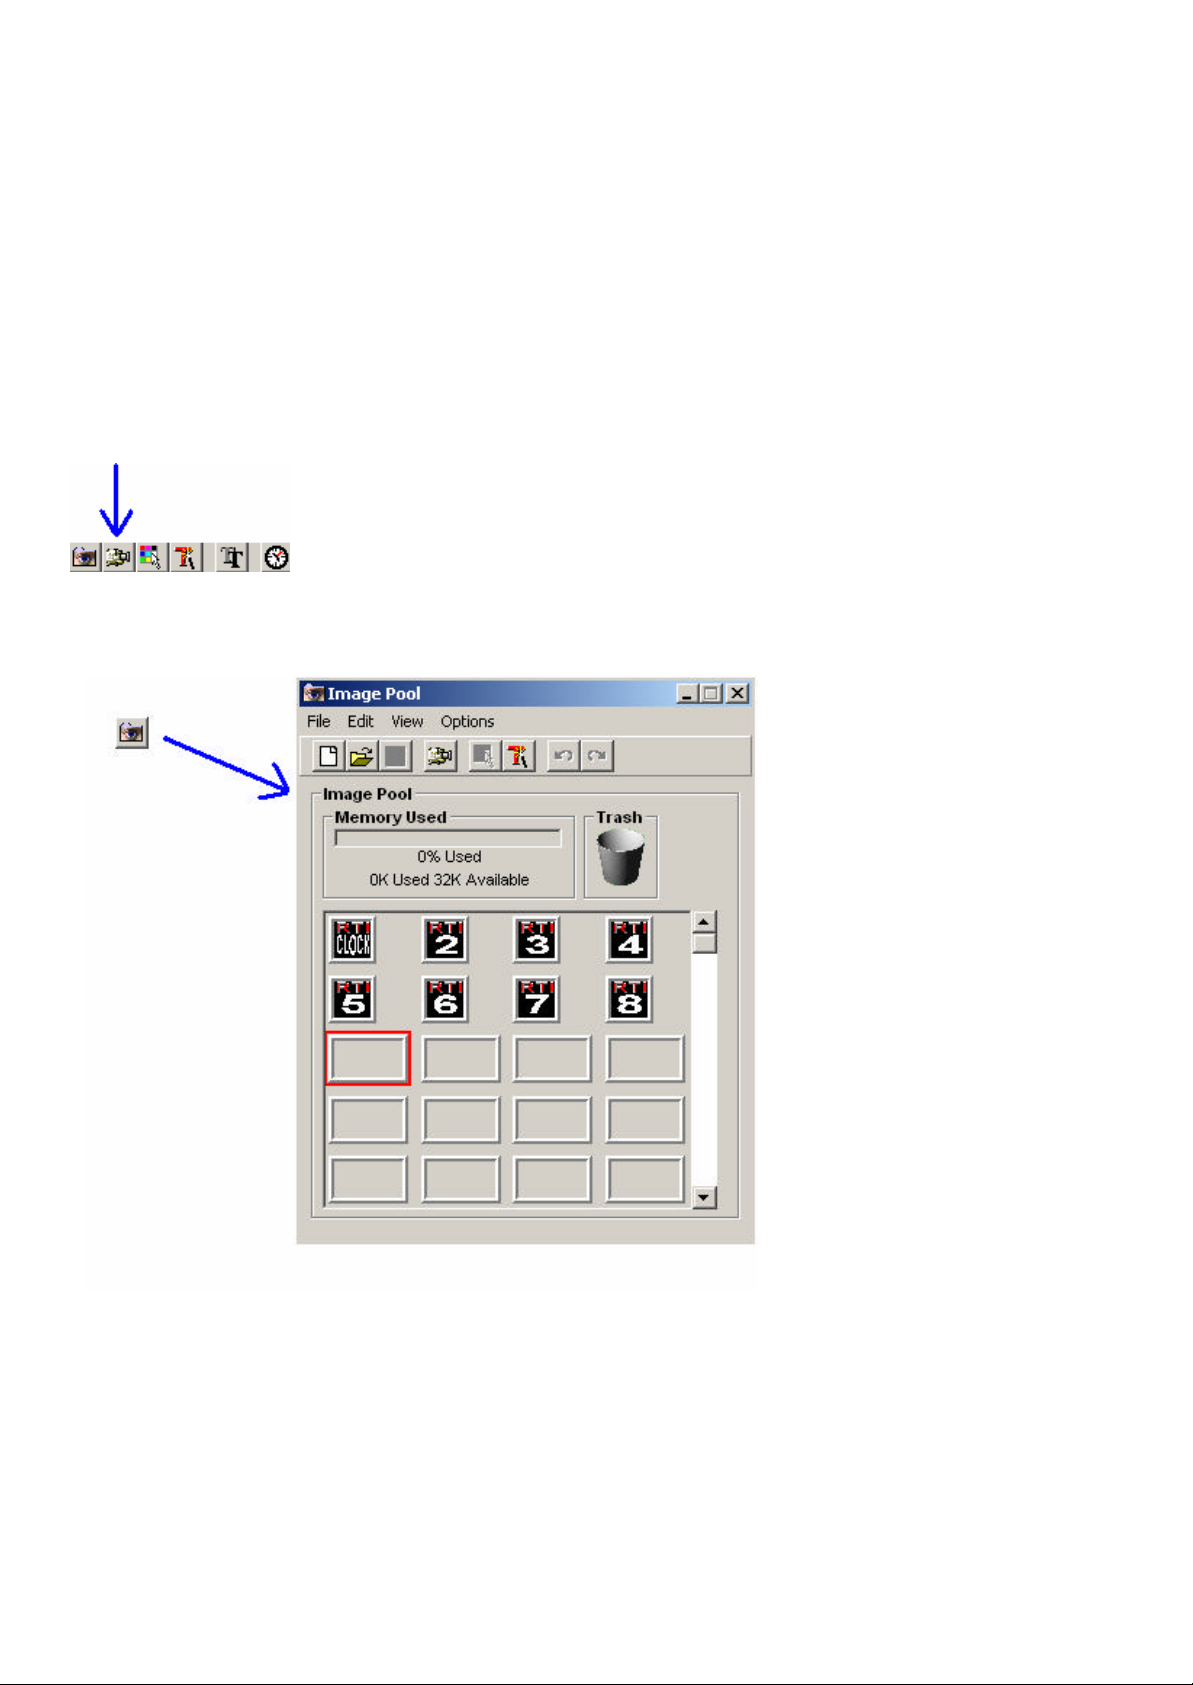
The graphics in your sequence are alway s stored in an “image pool” (see below) into which you can
also load individual frames into the iBall’s memory.
You can select any available slot outlined in red to insert your graphics. Once the graphics have been
imported here, you can drag them from their slot into the current animation sequence.
Page 6
6
Individual Frame Settings
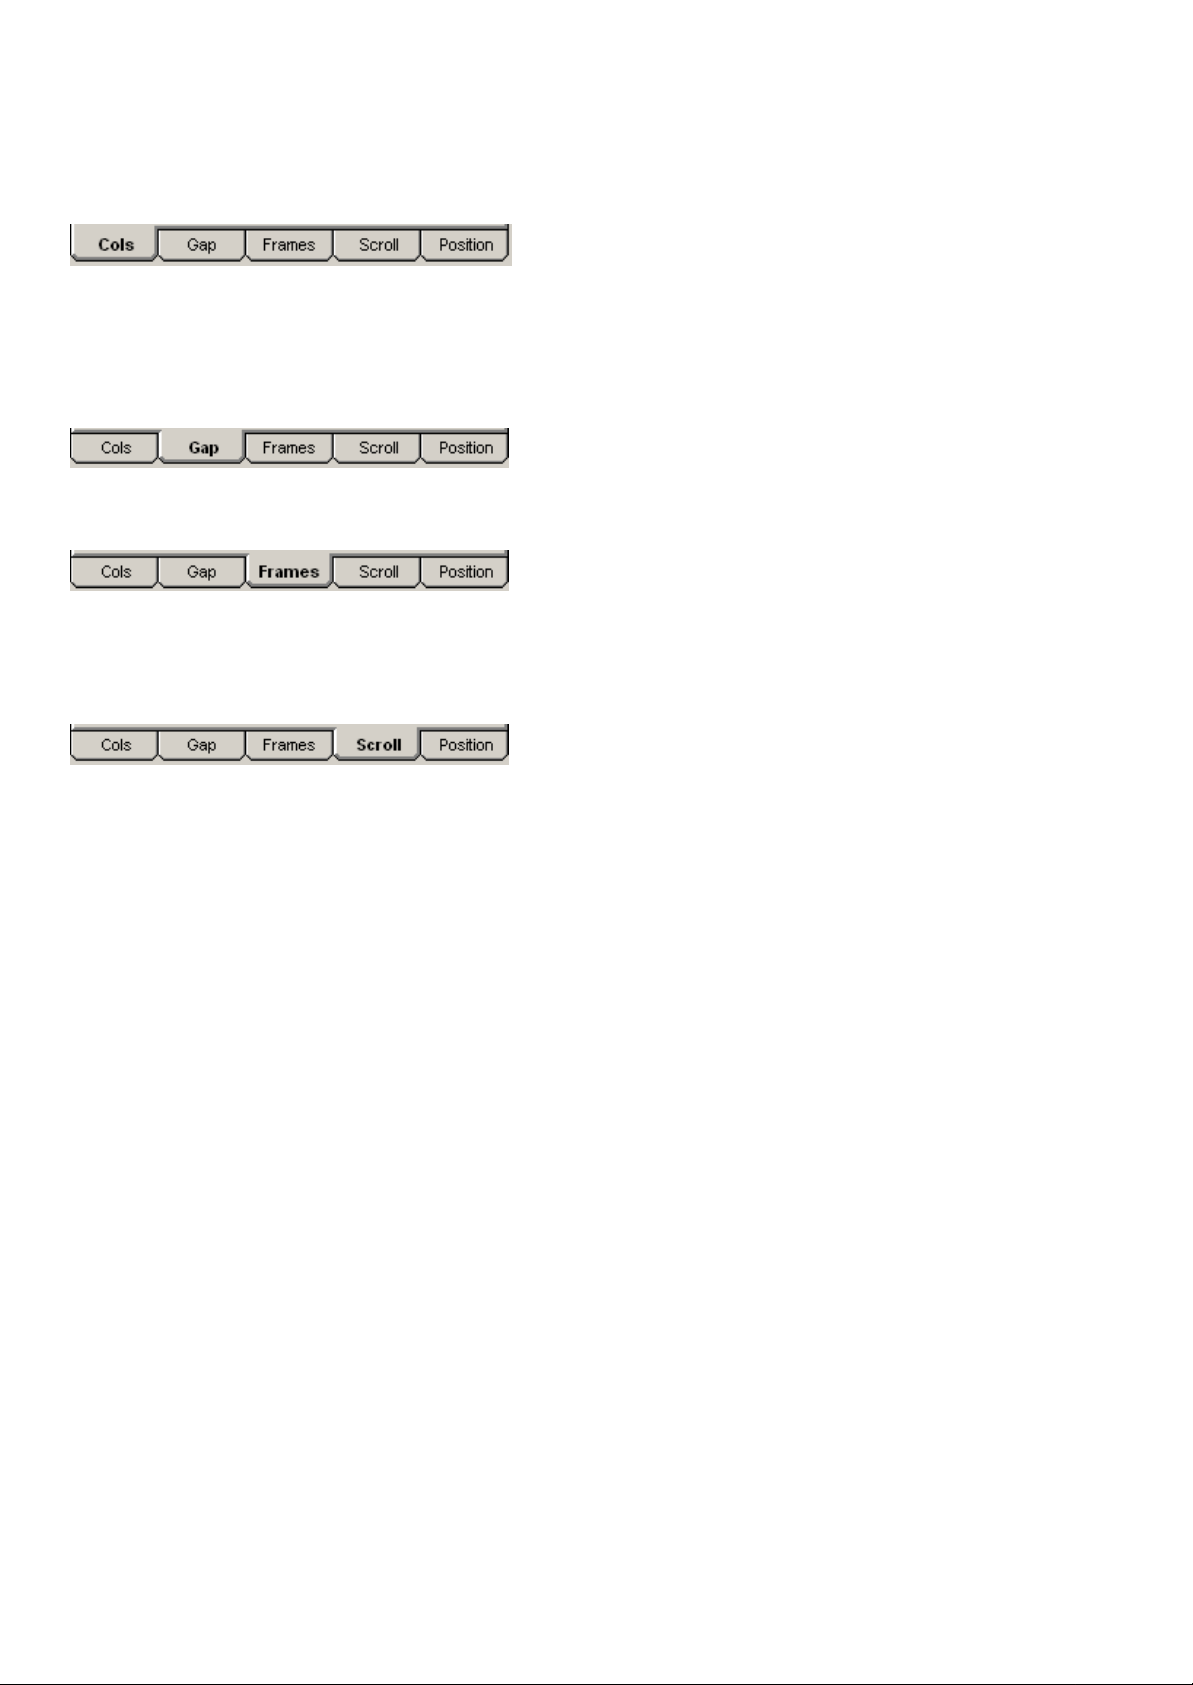
Experiment with the columns tab to define how dispersed a frame is and how many repeats it has over
the iBall’s circumference. The frame content may become less viewable if it is too squeezed, although
it is helpful to the viewer if they can view all of the content and specifically text, without having to wait
for it to scroll around.
Gaps can be used as opposed to black pixels at the edges of graphics to save memory space.
Set the number of frames to determine how long each graphic is displayed for. We suggest as a
guideline to ensure that each graphic can be viewed 3 times to allow all of the information to be
absorbed, while keeping an advert moved on at a steady pace maintaining the viewers attention.
The scroll speed can help the graphics be viewed quickly 3 times. We suggest a scroll speed setting of
between 3 and 5, depending on the frame width and number of columns. Scrolling the graphics from
right to left allows the viewer to easily read words as they are displayed into view .
Remember to check the effect of all of these variables on your frames. We suggest you work on your
iBall from a distance of 5 meters to appreciate whether your adverts will be viewable throughout the
venue they are displayed in.
Page 7
7
Creating a Good Advert
“Site” graphics, that is the “hosts” of the iBall can be created in much the same way as good adverts,
however, without the need of contact details, as the viewers are already in the site!
The Logo
A good advert needs to convey its message in as short a time as possible to accommodate even
passing viewers, hence, we suggest that a company logo and means of contact be presented on every
frame.
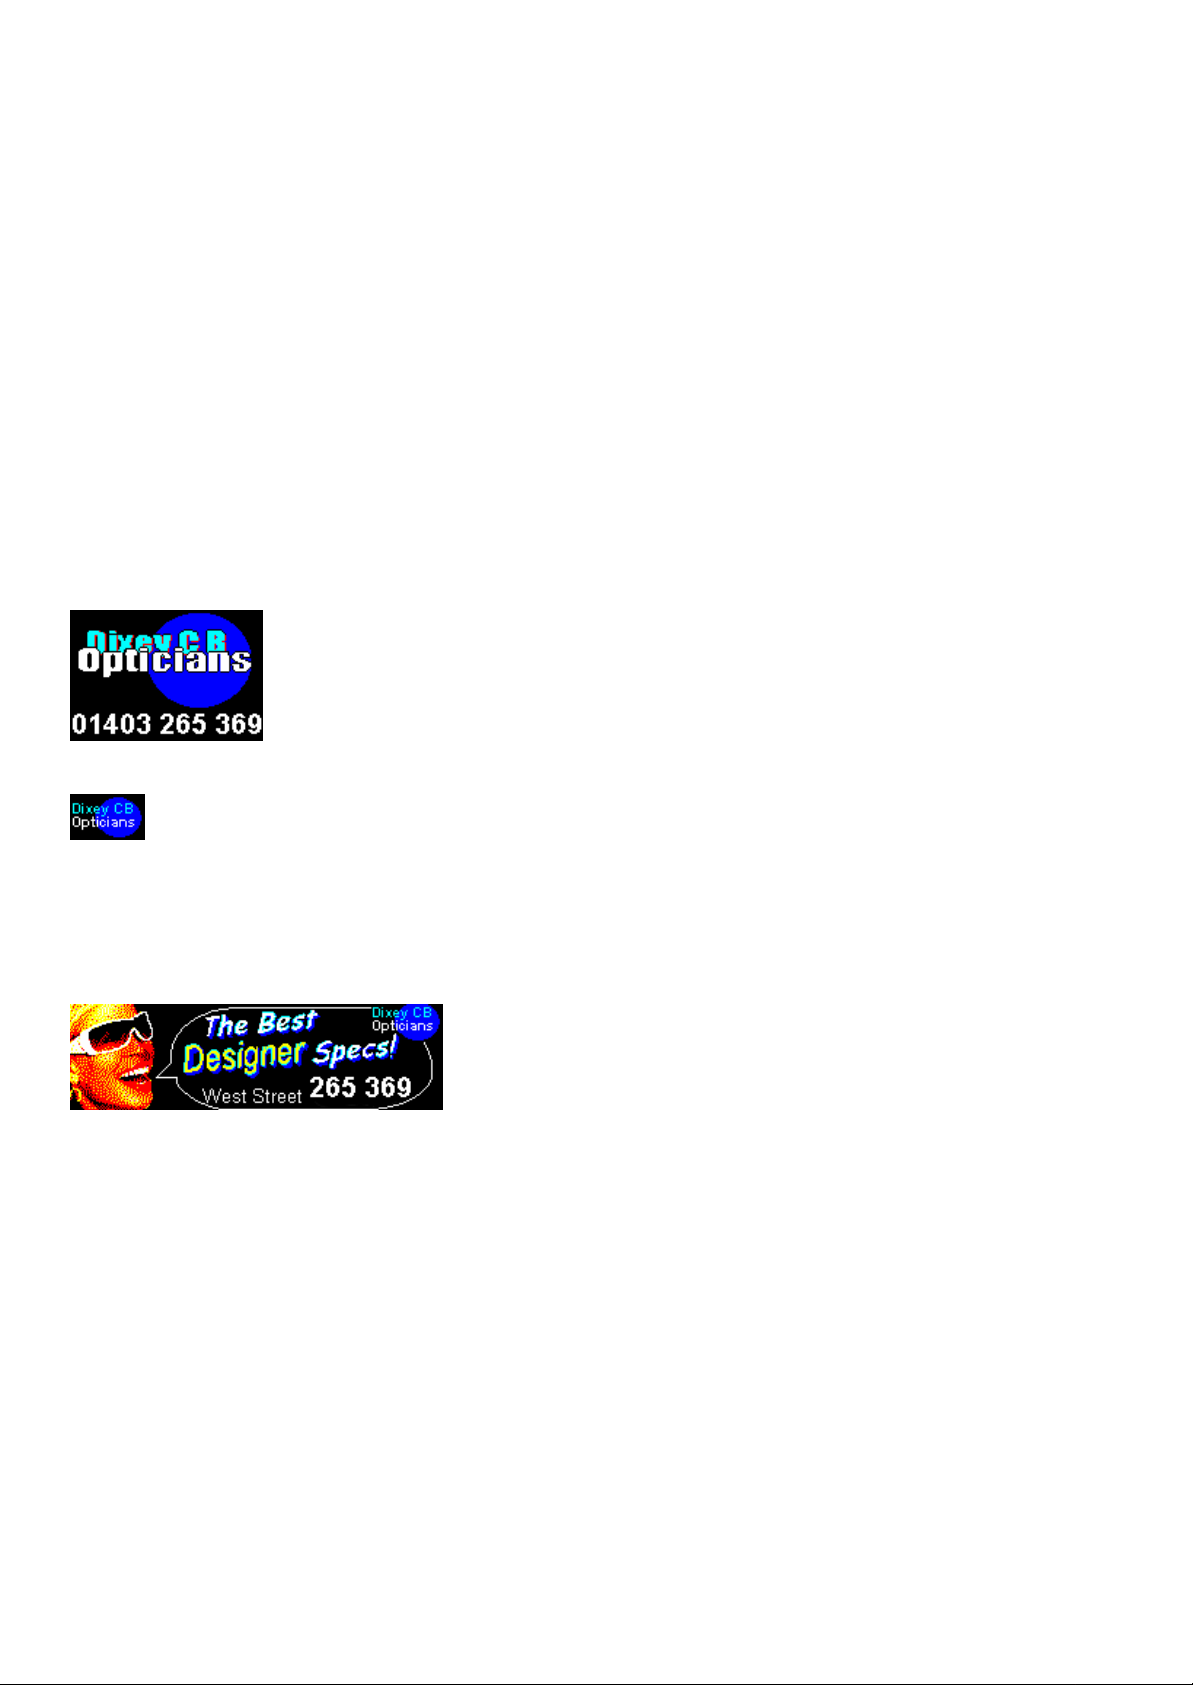
Our suggested format for adverts is to initially create a large logo and a small logo by the techniques
described with manipulating graphics. The layout is that an initial frame will display the large logo (see
example below) to introduce the viewer to the brand name.
A smaller version of the logo (see above) can remain always displayed in subsequent frames, allowing
space for the content of the advert (see below):
Page 8
8
Text on the iBall
Be sure to use large text and stand back to view your adverts at a distance to make sure the
information is easily readable. Ensuring that the text has a “kerning” value high enough to separate the
individual characters makes text on the iBall easily readable, otherwise, it may take some time to draw
black to separate the letters. If your text software has smoothing options or an option called “anti alias”,
make sure this is turned off, to keep the color you select consistent for all of the text you use in line with
the Iball’s colour range.
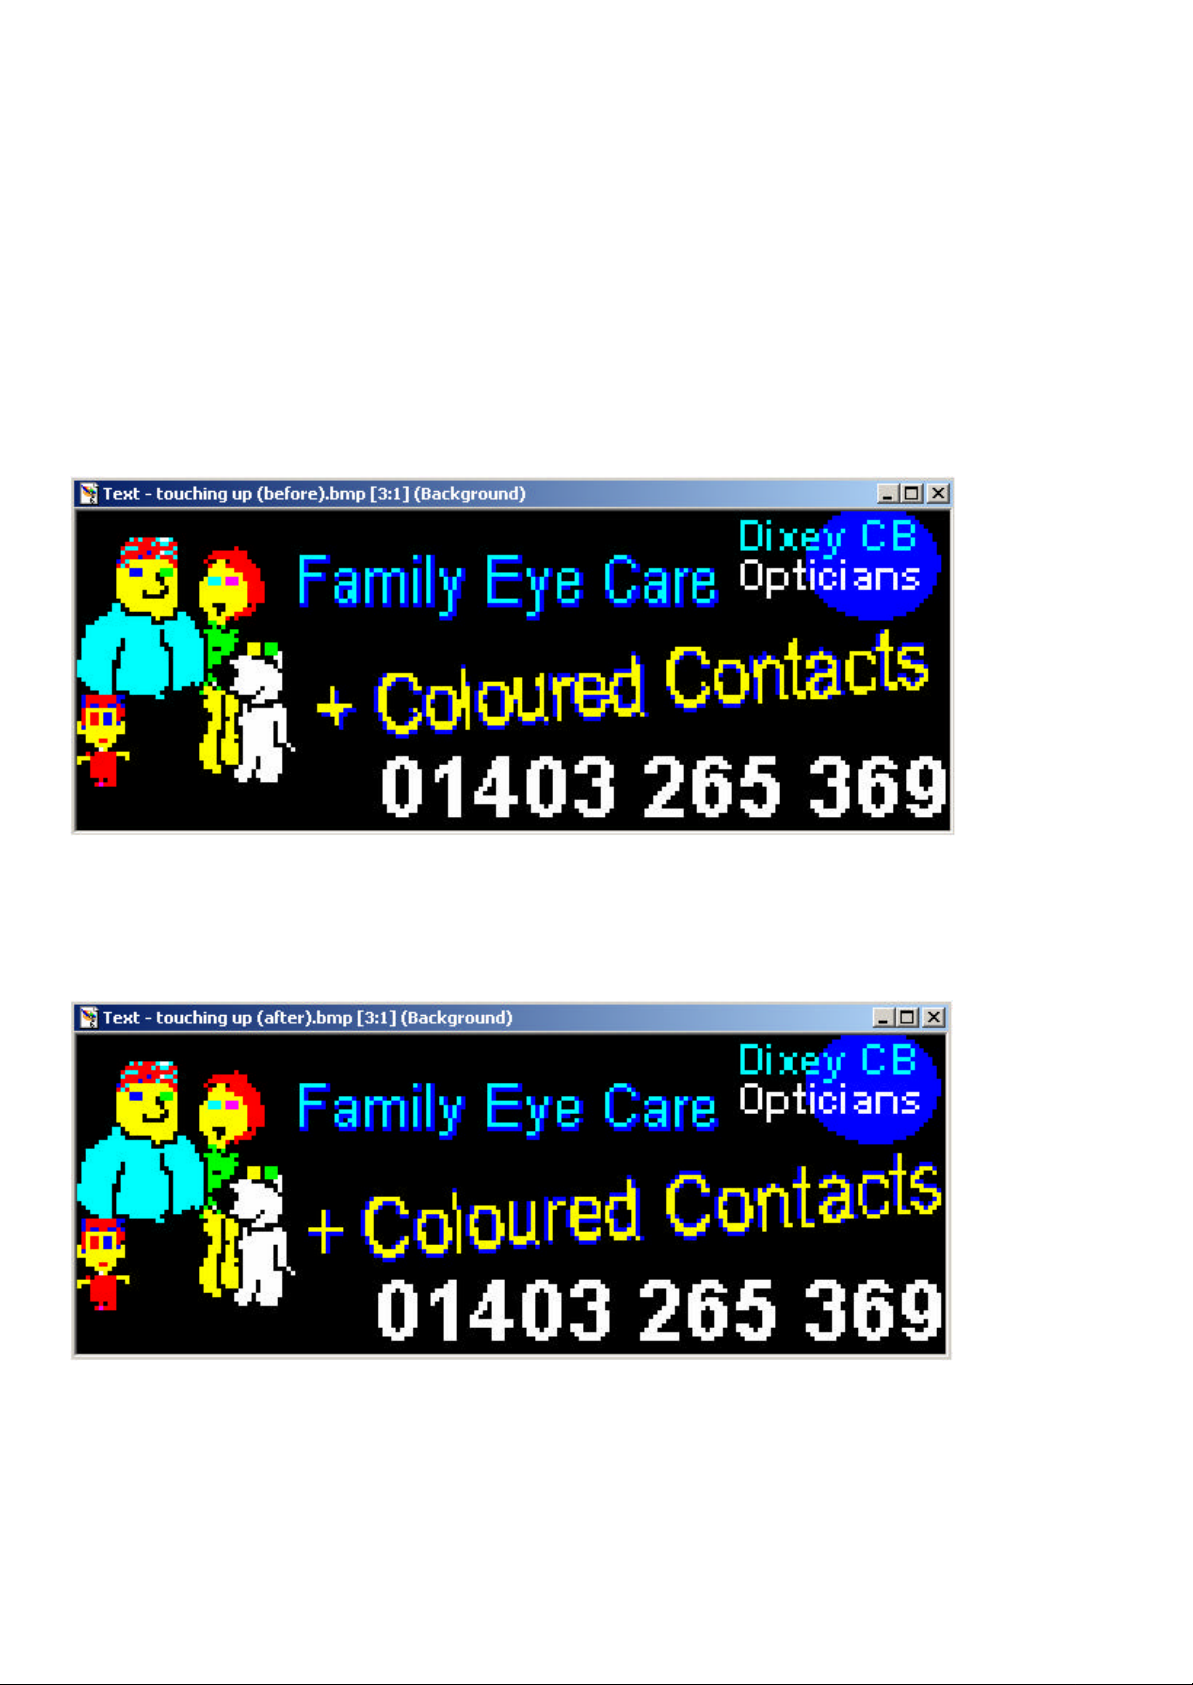
Due to the small font sizes necessary to fit into the iballs frame resolution, it may be required to
manually “touch up” the text to make it more readable (see the following example):
The edited text is the “+ Coloured Contacts” which was applied with the Spacial Display Editor Text
Creator. Not ice the subtle differences below, including that particular characters have been separated
and the shapes of some letters better defined, that for a small amount of editing, the text will look nicer
and be easier to read.
Page 9
9
Animating Your Graphics
Animating a sequence within Spacial Display Editor
1
2
3
4
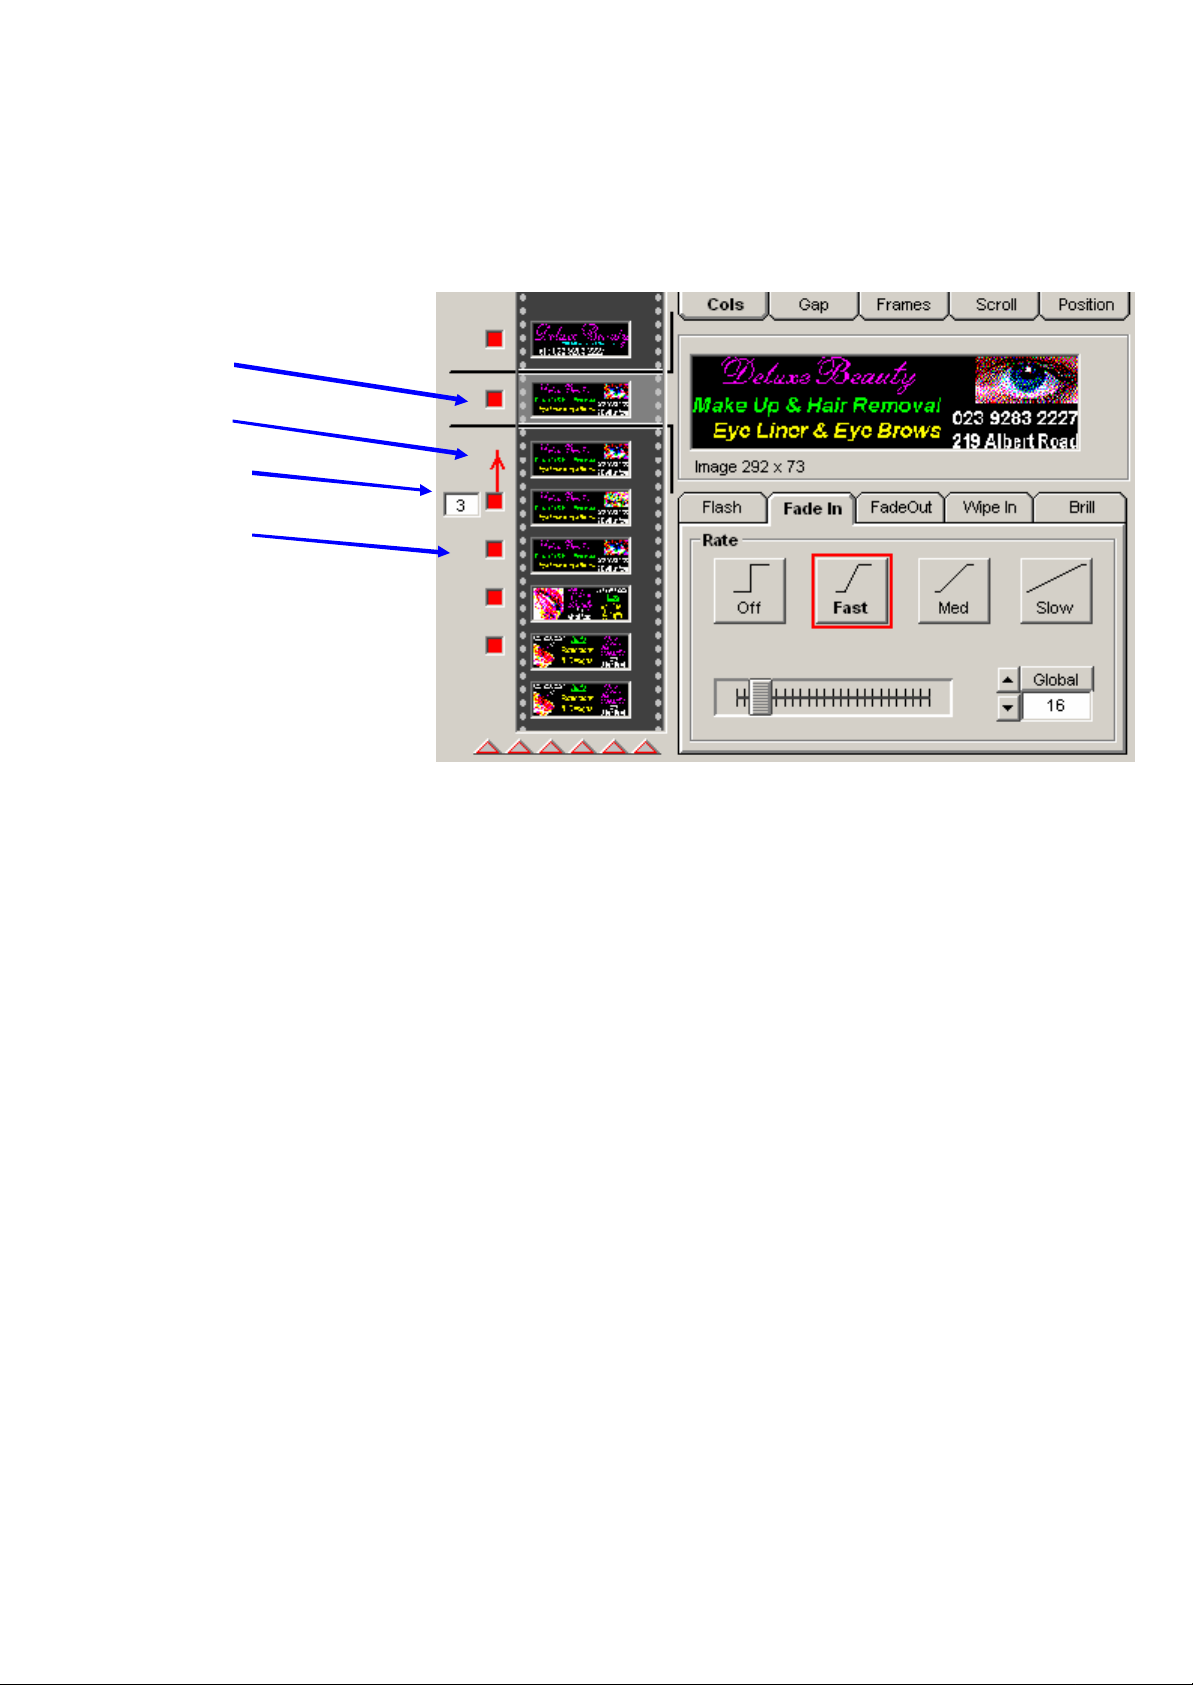
The animation example begins with the selected “open eye” frame (arrowed 1). This introduces the
animation sequence outside of the loop, with a “fast fade” in selected.
Arrow 2 points to the f irst frame which is animated in the loop, which again is the same open frame,
but without the fade in selected. This frame is held for a period of time, before the next frame, arrow
3 flashes on for a short period of time. Arrow 3 is the closed eye which loops back to the open eye,
creating the effect of the eye blinking.
The final frame arrowed 4 is the open eye again, with a fast fade out selected, to end the particular
animation.
Page 10
10
Preparing an Animated Sequence Using Animation Shop
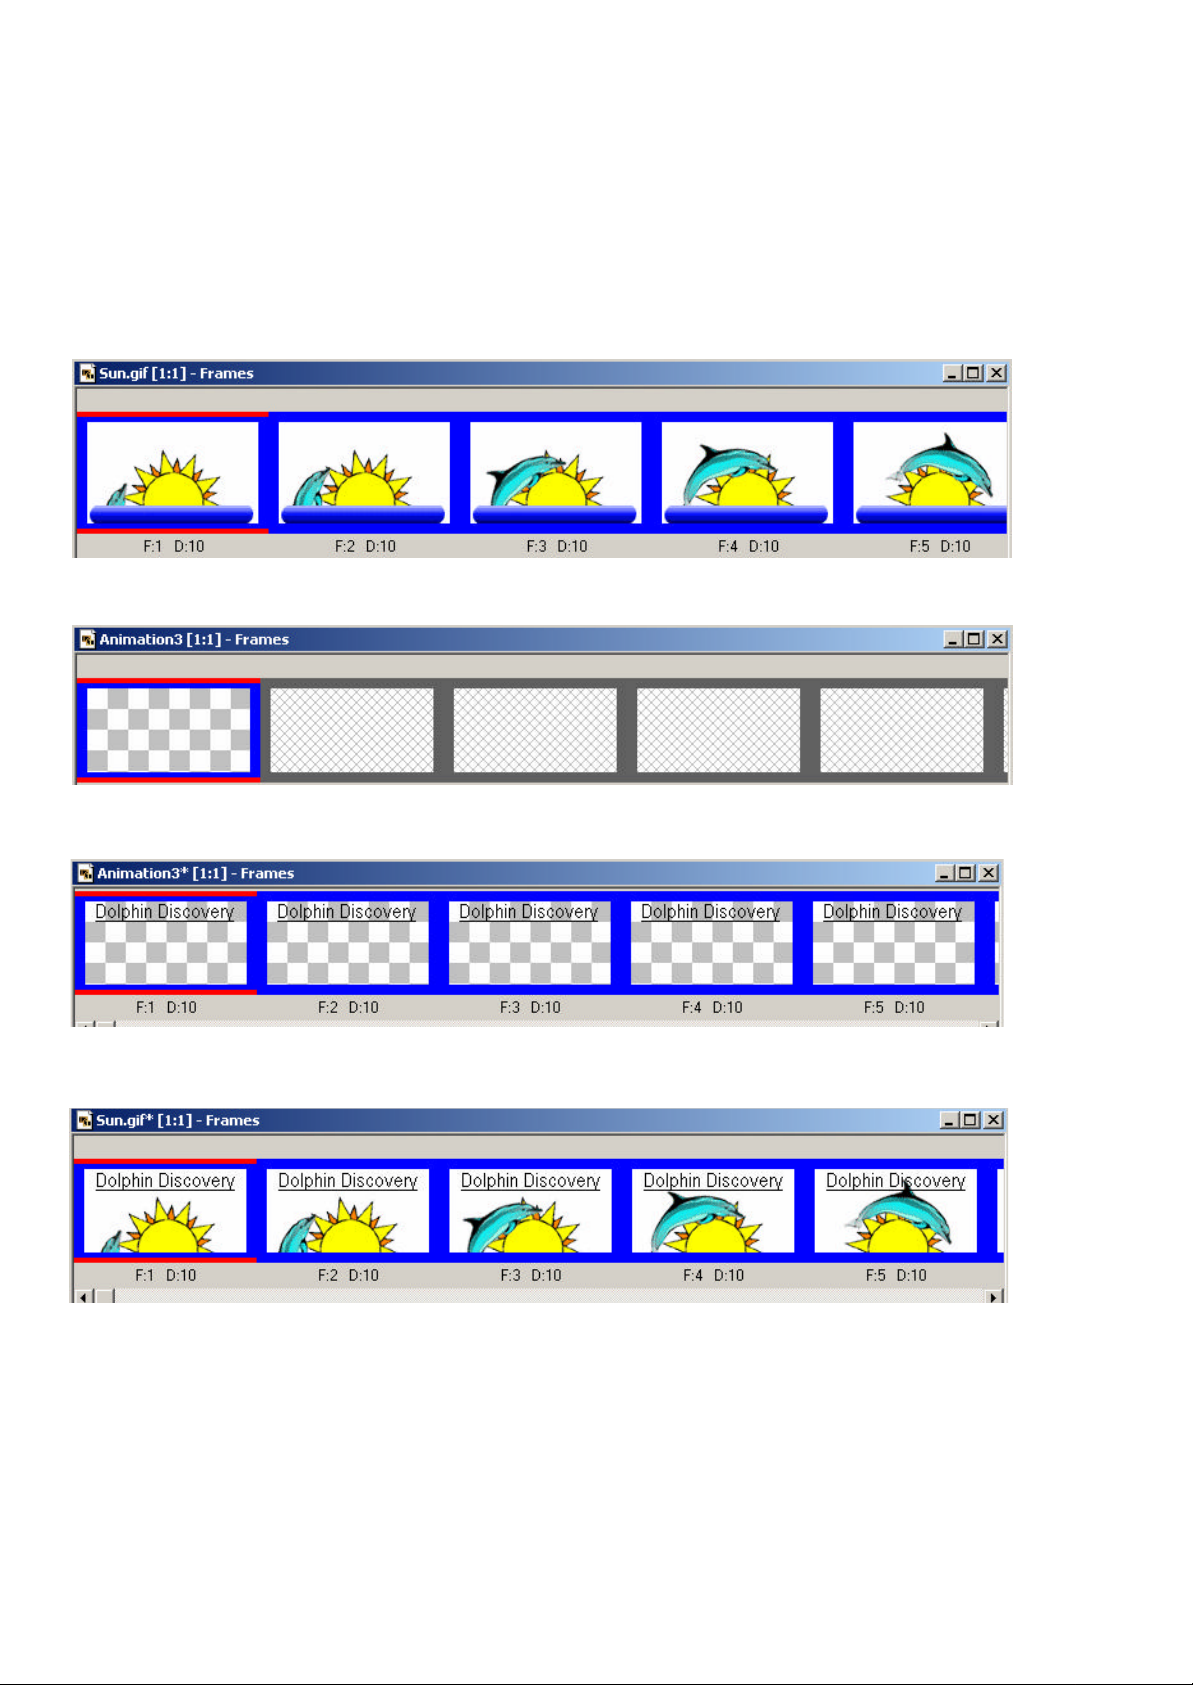
There are multitudes of freeware “gif” files available on the internet. These can be deconstructed
into their composite frames using Animation Shop which is part of the Paint Shop Pro suite. The
frames can be simultaneously resized and pasted on to with the content of your adverts. To
simultaneously edit all frames, “edit” and “select all” to highlight them
Step 1, crop the frames
Step 2, “file”, “new” and create an animation with the same frame size
Put the text into the new frame, right click it, and duplicate the frames. Then select all.
Drag the text onto the animation and watch it pasted on all frames simultaneously .
Page 11
11
Uploading
To assess the progress of your advert, you will need to be viewing your changes on the iBall. Many
of the changes you make in SDE will not require an upload to change on your iBall. An upload is
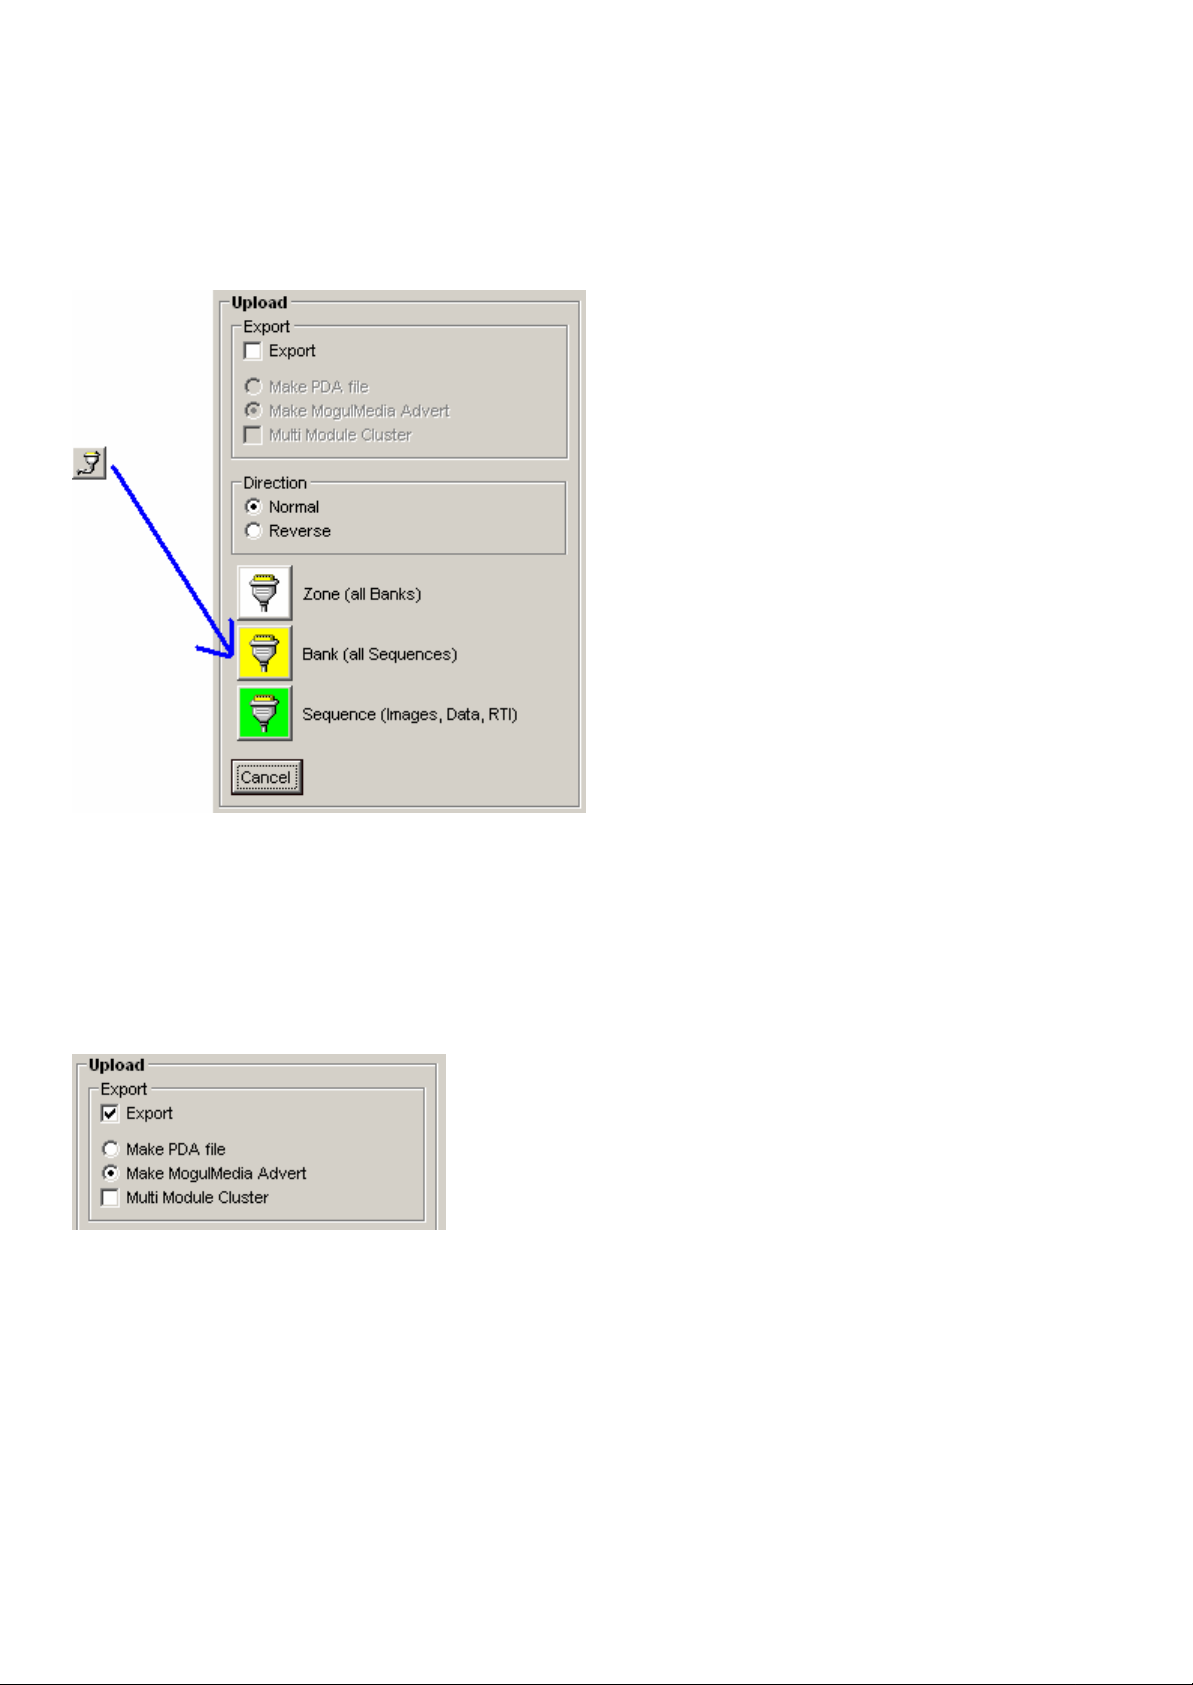
only required if you change graphics in the image pool. In order to do this, click the “upload” button.
In the upload window, you can select to upload the whole zone, a single bank or the currently
selected sequence. It will save time to upload only what is necessary. Once your advert is finished,
it will need to be exported to a MogulMedia Advert file.
Exporting to MogulMedia
When exporting to a MogulMedia file, simply upload in the normal way and put a tick in the export
box:
It is crucial when exporting to a MogulMedia file that you do not export blank sequences, for
example, if you have made a sequence or 6 sequences, export just those sequence as opposed to
a whole bank or zone. To export blank data would overwrite other sequences on the iBalls when
you come to broadcast.
Page 12

12
What is Mogul Media
Mogul Media is a unique remote broadcast system, specifically designed by Spacewriter for use
with their range of products.
It enables one, or multiple units to be installed on site and have adverts broadcast to remotely,
using a secure online account.
You will be given a Customer account, which enables you to set up clients. Each of your clients can
have one, or several groups. If you get a client with more than one site, all the balls at those sites
can be added to one group, so adverts only need be broadcast once. That is assuming that each
ball will have the same adverts displayed on them. If your client has several sites and wants
different adverts on each site, the balls can be put into different groups. Should you get an
advertiser that wants to appear on all of the sites, you can still broadcast to multiple groups. This will
all be explained later on.
How to Use Mogul Media
Spacewriter will have already set up your ball in your account for you. You will notice if you click on
“Clients” on the left hand menu that you also have a client account, of which your demo ball is
situated.
By clicking on “Details” you can view all the client details
By clicking on “Groups” you will notice that you have a group set up for you already. It would be
here that you would see all the groups of your client, if you have set up them up with multiple sites
that has different adverts broadcast to each.
You can edit the group details and view the module and device details. This again will be explained
later.
Step 1 – Getting Started
Now you have received your iBall you need to set it up in Mogul Media. The following procedure will
need to be carried out in the same way for any ball you receive, before it gets installed in your
customers sites.
Step 2 - Adding a new Client
Go to www.mogulmedia.biz and enter your username and password.
The first thing you need to do is create a new client for yourself. This client will be you, and will
contain your demo ball in the group.
Click on “Clients” in the left hand menu. Once entering the “Client” section from, go to “Add Client”
at the bottom of the page. Once completed, click “Submit”.
The client will now appear in your client list.
Page 13

13
Step 3 - Adding a group to a Client
Click on “Groups” for the relevant client. Go to “Add Group” Give the group a name. Here you can
also select the orientation of the ball, so if your client has the ball fixed on the ceiling, you can select
reverse. Once changing the reverse button on the bottom of the ball the graphics will appear the
correct way.
If you want your customer to be able to text to slot 7 only, so as not to interrupt with the advertising
you are selling, select “Standard (RTI) (Slot #7 Only) under “Text Mode”. Click “Submit.
Step 4 - Adding GPRS Module to the group
Click on “Modules” for the group you are creating and then click “Add GPRS Module”
Spacewriter will have added all the SIM details to our system that you have given us. You can then
search for the SIM Card XRef that you gave us in the drop down menu. Give the module a serial
number, this is just for your reference. Click “Submit”
Step 5 - Adding a Device to the module
Click on “Devices” and then “Attach Device”.
It will bring up a list of all the devices that you have purchased from Spacewriter, that are yet to be
assigned to a module. Find the relevant device number, by matching up the device chip number
from the ball in question and click “Attach”.
That new Client now has one group with one ball in it. If they have more than one ball going into the
group, under the group menu, click on “modules” and then add another GPRS module by following
the steps above.
Continue this process until all the balls have modules assigned and are in the relevant group. If that
client wants to have more than one ball, but displaying something different on it, then under
“Groups” Menu, add another group.
Each client has its own Private advert library, to which adverts can be uploaded as explained above.
*To find the chip number turn the iBall off and look down the globe. You will see a 4 or 5 digit
number printed on the chip on the Circuit Board.*
Page 14

14
Step 6 – Preparing the ball for a broadcast
Go To “Groups” in the left hand menu and select the group you want to broadcast your advert to,
this will be your demo group to begin with.
Click on “Initialise” and then click on the “Initialise” button again. This will take you to the broadcast
log. By Clicking “Refresh” you will see the Initialise broadcast appear. By clicking on details you will
see when the SMS has been received. By continuing to click refresh you will see when the
broadcast has been completed.
You will see red green and blue lines appear moving up the iBall. Your iBall is now ready to receive
broadcasts.
Every ball MUST be initialised before you broadcast any adverts to it.
Step 7 – Uploading adverts to your demo ball, using the private advert library
Visit www.mogulmedia.biz and use your email address and password to log in.
Click on “Clients” on the left hand menu and then click “Select” next to your company name. This
will automatically select your demo group, as at present you will only have one group.
Click on “Private Advert Library” and this will take you to that particular clients library of adverts,
which at this moment is your demo ball.
The only adverts in there to begin are adverts which clear images from the ball.
To add your advert, browse for the location of it, give the advert a description and click submit. It
may take a few moments to upload. You will then be able to click on “Broadcast” and select the
location of where you want the advert to be placed.
Mogul Media categorises adverts as follows:
Short Advert – 1 sequence
Medium Advert – 1 bank
Long Advert – more than 1 bank, or complete zone.
If you are trying to broadcast a short advert, you will get the option of broadcasting the advert in slot
1-64. A medium advert can only be broadcast in slot 1-4 and a Long Advert can only be broadcast
into slot 1. It is therefore important to follow the graphics guidelines when uploading, so that if you
only have one sequence you do not upload a whole zone.
Before you click “Broadcast” you can also select the time and date you want it to be broadcast, if
you do not want it to be immediate.
Once you click “Broadcast” it will take you to the broadcast log. If you click “Refresh” you will see
when the broadcast has completed.
By clicking on “Details” you can monitor when the SMS has been received. If the SMS is not
received this may be because the iBall is turned off, there is no cellular signal where the ball is
Page 15

15
located, or there may just be a delay with the ball receiving the SMS. It will continue to try and send
the SMS for 24 hours.
Step 8 - Viewing the Content on the iBall
By going back to the groups page and clicking on “Content” you can view each of the 64
sequences and see which are adverts are where, and which sequences are free.
Step 9 - Using your mobile phone
Your iBall has been set up so that you can send an SMS to it, using your mobile phone. The
configuration has been set so that the text will always be received in Slot 7, however you can
change this so that you can text to all 64 sequences if required. This will be explained later.
To be able to send a text you must first map your mobile number to the system, as only numbers on
the system will be able to text to the ball.
In the left hand menu click on “Mapping Manager” and then “Add Mapping” .
Enter the phone number of the person who wants to be able to send SMS to the ball. If you had
several groups you could select which group to assign the number too, otherwise just add a
description and click “Submit”
SMS Instructions
Simply send your SMS text message to +44 7781 484 703. If you want upper and lower lines of text
then type your upper line message first, then type L# and then your lower line message.
For example: Special OfferL#Carlsberg £1. In this message Special Offer would be on the upper
line and Carlsberg £1 would be on the lower line.
To chose red coloured text insert R# before the message. For example R#Great Deal
Colours available are:
R# Red
G# Green
B# Blue
Y# Yellow
M# Mauve
T# Turquoise
W# White
Page 16

16
Step 10 - Clearing an Advert
If you have broadcast something which you no longer want displayed on the ball you have two
options.
Firstly you can just overwrite the advert with new content, or you can broadcast a Clear advert to
remove the content from the ball.
With this option you can either clear the whole memory by broadcasting a Clear All advert. You will
notice this is a Long Advert (A complete Zone). You can broadcast a Clear Bank advert, which will
just clear the bank you select, or you can broadcast a Clear Advert, which will just clear the selected
sequence slot.
 Loading...