

Page 1
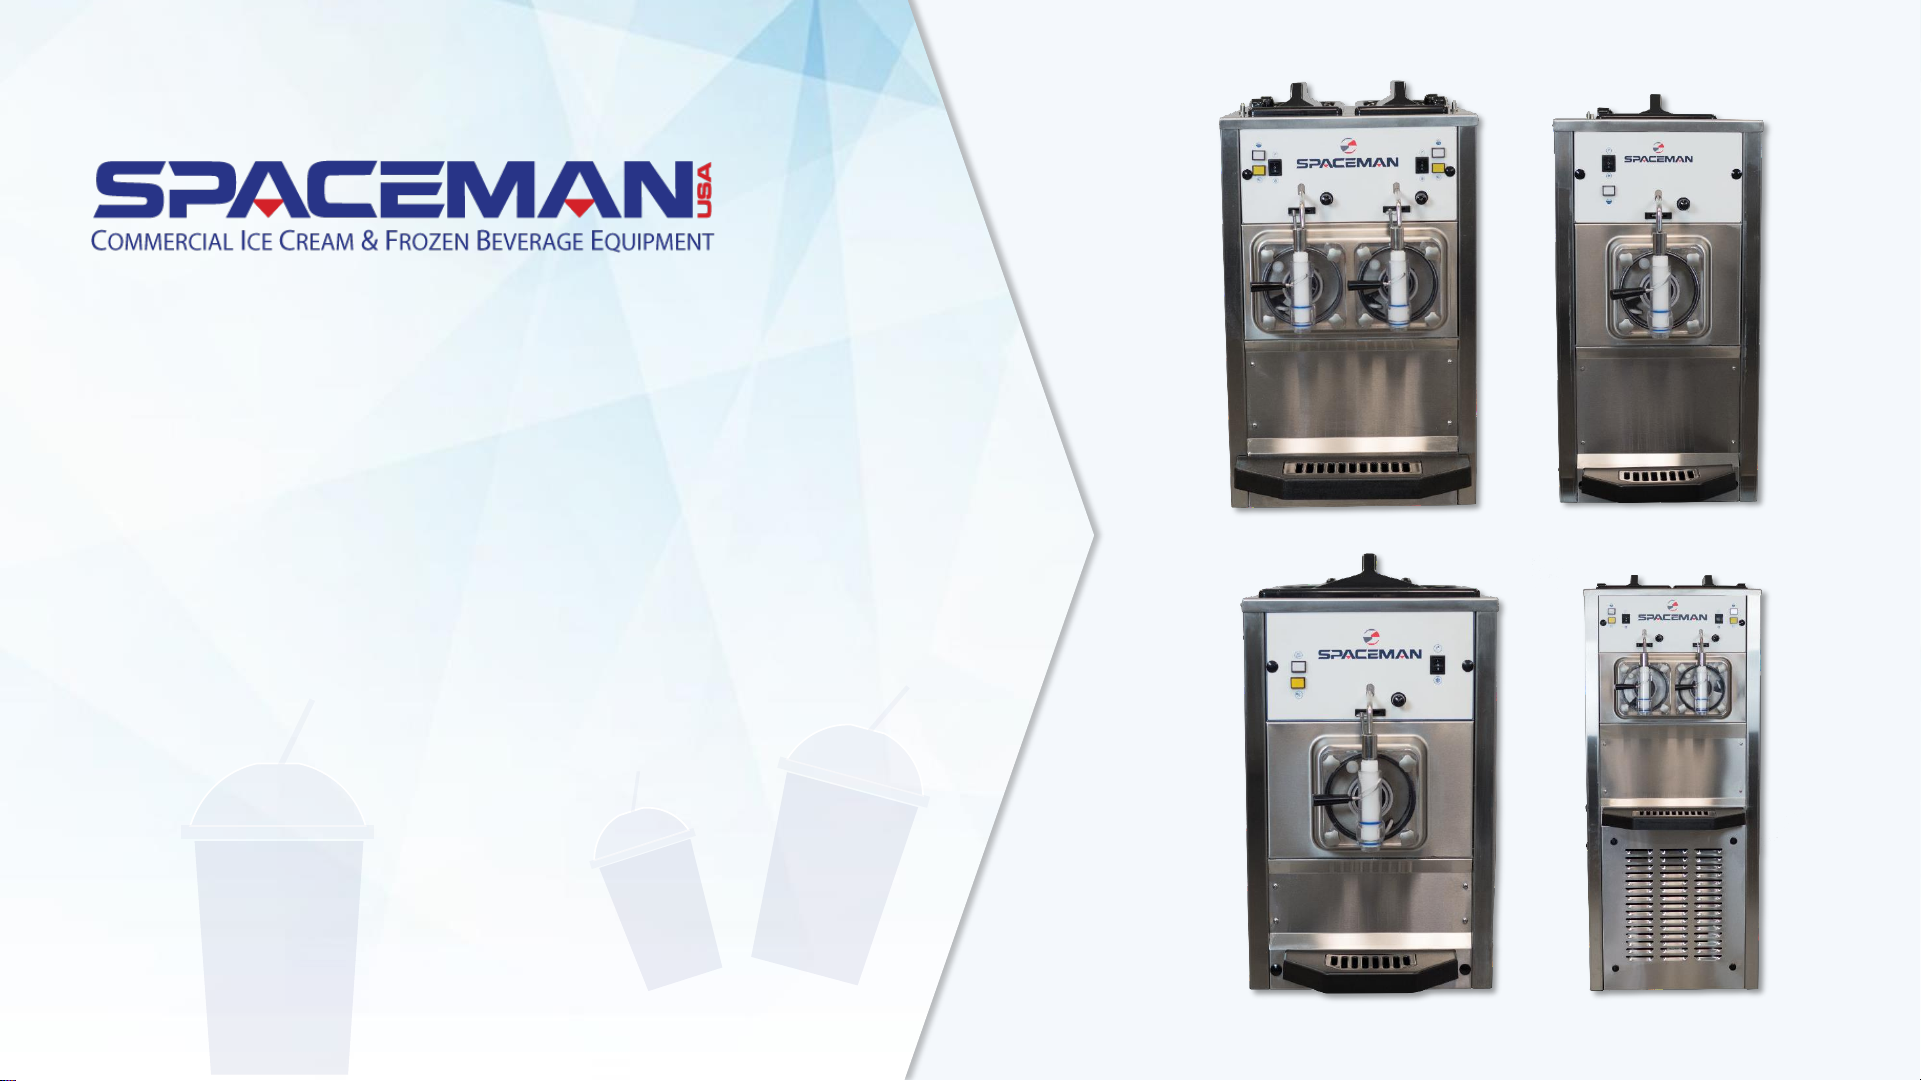
SPACEMAN FROZEN
BEVERAGE MACHINE
TRAINING
*use this training guide for Spaceman USA models:
6450, 6455H, 6490H, 6650, 6690H, 6695H, 6795H
Spaceman USA Frozen Beverage Training
rev042219
Page 2
NOTES AND FUNCTIONS OF YOUR MACHINE
The machine you have purchased is a non carbonated frozen beverage
machine. It is capable of producing a variety of frozen beverage
products. All Spaceman USA Frozen Beverage machines are capable to
freeze alcoholic beverages.
Product is poured into the hopper (product should be below 41°F)
where it is kept until flowing into the freezing cylinder via the air tube.
On the front of the machine is an analog rocker switch that controls
the function of the machine (off, wash, and cooling). Your machine
may also include a lighted standby button and low mix light.
Inside the freezing cylinder, the beater mixes the product while freezing
to produce the final frozen beverage product.
Most Spaceman beverage machines (except for 6450 and 6650) include
refrigerated hoppers and a standby mode.
Spaceman USA Frozen Beverage Training
rev042219
Page 3
ROUTINE MAINTENANCE OPERATIONS
Clean and Lubricate Daily
Replace Wearable Parts Every
1 to 3 months*
Internal Cleaning Quarterly**
* Based on machine usage and cleaning
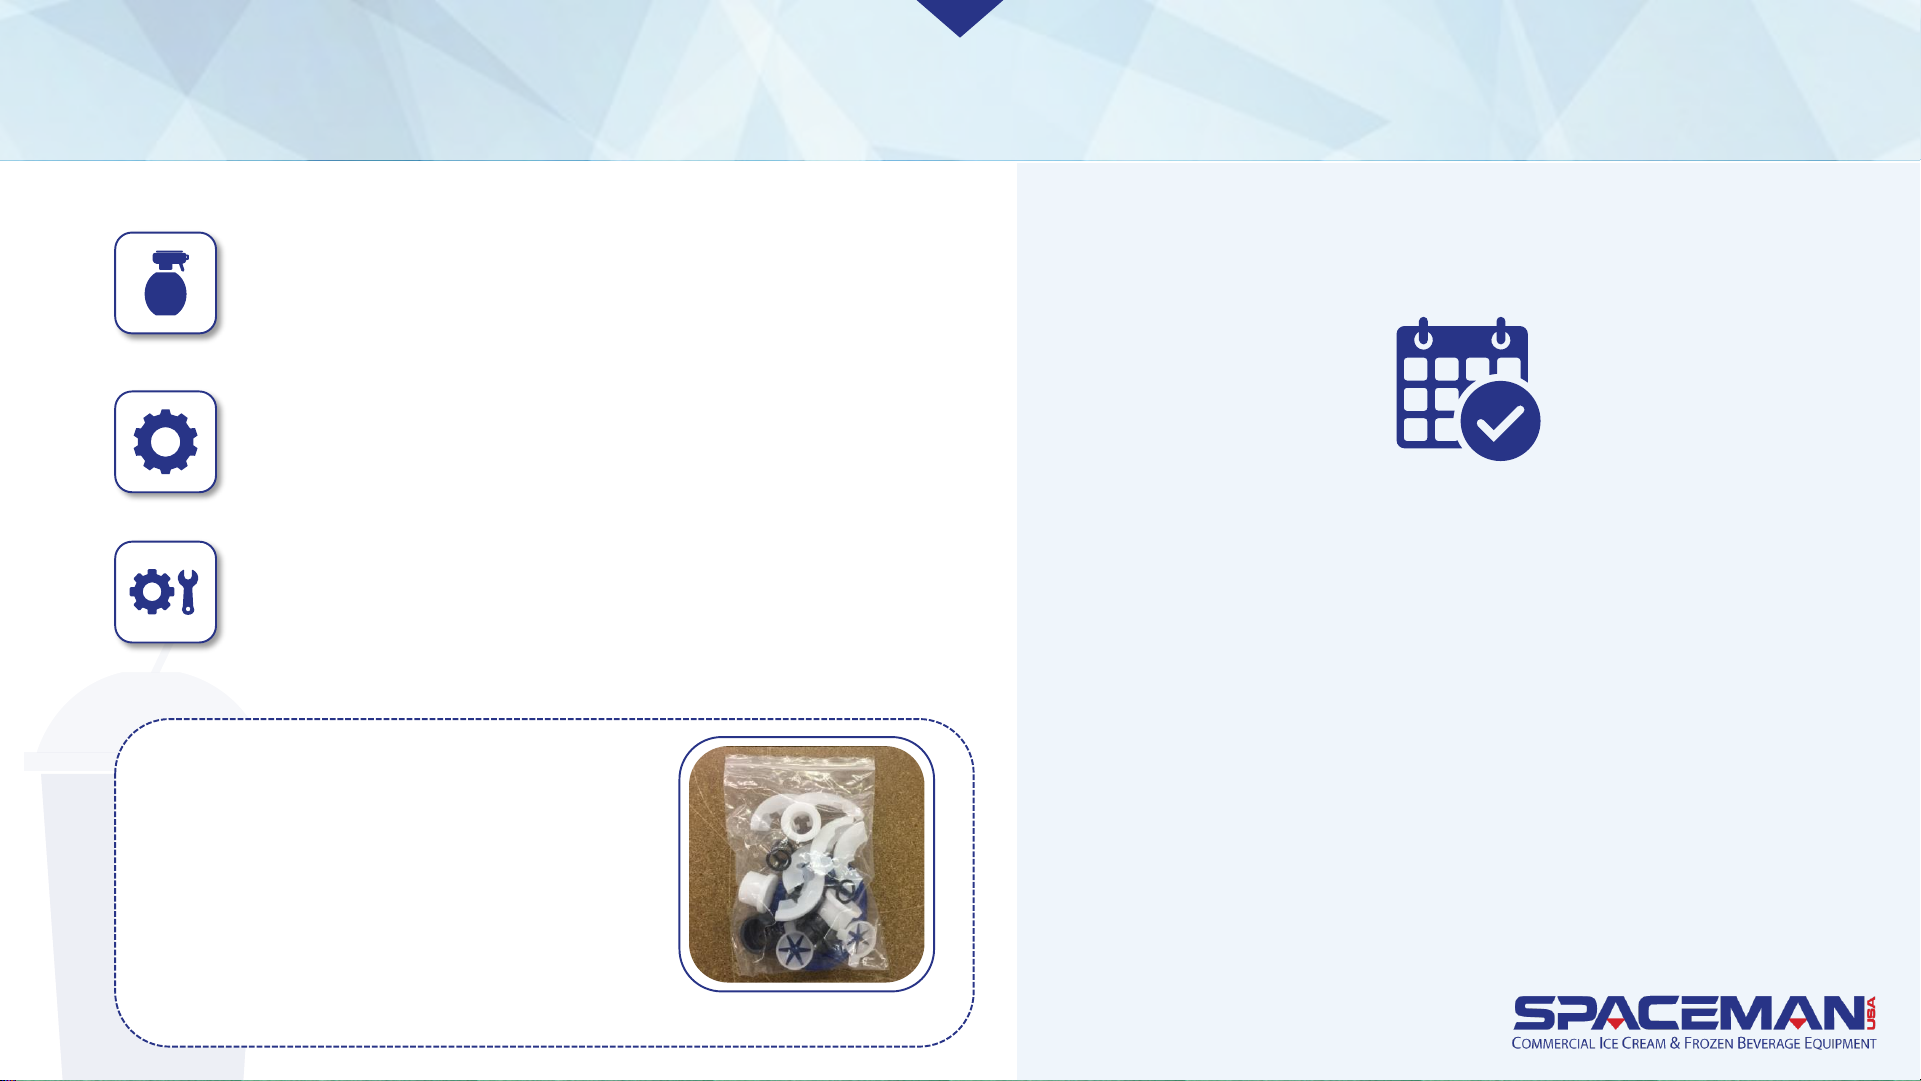
intervals; a Tune-Up Kit is available with
all wearable parts (O-rings, gaskets, etc.)
except scraper blades
** Based on cleanliness of location
and proximity to powder-based
machines
For optimal machine performance and
many years of efficiency and reliability
from your machine, Spaceman USA
recommends cleaning and sanitizing the
machine and its parts daily. The machine
comes equipped with a brush kit
specifically designed to efficiently and
properly clean the machine.
Tune-Up Kit
Spaceman USA Frozen Beverage Training
rev042219
Page 4
IMPORTANT:
Cleaning and sanitizing
schedules are governed by state
or local regulatory agencies and
MUST be followed accordingly.
Routine maintenance MUST be
performed a minimum of once
every 3 days.
CAUTIONS:
Do NOT run the machine without properly lubricating
required parts.
Do NOT clean the machine with abrasive or toxic chemicals
and cleaners. Doing so may cause damage to the stainless
steel material.
ONLY use Spaceman-USA-included cleaning brushes and lubrication.
NEVER use metal objects to clean or operate the machine.
ALWAYS replace wearable parts a minimum of every 3 months.
ALWAYS prime machine prior to operating.
ALWAYS inspect parts for excess wear and damage.
ROUTINE MAINTENANCE OPERATIONS
Spaceman USA Frozen Beverage Training
rev042219
Page 5
DRAIN PRODUCT
NOTE CAUTION
To expedite draining, turn off
machine 30 minutes prior to
soften product. To expedite
process, keep a bucket
nearby to temporarily store
removed parts.
NEVER use warm water
when rinsing the machine
to prevent damage.
Spaceman USA Frozen Beverage Training
rev042219
Page 6
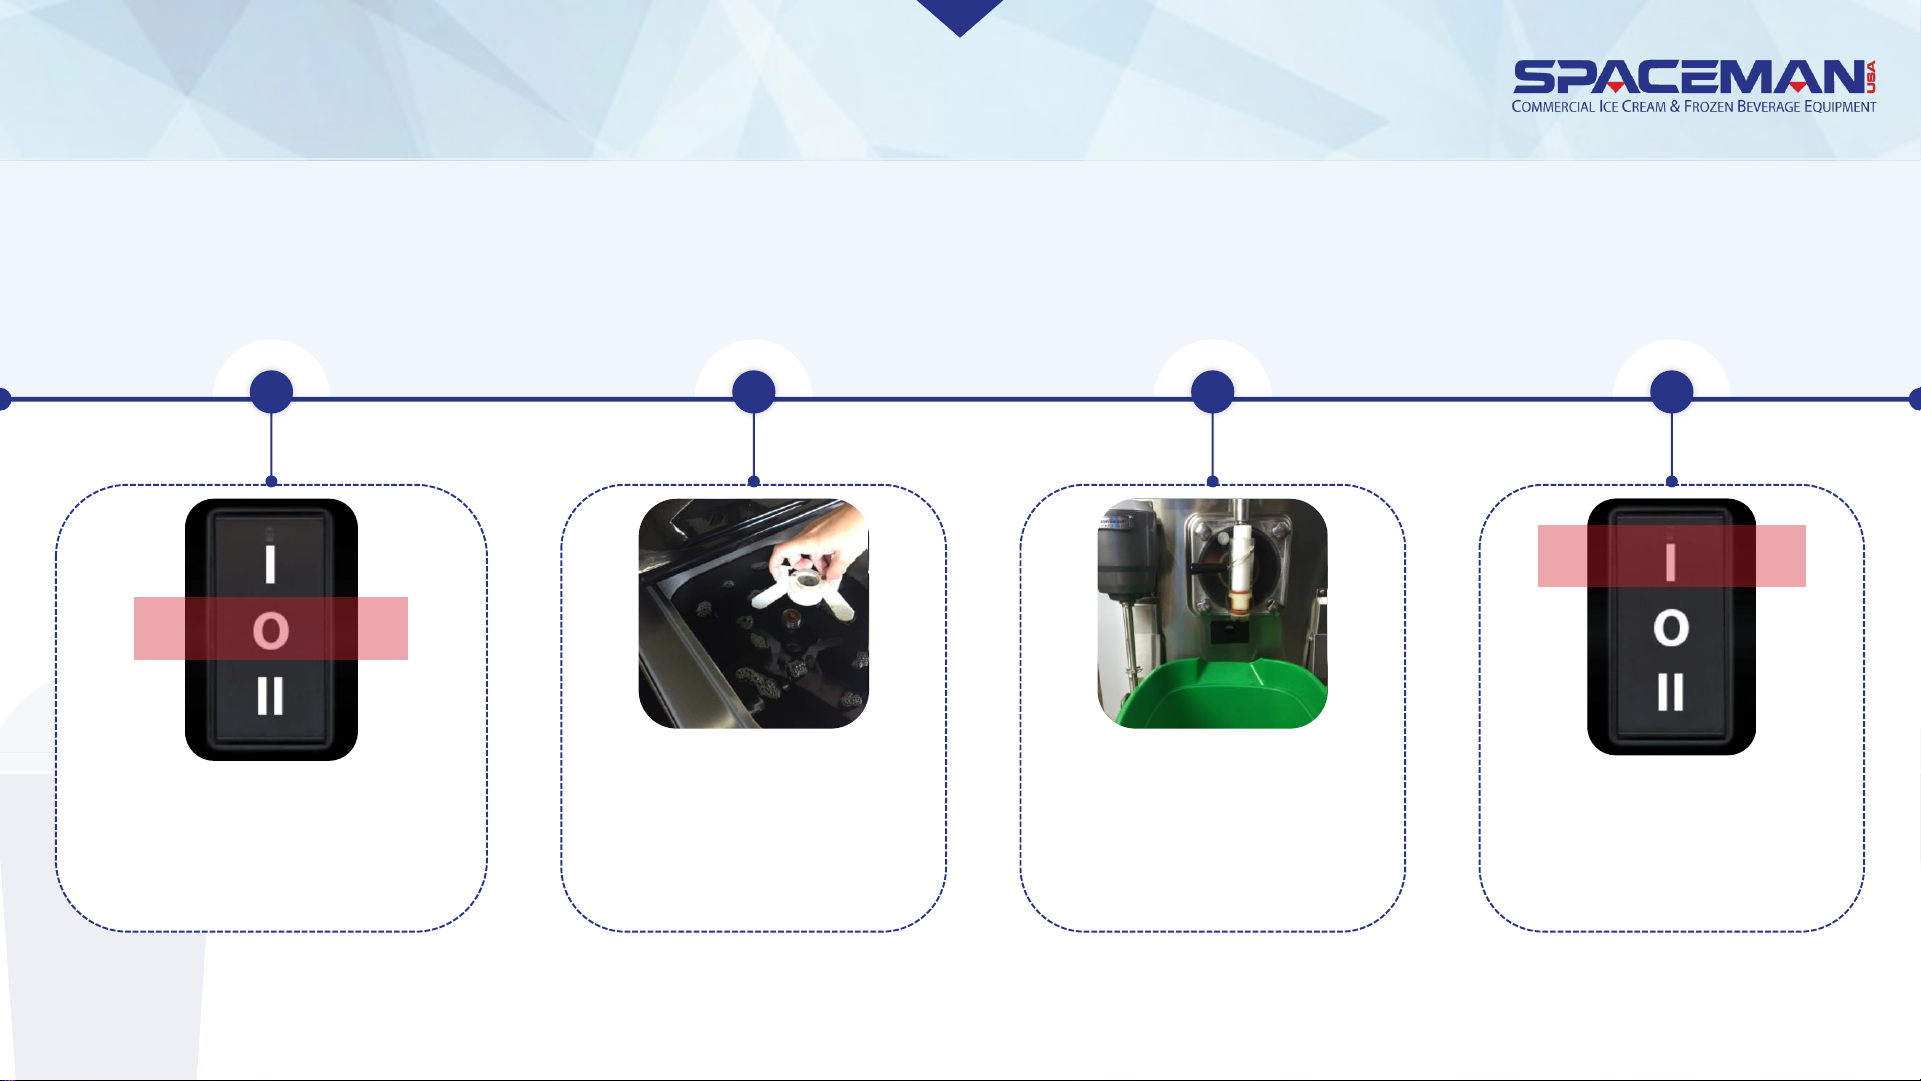
Turn power switch to
WASH
DRAIN PRODUCT
Place a bucket or other
container below draw
valve to capture product
as it drains
2
Remove hopper lid and
agitator (if present)
3
Turn power switch
to OFF Position
41
Spaceman USA Frozen Beverage Training
rev042219
Page 7
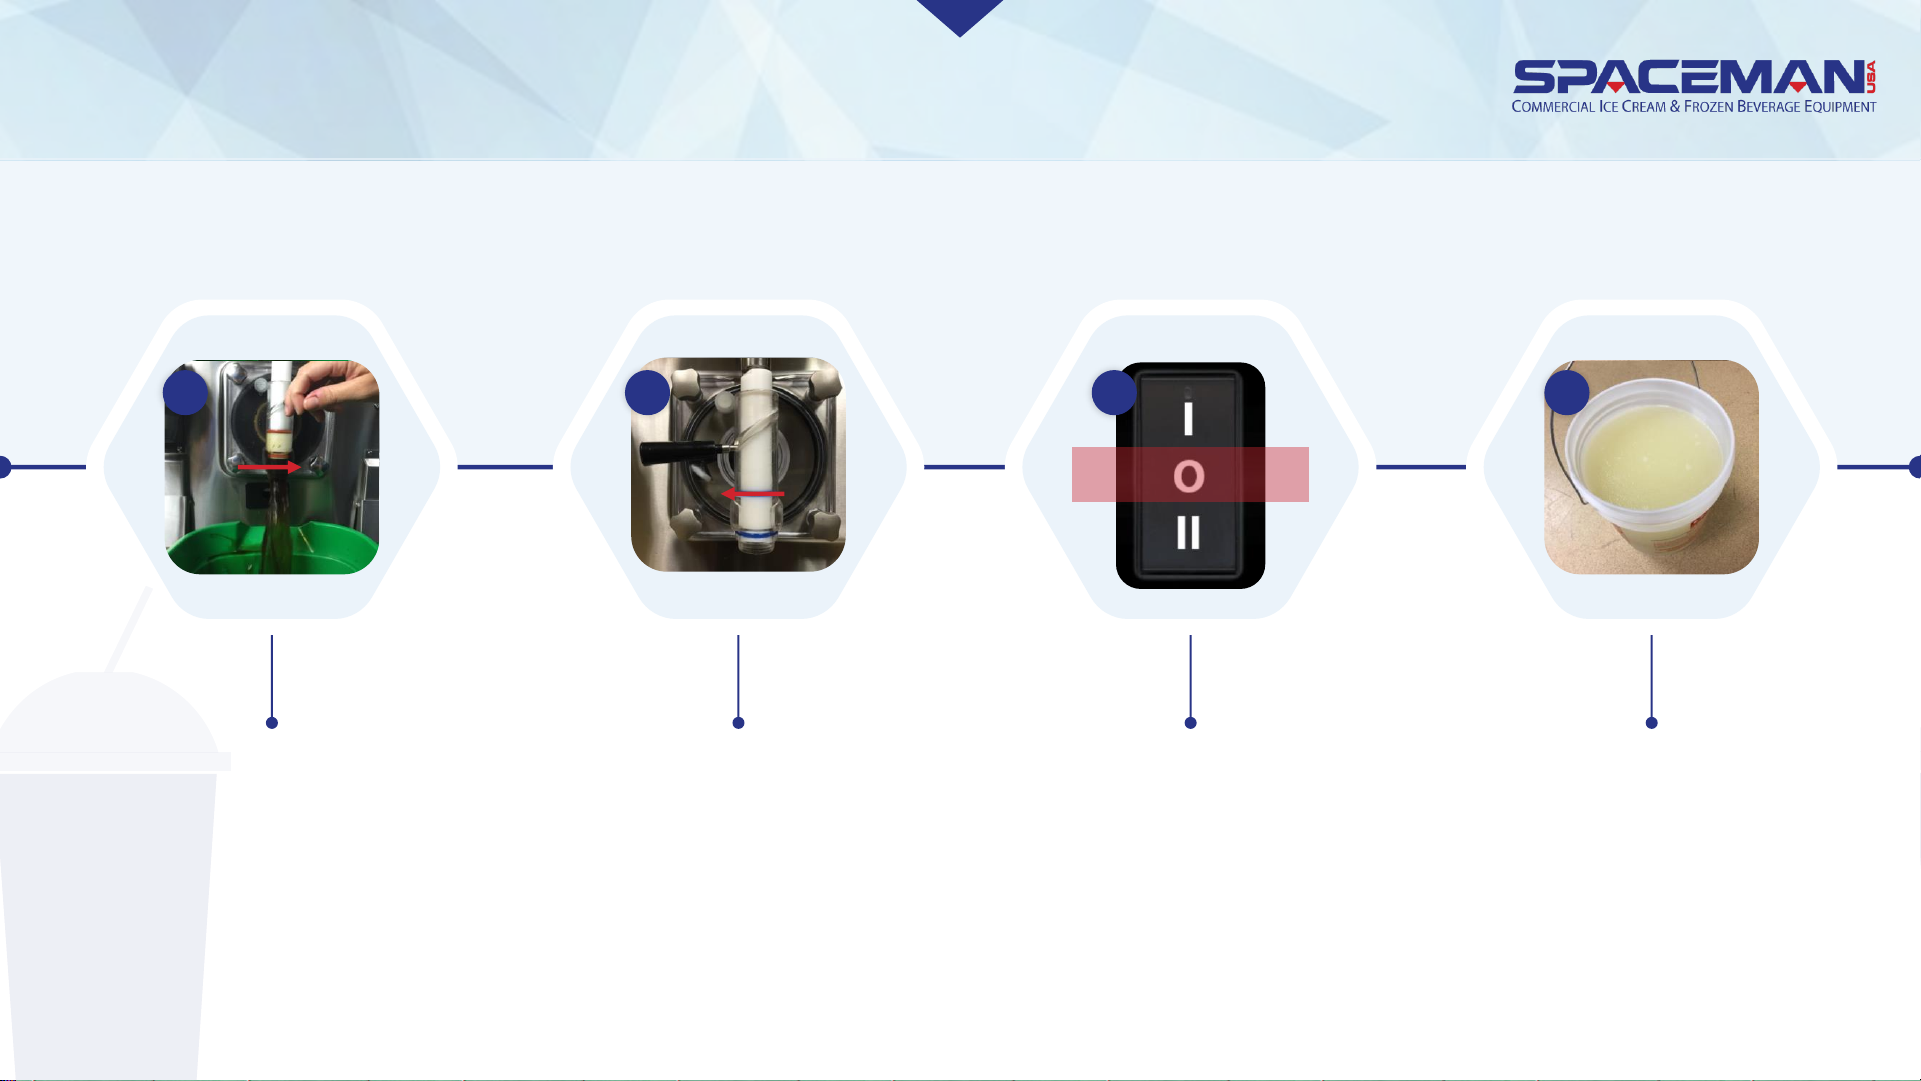
DRAIN PRODUCT
Remove product and
dispose or
refrigerate it
Move draw handle to OPEN
position (RIGHT) until all
product runs out
Move draw handle to
CLOSED position (LEFT)
Turn power switch
to OFF
5 6 87
Spaceman USA Frozen Beverage Training
rev042219
Page 8
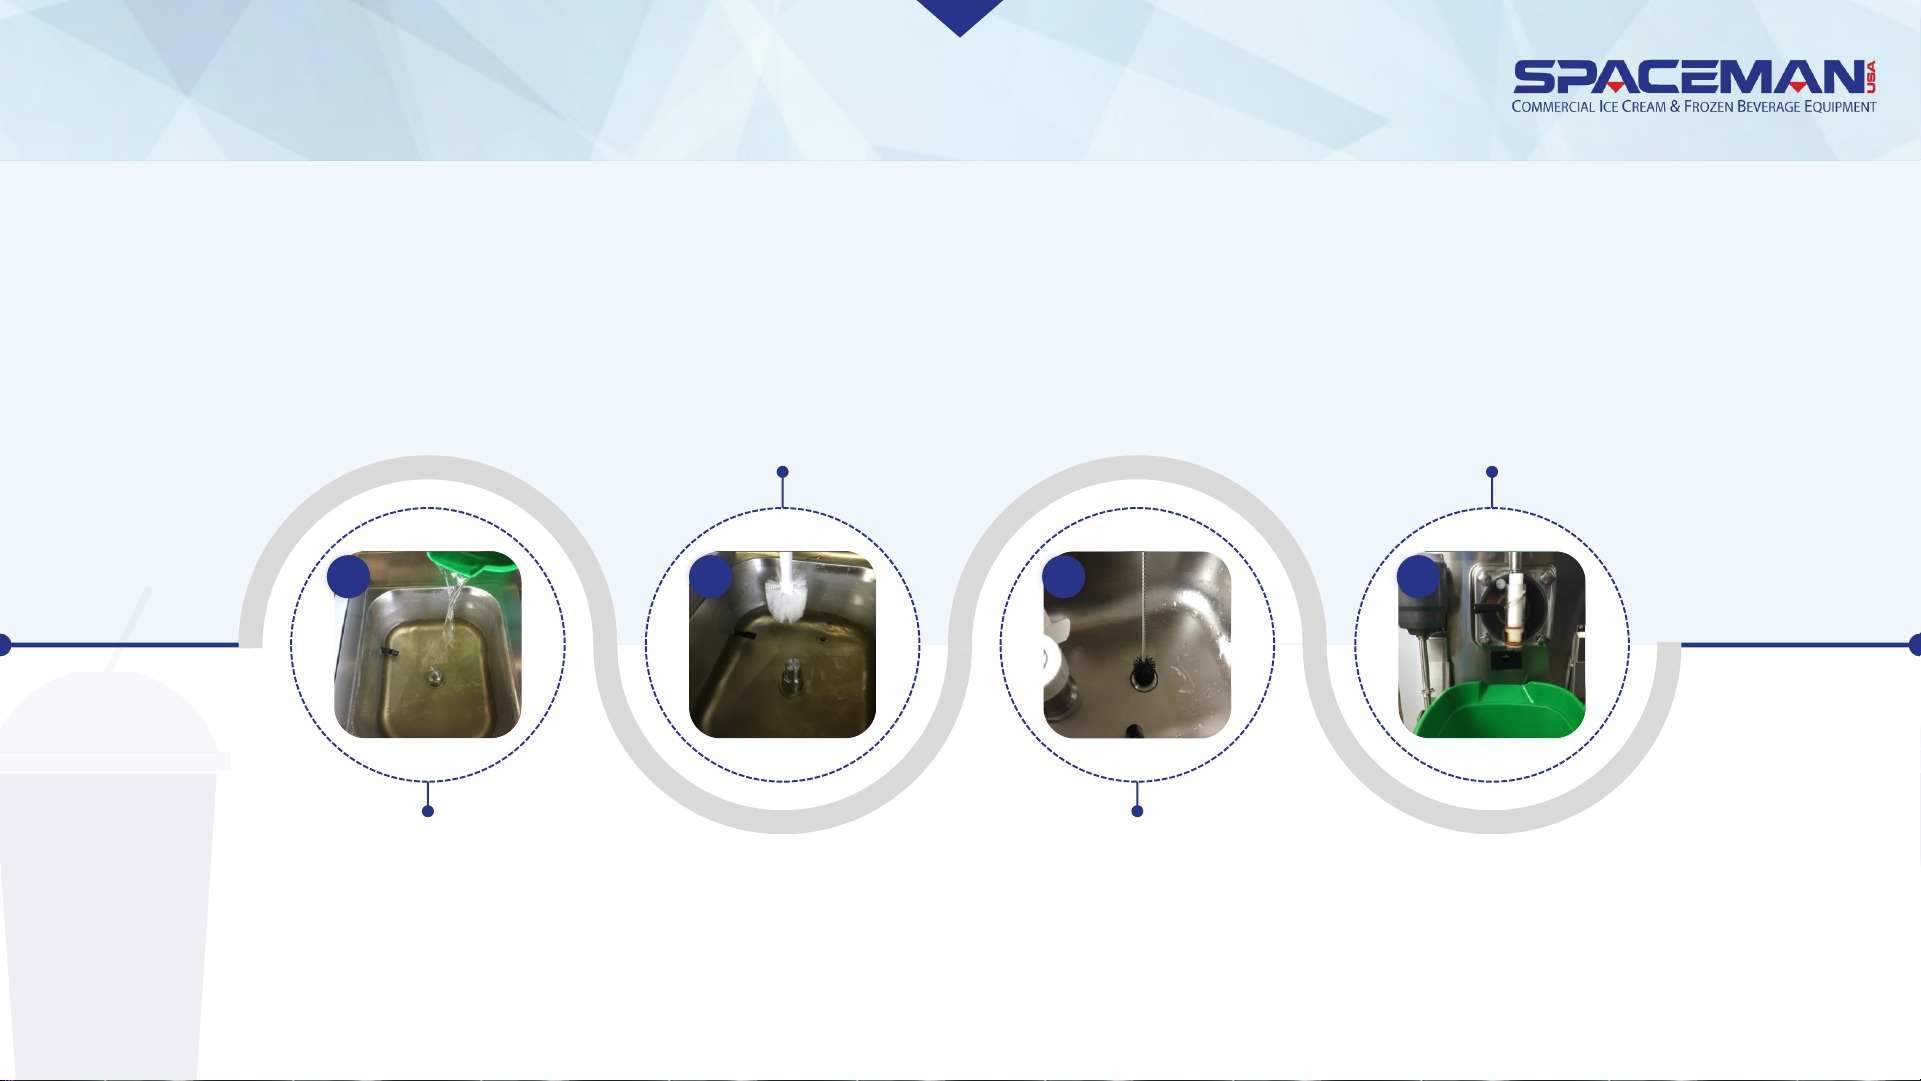
DRAIN PRODUCT
Place a bucket or other
container below the
draw valve
Fill hopper with a minimum of 2
gallons of COOL water
Use COOL water and the large
brush to scrub the sides and
bottom of the hopper; be VERY
careful not to damage the low-
mix sensor in the hopper
Use the small brush
kit to clean inside the
feed tube at the
bottom of the hopper
9 10 11 12
Spaceman USA Frozen Beverage Training
rev042219
Page 9
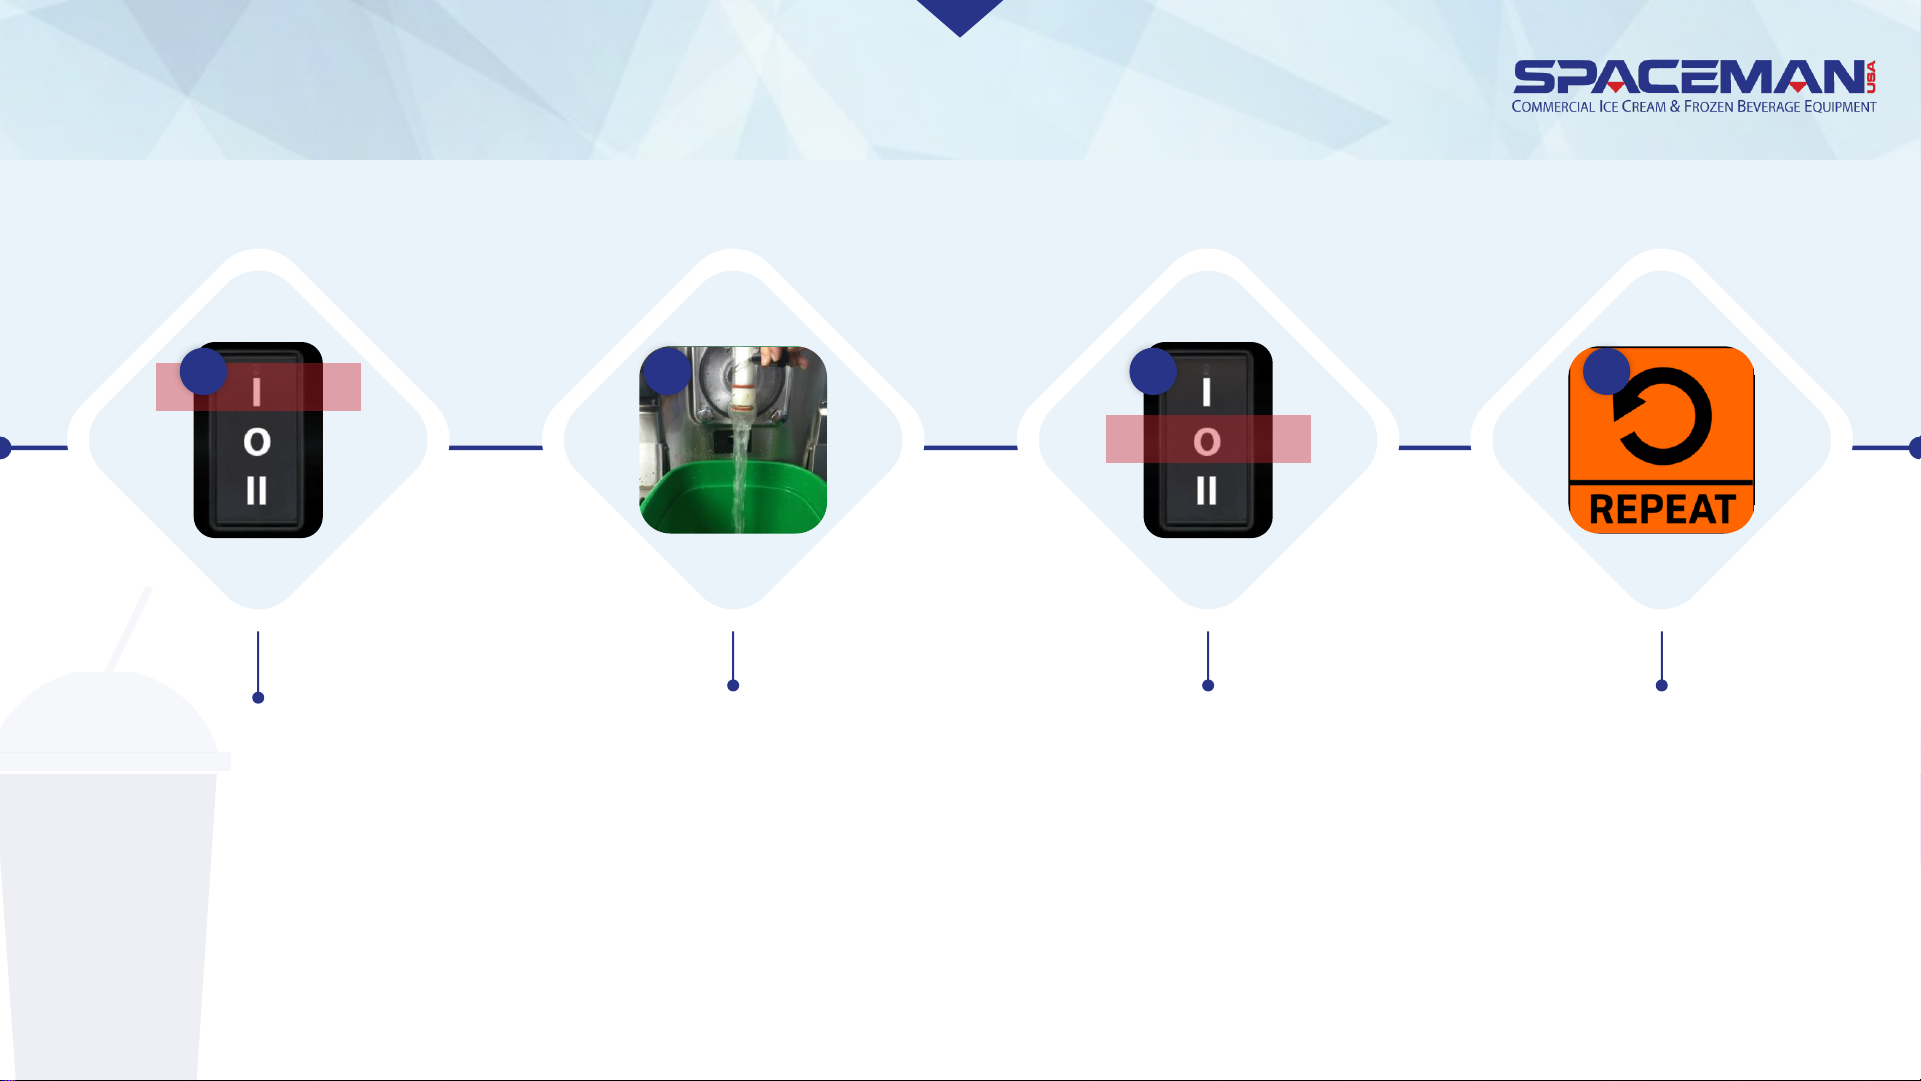
DRAIN PRODUCT
OPEN draw handle to
drain water and
remaining product;
CLOSE when finished
14
Repeat steps 9 to
14 until water
exiting the draw
valve is clear and
free of product
16
Turn power switch
to WASH
13
Turn power switch
to OFF
15
Spaceman USA Frozen Beverage Training
rev042219
Page 10
DISASSEMBLE
NOTE CAUTION
Prepare dishwashing area
prior to disassembly, and
use a bucket to temporarily
store removed parts.
ALWAYS separate O-
rings and gaskets from
metal parts to prevent
damage while washing.
Spaceman USA Frozen Beverage Training
rev042219
Page 11
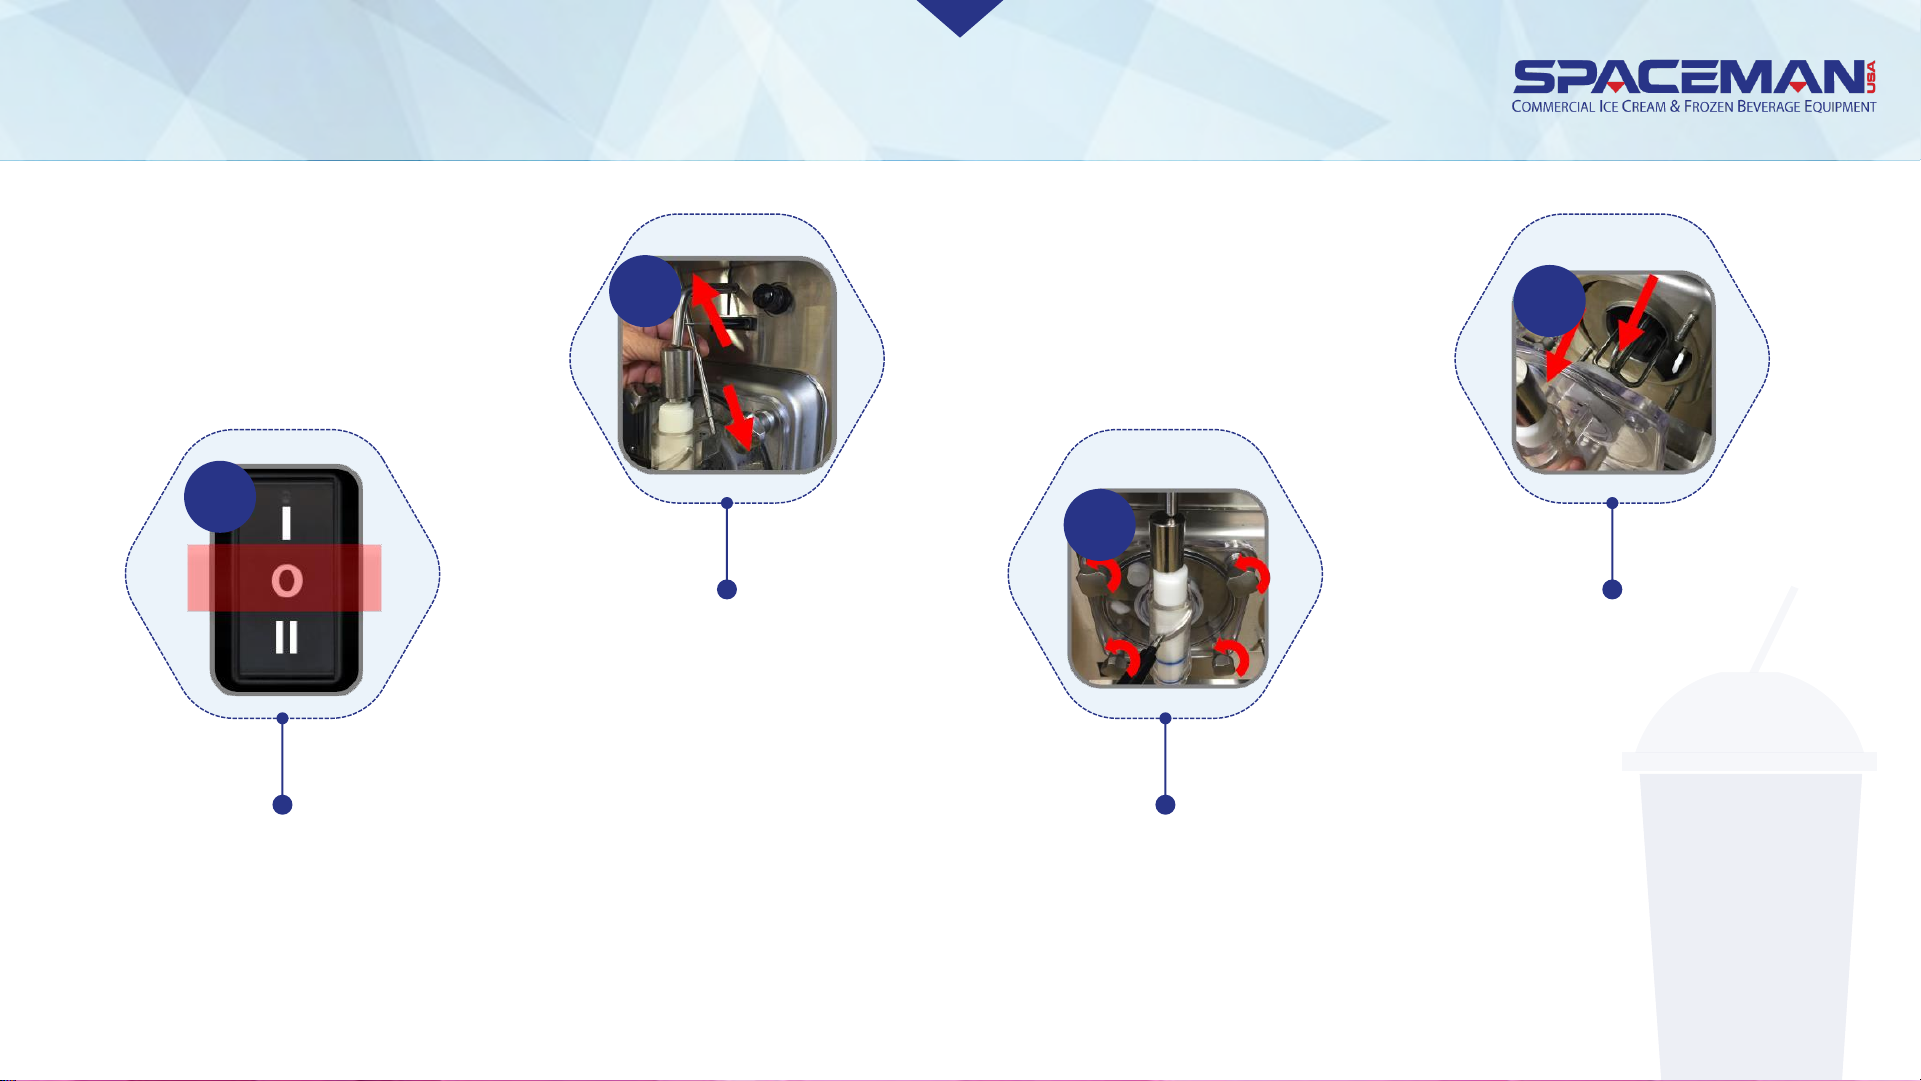
DISASSEMBLY
Verify the power
switch is turned
to OFF
Remove the torque arm,
first pulling up out of
the torque assembly
and then down out of
the flat sensor arm; DO
NOT LIFT UP ON
CURVED SENSOR ARM
Remove
dispensing door
hand-screws (4)
Remove dispensing door
assembly, torque
assembly (including
torque guide), and beater
assembly
1
2
3
4
Spaceman USA Frozen Beverage Training
rev042219
Page 12
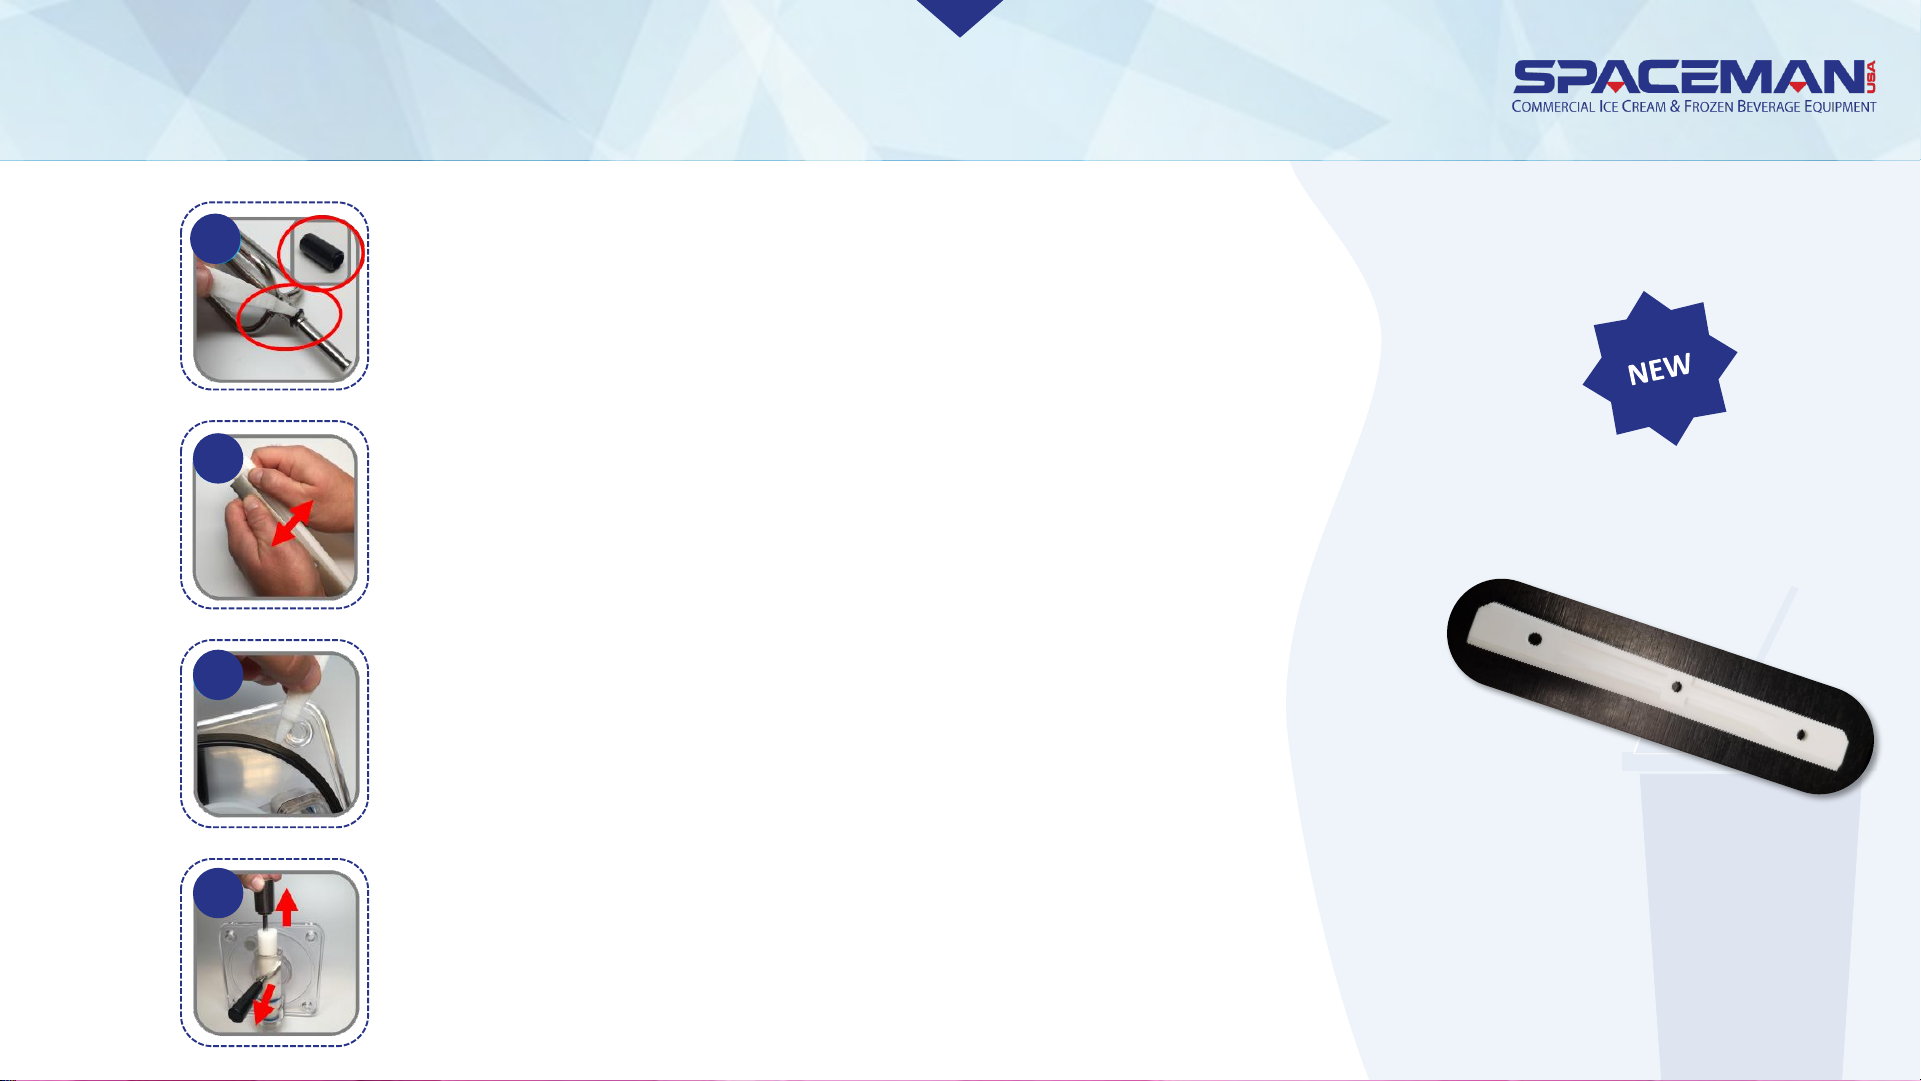
DISASSEMBLY
Remove torque assembly O-ring using O-ring tool;
remove torque guide
“clip-less” blade
Remove scraper blades (2) from beater assembly;
separate scraper blade clips (2) from scraper blades
*some new models will not have blade clips
Remove dispensing door gasket using O-ring tool
Rotate draw valve until the flat part at the top is
perpendicular to the clear face of the dispensing door
(use towel if necessary)
8
7
6
5
Spaceman USA Frozen Beverage Training
rev042219
Page 13
DISASSEMBLY
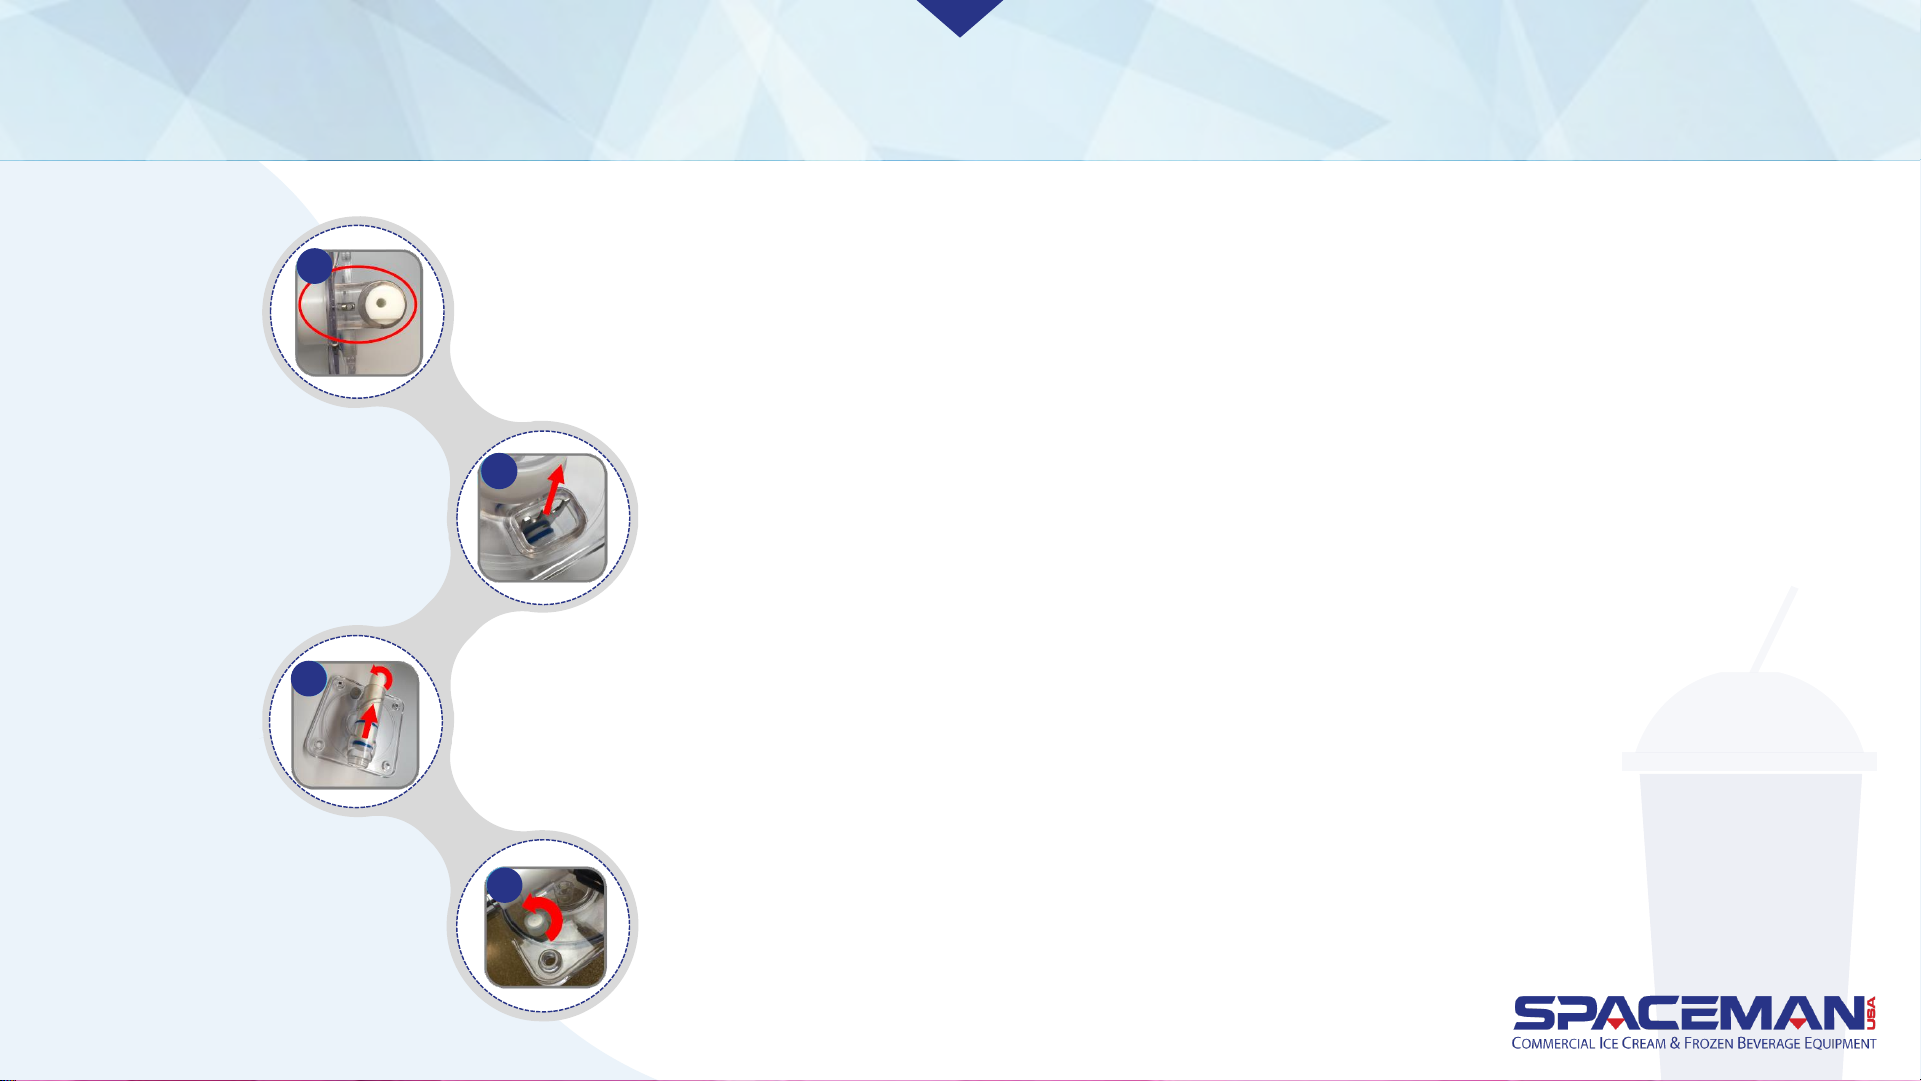
Remove ice buster
Remove draw valve, twisting it while removing
Unscrew and remove prime plug from dispensing door
Remove draw valve O-rings (2) using O-ring tool
9
10
11
Spaceman USA Frozen Beverage Training
rev042219
12
Page 14
DISASSEMBLY
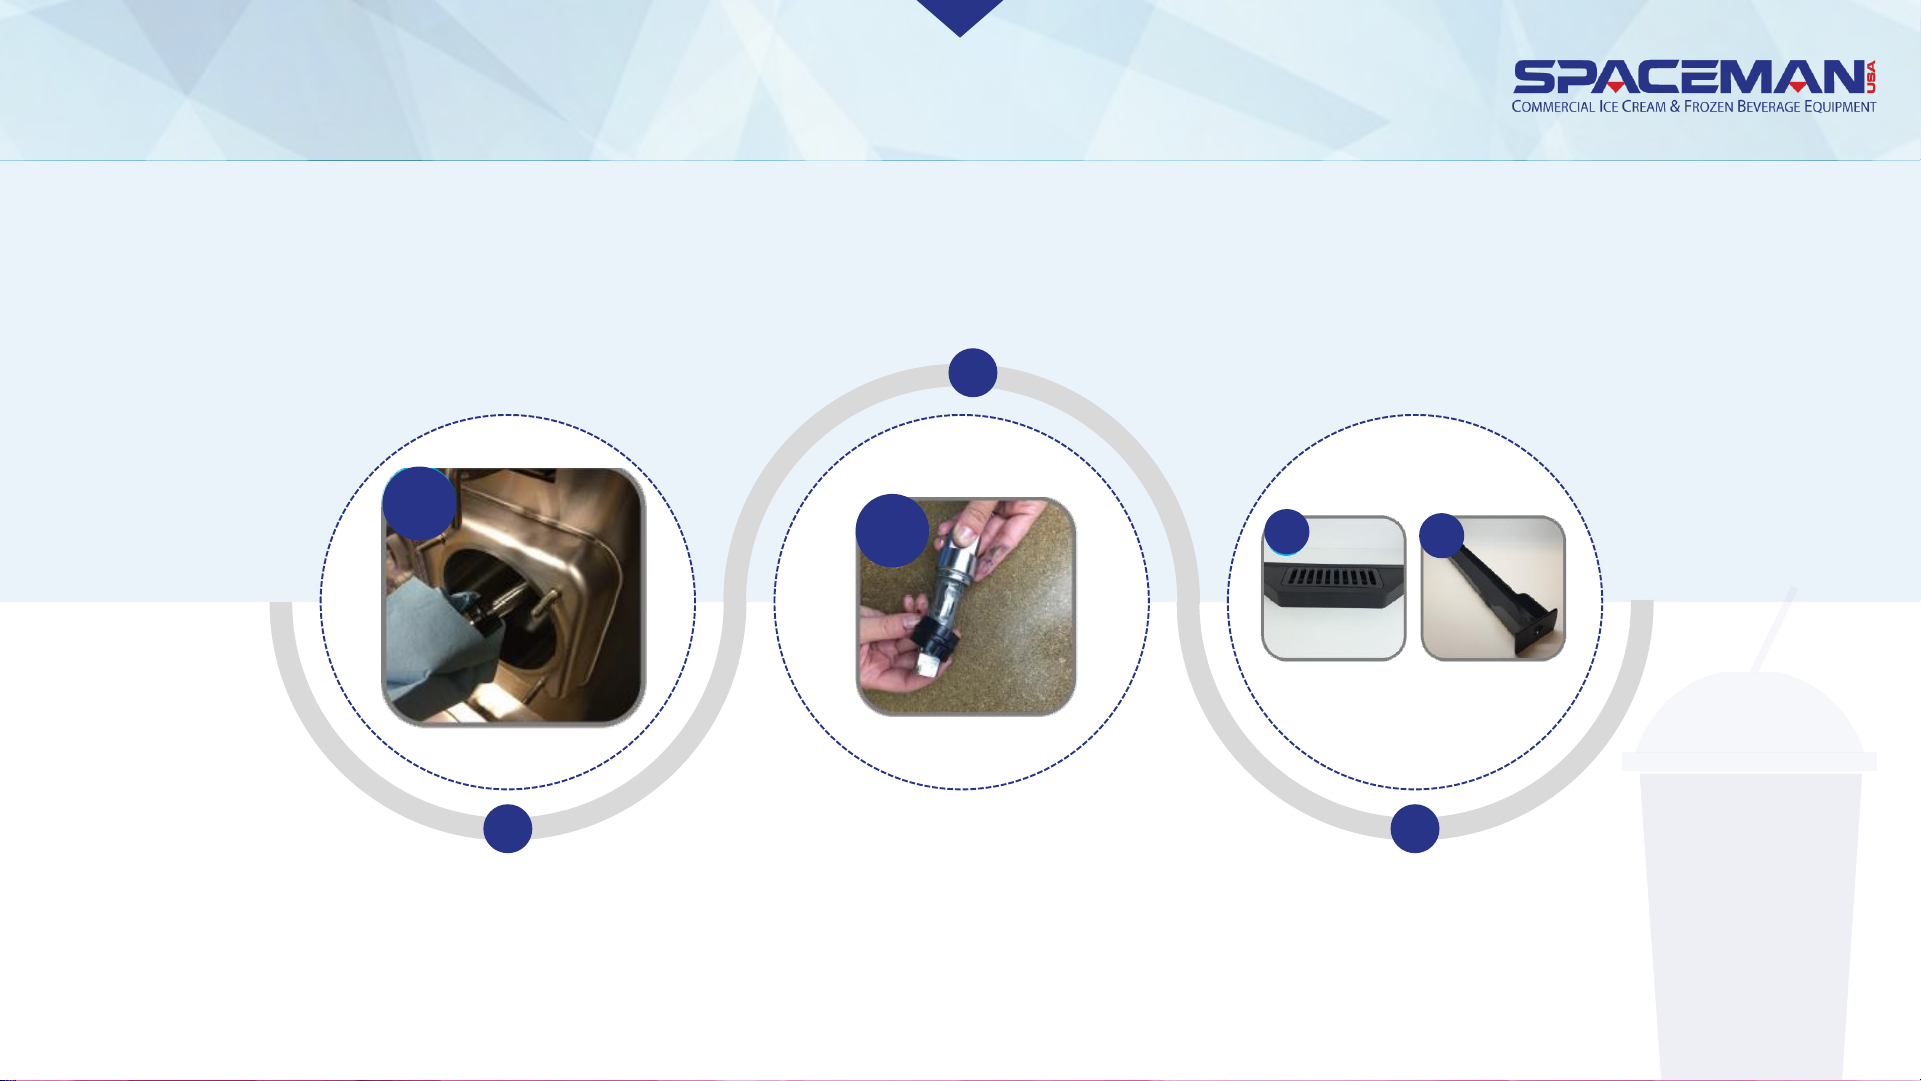
Use a towel to remove drive
shaft at the back of the cylinder
Separate drive shaft
gasket from drive shaft
Remove front drip tray
and internal drip tray
14
15
15
Spaceman USA Frozen Beverage Training
rev042219
13
Page 15
WASH ALL PARTS
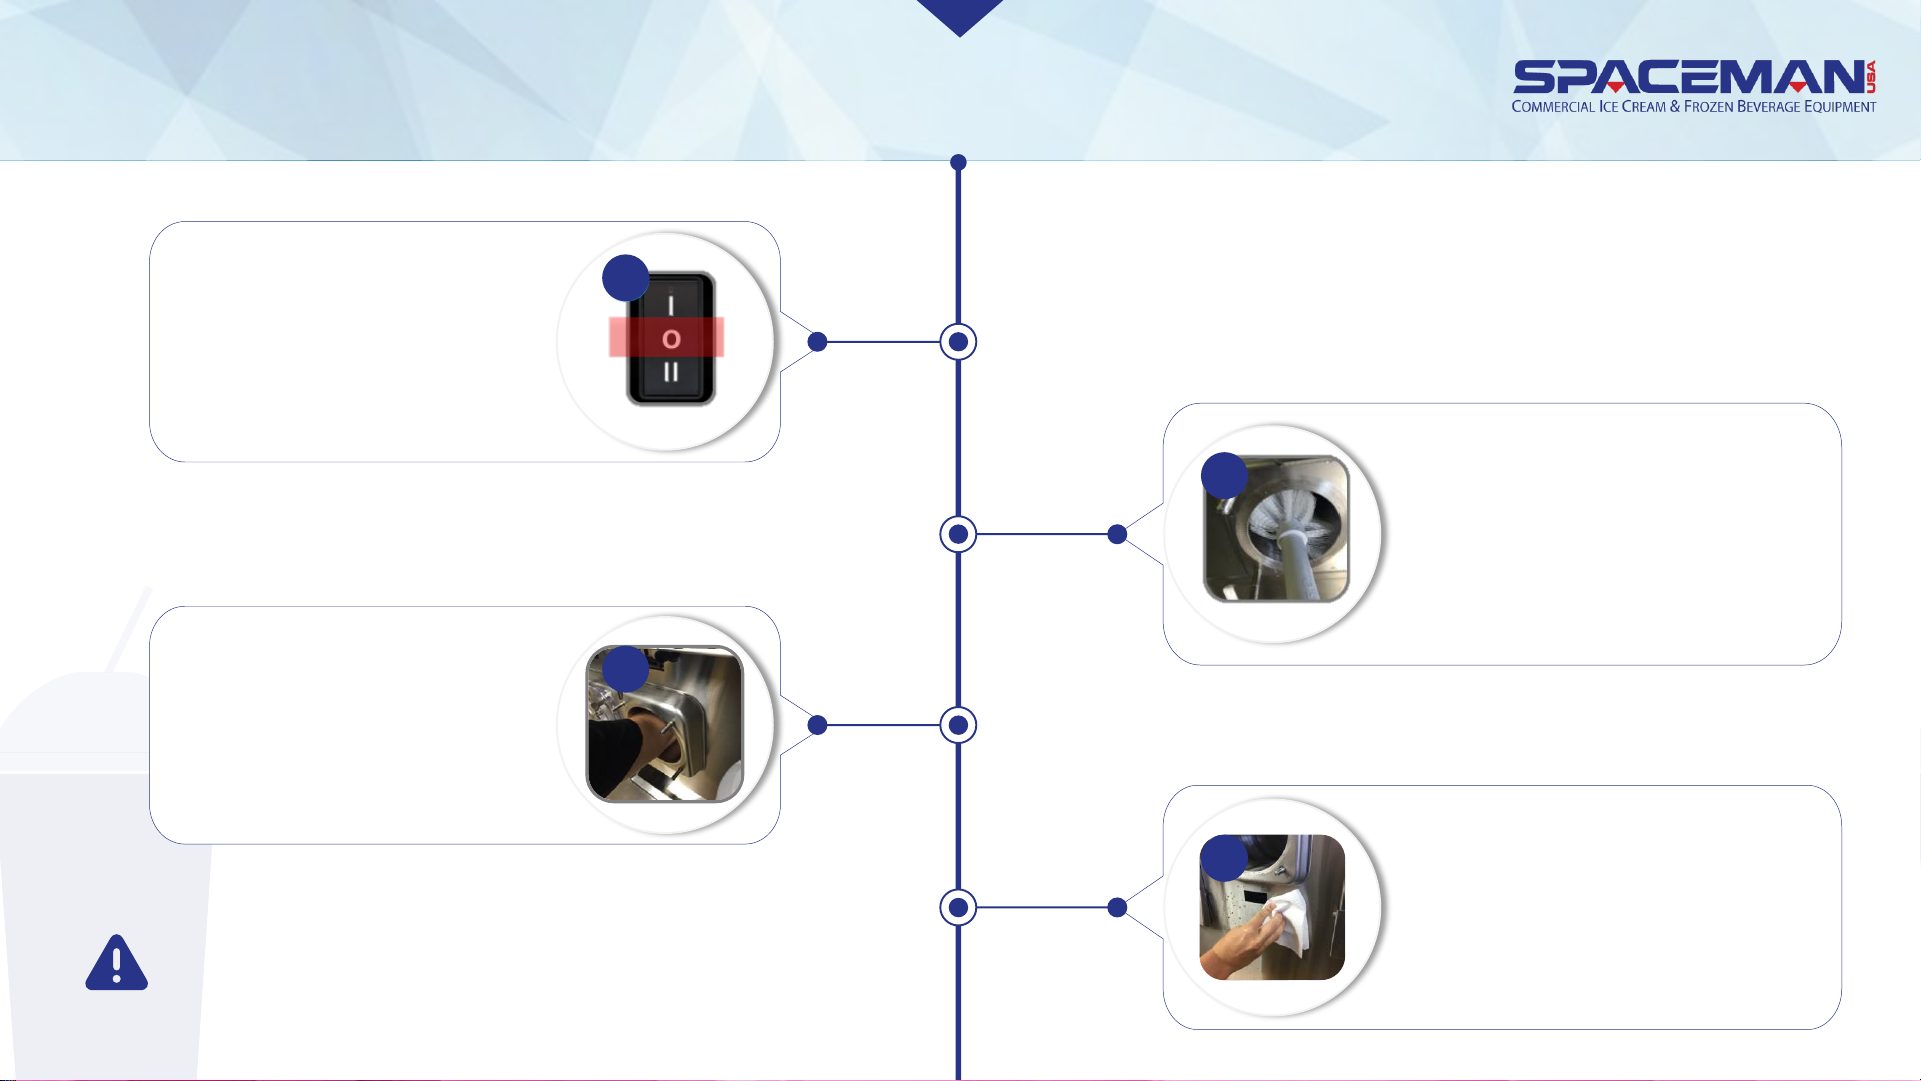
Use the large brush and cool
water to thoroughly clean inside
the cylinder; be sure to scrub the
back of the cylinder and verify
the cylinder is free of ALL
product
2
Verify power switches are
in the OFF position
1
CAUTION:
Never wash parts in a dishwasher. Always hand-wash
components with nontoxic, food-safe cleaners.
Thoroughly clean and dry the
rear of the cylinder with the
supplied black brushes and a
clean, dry towel
3
Gently clean and wipe down the
outside of the machine
4
Spaceman USA Frozen Beverage Training
rev042219
Page 16
WASH ALL PARTS
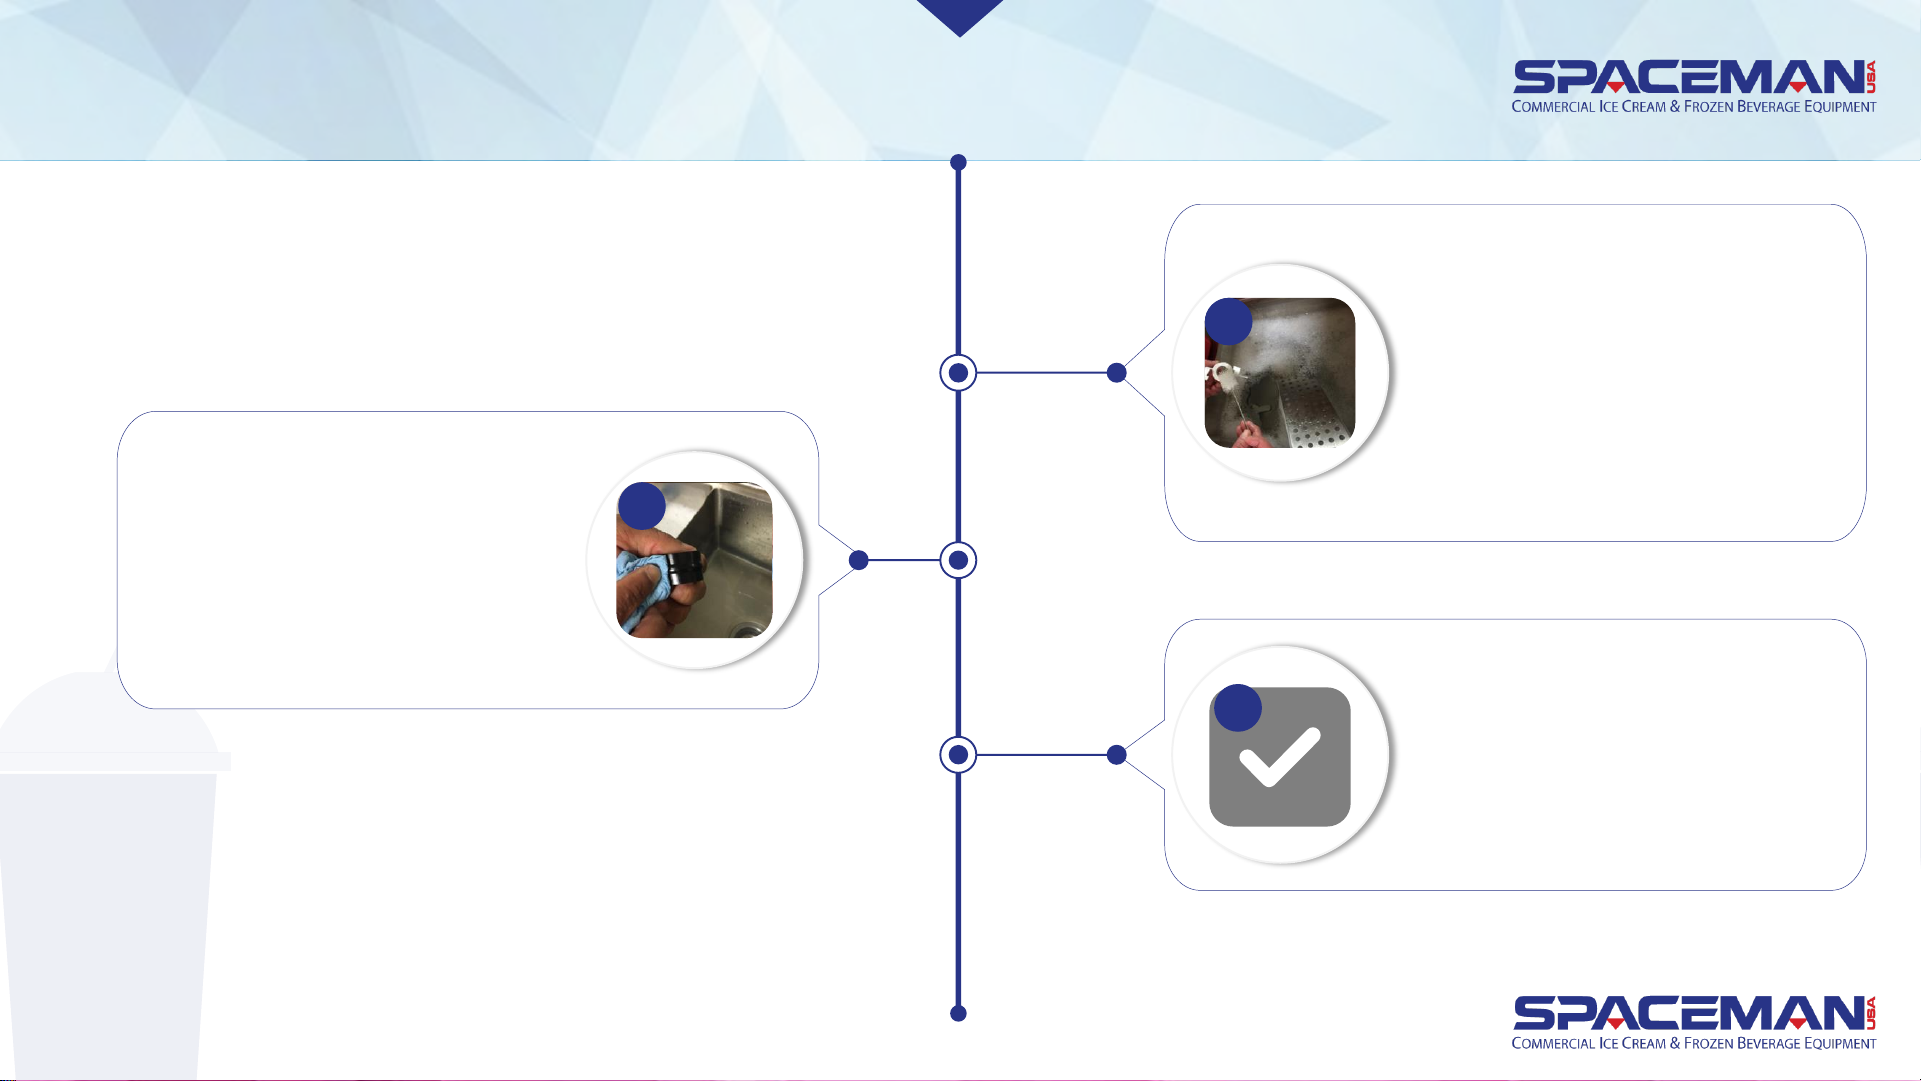
Carefully and thoroughly
clean all gaskets and O-
rings removed from the
machine; be sure to wipe
gaskets and O-rings to
remove excess lubricant
Carefully and thoroughly wash
all parts removed from the
machine using supplied
brushes, as well as sponges,
and clean towels; when
cleaning the dispensing door,
clean the priming port with a
small brush
Verify all parts are clean and
free of all food
7
5
6
Spaceman USA Frozen Beverage Training
rev042219
Page 17
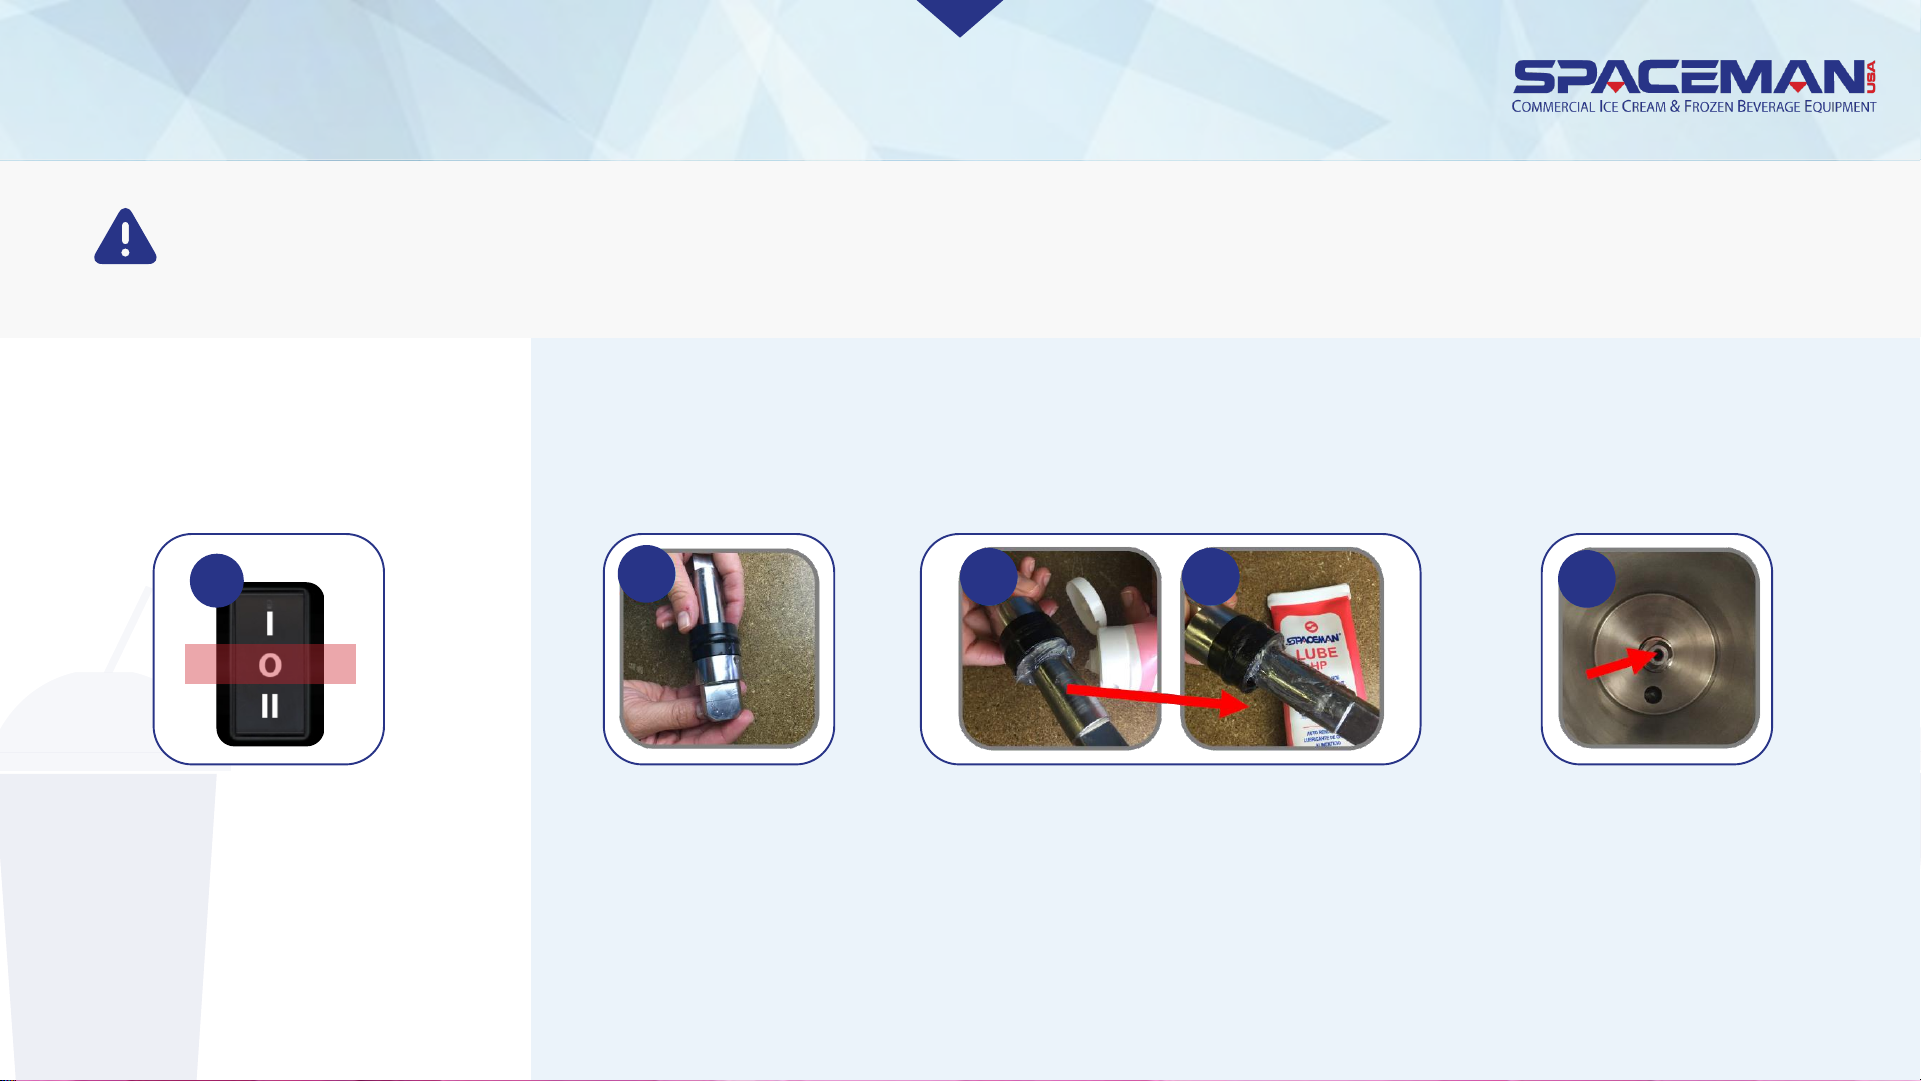
ASSEMBLE
1. VERIFY MACHINE POWER
SWITCH IS IN THE OFF POSITION
2. INSTALL DRIVE SHAFTS
CAUTION:
NEVER force the installation of any parts. All parts fit correctly without force. If parts don’t seem to fit,
remove all parts and repeat assembly.
Place drive shaft gasket
on drive shaft
Seal gasket open space
with Spaceman lubricant,
extending onto drive shaft
and avoiding the top
square part
Insert drive shaft into rear
shell bearing at the back of
the cylinder, and turn it until
the key engages firmly into
the socket (when inserted
correctly, the drive shaft will
no longer turn 360°)
2a
2b 2b
2c
Spaceman USA Frozen Beverage Training
rev042219
1
Page 18
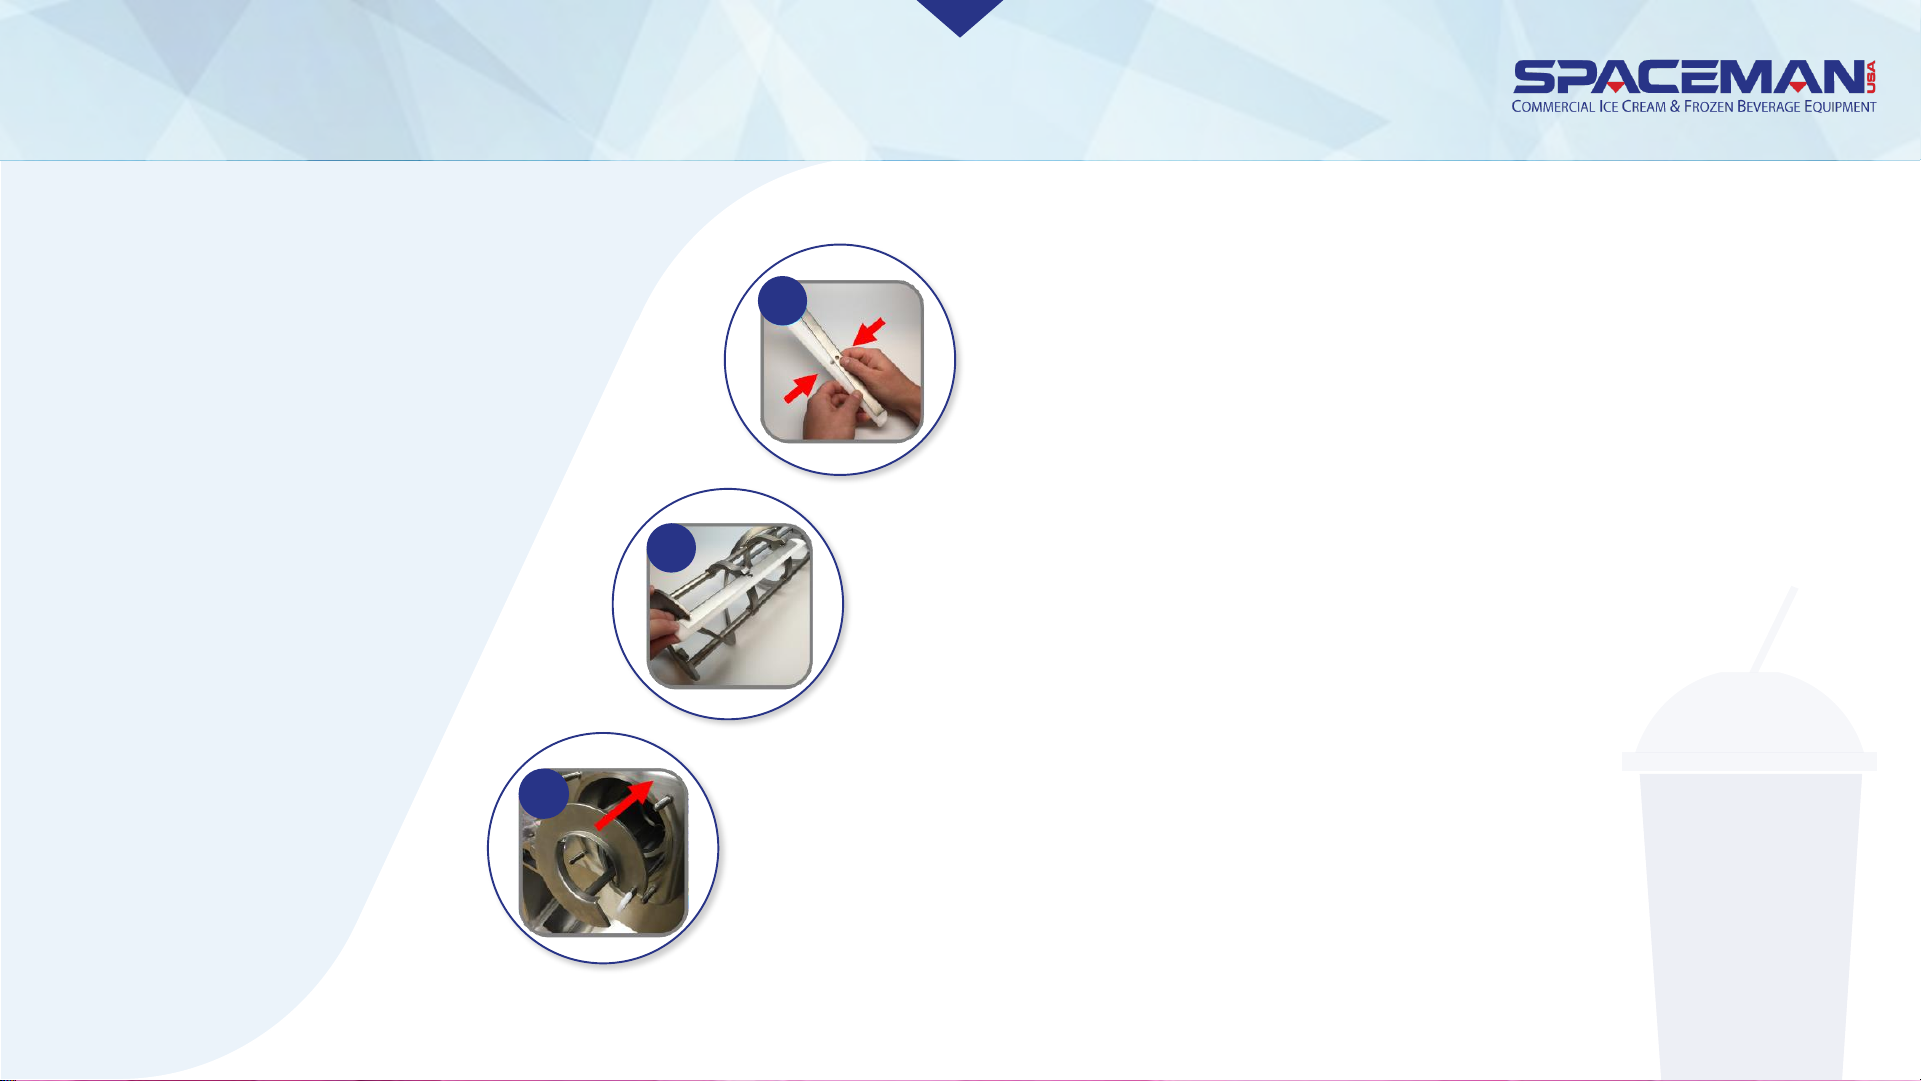
ASSEMBLE
3.
Install beater
assemblies
Insert assembly into cylinder; turn
assembly until it engages the drive
shaft key and no longer turns 360°
3c
Fit scraper blades onto beater
3b
Install scraper blade clip(s) onto scraper
blade(s)
3a
Spaceman USA Frozen Beverage Training
rev042219
Page 19
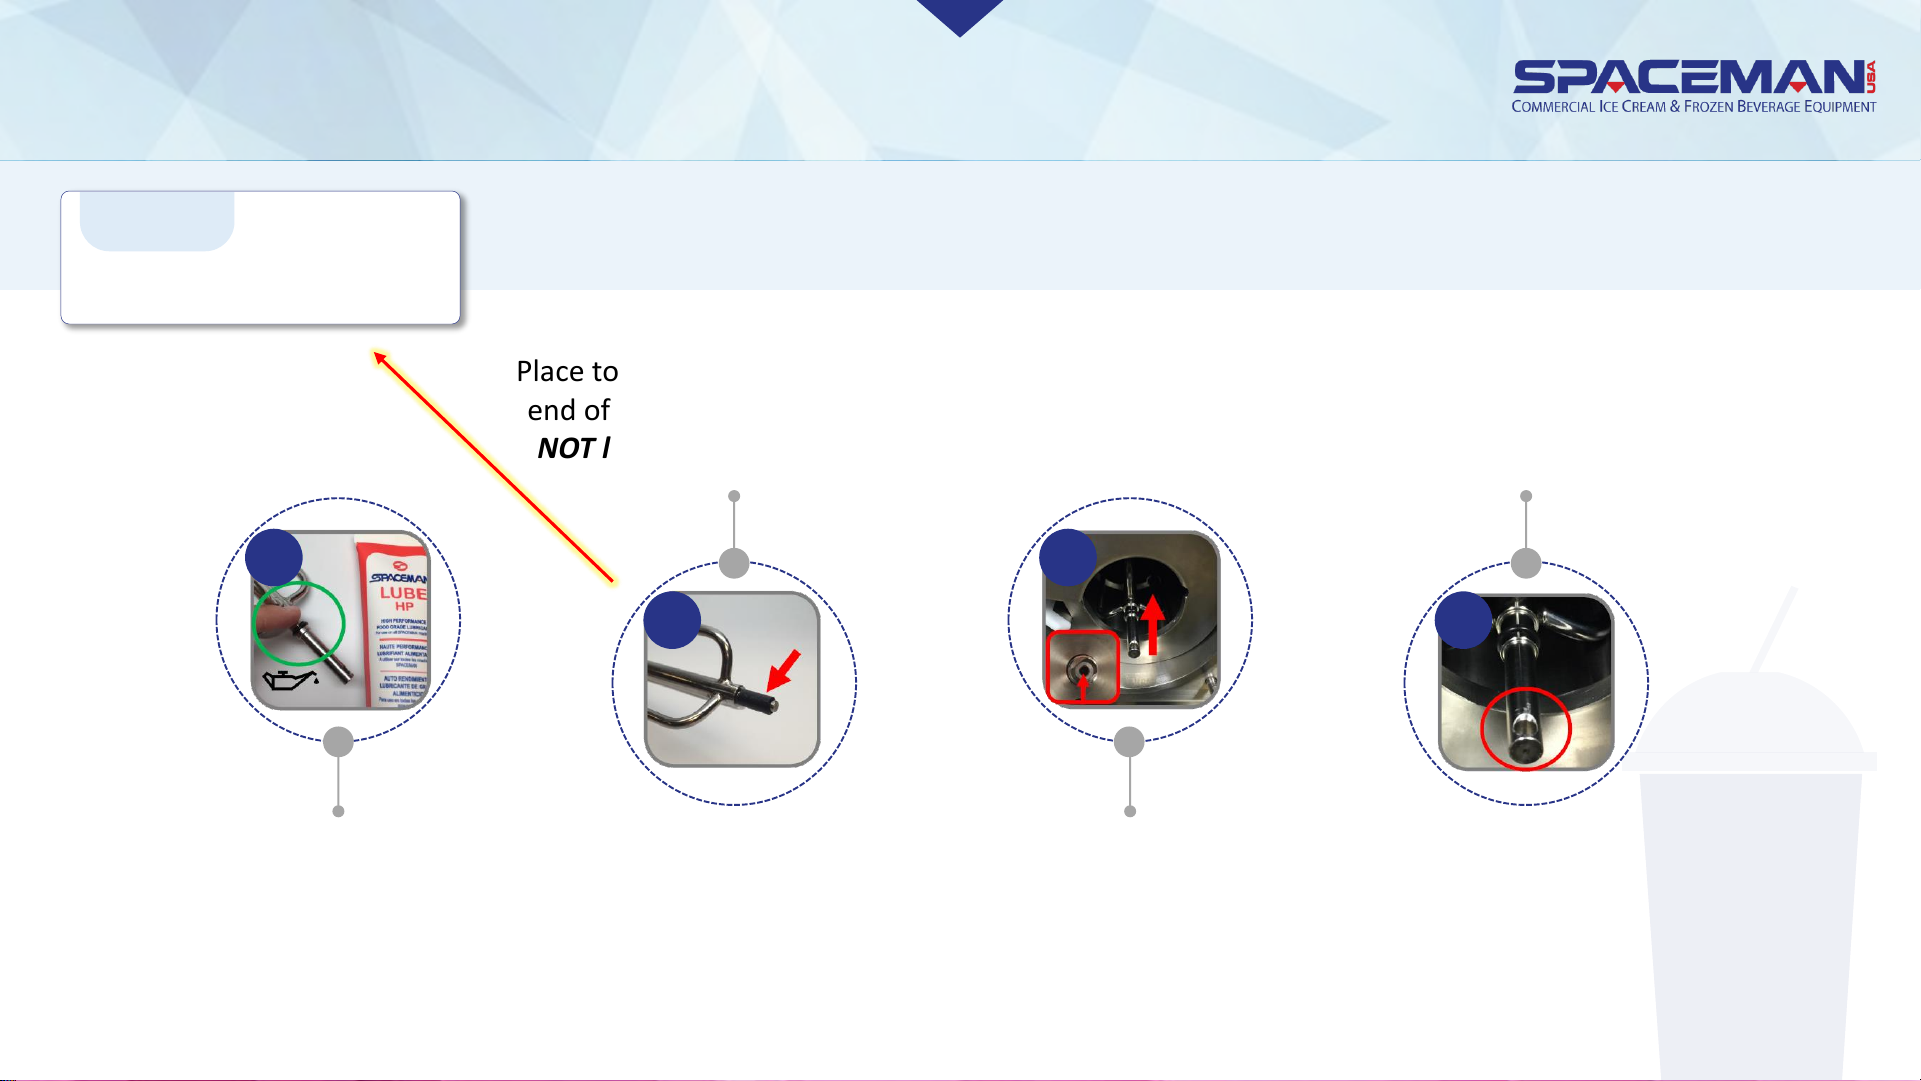
ASSEMBLE
Place O-ring on torque
assembly, coating with
Spaceman lubricant
Place torque guide onto the short
end of the torque assembly; DO
NOT lubricate this component
Insert torque assembly into
pilot hole in the center of the
drive shaft (torque guide first),
ensuring that torque guide
DOES NOT fall off
Rotate torque assembly so the
hole for the torque arm is
vertical, facing up and down
4. Install torque assembly
4a
4b
4c
4d
Spaceman USA Frozen Beverage Training
rev042219
Important:
Failure to install torque guide (4b) will
Result in machine damage and noise!
Page 20
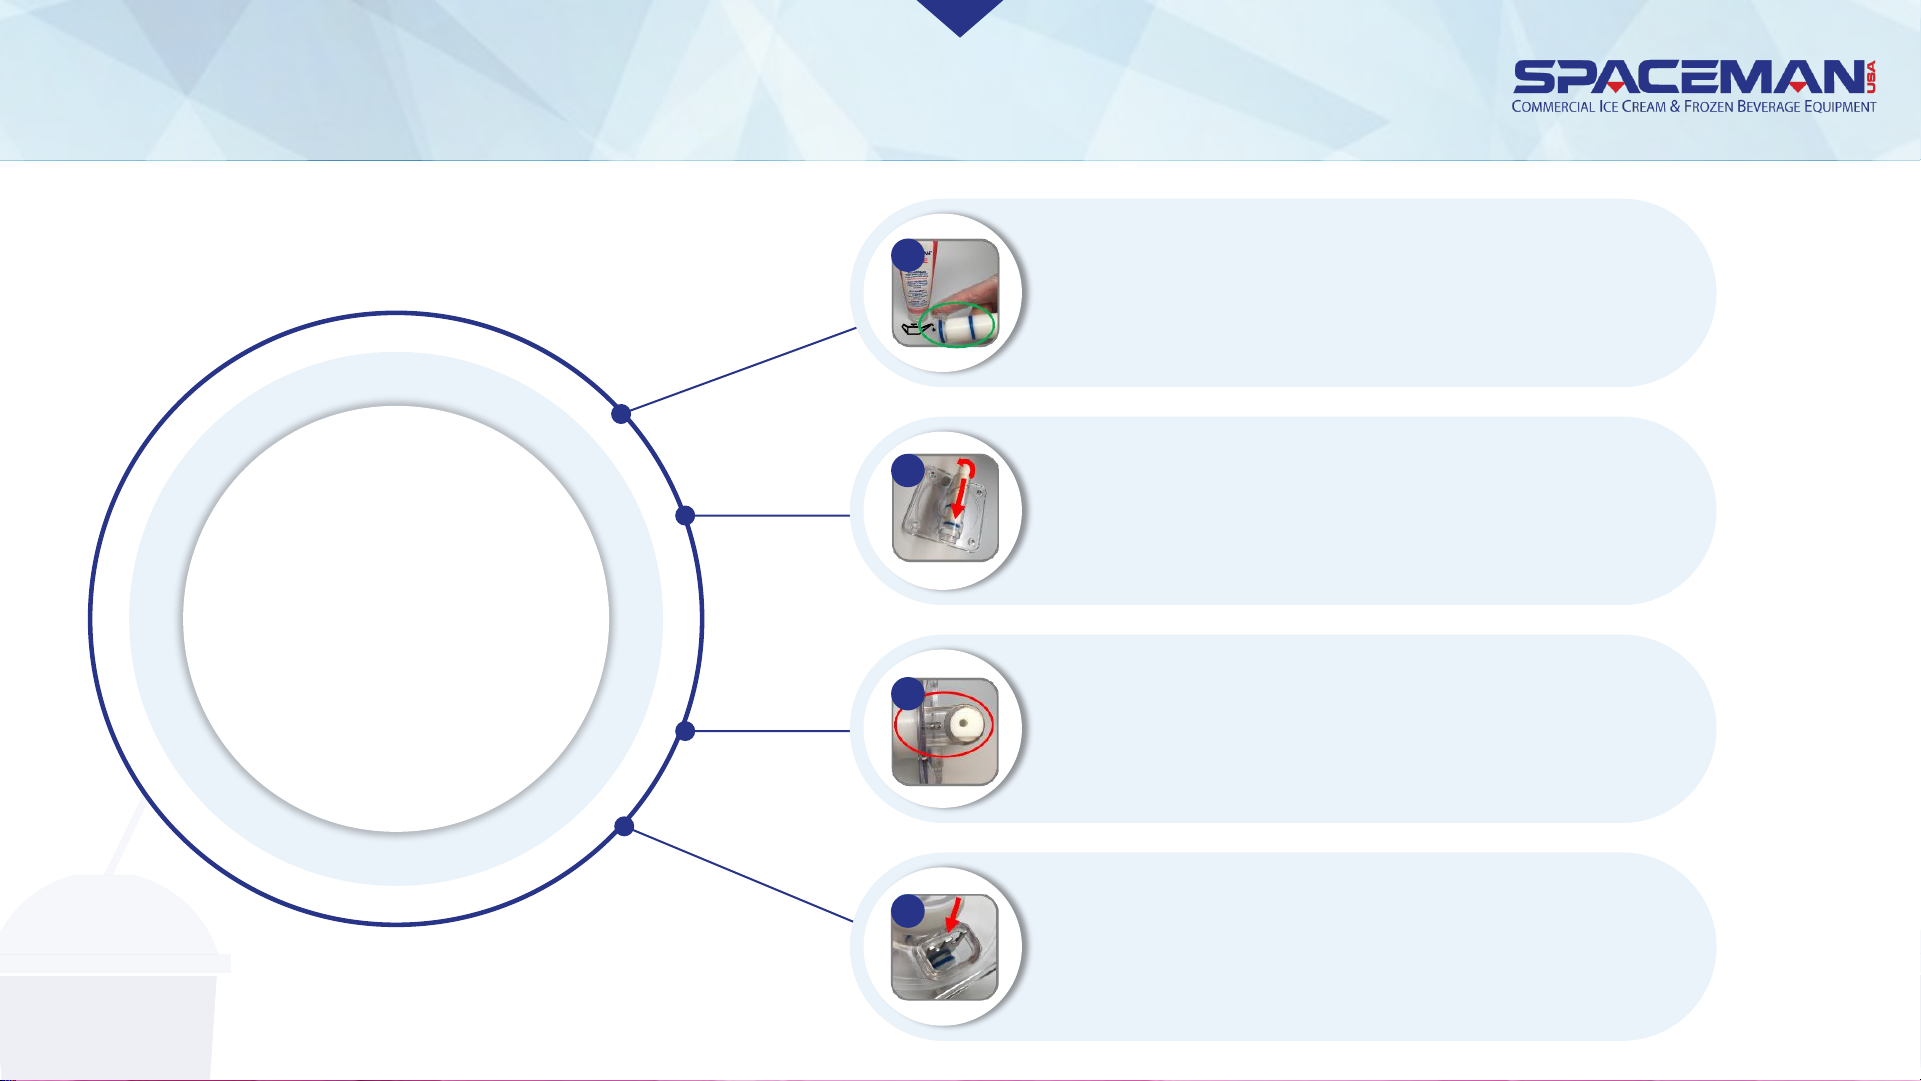
ASSEMBLEASSEMBLE
5.
Install
dispensing
door
Place O-rings (2) on draw valve, coating
with Spaceman lubricant
Insert draw valve 7/8 way into the dispensing
door from the top, rotating as you install
Insert ice buster through the dispensing
spout at the bottom of the door and into
the slot on the draw valve
Turn draw valve so the flat portion at the
valve top is perpendicular to the clear face
of the dispensing door
5a
5b
5c
5d
Spaceman USA Frozen Beverage Training
rev042219
Page 21
ASSEMBLE
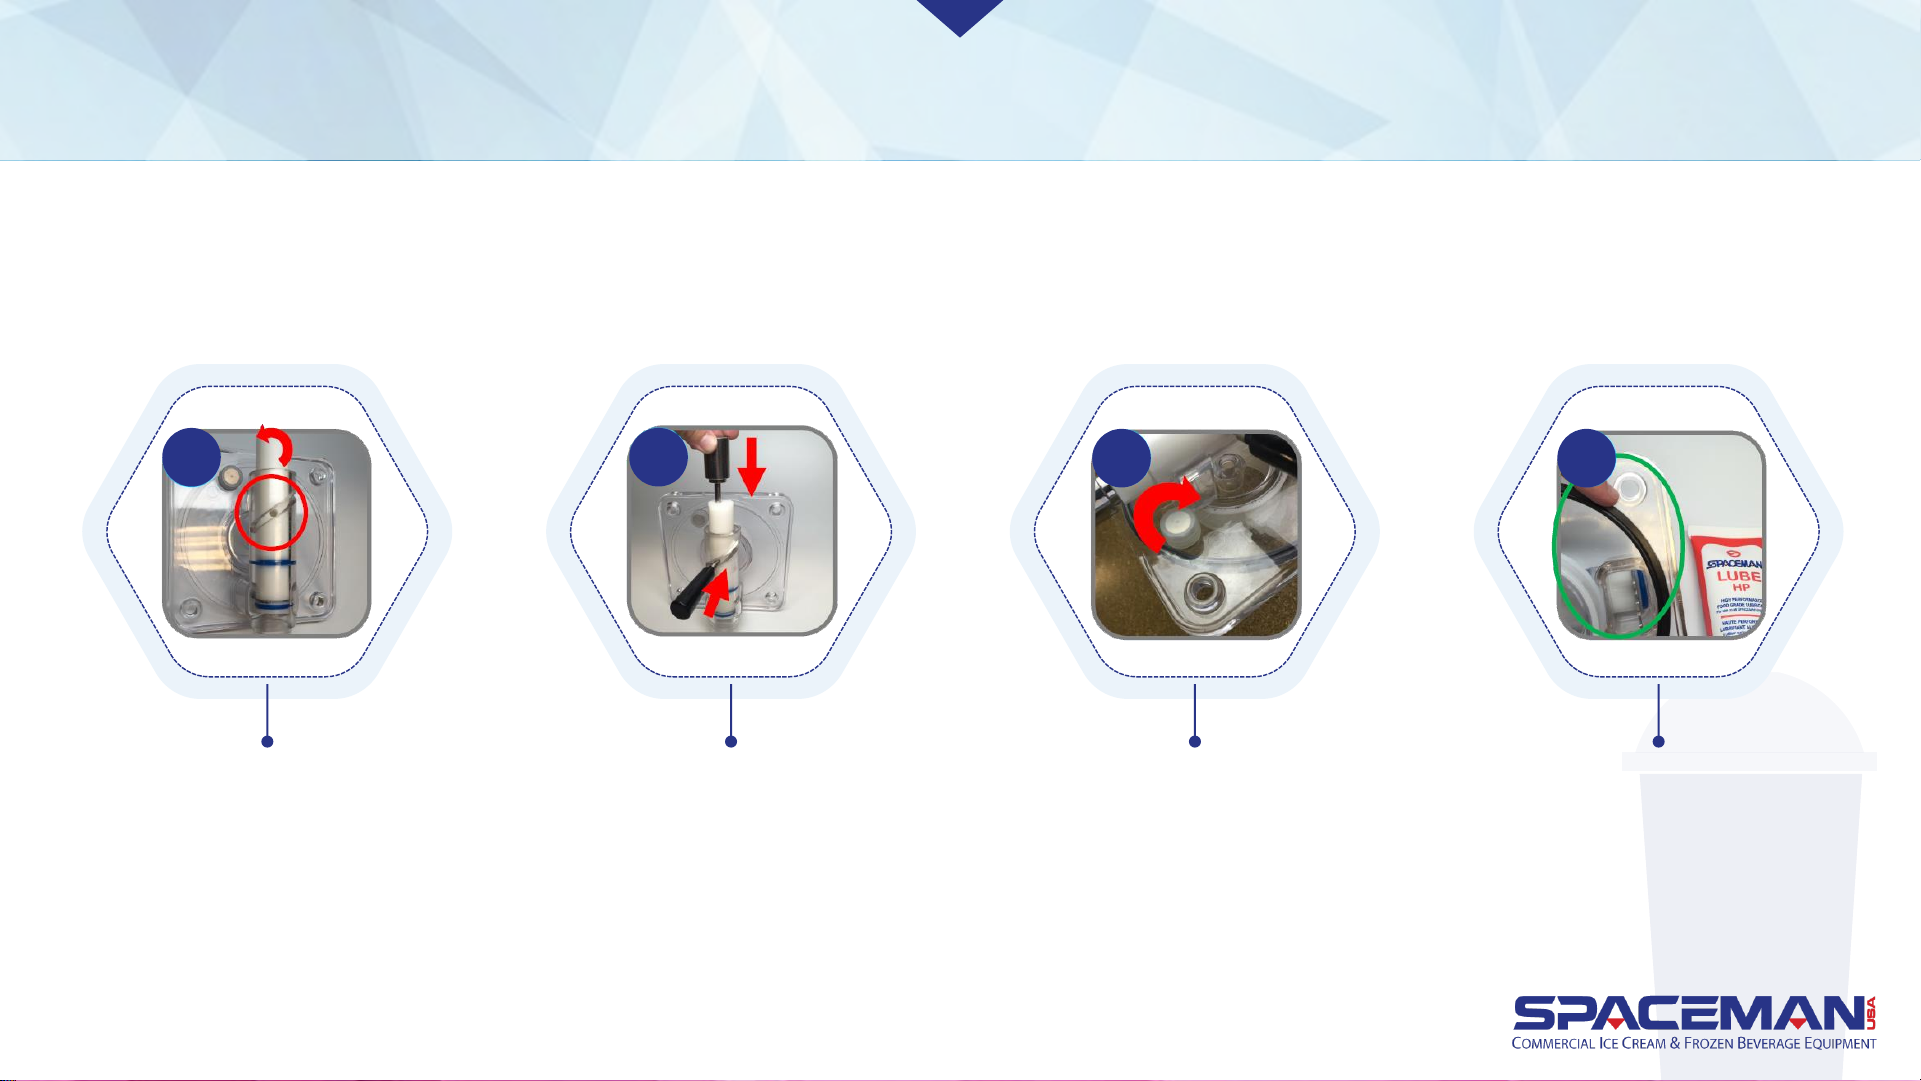
Rotate draw valve to lock
ice buster in place; turn
valve until the hole for
the draw handle is
accessible on front
Insert draw handle;
secure in place with
valve pin
Screw prime plug onto
dispensing door
Place dispensing door
gasket on door, coating
with Spaceman lubricant
5. Install dispensing door
5e 5f
5g 5h
Spaceman USA Frozen Beverage Training
rev042219
Page 22
ASSEMBLE
5.
Install
dispensing door
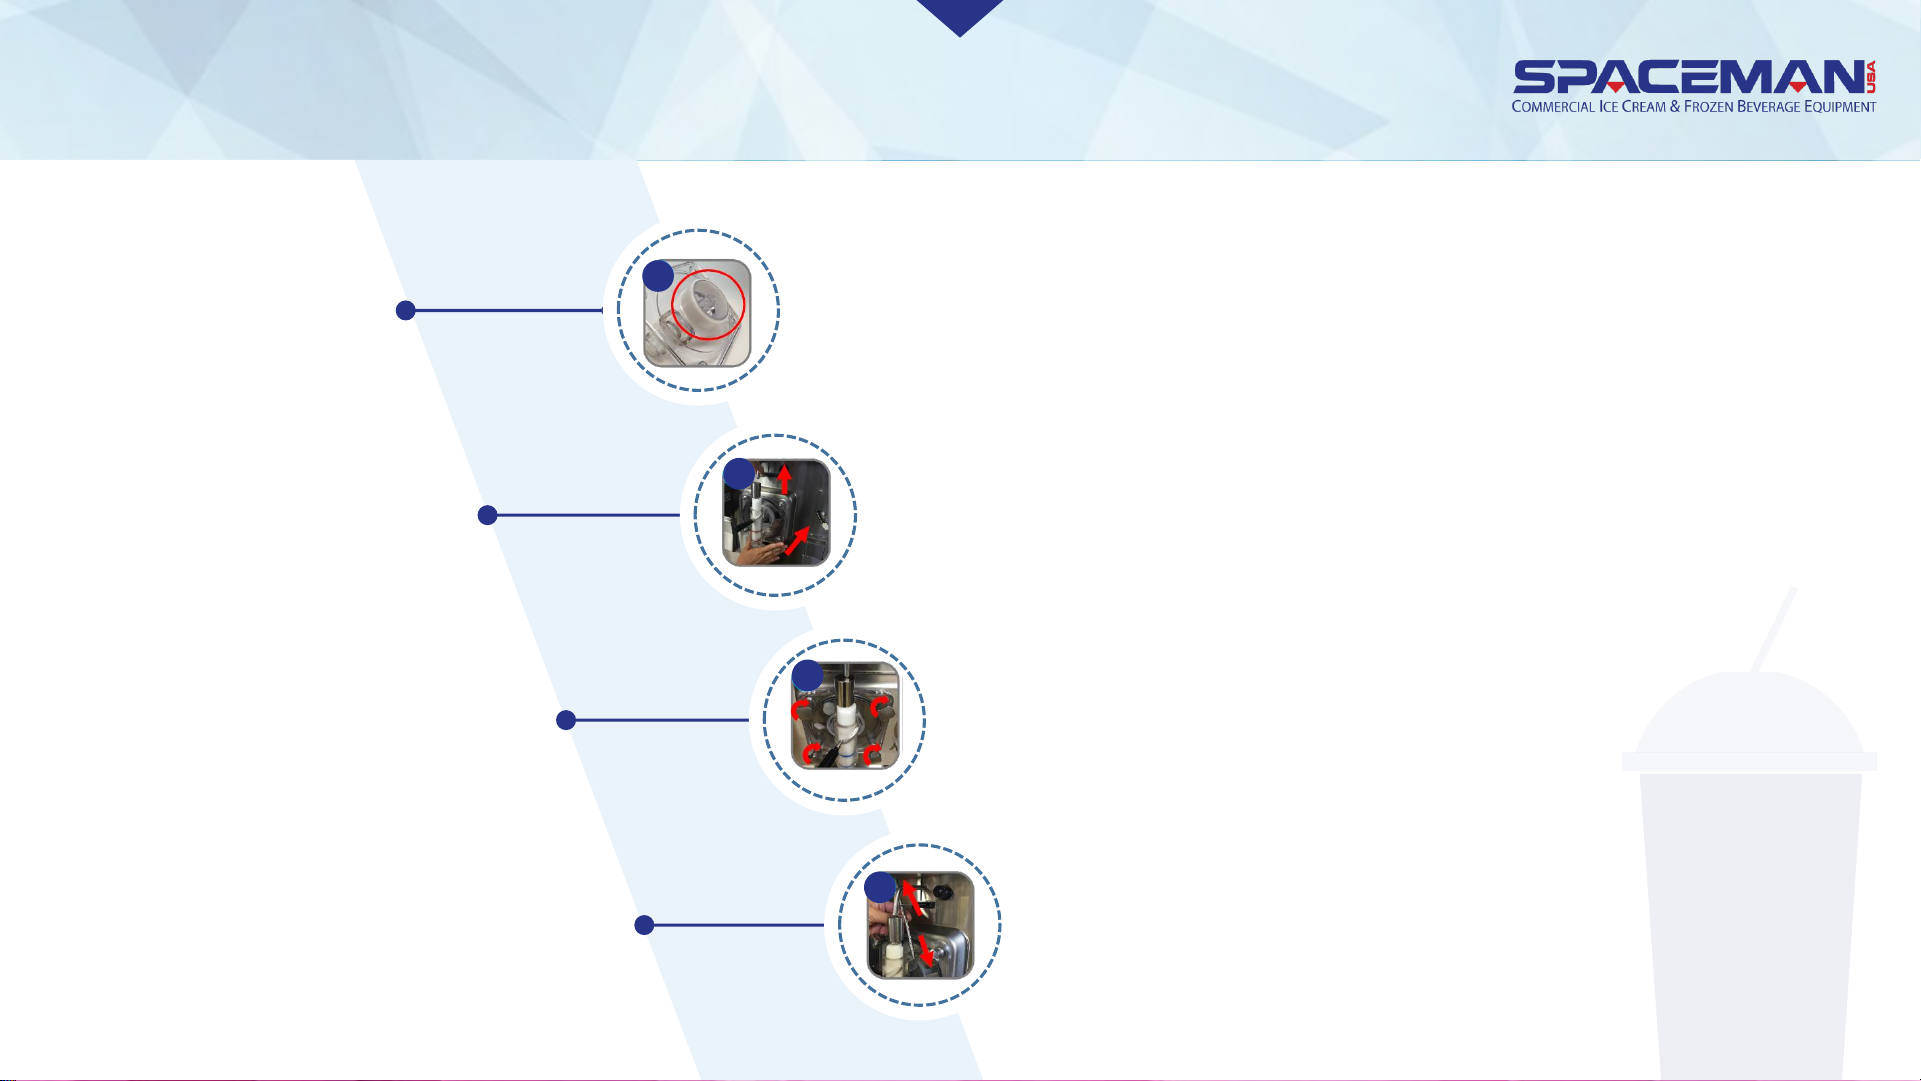
Place beater guide onto dispensing door, with flange flush with
the back of the door. Some models will not include this part,
please make sure to check accordingly.
Align door assembly with torque assembly and mounting bolts; carefully
lift curved sensor arm out of the way, and install dispensing door until
flush with machine; if needed, gently wiggle dispensing door to get the
beater guide to line-up correctly inside the beater; DO NOT force the
dispensing door onto the machine
Lifting door up, tighten dispensing door hand-screws (4) in a
cross-pattern
With tapered end down, install torque arm up through the flat
sensor arm and then down into the torque assembly; torque arm
should move freely back and forth; DO NOT LIFT UP ON CURVED
SENSOR ARM
5i
5j
5k
5l
Spaceman USA Frozen Beverage Training
rev042219
Page 23
ASSEMBLE
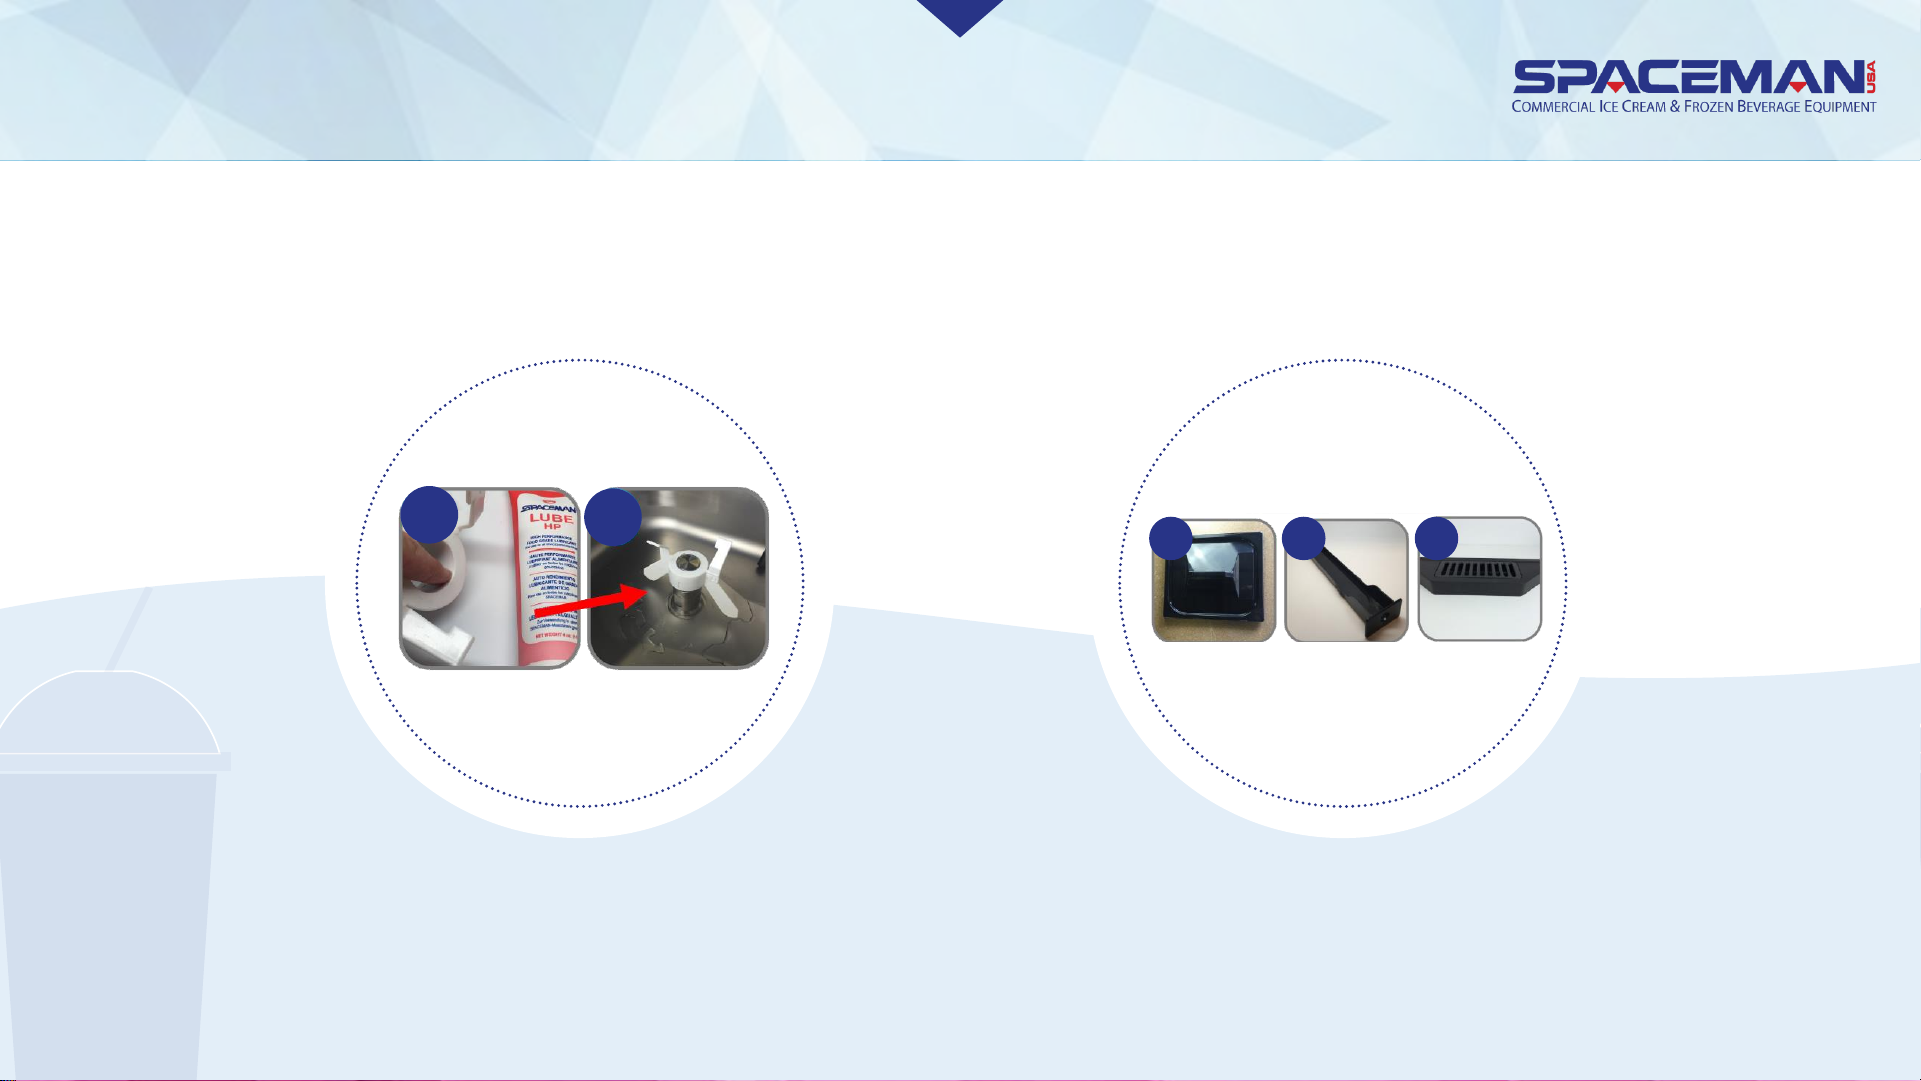
If machine has hopper agitator,
lubricate inside it and install with
arrow pointing up
Install hopper lid
and drip trays
(internal and front)
6.Install hopper assembly and drip trays
6a
6a
6b 6b 6b
Spaceman USA Frozen Beverage Training
rev042219
Page 24
SANITIZATION
IMPORTANT CAUTION
After sanitizing the machine, DO NOT
rinse or touch areas that have been
sanitized. Product must be added
immediately. If new product will not be
added immediately, rinse machine with
clean water and loosen door hand-
screws to allow cylinder to air-dry.
Sanitize machine before using again.
Always use food-grade, no-
rinse sanitizer (Stera-Sheen
green label or equivalent) to
sanitize. If warm water is
required to dissolve sanitizer,
allow the solution time to
cool before adding to
machine.
Spaceman USA Frozen Beverage Training
rev042219
Page 25
SANITIZATION
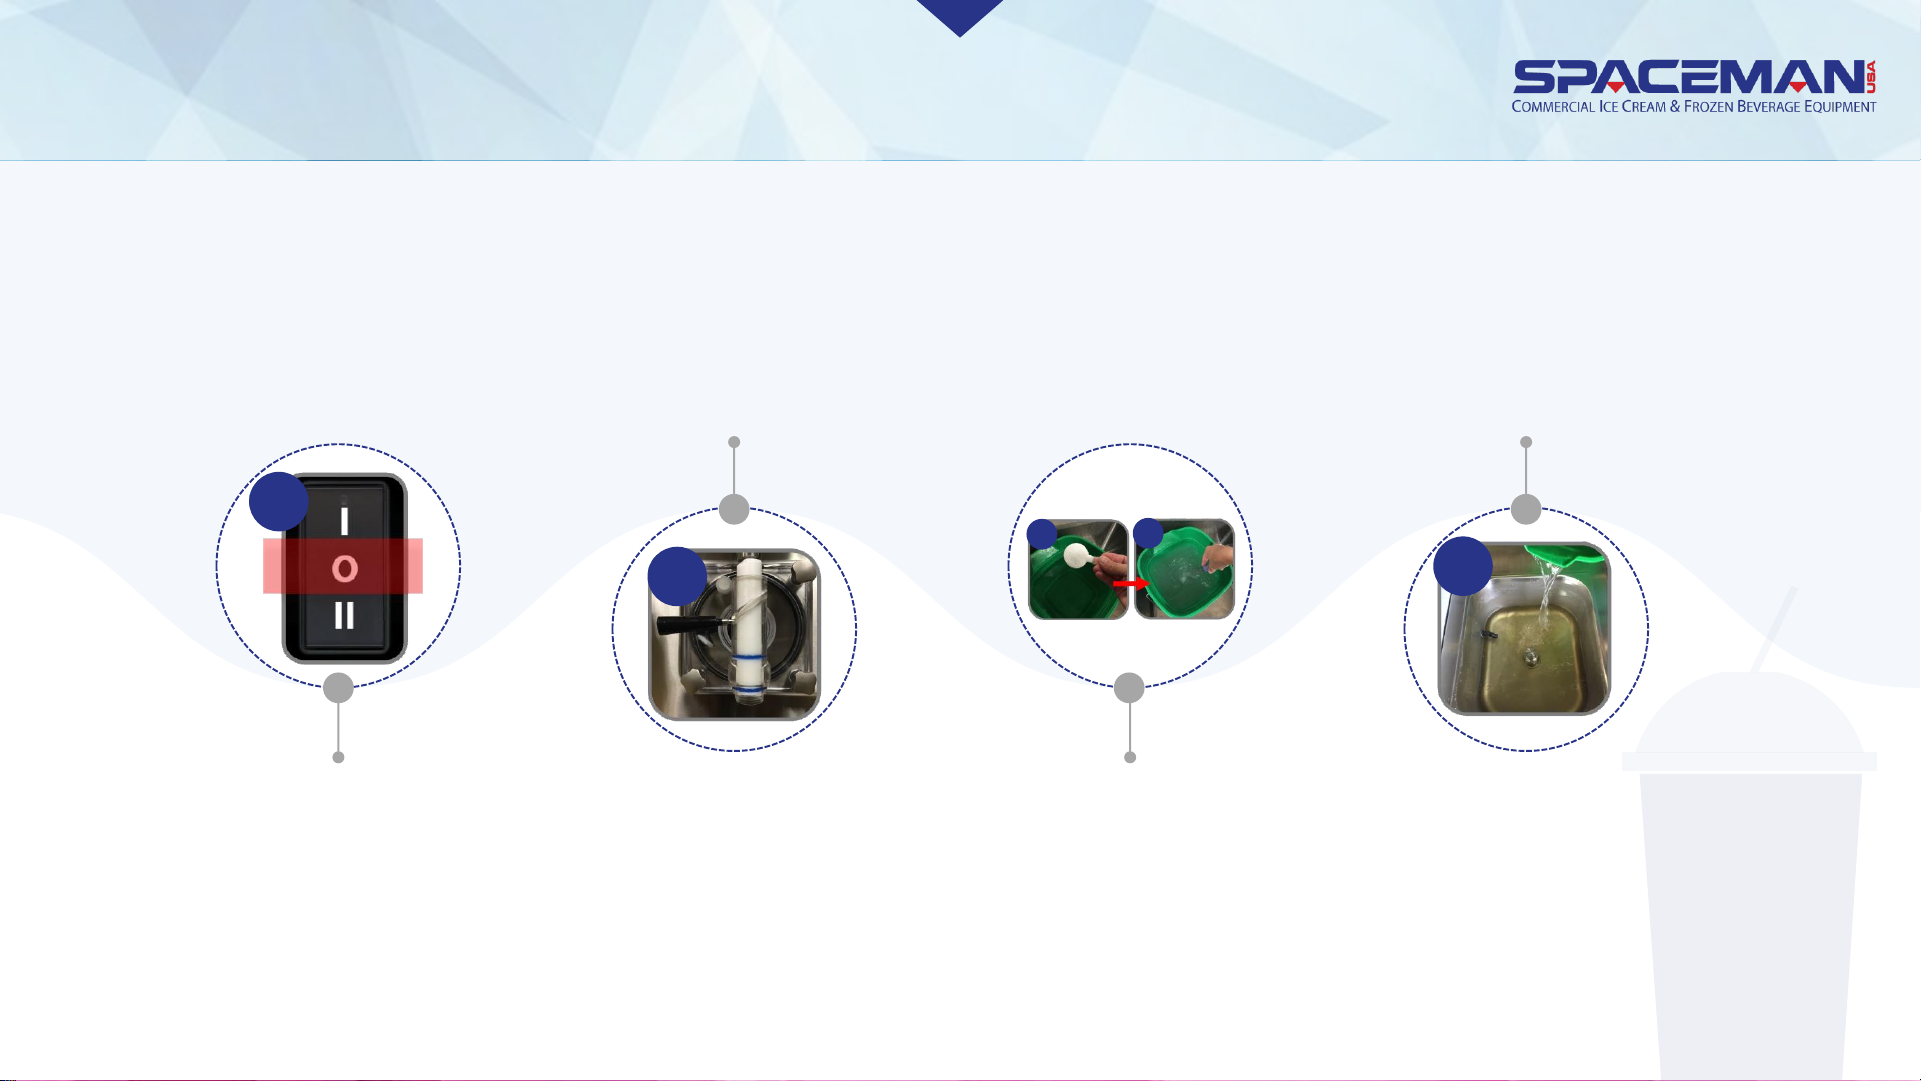
Verify assembly is
complete and machine
power is OFF
Verify the draw valve
is in the CLOSED
position (LEFT)
Mix a minimum of 2 gallons
of food-grade sanitizer in a
bucket or container
Pour food-grade sanitizer
solution into the hopper
1
2
3
3
4
Spaceman USA Frozen Beverage Training
rev042219
Page 26
SANITIZATION
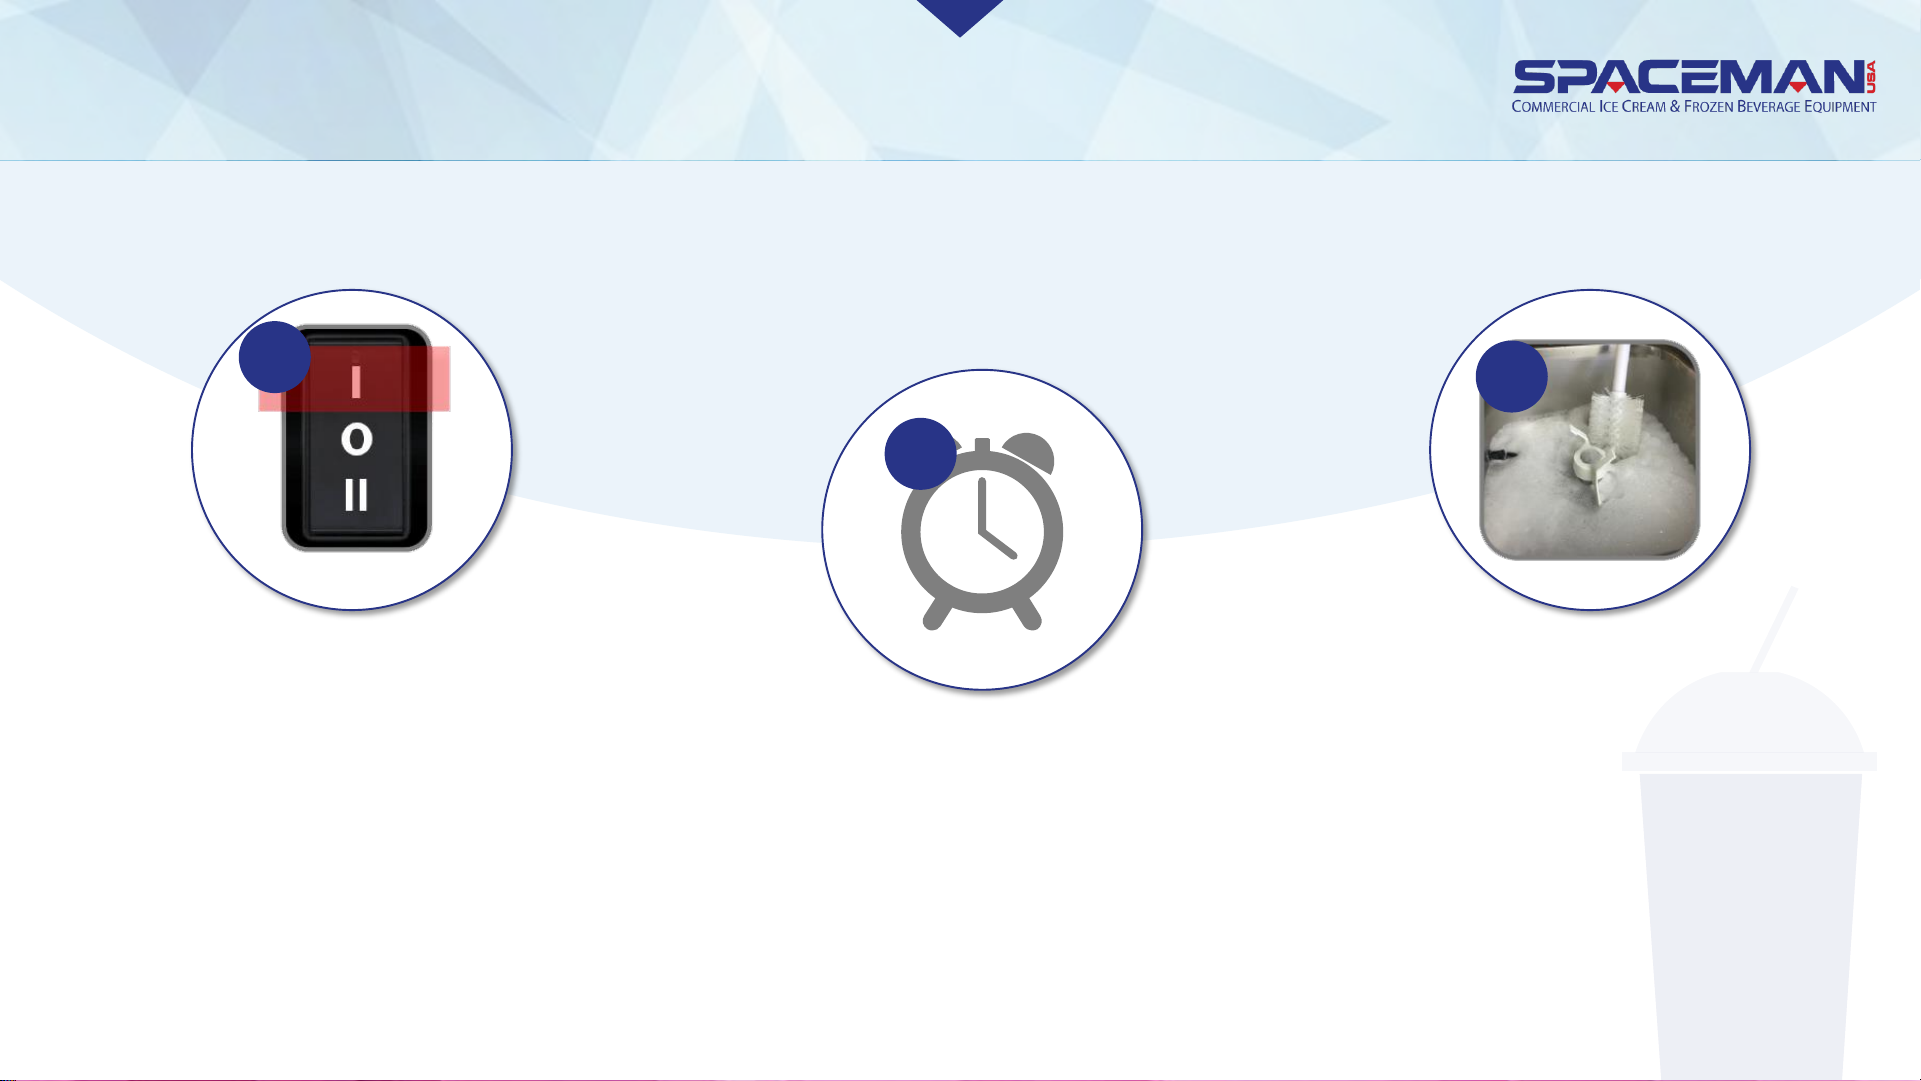
Turn power switch to WASH
5
Allow solution to agitate
for 5 to 10 minutes;
NEVER leave machine
on WASH for more than
10 minutes
6
While agitating, gently
use a clean brush to scrub
and distribute sanitizer
solution along hopper
walls and hopper agitator
(if present)
7
Spaceman USA Frozen Beverage Training
rev042219
Page 27
ASSEMBLESANITIZATION
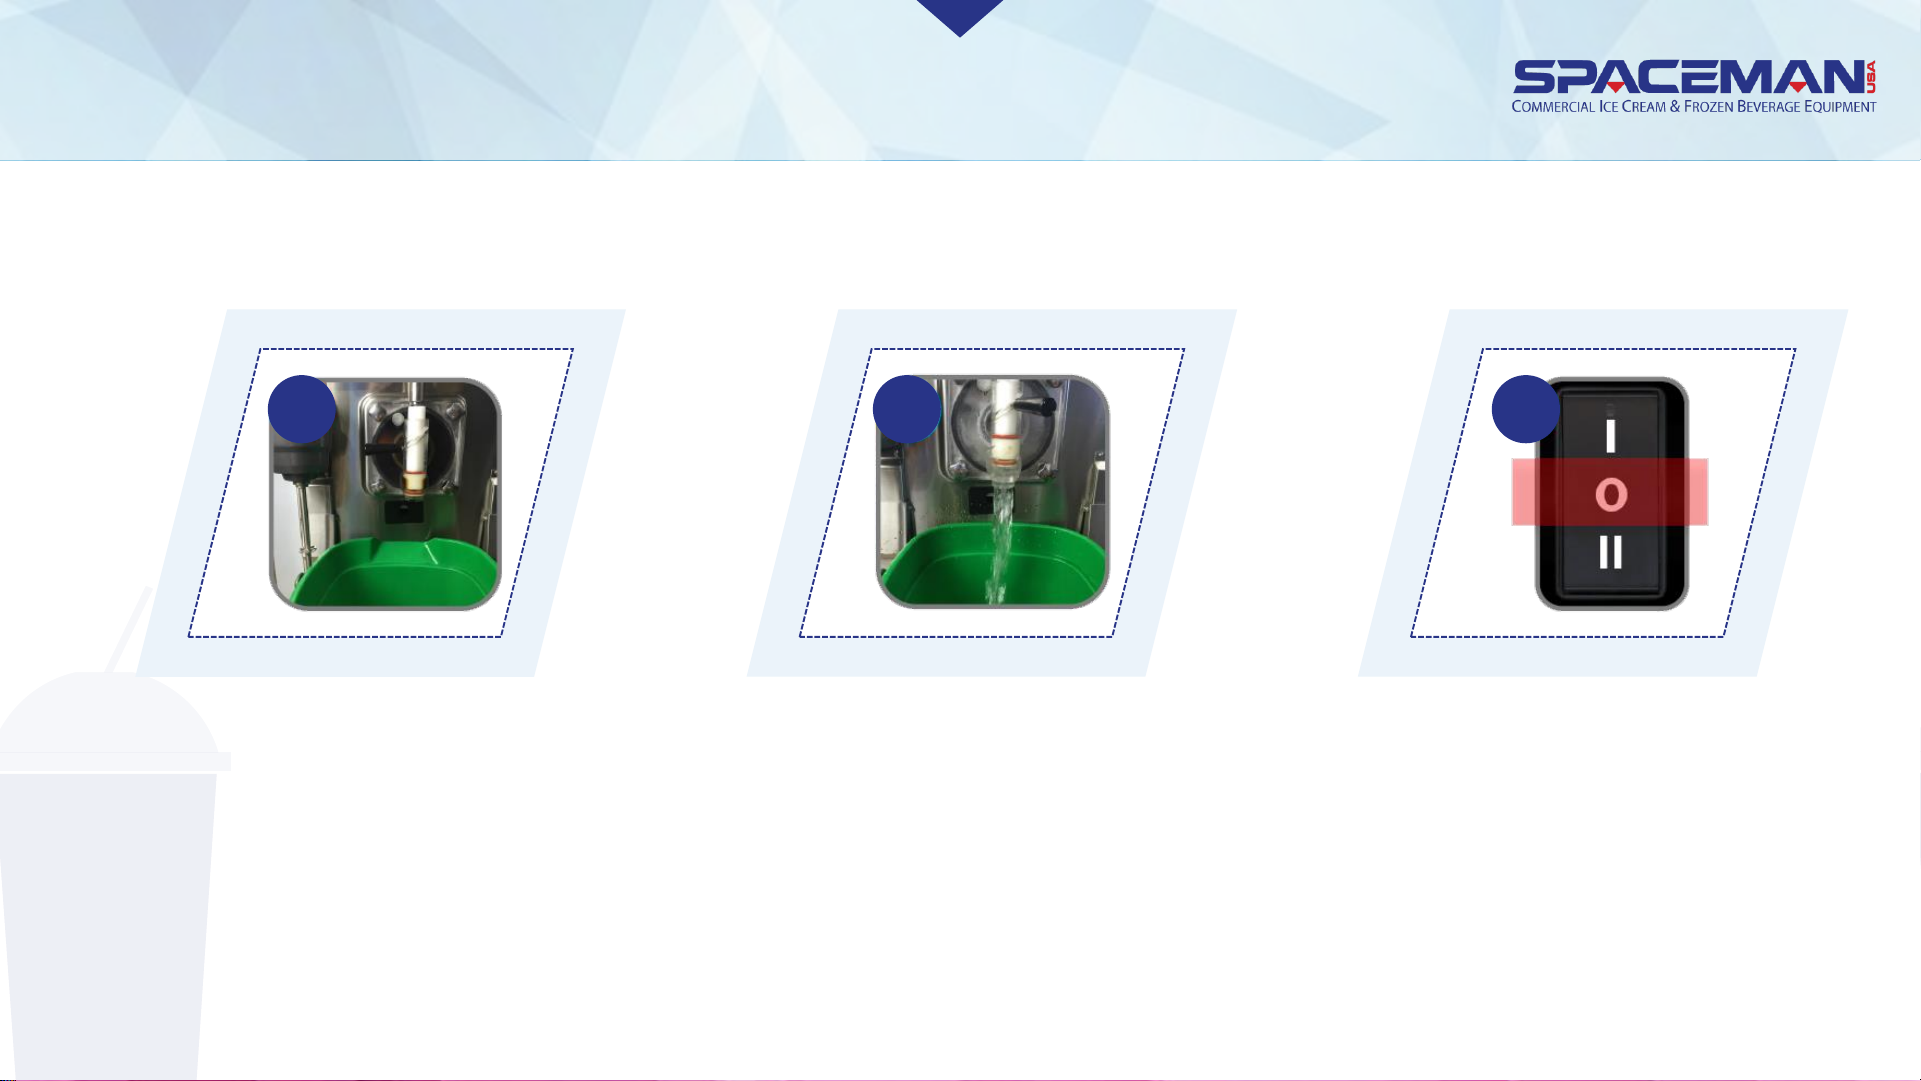
OPEN the draw valve
(RIGHT) and drain
solution from the
machine
Place a bucket or container
below the draw valve
Turn power switch
to OFF
8
9 10
Spaceman USA Frozen Beverage Training
rev042219
Page 28
FROZEN PRODUCT OPERATION
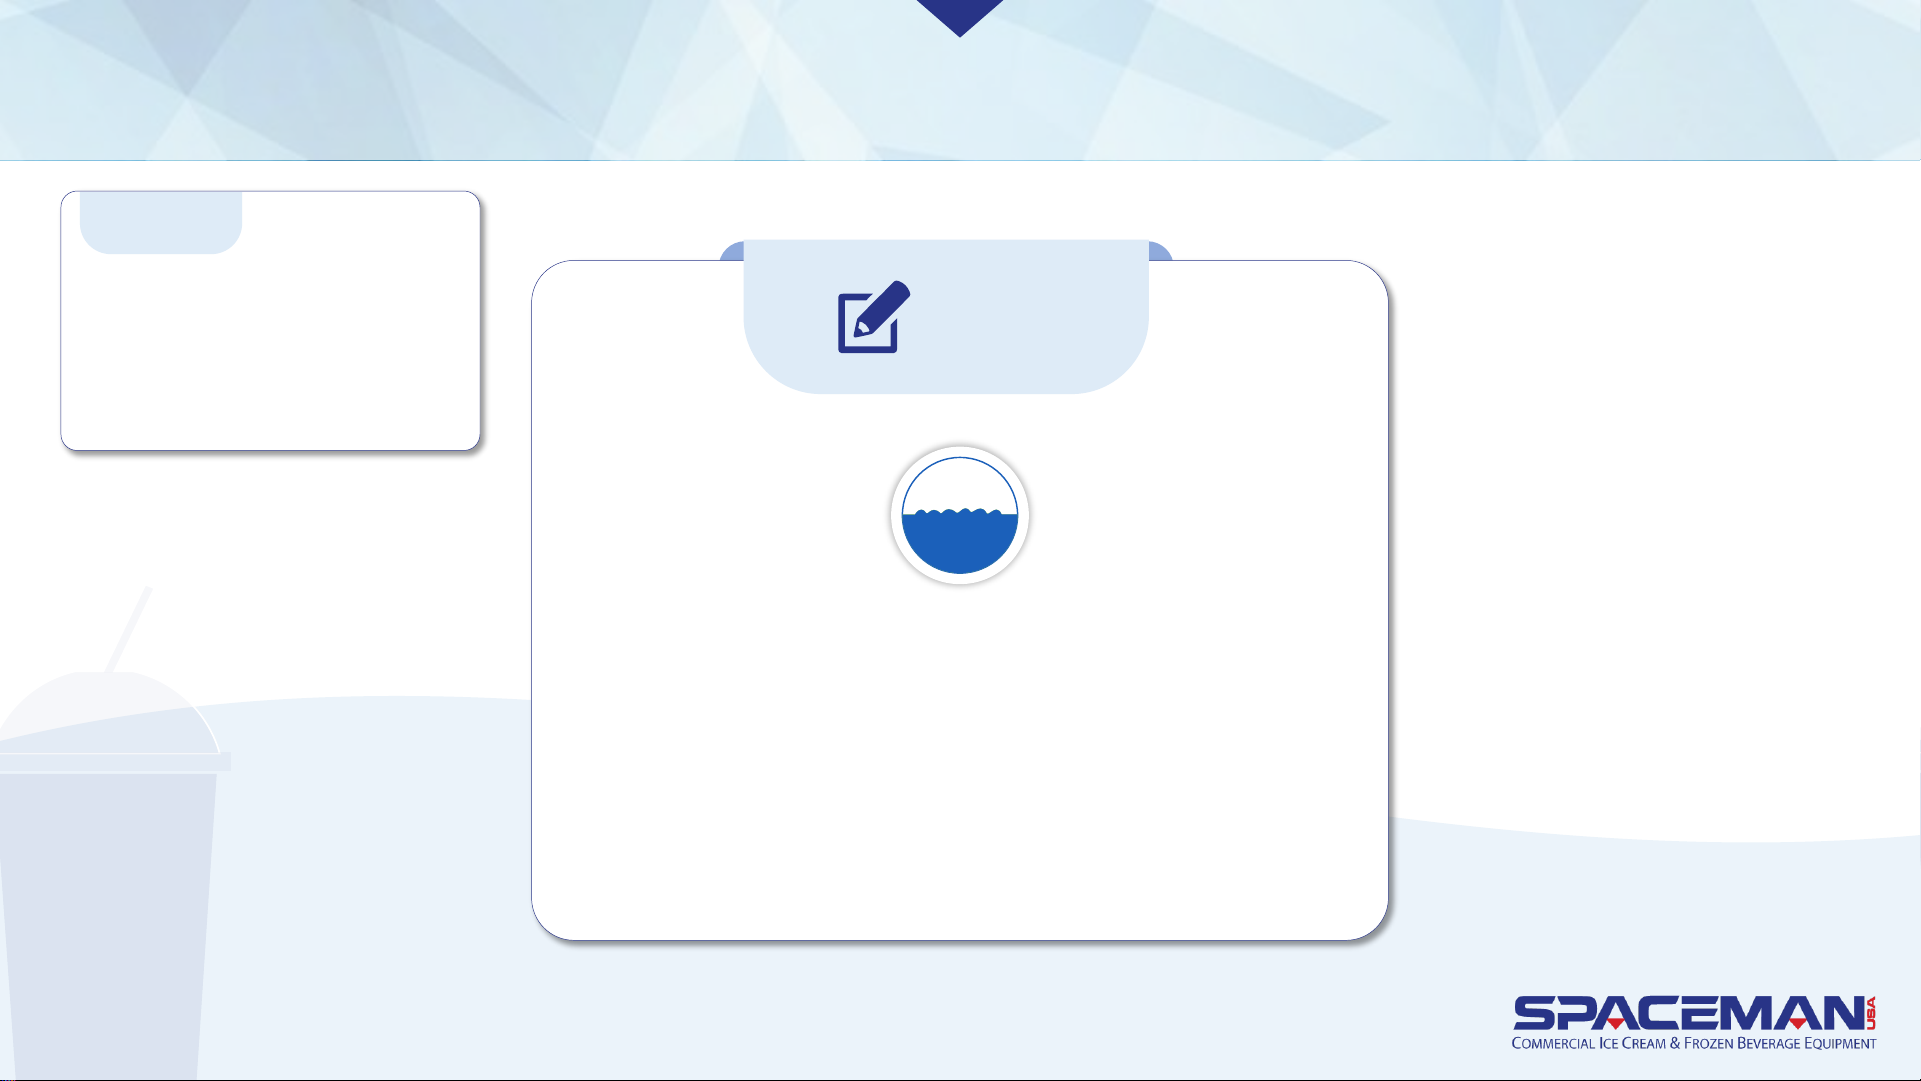
The MIX LOW light illuminates when
the hopper is low on product mix and
automatically turns off when machine
is filled.
NOTE
Mix
Low
Spaceman USA Frozen Beverage Training
rev042219
Important:
DO NOT dispense product with
low mix.
Doing so WILL cause freeze up and
damage to your machine.
Page 29
FROZEN PRODUCT OPERATION
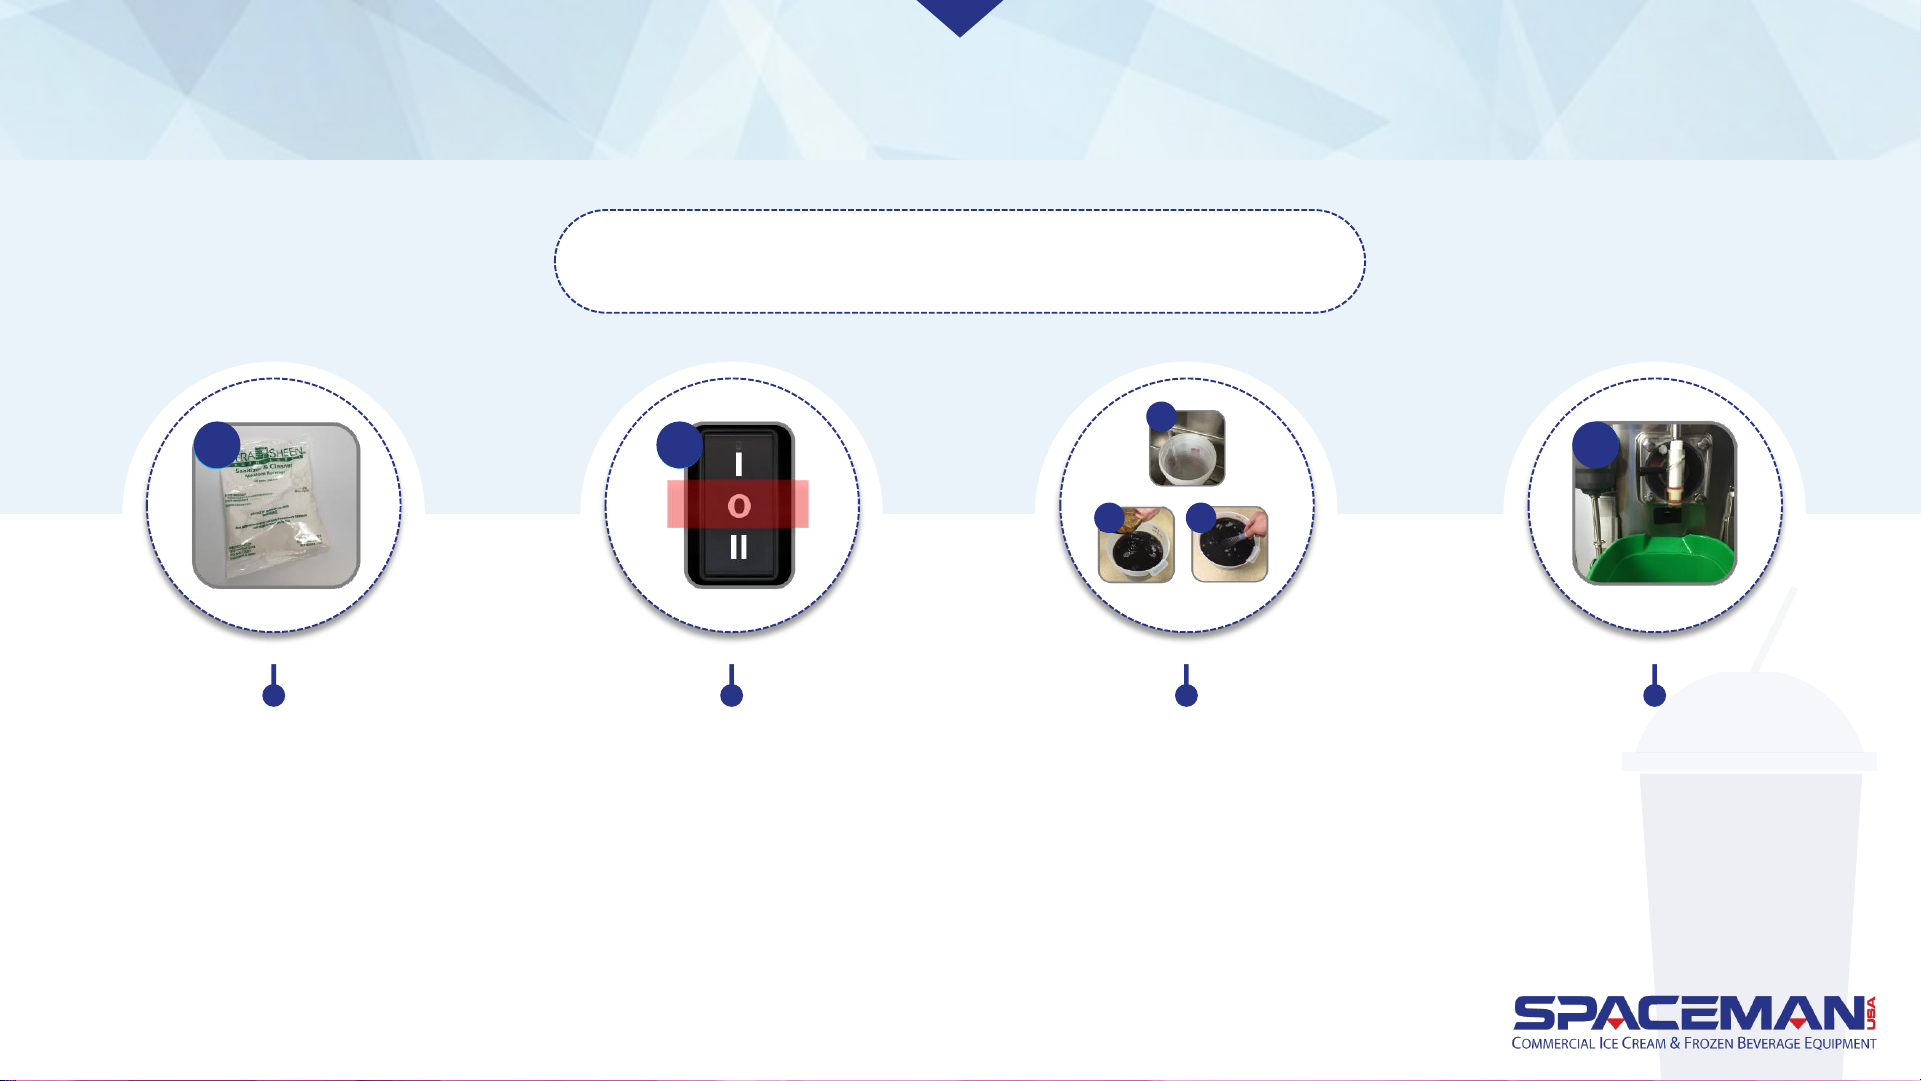
ADD PRODUCT TO MACHINE
Verify machine has been
recently sanitized (within 1
hour); if machine has not
been recently sanitized,
verify door hand-screws are
tight, and perform sanitizing
steps (Page 13)
Place a bucket or
container below the
draw valve
Turn power switch to OFF Thoroughly mix and prepare
at least 2 gallons of product
according to manufacturer
instructions; mix should be
cool and smooth (free of
large chunks)
1 2
3a
3b 3c
4
Spaceman USA Frozen Beverage Training
rev042219
Page 30
FROZEN PRODUCT OPERATION
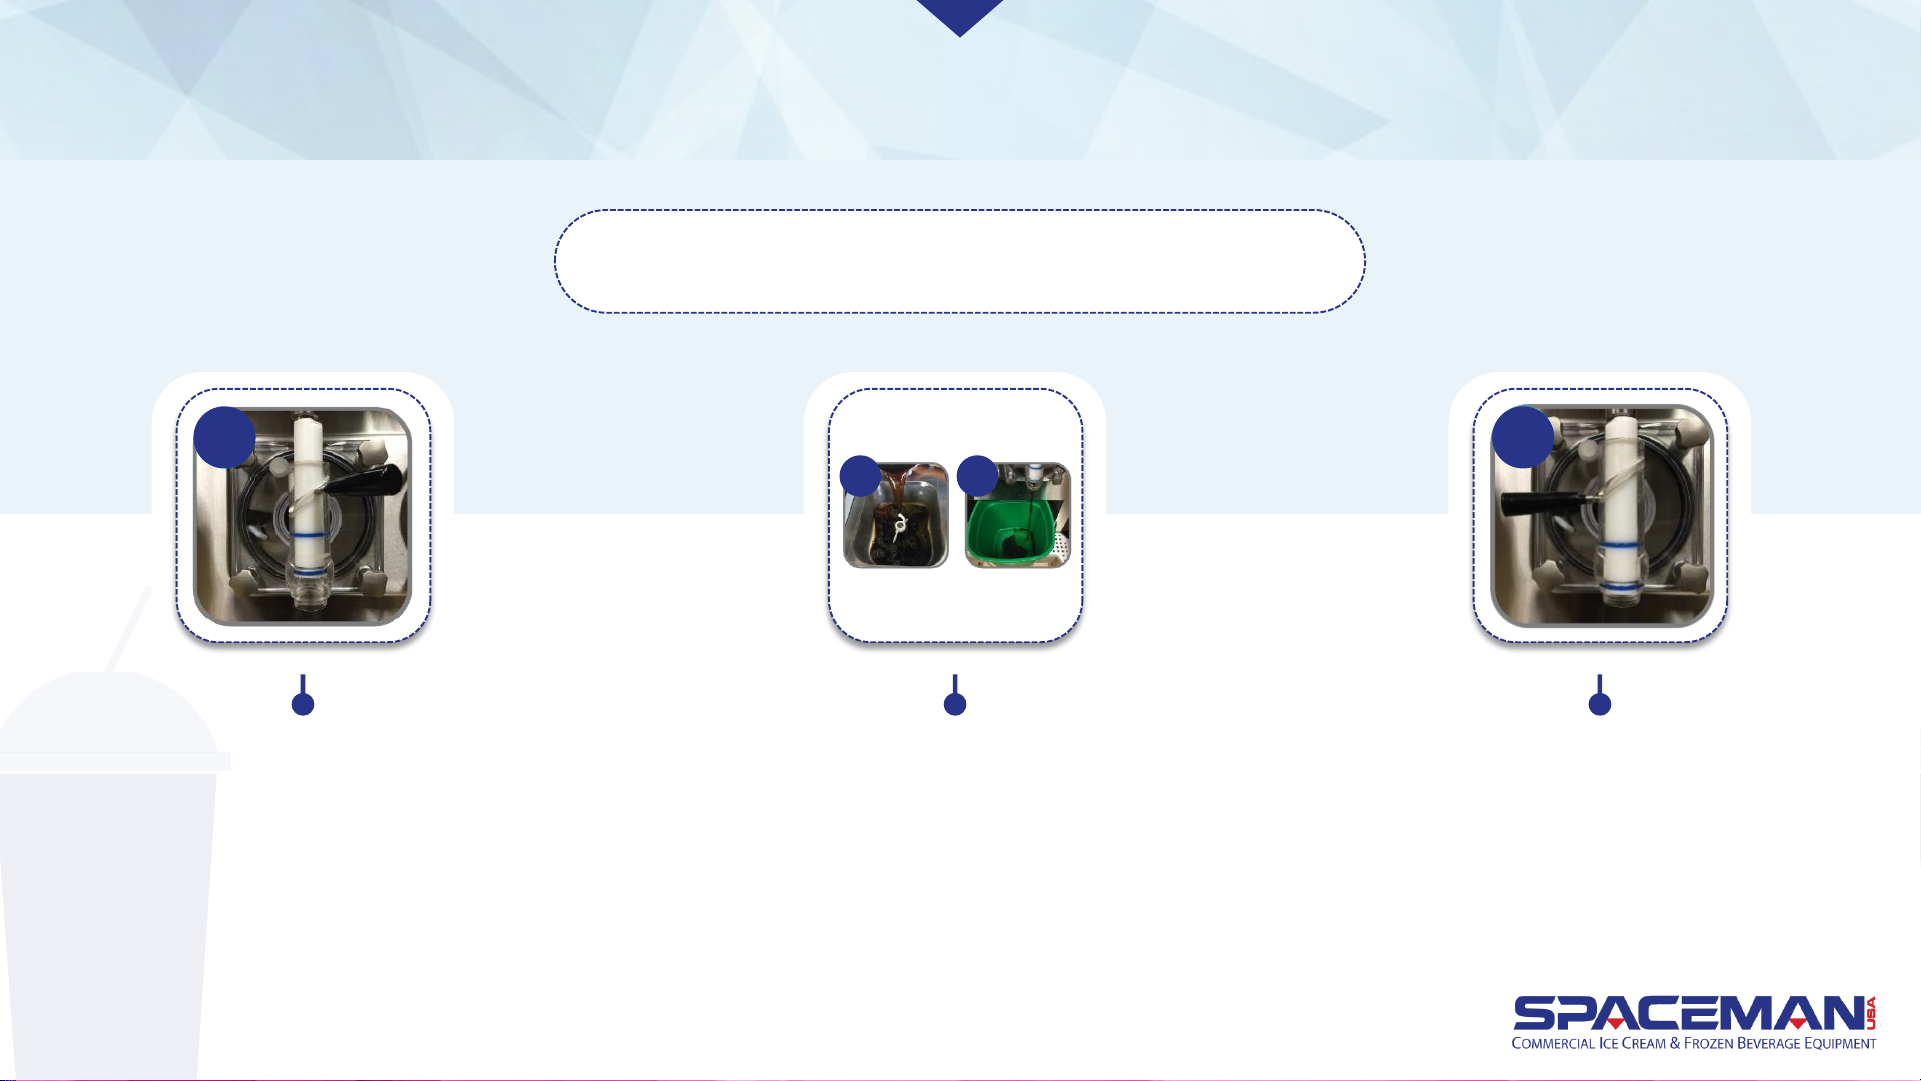
OPEN draw handle (RIGHT)
5
Pour 0.25 gallons of product
into the hopper; sanitizer
will start to flow out of the
draw spout
6a 6b
Once sanitizer has been
purged from the machine and
a steady stream of product is
flowing from the spout,
CLOSE draw handle (LEFT)
7
ADD PRODUCT TO MACHINE
Spaceman USA Frozen Beverage Training
rev042219
Page 31
FROZEN PRODUCT OPERATION
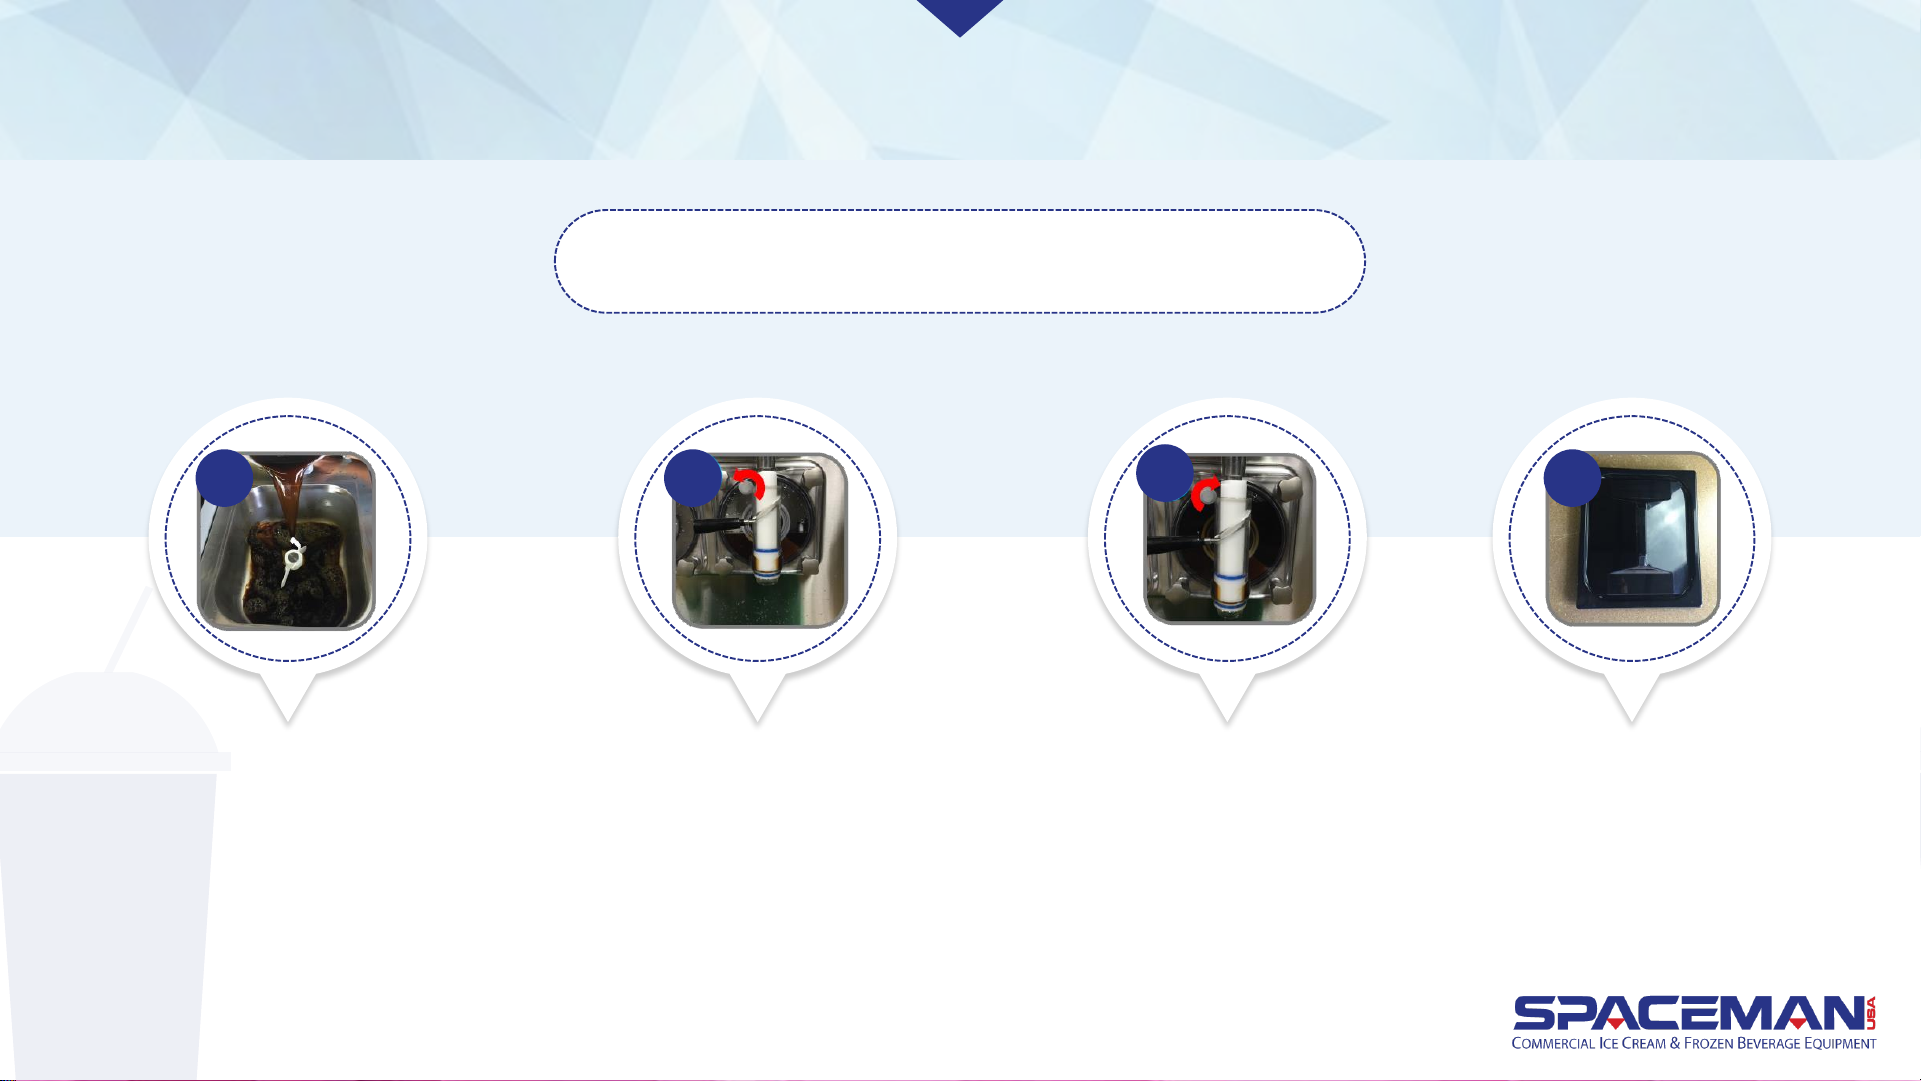
Pour remaining
product into the
hopper
Open the prime screw
(counter-clockwise) on the
front of the dispensing door
and allow the cylinder to fill
with product to the desired
level; cylinder must be at least
75% full to operate
Close the prime
screw and tighten
completely
Replace hopper lid
8 9
10
11
ADD PRODUCT TO MACHINE
Spaceman USA Frozen Beverage Training
rev042219
Page 32
FROZEN PRODUCT OPERATION
FREEZE PRODUCT
Verify cylinder is full of mixed product
Turn power switch to FREEZE and verify
STANDBY mode is off (see below)
The motor will begin to agitate the product,
and the cooling system will begin to freeze
the product
Freezing product takes approximately 10 minutes;
product is at the adjusted viscosity when the flat
sensor arm is switched to the RIGHT
When the product reaches the desired
viscosity, it is ready to dispense
IMPORTANT
Machine shuts down automatically if cylinder experiences
freeze-up (usually because the viscosity is set too high for the
selected product to prevent motor damage.
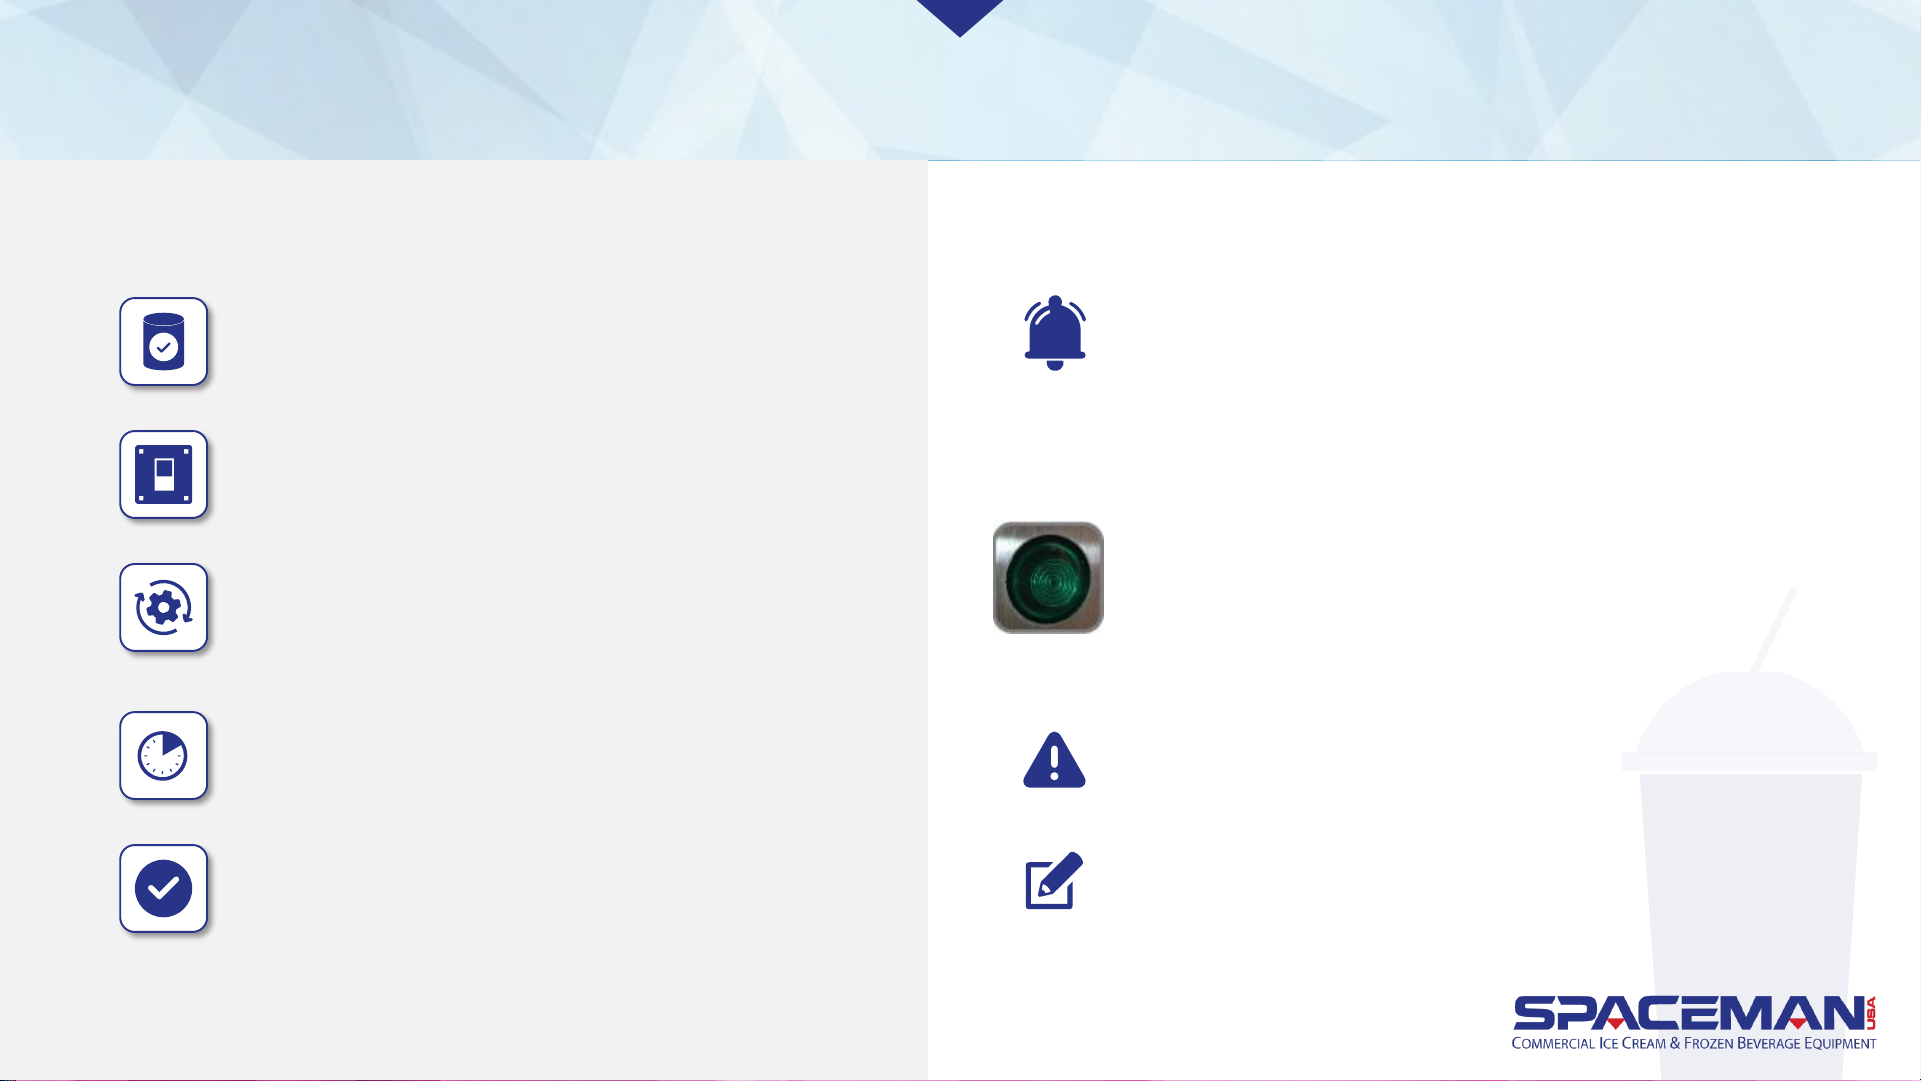
Use the green reset button on the machine’s back panel to return
the machine to normal operation.
PROPER MACHINE RESET
1. Turn power switch to OFF
2. Firmly press green reset button
3. Wait 15 to 20 minutes.
4. Turn power switch to WASH
5. Observe machine performance
CAUTION:
If machine makes any abnormal noise during reset,
immediately turn power switch OFF and contact service team.
NOTE:
If machine doesn’t turn on, turn power switch OFF, wait 30
minutes, and repeat steps 1 to 4. If problem persists, contact
service team.
MACHINE POWER RESET
Spaceman USA Frozen Beverage Training
rev042219
Page 33
FROZEN PRODUCT OPERATION
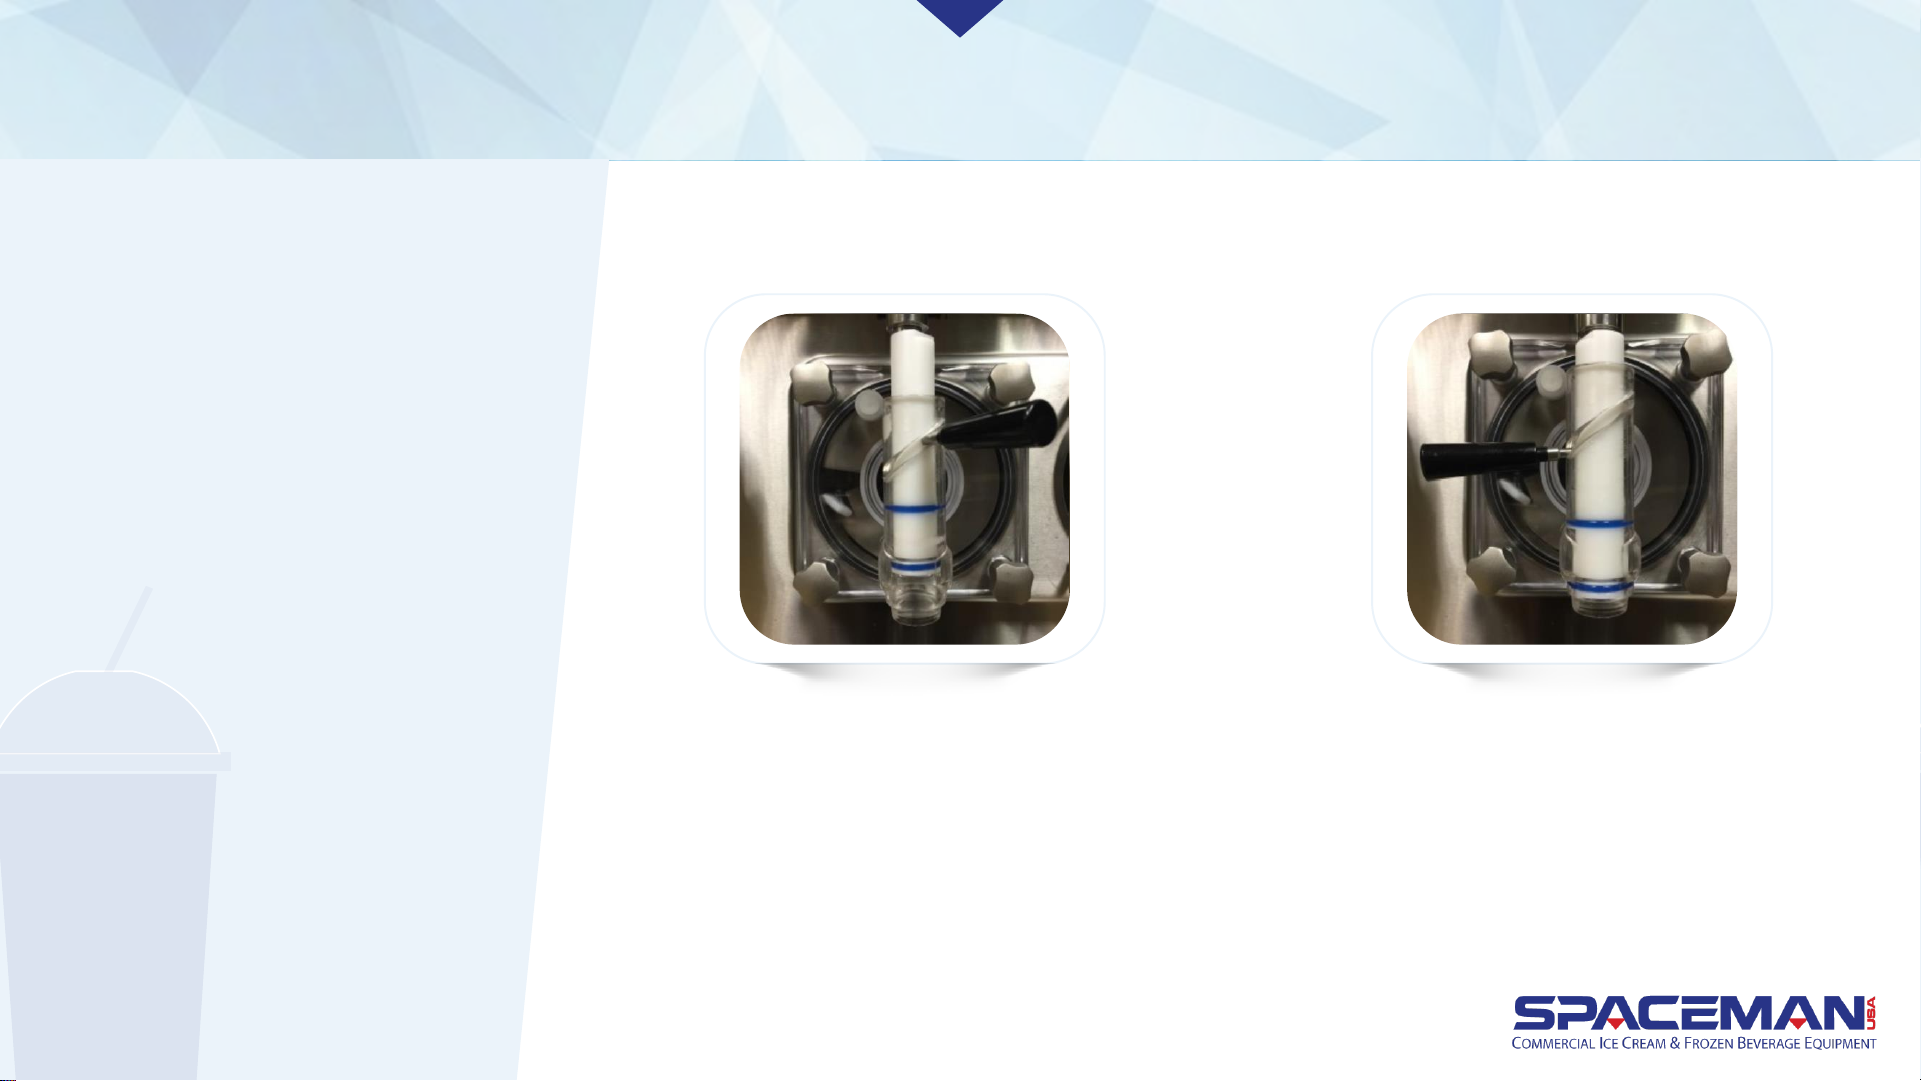
DISPENSE
PRODUCT
OPEN draw handle
(RIGHT) until the desired
amount is dispensed
CLOSE the draw
handle (LEFT) when
finished dispensing
OPEN CLOSE
Spaceman USA Frozen Beverage Training
rev042219
Page 34
IMPORTANT
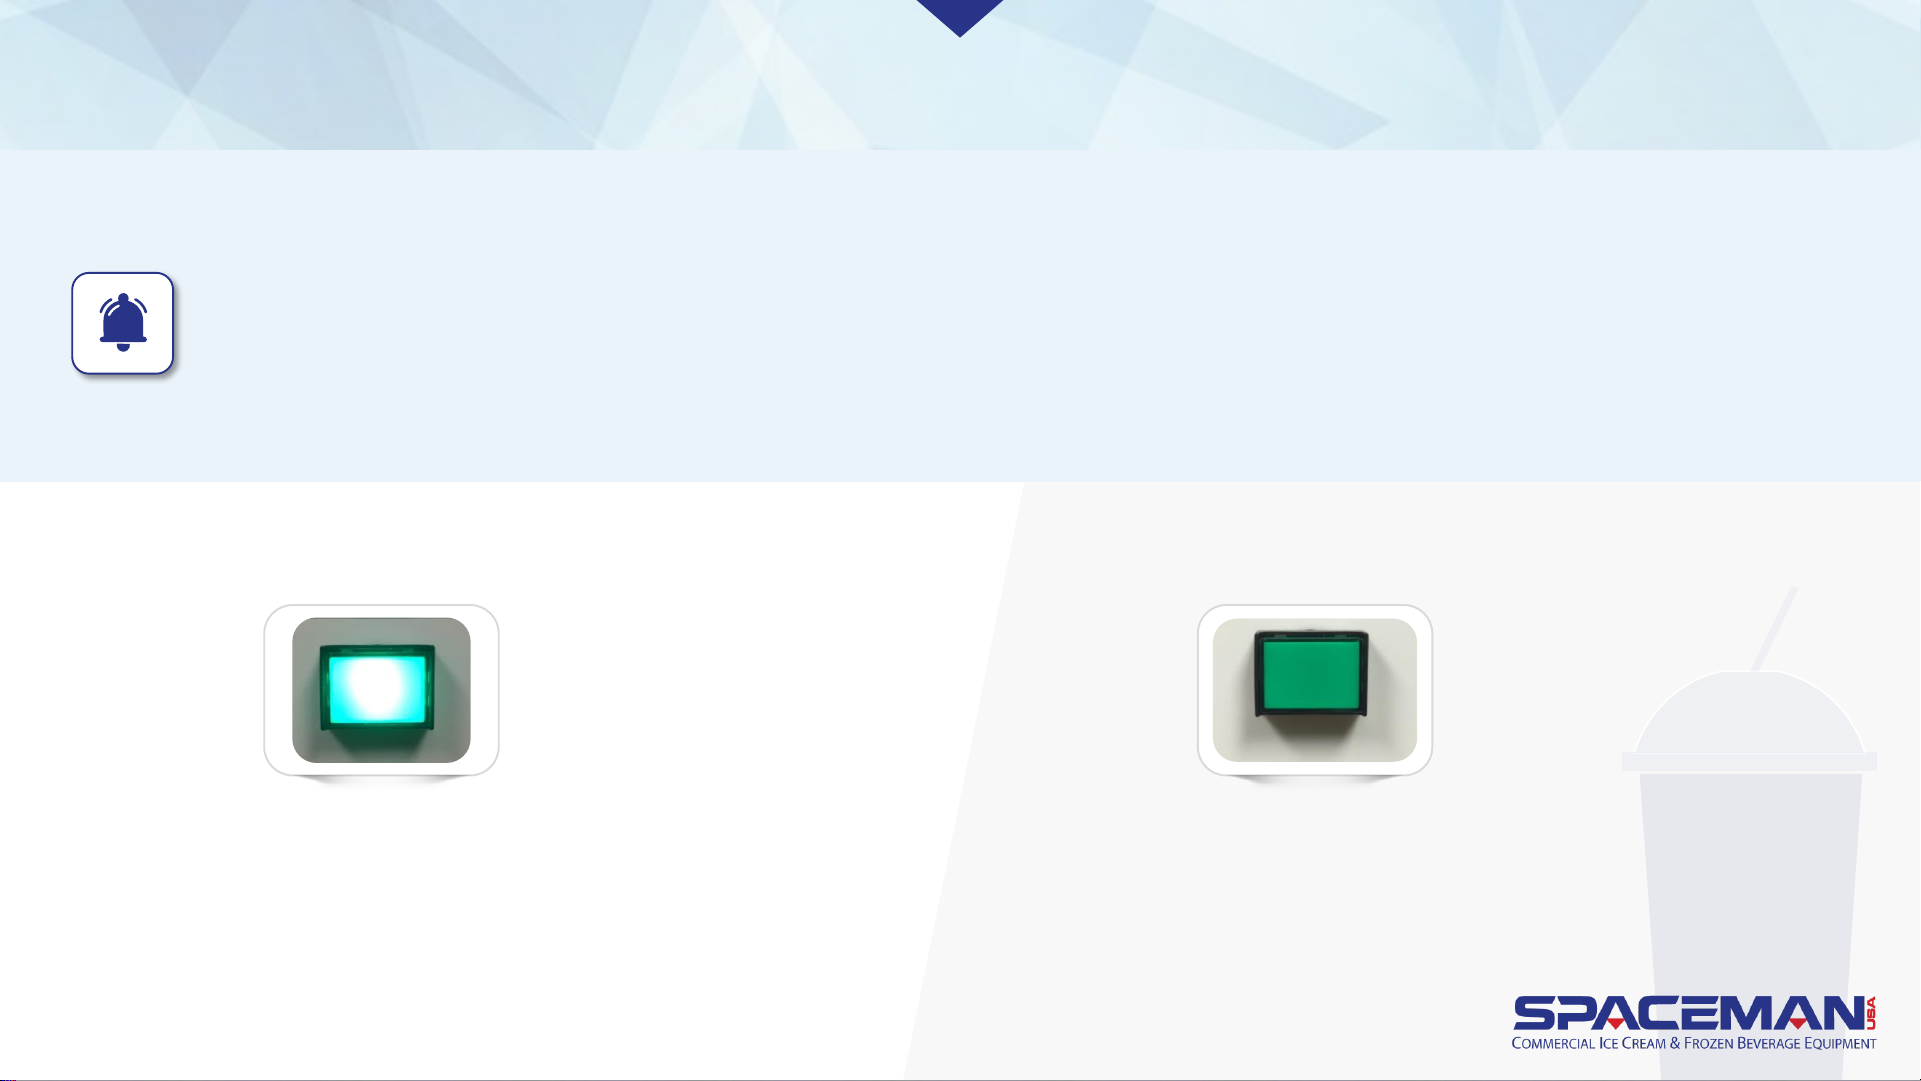
• When the machine will NOT be utilized for several hours, place it in STANDBY mode to conserve electricity and
reduce product loss.
• In STANDBY, product remains below 41oF in both the cylinder and hopper, but will NOT be frozen.
FROZEN PRODUCT OPERATION
STANDBY MODE
To enter STANDBY mode:
(Light may be amber in color)
To exit STANDBY mode:
• Press STANDBY indicator light on front of
machine, and green light will de-illuminate.
• Allow 5 to 10 minutes for machine to begin
freezing again.
• Press STANDBY indicator light on front
of machine. Light may be amber color.
• Light illuminates green when machine
is in STANDBY mode.
Spaceman USA Frozen Beverage Training
rev042219
Page 35
FROZEN PRODUCT OPERATION
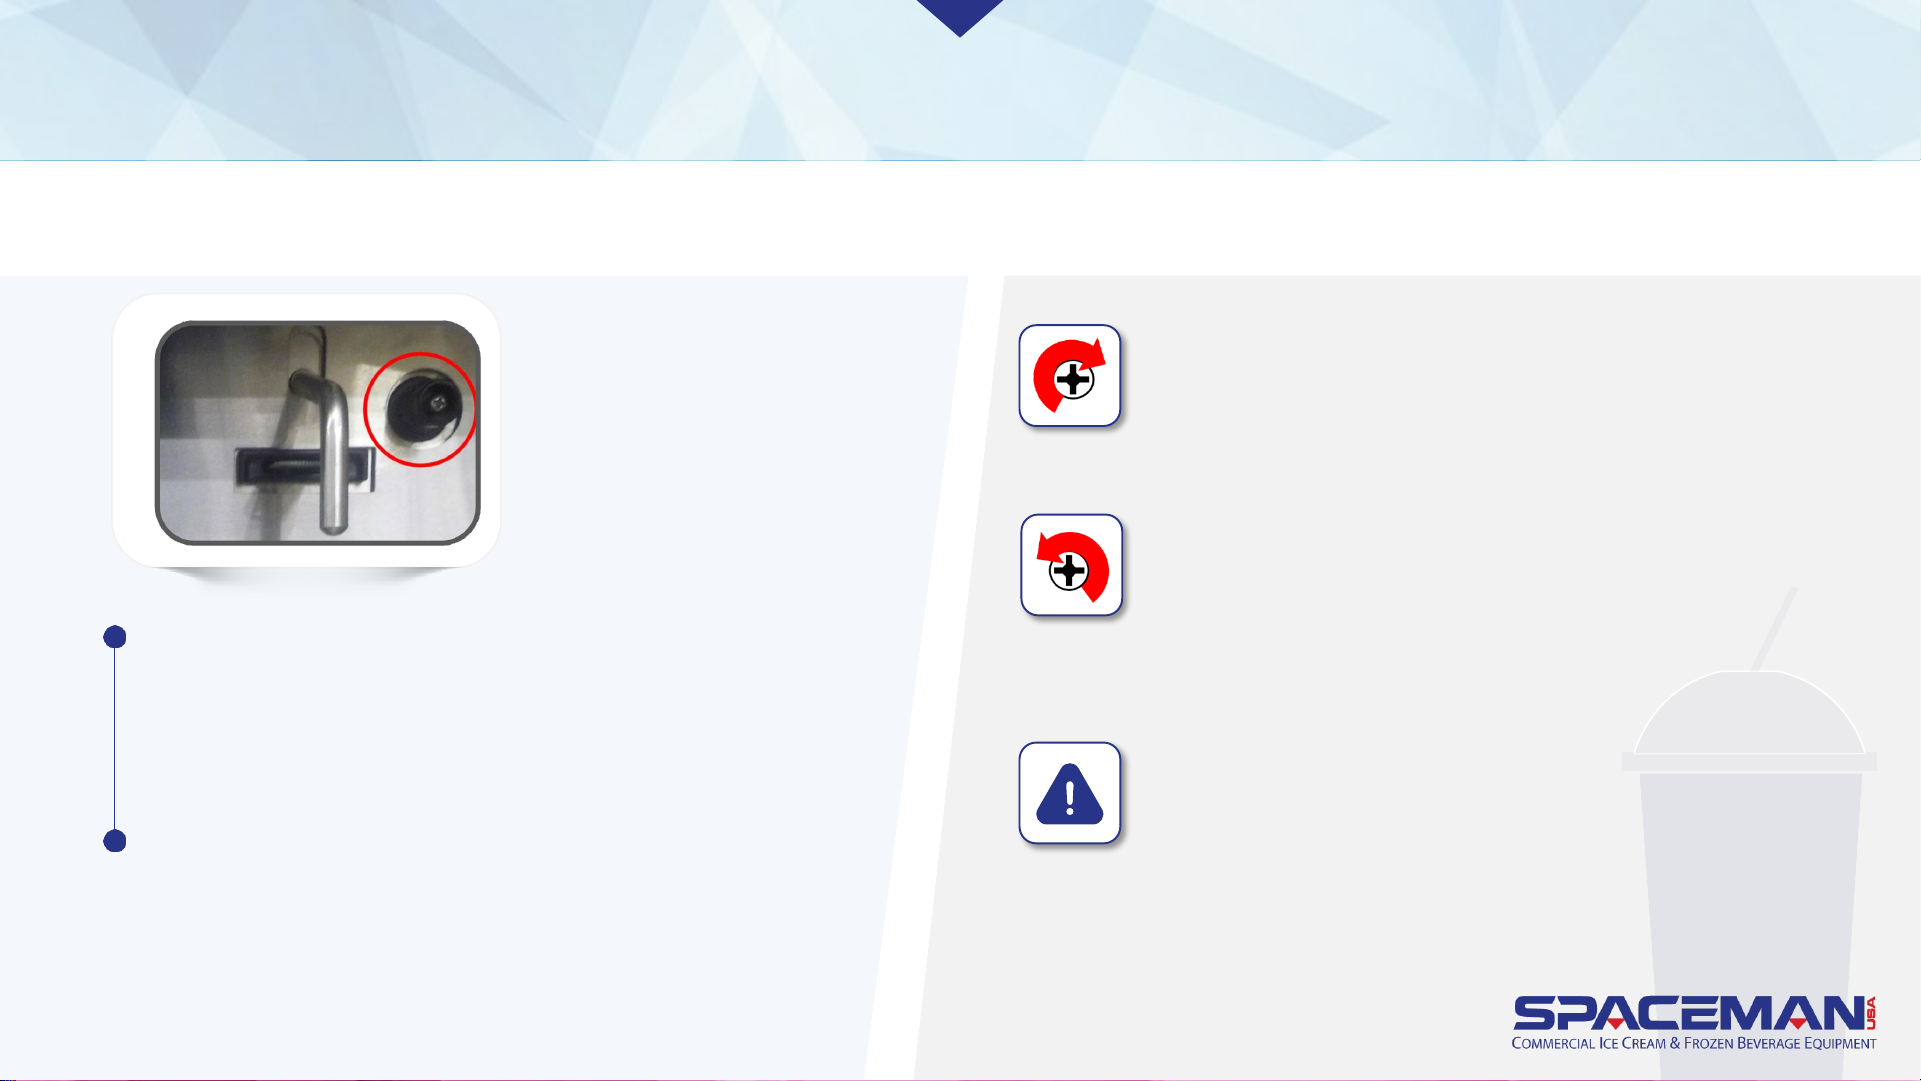
ADJUST PRODUCT CONSISTENCY
WARNING
STOP turning viscosity adjustment screw if you feel
any increase in resistance to prevent damage.
Increase viscosity (more firm):
• Turn viscosity adjustment screw clockwise.
• Turn a maximum of two full turns per adjustment.
Decrease viscosity (less firm)
• Turn viscosity adjustment screw counter-
clockwise.
• Turn a maximum of two full turns per adjustment.
The viscosity adjustment screw, located above the
draw handle, controls the firmness of dispensed
product. The higher the viscosity, the more firm
the product. Viscosity settings should NOT need
continuous adjustment.
To adjust product consistency, use a #2 Phillips-
head screwdriver to turn the viscosity adjustment
screw. Make small adjustments each time, and
allow at least 10 to 15 minutes between
adjustments to evaluate product firmness.
Spaceman USA Frozen Beverage Training
rev042219
Page 36
FROZEN PRODUCT OPERATION
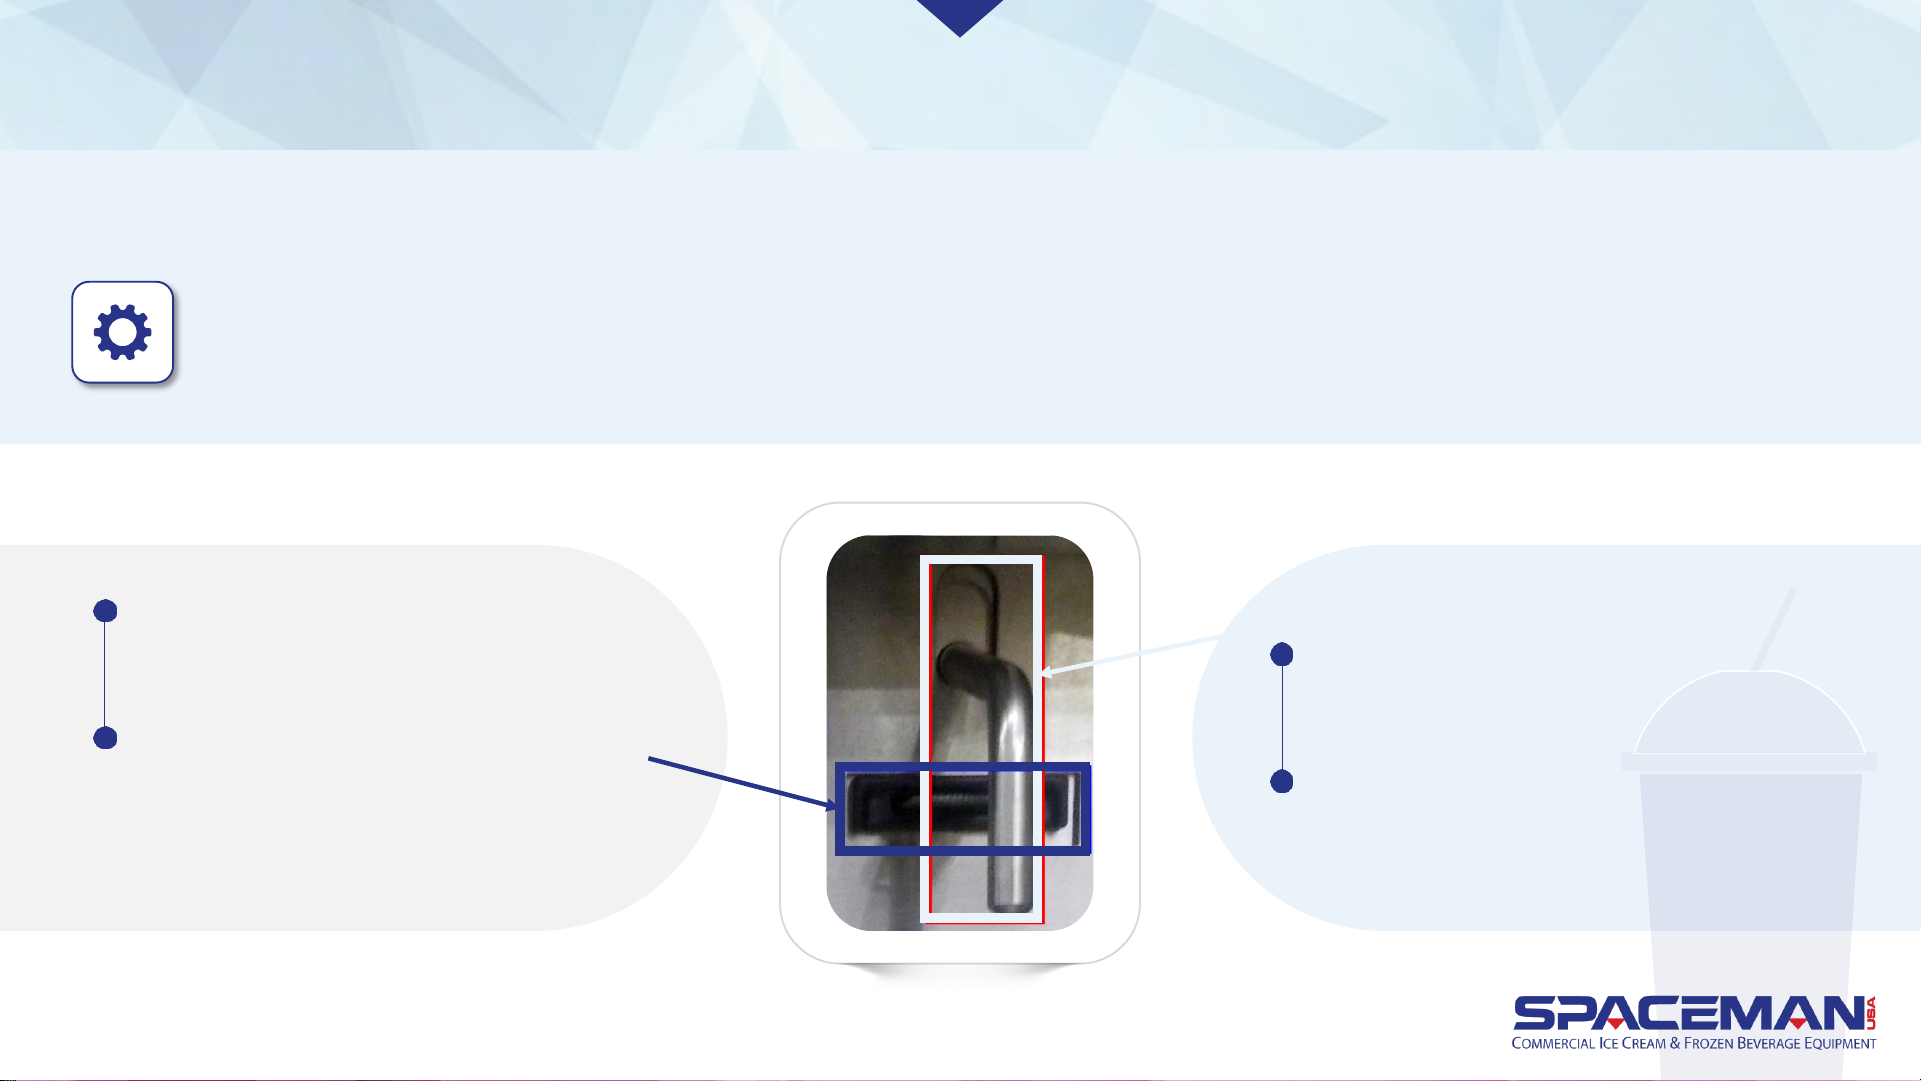
MANAGE SENSOR ARMS
Located directly above the draw valve, this arm tells the machine when product is being dispensed and
how firm the product is. Beater and cooling systems are turned on and off based on information from
the sensor arms.
Flat arm moves left and right and
tells machine when product is at
desired consistency.
Switched RIGHT means
consistency is correct. Switched
LEFT or IN THE MIDDLE means
consistency is not yet correct.
Curved arm moves up and down
and tells machine when product is
being dispensed.
It moves UP when draw handle is in
the OPEN position.
Spaceman USA Frozen Beverage Training
rev042219
 Loading...