

Page 1
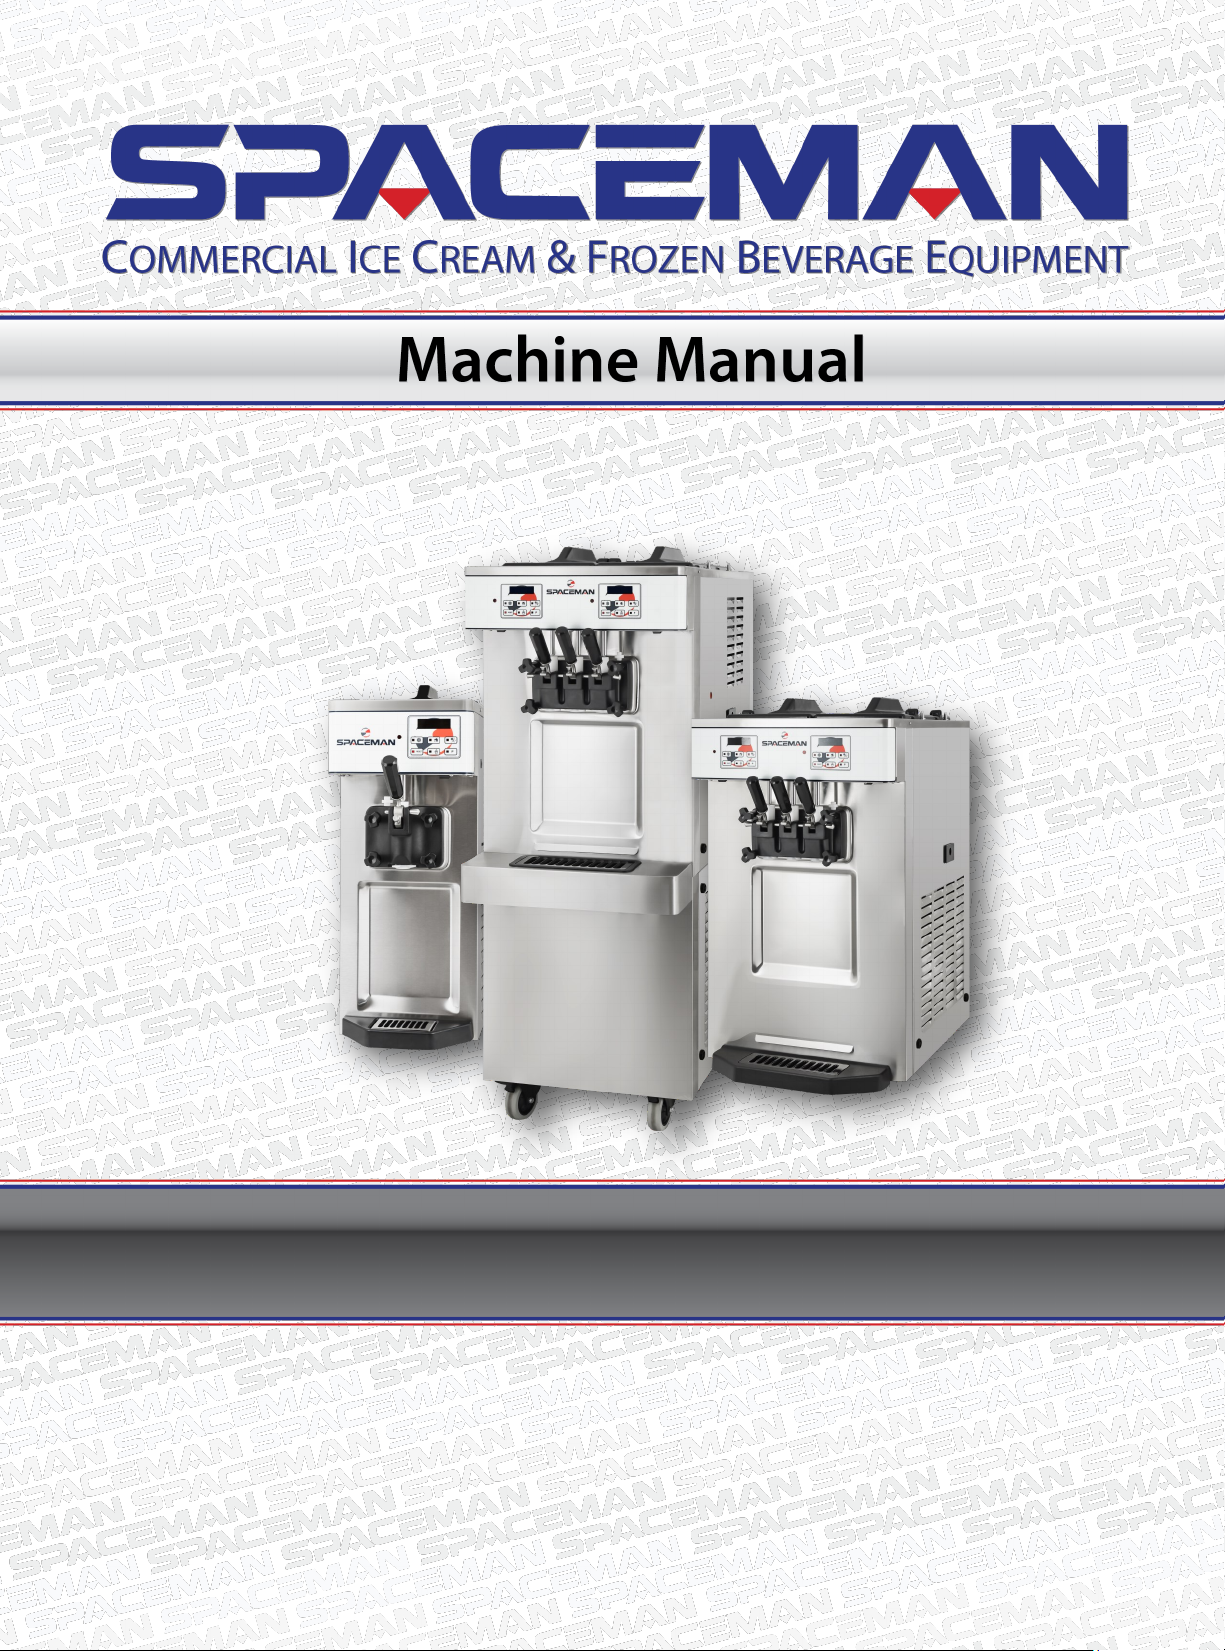
Two-Line Display :: Gravity or Air Pump :: Counter or Floor Standing
Page 2
This machine has many built-in safety features to protect the operator while the machine is
running.
All personnel operang this machine read and understand this manual in its enrety. Failure to
comply with this manual may damage the machine and cause severe injury to the operator.
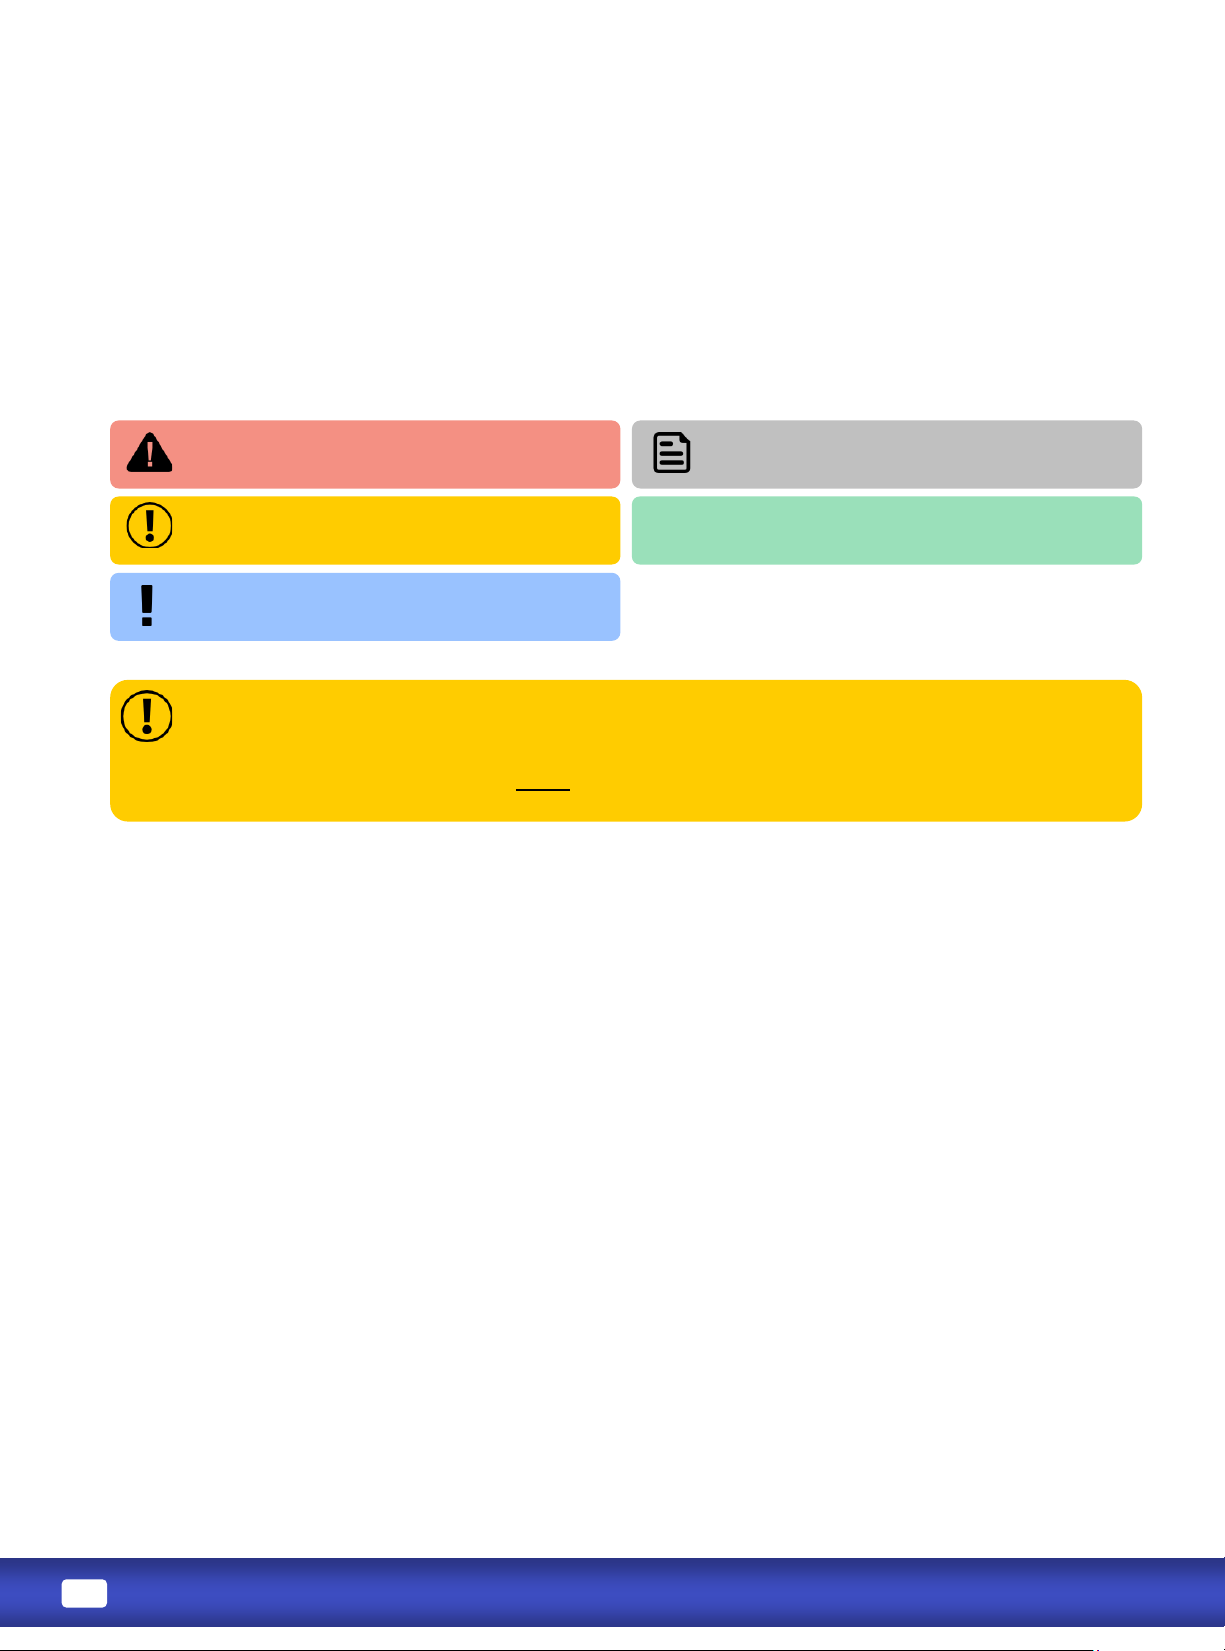
Denotes an acon that WILL cause
harm to the operator or machine if performed
incorrectly.
Informs the operator of a task that
may lead to harm if protocol is not properly
performed.
Represents a vital mechanical step
or note that the user must be aware of.
Non-hazard, but pay extra aenon.
throughout the manual represent
instrucons for machines with air pumps.
Welcome to your Spaceman so serve machine, engineered to provide dependable operaon and a consistent
quality product. Your machine is approved for dairy and nondairy products, with hopper refrigeraon funcon
to maintain product temperature below 4oC (40oF), and with digital viscosity control system to adjust and
maintain product consistency. All models, countertop or oor, single avor or twin twist, operate in the same
fashion.
This manual is a universal version that provides instrucons on installaon, operaon, cleaning and roune
maintenance to all NON-HEAT TREAT models with advanced two lines digital controls. Idenfy opons included
in your machine and refer to the corresponding secons for details. Informaon contained in this manual may
be subject to change. Please check online or contact your local Spaceman distributor for connued updates and
detailed informaon about your Spaceman machine.
.........................................................................................................................
...........................................................................................................................
...............................................................................................................
.......................................................................................................................
.............................................................................................................................
....................................................................................................
Disassemble Parts .................................................................................................................................... 6
Wash & Sanize Parts .............................................................................................................................. 8
Assemble Parts ......................................................................................................................................... 9
Sanize ................................................................................................................................................... 11
.................................................................................................................................
Introducon............................................................................................................................................ 12
Freeze .................................................................................................................................................... 13
Wash, Standby & Defrost ...................................................................................................................... 15
Set Menu ................................................................................................................................................ 15
..................................................................................................................................
Store Closing ........................................................................................................................................... 17
Store Opening......................................................................................................................................... 17
..................................................................................................................
-....................................................................................................................................
..................................................................................................................................
Page 3
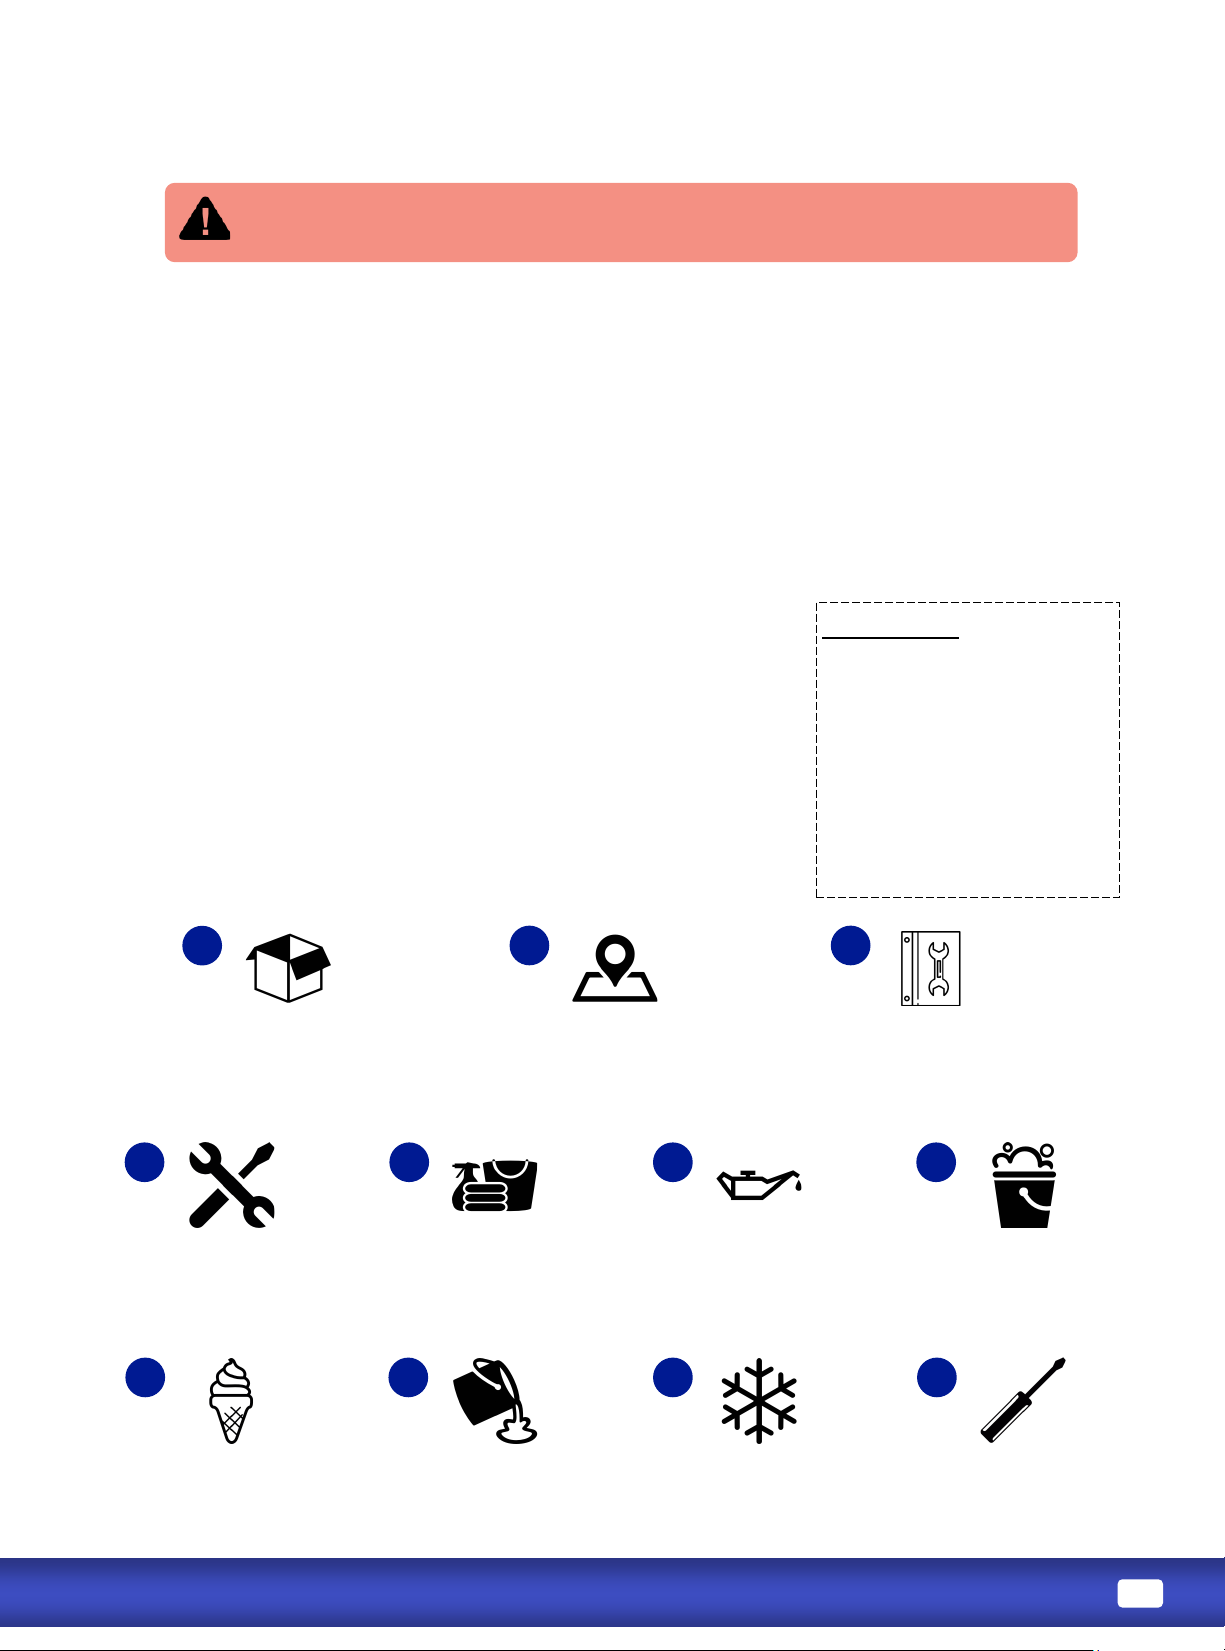
Unpack and inspect
machine, parts, and
accessories.
Place machine in appropriate food
preparaon area. Comply with all
installaon requirements.
Read and understand
ALL safety and standard
operang procedures.
Fully disassemble machine,
and prepare parts for
cleaning.
Thoroughly clean and scrub
machine hoppers, cylinders,
and all parts.
Lubricate and re-assemble
all machine parts.
Prepare product in a sepa-
rate container, and ensure
product is thoroughly mixed.
Add product to hoppers
and prime the cylinder
using the prime plug.
Turn machine to FREEZE
mode, and wait for product
to reach frozen consistency.
Slightly adjust viscosity
seng as necessary to
adjust product rmness.
Inspect the machine for any shipping damage. If you nd any, contact Spaceman Technical Service immediately
aer unpallezing. Our technicians will help you assess the damage and determine the appropriate acon prior
to accepng the delivery.
1. Cut packing straps, and remove cardboard lid and outer sides from the pallet. DO NOT cut cardboard.
2. Remove plasc wrapping around machine.
3. Cut stabilizing straps, being careful not to scratch or dent the machine panels.
4. Prepare the area where the machine will be placed, remove packing cardboard from underneath machine,
and place ramp wedges near front casters.
5. Unlock front casters, and roll machine down the wedges o the pallet.
6. Place the machine in its nal locaon according to the Installaon Requirements.
: Unpallezing requires liing.
Failure to do so may result in
severe injury or damage. Inspect equipment for hidden damage before signing for delivery.
Refer to the detailed parts diagrams on the back pages if necessary.
1. Remove all packaged parts and accessories from your machine.
2. Organize items on a clean table or operang area using the checklist.
3. Inspect for damage immediately upon unpacking and call Spaceman
Technical Service if you discover any damaged or missing parts.
4. Clean and properly lubricate machine parts prior to machine operaon.
Included Parts:
• Hopper Cover (1 or 2)
• Front Drip Tray + Splash Shield
• Dispensing Handles (1 or 3)
• Retenon Pin
• Start-Up Kit
• Operator’s Manual
• Cleaning Guide
• Quick Operaon Guide
Fully sanize machine.
Page 4
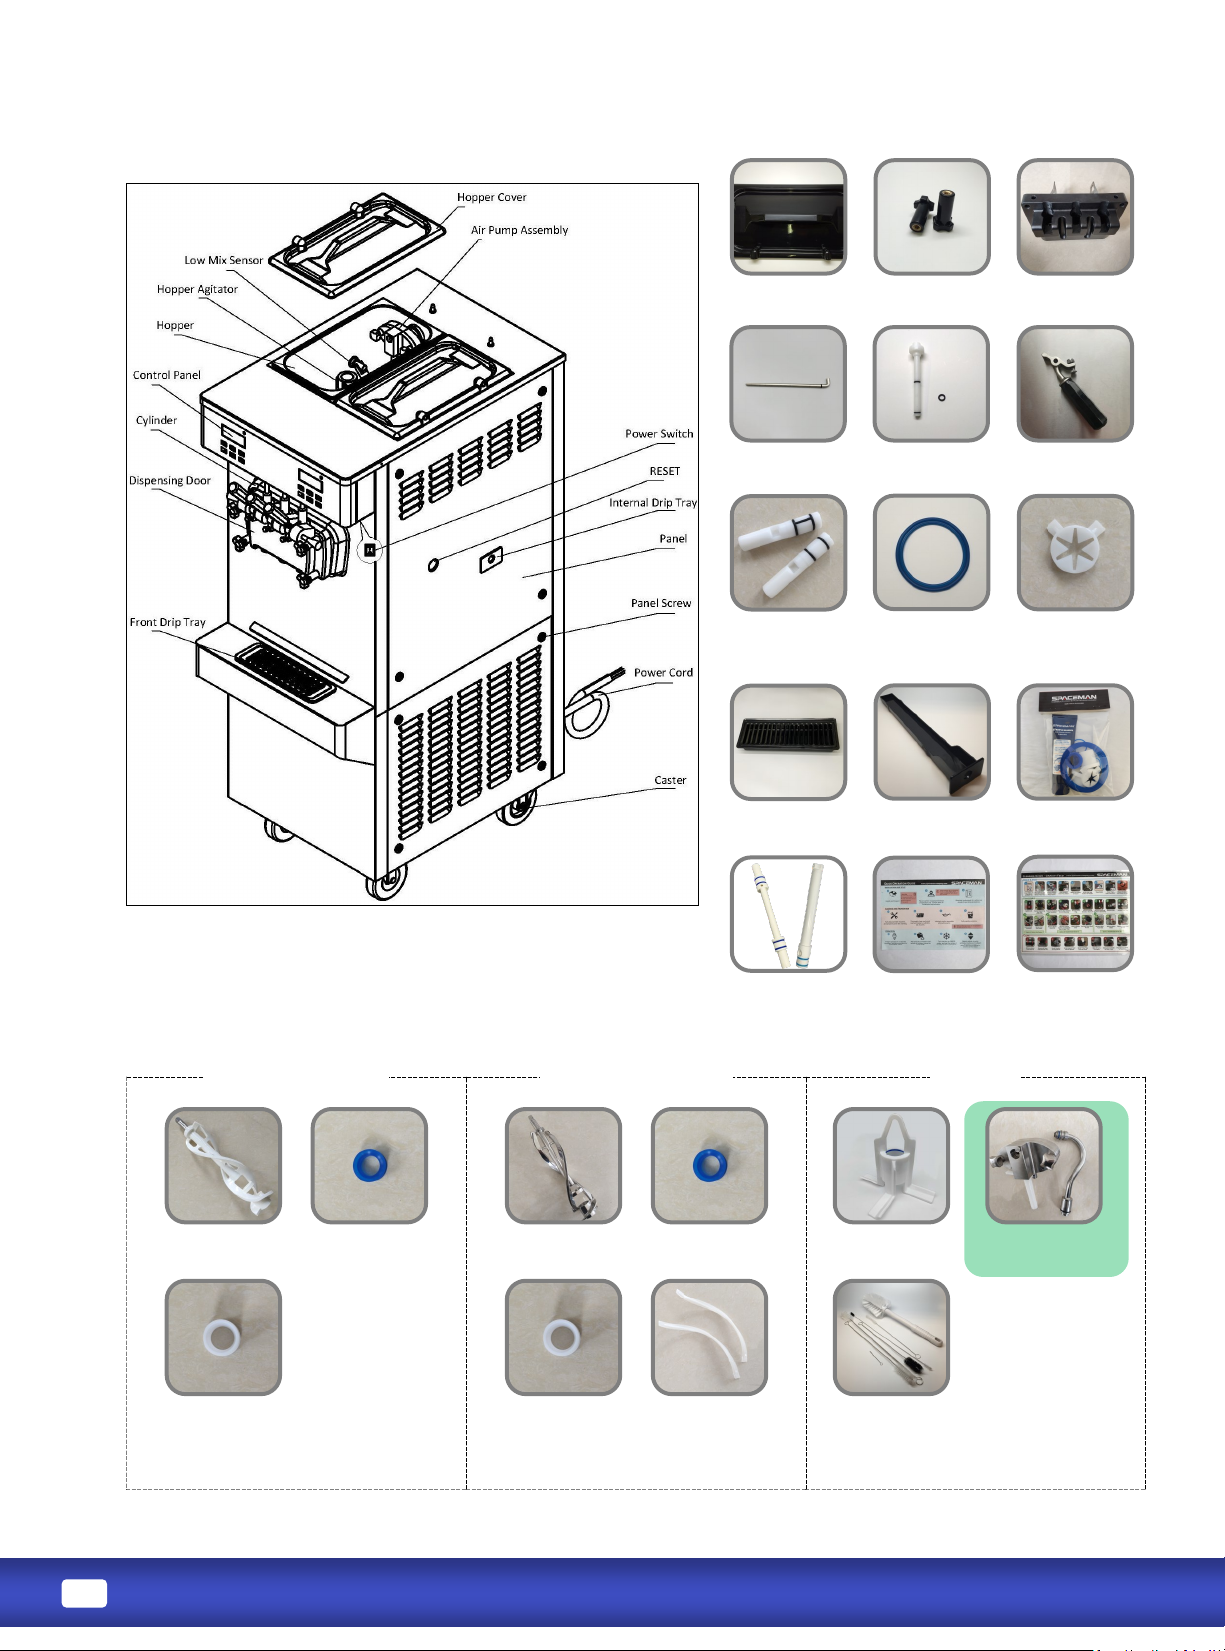
Brush Kit
Air Pump Assembly
(Oponal)
Hopper Agitator
Beater
Helix Beater Blade
End of Seal
End of Seal
Dispensing Door
with Beater Rods
Dispensing Door
Gaskets
Side & Middle
Draw Valves
with Seals
Design Caps
Prime Plug
with Seals
Screws
(Short & Long)
Internal Drip
Tray
Front Drip Tray
with Splash Shield
Retenon Pin
with Nut
Hopper
Cover
Tune-Up Kit
Quick Operaon
Guide
Draw Handle
Cleaning
Guide
Beater
Beater Guide Beater Guide
Feed Tube
(Gravity Feed Only)
The model displayed is for illustraon purpose only and may dier from the
actual product.
Page 5
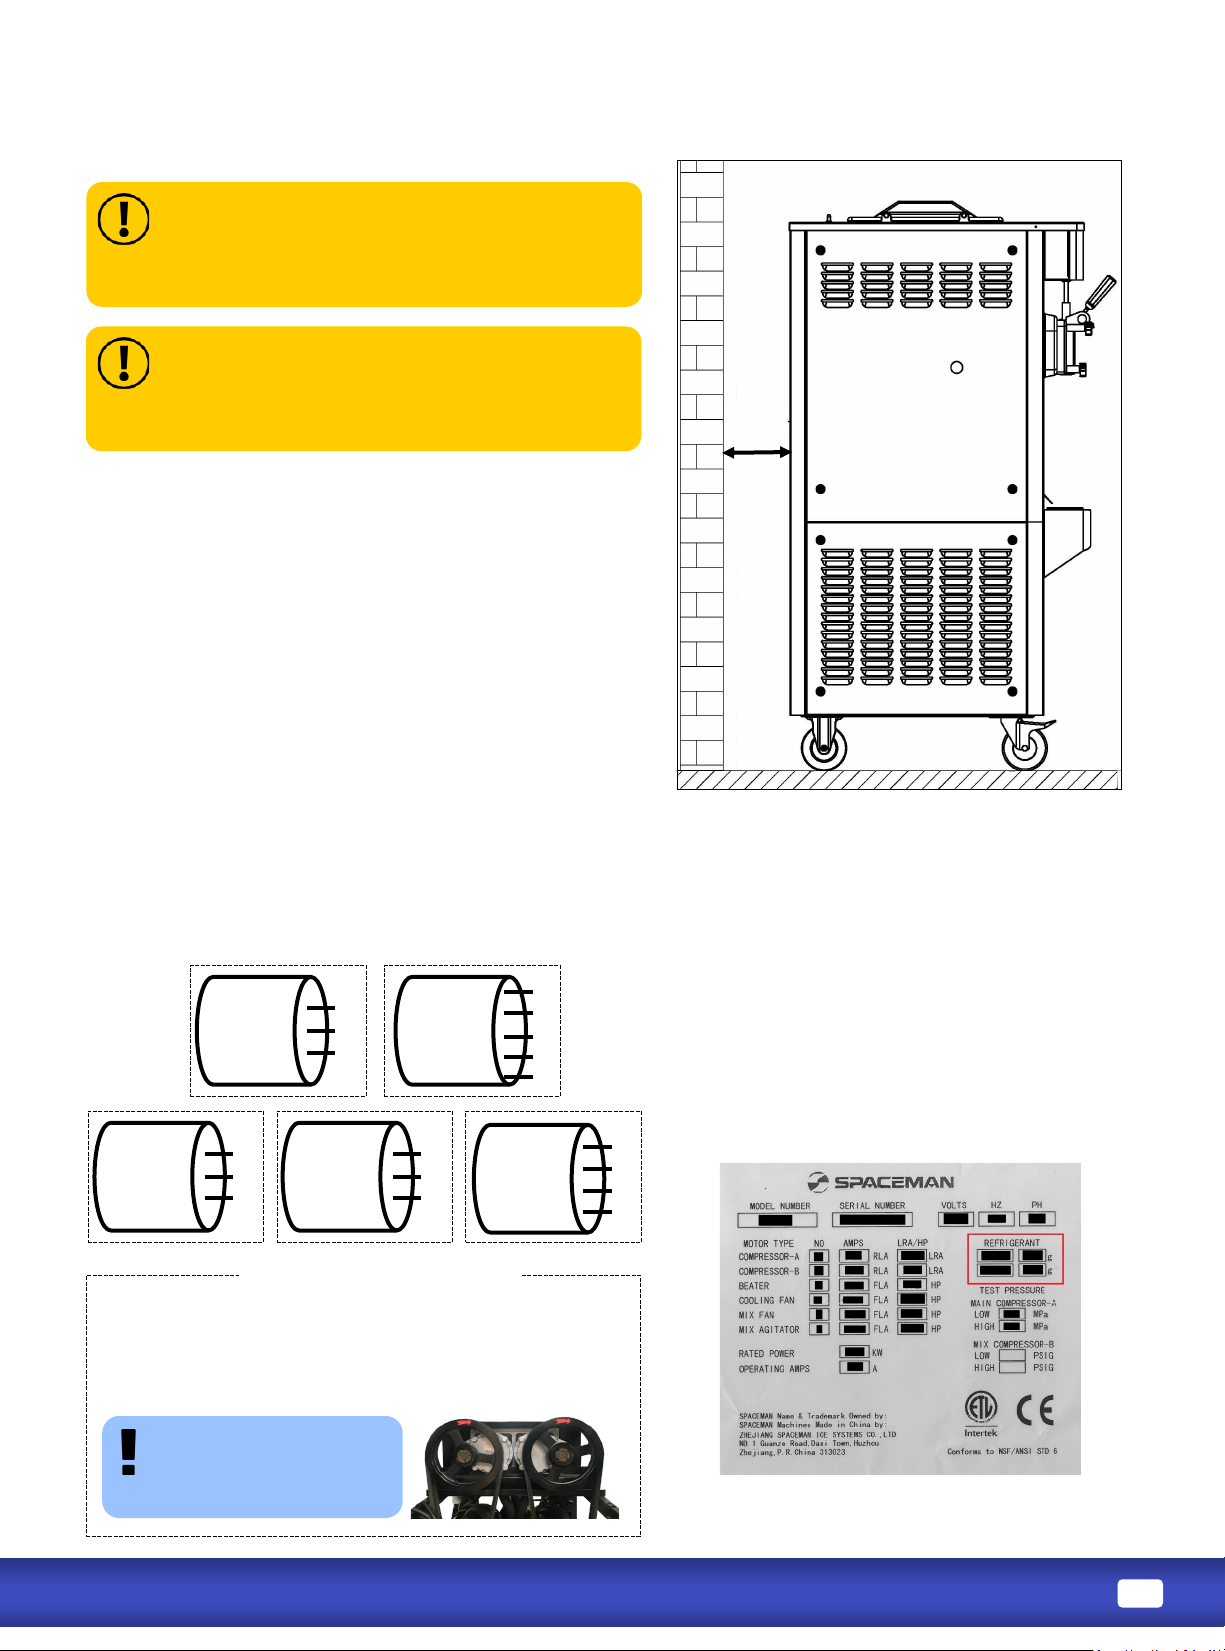
Spaceman requires that only the specied
refrigerant be used in your machine.
Alternave refrigerants may cause damage to
the cooling system and/or prevent the machine
from operang at opmal performance.
If you require an alternave refrigerant, please
call Spaceman Technical Support for a list of
compable alternaves for your compressor.
• Place on a at, level, and solid surface ed to the
machine dimensions.
• Ensure a minimum 152mm (6'') clearance on the
exhaust side (Side or Back); units with
installed do not need to meet this clearance
requirements.
• Completely clear area of dust, grease, and airborne
parcles.
• Place away from hot equipment such as stoves, frying
baskets, ovens, etc.
Failure
to comply will damage the machine and
refrigeraon components and will void all
warranes.
Operang in higher ambient temperatures
will result in degraded performance.
1. Connect all wires to Circuit Breaker (including neutral &
ground bus terminals) or Local Plug according to supply
voltage and wire codes on machine power cable.
2. Verify Incoming Supply Cable is wired the same way on
Circuit Breaker or Wall Receptacle before switching on
or plugging in the machine.
Switch on power and verify that motor turns clockwise as
per Red Arrow on motor pulley. If not, switch any two line
wires on Circuit Breaker or Plug and verify again.
Machine will
work properly and
WILL be damaged if motor
turns in wrong direcon.
The image displayed is for illustraon purpose only and may
dier from the actual product.
Page 6
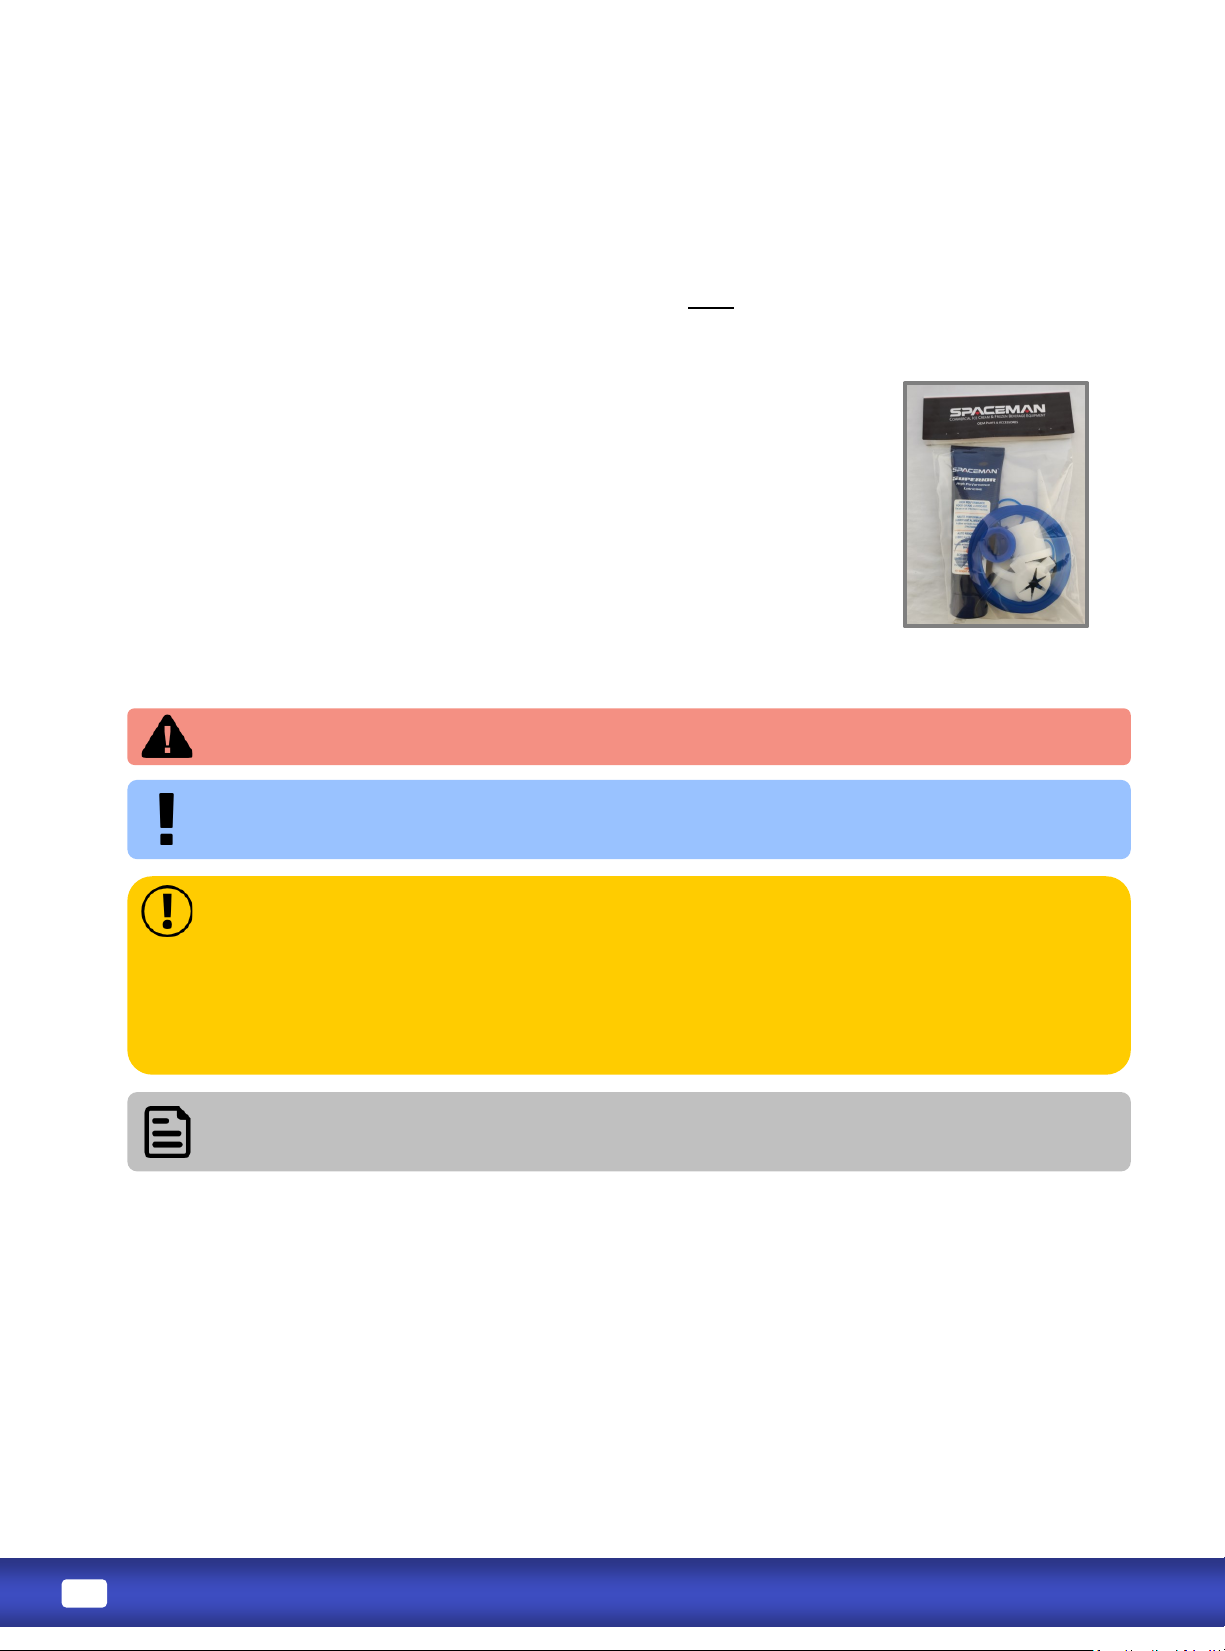
If this is the rst me operang the machine, you MUST clean and sanize ALL parts prior
to running the machine.
• Daily
• Every 1 to 3 months*
• Quarterly**
* Based on machine usage and cleaning intervals; a Tune-Up Kit is available with all
wearable parts (O-rings, gaskets, etc.) except beater blades.
** Based on cleanliness of locaon and proximity to powder-based machines.
Preventave maintenance includes cleaning condensers, checking belt tensions,
and cleaning the interior of the machine frame as required.
Cleaning and sanizing schedules are governed by state or local regulatory agencies and
MUST be followed accordingly.
• Do NOT run the machine without properly lubricang required parts
• Do NOT clean the machine with abrasive or toxic chemicals and cleaners. Doing so may cause
damage to the stainless steel material
• ONLY use Spaceman-included cleaning brushes and lubricaon
• NEVER use metal objects to clean or operate the machine
• ALWAYS replace wearable parts a minimum of every 3 months
• ALWAYS prime machine prior to operang
• ALWAYS inspect parts for excess wear and damage
Addional brushes, lubricaon, wearable parts, and tools can be purchased from Spaceman to
ensure proper maintenance. Extra wearable parts (except beater blades) are found in the Start-Up
Kit.
Aer unpacking and inspecng the parts, you are ready to disassemble the machine and prepare for the rst
operaon.
For opmal machine performance and many years of eciency and reliability from your machine, Spaceman
recommends cleaning and sanizing the machine and its parts .
The image displayed is for illustraon purpose
only and may dier from the actual product.
Page 7
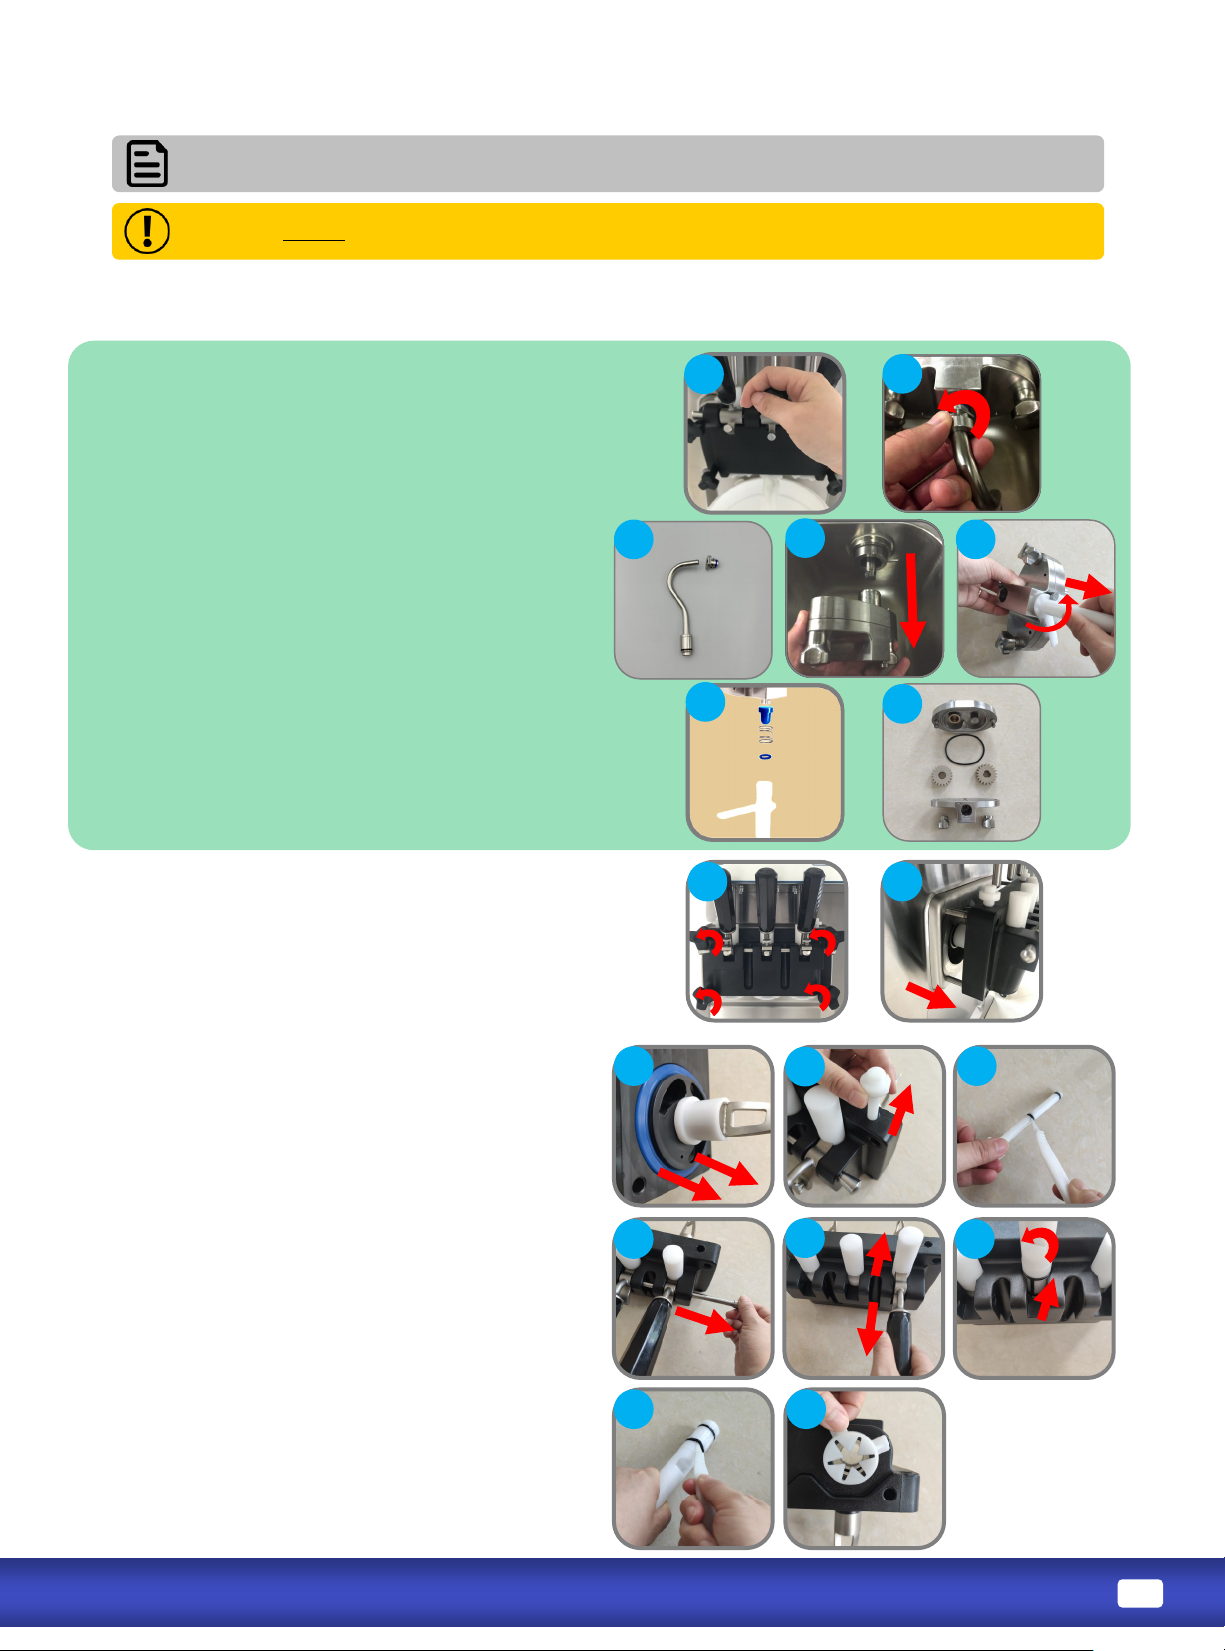
a. Remove front bearing from door assembly;
remove gasket from door assembly using O-ring
removal tool.
b. Remove prime plug from door assembly; remove
O-rings from prime plug using O-ring removal tool.
c. Remove the retenon pin.
d. Remove draw handles pushing down rst to pop
up draw valves, then pulling out.
e. Remove draw valves, twisng while removing to
prevent damage.
f. Remove O-rings and H-ring from draw valve using
O-ring removal tool.
g. Rotate star caps so that tabs are accessible; snap
o star caps.
Prepare dishwashing area prior to disassembly, use bucket to temporarily store large
removed parts and a small container for O-rings, and have a towel nearby to capture excess water.
Always separate O-rings and gaskets from metal parts to prevent damage while washing.
a. Remove dispensing-door hand-screws.
b. Remove dispensing door assembly from cylinders.
a. OPEN draw handles to verify zero pressure in
cylinders.
b. Twist injecon tube connectors to unlock and
disconnect air tube.
c. Take injecon tube apart completely; each
injecon tube has O-rings, connectors, and
check valve.
d. Push in and rotate air pumps 1/4 turn
clockwise; pull to remove.
e. Rotate sucon tubes to unlock and remove
sucon tubes, springs, and stoppers out of air
pumps; watch that springs don’t y out.
f. Take sucon tubes apart completely; each
sucon tube has O-ring, spring, and stopper.
g. Unscrew bolts on air pump housing; separate
air pump cover from shell. Remove gears and
O-rings from shells.
Page 8
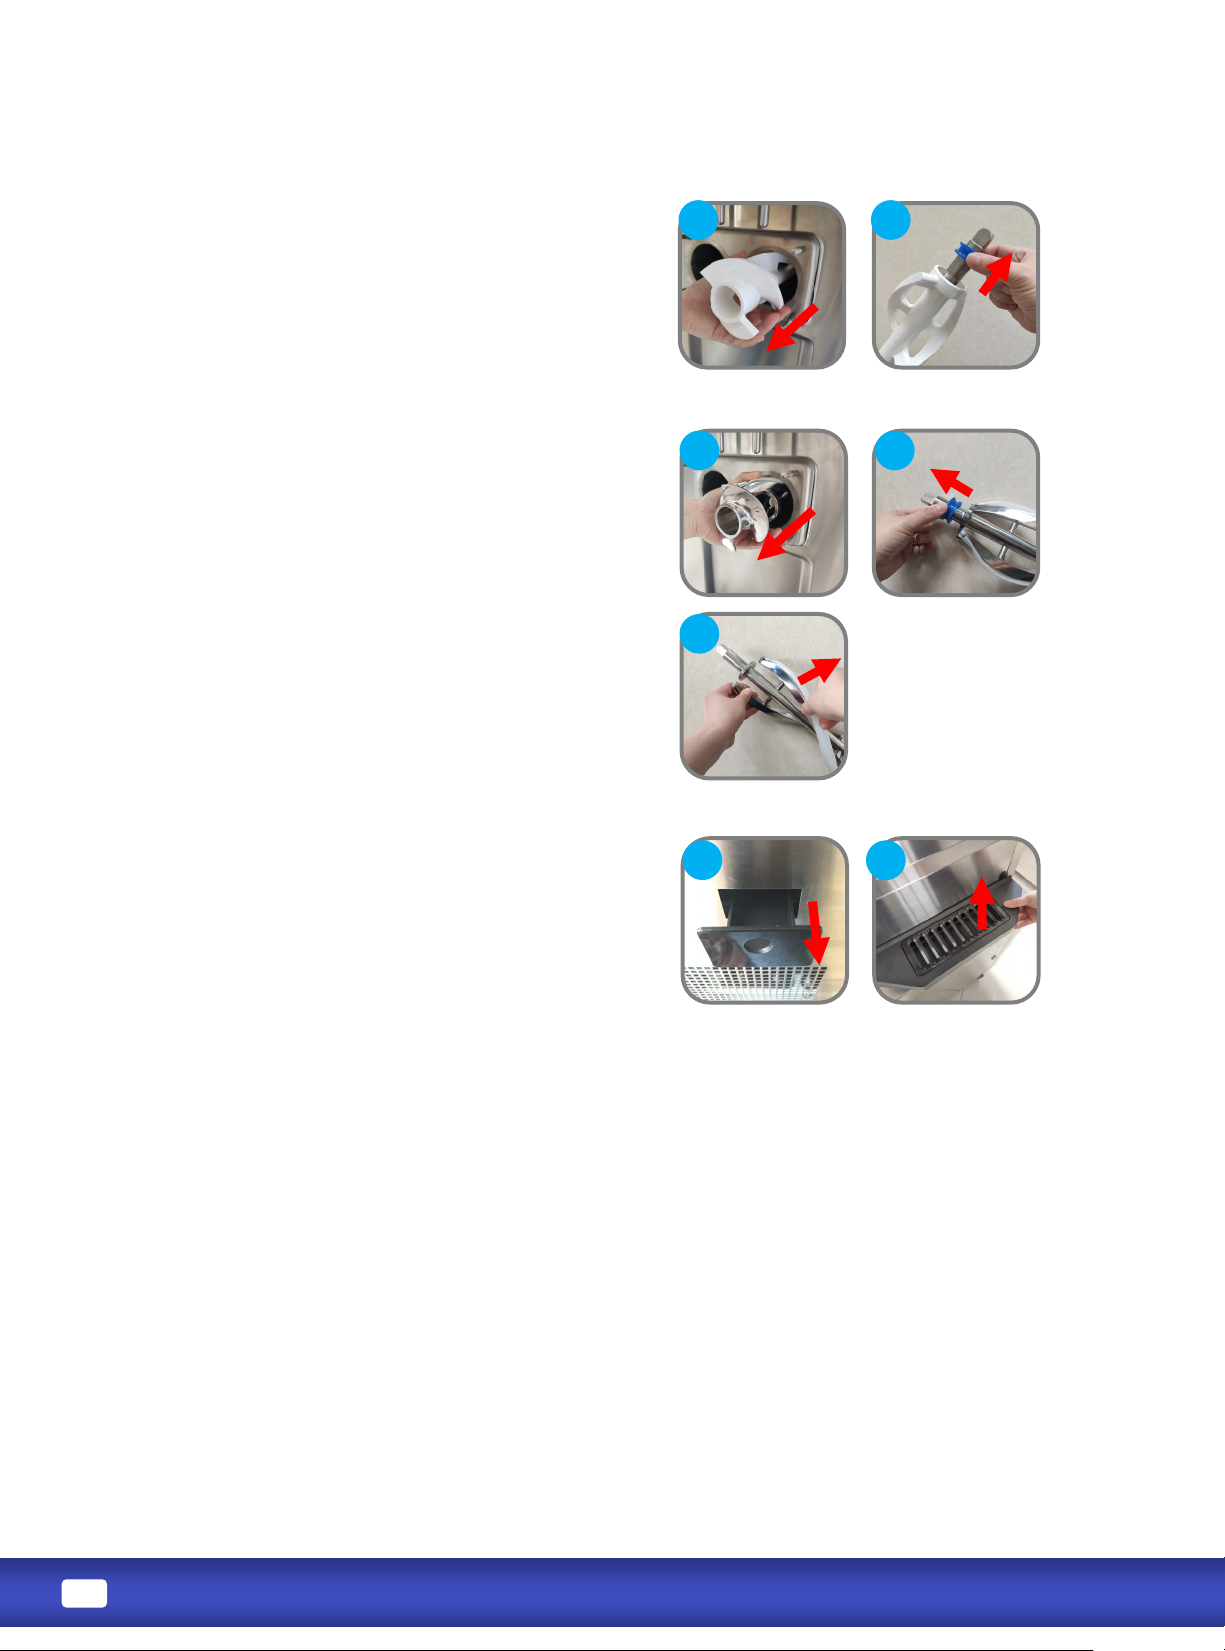
a. Remove beater assembly from cylinder.
b. Remove seal from beater assembly.
a. Remove beater assembly from cylinder.
b. Remove seal from beater.
c. Remove blades from beater.
Page 9
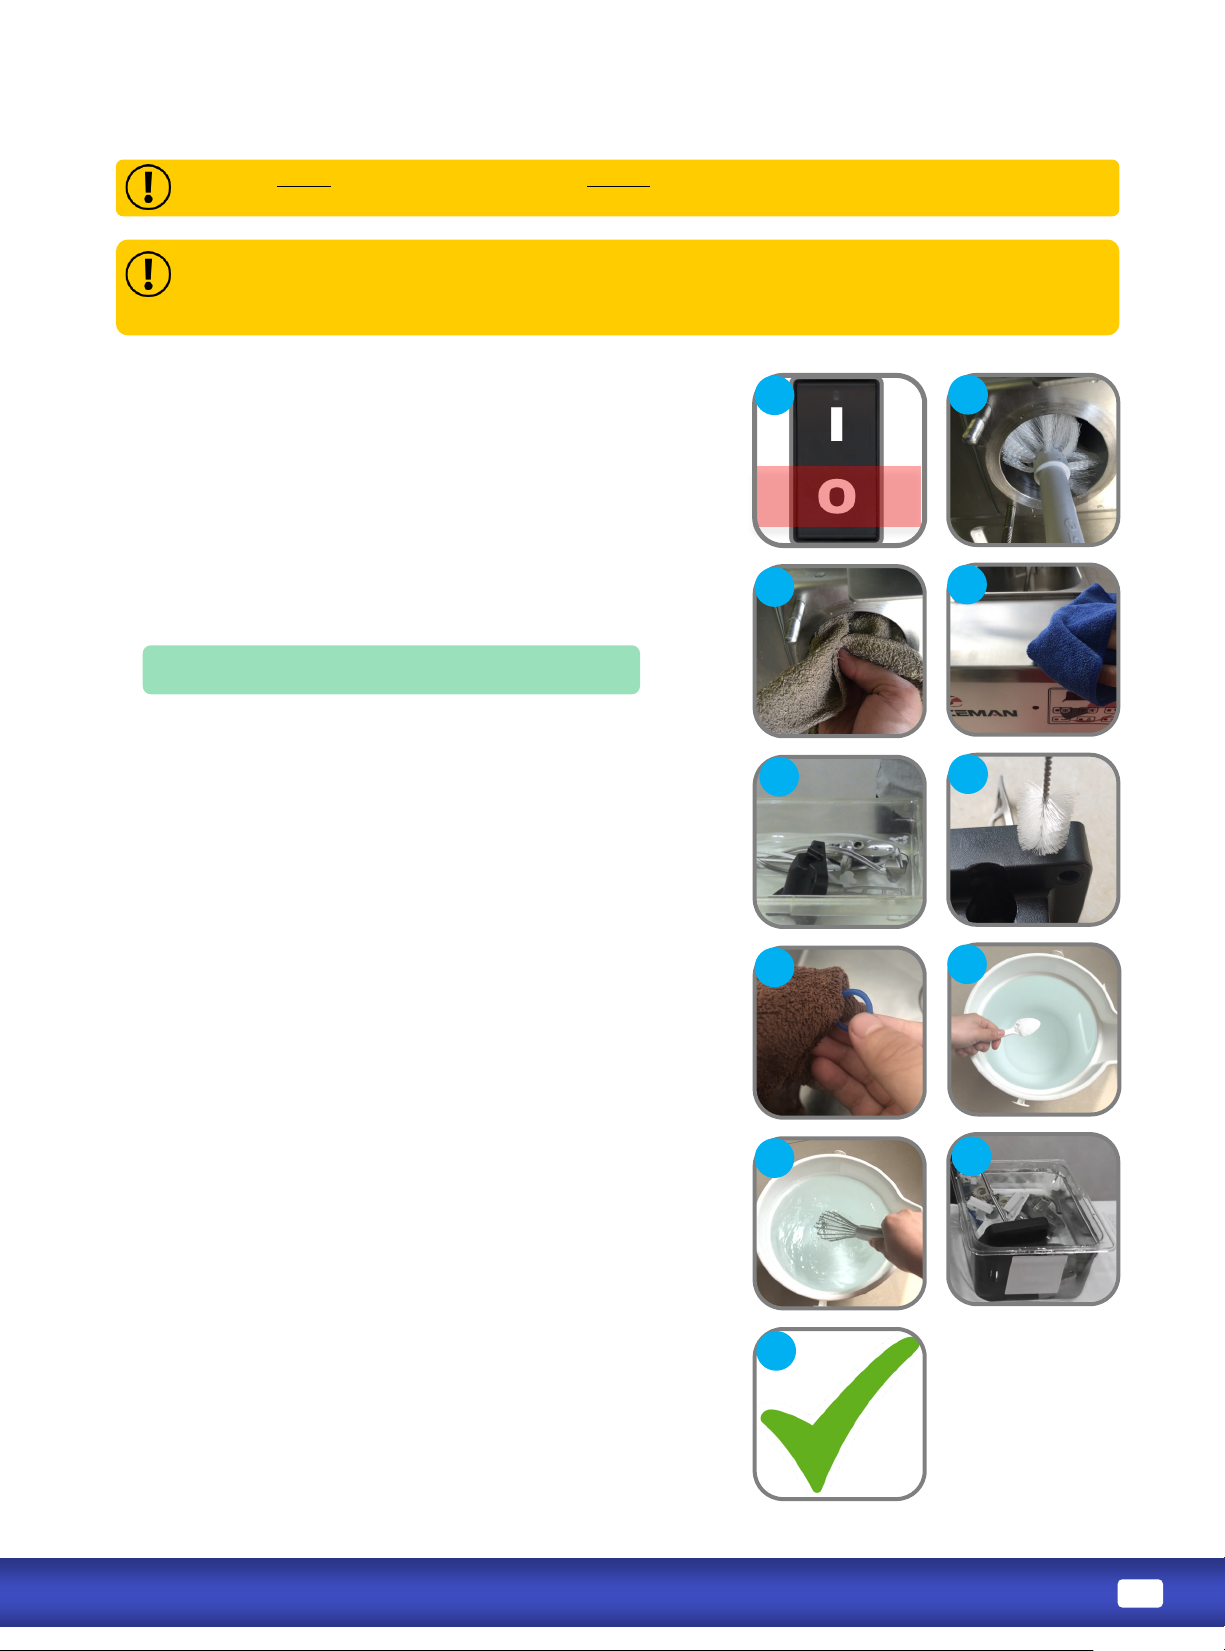
1. Verify power switches are in the OFF posion.
2. Use the large brush and cool water to thoroughly
clean inside the cylinder; be sure to scrub the back of
the cylinder.
3. Thoroughly clean and dry the rear of the cylinder
with a clean, dry towel.
4. Gently clean and wipe down the outside of the
machine.
5. Carefully and thoroughly wash all parts removed
from the machine using supplied brushes, sponges,
and clean towels;
if machine has air pumps, be sure to include all air
pump parts in cleaning.
6. When cleaning the dispensing door assembly, clean
the priming ports with a small brush.
7. Carefully and thoroughly clean all gaskets and
O-rings removed from the machine; be sure to wipe
gaskets and O-rings to remove excess lubricant.
8. Mix a minimum of 7.57 liters (2 gallons) of foodgrade sanizer in a bucket or container for each
hopper.
9. Soak all parts in the sanizer soluon for 10 minutes.
10. Verify all parts are clean and sanized prior to reassembling the machine.
Never wash parts in a dishwasher. Always hand-wash components with nontoxic, food-safe
cleaners.
Use a Sanizer mixed to 100PPM Chlorine with an acve ingredient of Sodium Dichloro-S-
Triazinetrione Dihydrate. If warm water is required to dissolve sanizer, allow the soluon me to
cool before adding to machine.
Page 10
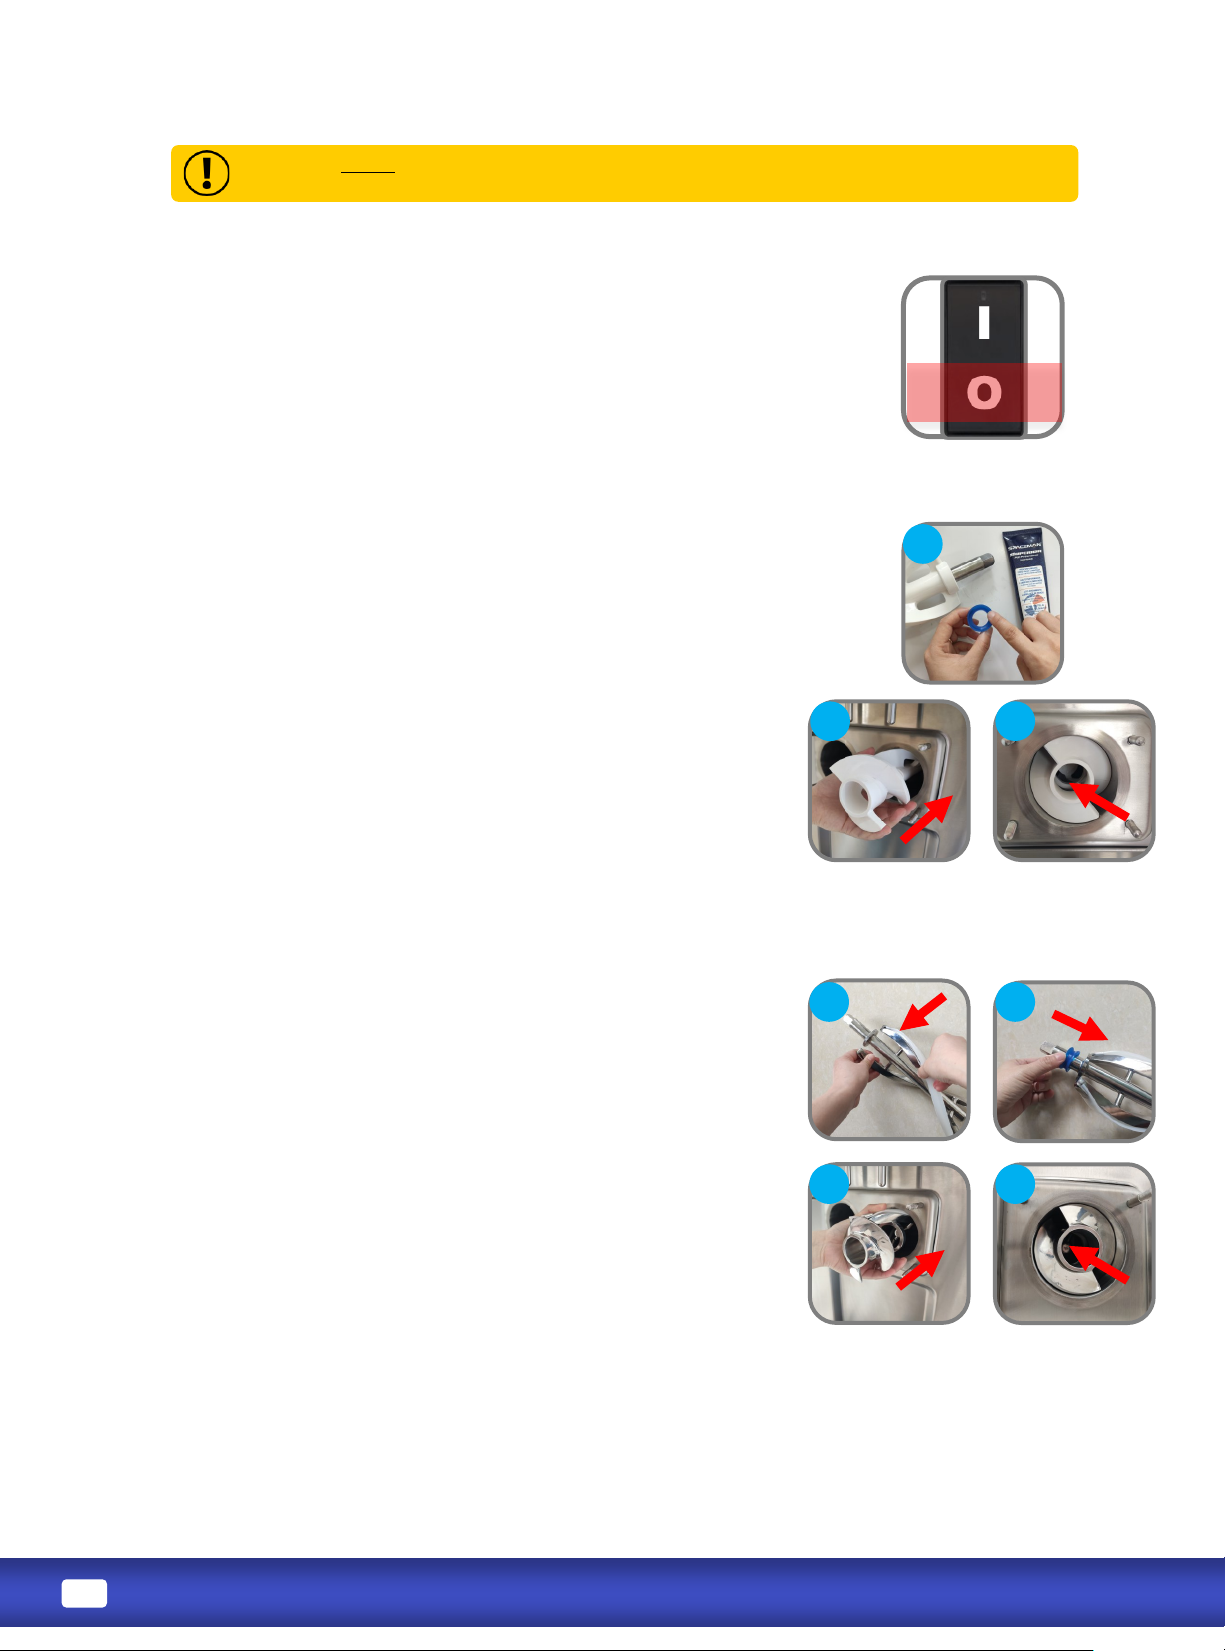
Never force the installaon of any parts. All parts t correctly without force.
If parts don’t seem to t, remove all parts and repeat assembly.
a. Fit beater blades onto beater.
b. Lubricate the seal on both ends; then place seal on the beater.
c. Insert beater assembly into cylinder, making sure beater stay in
place; turn assemblies unl they engage the beater sha keys and
no longer turn 360°.
a. Lubricate the seal on both ends; then place seal on the beater.
b. Insert beater assembly into cylinder, making sure beater stay in
place; turn assemblies unl they engage the beater sha keys
and no longer turn 360°.
Page 11
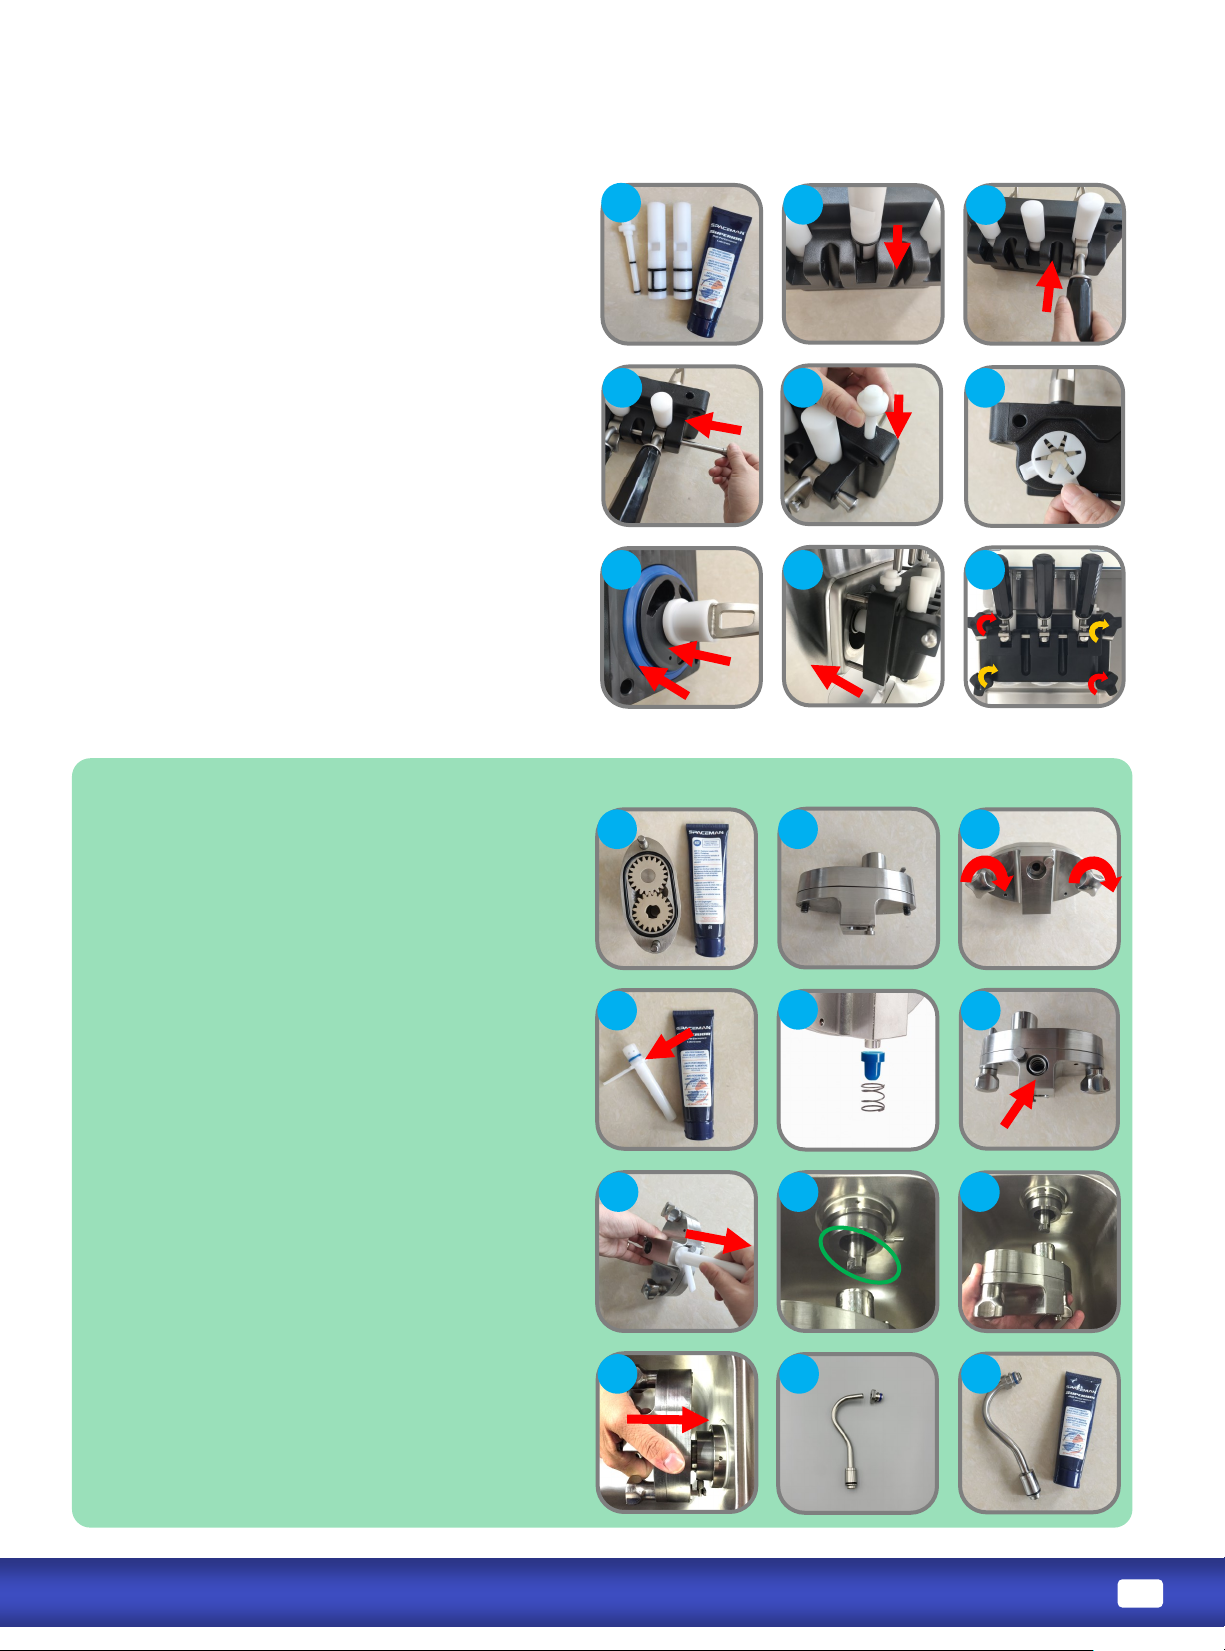
a. Place O-rings on side draw valves; place H-ring on
middle draw valve; place O-rings on prime plugs;
coat all ring areas with Spaceman lubricant.
b. Insert draw valves into dispensing door; middle
draw valve goes in the middle and slots face
outward.
c. Set draw handles into slots on dispensing door,
with adjustment screws facing down.
d. Slide retenon pin through draw handles; secure
with nut.
e. Push prime plugs into holes on top of dispensing
door.
f. Snap design caps onto boom of dispensing door.
g. Fit gaskets into grooves on back of door, at side
out; slide beater guides over beater rods, with
anged edges against the door.
h. Insert dispensing door assembly into cylinders,
beater rods rst, pushing handles all the way up as
you insert.
i. Secure door assembly in a cross-paern using
hand-screws, with the long hand-screws on top.
a. Place O-rings on rear shells, coang with
Spaceman lubricant; install gears into shells (they
only t one direcon).
b. Connect covers and shells, ensuring they t ush;
secure with hand-screws.
c. Place O-rings on sucon tubes; lightly lubricate
O-ring areas.
d. Place air pump stoppers into air pump springs,
verifying orientaon of stopper in spring; insert
into housings stopper-rst.
e. Insert sucon tubes into pumps; rotate to lock,
and turn to desired overrun seng.
f. Coat air pump drive shas with Spaceman
lubricant.
g. Install air pumps onto machine:
→ insert at an angle
→ while pushing air pump in, slightly rotate back
and forth unl the gear engages the air pump
drive sha
→ push in and rotate counter-clockwise to lock in
place
h. Assemble injecon tubes; each injecon tube has
O-rings, connectors, and check valve; lubricate Oring areas.
i. If machine will go unused, install injecon tubes
into hopper, but do not connect to air pumps;
otherwise, set air tubes aside unl aer machine
has been primed.
Page 12
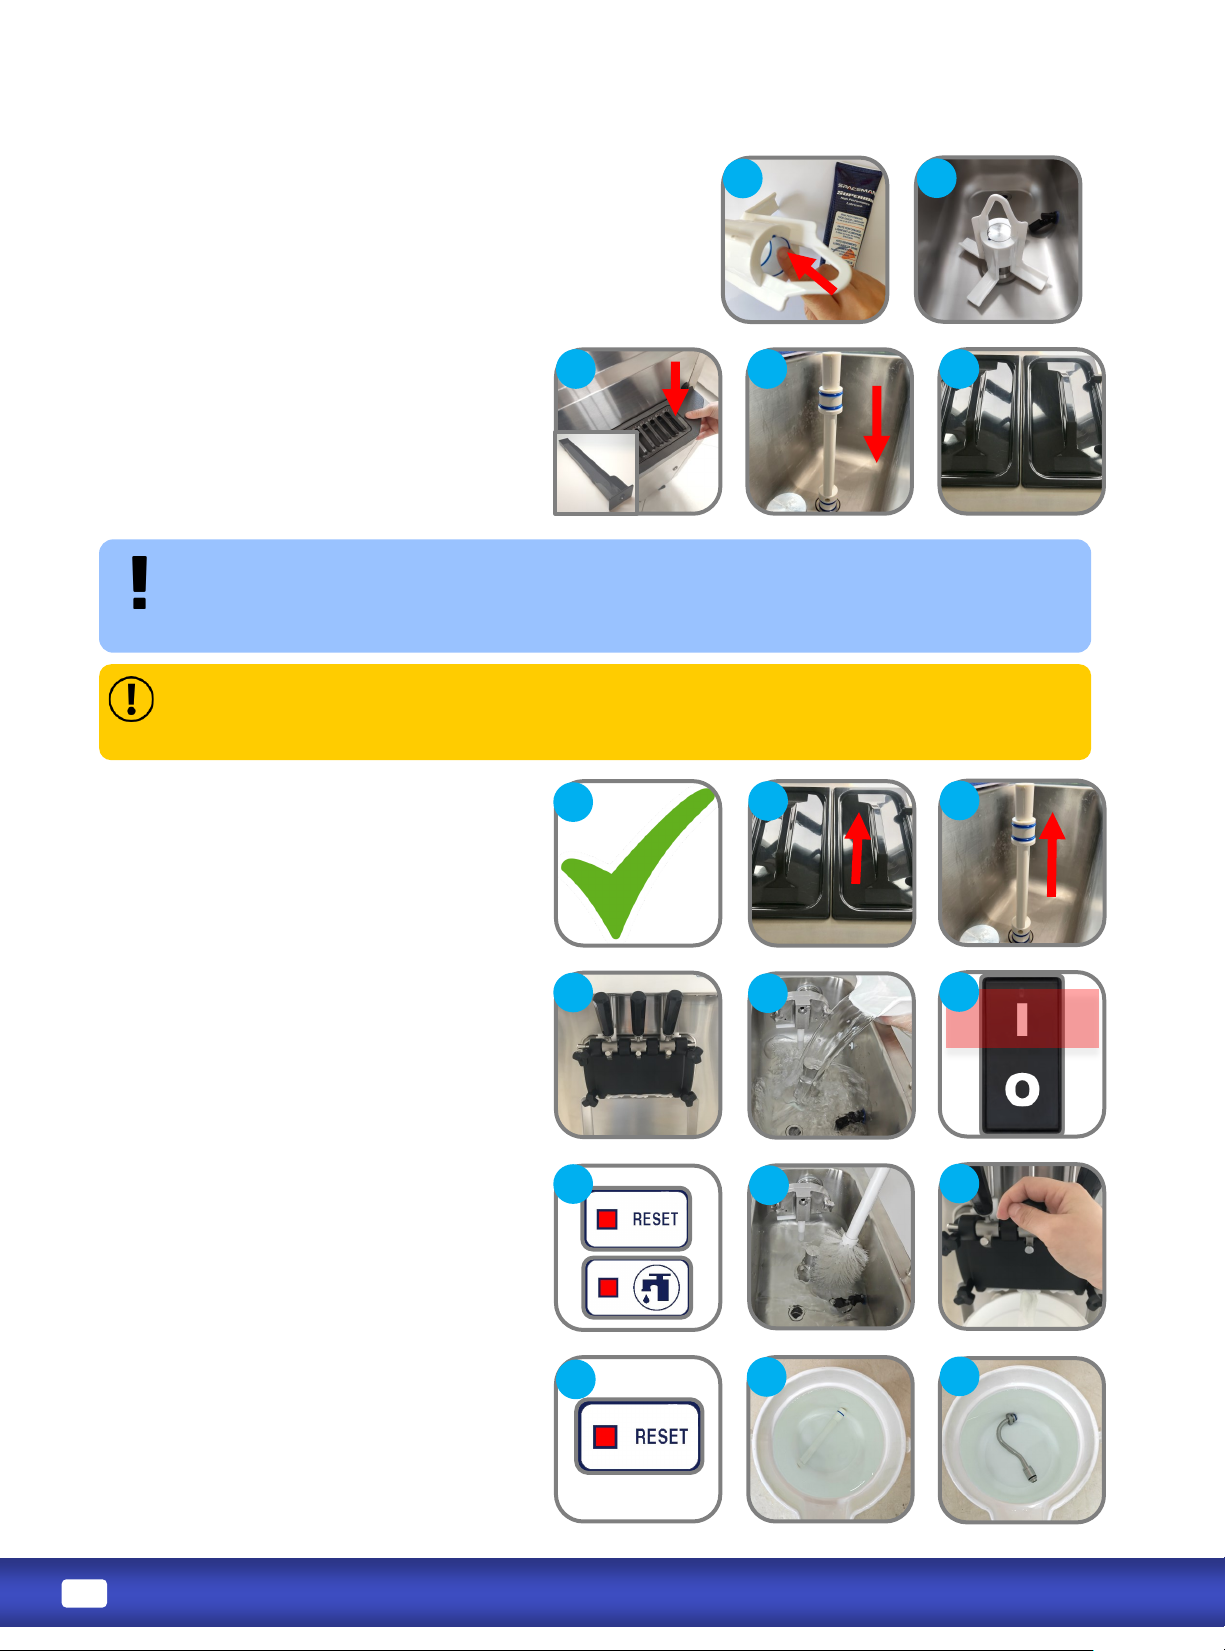
a. Coat inside of agitators (if present) with
Spaceman lubricant and install with arrow
poinng up.
b. Install internal and front drip trays.
c. If machine will be le unused, install air
tubes and place hopper lids on top;
otherwise, set air tubes aside unl aer
machine has been primed.
Aer sanizing the machine, DO NOT rinse or touch areas that have been sanized.
Product must be added immediately. If new product will not be added immediately, rinse machine
with clean water and loosen door hand-screws to allow cylinders to air-dry. Sanize machine before
using again.
1. Verify assembly is complete.
2. If installed, remove hopper cover and air
tube (gravity or pump).
3. Verify draw valves are in the CLOSED
posion (UP).
4. Slowly pour 7.57 liters (2 gallons) of the food
-grade sanizer soluon into each hopper,
allowing it to ow into the cylinder.
5. Turn power switches ON.
6. Press RESET buon; press WASH buon to
begin cycle. Allow soluon to agitate for 5 to
10 minutes; NEVER leave machine on WASH
for more than 10 minutes.
7. Make sure to clean and sanize your hands
before going to the next step.
8. While agitang, gently use a clean brush to
scrub and distribute sanizer soluon along
hopper walls, surface of agitator body and
pump assembly if there is a pump.
9. Place a bucket or container below the draw
valves; OPEN the draw valves (DOWN) and
drain soluon from the machine. For two-
avor machines, be sure to open the center
draw valve for a few mes to sanize the
center door spout.
10. Press RESET buons to stop cycle.
11. Submerge air tube (gravity or pump) into
sanizer soluon.
Use a Sanizer mixed to 100PPM Chlorine with an acve ingredient of Sodium Dichloro-S-
Triazinetrione Dihydrate. If warm water is required to dissolve sanizer, allow the soluon me to
cool before adding to machine.
Page 13
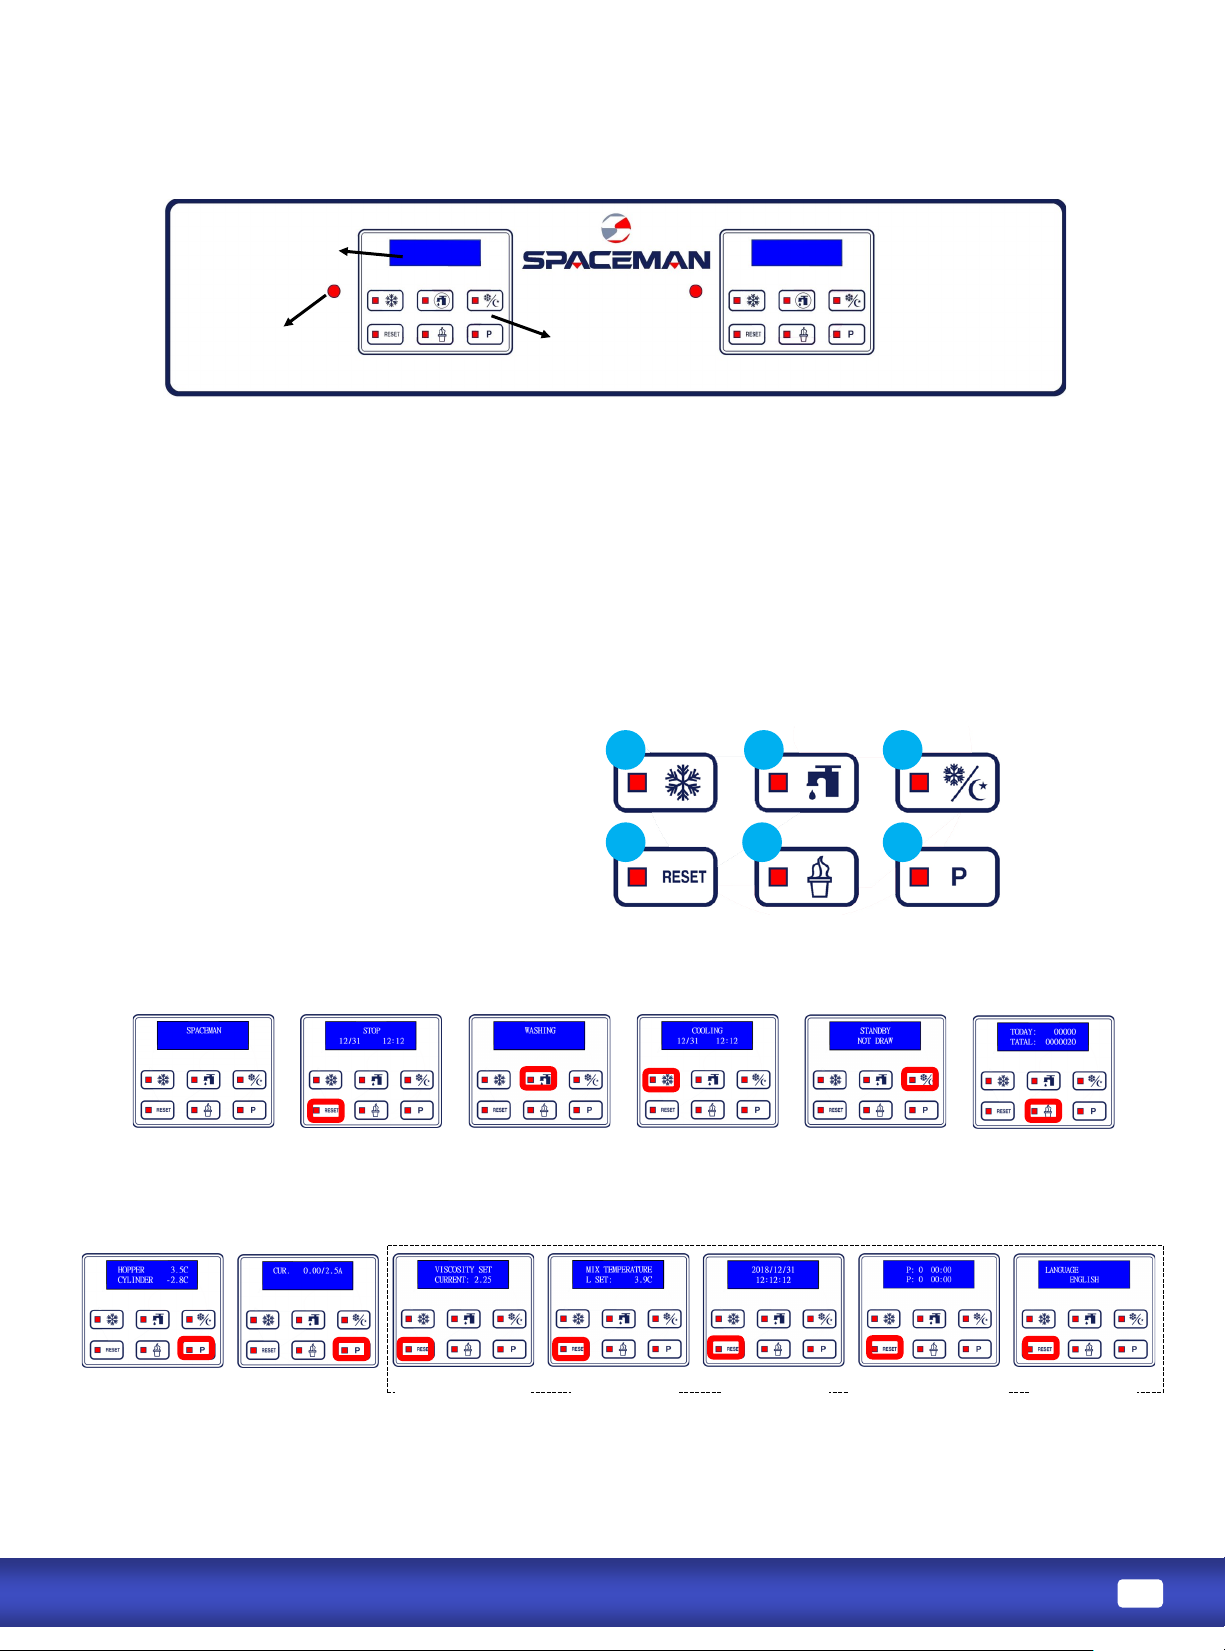
:A mix level indicang light is located at the front of the machine. When the light is
“ON”, it indicates that the mix hopper has a low supply of mix and should be relled as soon as possible.
Always maintain at least 2cm of mix in the hopper. If you neglect to add mix, a freeze-up may occur. This will
cause eventual damage to the beater assembly, the dispensing door, and gear box.
:During normal operaon the display is used to indicate funcon, the temperature of the
mix in the hopper and cylinder, the electric current of beater motor, error, and warning message.
:To beer communicate in the Internaonal arena, symbols have replace words on
many of your operator switches. SPACEMAN equipment is designed with these internaonal symbols.
Turn on power
Press and hold RESET for 3 seconds to enter into Menu;
Press RESET to turn to next page
Press RESET buon
to turn to STOP
mode
Press WASH buon
to turn to WASH
mode
Press P buon,
displays temperature
of Hopper & Cylinder
Press STANDBY
buon to turn on
STANDBY mode
Press FREEZE buon
to turn on FREEZE
Mode
Press ICE CREAM
buon, screen displays
dispense count
Press P buon
again, displays
motor current
Viscosity Seng
Hopper
Temperature
Date & Time
Auto Programming Language
Mix Low Indicator
Touch Switch Panel
Display Screen
Page 14
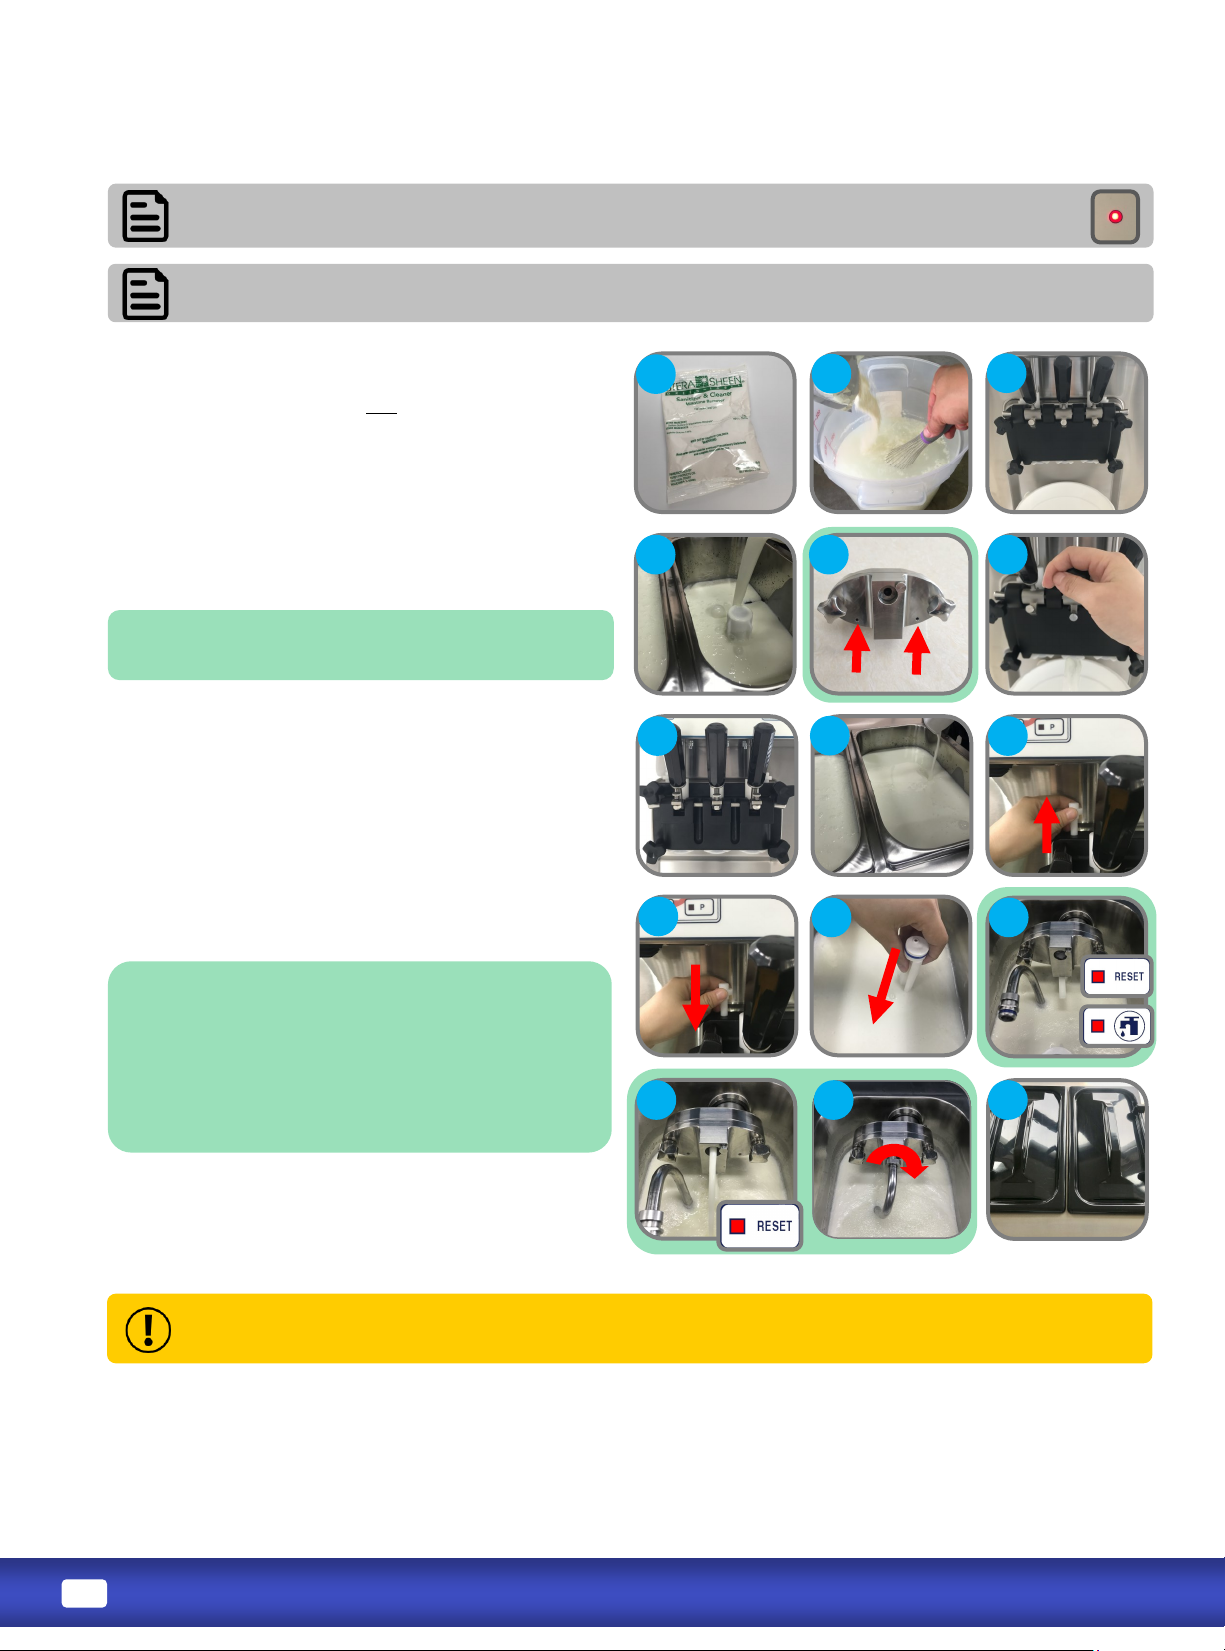
1. Verify machine has been recently sanized (within
1 hour); if machine has not been recently
sanized, verify door hand-screws are ght, and
perform sanizing steps (Page 11).
2. Thoroughly mix and prepare at least 8 liters (2.11
gallons) of product according to manufacturer
instrucons; mix should be cool and smooth (free
of large chunks).
3. Place bucket or large container below draw valve.
4. Pour 2 liters (0.53 gallons) of product into hopper.
5. For machine with air pumps, use lter when add
mix. Do not ll product over small air inlet holes on
the boom of the air pump.
6. OPEN draw valve (Handle Down); sanizer will
start to ow out draw valve.
7. Once sanizer has been purged from the machine
and a steady stream of product is owing from the
spout, CLOSE draw valve (Handle Up).
8. Pour remaining product into hopper.
9. Raise the prime plug on the top of the dispensing
door unl ow is 100% product.
10. Push prime plug back down.
11. Take air tube out of sanizer; install air tube in
hopper (inlet hole on side of air tube at boom).
12. For machine with air pumps:
→ Insert injecon tube into hopper but do not
connect to air pump
→ Press RESET, then press WASH to Prime
→ Ensure product is coming out of the large hole
near the top of the air pump. Press RESET
→ Rotate and insert air pump connector into air
pump; rotate connector to lock in place
13. Install hopper cover. Product is now ready to
freeze.
The mix-low lights illuminate when a hopper is low on product mix and automacally
de-illuminate when machine is lled.
Instrucons assume product is added one hopper at a me. Repeat steps as needed.
1. Verify cylinder is full of mixed product and primed.
2. Press FREEZE buon.
3. The motor will begin to agitate the product, and the cooling system will begin to freeze the product.
4. Freezing product takes approximately 10 minutes.
5. When product reaches the set viscosity, it is ready to dispense (viscosity can be changed in the Sengs
menu (Page 16).
Never disconnect air pump (if present) with the machine running. If disconnecng air pump, rst
press RESET to stop operaons and open draw handles for 10 to 15 seconds to relieve pressure in cylinder.
Page 15
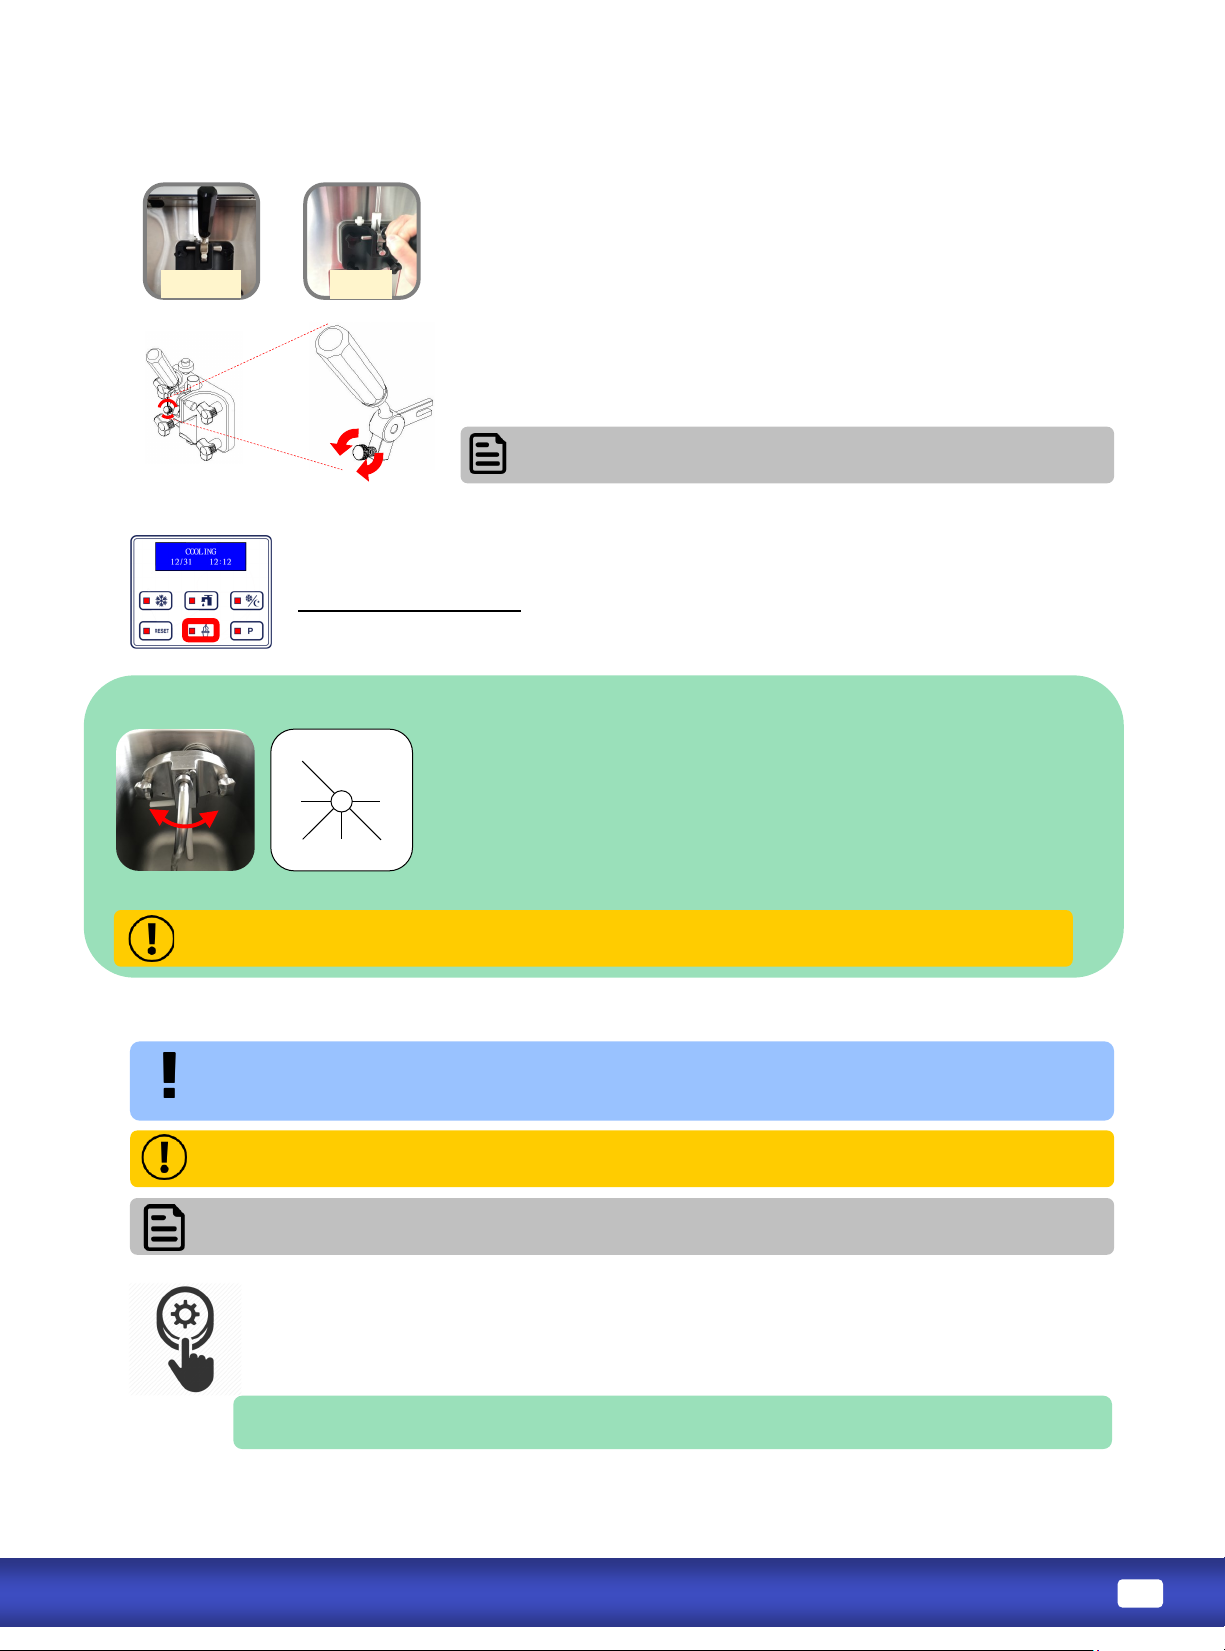
Side draw handles dispense product from their respecve hoppers. The
middle draw handle twists product from the le and right hoppers.
1. OPEN draw valve (Handle Down) unl desired amount is dispensed
2. CLOSE draw valve (Handle UP) when nished dispensing
Adjustment screws below draw handles control dispensing speed.
• Tighter (clockwise) reduces speed
• Looser (counter-clockwise) increases speed
If machine doesn’t turn on, turn power OFF, repeat steps 1 to 5. If problem persists, contact
service team.
If machine makes any abnormal noise during reset, immediately switch power OFF and
contact service team.
-(usually because
the viscosity is set too high for the selected product) to prevent motor damage. Use the
funcon to return the machine to normal operaon.
1. Switch power switches OFF.
2. Press power reset buon underneath front overhead, (If you can not nd power reset
buon, please disassemble the machine panel and press Reset buon on Inverter).
3. Press and hold STANDBY buon for 3 seconds and turn on Defrost mode.
4. Press RESET on Control Panel and re-prime. Li up prime plug and make sure product
comes out from boom prime port. Close prime plug.
5. Press RESET then WASH buon. Once product comes out of two small holes on pump
cover, press RESET to complete priming.
6. Observe machine performance and return to normal use if funconing properly.
Turn on freezing immediately to cool product down to serving consistency.
Use when quick serve is required aer long idle period.
• Under FREEZE mode press ICE CREAM buon
If adjustment screw is ghtened too far, product may not
dispense. If this occurs, loosen adjustment screw unl product dispenses.
Overrun is the amount of air mixed in with the product.
The higher the overrun, the higher the amount of air in each serving.
1. Turn sucon tube lever to the LEFT to reduce overrun;
Turn sucon tube lever to the RIGHT to increase overrun.
2. Six overrun levels total. Recommend to use 2-5.
3. Overrun and texture change will be visible aer 6-8 dispenses.
1
2
3 4 5
6
Overrun seng can dier between products. Seng too high of overrun can cause the
machine to malfuncon. When increasing overrun, you may need to reduce the viscosity seng.
Page 16
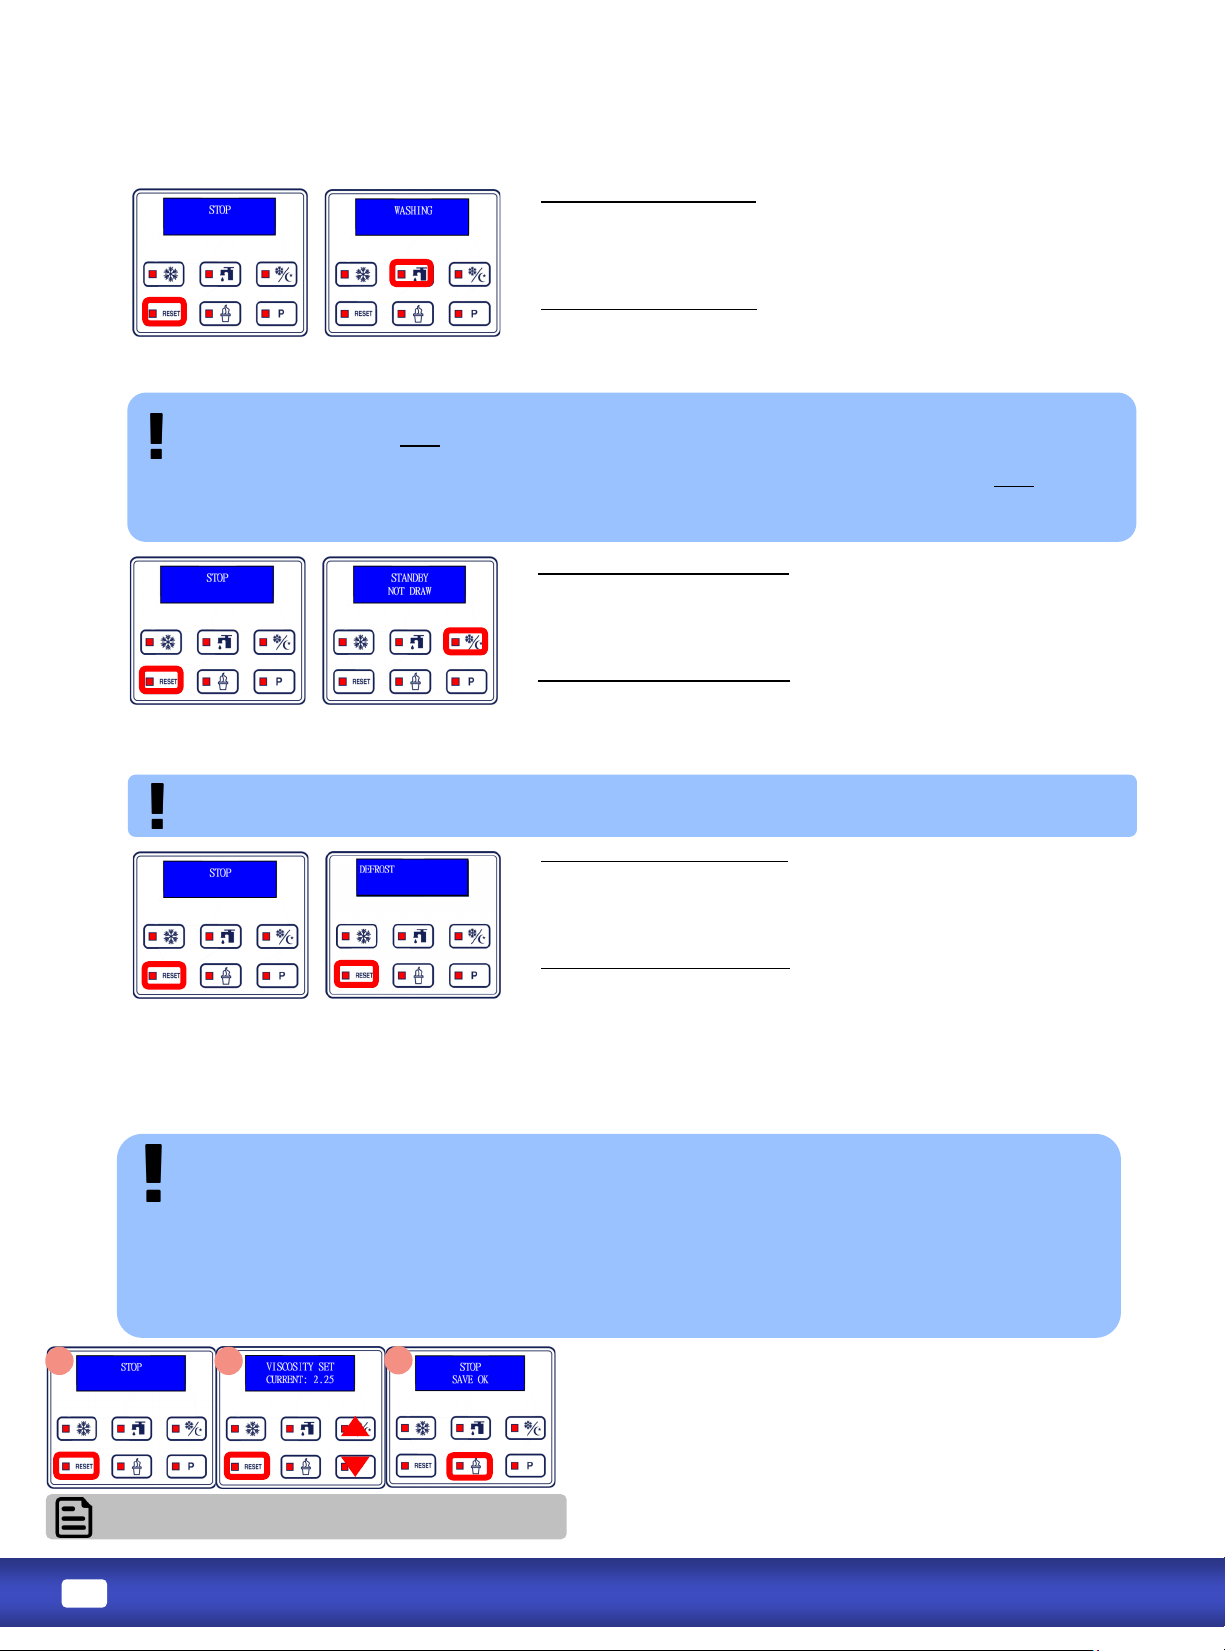
• Press RESET buon, then WASH buon
• Display reads WASHING when machine is in Wash mode
• Press RESET buon
• Machine is ready for a new mode selecon
• Press RESET buon, then STANDBY buon
• Display reads STANDBY when machine is in STANDBY mode
• Press RESET buon
• Machine is ready for a new mode selecon
When the machine will NOT be ulized for several hours, place it in STANDBY mode to conserve
electricity and reduce product loss.
In STANDBY, product remains below 4oC (40oF) in both the cylinders and hoppers, but will NOT be frozen.
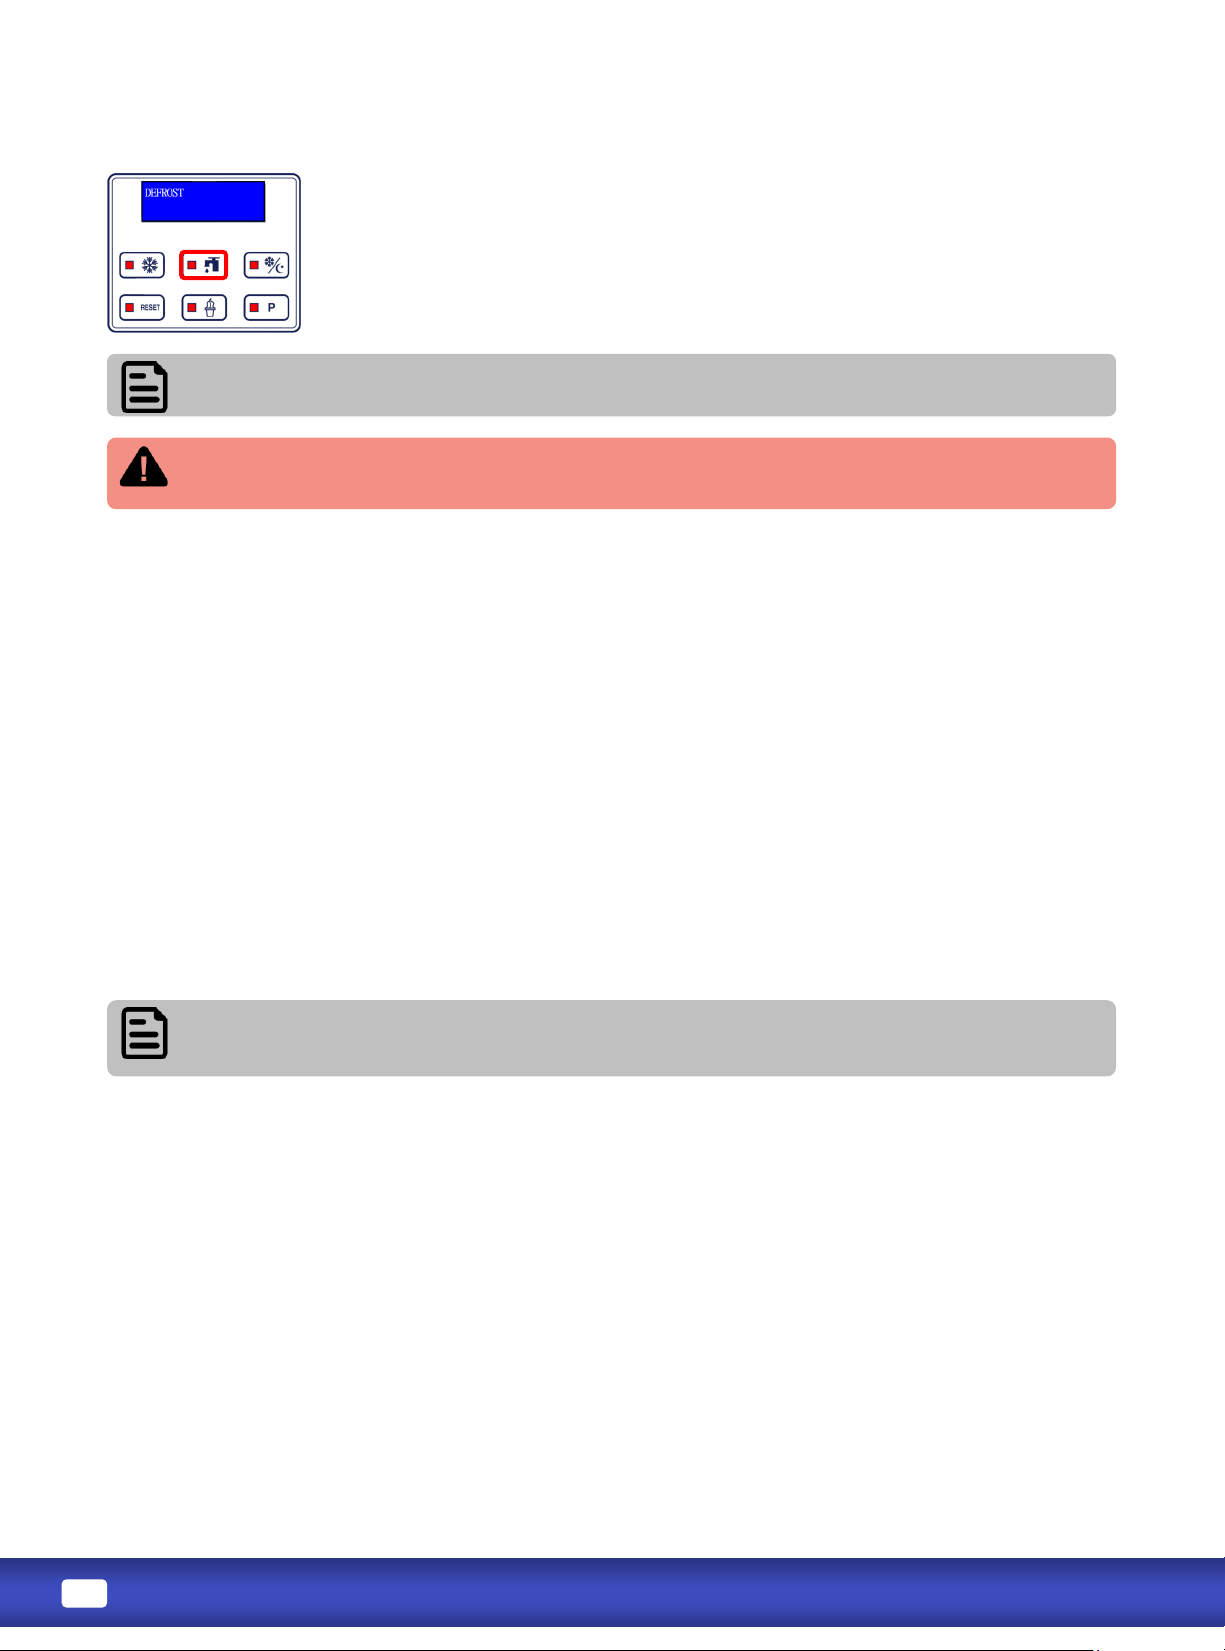
• Press RESET buon, then STANDBY for 3 seconds
• Display reads DEFROST when machine is in DEFROST mode
• Press RESET buon
• Machine is ready for a new mode selecon
Heat up frozen product in cylinder for faster draining and cleaning.
Use right before draining; start draining aer it completes in 3 to 5 minutes.
1. Viscosity controls how hard ice cream will be. Slightly adjust viscosity during inial setup and for
each avor/brand change.
2. Start with lower viscosity and gradually increase. Allow at least 2 freezing cycles to verify. Adjust
maximum 0.3A at a me.
3. Once desirable viscosity is set, DO NOT adjust again unless product (mix) is changed.
4. So and icy product in the aernoon requires more frequent dispense or a re-prime. Adjust viscosity
will result in FREEZE UP and/or DAMAGE to the machine.
1. Press RESET to stop machine funcons.
2. Press and hold RESET unl display shows sengs (viscosity is the
rst seng shown). If you scroll past the viscosity seng, conn-
ue pressing RESET unl it comes back around.
3. Press STANDBY to increase viscosity (more rm).
Press P to decrease viscosity (less rm).
4. Press and hold ICE CREAM buon for 3 seconds to save changes.
-
Refer to viscosity range (page 18) for
detailed viscosity seng value.
Page 17
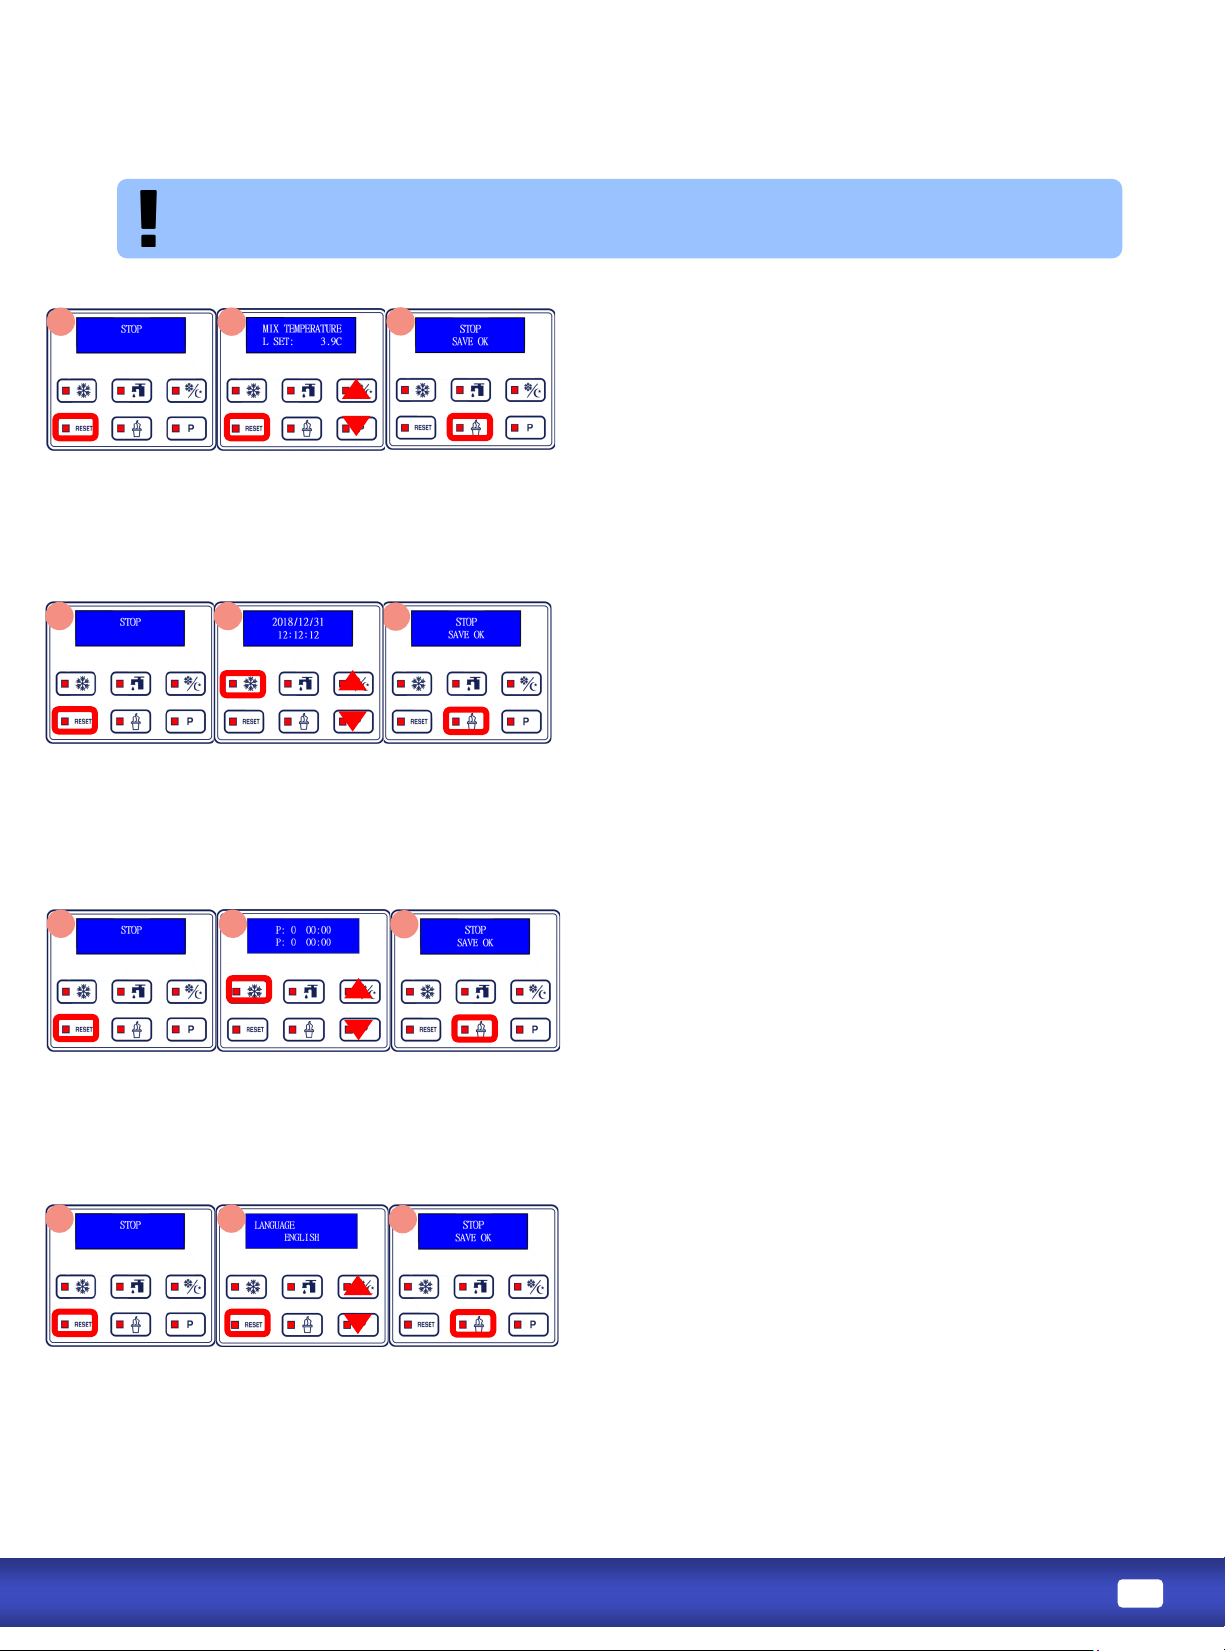
If temperature seng is too cold, product will freeze around the sides of the hopper and
potenally cause damage. Hopper temperature should be set above freezing at 3°C to 4°C (37°F to 40°F).
1. Press RESET to stop machine funcons. Press and hold RESET
unl display shows sengs.
2. Viscosity is the rst seng shown; press RESET again (without
holding), temperature will be next. If you scroll past the
temperature seng, connue pressing RESET unl it comes back
around.
3. Press STANDBY to increase temperature (warmer).
Press P to decrease temperature (cooler).
4. Press and hold ICE CREAM buon for 3 seconds to save changes.
-
1. Press RESET to stop all machine funcons. Press and hold RESET
unl display shows sengs. Press RESET twice (without holding)
to reach the date/me seng. If you scroll past the date/me
seng, connue pressing RESET unl it comes back around.
2. Press FREEZE to toggle cursor between date/me elds. Once
highlighted, a eld can be changed.
3. Press STANDBY to increase highlighted number.
Press P to decrease highlighted number.
4. Press and hold ICE CREAM buon for 3 seconds to save changes.
-
-
1. Press RESET to stop all machine funcons. Press and hold RESET
unl display shows sengs. Press RESET to reach the Auto
Programming seng. If you scroll past the Automac Mode
Programming seng, connue pressing RESET unl it comes
back around.
2. Press FREEZE to toggle cursor between elds. Once highlighted,
a eld can be changed.
3. Press STANDBY to increase highlighted number.
Press P to decrease highlighted number.
4. Press and hold ICE CREAM buon for 3 seconds to save changes.
-
1. Press RESET to stop machine funcons. Press and hold RESET
unl display shows sengs.
2. Press RESET to reach the Language seng. If you scroll past the
Language seng, connue pressing RESET unl it comes back
around.
3. Press STANDBY and P buon to change the language.
4. Press and hold ICE CREAM buon for 3 seconds to save changes.
Page 18
Press STOP when there is no liquid in hopper and cylinder to avoid cylinder damage due to
running dry. Press WASH again aer water is added in.
• Turn on DEFROST mode and wait for it to nish.
• Press on WASH and drain all product out from the dispensing door.
Gravity Feed Model Only: Remove feed tube before draining.
Do not install the air tube, gravity or pump, unl aer machine is fully sanized and primed.
Proper priming cannot be performed with air tube installed.
1. Pour clean water into hopper to rinse and drain while brush cleaning all areas inside the hopper.
2. Repeat rinsing and draining unl water drained is clear.
3. Completely disassemble the dispensing door assembly, beater assembly, pump assembly if present, hopper
agitator, hopper cover, front drip tray and internal drip tray.
4. Brush clean all parts disassembled and leave them air dry overnight.
5. Wipe down top, front and sides of the machine.
1. Soak and sanize all parts for a minimum of 10 minutes.
2. Assemble the beater assembly, dispensing door assembly, pump assembly if present, and front and internal
drip trays into the machine.
3. Sanize the hopper and cylinder by pouring sanizer soluon in hopper, running WASH mode for 10 minutes
and draining through the dispensing door. Use clean brush to sanize all surfaces inside the hopper.
4. Pour product in hopper and prime the machine with prime plug.
5. Install air tubes, hopper agitator and hopper cover.
6. Put machine in Freeze mode and wait for freezing cycle to nish.
Page 19
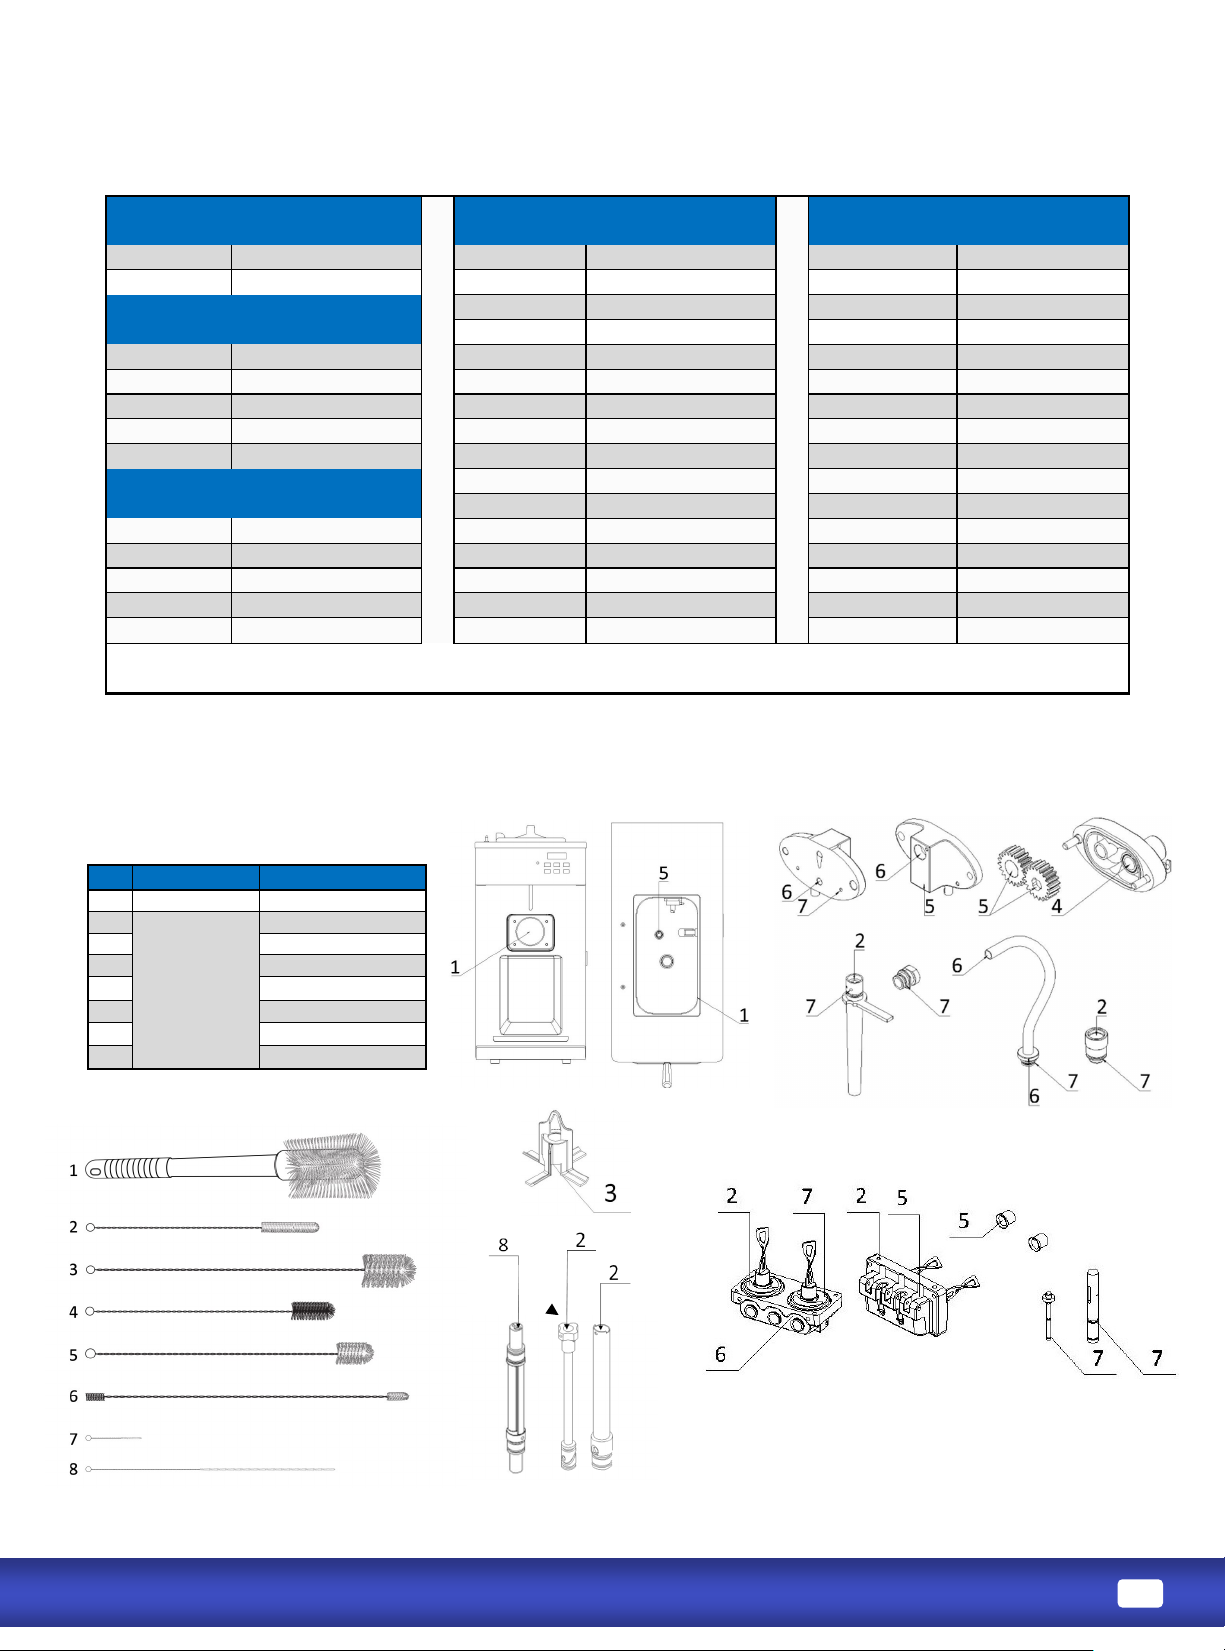
1 3.7.24.001 Brush - Large
2 Brush - φ13×77
3.7.24.002
3 Brush - φ38×80
4 Brush - φ25×60
5 Brush - φ25×70
6 Brush - φ10×25
7 Brush - φ3×25
8 Brush - φ3×230
--
--
--
6210-C 3.5 - 5.5
6220 2.5 - 4.5
6220 2.5 - 4.5
6225 3.0 - 5.5
6225 3.0 - 5.5
--
6240 3.0 - 5.5
6240 3.0 - 5.5
6245 2.5 - 4.5
6245 2.5 - 4.5
6350 1.8 - 2.6
6248 2.5 - 4.5
6248 2.5 - 4.5
6236-C 1.5 - 2.5/1.1KW
6265 2.5 - 4.5
6265 2.5 - 4.5
6378-C 1.5 - 2.5/1.1KW
6268
2.5 - 4.5
6268
2.5 - 4.5
6338-C 1.5 - 2.5/1.1KW
6210-C
1.8 - 2.8
6210-C
1.8 - 2.8
6228-C
1.8 - 2.8
6228-C
1.8 - 2.8
--
6236-C
2.0 - 4.0/1.1KW
6236-C
2.0 - 4.0/1.1KW
6234-C
1.0 - 1.8
6234-C
1.0 - 1.8
6368-C 1.8 - 2.8
6235-C
1.8 - 2.8
6235-C
1.8 - 2.8
6236-C 2.0 - 4.0/1.1KW
6250-C 1.8 - 2.8
6250-C 1.8 - 2.8
6378-C 2.0 - 4.0/1.1KW
6338-C 2.0 - 4.0/1.1KW
6338-C 2.0 - 4.0/1.1KW
6368-C 1.8 - 2.8
6368-C 1.8 - 2.8
6378-C
2.0 - 4.0/1.1KW
6378-C
2.0 - 4.0/1.1KW
1. Locate your model series based on voltage rang of your machine.
2. Conguraon model extensions such as A or W do not aect viscosity range of their model series.
Page 20
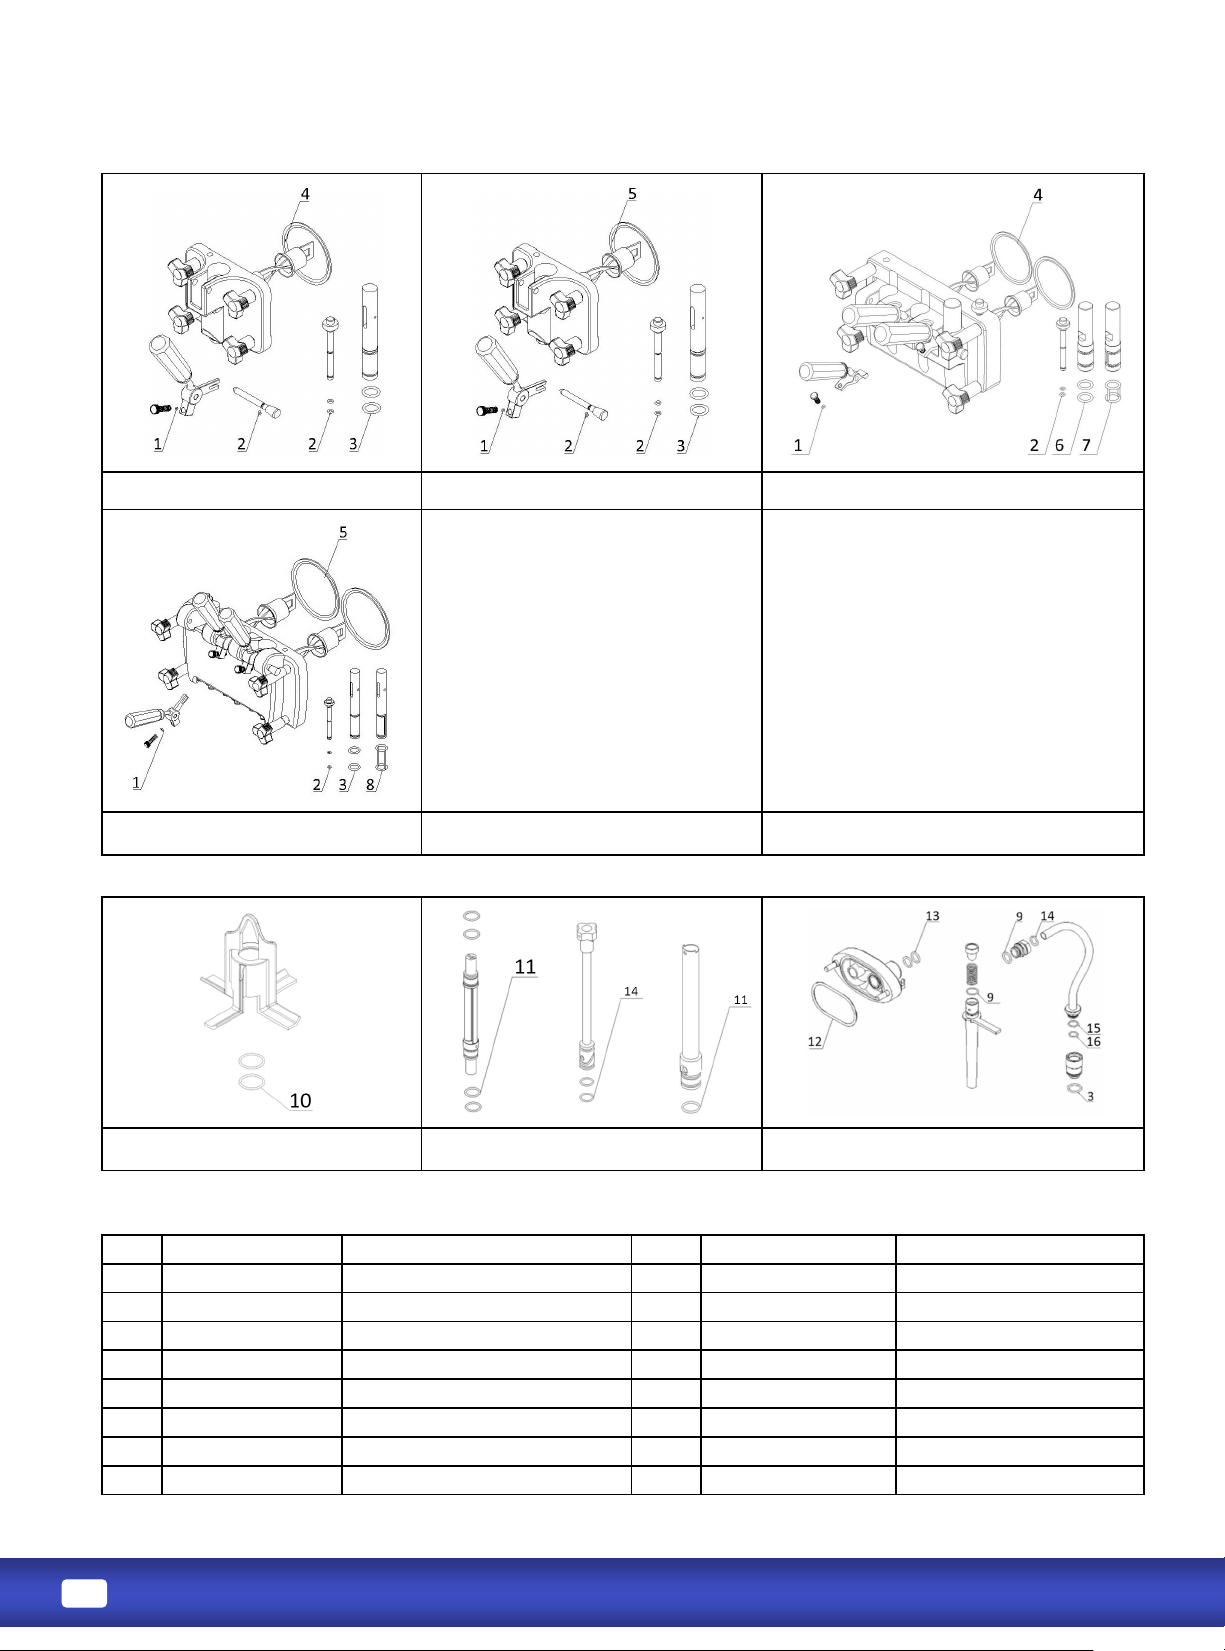
1 3.4.08.01.012 O-Ring - 3x1.5 9 3.4.08.01.003 O-Ring - 13.5x2.5
2 3.4.08.01.013 O-Ring - 5.2x1.9 10 3.4.08.01.034 O-Ring - 31×2
3 3.4.08.01.006 O-Ring - 16.8x2.4 11 3.4.08.01.002 O-Ring - 18x2.2
4 3.4.08.02.007 Door Gasket - SS - 1.3-1.8qt 12 3.4.08.01.041 O-Ring - 71.8x3
5 3.4.08.02.008 Door Gasket - SS - 3.4qt 13 3.4.08.01.025 O-Ring - 15.8x2.4
6 3.4.08.01.011 O-Ring - 19x3 14 3.4.08.01.008 O-Ring - 11.5x2.5
7 3.4.08.01.019 H-Ring - 19x3x2 15 3.4.08.01.024 O-Ring - 13x1.5
8 3.4.08.01.018 H-Ring - 16.8x2.4x2 16 3.4.08.01.040 O-Ring - 11.2x1.4
-
Page 21
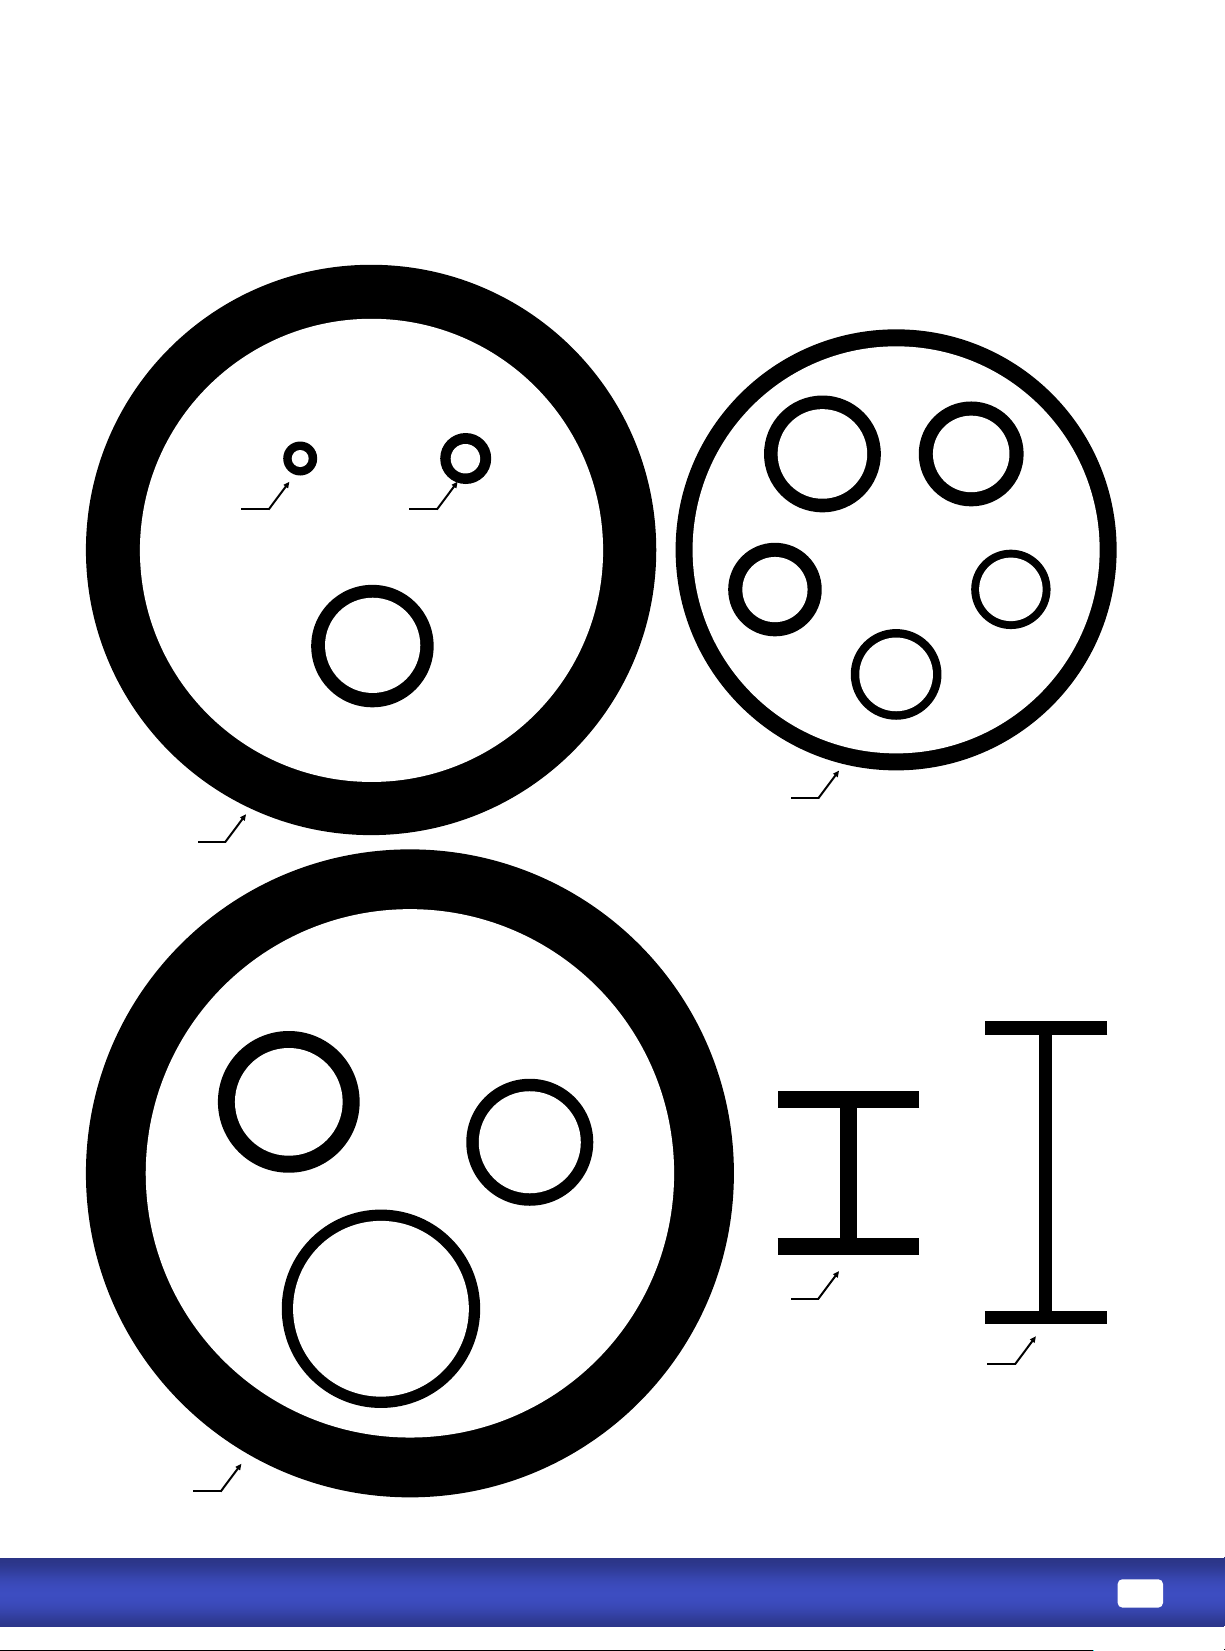
-
-
Page 22
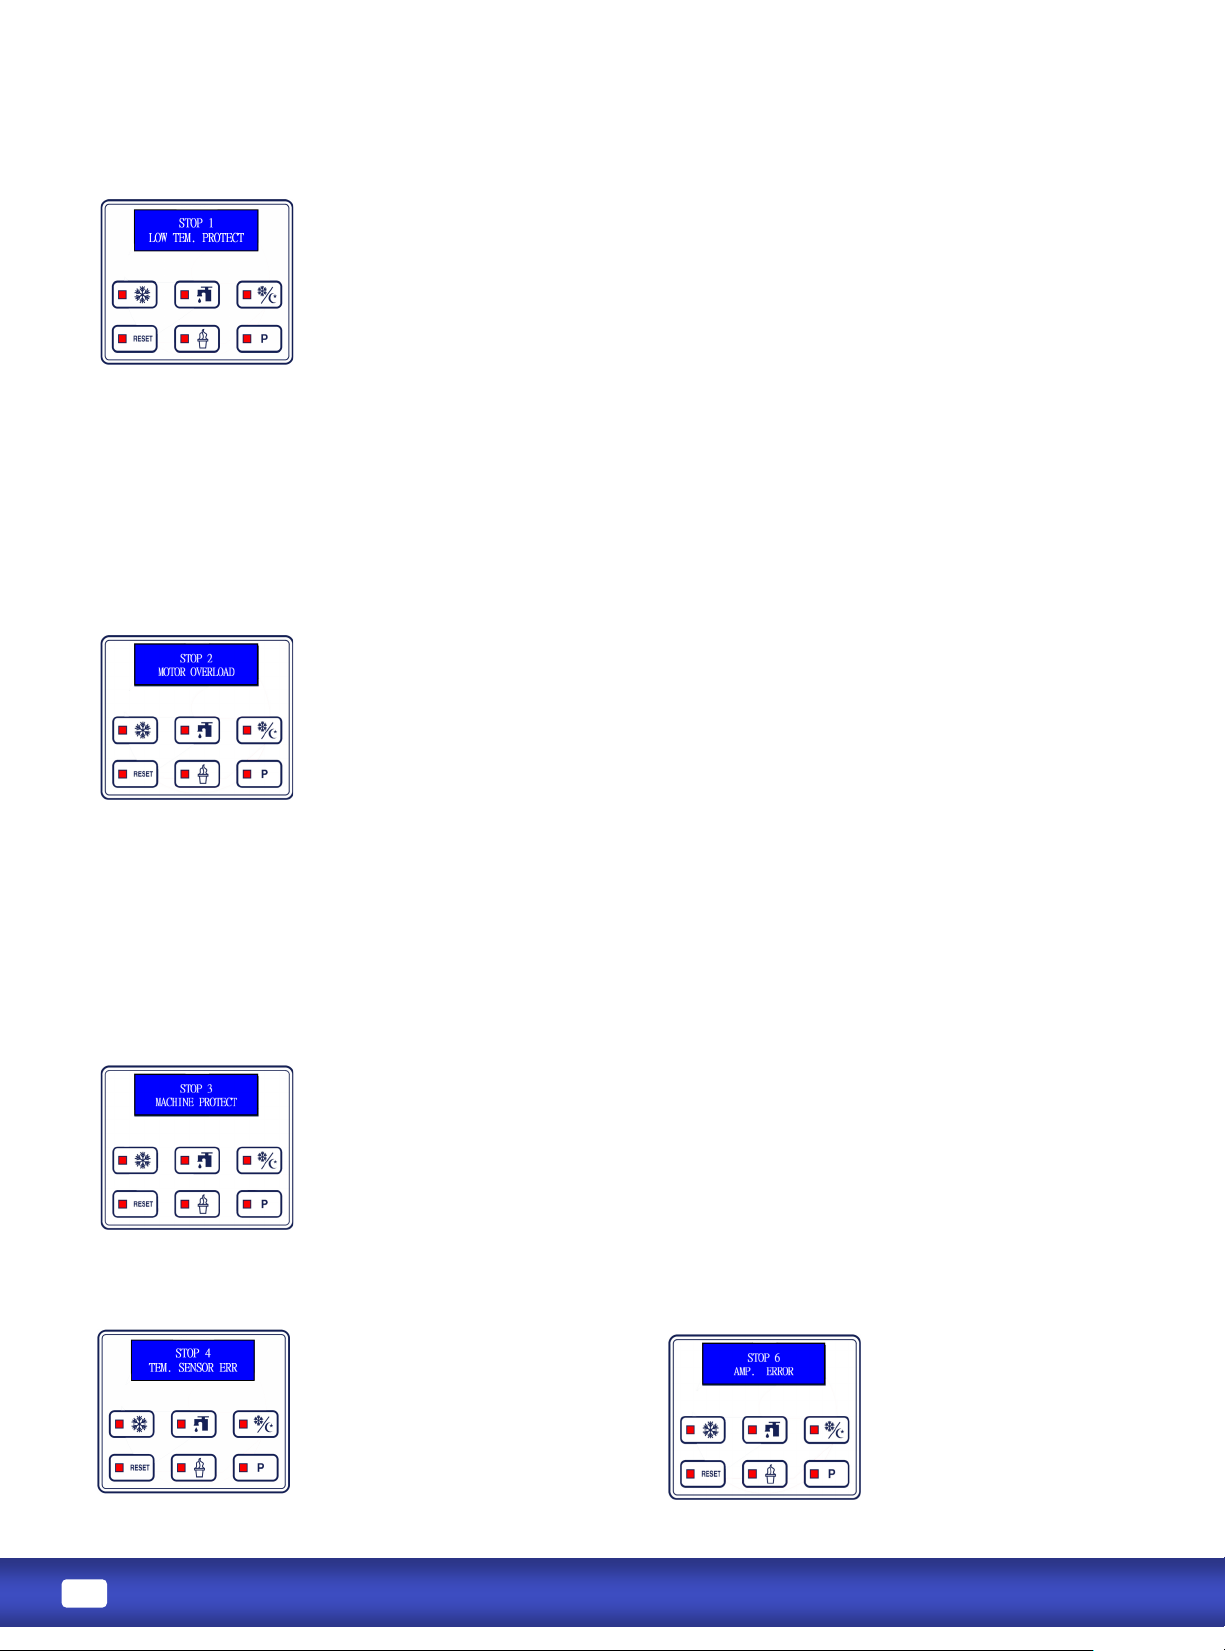
1
1. Starved cylinder
2. Inadequate mix in hopper.
3. Improper mixing of product.
4. Air tube isn’t installed correctly.
5. Viscosity adjustment is set
incorrectly.
6. Air pump is not primed
1. Ensure hopper is at least half full.
2. Follow manufacturer instrucons for
mixing product; ensure correct mix raos.
3. Lower viscosity seng as required.
4. Ensure air tube isn’t clogged, allow
machine 2 to 5 seconds between servings.
5. (G) Clean air tube, ensure proper
orientaon.
6. (A) Check to make sure hand screws ght
on pump shell body and that shell gasket is
installed.
7. Prime air pump
8. Turn on DEFROST mode. (Page 15)
4
Malfunconing temperature probe
Replace temperature probe.
6
Malfunconing power board.
Replace power board.
3
1. Install the dispensing door.
2. Check and reinstall jumper on display
board.
1. Dispensing door is o.
2. Jumper on display board is
disconnected or loose.
1. Viscosity adjustment is set
incorrectly.
2. Inadequate mix in hopper.
3. Improper mixing of product.
4. Air tube isn’t installed correctly.
5. Product is being drawn too
quickly.
2
1. Ensure hopper is at least half full.
2. Follow manufacturer instrucons for
mixing product; ensure correct mix raos.
3. Lower viscosity seng as required.
4. Ensure air tube isn’t clogged, allow
machine 2 to 5 seconds between servings.
5. (G) Clean air tube, ensure proper
orientaon.
6. (A) Check to make sure hand screws ght
on pump shell body and that shell gasket is
installed.
7. Prime air pump
8. Turn on DEFROST mode. (Page 15)
Page 23

1. Improper or inadequate lubricaon of drive
sha seal.
2. Damaged, missing, or improperly installed drive
sha seal.
1. Use sucient food-grade lubricant, and add
sucient lubricant inside drive sha gasket
during assembly (Page 9).
2. Replace drive sha gaskets every 1 to 3 months.
1. Improper or inadequate lubricaon of draw
valve and draw valve O-rings.
2. Cracked, broken, or worn draw valve O-rings.
1. Use sucient food-grade lubricant when
assembling draw valves (Page 10).
2. Replace O-rings every 1 to 3 months.
1. Machine isn’t cleaned/lubricated adequately.
2. Inadequate mix in hopper.
3. Product breakdown
4. Improper mixing of product.
5. Machine doesn’t have adequate venlaon.
6. Viscosity adjustment is set incorrectly.
1. Clean and properly lubricate machine daily.
2. Ensure hopper is at least half full.
3. Recycle fresh product.
4. Follow manufacturer instrucons for mixing
product; ensure correct mix raos.
5. Ensure at least 152mm (6'') clearance on all
sides.
6. Raise viscosity seng as required (Page 16)
1. Warm product was recently added.
2. Hopper temperature seng is too high.
3. Temperature osets need adjustment.
1. Allow at least 1 hour aer adding new mix for
hopper temperatures to stabilize.
2. Adjust hopper temperature warmer (Page 16).
3. Call Spaceman Technical Support.
1. Inadequate mix in hopper.
2. Warm product added to hopper.
3. Hopper temperature seng is too low.
1. Ensure hopper is at least half full.
2. Pre-chill product before adding to hopper.
3. Adjust hopper temperature warmer (Page 16).
Cylinders are experiencing freeze-up.
1. Check mix level.
2. Check for starved cylinder (refer to Stop 1 and
Stop 2 troubleshoong on page 21)
3. Reset machine (Page 14), and lower viscosity as
required (Page 16).
1. Improper assembly.
2. Wearable parts need replacement.
3. Internal cleaning/maintenance required.
4. Damaged internal parts.
1. Stop machine use, drain product with machine
powered OFF; clean and inspect parts.
2. Replace wearable parts (including beater
blades) at least once every 3 months.
3. Inspect parts carefully for damage, ensure
proper assembly; replace as required.
4. Contact Spaceman Technical Support.
Page 24

 Loading...