

Page 1

Introduction
SY-P4VDA
Motherboard
Hardware
Installation
Setup
Quick BIOS
The SOYO CD
Quick Start Guide
Driver
Realtek LAN
Installation
Page 2

SOYO™
SY-P4VDA Motherboard
mPGA Socket 478 processors
VIA P4X266A AGP/PCI Motherboard
400 MHz Front Side Bus supported
ATX Form Factor
Copyright © 2002 by SOYO Computer Inc.
Trademarks:
SOYO is the registered trademark of SOYO Computer Inc. All trademarks are the properties of their
owners.
Product Rights:
All names of the product and corporate mentioned in this publication are used for identification purposes only.
The registered trademarks and copyrights belong to their respective companies.
Copyright Notice:
All rights reserved. This manual has been copyrighted by SOYO Computer Inc. No part of this manual may
be reproduced, transmitted, transcribed, translated into any other language, or stored in a retrieval system, in
any form or by any means, such as by electronic, mechanical, magnetic, optical, chemical, manual or
otherwise, without permission in writing from SOYO Computer Inc.
Disclaimer:
SOYO Computer Inc. makes no representations or warranties regarding the contents of this manual. We
reserve the right to amend the manual or revise the specifications of the product described in it from time to
time without obligation to notify any person of such revision or amend. The information contained in this
manual is provided to our customers for general use. Customers should be aware that the personal computer
field is subject to many patents. All of our customers should ensure that their use of our products does not
infringe upon any patents. It is the policy of SOYO Computer Inc. to respect the valid patent rights of third
parties and not to infringe upon or to cause others to infringe upon such rights.
Restricted Rights Legend:
Use, duplication, or disclosure by the Government is subject to restrictions set forth in subparagraph (c)(1)(ii)
of the Rights in Technical Data and Computer Software clause at 252.277-7013.
About This Guide:
This Quick Start Guide can help system manufacturers and end users in setting up and installing the
Motherboard. Information in this guide has been carefully checked for reliability; however, to the correctness
of the contents there is no guarantee given. The information in this document is subject to amend without
notice.
For further information, please visit our Web Site on the Internet. The address is
"http://www.soyo.com.tw".
P4VDA Serial - Version 1.0 - Edition: February 2002
* These specifications are subject to amend without notice
2
Page 3
SY-P4VDA
Quick Start Guide
1
1
Congratulations on your purchase of the
steps for installing and setting up your new Motherboard.
This guide provides all users with the basic steps of Motherboard setting and operation. For further
information, please refer to the SY-P4VDA Motherboard User's Manual that came with your
Motherboard.
Introduction
SY-P4VDA
Motherboard. This Quick Start Guide illustrates the
Unpacking
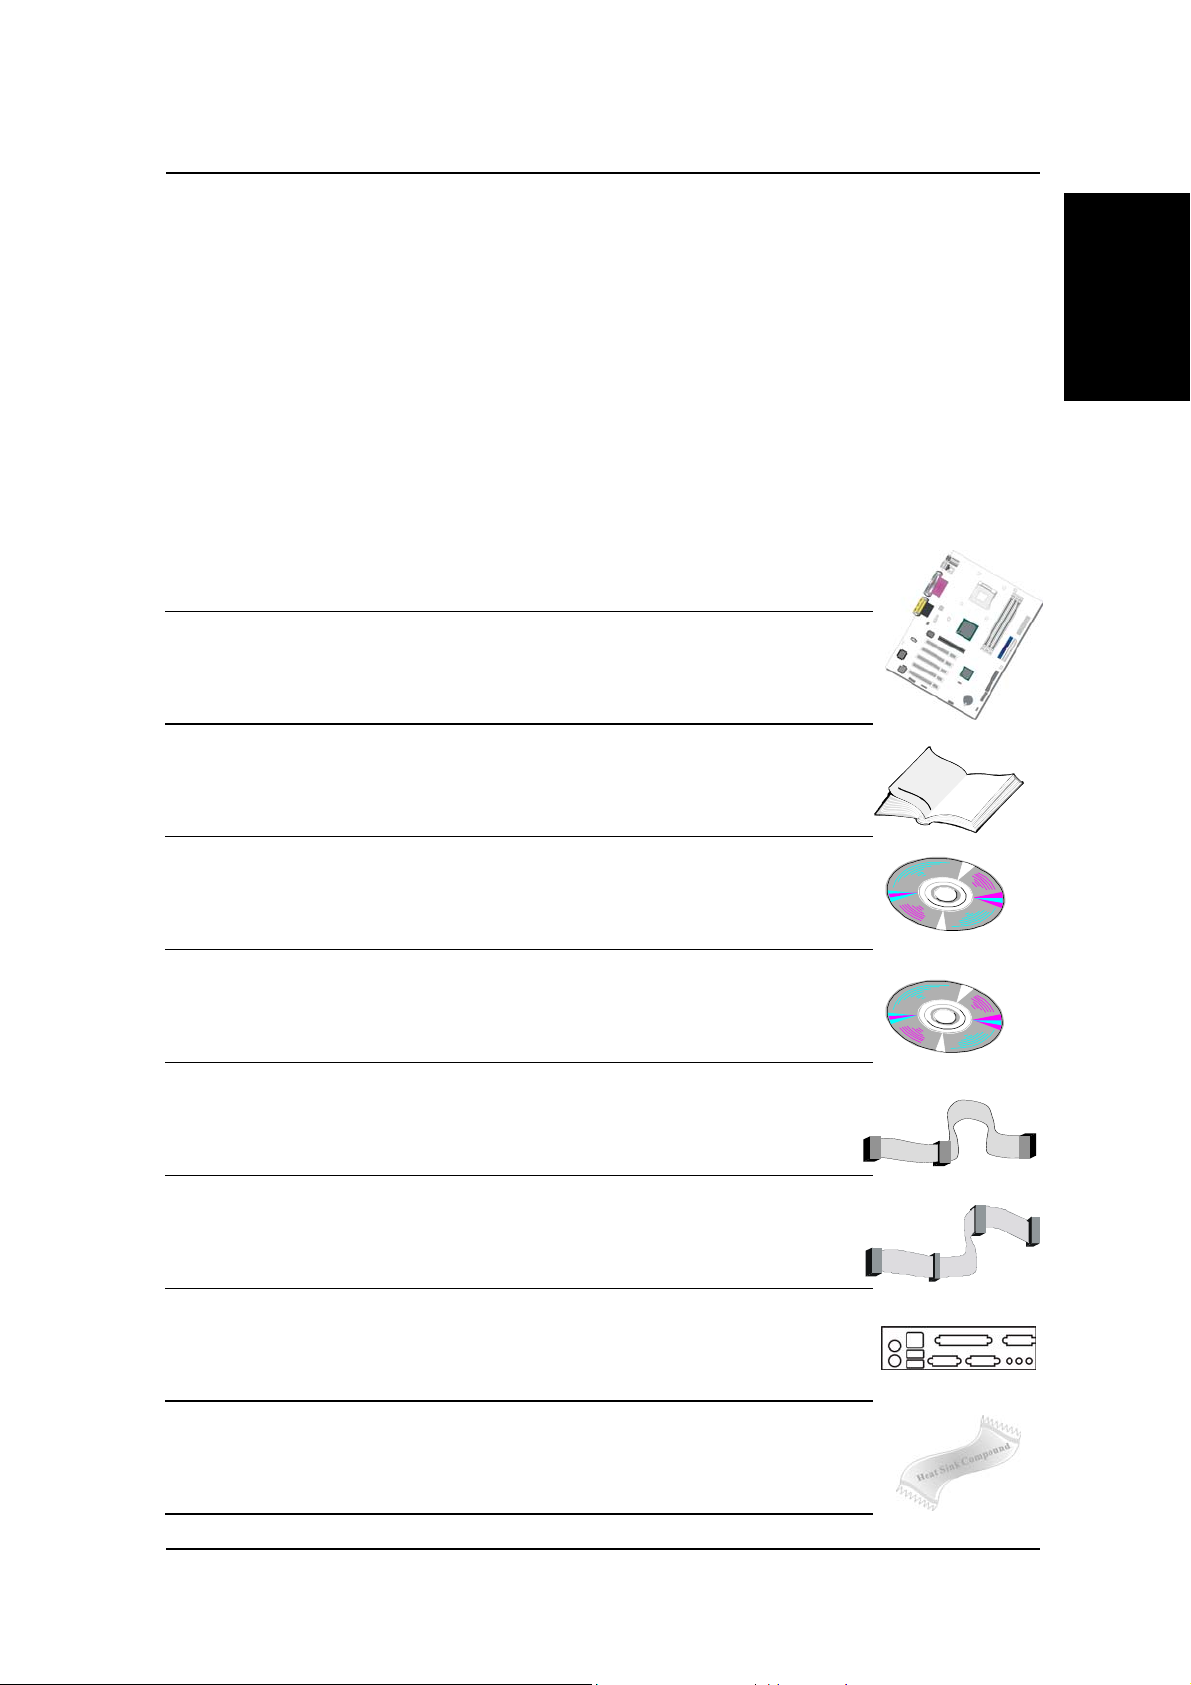
When unpacking the Motherboard, check for the following items:
The SY-P4VDA VIA P4X266A AGP/PCI Motherboard
This Quick Start Guide
Introduction
The Installation CD-ROM
SOYO Bonus Pack CD-ROM
One IDE Device ATA 100 Flat Cable
One Floppy Disk Drive Flat Cable
Bracket
One Heat Sink Compound
3
Page 4
Introduction
SY-P4VDA Quick Start Guide
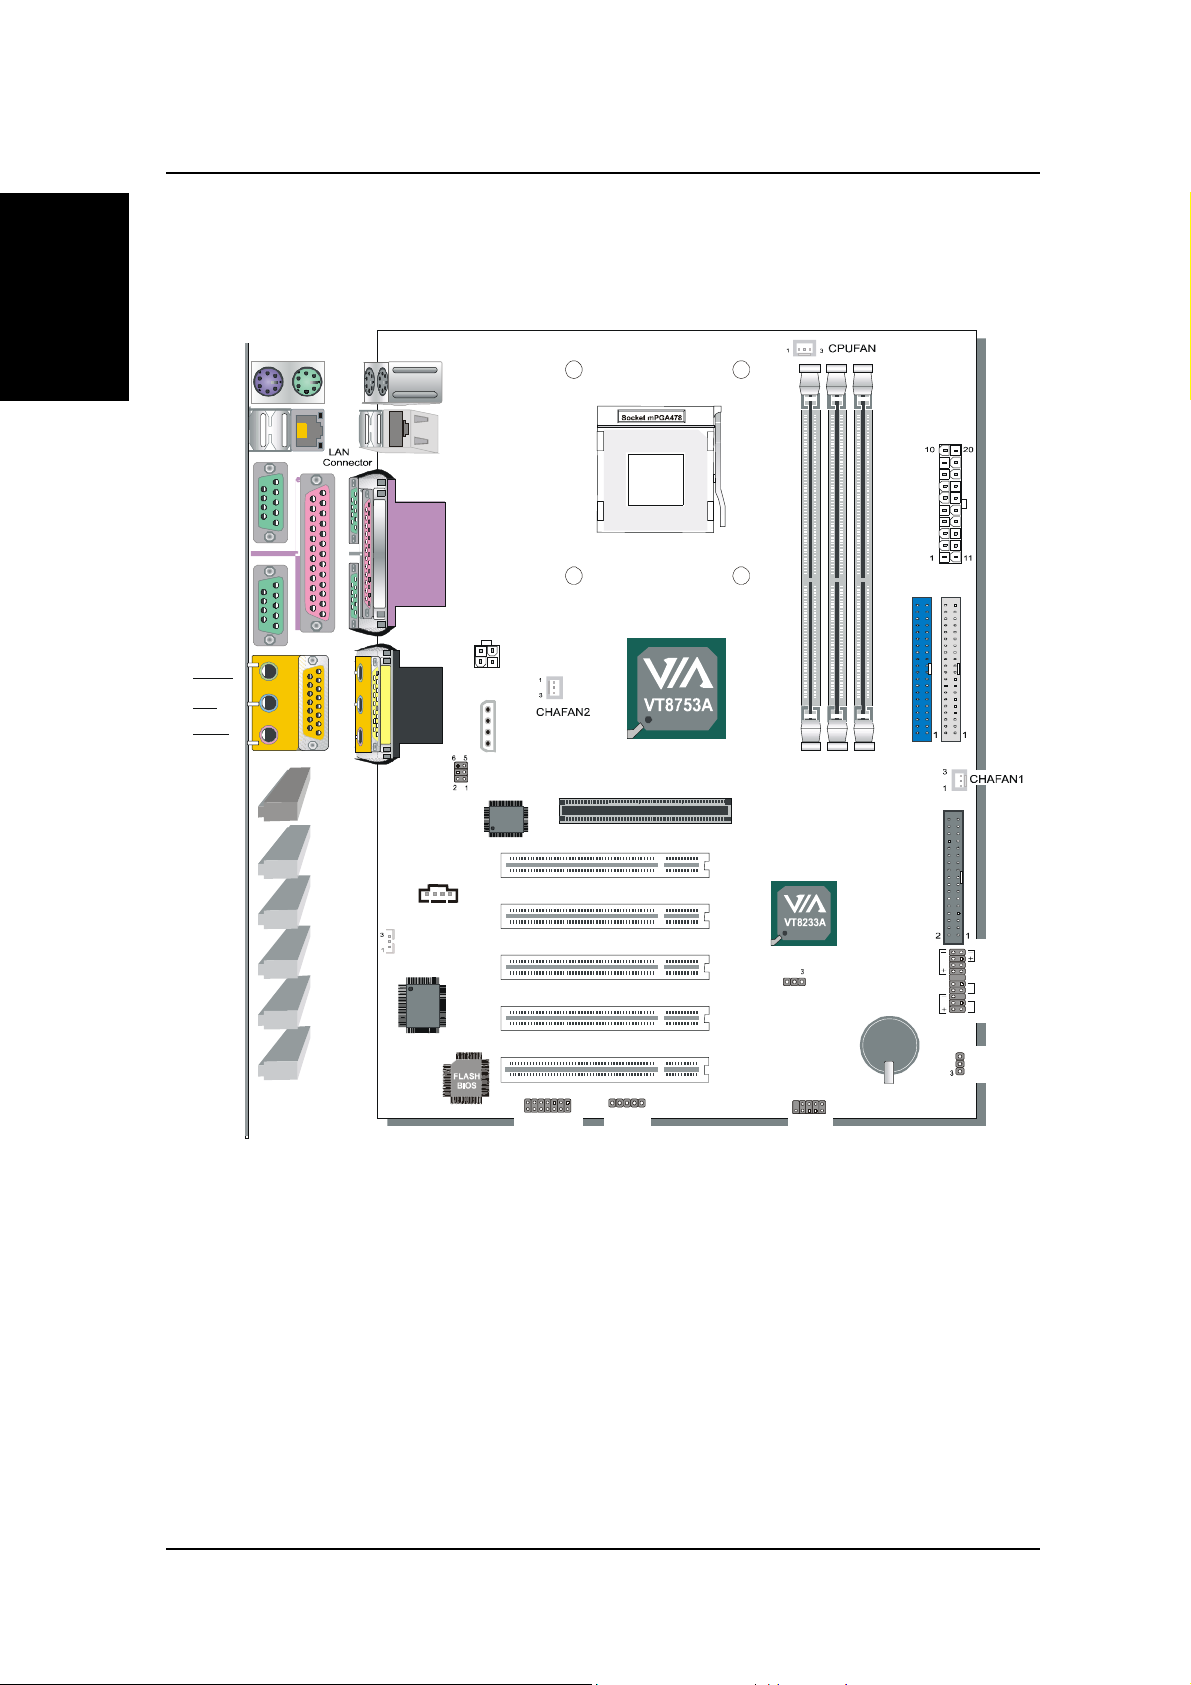
SY-P4VDA Motherboard Layout
PS/2 Mouse
PS/2 KB
Connector
Connector
USB 1_2
COM A
ATX Pow er
COM B
AOUT
AIN
AMIC
PRT
AGAME
JP10
WOL
Header
ITE
IT8705 F
J30
14
CDIN2
P1
P2
LAN
CHIP
13
14
SMCARDCN
1
51
2
SIRCON
AGP Slot
PCI#1
PCI#2
PCI#3
PCI#4
PCI#5
1
JP11
5
10
USB3_4
IDE 2IDE 1
DIMM1
DIMM2
DIMM3
FDC
HDD
J25
1
JP5
111
LED
PWRBT
Reset
CMOS Clear
Jumper
Speaker
Power
LED
3V
Lithium
Battery
1
6
4
(Optional)
Page 5

SY-P4VDA
Key Features
Quick Start Guide
Supports Intel® mPGA Socket 478
processors
- Pentium
Supports 400 MHz Front Side Bus Frequency
Support PC1600 and PC2100 DDR module
PC99, ACPI
Ultra 33/66/100/133 (ATA 33/66/100/133)
Supports Wake-On-LAN (WOL)
Supports ACPI Suspend Indicator
Power-on by modem, alarm and PS/2
Keyboard
Power failure resume
Supports Suspend to RAM
Supports onboard hardware monitoring and
includes Hardware Doctor™ utility
®
4
Supports multiple-boot function
AGP 2.0 Compliant;
AGP Connector supports:
- 1X/2X/4X data transfer
Smart Card Reader
- Compliant with Personal Computer Smart
Card (PC/SC) Working Group standard
- Compliant with smart card (ISO 7816)
protocols
- Supports card present detect
- Supports Smart Card insertion power-on
feature
3 x DIMM slots for DDR SDRAM memory
1 x 32-bit AGP slot
4 x 32-bit bus master PCI slots (slot2~slot5)
Introduction
Supports AC97 Codec
Easy CPU settings in BIOS with the “SOYO
COMBO Setup”
- CPU voltage adjust
- CPU ratio adjust
- CPU FSB adjust
1 x 32-bit bus slave PCI slot (slot1)
4 x USB ports onboard
1 x IrDA port
ATX 12V power connector
5
Page 6
SY-P4VDA Quick Start Guide
2
2
Hardware
Installation
Follow the directions in this section which is designed to guide you through a quick and correct method
to install your new
Motherboard User's Manual and Technical Reference online manual on the CD-ROM that came with
your Motherboard.
Installation
To avoid damage to your Motherboard, please follow these simple rules while handling
this equipment:
Before handling the Motherboard, ground yourself by touching on to an unpainted portion of the
system's metal chassis.
Remove the Motherboard from its anti-static packaging. Hold the motherboard by the edges
and avoid touching its components.
Check the Motherboard for damage. If any chip appears to be loose, press carefully to seat it
firmly in its socket.
SY-P4VDA
Motherboard. For detailed information, please refer to the SY-P4VDA
Gather and prepare all necessary components to complete the installation successfully:
Socket mPGA 478 processor with built-in CPU cooling fan (boxed type)
DDR SDRAM module (s)
Computer case with adequate power supply unit
Monitor
PS/2 Keyboard
Pointing Device (PS/2 Mouse)
Speaker(s) (optional)
Disk Drives: HDD, CD-ROM, Floppy drive…
External Peripherals: Printer, Plotter, and Modem (optional)
Internal Peripherals: Modem and LAN cards (optional)
VGA Card (AGP, PCI)
6
Page 7
SY-P4VDA
Install the Motherboard
Follow the steps below in order to perform the installation of your new
Step 1. Install the CPU
SY-P4VDA
Quick Start Guide
Motherboard.
Mark your CPU Frequency:
should be clearly marked on the CPU cover.
FSB 400MHz
1.5GHz (100 x 15.0 ) 1.6GHz (100 x 16.0) 1.7GHz ( 100 x 17.0) 1.8GHz (100 x 18.0)
1.9GHz (100 x 19.0 ) 2.0GHz (100 x 20.0) 2.2GHz (100 x 22.0)
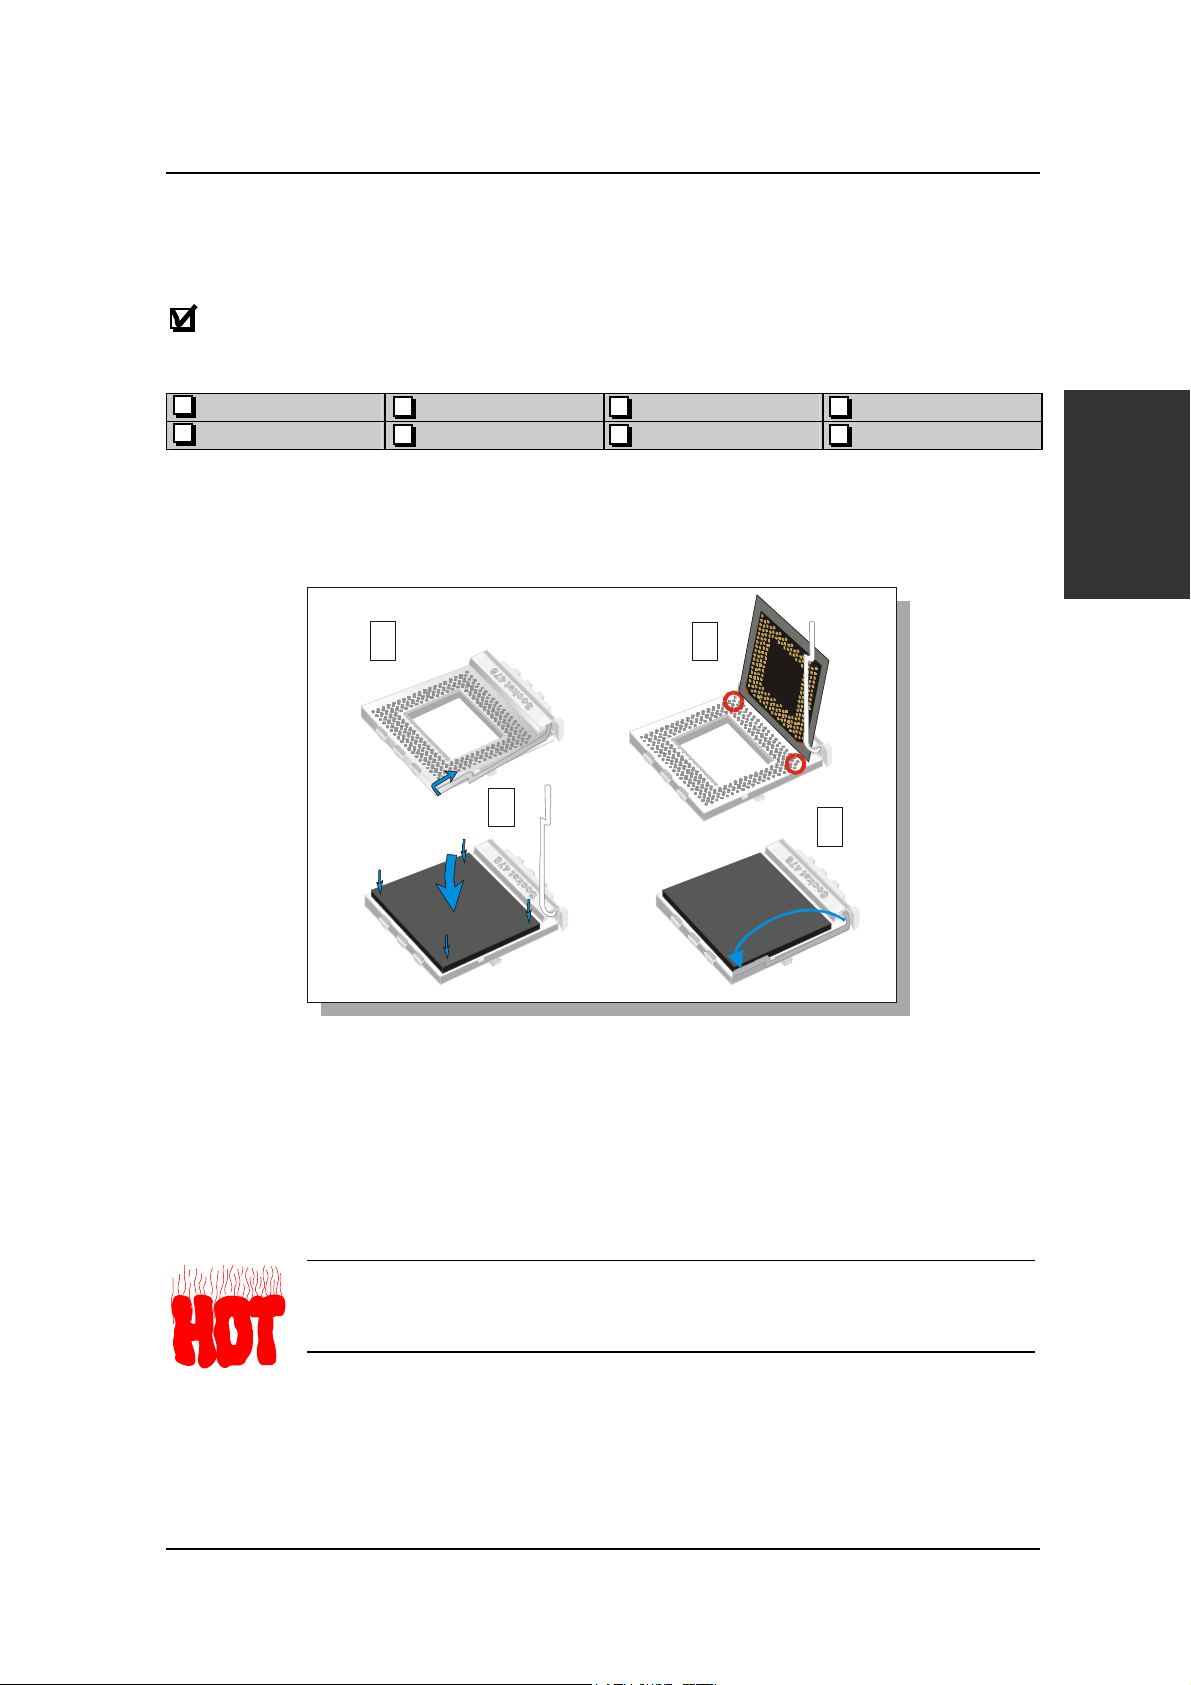
CPU Mount Procedure:
have purchased separately, follow these instructions.
1
1
To mount the Pentium® 4 Socket mPGA478 processor that you
3
Record the working frequency of your mPGA CPU that
2
4
Hardware
Installation
1. Lift the socket handle up to a vertical position.
2. Align the blunt edge of the CPU with the matching pinhole edge on the socket.
3. Seat the processor in the socket completely and without forcing.
4. Then close the socket handle to secure the CPU in place.
Remember to connect the CPU Cooling Fan to the appropriate power connector on
the Motherboard. The fan is a key component that stabilizes the system. It prevents the
equipment from overheating and prolongs the life of your CPU.
7
Page 8
SY-P4VDA Quick Start Guide
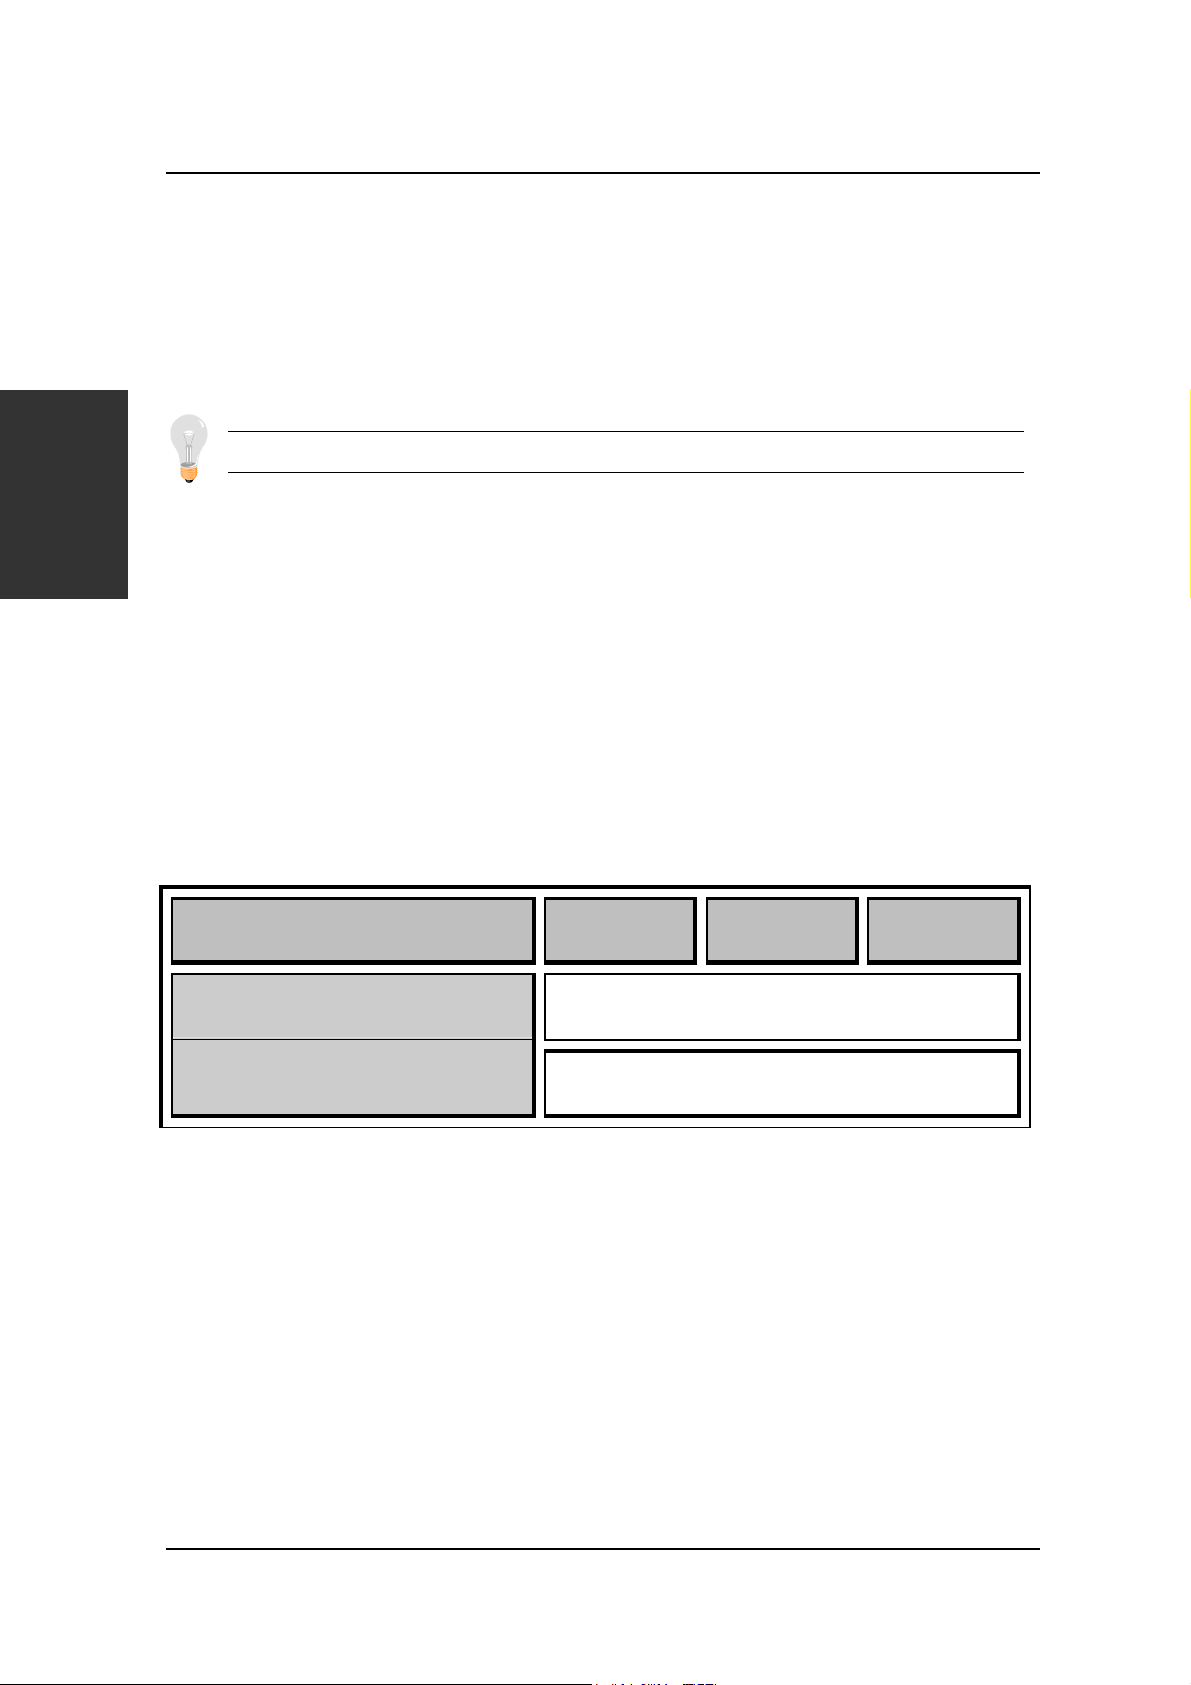
CPU Fan Installation
Your Socket 478 processor kit comes with a cooling fan. Mount the fan on the processor according to the
instructions provided by the manufacturer. The fan is a key component that will ensure system stability. The
fan prevents overheating, therefore prolonging the life of your CPU.
Note:
Remember to connect the fan to the appropriate power source.
Hardware
Installation
Step 2. Install Memory Module
Your board comes with three DIMM sockets, Directly supports one DDR SDRAM channel, 64b wide,
providing support max of 3 Double-Sided DIMMs with unbuffered (non-registered) and Non-ECC DDR
266.
The largest memory capacity possible is 3GB.
On this motherboard, DRAM speed can be set
independent from the CPU front side bus speed. Depending on the DRAM clock speed setting in the
BIOS setup.
Memory Configuration Table
Number of Memory Modules DIMM 1 DIMM 2 DIMM 3
RAM Type
Memory Module Size (MB) 64 /128 /256 /512 MB /1 GB
Step 3.
The motherboard has 1 AGP slot and 5 PCI slot.
Install Expansion Card
1. Read the related expansion card’s instruction document before inserting the expansion card into
the computer.
DDR SDRAM
2. Press the expansion card firmly into expansion slot in motherboard.
3. Be sure the metal contacts on the card are indeed seated in the slot.
4. Replace the screw to secure the slot bracket of the expansion card.
5. Install related driver from the operating system.
8
Page 9
SY-P4VDA
A
Quick Start Guide
Step 4. Connect cables, case wires, and power supply
This section tells how to connect internal peripherals and the power supply to the Motherboard.
The internal peripherals consist of IDE devices (HDD, CD-ROM), Floppy Disk Drive, Chassis Fan, Front
Panel Devices (Internal Speaker, Reset Button, and IDE LED Switch.), Wake-On-LAN card, VGA card,
Sound Card, and other devices.
For more details on connecting internal and external peripherals to your new SY-P4VDA Motherboard,
please refer to SY-P4VDA Motherboard User's Manual and Technical Reference online manual on the
CD-ROM.
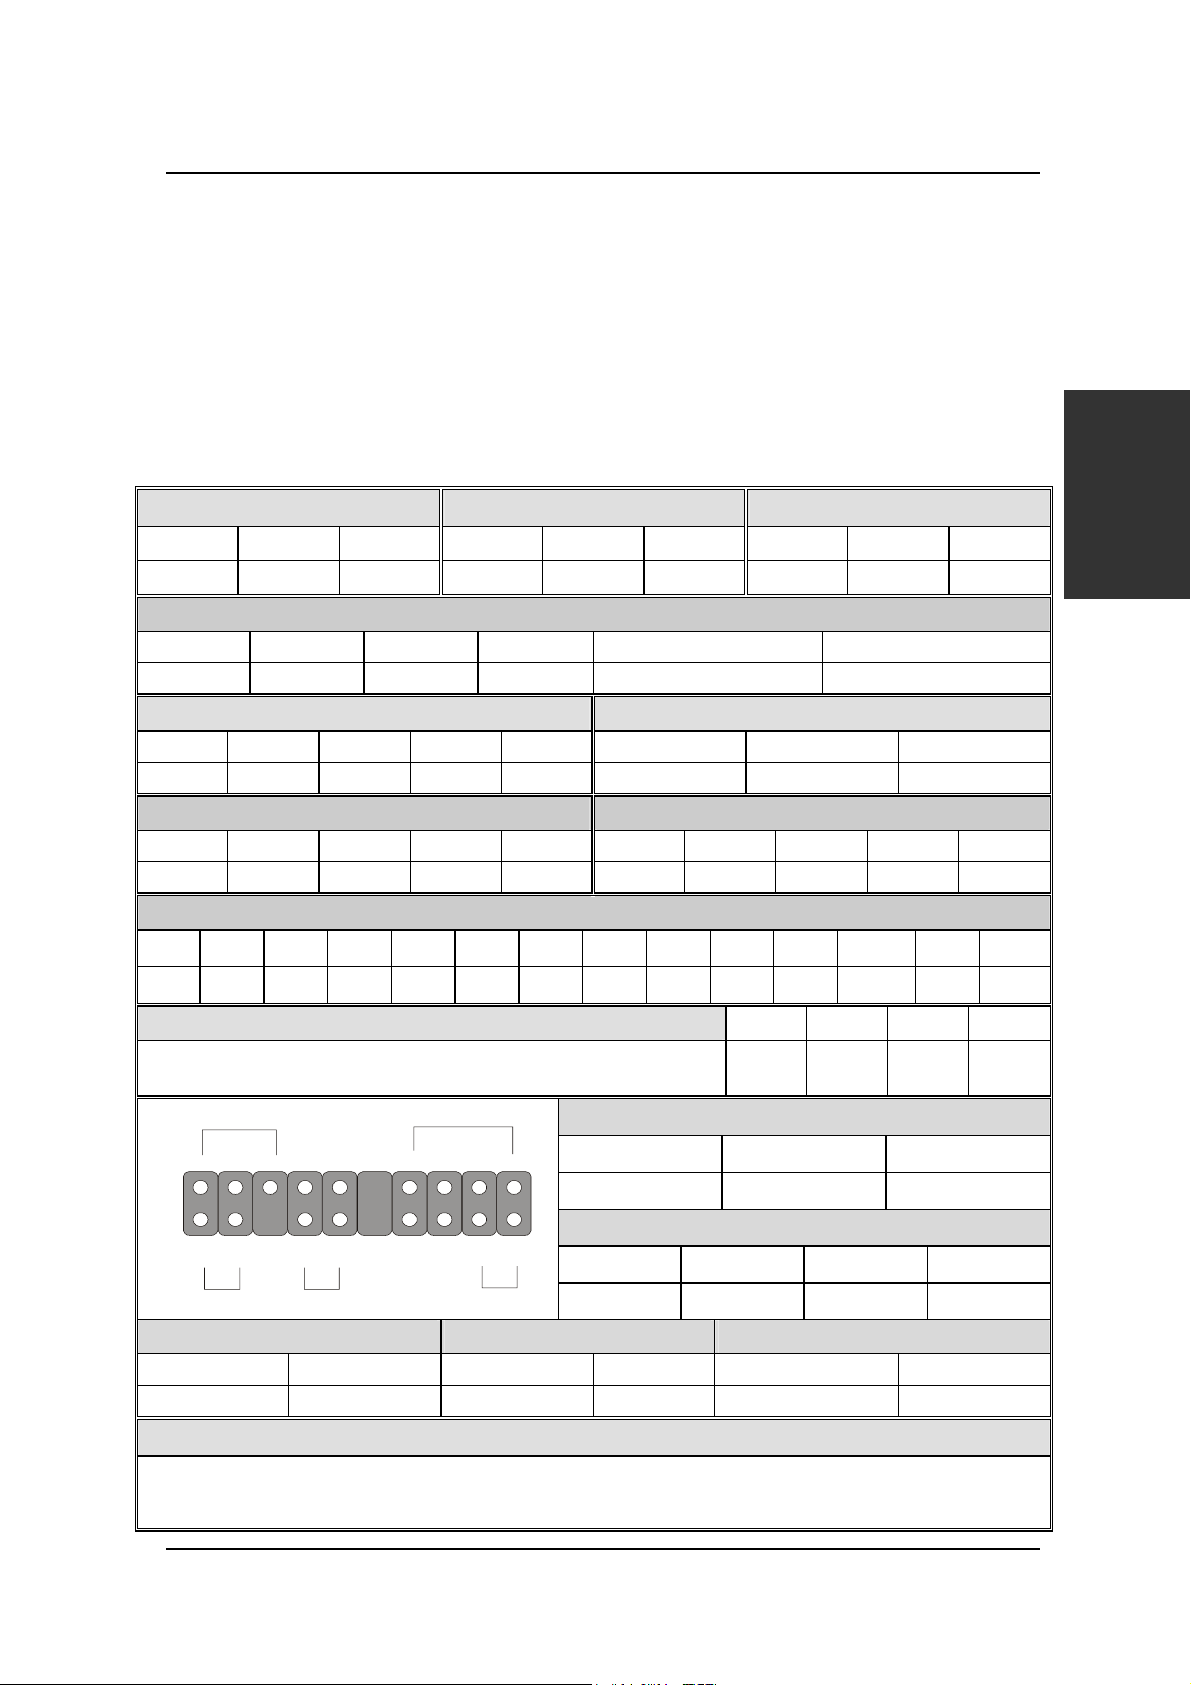
A. Connectors and Plug-ins
CPU Cooling Fan: CPUFAN Chassis Fan: CHAFAN1 Chassis Fan: CHAFAN2
Pin1 Pin2 Pin3 Pin1 Pin2 Pin3
GND 12V SENSOR GND 12V SENSOR GND 12V None
Pin1 Pin2 Pin3
MIC & LED Connector (J30)
Pin1 Pin2 Pin3 Pin4 Pin5 Pin6
AUDIO_L AUDIO_R MIC_OUT GND LAN_Active_LED_Cathode LAN_Active_LED_Anode
Standard IrDA (Infrared Device Header): SIRCON
Pin1 Pin2 Pin3 Pin4 Pin5 Pin1 Pin2 Pin3
VCC NC IRRX GND IRTX 5VSB GND MP-Wakeup
Wake-On-LAN Header: JP10
USB 3 USB 4
Pin1 Pin2 Pin3 Pin4 Pin5 Pin6 Pin7 Pin8 Pin9 Pin10
5VSB Data(-) Data(+) GND NC 5VSB Data(-) Data(+) GND GND
SMCARDCN
Pin1 Pin2 Pin3 Pin4 Pin5 Pin6 Pin7 Pin8 Pin9 Pin10 Pin11 Pin12 Pin13 Pin14
VCC NC NC NC Scrfet RST CLK NC NC Scrio GND Scrpres NC NC
_
_
_
+
HDD LED
Pin1 Pin2 Pin3 Pin4
L G G R
Power LED
Pin1 Pin2 Pin3
VCC NC GND
Speaker
Pin1 Pin2 Pin3 Pin4
VCC NC NC Speaker out
CD -IN: CDIN2
Connect the CD Line-in cord from the CR-ROM device to the
matching connector CDIN2.
Power LED
Key Lock
_
11
Reset PWRBT
HDD LED PWRBT RESET
Pin1 Pin2 Pin1 Pin2 Pin1 Pin2
LED Anode LED Cathode Power On/Off GND Power Good GND
Speaker
++
+
CPI LED
Hardware
Installation
Power On/Off: PWRBT
Connect your power switch to this header (momentary switch type).
To turn off the system, press this switch and hold down for longer than 4 seconds.
9
Page 10
SY-P4VDA Quick Start Guide
B. ATX Power Supply
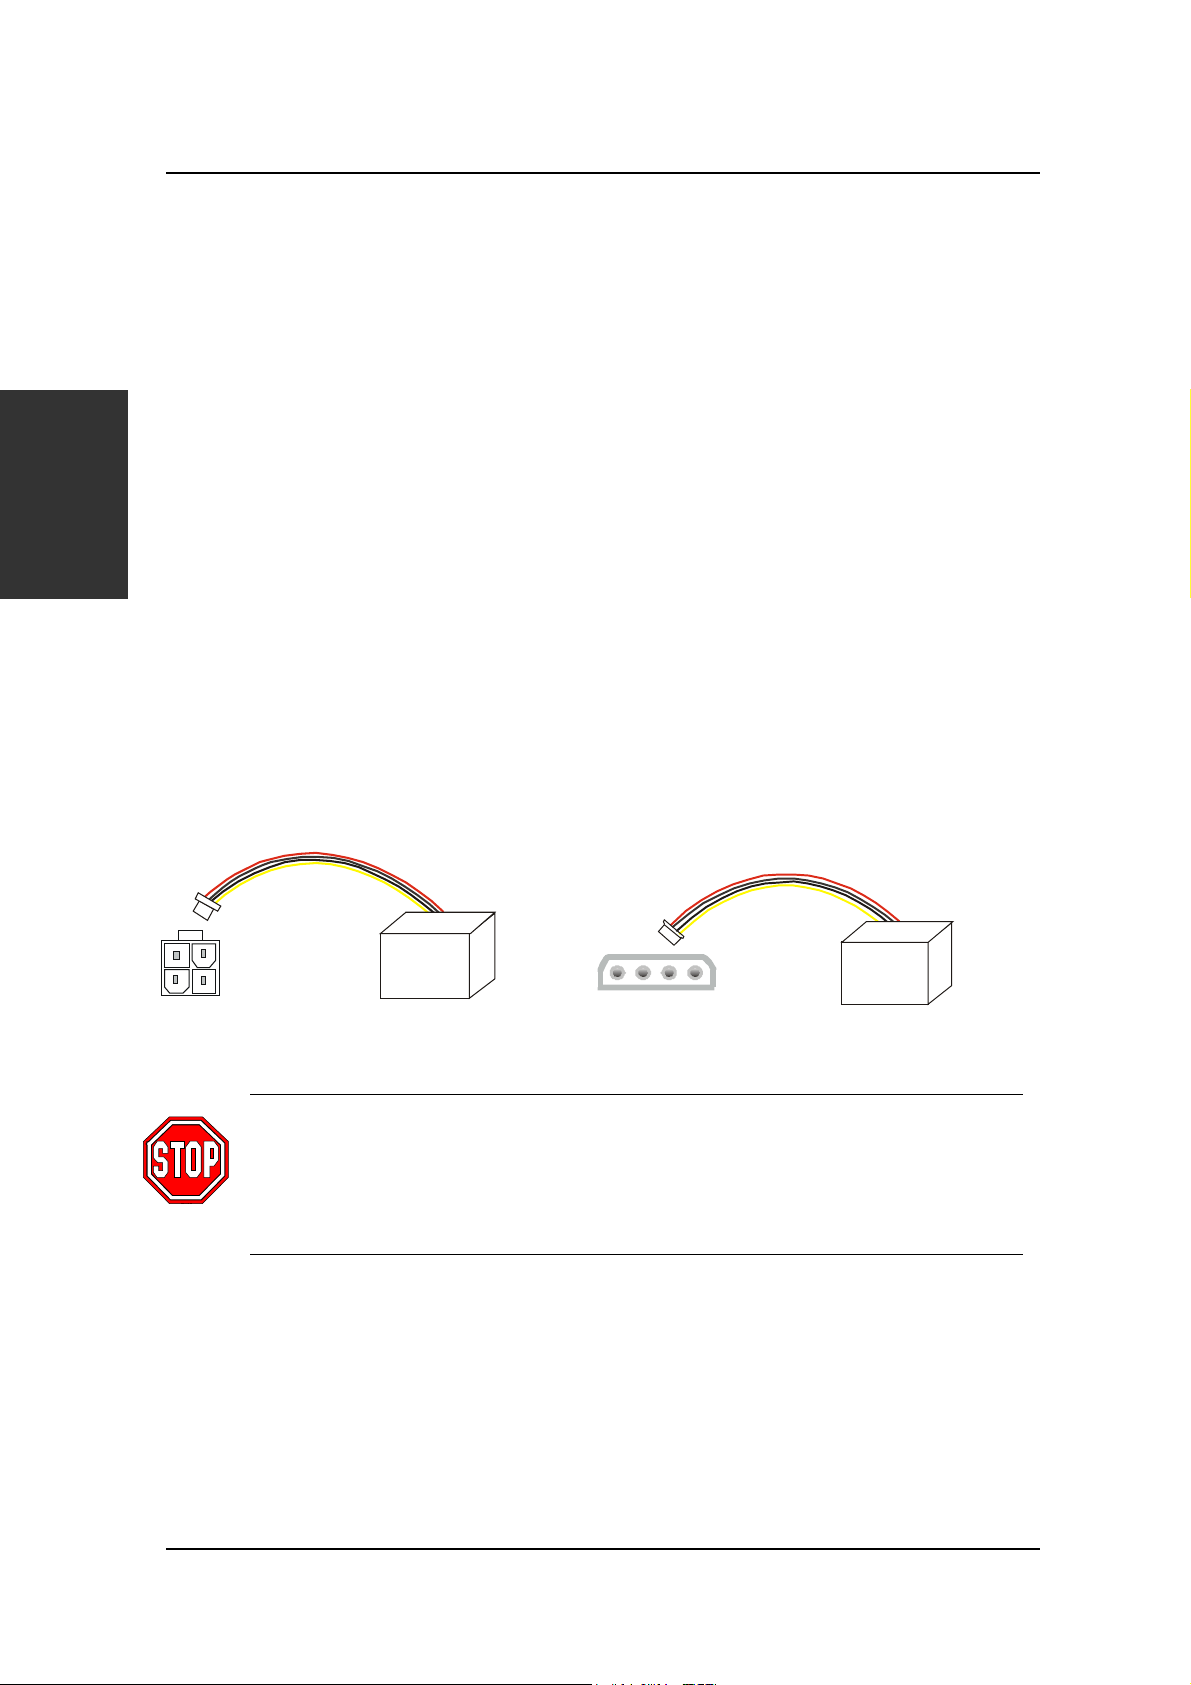
This M/B can support ATX Power supply version 2.03 (with 12V power connector) and older ATX power
supply.
The ATX12V power supply includes a 20-pin ATX connector that complies with the ATX specification,
Version 2.03 for M/B specification, a new 4-pin receptacle/header combination--the +12V power
connector--has been defined. The presence of the +12V power connector indicates that a power supply is
ATX12V; the absence of the +12V power connector indicates that a supply is ATX. To allow for greater than
+3.3V current, the Aux power connector is recommended for ATX and ATX12V power supplies with
Hardware
+3.3V current >18A.
Installation
If the user uses an old ATX power supply, please connect the main power connector and the peripherals
connector to the M/B.
If the user uses an ATX power supply version 2.03, please connect the main power connector and
12Vconnector to the M/B.
P1
ATX 12V Po wer Supply
Wa rn i n g : Follow these precautions to preserve your Motherboard from any remnant currents
P2
Standard
ATX Power Supply
when connecting to ATX power supply:
Turn off the power supply and unplug the power cord of the ATX power supply before
connecting to ATX PW connector.
The Motherboard requires a power supply with at least 250 Watts and a "power good" signal. Make sure the
ATX power supply can take at 1.5 A max current * load on the 5V Standby lead (5VSB) to meet the
standard ATX specification.
Note:
ATX 12V power supply is different from the normal ATX power supply.
If you use the Wake-On-LAN (WOL) function, make sure the ATX power supply can support at
least 720 mA on the 5V Standby lead (5VSB).
10
Page 11
SY-P4VDA
2
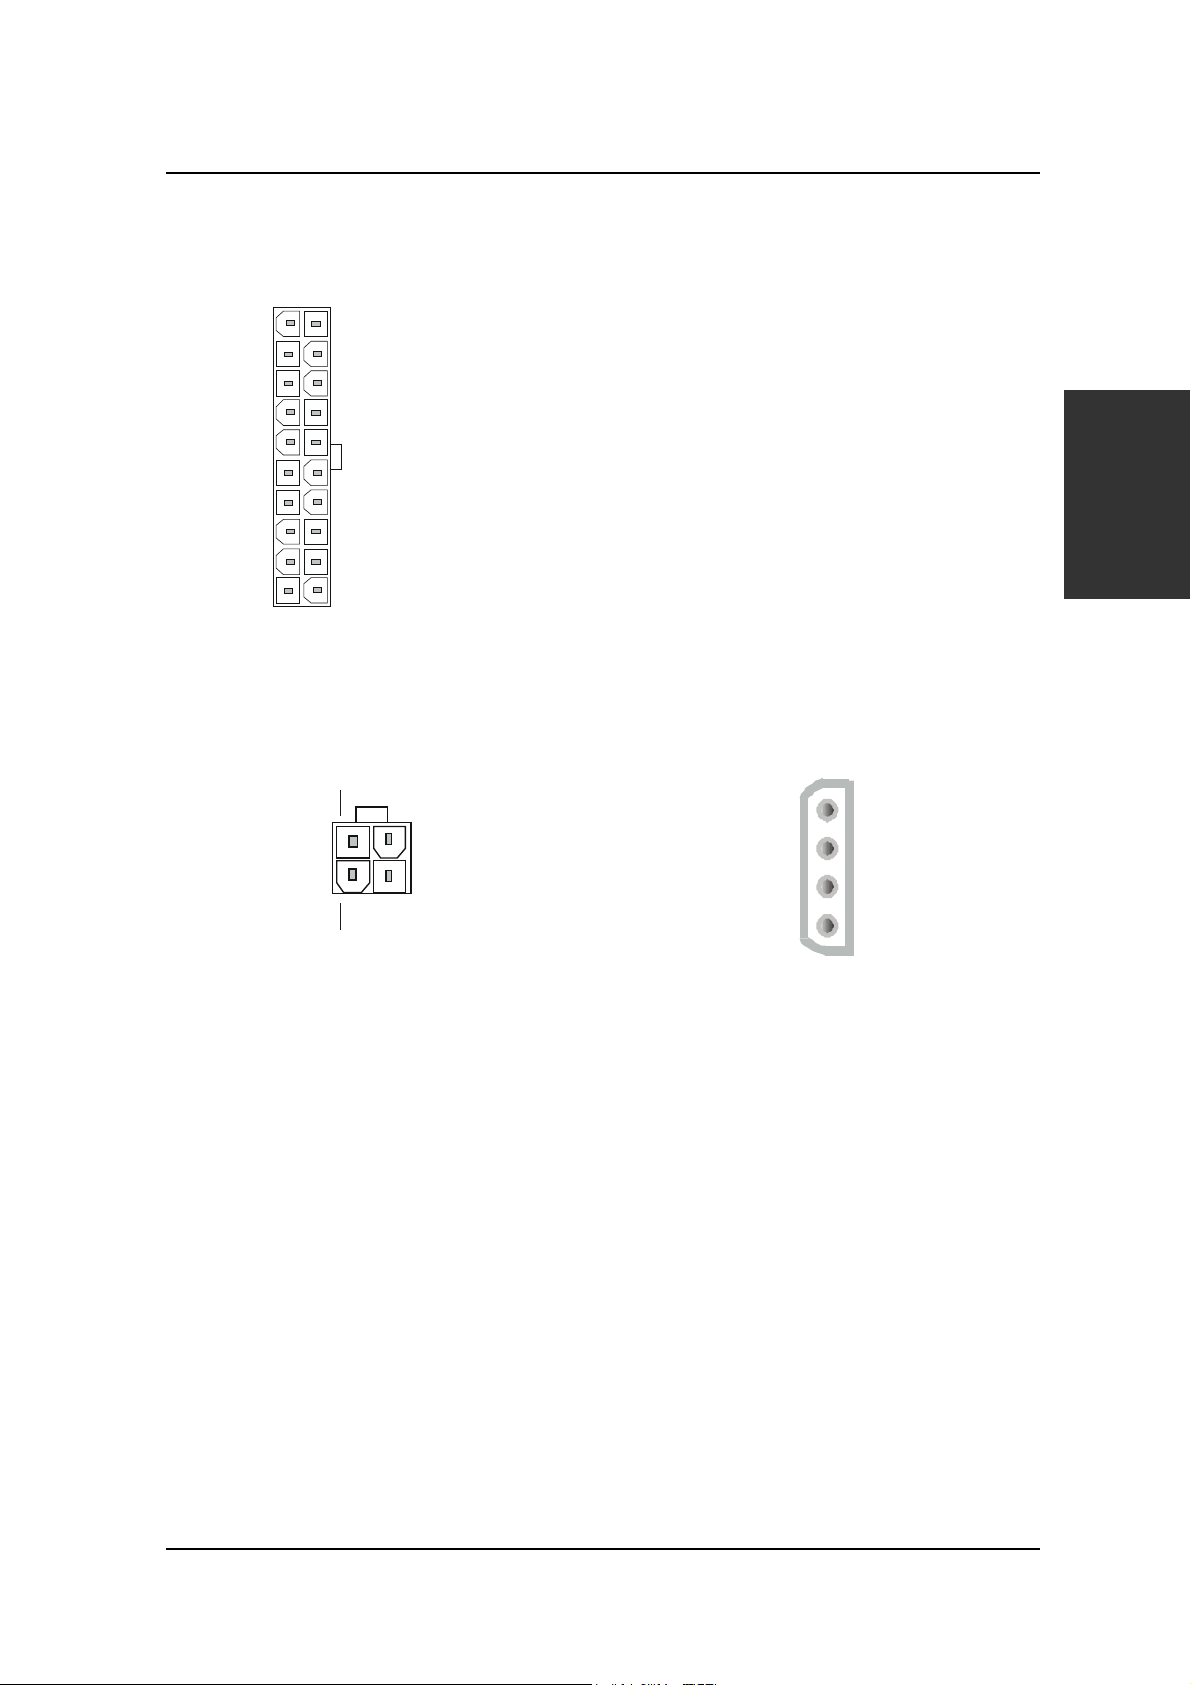
Please install the ATX power according to the following pin assignment:
ATX Power
Quick Start Guide
12V
5VSB
PW-OK
GND
5V
GND
5V
GND
3.3V
3.3V
5V
5V
-5V
GND
GND
GND
PS-ON
GND
-12V
3.3V
Pay special care to the directionality.
12V power connector Peripherals power connector
Pin3
+12V
+12VDC +12VDC
com com
GND
GND
Pin1
Hardware
Installation
Pin1
P1
NC
Pin4
P
11
Page 12
SY-P4VDA Quick Start Guide
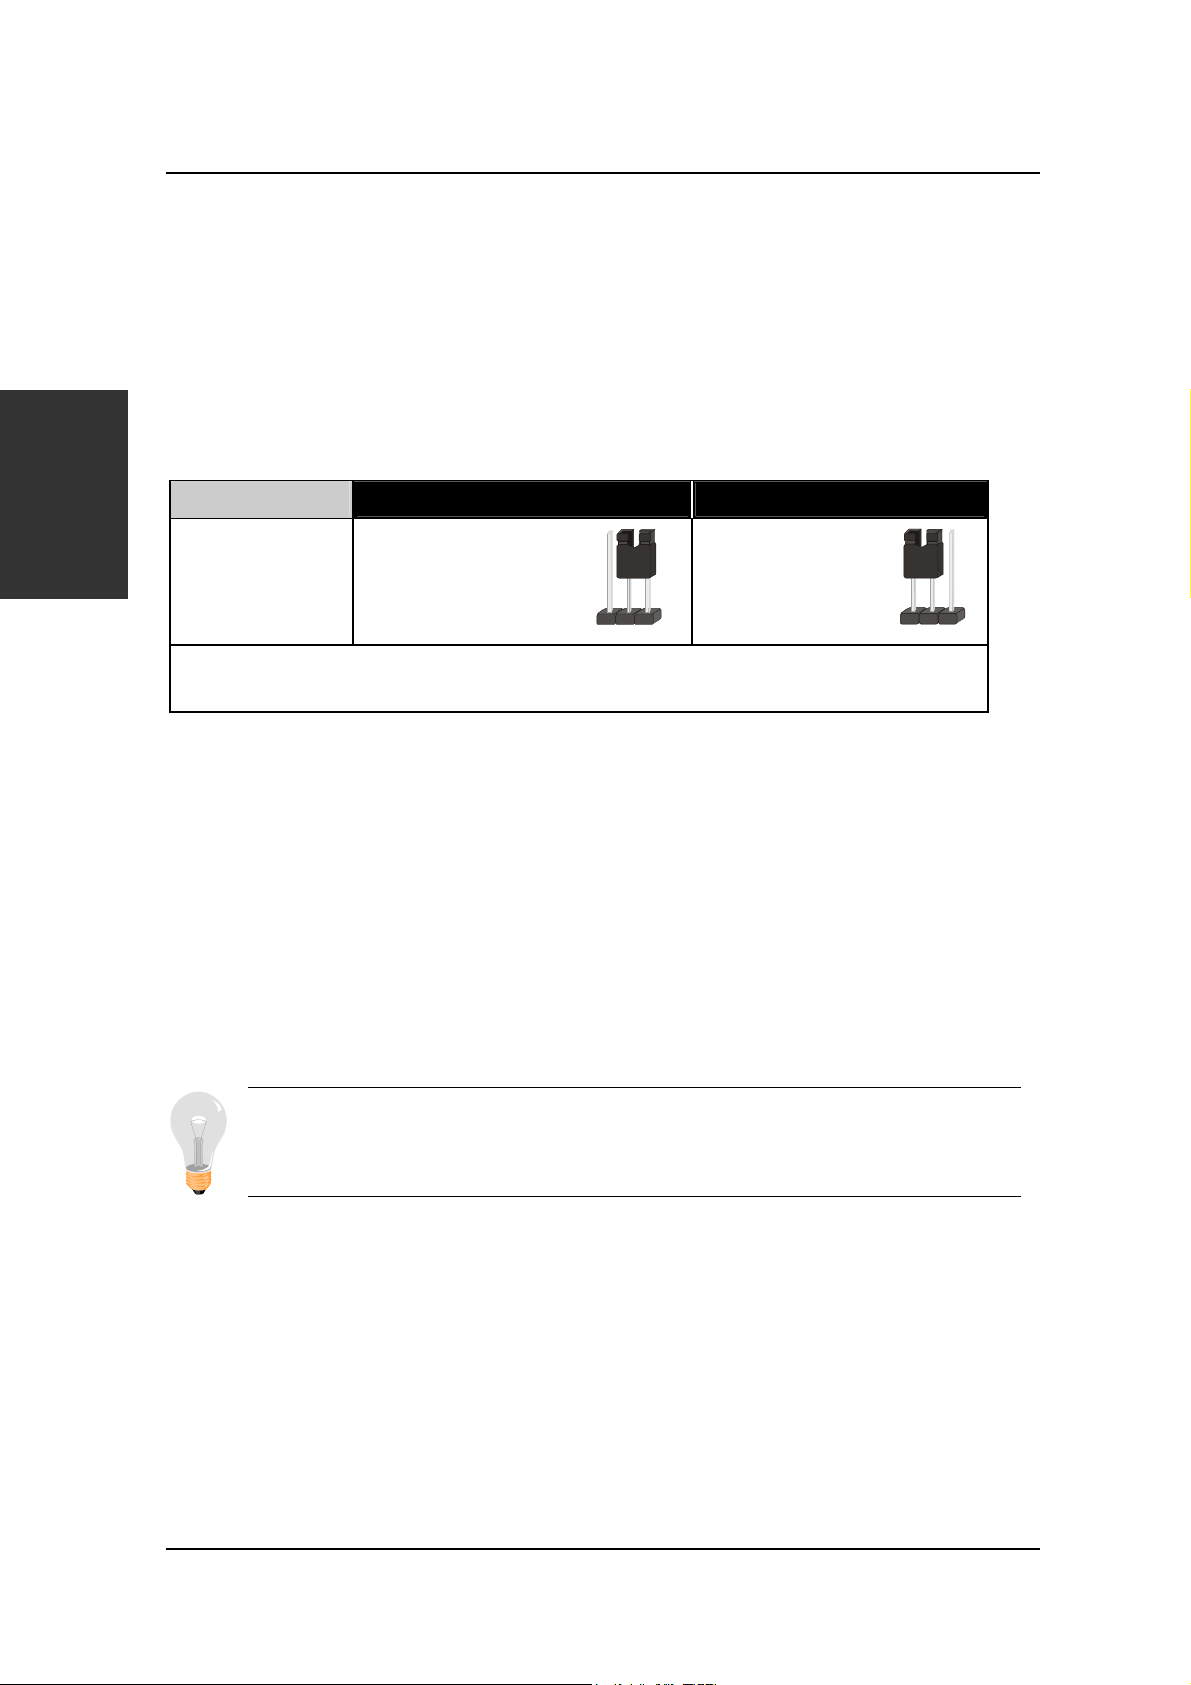
C. CMOS Clear (JP5)
In some cases the CMOS memory may contain wrong data, follow the steps below to clear the CMOS
memory.
1. Clear the CMOS memory by momentarily shorting pin 2-3 on jumper JP5. This jumper can be
easily identified by its white colored cap.
2. Then put the jumper back to 1-2 to allow writing of new data into the CMOS memory.
Hardware
Installation
CMOS Clearing
JP5 Setting
Note: You must unplug the ATX 12V power cable from the ATX 12V power connector when
performing the CMOS Clear operation.
at least 5 seconds to clear
Clear CMOS Data Retain CMOS Data
Short pin 2-3 for
the CMOS
Short pin 1-2 to retain
new settings
12 3
12 3
Step 5. Power On
You have now completed the hardware installation of your Motherboard successfully.
1. Turn the power on
2. To enter the BIOS Setup Utility, press the <DEL> key while the system is performing the diagnostic
checks.
Note: If you have failed to enter the BIOS, wait until the boot up sequence is completed. Then
push the RESET button and press <DEL> key again at the beginning of boot-up, during
diagnostic checks.
12
Page 13

SY-P4VDA
Quick Start Guide
3
3
This Motherboard does not use any hardware jumpers to set the CPU frequency. Instead, CPU settings
are software configurable with the BIOS
FEATURE] combines the main parameters that you need to configure, all in one menu, for a quick
setup in BIOS.
After the hardware installation is complete, turn the power switch on, then press the
system diagnostic checks to enter the Award BIOS Setup program. The CMOS SETUP UTILITY will be
shown on the screen. Then, follow these steps to configure the CPU settings.
Step 1.
Set [Date/Time] and [Floppy drive type], then set [Hard Disk Type] to “Auto”.
Step 2. Select [LOAD OPTIMIZED DEFAULTS]
Select the “LOAD OPTIMIZED DEFAULTS” menu and type “Y” at the prompt to load the BIOS optimal
setup.
Step 3.
Move the cursor to the
Quick BIOS Setup
[SOYO COMBO FEATURE].
Select [STANDARD CMOS FEATURE]
Select [SOYO COMBO FEATURE]
[CPU Frequency Select], [CPU Ratio]
field to set CPU Clock/Ratio.
The [SOYO COMBO
<DEL>
key during the
Setup
Quick BIOS
Note:
Set the
MHz stepping.
Step 4. Select [SAVE & EXIT SETUP]
Press
<Enter>
[CPU Frequency Select]
to save the new configuration to the CMOS memory, and continue the boot sequence.
field to “Manual”, to be able to change the CPU frequency 1
13
Page 14
SY-P4VDA Quick Start Guide
4
4
Your SY-P4VDA Motherboard comes with a CD-ROM labeled "SOYO CD." The SOYO CD
contains (1) the user's manual file for your new Motherboard, (2) the drivers software available for
installation, and (3) a database in HTML format with information on SOYO Motherboards and other
products.
Step 1.
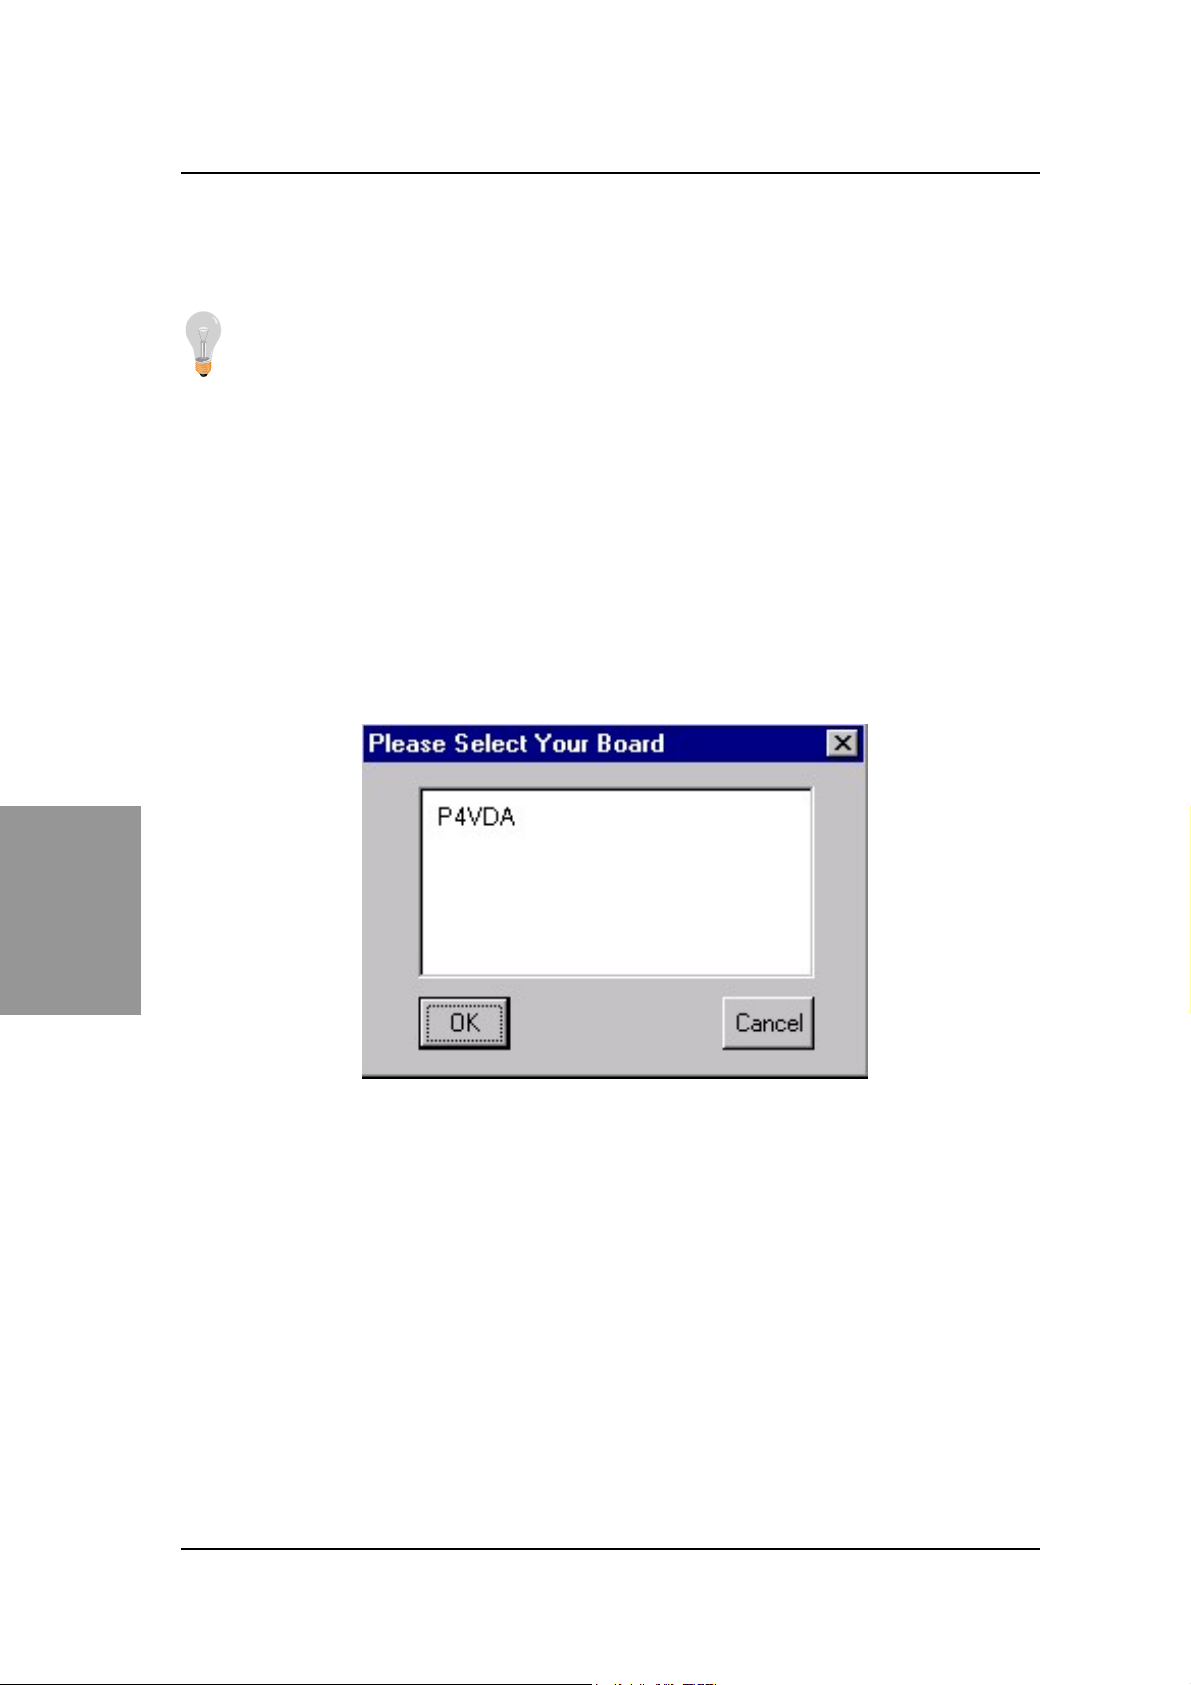
If you use Windows 2000, NT or XP, the SOYO-CD will not detect your motherboard type. In that case
the following dialog will pop up, please choose your motherboard and press OK. Now the SOYO-CD
Start Up Menu will be shown.
The SOYO CD
The SOYO-CD will NOT autorun if you use it on an Operating System other than
Windows 95/98/98SE/ME.
Insert the SOYO CD into the CD-ROM drive
The SOYO CD
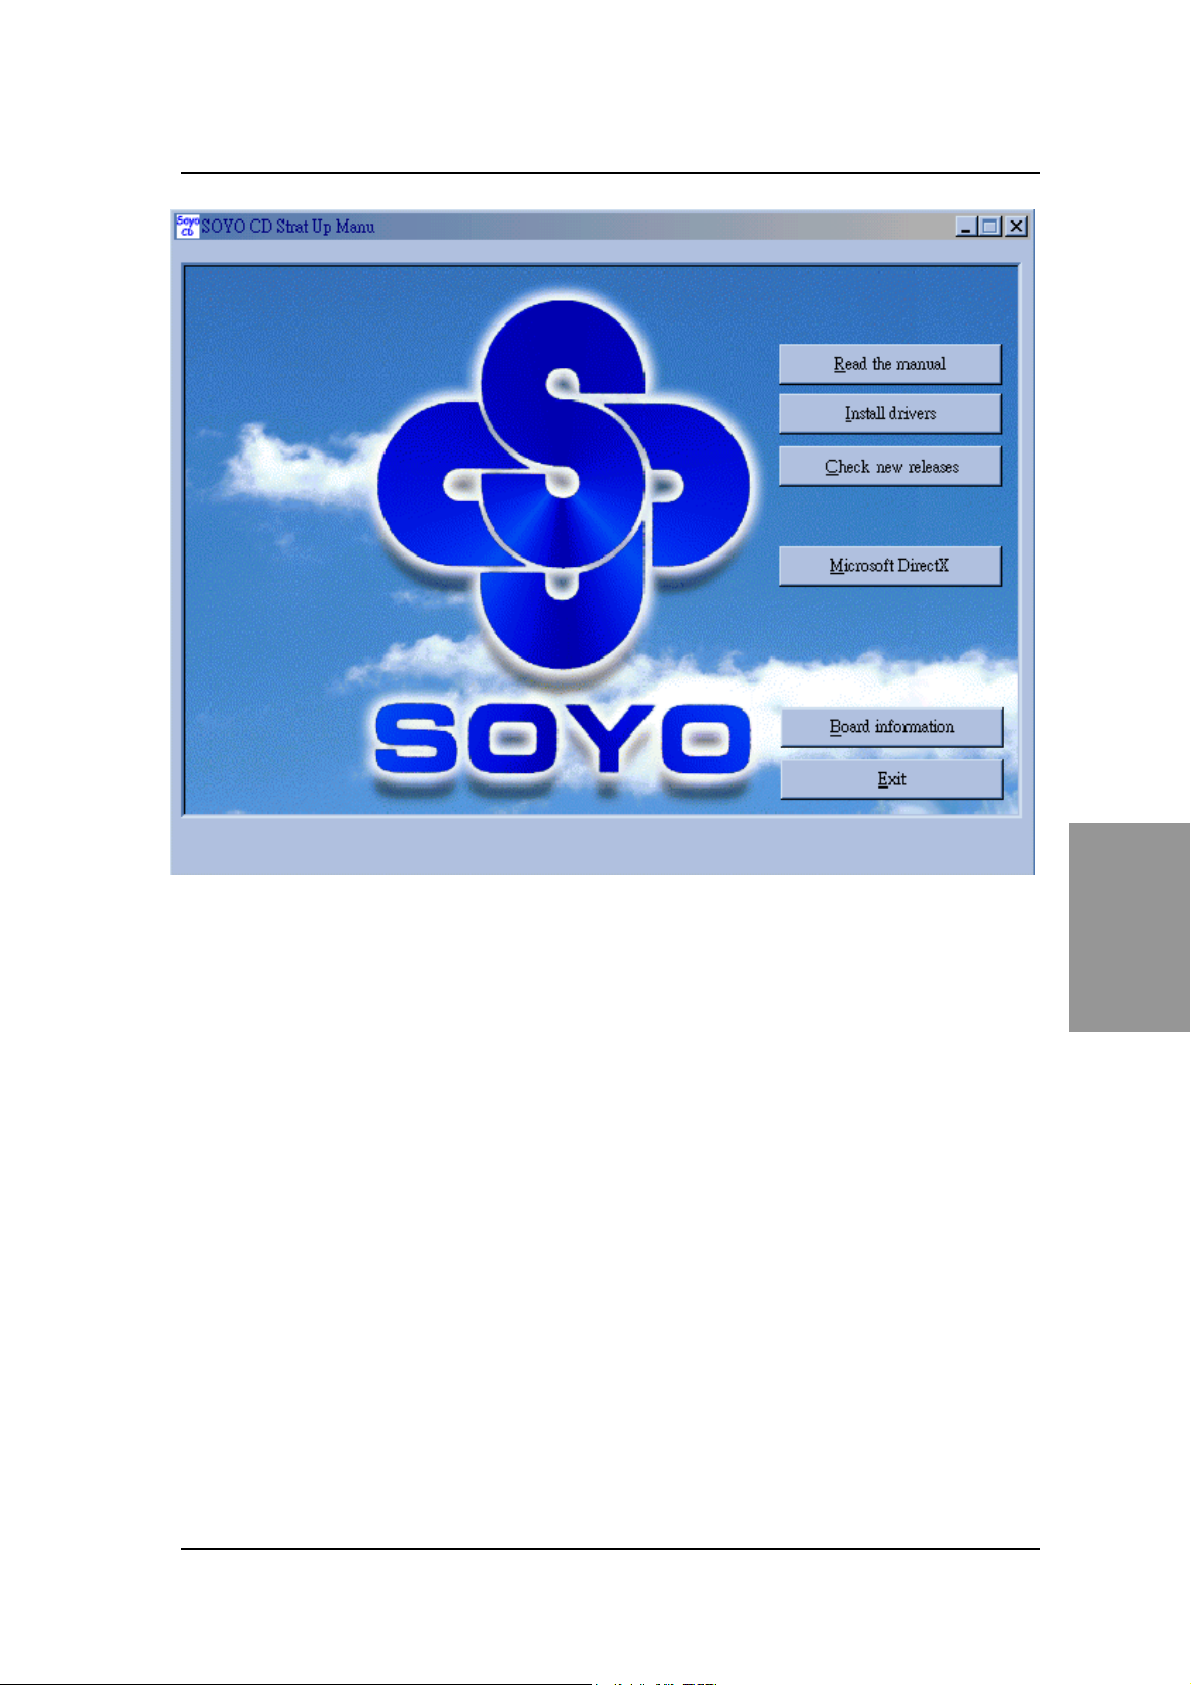
(SOYO CD Start Up Program Menu)
If you use Windows 95/98/98SE/ME, the SOYO CD Start Up Program automatically detects which
SOYO Motherboard you own and displays the corresponding model name.
14
Page 15
SY-P4VDA
Quick Start Guide
The user's manual files included on the SOYO CD are in PDF (Postscript Document) format. In order
to read a PDF file, the appropriate Acrobat Reader software must be installed in your system.
Note:
The Start Up program automatically detects if the Acrobat Reader utility is already present in
your system, and otherwise prompts you on whether or not you want to install it. You must install the
Acrobat Reader utility to b e able to read the user's manual file. Follow the instructions on your screen
during installation, then once the installation is completed, restart your system and re-run the SOYO
CD.
Step 2.
Drivers that are needed to install for the system to operate properly
The rest of the driver is optional
Click the
Motherboard. The Start Up program displays the drivers available for the particular model of
Motherboard you own. We recommend that you only install those drivers.
Install Drivers and Utilities
1. VIA 4 in 1 Driver Package for Win 9x/ME/NT/2k/XP
2. Realtek LAN driver , see chapter 5 for installation procedure.
3. Avance Onboard Audio Driver and Applications for Win 9x/ME/2000/NT
Install Drivers
button to display the list of drivers software that can be installed with your
The SOYO CD
15
Page 16
SY-P4VDA Quick Start Guide
pp
driver
driver
VIA 4 in 1 Driver Package for Win 9x/ME/NT/2k
VIA 4 in 1 Driver Package for Win 9x/ME/NT/2k/XP
Avance Onboard Audio Driver and A
VIA hardware monitor for Win 9x/ME
P4VDA ITE hardware doctor for Win 9x/ME/2000/NT/XP
P4VDA ITE SIM card reader driver for Win 9x/ME/2000/NT/XP(english)
P4VDA ITE SIM card reader driver for Win 9x/ME/2000/NT/XP(chinese)
Realtek 8100b Lan Driver (click here for installation procedure)
Cancel
Cancel
OK
OK
lications for Win 9x/ME/2000/NT/XP
revision:
revision:
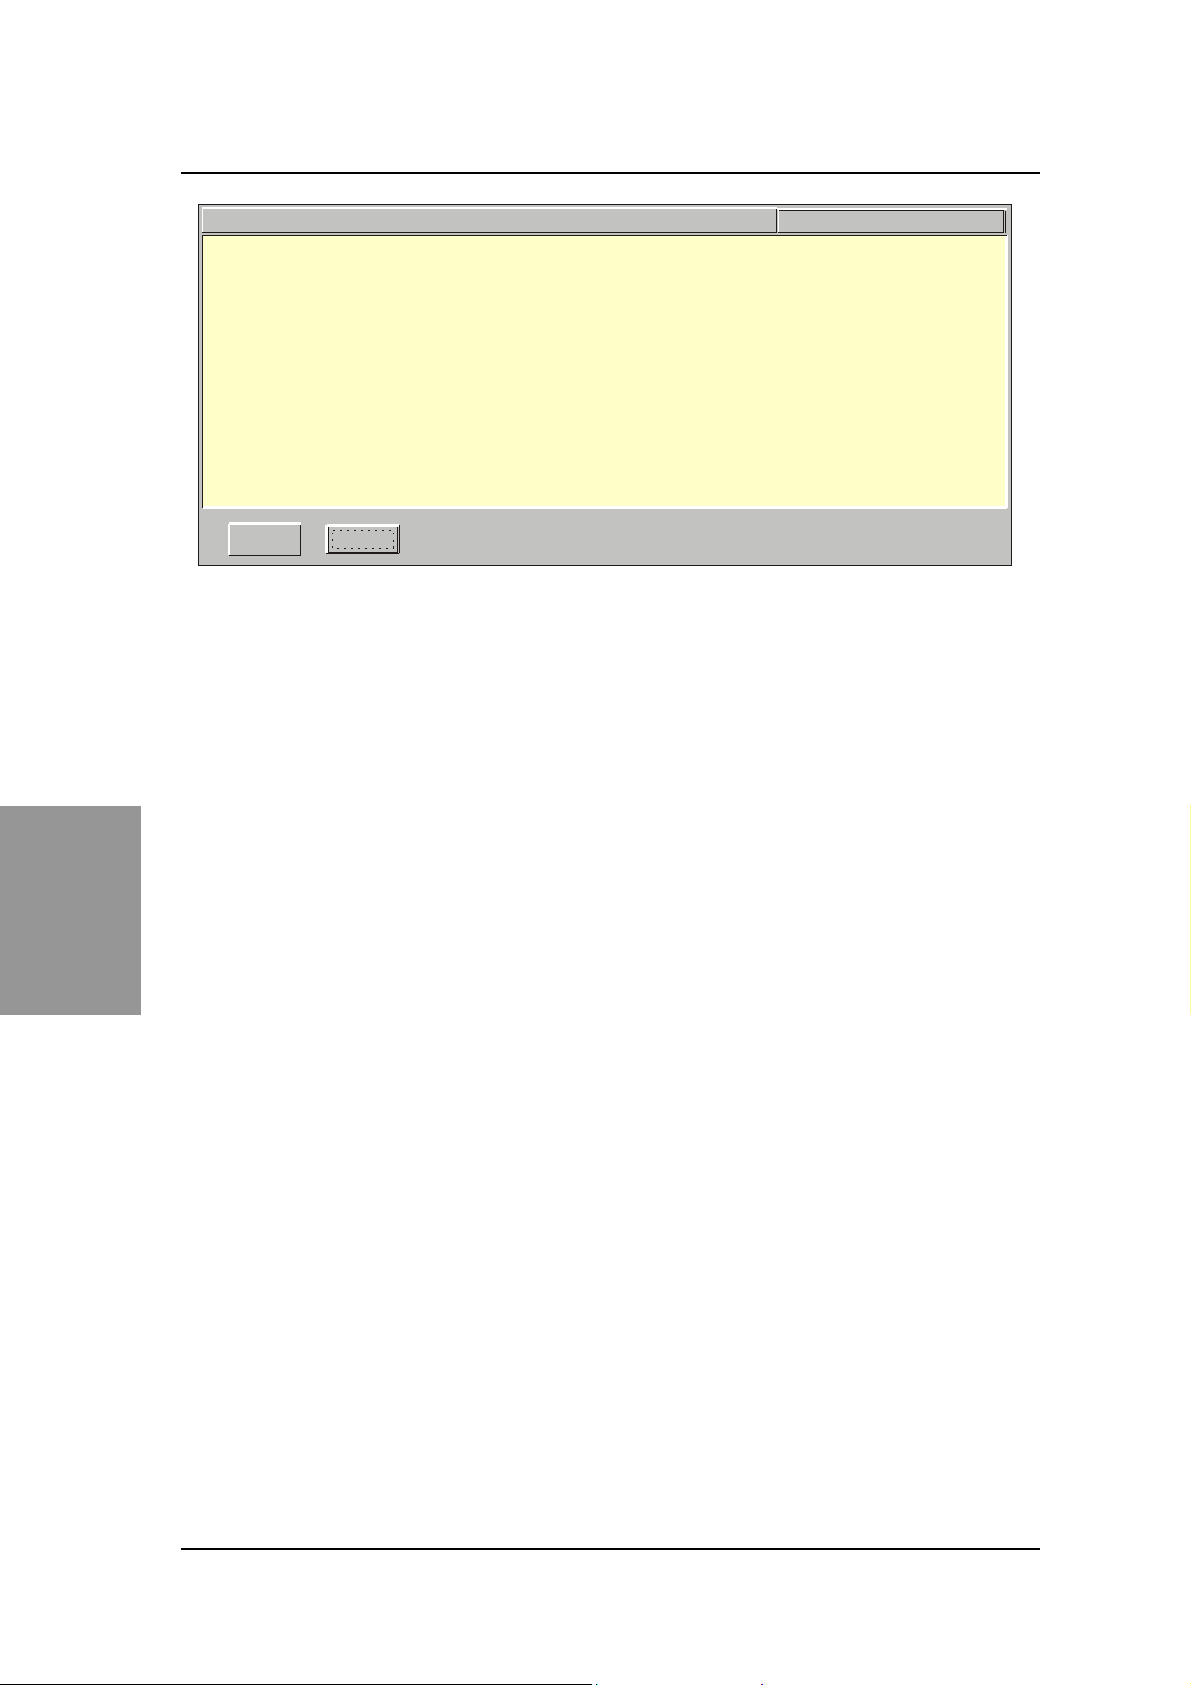
(Driver Installation Menu)
A short description of all available drivers follows:
VIA 4 in 1 Driver Package for Win 9x/ME/NT/2k/XP
VIA 4 In 1 driver includes four system drivers to improve the performance and maintain the stability of
systems using VIA chipsets. These four drivers are:
VIA Registry (INF) Driver, VIA AGP VxD driver, VIA ATAPI Vendor Support Driver and VIA PCI IRQ
The SOYO CD
Miniport Driver. For Windows NT users, the VIA IDE Bus Mastering driver is the only driver to be
installed in your system.
A description of 4 drivers followa:
Bus Master PCI IDE Driver
The ATAPI IDE driver enables the performance enhancing bus mastering functions on
ATA-capable Hard Disk Drives and ensures IDE device compatibility.
AGP VxD Driver
VIA AGP VxD Driver is to be installed if you are using an AGP VGA device. VIAGART.VXD
will provide service routines to your VGA driver and interface directly to hardware, providing
fast graphical access.
VIA Chipset Functions Registry
VIA Registry (INF) Driver is to be installed under Windows. The driver will enable the VIA
Power Management function.
IRQ remapping utility (This driver is installed automatically)
VIA PCI IRQ Miniport Driver is to be installed under Windows 98 only, it sets the system's PCI
IRQ routing sequence.
Avance Onboard Audio Driver and Applications for Win 9x/ME/2000/ NT/XP
This sound driver with applications is for windows 98, 98SE, ME, NT4.0, 2000 and XP. The
application support file formats including .MP3, .CDA, .MIDI, .WAV & .WMA.
16
Page 17

SY-P4VDA
P4VDA ITE hardware doctor for Win 9x/ME/2000/NT/XP
Your motherboard comes with a hardware monitoring IC. By installing this utility Temperature, Fan
speed and Voltages can be monitored. It is also possible to set alarms when current system values
exceed or fall below pre-set values.
P4VDA ITE SIM card reader driver for Win 9x/ME/2000/NT/XP
If you have reader card, it must be installed.
OK,
Select which driver you want to install and click
return to the main menu.
Note:
Once you have selected a driver, the system will automatically exit the SOYO CD to begin the
driver installation program. When the installation is complete, most drivers require to restart your
system before they can become active.
or click
Cancel
Quick Start Guide
to abort the driver installation and
Step 3.
Click the 'Check the latest Releases' button to go the SOYO Website to automatically find the latest
BIOS, manual and driver releases for your motherboard. This button will only work if your computer is
connected to the internet through a network or modem connection. Make sure to get your modem
connection up before clicking this button.
Check the Latest Releases
The SOYO CD
17
Page 18

SY-P4VDA Quick Start Guide
5
5
Realtek LAN Driver Installation
Install the Realtek LAN Drivers under windows 98
1. Move the mouse cursor to my computer icon, then press mouse right button press properties.
2. Open Device Manager.
3. Under Network Adapters there will be a yellow marker the first time the operating system is installed.
4. Select the “Driver” tab.
5. Click on update Driver.
6. The LAN Driver path is in SOYO CD “d:\driv-all\Realtek8100b\Win98”. (where D :is your CDROM drive)
7. You will need windows 98 to complete the installation.
8. After informing windows of the directory the driver will be installed. Restart your system after installation.
Install the Realtek LAN Drivers under windows NT4.0
1. Double click the Network icon in the control panel. The Network properties windows will appear. Click on the
Devices tab and press the Add button.
2. Select “Unlisted or Updated Drivers” from the list of drivers in the Add window by placing the mouse pointer over it
and clicking the left mouse button. Press the OK button.
3. The Install Driver dialog box will appear and request the path of the location of the drivers to be installed. Enter
“D:\driv-all\Realtek8100b\WinNT4”. (where D :is your CDROM drive)
4. After installation, Windows NT will display a dialog box asking you to restart your system.
Install the Realtek LAN Drivers under windows ME
(Because windows ME can detect LAN driver automatic, so this installation is for update
driver)
Driver
Realtek LAN
1. Move the mouse cursor to my computer icon, then press mouse right button press properties.
2. Open Device Manager.
Installation
3. Under Network Adapters there will be a LAN driver which Me detect is installed.
4. Select the “Driver” tab.
5. Click on update Driver.
6. The LAN driver path is in SOYO CD “d:\driv-all\Realtek8100b\WinME”. (where D :is your CDROM drive)
Install the Realtek LAN Drivers under windows XP
(Because windows XP can detect LAN driver automatic, so this installation is for update
driver)
18
Page 19

SY-P4VDA
1. Move the mouse cursor to my computer icon, then press mouse right button press properties.
2. Click hardware, then click Device manager.
3. Under Network Adapters there will be a LAN driver which XP detect is installed, click it.
4. Select Driver, then click update driver.
5. Select install from a list or specific location, then click next.
6. The LAN driver path is in SOYO CD ”d:\driv-all\Realtek8100b\WinXP”. (where D :is your CDROM drive)
7. After installation. Restart your system.
Quick Start Guide
Install the Realtek LAN Drivers under windows 2000
(Because windows 2000 can detect LAN driver automatic, so this installation is for update
Driver)
1. Press mouse right button then press properties.
2. Select hardware, then click Device manager.
3. Under Network Adapters there will be a LAN driver which 2000 detect is installed, Double click it.
4. Select driver then click update driver.
5. Click next then select search for a suitable driver for my device.
6. Click next.
7. The LAN driver path is in SOYO CD “d:\driv-all\Realtek8100b\Win2000”. (where D :is your CDROM drive)
8. Restart.
Driver
Realtek LAN
Installation
19
Page 20

SY-P4VDA Quick Start Guide
Quick Trouble shoot tips
Boot-up Issues
The system do not power-up, no beeping sound heard and the CPU fan does not turn
on.
1. Check if the power cord is plug to the power source.
2. Check if the power is connected to the M/B.
3. Check if the cable of the case power button is connected to the M/B power button
connector (see connectors and plug-ins in the manual for more info).
4. Make sure the power supply is not defective. Change the power supply. The minimum
should be 250 watts.
5. Remove the M/B from the case and test the system. The M/B might be shorted to the
case.
The system power-up, no video, no beeping sound heard, but the CPU fan is turning.
1. Clear CMOS battery. (JP5 connector, see Quick start guide for more info on how to
clear the CMOS).
2. Check all the jumper settings on the M/B. (if the M/B have any).
3. Check if the CPU is ok by using another CPU (check the Quick start guide for CPU
supported on this M/B).
4. Check if the power supply is ok. The minimum should be 250 watts.
5. Make sure the CPU fan is connected to CPUFAN1 connector.
6. Remove the M/B from the case and test the system. The M/B might be shorted to the
case.
The system power-up, no video, beeping heard.
1. Clear CMOS battery. (JP5 connector, see Quick start guide for more info on how to
clear the CMOS).
2. Check all the jumper settings on the M/B. (if the M/B have any).
3. Check the memory module and the VGA card if inserted properly on the M/B.
4. If yes, change the memory module, it might be defective. Make sure the memory
specification is supported by the M/B. (for more info on this, check our FAQ website).
20
Page 21

SY-P4VDA
5. Change the VGA card.
The system turns on for some seconds then shutdown by itself.
1. Check if the CPU fan is connected to the CPUFAN1 connector.
2. The CPU might be overheating. Check the CPU FAN if it is defective or see if the CPU
fan is in contact with the CPU.
3. Clear CMOS battery. (JP5 connector, see Quick start guide for more info on how to
clear the CMOS).
4. Make sure the power supply you have on your system support the M/B specification.
Example. If you have a P4 M/B, you need to use a P4 power supply.
5. If you already checked the power supply specification, change the power supply it
might be defective. The minimum is 250 watts.
6. Remove the M/B from the case and test the system. The M/B might be shorted to the
case.
Quick Start Guide
When I boot up my system, everything works fine, it sees my CPU and memory,
detects my hard drive, floppy drive and CD-ROM but locks up at "Verify DMI pool
data... ". Don't go any further. What should I do?
1. Clear CMOS battery. (JP5 connector, see Quick start guide for more info on how to
clear the CMOS).
2. If still has the problem, remove all other add-on cards except video card and floppy drive
see if it can boot from floppy. Then put peripherals in one by one to identify which one
cause the lockup.
3. Change the CPU.
During Boot-up, my computer says CMOS memory Checksum error. What is the
problem?
1. Clear CMOS memory.
2. Re-flash BIOS. Check on how to flash BIOS on the later part of this book.
3. Change the CMOS battery, the battery might be drained.
4. The BIOS chip might be failing.
5. This message will come up if the CMOS has been reset, try go to BIOS setup and load
setup defaults, save and exit.
21
Page 22

SY-P4VDA Quick Start Guide
Stability Issue
My system intermittently locks up, very unstable.
1. Check the CPU Temp, it might be overheating. Change the CPU FAN.
2. Do not over clock your CPU.
3. Check the specification of the memory module, maybe the M/B do not support it.
4. Go to BIOS setup and load fail safe settings. Please check if the system performance in
the BIOS setup is set to Turbo/Maximum.
5. Check website for latest BIOS update.
6. Check website for FAQ’s regarding instability issue.
7. Change the memory module or CPU.
8. The power supply might not have enough wattage to support all the peripherals. If your
system has other peripherals connected, like CD-RW, extra HDD, etc. disconnect them.
9. Install SiS AGP driver.
My system intermittently locks up, during Windows installation
1. Go to BIOS and load “load optimized default”.
2. Check website for any BIOS update.
3. If still has the problem, remove all other add-on cards except CPU/Memory/Video
card/Hard disk. See if you can finish Windows installation. Then put peripherals in one
by one to identify which one cause the lockup.
BIOS Issue
Where can I find the BIOS revision of my mainboard?
It will be displayed on the up-left corner on the screen during boot-up. It will show as your
board type followed by the revision number, such as kvxa_2BA1 (meaning BIOS revision
2BA1 for the SY-K7V Dragon plus board) or 6BA+ IV_2AA2 which means SY-6BA+ IV
motherboard with 2AA2 BIOS.
Where can I find the latest BIOS of my motherboard?
Please go to the technical support page of one of the SOYO websites (Taiwan:
www.soyo.com.tw
), and look up your motherboard to find the latest BIOS revision.
How can I flash the BIOS?
22
Page 23

SY-P4VDA
1. Download the BIOS on our support website.
2. Make a bootable floppy disk with out any memory manager loaded. (i.e. himem,
emm386, etc..).
3. Copy the BIOS file and awdflash utility to the diskette.
4. Type "awdflash biosname.bin /sn /py".
5. Then reboot.
After flashing the BIOS, my system will not boot-up.
1. Try clearing the CMOS.
2. The BIOS chip is defected due to unsuccessful flash, contact your nearest SOYO
branch for re-flashing.
Is there a way to reprogram my BIOS after an unsuccessful flash?
No other way, you need to send back the BIOS ROM to your nearest SOYO branch for
Quick Start Guide
re-flashing.
VGA Issue
I cannot set my VGA to go higher than 16 color (640x 480).
1. Make sure that you have installed the VIA 4 in 1 driver.
2. Install/ re-install the VGA driver.
After wake-up from Suspend to RAM or Standby mode, the screen has no display but
I can hear the hard disk operating.
1. Install VIA 4 in 1 driver.
2. Check the VGA card manufacturer for driver update. Or make sure the VGA card
support Suspend to Ram function.
When using Geforce 3 Ti500, my system will hang up while running 3D Mark2001.
Please update the nVIDIA driver to version 2311 or newer, to solve the problem.
Audio Issue
How can I disable the on-board Audio?
Go to the SOYO COMBO Feature in the BIOS setup, then set the “onboard audio” to
disable. Please also make sure ‘Legacy Audio’ in the BIOS setup is disable if there is one.
23
Page 24

SY-P4VDA Quick Start Guide
I cannot get the sound working on my system.
1. Check if the speaker wire is connected to the line out connector in the M/B.
2. Check if the speaker power is powered on.
3. Install the audio driver supplied on our driver disc.
4. Check BIOS setup if “onboard audio” is enabled.
5. If sound already installed, check our website for audio driver update.
The sound is working in my system, but when I play CD music from the CD-ROM, I
do not get any sound. What is wrong?
This is because the 3-wire audio cable from the CD-ROM to the on-board CDIN connector
in the M/B is not connected. See manual for location of CDIN.
The sound from my sound card is distorted when Windows start. What is wrong?
If you are using an ISA sound card, please make sure the IRQ needed for the sound card is
set to 'Legacy ISA' in the BIOS. In other word, if your ISA sound card takes IRQ5, then set
IRQ5 to 'Legacy ISA'.
The sound and everything else works fine except that the recorder and microphone do
not work. What is wrong?
1. Please go to sound properties and check if the recorder and microphone in the are
enabled.
2. Check if Microphone is ok.
Hard disk/FDD/ CD-ROM issue
My Western digital HDD is not detected during boot-up or No fix disk present.
Change the jumper settings to cable select or single or remove the jumpers.
Sometimes the system finds my CD-ROM, sometimes not.
1. Check CD-ROM if it is working properly.
2. The power supply might not have enough wattage to support all the peripherals. If your
system has other peripherals connected, like CD-RW, extra HDD, etc. disconnect them.
When I boot up my new computer I got "floppy boot failure" and the LED on the
floppy stays on.
Make sure the red wire of floppy ribbon cable goes to Pin1 on the floppy drive side (don't
24
Page 25

SY-P4VDA
trust the "key lock" or "notch") and use the end-connector of the cable (don't use middle one).
Quick Start Guide
USB Issues
Can I use USB port 3_4 for keyboard resume function?
This M/B has 4 USB ports, but only the 2 at the back panel can be used for USB keyboard
resume function.
I cannot get my USB working, help!
Please check if the system performance setting in the BIOS is set to maxium/Turbo, if yes,
then enable the USB by setting the system performance to normal or manually enable the
USB port (on-chip USB controller under Integrated Peripherals).
LAN Issues
During LAN driver installation, the system hangs on 75%, why?
Enable the onboard LAN in the BIOS setup.
For updated FAQs, please check http://www.soyo.com.tw/faq.htm
http://www.soyousa.com/faqs.html
or
25
Page 26

SY-P4VDA Quick Start Guide
How to contact us:
If you are interested in our products, please contact the SOYO sales department in the
region you live.
If you require Technical Assistance, please contact our Technical Support in the region
you live.
SOYO prefers Email as communication medium, remember to always add to the email the
country that you live in.
TAIWA N
SOYO COMPUTER INC.
Hong Kong
SOYO ASIA LTD.
No. 21 Wu-Kung 5 Rd., Hsing Chuang
City, Taipei Hsien, Taiwan, R.O.C.
TEL: 886-2-22903300
FAX: 886-2-22983322
http://www.soyo.com/
Email: [email protected]
USA
SOYO INC.
41484 Christy Street, Fremont, CA
94538, USA
TEL: 1-510-226-7696
FAX: 1-510-226-9218
http://www.soyousa.com/
Email: [email protected]
GM
SOYO Deutschland GmbH
(SAAT Technology GmbH)
5C, Big Star Centre, 8 Wang Kwong
Road, Kowloon Bay, Kowloon, Hong Kong
TEL: 852-2-710-9810
FAX: 852-2-710-9078
http://www.soyo.com.hk/
Email: [email protected]
August-Wilhelm-Kuhnholz-Str. 15,
D-26135 Oldenburg (Oldb), Germany
TEL: 49-441-209100
FAX: 49-441-203442
http://www.soyo.de/
Email: [email protected]
26
Page 27

Page 28

2
V
0
A
L
Edition : February 200
ersion 1.
SY-P4VD
SERIA
 Loading...