


EN
Operating
Instructions
Stud welding device BMS-9 ACCU
Stud welding gun PS-9K ACCU
EN
Device numbers
We recommend to enter the device numbers in the list so that they can be accessed quickly if servicing is required.
Device Type Serial number
Stud welding device BMS-9 ACCU
Battery BMS-9 ACCU
Stud welding gun PS-9K ACCU
Operating Instructions
Document no.: P00162, 04-2019, translation of the original instructions
(English: P00262)
All information in this document is the property of
Heinz Soyer Bolzenschweißtechnik GmbH.
Revision status
Document created/amended Editor Date
Original Created DD 03/05/2019

CONTENTS
1. General information . . . . . . . . . . . . . . . . . . . . . . . . . . . . . . . . . . . . . . . . . . . . . . . 5
1.1. Validity of the operating instructions 5
1.2. Declarations of conformity 5
1.3. Manufacturer 7
1.4. Instruction, training 7
1.5. Standards and directives 7
2. Important safety instructions . . . . . . . . . . . . . . . . . . . . . . . . . . . . . . . . . . . . . . . 8
2.1. Warning signs used 8
2.2. General safety instructions 9
2.3. Personal protective equipment 12
2.4. Intended use of the stud welding device 13
2.4.1 Incorrect use 13
2.5. Intended use of the stud welding guns 13
2.5.1 Incorrect use 13
2.6. Operating company prerequisites 14
2.6.1 Prerequisites for personnel 14
3. Important safety instructions for battery operation . . . . . . . . . . . . . . . . . . . . 15
4. Transport . . . . . . . . . . . . . . . . . . . . . . . . . . . . . . . . . . . . . . . . . . . . . . . . . . . . . . 18
5. Storage, shutdown. . . . . . . . . . . . . . . . . . . . . . . . . . . . . . . . . . . . . . . . . . . . . . . 18
6. Disposal . . . . . . . . . . . . . . . . . . . . . . . . . . . . . . . . . . . . . . . . . . . . . . . . . . . . . . . 18
7. Description of the BMS-9 ACCU stud welding
. . . . . . . . . . . . . . . . . . . . . . . . . . . . . . . . . . . . . . . . . . . . . . . . . . . . . . . . . . . device 19
7.1. Working method 19
7.1.1 Product features 20
7.1.2 Capacitor discharge stud welding 20
7.2. Overview of the controls 21
7.2.1 Displaying the operating states 22
7.2.2 Indication of the battery charging status on the device display 23
7.3. Charging and inserting the battery 24
7.4. Technical data of the BMS-9 ACCU stud welding device 28
7.5. Permitted stud welding guns 30
Operating Instructions Soyer Bolzenschweißtechnik 3

CONTENTS
7.6. Cleaning the stud welding device 30
8. Description of the PS-9K ACCU stud welding gun . . . . . . . . . . . . . . . . . . . . . 32
8.1. Technical data of the PS-9K ACCU stud welding gun 33
8.2. Cleaning of the stud welding gun 34
9. Description of the stud chuck. . . . . . . . . . . . . . . . . . . . . . . . . . . . . . . . . . . . . . 35
9.1. Adjusting and inserting the adjustable stud chucks 35
10. Setup and connection . . . . . . . . . . . . . . . . . . . . . . . . . . . . . . . . . . . . . . . . . . . 39
10.1. Requirements for the installation location 39
10.2. Connection of the stud welding device and the stud welding guns 40
10.2.1 Power supply 40
10.2.2 Switching the device on and off 40
10.2.3 Connecting the earth cable 40
10.2.4 Connecting the stud welding gun 42
11. Settings . . . . . . . . . . . . . . . . . . . . . . . . . . . . . . . . . . . . . . . . . . . . . . . . . . . . . . . 43
11.1. Adjusting the charging voltage on the stud welding device 43
12. Welding operation . . . . . . . . . . . . . . . . . . . . . . . . . . . . . . . . . . . . . . . . . . . . . . 45
12.1. Carrying out welding 45
12.2. Notes on checking the quality of the weld 46
12.2.1 Visual inspection 46
12.3. Welding defects and their causes 48
12.4. Malfunctions with an error message 49
13. Maintenance and repair . . . . . . . . . . . . . . . . . . . . . . . . . . . . . . . . . . . . . . . . . . 50
14. Service . . . . . . . . . . . . . . . . . . . . . . . . . . . . . . . . . . . . . . . . . . . . . . . . . . . . . . . 50
15. Warranty conditions . . . . . . . . . . . . . . . . . . . . . . . . . . . . . . . . . . . . . . . . . . . . 51
4 Operating Instructions Soyer Bolzenschweißtechnik

1. General information
i
These operating instructions include important instructions and provisions for the
operation of the devices. Please keep the operating instructions at hand near the
devices.
In these operating instructions, the term “devices” refers to the stud welding
device and the stud welding gun.
Carefully read the operating instructions and any other documents contained in
the technical documentation. Pay particular attention to the safety instructions
which are intended to help you recognise any possible residual risks and prevent
hazards.
The drawings and illustrations in these operating instructions are for illustrative
purposes and may vary slightly from the actual equipment.
The manufacturer reserves the right to make technical changes.
General information
1.1 Validity of the operating instructions
These operating instructions apply to the following devices:
Stud welding device BMS-9 ACCU
Stud welding gun PS-9K ACCU
1.2 Declarations of conformity
The devices are designed and constructed in accordance with the general
accepted codes of practice.
Please note that significant changes to the device will cause the
declaration of conformity to become void.
Furthermore, the manufacturer's warranty may be rendered invalid.
Operating Instructions Soyer Bolzenschweißtechnik 5

General information
Heinz
Soyer Bolzenschweißtechnik GmbH
Inninger Straße 14
82237 Wörthsee
CE - Declaration of Conformity
We herewith declare that the design of the machine described below as well as in
the version marketed by us meets the safety and health requirements of the stated
guidelines and standards. Any modification of this machine without confirmation
shall automatically annul this declaration.
Designation of the machine
Stud welding device
Machine type
BMS
-9 ACCU
Machine no.
_____________________
Applicable EU guidelines
RoHS directive (2011/65/EU)
Low-voltage directive (2014/35/EU)
EMC directive (2014/30/EU)
Harmonised standards
applied, in particular
EN 60974
-1:2012
EN 60974
-10:2008
National regulations applied
DGUV direc
tive 1
Date 29 March 2019
Manufacturer
- signature
Function of the signatory
CEO
Stud welding device
6 Operating Instructions Soyer Bolzenschweißtechnik

1.3 Manufacturer
i
The manufacturer of the devices is:
Heinz Soyer Bolzenschweißtechnik GmbH
Inninger Straße 14
82237 Wörthsee
Phone: 0049-8153-885-0
Fax: 0049-8153-8030
Mail: info@soyer.de
Web: www.soyer.de, www.soyer.com
1.4 Instruction, training
General information
Soyer offers optional and individual instruction in the operation of the devices.
Moreover, Soyer offers training for customer-specific use of the
devices. The tutorial is available at:
https://youtu.be/QrYjCVNdRZk.
Information on the scope and costs of instruction and training can be
obtained from Soyer GmbH.
Also see our video instructions at
www.youtube.com/user/SoyerGmbH.
1.5 Standards and directives
The following standards, inter alia, must be observed for carrying out stud welding
work and for the qualification of personnel:
• DIN EN ISO 14555 Welding - Arc stud welding of metallic materials
• DIN EN ISO 14732 Welding personnel - Qualification testing of welding
operators and weld setters for mechanised and automatic welding of metallic
materials
• DIN EN 60974-9 Arc
• Technical Bulletin DVS 0903 Capacitor discharge stud welding with tip ignition
• Technical Bulletin DVS 0904 Instruction for practice - Arc stud welding
welding equipment - Installation and use
Operating Instructions Soyer Bolzenschweißtechnik 7
Important safety instructions
DANGER
!
WARNINGWARNING
!
CAUTIONCAUTION
!
2. Important safety instructions
Read the following chapters carefully and follow the safety instructions. Please
contact the manufacturer if you are uncertain or an instruction cannot be followed.
The devices have been constructed in accordance with the generally accepted
codes of practice and established and usual safety requirements were observed
and applied. In order to reach maximum safety, it is absolutely necessary to follow
and observe all safety instructions specified in these operating instructions.
2.1 Warning signs used
Warning signs are used in this document, depending on the potential danger of
the situation.
Safety and information symbols used in this manual
This warning sign indicates imminent danger leading to severe injuries or death.
This warning sign indicates a potentially dangerous
situation that may lead to severe injuries or death.
This warning sign indicates a potentially dangerous
situation that may lead to minor injuries.
Without the warning triangle, this warning sign is
also used in the event of danger of material damage.
Additional sign indicating danger from electric current. The additional sign is used in connection with
a warning.
Additional sign indicating the danger of burns. The
additional sign is used in connection with a warning.
Do not touch the surface or the housing: Shock
hazard.
Do not touch or open, danger to unauthorised persons.
Danger to persons with medical implants such as
pacemakers.
The information sign is not a warning sign. It indicates important and useful information on the sub-
i
8 Operating Instructions Soyer Bolzenschweißtechnik
ject.

Important safety instructions
DANGER
!
Safety instructions
on the device
As an additional warning of danger, warning labels can be found on the devices.
Warning labels are affixed by the manufacturer and must not be removed. If a
warning label is damaged and thus illegible, a new warning label must be affixed
immediately.
Warning labels must be obtained from the manufacturer.
2.2 General safety instructions
Danger from electric current, general information
When working on live components, there is a danger to life from electric
current.
• Work on electric or electronic components may only be performe
tra
ined electrotechnical personnel in accordance with currently applicable
electrotechnical regulations.
d by
• Protection devices must not be manipulated or disabled. Protecti
vices include, for example, housing and housing cover, fuses or power
de
switches.
• If protection devices have to be removed for maintenance work, the device
may only be switched on again when all protection devices are ins
a
nd their functionality has been checked.
• Starting the device with faulty protection devices is not permitted. Fau
rotective devices must be repaired or replaced immediately. Un
p
eration by third parties must be prevented.
op
on
talled
lty
intentional
Operating Instructions Soyer Bolzenschweißtechnik 9

Important safety instructions
DANGER
!
DANGER
!
DANGER
!
Danger from electric current during maintenance and repair work
When working on live components, there is a danger to life from electric
current.
• Work on electric or electronic components may only be performe
tra
ined electrotechnical personnel of Soyer Bolzenschweißtechnik.
• Before performing any work on the stud welding device, the mains swi
f the device must be turned off and the mains plug must be disconnecte
o
e battery of battery-operated devices must be removed.
Th
• Before performing any work on the stud welding gun, the supply cables to
the stud welding device must be disconnected.
• If protection devices have to be removed for maintenance work, the device
may only be switched on again when all protection devices are ins
a
nd their functionality has been checked.
Danger from magnetic fields
In the area surrounding the device, strong magnetic fields which may influence medical auxiliary devices and therefore result in danger to life occur
during the welding process.
d by
tch
d.
talled
• Persons with electric medical aids (e.g. pacemakers) must stay away fr
the
devices.
• The operating personnel must ensure that persons with medical aids sta
ay from the devices.
aw
Danger of explosion from inappropriate operation sites in explosive
areas
The device is not designed for use in explosive areas.
• The device must not be installed and operated in explosive areas.
10 Operating Instructions Soyer Bolzenschweißtechnik
om
y

Important safety instructions
CAUTIONCAUTION
!
WARNINGWARNING
!
WARNINGWARNING
!
Danger of burns from hot surfaces
During the welding process, the workpieces and some parts of the welding
gun get so hot that touching them may cause burns.
• Always use personal protective equipment.
• Before working on hot parts of the device, check if they have cooled down.
Danger of burns from hot welding spatters
During the welding process, dangerous welding spatters may occur.
• Always use personal protective equipment.
Danger of fire from hot welding spatters
Welding spatters or hot workpieces occurring during the welding process may
cause danger of fire.
• Do not store combustible or highly flammable materials in the
ar
ea.
welding
Operating Instructions Soyer Bolzenschweißtechnik 11

Important safety instructions
WARNINGWARNING
!
2.3 Personal protective equipment
It is recommended to wear personal protective equipment when working with the
stud welding device.
Danger from missing or incorrect personal protective equipment
Stud welding may lead to danger of burns, especially due to hot welding spatters. Danger of blinding may also arise due to the occurrence of strong arcs.
• Always wear suitable and closed protective clothing.
• Type and extent of the required protective equipment depend on
tive occurrence of welding spatters and/or arcs. Both occurrences
respec
vary, depending on the basic material, stud material, stud size and t
quired welding performance.
re
• Please observe the following instructions for protective equipment.
Recommended personal protective equipment
Safety goggles
Welding spatters and a flash occur during the welding process. In order to protect your eyes, wear appropriate safety
goggles with side protection and a filter protector, if necessary.
Protective gloves
During the welding process, the workpieces and components of the welding gun get hot and welding spatters
occur. Wear appropriate, incombustible, heat-resistant protective gloves.
Protective clothing
the
he
12 Operating Instructions Soyer Bolzenschweißtechnik
Welding spatters occur during the welding process. Wear
appropriate, incombustible and, if necessary, heat-resistant
protective clothing.
Safety footwear
Welding spatters occur during the welding process. Wear
appropriate, incombustible, heat-resistant safety footwear.
Hearing protection
Relatively loud welding noises may occur, depending on
the welding device and the welding application. In that
case, wear appropriate hearing protection.

2.4 Intended use of the stud welding device
With the SOYER® BMS-9 ACCU capacitor discharge stud welding device, pins
and threaded studs from M3 to M8 as well as many different weld fasteners made
of steel, stainless steel, aluminium and brass can be welded in accordance with
DIN EN ISO 13918 (capacitor discharge).
Special studs or diameters upon request.
The stud welding device can only be operated with the welding guns described in
chapter “7.5 Permitted stud welding guns” on page 30.
The stud welding device must be operated within the scope of technical data.
2.4.1 Incorrect use
Any use of the device deviating from the intended use is considered as not intended.
Not intended use, unauthorised modification or manipulation of the device will
void the declaration of conformity and warranty claims against the manufacturer.
Important safety instructions
2.5 Intended use of the stud welding guns
With the SOYER® stud welding guns which are described in these operating
instructions, pins and threaded studs from M3 to M8 as well as many different
weld fasteners made of steel, stainless steel, aluminium and brass can be welded
in accordance with DIN EN ISO 13918 (capacitor discharge).
Special studs or diameters upon request.
The stud welding guns can only be operated with the stud welding devices which
are described in chapter “8.1 Technical data of the PS-9K ACCU stud welding
gun” on page 33.
The stud welding gun can only be operated within the scope of technical data.
2.5.1 Incorrect use
Every use of the welding gun deviating from the intended use is considered as not
intended.
Not intended use, unauthorised modification or manipulation of the device will
void the declaration of conformity and warranty claims against the manufacturer.
Misusing the gun as a tool, e.g. as a striking tool for checking the welding quality,
is not permitted.
Operating Instructions Soyer Bolzenschweißtechnik 13

Important safety instructions
i
2.6 Operating company prerequisites
The operating company of the device must ensure that the prerequisites described in these operating instructions for a safe operation of the device are met.
These include, for example, conditions at the installation location, regulatory requirements on a safe workplace, instruction of operating personnel and qualified
personnel in using the device, if applicable, compliance with required maintenance work as well as monitoring the intended use of the device.
These operating instructions must be stored in the vicinity of the device.
The operating company of the device must ensure that all protective devices are
present, active and intact before the device is used.
2.6.1 Prerequisites for personnel
Operating
personnel
Trained
electrotechnical
personnel
Persons authorised to operate the device must be familiar with the device and
trained accordingly. They must have read and understood these operating instructions. When working on the device, they must also be able to avert possible
residual danger to themselves or third parties or minimise them as far as possible.
To retain this qualification, safety training must be carried out at least once a year.
If necessary, specially trained personnel or the manufacturer must be consulted
in case of failure or for maintenance work.
Operators of stud welding devices must have technical expertise for operating
and adjusting the device properly as well as for properly carrying out weldings.
If welding personnel has to be qualified for certification of welding, the standards
DIN EN ISO 14555 and DIN EN ISO 14732 are to be observed.
In general: Works on live elements may only be performed by authorised electricians. This work must be performed in accordance with the applicable technical
rules for electrotechnical devices.
All devices of Soyer Bolzenschweißtechnik GmbH must only be opened
by personnel of Soyer or personnel authorised by Soyer.
14 Operating Instructions Soyer Bolzenschweißtechnik

Important safety instructions for battery operation
WARNINGWARNING
!
3.
Important safety instructions for battery operation
These operating instructions describe the operation of a stud welding device
which is operated by a lithium-based high-performance battery.
The battery consists of several connected individual cells.
Due to the very high energy density and the technical design of these batteries,
the batteries must be handled very carefully.
Hazards due to improper battery handling
Improper handling and use of a battery may lead to electric shocks, skin irritations, chemical burns, fire or explosion.
• For safe handling and operation, the following instructions and recommendations must be strictly observed.
General safety information
• Do not disassemble, open or shred batteries.
• Store batteries out of the reach of children and unauthorised persons.
• Do not expose batteries to heat or fire. Avoid storage in direct sunlight.
• Do not short-circuit batteries.
• Do not store batteries in a hazardous manner in a box or drawer where they
can short-circuit each other or can be short-circuited by other conductive materials.
• Do not expose batteries to mechanical impact.
• Only remove the battery from its original packaging right before it is used.
• If a cell is leaking, the fluid must not come into contact with the skin or the e
If
contact has occurred, please rinse the affected area with plenty of water
co
nsult a physician.
• Only use chargers which are especially designed for this type of battery.
• Always observe the polarity labels plus (+) and minus (-) on the batteries a
evices. Proper use must be ensured.
d
• Do not use rechargeable batteries, cells or other batteries which are not designed for the use in combination with the device.
• If the connections of batteries are soiled, clean them using a dry, clean cloth.
• Keep batteries clean and dry at all times.
• Batteries must be charged before use. Always use the proper charger and observe the manufacturer’s instructions for correct charging.
• Do not charge batteries for an extended period if they are not used.
• Do not charge batteries at temperatures below 0 °C.
• The batteries may only be used in the SOYER® devices for which they are intended.
yes.
and
nd
Operating Instructions Soyer Bolzenschweißtechnik 15

Important safety instructions for battery operation
• If possible, batteries should be removed from devices, if the devices are not in
use for several weeks.
• Never use or store batteries and devices with inserted battery in an exp
nvironment or in an environment with highly flammable substances.
e
• Ambient temperature during operation of the device: -20 °C to +50 °C.
Maintenance
• Regularly check whether the battery is in clean and dry condition.
• Use a clean and dry cloth to remove dirt.
Safe storage
losive
• Always store batteries in a clean and dry place. Ideally store the batteries a
r
oom temperature as a maximum or in colder environments (e. g. fridge).
• Admissible temperature during storage: -20 °C to +60 °C (recommended: 0
to +20 °C).
• Do not store batteries in discharged condition. The residual capacity should be
at least 50 - 80%.
• Check stored batteries every 2 - 3 months and charge them, if required, t
event deep discharge which results in the destruction of the battery.
pr
Handling of defective batteries and disposal
• Always dispose of batteries in an environmentally compatible way in accordance
with applicable local provisions. Consult the local waste disposal company.
• Never dispose of batteries in household waste.
• Do not dispatch batteries. If a battery is defective, please contact co. Soyer.
• Do not touch any leaking fluid with bare hands. Collect the fluid and dispos
o
f it in the correct manner. Wear goggles and protective gloves.
Dealing with battery malfunctions
Abnormal battery performance such as incorrect charging or unusually long
charging times, noticeable sudden power loss, unusual LED messages or leaking
fluids can indicate a battery defect.
t
°C
o
e
• In case of obvious or suspected battery malfunctions, please consu
e of co. Soyer.
servic
16 Operating Instructions Soyer Bolzenschweißtechnik
lt the

Important safety instructions for battery operation
Measures in case of battery fire
• Do not touch the burning battery, not even with protective gloves. A
ery is extremely hot due to plasma formation!
batt
• In case of battery fire, remove all flammable objects around the burning batter
a
nd call the fire brigade, if required.
• Ensure sufficient ventilation to ensure that hazardous and explosive vapou
ca
n escape.
• In case of significant smoke development, please leave the room immediately.
• In case of respiratory tract irritation, consult a physician.
• Do not fight battery fire with water. Powder extinguishers and fire blankets only
serve to extinguish surrounding fires but are not an effective method to fight
the battery fire.
burning
rs
y
Operating Instructions Soyer Bolzenschweißtechnik 17

Transport
i
i
i
4. Transport
When transporting the device, make sure that it cannot be damaged. Appropriate
packaging can protect the device against weathering effects, especially moisture.
Do not dispatch the battery. Please observe chapter “3. Important safety
instructions for battery operation” on page 15.
5. Storage, shutdown
6. Disposal
During storage or shutdown, make sure to protect the device against dirt and
humidity.
Protect the device against unauthorised access by third parties.
For the storage of the battery, please observe chapter “3. Important
safety instructions for battery operation” on page 15.
Local environmental directives must be observed when disposing of the device.
Water-endangering as well as environmentally hazardous substances are to be
disposed of in accordance with legal regulations.
If applicable, materials must be separated according to regulations.
For the disposal of the battery, please observe chapter “3. Important
safety instructions for battery operation” on page 15.
18 Operating Instructions Soyer Bolzenschweißtechnik
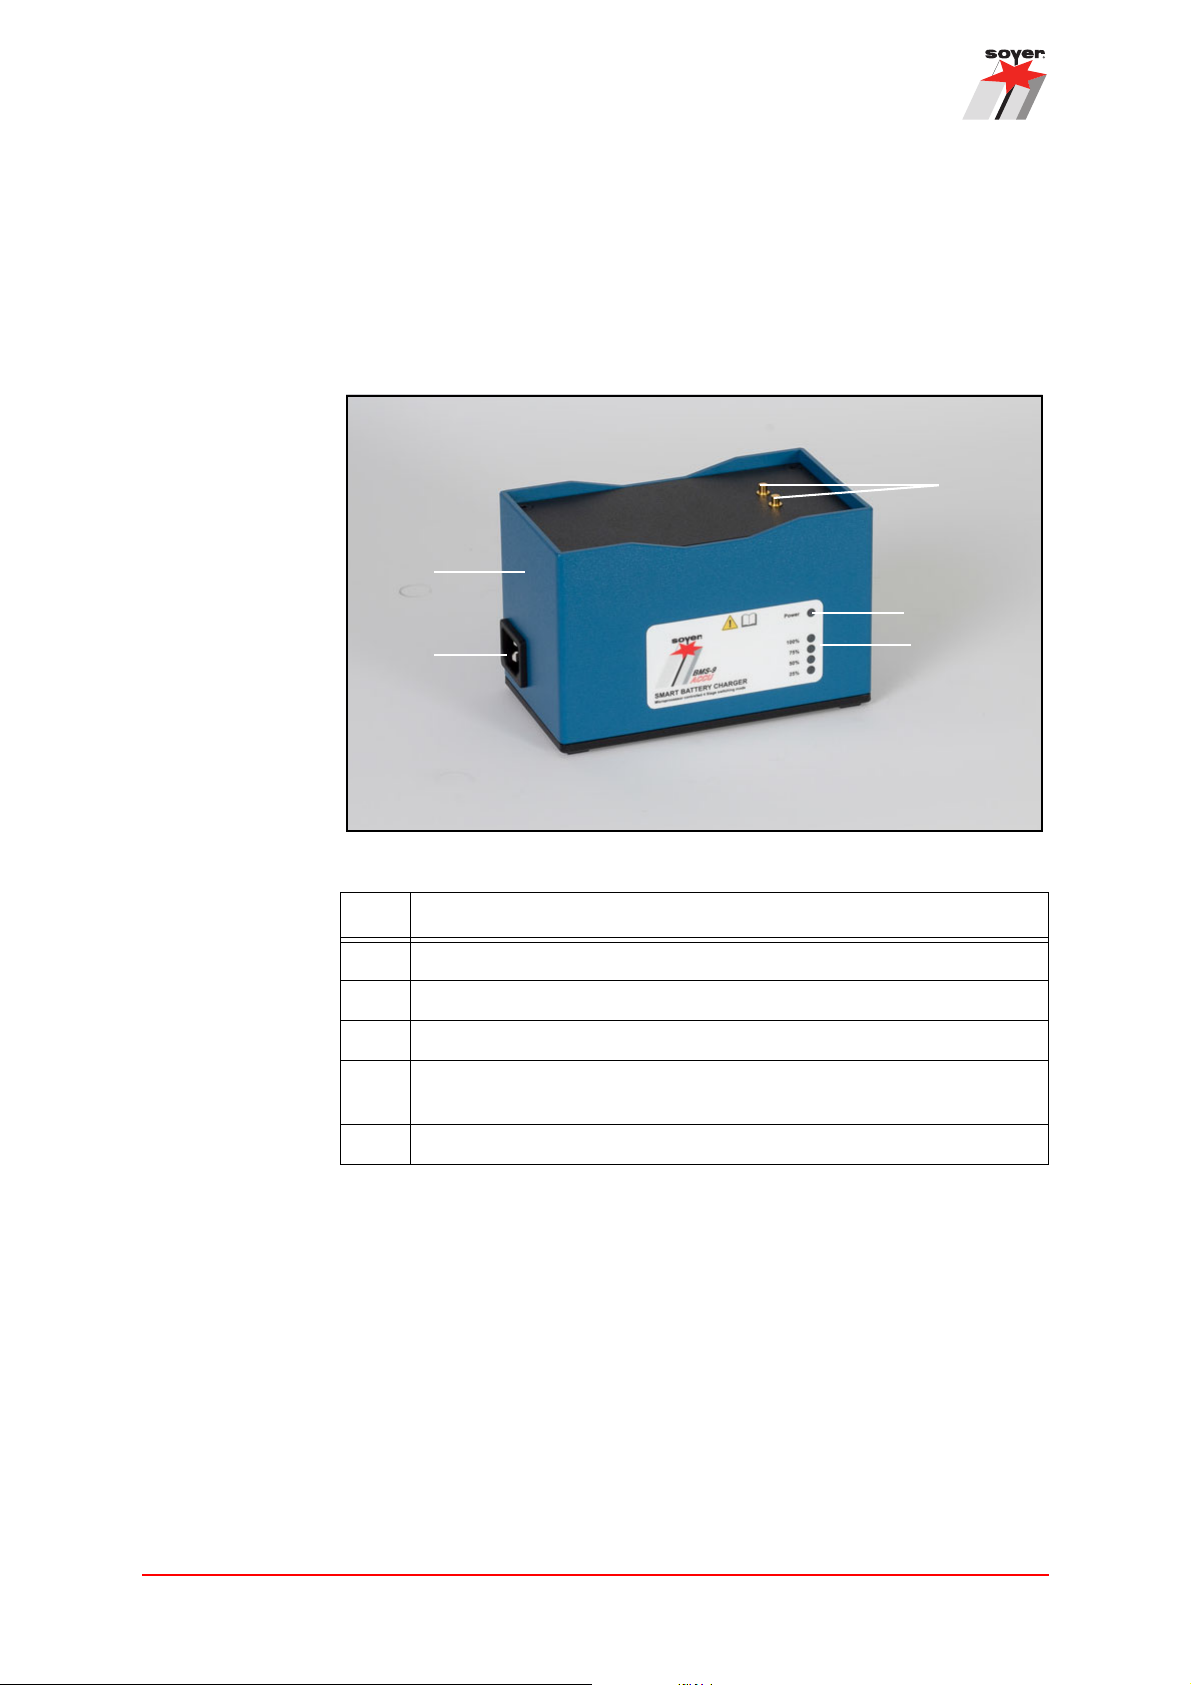
Description of the BMS-9 ACCU stud welding device
a
c
b
7. Description of the BMS-9 ACCU stud welding
de
vice
The main elements of the stud welding device and its features are described in
the following.
Figure 1: BMS-9 ACCU stud welding device
Item Designation
7.1 Working method
The welding capacitors with a capacity of 200 Millifarad are charged with up to
99 V using the energy from the battery (24 V). The charging unit corresponds to
a state-of-the-art inverter power source. The welding power is output exclusively
by the welding capacitors.
With the SOYER® BMS-9 ACCU stud welding device, pins and threaded studs
from M3 to M8 as well as many different weld fasteners made of steel or stainless
steel can be welded in accordance with DIN EN ISO 13 918 (capacitor discharge).
Welding of weld fasteners made of aluminium and brass is also possible.
a BMS-9 ACCU stud welding device
b Battery
c Battery charger
Operating Instructions Soyer Bolzenschweißtechnik 19

Description of the BMS-9 ACCU stud welding device
i
7.1.1 Product features
• Power supply via high performance battery
• Inverter switching power supply for maximum welding power
• High performance with a compact design and a low weight
• Automatic storage of the charging voltage
• Short charging cycles to increase productivity
• Precise digital display of the charging voltage
• Monitoring of all functions via a clear function display field
7.1.2 Capacitor discharge stud welding
The SOYER® BMS-9 ACCU stud welding device operates according to the
principle of capacitor discharge with tip ignition.
This system uses the sudden discharge of a capacitor bank to generate arc
energy.
Functional principle
The stud tip is placed
into contact with the
workpiece.
For more information on this subject, please visit: www.soyer.com.
The ignited arc creates
a melt zone on the stud
and the metal sheet.
The stud is immersed in
the weld pool. The
material solidifies and
the stud is permanently
welded.
20 Operating Instructions Soyer Bolzenschweißtechnik

7.2 Overview of the controls
Heinz Soyer Bolzenschweißtechnik GmbH · Inninger Str. 14 · D-82237 Wörthsee · Germany · Tel.: +49 8153 885-0 · www.soyer.com
R
BMS-9
Ø3
Ø4
Ø5
Ø6
Ø8
50V 60V 70V 80V 90V
S
MADE
IN
GERMANY
ab
h
dec
f
i
g
Description of the BMS-9 ACCU stud welding device
Figure 2: Overview of the front panel
Item Designation
Power key button for turning the device on/off
a
b Selection table with reference values for easy matching of the
required charging voltage to the stud diameter.
c Function key, reduce displayed charging voltage
d Display of operating states, see chapter “7.2.1 Displaying the operat-
ing states” on page 22.
e Function key, increase displayed charging voltage
f Display
g Socket for the connection of the earth cable
h 7-pin connection socket for the control cable
i Socket for the connection of the welding cable
Operating Instructions Soyer Bolzenschweißtechnik 21
Description of the BMS-9 ACCU stud welding device
ab dc
7.2.1 Displaying the operating states
Figure 3: Operating states
Item Designation
a Ready
In normal operation, the LED lights up when the stud welding device
is ready for operation in normal mode.
When the LED flashes, the device is in standby mode to save battery
power. When the gun is operated, the device starts up again.
b Indication of the charging voltage
The LED lights up as soon as the set charging voltage has been
reached.
After the welding process, the LED is off.
c Stud on workpiece
The LED lights up when the earth terminal is connected and the stud
touches the workpiece.
d Release
The LED lights up when the trigger button on the welding gun is
pressed.
22 Operating Instructions Soyer Bolzenschweißtechnik

Description of the BMS-9 ACCU stud welding device
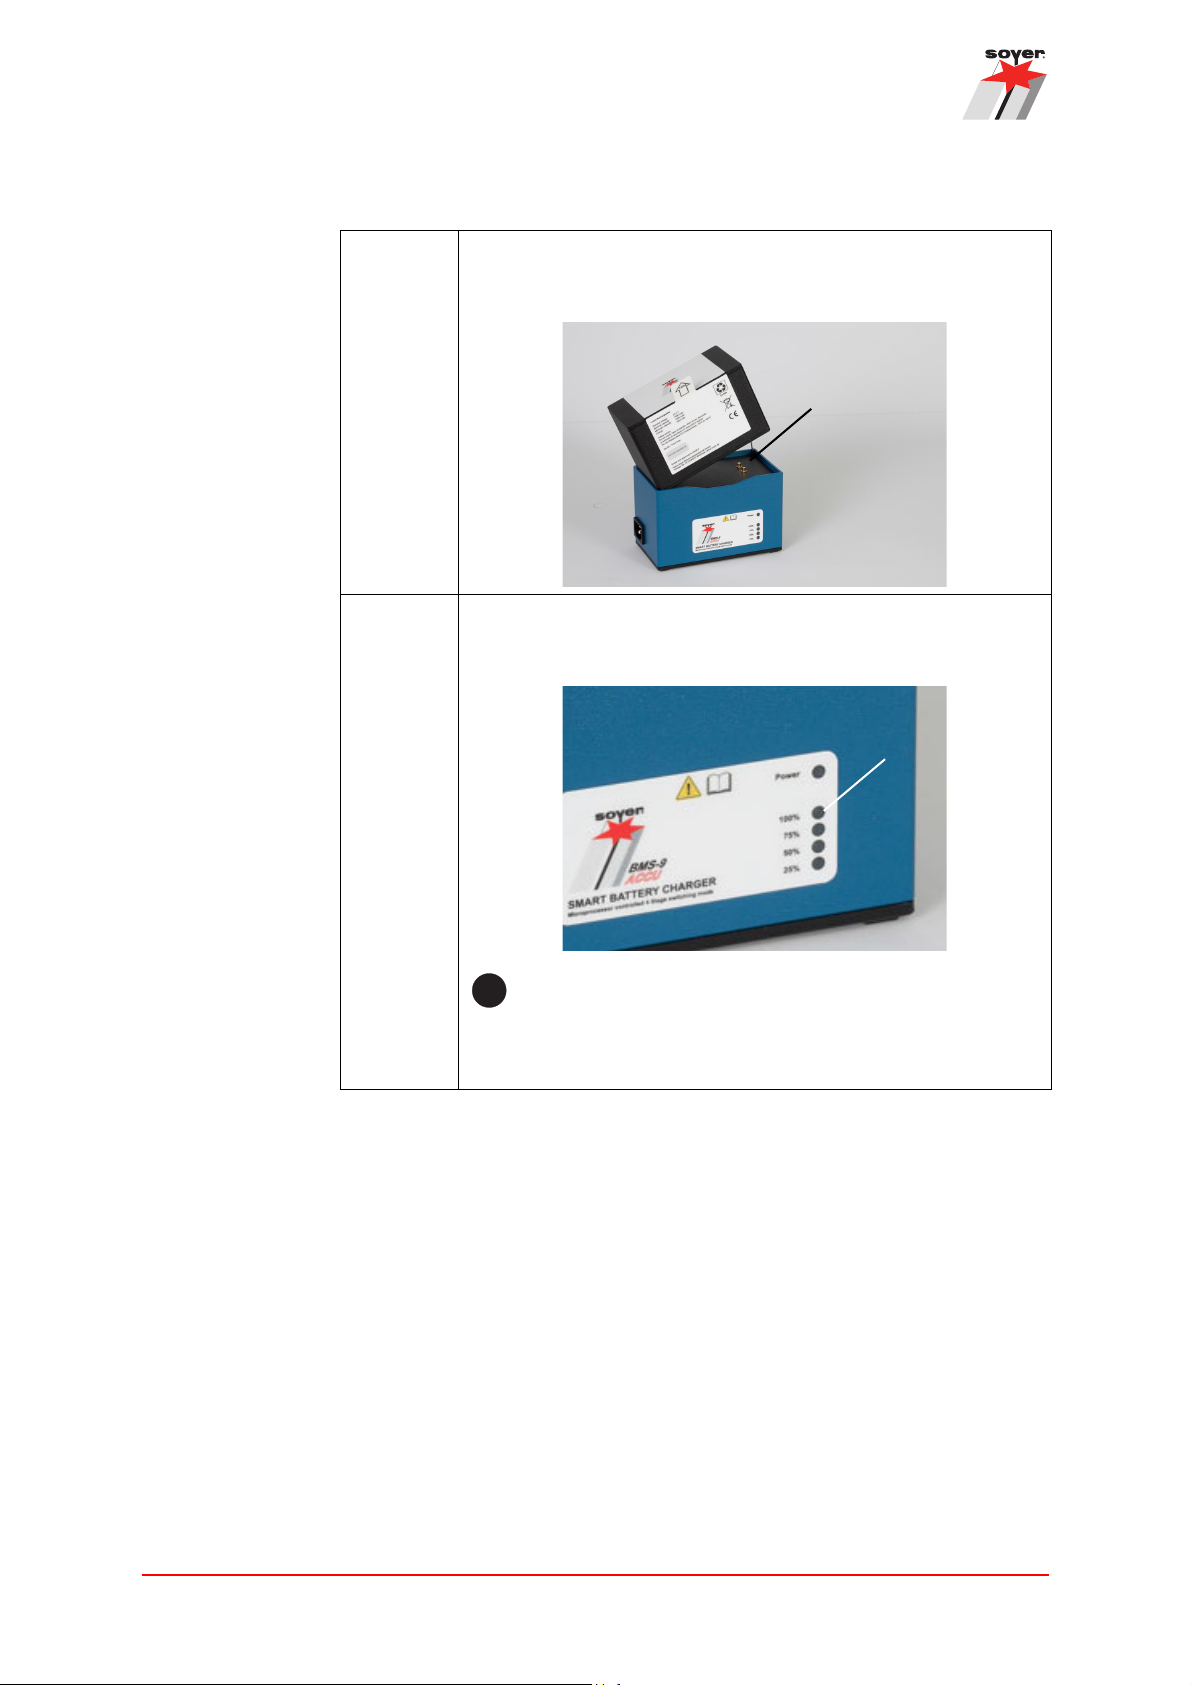
7.2.2 Indication of the battery charging status on the device display
Figure 4: Indication of the battery charging status (70% in the example)
On the device display, the charging status of the battery is displayed.
It is displayed as a capital “A” followed by the charging status in percent.
You see this when you switch on the device directly after the charging voltage
(which is displayed as a small “u” followed by the voltage in volt).
Operating Instructions Soyer Bolzenschweißtechnik 23
Description of the BMS-9 ACCU stud welding device
a
b
c
d
e
7.3 Charging and inserting the battery
The BMS-9 ACCU is operated exclusively by a battery. Please ensure that the
device battery is always charged and ready for operation.
To charge the battery, you need the dedicated original charger (SOYER® article
number F07051/FA).
Figure 5: Charger
Item Designation
aCharger
b Connection socket for the mains cable.
c Charging contacts for the battery.
d The Power LED is illuminated if the charger is connected to the
mains.
e
Charging status indicators for the current charging status of the battery.
24 Operating Instructions Soyer Bolzenschweißtechnik
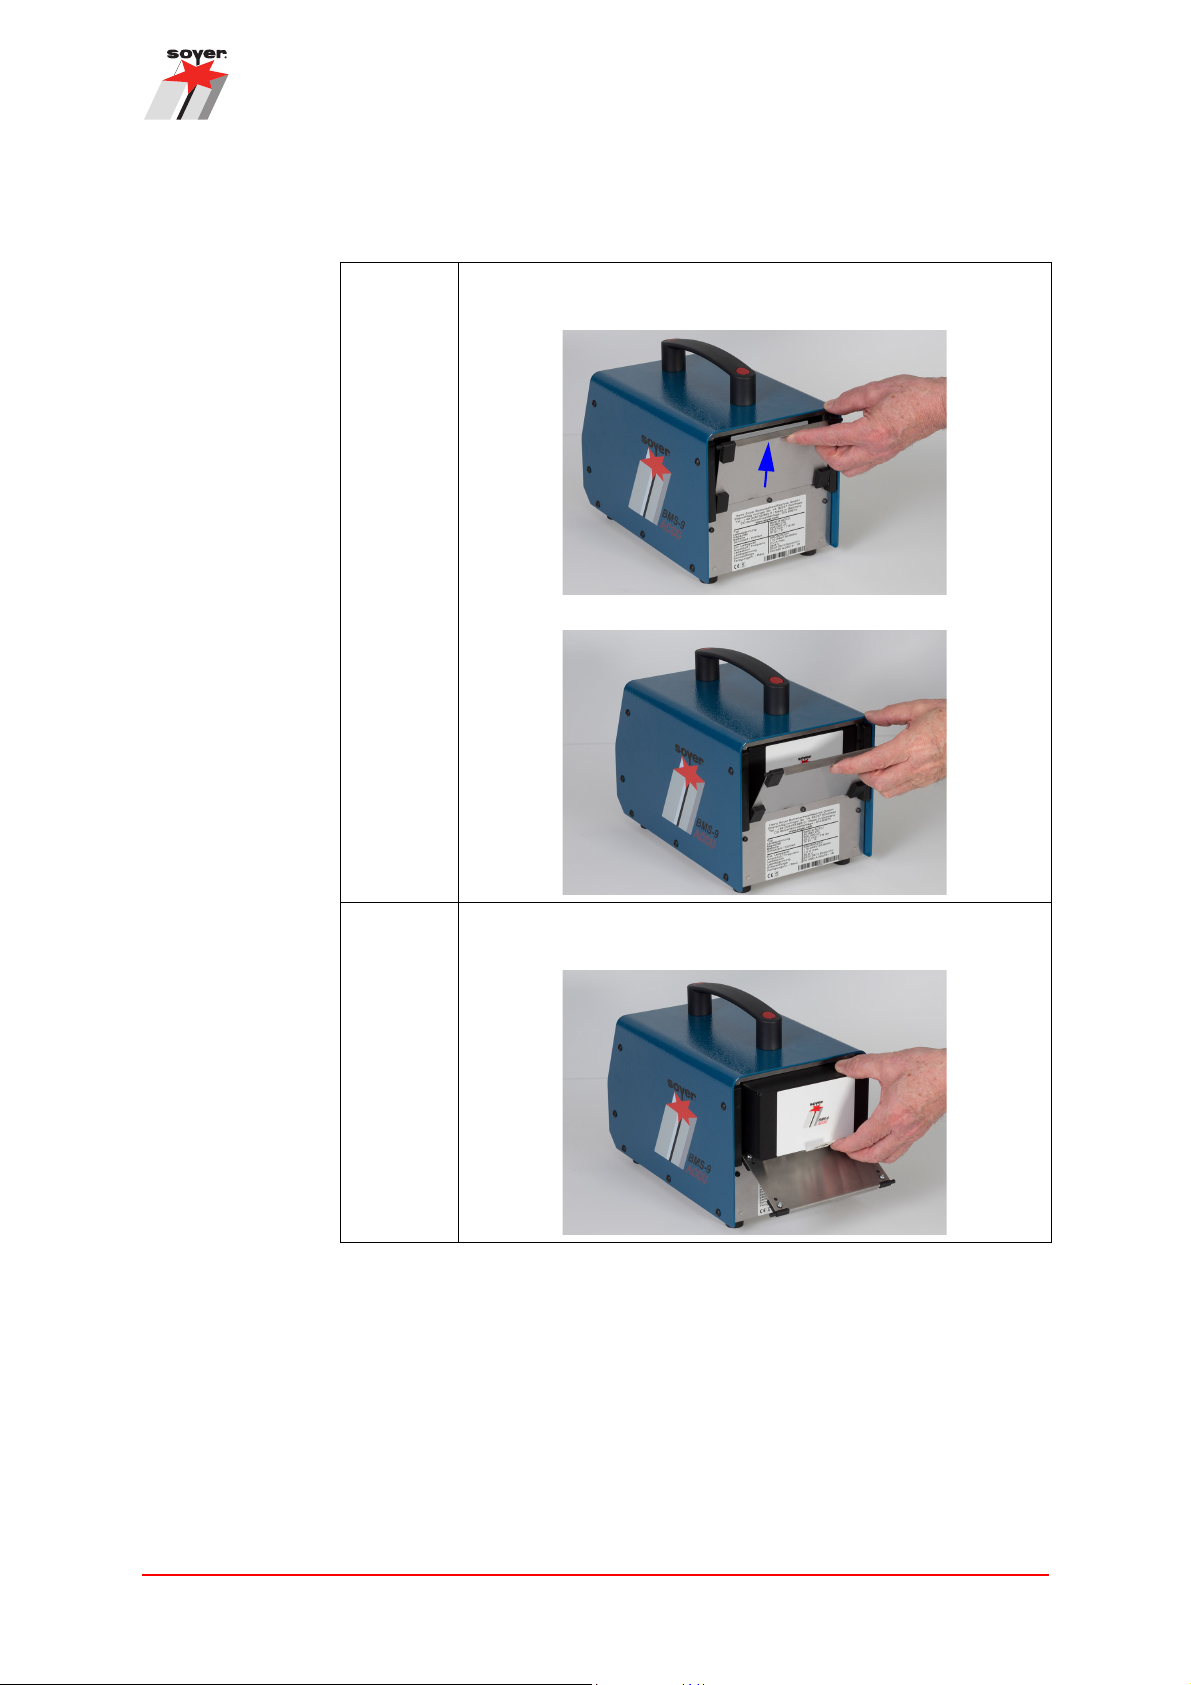
Description of the BMS-9 ACCU stud welding device
Removing, charging and inserting the battery
Step 1:
To remove the battery, pull the cover flap up to open it.
Step 2: Pull out the battery.
Operating Instructions Soyer Bolzenschweißtechnik 25
Description of the BMS-9 ACCU stud welding device
i
a
a
Removing, charging and inserting the battery
Step 3: Place the battery on the charging station. Ensure that the battery
is positioned correctly on the charging contacts (a).
Step 4:
Charge the battery until the 100% charging status indicator (a) of
the charger is illuminated.
Remove the battery from the charger when it is fully
charged. The charger is not suitable as a permanent
storage location for the battery.
26 Operating Instructions Soyer Bolzenschweißtechnik

Description of the BMS-9 ACCU stud welding device
i
a
Removing, charging and inserting the battery
Step 5: Push the charged battery into the device to the stop.
Ensure correct orientation so that the device contacts can
engage with the battery. If the labelling on the battery is properly
oriented to be read (a), the position is correct.
If the battery cannot be pushed completely into the
device, check the orientation and the contacts.
Step 6:
The exchange of the battery is complete.
Close the cover flap.
Operating Instructions Soyer Bolzenschweißtechnik 27

Description of the BMS-9 ACCU stud welding device
7.4 Technical data of the BMS-9 ACCU stud welding device
Stud welding device:
Designation BMS-9 ACCU stud welding device
Welding procedure
Standard gun PS-9K ACCU
Welding area M3 - M8 or Ø 3 - 8 mm for steel, stainless steel,
Power source Capacitor bank 200,000 μF
Charging voltage 40 - 99 V infinitely variable up/down
Welding sequence Ø6 mm: 10 studs/min
Power supply Battery
Cooling method S, or passive by convection
Protection class IP 23
Dimensions 180 x 235 x 300 mm (w x h x d)
Weight approx. 7.2 kg with inserted battery
Colour RAL 5009 azure blue
Capacitor discharge stud welding
aluminium and brass (aluminium and brass limited,
depending on the respective requirements)
Ø 3 mm: 20 studs/min
Subject to technical changes
Battery charger:
Designation Battery charger for BMS-9 ACCU
Mains connection Wide-range power supply 100 - 240 V, 50/60 Hz
Power output 28.8 V, 2 A
Protection class IP 30
Dimensions 83 x 96 x 152 mm (w x h x d)
Weight approx. 0.5 kg including mains cable
Colour RAL 5009 azure blue
Article number F07051/FA
Subject to technical changes
28 Operating Instructions Soyer Bolzenschweißtechnik
Description of the BMS-9 ACCU stud welding device
i
Battery:
Designation Battery for BMS-9 ACCU stud welding device
Type Lithium-ion
Rated voltage 25.2 V
Rated capacity 7800 mAh
Minimum capacity 7500 mAh
Energy 196.5 Wh
Dimensions 89 x 77 x 142 mm (w x h x d)
Weight approx. 1.2 kg
Colour RAL 5009 azure blue
Article number F07016/FA
Subject to technical changes
Please also observe chapter “3. Important safety instructions for battery
operation” on page 15.
Operating Instructions Soyer Bolzenschweißtechnik 29
Description of the BMS-9 ACCU stud welding device
WARNINGWARNING
!
i
DANGER
!
7.5 Permitted stud welding guns
Permitted stud welding gun: PS-9K ACCU
Hazards due to wrong gun
Hazards for the operator may occur when a wrong welding gun is used.
• Only use welding guns hereinafter permitted by Soyer.
The use of other guns or guns from another manufacturer will invalidate
the declarations of conformity and warranties of Soyer.
7.6 Cleaning the stud welding device
Dangers during cleaning
Improper cleaning of the stud welding device can endanger personnel.
• The device may only be cleaned by trained specialists.
• Before any cleaning work is done, the stud welding device must be disconnected from the main power supply and secured against accidental switchon. The battery of battery-operated devices must be removed.
• Work on electrical devices and components may only be performe
skilled e
lectricians in accordance with electrotechnical regulations.
d by
• Make sure that no liquids get into the device.
Do not use aggressive detergents for cleaning the device.
Please make sure that any cleaning waste is disposed of in an environmentally
safe manner. Please observe the instructions of the detergent manufacturer.
30 Operating Instructions Soyer Bolzenschweißtechnik

Description of the BMS-9 ACCU stud welding device
CAUTIONCAUTION
Damage to the device due to incorrect cleaning
Incorrect cleaning may cause damage to the device.
• Make sure that no liquids get into the device.
• Do not use aggressive detergents for cleaning the device.
The frequency of cleaning depends on the operating conditions of the stud welding device.
Operating Instructions Soyer Bolzenschweißtechnik 31

Description of the PS-9K ACCU stud welding gun
i
a
d
c
b
8. Description of the PS-9K ACCU stud welding gun
Figure 6: PS-9K ACCU stud welding gun
Item Designation
a PS-9K ACCU stud welding gun, contact gun without lifting magnet
b Support tube
c Release button
d Power and control cable for connection with the stud welding device.
Due to a projection on the support tube and a spring in the gun, the stud of this
gun is pressed firmly to the workpiece (contact gun).
The stud is not lifted before welding.
The PS-9K ACCU stud welding gun may only be operated with the stud
welding devices specified in the technical data.
32 Operating Instructions Soyer Bolzenschweißtechnik

Description of the PS-9K ACCU stud welding gun
8.1 Technical data of the PS-9K ACCU stud welding gun
Technical data of the PS-9K ACCU stud welding gun
Designation PS-9K ACCU stud welding gun (contact gun)
Item no. P02162
Welding procedure Capacitor discharge stud welding
Stud diameter M3 - M8
Stud chuck Adjustable
Stud length Adjustable stud chuck up to a maximum of 35 mm
Longer stud lengths with optional accessory possible
Stud welding device The gun is approved for operation on the following
SOYER® stud welding device:
• BMS-9 ACCU
Weight 2.3 kg
Subject to technical changes
Operating Instructions Soyer Bolzenschweißtechnik 33

Description of the PS-9K ACCU stud welding gun
CAUTIONCAUTION
!
i
8.2 Cleaning of the stud welding gun
On a regular basis, remove slag and welding spatters from the gun and the
support tube using a suitable tool.
The frequency of cleaning depends on the operating conditions of the stud
welding gun.
Risk of injury during cleaning
Welding spatters and slag can be sharp-edged.
• Wear protective gloves when cleaning.
• Please switch off or disconnect the stud welding device before cleaning the
stud welding gun.
We recommend the use of SOYER® separating spray in order to prevent
impurities from welding spatters and slag and to simplify the cleaning
process.
34 Operating Instructions Soyer Bolzenschweißtechnik

9. Description of the stud chuck
i
In principle, every welding gun is provided with a stud chuck that matches the
welding stud. Adjustable stud chucks must be set to the corresponding stud
length.
9.1 Adjusting and inserting the adjustable stud chucks
Adjustable stud chucks must be adjusted to the length of the welding stud and, if
necessary, to the gun size.
The standard stud chuck can hold studs with a length of up to 35 mm.
The adjustment of the stud chuck is shown using the example of the PS-9 gun.
The adjustment is carried out in the same way for other gun types.
Description of the stud chuck
Adjusting the
stud chuck
For welding guns with a short housing
(e. g. PS-1K or PS-9K ACCU), it may be
necessary to shorten the stop screw of
longer welding studs.
When the adjusting screw is too long, the stud
chuck cannot be fully plugged into the gun or
the stud lift cannot be properly executed during welding.
Adjusting an adjustable stud chuck
Step 1: Select the stud chuck according to the required stud diameter.
Step 2: Insert the stud into the stud chuck.
Operating Instructions Soyer Bolzenschweißtechnik 35
Description of the stud chuck
1.5 - 3 mm
WARNING
!
i
Adjusting an adjustable stud chuck
Step 3: Adjust the stop screw so that the top
Step 4: Fix the stop screw with the lock nut.
of the flange of the stud sits between
1.5 mm and 3 mm above the stud
chuck when it touches the screw.
Installation of the
stud chuck
The adjustment is complete.
The installation of the stud chuck is shown using the example of the PS-9 gun.
The installation of the stud chuck into other gun types is carried out in the same
way.
Installation of the adjustable stud chuck.
Step 1:
Step 2: Set the stud chuck to the required stud.
Step 3: Remove the gun support tube.
WARNING
Switch off the stud welding device when the gun is
connected to it.
It is not mandatory to remove
the support tube, however this
makes use easier.
36 Operating Instructions Soyer Bolzenschweißtechnik
Description of the stud chuck
Installation of the adjustable stud chuck.
Step 4: Undo the union nut
Step 5: If there is still a stud chuck in the gun, remove it.
Step 6: Slide the stud chuck up to the stop
into the spring piston of the gun.
Step 7: Hand-tighten the union nut.
Step 8: Plug the support tube onto the gun.
Operating Instructions Soyer Bolzenschweißtechnik 37

Description of the stud chuck
1.5 - 3 mm
Installation of the adjustable stud chuck.
Step 9: Insert a stud and check
The assembly is complete.
the stud protrusion.
The stud / stud flange
must protrude 1.5 - 3 mm
from the support tube.
If applicable, correct the
setting of the stud chuck
(see chapter “ Adjusting
the stud chuck” on
page 35).
38 Operating Instructions Soyer Bolzenschweißtechnik

10. Setup and connection
DANGER
!
CAUTIONCAUTION
!
10.1 Requirements for the installation location
The installation location for the stud welding device must be clean and dry.
Observe the permissible temperatures in chapter “7.4 Technical data of the BMS9 ACCU stud welding device” on page 28. Ensure that ventilation for the
stud welding device is sufficient. Do not install the stud welding device in an
unventilated room. There is a danger of overheating.
Ensure that the installation surface is flat, clean and stable.
The installation location and workplace must comply with legal requirements.
Ensure that the installation location has a good accessibility for maintenance
work.
Make sure that the stud welding device cannot be soiled by dust (especially metal
dust or chips) caused by work in the immediate surroundings (e.g. grinding work).
Setup and connection
Danger from humid operation site or mobile use
There is a danger of electrocution when operating the stud welding device in a
humid environment.
• The stud welding device should only be operated in a dry environment.
• The battery charger should only be operated stationary and in closed and
dry rooms. Mobile use is not permissible.
Danger from welding vapours
Vapours that are dangerous to health may occur, depending on the material of
the workpiece and/or the welding stud.
• Ensure suitable suction of welding vapours, if necessary.
Operating Instructions Soyer Bolzenschweißtechnik 39

Setup and connection
Heinz Soyer Bolzenschweißtechnik GmbH · Inninger Str. 14 · D-82237 Wörthsee · Germany · Tel.: +49 8153 885-0 · www.soyer.com
R
BMS-9
Ø3Ø4Ø5
Ø6
Ø8
50V 60V 70V 80V 90V
S
MADE
IN
GERMANY
10.2 Connection of the stud welding device and the stud welding guns
10.2.1 Power supply
The BMS-9 ACCU stud welding device is operated exclusively by a battery. For
the use of the battery, please observe chapter “7.3 Charging and inserting the battery” on page 24.
10.2.2 Switching the device on and off
Use the power key button to switch the stud welding device
on or off.
• Switching on the device: Push key button once briefly.
• Switching off the device: Push key
• Switching off the device if the device is in standby mode: Push key button
twice briefly (the device switches to normal operation first and then off).
Ensure that the stud welding device cannot be switched on and used by unauthorised persons.
button once briefly.
10.2.3 Connecting the earth cable
A secure earth connection must be established between the workpiece onto which
the studs are welded and the stud welding
device.
Insert the earth cable into the socket and
turn the plug to the right up to the stop.
Then connect the earth cable to the workpiece (ensure a conductive connection).
Then attach the earth clamps to the workpiece so that the welding gun is positioned
in the centre of the connecting line of the two earth clamps. This guarantees a
symmetrical current distribution around the stud as well as good welding results.
Difficult areas are weldings on the edge of the workpiece or great inhomogeneities in material thickness, i.e. the sheet thickness varies by a few millimetres or
additional material is welded or riveted to the material. This also includes stud
welding on vertical sections.
In order to achieve good welding results, c arry ou t sever al test weldings under different conditions. Simply change the position of the earth clamps or turn the welding gun, for example.
40 Operating Instructions Soyer Bolzenschweißtechnik

Blow effect
Setup and connection
Blow effect due to earth connection or workpiece geometry
Blow effect Explanation
Symmetrical earth connection
Ideal condition, stud is located in the centre
of the two earth connections.
Asymmetrical earth connection
The arc is deflected to the side where there
is a lower current density.
Workpiece geometry
Additional workpiece masses disturb the
arc symmetry.
Operating Instructions Soyer Bolzenschweißtechnik 41

Setup and connection
Heinz Soyer Bolzenschweißtechnik GmbH · Inninger Str. 14 · D-82237 Wörthsee · Germany · Tel.: +49 8153 885-0 · www.soye
R
BMS-
Ø3Ø4Ø5
Ø6
Ø8
50V 60V 70V 80V 90V
S
MADE
IN
GERMANY
a
b
10.2.4 Connecting the stud welding gun
Only use the welding guns approved by the manufacturer. See chapter “7.5 Permitted stud welding guns” on page 30.
Plug the welding cable into the socket (a) and
turn the plug to the right up to the stop.
Plug the control cable into the control cable
socket (b) and tighten the union nut.
42 Operating Instructions Soyer Bolzenschweißtechnik

11. Settings
i
B
Ø3
Ø4
Ø5
Ø6
Ø8
50V 60V 70V 80V 90V
MADE
IN
GERMANY
The stud welding device and the stud welding gun must be matched and adjusted
for the respective work.
11.1 Adjusting the charging voltage on the stud welding device
In the following, it is described how the charging voltage is adjusted.
In order to achieve an optimal stud welding result, carrying out some test welds
with different settings is necessary.
The charging voltage to be set on the stud welding device depends, among
others, on the following influencing factors:
• Material of the workpiece
• Thickness of the workpiece
• Material of the welding stud
• Diameter of the welding stud
At the stud welding device you find a support table with reference values for
charging voltages for the corresponding stud diameter.
Settings
The support table is intended to determine a suggested value for a
charging voltage which is approximately required to weld a stud with the
selected diameter according to experience. This value serves as a
guideline and normally has to be adjusted based on test welds using the
arrow keys.
The value which is set using the arrow keys is saved and remains
unchanged until a new value is entered even if the device is switched
off.
Adjusting the charging voltage
Step 1: Connect the device as described in chapter “10.2 Connection of
the stud welding device and the stud welding guns” on page 40.
Step 2: Use the table at the
stud welding device
to determine the
required charging
voltage for the relevant stud diameter.
Operating Instructions Soyer Bolzenschweißtechnik 43

Settings
i
Adjusting the charging voltage
Step 3: On the display, a
charging voltage value
will be displayed in [V].
Use the arrow keys
to increase or decrease the value, if required.
The charging voltage is adjusted.
The adjusted value is saved and remains unchanged even after
switching the device off and back on again.
↑↓
44 Operating Instructions Soyer Bolzenschweißtechnik

12. Welding operation
DANGER
!
In the following, it is described how weldings are carried out and how possible
welding errors can be avoided.
12.1 Carrying out welding
In the following, it is described how weldings are carried out with a stud welding
gun.
Danger from incorrect operation
During stud welding, incorrect operation of the devices may cause many
dangers.
Welding operation
• Before using the stud welding device, see chapter “2. Important safety
instructions” on page 8.
• If you have any problems understanding the operating instructions, contact
the manufacturer, Soyer.
Carrying out welding
Step 1: Before welding, see chapter “2. Important safety instructions” on
page 8
Step 2: Connect the gun to the stud welding device (see chapter “10.2
Connection of the stud welding device and the stud welding
guns” on page 40).
Step 3: Insert the appropriate stud chuck and a welding stud (see chap-
ter “8. Description of the PS-9K ACCU stud welding gun” on
page 32 and chapter “9. Description of the stud chuck” on
page 35).
Only use SOYER® welding studs.
Step 4: Check the charging voltage (see chapter chapter “11.1 Adjusting
the charging voltage on the stud welding device” on page 43).
Step 5: Ensure that the welding points on the stud and workpiece are
metallically bright.
Operating Instructions Soyer Bolzenschweißtechnik 45
Welding operation
i
Carrying out welding
Step 6: Press the gun onto the workpiece at an angle of 90 degrees.
When using a contact gun, press it firmly against the spring
force.
Step 7: Push the release button of the gun.
Welding is carried out.
During the welding process, hold the gun steadily and
only remove it vertically from the welded stud after the
welding process is finished. By doing so, widening or
damaging the stud chuck is avoided.
The welding process is finished.
12.2 Notes on checking the quality of the weld
If the SOYER® stud welding equipment is handled correctly and the correct
materials are selected, the strength of the welding joint (welding zone) is always
higher than the strength of the stud or the base material.
In practice, the following production control tests have proved successful:
• Visual inspection
• Bend test
For further information, see standard:
DIN EN ISO 14555 Arc stud welding of metallic materials or Technical Bulletin
DVS 0904 Instruction for practice - Arc stud welding.
12.2.1 Visual inspection
The visual inspection serves as a rough check for major defects. The uniformity
of the weld is assessed.
The following table serves as an aid for the assessment of the welding result:
46 Operating Instructions Soyer Bolzenschweißtechnik
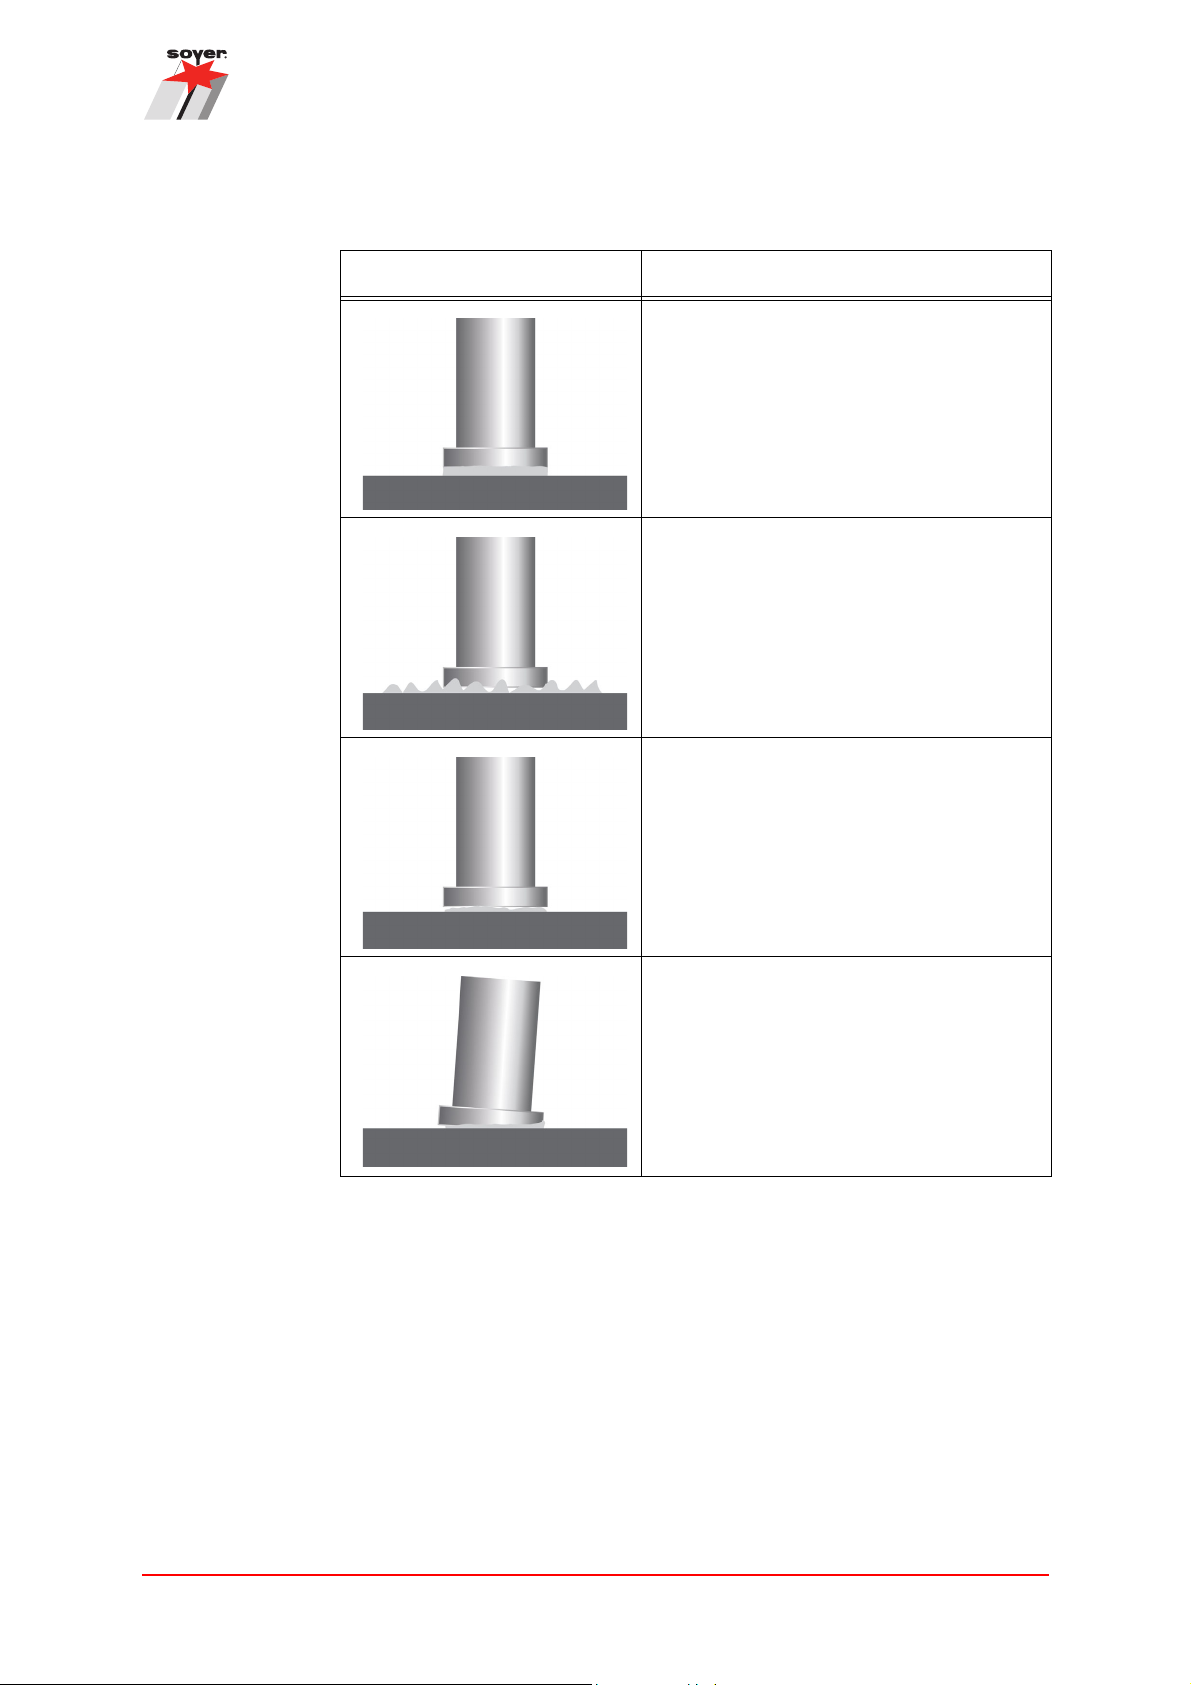
Visual inspection
Welding image Note
Welding operation
Good welding joint.
Optimum setting.
Even, bright and closed welding bead.
Poor welding joint, e.g. because the welding energy is too high or the immersion distance / lift is too small.
Poor welding joint, e.g. because the welding energy is too low or the lift is too short.
The welding bead is weak and unevenly
formed.
Poor welding joint, e.g. due to a blow effect
or a welding gun that was shaken or applied
at a slant.
The stud flange is not welded completely
and has visible imperfections. Undercuts
are visible.
Operating Instructions Soyer Bolzenschweißtechnik 47

Welding operation
12.3 Welding defects and their causes
In the following, the most common welding errors, possible causes and troubleshooting are described.
Please contact Heinz Soyer Bolzenschweißtechnik GmbH if a problem cannot be
solved.
Error Possible cause and troubleshooting
Device does not weld,
no sparking
Scorched stud thread Stud is too loose in the stud chuck.
Varying welding results
with unchanged settings
Stud welding device is not switched on or battery is empty.
• When switching on the device, the red indicator light “Ready” must
light up.
• Charge battery, if required.
Welding points or earth connection points on the workpiece are not
metallically bright. The LED display “Stud on workpiece” does not light
up (see chapter “7.2.1 Displaying the operating states” on page 22).
• Prepare the workpiece or stud. Grind connection points to a bright
metal finish.
• Press or retighten the stud chuck.
Stud chuck is worn.
• Exchange stud chuck.
Stud is too loose or not fully inserted into the stud chuck.
• Push in the stud until stop.
• If necessary, exchange the stud chuck.
Welding studs manufactured inaccurately.
• Only use SOYER® welding studs.
Stud is not welded to the
whole flange surface,
strength of the welding is
insufficient
48 Operating Instructions Soyer Bolzenschweißtechnik
Contamination on the surface of the workpiece is too heavy.
• Clean or grind the surface of the workpiece to a bright metal finish.
The front surface of the welding stud is deformed.
• Use new welding studs.
• Only use SOYER® welding studs
The welding gun was placed in tilted position.
• Position the welding gun evenly.

12.4 Malfunctions with an error message
DANGER
!
Dangers during troubleshooting
During troubleshooting, various dangers may occur.
Welding operation
• All devices of Soyer
by personnel of Soyer or personnel authorised by Soyer.
• For troubleshooting, the device must be disconnected from the main power
supply and secured against accidental switch-on. The battery of batteryoperated devices must be removed.
When there is a stud welding device malfunction, an error message (code) appears on the display.
Error
code
E01 Battery is empty. Charge or exchange battery.
E03 The thyristor is short-circuited. The thyristor is defective, please contact our
Description Possible cause
Bolzenschweißtechnik GmbH must only be opened
service.
E04 Excess temperature of the electronic
equipment.
E05 Capacitors are not being charged. • Gun not removed from stud after welding.
Operating Instructions Soyer Bolzenschweißtechnik 49
During high welding sequences, the device may
be exposed to an increased ambient temperature
(>45°C) or direct sunlight.
The device does not start again, even if the temperature decreases. In this case, switch off and on
again.
• Welding capacitor faulty (leakage current).
• Charging current source faulty.

Maintenance and repair
13. Maintenance and repair
Maintenance and repair of the stud welding device and the stud welding guns
should only be performed by Heinz Soyer Bolzenschweißtechnik GmbH or
authorised specialists.
14. Service
If servicing is required, please contact:
Heinz Soyer Bolzenschweißtechnik GmbH
Inninger Straße 14
82237 Wörthsee
Phone: 0049-8153-885-0
Fax: 0049-8153-8030
Email: info@soyer.de
Please have the serial number ready during service requests.
Alternatively, you can also contact your respective Soyer agent. Contact information can be found on our website at
www.soyer.de or
www.soyer.com (English)
50 Operating Instructions Soyer Bolzenschweißtechnik

15. Warranty conditions
The warranty period for commercial or equal use is 12 months. If repair is required, we guarantee the correction of the defects at the Etterschlag plant.
Wearing parts are excluded.
The warranty claim shall expire if damage is caused through improper operation,
repairs or interventions are undertaken by unauthorised persons and accessories
and spare parts are used that are not intended for our system.
When using welding studs from external manufacturers, we do not assume any
warranty for proper function of the stud welder and the quality of the welding joint.
Warranty conditions
Operating Instructions Soyer Bolzenschweißtechnik 51

Heinz Soyer Bolzenschweißtechnik GmbH
Inninger Straße 14
82237 Wörthsee
Tel.: 0049-8153-885-0
Mail: info@soyer.de
 Loading...