

Page 1

Operation Manual
10Base-T Ethernet Converter
AR-727CM
Table of Contents
1. Introduction
1.1 Features ----------------------------------- 1
1.2 Specifications ----------------------------------- 1
1.3 Applications ----------------------------------- 1
2. Overview
2.1 Dimensions and mounting ----------------------------------- 2
2.2 LED Indicators ------------------------------------ 3
2.3 DIP Switch Settings ------------------------------------- 3
2.4 D-SUB Connector pin out ------------------------------------ 3
3. Configuration
3.1 Reset To Factory Default ----------------------------------- 4
3.2 DHCP Function ----------------------------------- 4
3.3 How to configure the IP address assigned to your AR-727CM device 5
3.3.1 Get IP address by using Net727i software ------------------------- 5
3.3.2 Get IP address by DHCP Server ----------------------------------- 8
3.3.3 Get IP address by Hyper-Terminal function of the Window ------- 10
2005/12/16
Page 2

1. Introduction
The AR-727CM is an Ethernet to Serial Device Communication Controller. It
transparently routes the data between Ethernet Port and Serial Port. The Device
Server can be used in any application that need Ethernet and with a serial
communication port already.
1.1 Features
- Support Serial Port Freeze Function for High Security Use
- Support Lock Remote IP Function
- Provide TCP/IP Server Stack and DHCP function
- One asynchronous serial ports allow full-duplex, 8-bit, none parity data
transfers
- Serial port hardware handshaking with CTS and RTS selectable
- 10BASE-T NE2000 compatible Ethernet Controller
- Provide 256 Bytes Serial Buffer and 256 Bytes of TCP Buffer
- Auto Configuration of the IP and gateway addresses and subnet function
- Watchdog Timer included
- Remote Configuration Through Ethernet or Local Configuration via Serial
Port
- DIP Switch Selectable for RS-485 or RS-232 Interface
1.2 Specifications
- Ethernet : 10Base-T NE2000 compatible
- Serial Port : 2400~57600 bps, None Parity, 8 data, 1 stop bit
- Environment : -20°C to +75°C
- Power Suppiy (DC) : 9.0 ~ 24.0 VDC
- Power Consumption : 1.5W (max)
- Dimensions (mm) : 100 X 60 X 23
- Accessories : One DB9 Male Cable for RS-485/RS-232 and
Power
- Software and Utility : Net727i Setup Program in Floppy Disk or
CDROM.
1.3 Applications
Access Controller, Time Recorder, Industry Controller, etc.
1
Page 3
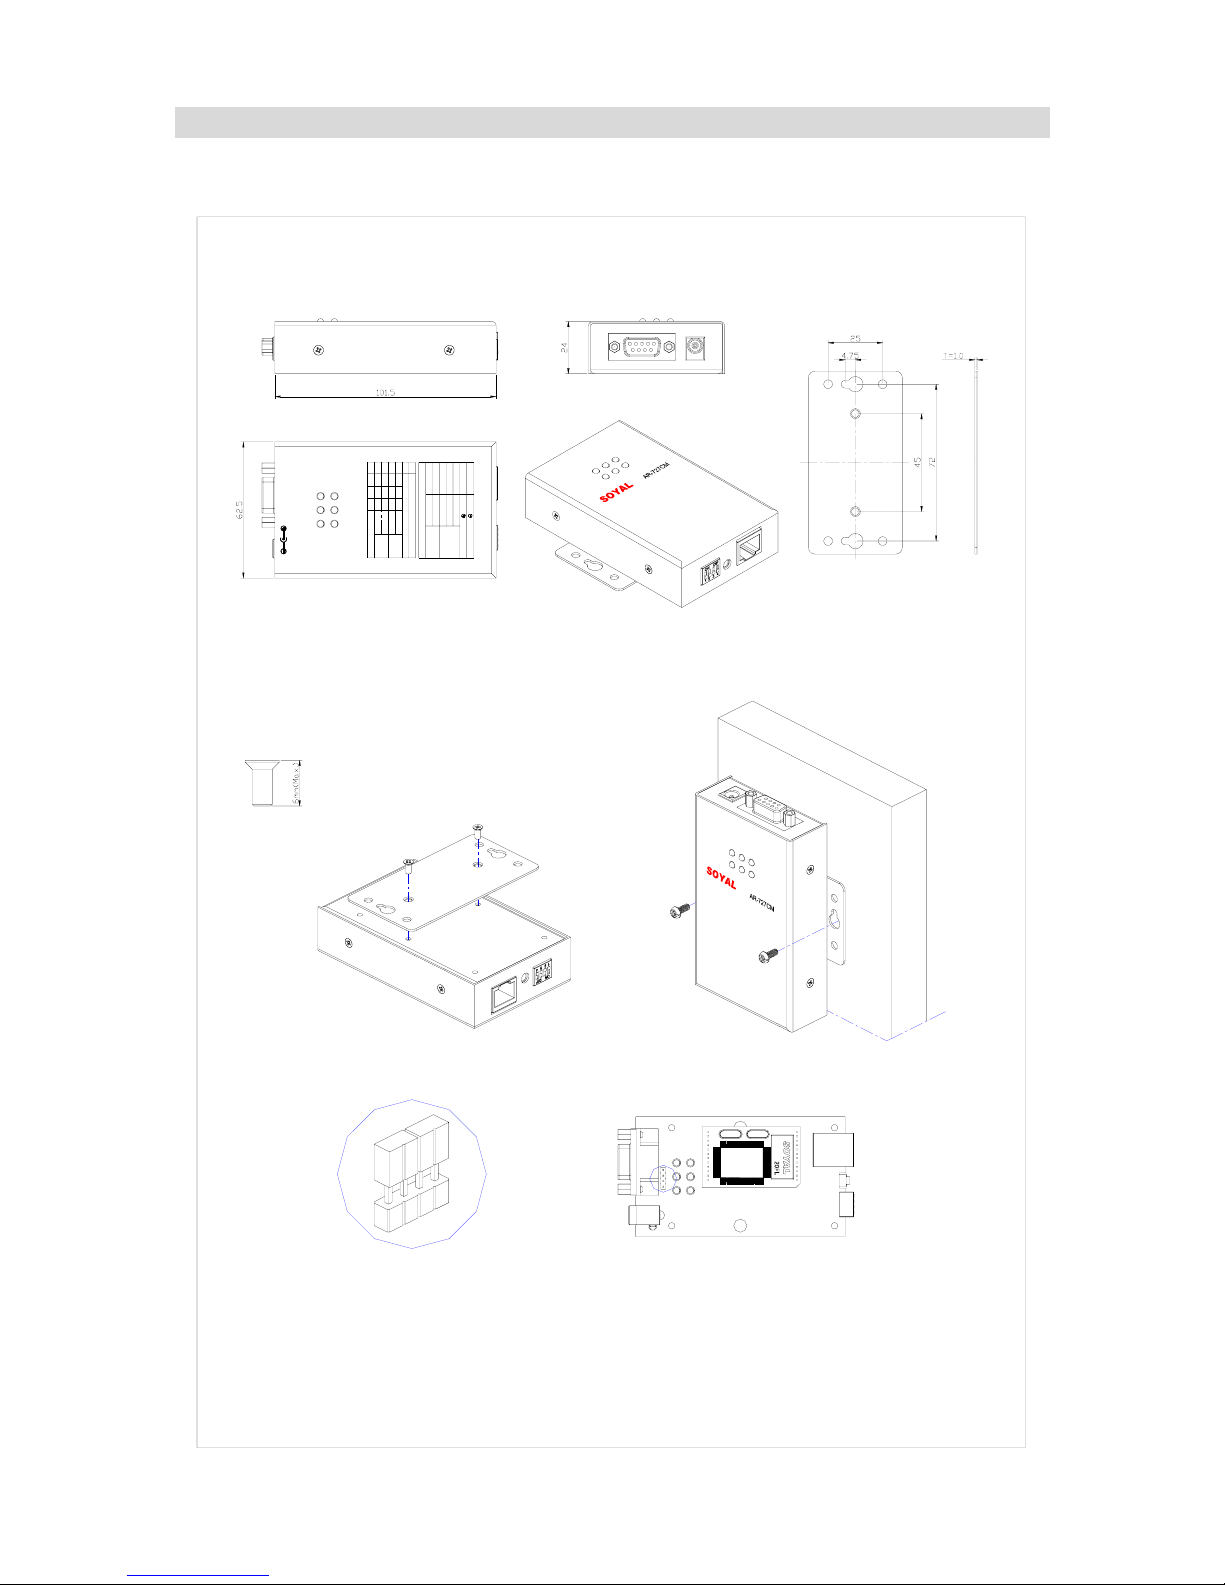
2. Overview
2.1 Dimensions and mounting
DIP-SW
RS-485
RS-232
5
GND
Ethernet Port
4
6
Rx ( Input )
Tx ( Output)
B ( - )
DB9
A ( + )
329
1
OFF
ACT
RS-485
RS-232
RS-485
RS-232
DHCP Enable
RUN Mode
Setup Mode
Link
Power
AR-727CM
OFFONOFF
ON
2
ON
OFF
OFF
1
ON
ON
ON
OFF
ON
3
OFF
4
BUSY
Serial TX
Serial RX
DC-IN
Serial Port
Power DC
Power DC
DHCP Disable
RESET
DIP-SW
SOYAL
How to install:
Screw length must no longer than 6mm.
Remove Jumper if powered by External Adapter.
Close Jumper if powered through DB9 (4,6).
2
Page 4
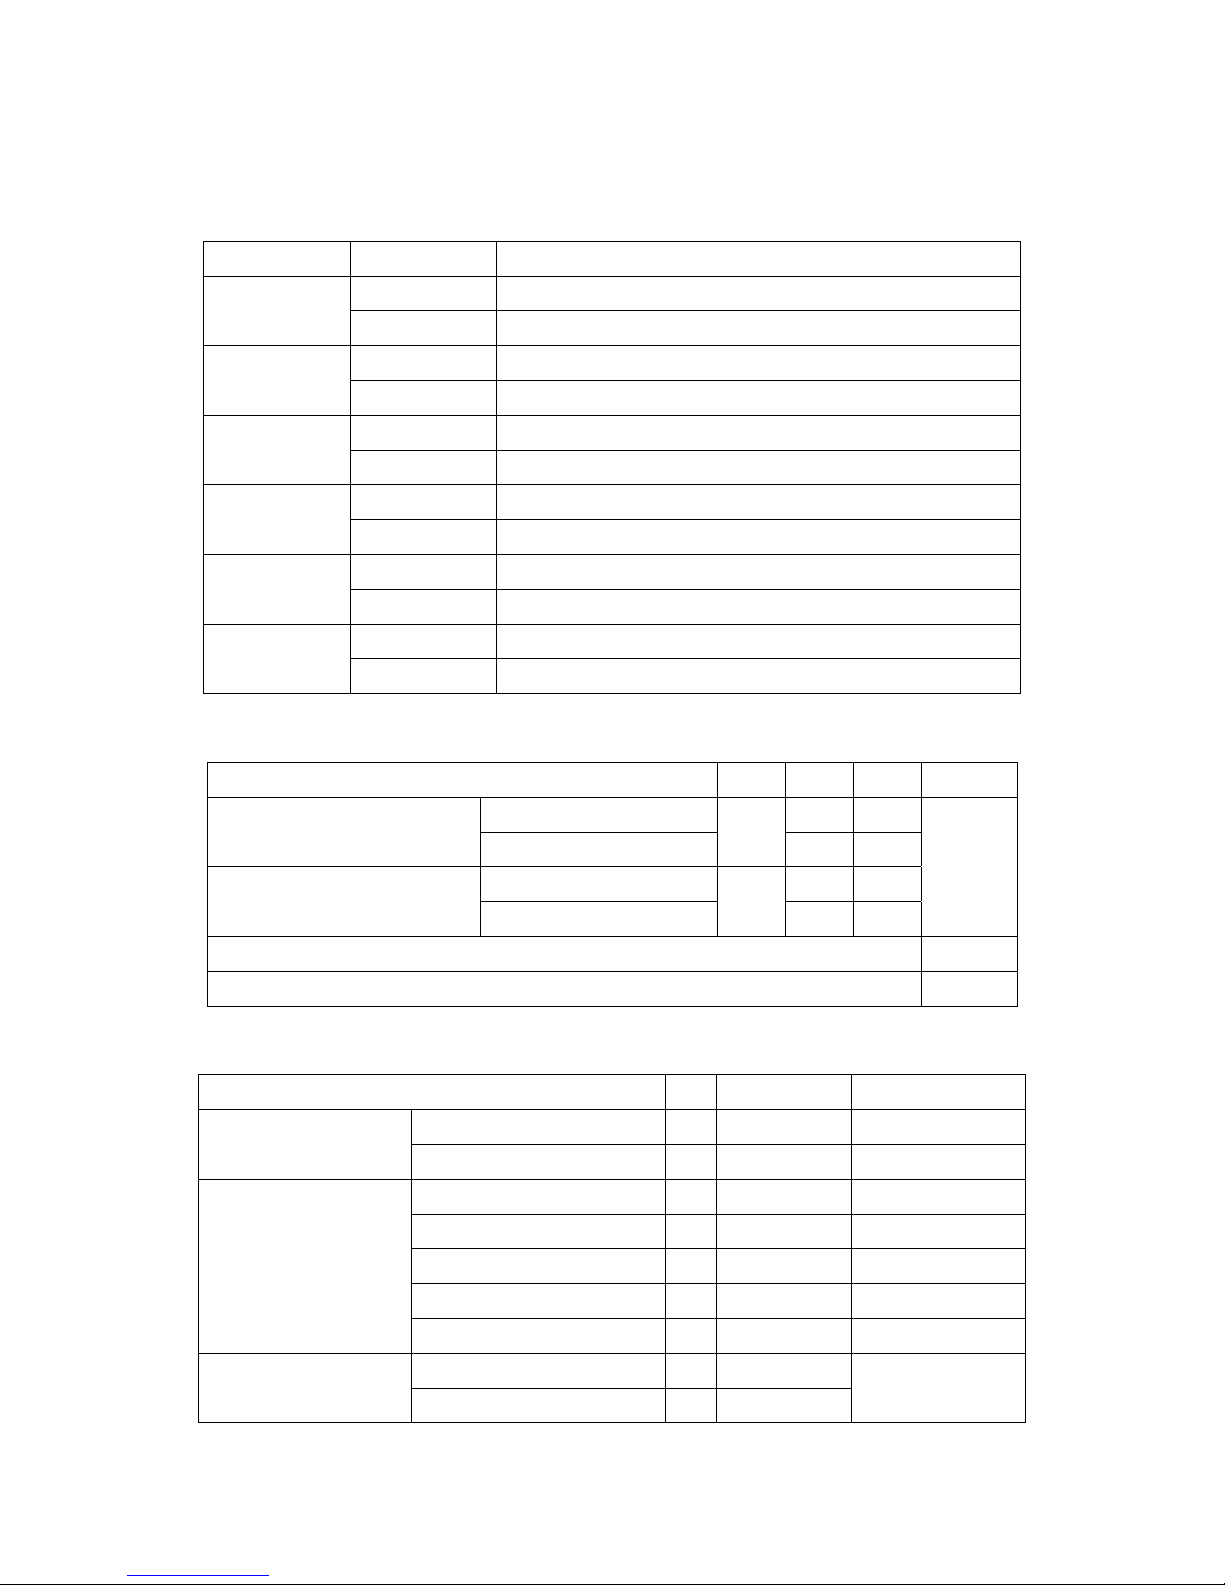
2.2 LED Indicators
AR-727CM’s top panel contains six LED indicators, as described in the following
table.
LED Name LED Color LED Function
Green Power is on. POWER
Off Power is off, or power error condition exits.
Yellow Media is connected. Link
Off Media is not connected.
Green 10 Mbps Ethernet connection. ACT
Off Ethernet cable is disconnected, or has a short.
Red Configuration Setup. BUSY
Off No.
Green Serial data is being received. Serial RX
Off Serial data is not being received.
Red Serial data is being transmitted. Serial TX
Off Serial data is not being transmitted.
2.3 DIP Switch Settings
DIP Switch 1 2 3 4
RS-232 ON OFF
Serial Setup Mode
Two Wire RS-485
ON
OFF ON
RS-232 ON OFF
Normal Run Mode and
Networking Setup
Two wire RS-485
OFF
OFF ON
DHCP Enable (Auto IP Address Configuration) ON
DHCP Disable (Auto IP Address Configuration) OFF
2.4 D-SUB Connector pin out
Function Pin Wire Color Type
DATA (A +) 1 Blue Bi-direction
Two Wire RS-485
DATA (B -) 9 Green Bi-direction
Data Transmit 2 White Output
Data Receive 3 Yellow Input
Signal Ground 5 Brown
Request to send (RTS) 8 Gray Output
RS-232
Clear to Send (CTS) 7 Purple Input
Power Source : V+ 6 Red
Power Input
Power Ground : V- 4 Black
Depend on JP1
Setting
3
Page 5

AR-727CM has two way of power supply, one from power jack and one from DB9.
In general usually, The Serial Device has DC power already, so AR-727CM can share
the power with Serial Device. The DB9 pin-4 connect to Power Ground (V-), pin-6
Connect to Power Source (V+). If you power AR-727CM from Adapter, remove the
jumper from JP1.
3. Configuration
3.1 Reset To Factory Default
Press RESET button more than 5 seconds, The
BUSY LED will flash 5 times, then AR-727CM
will restore to Factory Default value. DIPswitch is
OFF, OFF, OFF, OFF position.
IP Address : 192.168.001.127
Gateway IP : 192.168.001.254
Subnet Mask : 255.255.255.000
Serial Port : 9600,N,8,1
TCP Port : 1621
Password : none
DIP Switch position
OFF, OFF, OFF, OFF
3.2 DHCP Function
AR-727CM support Auto Configuration of the
IP and gateway addresses and subnet mask
function, but must make sure the DHCP Server
is active. Switch DIP SW-4 to “ON” position
then power cycle the Device. In begging state
the ACT LED will flashing, After IP has got ACT
LED will off and auto save the new IP address
to EEPROM, Switch DIP SW-4 to “OFF”
position and move DIP SW-1 to “ON” position
then you can get the new IP from Serial port
via Hyper terminal.
4
Page 6

3.3 How to configure the IP address assigned to your AR-727CM device?
3.3.1 Get IP address by using Net727i software
Usually, the network of some company don’t built-in the DHCP Server. Therefore, we
can use the following method to get default IP address and modify it. The steps as
follows:
Step 1: Press RESET button more than 5 seconds, The BUSY LED will flash 5 times,
then AR-727CM will restore to Factory Default value.
Step 2: Open explorer, click “My Network Places” and press right key to open Properties.
Step 3: Click “Local Area Connection” and press right key to open Properties.
Then double click Internet Protocol (TCP/IP) to open Properties.
5
Page 7

Step 4: Click ”Use the following IP address” and enter IP address 192.168.001.64,
Subnet mask 255.255.255.0
Step 5: Click “ok” to exit.
Step 6: Install Net727i.exe into your PC and run Net727i.exe
(Start → Programs → soyal software → Net727i )
6
Page 8

Step 7: Click “Get” to get default Local IP Address, Gateway, Netmask and TCP Port.
Step 8: Change new address and parameters then click “write”.
Step 9: If AR-727CM connects to soyal controller, please switch DIP Switch position
to OFF, OFF, ON, OFF to RS-485 RUN Mode.
Remark:
(1) How to know PC’s IP Address? (Win98)
Start → execute → enter “winipcfg”.
(2) How to know PC’s IP Address? (Win2000)
Start → Programs → Accessories → Command Prompt → C:\> ipconfig
(3) Please see detailed parameter in next page:
Setting Value Notes Necessity
Local IP Address 192.168.001
.127
Defines own IP Address of the AR-727CM Required
Local Gateway IP
Address
192.168.001
.254
Defines the IP Address of the default
gateway
Required
Local Subnet
Mask
255.255.255
.000
Defines the IP Address range for the local
network segment
Required
TCP Port 1621 The TCP port that other devices must use to
contact this device. To avoid conflicts with
standard TCP ports.
Required
MAC Address 00.E0.4C.00
.00.50
The MAC (Media Access Control) address is
a unique identifier set at the factory.
-
Force Transmit
time
5 Forces AR-727CM device’s TCP/IP protocol
software to try to pack serial data received
during the specified time into the same data
frame.
Optional
Force Transmit
Bytes
32 Defines the amount of data in the serial,
Ethernet buffer at which the break condition
will be generated and the contents of buffer
will be sent out via the Ethernet port.
Optional
Lock Remote IP
Address
- Allows contact with only the specified remote
IP address.
Optional
Lock Serial Port
(Free Run or
Freeze Over)
- To avoid the hacker use this IP to intercept
data when Remote IP Address doesn’t
receive data.
Optional
Setup Password none Console password Optional
Serial Port Speed 9600 Changes current baud rate of the
AR-727CM’s serial port (from 2400bps to
57600bps).
Required
TCP Auto
Disconnect Time
(Second)
60 This device automatically closes TCP
connection if there is no TCP activity for the
given time.
Optional
Serial Port
Hardware
Handshaking
(RTS/CTS)
- An exchange of signal over specific wires
which each device indicates its readiness to
send or receive data.
Optional
DHCP - Selecting the enable option allows DHCP to
automatically assign the AR-727CM’s IP
address.
Optional
7
Page 9

3.3.2 Get IP address by DHCP Server
AR-727CM support Auto Configuration of the IP and gateway addresses and subnet
mask function, but must make sure the DHCP Server is active. The steps as follows:
Step 1: Switch DIP Switch position to OFF, OFF, OFF, ON.
Step 2: Power cycle the device
Step 3: In begging state the ACT LED will flashing, after IP has got ACT LED will off
and auto save the new IP address to EEPROM.
Step 4: Switch DIP SW-4 to “OFF” position and move DIP SW-1 and SW-2 to “ON”
position
Step 5:To modify parameter on the AR-727CM through the Hyper-Terminal function of
the Window.
(Start → Programs → Accessories → Communication → Hyper Terminal)
Step 6: Click “Hyper-Terminal”.
Step 7: key-in any temporary name.
Shown as follows: It is not important matter.
Step 8: Choose which COM port Step 9: Set Port Settings to 9600, 8, None, 1,
and click OK to exit. None and click “OK” to save.
8
Page 10

Step 10: AR-727CM already gets IP address now shown as follows:
Note that save it after set all parameters.
Step 11: If AR-727CM connects to soyal controller, please switch DIP Switch position
to OFF, OFF, ON, OFF to RS-485 RUN Mode.
9
Page 11

3.3.3 Get IP address by Hyper-Terminal function of the Window
Step 1: To get Default IP address on the AR-727CM through the Hyper-Terminal function
of the Window. (Start → Programs → Accessories → Communication → Hyper
Terminal)
Step 2: Click “Hyper-Terminal”. Step 3: key-in any temporary name.
Shown as follows: It is not important matter.
Step 4: Choose which COM port Step 5: Set Port Settings to 9600, 8, None, 1,
and click OK to exit. None and click “OK” to save.
10
Page 12

Step 6: AR-727CM already gets IP address now shown as follows:
Step 7: Please refer above item and enter item on the so that set all
parameters.
Step 8: Note that enter item 6 on the to save parameter after finishing to
set parameter.
Step 9: If AR-727CM connects to soyal controller, please switch DIP Switch
position to OFF, OFF, ON, OFF to RS-485 RUN Mode.
11
 Loading...