

Page 1

Hand Push Cylinder Mower
GT5614
OPERATING INSTRUCTIONS
Sep 2014 Rev A
Page 2
ORIGINAL INSTRUCTIONS
INTRODUCTION
Thank you for purchasing a Hand Push
Cylinder Mower .
We would you like to be completely satisfied
with your new product and hope you will enjoy
using this tool for many years.
Your Hand Push Cylinder mower has
been designed for cutting grass
and similar soft vegetation in private and hobby
garden areas.
The device is not allowed to be used in public
gardens, parks, sports centres or at roadsides
as well as agriculture and forestry.
Caution: Carefully read this entire Instruction
Manual before using this product.
We are confident that this product will meet
and exceed your expectations of quality and
reliability. Please take the time to carefully
read this entire instruction manual before
using your new product, and take note of the
basic safety precautions contained herein.
SYMBOLS
The rating plate on your tool may show
symbols. These represent important
information about the product or instruction on
its use.
Read instruction manual before
operating or attempting any
maintenance work.
Indicates danger, warning, or caution.
Do not run the machine over objects.
They can be thrown and cause severe
injury.
Keep bystanders, especially children
10m
and pets, at a distance of greater than
10m.
Do not put your hands near the rotating
blades.
Avoid injury, do not place hands or feet
near the rotating blade.
SAFETY INSTRUCTIONS
WARNING!
Before using the mower, read following
instruction carefully.
1. TRAINING
a) Never allow children or people unfamiliar
with these instructions to use the mower. Local
regulation can restrict the age of the operator
b) Never mow while people, especially children,
or pets are nearby.
c) Keep in mind that the operator or user is
responsible for accidents or hazards occurring
to other people or their property.
2. PREPARATION
a) While mowing, always wear substantial
footwear and long trousers. Do not operate the
mower when barefoot or wearing open sandals.
b) Thoroughly inspect the area where the
equipment is to be used and remove all objects
which can be thrown by the machine.
c) Before using, always visually inspect to see
that the blades, blade bolts and cutter
assembly are not worn or damaged. Replace
worn or damaged blades and bolts in sets to
preserve balance.
3. OPERATION
a) Mow only in daylight or in good artificial light.
b) Always be sure of your footing on the slopes.
c) Walk, never run.
d) Exercise extreme caution when changing
direction on slopes.
e) Do not mow excessively steep slopes.
f) Use extreme caution when reversing or
pulling the mower towards you.
g) Stop the blades if the mower has to be tilted
for transportation when crossing surfaces other
than grass, and when transporting the mower
to and from the area to be mowed.
h) Never operate the mower with defective
guards, or without safety devices, for example
deflectors and/or grass catchers, in place.
Customer Helpline 01904 727503
1
www.gardenservicecentre.co.uk
Page 3

ORIGINAL INSTRUCTIONS
i) Do not put hands or feet near rotating parts
while the mower is being operated.
4. MAINTENANCE
a) Keep all nuts, bolts and screws tight to be
sure the equipment is in safe working condition.
b) Check the grass catcher frequently for wear
or deterioration.
c) Replace worn or damaged parts for safety.
d) Be careful during adjustment of the mower
to prevent entrapment of the fingers between
moving blades and fixed parts of the mower.
Caution-Do not touch rotating blade.
5. WORK AREA SAFETY
a) Keep work area clean and well lit.
Cluttered or dark areas invite accidents.
b) Keep children and bystanders away while
operating the mower.
Distractions can cause you to lose control.
6. PERSONAL SAFETY
a) Stay alert, watch what you are doing and
use common sense when operating the
tools. Do not use this mower while you are
tired or under the influence of drugs,
alcohol or medication.
A moment of inattention while operating this
mower may result in serious personal injury.
b) Use personal protective equipment.
Always wear eye protection and non-skid
safety shoes.
c) Do not overreach. Keep proper footing and
balance at all times.
This enables better control of the mower in
unexpected situations.
d) Dress properly. Do not wear loose
clothing or jewellery. Keep your hair,
clothing and gloves away from moving parts.
Loose clothes, jewel
caught in moving parts.
lery or long hair can be
Customer Helpline 01904 727503
www.gardenservicecentre.co.uk
2
Page 4
ORIGINAL INSTRUCTIONS
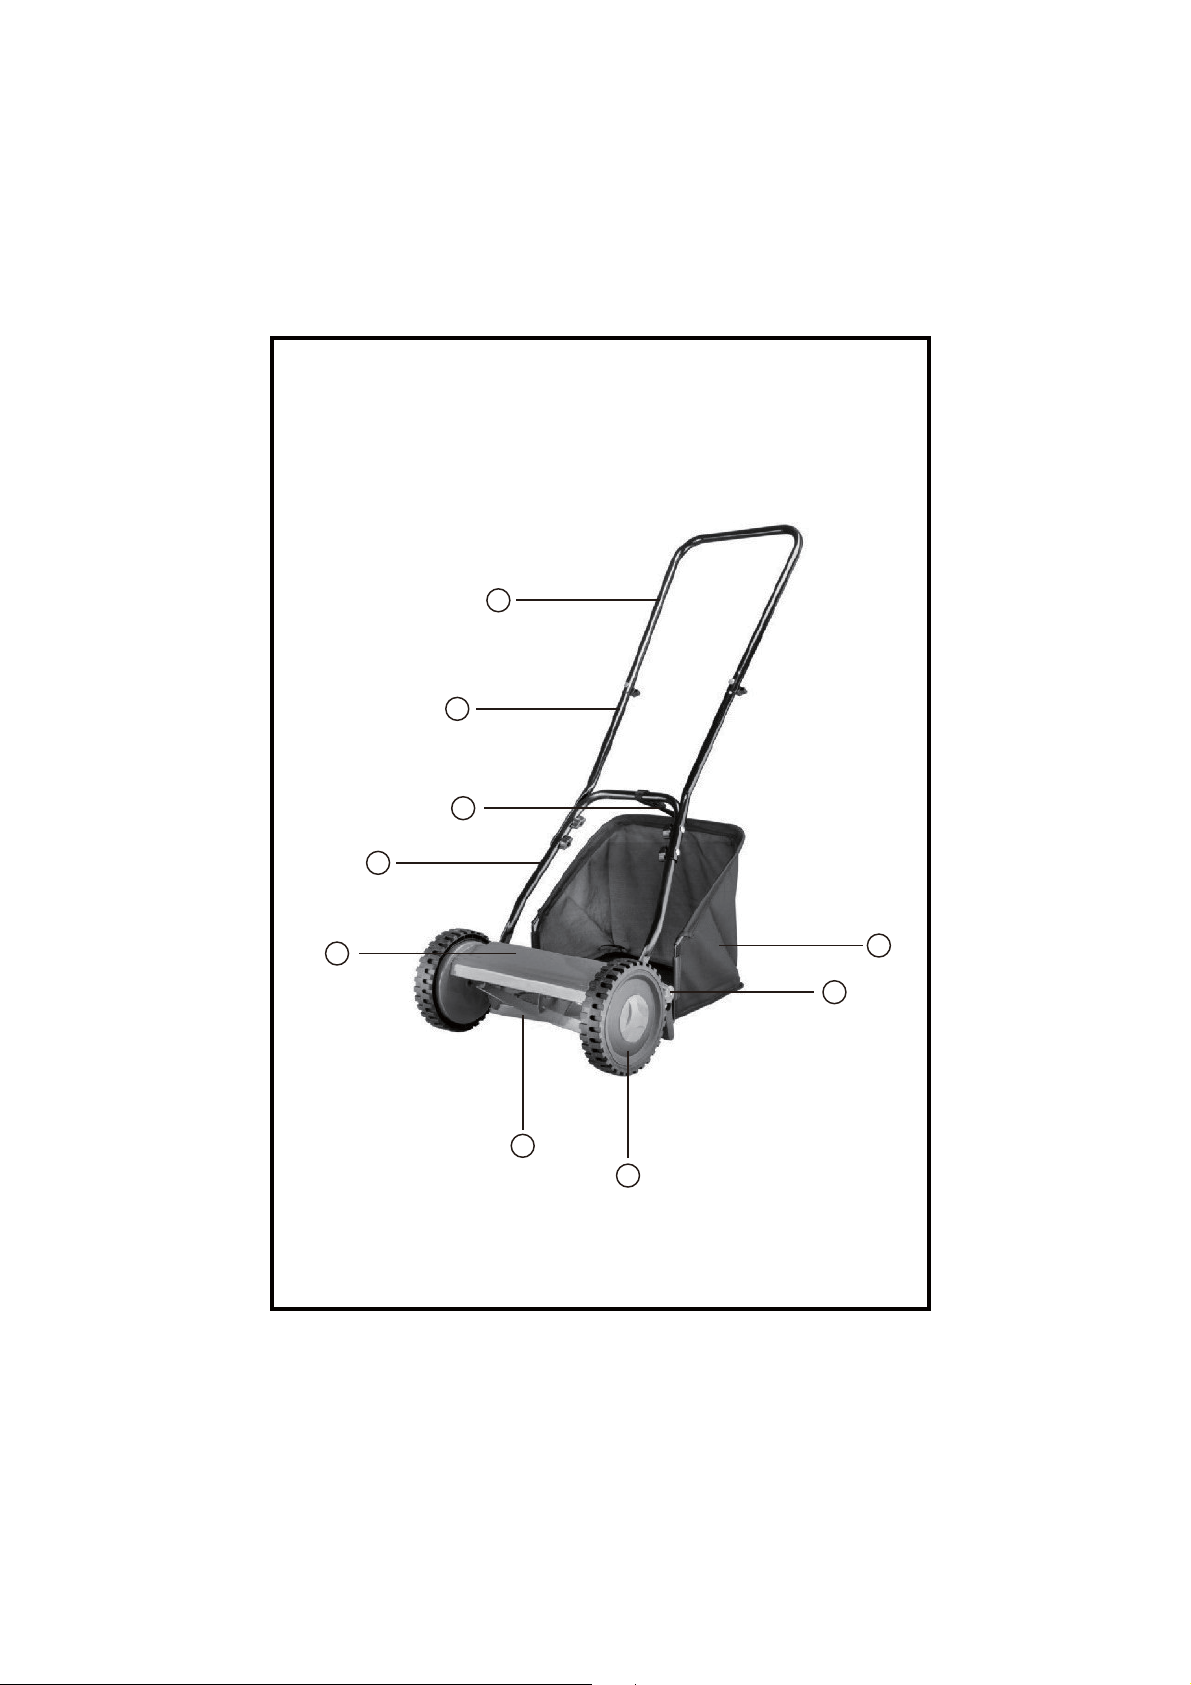
1
2
9
3
5
6
7
4
8
3
Customer Helpline 01904 727503
www.gardenservicecentre.co.uk
Page 5

ORIGINAL INSTRUCTIONS
1. Upper handle
2. Handle extensions
3. Lower handle
4. Cylinder blade
5. Mower body
6. Grass collecting box
7. Cutting height adjustment knob
8. Wheels
9. Grass collecting box support strap
Customer Helpline 01904 727503
www.gardenservicecentre.co.uk
4
Page 6

ORIGINAL INSTRUCTIONS
7. USE AND CARE
a) Do not force the machine. Use the correct
machine for your application.
The correct machine will do the job better and
safer at the rate for which it was designed.
b) Do not use the machine if any parts
of the machine is damaged or broken.
Any machine that is damaged or broken is
dangerous and must be repaired.
c) Store idle machine out of the reach of
children and do not allow persons
unfamiliar with the machine or these
instructions to operate the machine.
This machine is dangerous in the hands of
untrained users.
d) Maintain the machine. Check for
misalignment or binding of moving
parts, breakage of parts and any other
condition that may affect the machine's
operation. If damaged, have the machine
repaired before use. Many accidents are
caused by poorly maintained machine.
e) Keep cylinder blades sharp and clean.
Properly maintained cutting blades with sharp
cutting edges are less likely to bind and are
easier to control.
Slide the upper handle over the two handle
extensions until the holes are lined up, then
secure using the nuts and screws provided.
(See Fig.A)
Fig.A
Align the two holes on one of the handle
extensions with those on the lower handle.
Secure them together using the nuts and
screws provided. Repeat the process with the
other handle extension. (See Fig.B1,B2 & B3)
Fig.B1
OPERATION
INSTRUCTION
Note: Before using the tool, read the
instruction book carefully.
FITTING THE HANDLE
5
Fig.B2
Customer Helpline 01904 727503
www.gardenservicecentre.co.uk
Page 7

ORIGINAL INSTRUCTIONS
Fig.B3
Fig.C
Now the handle is fully assembled, and ready
to be attached to the mower head.
To attach the handle to the mower head, locate
the two metal lugs found forward of the cutting
bar adjustment knobs. To attach the handle,
insert one of the large holes in the handle arm
over the lug, then repeat the same process with
the other side. It may be required to use some
force to squeeze the two arms together to allow
room for locating the second arm over the
remaining metal lug.
Fig.D1
Insert the metal frames into the plastic holes
(See Fig.D2, D3 & D4)
Fig.D2
Fig.D3
Fig.D4
ASSEMBLE THE GRASS
COLLECTION BOX
The grass collection box need to be assembled
well before use (See Fig.D1).
Customer Helpline 01904 727503
www.gardenservicecentre.co.uk
6
Page 8

ORIGINAL INSTRUCTIONS
Wrap the metal frams by the plastic hems (See
Fig.D5, D6 & D7)
Fig.D5
Fig.D6
Fig.D7
WARNING!
The grass collection box must be fitted before
using the mower. Attach the box to the lawn
mower body by sliding the holes in them front
of the box over the attachment hooks in front
of the cutting height roller, also fit the grass box
support strap such that the rear of the box is
clear of the ground in normal use.
(See Fig.E1, E2 & E3)
Fig.E1
FITTING THE GRASS
COLLECTION BOX
7
Fig.E2
Fig.E3
Customer Helpline 01904 727503
www.gardenservicecentre.co.uk
Page 9

ORIGINAL INSTRUCTIONS
FIXED BLADE SETTING
Caution:
This operation will have to be done whilst
carefully turning the cylinder blade. We strongly
recommend that thick gardening gloves are
worn. The fixed blade must be set correctly in
order for the lawnmower to work efficiently.
Carefully tighten the two adjusting knobs by
turning them slowly in the clockwise direction.
When the cylinder blade just makes contact
with the fixed blade turn the rotating knobs
slightly in an anticlockwise direction until the
rotating blade turns without touching the fixed
blade.(See Fig.F)
Fig.F
ADJUSTING THE
CUTTING HEIGHT
Depending on the length of grass you are
cutting you may want to adjust the cutting
height of the lawnmower. This can be done
by raising or lowering the cutting height roller.
To adjust the cutting height, pull the cutting
height adjustment knobs on both sides away
from the mower body, and then move them
forward or backward to adjust the cutting
height. Make sure knobs are in the same
height at both sides.
EMPTYING THE GRASS
COLLECTING BOX
Fig.G1
Unhook the support strap from the box and
tilt the mower handle back.(See Fig.G1)
Fig.G2
Lift the handle a little, then take out the box.
(See Fig.G2)
Refit the box and support strap. Unhook the
support strap from the box and tilt the mower
Fig.H
Customer Helpline 01904 727503
www.gardenservicecentre.co.uk
handle back Lift the handle a little, then take
out the box.(See Fig.G3)
Fig.G3
8
Page 10

ORIGINAL INSTRUCTIONS
MAINTENANCE
Note:To ensure long and reliable service carry out the following maintenance regularly.
Regularly check for obvious defects such as loose, dislodged blades, loose fixings, and worn or
damaged components. Check that covers and guards are undamaged and correctly fitted.
Carry out necessary maintenance or repairs before using. If the lawnmower should happen
to fail despite the care taken in manufacture and testing, repair should be carried out by an
authorized service agent.
After mowing/storage clean the exterior of the machine thoroughly using a soft brush and
cloth. Do not use water, solvents or polishes.
Store the lawnmower in a dry place. Do not place other objects on top of the machine.
TECHINICAL DATA
Model No. GT5614
Grass collecting box
Cutting width
Variable cutting heights
Weight
23 litres
30cm
18-38mm 4pos
6.3kg
SHARPENING THE BLADE
Before taking the time and effort to sharpen the blades, make sure that it needs sharpening. Most
of all issues can be solved by ensuring the blades are properly
adjusted (ADJUSTMENTS section).
1. Prop up the push reel mower so that the blade reel can be rotated by turning the wheels.
2. Check the blades for nicks and burrs. If any damage is found, it usually can be removed by
holding a file flat against the blade and pushing away from the edge.
3. Examine the cutting bar. It should just meet the blades along their entire length. (To make sure
the cutting bar is located correctly, grasp a wheel and turn it forward; you should hear a whispery
sound as the blades pass the cutting bar).
4. If the bar is out of alignment, adjust using the adjustment knobs on the ends of the bar
(ADJUSTMENTS section).
5. Using your fingers or a soft paintbrush, cover the blades with a thin, even coat of automotive
valve-grinding compound (available at automotive stores).
6. Grasp a wheel and turn it slowly backward so the grinding compound is squeezed between the
blades and the cutting bar, thereby sharpening both cutting edges as they pass each other. Be
sure that each blade touches the bar as the wheel is rotated.
7. Make about a dozen turns, applying more grinding compound when necessary.
9
Customer Helpline 01904 727503
www.gardenservicecentre.co.uk
Page 11

ORIGINAL INSTRUCTIONS
8. Examine the blade edges. If they look sharp, wash off all the valve compound with soapy water
and rinse thoroughly.
9. Test for sharpness. Insert a sheet of newspaper between the blades and the cutting bar, and
rotate the reel forward. When the blades cut the paper as easily and as cleanly as a sharp pair of
scissors would, the task is complete.
Note: After each use, hose the mower clean and wipe it dry. Wipe all the metal parts with a thin
film of WD-40 or mineral oil.
GUARANTEE
This product is selected for DOMESTIC USE ONLY and not for business use. This product is
guaranteed against manufacturing defects for a period of 12 months. This does not cover the
product where the fault is due to misuse, abuse, use in contravention of the instructions, or
where the product has been the subject of unauthorised modifications or alterations, or has been
the subject of commercial use. In the event of a problem with the product within the guarantee
period please return it to your nearest store. If the item is shown to have an inherent defect
present at the time of sale, the store will provide you with a replacement. Your statutory rights
remain unaffected.
Customer Helpline 01904 727503
www.gardenservicecentre.co.uk
10
 Loading...