

Page 1
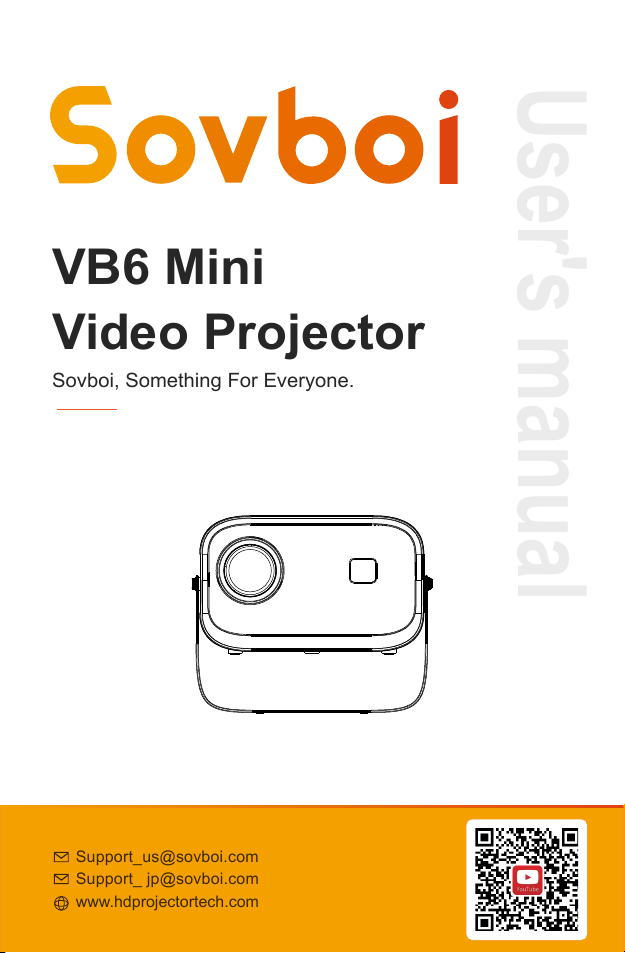
VB6 Mini
Video Projector
Sovboi, Something For Everyone.
User's manual
Page 2

Page 3

CONTENTS
CONTACT US ·································································01
TROUBLESHOOTING ······················································02
PACKING LIST ·······························································04
FUNCTION OVERVIEW ····················································05
REMOTE CONTROL ························································06
QUICK START ································································07
INPUT SOURCE ······························································08
-USB Connection······························································08
-HDMI Connection····························································09
-Speaker Connection·························································10
WIRELESS PROJECTION ················································11
SETTINGS······································································13
BLUETOOTH CONNECTION·············································14
PROJECTOR IMAGE SETTINGS ·······································16
-Installation Method···························································16
-Keystone Correction·························································18
-Electric Focus·································································19
-Zoom Function································································20
INSTALLATION ·······························································20
-Projection Distance and Size··············································20
-Install on the Ceiling·························································21
PROJECTOR SPECIFICATIONS ········································22
FCC STATEMENT····························································23
Page 4
Our High qualified and responsible customer service team is waiting to
WE ARE
constantly optimizing and upgrading our products, the pictures
and descriptions in the manual are for reference only may differ
from the actual product, please refer to the actual product.
Product warranty and support are provided if products have been
purchased from our authorized seller. In order to protect your
rights, you can also send an email to Sovboi official email
[email protected] to verify the authenticity of your Sovboi
VB6.
hear
from you and answer any of your questions 24/7.
We are happy to receive your message about the problems you met so that
we can help you to get out of the trouble. We are even happier to hear your
praise about our wonderful projector and to see the happy moments our
projector have brought to your life!
The fastest and most efficient way to contact us?
Method 1- Via email:
Method 2:
Your Orders>The order has a problem>Choose a topic from list
displayed>
Select Contact seller
Please come. Please~~~
www.hdprojectortech.com
Page 5
CONTACT US
Thank you very much for supporting Sovboi! Hope our products and
services bring you a pleasant journey of audio-visual enjoyment.
Sovboi promises a 3-Year Warranty and Lifetime Technical Support, please
do not worry when encountering any problems. Any buyer with any
questions who comes to contact us will have our promise to get a
satisfactory solution + an Extra 6-Month Warranty to thanks for your
support!
By the way, we are racking our brains to develop a new projector. If you have
any ideas about projector, such as user experience, parameters, features,
colors and appearance, we warmly invite you to tell us in detail.
We value all voices, and you won't imagine how much we look forward to
your ideas. Once your idea is adopted, as a thank you, I will apply to
send one to you for FREE as the first tester when the new product is
developed.
Looking forward to your messages!
Sovboi Support Team
Scan QR code below, start chatting with us!!!
US-Whatsapp CA-Whatsapp
Facebook
Scan this code, learn how to operate the projector visually on YouTube!!!
YouTube
United States: [email protected]
Japan&Canada: [email protected]
YouTube: Search “Sovboi” on YouTube
Official website: www.hdprojectortech.com
Page 6
TROUBLE SHOOTING
Our high-qualified customer services team is waiting to hear from you and
answer any of your questions 24 hours a day and 7 days a week. We are
happy to receive your message about the problems you met so that we can
help you to get out of the trouble. You can contact us through email.
Support_ [email protected]
Q: Where can I find the instructional videos on how to set up the
projector?
A: We have prepared detailed operation videos on YouTube, which contains
almost every step of operating the projector, like wifi connection, wired
connection and so on. Just search "Sovboi" on YouTube and you will find it.
Q: I received the projector but it has no remote control. Could you send
it to me?
A: If the product you receive is missing any accessories, please let us know
what accessory do you miss. We will send them to you as soon as possible.Just contact us via our e-mail:[email protected].
Q: I can't find the focus ring on the projector,how can I adjust the
focus?
A: This mini projector support electric-focus with remote control,just need to
press the "F+"&"F-" on the remote.Note: Projector and screen/wall must be
in effective distance.
Q: The remote control is unresponsive.
A: ①Make sure remote points at IR receiver directly.
②Do not cover IR receiver.
③Make sure you have put the battery in,this remote control does not come
with batteries.
Q: I don't need the projector stand,how can I remove it?
A: You can use the small wrench in the accessories bag to remove this
projector mount.
Q: The projector is scratched, did I receive a second-hand product?
A: We promise that our projector has been carefully checked before
shipping. However the long time and distance shipping may cause damage
Page 7

to the projector. Plz don't worried about that and you can contact us to get a
satisfactory solution.
Q: I can't play Netflix video on the projector, why?
A: There are quite a few video platforms like Netflix, Disney+ and Hulu are
under HDCP copyright protection, and thus do not support being displayed
on a projector, this is the same situation for all projectors. You would need a
TV stick to enjoy these video platforms.
Q: How can I use the projector as a speaker?And how can exit the
speaker mode?
A: ①Enter speaker mode: In the working state, short press the power button
to switch to speaker mode. After entering the speaker mode for 20 seconds,
it will automatically enter the Bluetooth standby state.
②Exit speaker mode: In the speaker mode, short press the power button or
any key on the remote control to exit speaker mode, and enter projection
mode.
Q: Up Side Down Images.
A: Enter “Menu” on projector or remote to flip the projection image.
Q: I contact the customer service team as suggested, but has not
received any reply. Why?
A: We promise that we will reply to all the emails within 24 hours. If you
haven’t received any reply from us more than one day, then maybe our email
has been blocked or has gone to the spam email box. Please send us email
again or contact us by Whatsapp or Facebook.
Q: Hello,could you tell me what the size of the mounting screw is at the
bottom of the projector? I am struggling to find a stand.
A: The size of the mounting screw is M6.
Page 8
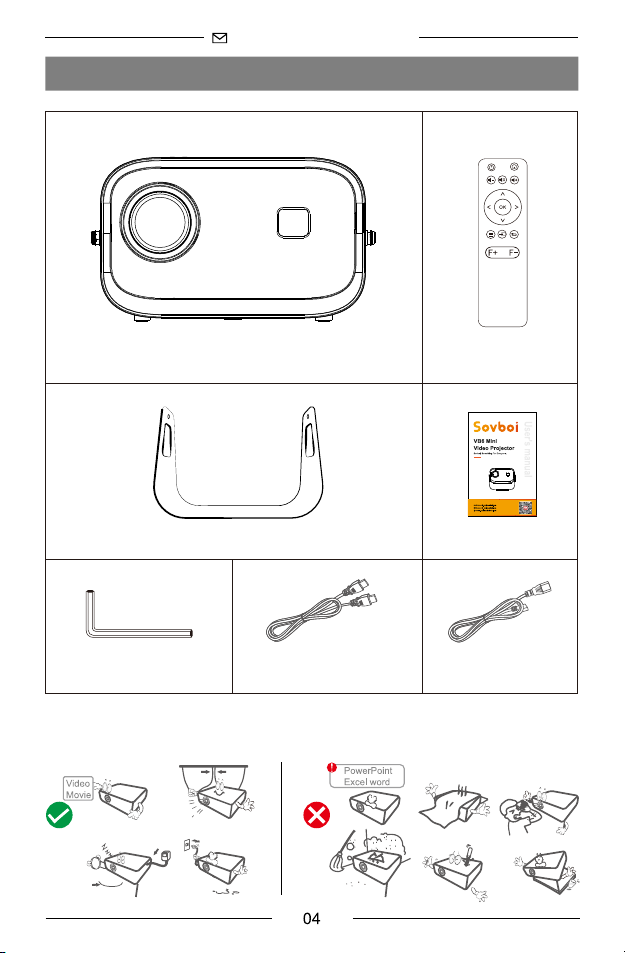
PACKING LIST
RemoteVB6
Projector Stand
Small Wrench HD Cable Power Cable
NOTICE
Recommended Not Recommended
User Manual
Page 9
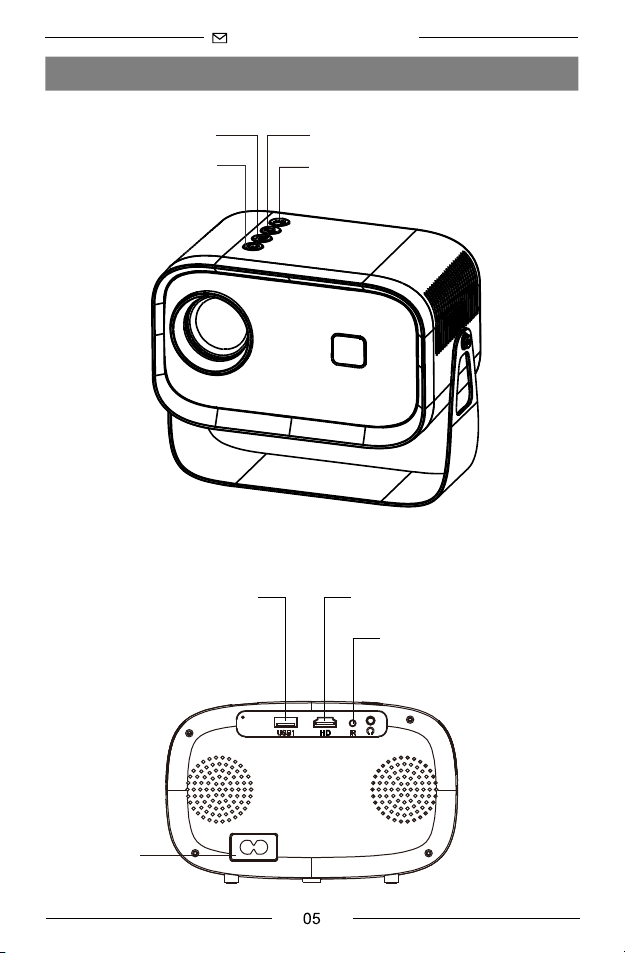
FUNCTION OVERVIEW
• Top View
Menu
Power
• Control Panel
USB HDMI
Return
OK
Power Input
IR
HD
Page 10
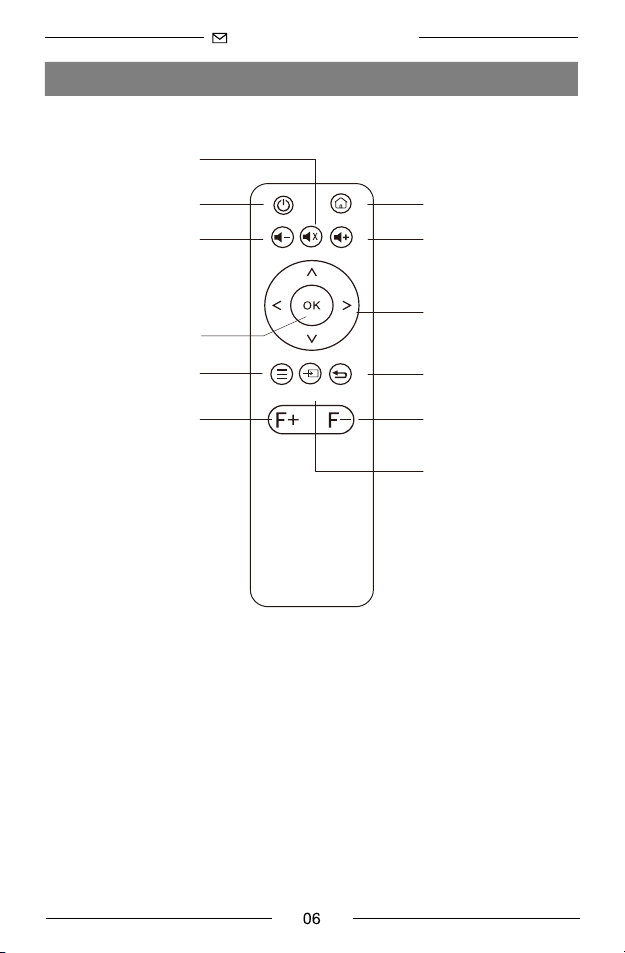
REMOTE CONTROL
Mute
On/Off
Volume-
OK
Menu
Focus+
Installation of the remote control
1. Install 2 pieces of AAA batteries into the remote before using it. Do not
combine new batteries with old ones in a remote controller, which can
cause operation failure due to insufficient power supply.
2. When using the remote controller, please make sure that the signal
transmitter of the remote controller aims at the infrared signal receiver of
the projector.
Home
Volume+
Direction Key
Back
Focus-
Input
Page 11
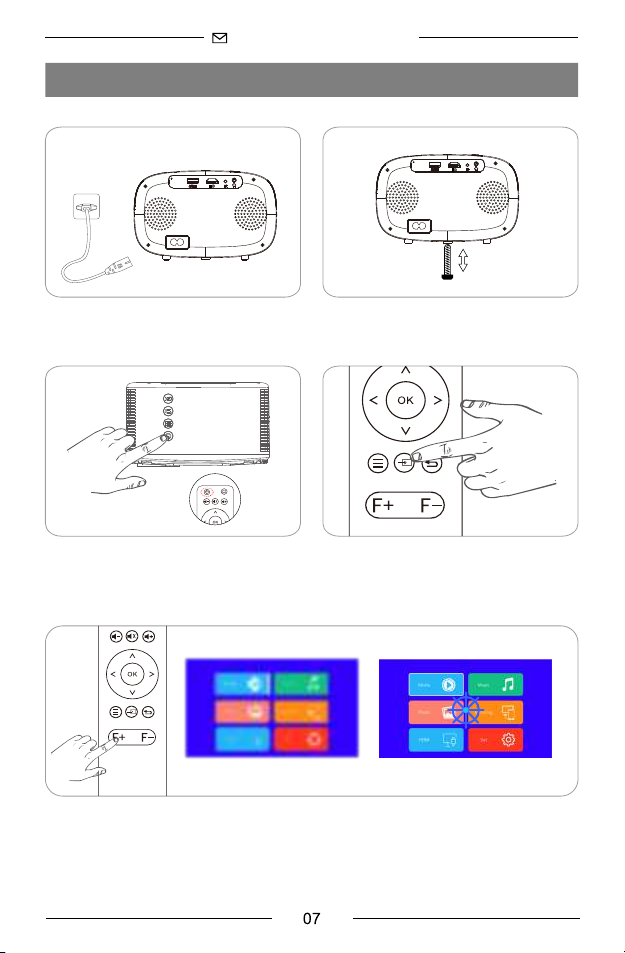
QUICK START
HD
Plug the power cord into an outlet
Press the power button to turn on
the projector
HD
Adjust the kickstand accordingly
Select the correct input source to
project your device.
Press the button F+ or F- on the remote, a focus indicator will appear on the
image. Please adjust according to the focus ring to get the best image
performance.
Page 12
INPUT SOURCE
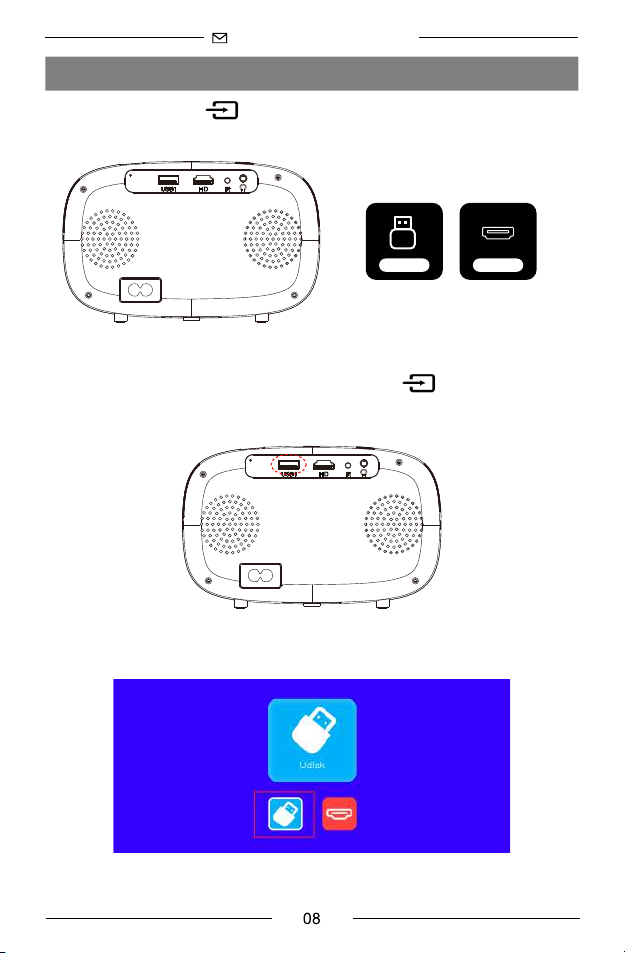
Press on this button on the projector remote to enter the interface
of input source.
HD
USB HDMI
USB Connection
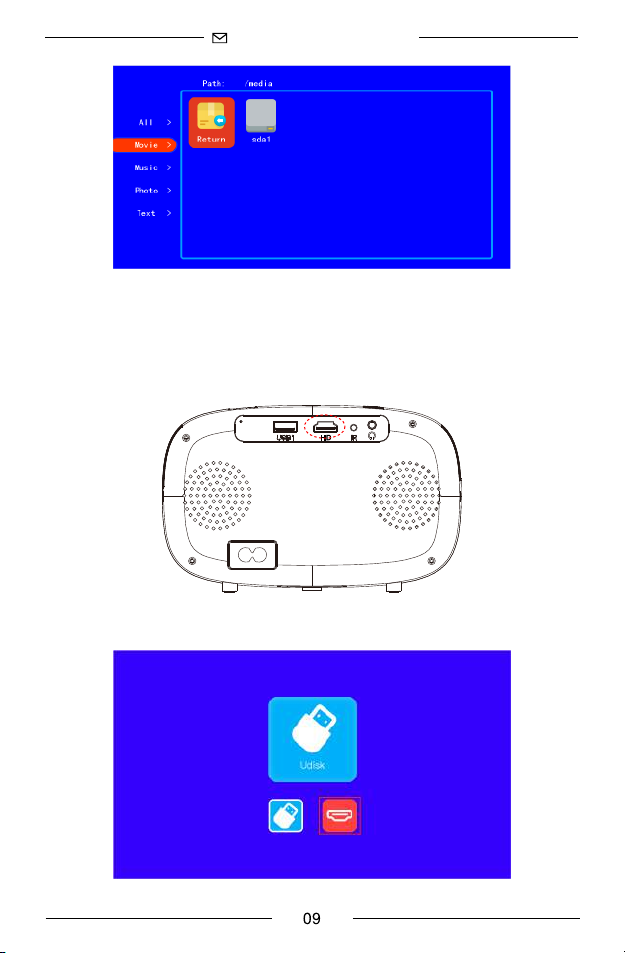
When the USB is plugged in, presse the button on the remote and
select the USB mode,then you can play any document in your USB disk.
HD
(1)
Insert U disk
(2)
Page 13
Page 14
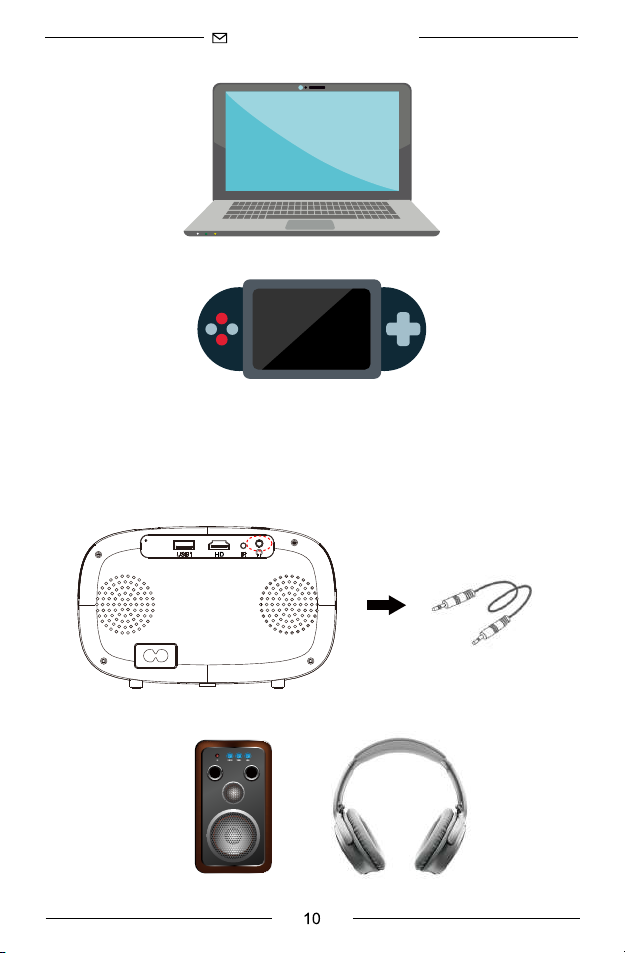
Speaker/Headphones Connection
Directly connect the wired speaker and your headphones/earphones to the
Audio Out port on the projector with a 3.5mm audio cable.
HD
Page 15
WIRELESS PROJECTION
Warming Tips:
① The fluency of screen mirroring with wireless connection will be affected
by the network environment. A bandwidth of 100Mbit or more is recommended when using screen mirroring.
② Make sure your mobile device is close to the projector when using
wireless connection. A distance within 1 meter is recommended.
③ Some mobile devices may not support screen mirroring due to the
compatibility.
④ Any questions, please feel free to email Sovboi via
Support_ [email protected]
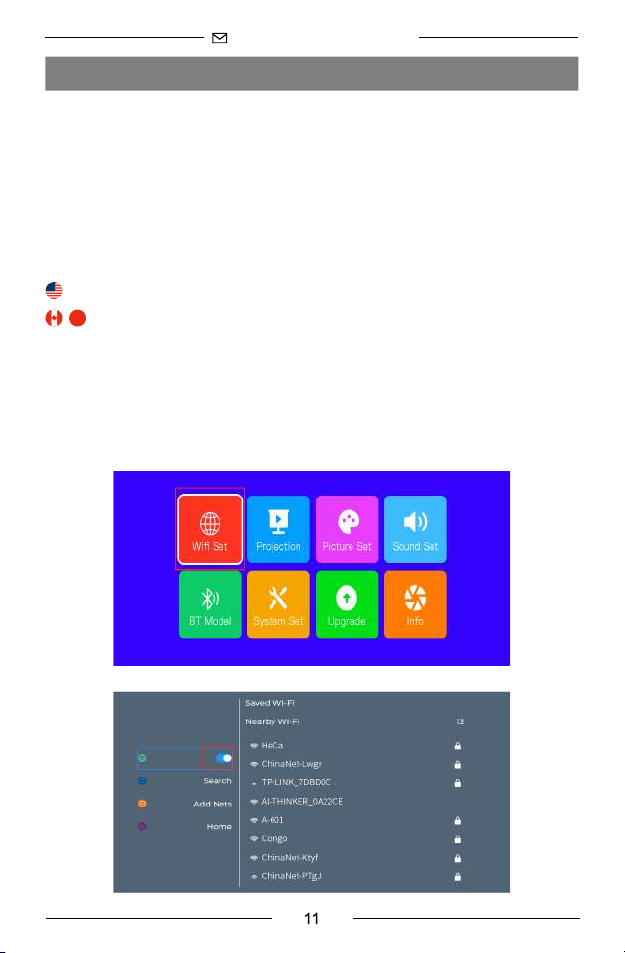
Step 1 : Connect Projector to your Home WiFi
Go to set page -- Select the [WiFi] Settings -- Open the WiFi function -Select your home WiFi from the list -- Connect the projector to your home
WiFi.
Page 16
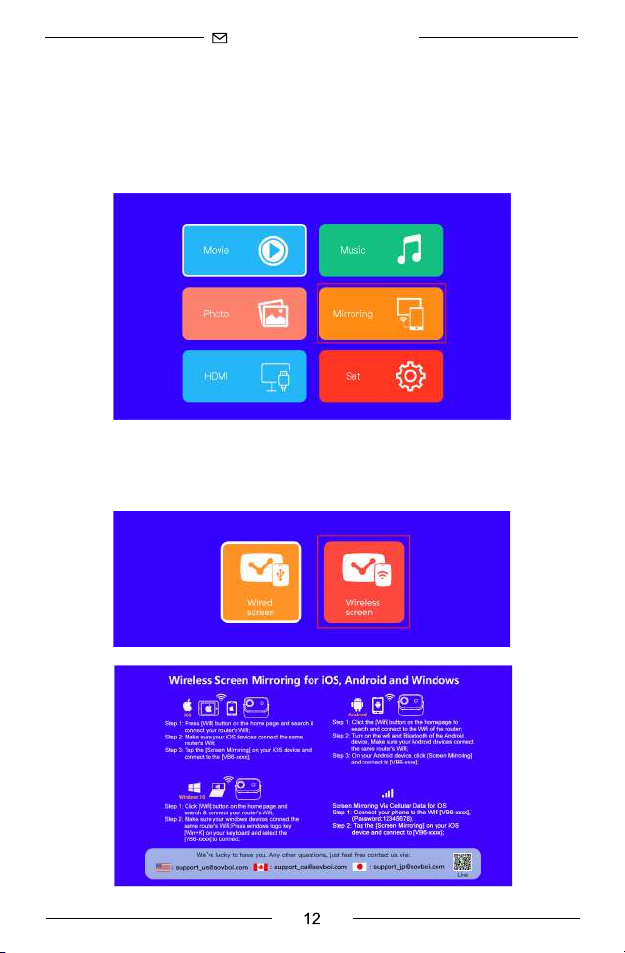
Please make sure the projector and your mobile devices are under the
same WIFI environment, and your mobile devices have been connected to
the WIFI.
Step 2: Go to Homepage of the projector and select [Mirroring] to enter the
screen mirroring interface.
Step 3: Choose the [Wireless screen] option to to enter Wi-Fi mirroring
page,and follow the steps to connect your devices.
Page 17
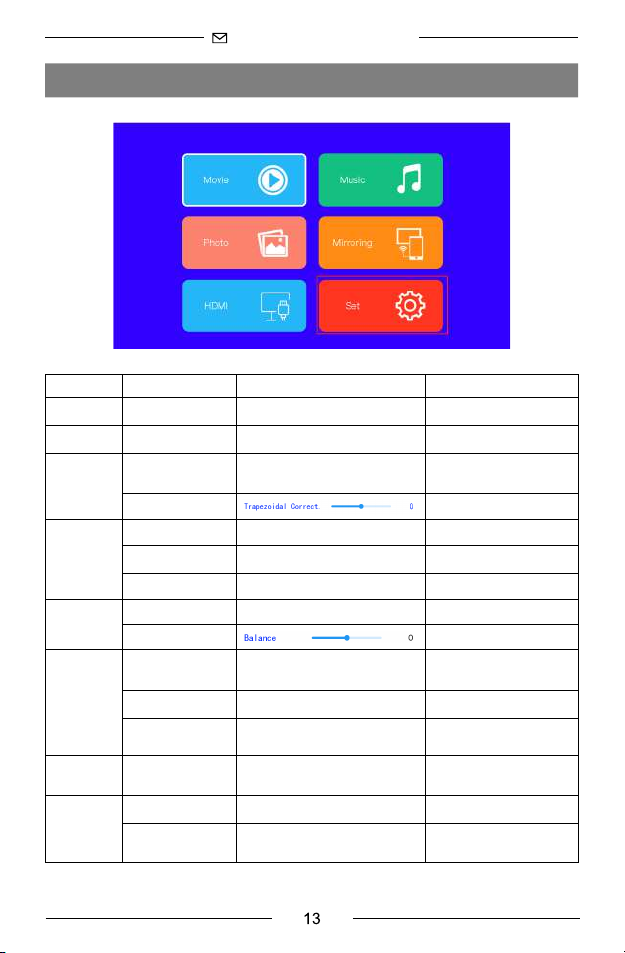
SETTINGS
Menu
WIFI
Bluetooth
Projection
Picture Set
Sound Set
System Set
Upgrade
Info
Menu2
/
/
Projection mode
Projection mode
Picture mode
Color temperature
Display size adjust
Sound mode
Balance
Language setting
Sleep timer
Restore factory
default
/
Device Name
System version
number
Options
/
/
Front Table/Front Ceiling/Back
Table/Back Ceiling
Standard/Soft/Light/Personal
Cool/Normal/Warm/Personal
/
Standard/Music/Movie/Personal
English/Chinese/French/German/Japanese/Japanese/Italian
Off/On
/
Upgrade System (Only Support
USB Disk)
Projector
/
Functions
Wifi Connection
Bluetooth Connection
Adjust projection mode
Adjust shape
Adjust picture mode
Adjust color temperature
Adjust display size
Adjust display size
Adjusting sound size
Adjusting language
setting
Tur on/off surround sound
Restore factory default
/
/
/
Page 18
BLUETOOTH CONNECTION
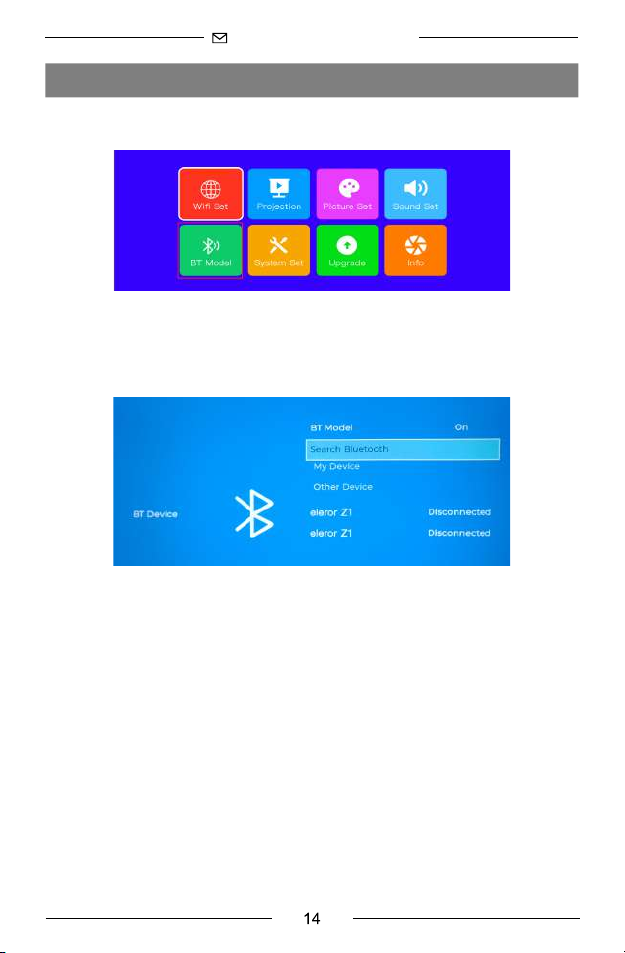
Go to the home page, click the “ Set ” to go to the Setting page. Choose
the "BT Mode" to enter the BT function.
1.Connect the projector to an exterior Bluetooth speaker.
On the BT Setting page, Press OK button to turn on the BT and scan for
available devices. Choose the right Bluetooth device name, Press OK button
to pair.
2.Cannot connect Bluetooth speaker?
When the Bluetooth speaker is connected to the projector, it will show up in
paired devices ,it means that the projector has been successfully connected.If it shows pairing failed, it means that the Bluetooth speaker has not
been connected to the projector.
Please try the following methods:
Method 1: Please click the [UNPAIR] , then connect your BT again.
Method 2: Operate on the projector to turn off Bluetooth (press the “OK”
button on the remote control).
Then turn on BT (the "OK" button on the remote control). Reconnect the
Bluetooth speaker again.
Method 3: Turn off the projector and restart it, then reconnect the Bluetooth
speaker.
Method 4: Restore the factory settings and then reconnect the Bluetooth
speakers.
Page 19
If you tried the above methods but still can not solve your problem, please
contact our customer service team to get a more specified checking and
instruction. We promise that you will get a satisfactory solution.
Support_ [email protected]
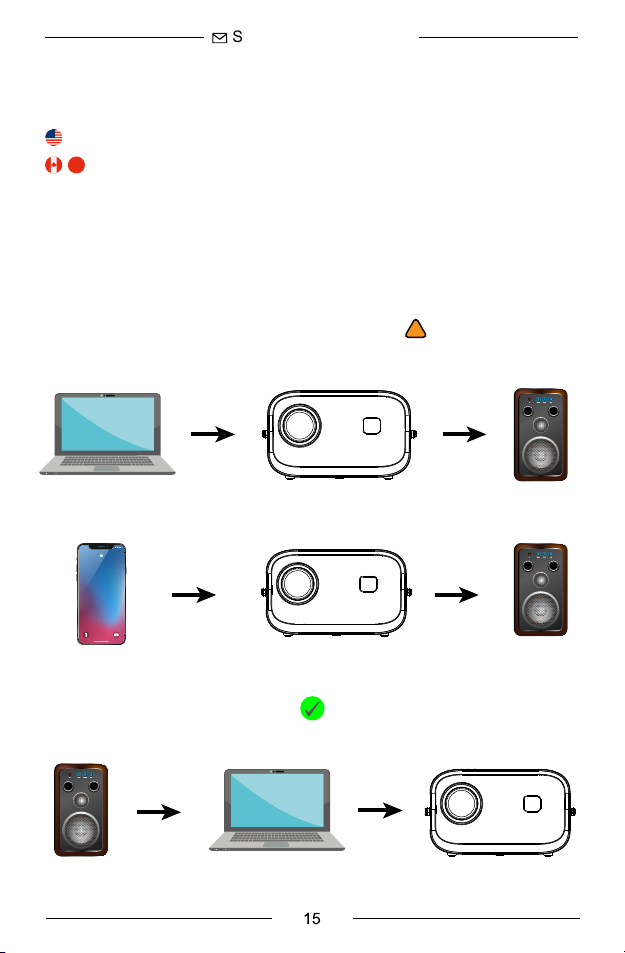
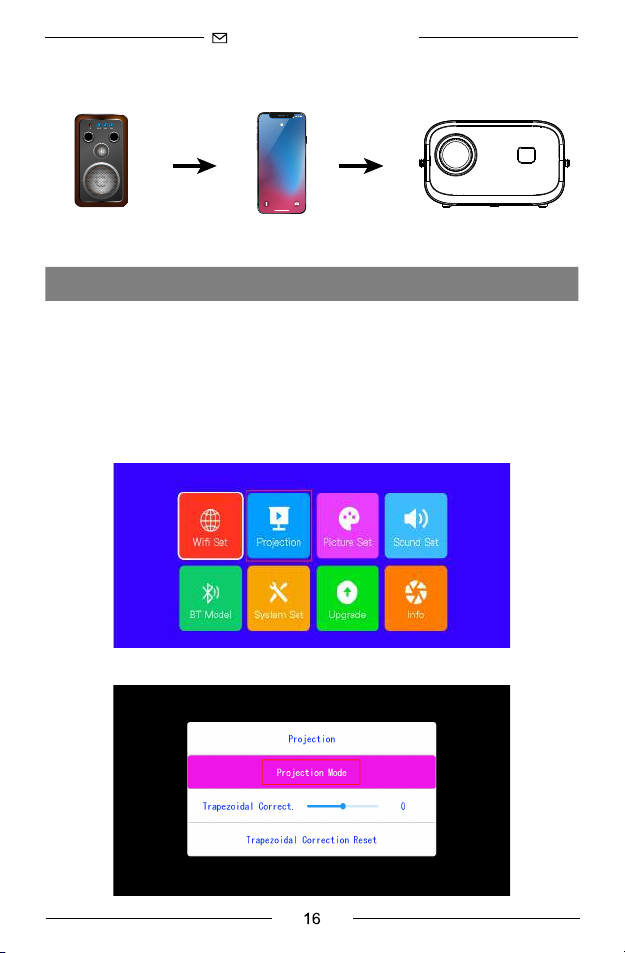
3.Audio Delay After Connecting Bluetooth?
If you have an audio delay after connecting Bluetooth, you can try a different
connection method, which is: Connect your Bluetooth speaker with your
phones(or iPads, laptops) first, and then connect your phones with our
projector. Please refer to the following pictures.
Connection methods that may cause sound delay !
20:30
Monday, September 23
Recommended connection method
✔
Page 20
20:30
Monday, September 23
PROJECTOR IMAGE SETTING
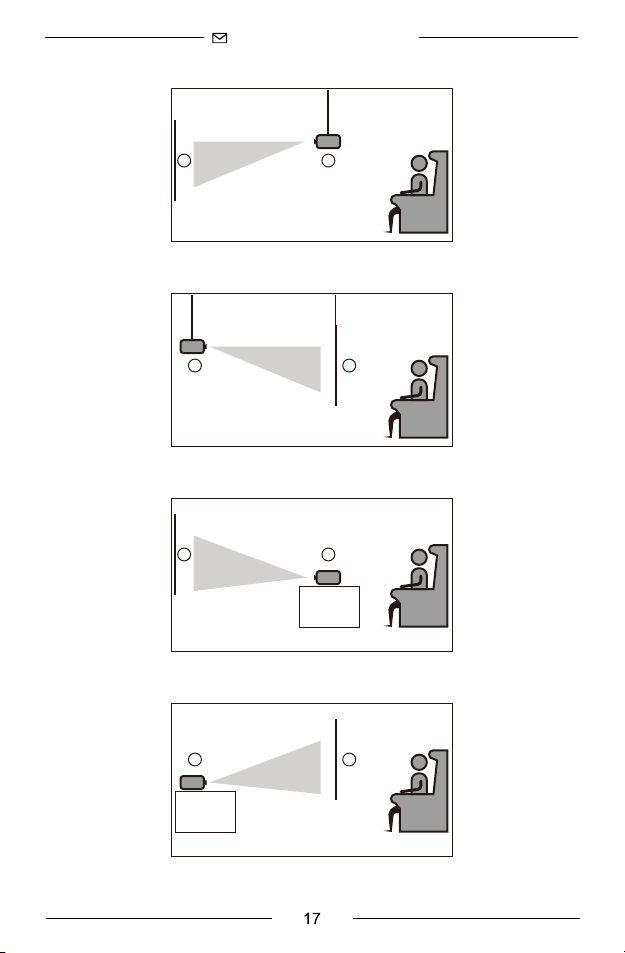
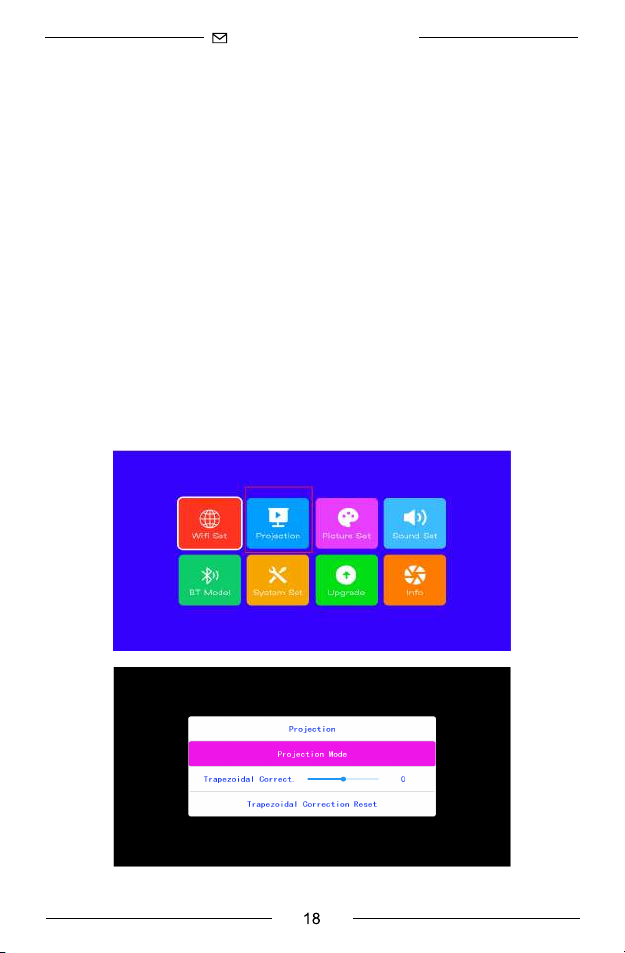
Installation Method
The projector support front and rear projection, it can be table mounted and
ceiling mounted. To set the projection mode, press the button on the remote,
go to the setting page. Click on the “Projection Image Setting” to go to the
projection image setting page. You can see the “Installation Mode” option,
press the left and right button to change to your desired mode.
Page 21
Page 22
Keystone correction & Electric-focus & Zoom function
Go to the setting page. Click on the “Projection” to go to the projection image
setting page.
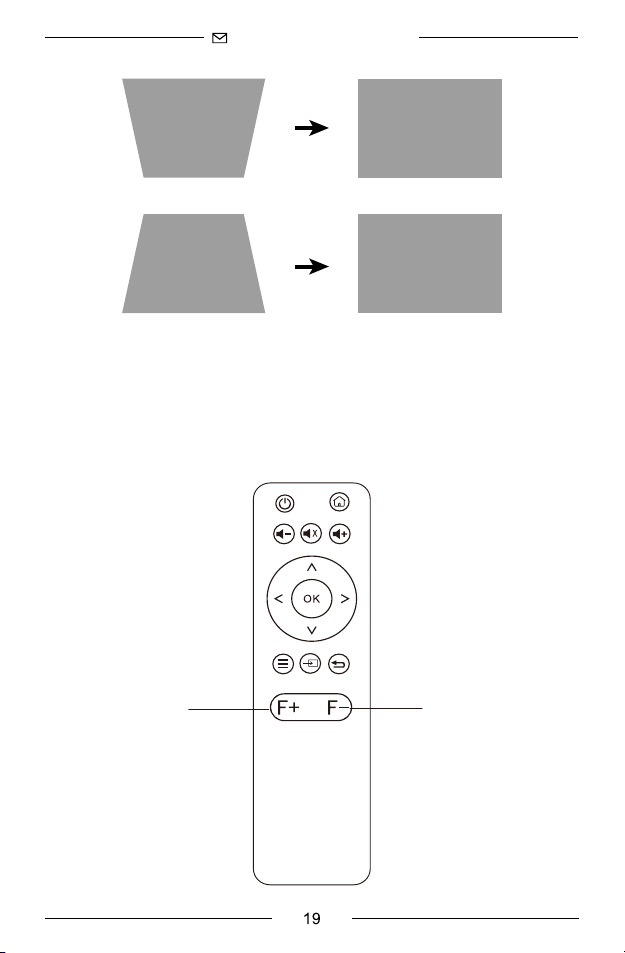
>> Vertical Correction
Press the button to select the “Vertical Correction” menu and press the left
and right button to adjust the image.
① If the projection image shows as (1), press the right button on the remote
to increase the vertical parameter (-45-0), until to achieve the
projection image (2).
② If the projection image shows as (3), then press the left button on the
remote, and decrease the vertical parameter (0-45), until to achieve the
projection image (4).
NOTE: For best projected image quality, we recommend only making
keystone adjustments within 15 degrees.
Page 23
(1) (2)
(3) (4)
>> Electric-focus
①This mini projector support electric-focus with remote control,just need to
press the "F+"&"F-" on the remote.
②Note: Projector and screen/wall must be in effective distance.
Focus-Focus+
Page 24
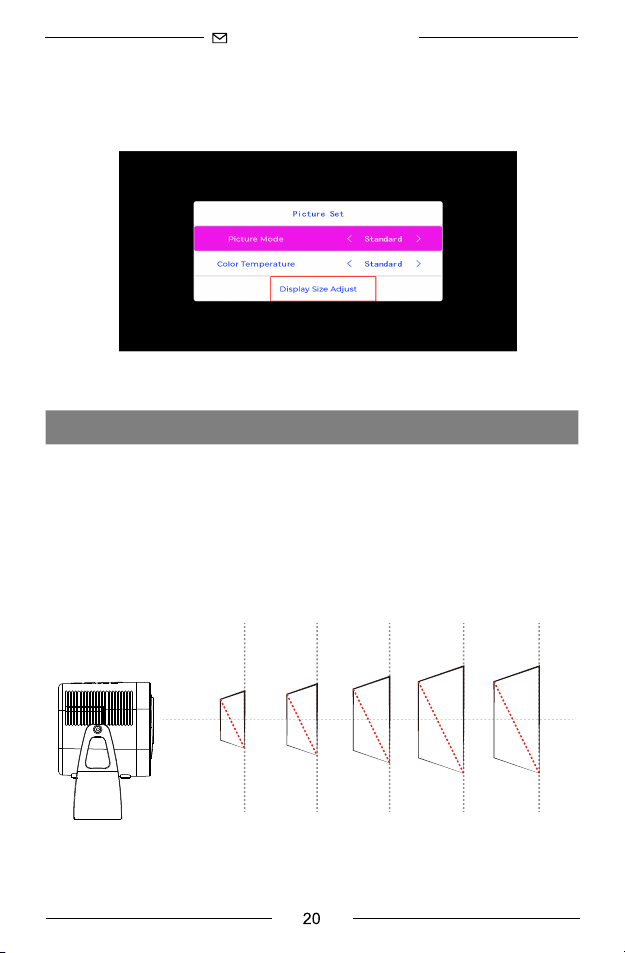
>> Zoom function
Go to the setting page. Click on the “Picture” to go to the picture setting
page,then choose "Display Size Adjust"
INSTALLATION
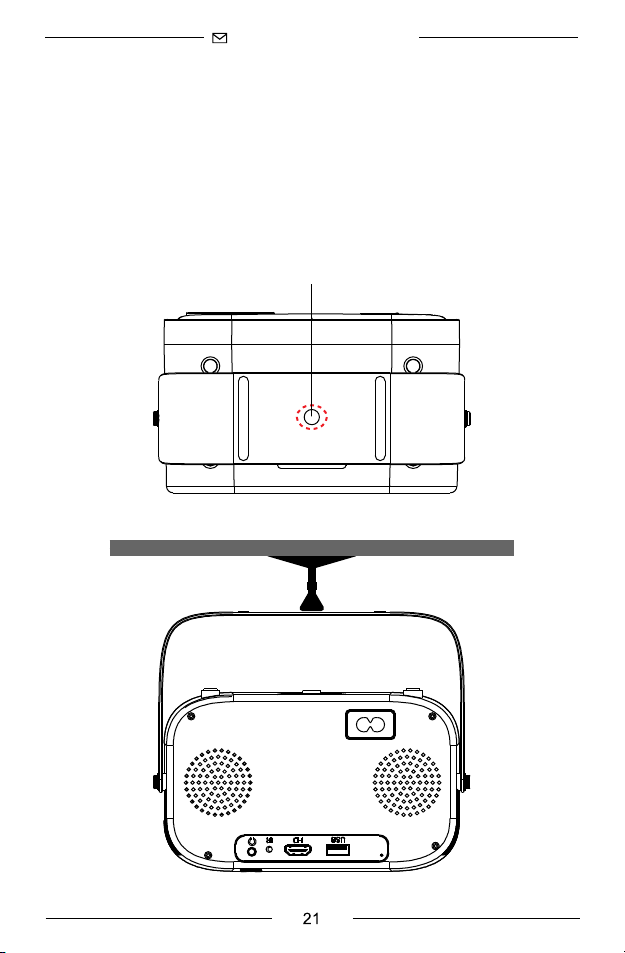
Projection Distance and Size
If you want to get a free projection screen,please email us via
[email protected]. Please follow the data in chart below, to adjust
the image size and the distance.
3.6ft 4.75ft 5.57ft 7.87ft 13.77ft
110cm 145cm 170cm 240cm 420cm
Page 25
Please note:
1.The best image quality would be achieved with a projection distance of
3.28-8.2ft. A larger screen size would affect the image quality in a certain
degree.
2.The image size depends on the distance between projector and
screen,there may be 3% deviation among above listed data. Different
settings cause various distances.
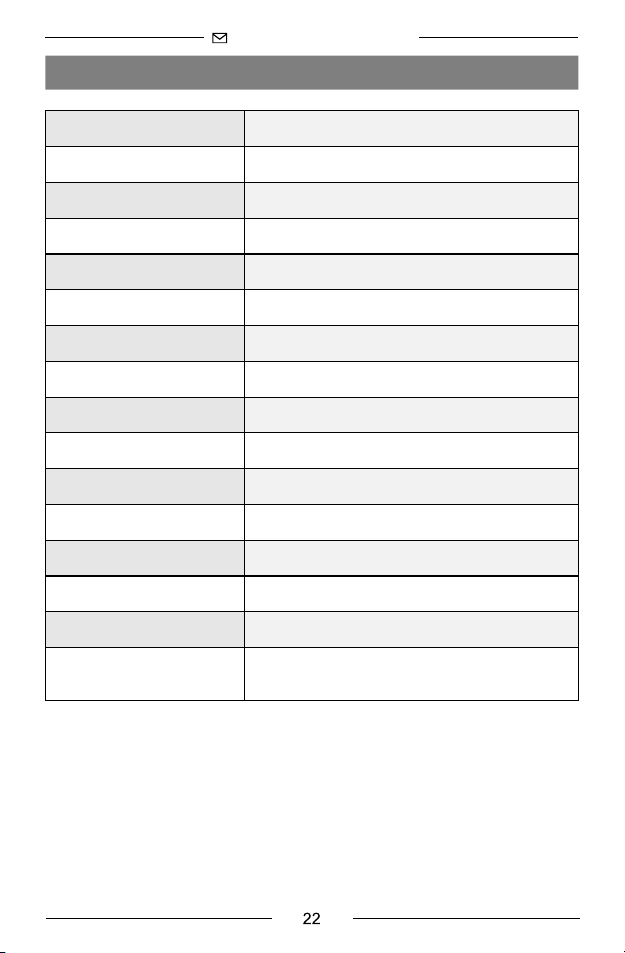
Install on the Ceiling
Please note that our projector only support the one-hole ceiling mount.
Ceiling mount hole
Page 26
PROJECTOR SPECIFICATIONS
Display technology
Power supply
Projection Distance
Installation Type
Focus
Speaker
Unit Dimension
Photo Format Supported
Light Source
Resolution Supported
Projection Screen
Aspect Ratio
Ports
Unit Net Weight
Audio Format Supported
Video Format Supported
LCD
AC 100-240V 50/60Hz
3.28FT-18FT
Front/Rear/Ceiling
Electric-focus
3W/4ohm
6.45*6.3*6.77 inch
BMP/JPG/PNG/GIF/JPEG
LED
576i, 576P, 720i, 720P,1080i, 1080P
37” - 170”
4:3/16:9/Auto
HD In*1/USB2.0 Port*1/AV In*1/Audio Out*1/
2.2 lb (1 kg)
MP2/MP3/PCM/FLAC/WMA
AVI/MP4/MKV/FL/MOV/RMVB/3GP/
MPEG1/MPEG2/H.264/XVID
*Any buyer with any questions who comes to contact us will have our
promise to get a satisfactory solution + an Extra 6 Month Warranty+other
surprises to thanks for your support!
US:[email protected]
JP&CA: [email protected]
Page 27

FCC STATEMENT:
This device complies with Part 15 of the FCC Rules. Operation is subject to
the following two conditions:
(1)This device may not cause harmful interference, and
(2)This device must accept any interference received, including interfer ence
that may cause undesired operation.
Warning: Changes or modifications not expressly approved by the party
responsible for compliance could void the user's authority to operate
theequipment.
NOTE:
This equipment has been tested and found to comply with the limits for a
Class B digital device, pursuant to Part 15 of the FCC Rules. These limits
are designed to provide reasonable protection against harmful interference
in a residential installation. This equipment generates uses and can radiate
radio frequency energy and, if not installed and used in accordance with the
instructions, may cause harmful interference to radio communications.
However, there is no guarantee that interference will not occur in a particular
installation. If this equipment does cause harmful interference to radio or
television reception, which can be determined by turning the equipment off
and on, the user is encouraged to try to correct the interference by one or
more of the following measures:Reorient or relocate the receiving
antenna.Increase the separation between the equipment and receiver.Connect the equipment into an outlet on a circuit different from that to which the
receiver is connected.
Consult the dealer or an experienced radio/TV technician for help.
FCC Radiation Exposure Statement:
This equipment complies with FCC radiation exposure limits set forth for an
uncontrolled environment. This equipment should be installed and
operated with minimum distance 20cm between the radiator & your body.
Page 28
 Loading...