

Southwestern Bell Freedom Phone GH2410C Owner's Manual
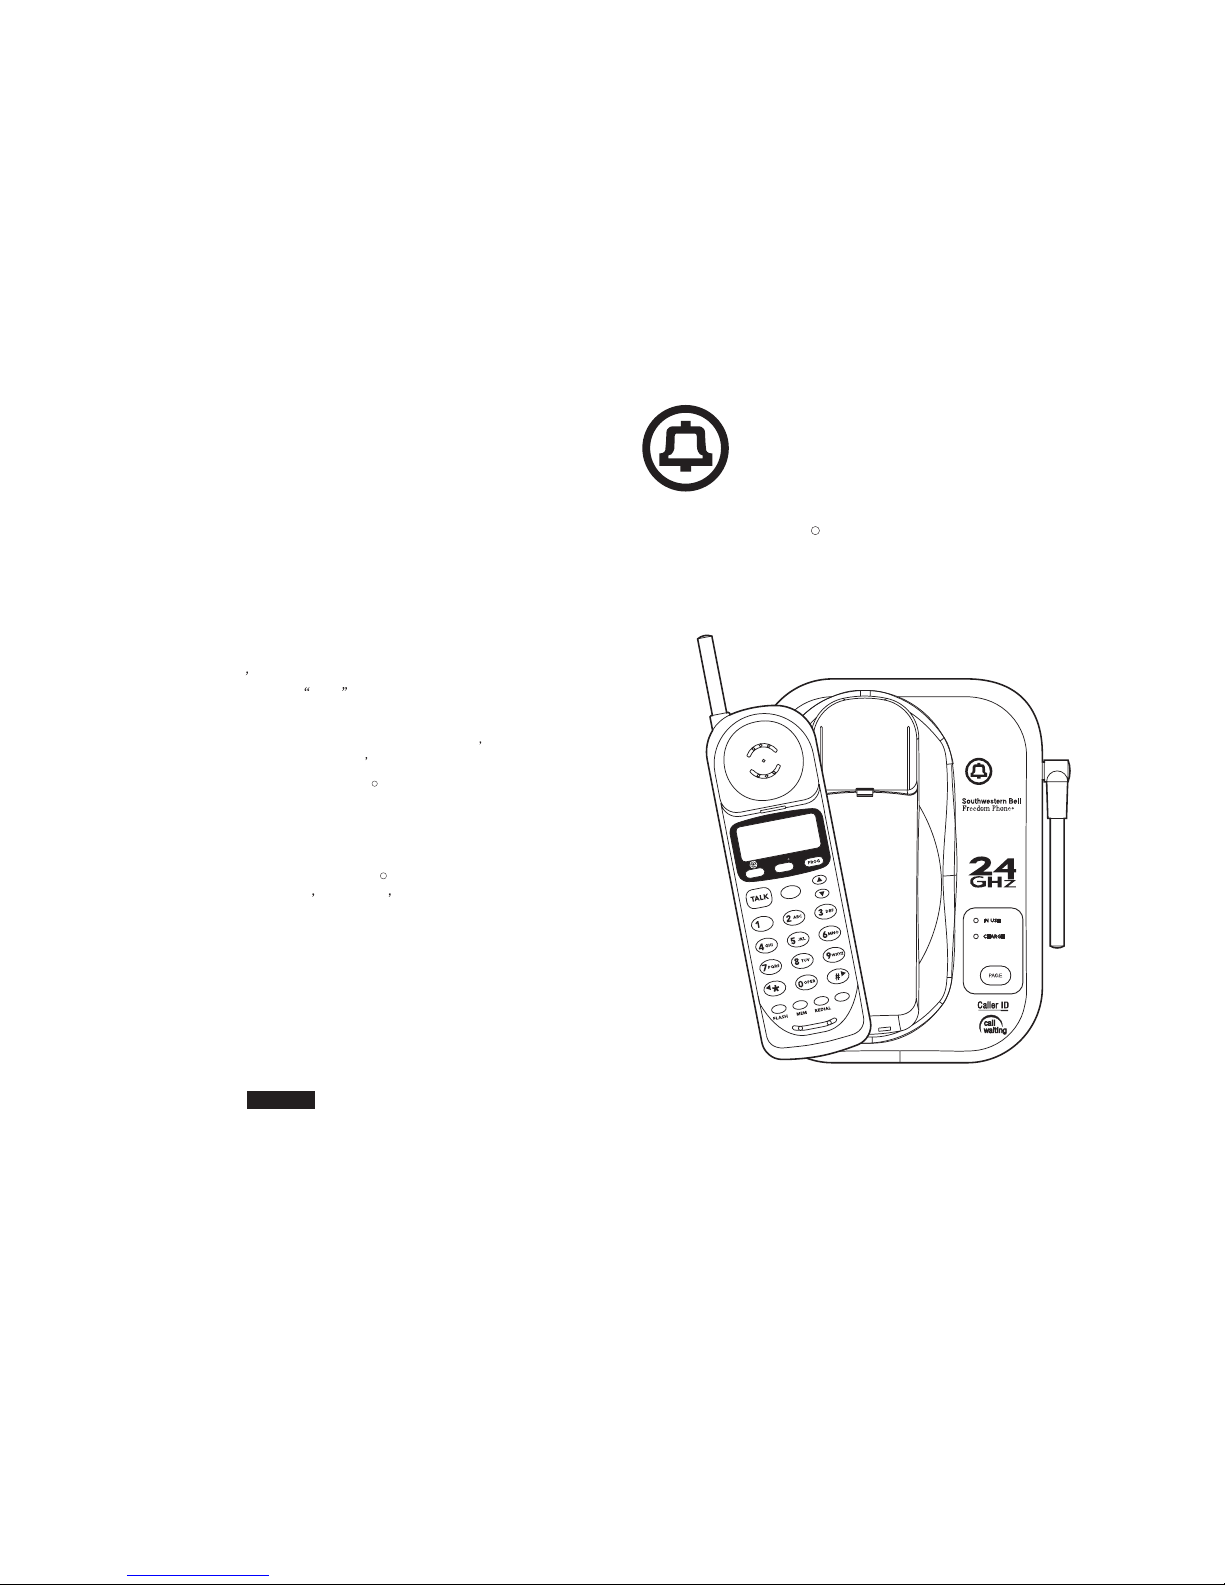
Southwestern Bell
Freedom Phone
2.4GHz
CORDLESS TELEPHONE
GH2410C Owners Manual
Toll-Free Help Line 1-800-366-0937
http://www.swbfredomphone.com
R
CID
CH
ERASE
REVVOL
EDIT
SAVE
PAUSE
OPTION
Southwestern
B
ell
Freedom
P
hone
R
MUTE
For immediate answersto your questionsregarding operation
missing partsor installation call:
1-800-366-0937
Monday - Friday 8:30 a.m.- 9:00 p.m. EST
Saturday 8:30 a.m. - 12:30 p.m.EST
http://www.swbfreedomphone.com
7475N.Glen Harbor Blvd Glendale AZ 85307
.
- DON T TAKE ME BACK TO THE STORE.
STOP
- FOR THE TOLL - FREE HELP TELEPHONE NUMBER.
LOOK
- AS THE EXPERTS TALK YOU THROUGH THE PROBLEM.LISTEN
Southwestern Bell Freedom Phone Help Line dt
R
SOUTHWESTERN BELL FREEDOMPHONE RETAIL SALES
R
GH2410C
PrintedinChina
IB-4142

1. Read andunderstand all instructions.
2. Follow allwarnings and instructions markedon the product.
3. Use onlywith class 2 powersource DC 9V300mA.
4. Unplug thisproduct from the walloutlet before cleaning.Do not use liquidcleaners or aerosolcleaners. Use adamp cloth
for cleaning.
5. Do notuse this product nearwater; for example,near a bathtub,wash bowl, kitchensink or laundry tub, in a wetbasement
or near a swimmingpool.
6. Do not place this product on an unstable cart, stand, or table. The product may fall, causing serious damageto the
Product.
7 . Slots and openings in the cabinet back or bottom are provided for ventilation. To protect it from overheating,these
openings must not be blocked or covered. The openings should neverbe blocked byplacing the product onthe bed,
sofa, rug,or other similarsur-face. This productshould never be placednear or over aradiator or heat register. This product
should notbe placed in anenclosed environment unlessproper ventilation is provided.
8. Do not allow anything to rest on the power cord.Do not locatethis product where thecord will be abusedby animals or
persons walkingon it.
9. Do notoverload wall outlets andextension cords asthis can result inrisk of fireor electrical shock.
10. Neverpush objects of any kind into this productthrough cabinet slots asthey may touchdangerous voltage points orshort
out partsthat could result in a riskof fire orelectrical shock. Never spillliquid of anykind on the product.
11. To reduce the risk of electrical shock, do not disassemblethis product. Insteadtake it toa qualified service personwhen
service or repairwor is required. Opening or removing covers may expose you to dangerous voltages or other risks.
Incorrect re-assemblycan cause electrical shockwhen the applianceis subsequently used.
12. Unplugall cords and referservicing to qualified servicepersonnel under the followingconditions:
A. When the power supplycord or plugis damaged or frayed.
B. If liquidhas been spilledinto the product.
C. If the product hasbeen exposed torain or water.
D. If the product does not operate normally byfollowing the operating instructions. Adjust onlythose controls covered in
the operatinginstructions. Improper adjustmentof other controlsmay result in damageand require workby a qualified
technician torestore the product tonormal operation.
13. Avoidusing a telephone (otherthan a cordless type)during an electricalstorm. There may bea remote risk ofelectric shock
from lightning.
14. Donot use a telephoneto report agas leak in thevicinity of the leak.
1. Use onlythe type and sizeof batteries specifiedin the users manual.
2. Do not dispose of the batteries in a fire. The cells may explode. Check with local codesfor possible specialdisposal
instructions.
3. Do notopen or mutilate the batteries. Released electrolyteis corrosive and maycause damage tothe eyes or skin.It may
be toxicif swallowed.
4. Exercise carein handling batteries in order not toshort the battery withconducting materials such asrings, bracelets and
keys. Thebattery or conductor mayoverheat and causeburns.
5 . Do not attempt to recharge the batteries with or identified for use with this product. Thebatteries may leak corrosive
electrolyte orexplode.
6. Do notattempt to rejuvenate the batteries provided with or identified for use withthis product byheating them. Sudden
release ofthe battery electrolyte may occurcausing burns or irritationto eyes or skin.
7. When replacingbatteries, all batteriesshould be replaced at the same time. Mixing freshand discharged batteries could
increase internalcell pressure and rupturethe discharged batteries.
8. When insertingthe batteries into this product, the proper polarity or direction must be obser ved. Reverse insertion of
batteries cancause charging, which mayresult in leakageor explosion.
9. Remove thebatteries from this productif the productwill not be used for a long period of time (several months ormore)
since duringthis time the batteriescould leak, damagingthe product.
10. Discard"dead" batteries as soonas possible sincethey are more likelyto leak ina product.
11. Donot store this product, or thebatteries provided with or for identified use with this product, in hightemperature areas.
12. Ifyour product uses arechargeable battery, chargethe battery(ies) only inaccordance with the instructions and limitation
specified inthe User Manual.
This symbolis to alert youto important operating or servicing instructions that may appear inthe
user's manual.Always follow basic safetyprecautions when using thisproduct to reduce therisk of
injury,fire, or electrical shock.
When usingthis product, basic safety precautions should always be followedto reduce the riskof fire, electricshock
IF YOURPRODUCT UTILIZES BATTERIES,THEFOLLOWING ADDITIONAL PRECAUTIONS SHOULDBE OBSERVED:
And injury to persons,including the following:
SAVE THESE INSTRUCTIONS
Important Safety Instructions ...........2
Battery Cautionary Instructions ........ 3
Location of Controls and Features....5-9
.................................5-6
..................... ................7-8
..............................9
Choosing a Location .....................10
Telephone Setup......................11-13
..................11
..........................12
.................... 13
Battery Installation ...................... 14
...................... 14
14
Headset and Data Jack...................15
..........................15
......................15
.................................15
Basic Displays.............................16
Basic Operation.......................17-18
...........................17
.........................17
................................ 18
.................... 18
Settings.................................19-26
................ 19-20
............. 20
...........21
................ 22
.............23
........... 23
........24
Handset
Base
LCD Display
Connecting the Base
Wall Mounting
Tone/Pulse Switch
Battery Duration
When the Battery Needs Charging.
The Data Jack
The Headset Jack
Belt-Clip
Making Calls
Receiving Calls
Redialing
Additional Options
Handset Settings.
Changing the Language
Turning the First Ring On or Off.....
Setting the Time and Date
Setting the Area Code
Adjusting the Contrast...
Setting the PBX Number..
Turning PBX Mode On or Off.
21
Gh2410 TABLE OF CONTENTS
IMPORTANT SAFETY INSTRUCTIONS
2
Changing the Pause Time
Deleting Message Waiting Indication.
Turning Auto Answer On or Off.
Disabling the Ring for Private Calls.
Disabling the Ring for
Unavailable Calls
Storing Phone Numbers.
Letter Table.
Viewing the Phone Book
Making Calls from the Phone Book
Deleting a Stored Number
Editing a Stored Number...
Priority (VIP) Calls
Blocked (REJ) Calls..
When You Receive a Call.
Viewing the Caller ID List.
Caller ID Displays
CallerIDwithCallWaitingService
Storing Caller ID Records
Deleting Caller ID Records.
Returning Caller ID Calls
New Call Light
Using the Handset Finder (PAGE).
Out-of-Range Warning
Channel Changing
....................24
..25
..........25
....26
............. .............26
Speed Dialing. ........................ .... .27-31
.......... ........27
..................................28
...................28
......29
................ .29
................30
...........................31
.......................31
Caller ID ......................................32-36
.................32
............... 32
................... .......33
..... 34
................. 34
.............. 35
................. 36
Message Waiting ...............................37
...............................37
Other Features. ............................... .38
..... 38
.................... 38
........ ... ... .... ... . 38
Care and Maintenance. .. ................... 39
Troubleshooting.............................40-41
Glossary ........................................42
Warranty. ...................................43-44
..


BATTERY CAUTIONARY INSTRUCTIONS
3
4
For the cordless handset, use only 3.6V 600mAh
cordless telephone battery pack (included).
Do not dispose of the batteries in a fire. The cells may explode. Check with
local codes for possible special disposal instructions.
Do not open or mutilate the batteries. Released electrolyte is corrosive and
may cause Damage to the eyes or skin. It may be toxic if swallowed.
Exercise care in handling batteries in order not to short the battery with
conducting materials such as rings, bracelets, and keys. The battery or
conductor may overheat and cause burns.
Do not attempt to rejuvenate the batteries identified for use with this product
by heating them. Sudden release of the battery electrolyte may occur causing
burns or irritation to eyes or skin.
When inserting batteries into this product, the proper polarity or direction
must be observed. Reverse insertion of batteries can cause charging, and
that may result in leakage or explosion.
Remove the batteries from this product if the product will not be used for a
long period of time (several months or more) since during this time the
battery could leak in the Product.
Do not store this product, or the batteries identified for use with this product,
in high temperature areas. Batteries that are stored in a freezer or refrigerator
for the purpose of extending shelf life should be protected from condensation
during storage and defrosting.
Nickel - Metal Hydride
Rechargeable battery pack
Batteries should be stabilized at room temperature prior to use after cold storage.
BATTERIES: CAUTION
To reduce the risk of fire or injury to persons, read and follow these instructions:
CID
CH
ERASE
REVVOL
EDIT
SAVE
PAUSE
OPTION
SouthwesternBell
FreedomPhone
R
MUTE
LOCATION OF CONTROLS AND FEATURES
LOCATION O F CONTROLS AND FEATURES
5
6
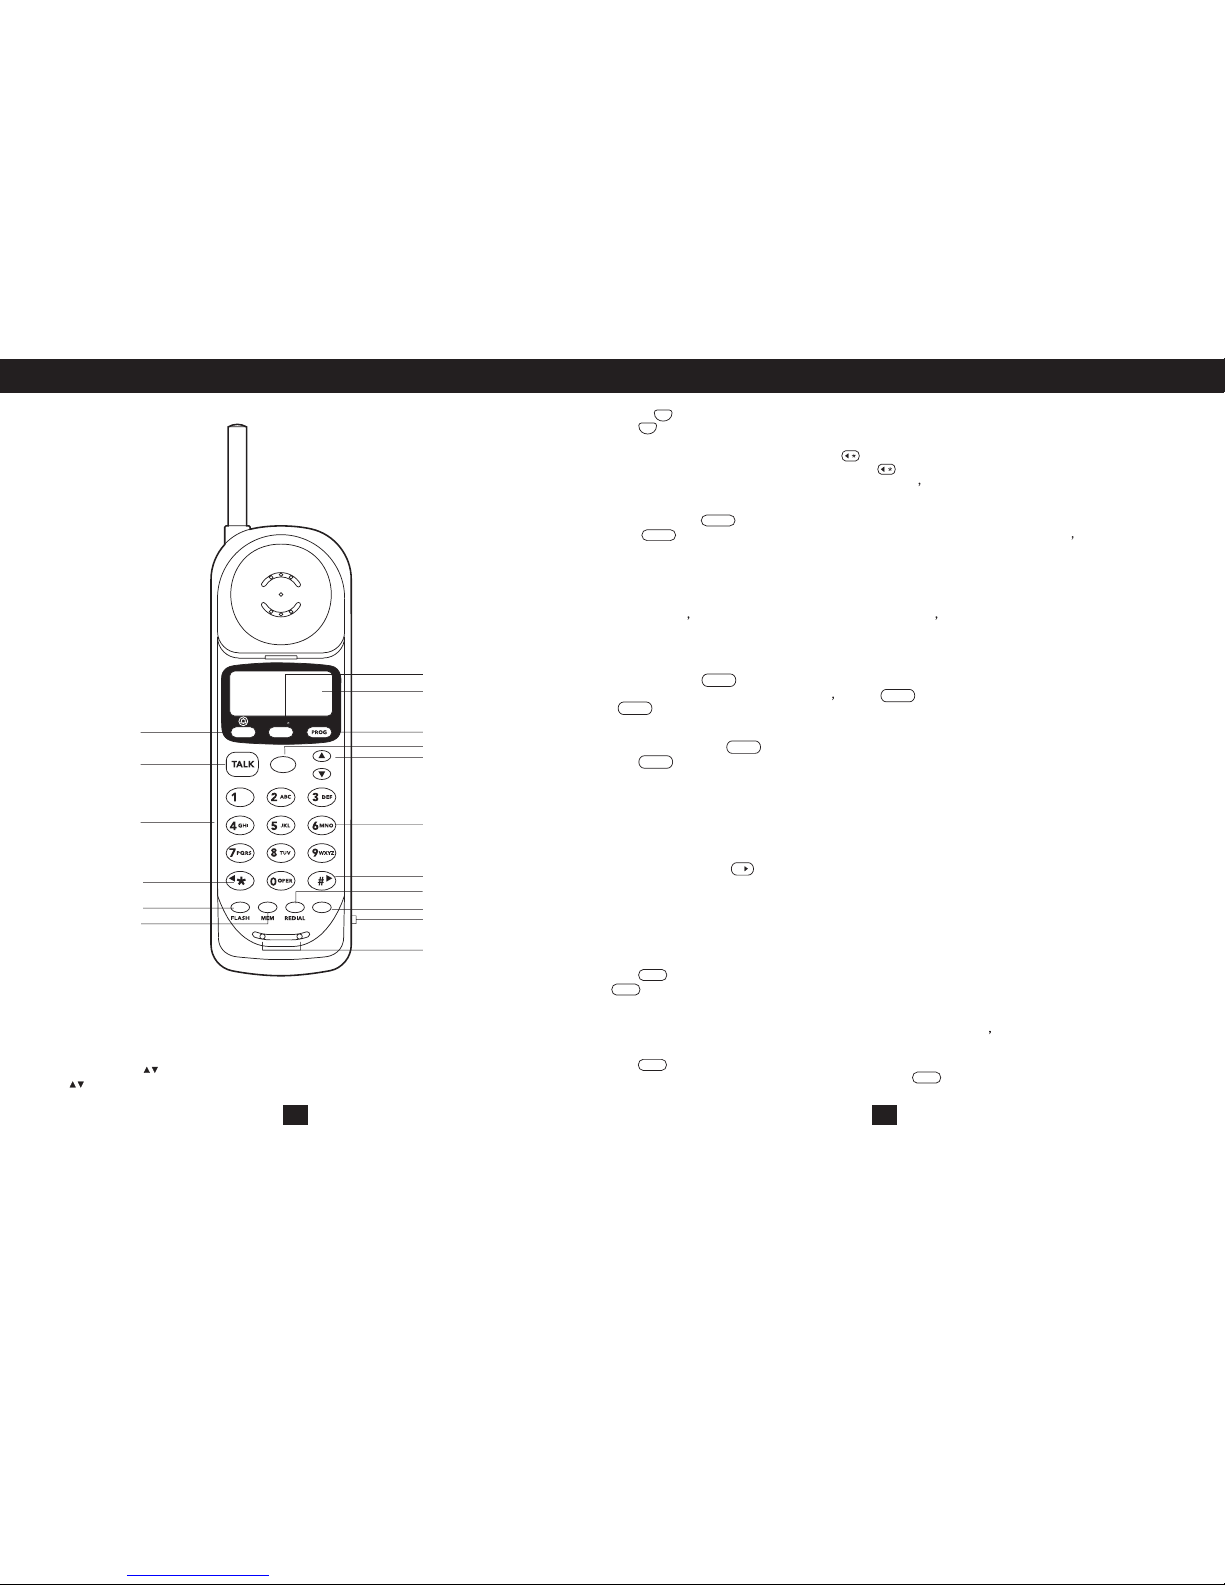
1.Option Key [Option]
The [Option] key,located on the bottom of the handset, is used to change the
7/10/11 digit dialing mode during caller ID callback.
2.Up/Down Key
The key lets you scroll through menus and logs, and adjust the handset volume.
The key is used to access the telephone line or end a call.
If the base is set to pulse dialing, pressing causes subseqent digits to be dialed
out using tone until the line is put back on hook Alse used to view the right part of
the display and move the cursor left when editing.
The /EDIT key is used to access telephone company ser vices like call
waiting. It is also used to create and edit phone book entries.
The key if pressed when the line is off-hook will scan up to 50 channels
and select the clearest one to provide the best possible reception.
WHen the phone is idle or off-hook press to redial the last number dialed.
Is also used to insert a programmable pause into a number stored in the
phone book.
The key is used to review Caller ID information stored in memory.
Allows using a headset for hands-free convenience.
Numeric keys are used in the conventional manner for dialing.
Used to view the left part of the display and move the cursor right when editing.
The PROG key is used to temporarily mute the handset microphone.This key is also
used to access the programmable functions of your phone.
Use /SAVE to program and retrive the numbers in the speed dial directory. The
/SAVE key is also used to save numbers into the phone book and other settings.
Adjust the switch to select the ringer - choose between on Off.
3.Talk
Talk
Talk
4.Temporary Tone/View Right key
5.Flash Key /EDIT
Flash
Flash
6.New Call Light
7.Channel Key
CH
8.LCD Display
9.Redial key
REDIAL
/Pause
REDIAL
REDIAL
10.Caller ID key
CID
CID
11.Headset Jack
12.Dial pad
13.View Left Key
#
14. PROG
15.Memory/SAVE key
MEM
MEM
16.Ringer Switch
17.Microphone
1
2
3.
4
5
6
7
8
9
10
11
12
13
14
15
16
17
18. Key
When viewing or editing menus and logs, the key is used to erase digits
and single or multiple entries from the phone book and Caller ID directories.
ERASE
ERASE
18
LOCATION OF CONTROLS AND FEATURES LOCATION OF CONTROLS AND FEATURES
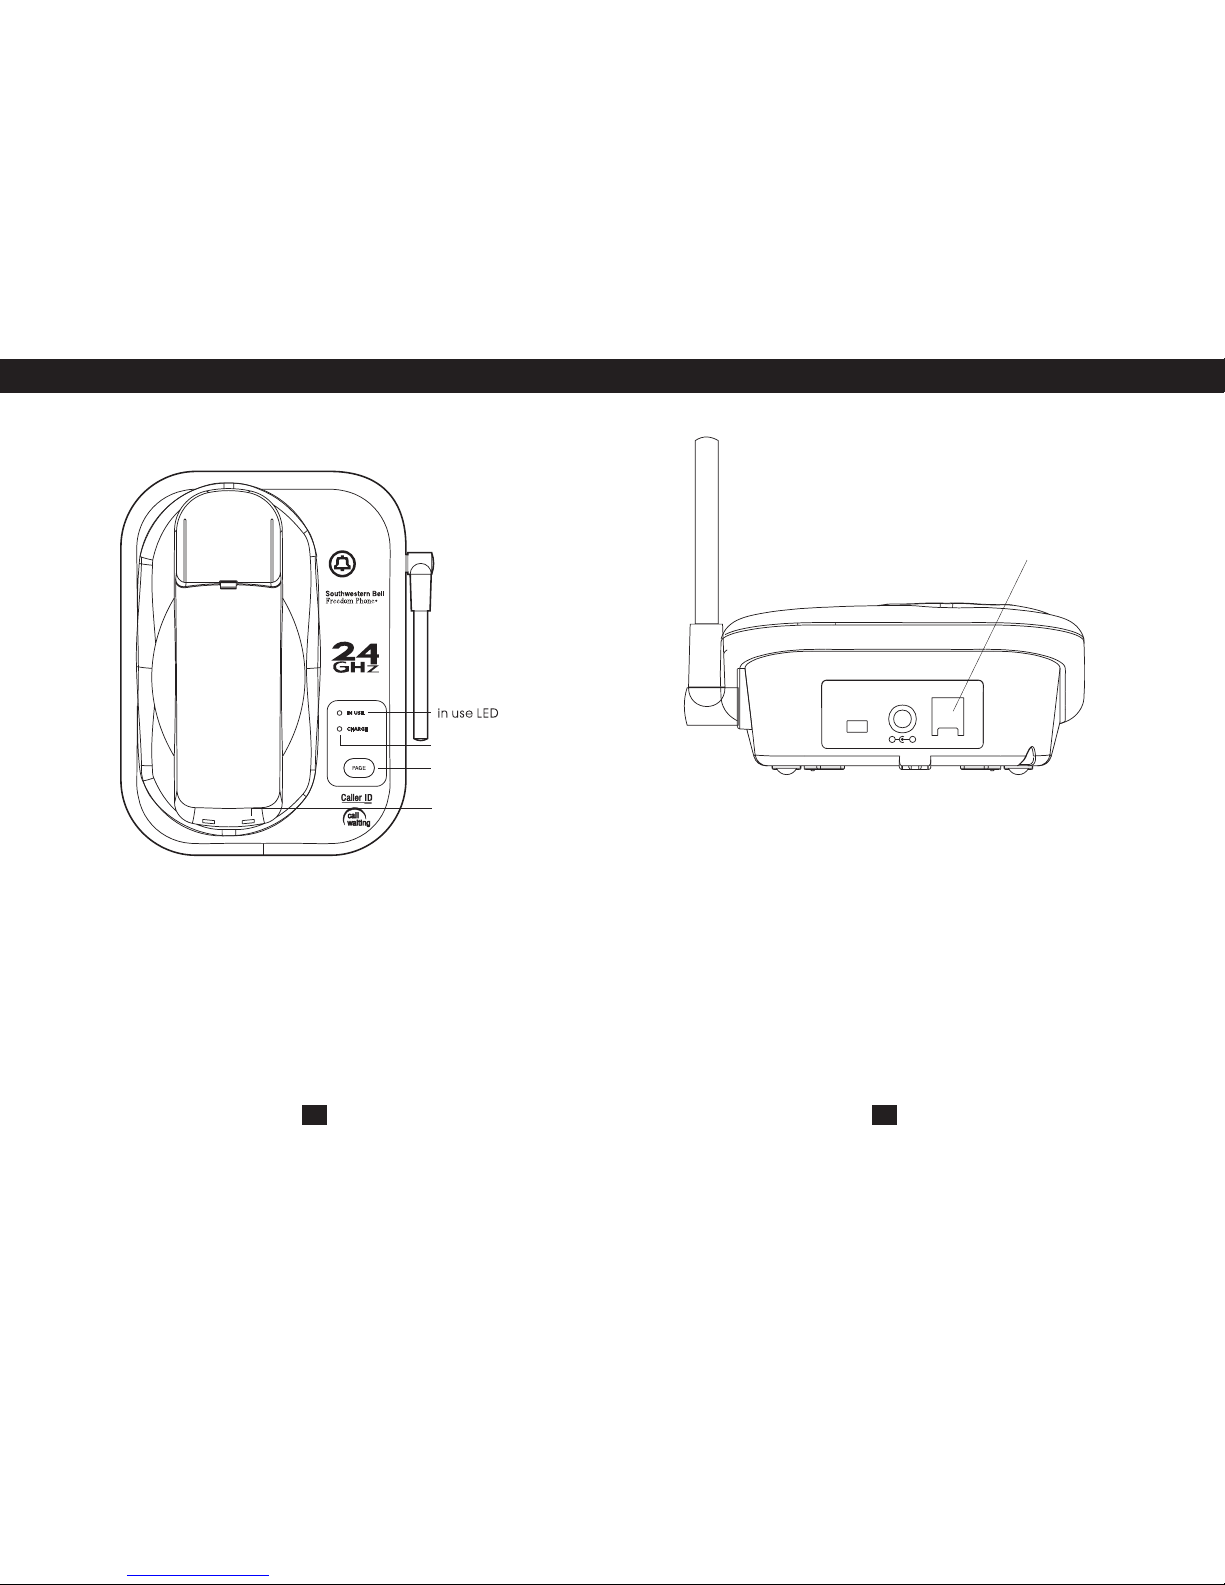
Page
Charge LED
Charging Contacts
Charging Contacts
Base
7
8
Charge LED
Page Button
-Usedtoinitiateahandsetpage.
- Used to recharge batter y and reset the security code
in the handset.
- Lights red when the handset is on the cradle is being charged
T/P
TEL
-
+
POWER SOURCE 9VDC 300mA
USE ONLY WITH CLASS 2
Base Back View
Data Jack
Used for connecting a computer or fax machine.
Tone/Pulse Switch
Used to set the dialing method for tone or pulse dialing.
Data Jack
In use LED - Light when handset is in use
LOCATION OF CONTROLS AND FEATURES CHOOSING A LOCATION
When in any of the menus a number is listed here next to the sign. This
number indicates the place in the list such as the 38th caller ID call or the 7th
setting in the menu.
When viewing caller ID entries the icon indicates that the same Caller ID
number has called more than one time since Caller ID memor y has last been
reviewed. Next to the icon is a counter that indicates how many times that
caller has called since the last review.
The Total Call Counter will show the total number of Caller ID messages
received the total number of phone numbers stored in the phone book etc
depending on the menu.
#
RPT
RPT
RPT Counter
Total Call Counter
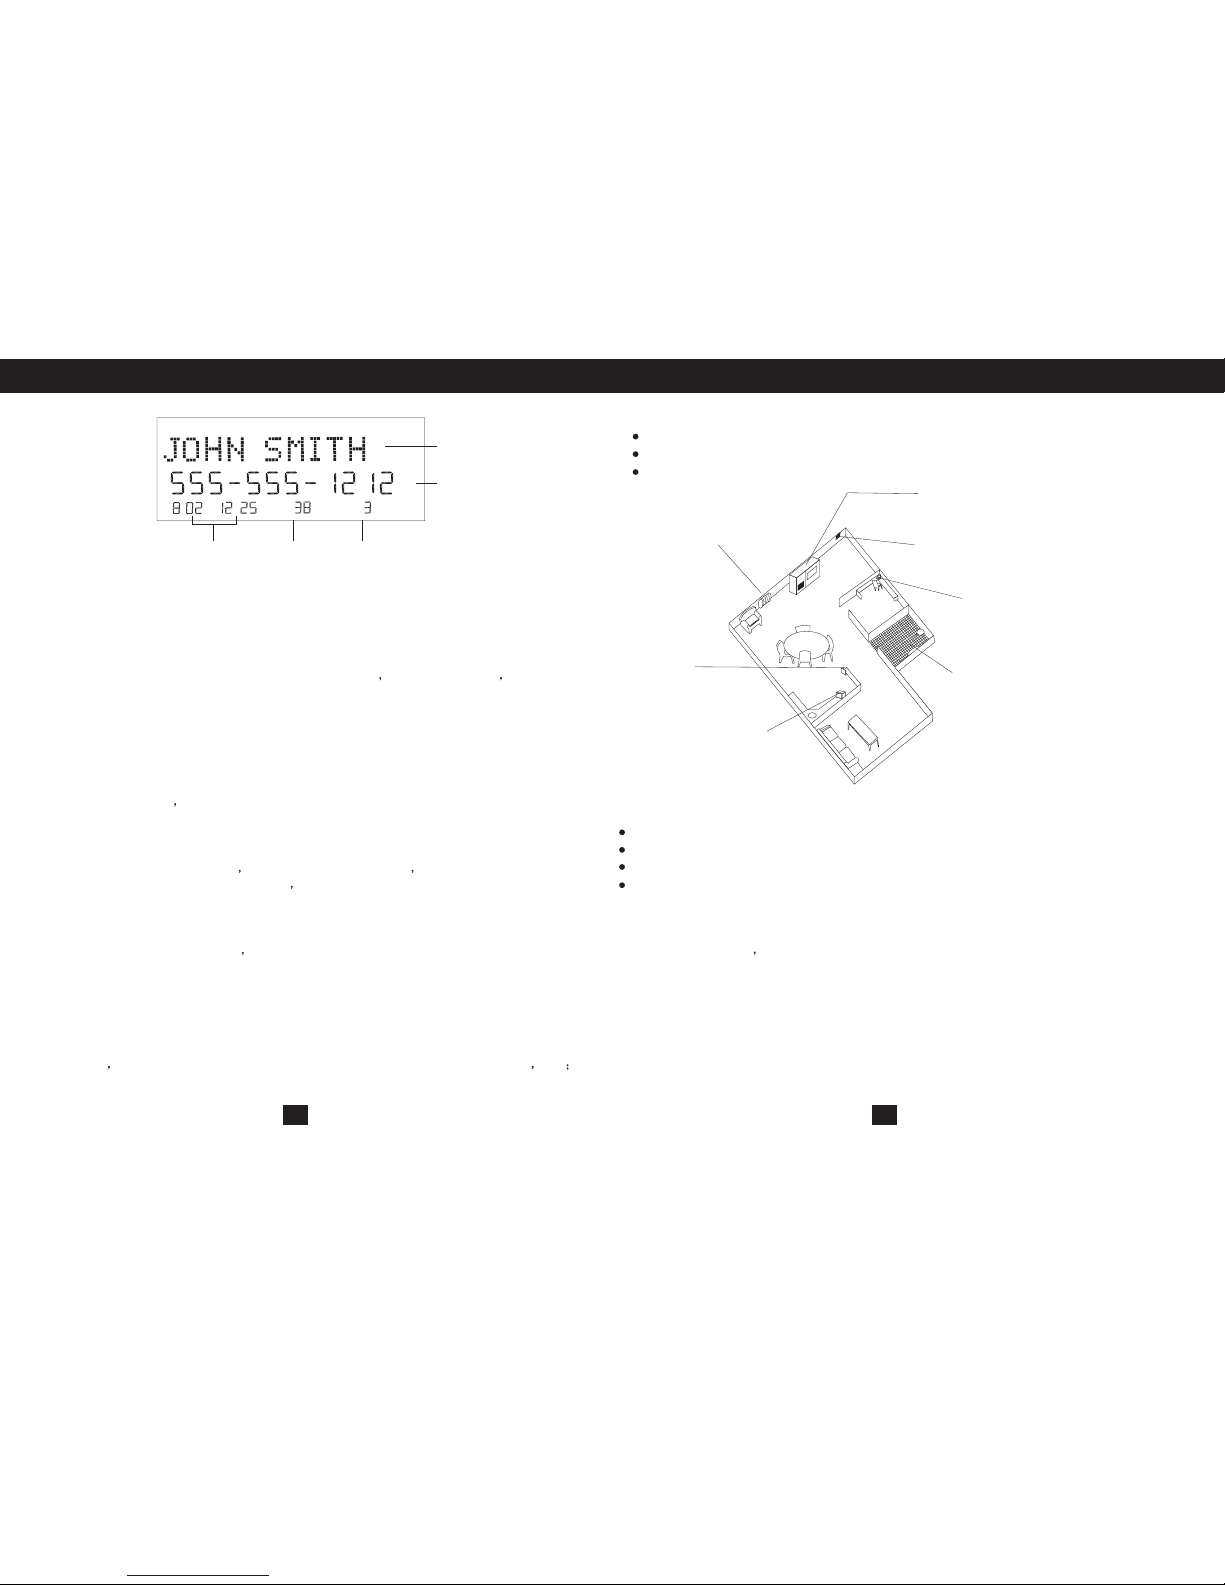
Do the following:
Choose the best location
Connect the phone
Choose the dialing mode
Where you place the phone affects the reception quality of the handset:
Away from another cordless telephone
Place the base near an AC electrical outlet and near telephone line jack
Place the base away from metal walls and metal file cabinets
Raise the base unit s antenna making sure it points towards the ceiling
The cordless telephone operates at a frequency that may cause
interference to nearby TVs and VCRs; the base phone should not be
placed near or on top of a TV or VCR. If interference is experi-enced,
moving the cordless telephone farther away from the TV or
VCR will often reduce or eliminate the interference.
CAUTION:
: While the 2.4GHz frequency is inherently clearer, we suggest that
you do not use this phone within 20 feet of a working microwave.
The microwave produces frequencies in this range which may
cause interference. This interference is normal for all 2.4GHz
phones and should not be considered a product defect.
Note
Name Character Field
Displays caller s name and operational menus.
Number Field
The number field will display numbers when dialing viewing Caller ID and
when viewing the phone book.
Date/Time Display
Shows the date and time of Caller ID calls or current date & time when idle.
NEW Icon
When in idle mode the call icon will flash slowly when a new Caller ID callNEW
has been received. The number of new caller ID calls is listed next to the icon.
Call/Entry Number
9 10
Away from heat sources, such as
radiators, airducts, and sunlight
Near acentral
location andon a
level surface
Away from a microwave oven
Away from VCRs and TV sets and
other electronicequipment
Away from noise sources such as a
window bya street withheavy traffic
Away from a
personal computer
Away from excessive
moisture, extremelylow
temperatures, dust,
mechanical vibration, or
shock
:
AM
/
RPT
Name CharacterField
Number Field
RPT or
Total Ca ll
Counter
New lcon
or Call/Entry
Number
Date/Time
Display
LCD
Display
NEW
#
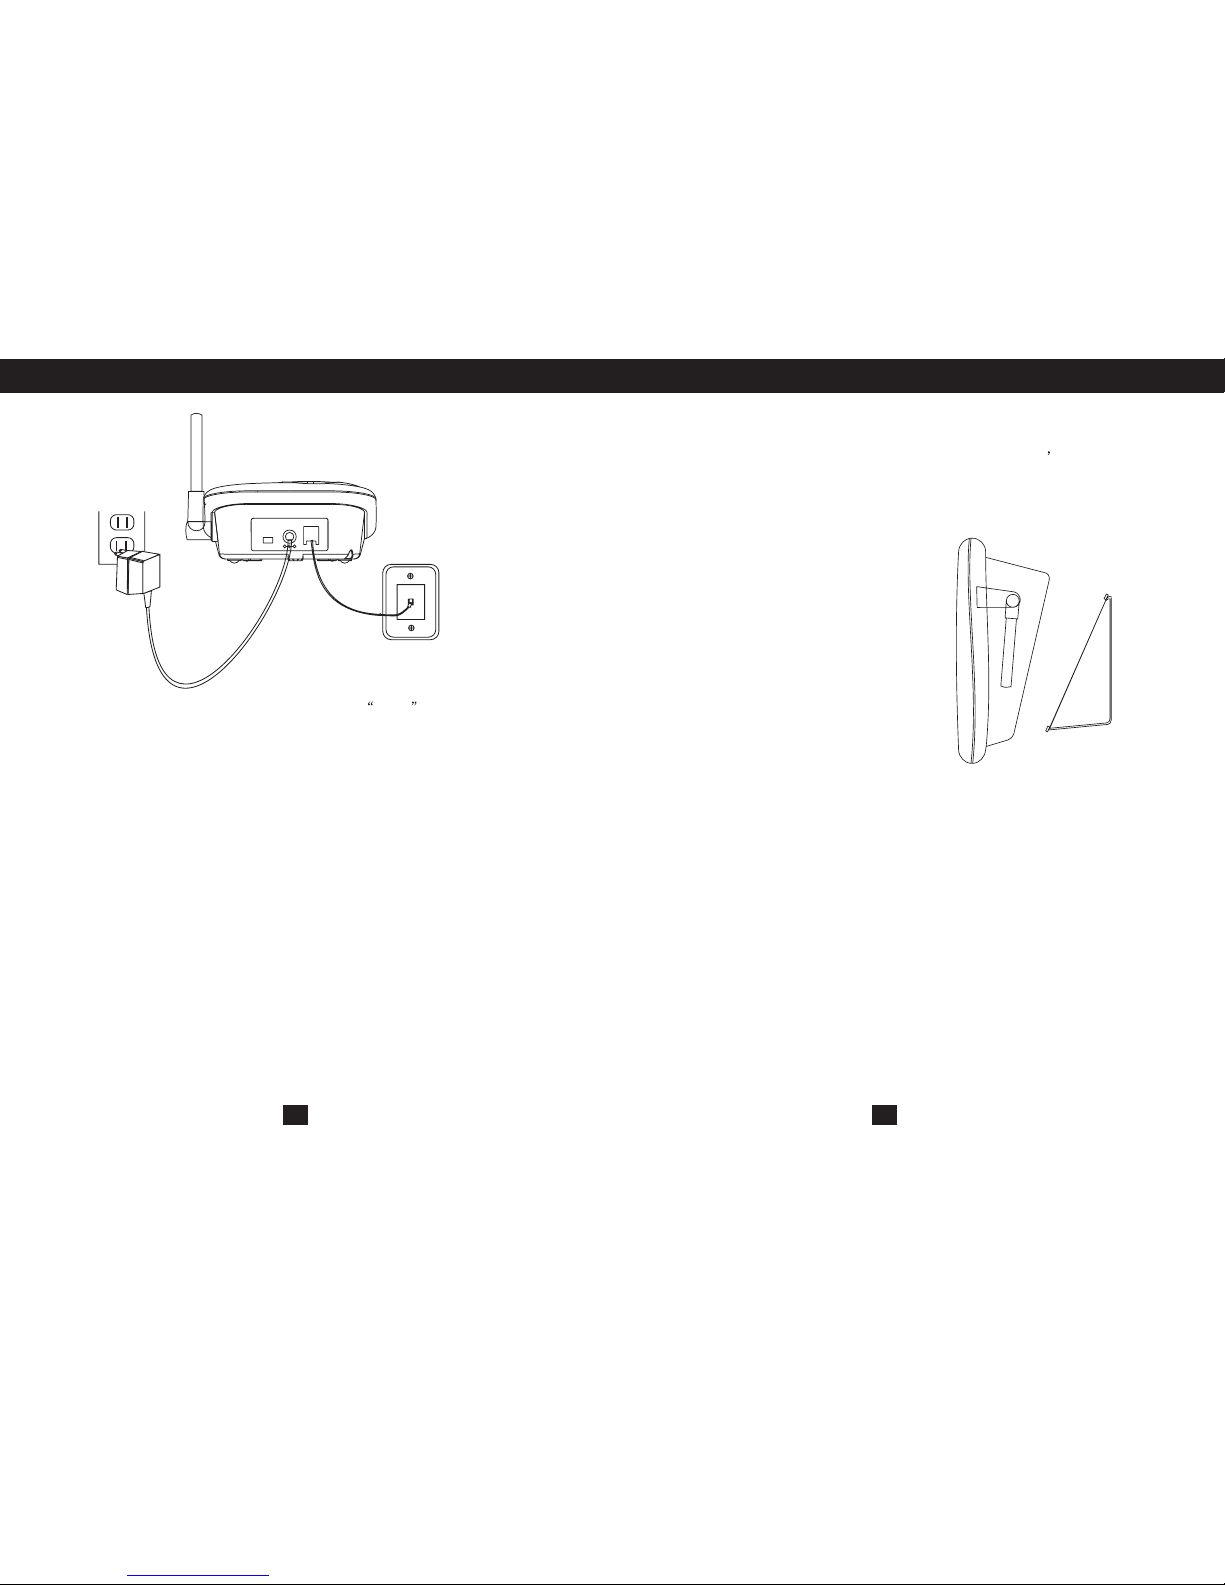
11
1. Connect the telephone line cord to the jack and to a
telephone outlet.
2. Connect the AC power adapter to the 9V DC jack and to an AC outlet.
3. Insert the pedestal into the slots on the bottom of the
base and slide up to lock in place. The pedestal is
reversible for desk or wall mounting.
4. Raise the antenna vertically.
: If your telephone outlet is not modular, contact your
telephone Company for assistance.
LINE
Tip
Note:
Note
Use only the supplied AC power adapter. Do not
use any other AC power adapter. Connect the AC
power adapter to a continuous power supply. Place
the phone close to the AC outlet so that you can
plug in the AC power adapter easily.
: The handset can be placed either face up or face down in the
Base when desk mounted.
The GH2410 telephone may be installed onto two screws (not included)
fastened into the wall.When installing screws into plasterboard walls use wall
anchors (not included) to ensure that the screws remain secure. Insert the
screws into the wall leaving 3/16" of each screw extending out from the wall.
The Gh2410 is not compatible with mounting on a standard
telephone wall plate.
1. Remove the handset from the base.
2. Adjust the base to the wall mount position.
3. Place the pedestal to the wall mount
position and slide into place.
4. If mounting over a telephone wall jack,
plug the supplied short telephone cord
intothejacklabeledLINEonthe
telephone. Thread the line cord through
the slot on the backside of the phone.
5. If wall mounting with screws, plug the
supplied 7-foot telephone cord into the
LINE jack on the telephone.
6. Connect the telephone line cord to the
wall jack.
7. Insert the AC adapter into the 9V DC jack on the top of the base.
8. Slip the telephone base onto the wall, lining up the wall mounting holes over
the wall plate posts or screws. Slide the telephone base down so it is firmly in
place.
9. Return the handset to the telephone base.
10. Plug the other end of the AC adapter into the AC outlet.
Note: For safety when wall mounted, the handset should only be placed in the
base with the caller ID display facing out.
TELEPHONE SETUP TELEPHONE SETUP
12
Connecting the BaseConnecting the Base
Wall Mounting
T/P
TEL
-
+
POWER SOURCE 9VDC 300mA
USE ONLY WITH CLASS 2
Pedestal
Wall Mounting Instructions:
 Loading...