

Southland SLS20825 User Manual

Operator’s Manual
25 Ton Log Splitter
208 cc, 4 Cycle
Look inside for:
Page
Safety Definitions 2
Safe Operation Practices 3-5
Product Specifications 6
Controls & Features 6
Safety Decals 7
Assembly 8-11
Operation 12-15
Maintenance 16
Troubleshooting 17
Technical Service 18
Slope Guide 19
Warranty 20
French 21
Spanish 41
IMPORTANT:
Thank you for purchasing this Southland® Log Splitter.
This manual provides complete instructions for safely operating and maintaining your Log Splitter. Read and save these
instructions. Refer to this manual each time before using your Log Splitter.
Record the following for future reference:
Mfg. Date Code: __________________
Date of Purchase: Attach a copy of your sales receipt.
Consumer Toll Free Number: 1-800-737-2112
MODEL No. SLS20825
Refer to the website for electronic manual and parts book.
www.southlandpowerequipment.com
WARNING: CONTAINS LEAD. May be harmful if eaten or chewed. May generate dust containing lead.
Wash hands after use. Keep out of reach of children.
WARNING: This product can expose you to chemicals including lead, which is known to the State
of California to cause cancer and birth defects or other reproductive harm. For more information go to
www.P65Warnings.ca.gov.
If you have a question or problem...
CALL TOLL FREE: 1-800-737-2112
KEEP THIS MANUAL FOR FUTURE REFERENCE
07/12/2018 Printed in China A203428
Safety Definitions
• Save these instructions
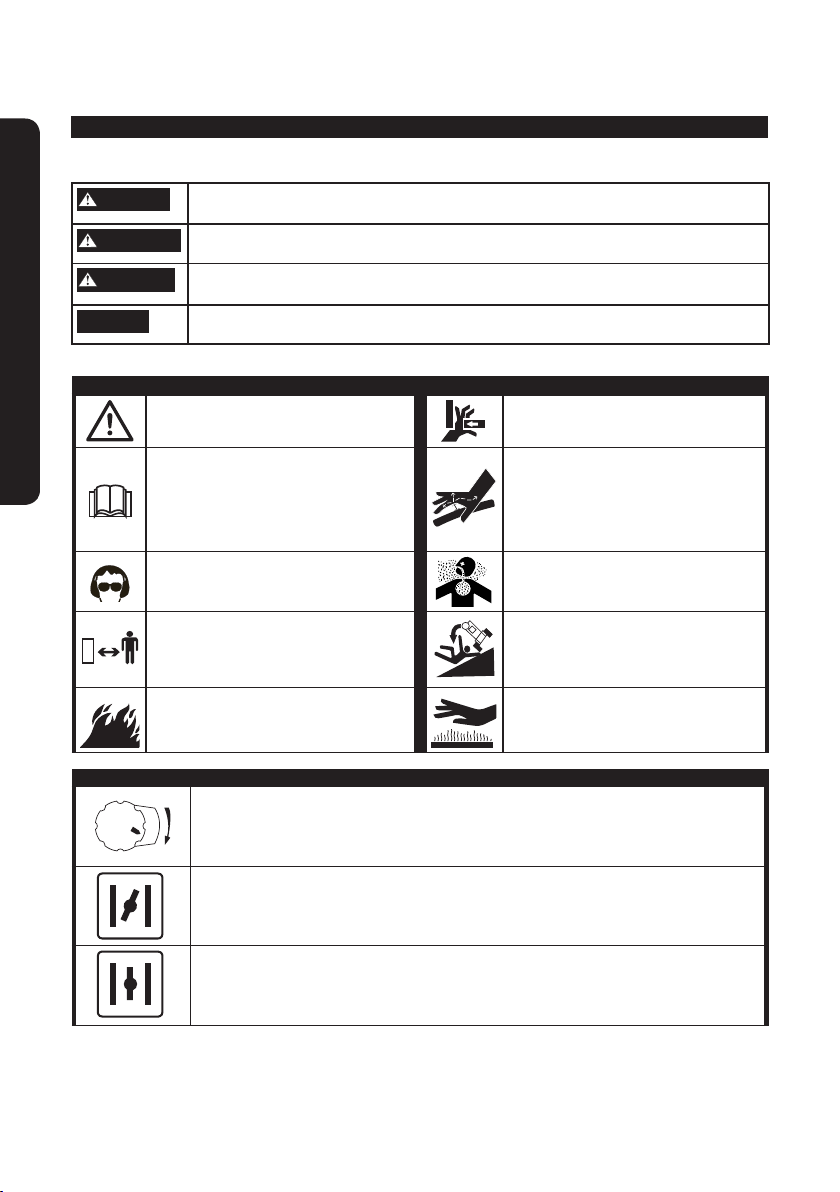
Safety Alert Symbols
Important Safety Information
The symbols below identify important safety information in this manual. Become familiar with these symbols
and the warnings associated with these symbol.
DANGER
WARNING
CAUTION
NOTICE
The following symbols can be found on your log splitter. Carefully read and understand their meaning.
Safety Warning Symbols
Indicates an imminently hazardous situation which, if not avoided, will result in death or serious
injury.
Indicates a potentially hazardous situation which, if not avoided, could result in death or serious
injury.
Indicates a potentially hazardous situation which, if not avoided, may result in minor or moderate
injury.
Indicates a practice not related to personal injury which, if not avoided, may result in property
damage.
Look for this symbol to point out important safety
precautions. It means: Attention! Become Alert!
Your Safety Is Involved.
Read, understand and follow operator’s manual
before operating this machine. Failure to follow
directions could result in serious injury.
Wear eye and ear protection complying with
ANSI Z87.1 and footwear protection.
Keep bystanders, pets and children at least 10
feet away from the machine while it is in operation.
Stop machine if anyone enters the area.
Avoid hand injury. Keep hands away from wedge,
footplate and other moving parts.
Check for hydraulic fluid leaks by passing a
piece of paper or cardboard underneath or over
the area of the leak. Do not check for leaks with
your hand. Fluid escaping from the smallest
hole, under pressure, can have enough force to
penetrate the skin resulting in tissue damage and
cause serious injury or death.
The engine produces carbon monoxide a
poisonous, odorless and deadly gas. Never run an
engine indoors or in a poorly ventilated area.
Do not operate or transport log splitter on slopes
greater than 5 degrees. Block wheels to prevent
movement and lock beam in the horizontal or
vertical position.
Gasoline is flammable. Allow the engine to cool at
least two minutes before refueling.
Hydraulic cylinder and other components can
become very hot. Avoid contact. Wear gloves
when operating log splitter.
Control and Operating Symbols
OFF
Turn the engine switch to the ON position to start the engine. Turn the engine switch to the
ON
OFF position to stop the engine.
To start cold engines move the choke to the full choke position.
Move the choke control to the RUN position as the engine warms up and when
starting a warm engine.
Questions? Call Toll Free at 1-800-737-2112 Copyright © 2018 MAT Engine Technologies, LLC

Important Safe Operation Practices
• Save all instructions
RESPONSIBILITY OF OPERATOR
1. Carefully read and follow these safety instructions. Failure to do so can result in serious injury.
2.
Know your product. Read and understand this manual before use. Compare the illustrations to machine. Learn
location and function of all controls. Thoroughly understanding the unit before use will result in the best
performance and safety.
3. Follow all instructions when assembling the unit. If the unit was purchased in assembled condition, the
operator must check the machine carefully to make sure it was assembled according the instructions in the
manual before use.
4. Regularly inspect the log splitter. Make sure parts are not bent, damaged, or loose.
5. Use this equipment for its intended purpose only. The intended purpose is to split wood for use in replaces.
6. Operate the machine only with guards, shields, and other safety items in place and working correctly.
7. Service the machine only with authorized or approved replacement parts.
8. Complete all unit maintenance and adjustments according to the instructions in this manual.
- Look for this symbol to point out important safety precautions. It means: “ Attention! Become Alert!
Your Safety Is Involved.”
DANGER
Carbon Monoxide is a poisonous gas. Using an engine indoors can kill you in minutes. Engine exhaust contains
high levels of carbon monoxide (CO), a poisonous gas you cannot see or smell. You may be breathing CO even
if you do not smell engine exhaust.
WARNING
The log splitter is capable of amputating or crushing hands and ngers. Read and follow all warnings and safety
instructions on the log splitter and in this manual. Failure to do so can result in serious injury or death to you or
bystanders.
WARNING
In order to prevent accidental starting when setting up, transporting, adjusting or making repairs, always
disconnect spark plug wire and place wire where it cannot come in contact with plug.
CAUTION
Muffler and other engine and hydraulic system components become extremely hot during operation and
remain hot after engine has stopped. To avoid severe burns on contact, stay away from these areas.
TRAINING SAFETY
1. Read, understand and follow the operating and service instruction manual carefully. Be thoroughly familiar
with the controls and the proper use of the equipment. Know how to stop the machine and disengage the
controls quickly.
2. Never allow children to operate the equipment. Never allow adults to operate the equipment
without proper instruction.
3. Keep bystanders, pets and children at least 10 feet (3 m) from the machine while it is in operation. Stop
machine if anyone enters the area.
4. Keep in mind that the operator or user is responsible for accidents or hazards occurring to other people,
their property and themselves.
Important Safety Information
PREPARATION SAFETY
1. Thoroughly inspect the area where the equipment is to be used and remove all foreign objects.
2. Operate only on level ground to ensure machine stability. Do not operate or transport log splitter on slopes
greater than 5 degrees.
3. Always wear safety glasses or safety goggles during operation and while performing an adjustment or
repair, to protect your eyes.
4. Do not operate the equipment without wearing adequate outer garments and safety goggles.
Avoid loose-fitting clothes and use protective footwear that will improve footing on slippery surfaces.
Wear leather work gloves.
5. Fuel is highly flammable. Take the following precautions:
a. Store fuel in containers specifically designed for this purpose.
b. Fill fuel tank outdoors with extreme care. Never fill fuel tank indoors. Do not smoke
while refueling.
c. Add fuel before starting the engine. Never remove the cap on the fuel tank or add fuel while the
engine is running or when the engine is hot. Allow engine to cool before refueling, at least
two minutes.
Questions? Call Toll Free at 1-800-737-2112 Copyright © 2018 MAT Engine Technologies, LLC

Important Safety Information (Continued)
• Save all instructions
d. If fuel is spilled, do not attempt to start the engine but move the machine away from the area of
Important Safety Information
spillage and avoid creating any source of ignition until fuel vapors have disappeared.
e. Replace all fuel tank and container caps securely.
f. After refueling, replace fuel tank cap securely and wipe up spilled fuel.
g. Never store fuel or log splitter with fuel in the tank inside a building where fumes may reach an
open flame.
h. Never fill gasoline containers or the log splitter fuel tank inside of a vehicle or in a truck bed.
Accidental electrical static discharge can ignite fuel vapors which could result in serious
injury or death.
6. Never attempt to make any adjustments while the engine (motor) is running (except where specifically
recommended by the manufacturer).
HYDRAULIC SAFETY
1. The hydraulic system of the log splitter requires careful inspection. Wear eye protection and gloves prior to
inspection. Be sure to replace frayed, kinked, cracked or otherwise damaged hydraulic hoses or hydraulic
components.
WARNING
Hydraulic fluid may be under high pressure or be hot and can cause personal injury. Read, understand and follow the
following safety precautions.
2. Hydraulic uid may be under high pressure or be hot and can cause personal injury.
3. Escaping hydraulic uid can create a re hazard and ignite if exposed to an ignition source.
4. Read, understand and follow the following safety precautions.
5. Check for hydraulic uid leaks by passing a piece of paper or cardboard underneath or over the
area of the leak.
6. Do NOT check for leaks with your hand.
7. Fluid escaping from the smallest hole, under pressure, can have enough force to penetrate the skin resulting in
tissue damage and cause serious injury or death. Machine operation should stop until any detected
leak is repaired.
8. Seek professional medical attention immediately, (see page 11) if injured by escaping hydraulic uid. Serious
infection or reaction can develop if medical treatment is not administered immediately.
9. Relieve all pressure by shutting off the engine and moving the valve control handle back and forth should it
become necessary to loosen or remove any hydraulic tting.
10. Do not remove the cap from the hydraulic tank or reservoir while the log splitter is running. The tank could
contain hot oil under pressure which could result in serious injury.
11. Do not adjust the hydraulic valve. The pressure relief valve on the log splitter is preset at the factory. Only a
qualied service technician should perform this adjust.
OPERATION
1. Do not put hands near moving parts. Contact with the splitting wedge can amputate ngers and hands.
2. Never allow bystanders within 10 feet of the machine while running. Keep children and pets away.
3. Never operate the machine without proper guards, plates or other safety protective devices in place.
4. The engine and its exhaust system and the hydraulic system can become hot and can cause a burn.
Do not touch.
5. Towing Precautions:
a. Never tow the machine at speeds greater than 45 miles per hour.
b. Always refer to the vehicle owner’s manual for proper towing.
c. Secure and lock the log splitter to the vehicle hitch before towing.
d. Verify the correct ball size of 2 inch is on the towing vehicle.
e. Ensure safety chains are correctly attached prior to towing.
f. Consult and comply with local or state regulations concerning highway use.
g. Do not carry passengers or allow them to sit or stand on the log splitter.
h. Avoid large holes or ditches when towing the equipment.
6. Exercise caution to avoid slipping or falling. Maintain a work space clean of wood and debris.
7. Do not operate the engine in a conned space where dangerous carbon monoxide fumes can collect.
8. If the machine should start to vibrate abnormally, stop the engine (motor) and check immediately for the cause.
Vibration is generally a warning sign of trouble.
9. Stop the engine (motor) when leaving the operating position, and when making any repairs,
adjustments and inspections.
Questions? Call Toll Free at 1-800-737-2112 Copyright © 2018 MAT Engine Technologies, LLC

Important Safety Information (Continued)
• Save all instructions
10. Take all possible precautions as recommended by the manufacturer when leaving the machine unattended.
Stop the engine, do not leave the unit unattended until all moving parts have come to a complete stop.
11. Before cleaning, repairing, or inspecting, shut off the engine and make certain that all moving parts have
come to a complete stop. Disconnect the spark plug wire, and keep the wire away from the plug to prevent
accidental starting.
12. Do not overload the machine by attempting to split any material beyond manufacturer’s recommendation.
13. Use only attachments and accessories approved by the manufacturer of the machine.
14. Never operate the machine without good visibility or light. Do not operate at night.
15. Do not change the engine governor settings or over speed the engine. This can cause the engine to operate
at an unsafe speed.
16. Start the engine carefully according to the manufacturer’s instructions.
17. Never move the machine while the engine is running.
18. Do not operate the machine while under the inuence of alcohol or drugs.
ASSEMBLY PRECAUTIONS:
This product requires assembly before use. See “Assembly” section for instructions.
CAUTION
Because of the weight and/or size of components of the log splitter, it is required that two adults be present to
assist with the assembly. Do not assemble the unit without two adults present.
Important Safety Information
Questions? Call Toll Free at 1-800-737-2112 Copyright © 2018 MAT Engine Technologies, LLC

Specifications
• Save all instructions
Unit Weight ......................................................... 439 lb. (199 kg)
Ram Force ........................................................................ 25 Ton
Cycle Time ................................................................ 16 seconds
Wedge Size .............................................. 8 inch hardened steel
Gear Pump ....................................................................2 - Stage
Max Log Length............................................................... 26 inch
Max Log Diameter ........................................................... 30 inch
Engine Size ....................................................................... 208cc
Engine Oil Capacity .............................................. 16oz. (470ml)
Engine Oil Type ........................................... API SG-SL 10W-30
Engine High Speed .................................... 3750 RPM (no load)
Gasoline Type......................................... Regular Unleaded / 87
Octane (Min) Maximum 10% ethanol
Gasoline Capacity ............................................ 0.7 gallon (2.6L)
Gear Pump ....................................................................2 - Stage
Hydraulic Oil Type ................................ 10 wt. AW32, or ISO 32
Hydraulic Fluid Max ......................... 6.5 gallon (User must insert
approx. 3.2 gallons on initial setup
Hydraulic Cylinder Dimensions .....................................4.13 inch
ID x 24.5 inch stroke
Max Hydraulic Pressure ................................................3625 PSI
Max Hydraulic Flow ......................... 11 gallon per minute (GPM)
Hitch Type.......................................................2 inch ball coupler
Max Towing Speed ...............................45 miles per hour (MPH)
Tire Size .......................................................... 4.80 x 8 - 16 inch
Max tire inflation pressure .................................................30 PSI
Bolt Torques:
- M6 x 20 Plate, filter, fixed suction ............................4 - 7 ft. lbs
(8 – 10 Nm)
- Pump to coupler housing ......................................11 – 18 ft. lbs
(15 – 25 Nm)
- Engine to mount plate ......................................... 11 – 18 ft. lbs
(15 – 25 Nm)
- External hydraulic oil filter ................................... 26 – 33 ft. lbs
(35 – 45 Nm)
- 2” Hitch coupler to tow bar .................................. 37 – 59 ft. lbs
(50 – 80 N m)
NOTICE
Refer to Engine Owner’s Manual for engine specifications.
NOTE: This spark ignition system compies with the Canadian Standard ICES-002.
Controls & Features
Read, understand and follow this owner’s manual
before operating the equipment. Familiarize yourself
with the location and function of the controls and
features. Save this manual for future reference.
(See g. 1)
1. Coupler - Attaches the log splitter to the 2” ball of
towing vehicle.
2. Hydraulic Cylinder - 4.13”x 24.5” cylinder.
3. Control Valve Lever - Controls the forward and
backward movement of splitting wedge.
4. 8” Wedge - Features wedge wings and tapered
ends making splitting easier.
5. External Filter - Filters the hydraulic oil.
6. Beam - 9.7” wide
7. Engine - Air cooled engine powers the hydraulic
pump.
8. Tires - Maximum rated towing speed is 45 MPH.
9. Gear Pump - Pumps the hydraulic oil through
the system.
10. Support Leg - Supports the log splitter
while operating.
11. Safety Chains - Safety feature to prevent loss of
log splitter while towing.
Figure 1
Questions? Call Toll Free at 1-800-737-2112 Copyright © 2018 MAT Engine Technologies, LLC

Safety Decals
NOTICE
WARNING
WARNING
WARNING
• Ensure the correct ball size of 2 inch is on the towing
WARNING
!
Hydraulic fluid injection hazard
• High pressure fluid escaping from a small hole
can penetrate skin causing serious injury.
• Avoid contact with escaping fluids.
• Check for leaks using paper, never your hands.
Overtur n and Slope hazard
Avoid personal injury
• Do not operate or transport log splitter on
slopes greater than 5 degrees.
• Block wheels to prevent movement and lock
beam in the horizontal or vertical position.
Burn Hazard
Avoid skin burn
• Hydraulic cylinder and other
components can become very hot.
• Avoid contact.
• Wear gloves when operating.
Operating Instructions
1. Wear ANSI approved safety gloves, glasses and
footwear.
2. Position splitter on a flat surface with wheels
blocked.
3. After ensuring proper fluid levels, start engine
and advance throttle.
4. Position log onto beam and against the endplate.
NOTICE: Always split wood in the direction of the
grain and hold the log by its sides when loading.
5. Push control valve handle FORWARD to split log.
6. Push control valve handle BACKWARD to return
wedge to its original position.
Read and follow operating
instructions before operating
log splitter.
Impact or Pinch Hazard
• Keep bystanders at least 10 feet away.
• Only one person should operate and
load the log splitter, staying within the
designated operator zone.
A203264
• Save all instructions
If you need assistance or find any parts missing,
CALL TOLL FREE: 1-800-737-2112.
This log splitter has been designed and manufactured
to provide you with the safety and reliability you
would expect from an industry leader in outdoor
power equipment manufacturing.
Although reading this manual and the safety
instructions it contains will provide you with the
necessary basic knowledge to operate this equipment
safely and effectively, we have placed several
safety labels on the log splitter to remind you of
this important information and warn you of specific
hazards while operating the machine.
These important safety labels are illustrated below,
and are shown here to help familiarize you with the
location and content to the safety messages you
will see as you perform normal chipping/shredding
operations.
Keep the beam clean and free of debris to avoid
damage to log splitter
!
Pinch Hazard
Avoid hand injury.
Lock support leg in the down
position by inserting pin prior
to splitting.
A203299
!
Crush Hazard
Avoid hand injury.
• When pivoting beam to horizontal
position, keep hands away from beam stop.
• Ensure pin completely locks beam before
splitting or towing.
Please review these labels now. If you have any
questions regarding their meaning or how to comply
with these instructions, reread the complete Important
Safe Operation Practice text or contact your local
dealer.
Should any of the safety labels become unreadable
because of being worn, faded or otherwise damaged
during the use of your log splitter, please contact your
local authorized dealer to order replacement label.
The safety labels are easily applied, and will act as a
constant visual reminder to you and others who may
use the equipment. Following the safety instructions
is necessary for safe, effective operation of your log
splitter.
A203267
!
!
Avoid serious injury or death while towing
• Read and follow operator manual instructions for correct
attachment and towing.
vehicle.
A203272
• Ensure safety chains are correctly attached prior to towing.
• Do NOT exceed a maximum towing speed of 45 MPH.
A203273
WARNING
Crush Hazard
Avoid Injury
Keep arms and
hands away from
moving parts.
A203270
Questions? Call Toll Free at 1-800-737-2112 Copyright © 2018 MAT Engine Technologies, LLC

Assembly
6
• Save all instructions
CAUTION
Read, understand and follow all instructions for
assembly and operation. Failure to properly assemble
this equipment could result in serious injury to the
user or bystanders, or cause equipment damage.
UNPACKING INSTRUCTIONS
Set the shipping crate on a solid flat surface and
carefully remove the lid. Use two adults and take
all parts out of the shipping crate and inspect the
components to ensure there are no missing pieces
before starting to assemble the log splitter follow
steps 1 through 9.
CARTON CONTENTS
1 Engine and Pump assembly 1
2 Hydraulic Oil Tank assembly 1
3
Tow Bar assembly
4 Support Leg 1
5 Beam assembly 1
6 Wheel assemblies 2
7 Hardware pack 1
Owner Manual and Engine
8
Manual
9 Hub Caps and assembly tube 2
TOOLS REQUIRED
• Rubber or Wooden Hammer
• 13 mm,16 mm,17 mm, 19 mm Wrenches or
Socket Wrenches
• One 8 inch Adjustable Wrench and one 10 inch
Adjustable Wrench
• Phillips Screwdriver
• Torque Wrench (ft. lbs.)
• Pliers
QTY
1
1
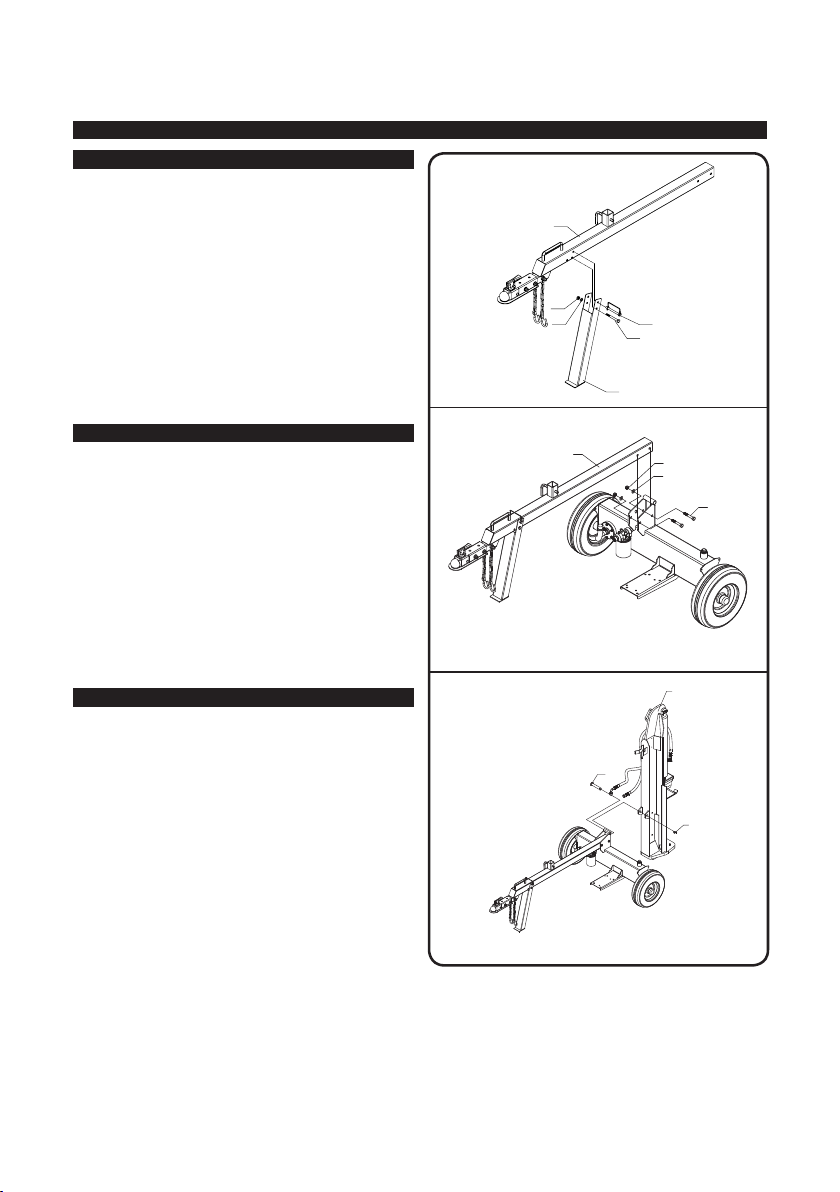
Step 1: Wheel Assembly
1. Attach the wheel (#2) to the oil tank axle (#1) using
a at washer Ø20 (#6) and hex slotted nut M20 (#3).
The slotted nut should be tightened by hand and
then slowly tightened with a wrench only until the
side free-play is removed from the bearing assembly. Rotate the wheel while tightening the nut. The
wheel should turn freely. Install the cotter pin Ø4x36
(#4) through a slot in the nut M20 (#3) and the hole
in the spindle. If necessary, the slotted nut may be
loosened slightly until a slot in the nut aligns with the
hole in the spindle.
2. Once installed, bend both ends of the cotter pin to
prevent its loss. Rotate the wheel and observe for
smooth and free movement. (See g. 2)
WARNING
Installation of the cotter pin is important and required.
Failure to install the cotter pin can result in loss of
wheel retention. Always assemble using a new cotter,
do not reuse.
3. Install the axle cap (#5) on the end using rubber
hammer and assembly tube.
NOTICE
Flat washer Ø20 (#6), hex slotted nut M20 (#3) and
cotter pin Ø4x36 (#4) are not located in the hardware
kit, but are already loosely assembled in the log splitter
spindles.
1
2
3
4
5
Figure 2
Questions? Call Toll Free at 1-800-737-2112 Copyright © 2018 MAT Engine Technologies, LLC
Assembly (Continued)
• Save all instructions
Step 2: Attach Support Leg to the Tow Bar
1. Attach the support leg (#6) to the tow bar (#1)
secure using a hex bolt M10x95 (#5), at washer
Ø10 (#3), Nylon lock nut M10 (#2) and lock pin A
(#4). (See g. 3)
1
2
3
4
5
Step 3: Attach Tow Bar to the Hydraulic Tank
1. Attach the tow bar (#1) to the hydraulic tank and
secure using two hex bolts M12x100 (#4), at
washer Ø12 (#3) and nylon lock nut M12 (#2).
(See g. 4)
Step 4: Attach the Beam Assembly
1. Attach the beam assembly (#1) to the hydraulic tank
and secure using the hinge pin
(#2 and R-Pin Ø3 #3). (See g. 5)
2. Rotate beam to horizontal position and secure with
front lock pin.
Figure 3
Figure 4
Figure 5
6
1
2
3
4
1
2
3
Questions? Call Toll Free at 1-800-737-2112 Copyright © 2018 MAT Engine Technologies, LLC
1
6
5
4
3
2
Assembly (Continued)
• Save all instructions
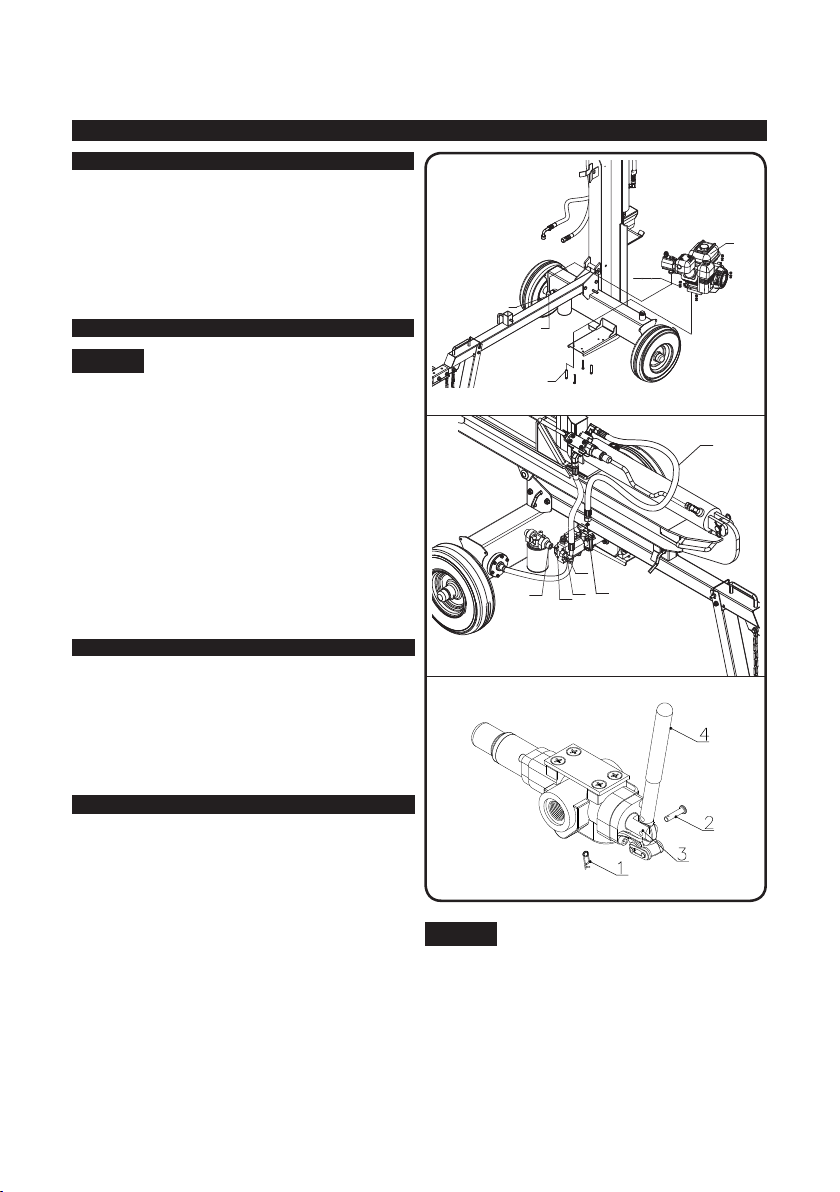
Step 5: Attach Engine to Mounting Plate
1. Position the engine (#4) and secure it to the mount
plate. Put four hex bolts M8x40 (#5) through the
bottom of the plate. Place a at washer Ø8 (#2)
and tighten the nylon lock nut M8 (#1) to 15 ft. lbs.
torque.
2. Attach the clear oil pipe (#7) to the bottom of the
gear pump and secure with clamp (#6). (See g. 6)
Step 6A: Attach Hydraulic Hoses
NOTICE
All hydraulic ports contain plastic plugs to prevent oil
loss during shipping. These plugs must be removed
prior to assembly. Because the unit has been factory
tested, there is some hydraulic oil in the lines. It is
recommended to have a small container to contain
some oil that will ow from the uncapped lines during
assembly.
1. Put O ring Ø11.2x2.4 (#3) on the rear pump outlet
connector (#4), attach the hydraulic hose (#2) to the
rear pump outlet connector (#4).
2. Put O ring Ø17x2.5(#6) on the external lter
connector (#5).
3. Attach the return hydraulic hose (#1) to the
connector (#5). (See g. 7A)
Step 6B: Attach Control Lever
1. Remove spring cotter pin (#1) and retaining pin
(#2) from control valve rod (#3). (See g. 7B)
2. Rotate control lever (#4) until its hole aligns with
hole in control valve rod (#3).
3. Install retaining pin (#2) through control valve rod
(#3) and control lever (#4) and secure with spring
cotter pin (#1).
Step 7: Add Engine Oil
1. Make sure the log splitter is on a level surface.
2. Remove oil ll cap/dipstick to check oil level. Note
that if the unit has been preassembled by the retail
store, oil may have already been added.
3. Refer to the separate owner’s engine manual for the
quantity of engine oil; add oil to the proper level and
replace oil ll cap/dipstick.
4. Check engine oil level daily and add as needed.
Questions? Call Toll Free at 1-800-737-2112 Copyright © 2018 MAT Engine Technologies, LLC
Figure 6
Figure 7A
Figure 7B
NOTICE
During the break-in period check the engine oil level
often.
DO NOT attempt to crank or start the engine before it
has been properly lled with the recommended type
and amount of oil. Damage to the log splitter as a
result of failure to follow these instructions will void
your warranty.
6
7
5
3 2
1
4

Assembly (Continued)
• Save all instructions
Step 8: Add Gasoline to the Engine
1. Use only clean, fresh, regular unleaded fuel with a
minimum 87 octane rating.
2. DO NOT mix oil with fuel.
3. Remove the fuel cap and slowly add fuel to the tank.
DO NOT overll and allow approximately 1/2 inch of
space from the top to the tank for fuel expansion.
4. Screw on the fuel cap and wipe away any
spilled fuel.
DANGER
• Log splitter engine exhaust contains carbon
monoxide, a colorless, odorless, poison gas.
• Breathing carbon monoxide will cause nausea,
dizziness, fainting or death. If you start to feel dizzy
or weak, get to fresh air immediately.
• Operate log splitter outdoors only in a
well-ventilated area.
• DO NOT operate the log splitter inside any building,
enclosure or compartment.
• DO NOT allow exhaust fumes to enter a conned
area through windows, doors, vents or
other openings.
WARNING
• Fuel and fuel vapors are highly ammable and
extremely explosive. Fire or explosion can cause
severe burns or death.
• Unintentional startup can result in entanglement,
traumatic amputation or laceration.
• Only use regular unleaded gasoline with a minimum
87 octane rating. DO NOT mix oil and
gasoline together.
• Fill tank approximately 1/2” below the top of the tank
to allow for fuel expansion. DO NOT ll fuel tank
indoors or when the engine is running or hot.
• DO NOT light cigarettes or smoke when lling
the fuel tank.
Step 9: Add Hydraulic Oil
1. The log splitter needs to be on a at, level surface
before adding the hydraulic oil.
2. Remove the oil cap from the hydraulic oil tank.
Check the hydraulic oil level. If the unit has been
preassembled by the retail store, hydraulic oil may
have already been added.
3. If required, add up to 3.2 gallons of hydraulic oil.
10W AW32 and ISO 32 are acceptable types
of uid.
4. Check the hydraulic oil level.
5. Start engine and use the control lever to extend and
retract wedge several times to remove air from
the lines.
6. With the wedge retracted, check hydraulic oil level
again and ll if necessary.
Questions? Call Toll Free at 1-800-737-2112 Copyright © 2018 MAT Engine Technologies, LLC
WARNING
Hydraulic uid may be under high pressure or be hot
and can cause personal injury.
• Do not remove the hydraulic oil ll cap when the
engine is running or hot. Hot oil can escape causing
severe burns. Always allow the log splitter to cool
completely before removing the hydraulic oil cap.
• High uid pressure and temperatures are created in
the hydraulic log splitters. Hydraulic uid can escape
through a pin-size hole opening and can puncture
skin and cause severe blood poisoning. Inspect
hydraulic system regularly for possible leaks.
• NEVER check for leaks WITH YOUR HAND while
the system is pressurized. Check for hydraulic uid
leaks by passing a piece of paper or cardboard
underneath or over the area of the leak. Seek
medical attention IMMEDIATELY if injured by
escaping uid.
• Make sure all ttings are tight and secure before
applying pressure.
• Relieve system pressure before servicing.
• Make sure the hydraulic hoses do not touch any hot
surfaces or cutting areas.
• Hoses need to be positioned were they are clear
from the engine and cutting wedge. To avoid serious
bodily injury always inspect the hoses before
operating the log splitter.

Operation
• Save all instructions
Before Operating
A
Before operating or using the log splitter, review the instructions below and all safety information. Failure
to follow these instructions may result in property damage or injury to the operator or bystanders.
WARNING
• Use the log splitter only for its intended use of splitting wood.
• When changing the splitter from vertical to horizontal operation, do not let the beam suddenly drop. Keep
hands and fingers clear of pinch or crush points at all times.
• When operating in the vertical position, make sure the beam lock pin engages the beam to prevent
inadvertent movement.
• Use the log splitter to split wood logs length wise with the grain.
• Never modify, alter or change the log splitter in any way.
• Never attach a rope, cable or other device to the control lever on the log splitter.
• Operate the log splitter only in daylight with good light and visibility.
• Do not leave the log splitter unattended while the engine is running.
• Do not change the splitting position with the engine running. Contact with the muffler can cause
serious burns.
• Never operate or let anyone else operate, the log splitter while under the influence of alcohol, drugs, or
medication.
Pre-Start Check List
B
1. Make sure all safety guards are in place and all nuts and bolts are secure.
2. Always wear safety gear, eye protection, gloves and work boots when operating the log splitter.
3. Make sure the machine is on a dry and flat surface. Block the wheels to prevent movement. Do not operate
on slopes greater than 5 degrees. (See Slope Guide)
4. Lock the beam in the horizontal or vertical position.
5. Check oil level in engine crankcase and the hydraulic tank. See your Engine Owner’s manual for
procedure and specifications.
6. Visually inspect all hoses and attachments for leakage and security.
7. Inspect air cleaner for cleanliness. See your Engine Owner’s manual for procedure.
8. Check the fuel supply. Fill the fuel tank no closer than 1/2” (12.7 mm) from top of tank to provide space for
expansion. See your Engine Owner’s manual for fuel recommendations.
9. Be sure spark plug wire is attached and spark plug is tightened securely.
10. Look for signs of damage to machine and engine.
11. Remove excessive debris from engine guards and muffler area.
12. The log splitter must have at least seven feet of clearance from combustible material. It needs to be on a
dry and level surface with good footing. Do not work on mud, ice, brush or snow. When using the log splitter
the work zone must be maintained at all times.
Towing Precautions
C
WARNING
Serious injury or death can occur if towing safety rules are not followed.
• Before towing the log splitter, check tires for excessive wear, cuts or damage. Check for proper tire
inflation. Add air as required. Do not over inflate tires. Serious injury can result if tires explode.
• Verify the correct ball size of 2 inches is on the towing vehicle.
• Refer to the vehicle owner’s manual for proper safety and towing instructions.
• Always use safety chains, secure and lock the log splitter to the vehicle hitch before moving. Drive safely.
Be aware of the added length of the log splitter.
• Never exceed the maximum travel speed of 45 mph.
• Never ride or transport cargo on the log splitter.
• Turn off the vehicle before leaving the log splitter unattended. Block the log splitter wheels to prevent
unintended movement.
Questions? Call Toll Free at 1-800-737-2112 Copyright © 2018 MAT Engine Technologies, LLC
Operation (Continued)
• Save all instructions
Operator Work Zone
D
NOTE: Serious accidents can happen when other
people are allowed inside the work zone. Keep
everyone else outside the work zone while operating
the control lever.
Engine Start-Up
E
A more detailed description of engine operation and
all related precautions and procedures can be found
in the Engine Owner's Manual that accompanies each
log splitter. Read and follow these instructions.
TO STOP ENGINE (FIG. 8)
Turn the engine switch to the OFF position. Refer to
Engine Owner’s Manual for further information. Do not
use the choke control to stop the engine.
TO START ENGINE (FIG. 9) (Cold Start)
1. Move choke control to the full choke position.
2. Move throttle control lever away from the SLOW
position, about 1/3 of the way toward the
FAST position.
3. Turn the engine switch to the ON position.
4. Firmly hold the starter grip. Pull the starter grip
handle slowly until resistance is felt, then
pull rapidly.
5. As the engine starts up, move the choke control to
the RUN position.
TO START ENGINE (FIG. 10) (Warm Start)
Restarting a warm engine does not require use of
the choke.
1. Move throttle control lever away from the SLOW
position, about 1/3 of the way toward the
FAST position.
2. Firmly hold the starter grip. Pull the starter grip
handle slowly until resistance is felt, then
pull rapidly.
Figure 8
Figure 9
START
OFF
ON
OFF
OFF
ON
Figure 10
ON
START
Questions? Call Toll Free at 1-800-737-2112 Copyright © 2018 MAT Engine Technologies, LLC

Operation (Continued)
• Save all instructions
Log Splitter Start-Up
F
NOTICE
The hydraulic oil needs to be above 10°F (-12C°)
before starting the engine. Cold hydraulic oil
can damage the hydraulic pump. If outdoor air
temperature is below 32°F (0C°) allow the log splitter
to warm up by extending and returning the wedge
several times before splitting wood.
1. Put the support leg in the down position and install
lock pin. Block both tires to prevent the log splitter
from moving during operation.
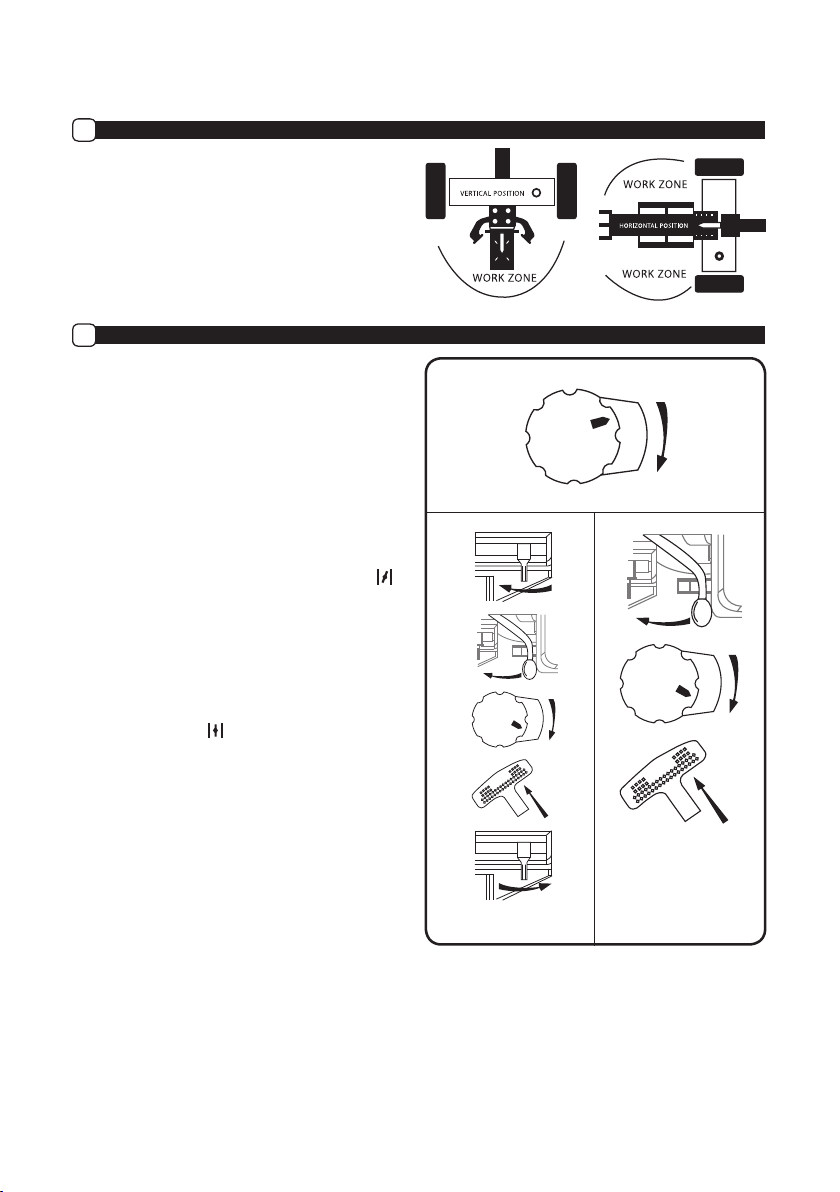
2. Set the log splitter in either the horizontal or
vertical position and lock with pin.
NOTICE
The HORIZONTAL position is used for lighter logs that
can easily be loaded onto the beam. The VERTICAL
position is used for either light logs or heavy logs that
are difcult to load onto the beam.
CAUTION
Back injury can result from lifting logs onto the log
splitter if proper lifting techniques are not used.
3. Load a log onto the beam against the endplate.
Grasp the log from the sides and not the ends.
(Max Log Length-26”). (See fig. 11)
4. Make sure hands are clear from the wedge and
crush hazard areas.
WARNING
Wedge can cut through skin and break bones. Keep
both hands away from wedge and beam slide. Serious
accidents can happen when other people are allowed
inside the work zone. Keep everyone else out of the
work zone while operating control lever.
DO NOT wear loose clothing. It can get tangled in
moving parts of log splitter. Only use the log splitter in
daylight so you can see what you are doing.
5. Using one hand, push control lever forward to split
the log.
6. Using one hand, pull control lever backward to
return wedge to its original position.
7. Always keep work zone clean and free of split wood
and debris.
WRONG
BETTER
BEST
Figure 11
WARNING
To avoid hand or nger injury, always keep hands clear
of the log and wedge while it is retracting. Always keep
ngers away from any cracks that open in the log while
splitting. They can quickly close and pinch or amputate
your ngers.
If a log gets stuck, embedded or will not split
completely, push the control lever in the reverse
direction and allow the splitter to strip the log
from the wedge.
Questions? Call Toll Free at 1-800-737-2112 Copyright © 2018 MAT Engine Technologies, LLC
Operation Illustrations
• Save all instructions
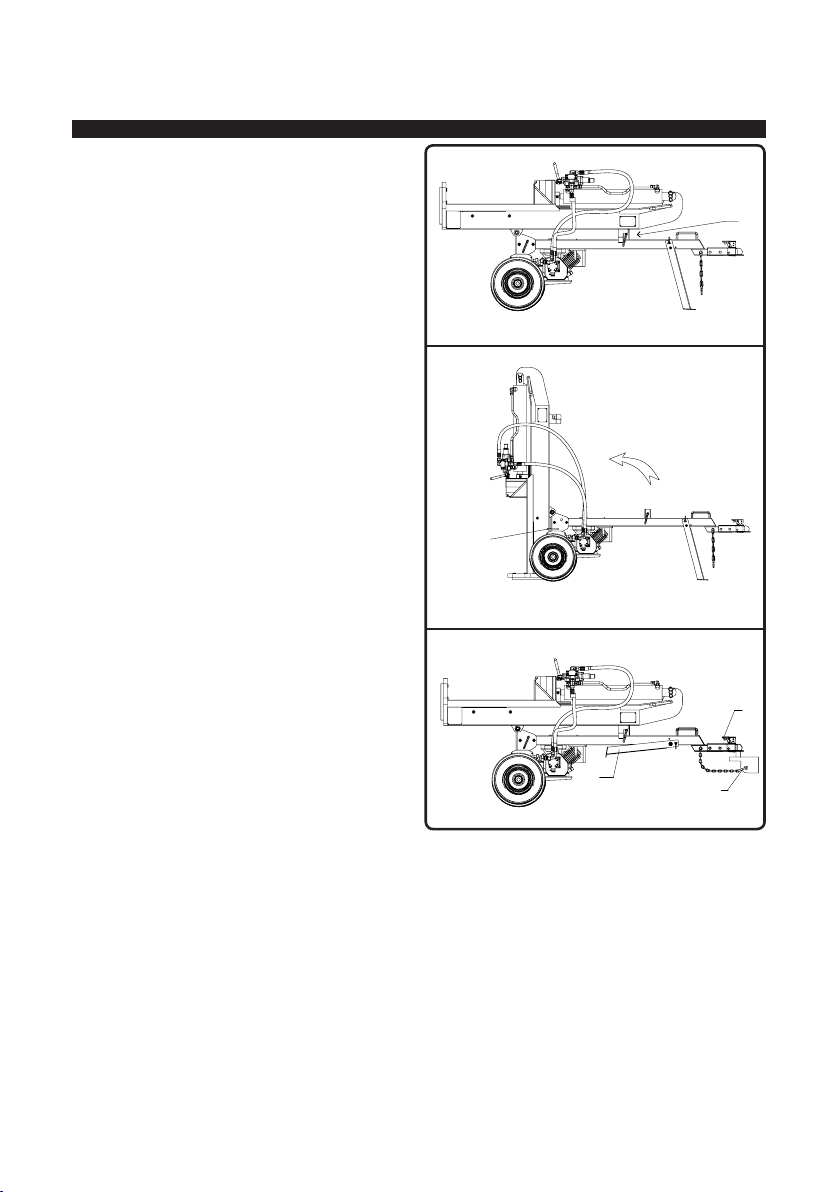
FOR HORIZONTAL USE:
1. Insure front pin is completely engaged to secure
front of splitter beam. (See fig. 12)
FOR VERTICAL USE:
1. Pull front pin to release beam.
2. Rotate beam to vertical position.
3. Pull rear beam lock pin and rotate to 9:00 o’clock
position to secure beam. (See fig. 13)
1
FOR VEHICLE TOWING:
1. Press handle down and lock tightly.
2. Hook safety chain to towing vehcle.
3. Rotate front leg up and install the lock pin.
(See fig. 14)
Beam Lock Pin
Figure 12
3
Figure 13
1
2
Figure 14
Questions? Call Toll Free at 1-800-737-2112 Copyright © 2018 MAT Engine Technologies, LLC

Maintenance
• Save all instructions
• Before performing maintenance, the log splitter must be placed in maintenance mode. Turn off the engine
and move the control lever forward and backwards to relieve the hydraulic pressure.
• After performing any maintenance, make sure all guards, shields and safety features are put back in place
before operating the log splitter.
• Before operating make sure the tires have the recommended tire pressure.
• Grease axle and wheel bearing annually.
• Periodically check all fasteners and hoses for tightness and leaks.
• Annually clean and lightly lubricate all moving parts or when needed.
• Use a glossy enamel spray paint to touch up scratched or worn painted metal surfaces.
What When Method
Hoses Each Use
Hydraulic
Fittings
Nuts and Bolts Each Use Check for loose bolts, tighten before operating.
Beam Each Use Apply grease to beam surface.
Moving Parts Each Use Clear debris from log splitter.
Refer to the Engine Owner’s Manual for engine maintenance.
Each Use
NOTICE
If a part needs replacement, only use GENUINE parts that meet the manufacturer’s specications. Replacement
parts that do not meet specications may result in a safety hazard or poor operations.
Inspect hoses for exposed wire mesh and leaks. Replace all worn or
damaged hoses before starting the engine.
Inspect ttings for cracks and leaks. Replace all damaged ttings before
starting the engine.
STORAGE
• Before storing make sure the log splitter is clean and dry.
• Store equipment in a clean, dry area. Store machine away from sparks, open ames, pilot lights, heat and
other ignition sources.
• Lightly lubricate all log splitter surfaces and moving parts to prevent rust. (see maintenance)
• Store indoors or protected area during severe weather and winter months.
• Refer to Engine Owner’s Manual for correct engine storage instructions. It is especially important to re-
move fuel from the engine when the unit is to be stored for an extended period.
Questions? Call Toll Free at 1-800-737-2112 Copyright © 2018 MAT Engine Technologies, LLC

Troubleshooting
• Save all instructions
PROBLEM POSSIBLE CAUSE(S) SOLUTION(S)
Cylinder rod will not move 1. Insufficient oil to pump
2. Blocked hydraulic lines
3. Blocked control valve
4. Damaged control valve
5. Internal cylinder leak
1. Check oil level in reservoir
2. Flush and clean the splitter hydraulic
system
3. Flush and clean the splitter hydraulic
system
4. Return control valve for authorized
repair
5. Return cylinder for authorized repair
Slow cylinder rod speed when
extending or retracting
Wood will not split or splits
extremely slowly
Engine bogs down during
splitting
Engine stalls under low load
condition
1. Insufficient oil to pump
2. Air in oil
3. Excessive pump inlet vacuum
4. Damaged control valve
5. Internal control valve leak
6. Internally damaged cylinder
7. Engine Control out of
adjustment
1. Insufficient oil to pump
2. Air in oil
3. Excessive pump inlet vacuum
4. Low control valve setting
5. Internal control valve leak
6. Internally damaged cylinder
1. High control valve setting
2. Engine Control out of
adjustment
1. Blocked hydraulic lines
2. Blocked control valve
3. Engine Control out of
adjustment
4. Engine is loaded during idle
down mode
1. Check oil level in reservoir
2. Check oil level in reservoir
3. Check pump inlet hose for blockage
or kinks
4. Return control valve for authorized
repair
5. Return control valve for authorized
repair
6. Return control valve for authorized
repair
7. Adjust idle control nuts
1. Check oil level in reservoir
2. Check oil level in reservoir
3. Check pump inlet hose for blockage or
kinks
4. Adjust control valve with a pressure
gauge
5. Return control valve for authorized
repair
6. Return cylinder for authorized repair
1. Adjust control valve with a pressure
gauge
2. Adjust idle control nuts
1. Flush and clean the splitter
hydraulic system
2. Flush and clean the splitter
hydraulic system
3. Adjust idle control nuts
4. Use shorter log length (26” or less)
to allow engine to speed up before
contact
Engine starts problem 1. Engine operation 1. Refer to the owner’s manual
Questions? Call Toll Free at 1-800-737-2112 Copyright © 2018 MAT Engine Technologies, LLC

Technical Service
You may have further questions about assembling, operating, or maintaining this log splitter. If so, you can
contact our Technical Service Department at 1-800-737-2112 (English only).
You may also write to:
METL Corporate Office - CORRESPONDENCE ONLY
ATTN: Technical Service – METL
6700 Wildlife Way
Long Grove, IL 60047
When contacting the Technical Service Department, have
ready:
• Your Name
• Your Address
• Your Phone Number
If you need assistance or have any questions, CALL
TOLL FREE: 1-800-737-2112.
• Model Number of Product
• Date of Purchase
(include copy of receipt for written requests)
Questions? Call Toll Free at 1-800-737-2112 Copyright © 2018 MAT Engine Technologies, LLC
 Loading...