


Instruction Sheet
Model SB1296/SB1297
Magnetic Chuck
Magnetic Chuck Safety
Magnetic chucks are heavy! Get assistance if
needed when installing or removing the magnetic chuck from the surface grinder. Wear
heavy duty leather boots for foot and toe
protection, and keep hands and fingers away
from all pinch points. Ignoring this warning
can lead to crushing injuries.
A
B
C
Figure 1. Inventory.
1. Strong Magnetic Field: A magnetic chuck
generates a powerful magnetic field. Keep all
objects sensitive to magnetic fields (watches,
cellular phones, magnetic cards, etc.)
away from the magnetic chuck to prevent
damaging them.
2. Pinching/Crushing Injury: A magnetic chuck
generates significant clamping power when
turned ON. When a magnetic object is moved
near a chuck that is turned ON, it will be
attracted. Any body parts caught between
the object and chuck will be pinched or
crushed by the magnetic force. Turn the
magnetic chuck OFF any time it is not in
operation.
3. Magnetic Force Variation: Make no
assumptions about the force generated by
different materials. The clamping force
generated varies greatly depending on the
material, thickness, flatness, and cleanliness
of the workpiece. A workpiece that does
not clamp securely may be ejected from
the chuck during use and thrown into the
operator or bystanders. Always check for
adequate clamping force before beginning an
operation.
Inventory
Description (Figure 1) Qty.
Magnetic Chuck ....................................................1
Selector Key ...........................................................1
Holddowns ............................................................. 2
If you need help with your new item, contact us at:
(360) 734-1540 • FAX: (360) 676-1075.
4. Sudden Workpiece Movement: When the
magnetic force is released, workpieces may
shift or fall unexpectedly and could result in
crushing injuries or personal injury. Fully
support any clamped workpieces before
turning the magnetic chuck OFF.
5. Workpiece Ejection: The workpiece could
be ejected during operation, causing it to
hit the operator with deadly force. Never
stand directly behind the workpiece (in the
direction of spark travel).

Model SB1296/SB1297
INSTRUCTIONS
For Machines Mfg. Since 8/09
6. Proper Mounting: If the magnetic chuck
shifts during use, the chuck and workpiece
could be ejected from the machine and
thrown into the operator or bystanders,
resulting in impact or crushing injuries.
Make sure the magnetic chuck is properly
secured to the grinding table before
operation.
7. Chuck Stops: If the workpiece is not resting
against the stops during operations, it may
shift and could be ejected from the machine
and thrown into the operator or bystanders,
resulting in impact or crushing injuries.
Make sure the workpiece rests against the
rear and side stops during operation. If
necessary, use spacers between the stops and
workpiece.
8. Surface Grinder Safety: Failure to follow
surface grinder safety could result in serious
personal injury or even death. Follow all
safety guidelines provided by your surface
grinder manufacturer.
9. Releasing Clamping Force: Turning the
magnetic chuck OFF during operation will
release the workpiece, which may cause the
workpiece to shift and be thrown into the
operator or bystanders. Never turn the chuck
selector OFF during grinding operation.
10. Other Machine Use: This magnetic chuck
was designed for use with a surface grinder
only. Attempting to secure workpieces on
milling machines or other types of machines
will likely result in the workpiece being
thrown from the chuck, resulting in impact
or crushing injuries.
11. Ferrous Metals: This magnetic chuck will
only work on metals containing iron. Nonferrous metals will be ejected from the
grinder during use and could be thrown
into the operator or bystanders, resulting in
impact or crushing injuries. Do not expect
the chuck to hold aluminum or other nonferrous metals.
Grinder Preparation
Before placing your magnetic chuck onto your
surface grinder table, you must ensure that
your grinder table is flat. Variations in table
flatness can occur as a result of shipping and
storage, manufacturer's production tolerances,
overheating during use, previously mounted
magnetic chucks, or for various other reasons.
To prepare the grinder table for chuck mounting,
very lightly grind, or "dust" the entire table
surface to make sure it is perfectly flat.
Chuck Preparation
Before putting your new magnetic chuck to use,
there are a few steps you must take to ensure
optimal performance and accuracy from your
grinding operation.
Removing Surface Imperfections
If damage was done to the crate during shipping,
the bottom surface may have scratches or dings.
If any imperfections are detected, perform the
following steps.
To remove surface imperfections:
1. Very carefully clean the grinder table and
top surface of the magnetic chuck to remove
any foreign material.
2. Stone the table and top surface of the
chuck to remove any surface imperfections
that may reduce holding power during the
following steps.
3. Carefully place the magnetic chuck upsidedown onto the the table surface.
4. Engage the magnet by turning the chuck
selector to the ON position to lock it to the
table.
5. Use the surface grinder to grind the bottom
surface flat and remove any imperfections.
Be careful to remove only as much material
as necessary and do not attempt to remove
more than 0.0001" per pass.
-2-

For Machines Mfg. Since 8/09 Model SB1296/SB1297
INSTRUCTIONS
Surface Flatness
Before your magnetic chuck left the factory,
the surfaces were finished flat. However, due
to storage and shipping they may have warped
slightly.
To test for flatness:
1. Make sure the magnetic chuck is turned
OFF, then carefully place the it upside-down
on a clean work surface.
2. Use a precision straightedge to check
for flatness along the length, width, and
diagonals, as shown in Figure 2.
Straightedge
4. Clean, then stone the bottom surface of the
chuck and the table surface of your surface
grinder to remove any foreign material and
surface imperfections. Then carefully place
the magnetic chuck right-side up onto the
grinder table in the position you plan to
mount it. Allow it to sit overnight. During
this time, any warping will be corrected and
the chuck will become matched to the table.
5. After allowing the chuck to sit overnight,
perform Steps 1–3 again. Repeat as
necessary until there is no longer any trace
of warping.
— If after repeated attempts, the chuck is
still warped, you must correct warping
by grinding.
If you attempt to correct for warping
by grinding away high points, you will
create variations in the overall thickness
of the chuck across its length and width.
These variations must be corrected by
grinding portions of the other side of the
chuck to compensate.
= Additional Straightedge Positions
Figure 2. Bottom surface flatness.
3. Carefully flip the chuck over, then perform
the same check on the top surface of the
chuck.
— If no space is detected between the chuck
surfaces and the straightedge, proceed to
Removing Surface Imperfections.
— If any space is detected between the
bottom surface and the straightedge at
any point, the chuck has warped slightly
during shipping. Perform Step 4 to
correct the warpage.
For example, if your chuck bows
upwards at each end and you correct
this by slightly grinding away the
surface at each end, your chuck will be
left thicker in the middle. You will have
to flip the chuck, then grind away the
middle portion to restore flatness.
-3-

Model SB1296/SB1297
INSTRUCTIONS
For Machines Mfg. Since 8/09
Matching the Chuck to Your Table
Every table/magnetic chuck combination varies.
To ensure that the top surface of your new chuck
stays equidistant from the grinding wheel during
table travel, you must grind the surface of your
magnetic chuck to match your table.
To match your chuck to your table:
1. Very carefully clean the grinder table and
bottom surface of the magnetic chuck to remove any foreign material.
2. Place the magnetic chuck on the table and
position it as desired, then clamp it with the
included holddowns (refer to Chuck Mount-
ing on this page).
3. Grind the entire surface of the magnetic
chuck. Make sure the chuck stays as cool
as possible during this process to avoid
damaging the magnets and keep it from
warping. Do not attempt to remove more
than 0.0001 inch per pass.
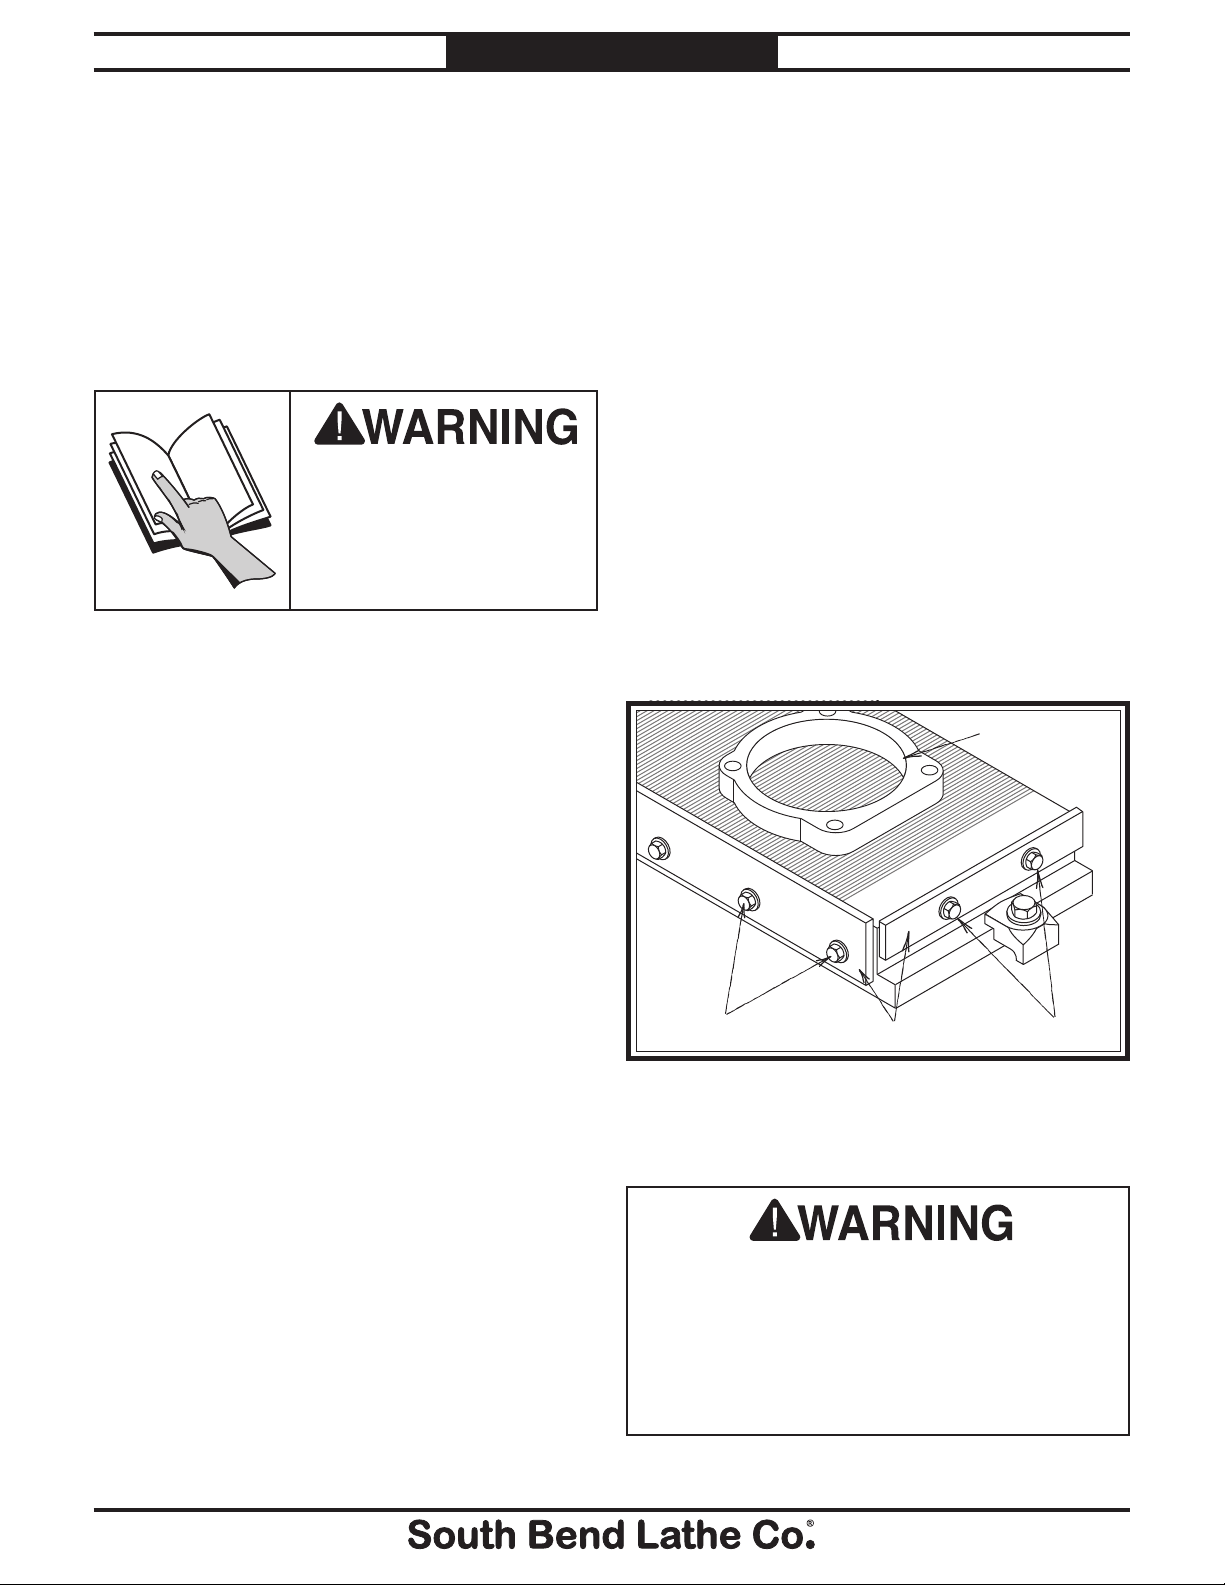
Chuck Mounting
The Model SB1296/SB1297 must be properly
mounted to the surface grinder table before use.
To mount the magnetic chuck to a surface
grinder table:
1. DISCONNECT GRINDER FROM POWER!
2. Very carefully clean the grinder table and
bottom surface of the magnetic chuck to remove any foreign material.
3. Place the magnetic chuck on the table and
position it as desired.
4. Use the appropriate mounting hardware for
your grinder table and the included holddowns to clamp the chuck to the table, as
shown in Figure 3.
If the chuck gets too hot during grinding, it
will bow slightly, causing the middle portion
to be ground more than the ends. Once the
chuck cools again, it will flatten and the
center will be left thinner than the edges.
Additionally, excessive heat will damage the
magnets and reduce holding power of the
chuck. For these reasons, it is critical to avoid
overheating the chuck during the grinding
process. Do not attempt to remove more than
0.001" per pass.
gnetic Chuck
OFF ON
South Bend Lathe Co.
T-Nut
Table Slot
Figure 3. Example of a chuck clamped to table.
Holddown
Hex Bolt
-4-
For Machines Mfg. Since 8/09 Model SB1296/SB1297
OPERATION
Operation Overview
INSTRUCTIONS
Workpiece Clamping
The purpose of the operation section is to
familiarize you with the basic controls,
terminology, capabilities, and adjustments that
are necessary to use this tool.
To better understand the remaining parts of
this section, please take a moment to read this
overview.
To reduce the risk of
serious injury when
using this tool, read and
understand this entire
manual before beginning
any operations.
To complete a typical operation, the operator
does the following:
1. Examines the workpiece to make sure it is
suitable for grinding.
Before any operation can be safely performed,
the workpiece must be properly positioned and
clamped on the chuck. While the magnetic field
is effective at keeping the workpiece from lifting
off the table during use, it may not be sufficient
to keep the workpiece from sliding. To keep the
workpiece from sliding, use the rear and side
stops.
To use the work stops:
1. DISCONNECT GRINDER FROM POWER!
2. Turn the ON/OFF selector to OFF.
3. Loosen the hex bolts that secure the stops,
lift the stops high enough so they are above
the surface of the chuck, but below the
surface of the workpiece, as shown in Figure
4, then re-tighten the hex bolts.
Workpiece
2. Checks that the magnetic chuck is mounted
securely to the surface grinder table
3. Thoroughly cleans the top surface of the
magnetic chuck and the bottom of the
workpiece(s) to ensure positive mating
between the two.
4. Places the workpiece(s) on the chuck.
5. Adjusts the work stops and adds spacers as
necessary to prevent the workpiece(s) from
sliding during operation.
6. Engages the magnetic chuck by turning the
ON/OFF selector to ON.
7. Checks that the chuck has secured the
workpiece(s)
8. Proceeds with the grinding operation.
9. Upon completion of grinding, allows the
grinding wheel to come to a stop, then
disengages the magnetic chuck and removes
the workpiece.
Hex Bolts (2 of 4)
Figure 4. Positioning stops.
4. Position the workpiece so it is near the
center of the chuck, as shown in Figure 4.
The non-striped areas at the ends of the chuck
do not produce a significant magnetic field
and will not securely clamp the workpiece.
Placing a workpiece in these areas could
result in the workpiece being ejected from
the chuck and thrown into the operator or
bystanders during use!
Stops
Hex Bolts
-5-

Hex Bolts
Hex Bolts (2 of 4)
Stops
Workpiece
Model SB1296/SB1297
INSTRUCTIONS
For Machines Mfg. Since 8/09
5. Place strips of steel bar (they must be
thinner than the workpiece) as necessary
between the workpiece and the stops, as
shown in Figure 5, to provide bracing
against slippage.
Since the ends of the chuck (the non-striped
portions) of the chuck produce very little
magnetic force, make sure the spacers
overlap the striped portion and are held
down well enough to not lift during use.
Workpiece
Spacer Overlapping
Striped Portion
7. Make sure the workpiece is secured by
pulling upward on it with moderate to heavy
force. If it releases, disengage the magnetic
chuck, make sure the mating surfaces are
clean, then repeat Step 6.
— If you are unable to secure the workpiece
with the magnetic chuck, you will need
to use an alternative mounting method.
Using Auxiliary Magnetic Blocks
If your workpiece cannot be placed flat on the
chuck due to warping, an irregular shape, or any
other reason, you must use auxiliary magnetic
blocks to support the workpiece. To ensure that
the workpiece is held parallel to the chuck, you
may need grind the auxiliary magnetic blocks
before placing your workpiece in them.
Figure 7 shows an example of how magnetic
V-blocks can be used to mount a workpiece with
an irregular bottom surface.
Spacers
Figure 5. Positioning spacers.
6. Make sure the workpiece is snug against
the spacers and that the spacers are snug
against the stops, then turn the ON/OFF
selector to the ON position, as shown in
Figure 6, to engage the magnet.
Workpiece and Spacers
Snug Against Stops
CAUTION!
Powerful
Magnet.
Can damage
instruments.
Permanent Magnetic Chuck
Model:
Serial No:
Made in Taiwan specially for South Bend Lathe Co.
OFF ON
Selector Turned
to ON Position
Figure 6. Workpiece properly secured.
Workpiece
CAUTION!
Powerful
Magnet.
Can damage
instruments.
Auxiliary
Magnetic Blocks
Permanent Magnetic Chuck
Model:
Serial No:
Made in Taiwan specially for South Bend Lathe Co.
OFF ON
Figure 7. Using auxiliary blocks.
Only use magnetic blocks on this chuck
to hold irregular workpieces. Using nonmagnetic auxiliary blocks will not provide
sufficient clamping force and may result in the
workpiece being thrown from the grinder and
into the operator or bystanders during use.
-6-

For Machines Mfg. Since 8/09 Model SB1296/SB1297
Removing Workpieces
After the grinding operation, remove your
workpiece from the magnetic chuck.
To remove a workpiece from the chuck:
1. DISCONNECT GRINDER FROM POWER!
INSTRUCTIONS
• Apply rust preventative to the magnetic
chuck after each use to prevent rust.
• Avoid leaving a workpiece on the magnetic
chuck when not in use.
• Inspect for damage to the surface of the
magnetic chuck that may compromise its
flatness. Regrind as necessary.
• Stone chuck surface before use.
2. Turn the ON/OFF selector to OFF.
3. Clean away any metal chips or swarf from
around the workpiece and magnetic chuck
with a stiff-bristled brush.
4. Remove the workpiece from the chuck
Note: The workpiece may seem stuck to
the chuck due to residual magnetism in
the workpiece or a vacuum between the
workpiece and chuck. If this is the case,
a blast of air from an air nozzle can be
used to release the vacuum. Alternately,
you can slide the workpiece off the
side of the chuck to remove it. Using
this method, however, may result in
scratches to the chuck surface.
Care & Maintenance
Always disconnect
!
machine from power before
performing maintenance
or accidental startup may
occur, resulting in abrasion
or pinching injuries as
a result of the spinning
grinding wheel.
Monthly:
• Grind top of magnetic chuck to reduce the
effects of warping.
Semi-annually/annually:
• Remove the chuck, re-grind the table, replace
the chuck, then re-grind the chuck surface.
If you plan to place your surface grinder into
storage, remove the magnetic chuck from the
table. Metal objects left on the grinder table
over extended periods will rust and cause
permanent damage to the magnetic chuck and
grinder table. Store the magnetic chuck on a
flat surface to minimize warping.
A Note About Chuck Warping
The unique forces that occur as a result of the
design and function of a magnetic chuck will
cause the chuck to warp over time. Since the
chuck is mounted to the table surface, the table
may also warp. This is a normal occurrence that
must be monitored and corrected periodically
by lightly grinding or "dusting" the table
surface and top and bottom of the magnetic
chuck. Follow the schedule above for standard
maintenance. If your magnetic chuck sees
heavy use or you demand ultra-high tolerances,
decrease the interval between services.
For optimal performance from your magnetic
chuck, follow the maintenance schedule below.
Daily:
• Check/correct loose clamping bolts.
• Use a vacuum, rag, or brush to clean the
chuck after use. Never use air pressure
to clean metal chips or swarf away from a
chuck.
-7-

Model SB1296/SB1297
INSTRUCTIONS
For Machines Mfg. Since 8/09
Troubleshooting
If you need replacement parts, or if you are unsure how to do any of the solutions given here, feel free
to call us at (360) 734-1540.
Symptom Possible Cause Possible Solution
The magnetic
chuck does
not attract the
workpiece.
Holding power is
weak.
Workpiece cannot
be removed from
chuck.
Magnetic field is not engaged.
1.
Workpiece is a non-ferrous
2.
material.
Selector mechanism is faulty.
3.
ON/OFF selector is not fully turned
1.
to ON position.
Chuck surface is dirty.
2.
Workpiece is placed off center.
3.
Workpiece mating surface is
4.
irregular/has contaminants.
Workpiece material is not strongly
5.
attracted to magnets.
ON/OFF selector is not fully turned
1.
to OFF position.
Vacuum lock between chuck and
2.
workpiece; residual magnetism
between workpiece and chuck.
Parts Breakdown & List
Turn ON/OFF selector to ON position.
1.
Use only materials that are attracted to magnets;
2.
Use alternative clamping methods.
Replace magnetic chuck.
3.
Make sure ON/OFF selector is turned all the way
1.
to ON.
Clean chuck surface.
2.
Keep workpiece centered on chuck.
3.
Use holding blocks; clean mating surface before
4.
placing on chuck.
Use only materials that are attracted to magnets;
5.
Use alternative clamping methods.
Make sure ON/OFF selector is turned all the way to
1.
OFF.
Slide workpiece off the side of the chuck.
2.
1
3
2
4
9
CAUTION!
Powerful
Magnet.
Can damage
instruments.
South Bend
7
Permanent Magnetic Chuck
6
8
10
5
*Breakdown shown for service purposes only.
Not all parts are available for purchase.
Copyright © February, 2010 By South Bend Lathe Co.
WARNING: No portion of this manual may be reproduced in any shape or form
without the written approval of South Bend Lathe Co.
#JB12570 Printed in Taiwan.
www.southbendlathe.com
REF PART # DESCRIPTION
1 PB83M HEX BOLT M6-1 X 16
2 PWF06M FENDER WASHER 6MM
3 PSB1296003 REAR STOP (SB1296)
3 PSB1297003 REAR STOP (SB1297)
4 PSB1296004 SIDE STOP (SB1296)
4 PSB1297004 SIDE STOP (SB1297)
5 PSB1296005 HOLDDOWN
6 PSB1296006 BRASS RIVET 3/32
7 PSB1296007 ID BADGE
5
8 PSB1296008 CAUTION BADGE
9 PSB1296009 MAGNETIC CHUCK ASSEMBLY (SB1296)
9 PSB1297009 MAGNETIC CHUCK ASSEMBLY (SB1297)
10 PSB1296010 SOUTH BEND HEX KEY 8MM
-8-
 Loading...