

Page 1
CALAEVIN
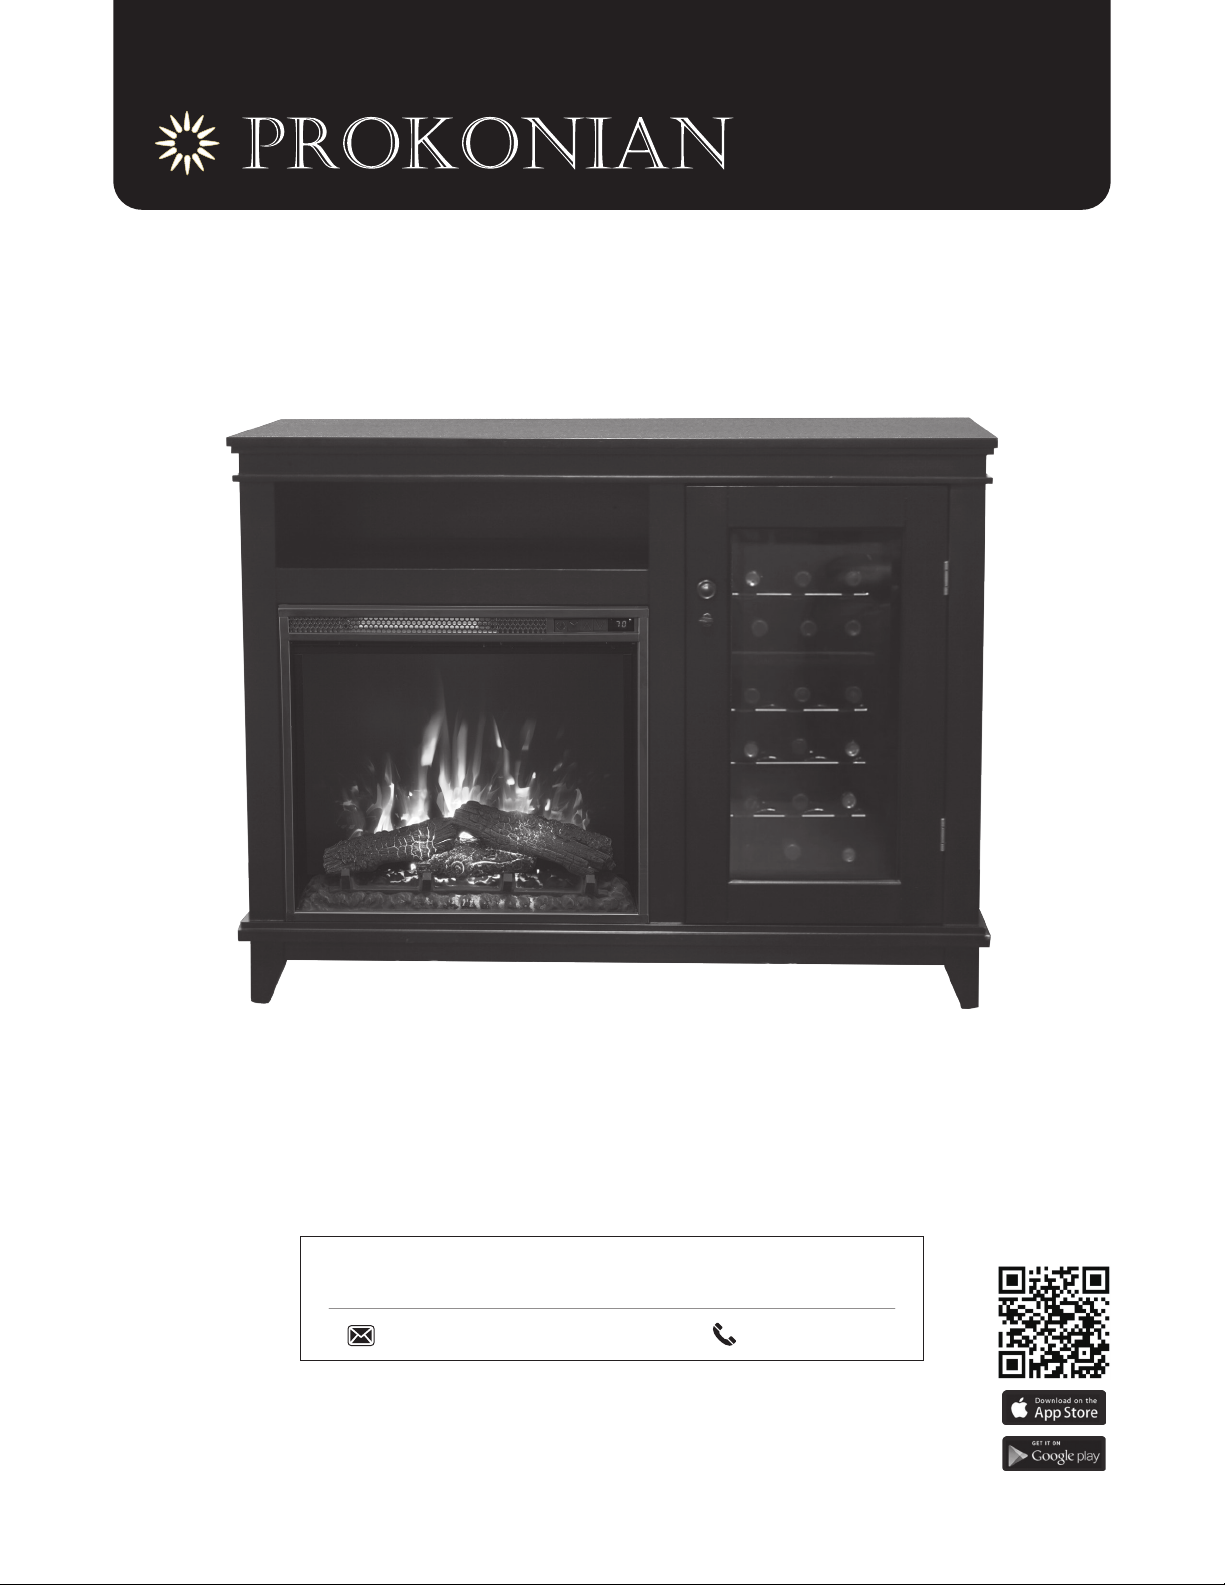
SP5560
USER MANUAL
Please carefully check the unit and make sure there is no damage when you open the carton
QUESTIONS, PROBLEMS, OR MISSING PARTS?
Please Contact Customer Service Before Returning to Store
[email protected] +1-203-440-9911
Keep this manual for future reference
Download App
Page 2
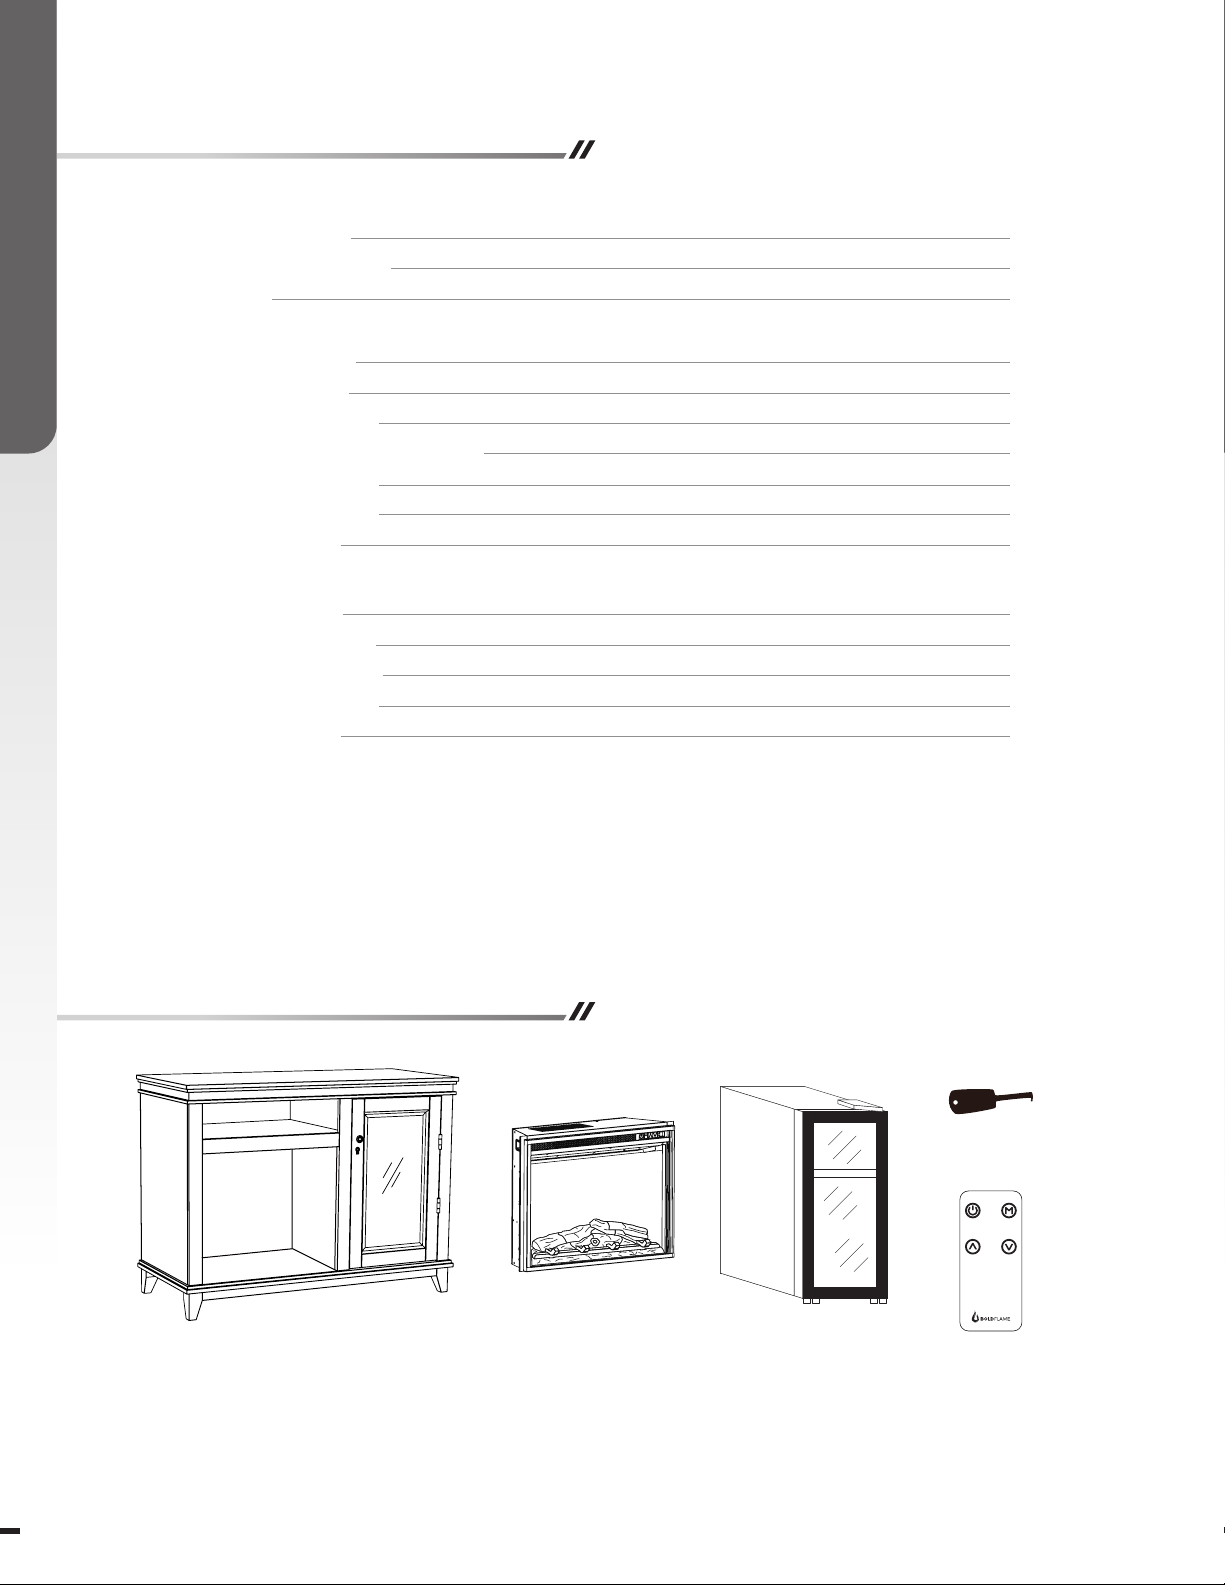
Table of Contents
• GENERAL INFORMATION
Safety Instructions
Maximum Load Warning
Warranty
• FIREBOX OPERATIONS
FCC/IC Information
Safety Information
Operating Instructions
Fireplace Remote App Connectivity
Fireplace Remote App
Care And Maintenance
Troubleshooting
• WINE COOLER OPERATIONS
Safety Information
Wine Cooler Structure
Operating Instructions
Care And Maintenance
Troubleshooting
3
3
4
5
6
7
8
9
10
11
12
14
14
15
15
Package Contents
Cabinet Key
Fireplace Mantel
SP5560
2 3
Firebox
SP2320-IR-FGPBBT
Wine Cooler
SPWC-52ACT
Remote Control
Page 3
Safety Instructions
Please read and understand this entire manual before attempting to assemble, operate or install the product.
IMPORTANT NOTICE
and injury to persons, including the following:
Read all instructions before installing or using this heater.
WARNING: Place this unit in a location that avoids direct sunlight and high temperatures.
WARNING: Plastic bags, nails, etc. should be kept out of reach of children.
WARNING: This appliance is hot when in use. To avoid burns, DO NOT let bare skin touch hot surfaces. Keep
combustible material, such as furniture, pillows, bedding, papers, clothes, etc. and curtains, at least 3 (0.9m) feet from
the front of the heater and keep them away from the side and rear.
WARNING: Extreme caution is necessary when any heater is used by or near children or individuals with
WARNING: DO NOT run cord under carpeting. DO NOT cover cord with throw rugs, runners, or similar covering.
Do not route cord under furniture or appliances. Arrange cord away from traffic areas and where it will not be
tripped over.
WARNING: DO NOT insert or allow foreign objects to enter any ventilation or exhaust opening as this may cause
WARNING: This appliance has hot and arcing or sparking parts inside. DO NOT use it in areas where gasoline,
clothing. Christmas stockings or decorations should not be hung in the area of it.
WARNING: Do not operate any heater after it malfunctions. Disconnect power at service panel and have heater
inspected by a reputable electrician before reusing.
WARNING: Do not use outdoors.
WARNING: To disconnect heater, turn controls to off, and turn off power to heater circuit at main disconnect panel.
WARNING: To prevent a possible fire, do not block air intakes or exhaust in any manner.
WARNING: Use this heater only as described in this manual. Any other use not recommended by the manufacturer
may cause fire, electric shock, or injury to persons.
Installation
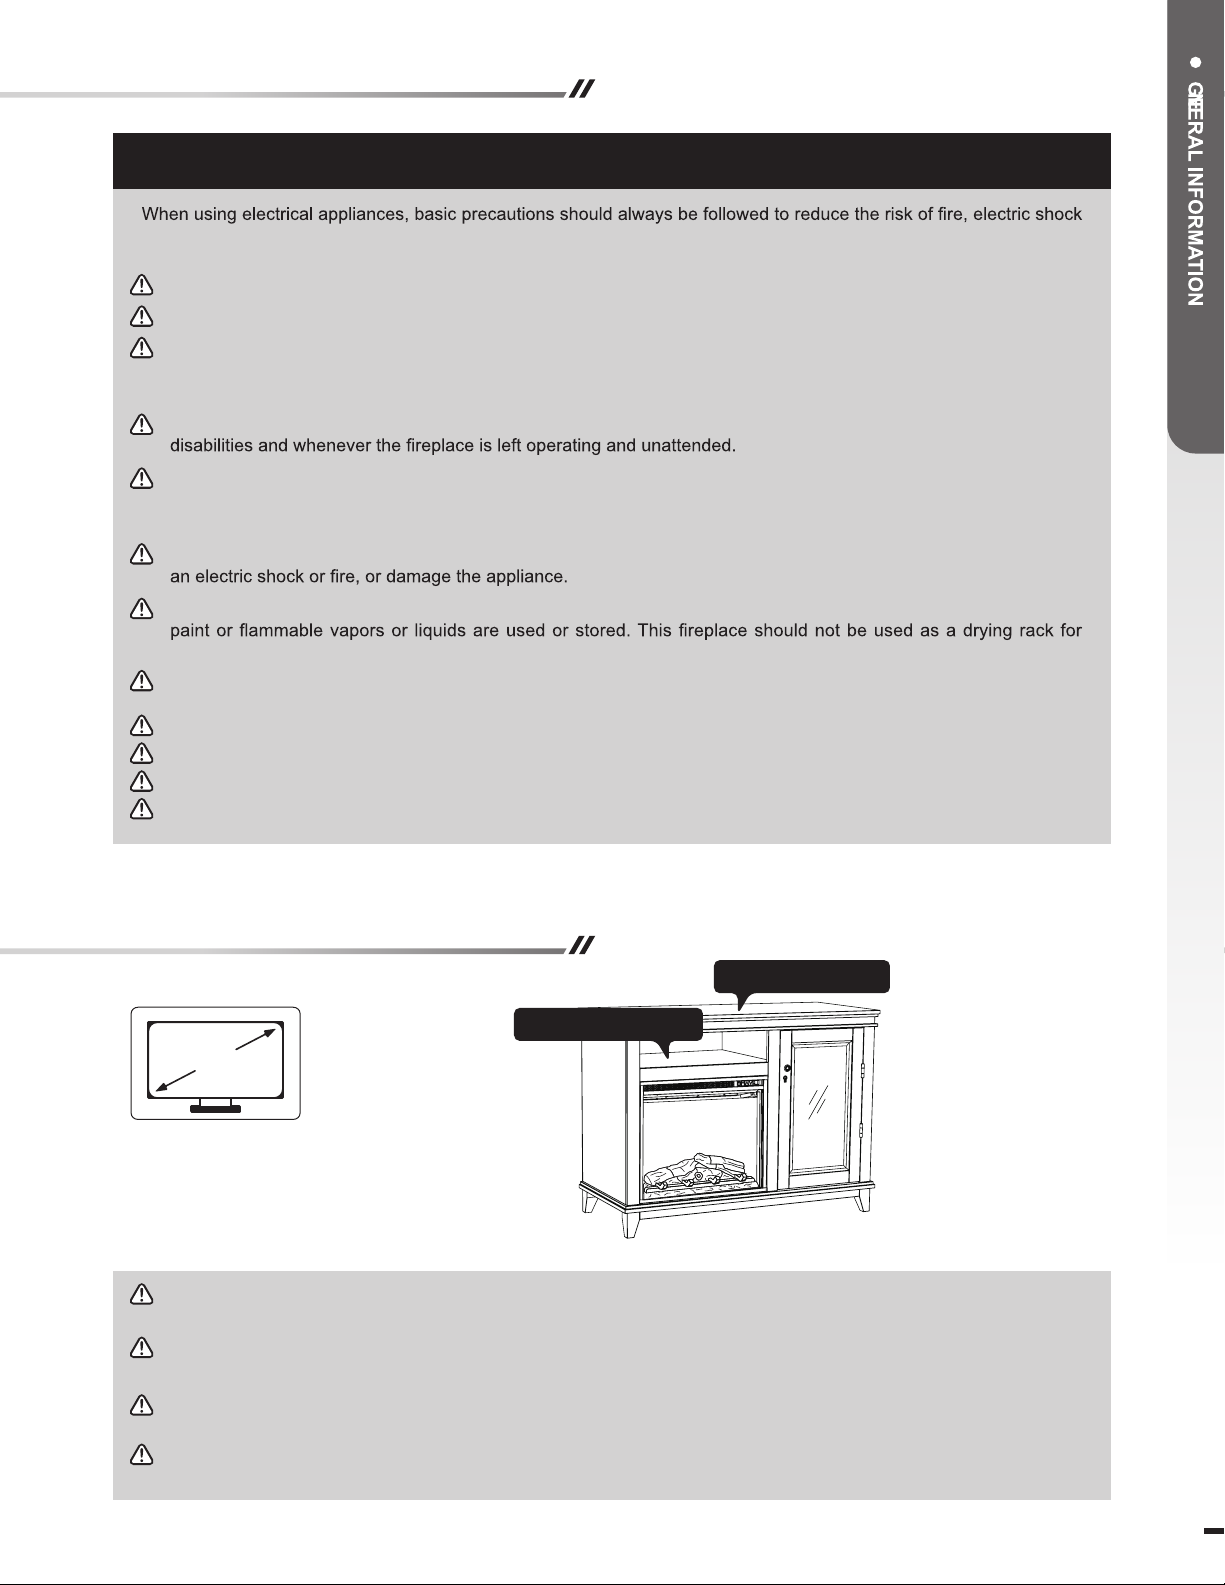
53"
CAUTION: This unit is intended for use only with the products and maximum weights indicated. Use with other
products or products heavier than the maximum weights indicated may result in instability causing possible injury.
NOTE: Flat panel TVs with base support should be placed squarely in the center of the stand with no overhang
on any side.
NOTE: To reduce the risk of fire, do not store or use gasoline or other flammable vapors and liquids in the vicinity
of the heater.
WARNING: Risk of Fire - keep combustible material such as furniture, papers, clothes, and curtains at least
3 feet (0.9m) from the front of the heater and away from the sides and rear.
SAVE THESE INSTRUCTIONS
Max. 75 lbs (34 kg)
Max. 30 lbs (13.6 kg)
3
Page 4
Warranty
1-YEAR LIMITED WARRANTY
Prokonian Inc.
is free from manufacturing and materials defects for a period of one (1) year from date of purchase. Subject to the following
conditions and limitations:
1. The electric fireplace must be installed and operated at all times in accordance with the installation
2. This warranty is non-transferable, and is made to the original owner, provided that the purchase was
3. The warranty is limited to the repair or replacement of part(s) found to be defective in material or
4. The Company may, at its discretion, require that any defective part(s) be returned in exchange for the
5. The Company may, at its discretion, fully discharge all obligations with respect to this warranty by
6. This warranty does not cover the LED light bar included with the electric replace.
7. Any installation, labor, construction, transportation, or other related costs/expenses arising from defective
8. The owner/user assumes all other risks – if any – including but not limited to the risk of any direct, indirect
9. All other warranties – express or implied – with respect to the unit, its components and accessories, or
10. The Company neither assumes, nor authorizes any third party to assume on its behalf, any other liabilities
11. The warranties as outlined within this document do not apply to non-accessories used in conjunction with
12. This warranty gives you specic legal rights, and you may also have other rights which vary from state to
(hereinafter referred to collectively as “the Company”) warrants that your new Bold Flame Electric Fireplace
and operating instructions furnished with the product. Any unauthorized repair, alteration, willful abuse,
accident, or misuse of the product shall nullify this warranty.
made through an authorized supplier of the Company.
workmanship - provided that such part(s) have been subjected to normal conditions of use and service -
after said defect is conrmed by the Company’s inspection. All replacement parts or products will be new,
remanufactured, or refurbished.
replacement part(s).
refunding the wholesale price of the defective part(s).
part(s), repair, replacement, or otherwise of same, will not be covered by this warranty, nor shall the
Company assume responsibility for the same.
or consequential loss or damage arising out of the use, or inability to use the product, except as provided
by law.
any obligations/liabilities on the part of the Company are hereby expressly excluded.
with respect to the sale of the unit.
the installation of this product.
state.
This warranty is void if:
a) The replace is subjected to prolonged periods of dampness or condensation.
b) Any unauthorized alteration, willful abuse, accident, or misuse of the product.
c) You do not have the original purchase receipt.
IF WARRANTY SERVICE IS NEEDED
Please Contact Customer Service
[email protected] +1-203-440-9911
Make sure you have the following information ready:
- Warranty
- Sales Receipt
- Product Model/Serial Number
- Date of Purchase
- Location of Purchase
4 5
4 5
Page 5
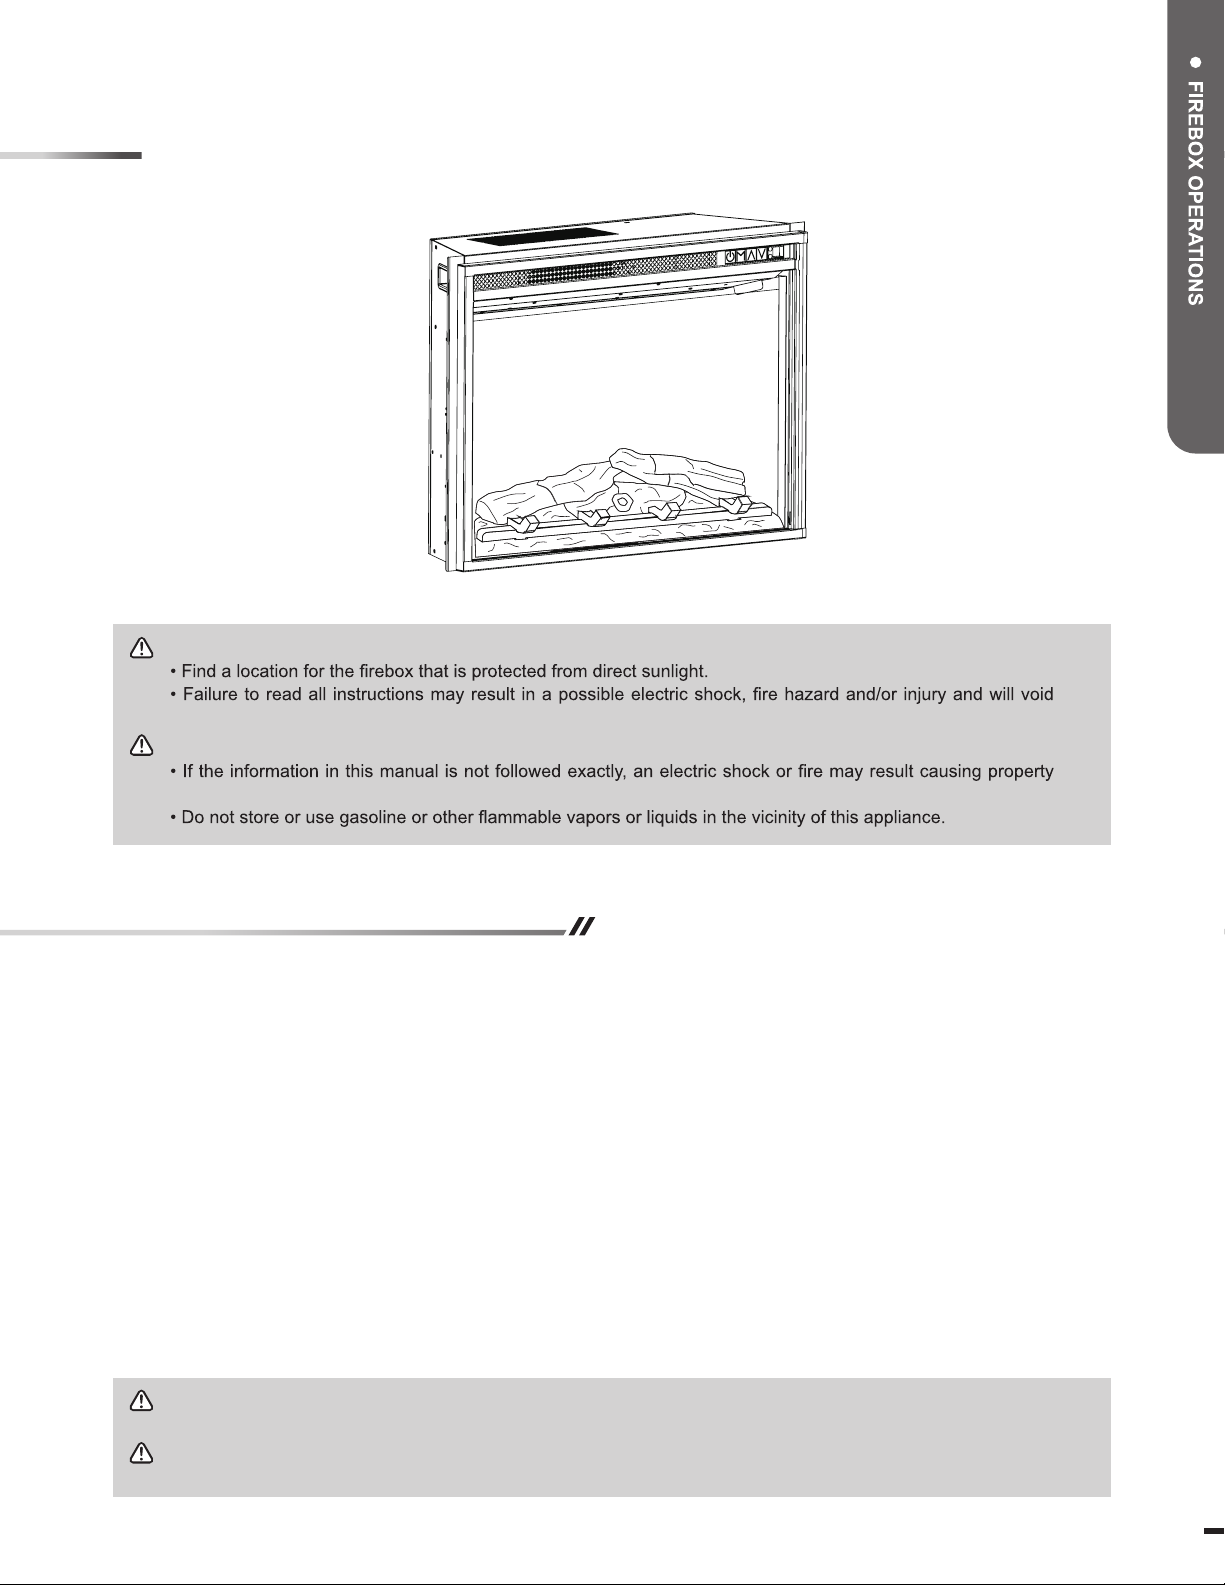
Firebox Model
ATTENTION:
the warranty.
WARNING:
SP2320-IR-FGPBBT
damage, personal injury or loss of life.
FCC / IC Information
This equipment has been tested and found to comply with the limits for a Class B digital device, pursuant to Part 15 of
the FCC Rules. These limits are designed to provide reasonable protection against harmful interference in a residential
installation. This equipment generates, uses and can radiate radio frequency energy and, if not installed and used in
accordance with the instructions, may cause harmful interference to radio communications.
However, there is no guarantee that interference will not occur in a particular installation. If this equipment does cause
harmful interference to radio or television reception, which can be determined by turning the equipment off and on, the user is
encouraged to try to correct the interference by one or more of the following measures:
• Reorient or relocate the receiving antenna
• Increase the separation between the equipment and the receiver
• Connect the equipment into an outlet on a circuit different from that to which the receiver is connected.
• Consult the dealer or an experienced radio/TV technician for help.
This device complies with Industry Canada License-exempt RSS-210. Operation is subject to the following two condtions:
(1) this device may not cause interference, and
(2) this device must accept any interference, including interference that may cause undesired operation of the device.
CAUTION: To maintain compliance with the RF exposure guidelines, place the base unit at least 20cm from
nearby persons.
WARNING: Changes or modifications to this unit not expressly approved by the party responsible for
compliance could void the user’s authority to operate the equipment.
55
Page 6
Safety Information
CAUTION:
•
•
•
operating this unit again.
• DO NOT use outdoors.
• This unit is not intended for use in bathrooms, laundry areas and similar indoor locations. NEVER place heater where it may
fall into a bathtub or other water container.
• To disconnect this unit, turn all controls to the OFF position, then remove plug from outlet.
• ONLY connect to properly grounded outlets.
• This appliance, when installed, must be electrically grounded in accordance with local codes, with the current CSA C22.1
Canadian Electrical Code or, for USA installations, follow the National Electrical Code, ANSI/NFPA NO.70.
bed, where opening may become blocked.
• ALWAYS plug this unit directly into a wall outlet/receptacle. NEVER use with an extension cord or relocatable power tap
(outlet/power strip).
• This heater includes an automatic protection system that will shut off the unit to prevent overheating. If the unit is at risk of
overheating, the front panel will display 'E1' and a thermal cut out will shut of
Grounding Instructions
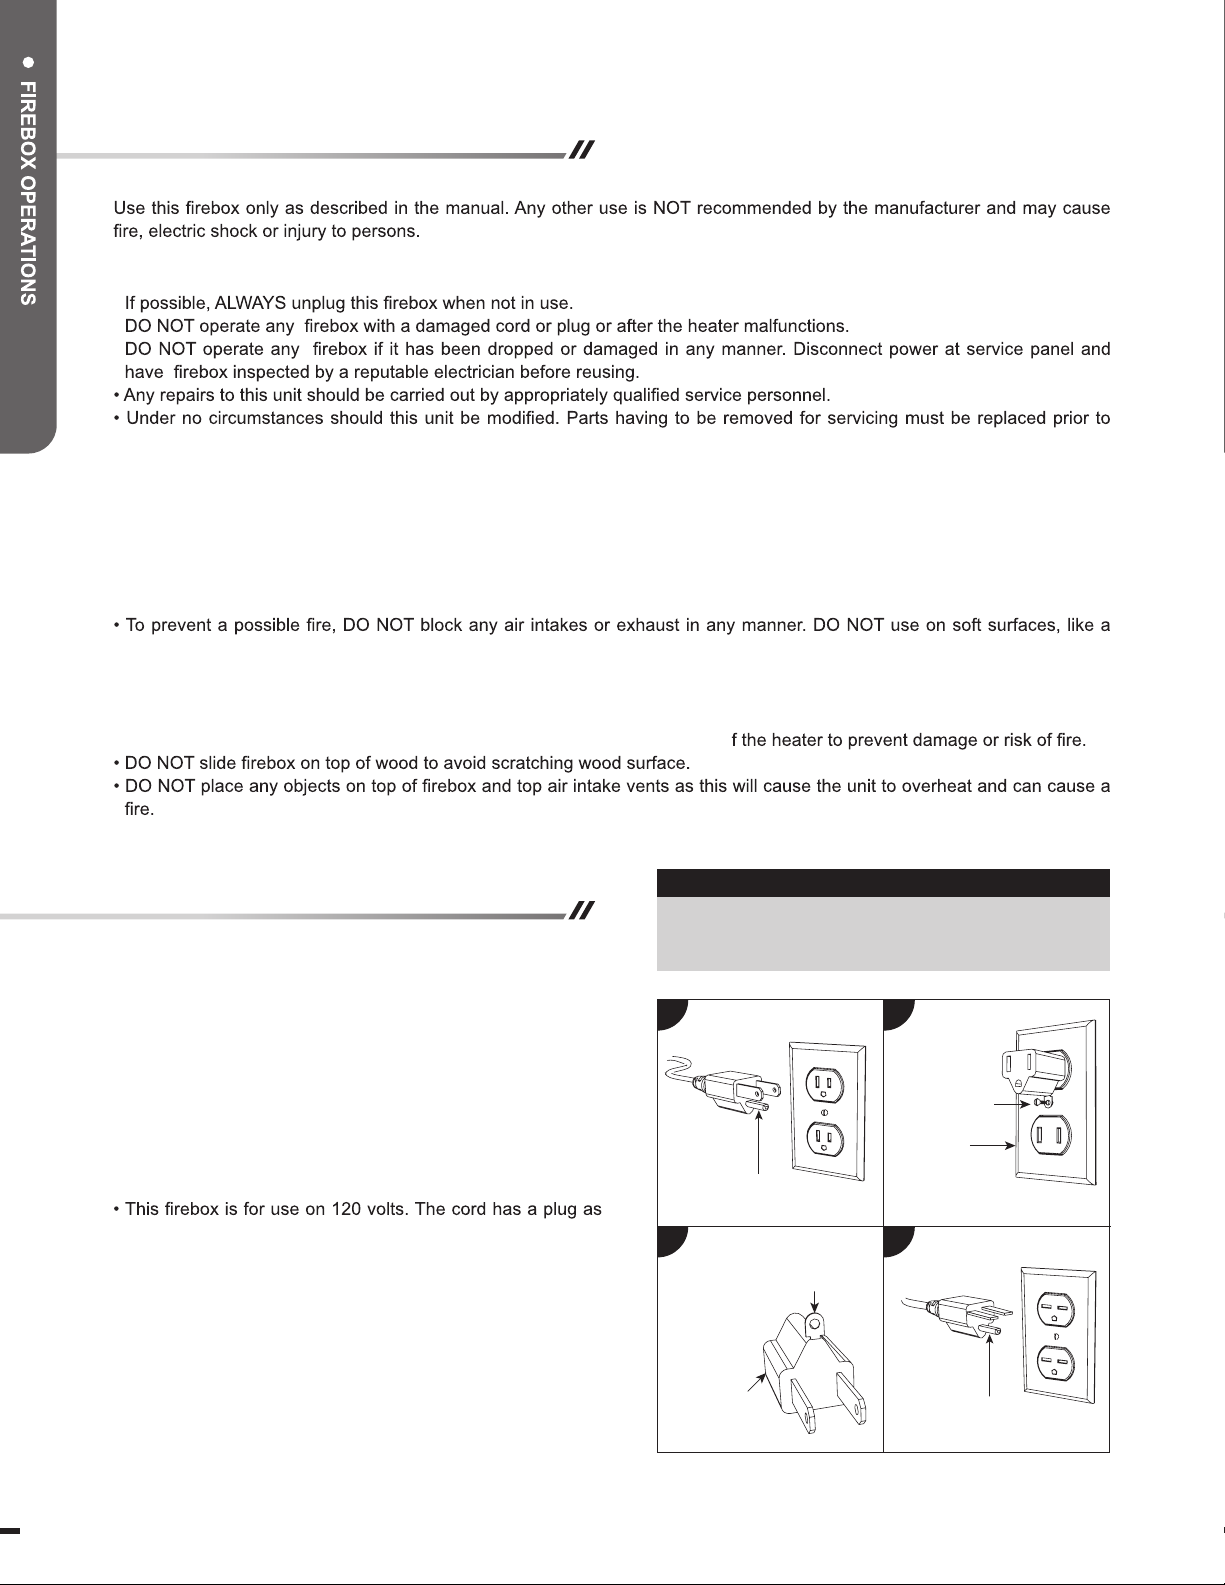
ELECTRICAL CONNECTION:
• A 15-amp, 120-volt, 60 Hz circuit with a properly grounded
outlet is required. Preferably, the fireplace will be on
a dedicated circuit as o ther appliances on the same
circuit may cause the circuit breaker to trip or the fuse
to blow when the heater is in operation. The unit comes
standard with 6-ft. three-wire cord, exiting from the rear
of the fireplace. DO NOT exceed the current rating of
the current tap. ALWAYS plug this unit directly into a wall
outlet/receptacle. NEVER use with an extension cord or
relocatable power tap (outlet/power strip).
shown below. See illustration for grounding instruction. An
adapter as shown at C is available for connecting threeblade grounding type plugs to two-slot receptacles. The
green grounding lug extending from the adapter must
be connected to a permanent ground such as a properly
grounded outlet box. The adapter should not be used if a
three-slot grounded receptacle is available.
A
Grounding Pin
C
Grounding Means
Adapter
ELECTRICAL SPECIFICATIONS
Voltage:
Amps:
Watts:
120 VAC, 60 Hz
12.5 Amps
1500 Watts
B
Metal Screw
Cover of
Grounding Box
D
Grounding Pin
6
Page 7
Operating Instructions
The heater must be properly installed before it is used.
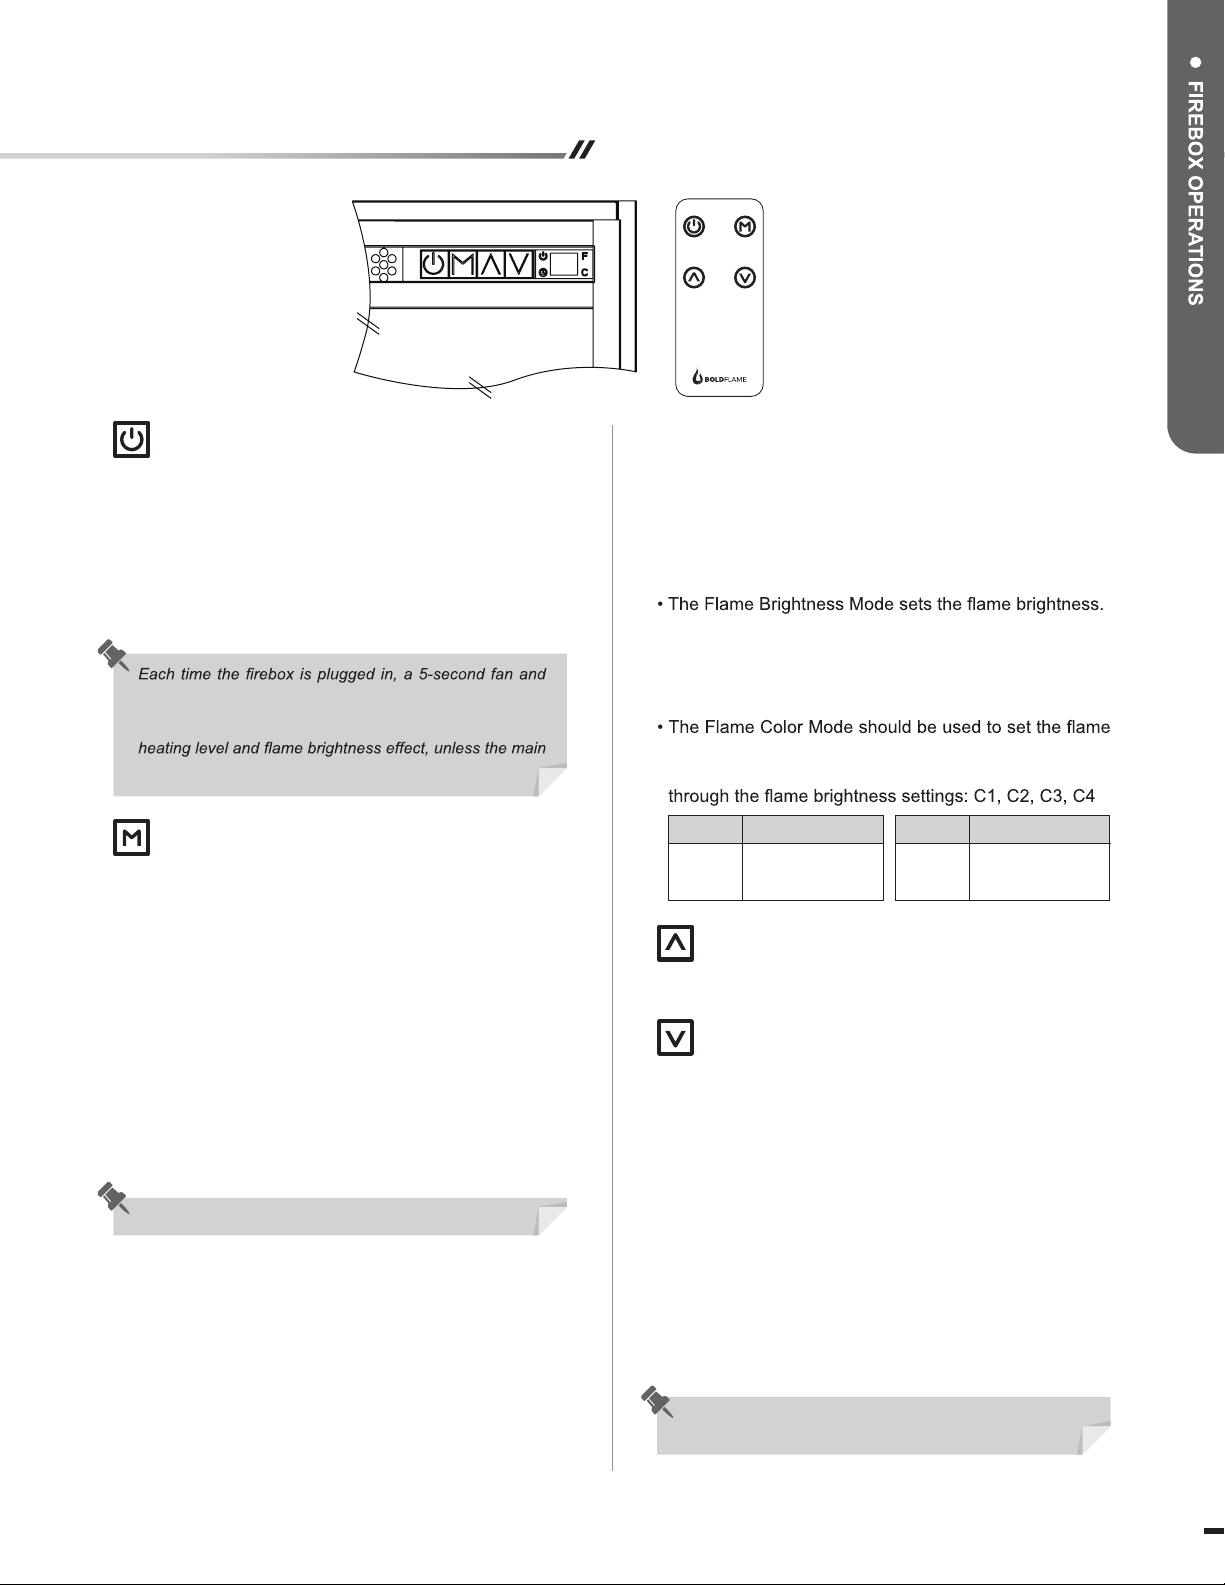
Power Button
• Press the POWER button to turn ON or OFF the unit.
• When the unit is in ON mode, the power icon indicator
light will be shown green.
• When the unit is in OFF mode, the power icon indicator
light will be shown red. When power OFF, unit will be
stopped, if heater is working before power OFF the
unit, fan will have
not be trapped inside the unit.
heater will turn on for internal check program.
The unit has a memory function with last settings for
power to the unit has been interrupted.
20 seconds delay to ensure heat will
Mode Button
• Press the MODE button to cycle through the different
functions. Each time the MODE button is pressed, the
Ember Bed Brightness, Flame Brightness or Flame
Color.
Temperature Mode
• The Temperature Mode controls the heater’s thermostat
setting.
• Press UP arrow button or DOWN arrow button to scroll
through the pre-set temperature range from 59°F (15°C)
to 86°F (30°C), ON and OF (OFF).
• Hold the mode button for 3 seconds, this allows the
temperature unit to change from °C to °F or °F to °C.
The unit default is °F.
This function is only available if using the control panel.
• When the ambient temperature is higher than the set
temperature, heater will turn off automatically.
Timer Mode
• The Timer Mode sets the fireplace to automatically
shutoff.
• Press UP arrow button or DOWN arrow
the timer setting from 0 hour (OFF) to 9 hours with 0.5
hour intervals.
button to adjust
Ember Bed Brightness Mode
• The Ember Bed Brightness Mode sets the ember bed
brightness
• Use the UP arrow button or DOWN arrow button to
scroll through the log brightness settings: L0 (dimmest),
L1, L2, L3, L4, L5 (brightest)
Flame Brightness Mode
• Use UP arrow button or DOWN arrow button to scroll
,emalf oN( 0F :sgnittes ssenthgirb emalf eht hguorht
F1, F2, F3, F4, F5 (brightest).
Flame Color Mode
color.
• Use UP arrow button or DOWN arrow button to scroll
Setting Color
C1
C2
,remiT ,erutarepmeT - noitcnuf txen eht retne lliw edom
Orange
Blue
Setting Color
C3C4Orange + Blue
Color Rotation
Up Arrow Button
• Use UP arrow button to increase the setting of the
selected function.
Down Arrow Button
• Use DOWN arrow button to decrease the setting of the
selected function.
Child Lock
Activate Child Lock
When the unit is ON, hold the POWER button for 10
seconds to activate the Child Lock function. E3 will be
displayed and a "Beep" will sound 3 times to indicate the
Child Lock function is activated. Then, all function keys are
locked. When pressing any button, E3 will be displayed to
indicate the Child Lock function has been activated.
Deactivate Child Lock
To deactivate the Child Lock function, hold the POWER
button for 10 seconds. Then, all functions keys are unlocked.
Child Lock function is only available if using the control
panel.
7
Page 8
Fireplace Remote App Connectivity
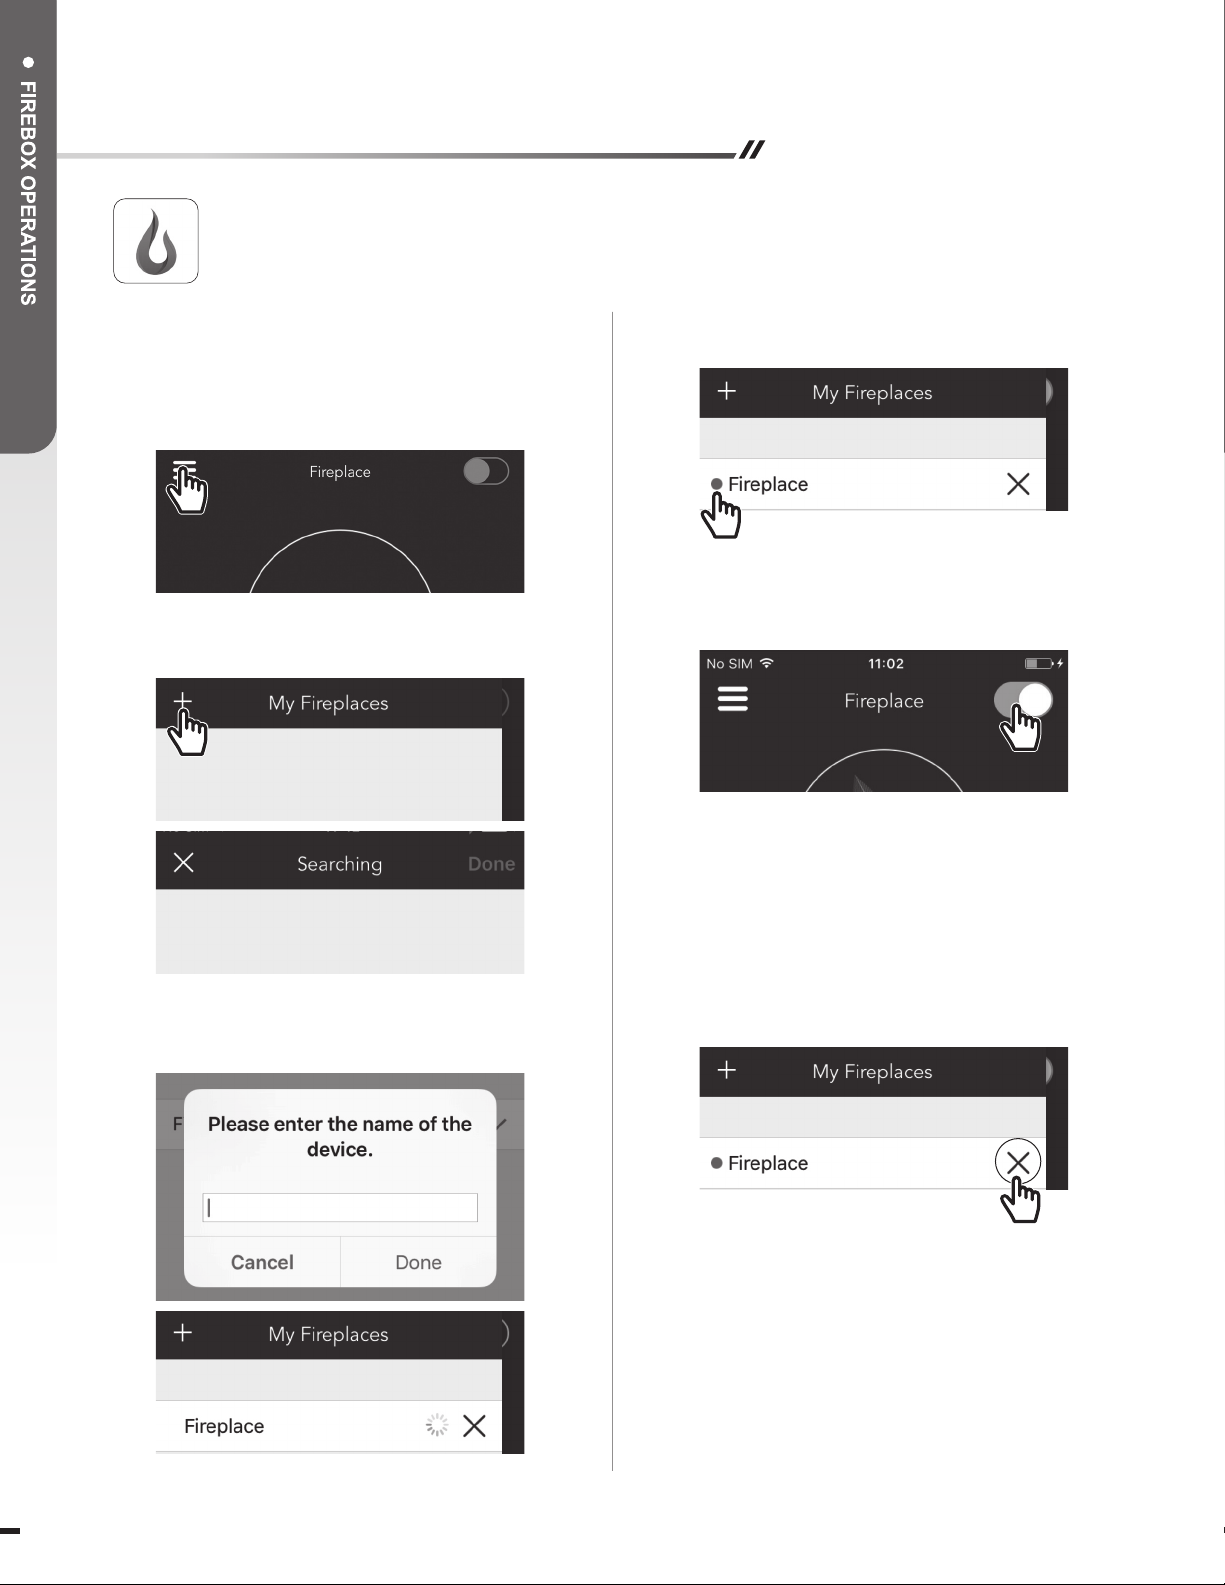
To Connect
1. Turn on the replace
2. Switch on Bluetooth on your mobile devices
3. Tap the side menu icon (Fig. 1)
Fig. 1
4. Tap "+" icon (Fig. 2) and start searching for the
replace nearby (Fig. 3)
Fig. 2
Fig. 3
5. Enter a name for the replace (Fig. 4) and wait for it to
connect (Fig. 5)
6. Blue dot indicates that the replace is connected properly
and ready to use (Fig. 6)
Fig.6
7. Return to main page by tapping the side menu icon
8. Make sure that the top right corner icon is switched
"ON" (Fig. 7)
Fig. 7
To Disconnect
• To remove your replace from your Apple device, tap
the "X" next to the fireplace name that you want to
remove. (Fig. 8)
• To remove your fireplace from your Android device,
hold on to the name until the options appear, then
select "Delete".
Fig. 8
Fig. 4
Fig. 5
8 9
Page 9
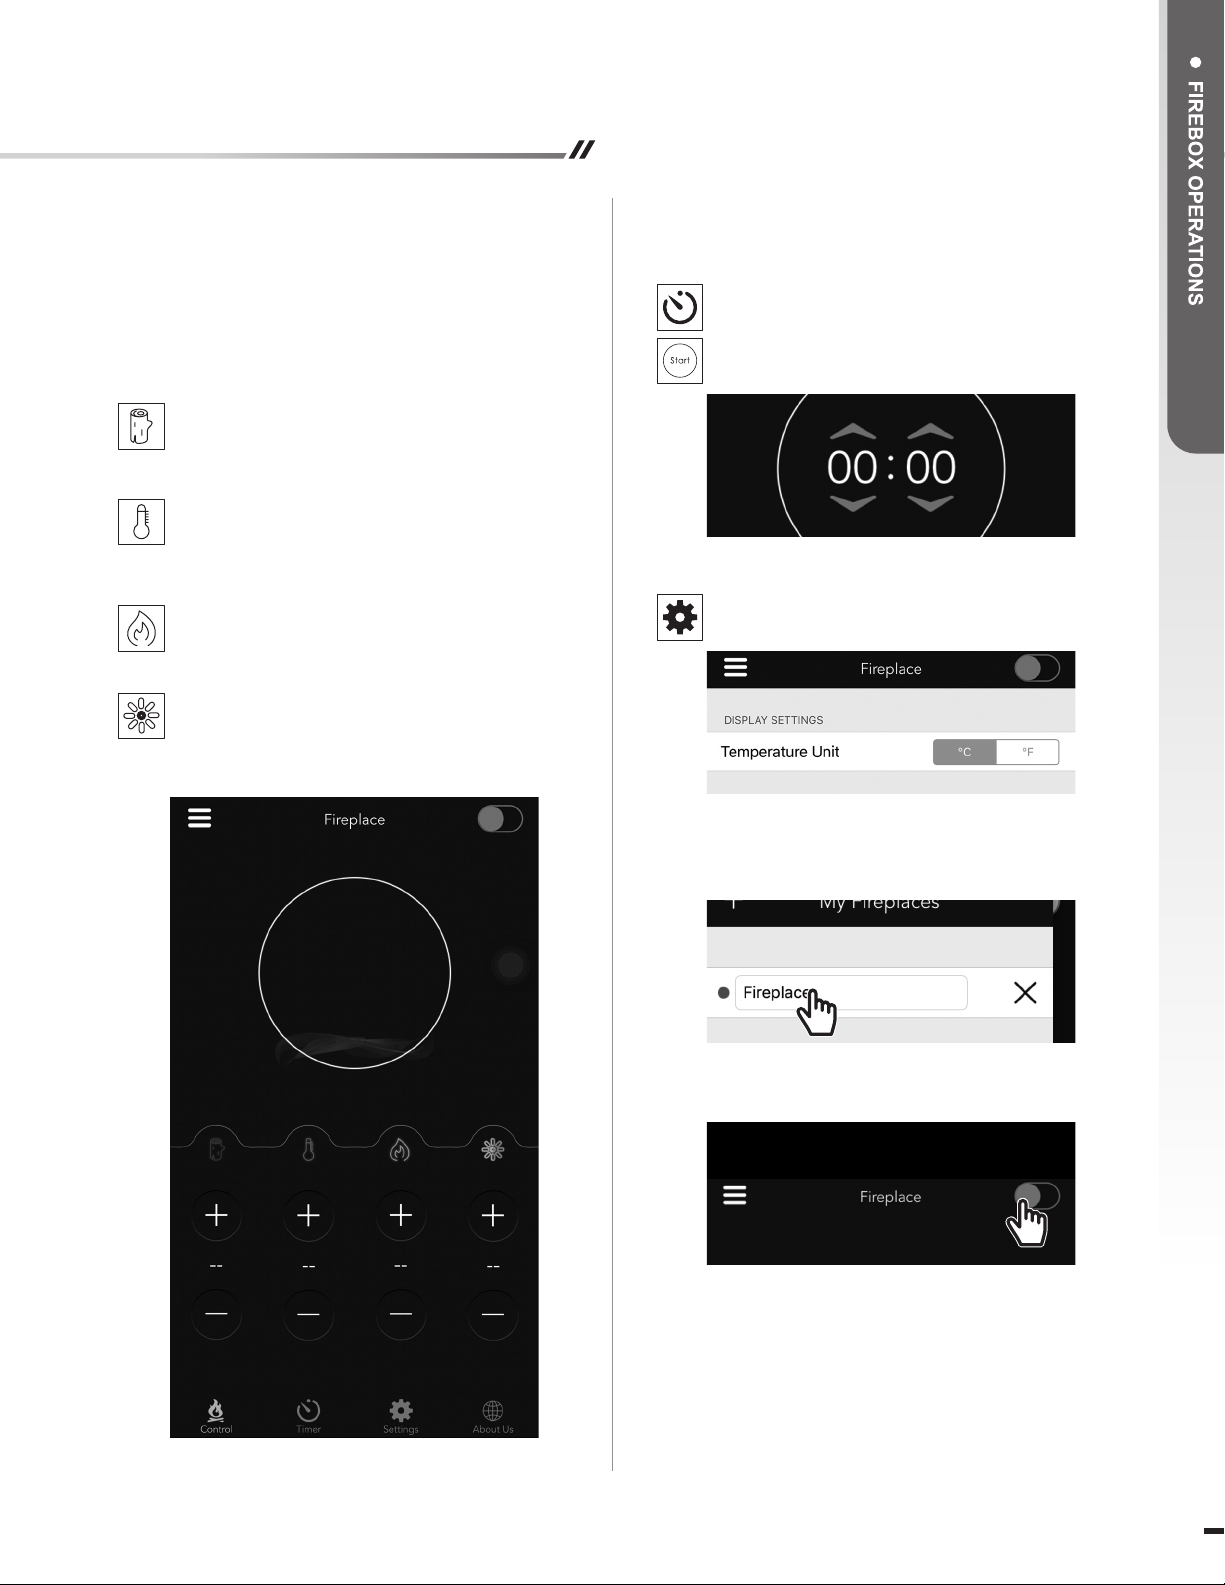
Fireplace Remote App
Operating Instructions
You can remotely adjust your fireplace settings in the
following ways:
Control Screen (Fig. 9):
You can remotely adjust your fireplace settings in the
following ways:
• Adjust the ember bed brightness by tapping the
" + " or " - " button under the log icon
Settings range from L0 ( dimmest) to L5 (brightest)
• Adjust the temperature by tapping the " + " or
" - " button under the thermostat icon
Settings range from 59°F - 86°F, 15°C - 30°C, ON,
or OFF
• Adjust the ame brightness by tapping the " + "
or " - " button under the ame icon
Settings range from F0 (no ame) to F5 (brightest)
• Change the ame color by tapping the " + " or
" - " button under the color wheel icon
Settings range from C1: Orange, C2: Blue, C3:
Orange + Blue, or C4: Color Rotation
Timer Screen (Fig. 10):
• Select the Timer Mode, then set a shut-off timer
for the replace to automatically turn off
• Set the timer from 0:30 to 9:00 in 30-minute
intervals, then press Start
Fig. 10
Setting Screen (Fig. 11):
• Select Settings, then change the temperature
unit to °F or °C
Fig. 11
Others:
• You can edit the name of your fireplace by holding
down on the replace name. (Fig. 12)
Fig. 9
Fig. 12
• Turn off your replace by tapping the switch on the top
right corner. (Fig. 13)
Fig. 13
Page 10
Care And Maintenance
CLEANING INFORMATION:
• Make sure the unit is turned off, unplugged and the heating elements of heater are cool whenever you are cleaning the
heater.
• Clean the metal trim using a water-dampened, soft, and clean cloth. DO NOT use brass polish or household cleaners as
these products will damage the metal trim.
• The motors used on the fan and the flame generator assembly are pre-lubricated for extended bearing life and
require no further lubrication. However, periodic cleaning/vacuuming of the fan/heater and air intake/output vents is
recommended.
• All other servicing should be performed by qualified service personnel.
GLASS INFORMATION:
• Under no circumstances should this product be operated with broken glass.
• Do not strike or slam the glass.
• Do not use abrasive cleaners to clean the glass.
•
service personnel.
WARNING: Make sure the power is turned off before proceeding. Any electrical repairs or rewiring of this unit
should be carried out by a licensed electrician in accordance with national and local codes.
If repairing or replacing an electrical component or wiring, the original wire routing, color coding and securing
locations must be followed.
WARNING: Electrical outlet wiring must comply with local building codes and other applicable regulations to
WARNING:
WARNING:
electrical shock or personal injury.
WARNING: During any service of this appliance, the power to the unit must be turned off. First turn the main
power switch to the “OFF” position. Then remove the electrical plug from the wall outlet.
NOTE: When the heater is not in use, it should be stored in a dry location, away from possible
damage. The power cord should be stored properly to avoid contact with hot or sharp objects.
REPLACING THE REMOTE CONTROL BATTERY:
When the remote control stops operating or its range seems reduced, it is time to replace the batteries.
NOTE: The batteries should be removed if the product is to be left unused for a long time.
CAUTION:
Non-rechargeable battery is not to be recharged. Exhausted battery is to be removed from the product:
1. The battery compartment is located on the back end of the remote control.
2. Press the small tab inward as you slide the battery door open and remove the old battery.
3. Insert a new CR2025 lithium battery (not included), ensuring the polarities of the battery match the inside of
the battery compartment.
4. Re-insert the battery door.
10
Page 11
Care And Maintenance
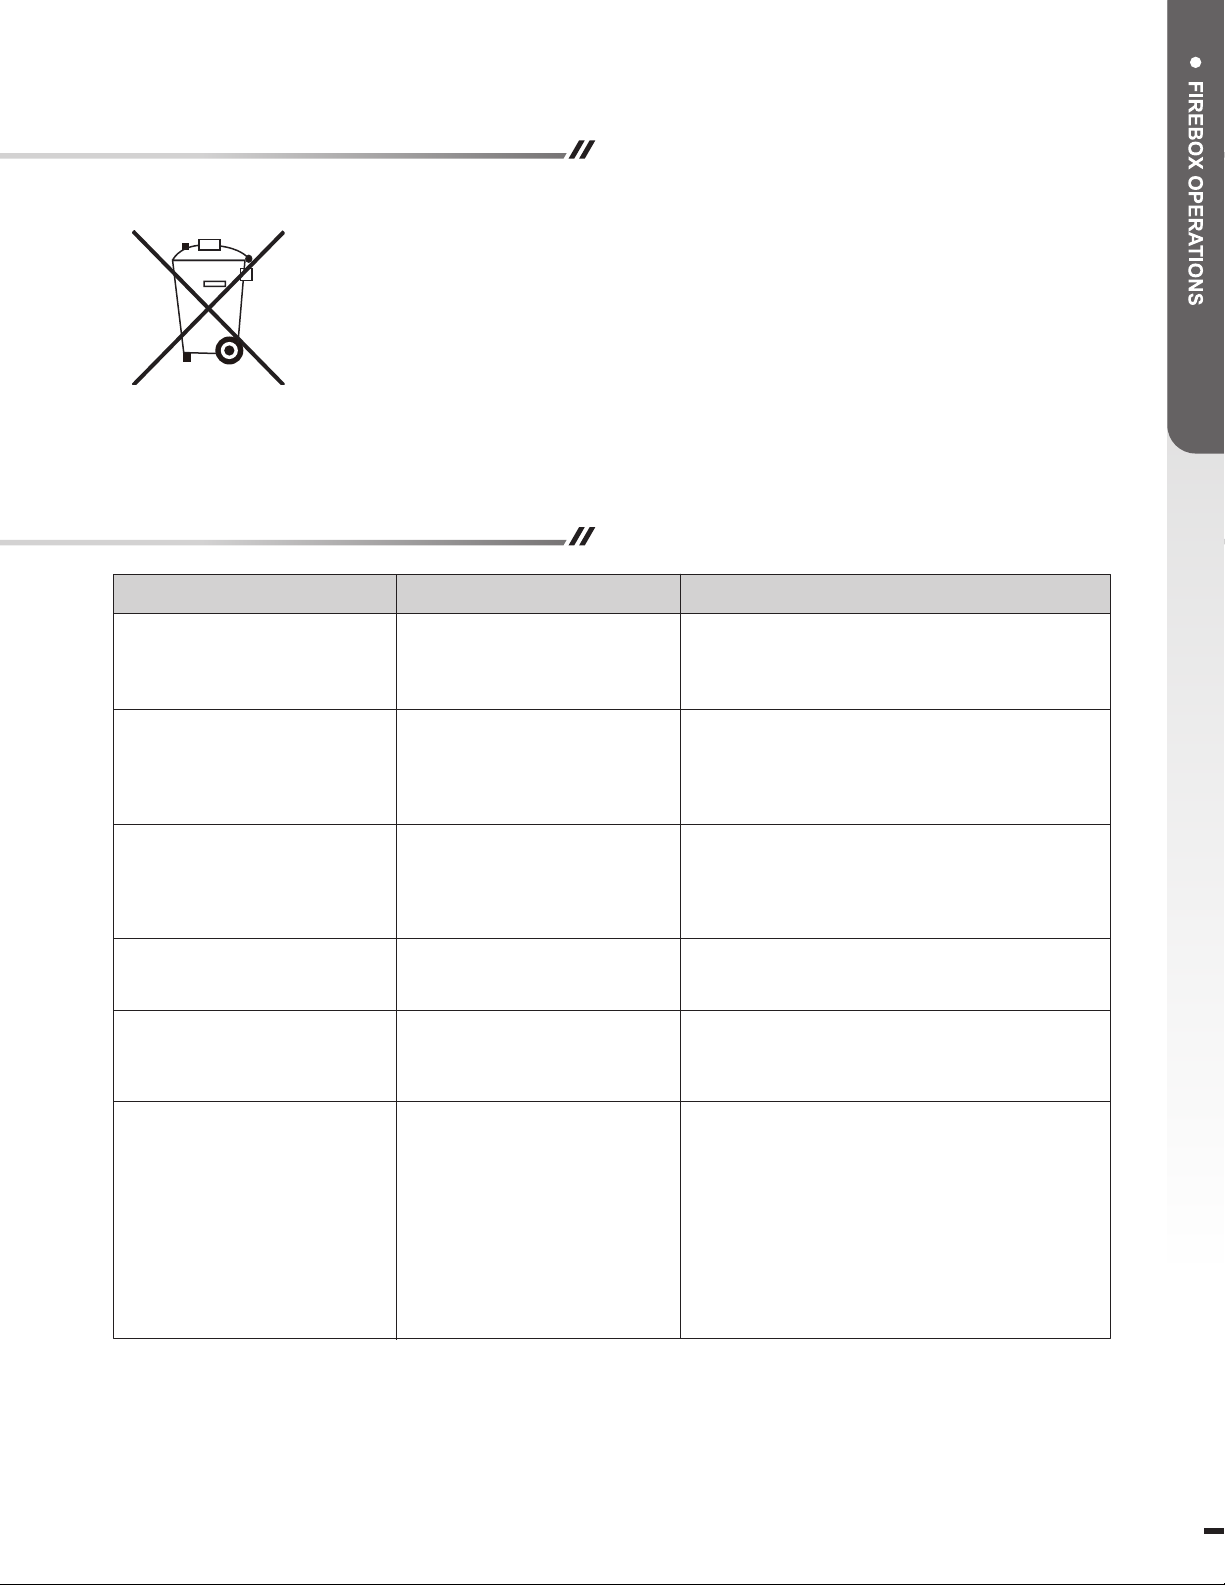
DISPOSAL OF USED BATTERY:
A battery may contain hazardous substances that could be endangering to the environment
and human health.
• This symbol marked on the battery and/or packaging indicates that used battery shall not be
treated as municipal waste. Instead it shall be left at the appropriate collection point for recycling.
• By ensuring the used battery is disposed of correctly, you will help prevent potential negative
consequences for the environment and human health. The recycling of materials will help to
conserve natural resources.
For more information about collection and recycling of used batteries, please contact your local municipality, your waste
disposal service or the point of sale where you purchased this item.
Troubleshooting
Problems
1. No power, logs do not
glow.
2. E1 is displayed on
control panel.
3. E2 is displayed on
control panel.
4. E3 is displayed on
control panel.
5. Fan motor continues
to blow after unit is
powered off.
6. Power cord gets warm
to the touch.
Possible Causes
1. The unit does not have
power.
2. The overheat protection
device has been
engaged.
3. The ambient temperature
sensor is broken or not
working correctly.
4. Child Lock function is
activated.
5. Normal operation.
6. Normal operation.
Solutions
1. Check that unit is plugged into a standard
120 volt outlet. Then make sure power is set
at “ON” position.
2. Unplug unit, wait 5-10 minutes, then the
sensor will reset itself. Plug the unit back
in and turn on the heater. If the problem
persists, call customer service.
3. Unplug unit, wait 5-10 minutes, then the
sensor will reset itself. Plug the unit back
in and turn on the heater. If the problem
persists, call customer service.
4. To inactivate the Child Lock function, hold
the POWER button for 10 seconds.
5. This is a standard feature; the blower runs
for an additional 20 seconds to ensure heat
will not be trapped inside the unit.
6. This is normal for a heater appliance as it
requires more current to operate. Check the
connections of the appliance cord and the
outlet. Make sure the plug fits tightly into
the outlet. During use, check the plug and
outlet frequently to determine if it is HOT;
if so, discontinue use of the appliance and
consult with a qualied electrician to check
or change the overheating outlet(s).
Page 12
Wine Cooler Model
SPWC-52ACT
WARNING:
If repairing or replacing any electrical component or wiring, the original wire routing, color coding and securing
locations must be followed.
ATTENTION:
corresponds to your power supply.
ATTENTION:
space on each side and at least 10 cm of space behind.
WARNING:
WARNING:
Disconnect power before servicing.
Read the operation manual carefully and check that the rating data on the rating nameplate
For the best results, this wine cooler needs to be placed on a at surface, with at least 2 cm of
Find a location for the wine cooler that avoids direct sunlight and high temperatures.
Do not place heavy items on the top of the cellar.
Safety Information
This wine cooler can only be used in the way of which it was designed. The manufacturer is not liable for any damage due to
improper use or repairs made by unqualied personnel.
CAUTION:
• Before cleaning the cooler, make sure it is unplugged. NEVER clean the unit with acid preparation, medical, dilution,
gasoline, oil or any other kind of chemical substance that could damage the wine cooler.
• To reduce the risk of re, if the fuse of the power board is broken, replace the power board only with the same fuse type that
is authorized by the service center.
12 13
Page 13
Safety Information
CAUTION:
• If possible, ALWAYS unplug wine cooler when not in use.
• DO NOT operate any wine cooler with a damaged cord or plug or after the wine cooler malfunctions.
• DO NOT operate any wine cooler if it has been dropped or damaged in any manner. Disconnect power at service panel and
have wine cooler inspected by qualied service personnel before reusing.
• Any repairs to this unit should be carried out by appropriately qualied service personnel.
• Under no circumstances should this unit be modied. Parts having to be removed for servicing must be replaced prior to
operating this unit again.
• DO NOT use outdoors.
• This unit is not intended for use in bathrooms, laundry areas and similar indoor locations. NEVER place unit where it may
fall into a bathtub or other water container.
• To disconnect this unit, turn all controls to the OFF position, then remove plug from outlet.
• ONLY connect to properly grounded outlets.
• This appliance, when installed, must be electrically grounded in accordance with local codes, with the current CSA C22.1
Canadian Electrical Code or, for USA installations, follow the National Electrical Code, ANSI/NFPA NO.70.
• To prevent a possible re or damage to the unit, DO NOT block any air intakes or exhaust in any manner.
• ALWAYS plug heaters directly into a wall outlet/receptacle. NEVER use with an extension cord or relocatable power tap
(outlet/power strip).
• DO NOT slide wine cooler on top of wood to avoid scratching wood surface.
DANGER:
leave the shelves in place, so that children may not easily climb inside.
ELECTRICAL CONNECTION:
• A 15-amp, 120-volt, 60 Hz circuit with a properly
grounded outlet is required. Preferably, the fireplace
will be on a dedicated circuit as other appliances on the
same circuit may cause the circuit breaker to trip or the
fuse to blow when the heater is in operation. The unit
comes standard with 6-ft. three-wire cord, exiting from
the rear of the fireplace. DO NOT exceed the current
rating of the current tap. ALWAYS plug heaters directly
into a wall outlet/receptacle. NEVER use with an
extension cord or relocatable power tap (outlet/power
strip).
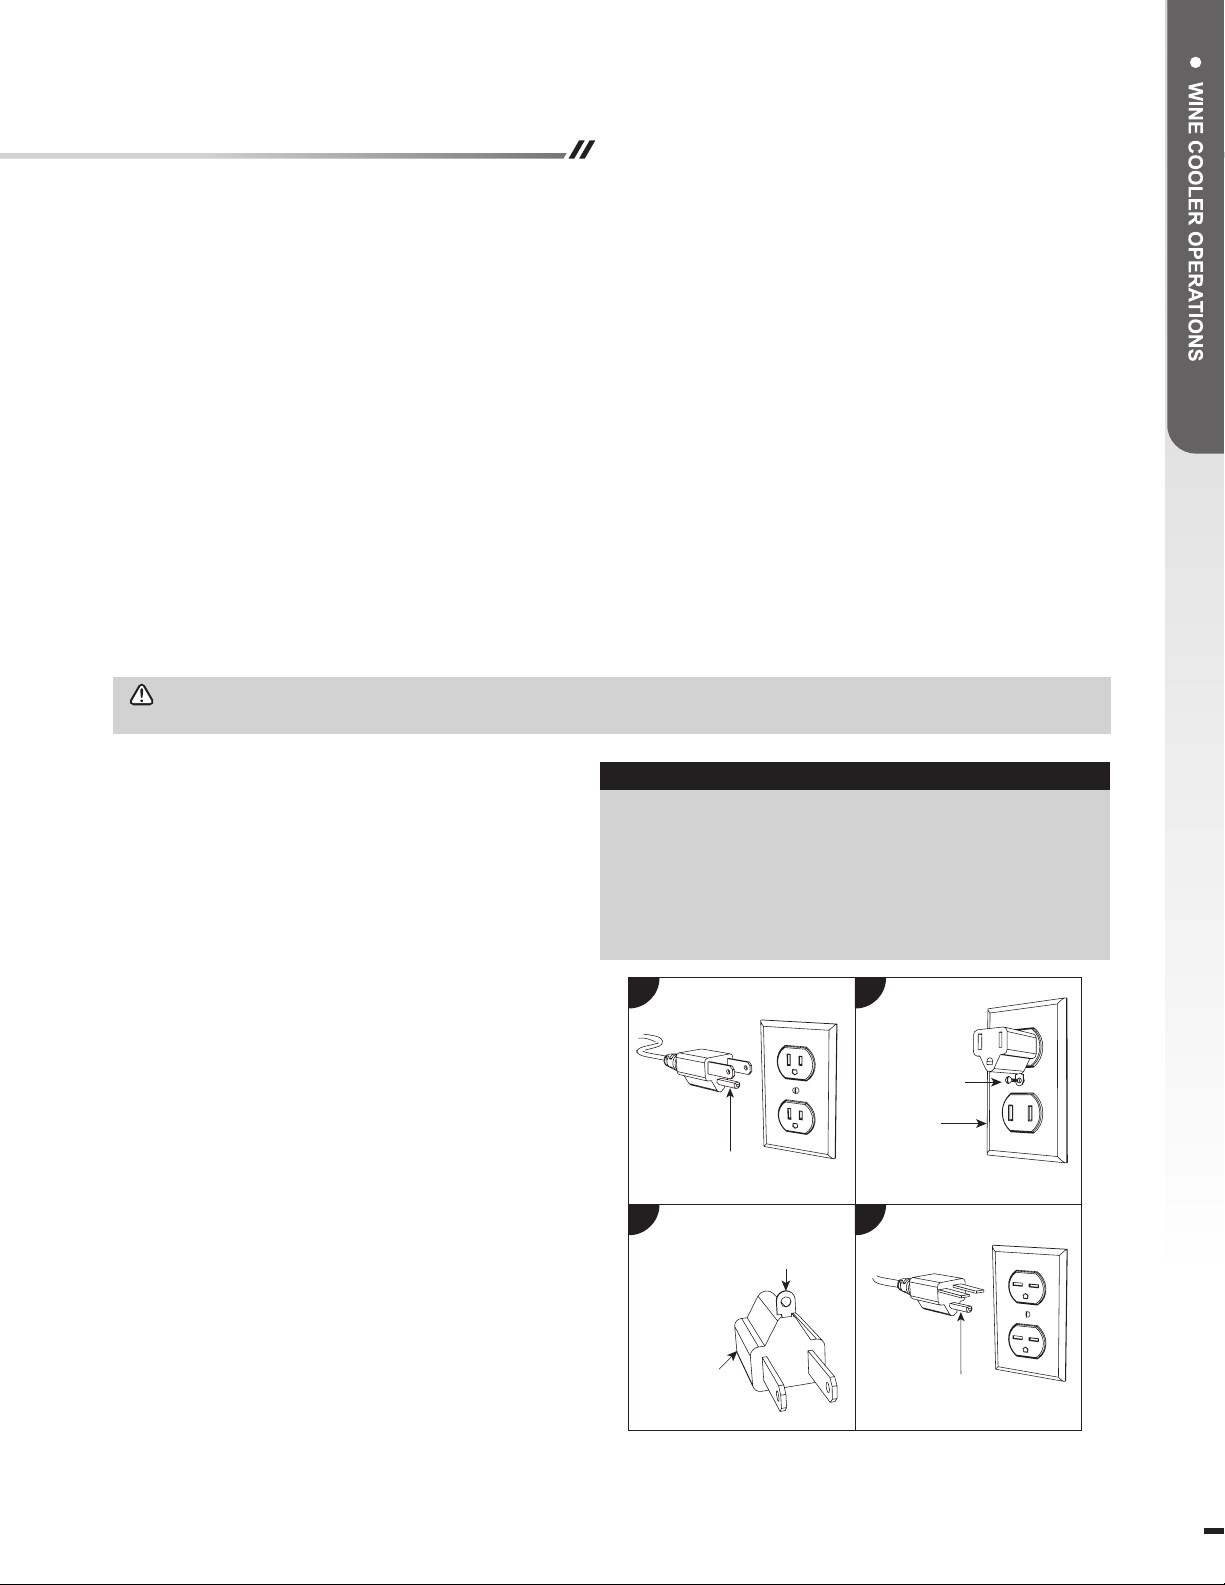
• This wine cooler is for use on 120 volts. The cord has
a plug as shown below. See illustration for grounding
instruction. An adapter as shown at C is available for
connecting three-blade grounding type plugs to two-slot
receptacles. The green grounding lug extending from
the adapter must be connected to a permanent ground
such as a properly grounded outlet box. The adapter
should not be used if a three-slot grounded receptacle
is available.
Risk of child entrapment. Before throwing away your old wine cooler, you must take off the door and
ELECTRICAL SPECIFICATIONS
Power Consumption (KW.h/24h):
Temperature Range:
Rated Voltage:
Rated Frequency:
Current:
Power Draw:
A
Grounding Pin
C
Grounding Means
B
Metal Screw
Cover of
Grounding Box
D
1.2
45°F - 64°F (7°C - 18°C)
110 - 120 VAC
60 Hz
1.9 A
130 W
Adapter
Grounding Pin
Page 14
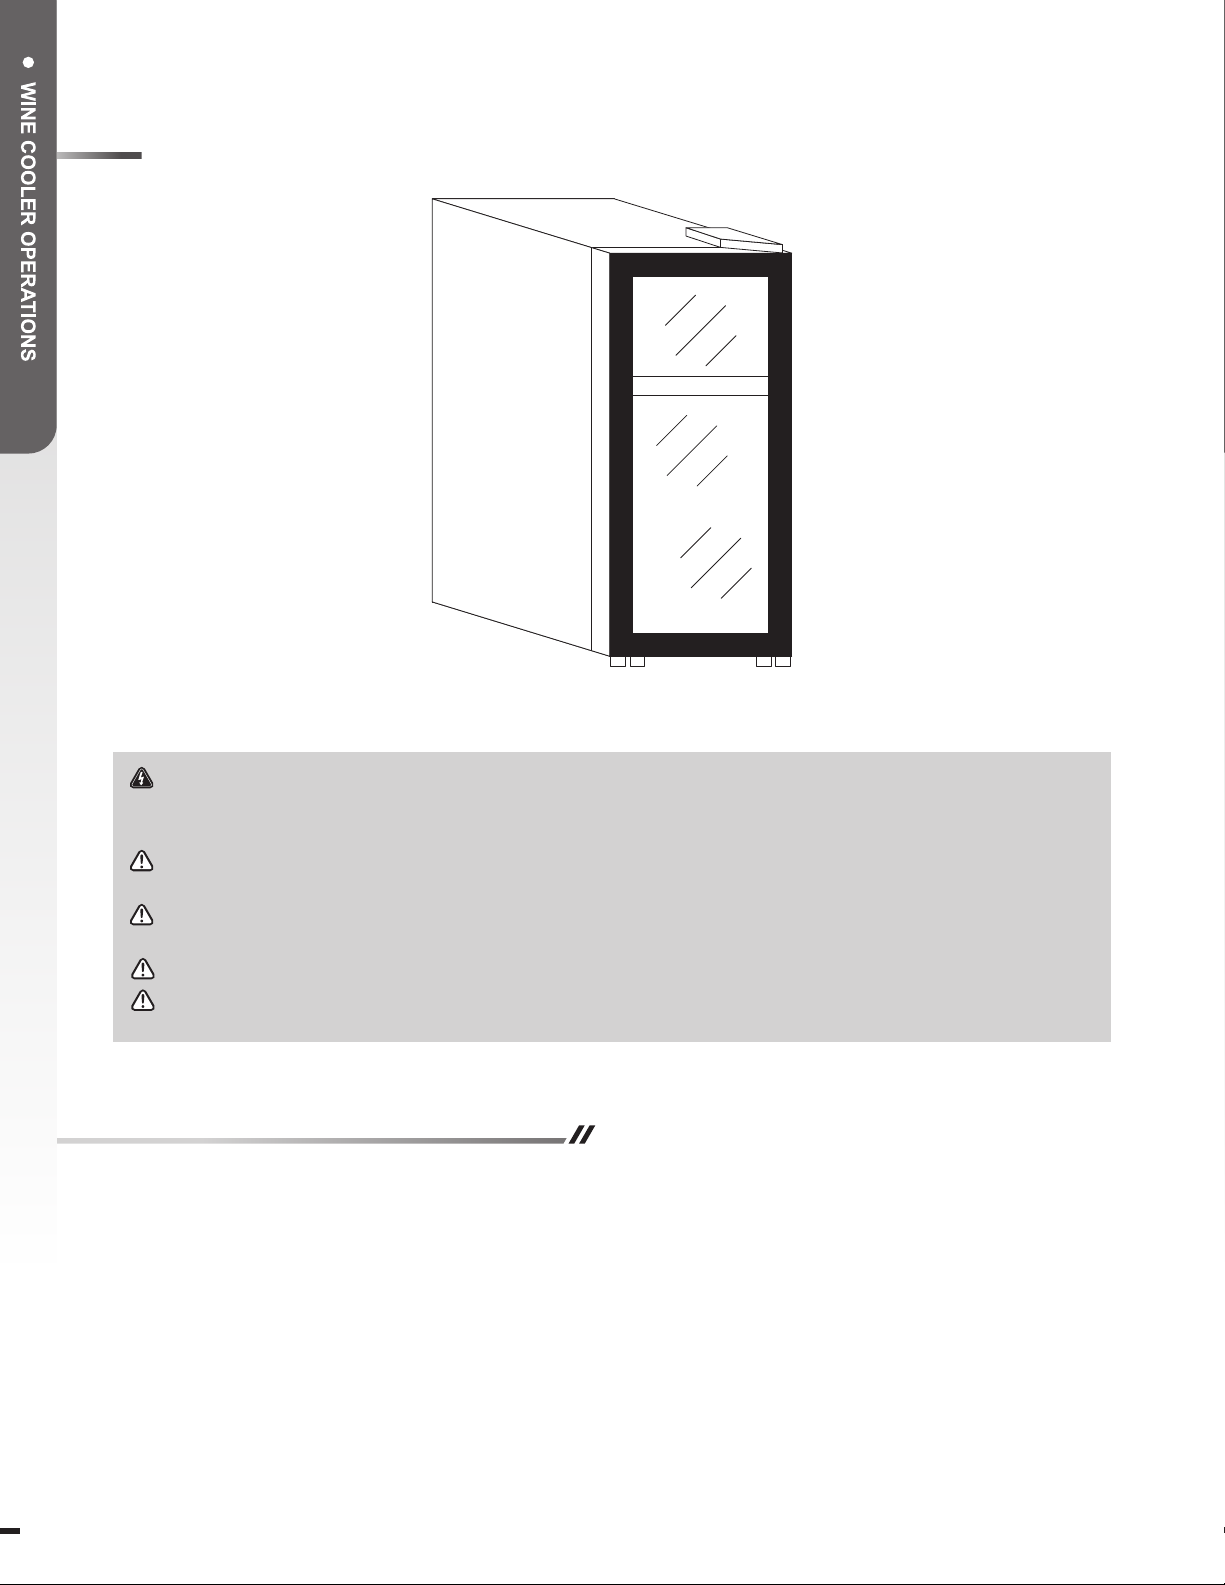
Wine Cooler Structure
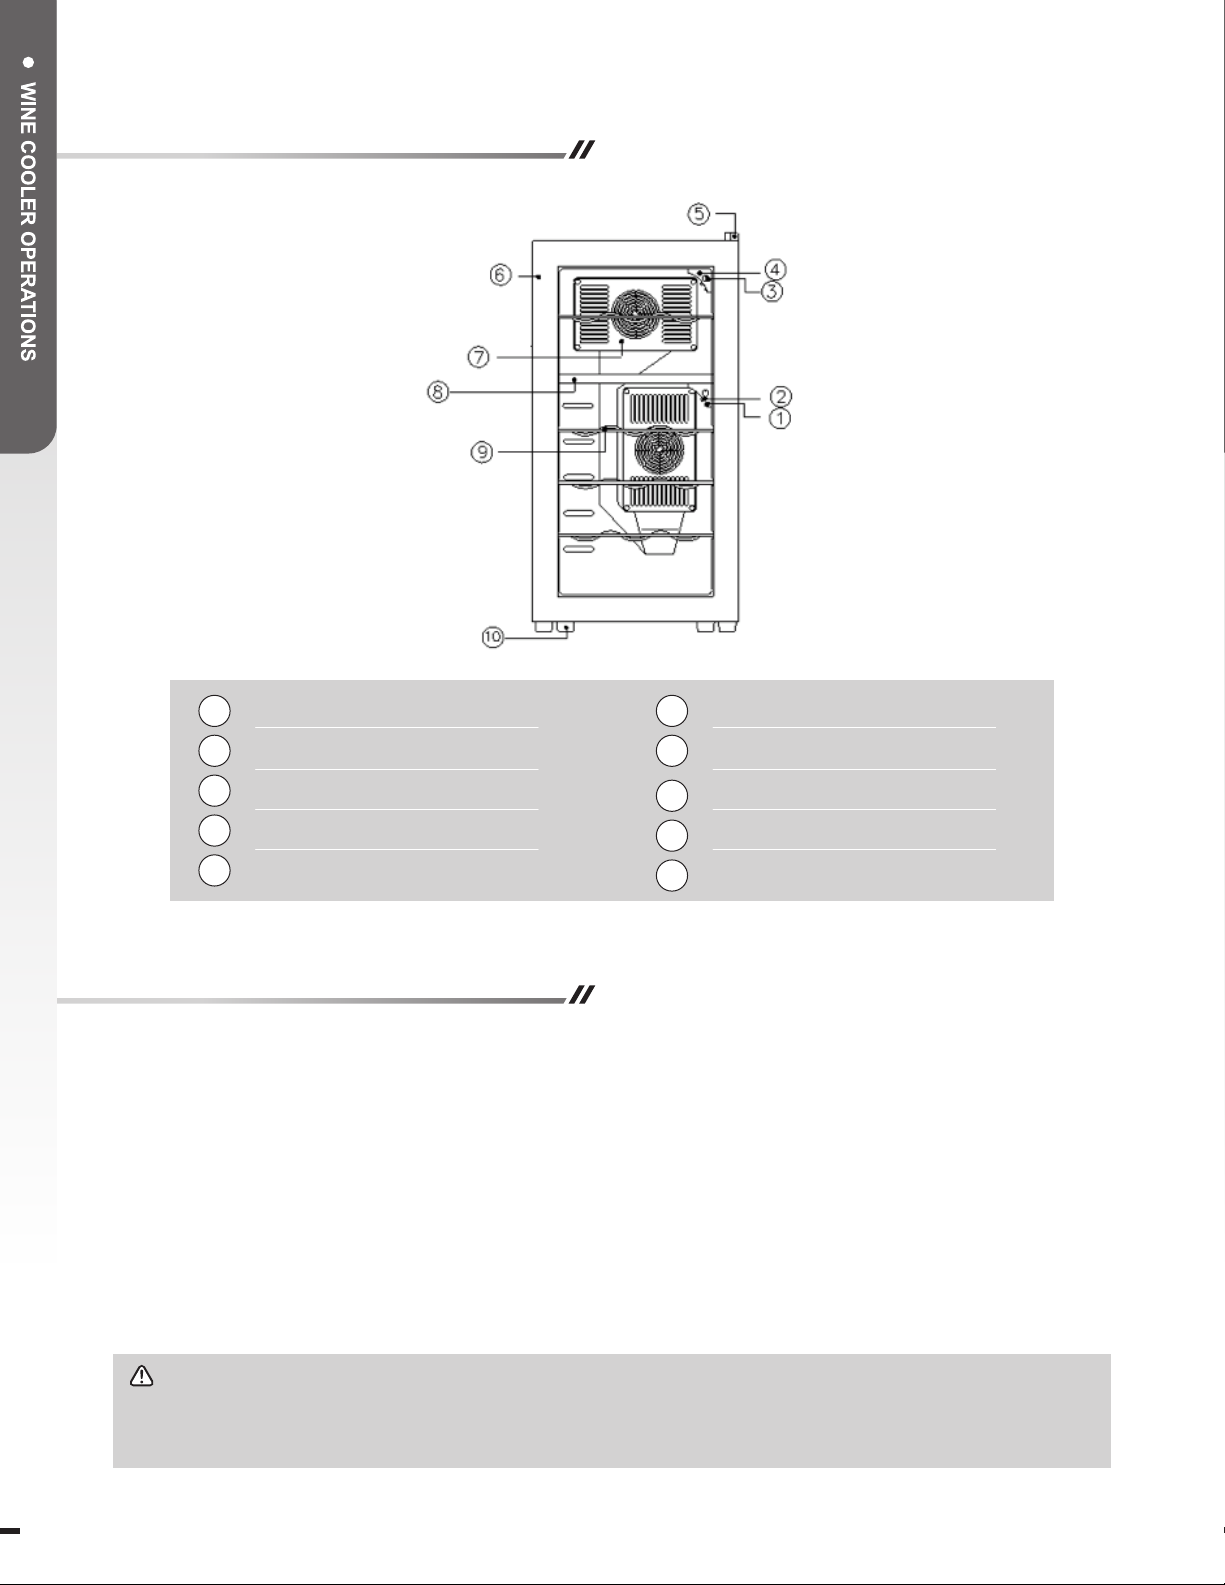
LED Interior Light
1
Light Switch
2
Temperature Control Knob
3
Temperature Control Box
4
Hinge Cover
5
x 2
x 2
x 2
x 2
x 1
Glass Door
6
Cooling Fan Faceplate
7
Compartment Divider
8
Shelf
9
Foot
10
x 1
x 2
x 1
x 4
x 4
Operating Instructions
This is a dual zone wine cooler;
(1) upper zone is for storage of white wine with a temperature range from 45°F to 54°F (7°C to 12°C).
(2) lower zone is for storage of red wine with a temperature range from 54°F to 64°F (12°C to 18°C).
• Each wine cooler zone has a control box for regulating the temperature, which is located on the upper right hand corner of
each zone compartment. To change the internal temperature, adjust the control knob according to the ambient temperature
or purpose of use.
• The range of the temperature control is from "Max" to "Min". The rst time the unit is turned on, set the temperature control
to "Max". After 2 hours, adjust the knob to the temperature control setting that best suits your needs.
• Turn the knob to the middle for the most appropriate temperature control at home or at the ofce.
This wine cooler has a LED light located under the bottom surface of each temperature control box. You can turn the LED
light ON or OFF by pressing the light switch.
NOTE:
temperature will cool until it reaches the set temperature and then the cooling system will shut off. When the
internal temperature is higher than the temperature set on the thermostat, the cooling system will activate again
to cool to the set temperature.
14 15
When the power is connected, the cooling system will activate. When the thermostat is set, the internal
Page 15
Care And Maintenance
• Shut off power supply before cleaning the wine cooler.
•Removethewineandshelves.Cleanthewinecoolerwithbakingsodaandwaterrst,andthencleanwithonlywater.
•Donotusesoapordetergentforthecabinet.NEVERcleantheunitwithacidpreparation,medical,dilution,gasoline,oilor
any other kind of chemical substance that could damage the wine cooler.
• Clean the wine cooler regularly.
Troubleshooting
Problems Possible Causes Solutions
1. Wine cooler is not
cooling
2. Inside temperature is
not cold enough
3. Peculiar odor inside
refrigerator
4. Frost is found on the
cooling fan faceplate
1a. Unit is unplugged
1b. Low voltage
1c. Fuse is broken
2a. The refrigerator is placed
too close to a heat
source
2b. Poor ventilation
2c. Cooling fans are not
working
2d. The door is not shut
completely, has been
opened too frequently,
or has been left open for
too long
3. Check whether there is
anything foul inside
4. Too much humidity or too
low temperature inside
the case
1a. Plug in the unit to the outlet
1b. Ensure normal voltage
1c. Contact qualified service personnel to
replace the fuse
2a. Keep the refrigerator away from sunshine
or other heat sources
2b. Ensure that all air intakes and exhausts are
not blocked in any manner.
2c. Contact qualified service personnel to
inspect the fans and replace them
2d. Completely shut the door. Do not open the
door too frequently or keep it open for too
long
3. Wrap the source or dispose it
4. Disconnect from the outlet, stop the power,
and manually defrost. Connect the power
again when the ice thaws
Page 16
DOWNLOAD THE FIREPLACE REMOTE APP
Fireplace Remote
Free replace remote
app gives you full
access and control of
your replace
Scan QR Code to Download App
QUESTIONS, PROBLEMS, OR MISSING PARTS?
Please Contact Customer Service Before Returning to Store
1. Go to Apple Store or Google Play Store
2. Type “replace remote” on the search bar
3. Click “INSTALL” button
4. Enter your account and password if necessary
5. Installation will be completed automatically
[email protected] +1-203-440-9911
Crafted in China
Distributed by Prokonian Inc., Meriden, CT 06450, USA
 Loading...