

Page 1

Mercury Flanger User’s Guide
Welcome
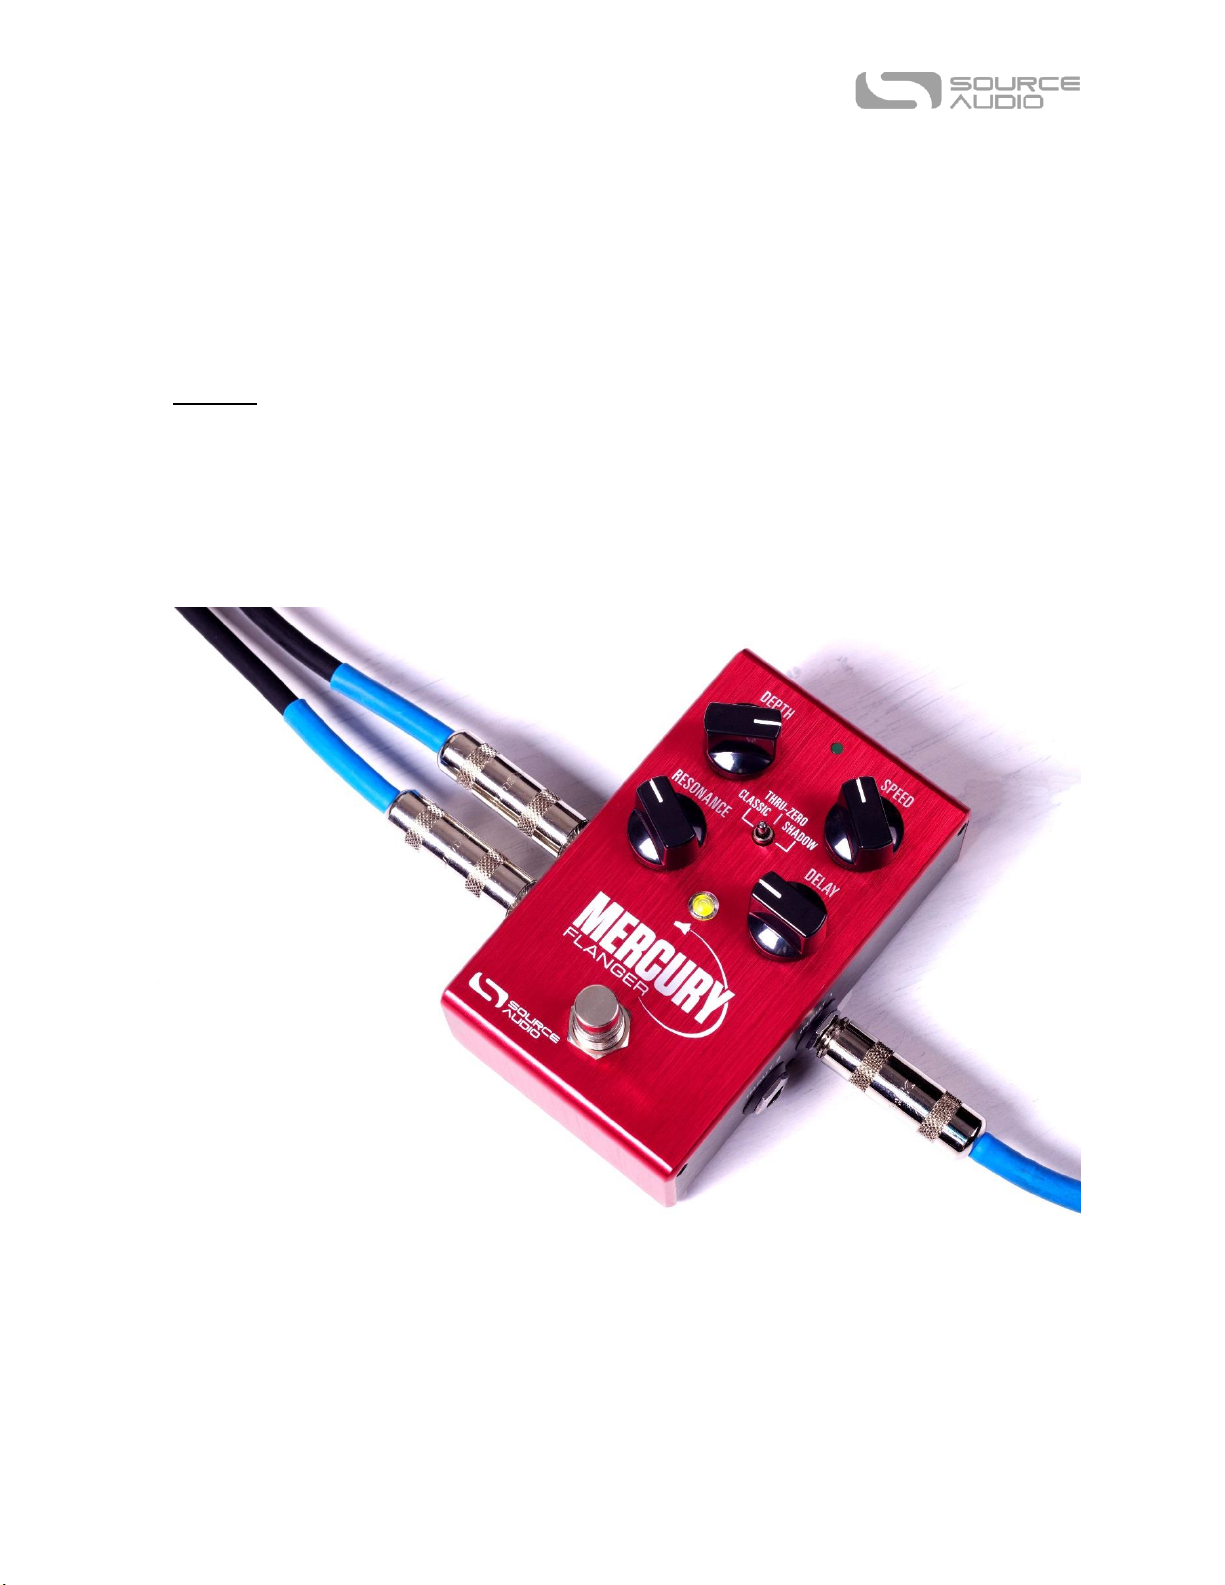
Thank you for purchasing the Mercury Flanger. This powerful stereo effects pedal features a
collection of meticulously crafted flanger sounds ranging from classic two-voice sounds inspired by
60s studio tape flangers to the swooshing jet engine sounds of the 70s and 80s and beyond. With a
simple control set, the Mercury can work in a wide variety of musical settings, and the powerful MIDI
and Neuro control options under the hood provide access to a vast array of additional tonal
possibilities.
SA240 Mercury Flanger User’s Guide 1
Page 2

The Mercury is housed in a durable, lightweight aluminum housing, packing rack mount power and
flexibility into a compact, easy-to-use stompbox.
The USB and Neuro ports transform the Mercury from a simple flanger pedal into a powerful multieffects unit. Using the free Neuro App (iOS and Android), a wide range of additional control
parameters and effect types (chorus, phaser, resonator) are accessible. When used together with the
Neuro Hub, the Mercury is fully MIDI-controllable and 128 multi-pedal presets, or “scenes,” can be
saved for instant recall on the stage or in the studio. The Mercury can also connect directly to a
passive expression pedal or the Hot Hand for expressive control of any parameter.
The Quick Start guide will help you with the basics. For more in-depth information about the Mercury
Flanger, move on to the following sections, starting with Connections.
Enjoy!
- The Source Audio Team
Overview
Diverse Flanger Sounds – Choose from traditional flanger tones such as Classic, Thru-Zero, and
Shadow, or delve deeper into unique sounds cooked up in the Source Audio lab.
Flexible Stereo Routing – The Mercury is equally at home in a mono rig or a stereo rig. A variety of
routing modes such as True Stereo, Mono, Mono-to-Stereo, Sum-to-Mono and External Loop allow
the Mercury to harness the true power of stereo signal chains.
Compact Design – The durable, anodized aluminum housing has a slim profile, a small footprint, and
sturdy hardware that will withstand the rigors of the road.
Universal BypassTM – True bypass or buffered bypass? The choice is yours. The Mercury features
high-quality signal relays for true bypass and transparent buffers for analog bypass.
Preset Saving – Save your favorite sound by pressing and holding the footswitch. No need to
remember knob positions in the middle of a show.
Neuro Technology – The Neuro App opens up new possibilities for the Mercury, including completely
new effect types, additional control parameters, and access to the Neuro Community, including free
presets from artists and other users. The Neuro Hub can store up to 128 presets for the Mercury,
easily recalled with a MIDI controller. You can also download any effects for the Gemini Chorus or
Lunar Phaser and use them on the Mercury Flanger.
Deep Control Set – Beyond the four knobs on the face of the Mercury are many additional
parameters. The Neuro App provides access to the inner workings of the flanger effect for advanced
users who want to create a unique signature sound.
Parametric EQ and Low Cut – A 4-band parametric EQ is included in the Mercury, allowing for fine
tonal control, and a low cut filter tightens up the low end.
MIDI Control – All of the Mercury’s parameters can be accessed and controlled using MIDI via the
Neuro Hub or USB. Class compliant USB-MIDI allows the Mercury to work as a plug-and-play device
SA240 Mercury Flanger User’s Guide 2
Page 3
with recording software running on Mac and Windows, and the MIDI Learn feature makes control
mapping simple. The Mercury can also sync to your DAW or other MIDI devices using MIDI clock.
Quick Start
Power
To power the unit, connect the included 9V DC power supply to the jack labeled DC 9V on the back
panel.
Warning: Using a non-Source Audio supply, especially an unregulated supply, could damage the unit.
Please be very cautious when using 3rd-party power supplies.
Guitar/Audio Connections
Using standard ¼” mono cables, connect your guitar, bass, or other instrument to the INPUT 1 jack
and your amp (or the next audio device in the signal chain) to the OUTPUT 1 jack.
When the power and audio connections have been made, the Mercury is ready to play.
Brief Knob, Footswitch, and Button Descriptions
Depth Knob: Controls the depth of the Low Frequency Oscillator (LFO), which determines the
strength or prominence of the flanger effect.
Speed Knob: Controls the frequency of the LFO, which determines the speed of the flanger effect.
SA240 Mercury Flanger User’s Guide 3
Page 4

Resonance Knob: Controls the resonance of the effect by feeding the output back into the input –
higher resonance could be described as “intense,” “brighter” or “chime-like.”
Delay Knob: Controls the delay time for the delayed signal in the effect – experiment with the delay
knob for different effect characteristics.
Effect Switch: Selects between the three basic flanger effect types – Classic, Thru-Zero, and Shadow.
Footswitch: Enables or bypasses the flanger effect. The large LED will be lit green when the flanger
effect is engaged.
Contents
Welcome .................................................................................................................................................. 1
Overview .................................................................................................................................................. 2
Quick Start ............................................................................................................................................... 3
Connections ............................................................................................................................................. 5
Basic Flanger Operation ........................................................................................................................... 9
Effect Types ............................................................................................................................................ 11
Controls .................................................................................................................................................. 13
Preset Storage and Recall ...................................................................................................................... 15
Universal Bypass TM ................................................................................................................................ 15
Stereo Routing ....................................................................................................................................... 16
Parametric EQ ........................................................................................................................................ 17
External Control ..................................................................................................................................... 18
Neuro App .............................................................................................................................................. 21
Specifications ......................................................................................................................................... 31
Troubleshooting ..................................................................................................................................... 32
Frequently Asked Questions .................................................................................................................. 33
Rubber Feet ........................................................................................................................................... 35
Waste Disposal Notes ............................................................................................................................ 35
Warranty ................................................................................................................................................ 36
Version History ...................................................................................................................................... 37
SA240 Mercury Flanger User’s Guide 4
Page 5
Connections
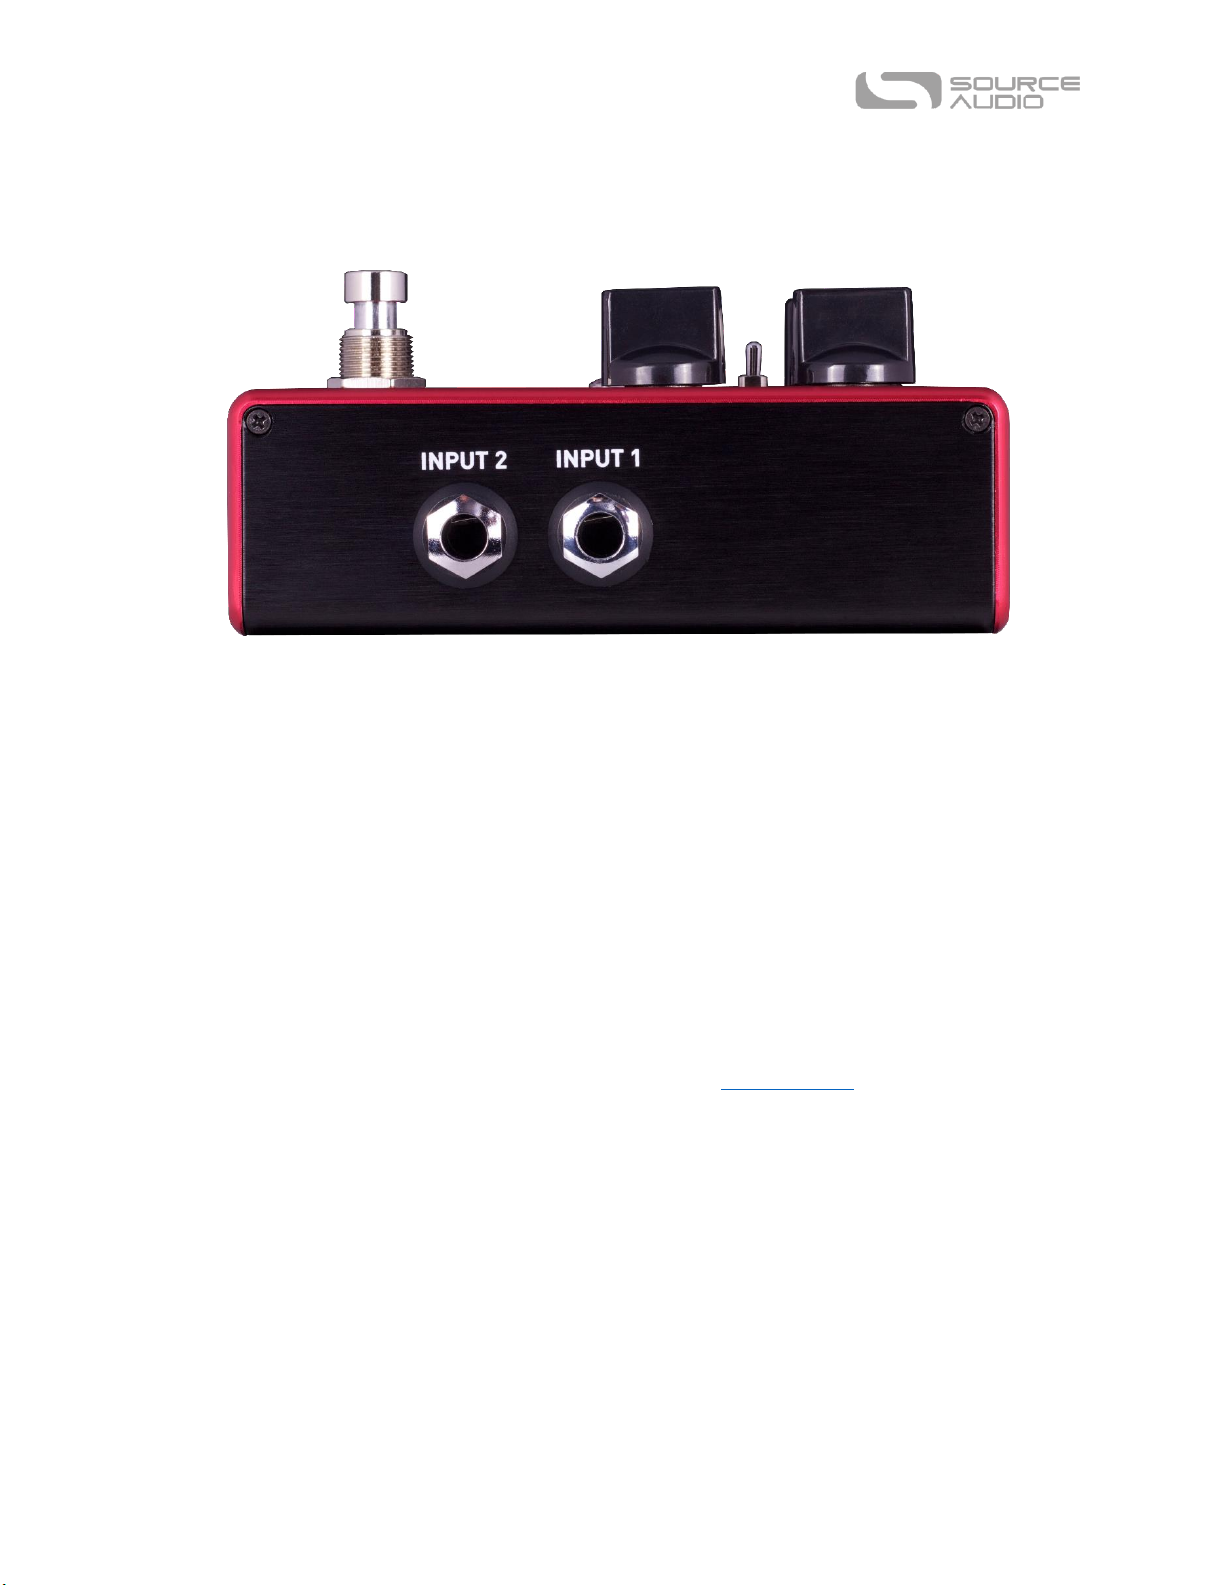
Input Side Connections
Input 1
This is the primary input for guitar, bass, or other instruments. It can also accept line-level inputs.
Connect it to your instrument or other audio source using a mono (TS) ¼” cable.
Input 2
Input 2 can act either as an audio input or as the data connection for the Neuro App, or both at the
same time.
Input 2 as an Audio Input
The tip contact on Input 2 acts as a secondary input for guitar, bass, or other instruments. It is only
active when the Mercury is configured with a signal routing that uses stereo inputs. Connect it to
your instrument (or the previous effect in the signal chain) using a mono (TS) ¼” cable. By default,
the Mercury will auto-detect the routing mode. Other routing options are available using the Neuro
App. For more information about stereo routing, refer to the Stereo Routing section.
Input 2 as a Neuro App Data Input
The ring contact on Input 2 acts as a data connection for the Neuro App. Connect it to your mobile
device using a stereo (TRS) ¼” cable. It can also accept daisy-chained Neuro data from another
Neuro-compatible pedal in the chain, provided that a TRS cable is used. The audio signal (if
applicable) will be on the tip contact of the plug, and the Neuro App data will be on the ring contact.
Input 2 only accepts data from the Neuro App. Data from the Neuro Hub comes from the Control
Input port.
SA240 Mercury Flanger User’s Guide 5
Page 6

Output Side Connections
Output 1
This is the primary output. Connect it to your amplifier, recording interface, or the next device in
your effects signal chain using a mono (TS) ¼” cable.
Output 2
Output 2 can act either as an audio output or as the daisy-chain data connection for the Neuro App,
or both.
Output 2 as an Audio Output
The tip contact on Output 2 acts as the secondary audio output. It carries an audio signal when the
Mercury is configured with a signal routing that uses stereo outputs. Connect it to your amplifier,
recording interface, or the next device in your effects signal chain using a mono (TS) ¼” cable.
Output 2 as a Neuro App Data Daisy-Chain Output
The ring contact on Output 2 acts as a data connection for the Neuro App, passing data from the
Mercury to the next Source Audio effect in your signal chain. You can daisy-chain the Neuro App data
regardless of whether Output 2 is configured to output audio or not. Connect Output 2 to the next
device’s Neuro App Data input (usually Input 2) using a stereo (TRS) ¼” cable. The audio signal (if
applicable) will be on the tip contact of the plug, and the Neuro App data will be on the ring contact.
SA240 Mercury Flanger User’s Guide 6
Page 7
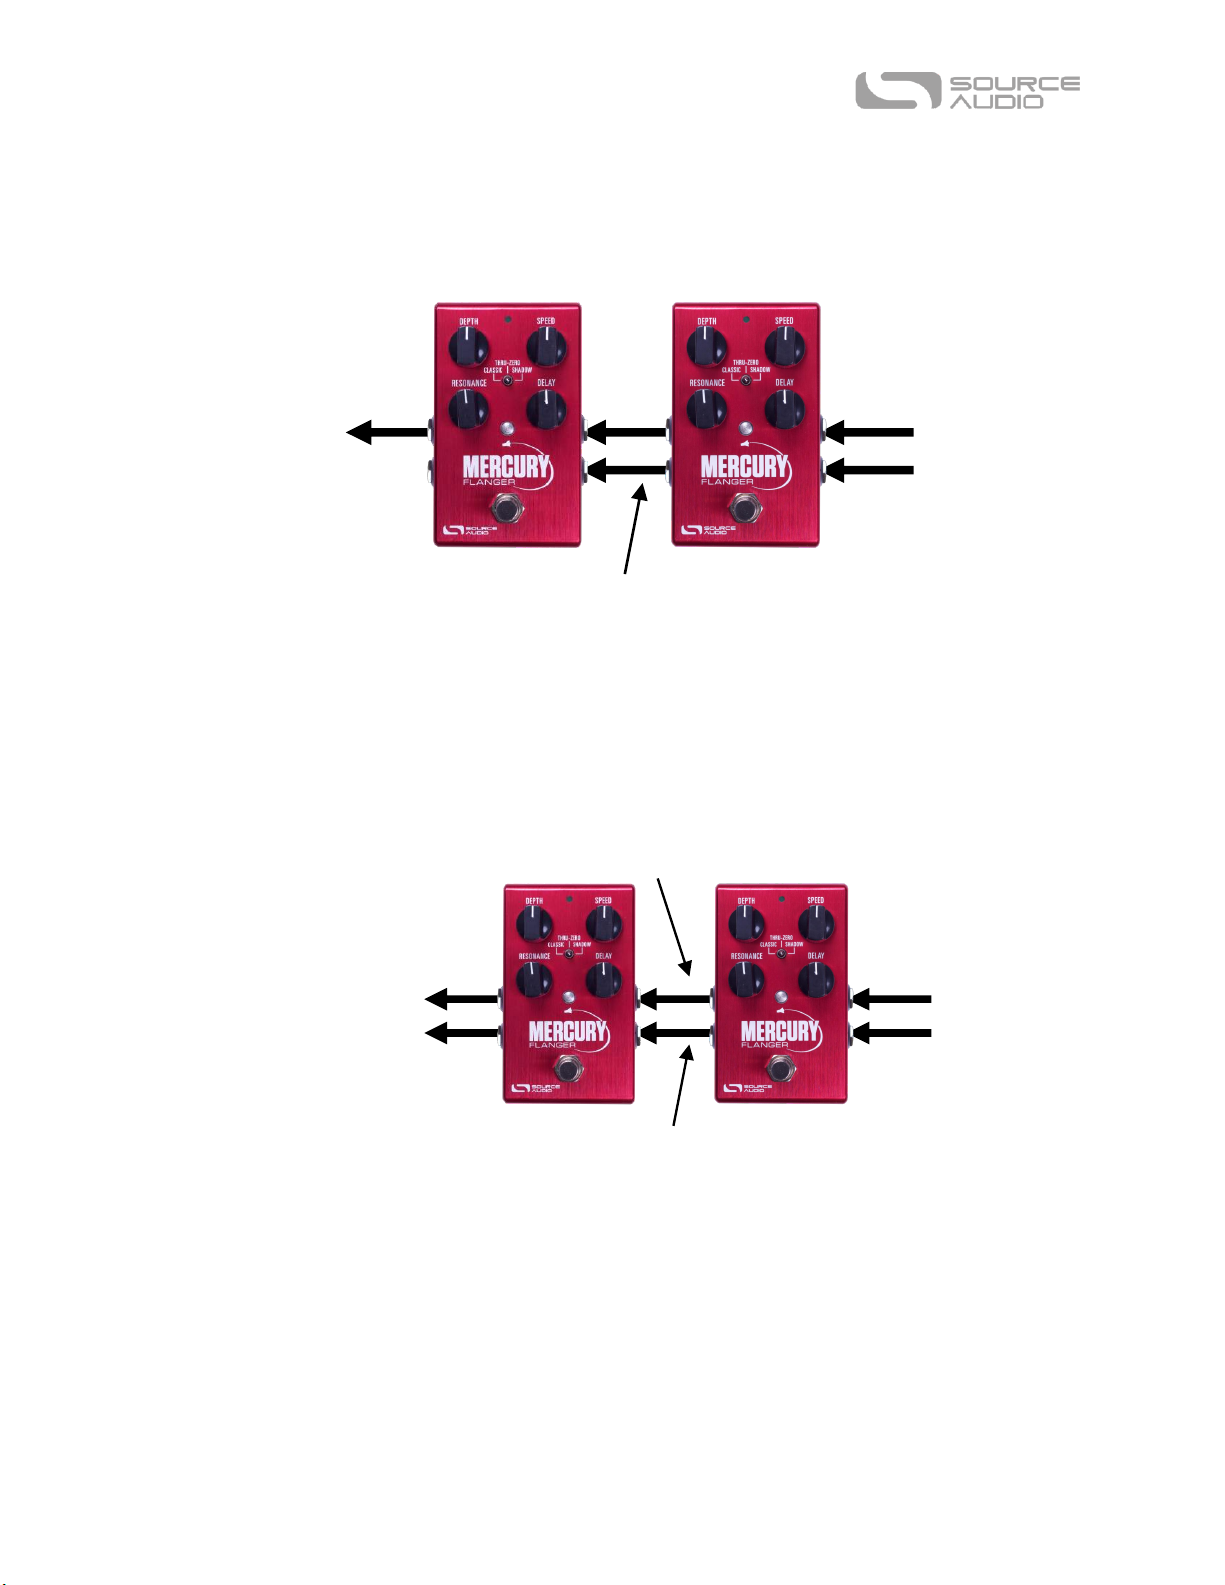
Guitar In
Neuro In
Out to Amp
Neuro
Daisy-Chain
Guitar In
Neuro In
Out to Amp (Left)
Audio (Right)
and
Neuro Daisy-Chain
Out to Amp (Right)
Audio (Left)
Example Neuro Daisy-Chain Connections
Mono Audio Path with Neuro Daisy-Chain
In the case of a purely mono audio signal path, the Neuro data can be input to the first effect directly
from the mobile device and then carried on to the second effect via TRS cable.
Mono-To-Stereo Audio Path with Neuro Daisy-Chain
In the case of a signal path that splits a mono input to stereo outputs, the Neuro data can be input to
the first effect directly from the mobile device and then carried on to the second effect via TRS cable.
The audio signal is carried on the same cable.
SA240 Mercury Flanger User’s Guide 7
Page 8
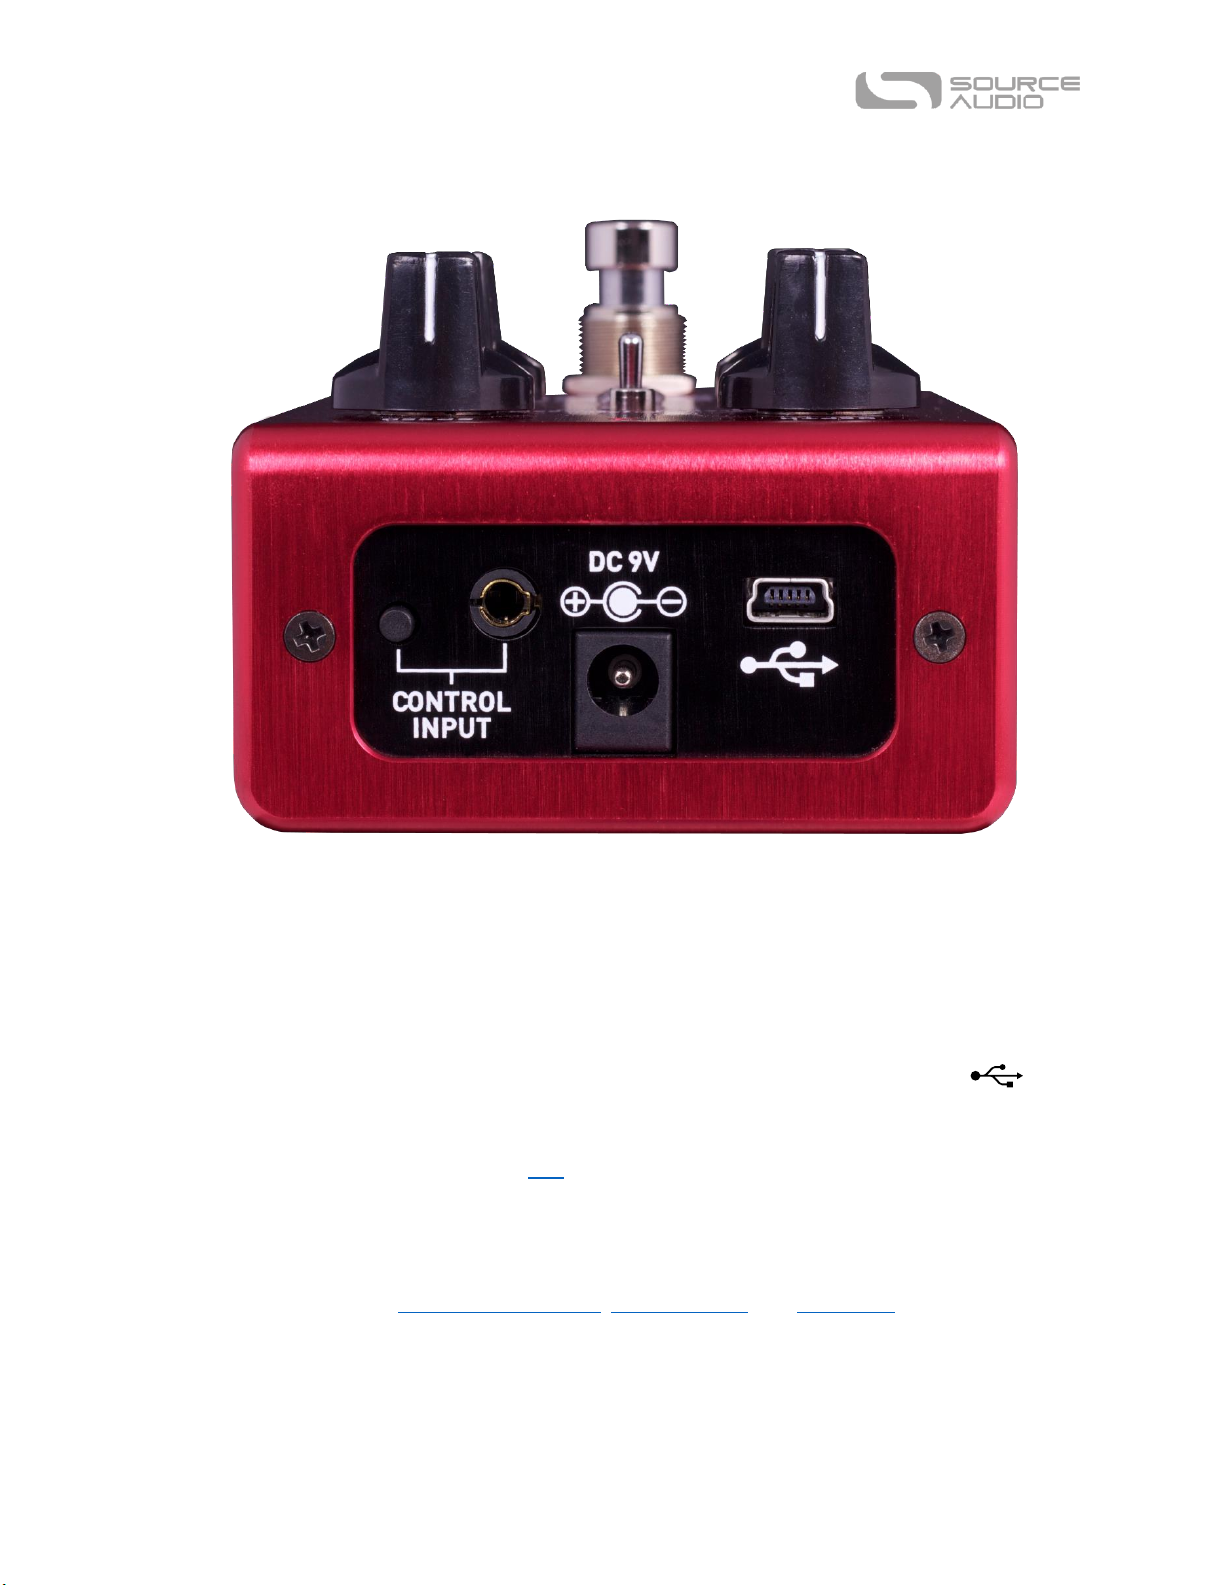
Power and Control Connections
DC 9V (Power)
Connect to the included 9 Volt DC power supply. The power supply must be regulated at 9 Volts
(direct current), able to source at least 180 mA (milliamps) of current, and the plug should have a tipnegative, sleeve-positive polarity (the center tip is ground and the sleeve is power).
USB
Connect to your computer (Mac or Windows) to the Mercury’s USB port (denoted by the icon)
using a standard mini USB cable. The Mercury is a class compliant USB device, meaning that it should
be recognized by Mac and Windows computers automatically. For more information about the
Mercury’s USB capabilities, refer to the USB section of the User’s Guide.
Control Input
The 3.5 mm Control Input port connects to external control devices such as the Dual Expression
Pedal, Reflex Universal Expression Pedal, Neuro Hub, and Hot Hand Motion Controller. For more
information, refer to the Expression Pedal Input, Hot Hand Input, and Neuro Hub sections of the
User’s Guide.
SA240 Mercury Flanger User’s Guide 8
Page 9
DELAY TIME
TIME
Basic Flanger Operation
Flanging is a delay effect that has been used in recording studios since the late 1960s. The original
effect relied on using two tape machines playing the same tape simultaneously, with their outputs
combined.
By touching the flange of one of the tape players, the corresponding reel will slow by a small amount,
introducing a delay into the signal. The flange is then released, and the tape returns to its original
speed. The flange for the other tape player is then touched, causing it to slow down slightly, and the
process is repeated. This creates a slowly modulating difference in timing between the two tape
players, typically only a few milliseconds at most. The resulting effect can be described as a “whoosh”
sound that is similar to the sound of a jet plane passing by in the sky. In fact, the comparison is very
accurate – a passing jet sounds the way it does because the sound waves arriving directly at your
ears and the reflected waves bouncing off the ground are delayed slightly from each other, and this
delay time changes as the jet changes its position relative to you.
In technical terms, a flanger sweeps uniformly spaced notch filters through the frequency spectrum
of an input signal.
Over the years, as technology has permitted, methods for producing flanger effects have become
possible without the need for big, bulky tape players. The Mercury packs all of the power of a
traditional tape flanger into a compact package, and brings some new technology to the table as well.
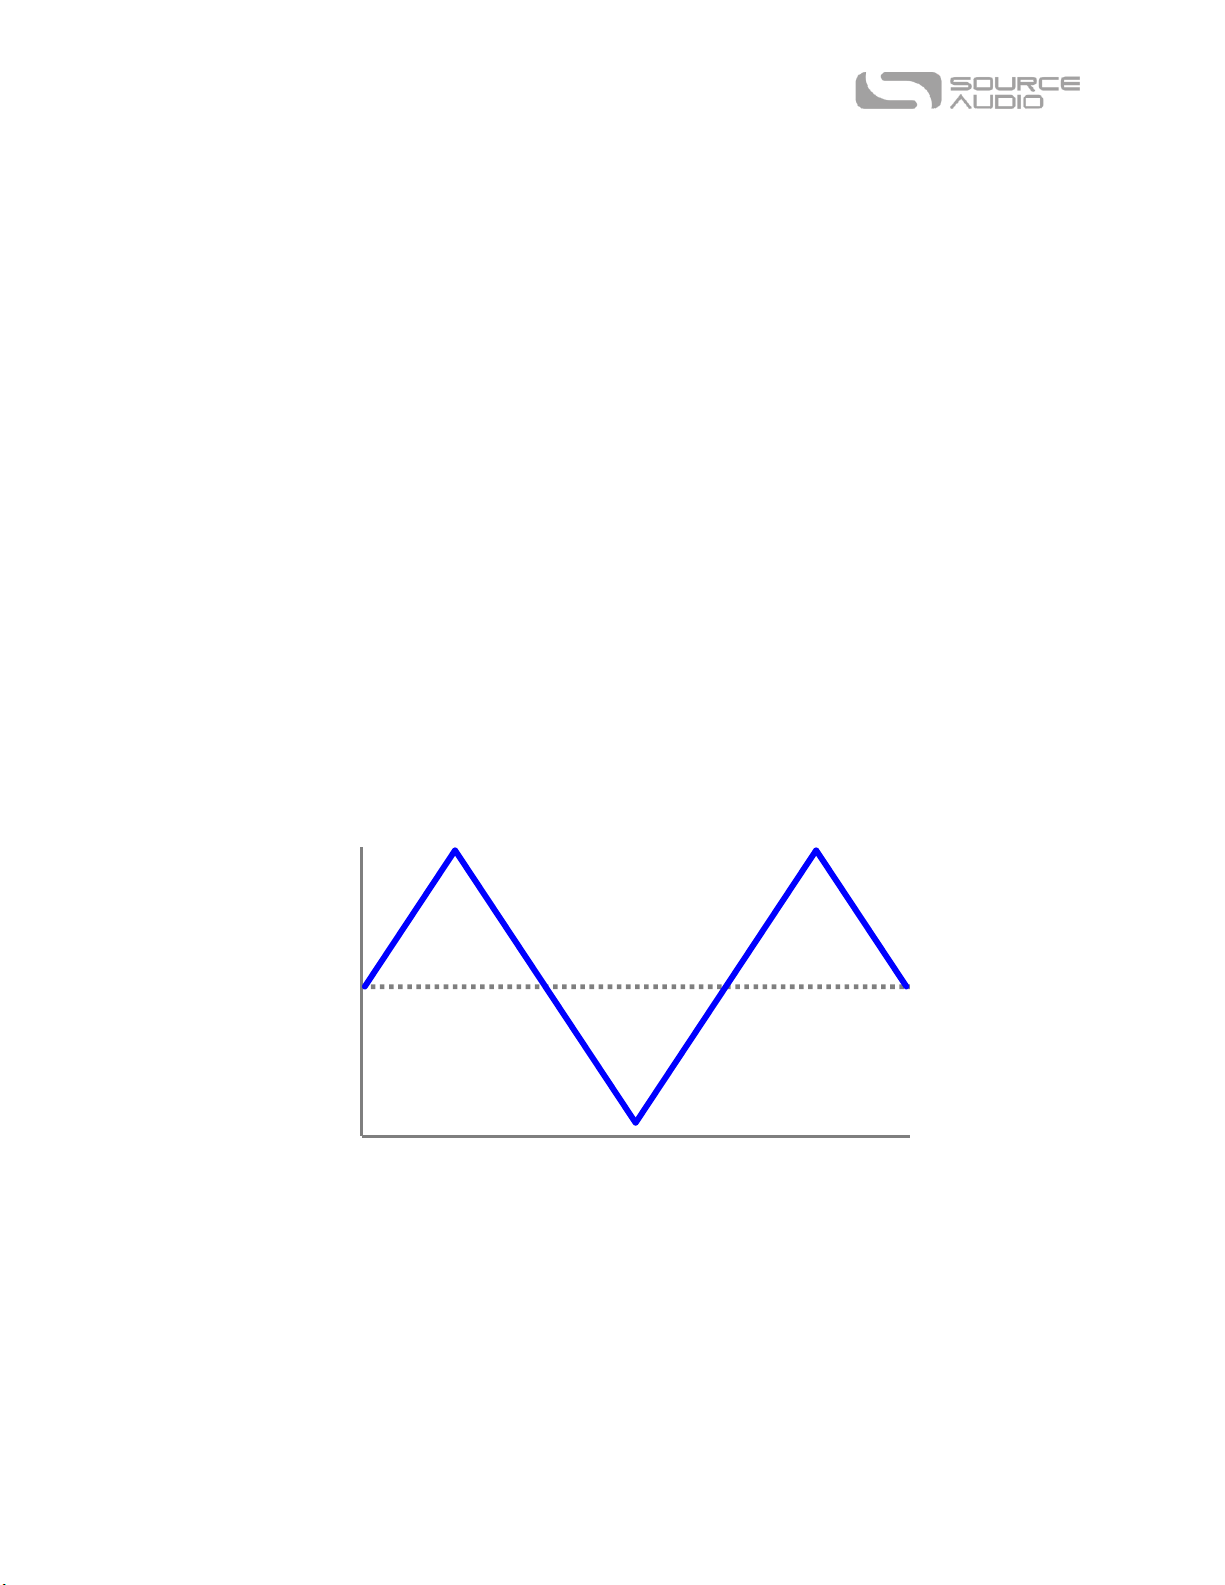
The amount of delay in the flanger effect needs to be changed over time to sweep the notches across
the spectrum. In order to do this, a low frequency oscillator (also known as an LFO) is used to control
the delay time, as well as several other parameters. This is illustrated by the following graph:
The blue line in the graph is known as the LFO. It changes the amount of delay over time.
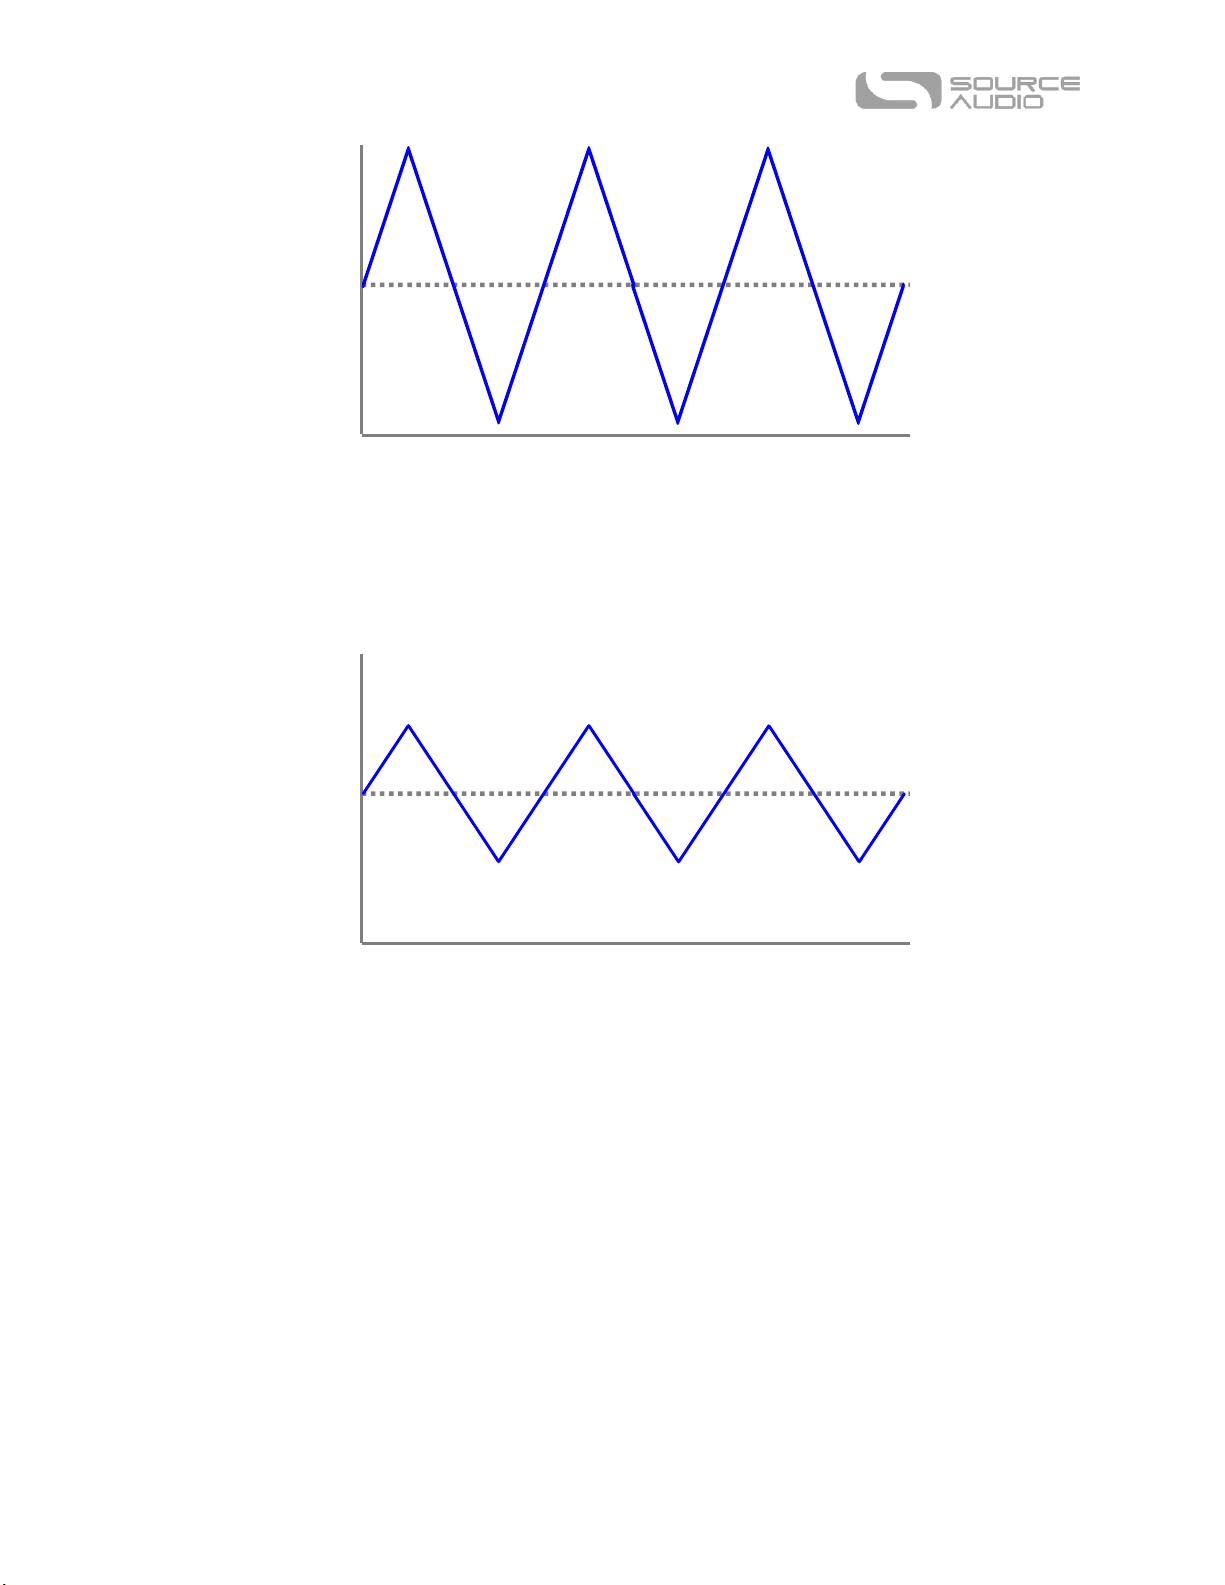
The frequency (a.k.a. “rate” or “speed”) of the LFO can be increased to get a more rapid change in
the delay time, as shown in this graph:
SA240 Mercury Flanger User’s Guide 9
Page 10
DELAY TIME
TIME
DELAY TIME
TIME
If the speed is set to a high enough rate, the effect will resemble the Doppler shift common in “Leslie”
rotating speaker effects.
The depth of the LFO can also be changed to make the flanger effect more or less prominent, as
shown in this graph:
SA240 Mercury Flanger User’s Guide 10
Page 11
OUTPUT GAIN
TIME
OUTPUT GAIN
TIME
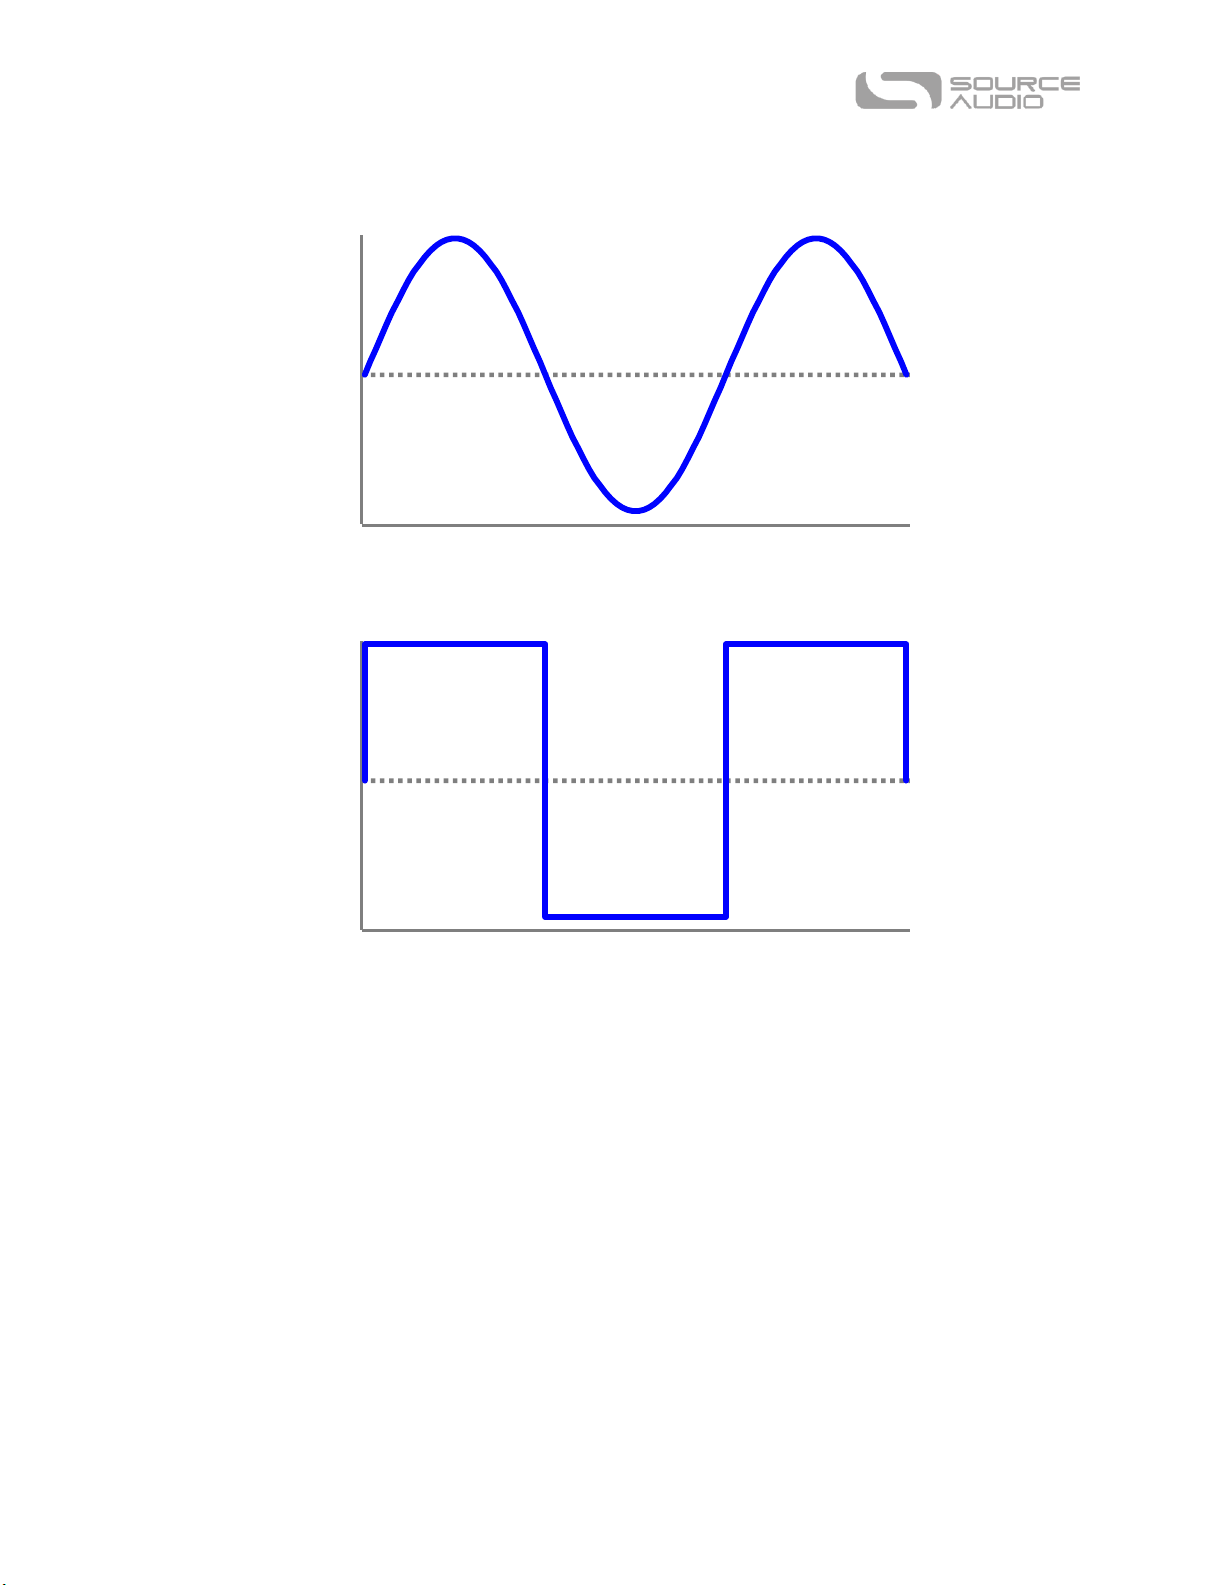
Finally, the shape of the LFO can be changed to give the flanger effect a different character.
Sine wave:
Square wave:
By default, the Mercury uses a sine wave for its LFO, but other wave shapes can be selected using the
Neuro App.
Effect Types
The Mercury includes three basic effect types, with more effects available in the Neuro mobile app.
Classic
The Classic Flanger effect combines the original dry input signal with a single modulating clone signal,
creating the simple sound of two voices in unison. It is very similar to the classic chorus effect except
that the delay time is relatively long in a chorus effect and relatively short in a flanger effect.
Thru-Zero
The Thru-Zero Flanger effect tries to recreate the original tape flange effect in which the two tape
machines would alternately be slowed down and sped up so that their signals would pass in front of
and behind each other. Obviously, this is a difficult feat to pull off during a live performance (without
SA240 Mercury Flanger User’s Guide 11
Page 12

the assistance of a time machine). The Mercury achieves this effect with two delay lines, one of
which is very short, but stationary, which functions as the dry signal - the other signal modulates. As
the modulating signal passes through and moves ahead of the stationary tap, we hear the classic
through zero twist (a split second of complete phase cancellation) as the frequency response inverts.
Shadow
The Shadow Flanger effect features two modulating signals. This setup generates a more animated
flanging effect, with the primarily flange closely shadowed by a subtle, more resonant reflection.
Additional Effect Types
Additional effect types can be loaded into the Mercury using the Neuro App on your mobile device
(iOS and Android).
The Mercury Flanger is compatible with Source Audio’s Phaser and Chorus effects, so it is possible to
load chorus, phaser, and flanger effects on the Mercury at the same time.
SA240 Mercury Flanger User’s Guide 12
Page 13

Depth Knob
Effect Switch
Resonance
Knob
Speed Knob
Delay Knob
Engage/Bypass
LED
Engage/Bypass
Footswitch
Control LED
Control Input Button
DELAY TIME
TIME
DELAY TIME
TIME
Low Depth High Depth
Controls
Knobs
Depth Knob
Controls the depth of the LFO, which determines how prominent the flanger effect is. When the
depth is set fully counter-clockwise, the flanger effect will be most subtle. When the depth is set fully
clockwise, the flanger effect will be most prominent.
SA240 Mercury Flanger User’s Guide 13
Page 14

DELAY TIME
TIME
DELAY TIME
TIME
Low Speed High Speed
Speed Knob
Controls the frequency of the LFO, which determines how fast the flanger effect is. The minimum
setting is 1 Hz (one LFO cycle per second) and the maximum setting is 10 Hz (ten LFO cycles per
second).
Resonance Knob
Sets the resonance of the peak/notch filters in the flanger effect. Subjectively, a higher resonance
will result in a more metallic, bell-like or chime-like sound, whereas a lower resonance will sound
more subdued.
Delay Knob
Sets the base delay time for the flanger effect. Lower delay times typically create a more pronounced
“whoosh” sound that is closer to the classic tape flanger sound, whereas longer delay times result in
a less pronounced flanger effect that can start to resemble a chorus effect.
Effect Switch
Selects between the three basic flanger effect types – Classic, Thru-Zero, or Shadow. These effects
are described in further detail in the Effect Types section.
LEDs
Engage / Bypass LED
The Engage / Bypass LED above the footswitch indicates if the flanger effect is active (lit green) or
bypassed (not lit).
When the user preset mode is enabled, the LED will turn red. See the Preset Storage and Recall
section for more information about user presets.
External Control LED
The small LED located between the Depth and Speed knobs is the External Control LED. When lit, it
indicates that external control mode (expression, hot hand, or MIDI) is active. For more information,
see the External Control section.
Footswitch
Enables or bypasses the flanger effect.
SA240 Mercury Flanger User’s Guide 14
Page 15

Control Input Button
This small button is used when configuring external control. See the External Control section for
more details.
Preset Storage and Recall
The Mercury features a user preset that can be easily saved and recalled using the footswitch. When
a preset is recalled, all of the parameters instantly jump to their saved value, regardless of the
position of the knobs. This allows you to save your favorite sound without having to worry about the
knob positions.
Saving Your First Preset
Bypass the Mercury by clicking the footswitch once. The engage/bypass LED should be dark at
this time.
Press and hold the footswitch for 5 seconds and wait for the engage/bypass LED to turn red.
You are now in preset mode.
Set up the effect how you want it to sound, including the effect switch, depth, speed,
resonance, and delay knobs. Once you have made a change, the engage/bypass LED will begin
to blink.
To save your preset, hold the footswitch until the LED blinks rapidly 3 times.
Now you can engage and bypass the Mercury using the footswitch, and each time you engage
the effect, your saved preset will be recalled.
Editing a Preset
Activate your preset (the engage/bypass LED will be solid red).
Change any parameter you wish (effect switch, depth, speed, shape, and level knobs). Once you
have made a change, the engage/bypass LED will begin to blink.
When you are ready to save, press and hold the footswitch for a few seconds. The LED will blink
three times to show that the preset was saved.
Exiting Preset Mode
When Preset Mode is active, bypass the effect using the engage/bypass footswitch. The
engage/bypass LED should be dark at this time.
Press and hold the footswitch for 5 seconds and wait for the engage/bypass LED to turn off. You
have now exited Preset Mode.
Quick Preset Switching
Using the Neuro App, it is possible to configure an option that speeds up the process of switching
to/from preset mode. In this mode, preset mode activates in 800 ms instead of 5 seconds.
Universal Bypass TM
Most effect pedals offer either true bypass or buffered bypass. The Mercury contains two separate
circuits for bypass mode, allowing you to choose the method you prefer. The true bypass path uses
signal relays, which are electromechanical switches. This provides an ultra-low resistance path from
the input jacks to the output jacks, which is effectively the same as a wire. The buffered bypass path
SA240 Mercury Flanger User’s Guide 15
Page 16

A
B
1
2
1
2
True Stereo
Mono In, Stereo Effect
A
B
1
2
1
Stereo In, Mono Effect
A1
1
2
Mono Effect, Dry Thru
A1
2
1
Mono Effect, Double Output
A1
2
1
uses extremely low noise buffers, which provide a very low output impedance and are effective for
driving long cables or long chains of effects following the Mercury’s audio output.
Out of the box, the Mercury operates in true bypass mode. In order to switch to buffered bypass
mode, edit the Mercury’s global settings using the Neuro App.
We recommend you choose between the active analog bypass (a.k.a. buffered bypass) and relaybased true bypass based on what is needed in your signal chain. Ideally, the first pedal in a signal
chain is a buffered input followed by true bypass in the rest of the signal chain.
Both bypass methods have pros and cons associated with them. Buffered bypass provides consistent
input impedance so that if the source is susceptible to variations in input impedance (similar to a
guitar pickup), there won’t be a noticeable change in tone. True bypass has the benefit of providing a
dedicated hardwired bypass signal path. The Mercury features small-signal relays for true bypass
switching that offer reduced pops and clicks compared to the traditional true bypass switching
method using a mechanical switch.
Stereo Routing
The Mercury works great as a mono flanger effect, but its stereo inputs and outputs also make it a
true stereo effect as well as a flexible signal router. It can act as a stereo splitter, merger, or true
stereo effect, and it can also be set up in a number of other unique signal routing modes.
By default (as of firmware version 1.06), the hardware will automatically set the routing mode by
detecting cables connected to the inputs and outputs. If, for example, cables are connected to INPUT
1 and OUTPUT 1 only, then the routing mode will be set to Mono In, Mono Out. If cables are
connected to INPUT 1, OUTPUT 1, and OUTPUT 2, then the routing mode will be set to Mono In, Stereo
Out. If cables are connected to INPUT 1, INPUT 2, OUTPUT 1, and OUTPUT 2, then the routing mode will
be set to stereo in, stereo out. Other routing options are available via MIDI or the Neuro App.
A few different routing options are displayed below. The right side of each diagram shows inputs 1
and 2, the left side shows outputs 1 and 2, and flanger effects A and B are in the center.
SA240 Mercury Flanger User’s Guide 16
Page 17

50 100 200 300 500 1.0k 2.0k 3.0k 5.0k 10.0k 20.0k
-6
0
+6
1
2
3
4
Parametric Equalizer
Parametric EQ
The Mercury features a built-in 4 band parametric EQ that can be configured using the Neuro.
Different EQ settings can be saved for each of the three effect types, as well as for the user preset.
The EQ consists of four independently configurable bands:
Band 1: Low Shelf
Band 2: Peaking (a.k.a. Bell / Band)
Band 3: Peaking (a.k.a. Bell / Band)
Band 4: High Shelf
Each band has configurable frequency, boost/cut, and Q (bandwidth).
A simple example of these four bands in action is shown in the graph below. In this example, Band 1
is a low shelf filter at 100 Hz with a 6 dB cut, Band 2 is a peaking filter at 620 Hz with a 3 dB cut and
relatively high Q, Band 3 is a peaking filter at 3 kHz with a 1.5 dB boost and relatively low Q, and Band
4 is a high shelf filter at 10 kHz with a 2.5 dB cut.
Using the Neuro App, Band 1 (Low Shelf) can optionally be configured as a high pass filter, and Band
2 (High Shelf) can optionally be configured as a low pass filter.
SA240 Mercury Flanger User’s Guide 17
Page 18

50 100 200 300 500 1.0k 2.0k 3.0k 5.0k 10.0k 20.0k
-6
0
+6
Configurable Low Cut Filter
Low Cut Filter
The Mercury also includes a low cut filter (a.k.a. high pass filter) with an adjustable frequency. This
filter is very useful for cutting out low frequencies that do not contribute to the sound of the
instrument, as well as subsonic frequencies which cannot be heard at all. Bass players often use low
cut filters set very low (around 10 Hz to 30 Hz) to reduce speaker excursion and improve the clarity of
the bass. Guitarists often use low cut filters set somewhat higher (around 80 Hz) in order to give the
bass player additional room in the low end of the mix.
The Parametric EQ and the Low Cut filter are configurable using the Neuro App. By default, the
parametric EQ is disabled (flat), and the Low Cut filter is set to 10 Hz.
External Control
The Control Input port opens up a wide array of external control options, allowing for direct control
over many of the Mercury’s built-in parameters. It can be used as an expression input or as a data
port for the Neuro Hub.
Expression Control
The Mercury’s effects parameters can be controlled directly by an expression pedal or Hot Hand
connected to the Control Input port.
Expression Pedal Input
The Dual Expression Pedal or Reflex Universal Expression Pedal, both from Source Audio, can be
directly connected to the Control Input using a 3.5 mm, TRRS cable.
SA240 Mercury Flanger User’s Guide 18
Page 19

Ground Power
Y Exp X Exp
Ground Power
Expression
In the case of an expression pedal with a TRRS plug, like Source Audio’s expression pedals, the tip
connection is power, the first ring is the X axis expression signal, the second ring is the Y axis
expression signal, and the sleeve connection is ground.
Third party expression pedals can be used as well, as long as they have a TRS (Tip Ring Sleeve) plug
with power on the tip, expression (the wiper of the potentiometer) on the ring, and ground on the
sleeve, as seen in the diagram below.
Expression pedals with TS (Tip Sleeve) plugs will not work correctly with the Mercury.
The resistance of the expression pedal does not matter. The Mercury will automatically adjust itself
to the range of the expression pedal when it is configured.
Most expression pedals use a ¼” plug, but the Mercury’s control port is 3.5 mm. To make the
connection, a simple TRS plug converter (1/4” to 3.5 mm) can be used.
Note that although the Control Port expects a 4-contact TRRS plug, most 3rd party expression pedals
use a 3-contact TRS plug. This is OK – using a simple 3-contact TRS plug converter, the expression
pedal’s output will be connected to the Mercury’s X expression input.
Configuring the Expression Pedal
It is easier than ever to set up expression control using the Mercury’s new calibration and mapping
method. When the expression pedal is connected to the Mercury, follow these simple steps to
calibrate it and map it to control different effect parameters.
1. Press the Control Input button to turn on Control Input mode. The Control LED should be lit
green.
2. Press and hold the Control Input button until the Control LED begins to blink slowly
(approximately one blink per second).
SA240 Mercury Flanger User’s Guide 19
Page 20

Ground Power
Y Exp X Exp
3. Move the expression pedal over the range of motion you would like to use to control the
Mercury. If you would like to use the expression pedal’s full range of motion, then make
sure to move the pedal all the way from its minimum position to its maximum position.
Note that you can create “dead zones,” if desired, by only moving the expression pedal over
a limited region of its full range of motion.
4. After setting the expression pedal range, click the Mercury’s footswitch once. The
calibration is now complete, and the Control LED will blink faster (about 2 blinks per second).
Now, it is time to map the expression pedal to the effect parameters.
5. Move the knob(s) you wish to control with the expression pedal to the minimum desired
position, then click the Mercury’s footswitch. The Control LED will now blink even faster
(about 4 blinks per second). Note that you may control one or more knobs with the
expression pedal, up to four total knobs.
6. Move the knob(s) you wish to control with the expression pedal to their maximum desired
position, then click the footswitch. The Control LED will now be lit solid green. Note that you
may control one or more knobs with the expression pedal, up to four total knobs.
7. After setting the minimum and maximum knob positions, the parameter mapping is
complete.
Note: The parameter range can be inverted by swapping the minimum and maximum position of the
knobs during calibration.
Hot Hand Input
The Hot Hand 3 Wireless Effects Controller can be connected directly to the Mercury’s Control Input
for motion control of the Mercury’s effects parameters. The Hot Hand has two axes of expression: X
and Y. These signal are carried on the two rings of the TRRS cable that comes from the Hot Hand
receiver.
Configuring the Hot Hand
When the Hot Hand is connected to the Mercury, follow these simple steps to calibrate it and map it
to control different effect parameters.
1. Press the Control Input button to turn on Control Input mode. The Control LED should be lit
green.
2. Press and hold the Control Input button until the Control LED begins to blink slowly
(approximately one blink per second).
3. Move the Hot Hand ring over the range of motion you would like to use to control the
Mercury. The easiest way to do this is to move the ring in the same way that you intend to
SA240 Mercury Flanger User’s Guide 20
Page 21

move it as you perform. The Mercury will intelligently select the X or Y axis of the Hot Hand
automatically, based on the motion of the ring.
4. After setting Hot Hand range of motion, click the Mercury’s footswitch once. The calibration
is now complete, and the Control LED will blink faster (about 2 blinks per second). Now, it is
time to map the Hot Hand to the effect parameters.
5. Move the knob(s) you wish to control with the Hot Hand to their minimum desired position,
then click the Mercury’s footswitch. The Control LED will now blink even faster (about 4
blinks per second). Note that you may control one or more knobs with the Hot Hand, up to
four total knobs.
6. Move the knob(s) you wish to control with the Hot Hand to their maximum desired position,
then click the Mercury’s footswitch. The Control LED will now be lit solid green. Note that
you may control one or more knobs with the Hot Hand, up to four total knobs.
7. After setting the minimum and maximum knob positions, the parameter mapping is
complete.
Note: The parameter range can be inverted by swapping the minimum and maximum position of the
knobs during calibration.
Reset Expression Control Mapping
To clear the expression control mapping (Expression or Hot Hand), first press the Control Input
button and turn off Control Input mode. The Control LED should be dark. Then, press and hold the
Control Input button until the Control LED blinks. This clears all Expression, Hot Hand, and MIDI
mapping.
Neuro App
The Neuro App is available as a free download for iOS and Android devices. Get the iOS version from
the App Store or the Android version from the Play Store. The Neuro App provides access to a
number of parameters that are not accessible on the control knobs, as well additional effect types. In
order to use the Neuro App, use the included 3.5 mm to ¼” TRS cable to make a connection between
the headphone jack on your mobile device and the Input 2 jack on the hardware. The Neuro App uses
special audio signals sent over your mobile device’s headphone jack to remotely control the pedal.
Make sure the headphone volume on your mobile device is set to maximum when using the Neuro
App for the most reliable device to pedal communication.
SA240 Mercury Flanger User’s Guide 21
Page 22

Main Menu
The main menu includes links to the three main sections of the app:
Sound Editor allows the user to edit the current effect or create a new sound from scratch.
These sounds can be burned into the internal preset memory (three sounds corresponding to the three
positions of the effect selector switch, and an additional preset accessible via the footswitch), saved to a
preset file in the app, emailed to friends, posted to the Neuro Community site, and more.
Browse Sounds opens a library of sounds to choose from, divided into User, Factory, Published,
and Web categories. This is a place to organize and share your favorite settings. You can also explore
sounds and settings made by other users.
Hardware Options allows access to the global options for the hardware. Global options are “set
and forget” type settings that are NOT saved per preset.
SA240 Mercury Flanger User’s Guide 22
Page 23

Sound Editor
The Sound Editor displays a wide range of parameters that can be changed to create different sounds.
The Sound Editor works kind of like a remote control for a TV – only the parameters you touch on the
screen will be modified on the hardware; all other parameters remain unchanged.
The links at the bottom of the screen allow access to the File Menu, the Burn command, and the
Send All command.
Send All
If you wish to update all of the parameters on the hardware so that they match what is shown on the
Sound Editor screen, tap the Send All button. This sends every parameter setting over to the
hardware and guarantees that its settings will exactly match what is shown in the app.
SA240 Mercury Flanger User’s Guide 23
Page 24

File Menu
The File Menu displays different options for the sound you’re currently editing in the Sound Editor.
Save
Saves the current settings from the Sound Editor. If you haven’t saved yet, this will perform a Save As.
Save As
Allows you to save the current settings to a new file. You can choose a file name and description.
Share
Allows you to send the current settings to a friend as a text message or email attachment.
Edit Description
Edits the description that accompanies the preset in the Browse Sounds menu.
Create New Sound
Closes the current sound being edited and opens a new sound for editing with default settings.
Browse Sounds
Returns to the Browse Sounds screen, which displays a list of user and web presets.
SA240 Mercury Flanger User’s Guide 24
Page 25

Burn
The Burn command takes the current sound that is running in the hardware and “burns” it to the
internal memory for later use. Burn works as a “what you hear is what you get” type of control; it will
save all of the settings in their current state, as you hear them, and put those into memory. This will
not necessarily match the exact settings shown in the Sound Editor for all parameters unless you
have performed a Send All command first.
After selecting the Burn command, a list of target locations in memory is displayed. There are a total
of 4 options: the 3 factory slots that correspond to the effect selector switch, and the 1 slot in preset
memory.
Replacing an Effect on the Effect Switch
It is possible to replace one of the main effect types with one of the extended effect types or with a
user-created sound. To do this, follow these steps:
Load the sound in the Sound Editor.
Hit the Send All button.
Hit the Burn button.
Select one of the Effect Selector Switch positions to overwrite it.
SA240 Mercury Flanger User’s Guide 25
Page 26

Browse Sounds
The Browse Sounds screen displays lists of presets that can be easily loaded into the hardware. Just
tap on a preset name to send it to the hardware, and you should be able to hear it instantly.
Presets are divided into four sections:
User: Presets that you have created and saved.
Factory: Presets that were created by Source Audio. New presets will automatically be added to
this list as Source Audio creates them.
Published: Presets that you have created and uploaded to the Neuro Community for other users.
Web: Presets created and shared by other users.
Open In Sound Editor
The Open In Sound Editor button allows you to take the currently selected preset and open it in the
Sound Editor for editing and customization.
Deleting or Publishing Presets
Swipe to the left on any preset name for additional options. Tap DELETE to remove the preset from
your device. Tap PUBLISH to publish the preset – this lets other Neuro users enjoy your creation!
SA240 Mercury Flanger User’s Guide 26
Page 27

Hardware Options
This screen shows some advanced options.
Effect Bypass Mode
Selects which bypass path will be used for presets that use hardware bypass mode.
True Bypass (Relay) uses two relays for true bypass switching.
Active Analog (Buffered) bypass uses a buffer to help prevent signal loss and clicking.
MIDI Channel (Device ID)
Selects which channel (1 to 16) the hardware will respond to on Hub and USB-MIDI inputs.
Preset Mode (Soundblox 2 Mode)
Enables the preset saved in memory to be loaded each time the effect is enabled using the
footswitch. This loads all settings from the preset and ignores the knob positions. When Preset Mode
is enabled, the main LED will be red instead of green. Preset Mode can also be enabled/disabled by
pressing and holding the footswitch for a few seconds.
Enable External Tap Tempo Switch
Allows the Source Audio tap tempo switch to be connected to the Control Input Port. This allows the
tempo for the LFO to be tapped in directly. The Control LED will blink in time with the tempo if this
mode is enabled.
Factory Reset
Resets the internal memory (including all presets and effect types) to the factory default settings.
SA240 Mercury Flanger User’s Guide 27
Page 28

Quick Preset Mode
Allows preset mode to be enabled/disabled in 0.8 seconds instead of 5 seconds (by holding down the
footswitch).
Neuro Hub (Formerly the Soundblox Hub)
The Source Audio Neuro Hub (sold separately), unites Source Audio pedals from the Soundblox 2 and
One Series families to create a single, stage-ready system. It features shared MIDI, passive expression
pedal input, Hot Hand connectivity, and USB, and can connect to up to five Source Audio pedals. The
Neuro Hub features a powerful scene saving functionality, which allows you to create up to 128
multi-pedal presets known as scenes, each recallable via MIDI program change messages. Connect
the Neuro Hub to your computer via USB for updates, saving and editing multi-pedal presets, and
more. To connect the Mercury to the Neuro hub, use a 3.5 mm TRRS cable and make a connection
between the Mercury’s Control Input jack and any of the Neuro Hub’s multi-function outputs. For
more information, refer to the Neuro Hub documentation on the Source Audio website.
MIDI
Using a USB connection or the Neuro Hub (sold separately), the Mercury can be controlled by generic
MIDI messages. Each of the Mercury’s parameters (even those that are not assigned to a control
knob) is directly accessible via MIDI continuous controller messages. MIDI messages can be sent
directly via USB or forwarded on to the Mercury via the Neuro Hub.
MIDI Learn
MIDI Continuous Control messages
In order to assign a MIDI continuous controller to one of the four knobs, the effect selector switch, or
the enable/bypass footswitch, follow these steps:
1. Press the Control Input button to turn on Control Input mode. The Control LED should be lit
green.
2. Press and hold the Control Input button until the Control LED begins to blink slowly
(approximately one blink per second).
3. Send a MIDI continuous control message to the Mercury via USB or the Neuro Hub. When a
valid continuous control message is received, the Control LED will begin to blink faster
(about two blinks per second).
4. To assign this continuous controller to a knob, turn the corresponding knob. To assign it to
the enable/bypass footswitch, press the footswitch. To assign it to the effect type switch,
toggle the effect type switch.
5. Once the MIDI continuous controller has been assigned, the Control LED will be solid green.
This shows that the mapping was successful. Note: The Control LED blinks any time a MIDI
message is received, so it’s possible that the Control LED will continue blinking even after
the MIDI mapping is complete – this shows that MIDI messages are still being sent to the
Mercury.
For parameters like depth and speed, which are normally controlled by knobs, the full range of
continuous control values from 0 to 127 will be mapped to the range of the knob.
SA240 Mercury Flanger User’s Guide 28
Page 29

For the enable/disable footswitch, continuous control values in the range from 0 to 63 will bypass
the Mercury and values in the range from 64 to 127 will enable the Mercury.
For the effect type switch, continuous control values map directly to each effect type. 0 = Classic, 2 =
Thru-Zero, and 1 = Shadow. Other values map to additional effect types that are available in the
Neuro App.
Any MIDI CC, from 0 to 127, can be mapped to a control on the Mercury.
Each CC number can only be mapped to control one parameter at any given time. If you attempt to
map a CC that has already been assigned to another parameter, the previous mapping will be
overridden.
Several CCs can potentially be mapped to the same parameter, although this is not very useful.
When using MIDI Learn, the Mercury listens for the first MIDI CC message sent to it and then ignores
any subsequent CC messages until the mapping is complete. This means that you must make sure
that only send the MIDI CC message to the Mercury that you intend to use for the MIDI Learn
mapping. Some DAWs send multiple MIDI messages when the play or pause buttons are pressed, and
this can lead to unintended MIDI mappings. Check your DAW documentation in order to learn about
messages that are sent at the beginning or end of playback.
Reset MIDI Mapping
To clear MIDI mapping, first press the Control Input button and turn off Control Input mode. The
Control LED should be dark. Then, press and hold the Control Input button until the Control LED
blinks. This clears all Expression, Hot Hand, and MIDI mapping.
MIDI Channel
By default, the Mercury responds to MIDI Channel 1. The Mercury ignores all MIDI messages sent to
it that are not on its assigned channel, with the exception of MIDI clock messages. To change the
Mercury’s MIDI channel, edit the Mercury’s global settings using the Neuro App.
MIDI Clock
The Mercury syncs to MIDI clock (also known as MIDI timing clock or MIDI beat clock). MIDI clock is
tempo-dependent and is used to ensure that multiple MIDI-enabled devices stay in synchronization.
A common use of MIDI clock with the Mercury is when recording along to a click track in a DAW
(Digital Audio Workstation) running on a computer. MIDI clock can be sent to the Mercury directly
over USB-MIDI or via the Control Port from the Neuro Hub.
The Mercury begins to sync its LFO to the MIDI Clock as soon as the first MIDI Clock message is
received. If the tempo changes, the rate of MIDI Clock messages will change as well, and the Mercury
will adjust to resynchronize itself accordingly. The Mercury doesn’t require any special configuration
to use MIDI Clock; just start sending it MIDI Clock messages and it will synchronize itself
automatically.
By default, the LFO starts synchronized with the first MIDI Clock message received. If you wish to
offset the LFO start time, for example by an eighth note, simply start playback in your DAW an eighth
note earlier or later than the beginning of the measure.
SA240 Mercury Flanger User’s Guide 29
Page 30

MIDI CC Speed
Value
LFO
Subdivisions
Musical
Equivalent
0 to 31
1
Quarter Note
32 to 63
2
Eighth Note
64 to 95
3
Triplet
96 to 127
4
Sixteenth Note
Quarter Notes
Eighth Notes Triplets
3
Sixteenth Notes
After the Mercury receives its first MIDI clock message, the function of the Speed Knob changes.
Instead of controlling the speed of the LFO directly, it controls the number of subdivisions are in the
LFO, using the MIDI clock as a basis for the tempo. One, two, three, or four subdivisions can be
created. Musically speaking, this means that the LFO can run at the rate of quarter notes, eighth
notes, triplets, or sixteenth notes. The following diagram shows the knob positions corresponding to
each subdivision, with the knob currently set to quarter notes:
The number of subdivisions can also be modified via MIDI using the Speed parameter. If you have
mapped a MIDI CC message to the Speed parameter, you can choose the number of subdivisions
using the following table:
USB
The Mercury does not sync to MIDI timecode containing SMPTE timestamps.
The Mercury’s USB port is plug-and-play ready for Windows and Mac computers. The Mercury uses
class-compliant drivers, so no special drivers are needed. Just power up the Mercury and connect it
to the computer using a USB cable. The computer should automatically recognize the Mercury, which
will be identified as “Source Audio One Series” in the operating system.
USB-MIDI
The Mercury will appear as a MIDI device in your computer’s operating system. As a result, the
Mercury can communicate with audio production software that utilizes MIDI, such as Pro Tools,
Ableton Live, Logic Pro, and more. MIDI messages can be sent directly to the Mercury using the USB
connection, which allows for full automation of the Mercury within host software such as a DAW. For
example, the depth or speed of the LFO can be automated by outputting MIDI continuous controller
messages from the host software to the Mercury via the USB connection.
SA240 Mercury Flanger User’s Guide 30
Page 31

Ground 3.3V Power
No Signal Switch
External Tap Tempo
The Mercury supports an external tap tempo switch that can be connected to its Control Input port.
Tap tempo can be used to directly input a tempo and override the speed knob. Tap tempo is disabled
by default; it can be enabled in the hardware options menu in the Neuro App.
When External Tap Tempo mode is active, the Speed knob acts to set the beat subdivisions, just as it
does when MIDI Clock is enabled.
Source Audio makes tap tempo switches that are compatible with the Mercury. These switches can
be purchased on the store on Source Audio’s website.
The plug going to the tap tempo footswitch must be TRRS and have the signal connections as shown
in the following figure.
The tap tempo switch needs to be more than a simple switch; a pull-up resistor and RC passive low
pass filter are required. The circuit for the footswitch is shown in the following figure:
Specifications
Dimensions
Length: 11.63 cm (4.58 inches)
Width: 7.00 cm (2.75 inches)
Height (not including knobs and footswitch): 3.71 cm (1.46 inches)
Height (including knobs and footswitch): 5.61 cm (2.21 inches)
SA240 Mercury Flanger User’s Guide 31
Page 32

Weight
280 grams (0.625 pounds)
Power
180 mA @ 9V DC (max 220 mA with Hot Hand Wireless Adapter)
Negative tip (positive sleeve) barrel power jack, 2.1 mm inner diameter, 5.5 mm outer diameter
Audio Performance
Maximum Input Level: +6 dBV = 8.2 dBu = 2 V RMS = 5.6 V p-p
Input Impedance: 1 MegaOhm (1 MΩ)
Output Impedance: 600 Ohm (600 Ω)
108 dB DNR Audio Path
24-bit Audio Conversion
56-bit Digital Data Path
Universal Bypass
TM
(relay-based true bypass and analog buffered bypass)
Troubleshooting
General
Restore factory settings: In order to revert the Mercury to its factory settings, clearing all user data,
presets, expression mappings and custom effect types, perform a factory reset using one of the
methods described below.
Factory Reset using the Neuro App
Using the Neuro App, go to Hardware Settings and choose the Factory Reset option.
Factory Reset using the Hardware (Firmware v1.06 and later)
Disconnect power. While holding down the footswitch, reconnect power. The main LED and control
LED will be lit for a few seconds. When the reset is complete both LEDs will turn off and you can
release the footswitch.
Noise
Power source: Ensure that the proper power supply is being used.
Near noise source: Move pedal away from power supplies and other equipment.
Other equipment: Remove other effects from signal chain; see if noise persists.
Bad cables: Swap out audio cables.
USB ground loop: When connected to a computer using a USB cable, noise can appear in the audio
signal. This usually results from ground loop noise due to the Mercury and computer running on
separate power supplies. In the case of laptops, the noise can often be mitigated by disconnecting
the computer’s power supply and running it on a battery. External display monitors are often the
primary source of noise, and powering down monitors can also resolve noise issues.
Hot Hand Doesn’t Work
Low power: Ensure that the proper power supply is being used.
SA240 Mercury Flanger User’s Guide 32
Page 33

Not calibrated properly: Calibrate the Hot Hand. See the Hot Hand Input section for more details.
Not connected properly: Check Hot Hand connections.
Unit Appears Dead / No LEDs Lit
Wrong power supply: Use correct power supply. See the DC 9V (Power) section for more details.
Corroded power cable plug: Check power plug for corrosion on sleeve. Swap out power supply if
necessary.
Frequently Asked Questions
How do I change the routing mode for my pedal without changing anything about the sounds?
Connect the Neuro App cable and go to the Sound Editor in the app.
Flip the toggle switch on the hardware to the left position.
In the app, go to the I/O Routing Option (bottom of the list), select it, and the desired routing
mode. Then tap Done. You should see the Control LED blink when the message is received.
Tap the Burn button. This opens a menu for burning locations.
Select "Toggle Switch Left". This burns any changes you made into memory. Since you only
changed the I/O Routing mode, that will be the only thing that is changed. The rest of the
parameters for that sound will remain unchanged.
Repeat these steps for the middle switch position and the right switch position.
What kind of instruments can I connect to the Mercury’s inputs?
The Mercury’s audio inputs are high impedance (~ 1 MΩ) and they can accept high impedance signal
sources like guitars/basses with passive pickups, as well as low impedance sources like line-level
audio circuits, guitars/basses with active pickups, electronic keyboards, or mixer outputs. The input
circuit can handle signals ranging up to 5.6 Volts, peak-to-peak.
Can I power the Mercury directly over USB, without using the 9 Volt supply?
No. USB provides 5 Volts, but the Mercury needs 9 Volts, so the Mercury cannot be powered directly
from USB. Make sure that you have plugged in the included 9V DC power supply when connecting to
the Mercury’s USB port.
When connecting the Mercury to a recording interface or mixer, should I used a Lo-Z (microphone) or Hi-Z (line / instrument) input?
The Mercury’s output will be low impedance when the effect is active or in buffered bypass mode,
but it will be high impedance when using true bypass mode and a guitar with passive pickups.
Therefore, it is recommended that you use a high impedance (Hi-Z) input on your recording interface
or mixer to avoid signal loss.
Why doesn’t the Mercury respond to MIDI messages being sent to it?
By default, the Mercury should respond to MIDI continuous controller messages on channel 1 (in
technical terms, this means that the lower 4 bits in the command byte of MIDI messages should be
0000 in binary or 0 in hexadecimal). The Mercury’s MIDI channel can be configured using the Neuro
SA240 Mercury Flanger User’s Guide 33
Page 34

MIDI Channel
(Decimal)
1 2 3 4 5 6 7 8 9
10
11
12
13
14
15
16
CC Command Byte
(Hex)
B0
B1
B2
B3
B4
B5
B6
B7
B8
B9
BA
BB
BC
BD
BE
BF
App. Channel numbers in MIDI use zero-based counting, so MIDI channel 1 is described as 0 in
hexadecimal, MIDI channel 2 is described as 1 in hexadecimal, and so on, concluding with MIDI
channel 16, which is described as F in hexadecimal. A continuous controller message starts with a
hexadecimal B and is followed by the channel number (0 through F). So, the command byte from
your MIDI controller should be formatted as shown in the following table:
Each continuous controller command byte is followed by two bytes, the CC number and the value. So,
each CC message consists of a total of three bytes. If the Mercury is not responding to MIDI, make
sure that your MIDI controller is properly configured and sending messages in the format described
above.
SA240 Mercury Flanger User’s Guide 34
Page 35

CC Value
Effect Type
0
Classic Flange/Chorus
1
Shadow
2
Thru-Zero
3
Resonator 1
4
Resonator 2
5
Dual Chorus
6
Quad Chorus
7
Vibe
8
4 Stage Phaser
9
6 Stage Phaser
10
8 Stage Phaser
11
12 Stage Phaser
How do I enable extended effect types via MIDI?
Refer to the MIDI Learn section to map a MIDI continuous controller to the Effect Type switch. Then,
send a CC message with one of the following values to enable a certain effect type:
Additional effect types may become available in future updates.
Can I use the Mercury in my amp’s effects loop?
The audio inputs can handle up to 8.2 dBu or 5.6 Volts peak-to-peak, which allows them to work in
most amp effects loops. In order to avoid clipping, be sure to check your amp’s documentation and
verify that the maximum send level is less than 5.6 Volts peak-to-peak.
Rubber Feet
The Mercury comes standard with a flat aluminum bottom, making it easy to apply Velcro and mount
to a pedalboard. Additionally, adhesive rubber feet are included in the Mercury’s box. Applying the
rubber feet to the Mercury can help prevent it from sliding on flat surfaces such as a hardwood floor.
Waste Disposal Notes
If possible, dispose of the device at an electronics recycling center. Do not dispose of the device with
the household waste.
For full compliance with EN 61000-4-6 standard, input cable must be less than 3 meters in length.
SA240 Mercury Flanger User’s Guide 35
Page 36

Warranty
Limited Transferrable Warranty
Source Audio, LLC (hereinafter “Source Audio”) warrants that your new Source Audio One Series
Mercury Flanger, when purchased at an authorized Source Audio dealer in the United States of
America (“USA”), shall be free from defects in materials and workmanship under normal use for a
period of two (2) years from the date of purchase by the original purchaser. Please contact your
dealer for information on warranty and service outside of the USA.
Under this Limited Warranty, Source Audio’s sole obligation and the purchaser’s sole remedy shall be
repair, replacement, or upgrade, at Source Audio’s sole discretion, of any product that, if properly
used and maintained, proves to be defective upon inspection by Source Audio. Source Audio reserves
the right to update any unit returned for repair and to change or improve the design of the product
at any time without notice. Source Audio reserves the right to use reconditioned parts and
assemblies as warranty replacements for authorized repairs. Any product repaired, replaced, or
upgraded pursuant to this Limited Warranty will be warranted for the remainder of the original
warranty period.
This Limited Warranty is extended to the original retail purchaser. This Limited Warranty can be
transferred to anyone who may subsequently purchase this product provided that such transfer is
made within the applicable warranty period and Source Audio is provided with all of the following
information: (i) all warranty registration information (as set forth on the registration card) for the
new owner, (ii) proof of the transfer, within thirty (30) days of the transfer, and (iii) a photocopy of
the original sales receipt. Warranty coverage shall be determined by Source Audio in its sole
discretion. This is your sole warranty. Source Audio does not authorize and third party, including any
dealer or sales representatives, to assume any liability on behalf of Source Audio or to make any
warranty on behalf of Source Audio.
Warranty Information
Source Audio may, at its option, require proof of the original purchase date in the form of a dated
copy of the original authorized dealer’s invoice or sales receipt. Service and repairs of Source Audio
products are to be performed only at the Source Audio factory or a Source Audio authorized service
center. Prior to service or repair under this Limited Warranty, the purchaser must request from
Source Audio a return authorization, which is available at:
Source Audio LLC
120 Cummings Park, Woburn, MA 01801
(781) 932-8080 or at www.sourceaudio.net
Unauthorized service, repair, or modification will void this Limited Warranty.
SA240 Mercury Flanger User’s Guide 36
Page 37

Disclaimer and Limitation of Warranty
Do not open the effects pedal under any circumstance. This will void the warranty.
The foregoing limited warranty is the only warranty given by Source Audio and is in lieu of all other
warranties. All implied warranties, including warranties of merchantability and fitness for any
particular purpose, exceeding the specific provisions of this limited warranty, are hereby disclaimed
and excluded from this limited warranty. Upon expiration of the applicable express warranty period,
Source Audio shall have no further warranty obligation of any kind, express or implied. Source Audio
shall in no event be liable for any special, incidental, or consequential damages suffered by the
purchaser or any third party, including without limitation, damages for loss of profits or business or
damages resulting from use or performance of the product, whether in contract or in tort. Source
Audio shall not be liable for any expenses, claims, or suits arising out of or relating to any of the
foregoing. Some states do not allow the exclusion or limitation of implied warranties so some of the
above limitations and exclusions may not apply to you. This Limited Warranty gives you specific legal
rights, and you may also have other rights, which vary, from state to state. This Limited Warranty
only applies to products sold and used in the USA. Source Audio shall not be liable for damages or
loss resulting from the negligent or intentional acts of the shipper or its contracted affiliates. You
should contact the shipper for proper claims procedures in the event of damage or loss resulting
from shipment.
Version History
July 9, 2015: Initial Release
July 22, 2015: Updated Saving Your First Preset section
August 24, 2015: Added External Tap Tempo section
January 4, 2016: Added Neuro App section
February 4, 2016: Added new information for firmware version 1.06 (Hardware factory reset,
automatic stereo routing, quick preset mode). Added amp effects loop to FAQ.
February 19, 2016: Added Android support.
©Source Audio LLC | 120 Cummings Park, Woburn, MA 01801 | www.sourceaudio.net
SA240 Mercury Flanger User’s Guide 37
 Loading...