

Page 1
SA116
User’s Guide
CHARGE.
CONNECT.
CONTROL.
CUSTOMIZE.
Welcome
Thank you for purchasing a Hot Hand USB Wireless MIDI Controller. Hot Hand USB is the
latest innovation in music motion control from Source Audio. Hot Hand USB consists of a
small wireless 3-axis motion and tilt-sensing Ring and a USB Receiver. The Receiver
installs without drivers and appears as a MIDI device to your Windows or Mac PC. The
MIDI output from the Receiver can be assigned to control an infinite number of
parameters in your DAW (digital audio workstation) or live performance audio software
to help you bring dynamic motion control to your music.
Demo Projects
As a starting point, we have created sample projects and songs for a variety of software
packages using Hot Hand to control various parameters. The project files can be
downloaded from the Hot Hand USB product page:
http://www.sourceaudio.net/products/hothand/hothand_usb.php
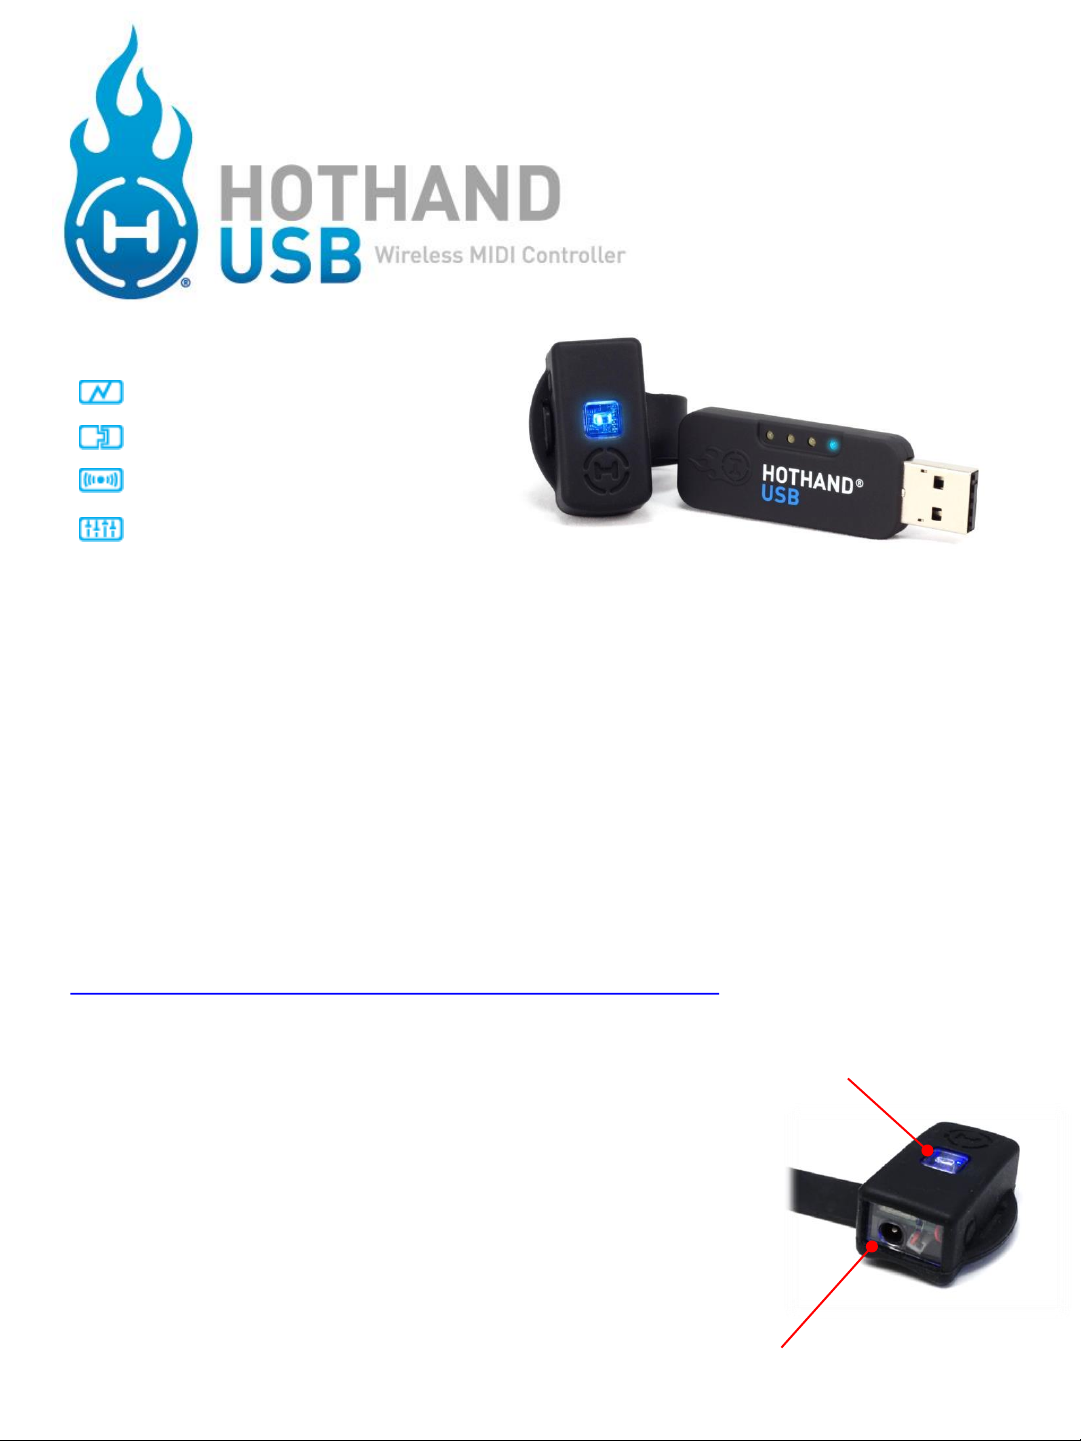
Getting Started
Charging
To get started using Hot Hand, first you need to charge your
Hot Hand Ring. The Ring can be charged by connecting the
included AC adapter power supply to the charging jack on
the back of the Ring. The Ring features a fast-charging and
high performance Li-ion battery. When the charger is
connected, the blue LED on the Ring will blink quickly.
When the charge is complete, the LED will turn off.
Charging time is around 1.5 hours. On a full charge, the
Ring can be used for around 6 hours.
Charging Port
Status LED
Page 2
Connections and Wireless Linking
Connect the Hot Hand USB Receiver to any open USB port on your Windows or Mac PC. Drivers
will install automatically. The Hot Hand USB uses built-in drivers on your computer for MIDI
and requires no custom driver installation. Once the Receiver is installed on your computer, the
blue status LED on the Receiver will begin to blink slowly. A slow blink means that the Receiver
is ready to pair with a Ring.
Holding the Ring close to the Receiver, press the small ON/OFF button on the side of the Ring to
start the wireless link. Both LEDs on the Ring and the Receiver should turn solid blue indicating
that the link is complete. The Ring is now sending motion control data to the Receiver and is
ready for use. Note that the Ring should be turned off when not in use to conserve battery life.
Up to four Hot Hand Ring/Receiver pairs can be used in one area at the same time. This
includes Hot Hand 3 devices as well (see sourceaudio.net for more information on the Hot
Hand 3). The Hot Hand USB Receiver has four LEDs to indicate which of the four channels is
currently being used.
If multiple devices are in use, take care to link rings and receivers one at a time, holding the
rings close the desired receiver when making the initial connection. Once a Ring/Receiver pair
has been established, you can turn rings on and off as needed and the link will remember the
correct channels and Ring/Receiver pairs. The Ring and Receiver will stay paired until the
Receiver is unplugged or a “Radio Reset” is performed from the Hot Hand USB Editor software.
Status LED
ON/OFF button
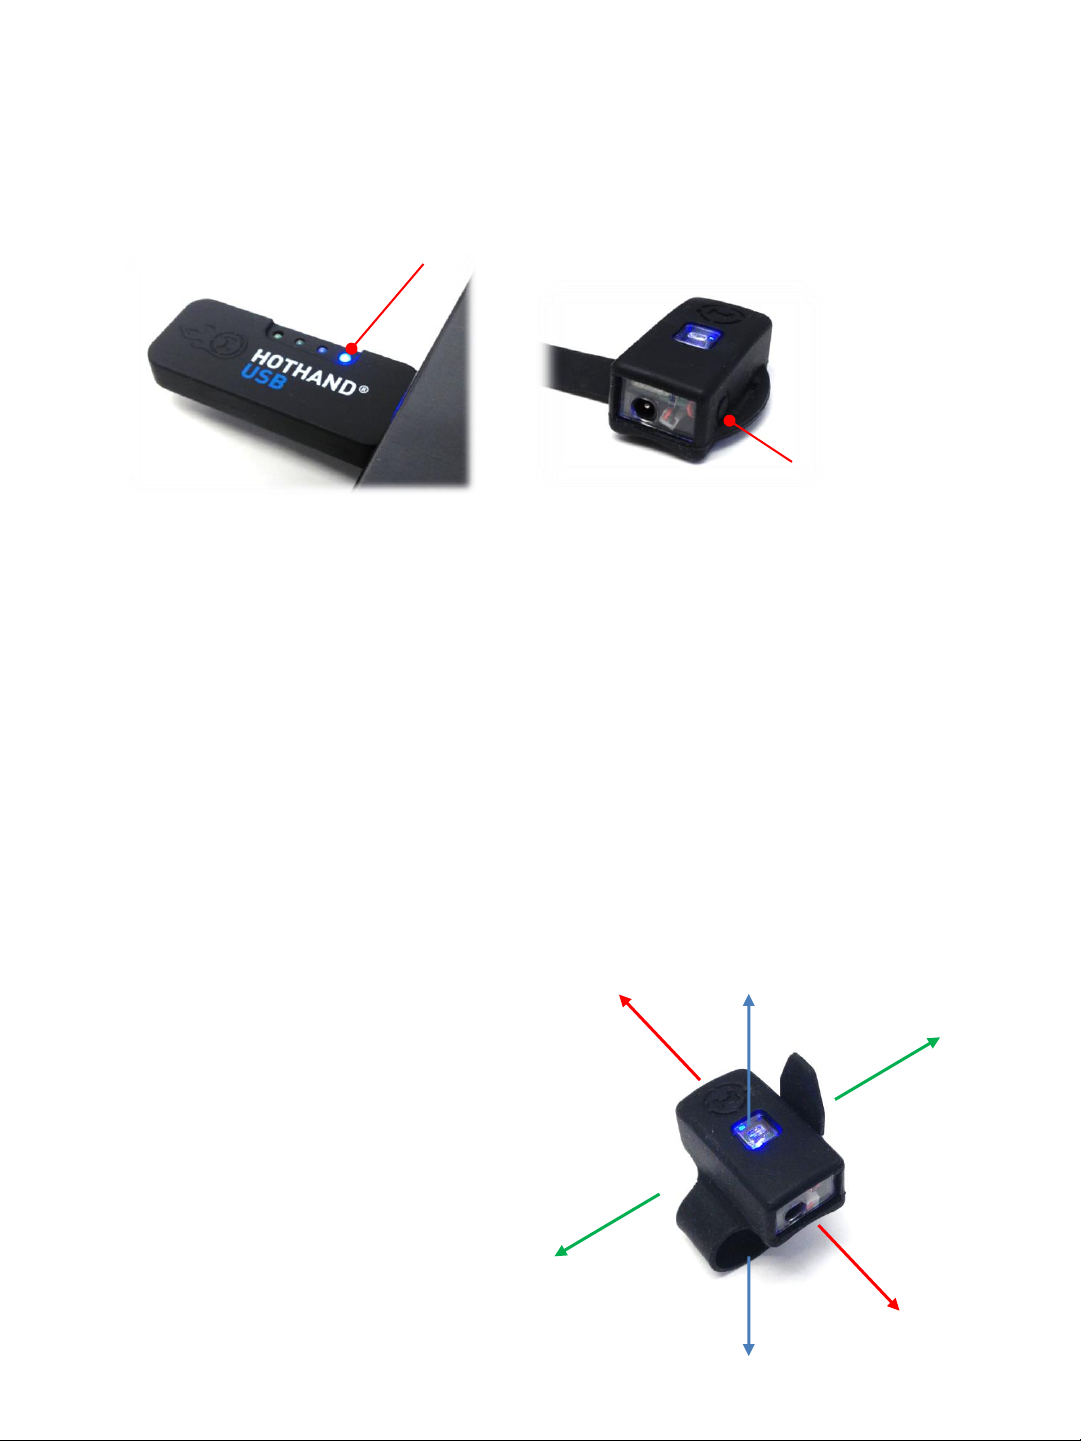
Controlling
The primary sensor on the Hot Hand USB Ring is a 3axis accelerometer. Accelerometers can detect both
motion and “tilt” (the position of the Ring relative to
the ground). Moving the Ring quickly or changing its
position slowly will create control signals that can be
used to control a variety of audio effects. For
example, bass wobbles, filter sweeps, delay times,
modulation effects, and beat repeats can all be
control dynamically with the motion of your hand.
The 3 axes of the motion sensor are arranged as
shown in the diagram. Any motion along an axis or
any change in tilt will create a changing control
signal that can be used to create a MIDI output.
X-axis
Y-axis
Z-axis
Page 3
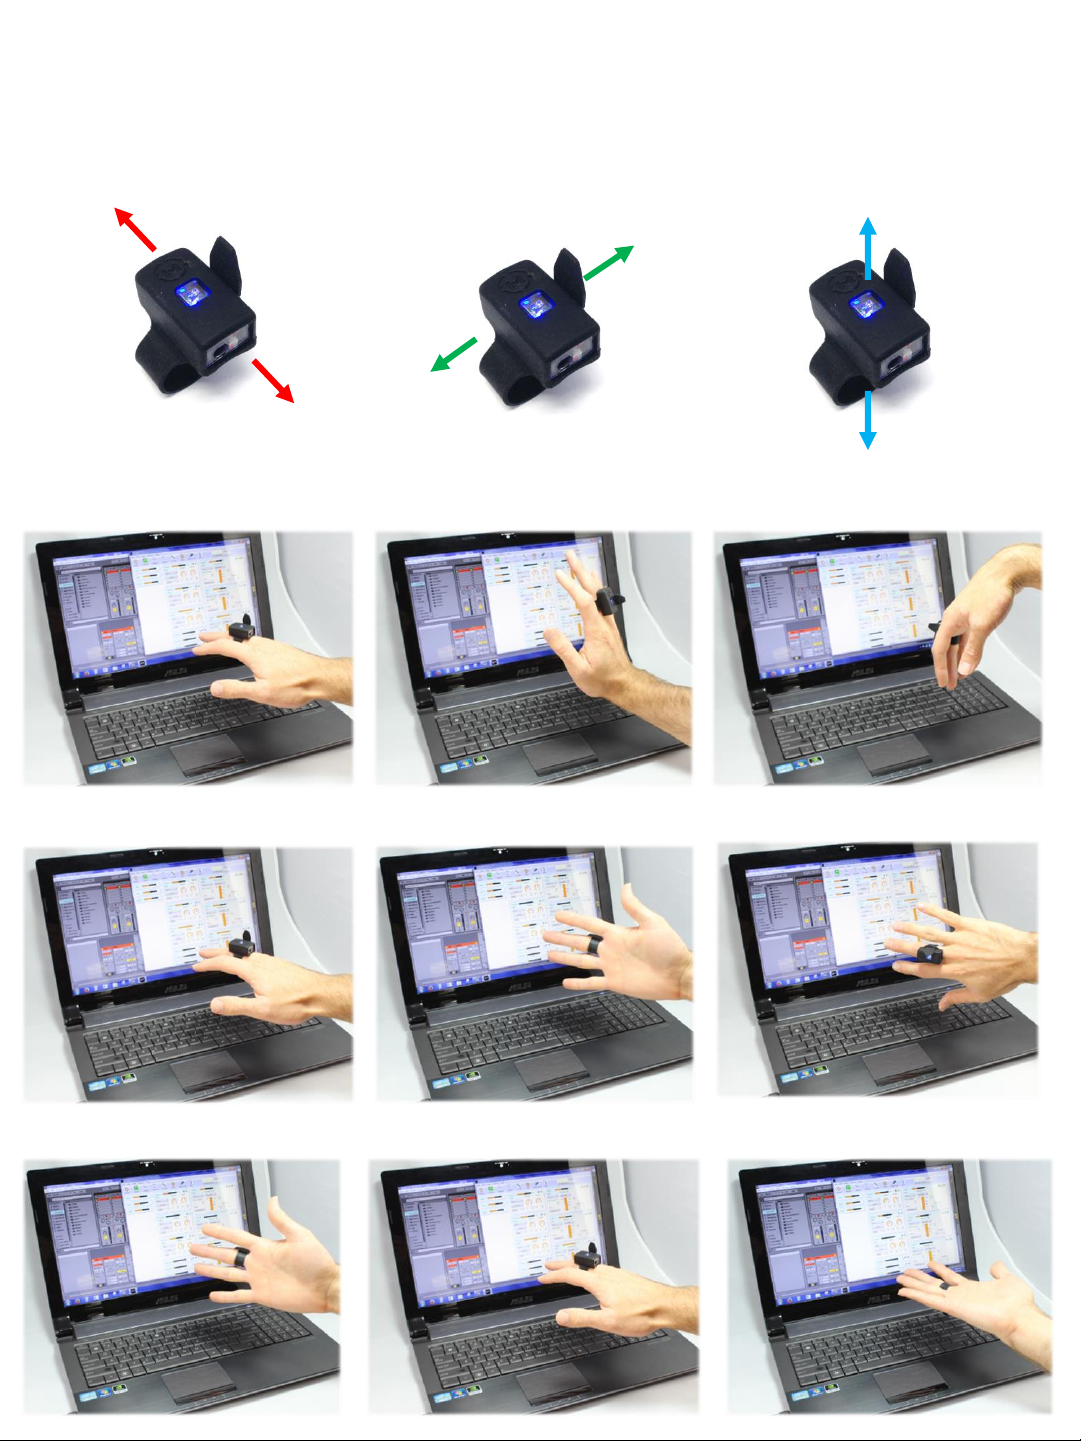
To understand the basics of Hot Hand motion control, it’s helpful to know how to move or position
the Ring to get the most reliable signal output. The following photos illustrate the direction of
motion and hand positions for each sensor axis of the Hot Hand Ring:
Motion map:
X motion
Tilt Positions:
X neutral
Y motion
X maximum
Z motion
X minimum
Y neutral
Z neutral
Y maximum
Z maximum
Y minimum
Z minimum
Page 4

Controlling continued…
The motion data from the Ring is sent to the Receiver where it is processed and converted into MIDI
signals. MIDI is a very common means of sending control information from audio hardware to audio
software or vice versa. MIDI is even used for a number of non-music purposes since it is very simple
to use and implement. Most Digital Audio Workstation (DAW) software, soft synths, or virtual
instruments will allow users to assign MIDI controls to a variety of parameters. Some examples of
popular software packges are Ableton Live, Native Instruments Traktor, Propellorheads Reason,
Apple Logic and Mainstage.
By default and out of the box, the Hot Hand USB will output three different MIDI messages using the
three-axis data from the Ring. These are:
• X-axis - MIDI Continuous Controller (CC) 7
• Y-axis - MIDI Continuous Controller (CC) 8
• Z-axis - MIDI Continuous Controller (CC) 9
Continuous Controller (CC) messages are commonly used to control knob based parameters in audio
software and hardware. Other MIDI message types are used for Note ON/OFF, Pitch Bend, and
Aftertouch. It’s important to note that the response of the Ring, MIDI Message types, controller
numbers, and channels can all be easily changed using the Hot Hand USB Editor software.
Customizing with the Editor
Application
Once you have a basic
understanding of Hot Hand,
you’ll likely need to tweak the
signals and MIDI messages to
suit your needs. This can be
done with the Hot Hand USB
Editor, a software tool that
can be downloaded from the
Hot Hand USB product page.
The application is available
for both Windows and Mac.
Simply download and run the
installer packages to install
the software on your
computer.
Hot Hand USB Editor screenshot
Page 5
When you first start the software editor it will connect automatically to the USB Receiver and
load a 3-axis basic preset that matches the default configuration which was preloaded on the
USB Receiver. You can use the application to edit, save, load, and burn presets to the USB
Receiver. Once a preset is burned, it will be automatically loaded when the USB Receiver is
connected to the computer without having to open the software editor.
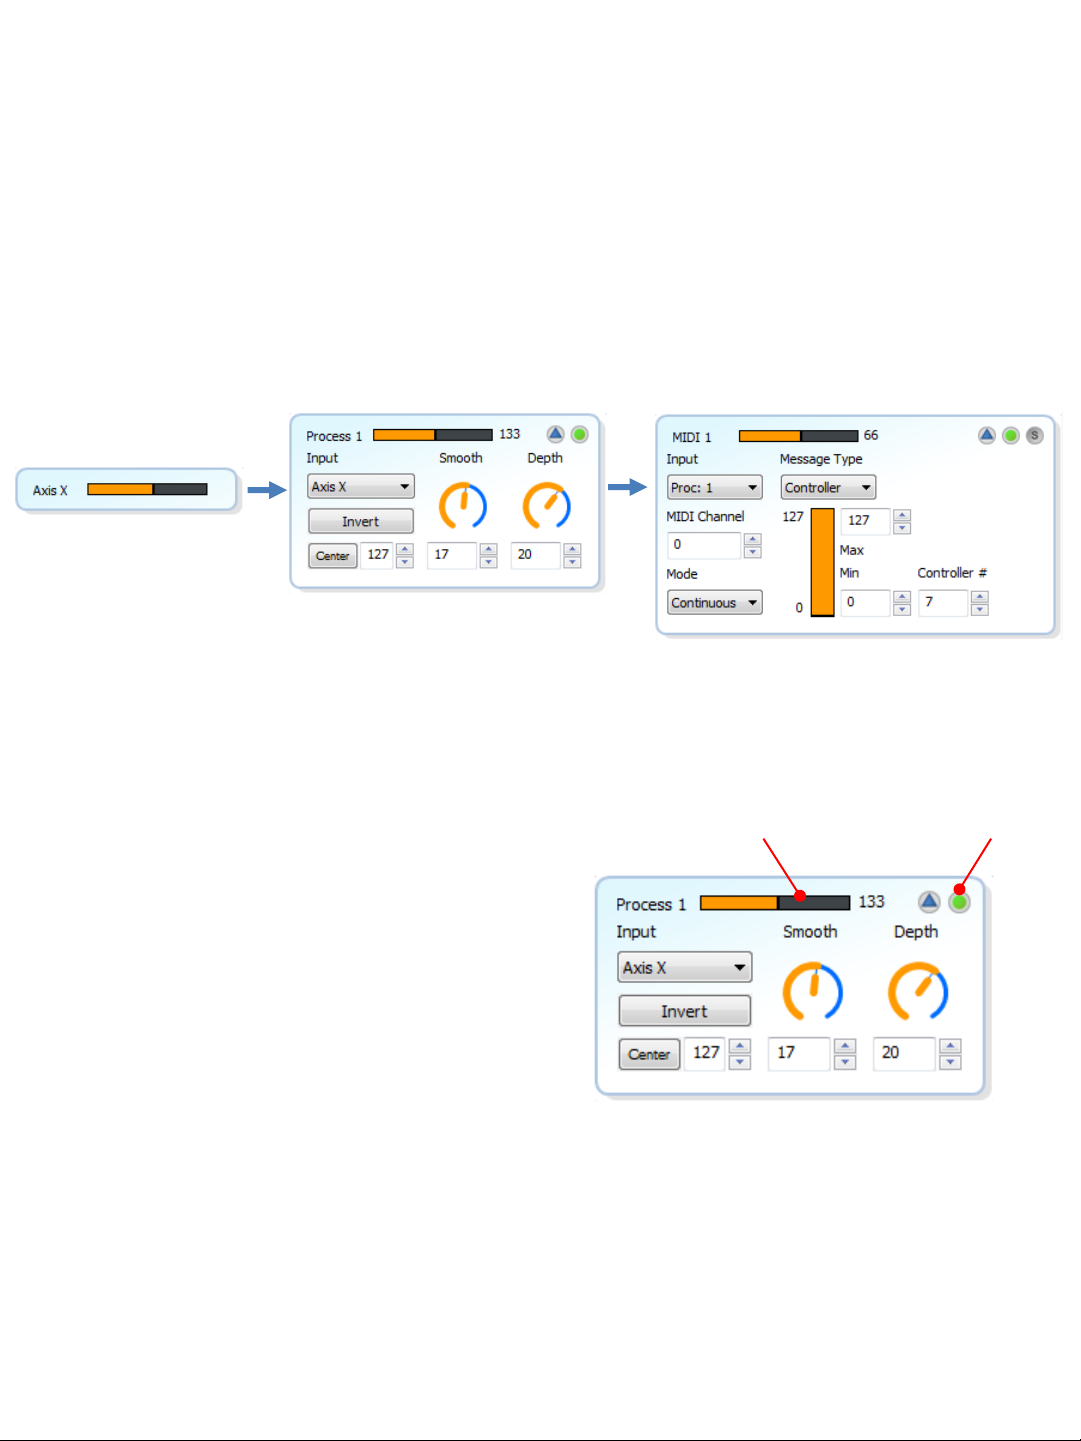
The software interface is arranged in modules as a “signal flow” from left to right. Starting on
the left side, you have the raw signals from the Ring for each axis. The raw X, Y, and Z signals
can feed into any of the six processor modules. The processor modules are used to amplify
and smooth out the raw signals from the Ring. The processor modules then feed the ten MIDI
output modules which use the processed signal to create a MIDI message.
Axis module
Processor module
MIDI output module
The Processor signal varies from 0 to 255 which allows for more range than a 0 to 127 signal.
The Processor modules feature useful controls for working the raw outputs into usable control
signals:
• The Input control selects which of the three axis
signals will be used for the processor. The same
Signal Monitor
Module Enable
raw axis signal can be used for multiple processor
modules.
• Invert will flip the incoming raw data to invert the
signal.
• Center sets the center point for the processor
signal. By moving the center value up or down,
you can create “dead zones” where there will be
little or no signal output for certain hand
positions. The value can be set manually or by
pressing the center button, the current position
Processor module details
of the Ring axis will be used. The default value is
127 which the middle of the 0 to 255 range.
• Smooth adjusts the amount of filtering applied to the Hot Hand signal. More filtering will
smooth out the response and make it less jittery. In some cases, it will be more useful to
have less filtering for a faster and more responsive output.
• Depth applies gain (amplifies) the incoming signal for greater range. Reduce the Depth to
reduce the overall signal range.
Page 6

The MIDI modules take the output from the
processor modules and converts it into a
MIDI message. The MIDI modules can also
be used to edit MIDI parameters, limit
values or set up trigger events based on the
input signal.
The basic controls of the MIDI modules are:
• Input selects which processor block
output will be used as the input to the
MIDI module. Any of the six processor
modules can be used.
• MIDI Channel selects which MIDI
Channel will be used for the MIDI output
message. Numbers are 0 to 15 (called 1
to 16 in some MIDI systems).
• Mode dropdown menu will set the type of MIDI output to be used. Currently there are three
choices: Continuous, Trigger Single, Trigger Double
• Output ON/OFF button enables or disables the MIDI output
• Solo button will enable only the selected output and disable all other outputs. This is a very
important feature for mapping MIDI messages in any software that uses a MIDI learn approach
to mapping external MIDI controls to knobs and parameters.
In Continuous mode, the MIDI output will be a constantly varying value depending on the
position and motion of the Ring. This mode is useful for controlling things like filters, stereo
panning, pitch shifting, beat repeaters, etc. In this mode you can edit:
• Message Type selects the type of MIDI output message: Continuous Controller (CC), Pitch
Bend, or Aftertouch.
• Minimum and Maximum set the limits for high and low values of the MIDI output.
• Controller Number to be used, there are 128 (0 to 127) controller numbers available.
In Single and Double Trigger modes, the MIDI output value will jump between two predefined
start and stop values. You can set a threshold and when the input to the MIDI module crosses
the Threshold value, the output will ramp back and forth from Start to Stop .
MIDI Module Continuous Mode
Output ON/OFF
Solo Output
The Trigger modes are handy when you
want to turn an effect on or off depending
on your hand position or by triggering the
ramp with a quick motion of your hand.
You can also use the Ramp Time to set how
long it takes to get from the Start value to
the Stop value.
Single Trigger mode will only start an output
ramp when the input crosses the threshold
value in one direction. This will “toggle” the
output. Double Trigger will start a ramp
when the threshold is crossed going up or
down. The Double Trigger controls are
identical to Single Trigger mode.
Threshold Control Trigger Direction
Page 7
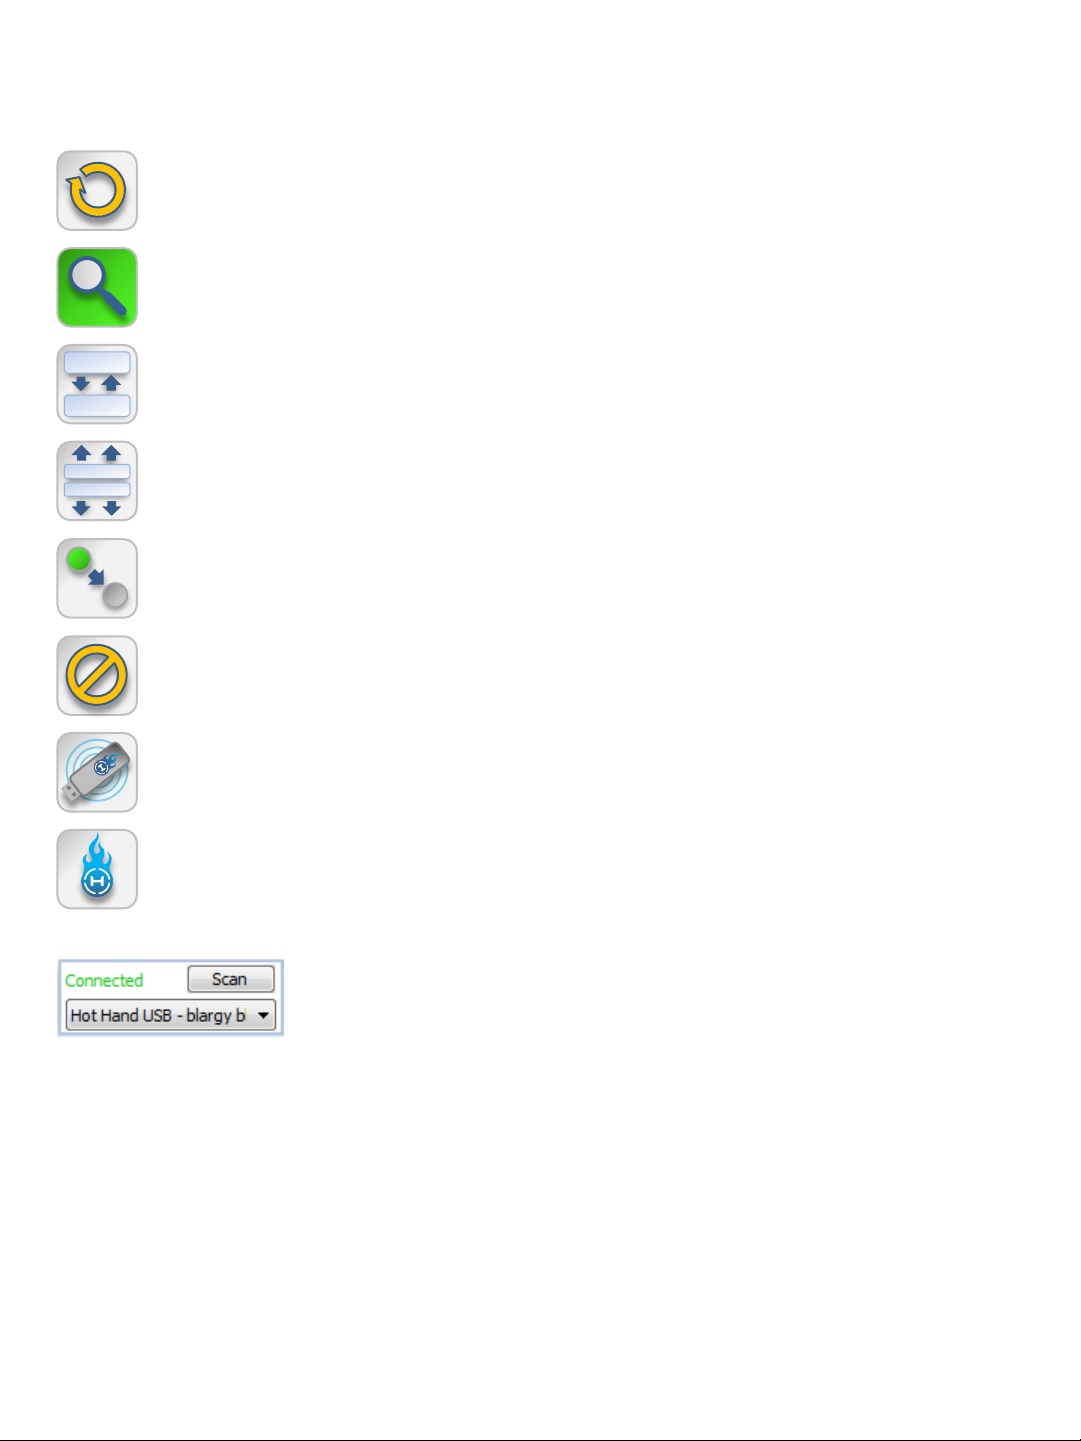
Additional Software Features
Toolbar Controls:
Reload – refreshes the current settings from the Editor to the USB Receiver. This
function will NOT burn settings to the flash memory.
Monitor ON/OFF – Enables or disables the monitor graph for each module. The
graphical updates require a small amount of CPU cycles so you might want to
turn them off in some cases.
Collapse – shrinks all open modules down to their minimum size. The
monitor graphs are still visible.
Expand – Expands all enabled modules to their maximum graphical size.
S
S
Un-Solo – Turns off the solo function for all MIDI outputs.
Mute – Disables (Mutes) all MIDI output.
Radio Reset – Tells the Receiver to cancel the link with the currently used
Hot Hand Ring and begin searching for a new Ring.
Burn – Writes the current software settings to the flash memory of the USB
Receiver. Burning can be done to 128 possible memory locations. Select a memory
slot to use when Burn is pressed. *See MIDI Control Section
Hardware Info block – Displays information about Hot Hand USB
receivers that are currently connected to the computer. Use the “Scan”
function to refresh the list of connected hardware. Use the drop down
menu to select which USB Receiver you would like to connect to and
edit. Up to four receivers can be used at a time.
File Menu: Here’s a brief description of the extra functions found in the File menu.
• Rename writes a name to the flash on the USB Receiver. Making it easier to tell one
Receiver from another.
• Identify In case multiple receivers are being used this will blink the LEDs on the current
receiver so that you can see which is currently in use.
• Firmware Update In the case that we have made changes or feature improvements to the
firmware on the USB Receiver, you can update the firmware using this function. You can
view the current version of firmware on your Receiver and check the web for a new version
or load a specific file instead.
Page 8

Advanced Features - MIDI Control
In addition to creating MIDI output, the Hot Hand USB Receiver can also receive MIDI messages from
the computer. These incoming MIDI messages can be used to automate settings for a performance by
enabling or disabling any of the 10 MIDI output modules or by recalling an entirely different preset
from the onboard flash memory.
The Receiver will respond to two types of MIDI message inputs:
• Continuous Controllers (CC)
• Program Changes (PC)
Continuous Controller messages can be used to disable or enable any of the ten MIDI modules.
Disabling the modules will “mute” the MIDI output.
Continuous
Controller #
CC 0 Disable Module 1 Enable Module 1
CC 1 Disable Module 2 Enable Module 2
CC 2 Disable Module 3 Enable Module 3
CC 3 Disable Module 4 Enable Module 4
CC 4 Disable Module 5 Enable Module 5
CC 5 Disable Module 6 Enable Module 6
CC 6 Disable Module 7 Enable Module 7
CC 7 Disable Module 8 Enable Module 8
CC 8 Disable Module 9 Enable Module 9
CC 9 Disable Module 10 Enable Module 10
CC 10 Disable All Modules Enable All Modules
Value < 64 Value>=64
MIDI Program Change messages can be used to recall “burned” presets from the Receiver
without opening the Hot Hand USB Editor application at all. This way, it’s not necessary to
have the software running and you can instantly recall up to 128 presets from the flash
memory. There is a one to one relationship between stored presets and incoming Program
Change messages:
Program Change #
PC 1 Recall Preset from memory slot 1
PC 2 Recall Preset from memory slot 2
PC… Recall Preset from memory slot …
Note: The preset burned to memory slot 1 will automatically be recalled when the USB
Receiver is connect to the computer.
Page 9

Specifications
Radio Frequency: 2.4 GHz, ISM Band
Battery Capacity: 45mAh, 6 hours usage time
Ring Charger Power Supply: 5 Volts, 50mA, Center Positive
Limited Warranty
Source Audio, LLC (hereinafter “Source Audio”) warrants that your new Source Audio Hot Hand USB Wireless MIDI
Controller, when purchased at an authorized Source Audio dealer in the United States of America (“USA”), shall be free
from defects in materials and workmanship under normal use for a period of one (1) year from the date of purchase by
the original purchaser. This Limited Warranty does not extend to the batteries which are purchased as is. Please
contact your dealer for information on warranty and service outside of the USA.
Under this Limited Warranty, Source Audio’s sole obligation and the purchaser’s sole remedy shall be repair,
replacement, or upgrade, at Source Audio’s sole discretion, of any product that, if properly used and maintained,
proves to be defective upon inspection by Source Audio. Source Audio reserves the right to update any unit returned
for repair and to change or to improve the design of the product at any time without notice. Source Audio reserves the
right to use reconditioned parts and assemblies as warranty replacements for authorized repairs. Any product
repaired, replaced, or upgraded pursuant to this Limited Warranty will be warranted for the remainder of the original
warranty period.
This Limited Warranty is extended to the original retail purchaser. This Limited Warranty can be transferred to anyone
who may subsequently purchase this product provided that such transfer is made within the applicable warranty
period and Source Audio is provided with all of the following information: (i) all warranty registration information (as
set forth on the registration card) for the new owner, (ii) proof of the transfer, within thirty (30) days of the transfer,
and (iii) a photocopy of the original sales receipt. Warranty coverage shall be determined by Source Audio in its sole
discretion. This is your sole warranty. Source Audio does not authorize any third party, including any dealer or sales
representative, to assume any liability on behalf of Source Audio or to make any warranty on behalf of Source Audio.
WARRANTY INFORMATION
Source Audio may, at its option, require proof of the original purchase date in the form of a dated copy of original
authorized dealer’s invoice or sales receipt. Service and repairs of Source Audio products are to be performed only at
the Source Audio factory or a Source Audio authorized service center. Prior to service or repair under this Limited
Warranty, the purchaser must request from Source Audio a return authorization, which is available at:
Source Audio LLC 120 Cummings Park, Woburn, MA 01801 (781) 932-8080 or at www.sourceaudio.net.
Unauthorized service, repair, or modification will void this Limited Warranty.
DISCLAIMER AND LIMITATION OF WARRANTY
DO NOT OPEN THE RING OR USB RECEIVER UNDER ANY CIRCUMSTANCE. THIS WILL VOID THE WARRANTY.
THE FOREGOING LIMITED WARRANTY IS THE ONLY WARRANTY GIVEN BY SOURCE AUDIO AND IS IN LIEU OF ALL OTHER
WARRANTIES. ALL IMPLIED WARRANTIES, INCLUDING WARRANTIES OF MERCHANTABILITY AND FITNESS FOR ANY
PARTICULAR PURPOSE, EXCEEDING THE SPECIFIC PROVISIONS OF THIS LIMITED WARRANTY ARE HEREBY DISCLAIMED
AND EXCLUDED FROM THIS LIMITED WARRANTY. UPON EXPIRATION OF THE APPLICABLE EXPRESS WARRANTY PERIOD,
SOURCE AUDIO SHALL HAVE NO FURTHER WARRANTY OBLIGATION OF ANY KIND, EXPRESS OR IMPLIED. SOURCE
AUDIO SHALL IN NO EVENT BE LIABLE FOR ANY SPECIAL, INCIDENTAL OR CONSEQUENTIAL DAMAGES SUFFERED BY
THE PURCHASER OR ANY THIRD PARTY, INCLUDING WITHOUT LIMITATION, DAMAGES FOR LOSS OF PROFITS OR
BUSINESS OR DAMAGES RESULTING FROM USE OR PERFORMANCE OF THE PRODUCT, WHETHER IN CONTRACT OR IN
TORT. SOURCE AUDIO SHALL NOT BE LIABLE FOR ANY EXPENSES, CLAIMS OR SUITS ARISING OUT OF OR RELATING TO
ANY OF THE FOREGOING. Some states do not allow the exclusion or limitation of implied warranties so some of the
above limitations and exclusions may not apply to you. This Limited Warranty gives you specific legal rights, and you
may also have other rights, which vary, from state to state. This Limited Warranty only applies to products sold and
used in the USA. Source Audio shall not be liable for damages or loss resulting from the negligent or intentional acts of
the shipper or its contracted affiliates. You should contact the shipper for proper claims procedures in the event of
damage or loss resulting from shipment.
© SOURCE AUDIO LLC 120 CUMMINGS PARK, WOBURN, MA 01801 ONLINE AT: SOURCEAUDIO.NET
 Loading...