

Page 1

TM
Motion Controlled Phaser/Flanger
Users Guide
SA-102
Page 2

Please Read This First
Contents
Important Safety Information
• WARNING! Before using unit, be sure to read the owners manual and
other warnings below.
• CAUTION! All electronic devices should be out of reach of children.
• CAUTION! If used improperly, batteries may explode or leak and cause
damage or injury.
4 Welcome
5 Overview of Features
6 Quick Start
10 Features
12 Modulation Sources
16 Knobs
20 Connections
22 Pedals
23 Saving Presets
24 Effect Types
26 Back Page Features and Controls
31 Sequencer Controls
33 Factory Presets
34 Specifications
34 Troubleshooting
35 Warranty
| 3
Page 3

Overview of Features | 5
Welcome!
Overview of Features
Thank you for purchasing The Hot Hand™ Motion
Controlled Phaser/Flanger. We hope to help you
discover a whole new world of musical expression.
Hot Hand products may be completely new,
but they are easy to use. We have worked hard
to bring you as much power and as many features
as possible while keeping the controls simple
and intuitive.
This manual is organized so that you can get
started quickly. Read over the first few pages and
you will be ready to go. If you would like to know
more about the product, move on to the following
sections. It is certainly recommended that you
quickly read the section on the Hot Hand on page
13. A few quick insights into how it works will
allow you better control of the sounds you create.
Enjoy!
MOTION CONTROL
Motion control with Hot Hand™, which uses
patent-pending technology to translate your body
movement into sound.
INTUITIVE
An innovative and simple interface that makes
it easy to access all features.
MODERN DESIGN
A thoughtfully designed box, which features
rugged construction and sleek design.
DIVERSE SOUND PALETTE
A wide palette of sounds: some new, some
classics, and all customizable.
STATE-OF-THE-ART DSP
Our proprietary state-of-the-art 56 bit Digital
Signal Processing chip, the
clear
24 bit converters.
SA601, and crystal
—The Source Audio team
4 | Welcome
ULTRA-CLEAN SIGNAL
“Active Analog Bypass” which routes the signal
around the entire signal processing path to
ensure your signal is clean when the effect is
not engaged.
Page 4
Quick Start
SAVE
(ALT) BACKPAGE
PRESET 03PRESET
04
EFFECT
(ALT) MOD SOURCE
MOTION/SPEED
PRESET
02
PRESET
01
ON/OFF
ENVELOPE
CALIBRATE
LFO/SEQ
INVERT/SEQ ENABLE
DEPTH
(ALT) FREQUENCY/DELAY
HOT HAND
MOTION CONTROLLED PHASER/FLANGER
ON/OFF
SELECT
(HOLD FOR ALT MODE)
02
04
06
07
03
02
04
06
07
01
05
02
03 05
00
08
07
06
01
02
03
05
04
00 08
07
06
01
03 05
01
FLANGER
PHASER
FLAIL/SLOWPICK/FAST
STRUM
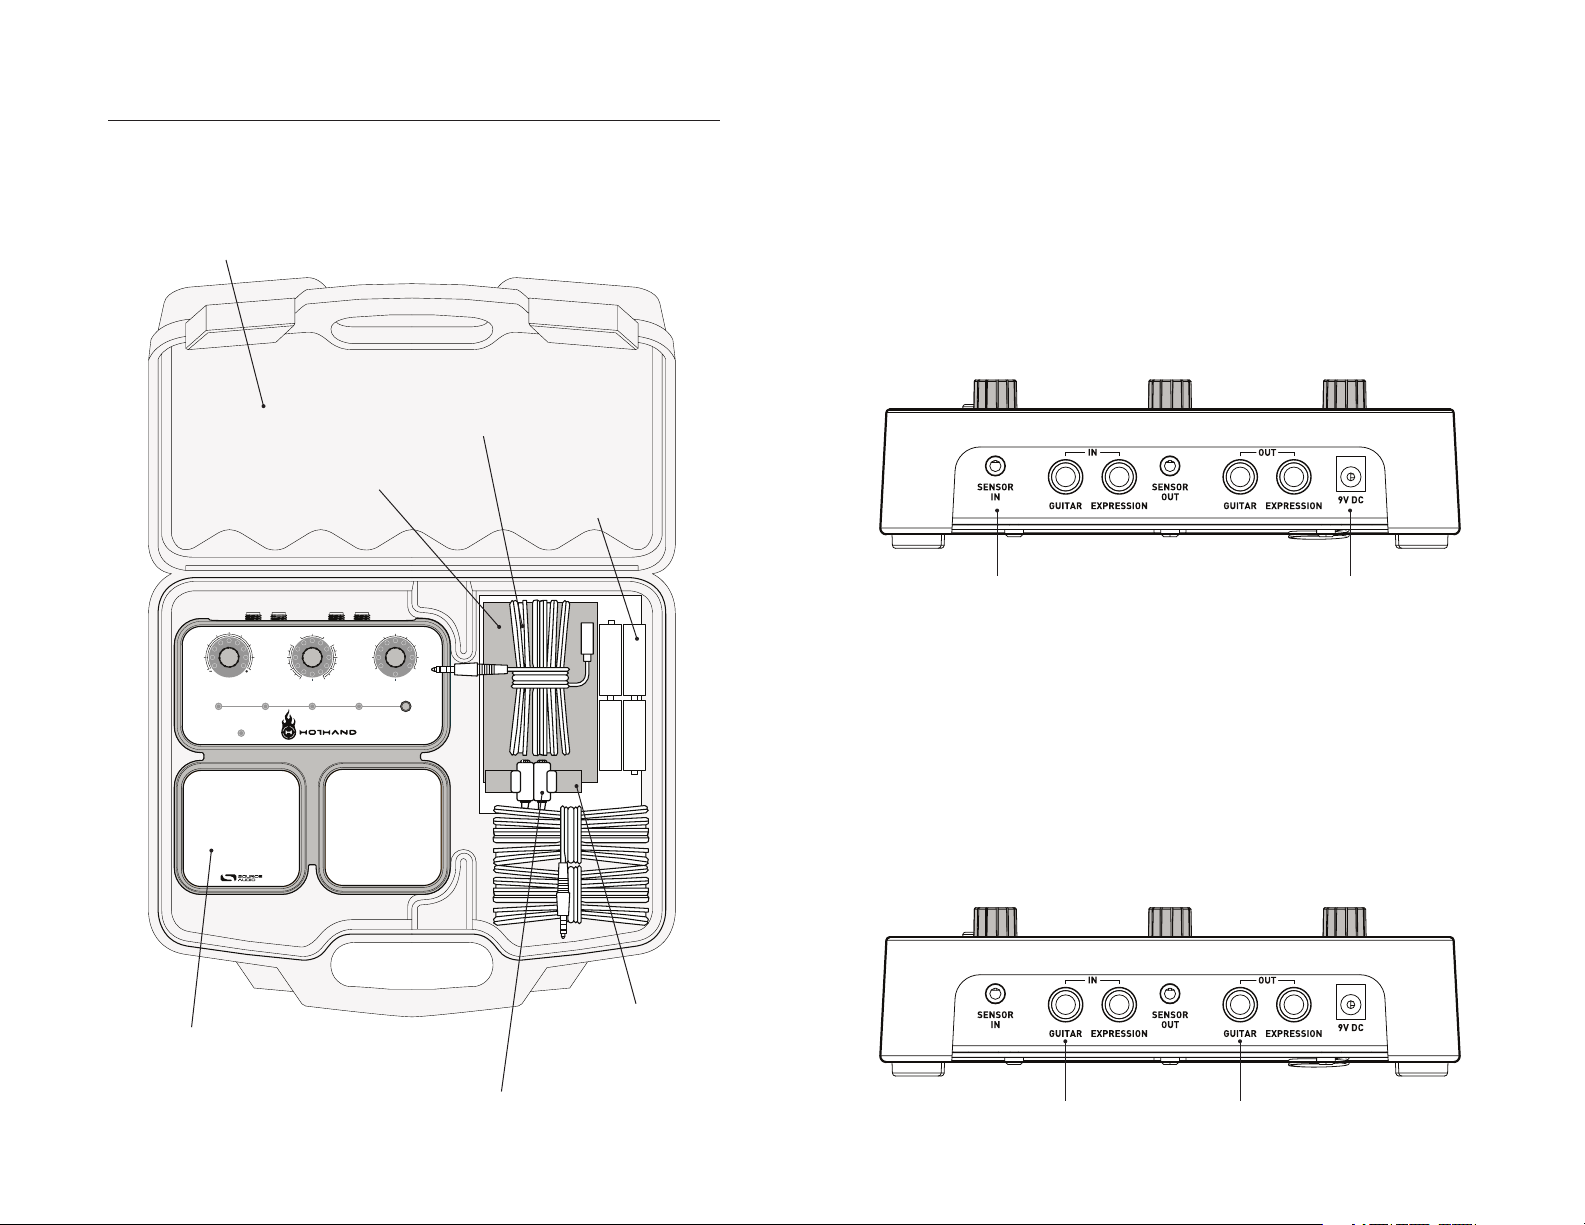
Your Hot Hand comes with the following components.
Carrying Case
Hot Hand Extension
Hot Hand Arm Band
4 AA Batteries
01 : Power
The first thing you will need is power. Your Hot Hand
batteries to get you started. The batteries will typically last about
™
unit comes with
4 AA
15 to 20
hours. To avoid concerns about battery life, we recommend you buy a Source
Audio 9V DC power supply (A) (see power supply note on page 14 for exact
requirements).
02 : SENSOR IN connection
Next, connect the supplied EXTENSION CABLE to the SENSOR IN jack (B). Later,
you’ll plug the other end into the wire that trails from the Hot Hand, but hold
off on that for now.
B A
Hot Hand Control Box
03 : Guitar/Audio Connections
Now, you’ll need to make the audio connections. Plug a regular (mono)
¼-inch guitar cable from your guitar into the
amp (or other audio device) to the
¼-inch cable
Note: Plugging a cable into the input will turn the unit on, causing some
(D).
GUITAR OUT jack, again with a regular
of the LEDs to light up. Don’t forget to turn off the unit by unplugging this
Hot Hand Rings (5 sizes)
Hot Hand Motion Sensor
cord—otherwise the battery will continue to drain.
C D
GUITAR IN jack (C). Connect your
Quick Start | 76 | Quick Start
Page 5
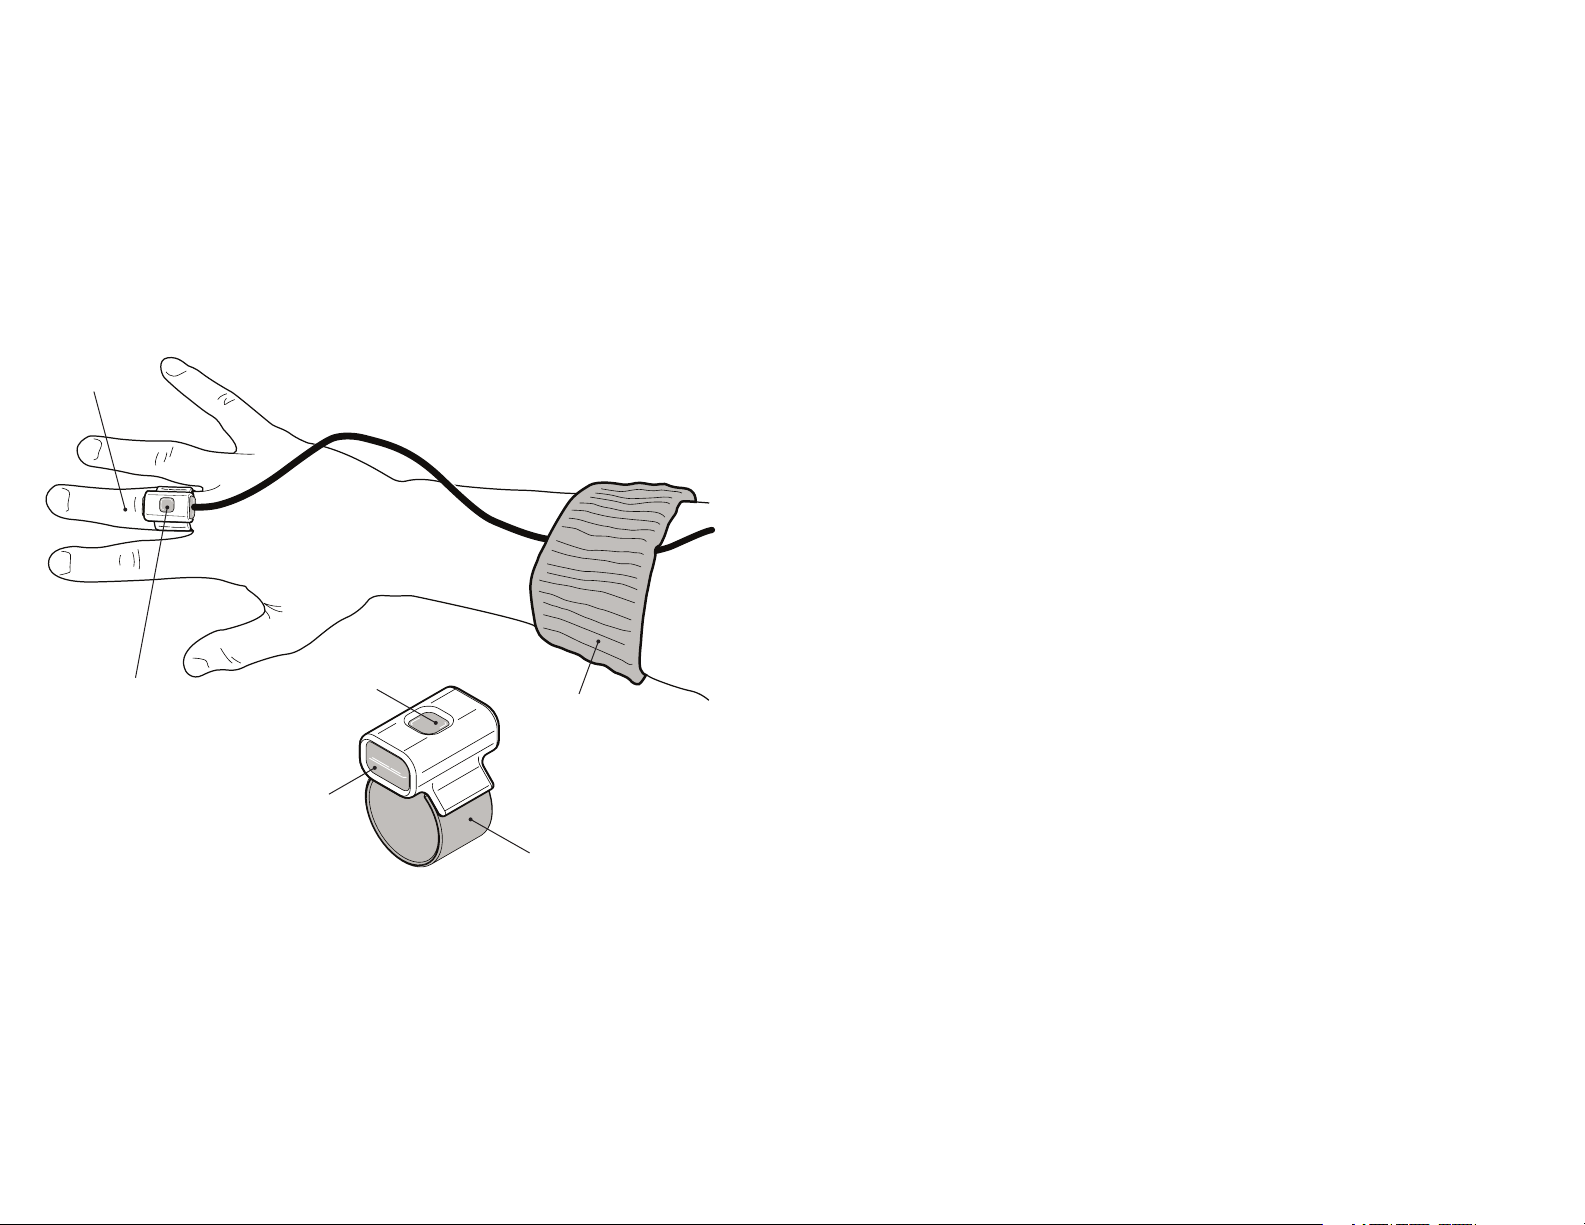
04 : Attaching the Hot Hand Motion Sensor
Choose the ring size which fits most comfortably. This is ideally placed on the
middle or ring finger of your strumming hand (A). Put your guitar on and take
out the Hot Hand sensor. Insert the Hot Hand into the ring as shown. To pre
vent the sensor cord from interfering with your playing, use the provided arm
band (B) to hold it up near your elbow as shown. Once everything is comfort
able, attach the wire that comes from the Hot Hand into the
Note: the extension cable is not required for operation, but it is almost cer
tainly required for using the product in the standing position. When the Hot
Hand is connected, and the control box is powered-on, a blue
the sensor to indicate is it ready to be used (C).
A
C
Hot Hand Motion Sensor
LED
EXTENSION CABLE.
LED will glow in
B
06: How to select and control the effects
Preset Selection
-
-
-
Make sure effects are engaged by checking the ON/OFF light. Toggle the ON/OFF
pedal to turn it on, if necessary.
Select any of the four presets by using the
them. Note which of the
MOD SOURCE lights are on at the top of the EFFECT
knob. These select what will be sweeping the effect. If the
on, moving the
HOT HAND will not make any difference.
SELECT pedal to advance through
HOT HAND light is not
Editing
• Use the EFFECT knob to select any of the 7 phasers or 7 flangers.
• Hold down the SELECT pedal, and turn the EFFECT knob. It will now change
the MOD SOURCE selection instead of making an effect selection.
• Use the DEPTH control to select the amount of modulation depth (sweep)
applied to the effect.
• Use the MOTION/SPEED control to select how fast the modulation source var-
ies. It determines how much the Hot Hand responds to rapid motion; it sets
the LFO speed; and it controls how quickly the ENVELOPE tracks the levels of
the guitar signal.
• Turn the MOTION/SPEED knob such that the LED indicator light moves across
the bottom-most part of the range. This will change the state of the
switch. If
INVERT is on, both the HOT HAND and ENVELOPE direction of sweep
will be reversed.
• When LFO is selected as the MOD SOURCE, turning on INVERT will select SEQ
as the modulation source instead of the
LFO. Sequencer patterns will then be
used to sweep the effect.
• Hold down the SELECT pedal, and adjust FREQUENCY range for the phasers,
and DELAY time for the flangers with the DEPTH knob.
INVERT
Hot Hand Ring
05 : Calibration (optional)
Calibration is recommended, but not required. See page 11 for additional
information.
Calibration is easy. Just turn the
position and hold your strumming hand in its normal playing position over
the strings. Your hand should be held relatively still. Then, tap the
pedal once. The
ON/OFF LED will blink for a few seconds. When the LED is off,
you are calibrated and ready to go. Turn the Effect Selector knob away from
the CALIBRATE position to select an effect.
EFFECT knob to the CALIBRATE
ON/OFF
Advanced editing
The Back Page parameters provide access to a number of miscellaneous
parameters, including control of the sequencer. Press
SAVE while holding down
the SELECT pedal to edit these parameters. See page 26-30 for a detailed list.
Save Preset
If you wish to save the changes you have made to a preset location, hold down
the SAVE button. When the preset LED stops blinking, the data has been saved
to the current preset.
Quick Start | 98 | Quick Start
Page 6
Features
SAVE
(ALT) BACKPAGE
PRESET
03
PRESET
04
EFFECT
(ALT) MOD SOURCE
MOTION/SPEED
PRESET
02
PRESET
01
ON/OFF
ENVELOPE
CALIBRATE
LFO/SEQ
INVERT/SEQ ENABLE
DEPTH
(ALT) FREQUENCY/DELAY
HOT HAND
MOTION CONTROLLED PHASER/ FLANGER
ON/OFF
SELECT
(HOLD FOR ALT MODE)
02
04
06
07
03
02
04
06
07
01
05
02
03
05
00
08
07
06
01
02
03
05
04
00 08
07
06
01
03
05
01
FLANGER
PHASER
FLAIL/SLOWPICK/FAST
STRUM
The Hot Hand Concept
The Hot Hand provides a new way to control effects. It is no longer necessary
to stand over a pedal board. The movement of the picking hand becomes an
expression pedal. The control follows the rhythm of the music without con
scious effort. It is also possible to move the hand much quicker than a pedal
can be moved. The potential for additional showmanship in live performance
must not be overlooked.
Some other possible places to put the Hot Hand sensor besides on a finger of
the picking hand include shoes, a headband, the guitar headstock, your drum
mer’s hand, your singer’s hand…
OK, maybe the singer isn’t such a good idea.
-
The Controls
The Hot Hand Control Box is where all of the effects are created and controlled. The product contains
Some sounds are classics, others are new, and all have been carefully
modeled and created by real musicians. And by using the presets, you can
switch between
FOUR of those sounds without ever bending down to tweak
a knob on stage.
Note that the Hot Hand control box uses rotary encoder knobs and
rings. This allows you not only see the knob locations in low light situations,
but you can also jump from one preset to the next and see the setting of each
knob quickly.
The product also gives you one control over each effect:
the Phaser, which shifts the range of the Phaser sweep, or
Flanger, which scales all the delay times. This control will greatly change the
sound of the effects. It is independent of the modulation source selection.
In addition to using the Hot Hand to translate hand motion into a signal to
sweep the effects, other modulation sources that may be used are a Low
Frequency Oscillator
(LFO) that provides a periodic back and forth sweep,
a Sequencer that generates a repeating series of control levels, and an
Envelope Follower, which responds to the level of the guitar input signal.
The MOTION/SPEED control adjusts how fast all of these control sources act,
and the DEPTH control adjusts the range of the effect sweep.
There are three other features related to external “expression” control. First,
the EXPRESSION IN allows you to control the effects in the Control Box with an
external expression pedal. The
effect modulation signal and use it to control other effects boxes that have an
Expression Input feature. Finally, the
Hot Hand signal to other Source Audio Hot Hand products and control them
with a single motion sensor.
7 different Phasers and 7 different Flangers.
LED
FREQUENCY for
DELAY for the
EXPRESSION OUT allows you to take the final
SENSOR OUT jack allows you to send the
The ON/OFF pedal switch puts the effect in or out of the circuit. Another way
in rapid succession with the knuckles of the hand wearing the ring sensor
will switch the effect from On to Off, or from Off to On. The taps should cor
respond roughly to a rate of
180 BPM. (The time between the taps must be
greater than ¼ of a second, and less than ½ second.) It is not necessary to
to toggle the effect state is to use the special
KNOCK mode. Tapping twice
-
actually tap the ring itself on a solid surface. If you are wearing the sensor
on a headband, we do not advise using
KNOCK mode. KNOCK mode may be
enabled and disabled with a Back Page parameter.
Features | 1110 | Features
Page 7

Modulation Sources
SAVE
(ALT) BACKPAGE
PRESET
03
PRESET
04
EFFECT
(ALT) MOD SOURCE
MOTION/SPEED
PRESET
02
PRESET
01
ON/OFF
ENVELOPE
CALIBRATE
LFO/SEQ
INVERT/SEQ ENABLE
DEPTH
(ALT) FREQUENCY/DELAY
HOT HAND
MOTION CONTROLLED PHASER/ FLANGER
ON/OFF
SELECT
(HOLD FOR ALT MODE)
02
04
06
07
03
02
04
06
07
01
05
02
03
05
00
08
07
06
01
02
03
05
04
00 08
07
06
01
03
05
01
FLANGER
PHASER
FLAIL
/SLOWPICK/FAST
STRUM
The effects may be swept (or modulated) from any of a variety of control signals. The
is set by the
MOD SOURCE knob does the selection, and the amount of modulation
DEPTH control.
Hot Hand
While it is certainly possible to use Hot Hand without much technical background, a few words about how it works will allow you to quickly understand
how hand position and hand motion impact the sound. The Hot Hand sensor
senses acceleration. This means that both hand position and hand motion
will cause the Hot Hand to react and send signals to the control box.
Hand Position
Since gravity is an acceleration, the Hot Hand is always measuring the pull
of the Earth’s gravitational force. To illustrate this, try strumming a chord
and pointing your hand with the sensor attached straight at the ground. By
bending your arm at the elbow, slowly move your forearm up until your hand
is pointing at the ceiling. You should hear the effect sweep following the posi
tion of your arm. When the
same gesture will sweep the effect in the opposite direction. You don’t need
to move your entire arm to accomplish this. The same effect can be achieved
changing your hand position by bending at the wrist or by leaning back and
moving your hand and the guitar together. Hand position can range from
subtle movement to the not so subtle. If subtlety is not your thing, dramatic
motions will open the door for showmanship as your hand shapes the
sounds from your guitar. We must point out that the Hot Hand will respond
differently in Outer Space!
When you are using hand position and larger hand or arm motions to control
the Hot Hand, we recommend turning the
will prevent the Hot Hand from responding to small variations and sounding
too “jittery”.
INVERT light is on, the opposite will be true and the
MOTION knob towards FLAIL. This
-
Hand Motion
In addition to measuring gravitational force, the sensor also measures
movement. The more the hand moves, the more the signal will change. To
illustrate this, strum a chord and shake your hand quickly. You should hear
the filter sweep back and forth following your hand motion. Experiment with
moving your hand in different directions and at different speeds to find the
method that works best for you. Use the
MOTION/SPEED knob to control how
quickly an effect will respond to your hand motion. In the most sensitive posi
tion (PICK) the Hot Hand will detect even the slightest motion of the picking
hand. In the STRUM position, the Hot Hand will react more slowly. Try strumming some chords normally and listen to how the Hot Hand reacts.
12 | Modulation Sources Modulation Sources | 13
-
Page 8

Calibration (optional)
EFFECT
(ALT) MOD SOURCE
MOTION/SPEED
ENVELOPE
CALIBRATE
LFO/SEQ
INVERT/SEQ ENABLE
DEPTH
(ALT) FREQUENCY/DELAY
HOT HAND
02
04
06
07
03
02
04
06
07
01
05
02
03
05
00
08
07
06
01
02
03
05
04
00 08
07
06
01
03
05
01
FLANGER
PHASER
FLAIL
/SLOWPICK/FAST
STRUM
Your use of Hot Hand will benefit from the unit being calibrated to your playing position and style. In effect, you are telling the control box where your
hand is when it is centered over the strings. Calibration is recommended
when using for the first time or when your playing position changes due to
guitar strap changes or when moving from standing to sitting. If you do not
calibrate, the “zero” or center point of the Hot Hand signal may not match the
natural resting position of your hand.
To calibrate, turn the
EFFECT knob to the CALIBRATE position and hold your
strumming hand in its normal playing position over the strings. Then, tap the
ON/OFF pedal once. The
LED is off, you are calibrated and ready to go. Please note that the effect will
be muted when the selector is in the
ON/OFF LED will blink for a few seconds. When the
CALIBRATE position.
Calibration data is remembered until another calibration is performed, even
when the unit is turned off.
ADVANCED USER NOTES
1) The calibration “zero” point does not necessarily need to be in the middle of your arm stroke.
By setting the zero point higher or lower it is possible to span a different range of the effect.
Also, calibration may be required if the Hot Hand sensor is mounted to some other part of your
body (head, foot, etc.)
2) One calibration setting is typically used across all presets. However, it may desirable to create
a different calibration setting for each preset. When the function selector is turned to CALIBRATE
all the preset LEDs will be lit, indicating that you will be recalibrating all the presets. If, before de
pressing the ON/OFF pedal, one hits the SELECT pedal, the light from the last preset selected turns
on. If only one preset LED is lit, then only that preset gets the new calibration data. The remaining
presets are unaffected, even if the last calibration applied to all presets. Pressing SELECT again
toggles back to selecting all presets.
-
Expression input
If a modulation control signal is needed that is more appropriately generated
by a controller like a wah pedal, an external expression pedal may be plugged
into the
EXPRESSION IN jack.
LFO
Phasers and flangers are typically controlled by an automatically slowly varying signal called a Low Frequency Oscillator
the modulation source. In addition to the
be controlled by an external expression pedal, or by the Hot Hand. The
(LFO). An LFO may be selected as
MOTION/SPEED knob, the speed may
LFO
produces a sine wave to modulate the Flanger, and a triangle wave for the
Phaser. The
LFO may also be switched to become an audio frequency oscilla-
tor. It can provide ring-modulated sorts of sounds. This option is only for the
seriously crazed.
Sequencer
A sequencer is a device, more commonly associated with synthesizers, that
puts out a repeating series of control levels. While not often found on phasers
and flangers, it is quite an interesting sound. The
driving such a sequencer, by turning on the
SPEED knob. 9 different sequence lengths are available, and for each of these
lengths there are
9 different prestored patterns that may be chosen.
A transition time may be set that determines how rapidly the control
signal moves from one level to the next when the sequencer moves on to
the next step.
Instead of putting out a repeating series of levels, the sequencer may be
switched into chosing a random value each time the next step is taken.
LFO may be switched into
INVERT switch from the MOTION/
See page 31 for a full description of the sequencer control parameters.
Envelope follower
An envelope follower takes the incoming guitar signal and generates a control signal which gets larger for louder guitar signals. This control signal may
be used as a modulation source.
The attack rate, or the time it takes for the control signal to rise up after a
14 | Modulation Sources Modulation Sources | 15
new note has been struck, may be adjusted. Stacato playing, with a very brief
period of silence between notes, will give the most dramatic results, by allow
ing the control signal to be reset back to zero during the silence.
-
Page 9

DEPTH
(ALT) FREQUENCY/DELAY
02
03
05
04
00 08
07
06
01
Knobs
EFFECT
(ALT) MOD SOURCE
ENVELOPE
CALIBRATE
LFO/SEQ
HOT HAND
02
04
06
07
03
02
04
06
07
01
05
03
05
01
FLANGERPHASER
EFFECT Knob
The EFFECT knob switches between the various different effects. For a
description of each effect, please see page
Flangers to select from. Some of the selection positions are “between” the
positions marked by the
LEDs on at the same time. Thus, when Phaser 02 is selected, the LEDs for
LEDs; these are indicated by having both bracketing
Phaser 01 and Phaser 03 are both on.
The effects selection jumps past the topmost three
Phaser 07 to Flanger 01. Going from Flanger 07 to Phaser 01 requires going
through the position labeled
CALIBRATE. Simply scrolling through CALIBRATE
does not invoke the calibration function (although it does temporarily mute
the audio.)
The LEDs around this knob always display the current MOD SOURCE, as one
of the topmost three
ENVELOPE. The selection may be changed by holding down the SELECT pedal,
LEDs. The three choices are HOT HAND, LFO/SEQ, and
and moving the knob.
24. There are 7 Phasers and 7
LEDs, to go directly from
DEPTH Knob
The DEPTH knob sets how much of the selected modulation source is used
to modify the frequency responses that are created by the Phaser or Flanger
algorithms.
When using the Hot Hand as the selected modulation source, any signal
present at the
Hot Hand signal is controlled by the
EXPRESSION IN jack is summed with the Hot Hand signal. The
DEPTH control, while the EXPRESSION IN
signal is not. Thus the pedal always has the full range of control.
FREQUENCY/DELAY Knob
If the Phaser effect has been selected, the FREQUENCY/DELAY knob acts as an
offset for the Phaser’s frequency response characteristic. Counterclockwise
values will position the typical Phaser notches at lower frequencies than will
clockwise values.
If the Flanger effect is selected, the
the delay times used in the Flanger together. Counterclockwise settings
give short delays, which will have fewer notches in the Flanger frequency
response. Clockwise settings will give longer delays, producing a more
complex sound.
FREQUENCY/DELAY knob scales all of
16 | Knobs
Knobs | 17
Page 10

MOTION/SPEED Knob/INVERT
MOTION/SPEED
INVERT/SEQ ENABLE
02
03
05
00
08
07
06
01
FLAIL/SLOWPICK/FAST
STRUM
If Hot Hand has been selected as the MOD SOURCE, the MOTION/SPEED knob
essentially determines how sensitive the Hot Hand is to rapid motion of
the sensor. Setting this knob towards “Pick” will make the Hot Hand more
sensitive so that even the quickest motions will be picked up. Setting it to
near “Strum” is best for strumming, and “Flail” will reduce the sensitivity so
that only more dramatic (slower) motions will produce a noticeable effect.
Alternatively, the motion knob can be thought of as setting the amount of
“smoothing” of the Hot Hand signal. “Pick” having the least smoothing, while
“Flail” has the most.
The “Pick” position will pass more of the very rapid transient motion caused
by the jar of hitting a string with a pick to go into the final control signal. It
can produce something like an envelope follower type of sound. As the knob
is rotated clockwise, less of these quick transients are passed, and things
seem less jittery. You really have to do some experimenting with this control
in order to get a feel for how to adjust it to match your playing style and the
sound you are trying to get.
If ENVELOPE has been selected as the MOD SOURCE, the MOTION/SPEED
knob sets how fast the envelope signal rises and falls in response to the
guitar input signal. Counterclockwise is faster, and clockwise is slower. The
INVERT switch flips over the direction of modulation sweep by the envelope.
If the LFO has been selected as the MOD SOURCE, the MOTION/SPEED knob
becomes the rate control for the
LFO. Faster rates are in the counterclockwise
direction. (Note that regardless of the specific modulation source selected,
things happen faster with the
clockwise direction.) The range of the
MOTION/SPEED knob set toward the counter-
LFO is from .2 Hz to 10 Hz (or a period
of five seconds down to one-tenth of a second.)
If an expression pedal is plugged in to the
EXPRESSION In jack, it will modify
the LFO speed as set by the MOTION/SPEED control. When the pedal is in the
full down position, all
position multiplies all rates by
es the range of
LFO rates are divided by a factor of 2.88, while a full up
2.88. (Use of an expression pedal thus increas-
LFO speeds.) The fastest speeds can produce something of
a ring modulated sound.
Turning the
MOTION/SPEED knob all the way around past the six o’clock posi-
tion causes the Hot Hand to invert its axis—up is down and down is up. When
the INVERT light is off, the product is in normal mode, while on indicates
inversion. For the Phaser, with normal mode, the hand up position moves
the frequency response notches to higher frequencies, and with invert moves
them to lower frequencies. For the Flanger, normal mode and hand up posi
tion generally makes the delay lines longer, and thus increases the number
of frequency response notches present.
There is a Back Page parameter that may be set to permit use of the Hot
Hand for controlling the
LFO speed, instead of the pedal. This may be of
marginal utility if the sensor ring is worn on the picking hand, but nice results
can be obtained with the ring worn on the player’s head or on the guitar body.
-
The INVERT switch turns the LFO into a “preset” sequencer. A variety of patterns, of different lengths, are pre-stored. The Back Page parameters may
be used to choose the pattern and length. Also available is the transition time
from one step to another. Finally, instead of a repeating sequence of levels,
a random value may be chosen each time the level changes.
When using the sequencer, there is one step per
rates for normal
and so the slowest
rate remains the same at
LFO mode become too slow to be useful with the sequencer,
LFO speed has been increased to 1 Hz, while the fastest
10 Hz. Control by an expression pedal is still by the
LFO period. The slowest LFO
same factors.
18 | Knobs
Knobs | 19
Page 11

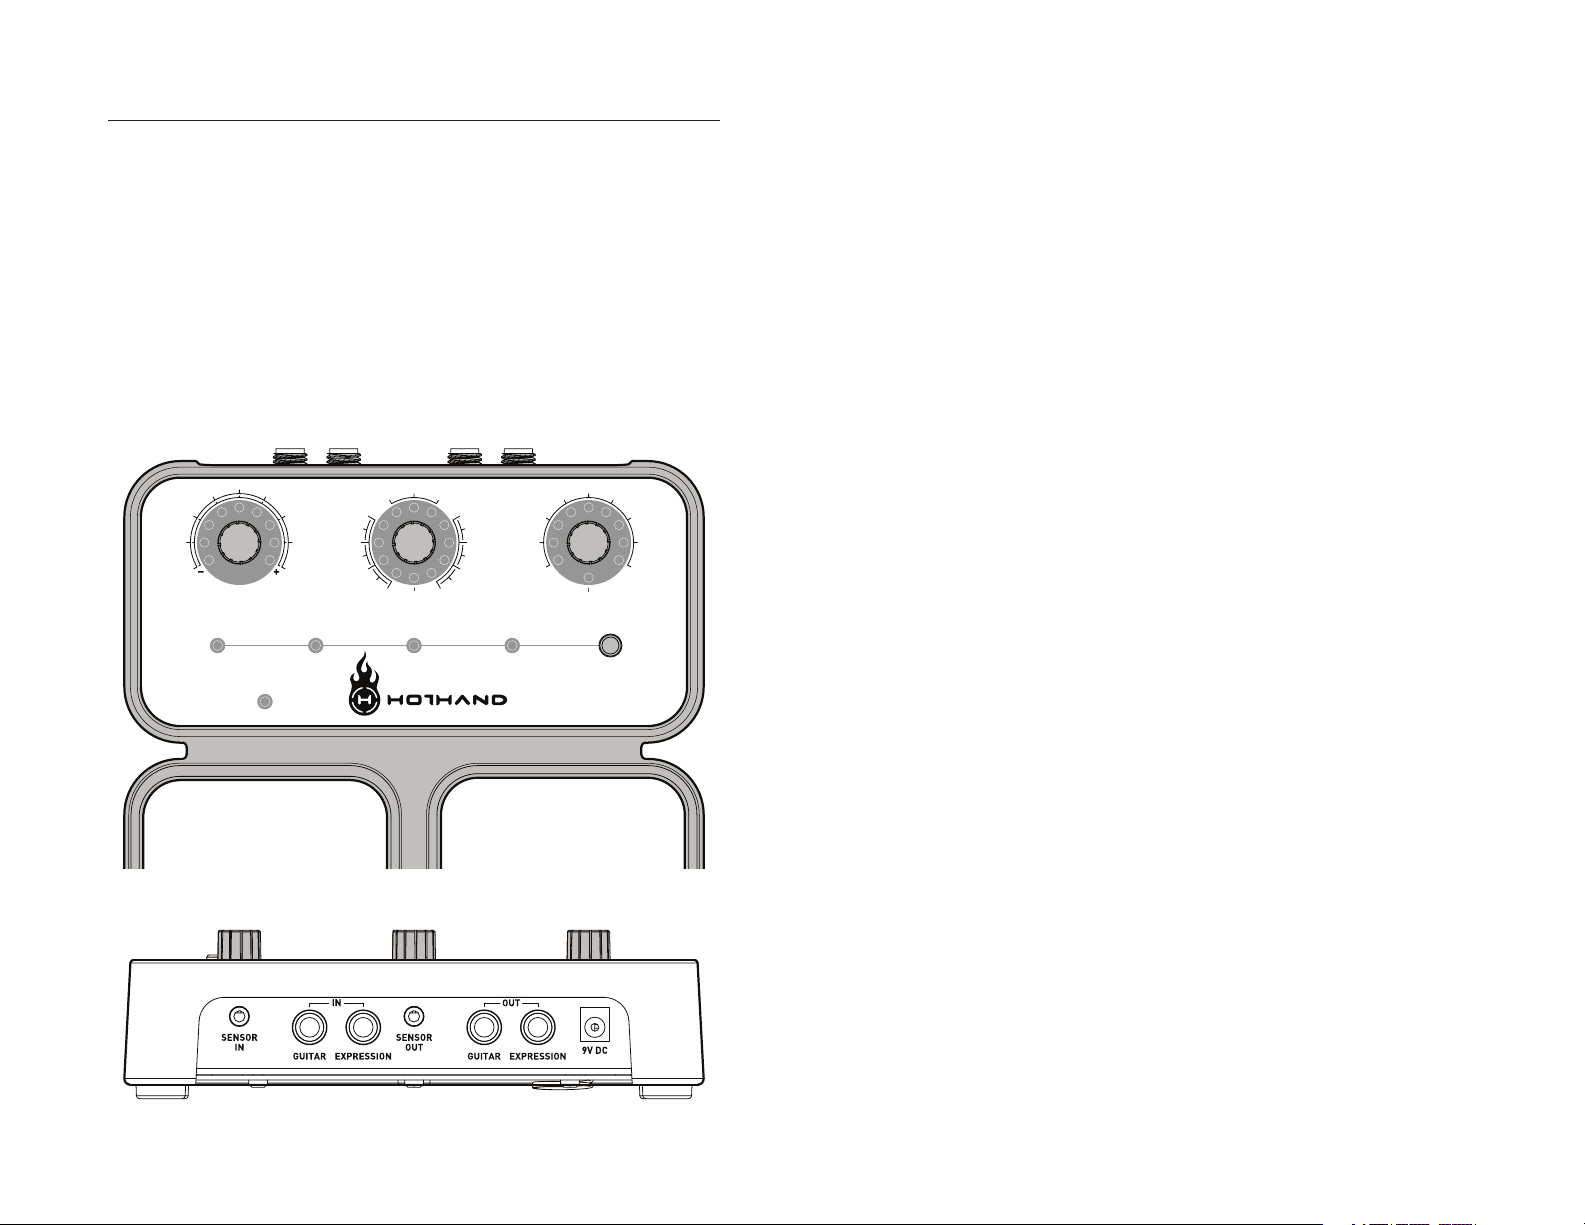
Connections
SENSOR IN
Connect the Hot Hand here directly or using the supplied EXTENSION CABLE.
GUITAR IN
This is where you connect your guitar to the box, using a standard ¼-inch
guitar cable.
Technical Note: The input impedance is 2.2 M. The maximum signal should not exceed 4.2 volts
peak-to-peak.
EXPRESSION IN
This input allows you to connect any standard expression pedal to the product
The EXPRESSION IN signal is summed with the Hot Hand, when the MOD
SOURCE is set to Hot Hand. If the Hot Hand is disconnected, then the pedal
will have exclusive control. If the
IN signal will control the LFO speed. EXPRESSION IN is unused when the MOD
SOURCE is set to ENVELOPE.
MOD SOURCE is set to LFO, the EXPRESSION
GUITAR OUT
This ¼-inch output is where you connect your amp or the next pedal in
your chain.
EXPRESSION OUT
This jack allows you to send the Hot Hand control signals, or whatever modulation has been selected by the
MOD SOURCE control, to other effects devices
that accept an expression input. This output signal defaults to an analog volt
age ranging from zero to
age can be adjusted up to
3.3VDC. This signal is “tip hot”. The maximum volt-
4.5VDC to accommodate other devices that require
higher voltages. For details on adjusting the voltage range see the Back Page
Parameters section on page 24. Note that this output is active at all times
when the Control Unit power is On.
ANY DEVICE YOU USE WITH THE HOT HAND IN THIS CONFIGURATION.
BE SURE TO READ THE DOCUMENTATION ON
9V DC
Connect a 9V DC power supply here if you do not wish to use batteries. Batteries will not be drained while the power supply is connected. Power supply
must be
tip plug is generally indicated by the symbol on the power supply.
REGULATED, minimum 200mA, and use a NEGATIVE tip plug. A negative
-
Technical Note: The pedal needs to have a linear taper potentiometer, from 10K to 100K, with one
side connected to ring, and the other to ground, and the wiper connected to the tip of the TRS ¼inch connector. We have found that the Moog and M Audio EXP pedals work well. Audio taper pots,
as commonly found in volume control pedals, will not give good results.
Very Technical Note: An external control voltage source, such as from an analog synthesizer, may
be connected to the EXPRESSION IN jack. A mono ¼-inch cable may be used for this application. Do
not allow the input voltage to go negative with respect to ground.
SENSOR OUT
This output can be used to “pass on” the Hot Hand signal to other Source
Audio Hot Hand Products (such as the Motion Controlled Wah Filters) so that
one Hot Hand Sensor will control multiple effects. This application is also
known as “Daisy Chaining”.
• WARNING! Do not connect this to any device other than the SENSOR IN jack
on another Source Audio product. Damage may result.
Use of a non-Source Audio approved supply may cause damage and void the
warranty.
Sensor In
Jack
Expression In
Guitar In
Jack
Jack
Sensor Out
Jack
Guitar Out
Jack
Expression Out
Power Supply
Jack
9V DC
Jack
Connections | 2120 | Connections
Page 12

SAVE
(ALT) BACKPAGE
PRESET
03
PRESET
04
EFFECT
(ALT) MOD SOURCE
MOTION/SPEED
PRESET
02
PRESET
01
ON/OFF
ENVELOPE
CALIBRATE
LFO/SEQ
INVERT/SEQ ENABLE
DEPTH
(ALT) FREQUENCY/DELAY
HOT HAND
MOTION CONTROLLED PHASER/ FLANGER
ON/OFF
SELECT
(HOLD FOR ALT MODE)
02
04
06
07
03
02
04
06
07
01
05
02
03
05
00
08
07
06
01
02
03
05
04
00 08
07
06
01
03
05
01
FLANGER
PHASER
FLAIL
/SLOWPICK/FAST
STRUM
Pedals
SAVE
(ALT) BACKPAGE
PRESET
03
PRESET
04
EFFECT
(ALT) MOD SOURCE
MOTION/SPEED
PRESET
02
PRESET
01
ON/OFF
ENVELOPE
CALIBRATE
LFO/SEQ
INVERT/SEQ ENABLE
DEPTH
(ALT) FREQUENCY/DELAY
HOT HAND
MOTION CONTROLLED PHASER/ FLANGER
ON/OFF
SELECT
(HOLD FOR ALT MODE)
02
04
06
07
03
02
04
06
07
01
05
02
03
05
00
08
07
06
01
02
03
05
04
00 08
07
06
01
03
05
01
FLANGER
PHASER
FLAIL
/SLOWPICK/FAST
STRUM
Saving Presets
ON/OFF (left) Pedal
Pressing this pedal once engages the effect that is selected. Pressing the
pedal again will turn the effect off and the bypass on. There is an
ON/OFF LED
right above the pedal that notifies you when the effect is turned on.
Technical Note: In bypass mode, the signal still passes through a unity-gain, high input impedance,
low noise buffer.
SELECT (right) Pedal
The SELECT pedal cycles through the 4 presets in a repeating pattern. The 4
LEDs above this pedal indicate which preset has been selected.
The preset will change when the pedal is released. If the
held down, it invokes
EFFECT knobs to FREQUENCY/DELAY and MOD SOURCE. ALT MODE also changes
ALT MODE, which changes the function of the DEPTH and
the SAVE button into a switch to enter the Back Page parameter editor. When
the SELECT pedal is held down long enough to go into ALT MODE, the preset
selection will not advance upon pedal release.
SELECT pedal is
The PRESET feature of this product has been designed to be simple. This
product allows you to save
4 different configurations so that they may be eas-
ily recalled from the standing position. When you receive your product from
the factory, we have selected what we think are 4 useful configurations. You
may either keep these or replace any of them with your own settings. Should
you wish to return to the original factory presets, see the Restore Defaults
section on page 33.
01 : Select and edit a preset
By stepping on the SELECT pedal you can select one of four user presets.
Edit a preset by changing values for
SOURCE, MOTION/SPEED or INVERT. Any time that you change the knob posi-
tions of a given preset, that preset
DEPTH, FREQUENCY/DELAY, EFFECT, MOD
LED will blink slowly to indicate that the
preset has been edited.
02 : Press and hold the SAVE button for two seconds
The preset LED will blink rapidly to signal that the saving process has begun.
When the light becomes solid, the save process is complete. Note that this
process will over-write any setting that was previously stored in this location.
ADVANCED USER NOTE
It is possible to save different calibration settings for each preset. The procedure is described in the
CALIBRATE section on page 12. Different settings of the Back Page parameters may also be saved
for each preset. See page
24.
ON/OFF pedal Select pedal
01 02
Saving Presets | 2322 | Pedals
Page 13

Effect Types
Following are descriptions of the different effect types we programmed into
the Hot Hand box. Note that each sound interacts differently with both the Hot
Hand hand motions, or other modulation sources, as well as the settings on
the
DEPTH, FREQUENCY/DELAY and MOTION/SPEED knobs. It is suggested that
you experiment a bit to find just the right sound for different playing styles.
Phasers
The input signal goes into a number of phase shift sections. Each section
has a control which determines the frequency around which the resultant
phase shift makes a smooth transition from
output of the last phase shifter is combined with the input. Any frequencies
at which the shifted signal is an odd multiple of
will undergo total cancellation, producing a notch in the spectrum. Some
of the shifted signal may be fed back to the phase shift chain. Frequencies
which are a multiple of
360 degrees from the input will be boosted, causing
a peak in the spectrum. This is called resonance.
0 degrees to -180 degrees. The
180 degrees from the input
Flangers
A Flanger works very much like a Phaser, except that instead of using a chain
of phase shifters, a delay line is used. The length of time a signal is delayed
is controlled by the modulation. The sum of the delayed signal with the input
signal produces notches at frequencies where there is cancellation. Feedback
will introduce resonance peaks between the notches. At short settings of the
DELAY time control, there will be fewer notches in the Flanger’s frequency
response than at long delays.
Delay Controller
Delay Generator
(not frequency dependent)
Input
Output
Flanger Algorithms
The number of phase shift stages and the amount of feedback are hard-wired
for each of the Phaser algorithms. Note that for every
2 stages of phase shift
section, one obtains one notch in the frequency response.
Delay Controller
Delay Generator
(frequency dependent)
Input
Output
Phaser Algorithms
#1 A model of one of the oldest rotating speaker simulators. 2 notches, but one is
#2 Standard 2 notch. Some resonance.
#3 Standard 3 notch. No resonance.
#4 Standard 4 notch. Some resonance.
#5 Standard 6 notch. Some resonance.
#6 6 notch, but shifted signal subtracted from input rather than added. Produces a
#7 2 notch, but 6 peaks. Some resonance.
such low frequency as to be nearly inaudible. No resonance.
hollow sort of sound. No resonance.
#1 Classic Flanger.
#2 Delayed subtracted from input, producing a hollow sound.
#3 Multiple, individually varying, delay lines summed.
#4 High resonance, peaks only, no notches.
#5 Multiple delays, no resonance.
#6 Multiple delays, with resonance.
#7 Delayed signal only, no flanging effect. Meant for pitch modulation, such as
vibrato. There are some small resonance peaks, so that vibrato doesn’t sound
too sterile and mechanical. Slow modulation will be nearly inaudible. Shorter
delay times will produce less of an effect than long delay times.
Order of Effects
A controversial subject, to be sure. But phasers and flangers will give more
dramatic results if there is more high frequency content to the sound being
processed. A distortion box will do just that, if it is in front of the phaser or
flanger. Distortion following a phaser or flanger, on the other hand, tends to
fill in the notches in the frequency spectrum and obscure the effect. Let your
ears be your guide.
A compressor in front of this product will somewhat reduce the range of
the envelope follower signal, since it will be reducing the loudness variations.
Total, over-the-top mega-distortion before the effect can be a problem for
the envelope follower, because it removes all of the dynamic range of the
guitar signal, and tends to fill in what would be silence between notes with
hum and noise.
Effect Types | 2524 | Effect Types
Page 14

Back Page Features and Controls
We have tried to balance the conflicting requirements of flexibility and simplicity in this unit. Thus, a number of parameters appear in what we call Back
Page editing. These are parameters that, in general, will not need as frequent
adjustments as the controls that are directly accessible from the front panel.
(These parameters, along with the presets, may be restored to the factory
settings through the Restore function.)
To get into this special editing mode, hold down the
push and hold the SAVE button for 2 seconds. The unit will then stay in this
editing mode without any controls being held down. The
knobs will used to edit the parameters. To exit from this mode, turn the func
tion selector to the
Page editing mode is the lack of any lit
CALIBRATE position. An indication that the unit is in Back
LEDs around the MOTION/SPEED knob.
Each preset has its own independent set of Back Page parameters. When
entering the Back Page parameter editor, either all the preset
lit, or only the one corresponding to the currently selected preset. Hitting the
SELECT pedal will toggle between these two states. Any changes made to any
particular parameter will be made to all presets if all the preset
otherwise, the change will only be made to the current preset. Thus, it is easy
to go in and change the Hot Hand axis selection for all presets, or to change
the sequencer pattern for only one preset. Without exiting from the Back
Page editor, you can make changes for all presets, and then some changes to
only the current preset.
The EFFECT knob selects the parameter to be edited and the DEPTH knob
displays the current value and allows adjustment. The displayed value of each
parameter is taken from the stored value for the current preset. All changes
are saved automatically as they are made, either to all the presets, or only
the current preset. If no change is made with the
is saved, even though all the preset
LEDs may be lit. Thus, you do not have to
worry about replacing all the parameters for all presets merely by scrolling
through the parameters when all the preset
SELECT pedal, and then
DEPTH and EFFECT
-
LEDs will be
LEDs are on;
DEPTH knob, then nothing
LEDs are lit.
Parameters EFFECT knob
Input trim Phaser
01
Hot Hand Gain Phaser 03
Hot Hand X/Y axis rotation Phaser 05
Expression out scaling Phaser 07
Restore factory settings for HOT HAND
all presets and Back Page
parameters. Use
SELECT pedal
to engage.
Hot Hand to
LFO speed LFO/SEQ
Knock control ENVELOPE
Sequencer/random select Flanger 01
Sequencer pattern select Flanger 03
Sequencer length select Flanger 05
Sequencer transition rate Flanger 07
Exit CALIBRATE
Input gain trim (Effect=Phaser 01)
This is a gain adjustment applied to the guitar signal immediately after A/D
conversion. The possible values are
-8, -6, -4, -2, 0, 2, 4, 6, and 8 dB. Positive
values may be helpful for low level signals. If the input signal is particularly
hot, some attenuation may be required in order that the outputs of some of
the effects with the most resonance does not clip. This may also be used as
a per-preset volume adjust.
Hot Hand gain trim(Effect=Phaser 03)
This adjusts the gain multiplier applied to the Hot Hand signals relative to the
zero point from calibration. The lowest gain is
default of
1.0 is in the center position. The higher gains may be useful if you
like to use small hand motions and the lower gains if you prefer larger hand
motions. When using higher gains, calibration becomes more necessary.
.5, and the highest is 2.0. The
Generally the values on the
DEPTH control run from minimum at CCW (0) to
maximum at CW (8). There are only 9 possible values per parameter; there are
no in-between values. The current effect settings will be used while editing,
and Back Page parameter changes will be heard immediately.
Back Page Features and Controls | 2726 | Back Page Features and Controls
Page 15

Hot Hand x and y-axis interchange (Effect=Phaser 05)
The Hot Hand sensor uses a two axis accelerometer. By default, the Hot Hand
senses acceleration along the x-axis. The x-axis runs parallel to your arm and
the long dimension of the sensor ring. The y-axis is perpendicular to x, while
still being in the plane of an outstretched hand wearing the ring. We gener
ally find that the x-axis gives better control than the y-axis, but feel free to
experiment, especially if your playing technique is somewhat unconventional.
(Lefties—no, you still want to use x, but the normal and inverted settings are
effectively switched.)
Please note that if you are using the y-axis that you may need to re-calibrate
with your hand and the sensor parallel to the ground (palm down). This will
allow you to set a useful “zero” point for the y-axis.
-
Expression control output gain trim (Effect=Phaser 07)
This allows adjustment of the level of the signal on the EXPRESSION OUT
jack. The default is position
zero and
3.3VDC. The maximum output voltage is 4.5VDC. Note that greater
2. This will result in a signal that varies between
changes in signal can also be produced by faster motion of your hand. Higher
gain will allow you to use slower motions to achieve the desired signal levels.
Restore defaults (Effect=Hot Hand)
When the EFFECT knob is set to restore (HOT HAND) in the Back Page mode,
depressing the
their default settings, along with the Presets.
SELECT pedal will reset all of the Back Page parameters to
The default setting of the x-axis sensor is indicated by the top-most
LED on
the DEPTH knob. The next LED, in either direction, indicates use of an axis
midway between x and y (a
gets us to the y-axis. The complete set of
DEPTH
Knob Axis
0 -x
1 Halfway between –x and –y
2 -y
3 Halfway between –y and x
4 x
5 Halfway between x and y
6 y
7 Halfway between y and –x
8 -x
45 degree angle.) Another step in either direction
9 choices, from counter-clock-wise:
y
x
Note that a selection of –x acts the same as a selection of x with the INVERT
switch on. The
INVERT setting on the MOTION/SPEED knob will always act to
invert whichever axis direction is chosen.
Hot Hand to LFO Speed (Effect=LFO/SEQ)
When this parameter is in the center, or OFF position, (which is the default
value) an expression pedal plugged into the
to control the
LFO speed. This is the default. Away from this position, the
pedal is disabled, and the Hot Hand takes over. There is a range of four values
that determine how much change there is in the
x
are also repeated with a negative sign, indicating that the direction of control
by the Hot Hand is inverted. (The
INVERT switch cannot be used for this
purpose, since it is being used for selecting either the
The SPEED control is also used to set the initial LFO speed, and thus it cannot
y
control the speed of response to the Hot Hand motion. The Hot Hand motion
speed is automatically set to the middle of the range of the
The maximum range of control with the Hot Hand is the same as the control
range with the pedal.
DEPTH Relative LFO Speed Multiplier
Knob Speed Mod Range
0 -1.0 x2.88 to x.35
1 -0.75 x2.21 to x.45
2 -0.50 x1.70 to x.59
3 -0.25 x1.30 to x.77
4 0.0 (Use continuous control pedal instead)
5 0.25 x.77 to x1.30
6 0.50 x.59 to x1.70
7 0.75 x.45 to x2.21
8 1.0 x.35 to x2.88
EXPRESSION IN jack may be used
LFO speed. These values
LFO or the Sequencer.
SPEED control.)
Back Page Features and Controls | 2928 | Back Page Features and Controls
Page 16

KNOCK control (Effect=Envelope)
This parameter enables the unit to be toggled between effect on and effect
off by tapping the sensor wearing hand against a hard surface, such as the
guitar. There is a threshold level, which may be adjusted as needed. Higher
thresholds will need a harder tap to be recognized, but there will be less
chance of an accidental trigger from normal hand motions. Somewhere in
the middle of the range will generally be best. Note that this control may be
used regardless of whether or not the Hot Hand is being used as a modula
tion source.
DEPTH
Knob Threshold
0 KNOCK is disabled (default setting)
1 Lowest threshold (easiest)
2
3
4
5
6
7
8 Highest threshold (hardest)
Sequencer Controls
There are 9 patterns available for each of 9 length selections. The first length
selection is for a length of 3. It also includes the only possible length 2 pat
tern, a square wave. Since there aren’t enough other length 3 patterns to fill
-
out the entire list of 9 patterns, several length 6 patterns are also included.
The other lengths, from 4 through 12 (excluding 11) are all consistent through
each of their patterns. A brief description of the nature of the patterns is in
the table below. For lengths 9, 10, and 12, the narrow pulse pattern (all steps
at the lowest level, except for one at the highest) seemed pointless, and so a
more complicated pattern was used.
Sequence/Random (Effect=Flanger 01)
This parameter determines whether the sequencer will cycle through the
pre-stored sequence patterns, or use random values that don’t repeat. If
random is selected, the pattern and length parameters are ignored.
Piggy-backing on this parameter is the ability to speed up the LFO by a factor
of 100. This speed up applies even if the sequencer is not selected.
DEPTH
Knob Seq/Ran
0 Use sequence patterns (default setting)
1 Use random levels
2 Use sequence patterns; LFO speed is 100 times faster than normal
3 Use random levels; LFO speed is 100 times faster than normal
-
Pattern (Effect=Flanger 03)
The sequence pattern selection.
DEPTH
Knob Pattern description
0 triangle
1 rising saw
2 falling saw
3 narrow pulse (lengths of 9, 10, and 12 have other complex patterns)
4 only 3 different levels present in the pattern
5 only 2 different levels present in the pattern
6 complex patterns (default setting)
7 complex patterns
8 complex patterns
Sequencer Controls | 3130 | Back Page Features and Controls
Page 17

Length (Effect=Flanger 05)
SAVE
(ALT) BACKPAGE
PRESET
03
PRESET
04
EFFECT
(ALT) MOD SOURCE
MOTION/SPEED
PRESET
02
PRESET
01
ON/OFF
ENVELOPE
CALIBRATE
LFO/SEQ
INVERT/SEQ ENABLE
DEPTH
(ALT) FREQUENCY/DELAY
HOT HAND
MOTION CONTROLLED PHASER/ FLANGER
02
04
06
07
03
02
04
06
07
01
05
02
03
05
00
08
07
06
01
02
03
05
04
00 08
07
06
01
03
05
01
FLANGER
PHASER
FLAIL
/SLOWPICK/FAST
STRUM
The sequence length selection. The selections are:
Factory Presets
DEPTH
Knob Length
0 2/3/6
1 4
2 5
3 6
4 7
5 8 (default setting)
6 9
7 10
8 12
A selection of 0 on the DEPTH knob for the length parameter can yield any of
three different lengths (
Pattern
Selection Length
0 2
1 3
2 3
3 3
4 3
5 6
6 6
7 6
8 6
2, 3, or 6), depending on the selected pattern:
Transition (Effect=Flanger 07)
The time taken for the sequencer control signal to smoothly move from one
sequence level to another. A value on the
transition time, and
8, the shortest. The fastest ones may sound clicky or
glitchy as the control signal moves very quickly from one level to the next. The
slowest ones can remove the sense of discrete steps, when the sequencer is
set to a high rate.
DEPTH knob of 0 gives the longest
These are the presets that the unit ships with. The notation for the DEPTH,
FREQUENCY/DELAY, and MOTION/SPEED knobs is as follows: There are 9 posi-
tions around each knob, numbered
between each numbered position, which will be written as
Thus a value of
6 means that only the LED in position 6 is lit, while 6.75 means
that the knob has been turned three clicks beyond
0 to 8. There are 3 intermediate values
.25, .50, and .75.
6, and that both LED’s 6
and 7 are lit, with 7 being brighter than 6.
PRESET 01 02 03 04
DEPTH 5.50 7.75 4.75 7.25
FREQUENCY/DELAY 1.50 2.50 3.00 8.50
EFFECT PHASER 03 FLANGER 01 PHASER 02 FLANGER 06
MOD SOURCE HOT HAND HOT HAND LFO/SEQ LFO/SEQ
MOTION/SPEED 4.00 5.50 4.75 1.75
INVERT Off Off Off On
DEPTH Transition
Knob Rate
0 Slowest
1
2 (default setting)
3
4
5 8 (default setting)
6
7
8 Fastest
Back Page Parameters (default values)
• Input trim 4
• Hot Hand Gain 4
• Hot Hand X/Y axis rotation 4
• Expression out scaling 2
• Hot Hand to LFO speed 4
• Knock control 0
• Sequencer/random select 0
• Sequencer pattern select 6
• Sequencer length select 5
• Sequencer transition rate 2
Factory Presets | 3332 | Sequencer Controls
Page 18

Specifications
Dimensions
• L: 7.125 inches (18.1cm)
• W: 7.125 inches (18.1cm)
• H: 1.75 inches (4.5cm)
Total including knobs:
• H: 2.125 inches (5.5cm)
Weight
• 5lbs/2.27kg (floor unit only)
• 7lbs/3.18kg (total, including case)
Power
• 130mA @ 9 VDC
• 15-20 hours of battery life
• NEGATIVE tip power jack
Audio Performance
• 115dB audio ADC
• 24 bit audio conversion
• 56 bit digital data path
• Active analog bypass utilized
when effect not engaged
Troubleshooting
Noise
Low Power Change batteries or plug in a
Near noise source Move control box away from power supplies and
other equipment.
Other equipment Remove other boxes from signal chain,
see if noise persists.
Bad cables Swap out audio cables.
Low volume
Low power Change batteries or plug in a
Hot Hand doesn’t work
Low power Change batteries or plug in a
Not calibrated Calibrate the Hot Hand - see page
Different modulation source selected Change
EFFECT knob position to HOT HAND
while holding down the
Not connected Check data cable connections.
Knobs don’t work /light up
Low power Change batteries or plug in a
Plug inserted into
A stereo
GUITAR IN is corroded Use a good cable.
(TRS) cable has been used for GUITAR IN Use a mono cable only.
Wrong power supply Use correct power supply as defined on page
Unit repeatedly runs briefly, then stops working
DC power supply puts out more than 9 volts Use proper 9 volt supply.
For additional assistance, please visit www.sourceaudio.net.
DC power supply.
DC power supply.
DC power supply.
14.
SELECT pedal.
DC power supply.
21.
LIMITED WARRANTY
Source Audio, LLC (hereinafter “Source Audio”)
warrants that your new Source Audio Hot
Hand Control Box, when purchased at an
authorized Source Audio dealer in the United
States of America (“
USA”), shall be free from
defects in materials and workmanship under
normal use for a period of one (1) year from
the date of purchase by the original purchaser.
Source Audio further warrants that the Hot
Hand Ring Sensor shall be free from defects
in materials and workmanship under normal
use for a period of ninety (90) days from the
date of purchase by the original purchaser.
This Limited Warranty does not extend to the
batteries, wires, and other components sold
as part of the product, which are purchased as
is. Please contact your dealer for information
on warranty and service outside of the
USA.
Under this Limited Warranty, Source Audio’s
sole obligation and the purchaser’s sole rem
edy shall be repair, replacement, or upgrade,
at Source Audio’s sole discretion, of any
product that, if properly used and maintained,
proves to be defective upon inspection by
Source Audio. Source Audio reserves the right
to update any unit returned for repair and to
change or to improve the design of the product
at any time without notice. Source Audio
reserves the right to use reconditioned parts
and assemblies as warranty replacements
for authorized repairs. Any product repaired,
replaced, or upgraded pursuant to this Limited
Warranty will be warranted for the remainder
of the original warranty period.
This Limited Warranty is extended to the
original retail purchaser. This Limited Warranty
can be transferred to anyone who may sub
sequently purchase this product provided that
such transfer is made within the applicable
warranty period and Source Audio is provided
with all of the following information: (i) all
warranty registration information (as set forth
on the registration card) for the new owner, (ii)
proof of the transfer, within thirty (30) days of
the transfer, and (iii) a photocopy of the original
sales receipt. Warranty coverage shall be de
termined by Source Audio in its sole discretion.
This is your sole warranty. Source Audio does
not authorize any third party, including any
dealer or sales representative, to assume any
liability on behalf of Source Audio or to make
any warranty on behalf of Source Audio.
WARRANTY INFORMATION
Source Audio may, at its option, require proof
of the original purchase date in the form of
a dated copy of original authorized dealer’s
invoice or sales receipt. Service and repairs
of Source Audio products are to be performed
only at the Source Audio factory or a Source
Audio authorized service center. Prior to ser
vice or repair under this Limited Warranty, the
purchaser must request from Source Audio a
return authorization, which is available at:
Source Audio
120 Cummings Park, Woburn, MA 01801
(781) 932-8080 or at www.sourceaudio.net.
LLC
Unauthorized service, repair, or modification
will void this Limited Warranty.
DISCLAIMER AND LIMITATION OF WARRANTY
DO NOT OPEN THE FLOOR BOX UNDER ANY CIR-
-
CUMSTANCE. THIS WILL VOID THE WARRANTY
THE FOREGOING LIMITED WARRANTY IS THE ONLY
WARRANTY GIVEN BY SOURCE AUDIO AND IS IN LIEU
OF ALL OTHER WARRANTIES. ALL IMPLIED WARRANTIES, INCLUDING WARRANTIES OF MERCHANTABILITY AND FITNESS FOR ANY PARTICULAR PURPOSE, EXCEEDING THE SPECIFIC PROVISIONS OF
THIS LIMITED WARRANTY ARE HEREBY DISCLAIMED
AND EXCLUDED FROM THIS LIMITED WARRANTY.
UPON EXPIRATION OF THE APPLICABLE EXPRESS
WARRANTY PERIOD, SOURCE AUDIO SHALL HAVE
NO FURTHER WARRANTY OBLIGATION OF ANY KIND,
EXPRESS OR IMPLIED. SOURCE AUDIO SHALL IN NO
EVENT BE LIABLE FOR ANY SPECIAL, INCIDENTAL
OR CONSEQUENTIAL DAMAGES SUFFERED BY THE
PURCHASER OR ANY THIRD PARTY, INCLUDING
WITHOUT LIMITATION, DAMAGES FOR LOSS OF
PROFITS OR BUSINESS OR DAMAGES RESULTING
FROM USE OR PERFORMANCE OF THE PRODUCT,
WHETHER IN CONTRACT OR IN TORT. SOURCE
AUDIO SHALL NOT BE LIABLE FOR ANY EXPENSES,
CLAIMS OR SUITS ARISING OUT OF OR RELATING
TO ANY OF THE FOREGOING. Some states do not
allow the exclusion or limitation of implied
warranties so some of the above limitations
and exclusions may not apply to you. This Lim
ited Warranty gives you specific legal rights,
and you may also have other rights, which
vary, from state to state. This Limited Warranty
only applies to products sold and used in the
USA. Source Audio shall not be liable for dam-
ages or loss resulting from the negligent or
intentional acts of the shipper or its contracted
affiliates. You should contact the shipper for
proper claims procedures in the event of dam
age or loss resulting from shipment.
-
-
-
34 | Specifications / Troubleshooting
Warranty | 35
Page 19

About Source Audio
Source Audio was founded in January 2005 by former engineers, scientists,
and executives of Analog Devices, Kurzweil Music Systems, and Thomas H.
Lee Partners. With over
we bring to the audio effects market a powerful team with skills in analog
and digital circuit design, algorithm and effects development, and marketing
and business management.
80 years of broad combined industry experience,
SA-102
© Source Audio LLC
120 Cummings Park, Woburn, MA 01801 www.sourceaudio.net
 Loading...