

Page 1
84mm wide
84mm tall
SMD-322
THE SINGING MACHINE INC.,
D/B/A SMC GLOBAL INC.,
6601 LYONS ROAD BUILDING A-7,
COCONUT CREEK, FL 33073
COPYRIGHT ©2010
Printed in China
THE SINGING MACHINE INC.,
D/B/A SMC GLOBAL INC.,
6601 LYONS ROAD BUILDING A-7,
COCONUT CREEK, FL 33073
COPYRIGHT ©2010
Impreso en China
Page 2

T
ABLE
OF
CONTENTS
1
Precautions . . . . . . . . . . . . . . . . . . . . . 2
FCC Declaration. . . . . . . . . . . . . . . . . . 3
EIA Guidelines . . . . . . . . . . . . . . . . . . . 4
Location of Controls . . . . . . . . . . . . . . . 6
Charging the Battery . . . . . . . . . . . . . . 7
Using the Neck Strap . . . . . . . . . . . . . . 8
Downloading and Transferring Files . . 9
Safely Remove Hardware . . . . . . . . . 15
General Operation . . . . . . . . . . . . . . 16
• Turning the Power On/Off . . . . . . . 16
• Hold Switch . . . . . . . . . . . . . . . . . . 16
• Headphones Jack . . . . . . . . . . . . . 16
• Volume Setting. . . . . . . . . . . . . . . . 16
Operation–Music Playback Mode. . 17
• To Listen to MP3s/WMAs. . . . . . . . 17
• High-Speed Music Search . . . . . . . 18
• Forward/Reverse Skip . . . . . . . . . . 18
Operation–
Video(AMV) Playback Mode
. 19
• To Play Video. . . . . . . . . . . . . . . . . 19
Operation–Photo Playback Mode. . 22
• To View Photos . . . . . . . . . . . . . . . 22
Operation–Ebook Mode. . . . . . . . . . 23
• To View an Ebook . . . . . . . . . . . . . 23
Setting Menu. . . . . . . . . . . . . . . . . . . 28
Troubleshooting Guide. . . . . . . . . . . . 29
Formatting the Player. . . . . . . . . . . . . 31
Resetting the Unit . . . . . . . . . . . . . . . 32
Video Conversion . . . . . . . . . . . . 33
Specifications . . . . . . . . . . . . . . . . . . . 35
Operation–Recorder Mode . . . . . . . 20
• To Create a Voice Recording. . . . . 20
• To Listen to a Recording . . . . . . . . 21
. .
Setting the Equalizer. . . . . . . . . . . . 24
Setting the Play Mode . . . . . . . . . . . 25
Setting the Power Saving. . . . . . . . 26
Setting the Backlight Timer . . . . . . 27
Page 3

COPYRIGHT:
• Distributing copies of MP3, WMA or AMV files without permission is a violation of
international copyright laws.
SAFETY:
• Vibration experienced during walking or exercising will not affect the player.
However, dropping the player or dropping a heavy object on the player may result
in damage or sound distortion.
• Avoid spilling any liquid onto or into the player.
• Do not leave the player in a location near heat sources; in a location subject to direct
sunlight, excessive dust, sand, moisture, rain or mechanical shock; on an unlevel
surface; or in a car with the windows closed during periods of excessive heat.
ROAD SAFETY:
• Do not use headphones while driving, cycling or operating any motorized vehicle. It
may create a traffic hazard and it is illegal in some areas. It can be potentially
dangerous to play your headset at a high volume while walking, especially at
pedestrian crossings. You should exercise extreme caution or discontinue use in
potentially hazardous situations.
FCC WARNING:
• This equipment may generate or use radio frequency energy. Changes or
modifications to this equipment may cause harmful interference unless the
modifications are expressly approved in the instruction manual. The user could
lose the authority to operate this equipment if an unauthorized change or
modification is made.
PRECAUTIONS
2
Page 4

3
FCC DECLARATION
This device complies with Part 15 of the FCC rules. Operation is subject to the following
two conditions: 1) This device may not cause harmful interference, and 2) This device must
accept any interference received, including interference that may cause undesired
operation.
Warning: Changes or modifications to this unit not expressly approved by the party
responsible for compliance could void the user’s authority to operate the equipment.
NOTE: This equipment has been tested and found to comply with the limits for a Class B
digital device, pursuant to Part 15 of the FCC Rules. These limits are designed to provide
reasonable protection against harmful interference in a residential installation. This
equipment generates, uses and can radiate radio frequency energy and, if not installed
and used in accordance with the instructions, may cause harmful interference to radio
communications.
However, there is no guarantee that interference will not occur in a particular installation. If
this equipment does cause harmful interference to radio or television reception, which can
be determined by turning the equipment off and on, the user is encouraged to try to correct
the interference by one or more of the following measures:
• Reorient or relocate the receiving antenna.
• Increase the separation between the equipment and receiver.
• Connect the equipment into an outlet on a circuit different from that to which the receiver
is connected.
• Consult the dealer or an experienced radio/TV technician for help.
Shield cable must be used with this unit to ensure
compliance with class B FCC limits.
Page 5

Dear Customer:
Selecting fine audio and video equipment such as the unit you’ve just purchased is
only the start of your musical enjoyment. Now it’s time to consider how you can
maximize the fun and excitement your equipment offers. This manufacturer and the
Electronic Industries Association’s Consumer Electronics Group want you to get the
most out of your equipment by playing it at a safe level. One that lets the sound come
through loud and clear without annoying blaring or distortion and, most importantly,
without affecting your sensitive hearing.
Sound can be deceiving. Over time your hearing “comfort level” adapts to higher
volumes of sound. So what sounds “normal” can actually be loud and harmful to your
hearing. Guard against this by setting your equipment at a safe level BEFORE your
hearing adapts.
To establish a safe level:
• Start your volume control at a low setting.
• Slowly increase the sound until you can hear it comfortably and clearly, and without
distortion.
Once you have established a comfortable sound level:
• Set the dial and leave it there.
Taking a minute to do this now will help to prevent hearing damage or loss in the future.
After all, we want you listening for a lifetime.
We Want You Listening For A Lifetime
Used wisely, your new sound equipment will provide a lifetime of fun and enjoyment.
Since hearing damage from loud noise is often undetectable until it is too late, this
manufacturer and the Electronic Industries Association’s Consumer Electronics Group
recommend you avoid prolonged exposure to excessive noise. This list of sound levels
is included for your protection.
4
Page 6
Decibel
Level Example
30 Quiet library, soft whispers
40 Living room, refrigerator, bedroom away from traffic
50 Light traffic, normal conversation, quiet office
60 Air conditioner at 20 feet, sewing machine
70 Vacuum cleaner, hair dryer, noisy restaurant
80 Average city traffic, garbage disposals, alarm clock at two feet
THE FOLLOWING NOISES CAN BE DANGEROUS UNDER CONSTANT EXPOSURE:
90 Subway, motorcycle, truck traffic, lawn mower
100 Garbage truck, chain saw, pneumatic drill
120 Rock band concert in front of speakers, thunderclap
140 Gunshot blast, jet engine
180 Rocket launching pad
Information courtesy of the Deafness Research Foundation.
5
A
S
S
O
C
I
A
T
I
O
N
EST. 1924
E
L
E
C
T
R
O
N
I
C
I
N
D
U
S
T
R
I
E
S
EIA
We
LISTENING
For A Lifetime
Want You
Page 7
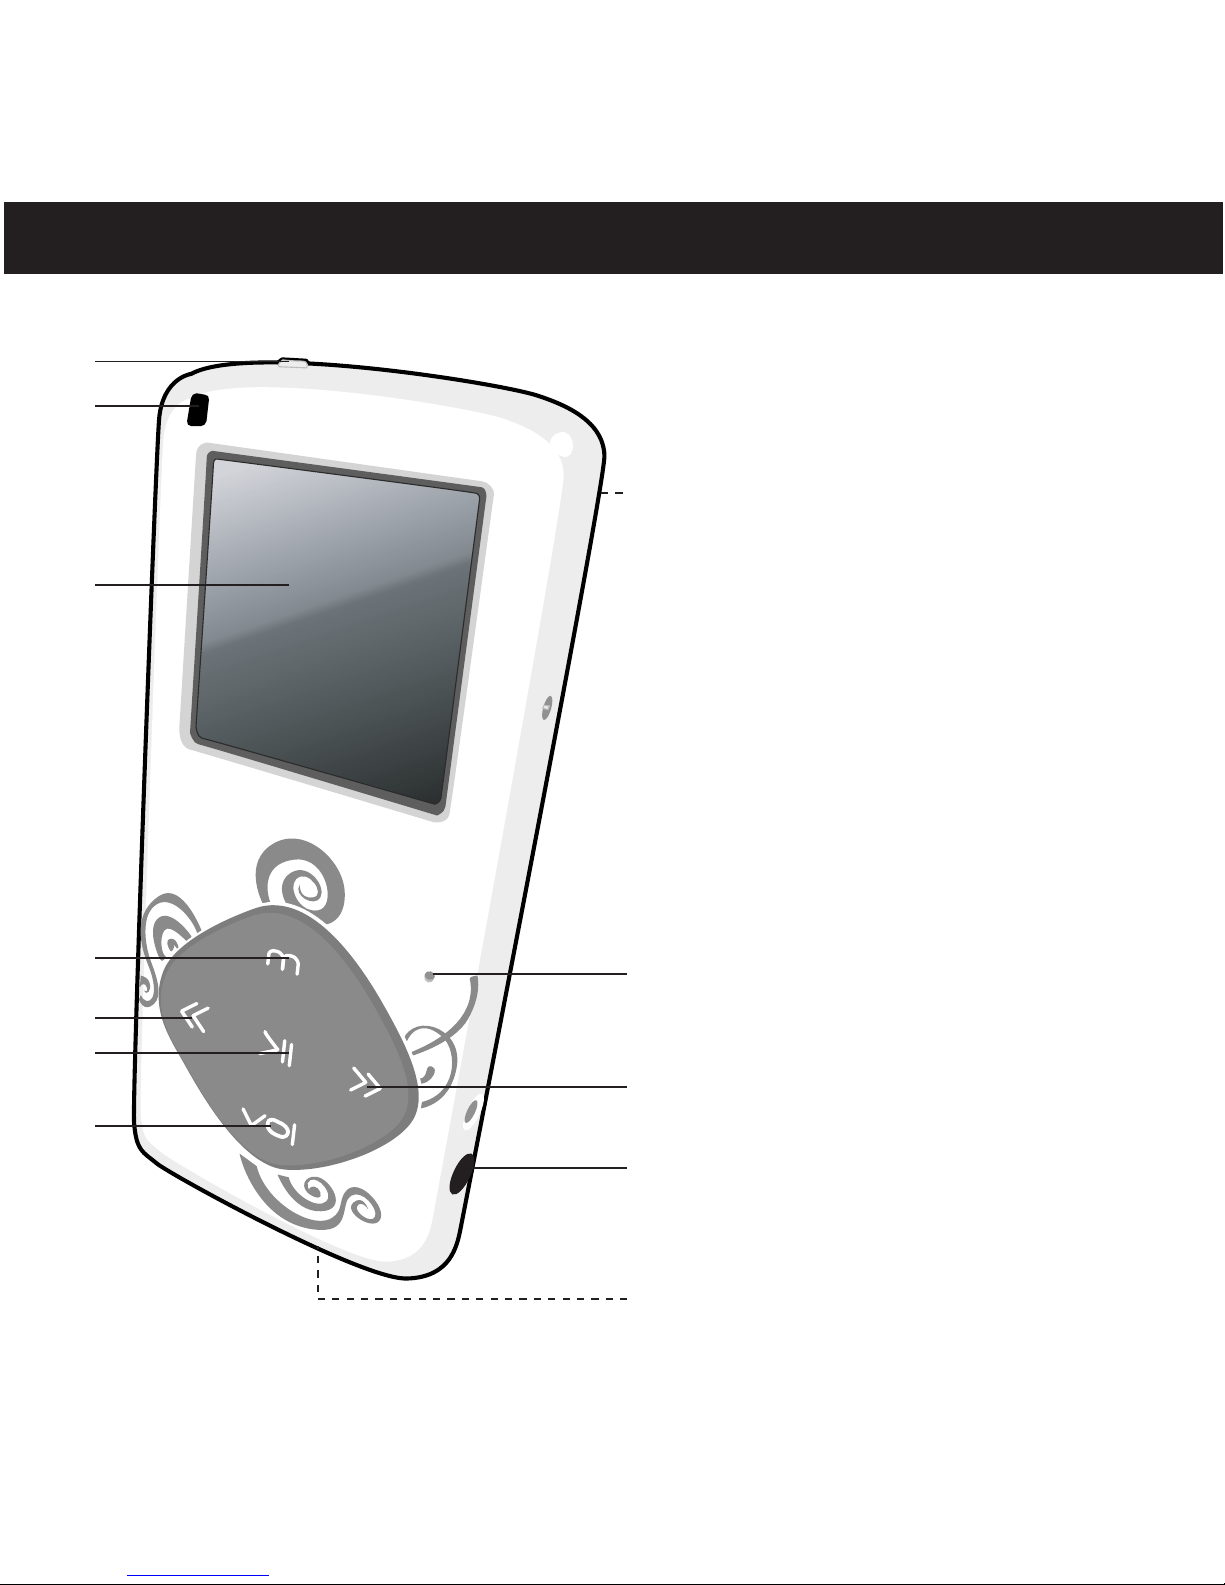
LOCATION OF CONTROLS
6
1
2
3
4
5
6
10
7
11
9
8
12
1. Hold Switch
2. Strap Holder
3. Display
4. Mode/Enter Button
5. Navigation Up/Skip–Search m
Button
6. Power/Play/Pause ®p Button
7. Volume Button
8. Reset Button (Rear of Unit)
9. Microphone
10. Navigation Down/Skip–Search
l Button
11. Headphones Jack
12. USB Jack
Page 8
CHARGING THE BATTERY
7
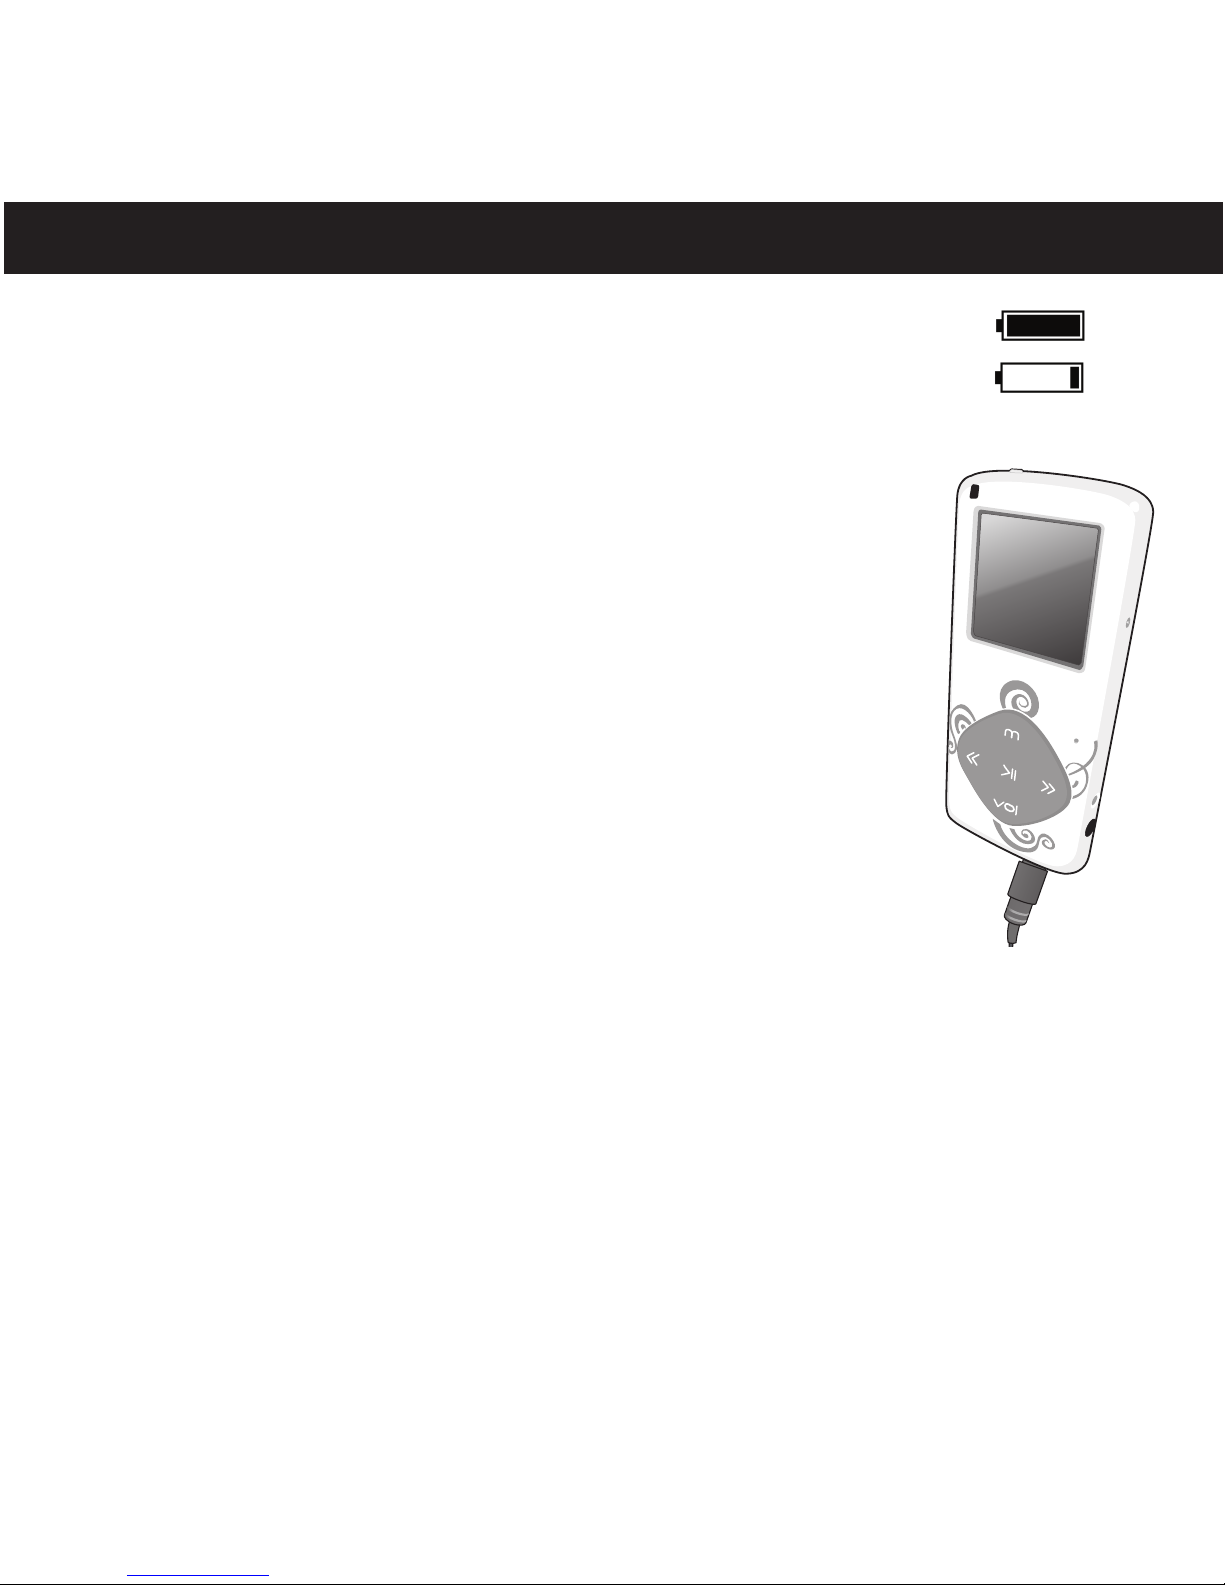
This unit has a built-in Lithium Polymer rechargeable battery. When the bars
in the battery indicator (in the display) become low (see Figure 1) and
especially when the Battery Low indicator appears, recharge the battery as
follows.
1. Connect the USB cable to the USB jack on the bottom of this
unit (as shown) and to the USB port on your computer. When
charging, the battery indicator will cycle from empty to full.
Once the battery is fully charged, the battery indicator will
stop cycling.
NOTES:
• To disconnect this unit from your computer, make sure to follow the “Safely Remove
Hardware” instructions on page 15.
• It takes approx. 3 hours to charge the battery from empty to full. When fully charged,
the unit can playback for approx. 8 hours in Music Playback mode. (Actual playback
times may vary.)
• For data transfer, please use the USB cable (included) to connect the unit to
your computer.
Figure 1
Full
battery
Low
Battery
Page 9
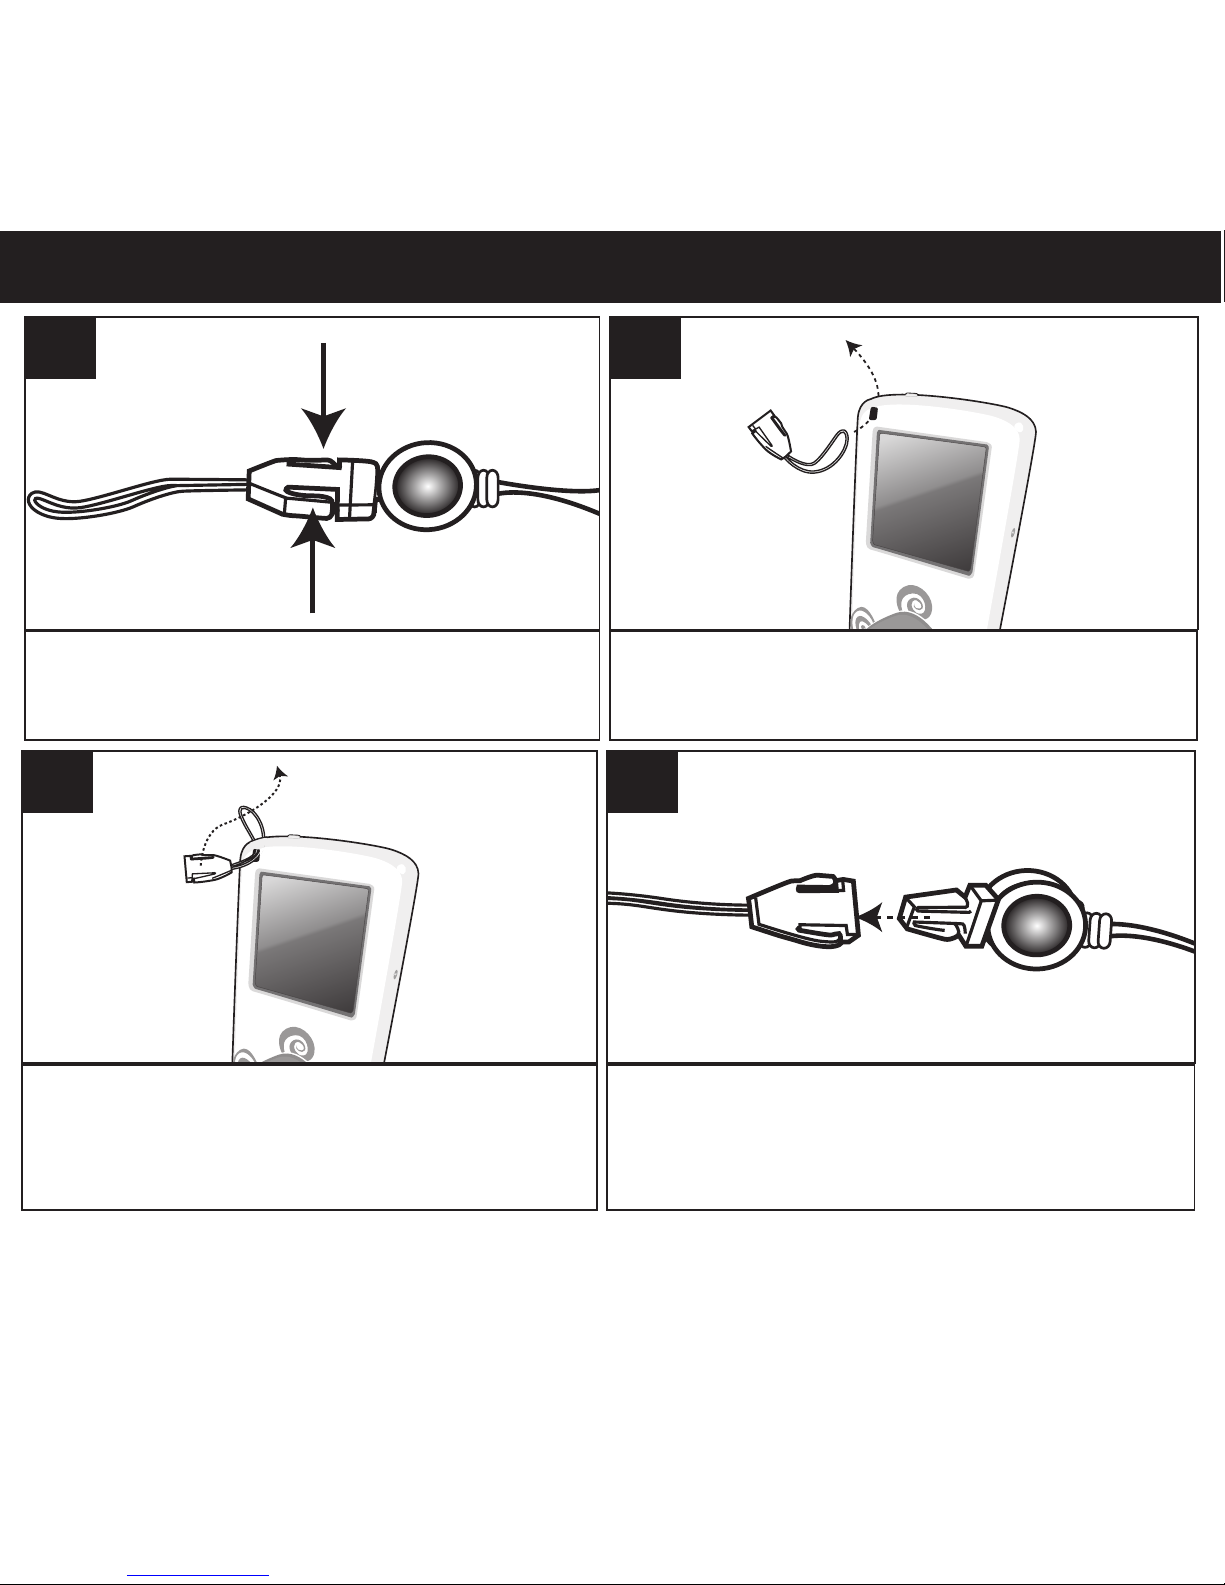
8
USING THE NECK STRAP
Press the Tabs to release the Strap connector
from the Neck strap.
1
Insert the rope through the hole in the main unit.
2
Insert the Strap connector through the rope’s loop
until snug.
3
Connect the Neck strap back to the Strap connector.
Repeat for the other side of the unit. Adjust the next
strap as desired using the Loop Adjuster.
4
Page 10

9
SUPPORTED OPERATING SYSTEMS
This unit is compatible with Microsoft Windows XP (Home or Professional
Edition with Service Pack 2 or higher) or Vista and Macintosh 9 or above.
Please refer to the following pages to learn how to: transfer files, convert music on
an audio CD into MP3 or WMA format using Windows Media Player 10, transfer
photos, transfer Ebooks and to safely remove your unit from the computer and how
to transfer files using a Macintosh.
NOTE: Visit www.Microsoft.com to download the corresponding Windows Media
Player for your computer.
MEDIA FILES SUPPORTED FORMATS
Audio Formats: MP3, WMA files
Photo Format: Baseline JPEGs
Ebook Format: TXT
DOWNLOADING AND TRANSFERRING FILES
Video Format: AMV (Use AMV conversion software (Included) to do the video conversion.
Please refer to the page 33 for video conversion.)
Page 11

DOWNLOADING AND TRANSFERRING FILES (CONT.)
10
TRANSFERRING AUDIO FILES
You can download digital music files from the Internet or use encoding
software to convert music that you have on an audio CD into MP3 or WMA
format. Once these files are stored on your computer you can easily copy them
to your player.
If you have Windows Media Player 10 or 11, you can transfer music files
(MP3, WMA) to the player through the "Sync" function of Windows Media
Player 10 or 11. Connect your player to the USB port on your computer as
shown on page 7. Then, follow the procedure on page 12 to transfer music
files to the player.
If you do not have Windows Media Player 10 or 11, transfer music files as
follows:
1. Connect your player to the USB port on your computer using the USB
cable as shown above.
2. A "Removable Disk" window will automatically pop-up on your computer
screen.
3. To add more files and songs to your player, simply drag and drop MP3 or
WMA files/folders from anywhere on your computer into the "Removable
Disk" window.
Page 12
DOWNLOADING AND TRANSFERRING FILES (CONT.)
11
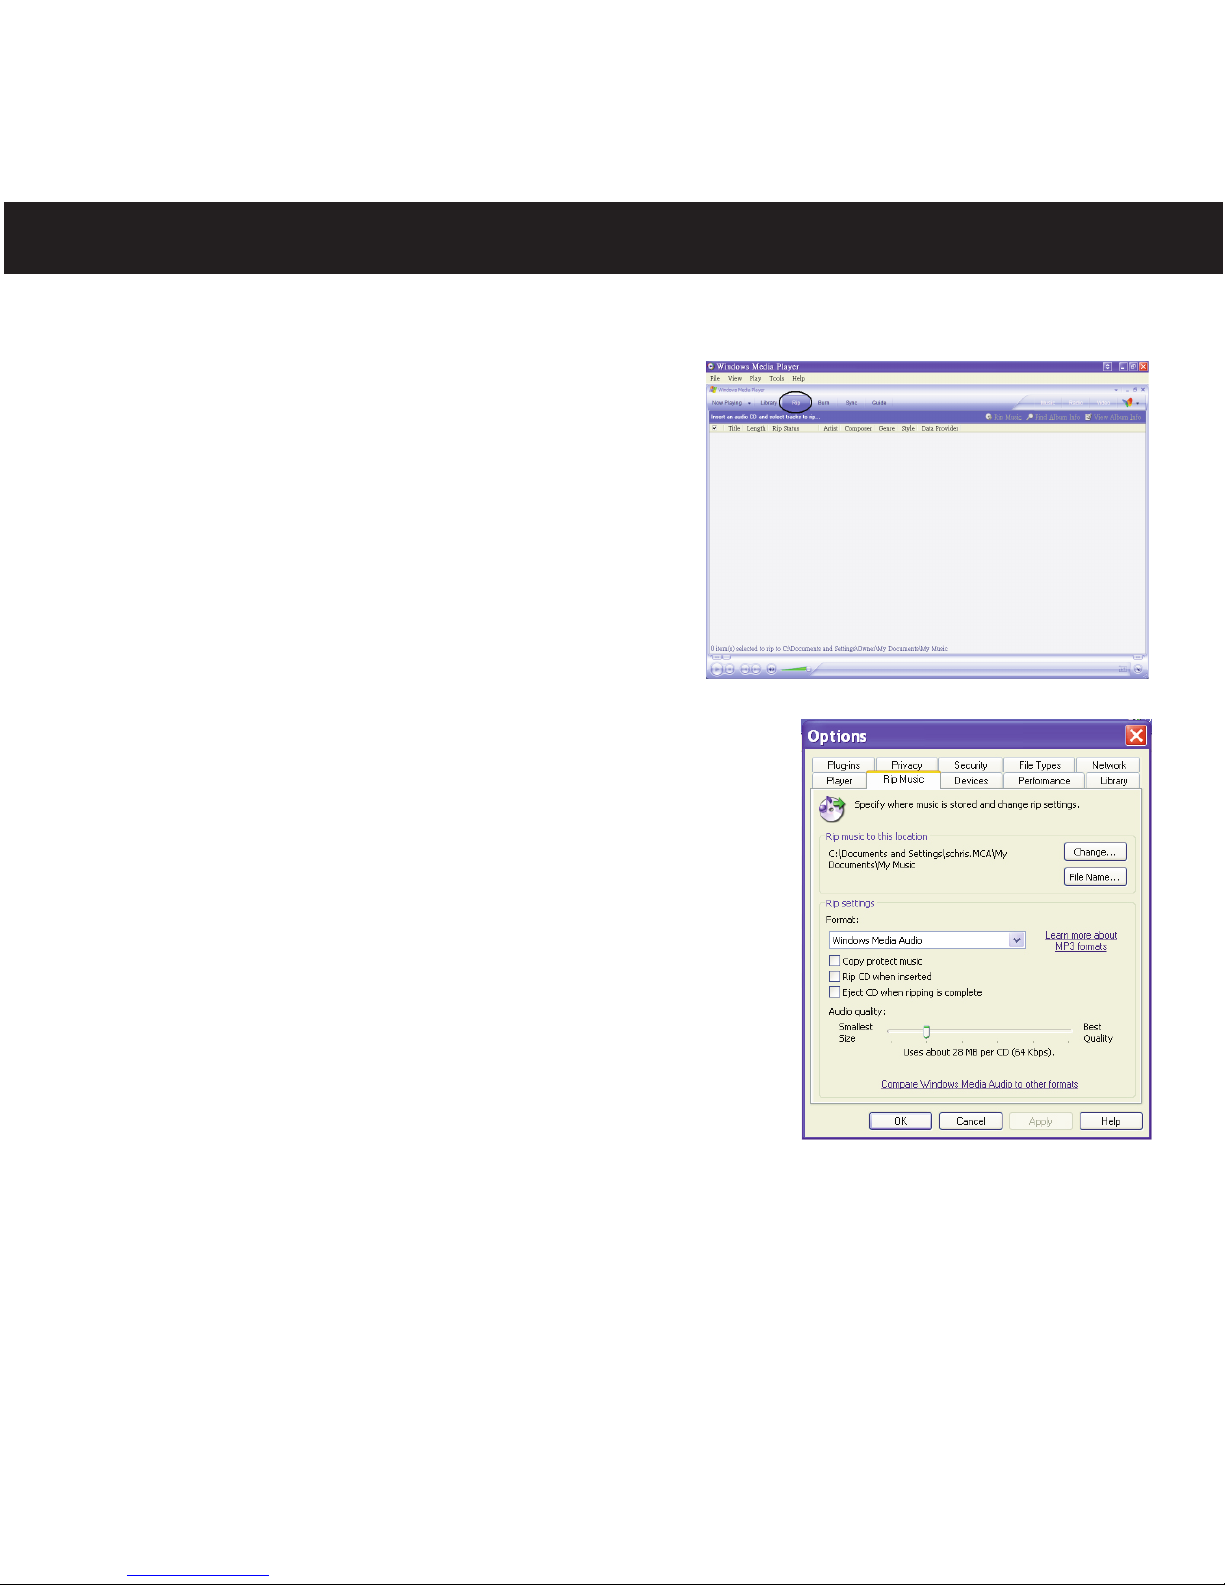
CONVERTING AN AUDIO CD INTO MP3 OR WMA FORMAT
If you previously installed Windows Media Player 10 or 11 software, you can utilize it to convert
music on an audio CD into MP3 or WMA format as
follows:
1. Open the Windows Media Player 10 or 11
Browser, then click on the “Rip” icon on the top
tool bar. Insert a Music CD into the CD-Rom
drive of your computer.
2. Click on the “Tools” menu option at the top menu
bar, then click on “Options”; the Option setting
menu will appear. Click on Rip Music and set the
Rip Music to the desired location on your
computer. Then, set the desired format for the
newly ripped music (MP3 format or Windows
Media Audio format). Adjust the audio quality as desired.
When finished, click “OK” to confirm the settings.
3. Click on the “Rip Music” icon to start ripping the music to
your computer.
4. When the music tracks are ripped; connect the player to
your computer. Open the "Removable Disk" window and
open the ripped music location window.
5. To add the transferred/ripped music files/songs to your
player simply drag and drop the MP3 or WMA files into
the "Removable Disk" window.
6. When the files are finished loading into the player, you
can follow the “Safely Remove Hardware” procedure as
shown on page 15.
NOTES:
• For Windows Media Player 11 users, please visit the following link for instructions on how to
rip (copy) songs from CDs to your computer:
http://www.microsoft.com/windows/windowsmedia/knowledgecenter/howto/mp11/rip.aspx
• Windows Vista users must use Windows Media Player 11 to convert music on an audio CD
into MP3 or WMA format.
Page 13
DOWNLOADING AND TRANSFERRING FILES (CONT.)
12
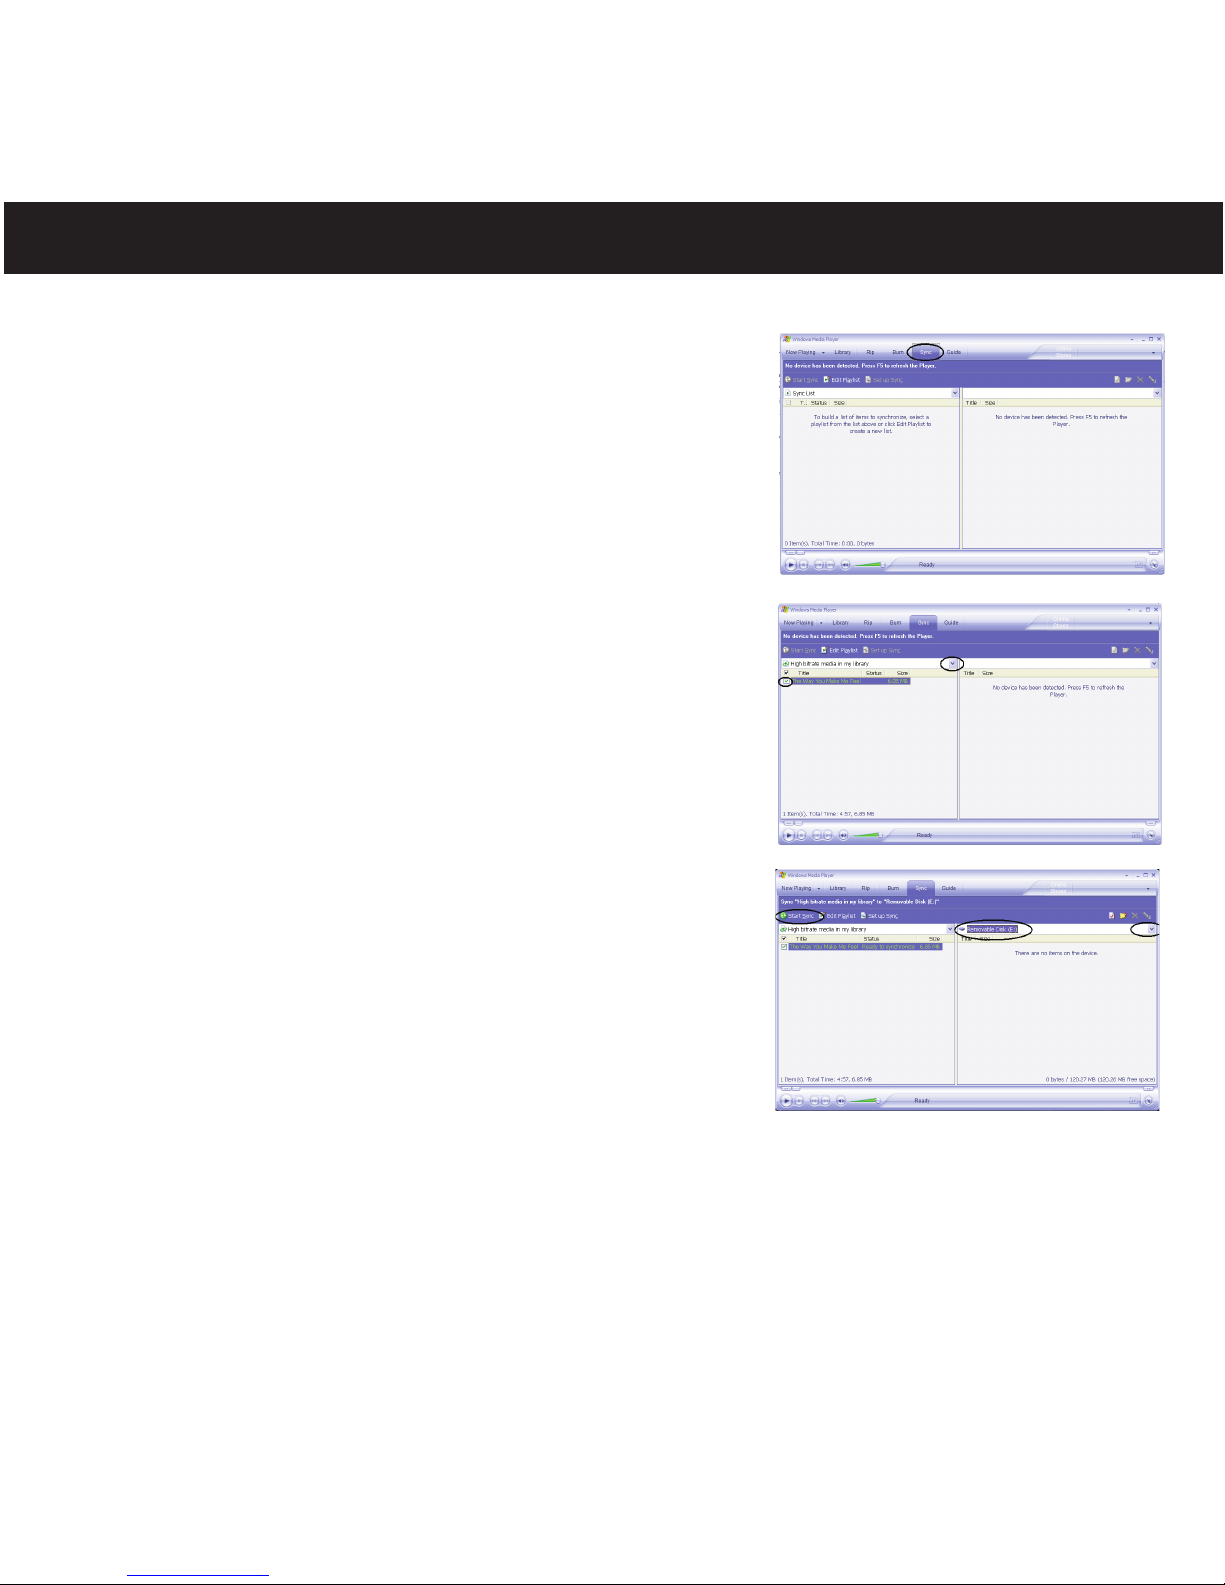
TRANSFERRING MP3/WMA FILES USING WINDOWS MEDIA PLAYER 10 (FOR WINDOWS XP
ONLY)
For Windows XP to transfer MP3/WMA files to the player,
follow the procedure described below using the previously
installed WMP (Windows Media Player) 10. Before beginning
the procedure, please connect the unit to the computer as
previously described.
1. Open the “Windows Media Player Browser 10” and click on
“Sync”.
2. Click on the “Sync List” pull-down menu to locate the music
files you wish to download. Then make sure to tick the box
next to the files.
3. Select the Portable Device ("Removable Disk") that you
want to copy to from the right side drop-down menu. Click
“Start Sync” to start transferring music files to the player.
4. After you are finished transferring all the desired files to your
unit, follow the “Safely Remove Hardware” procedure on
page 15.
NOTES:
• For Windows Media Player 11 users, please visit the
following link for instructions on how to sync files to this unit:
http://www.microsoft.com/windows/windowsmedia/knowledgecenter/howto/mp11/sync.aspx
• Windows Vista users must use Windows Media Player 11 to transfer music files to the player.
Page 14

13
TRANSFERRING TEXT AND PHOTO FILES TO YOUR DIGITAL PLAYER
USING DRAG AND DROP METHOD USING WINDOWS
1. Turn on your computer.
2. Turn on your digital player.
3. Connect the smaller end of the cable to the USB jack on the player and the
larger end of the cable to your USB port on your PC.
4.
A "Removable Disk" window will automatically pop-up on your computer
screen.
5.
6
. After you have finished your transfer, safely remove the player as described
on page 15.
7. Your player is ready to play the files you transferred.
DOWNLOADING AND TRANSFERRING FILES (CONT.)
Simply drag and drop the files (Audio, Video, Photo, Ebook) inside the
"Removable Disk".
Page 15

TRANSFERRING FILES TO YOUR DIGITAL PLAYER USING A MACINTOSH
COMPUTER
Make sure to use a Macintosh computer with
an operating system of 9 or later to
transfer audio files.
1. Turn on your computer.
2. Turn on your digital player.
3. Connect the smaller end of the cable to the USB jack on the player and the
larger end of the cable to your USB port on your Macintosh.
4. Your computer will automatically recognize your player and mount a hard
disk icon onto your desktop.
5.
6. After you have finished your transfer, put away the digital player hard disk
icon(s) by dragging it to the Trash icon or Control-click its icon and choose
Eject from the file menu or select Eject from the File drop down menu located
at the top of your screen. You can also use the keyboard shortcuts by
selecting the digital player hard disk icon and pressing the Command-E keys.
7. Your player is ready to play the files you transferred.
DOWNLOADING
ANDTRANSF
ERRING FILES (CONT.)
14
Simply drag and drop the files (Audio, Video, Photo, Ebook) inside the
"Removable Disk".
Page 16
SAFELYREMOV
E
HARDWAR
E
15
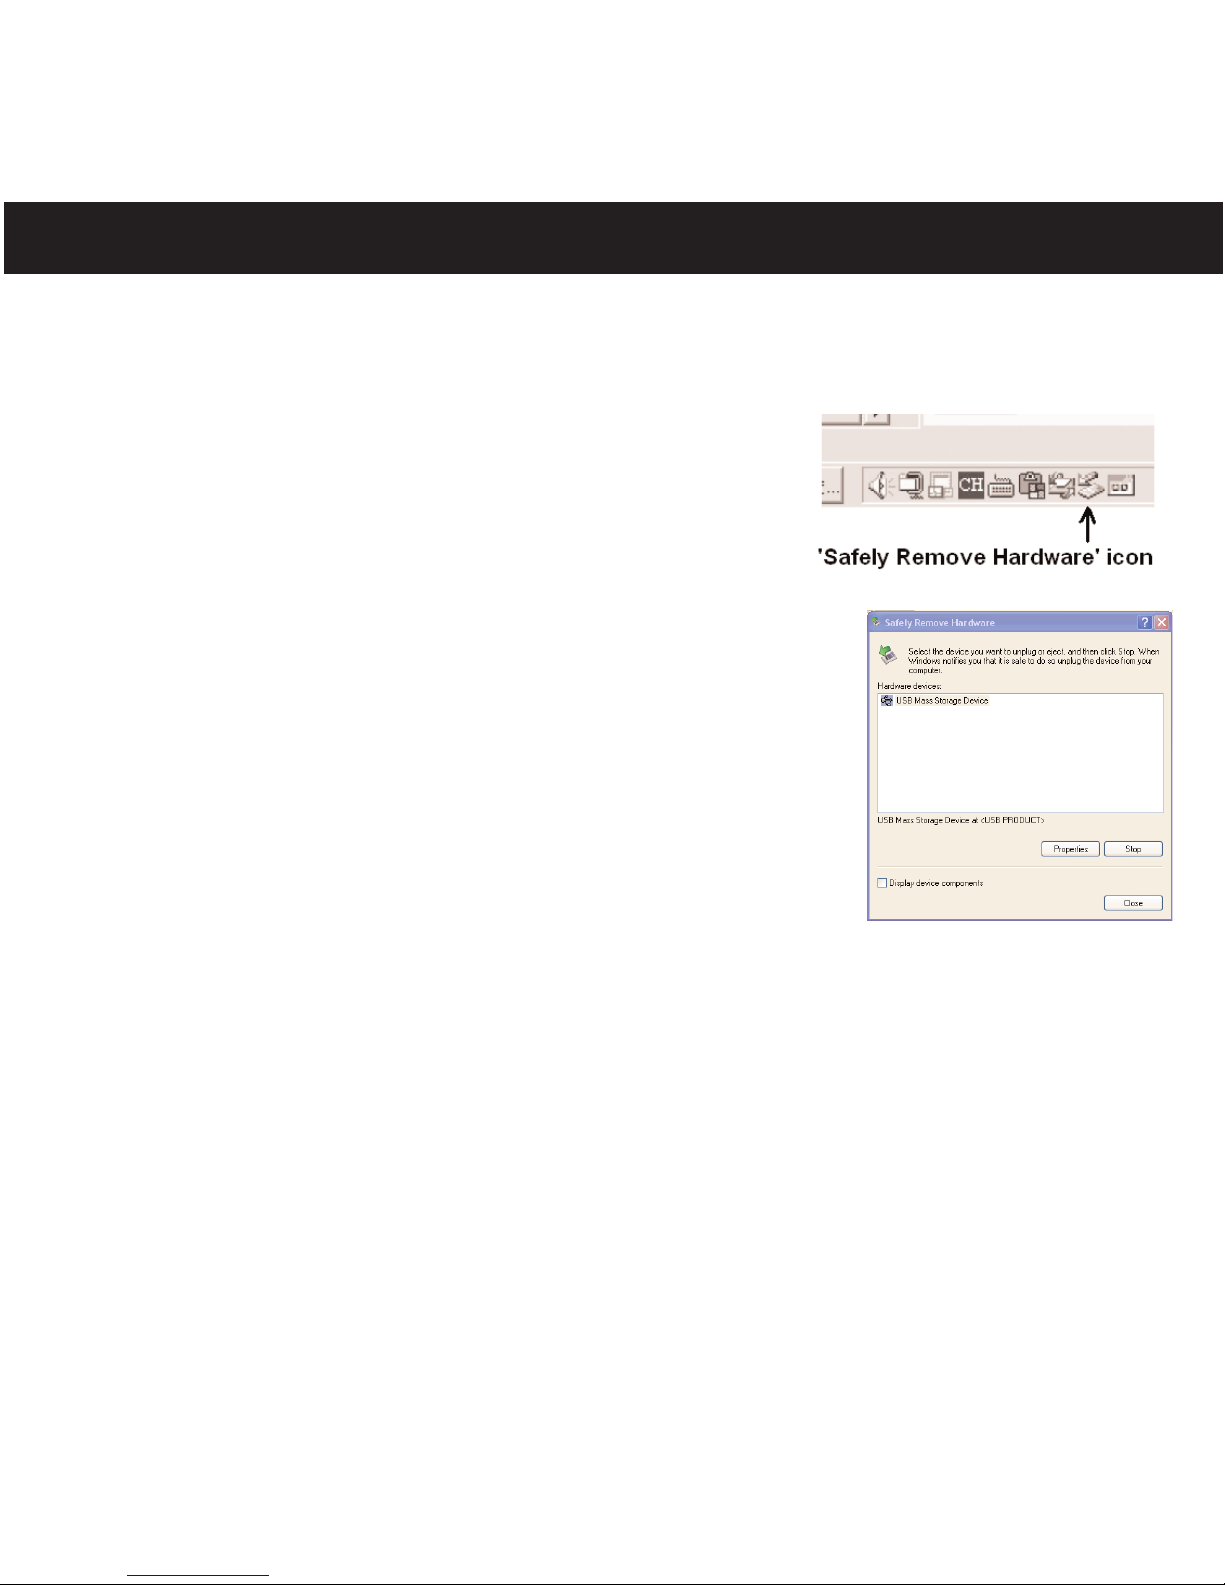
SAFELY REMOVING YOUR PLAYER FROM THE COMPUTER
NOTE: To avoid damage to your player or data loss, always follow
the procedure listed
below before disconnecting your player from the USB port on your computer.
Using your mouse, double click the "Safely Remove
Hardware" icon on the task bar.
From the "Safely Remove
Hardware" window (shown lower
right), select "USB Mass Storage Device" and click the
"Stop" button. The "Stop a Hardware Device" window will pop-up.
Click "OK". When the "Safe to Remove Hardware" window is
displayed, you may remove the player from the USB cable or
remove the USB cable from the computer.
NOTES:
• If the “Safely Remove Hardware” icon is not displayed on the
task bar, please double click on My Computer
. Right click on
“
R
emovable Disk
” and left click on “Eject”. Then it is safe to
remove the player from the computer.
• If you are
using Windows XP/Vista and the Windows Media
Player 10 or 11 software is already installed, then you do not
need to follow the above "Safely Remove Hardware" procedure.
Page 17
GENERAL
OPERA
TION
16
HEADPHONES JACK
VOLUME SETTING
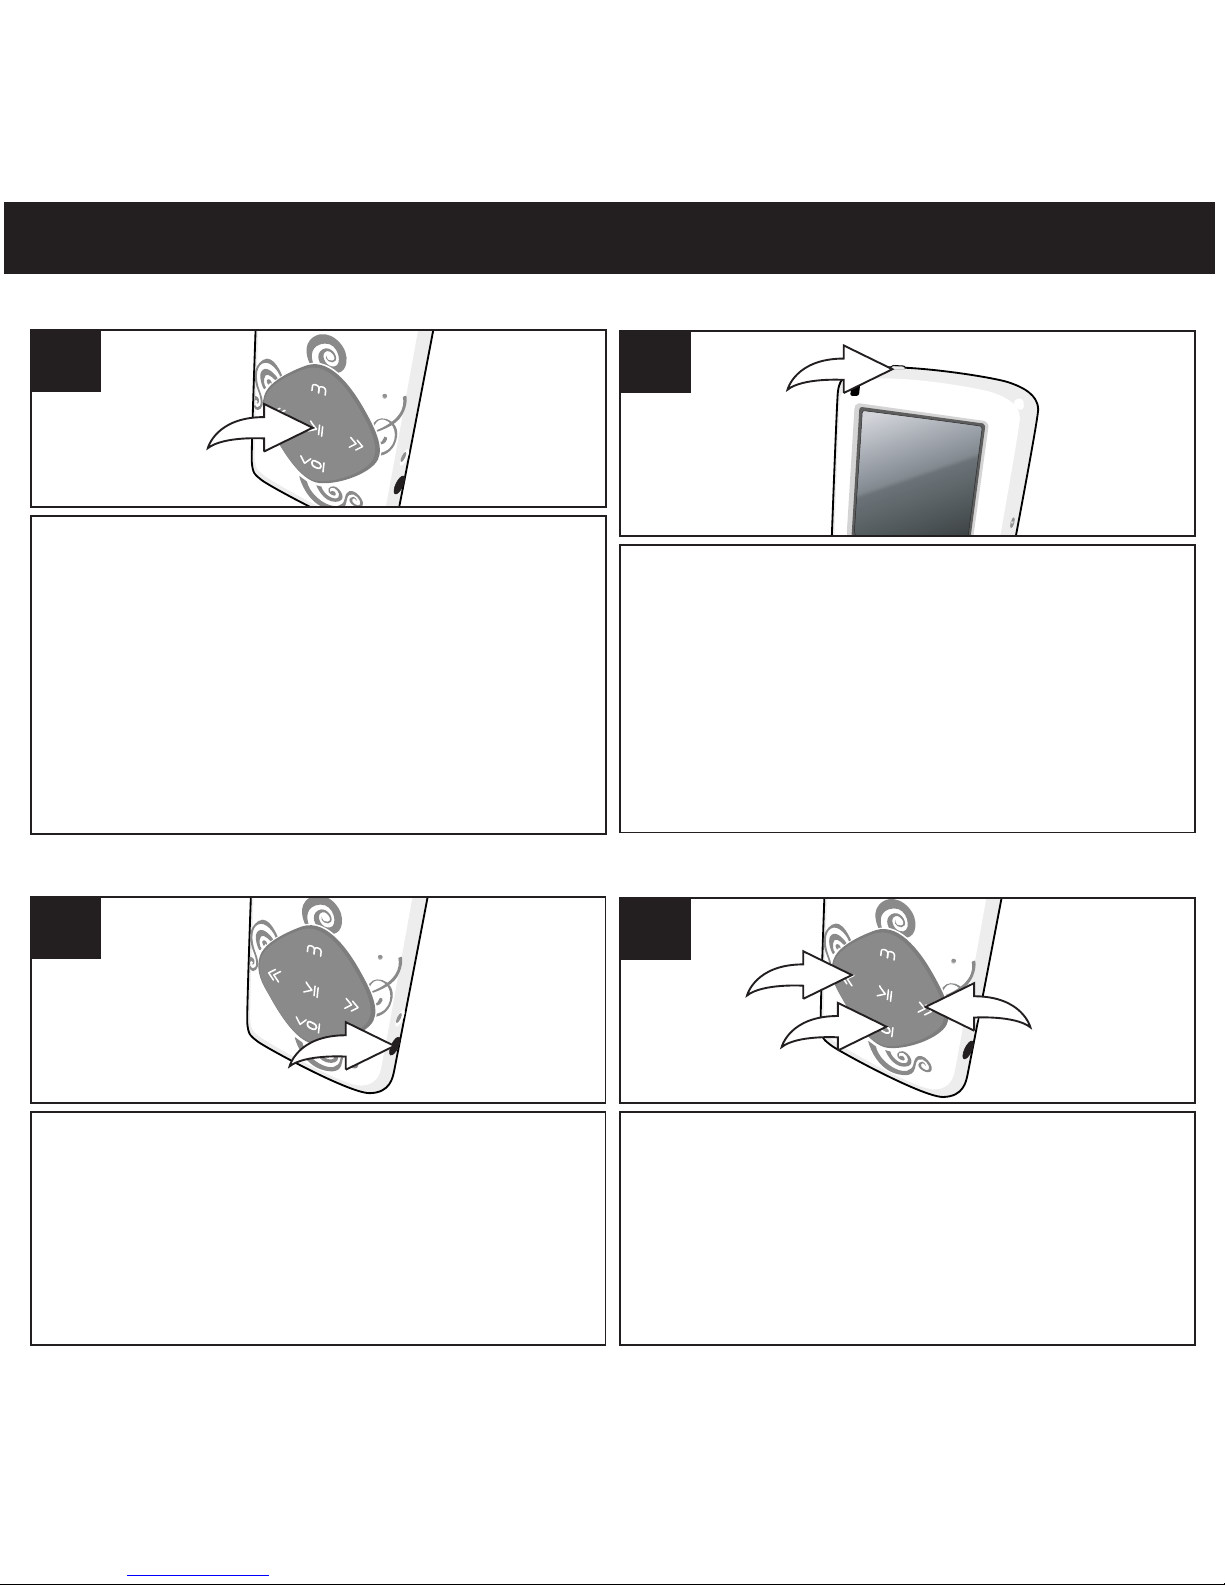
Plug the headphones (included) into the
Headphones jack on the side of the unit.
1
To control the volume, while in the Music or Voice
modes, press the Volume button 1; the V
olume
Setting screen will appear. Within four seconds,
press the Navigation Down/Skip–Search l button
2 to raise or Navigation Up/Skip–Search m
button 3 to lower the volume. The volume level is
indicated on the screen by a number (0-30).
2
3
1
1
TURNING THE POWER ON/OFF
HOLD SWITCH
To turn the unit on, press and hold the
Power/Play/Pause ®p button; the Welcome
screen will appear for a few moments followed
by the MP3 screen. To turn the unit off, press
and hold the Power/Play/Pause ®p button.
Do not release the Power/Play/Pause ®p
button until the Good Bye screen appears.
Wait a minute after turning off the unit to turn
on the unit again.
1
Slide the Hold switch to
the Lock position to lock
the buttons; This is useful, for example,when
you do not want the file changed by
accidentally pressing a button. Slide the Hold
switch to the Unlock position to cancel the Hold
function;
1
Page 18
1
2
3
17
OPERATION–MUSIC PLAYBACK MODE
TO LISTEN TO MP3s/WMAs
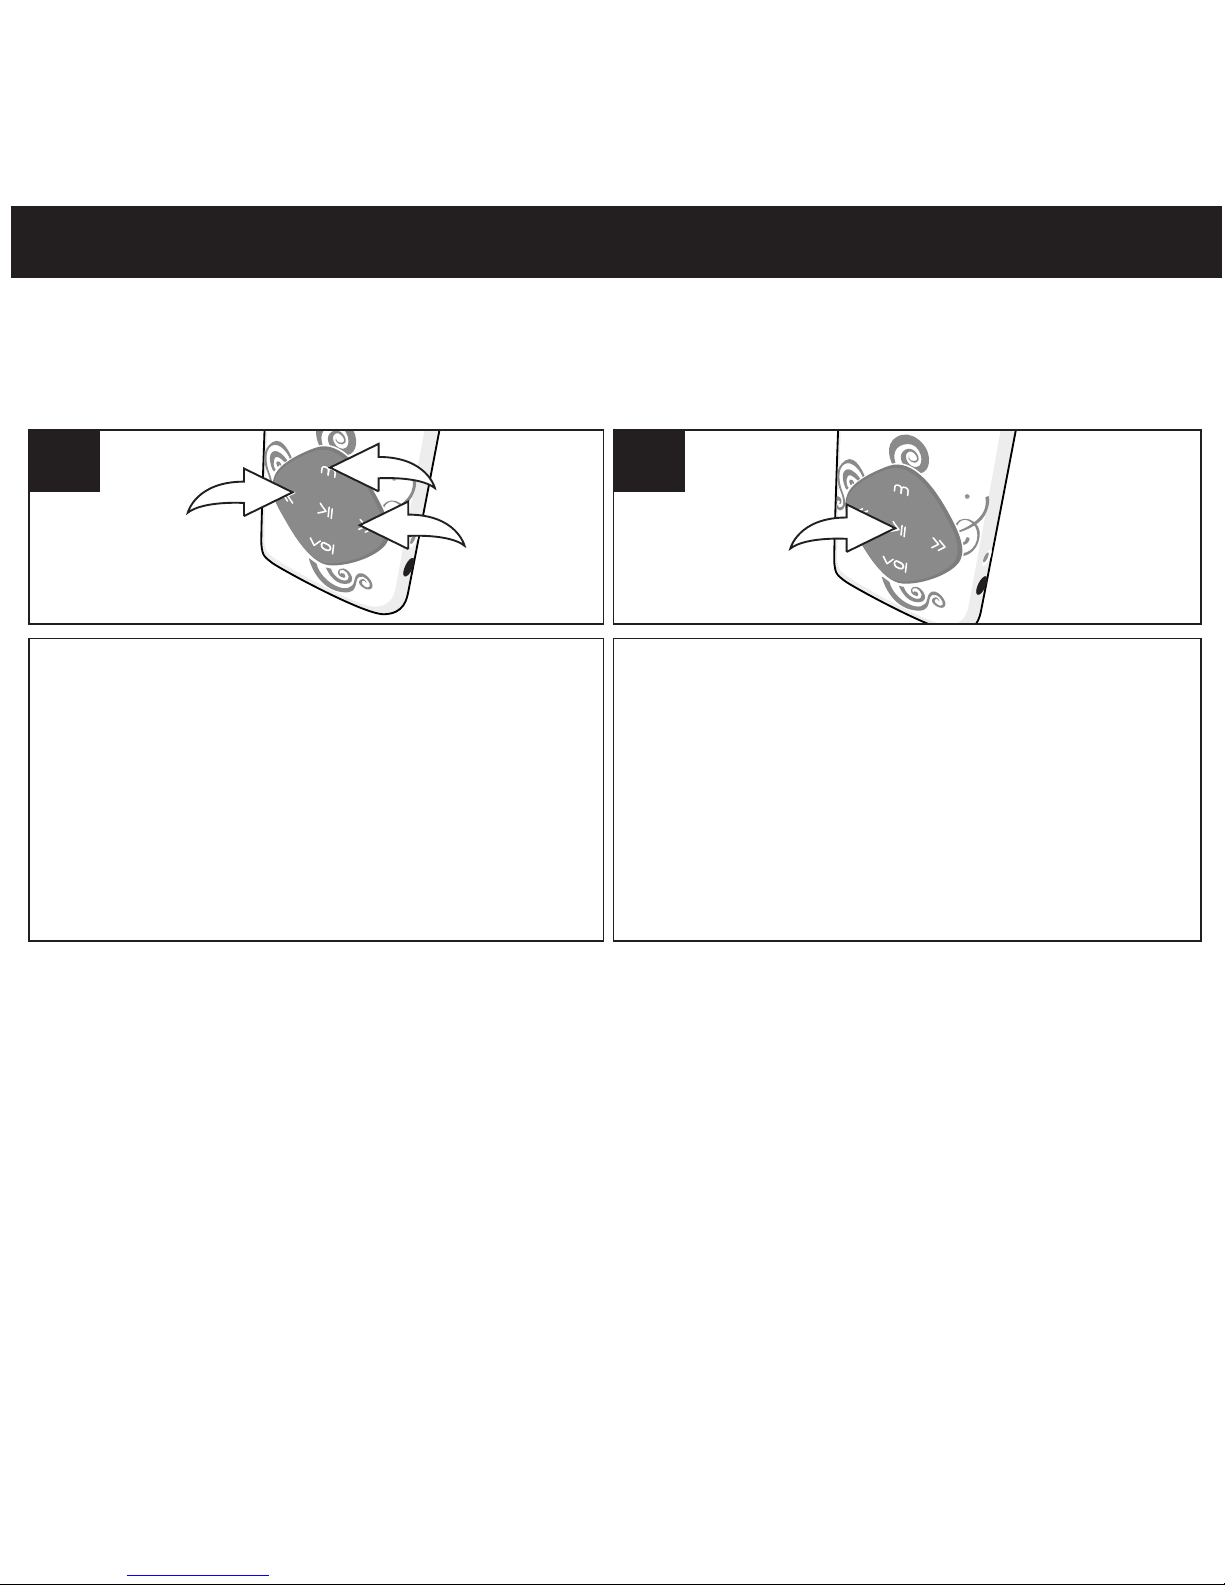
Press the Power/Play/Pause ®p button to
start playback. The MP3 information will
scroll across the screen.
2
(7
This unit supports the following audio formats: MP3, MPEG 1/2/2.5 Layer 3 with a bit rate of 32-
320 kbps and WMA files.
1
Turn the unit on as shown on page 16.
If the unit is already on and in another mode,
press and hold the Mode/Enter button 1;
the Mode Menu screen will appear. Select
Music using the Navigation Down/
Skip–Search l button 2 or Navigation
Up/Skip–Search m button 3 then press
the Mode/Enter button 1 again to select it.
NOTES:
• See pages 10-12 and 14 for information on transering MP3/WMA files to this unit.
• You can pause playback at anytime by pressing the Power/Play/Pause ®p button; the Pause icon will appear on
screen and the song will remain paused until the button is pressed again.
• To set the Play Mode (Normal, Repeat One,Folder, Repeat Folder, Repeat All, Random, Intro) setting refer to page 25.
• To set the Equalizer, see page 24.
(AUTO RESUME): Each time you exit the Music Playback mode or Voice Playback mode and turn the unit off,
when the unit is turned back on or you enter the Music Playback mode or Voice Playback mode again, this unit will
resume at the beginning of the last track which was playing before turning the power off.
• While playing the music, press Mode/Enter button to go to submenu. (Repeat, Equalizer, Tempo Rate, Replay,
Replay Times, Replay Gap). Press navigation Down/Skip-Search or Up button to select and press mode/enter
button to enter. Press Power/Play/Pause button to return to previous menu.
•
While the music is stop/pause playing, press mode/enter button to go to submenu(Local Folder, Delete, Delete All). Press
navigation Down/Skip-Search or Up button to select and press mode/button to enter. Press Power/Play/Pause
to return to previous menu.
®p
l
m
®p
®p
l
m
Page 19
OPERA
TION–MUSIC
PLA
YBAC
K
MODE
(CONTINUED)
18
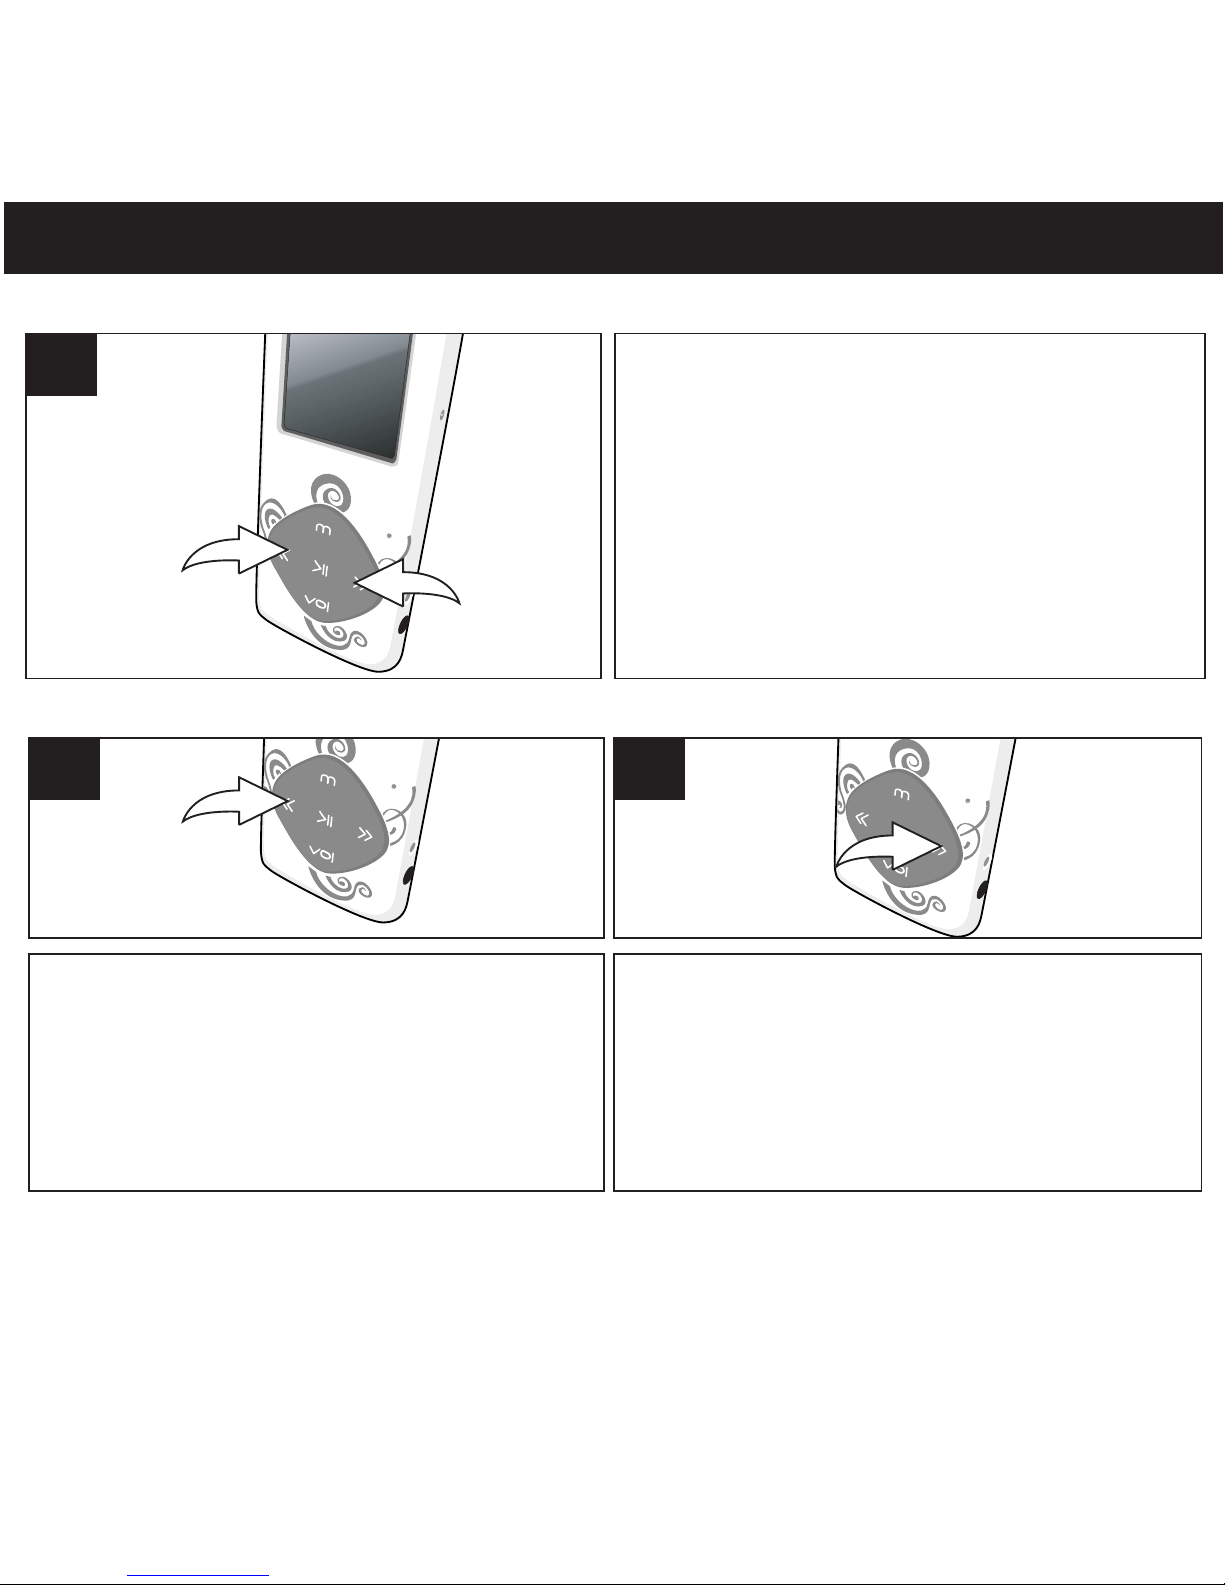
During playbac
k, press and hold the
Navigation Down/Skip–Search l1or Up/m
2 button to move the player forward or
backward within a file to locate a specific
musical passage. The player will move
forward or backward at high speed as long
as the button is held. When you release the
button, normal playback will resume.
1
2
1
HIGH-SPEED MUSIC SEARCH
During playbac
k, press the Navigation Up/
Skip–Search m button to skip the player
back to the beginning of the currently playing
file. Press the Navigation Up/Skip–Search m
button repeatedly to skip the player to
previous track.
1
FORWARD/REVERSE SKIP
During playbac
k, press the
Navigation
Down
/Skip–Search
l buttontoadvanceth
e
pla
yer to the beginning of the next file. Press
the
Navigation Dow
n/Skip–Search
l button
repeated
ly to skip the player to next track.
2
Page 20
OPERA
TION–
VIDEO(AMV) PLAYBACK MODE
19
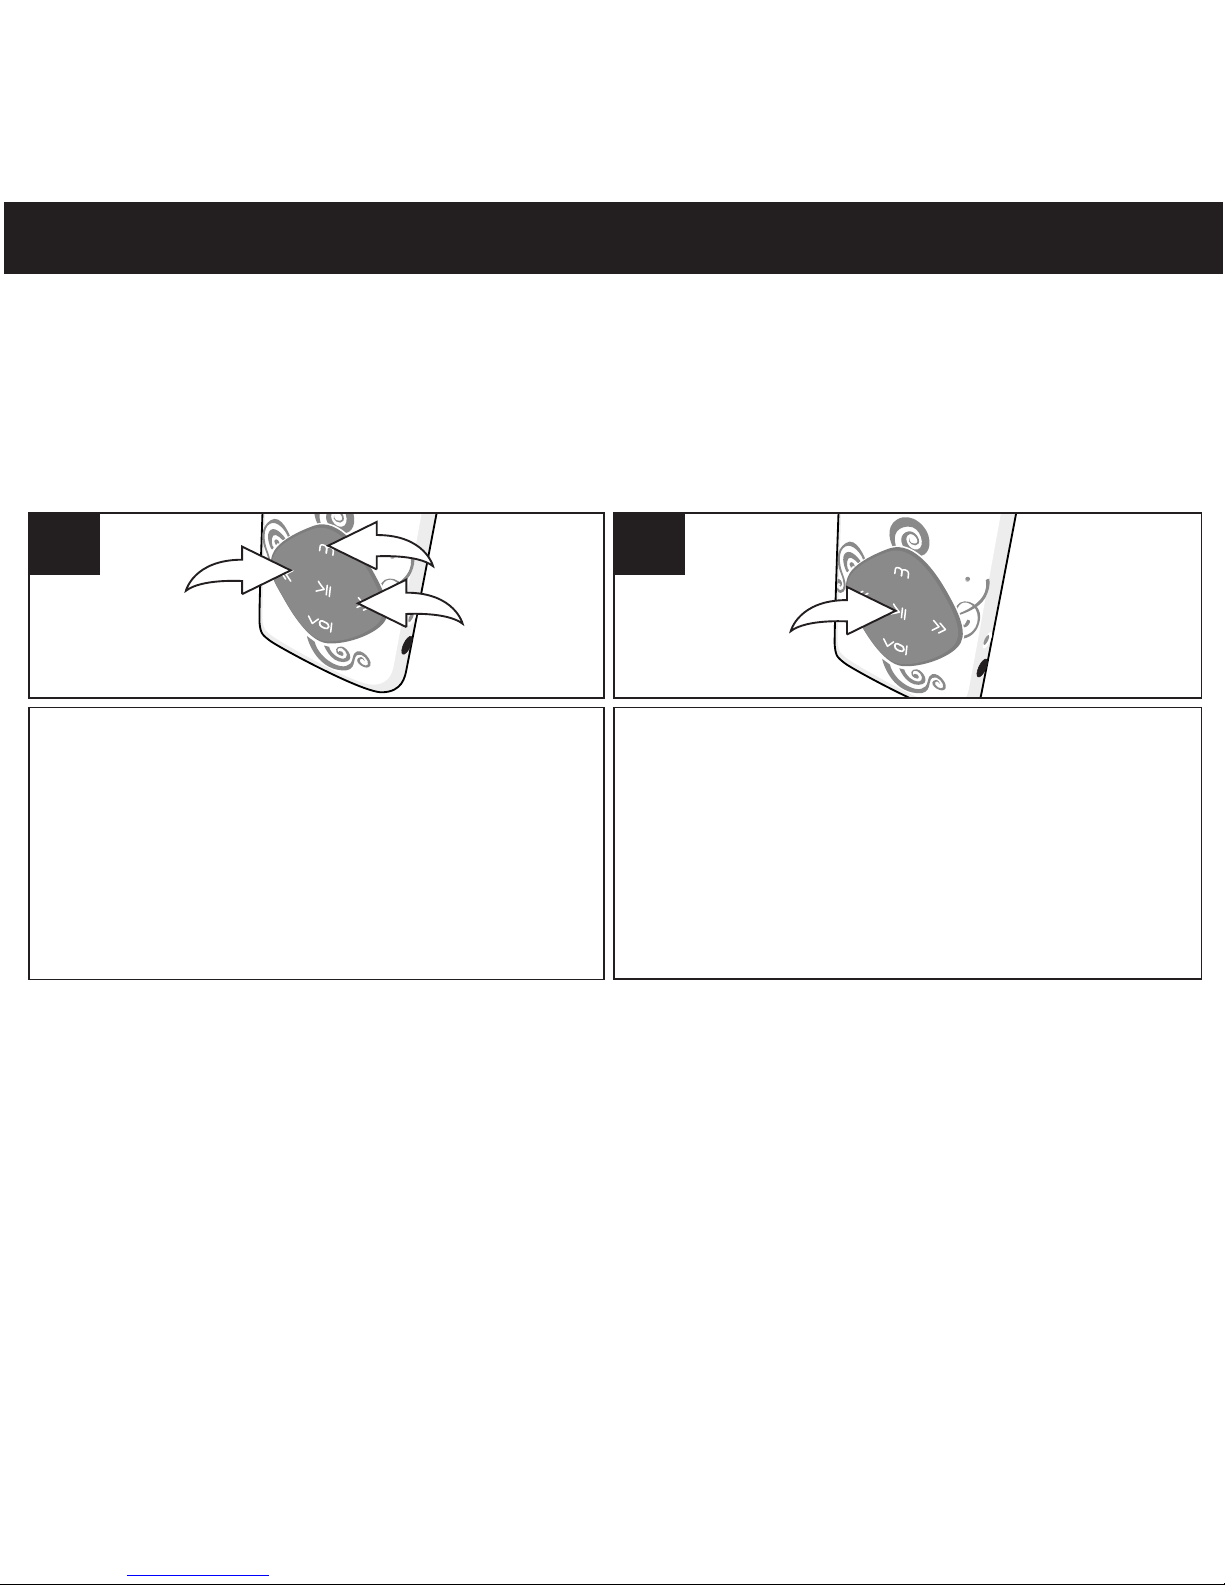
Turn the unit on as shown on page16 . If the unit
is already on and in another mode, press
and
hold the Mode/Enter button ; the mode
menu screen will appear. Select AMV using
the navigation Down/Skip-Search button
or navigation Up/Skip-Search button
then press the Mode/Enter again to select
it.
3
1
2
1
TO PLAY VIDEO(AMV)
This unit supports the following video formats: AMV(Need AMV conversion software (Included)
to process the video conversion. Please refer to the page 33 for video conversion).
Press the Power/Play/Pause ®p button to
start playback.
2
NOTE:
While the video(AMV File) is stopped/paused, press Mode/Enter to go to submenu(Local
Folder, Delete, Delete All, Repeat). Press navigation Down/Skip-Search button or Up
button to select and press Mode/Enter button to enter. Press Power/Play/Pause to return
menu.
®p
l
2
m
3
1
1
l
m
Page 21
OPERA
TIO
N–RECORDER
MODE
20
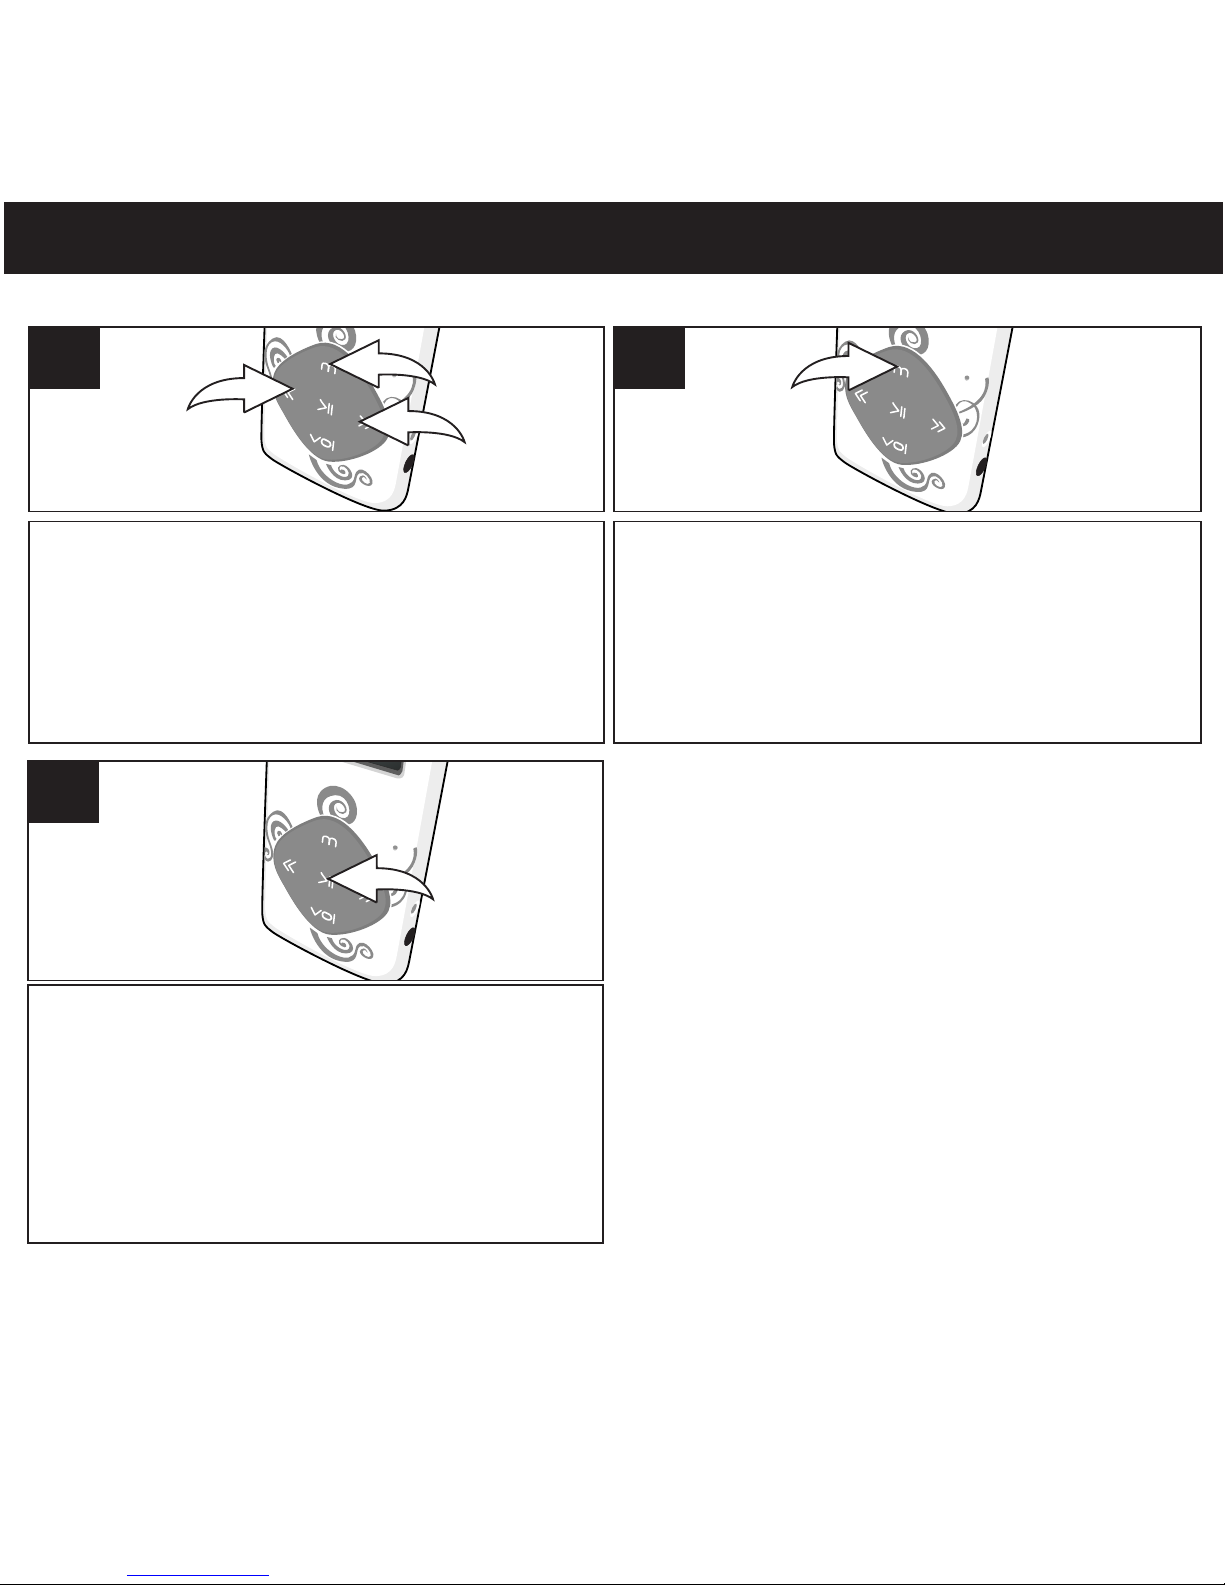
Turn the unit on as shown on page 16. Press
and hold Mode/Enter button 1; the
Mode Menu screen will appear. Select
Record using the Navigation Down/
Skip–Search l button 2 or Navigation Up/
Skip–Search m button 3.
1
2
3
1
TO CREATE A VOICE RECORDING
Press the Mode/Enter button to select it;
The Elapsed time will appear in the middle
of the display.
2
Speak into the microphone,
Press the
Power/Play/Pause ®p button to start/pause
recording, and press again to resume
recording. Press and hold Power/Play/
Pause button to stop and save the
recording.
3
®p
Page 22
OPERA
TION–RECORDER
MODE
(CONTINUED)
21
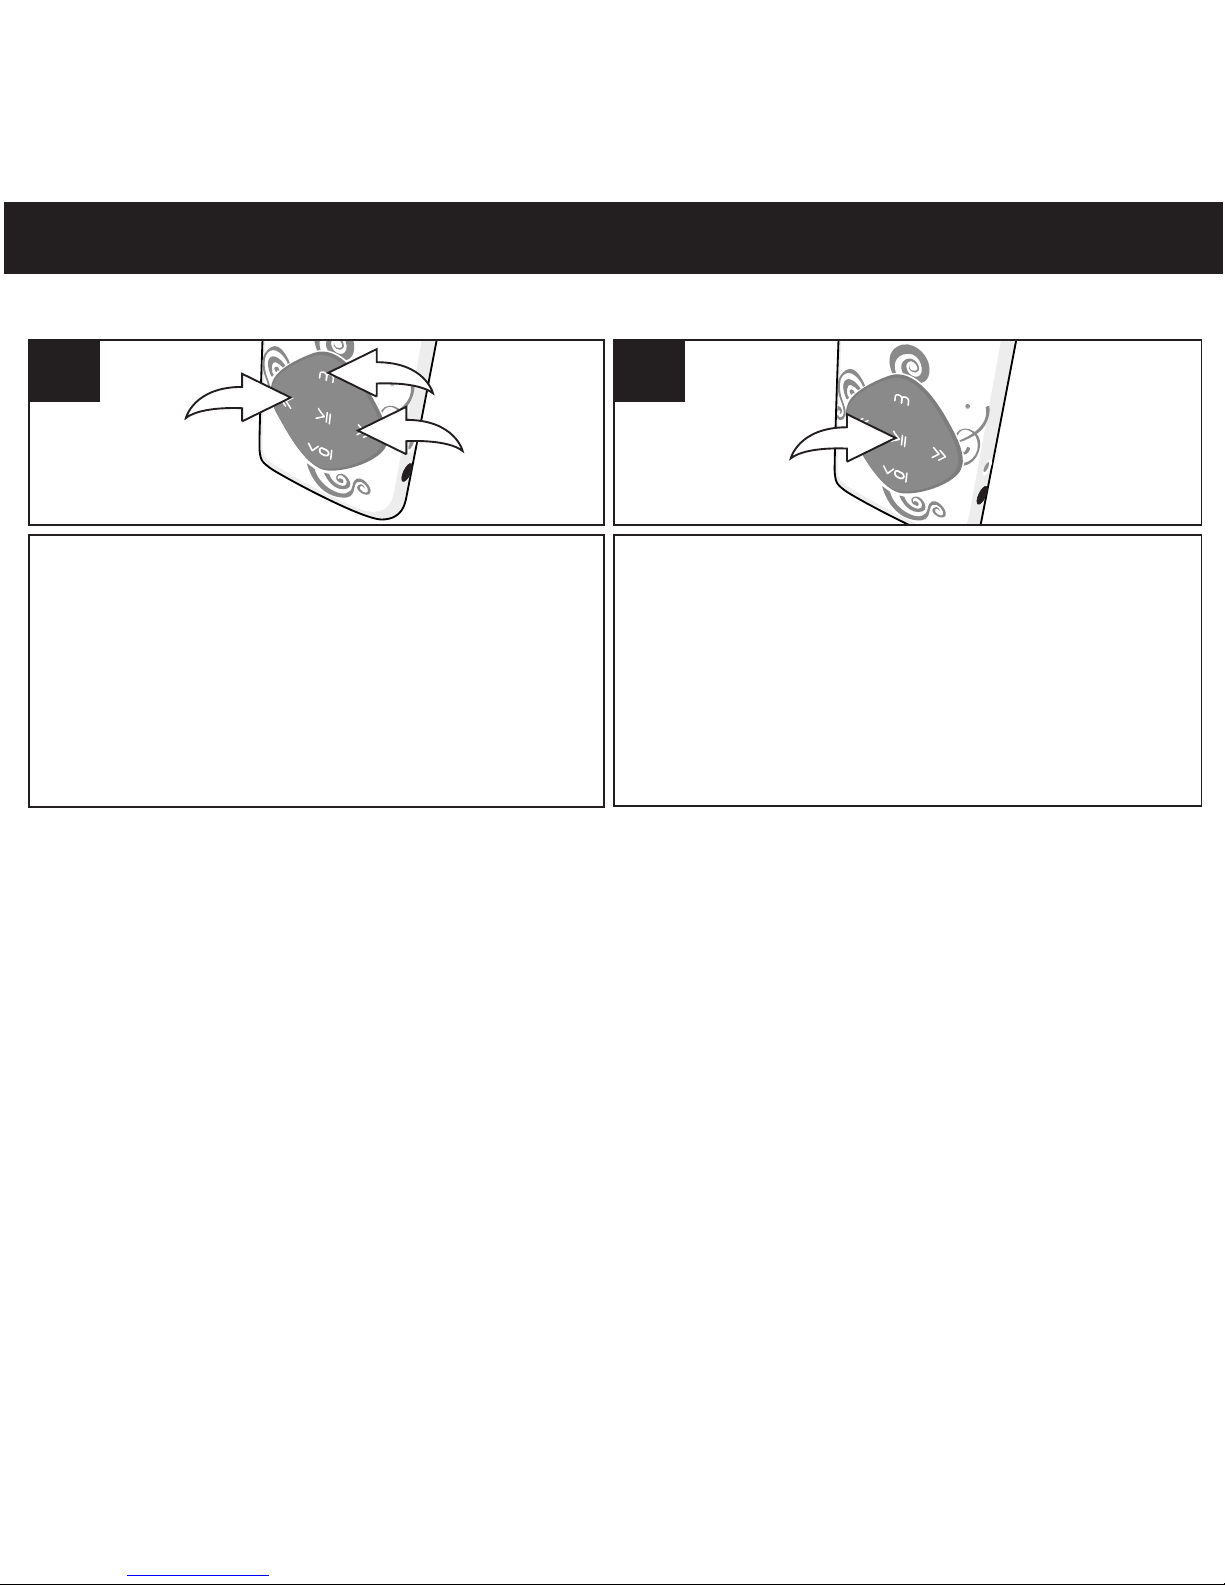
To listen to the recording, while in the main
menu, select Voice using the Navigation
Down/Skip–Search l button 1 or
Navigation Up/Skip–Search m button 2,
then press the Mode/Enter button 3 again to
select it.
3
1
2
1
TO LISTEN TO A RECORDING
Press the Power/Play/Pause ®p button to
start playback. The WAV information will
scroll across the screen.
2
NOTE: Play/Pause, Forward/Reverse Skip and High-Speed Search work the same way in
Recording Playback mode as they do in Music Playback mode. See pages 17 and 18 for more
details.
• While playing the recording, press Mode/Enter button to go into submenu. (Repeat, Tempo
Rate,Replay). Press navigation Down/Skip-Search or Up button to select and press
Mode/Enter button to enter. Press Power/Play/Pause button to return to previous menu
• While the recording is stop/pause playing, press Mode/Enter button to go to submenu.
(Local Folder, Del. File?, Delete All). Press navigation Down/Skip-Search or Up button
to select and press Mode/Enter button to enter. Press Power/Play/Pause to return to
previous menu.
l
m
®p
l
m
®p
Page 23
22
OPERATION–PHOTO PLAYBACK MODE
1
2
3
1
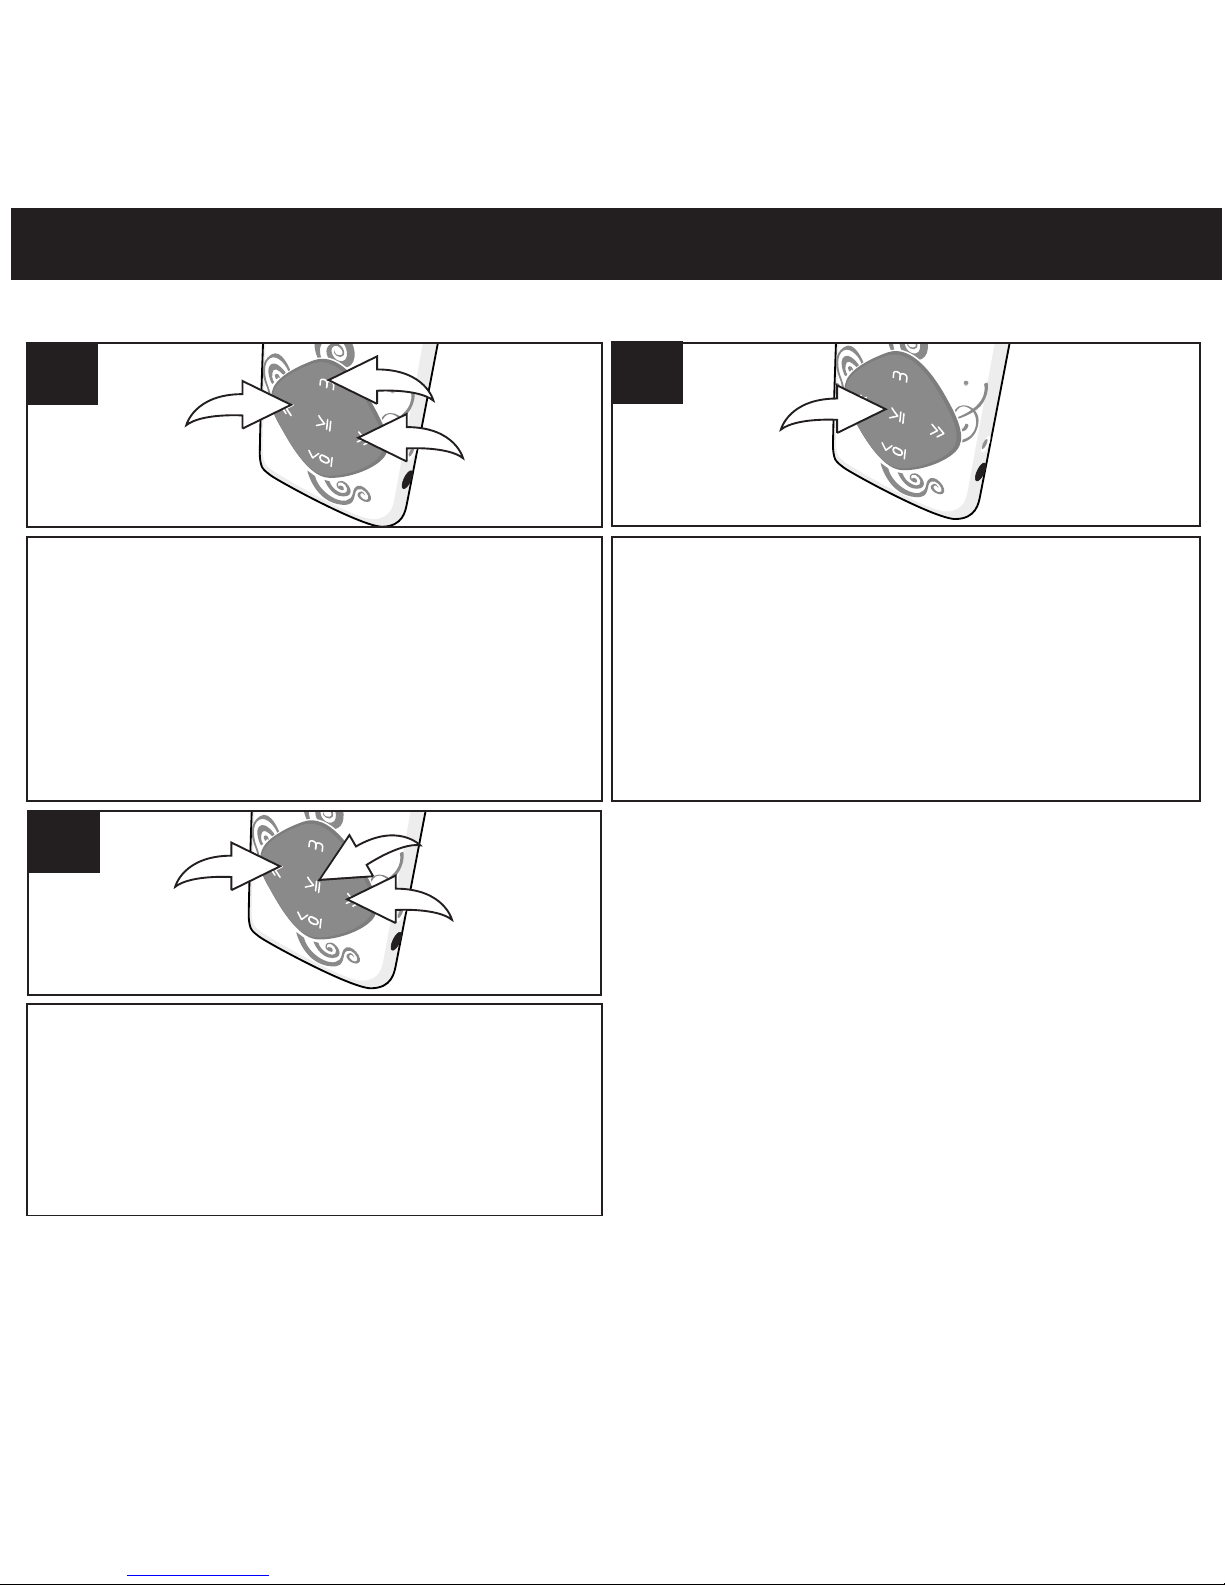
TO VIEW PHOTOS–
This unit supports baseline JPEGs.
Press the Power/Play/Pause button to
view the photo.
®p
Turn the unit on as shown on page 16. Press
and hold the Mode/Enter button 1; the
Mode Menu screen will appear. Select
Photo using the Navigation Down/
Skip–Search l button 2 or Navigation
Up/Skip–Search m button 3,then press the
Mode/Enter button 1 again to select it.
2
Press the Navigation
Down/Skip–Search
l1
or Up/m2button to
skip to the next
or previous photo. Press Power/Play/
Pause button button 3 and return to
Photo Menu.
3
1
2
3
NOTE: See pages 13 and 14 for information to transfer photo files to this unit.
®p
Press Mode/Enter button to go to submenu(Local Folder, Play Set(Manual Play, Auto Play),
•
Delete, Delete all). Press navigation Down/Skip-Search or Up button to select and press
Mode/Button to enter. Press Power/Play/Pause to return to previous menu.
®p
l
m
Page 24
OPERA
TION–EBOOK
MODE
23
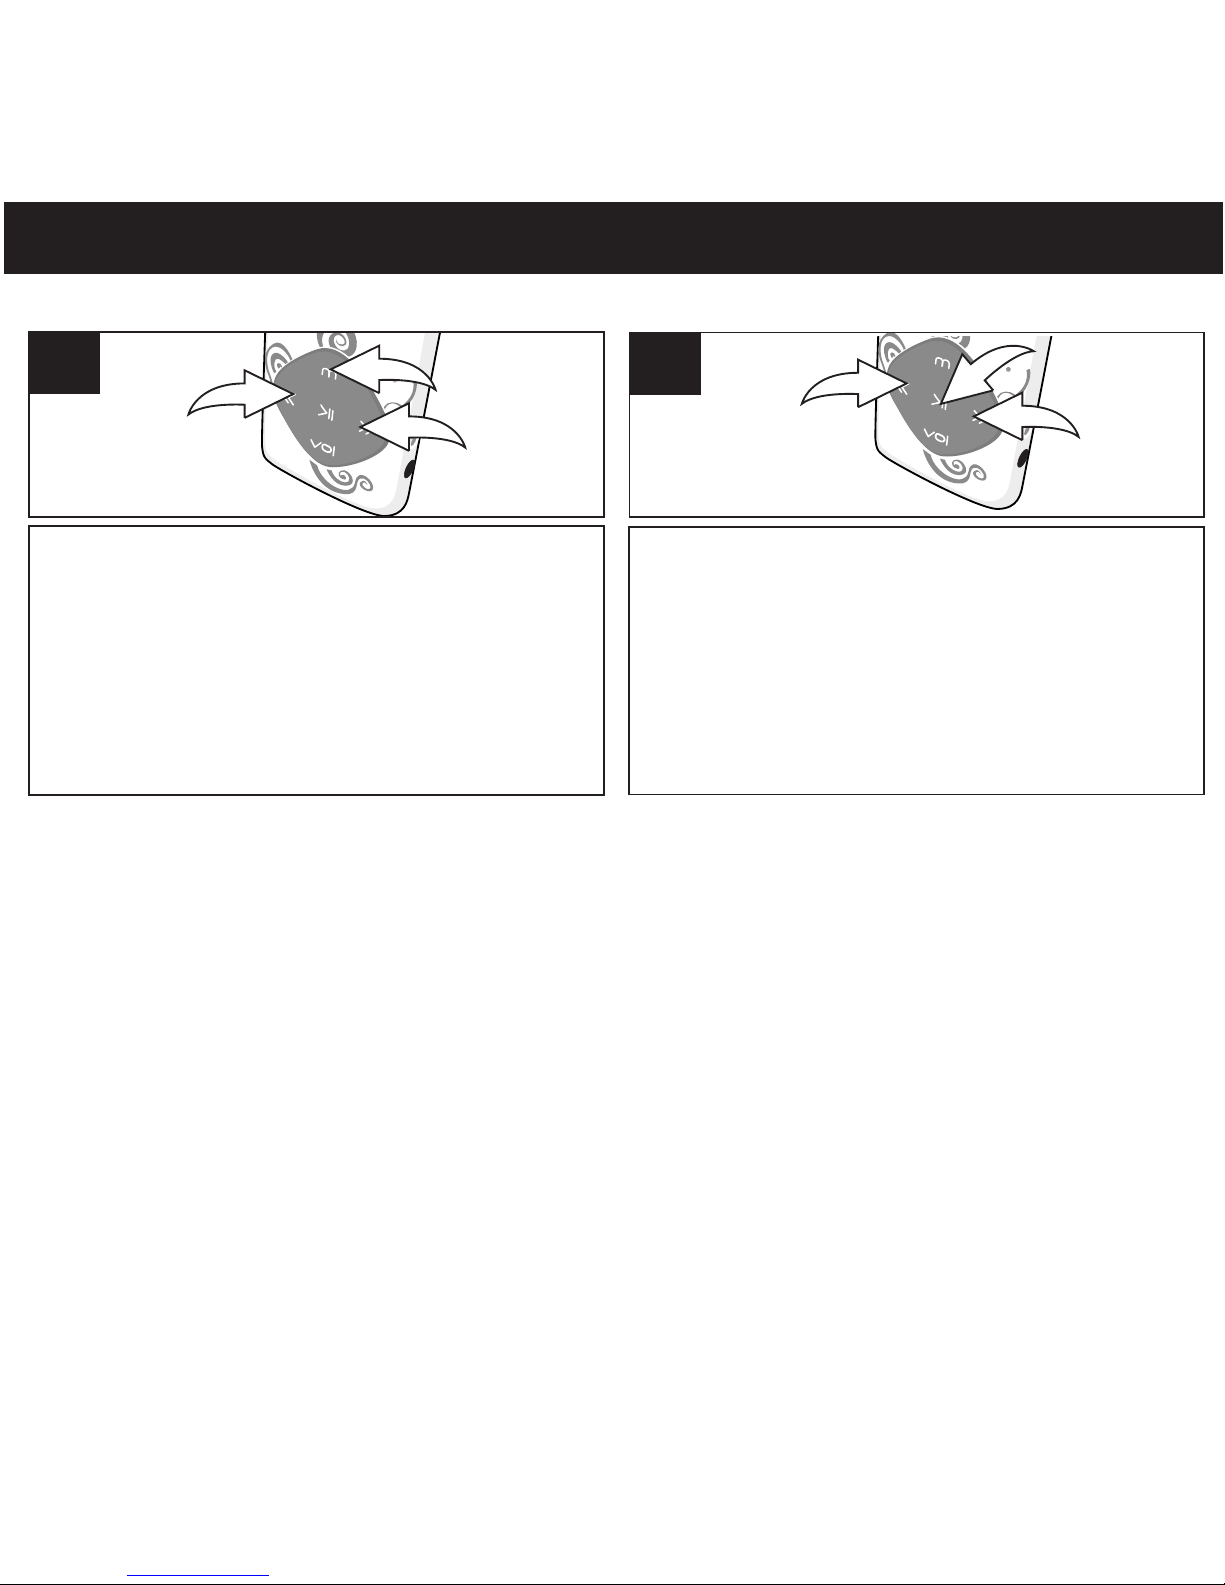
Turn the unit on as shown on page 16. Press
and hold the Mode/Enter button 1; the
Mode Menu screen will appear. Select Ebook
using the Navigation Down/Skip–Search l
button 2 or Navigation Up/Skip–Search m
button 3.
1
2
3
1
Press the Power/Play/Pause ®p button to
select the title; the book will appear. If there
is more than one screen, use the
Navigation Down/Skip–Search l button 2
to scroll to the right or Navigation
Up/Skip–Search m button 3 to scroll to the
left.
2
1
3
3
TO VIEW AN Ebook–
This unit supports books in txt format.
NOTES:
• Press the Power/Play/Pause button once to
return to the Ebook Menu screen, and press and
to go to submenu .(Favourites Select, Delete
Skip-Search or Up button to select and
press Mode/Enter button to enter. Press
Power/Play/Pause button to return to
return to previous menu.
• White not reading the text, press Mode/Enter
button to go to submenu(load folder, Play set,
delete, delete all). Press navigation Down/
Skip-Search or Up button to select and
press Mode/Button to enter. Press Power/
Play/Pause to return to previous menu.
®p
l
m
®p
l
m
®p
Page 25
24
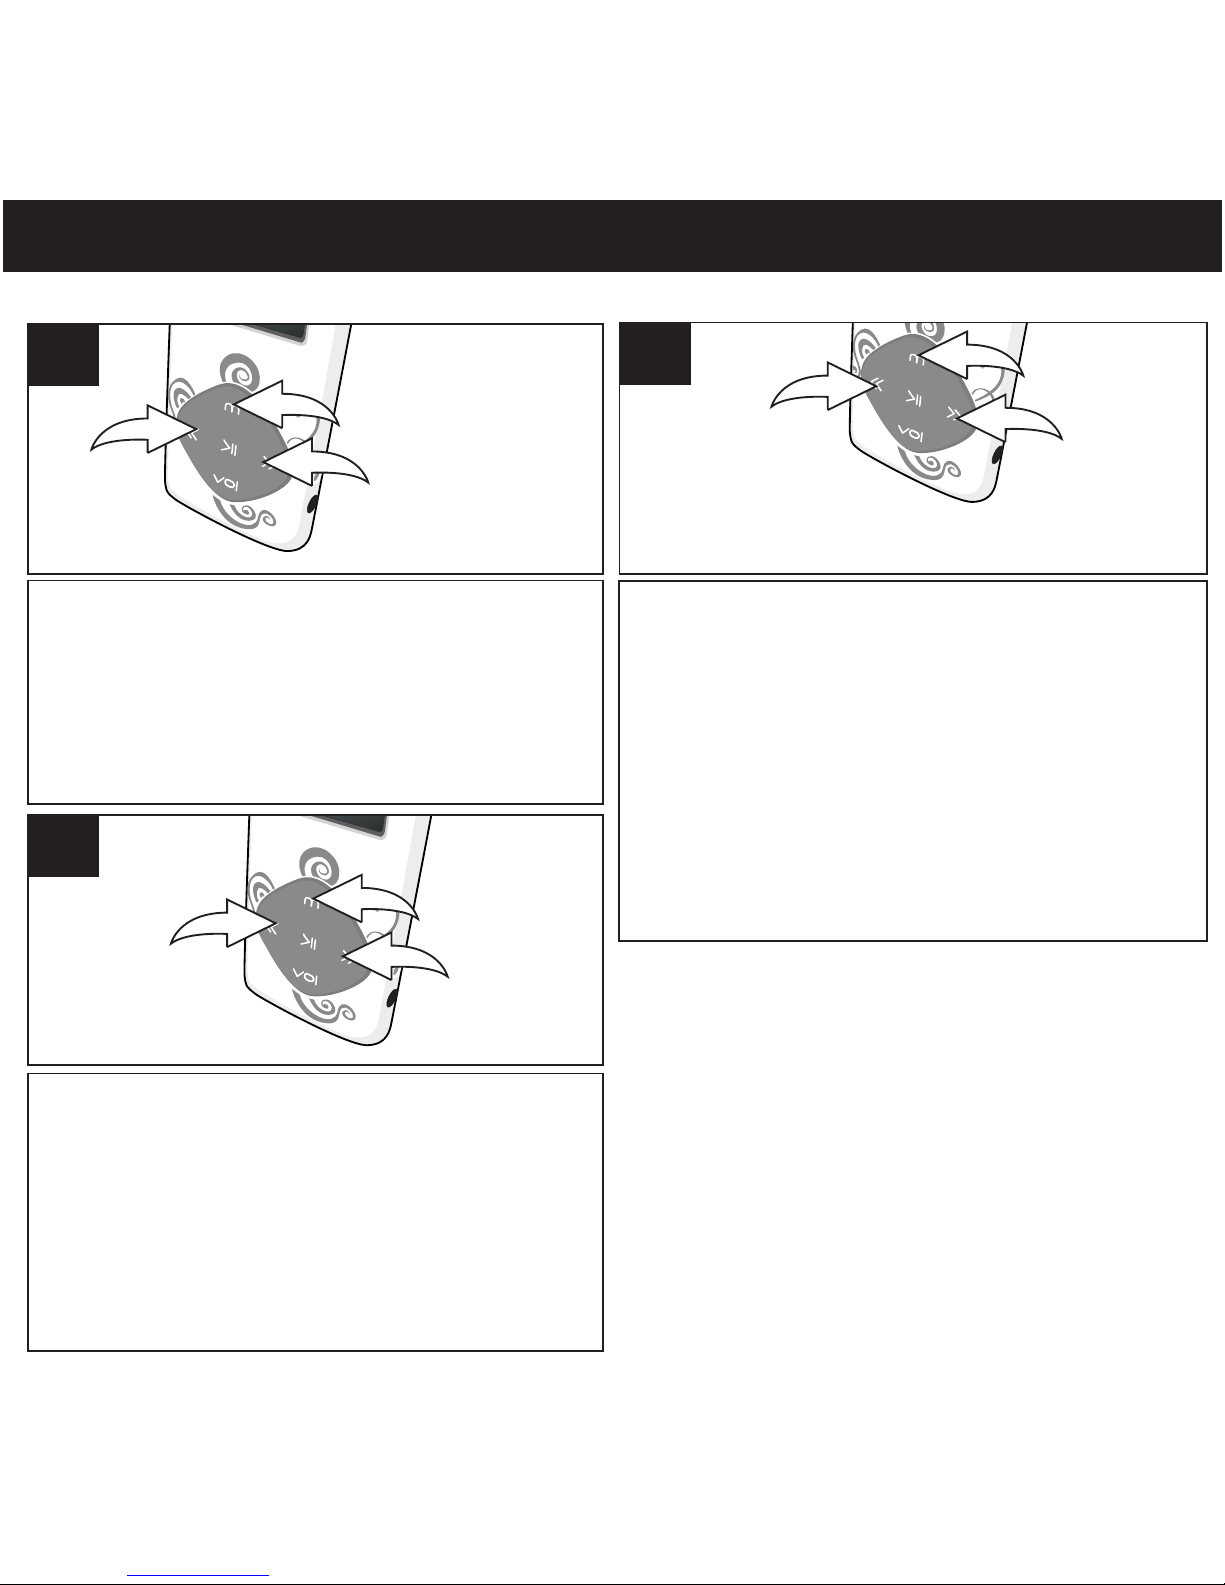
SETTING THE EQUALIZER
Turn the unit on as shown on page 16. Press and
hold the Mode/Enter button 1; the Mode Menu
screen will appear. Select music using the
Navigation Down/Skip–Search l button 2 or
Navigation Up/Skip–Search m button 3, then
press the Mode/Enter button 1 again to select it.
1
2
3
1
W
hile playing the music, press Mode/Enter
button to go to submenu. Select Equalizer
1
2
Select a desired Equalizer setting (Natural
[Normal], Rock, Pop, Classic [Classical],
Soft, Jazz or DBB[XBass]) using the
Navigation Down/Skip–Search l
1 or Navigation Up/Skip–Search m
2, then press the Mode/Enter button 3 to
confirm and return to music menu.
3
1
2
3
SETTING THE EQUALIZER
1
button
button
3
2
in submenu using the Navigation Down/
Skip-Search
button or Navigation Up/
Skip-Search button , then press the
Mode/Enter button to confirm.
l
2
m
3
1
Page 26
25
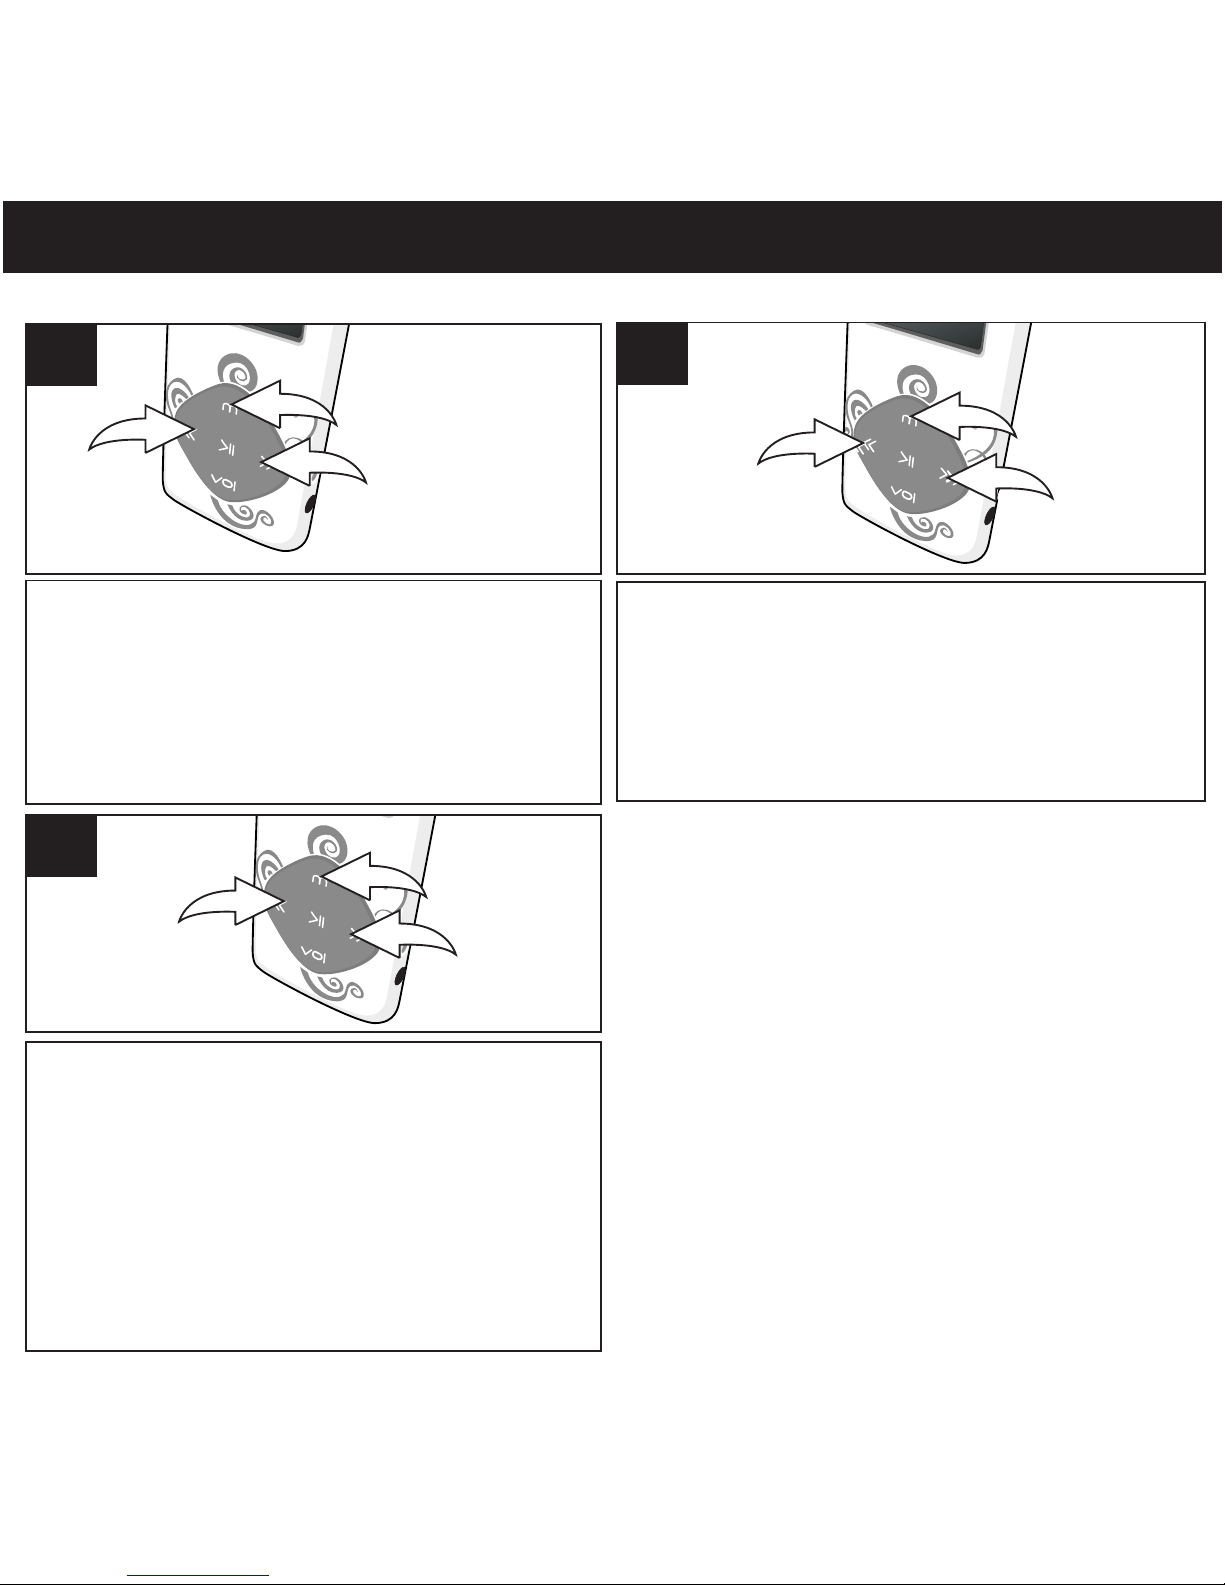
SETTING THE PLAYMODE
SETTING THE PLAY MODE
Turn the unit on as shown on page 16. Press and
hold the Mode/Enter button 1; the Mode Menu
screen will appear. Select music using the
Navigation Down/Skip–Search l button 2 or
Navigation Up/Skip–Search m button 3, then
press the Mode/Enter button1 again to select it.
1
2
3
1
While playing the music, press Mode/Enter
1
1
2
Select a desired Repeat setting (Normal,
Repeat One, Folder, Repeat Folder, Repeat All,
Random, Intro) using the Navigation Down/
Skip–Search l button 1 or Navigation Up/
Skip–Search m button 2, then press the
Mode/Enter button 3 to confirm and return to
Setting menu.
3
1
2
3
to go to submenu. Select Repeat in submenu
2
3
using the Navigation Down/Skip-Search
button or Navigation Up/Skip-Search button
then press the Mode/Enter button to
l
m
3
2
1
confirm.
Page 27
26
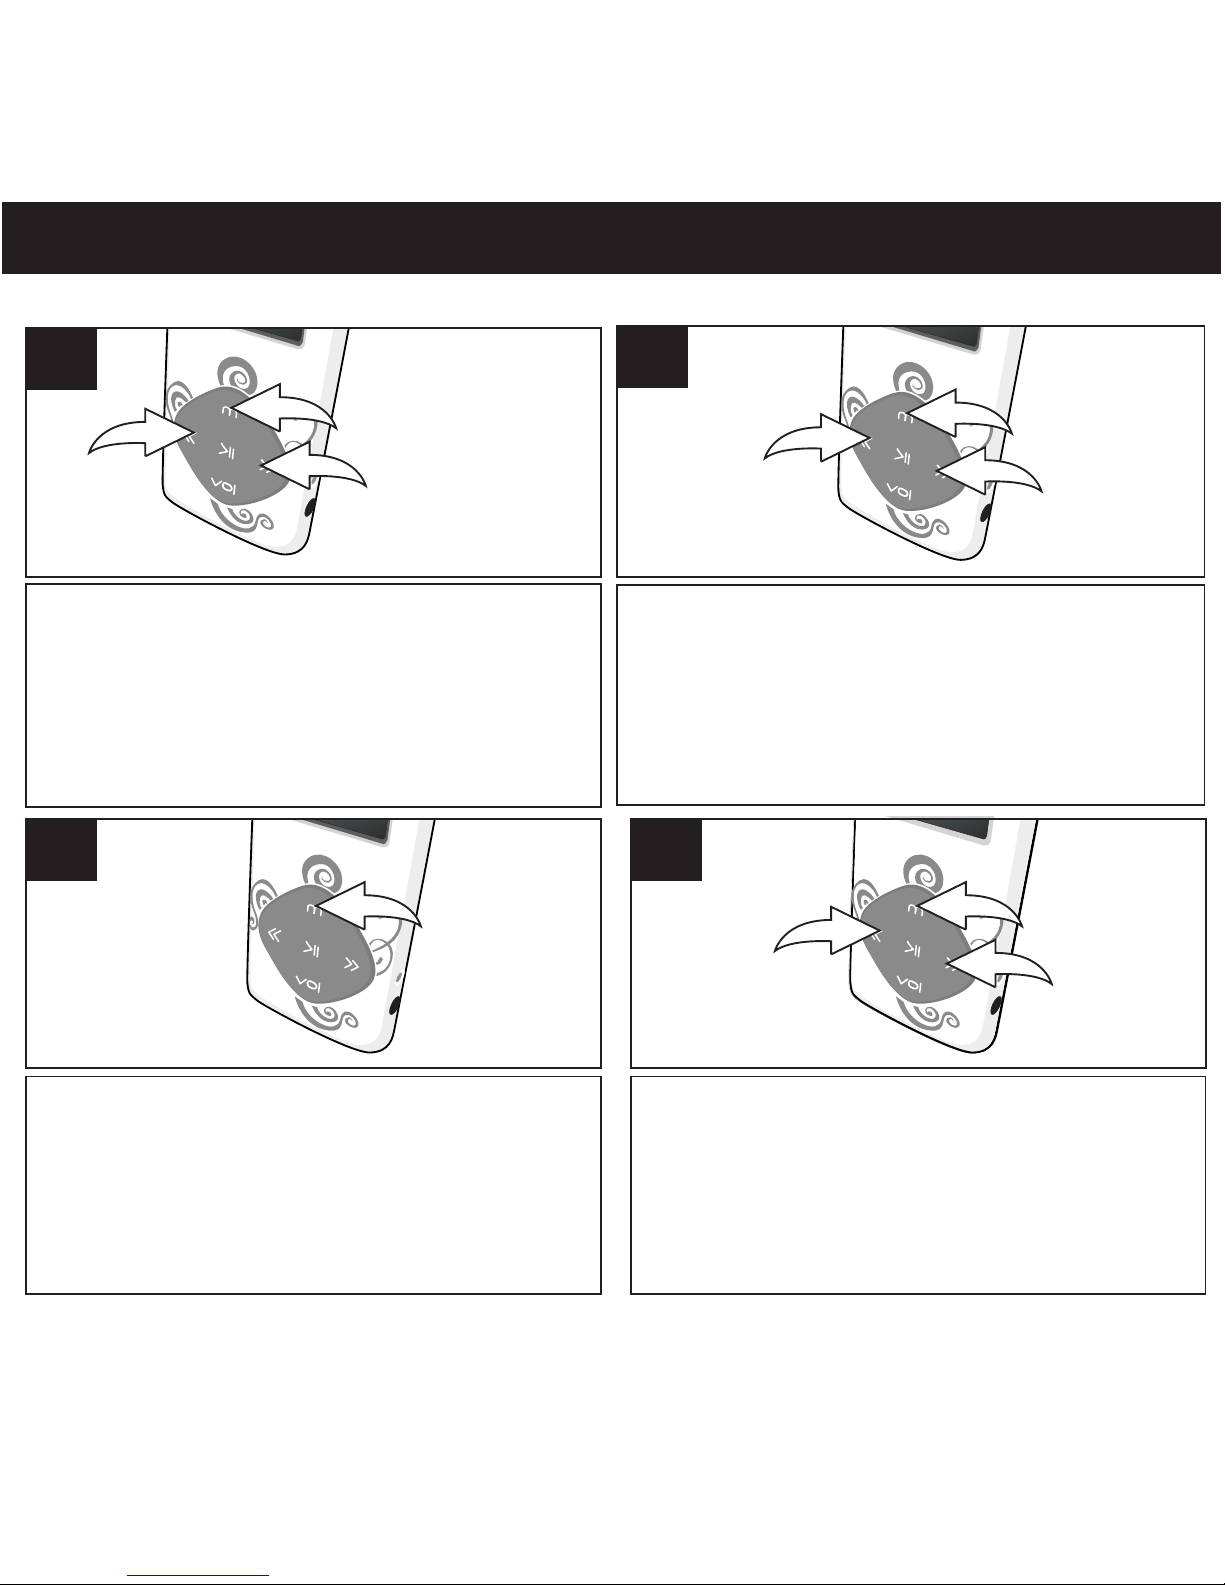
SETTING THE POWER SAVING
SETTING THE POWER SAVINGS
Turn the unit on as shown on page 16. Press and
hold the Mode/Enter button 1; the Mode Menu
screen will appear. Select Setup using the
Navigation Down/Skip–Search l button 2 or
Navigation Up/Skip–Search m button 3, then
press the Mode/Enter button 1 again to select it.
1
2
3
1
Select Power off using the Navigation
Down/Skip–Search l button 1 or
Navigation Up/Skip–Search m button 2,
then press the Mode/Enter button 3 to
select it.
3
1
2
2
Press the Mode/Enter to select Off Time.
1
3
Sel ec t a des ir ed Po we r Sa vi ng s off Time
set ti ng(Disable; 10, 20... or 60 seconds) using
the Navigation Down/Skip–Search l
1 or Navigation Up/Skip–Search m button 2,
then press the Mode /Ent er butt on 3 t o
confirm and return to Setting menu.
4
NOTE:
• This sets the time interval of the unit will stay on during no operation.
3
1
2
button
1
Page 28
27
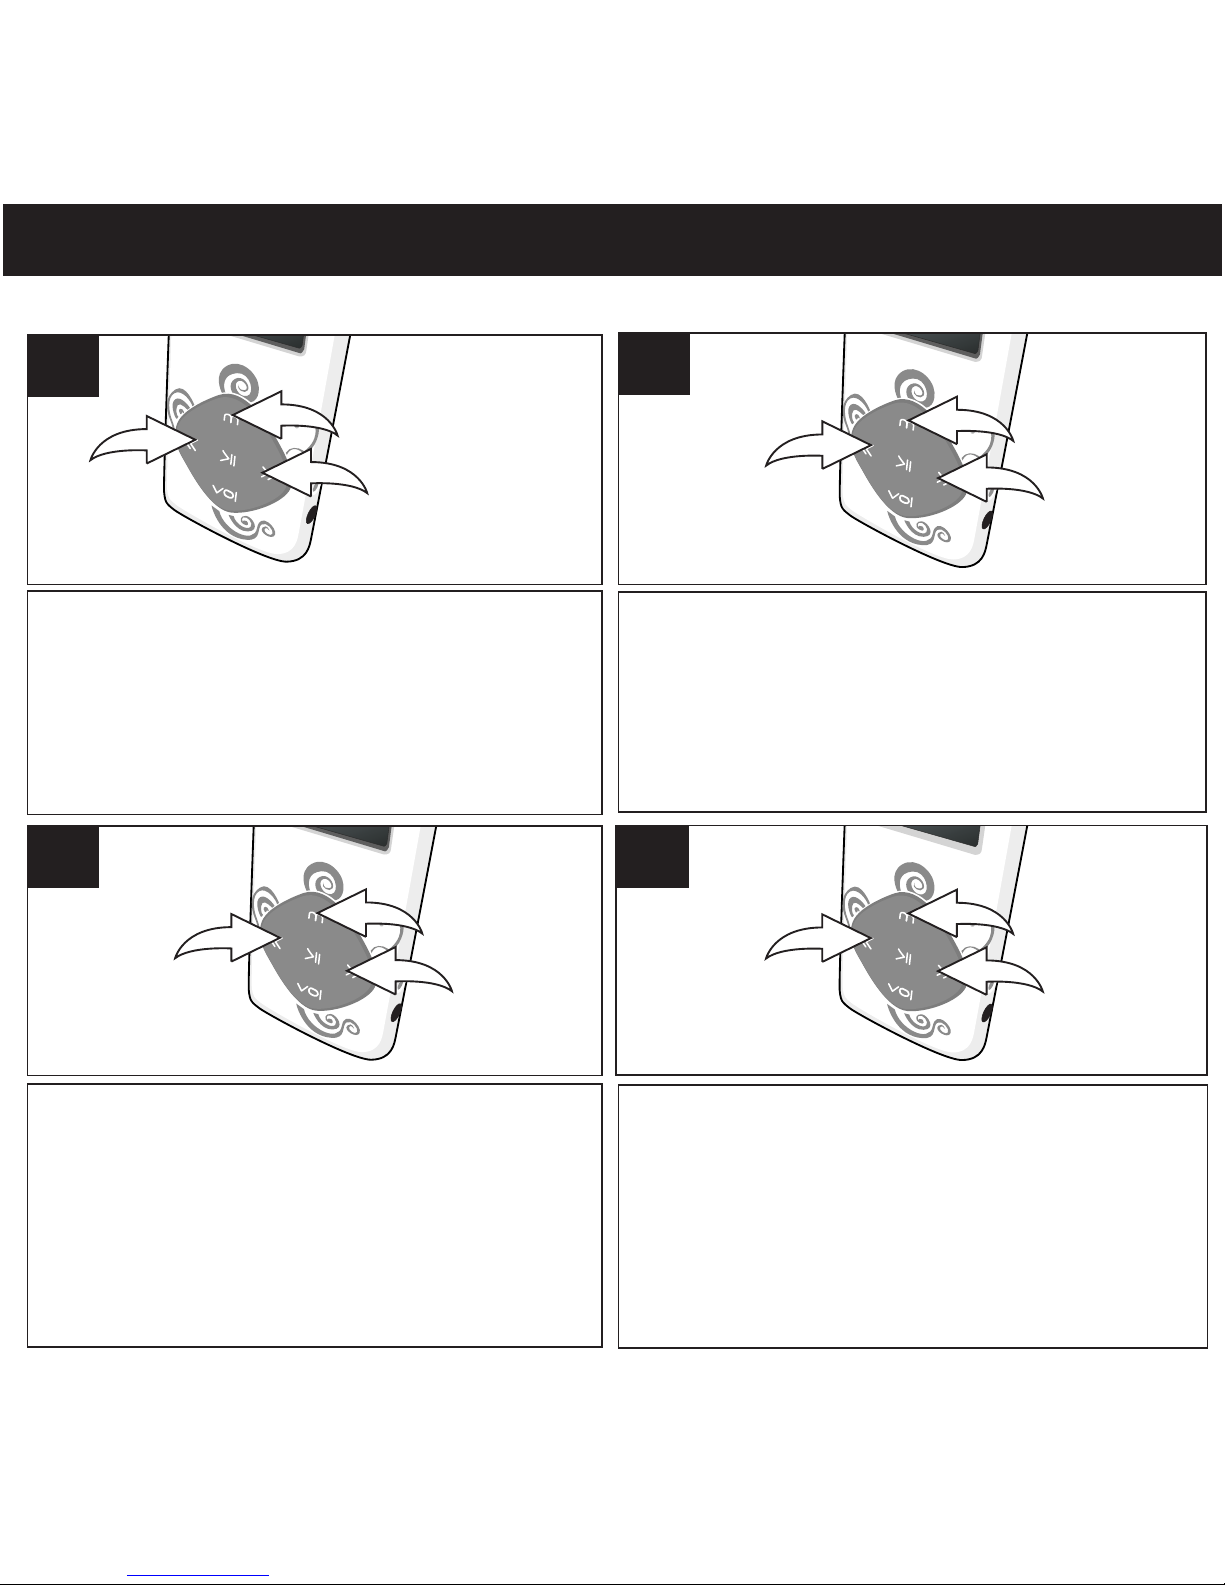
SETTING THE BACKLIGHT TIMER
SETTING THE BACKLIGHT TIMER
Turn the unit on as shown on page 16. Press and
hold the Mode/Enter button 1; the Mode Menu
screen will appear. Select Setup using the
Navigation Down/Skip–Search l button 2 or
Navigation Up/Skip–Search m button 3, then
press the Mode/Enter button 1 again to select it.
1
2
3
1
Select LCD Set using the Navigation
Down/Skip–Search l button 1 or
Navigation Up/Skip–Search m button 2,
then press the Mode/Enter button 3 to
select it.
3
1
2
2
3
1
2
3
Skip-Search button or Up button
then press the Mode/Enter button to select it.
Select Darkmode using the navigation Down/
l
1
m
2
3
3
1
2
4
0, 2, 4,...60) using the navigation Down/Skip-
Search button or Up button and press
Select a desired backlight(Darkmode). (disable;
l
1
m
2
3
Mode/Enter button to confirm and return to
setting menu.
Page 29
28
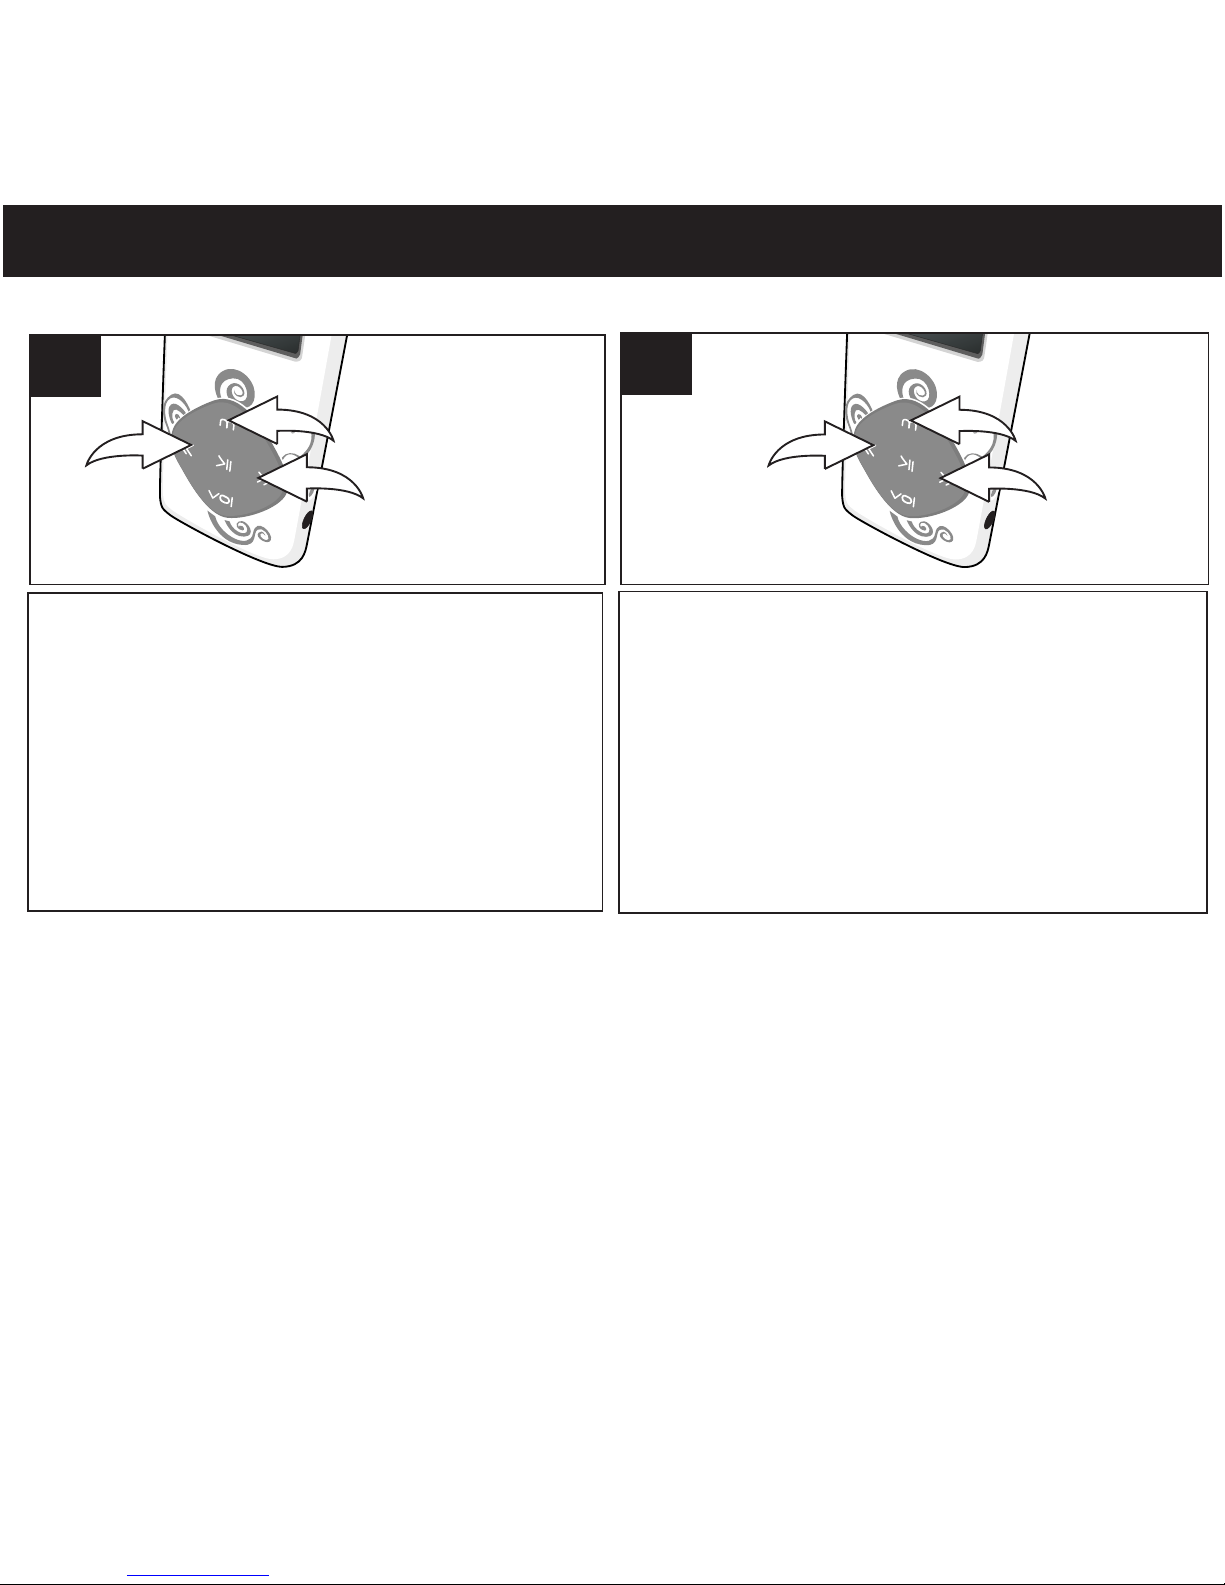
SETTING MENU
Turn the unit on as shown on page 16. Press and
hold the Mode/Enter button 1; the Mode
Menu screen will appear. Select Setup using
the Navigation Down/Skip–Search l button 2
or Navigation Up/Skip–Search m button 3,
then press the Mode/Enter button 1 again to
select it.
1
2
3
1
Select the desired submenu(LCD Set,
Language, Power Off, Memory Info,
Firmware Verson) using the navigation
Down/Skip–Search l button 1 or
Navigation Up/Skip–Search m button 2,
then press the Mode/Enter button 3 to
select it and make the setting. Press Power/
3
1
2
2
Play/Pause to return previous menu.
®p
NOTE:
• Playmode setting and equalizer setting are set under music Playback Mode.
• There are more settings which select under each mode. Please refer to the note
under each operation in this user manual.
Page 30
29
TROUBLESHOOTING GUIDE
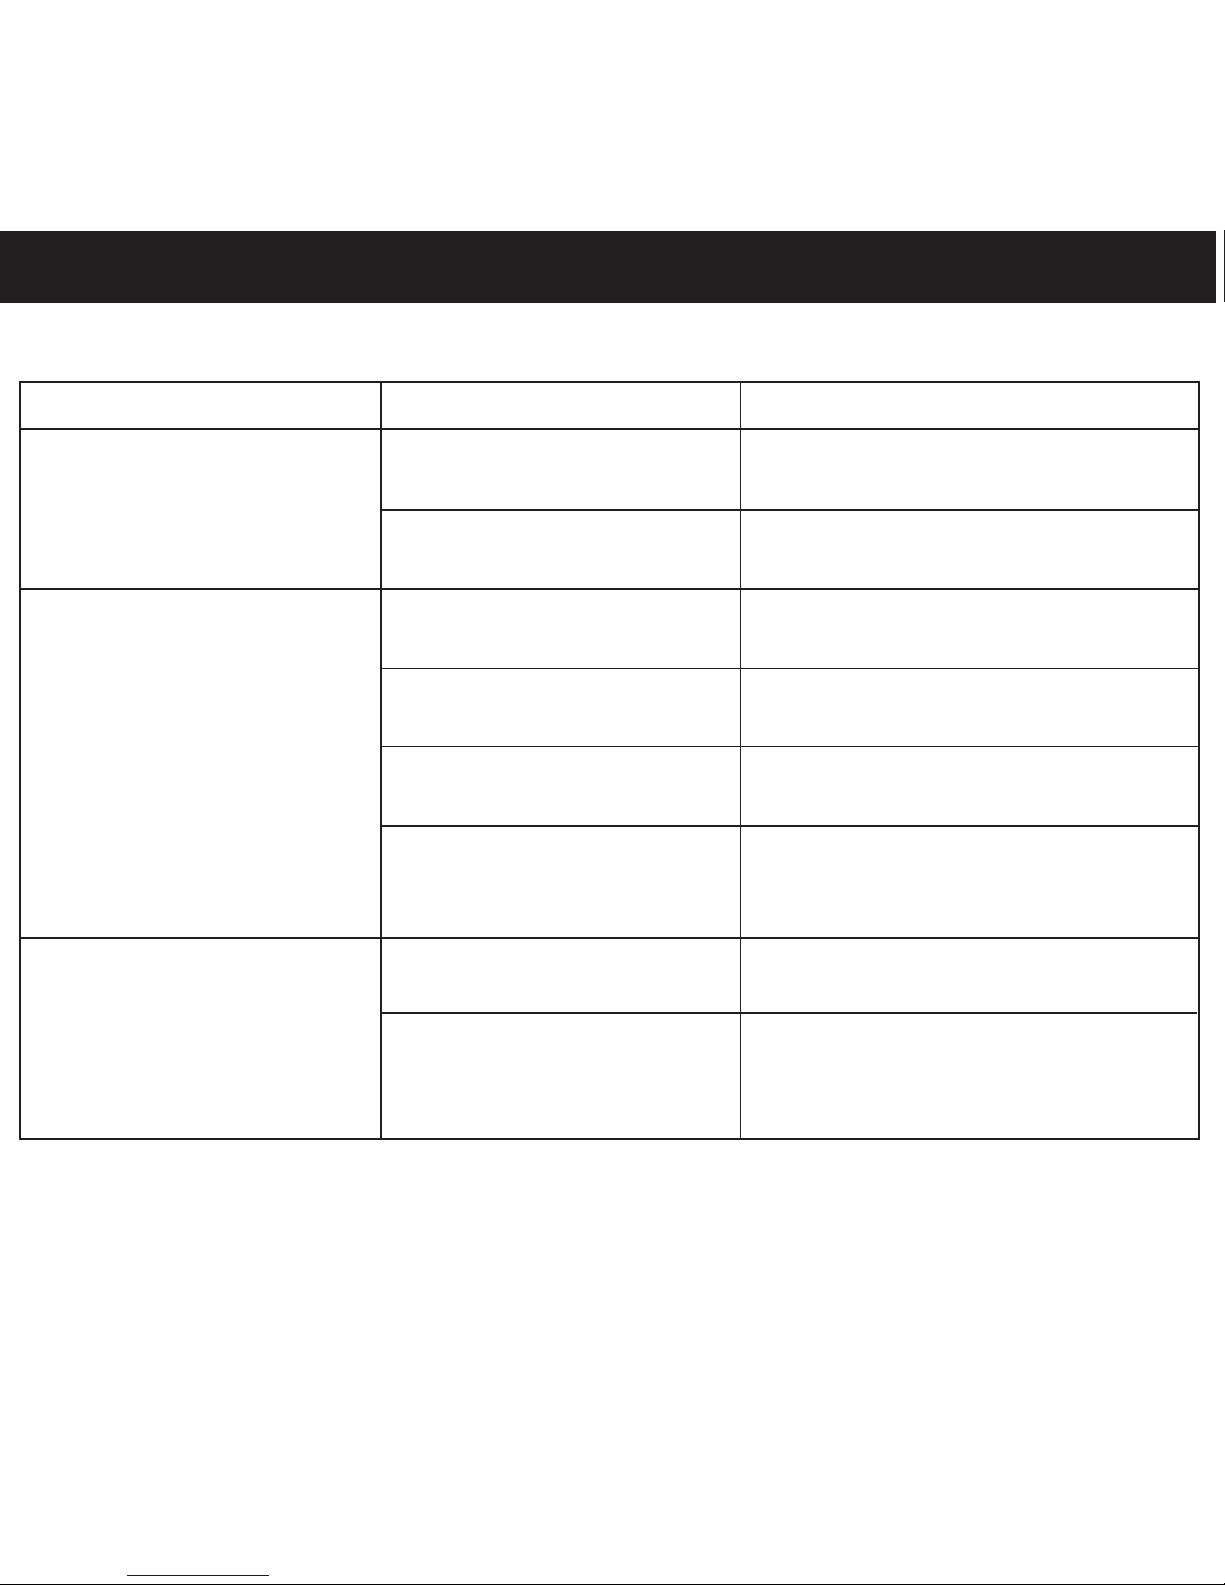
If you experience a problem with this unit, check the chart below before calling for service.
SYMPTOM CAUSE SOLUTION
Unit can not Battery is low/empty. Recharge battery as
turn on. described on page 7.
Power is not See page 16 for how to turn
turned on. on the power.
No sound. Headphones are not Insert headphones.
inserted.
Volume is set too low. Raise the volume as described
on page 16.
The media files Download uncorrupted
are corrupted. files.
No files are in the Upload files to the unit as
player. described on pages 10-14.
The computer can not The player is Make sure player is
recognize the not securely connected. securely connected.
player. Computer is not Supported OS: Windows XP
compatible. and Vista and Mac OS 9/X.
Page 31

30
TROUBLESHOOTING
GUIDE
(CONTINUED)
SYMPTOM CAUSE SOLUTION
No button works.
The Lock feature is Deactivate Lock feature as
activated. described on page 16.
Unit acting abnormally Unit needs to be reset Reset unit as described
on page 32
.
Page 32
31
Formatting the Player
WARNING! Do not format this player unless it stops working and you are
instructed to do so by
technical support personnel.
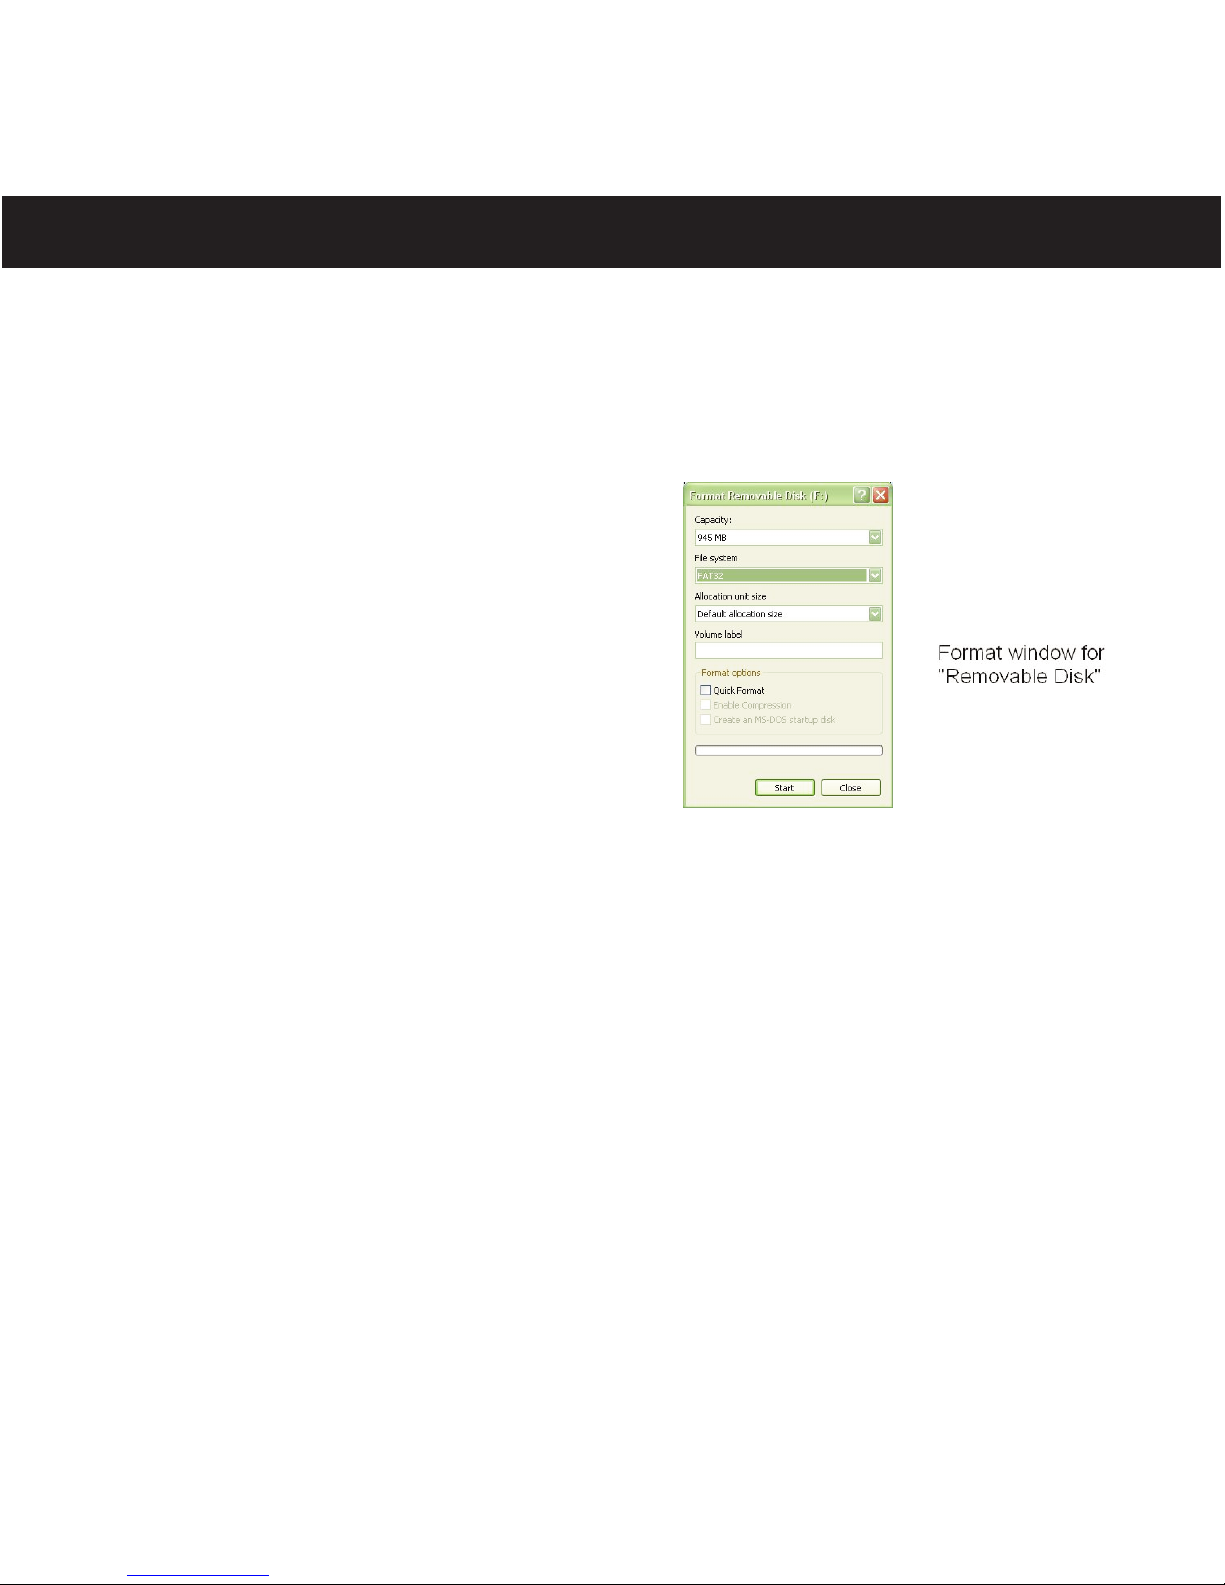
1. Use the USB cable to connect the
player and the computer.
2. Double click on My Computer, then
right click "Removable Disk" and left
click on "Format".
3. At the "Format" window, select "FAT
32" from the file system pull-down
menu, then click "Start" to format the
unit (see figure above).
NOTE: Make sure you have selected "FAT 32" at the file system pull-down
menu; otherwise, after formatting, the player will not work properly. Then,
click OK to confirm and the player will start to format. When finished, click
"Close" to close the Format window.
FORMATTING THE PLAYER
Page 33

If the unit acts abnormally, reset the unit by inserting a thin object (such as a paper clip)
into the
recessed Reset button. For the Reset button, see page 6 for the button's
location.
RESETTING THE UNIT
32
Page 34
VIDEO CONVERSION
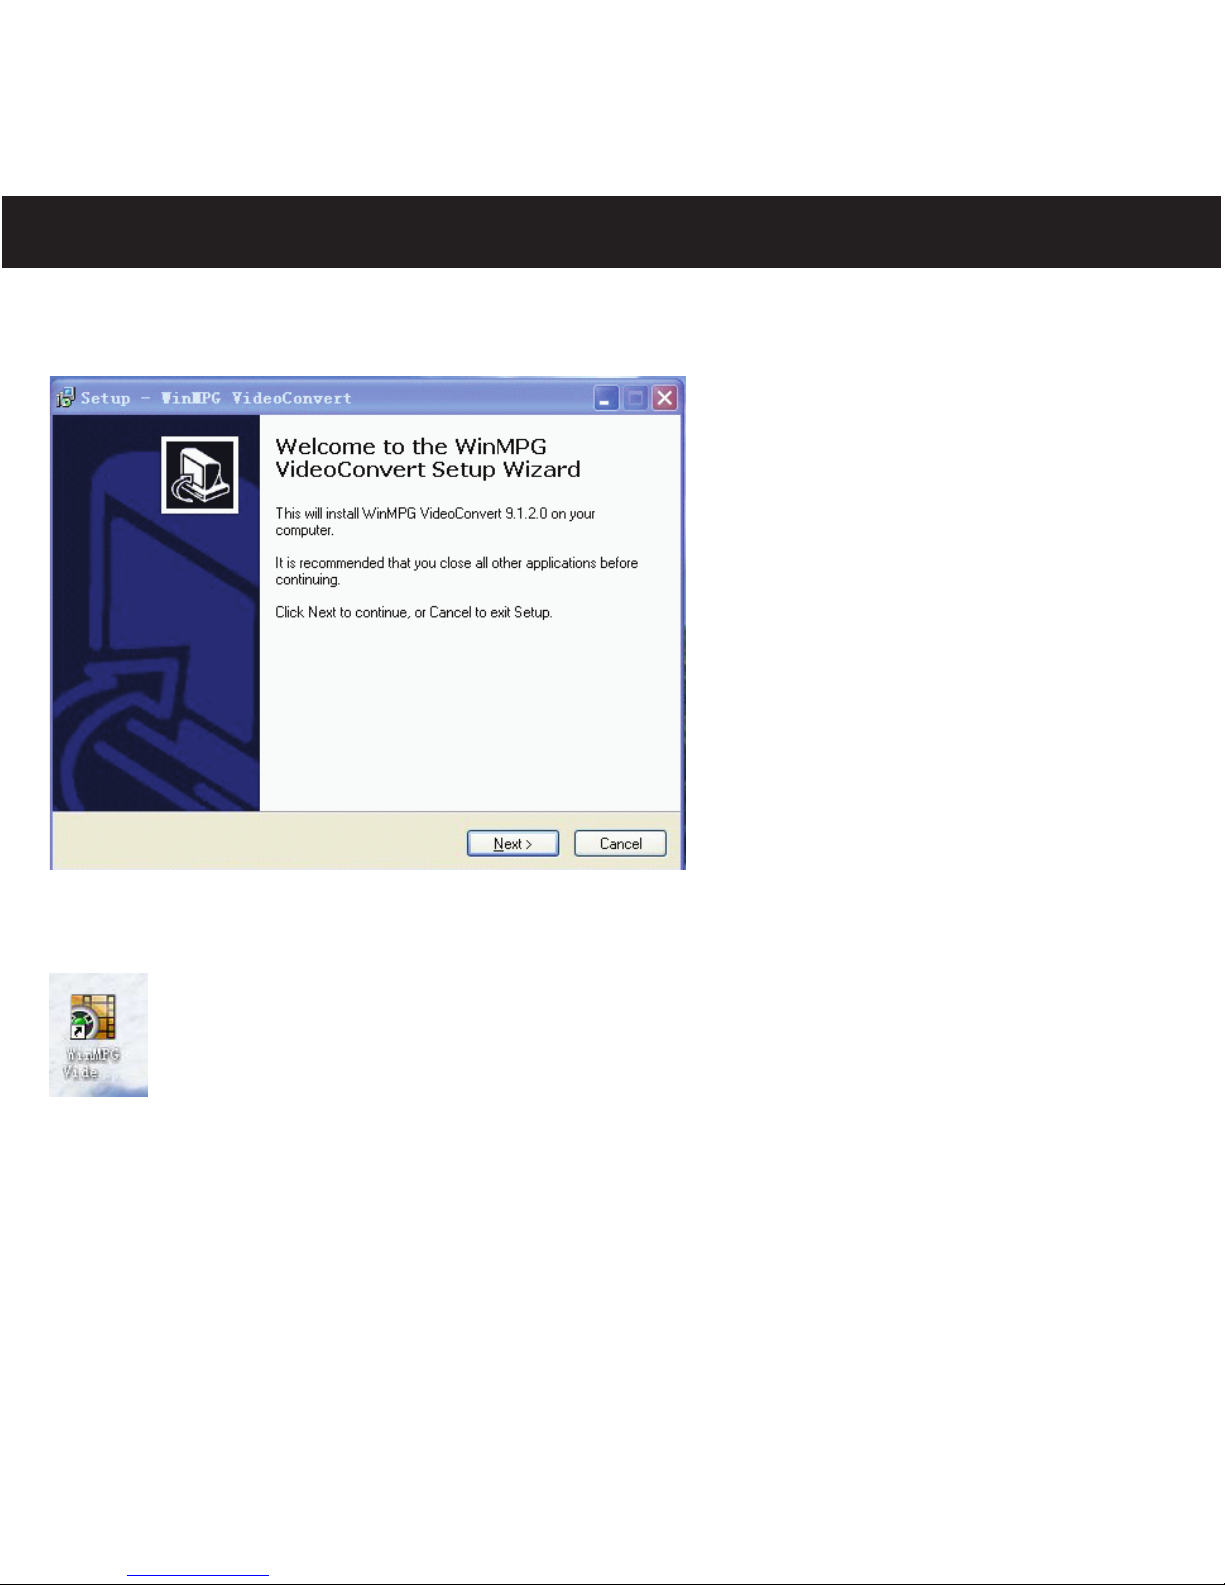
1. Install the software WinMPG_VideoConvert_Setup from CD ROM supplied.
2. Run the software WinMPG Video Convert after installed.
33
Page 35
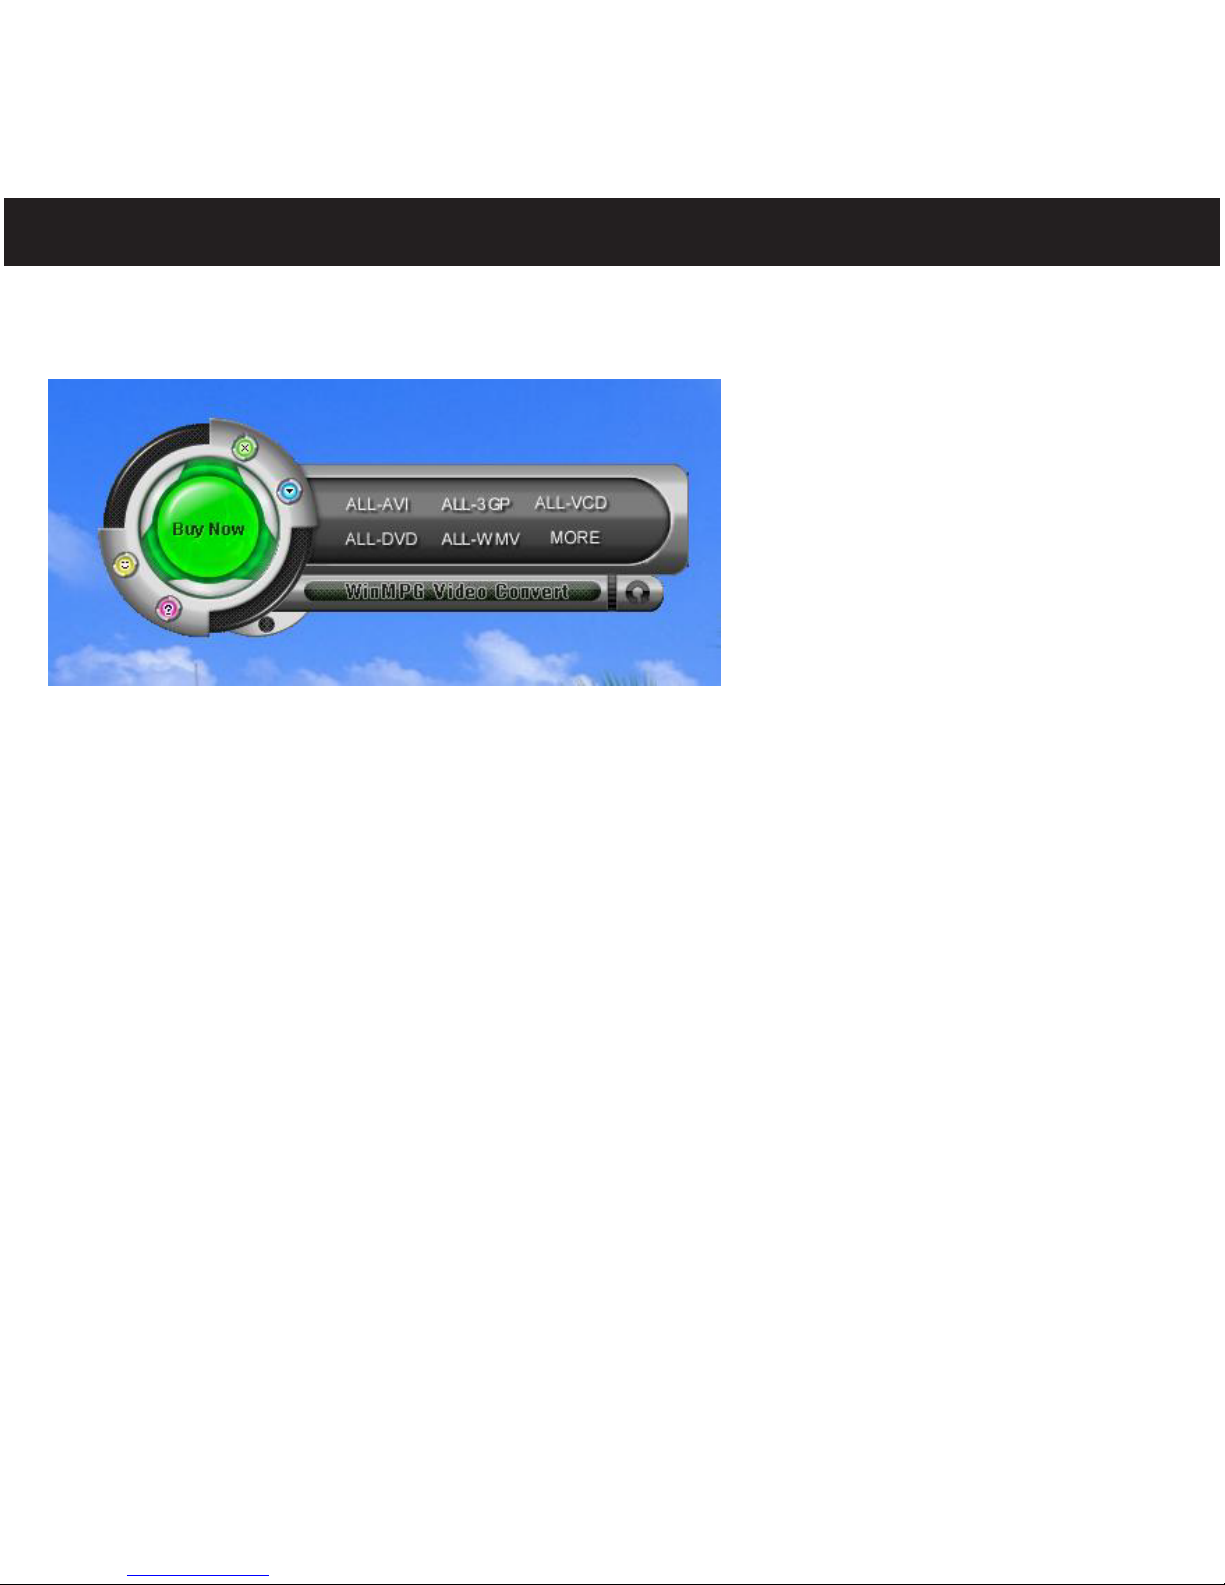
3. Press the button MORE in the main interface. And then select the AMV
format for video conversion.
4. Press the button Add File. Select the movie you want to do the video
conversion to AMV format.
5. Select the destination you want to save the converted AMV video file.
6. Select the 128×128 format in the AMV Video File Width in setting.
7. After setting, press Start To Convert.
8. The converted AMV Video file will be saved in your selected destination after conversion.
9. Transfer the converted files to your digital player using drag and drop method using
Windows for video playback.
NOTES:
Below are the file formats, which the Video conversion software can support for video
conversion to AMV format:
1) Windows Media file format which the expanded name is WMV, ASF
2) MPEG1 file format which the expanded name is MPG, MPEG, MPEG1 file format
3) Real play file format which the expanded name is RM, RAM, RMVB
4) QuickTime file format which the expanded name is MOV
5) MPEG2 file format which the expanded name is VOB
6) MPEG2 file format which the expanded name is SWF
VIDEO CONVERSION
34
Page 36

SPECIFICA
TIONS
35
Audio Frequency Range 20Hz–20KHz
Headphones Output 5mW, 32ohm (Max Vol)
S/N Ratio 90dB (MP3)
File Support MP3 MPEG 1/2/2.5 Layer 3
with a Bit Rate of 32-320 kbps
WMA Windows Media Audio
with a Bit Rate of 48-192 kbps
Picture Baseline JPEGs
Ebooks TXT (Text) file
General Dimension 1.7 (W) x 3.8 (L) x 0.4 (D) inches
Weight 43 grams
USB USB 2.0
Built-in Memory 2GB
Built-in Battery Li-Polymer Rechargeable battery
250mAh
Max. Playtime approx.8 hrs in Music Playback mode
Supported OS Windows XP and Vista and Mac 9 or later
Operating Temperature 23° F to 104° F (-5° C to 40° C)
LCD Display 1.44" (measured diagonally)
Specifications are subject to change without notice.
Video AMV
 Loading...