

Page 1

1
USB SoundWave 7.1 Digital
Quick Installation Guide
Introducing the USB SoundWave 7.1
The USB SoundWave 7.1 Digital is a portable sound card
that brings a home theater atmosphere to notebook or
desktop computers.
Features and Benefits
• External volume and mic controls with mute buttons
• 2 microphone inputs and 1 stereo headphone
output
• Supports recording through S/PDIF-in/Mic/Linein
• S/PDIF out – provides digital surround sound
output
• Provides 2.1/5.1/7.1 connection for surround sound
speakers
Requirements
• PC computer with an available USB 2.0 port
• Windows
®
XP (32-/64-bit) / Server 2003 & 2008
(32-/64-bit) / Vista (32-/64-bit)
04-0577A
Page 2
2
Package Contents
• USB SoundWave 7.1 Digital
• USB cable
• Software CD
• Quick Installation Guide
Layout
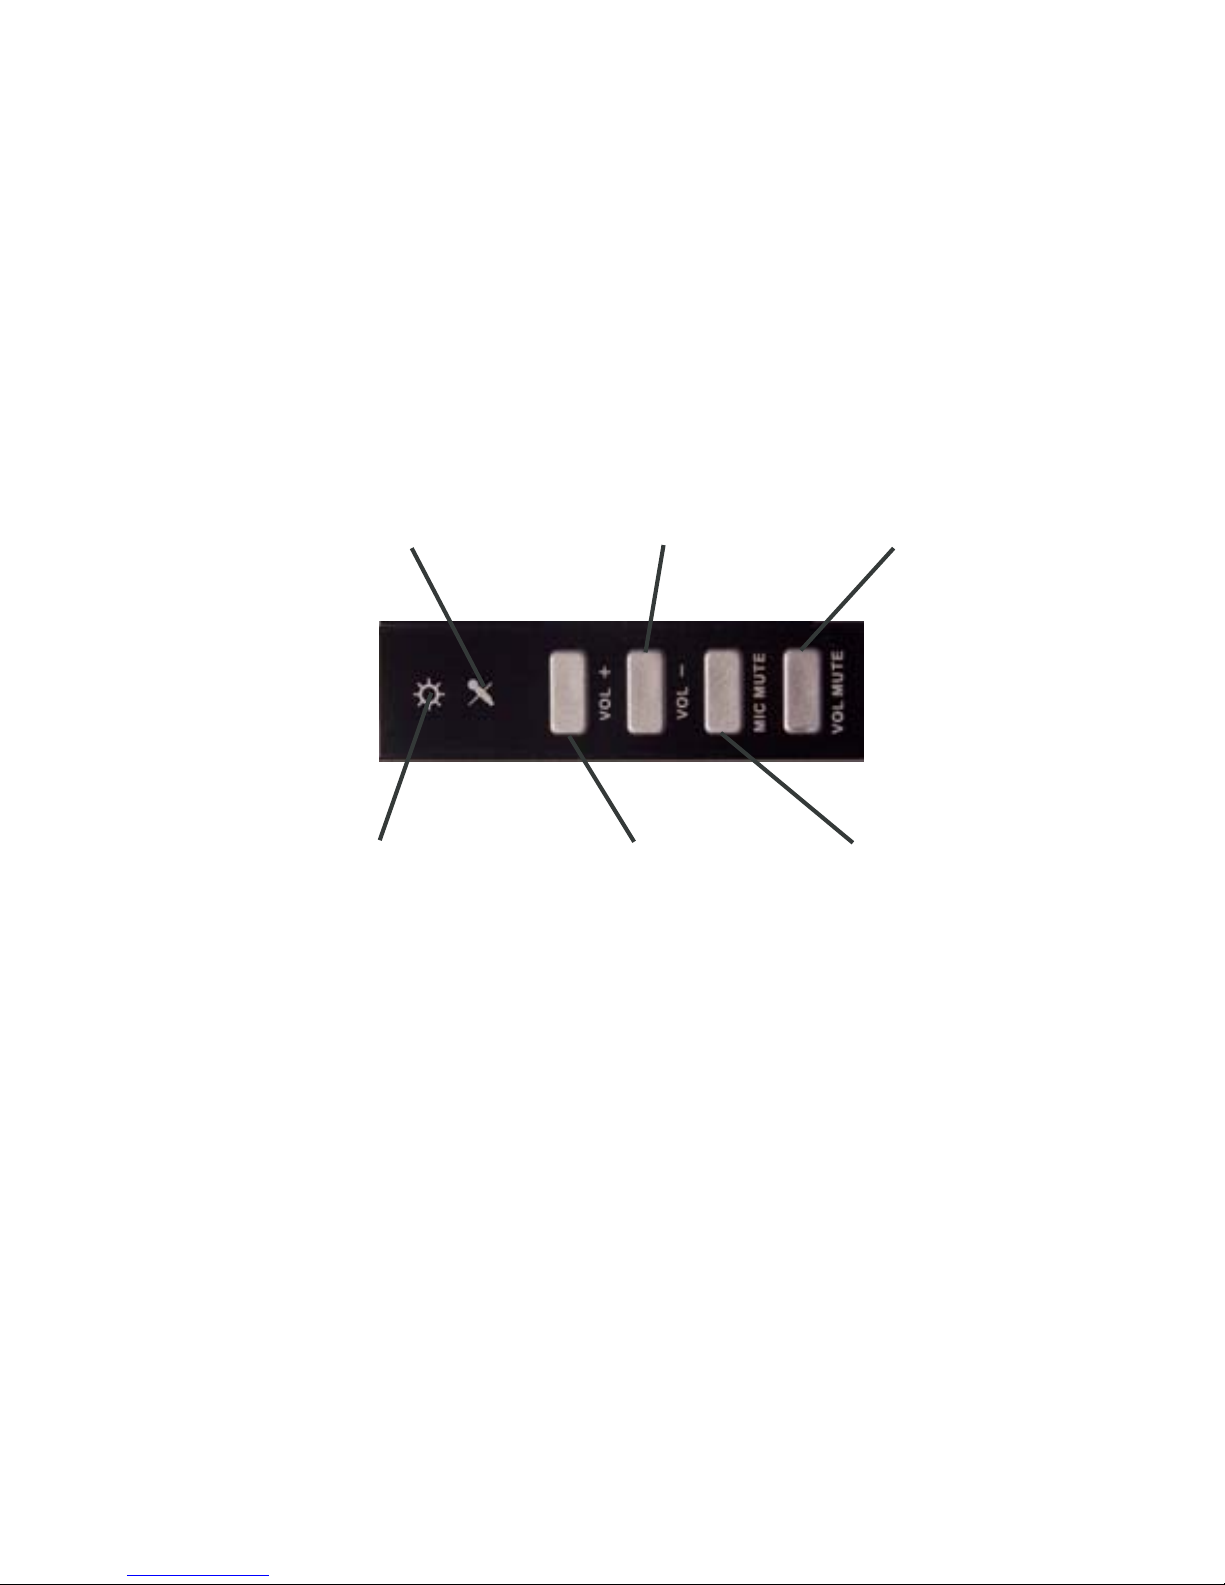
Figure 1. Top view
Power/Activity LED
Volume Up
Volume Down
Microphone Mute
Volume Mute
Microphone
Mute LED
• Volume Mute: Press this button to
mute/un-mute audio outputs
• Microphone Mute: Press this button to
mute/un-mute microphone
• Volume (UP, Down): Increases or
decreases audio output volume
• Microphone Mute LED: When the
microphone inputs are muted, the light
will turn on
Page 3
3
• Power/Activity LED: The light will be on when the
system is powered up. The light will blink when
activity is detected
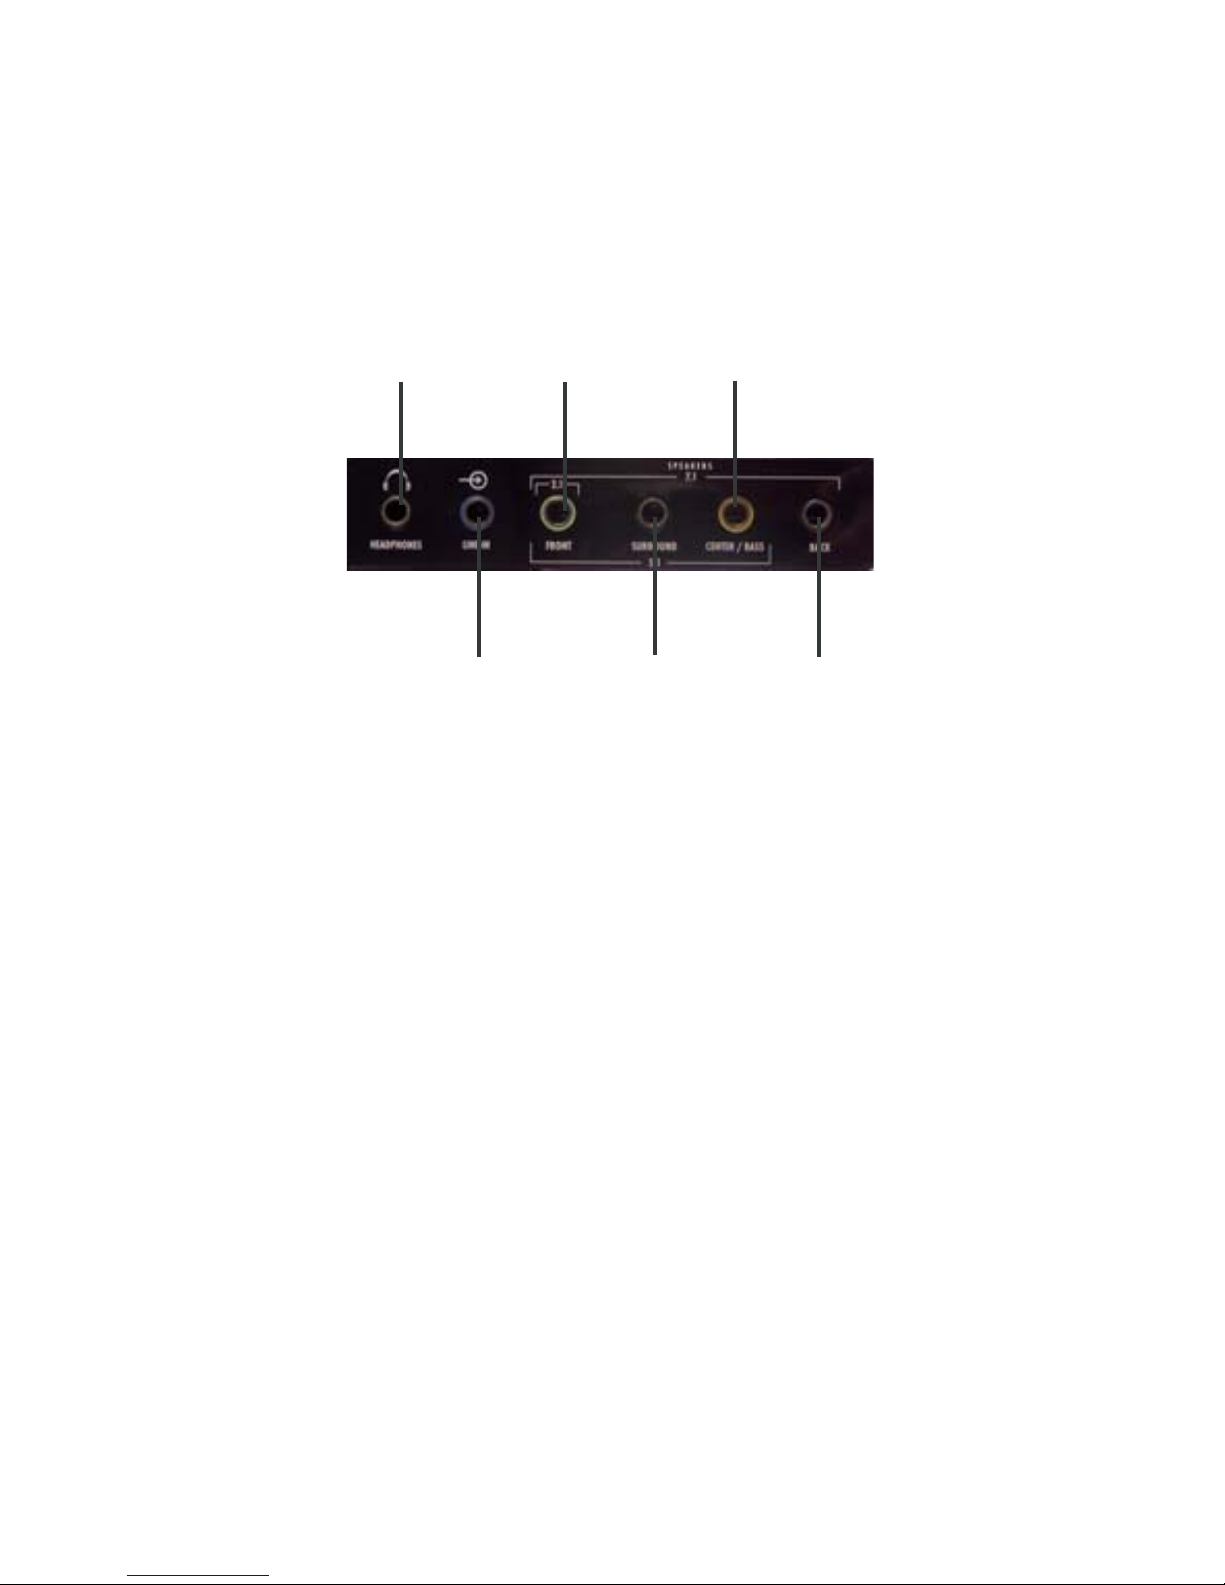
Headphone
Line In
Front
Speaker
Surround
Speaker
Center/Bass
Speaker
Back Speaker
Figure 2: Front connector
• Headphone: Connect to headphone.
• Line In: Connect to tape/CD/DVD
Player, or other audio sources for output
mixing and/or recording
• Front Speaker: Connect to Front
speakers (via external amplifier)
• Surround Speaker: Connect to
Surround speakers while in 4/6/8
channel modes (via external amplifier)
• Center/Bass Speaker: Connect to
Center/Bass speakers while in 6/8
channel modes (via external amplifier)
Page 4
4
• Back Speaker: Connect to Back speakers while in 8
channel mode (via external amplifier)
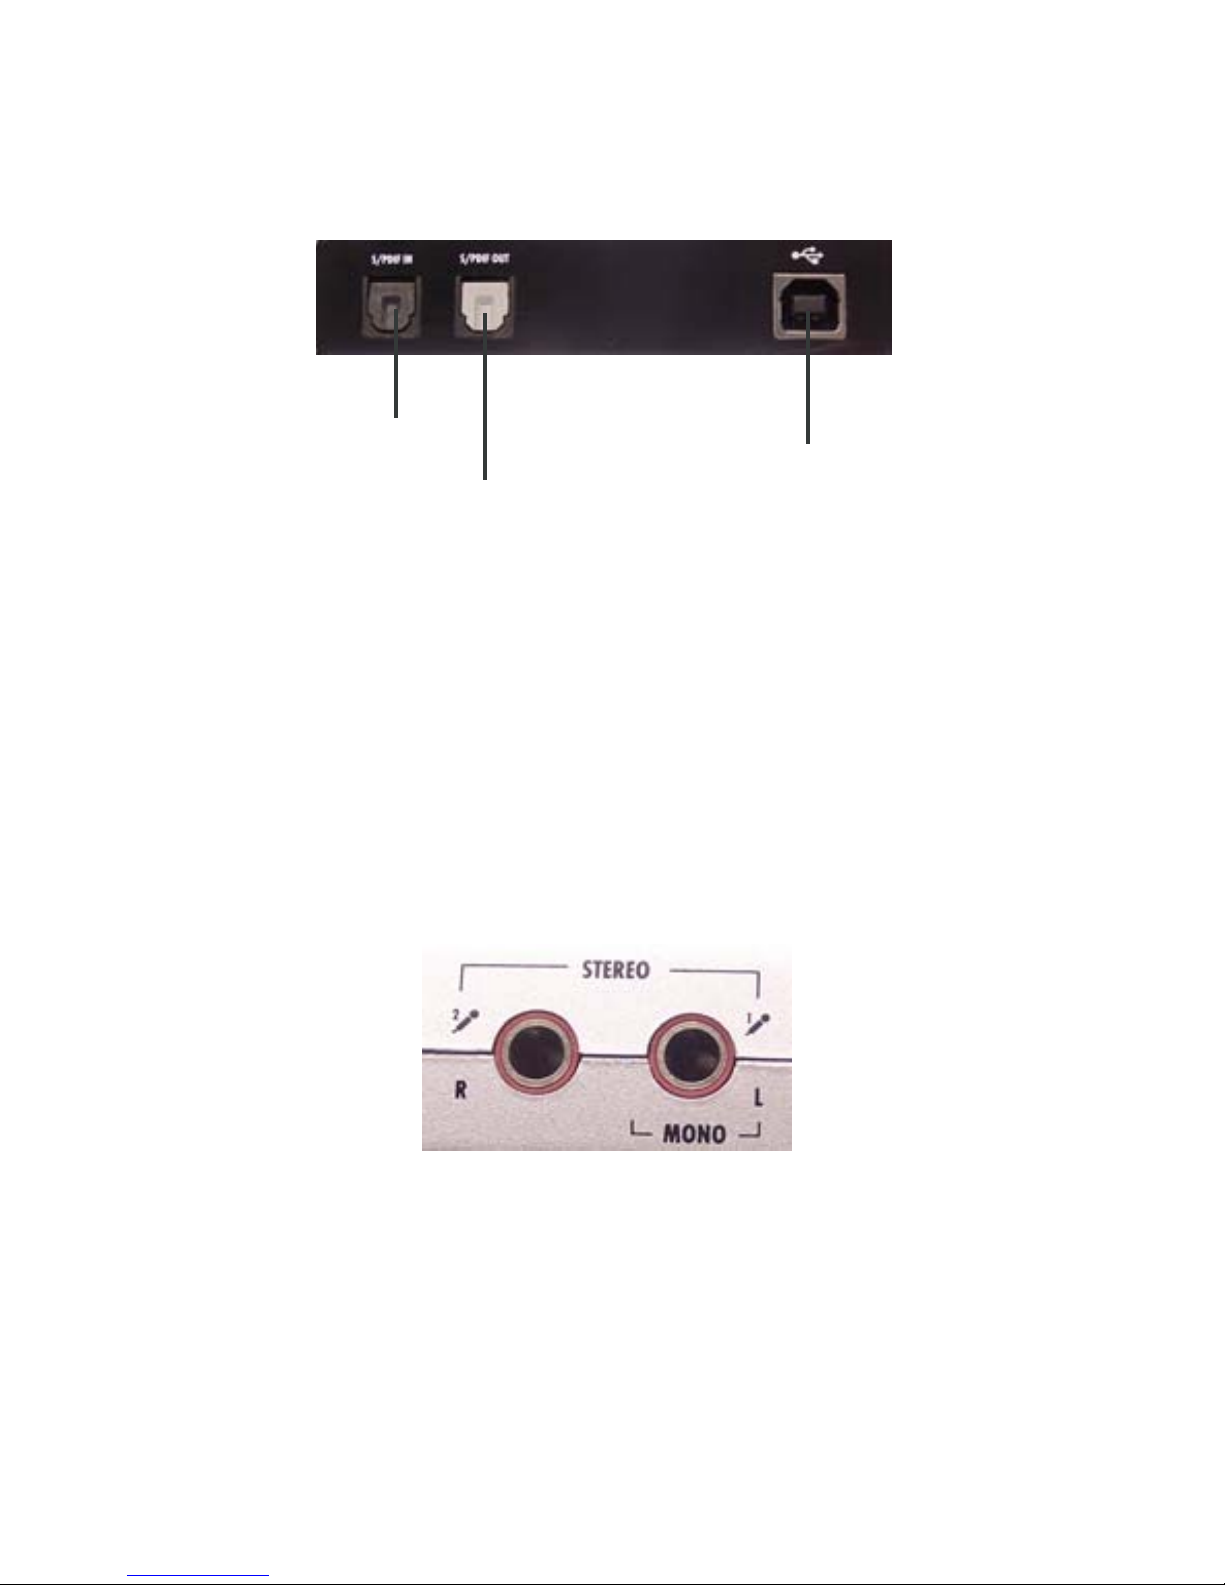
Figure 3: Rear connector
S/PDIF IN
S/PDIF OUT
USB Connector
• S/PDIF IN: Connect to digital output of external
audio device via an optical S/PDIF cable
• S/PDIF OUT: Connect to digital input of external
audio device via an optical S/PDIF cable (cable not
included)
• USB Connector: Plugs into the system’s USB port.
Figure 4: Side connector
• MIC (1) IN: Connect to a microphone (Mono left
channel)
• MIC (2) IN: Connect to a microphone (Mono right
channel)
Page 5

5
Software Installation
Windows XP/Server 2003 & Vista will automatically install
it's built-in driver for the USB SoundWave 7.1 Digital when
connected. To get USB Multi-Channel Audio Device
Utility, Mixer, Equalizer and simulated 7.1-channel sound
from headphones or stereo speakers, install the USB MultiChannel Audio Device software and driver from the CD.
Plug in the USB SoundWave 7.1 Digital and allow the
Windows driver to load before inserting the software CD.
Windows XP/Server 2003
1. Insert the software CD. Autorun should start the
installation. If Autorun doesn't start, click Start,
then Run. Type X:\setup.exe, then click OK.
(Change X: to match your CD-ROM drive letter)
2. Click Next, Next.
3. Select Yes, I want to restart my computer now, then
click Finish.
Windows Vista
™
1. Insert the software CD. AutoPlay should start the
installation.
At the AutoPlay box: click Run Setup.exe.
If AutoPlay doesn't start: click Start, in Start Search,
type X:\setup.exe, then press Enter. (Change X: to
match your CD-ROM drive letter)
2. Select Yes, I want to restart my computer now, then
click Finish.
Page 6

6
Windows Server 2008
1. Plug in the USB SoundWave 7.1 Digital into a avalible
USB port. The OS does not have a build in driver.
2. Insert the software CD. AutoPlay should start the
installation.
At the AutoPlay box: click Run Setup.exe.
If AutoPlay doesn't start: click Start, in Start Search,
type X:\setup.exe, then press Enter. (Change X: to
match your CD-ROM drive letter)
2. Select Yes, I want to restart my computer now, then
click Finish.
To Verify Installation
1. Check Device Manager for proper installation:
For Windows Server 2008: right click Computer, click
Manage, double click Diagnostics, click Device
Manager.
For Windows Vista: right click Computer, click
Manage, click Continue, click Device Manager.
For Windows XP/2003: right click My Computer,
click Manage, click Device Manager.
2. Double click Sound, video and game controllers:
With USB Multi-Channel Audio Device driver: USB
Multi-Channel Audio Device will be displayed.
With Windows built-in driver: USB Audio Device
will be displayed.
Page 7

7
USB Multi-Channel Audio Device Software
Utility
The USB Multi-Channel Audio Device quick start icon,
located in the taskbar by the clock, starts automatically
when Windows boots. Simply click on the quick start icon
to open it.
Enable/Disable Optical S/PDIF Output
The Optical S/PDIF out is enabled by default.
1. Click on the USB Multi-Channel Audio Device
quick start icon.
2. From the Main Settings tab, click on the radial
button next to S/PDIF Output.
Speaker Configuration
Windows XP
1. From the main desktop, click Start, Control Panel.
2. Click Sounds and Audio Devices.
3. Select the Audio tab.
4. Click Advanced under Sound Playback, then click
the Speakers tab.
5. Select your speaker type from the drop down list.
6. Click OK to save the settings.
Page 8

8
Windows Server 2003
Make sure to log in as Administrator or an account with
administrative privileges.
1. From the main desktop click Start, Control Panel.
2. Click Sounds and Audio Devices.
3. Select the Audio tab.
4. Click Advanced under Sound Playback, then click
the Speakers tab.
5. Select your speaker type from the drop down list.
6. Click OK to save the settings.
Windows Vista/Server 2008
Make sure to log in as Administrator or an account with
administrative privileges.
1. Right click the volume control icon located in the
taskbar by the system clock.
2. Click Playback devices, select Speakers USB PnP
Sound Device, click Configure.
3. Follow the on screen instructions to configure your
speakers.
Microphone Configuration
Windows Vista/Server 2008
1. Right click the volume control icon located in the
taskbar by the system clock.
Page 9

9
2. Click Playback Devices, under the Playback tab,
select Speakers USB PnP Sound Device, click
Properties.
3. Click the Levels tab. Click the speaker icon to either
enable or mute the microphone as indicated by the
red circle (muted) next to the icon.
4. Move the slider to change the volume level.
5. Click OK to save the changes.
6. Click the Recording tab.
7. Select Microphone USB PnP Sound Device, click
Properties.
8. Clickthe Levels tab.
9. Move the slider to the left to increase sensitivity.
10. Click OK to save the changes.
11. Click the Custom tab.
12. Check Microphone Boost, click OK.
Note: Microphone Boost increases sensitivity
by approximately 20dB. This setting is
optional and not be needed in most cases
Page 10

10
Uninstalling USB Multi-Channel Audio
Device Software Utility
For Windows XP/Server 2003
1. Click Start.
2. Click Control Panel, double click Add/Remove
Programs.
3. Select USB Multi-Channel Audio Device, then
click either Change/Remove or Add/Remove.
4. Follow the on screen instructions to complete.
For Windows Vista/Server 2008
1. Click Start, Control Panel.
2. Click Classic View, double click Programs and
Features.
3. Select USB Multi-Channel Audio Device, then
click Uninstall/Change.
Windows Vista: click Continue.
Windows Server 2008: continue to step #4
4. Select Yes, I want to restart my computer now and
click Finish.
Page 11

11
Technical Support and Warranty
QUESTIONS? SIIG’s Online Support has answers! Simply visit our web site at
www.siig.com and click Support. Our online support database is updated daily
with new drivers and solutions. Answers to your questions could be just a few
clicks away. You can also submit questions online and a technical support
analysts will promptly respond.
SIIG offers a 5-year manufacturer warranty with this product. Please see our web
site for more warranty details. If you encounter any problems with this product,
please follow the procedures below.
If it is within the store's return policy period, please return the
product to the store where you purchased from. If your purchase has passed the
store's return policy period, please follow these steps to have the product repaired
or replaced.
Step 1: Submit your RMA request.
Go to www.siig.com, click Support, then RMA to submit a
request to
SIIG RMA. If the product is determined to be
defective, an RMA number will be issued.
Step 2: After obtaining an RMA number, ship the product.
• Properly pack the product for shipping. All accessories that came with
the original package must be included.
• Clearly write your RMA number on the top of the returned package. SIIG
will refuse to accept any shipping package, and will not be responsible
for a product returned without an RMA number posted on the outside of
the shipping carton.
• You are responsible for the cost of shipping. Ship the product to the
following address:
SIIG, Inc.
6078 Stewart Avenue
Fremont, CA 94538-3152, USA
RMA #: ________________
• SIIG will ship the repaired or replaced product via Ground
in the U.S. and International Economy outside of the U.S. at
no cost to the customer.
Page 12

About SIIG, Inc.
Founded in 1985, SIIG, Inc. is a leading computer upgrade manufacturer of I/O
connectivity products, including PCI & ISA serial and parallel ports, USB, Serial
ATA & UltraATA controllers, FireWire (1394a/b), networking, sound cards,
and other accessories. SIIG is the premier one-stop source of upgrades.
SIIG products offer comprehensive user manuals, many user-friendly features,
and are backed by an extensive manufacturer warranty. High quality control
standards are evident by the overall ease of installation and compatibility of
our products, as well as one of the lowest defective return rates in the industry.
SIIG products can be found in computer retail stores, mail order catalogs,
through major distributors, system integrators, and VARs in the Americas and
the UK, and through e-commerce sites.
USB SoundWave 7.1 Digital is a trademark of SIIG, Inc. SIIG and the SIIG logo are registered
trademarks of SIIG, Inc. Microsoft, Windows and Windows Vista are either registered
trademarks or trademarks of Microsoft Corporation in the United States and/or other
countries. Pentium is a registered trademark of Intel Corporation. Other names used in this
publication are for identification only and may be trademarks of their respective companies.
June, 2009 Copyright © 2009 by SIIG, Inc. All rights reserved.
PRODUCT NAME
USB SoundWave 7.1 Digital
FCC RULES: TESTED TO COMPLY WITH FCC PART 15, CLASS B
OPERATING ENVIRONMENT: FOR HOME OR OFFICE USE
FCC COMPLIANCE STATEMENT:
This device complies with part 15 of the FCC Rules. Operation is subject
to the following two conditions: (1) This device may not cause harmful
interference, and (2) this device must accept any interference received,
including interference that may cause undesired operation.
THE PARTY RESPONSIBLE FOR PRODUCT COMPLIANCE
SIIG, Inc.
6078 Stewart Avenue
Fremont, CA 94538-3152, USA
Ph: 510-657-8688
 Loading...