

Soundtube SM1001p User Manual
SM1001p
Install Instructions For:
SM1001p Powered Subwoofer
The SM1001p ships without mounting accessories.
Optional accessories include:
1. Surface Mount Bracket (AC-SM1001p-S)
2. Corner Mount Bracket (AC-SM1001p-C)
Mounting brackets include mounting instructions.
SM1001p
Floor-mount Installation For:
SM1001p Powered Subwoofer
1.435.647.9555
|
800.647.TUBE
|
www.soundtube.com
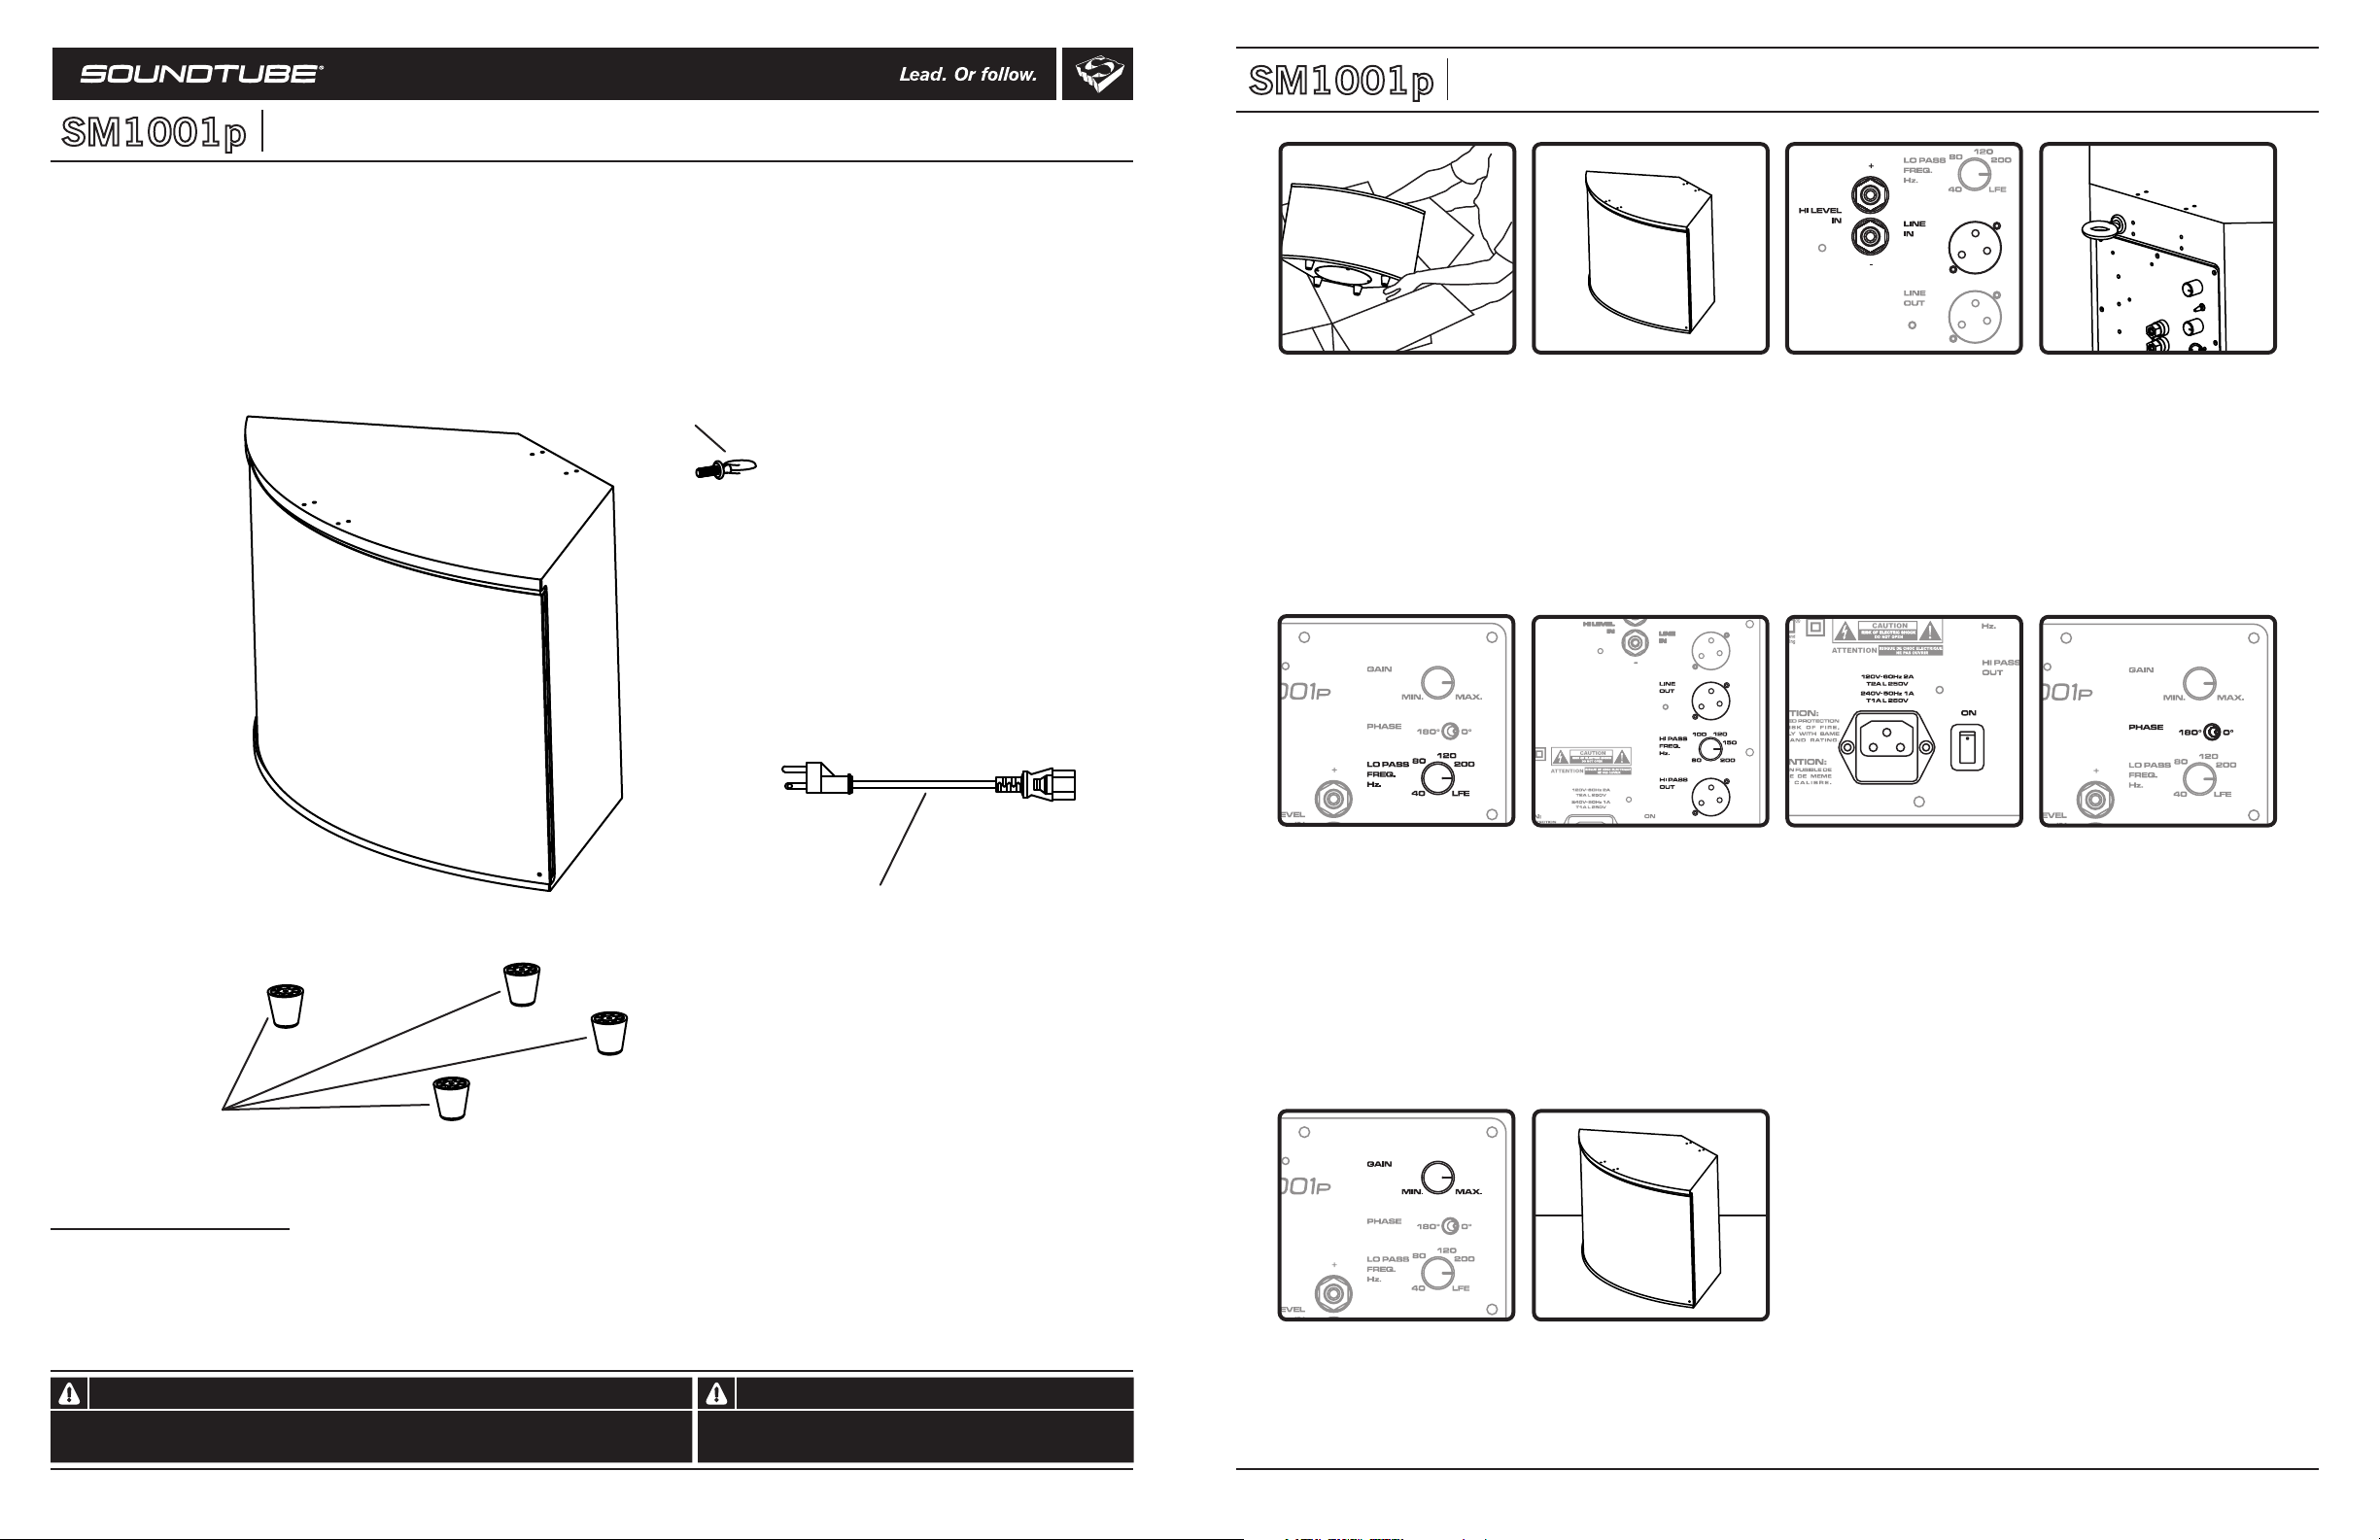
Removable feet
Forged eyebolt
Power cord
1. Unpack subwoofer. 2. Place in desired location.
5. Set the low-pass filter
with the user-adjustable
knob. The low pass filter
ranges from 40 Hz - 200
Hz with over-toggle to full
range (LFE).
6. If signal pass-through is
desired, connect the signal
output to either the full
range pass-through or the
user-adjustable high pass
output (40 Hz - 200 Hz)
using the balanced XLR
outputs. Note: The 70v
input does not pass signal
through the balanced XLR
outputs.
3. Connect signal wire to
either the balanced XLR
input or the 70.7 V binding
post.
7. Plug in the power cord,
and turn the unit on. The
SM1001p senses when no
signal is present, and
powers down to conserve
energy.
4. For a safety cable
attachment, screw the
forged eye bolt into the
1/4-20 inserts on the back
of the speaker. Attach
included safety cable from
forged eyebolt to secure
mounting point on
structure. Installer to supply
structural fastener.
8. For optimal subwoofer
performance, set phase
switch to either 0º or 180º
(bass will be more rich when
set correctly for the
installation).
Box contents: SM1001p
1 Subwoofer
4 Removable feet
1 Power cord
1 Forged eyebolt
1 Seismic cable
3 Zip ties
© 2010 SoundTube Entertainment, Inc. All rights reserved. PN SM1001p Rev 07.13.10
Warning Warning
SoundTube speakers must be installed by a professional audio installer/contractor. Fo r safety and for
optimu m au dio performance, installe r must follow all direc tions issued by SoundTube Entertainment.
9. Set gain. 10. Done!
Do not spec or install speaker near support beam, ventilation duct or
other structure that may interfere with speaker function or dispersion.
AC-SM1001p-C
Install Instructions For:
SM1001p Powered Subwoofer Corner Mount Bracket
For wiring instructions, consult SM1001p installation instructions.
Alternate optional accessory is a surface mount bracket (AC-SM1001p-S).
AC-SM1001p-C
Corner-mount Installation For:
SM1001p Powered Subwoofer
1.435.647.9555
|
800.647.TUBE
|
www.soundtube.com
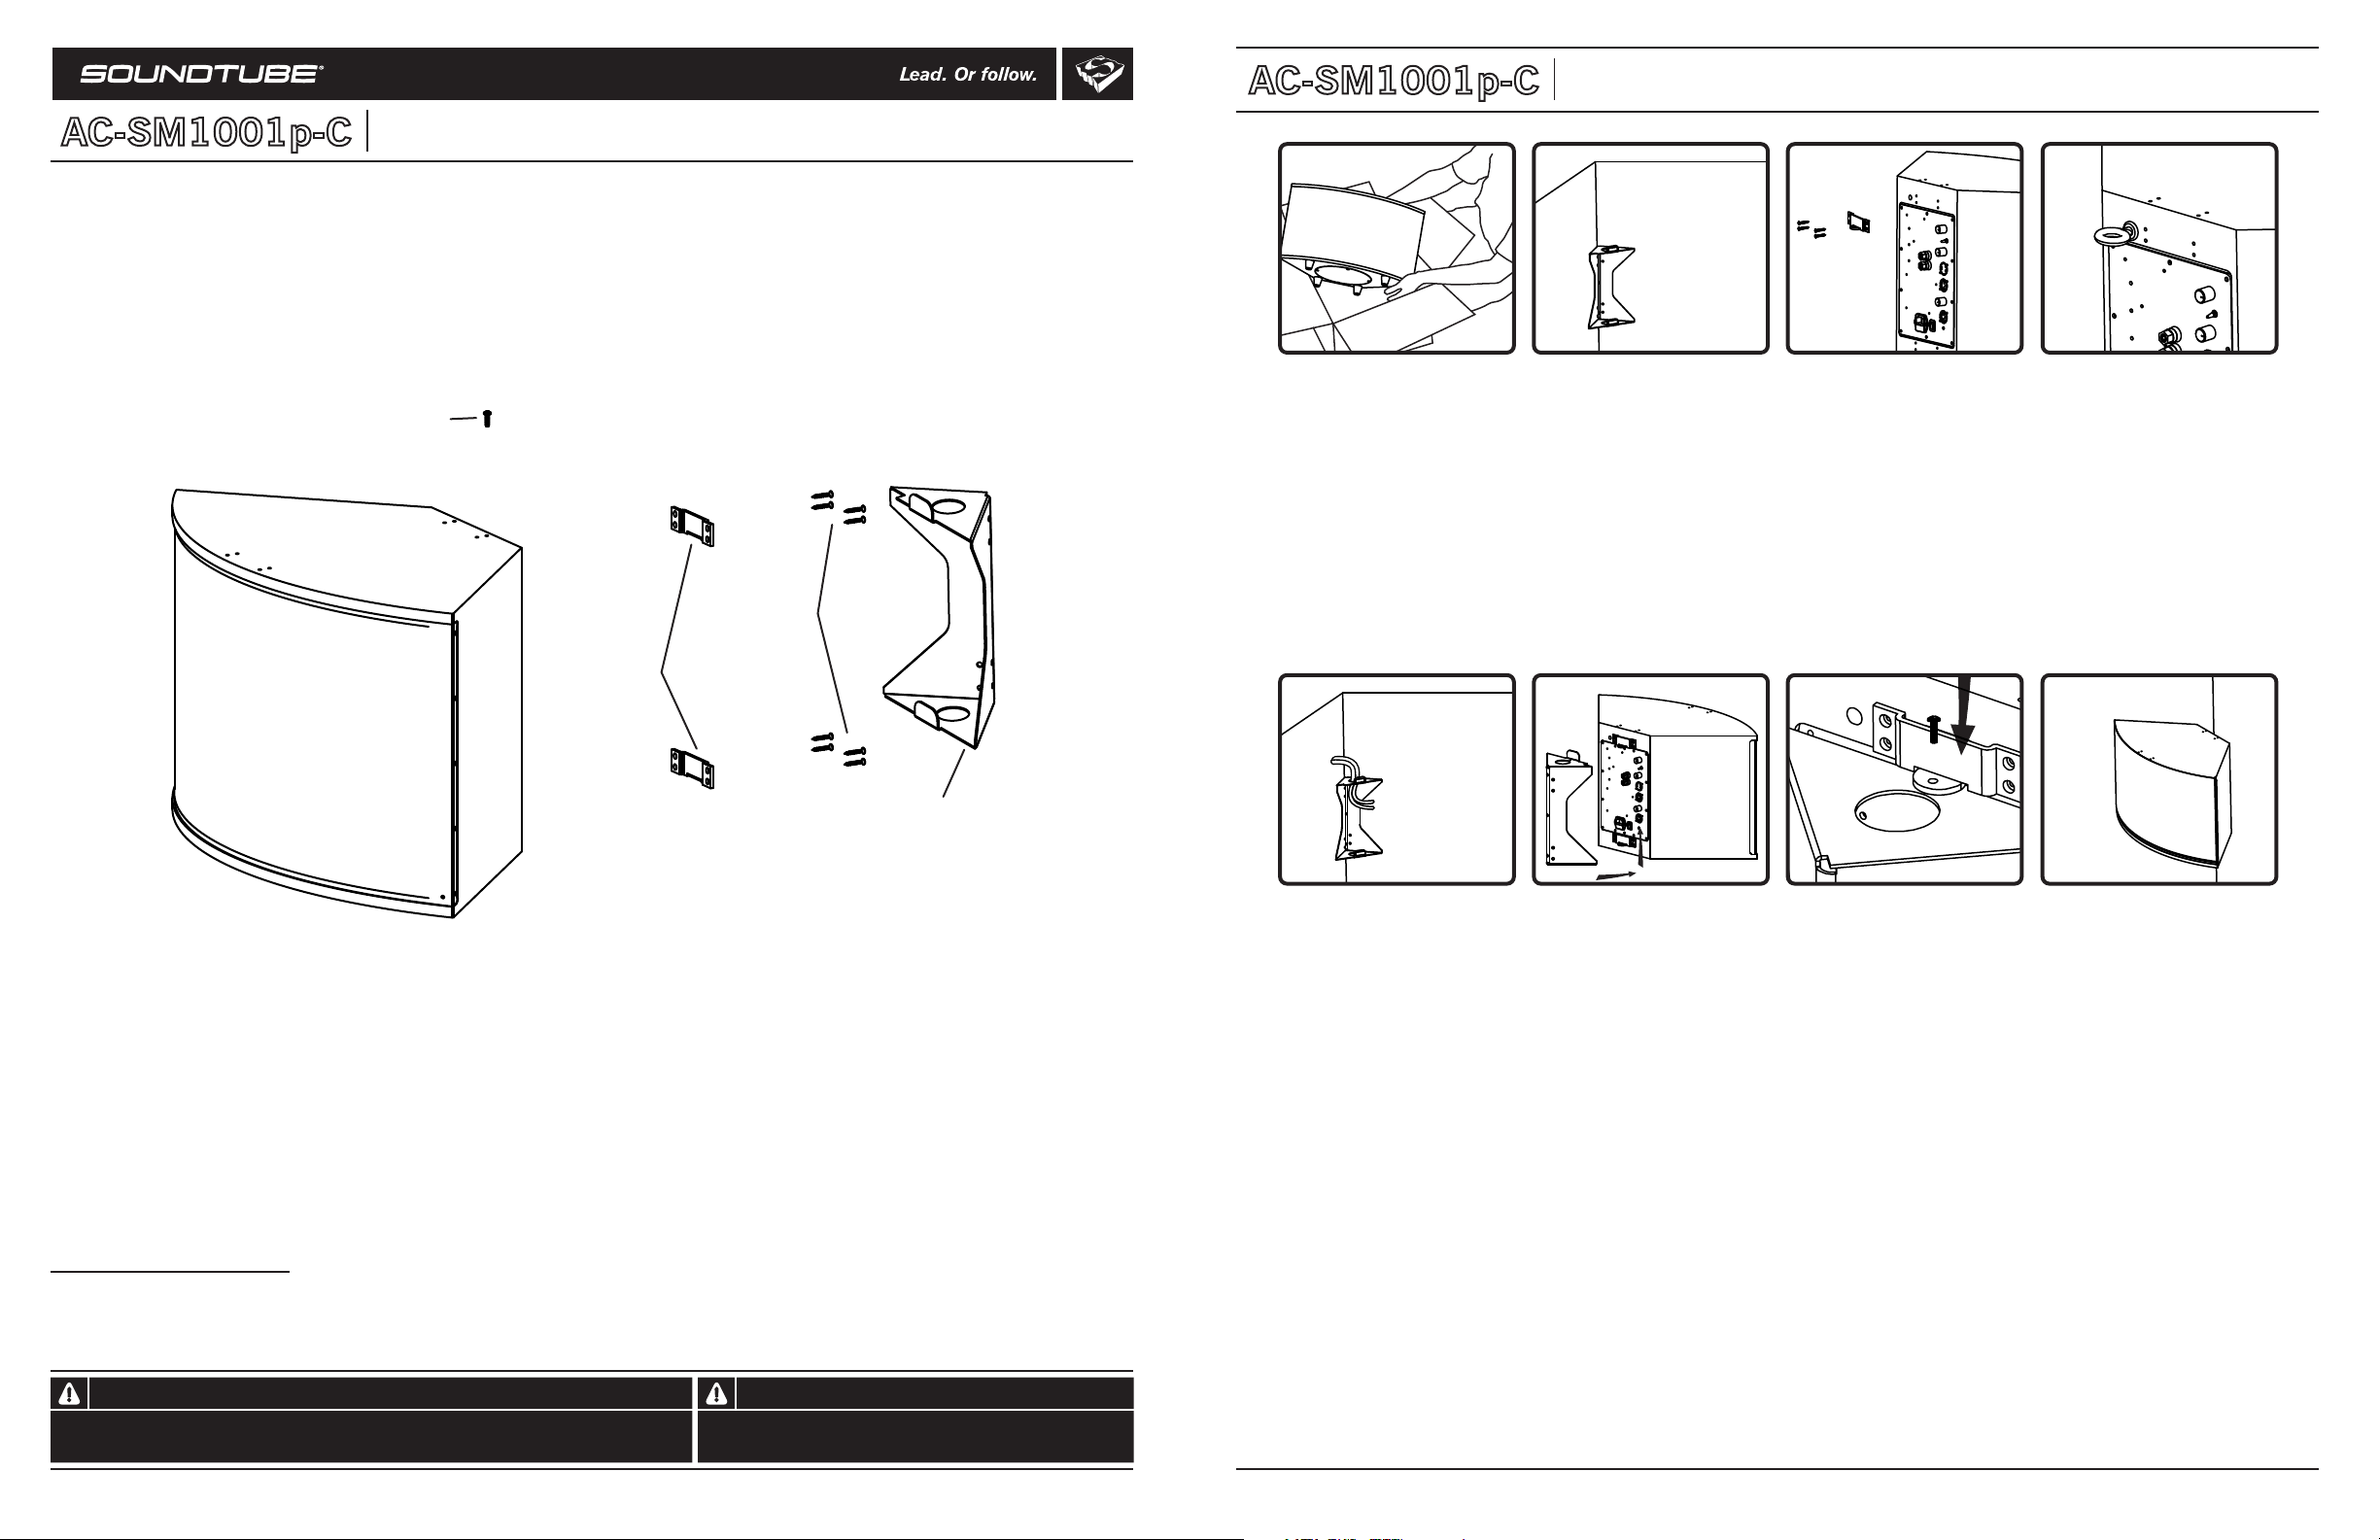
Note: Speaker ships separately.
Security screw
Speaker brackets
Mounting screws
Corner-mount bracket
1. Unpack subwoofer and
unscrew 4 feet. Remove
screws from rubber plugs
and replace screws to fill
holes.
5. Run wires through hole
in top or bottom of bracket.
Connect wires and set gain
and filters as described in
the SM1001p installation
instructions.
2. Choose a secure corner
and mount bracket with
tabs pointing up. Corner
mount bracket must be
mounted at least 3 inches
below ceiling, beam or other
top structure. Bracket
accepts up to 1/4 inch lag
bolts (installer supplies
fasteners). Be sure
mounting tabs point up.
6. Slide speaker onto
pre-mounted bracket.
3. Mount speaker brackets
to back of speaker with tabs
down. Use included 1/2
inch wood screws.
7. Install security screw.
4. For a safety cable
attachment, screw the
forged eyebolt into the
1/4-20 insert on the back of
the speaker and attach
included safety cable from
forged eyebolt to a secure
mounting point on the
structure. Installer to supply
fasteners to structure.
8. Done!
Box contents: Corner-mount kit
1 Corner-mount bracket
2 Speaker brackets
8 Fasteners (1/2 inch wood screws)
1 Security screw
© 2010 SoundTube Entertainment, Inc. All rights reserved. PN SM1001p-C Rev 07.13.10
Warning Warning
SoundTube speakers must be installed by a professional audio installer/contractor. Fo r safety and for
optimu m au dio performance, installe r must follow all direc tions issued by SoundTube Entertainment.
Do not spec or install speaker near support beam, ventilation duct or
other structure that may interfere with speaker function or dispersion.
 Loading...