

SoundTube RSi Series, RS4-EZ, RS400i, RS500i, HP590i Install Instructions Manual
...
SOUNDTUBE
•
Rs
S •
I
erleS
Secure
anchor point
Hangingorsafetycable
Speed
Safety
cable with clip
Signal
I
Install Instructions For:
RS4-EZ, RS400i, RS500i,
II
l
I
~
Clamp
·
·--__,~
---~
wire \
'tl----
HP590i,
RS
600i,
Hangingcablewithclip
HP690i,
RS800i,
HP890i,
RSlOOli-11, HP
Lead.
12
9i
&
HP1290
Box contents
1 Speaker
2
SpeedCiamps
1
Release
1 Hanging cable
1 Safety
1
Terminal
1
Euroblock
1
Grille-mounted
4 Zip ties
Or
follow
i
s
pe
a
kers
'"
key
(small hex wrench)
cable
weather boot
connector
tap
.
•
swit
ch
co
ver
Terminal weather
Euroblockconnector
Euroblockjack /
Surface:mount
bracket
msert
boot---~
~
II
~
M
If
R:~'
RS4-EZ
&
RS400i
tap
location
Euroblockjack
RS400i, RS500i, RS600i, RS800i, RSlOOli·ll, HP690i, HP890i,
m
Sound
Tub
e sp
ea
opt
rrnum aud;o
kers mu st be 1r sta
perf
or
mance. rnsta
ll
ed
by
ll
er
mu
a
prof
es
st follow all d rr
s1ona
l aud•o
ec
tr
on
HP129i, and
li1
Stall
eu
s
co
r
ss
ued
by
HP1290i
ntr
actor
S
ou
nd
1.435.647.9555
©2009
So
.
UL
listed
1480
undTube
En
I
terta
800.647.
inment,
Inc.
TUBE
All
rights
I
www.soundtube.com
reserved
.
PN
IN
S-
RSI
Rev
0
5.
13.09
m
For
sa
fety and f
Tu
be E
nt
e
rt
ar
nm
en t.
or
Do not spec or
o
th
er structure
•n
sta
ll
speaker near sup
th
at
may
po
rt
beam.
ven!lla
t1
on
r
nt
e
rf
ere
\V
rt
h
speak
er
fun
cti
on
or
drspe rsro:
duct or
"'l
RSi Series
Install
RS4-EZ, RS400i, RS500i,
Instructions
For:
HP590i,
RS600i,
HP690i,
RS800i,
HP890i,
RSlOOli-11,
HP129i & HP1290i
speakers
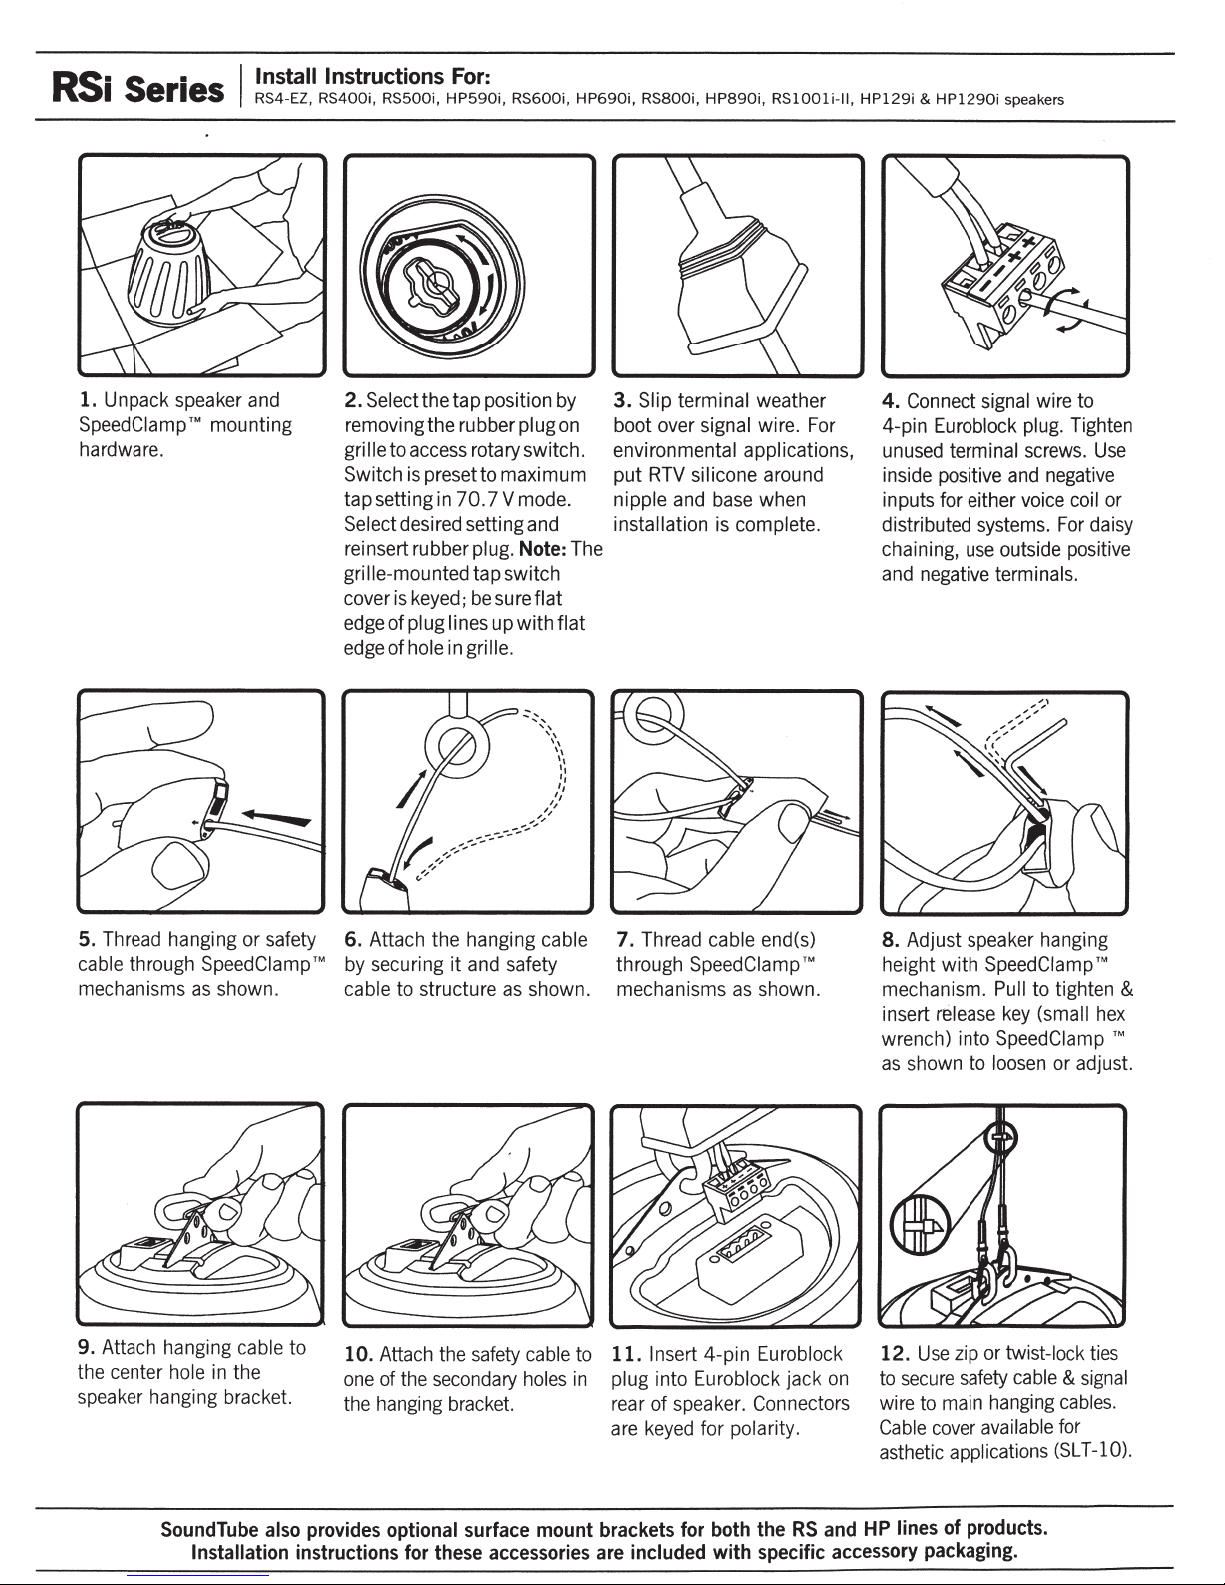
1. Unpack speaker and
SpeedCiamp '"' mounting
hardware.
5. Thread hanging
cable through SpeedCiamp
or
safety 6. Attach the hanging cable
as
shown. cable to structure
2. Select the
removing the rubber plug
gri lie to access rotary switch.
Switch is preset to maximum
tap setting in
Select desired setting and installation is complete.
reinsert rubber plug.
grille-mounted
cover is keyed; be sure
edge of plug lines
edge of hole in grille.
tap
position by
70.7Vmode.
Note:
tap
switch
flat
up
with
3.
Slip terminal weather
on
boot over signal wire. For
en
vi ron menta I applications,
put
RTV silicone around
nipple and base when
The
flat
7. Thread cable end(s)
TM
by securing
it
and safety
as
shown.
through SpeedCiamp '
mechanisms as shown. mechanisms
4. Connect signal wire to
4-pin Euroblock plug. Tighten
unused terminal screws.
inside positive and negative
inputs for either voice coil or
distributed systems.
use
chaining,
and negative terminals.
outside positive
For
Use
daisy
8. Adjust speaker hanging
"'
wrench) into SpeedCiamp '"'
as
with
height
mechanism. Pull
insert release
shown to loosen or adjust.
SpeedCiamp
to
tighten &
key
(small hex
'"'
9. Attach hanging cable
the center hole in the
speaker hanging bracket.
SoundTube
Installation
to
also
provides
instructions
10. Attach the safety cable to
one of the secondary holes
the hanging bracket.
optional
for
surface
these
in
mount
accessories
11. Insert
plug into Euroblock jack on
rear
are keyed for polarity.
brackets
are
included
4-pin
Euroblock
of
speaker. Connectors
for
both
the
RS
with
specific
12.
Use
zip or twist-lock ties
to secure safety cable
wire
to
main hanging cables.
Cable cover available for
asthetic applications
and
HP
lines
of
accessory
packaging.
products.
& signal
(SL
T -10).
 Loading...