

SoundTube AC-HP-SM1290 Instructions
RSi & HP Series
Install Instructions For:
RS600i, RS800i, RS1001i-II, HP690i, HP890i, HP129i, HP1290i speakers
1.435.647.9555
|
800.647.TUBE
|
www.soundtube.com
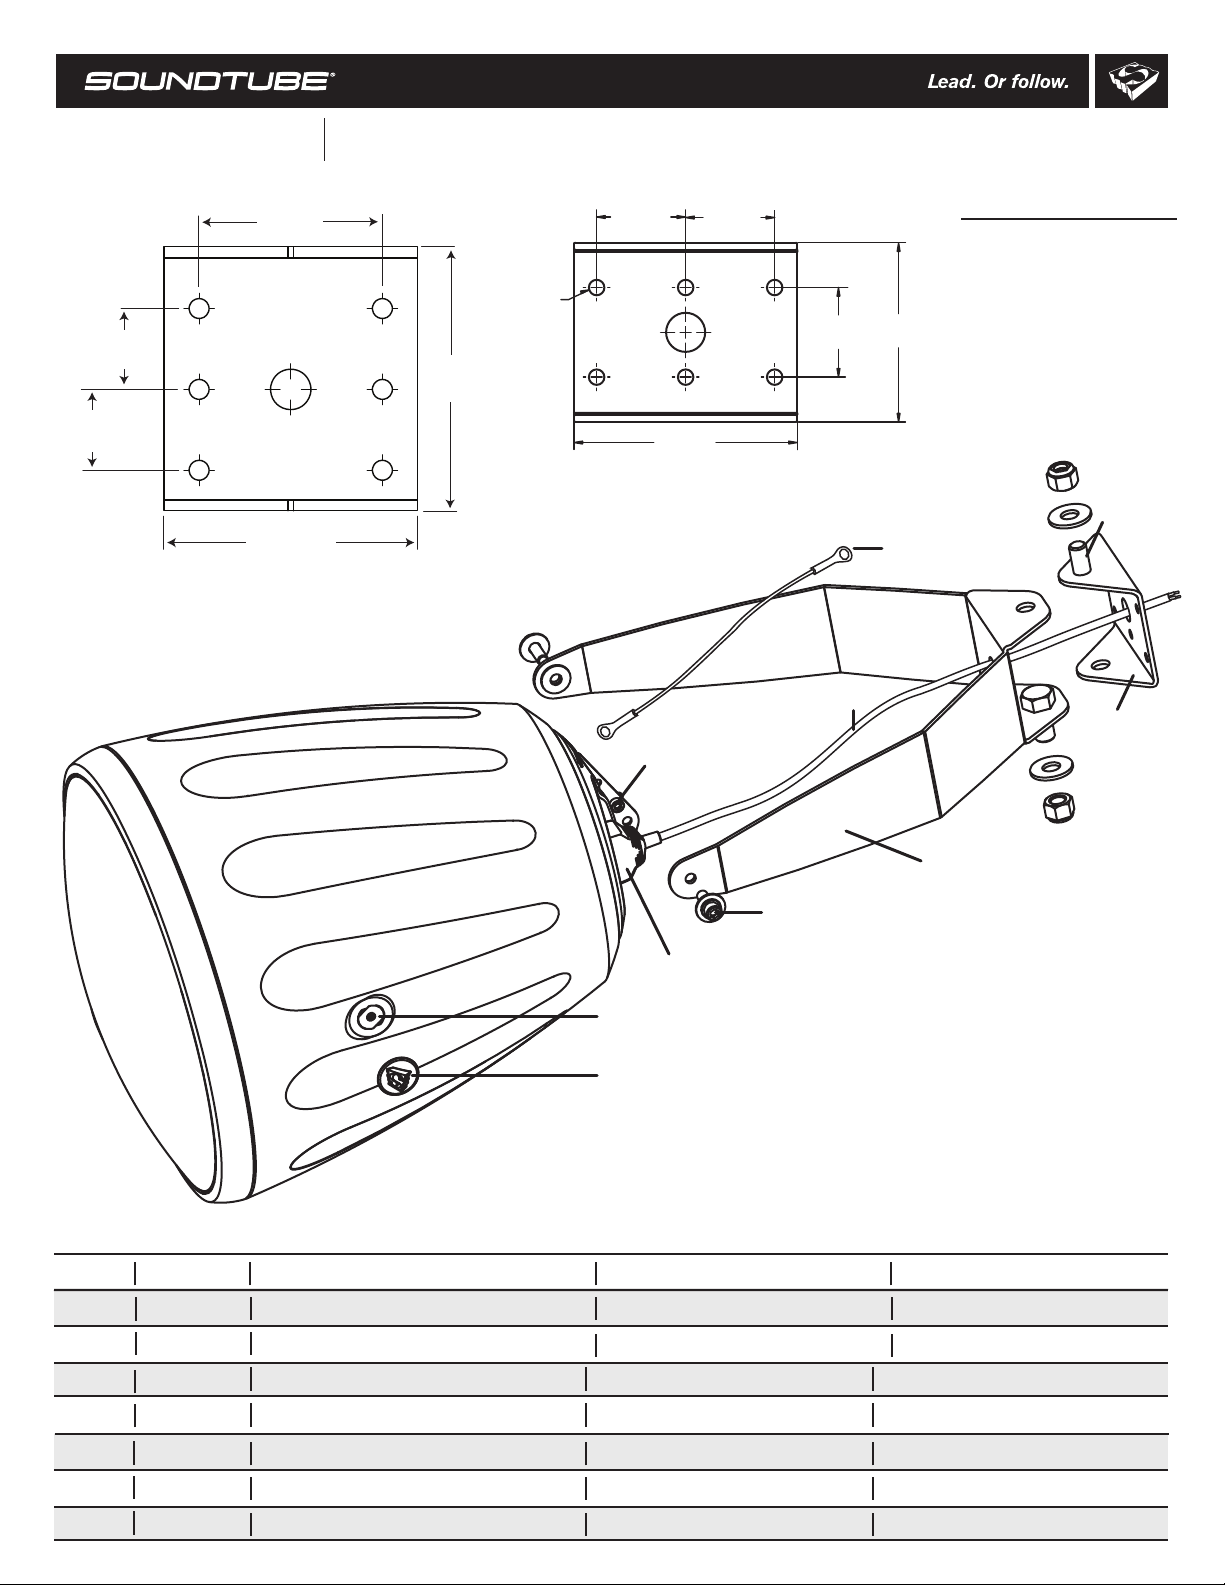
38.1 mm
(1.50 in)
38.1 mm
(1.50 in)
86.4 mm
(3.40 in)
119.4 mm
(4.70 in)
Wall-plate hole pattern
HP129i, HP1290i
124.5 mm
(4.90 in)
ø7.1 mm
(.28 in)
40.9 mm
(1.61 in)
102.9 mm
(4.05 in)
40.9 mm
(1.61 in)
41.4 mm
(1.63 in)
Wall-plate hole pattern
RS600i, RS800i, RS1001i-II, HP690i, HP890i
Signal wire
Safety cable nut, washer & bolt
82.6 mm
(3.25 in)
Safety cable
Box contents
1 Surface-mount bracket
1 Safety cable
Nylock nut
Wall-plate
stud
Wall-plate
Transformer Taps Settings
RS600i
RS800i
RS1001i-II
HP690i
HP890i
Voice Coil
8 Ohm=111 dB
8 Ohm=112 dB
4 Ohm=112.5 dB
8 Ohm=117 dB
8 Ohm=111 dB
70.7 Volt Transformer Taps (dB) 100 Volt Transformer Taps (dB) 25 Volt Transformer Taps (dB)
33W=105.5, 17W=103, 9W=100, 6W=98.5, 3W=95.5 33W=105.5, 17W=103, 9W=100, 6W=98.5
66W=110.5, 35W=108, 19W=105.5, 10W=102.5, 5W=99.5
150W=112.5, 75W=109.5, 38W=106.5 19W=103.5
66W=111, 35W=108.5, 19W=106 10W=103, 5W=100 66W=111, 35W=108.5, 19W=106 10W=103
120W=115, 64W=112, 32W=109 16W=106 120W=115, 64W=112, 32W=109 16W=106
Surface-mount bracket
Mounting bolt and washer
Terminal weather boot
Treaded insert
Insert cover
© 2008 SoundTube Entertainment, Inc. All rights reserved. PN INS-RS Rev 05.12.08
5W=97.5, 2.5W=94.5, 1.3W=91.5, .63W=88. 5
66W=110.5, 35W=108, 19W=105.5, 10W=102.5 9W=102, 4.5W=99, 2.3W=96, 1.1W=93
150W=112.5, 75W=109.5, 38W=106.5
Warning
19W=103.5, 9.5W=100.5, 4.8W=97.5, 2.4W=94.5
9W=100, 2.5W=97, 1.25W=94, .75W=92
16W=106, 8W=103, 3.8W=100, 1.9W=97
HP129i
HP1290i
8 Ohm=119 dB
8 Ohm=120 dB
150W=119, 75W=116, 38W=113 19W=110 150W=119, 75W=116, 38W=113
150W=120, 75W=117, 38W=114 19W=111 150W=120, 75W=117, 38W=114
19W=110, 9.5W=107, 4.8W=104, 2.4W=101
19W=111, 9.5W=108, 4.8W=105, 2.4W=102

RSi & HP Series
Install Instructions For:
RS600i, RS800i, RS1001i-II, HP690i, HP890i, HP129i, HP1290i speakers
1.435.647.9555
|
800.647.TUBE
UP
|
www.soundtube.com
1. Unpack speaker and
surface-mount bracket.
5. Mount speaker and
bracket assembley to wallplate. Use nylock nuts and
washers to secure. Do not
fully tighten fastening
hardware.
2. Remove covers from
threaded insert on each
side of speaker.
6. Slip terminal weather
boot over signal wire. For
environmental applications,
put RTV silicone around
nipple and base when
installation is complete.
3. Attach surface-mount
bracket to speaker.
7. Connect signal wire to
4-pin Euroblock plug.
Tighten unused terminal
screws. Use inside positive
and negative inputs for either
voice coil or distributed
systems. For daisy chaining,
use outside positive and
negative terminals.
4. Mount wall-plate to
secure surface with appropriate hardware (not included).
Mount with wall-plate-stud
pointing up.
VC= 8 Ohm
8. Select the tap position by
removing the rubber plug on
grille to access rotary switch.
Switch is preset to maximum
tap setting in 70.7 V mode.
Select desired setting and
reinsert rubber plug. Note: The
grille-mounted tap switch
cover is keyed; be sure flat
edge of plug lines up with flat
edge of hole in grille.
9. Attach the safety cable to
one of the secondary holes in
the hanging bracket using the
supplied hex wrench, nut,
washer & bolt. Attach other
end to secure surface.
10. Insert 4-pin Euroblock
plug into Euroblock jack on
rear of speaker. Connectors
are keyed for polarity.
11. Aim speaker and tighten
fasteners.
 Loading...