

Page 1

SurroundTraxx
User’s Guide
Software Release 1.00
11/2/11 Rev. A
Page 2

Notice
The information in this document is subject to change without notice.
SoundTraxx (Throttle Up!) shall not be liable for technical or editorial errors or omissions contained herein; nor for incidental or consequential
damages resulting from the furnishing, performance or use of this material.
This document contains information protected by copyright. No part of this document may be photocopied or reproduced in any form without the
prior written consent of Throttle Up! Corp.
Product names mentioned herein may be trademarks and/or registered trademarks of their respective companies.
SoundTraxx, Tsunami, SoundTraxx DCC, Digital Sound Decoder, Dynamic Digital Exhaust, Auto-Exhaust and Hyperlight are
trademarks of Throttle Up! Corp.
Page 3

Table of Contents
Overview.......................................................................................................i
Section 1: Setup Guide ...........................................................................1:1
Product Orientation.............................................................................1:1
SurroundTraxx Operating Modes .......................................................1:1
Transponder-free Mode ......................................................................1:1
Transponding Mode ........................................................................... 1:1
5-Channel Mode with Subwoofer .......................................................1:2
Multi-System Conguration ................................................................1:4
Multi-System Mode with Subwoofer ...................................................1:4
What’s included ..................................................................................1:6
Product Introduction ...........................................................................1:7
Additional Items Needed for Operation ..............................................1:9
Planning the Installation ................................................................... 1:11
The Track Plan .................................................................................1:12
Drawing a Schematic........................................................................1:13
Verify the Detection Equipment Works .............................................1:18
Installing the SurroundTraxx System ................................................ 1:20
SurroundTraxx Wiring ............................................................1:20
Section 2: Conguration Guide ..............................................................2:1
What's Next ........................................................................................ 2:1
Menu Overview and Navigation..........................................................2:2
System Monitor Mode.........................................................................2:3
The Roundhouse Menu ...................................................................... 2:4
Viewing the Locomotive Roster ...............................................2:4
Adding a Locomotive ...............................................................2:5
Editing a Locomotive ...............................................................2:7
Sound Mixer Parameters ....................................................... 2:11
FX Bus Mixer Parameters ...................................................... 2:12
Conguring the Sound Features ............................................2:13
Function Mapping ..................................................................2:18
Copying Settings from an Existing Locomotive .....................2:23
Erasing a Locomotive ............................................................2:24
The Audio Menu ...............................................................................2:25
Fader Settings .......................................................................2:25
Ambient Effects ...................................................................... 2:26
The Zone ID Menu............................................................................2:28
The System Menu ............................................................................2:28
Diagostic Features............................................................................2:32
Page 4

Section 3: Operations Guide ..................................................................3:1
Automatic Dispatcher Settings ...........................................................3:1
Dispatching a Locomotive ..................................................................3:3
Operations Mode Programming .........................................................3:5
Section 4: Troubleshooting Guide .........................................................3:1
Appendix A - SurroundTraxx Menu Tree
Appendix B - More Sample Layouts
Appendix C - License Agreement
Page 5

Overview
All Aboard!
Congratulations on the purchase of your SurroundTraxx system.
SurroundTraxx is a revolutionary sound system for your DCC layout. For the
rst time a stationary sound system can interact and “move” with the train
gaining the same advantages as onboard sound decoders but without the
space limitations that accompany onboard speakers - making it ideal for the
smaller scales!
When operating SurroundTraxx you will be able to control your train just as
you would a DCC sound decoder equipped model by accessing it through
the same address as the locomotive. Sounds are assigned to the locomotive
and sound functions controlled through your DCC Cab. The Quick Start
Guide that accompanies the SurroundTraxx system gives a simple step-bystep process to immediately hear the sounds – right out of the box, and help
familiarize you with basic operations.
Feature Highlights Found in SurroundTraxx
Six Sound channels which allows for up to 6 different ‘sound zones’ on
your layout
Simultaneous sound operations for up to 6 trains at once
Roundhouse memory storage for up to 99 locomotives in the database
An extensive sound library to closely match your prototype locomotive
Adjustable ambient effects such as echo and reverb
How to Make SurroundTraxx Work
While SurroundTraxx is not difcult to use and install, there are a number of
steps that need to happen in order to get your system up and working. We
have structured this manual so that it has ve major sections.
The Setup Guide will explain how SurroundTraxx works, its operating
modes, what is included and what additional items you may need, planning
for your SurroundTraxx installation and the actual wiring and installation of
the SurroundTraxx system.
The Conguration Guide delves into setting up your SurroundTraxx system.
You will learn how to set up all of the system features and sound channels
and how to program the individual locomotives and set up all of the sound
features in the roundhouse.
The Operations Guide explains how to dispatch a locomotive and activate
the sound features and functions.
The Troubleshooting Guide is designed to help you past any difculties you
may have with any of the above sections.
SurroundTraxx User’s Guide Page i
Page 6
Setup Guide
Product Introduction (How It Works)
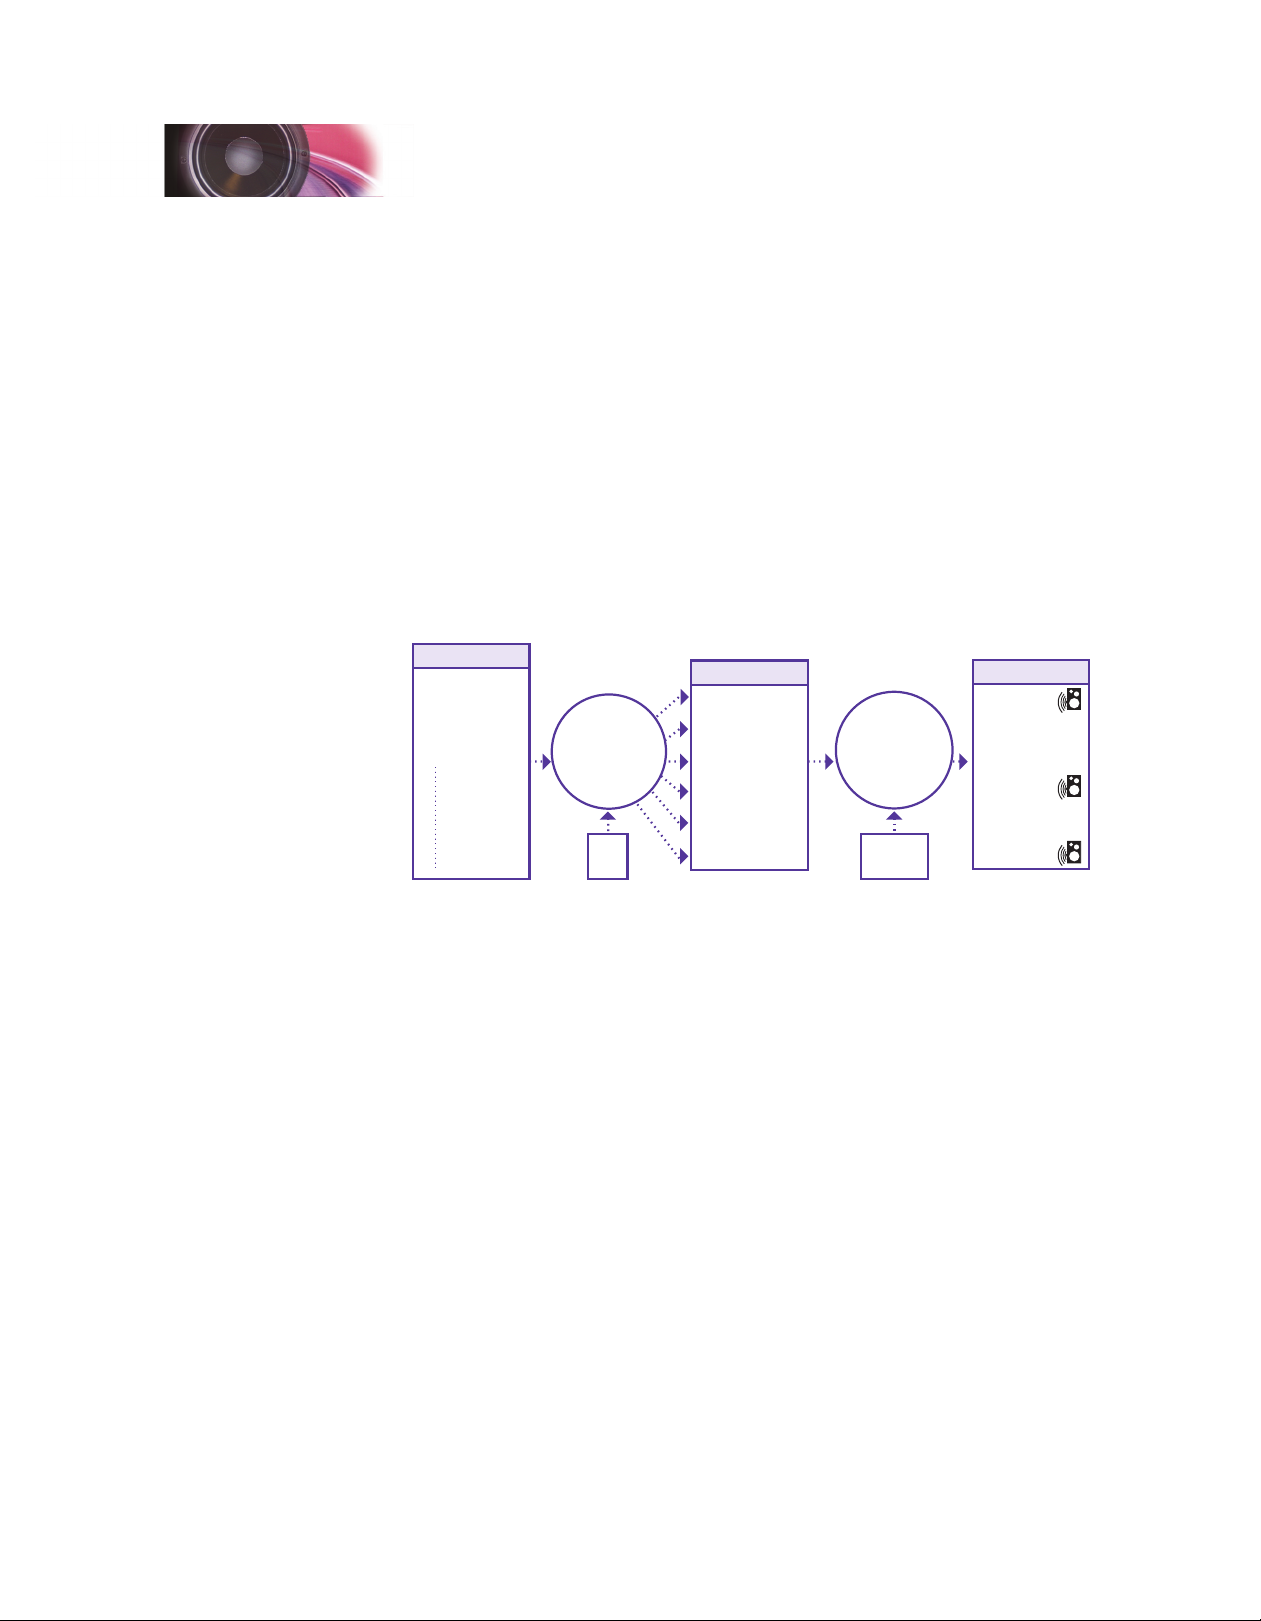
SurroundTraxx stores a roster of locomotive sound settings in a menu called
the Roundhouse. This menu contains an extensive sound library that you can
set and adjust to closely match your models' prototype or to sound like your
favorite horn, prime mover, exhaust chuff or whistle.
Once you have entered your locomotive roster into the roundhouse your
SurroundTraxx system has an internal “dispatcher” that allows up to 6 trains
to be in operation at one time. SurroundTraxx can be set up to pick the rst 6
locomotives detected or you can assign these slots to the locomotive of your
choice (Perfect to make sure your favorite engine never goes silent!). These
locomotive “slots” used by the dispatcher are called Auto Dispatch Slots (AD
Slots). We’ll learn more about these later.
Roundhouse
1. 03
2. 473
3. 18
4. 4449
5. 3985
6. 1744
99. 1989
Dispatcher
DCC
CAB
Dispatched Trains
1. 473
2. 18
3. 03
4. 4449
5. 1989
6. 1744
Zone Manager
Block
Dectectors
Sound Zones
1. 473
2.
3.
4. 4449
5.
6. 1744
Once the trains have been dispatched the block detector will identify the
trains' location, at what speed they are traveling and at what point they
cross into new blocks. SurroundTraxx uses this information to move the
corresponding sounds to the appropriate sound channel (out of six available)
in the SurroundTraxx system. Additionally, SurroundTraxx uses an intelligent
cross fade algorithm that factors in train speed, direction, and distance
between speakers and reproduces the sound in such a way that it appears
as though the sound is coming directly from the train and not the speakers on
the layout.
The multiple trains running on the layout can all be in the same area or
spread throughout the layout. SurroundTraxx will dispatch and reproduce
their respective sounds in full audio richness. It truly is a complete layout
sound system designed with multiple trains and operating sessions in mind!
SurroundTraxx Operating Modes
While a single SurroundTraxx system can support up to six locomotives and
six sound zones, you are not limited to that specic conguration on your
layout. SurroundTraxx has several different operating modes, the simplest
of which doesn’t require any form of block detection thus making it ideal for a
small shelf layout, or those who just want superior under the table sound.
SurroundTraxx User’s Guide Setup Guide Page 1:1
Page 7
SurroundTraxx User’s Guide Setup Guide Page 1:3
Setup Guide
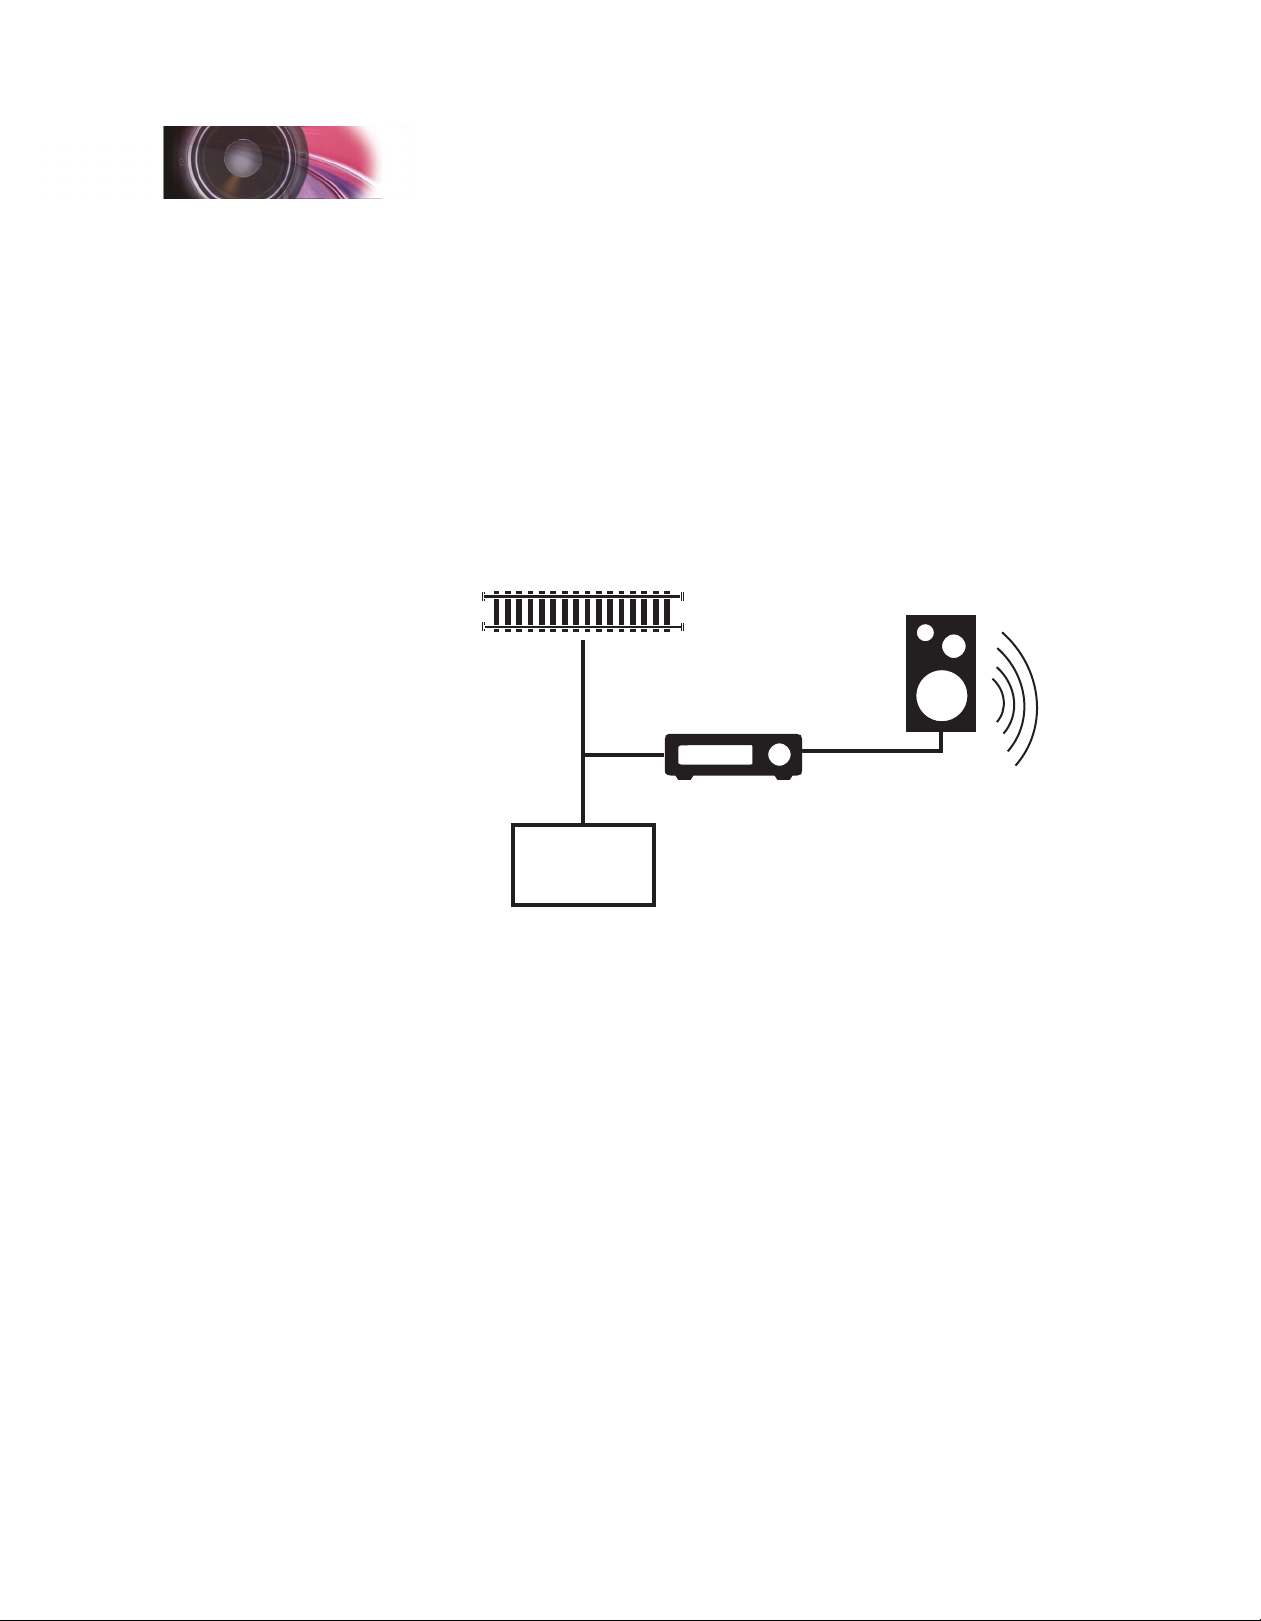
Transponder-Free Mode (default)
Out of the box, you can use SurroundTraxx in transponder-free mode to start
making sound and running trains before incorporating block detectors into
your layout. This is a great way to add sound to a small shelf layout, or just
test a particular spot on your layout before permanently mounting a speaker.
When used in transponder-free mode, SurroundTraxx will work like a
'giant' sound decoder. It will produce the correct sound for a locomotive
and operate all of the different sound functions; however, sound will not
'travel' with your train in this mode, as there is no block detection used.
SurroundTraxx will also produce sound and volume to all the audio outputs,
so sound will come out of every speaker that is connected to the system.
Speaker
SurroundTraxx
Command
Station
Note: This is the default mode for your SurroundTraxx system. For quick
installation and use of this application please see the SurroundTraxx Quick
Start Guide. This mode still requires use of a LocoNet equipped DCC
command station to operate.
The transponder-free mode:
• Works out-of-the-box, requires no detectors or transponders.
• Is ideal for small shelf layouts.
• Provides one sound zone for the entire layout, with simultaneous support
for up to six locomotives.
• Can use multiple speakers or a single speaker and subwoofer.
Transponding Modes of Operation
The remaining modes of operation require the use of transponding and block
detection. Attempting to operate SurroundTraxx without these items will not
produce any sound in the 6-Channel, 5-Channel with Subwoofer, or
Multi-system modes.
SurroundTraxx User’s Guide Setup Guide Page 1:2
Page 8
Setup Guide
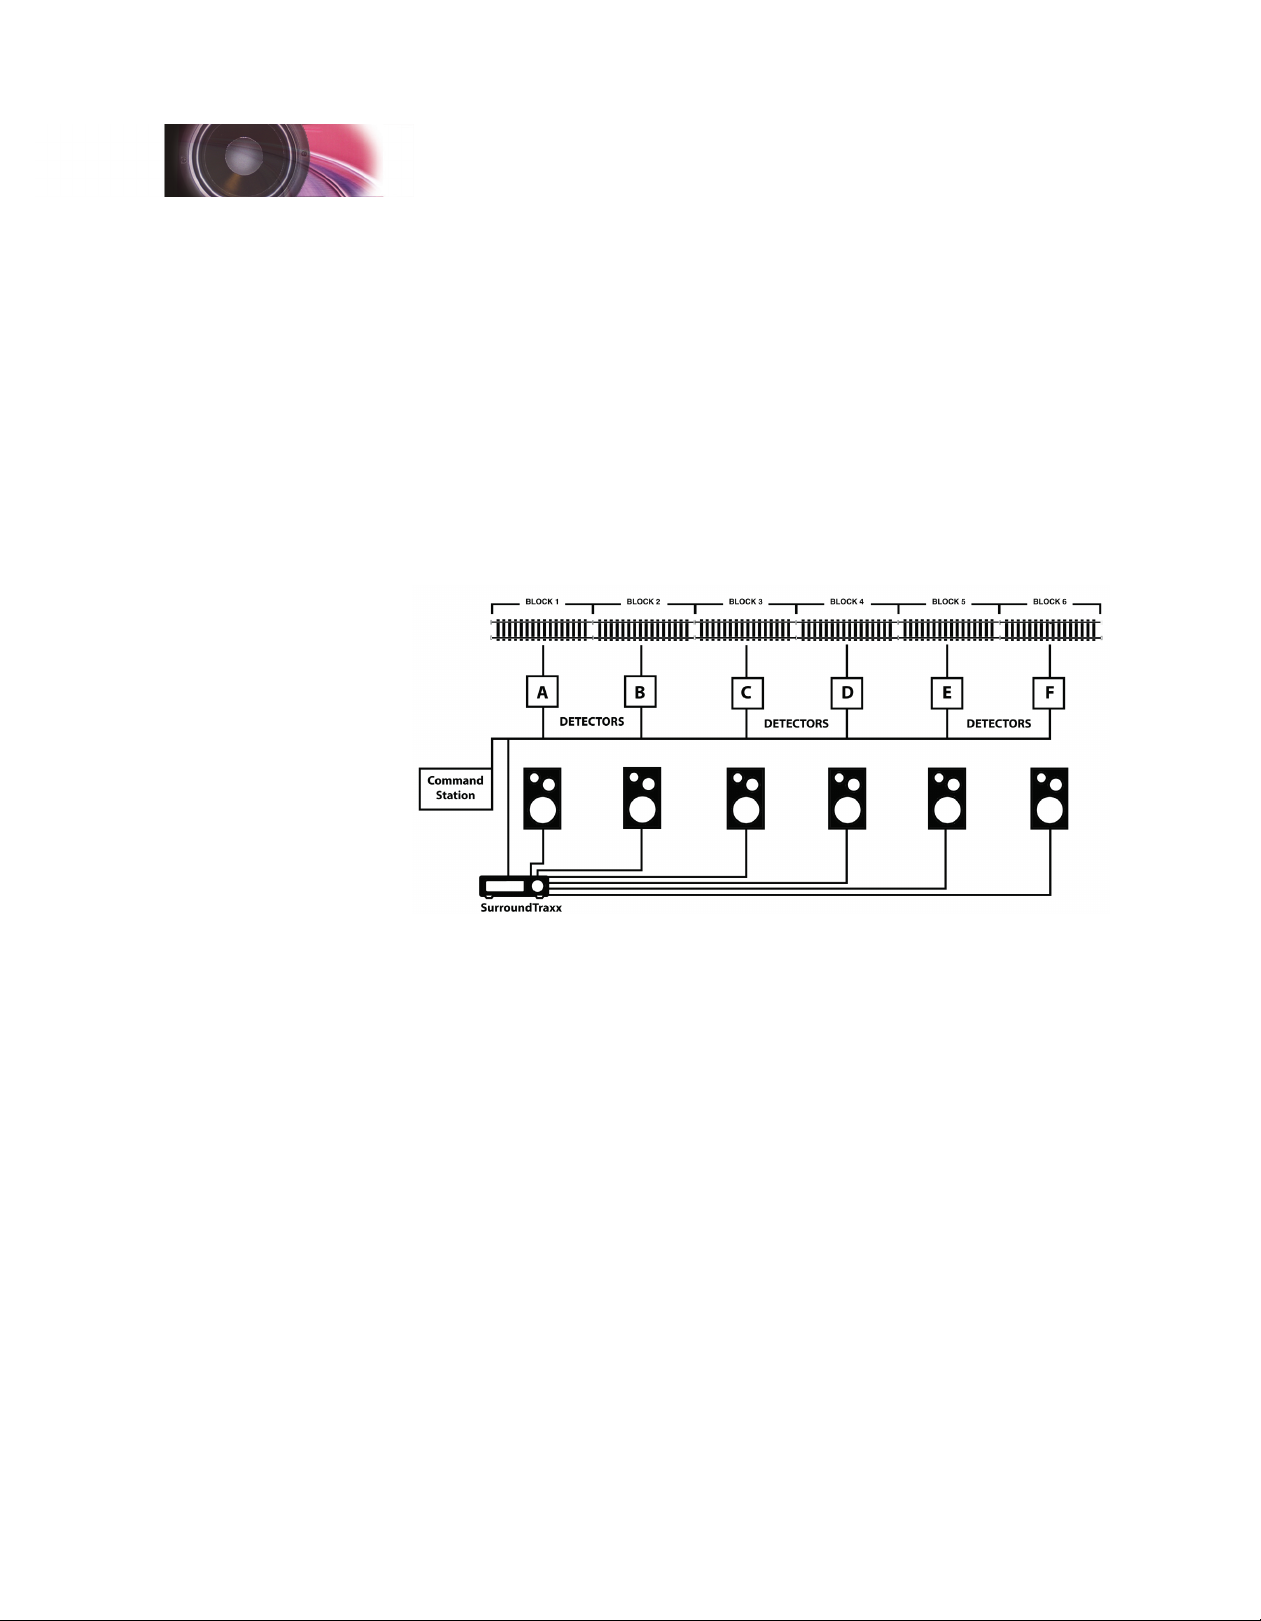
6-Channel Mode
The six-channel conguration is best suited to small or medium-sized layouts.
This mode provides six sound zones with a single SurroundTraxx system,
while supporting up to six locomotives simultaneously. Because there is no
subwoofer in this conguration, the bass response is limited to what the six
speakers can produce. Due to lack of a subwoofer it is recommended to
purchase quality, full range speakers that have a frequency range of at least
80-16,000 Hz to give a good spectrum of sound.
Six channel mode:
• Can produce sound for up to six locomotives simultaneously.
• Up to six sound zones can exist throughout your layout.
• Requires transponding decoders and block detectors.
5-Channel Mode with Subwoofer
The use of a subwoofer provides a new level of realism to your layout. Trains
are big machines with rich sounds across the spectrum, and the extra bass
from a subwoofer really announces the train’s arrival! While this mode offers
ve rather than six sound zones, we recommend it for the quality of the
overall sound experience. Some users feel that it is especially well suited to
diesel locomotives.
This mode works well with a small or medium sized layout. The frequency
response of the ve individual speakers is less important than in the sixchannel mode because the subwoofer (the sixth channel) lls out the audio
spectrum with plenty of deep bass.
Remember that hidden track and tunnels don’t require a sound zone.
Five channel mode:
• Can produce sound for up to six locomotives simultaneously.
• Five sound zones can exist throughout your layout.
• Produces the best bass and richest audio experience.
• Requires transponding decoders and block detectors.
SurroundTraxx User’s Guide Setup Guide Page 1:3
Page 9

SurroundTraxx User’s Guide Setup Guide Page 1:5
Setup Guide
BLOCK 3 BLOCK 4 BLOCK 5BLOCK 1 BLOCK 2
A B C D E
DETECTORS DETECTORS
Command
Station
SurroundTraxx
Subwoofer
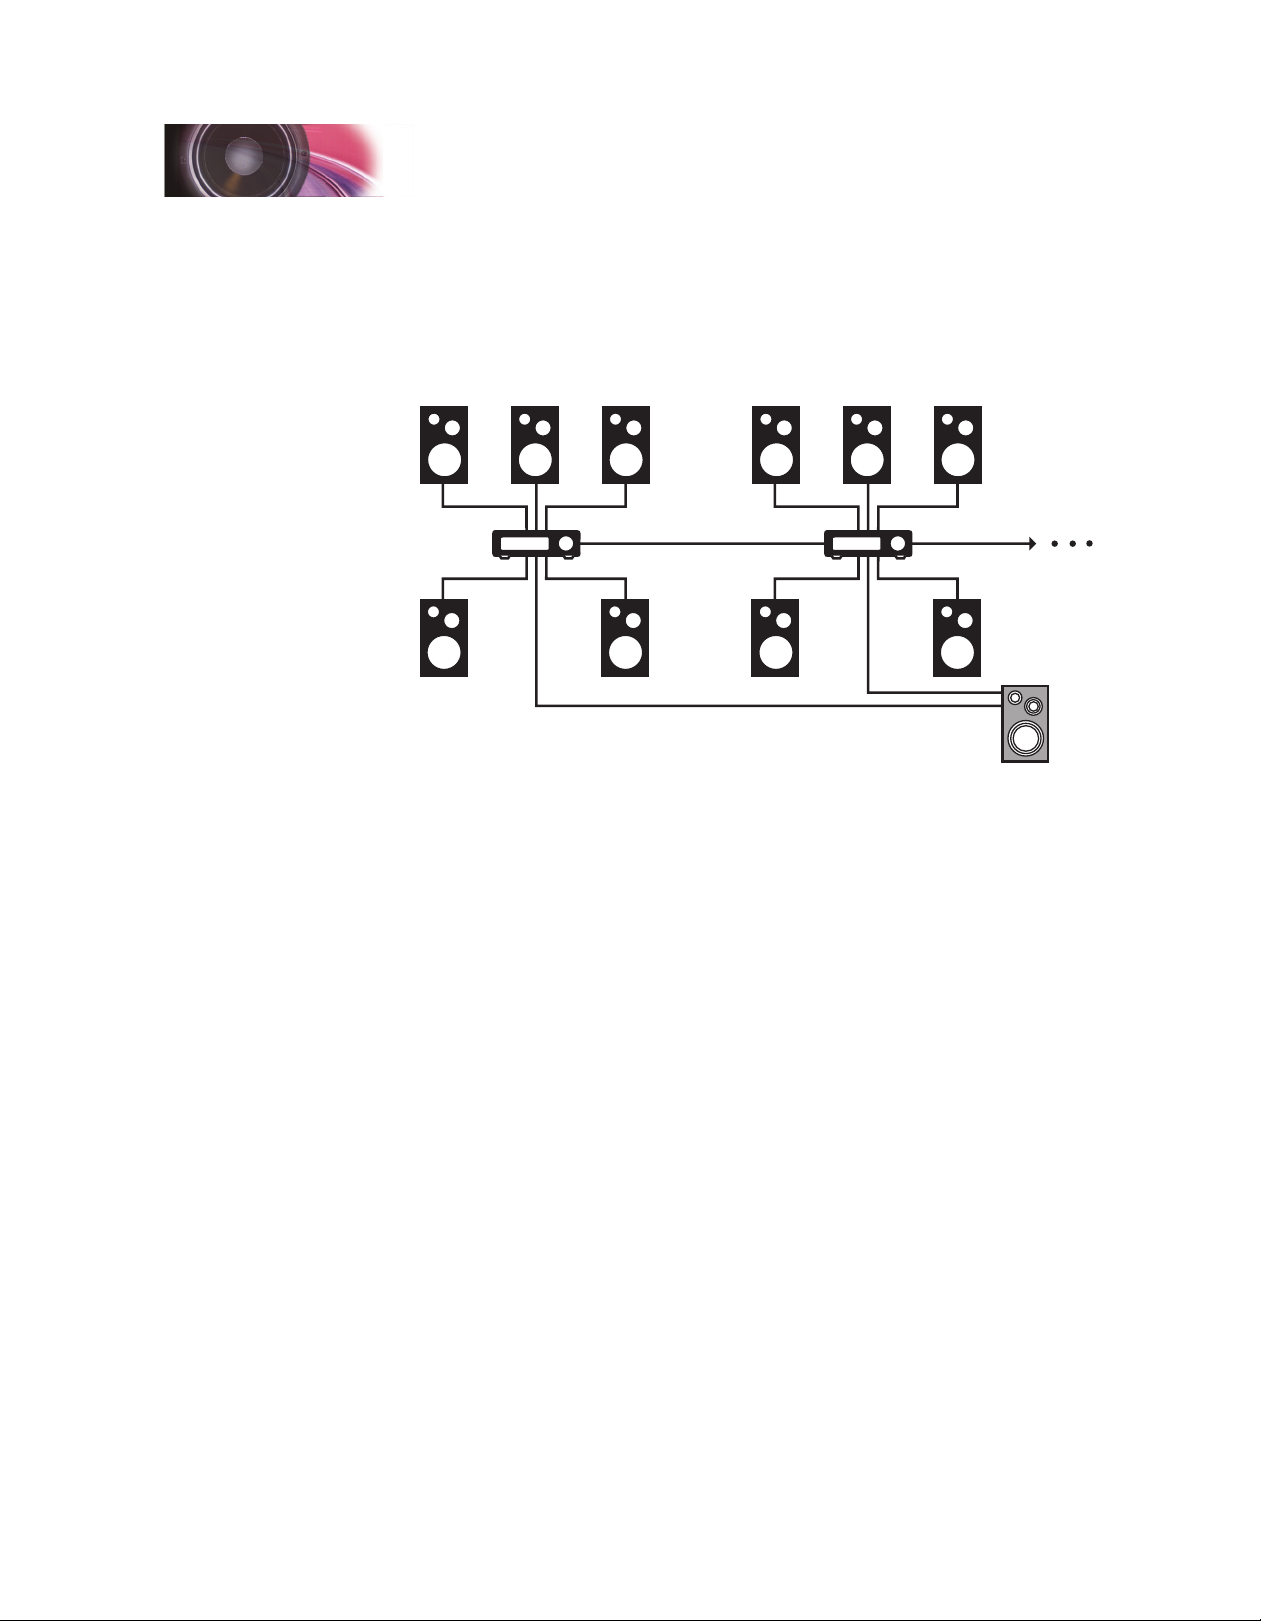
Multi-System Conguration
This mode is appropriate for large layouts requiring more than ve or six
sound zones and ambient sounds, and incorporates multiple SurroundTraxx
systems covering different regions of the layout.
This conguration supports:
• Six locomotives per SurroundTraxx system
• 6 x N sound zones, where N is the number of SurroundTraxx systems
• Requires transponding decoders and block detectors.
Multi-System Mode with Subwoofer
When you add a subwoofer to the multi-system conguration, only one
subwoofer is required, with one channel from each SurroundTraxx system
reserved for the subwoofer. However, on very large layouts, you can choose
to use multiple subwoofers as appropriate.
SurroundTraxx User’s Guide Setup Guide Page 1:4
Page 10
Setup Guide
This conguration supports:
• Six locomotives per SurroundTraxx system
• 5 x N sound zones, where N is the number of SurroundTraxx systems
• Requires transponding decoders and block detectors.
Note: When using multiple SurroundTraxx systems, all of your locomotives
must exist in each system's roundhouse, or else they may not properly play
back when a locomotive moves into a section of track assigned to a different
SurroundTraxx system.
SurroundTraxx User’s Guide Setup Guide Page 1:5
Page 11
SurroundTraxx User’s Guide Setup Guide Page 1:7
Setup Guide
Customer Registration
SoundTraxx often sends out notices to our customers of new product releases, technical notes,
special events or sales. In order to be included in these announcements, we ask that you fill out and
return this registration form as it helps us to keep our customer list up-to-date.
Please print or type all information.
Name (Mr., Ms.)
Street address
City State ZIP
Daytime phone ( ) Email
Date Purchased Purchased From
What scale do you model? Steam [ ] Diesel [ ]
How many locomotives do you own?
What is the size of your layout (approx. sq. ft.)?
How many Sound Zones do you have on your layout?
What improvements would you like to see in your new SurroundTraxx system?
Which Command Control System are you using?
[ ] Digitrax Chief [ ] Digitrax EB/Genesis/Zephyr [ ] Other
What new products, features or accessories would you like to see?
Would you like to receive information on other SoundTraxx Products?
[ ] SoundTraxx Mobile Decoders [ ] SoundTraxx Lighting Products
[ ] SoundTraxx Digital Sound Decoders [ ] Blackstone Models (a division of SoundTraxx)
120079 1M 0611
TM
SoundTraxx
®
Quick Start Guide
for the SurroundTraxx Digital Sound System
June 2011
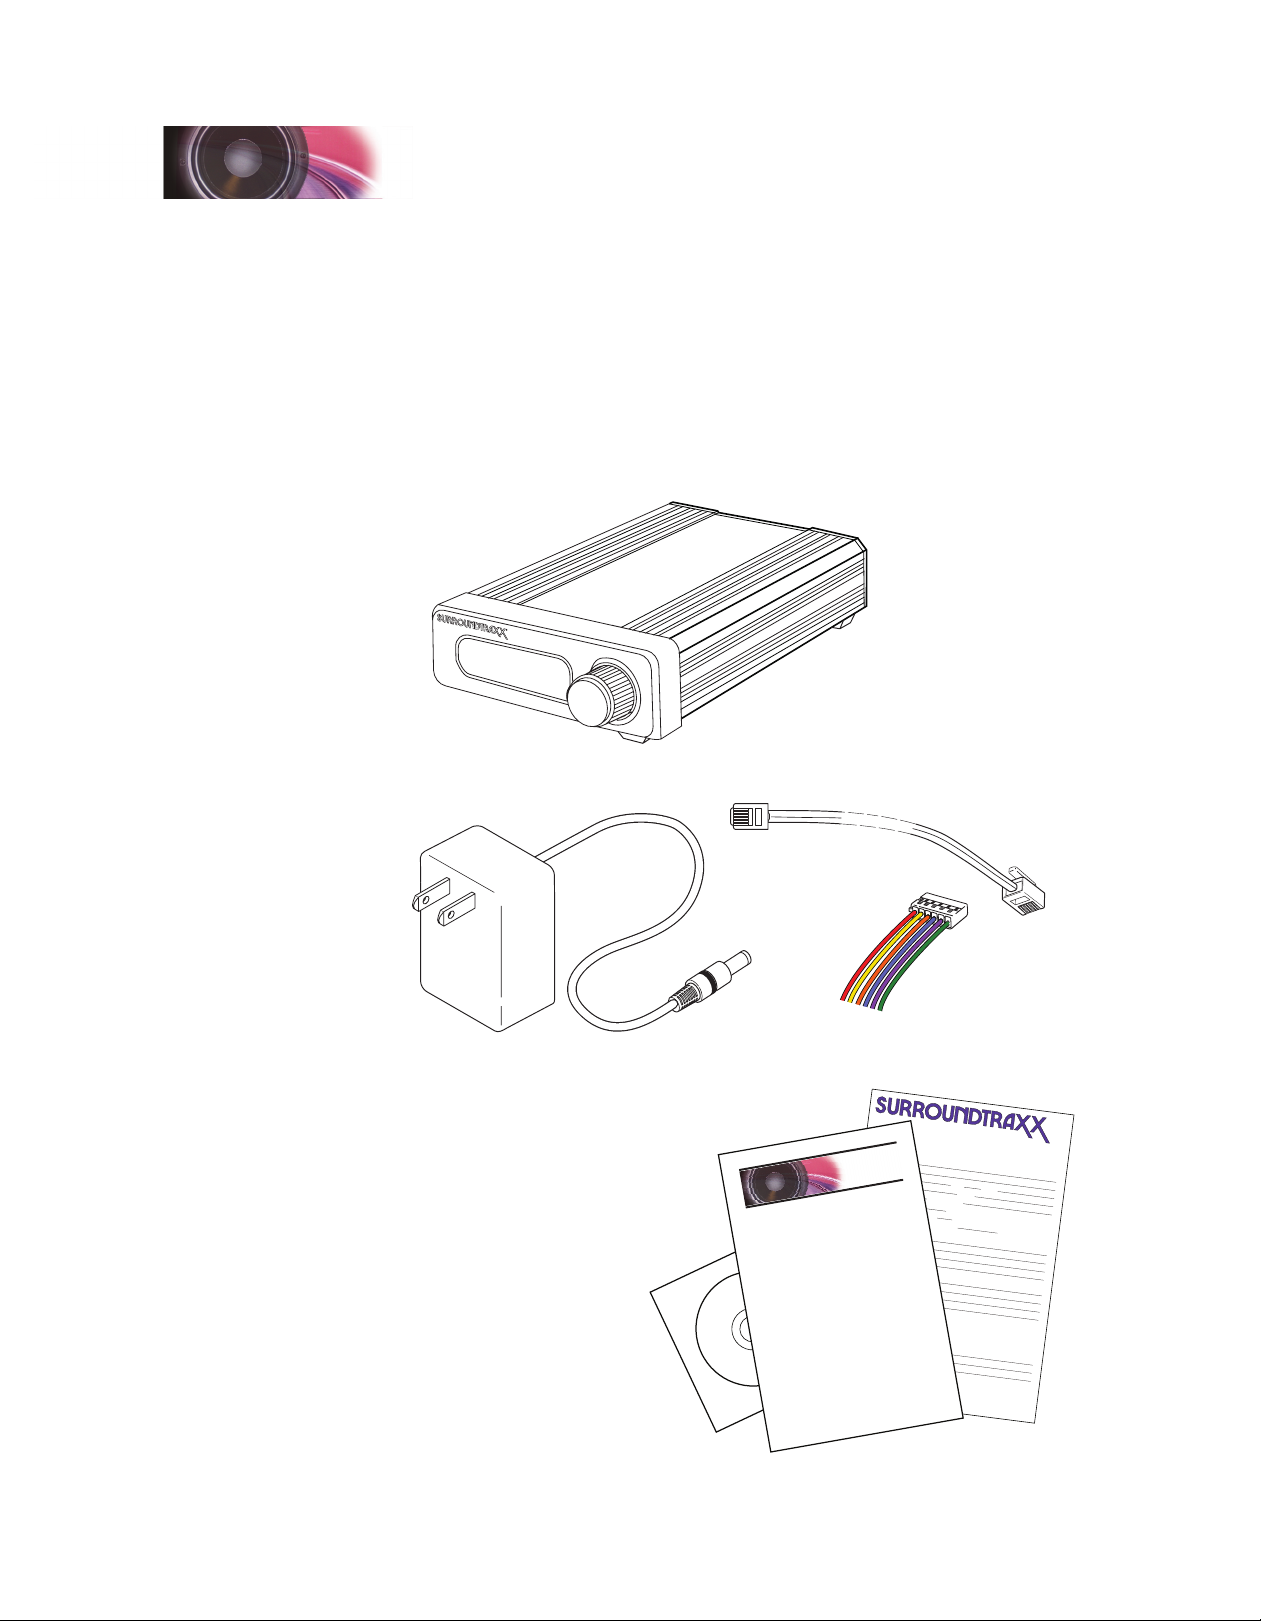
What's included
Your SurroundTraxx box includes the following items:
SurroundTraxx sound system
5 Volt Power Supply
Network cable
Speaker harness for 6 sound channel outputs (6’ sections of each)
Quick Start Guide
Owner’s manual CD
Customer Registration card
SurroundTraxx Digital Sound Processor
Network Cable
Speaker Harness
5V Power Supply
Warranty Card
Quick Start Guide
CD Manual
SurroundTraxx User’s Guide Setup Guide Page 1:6
Page 12
Setup Guide
Po
Input
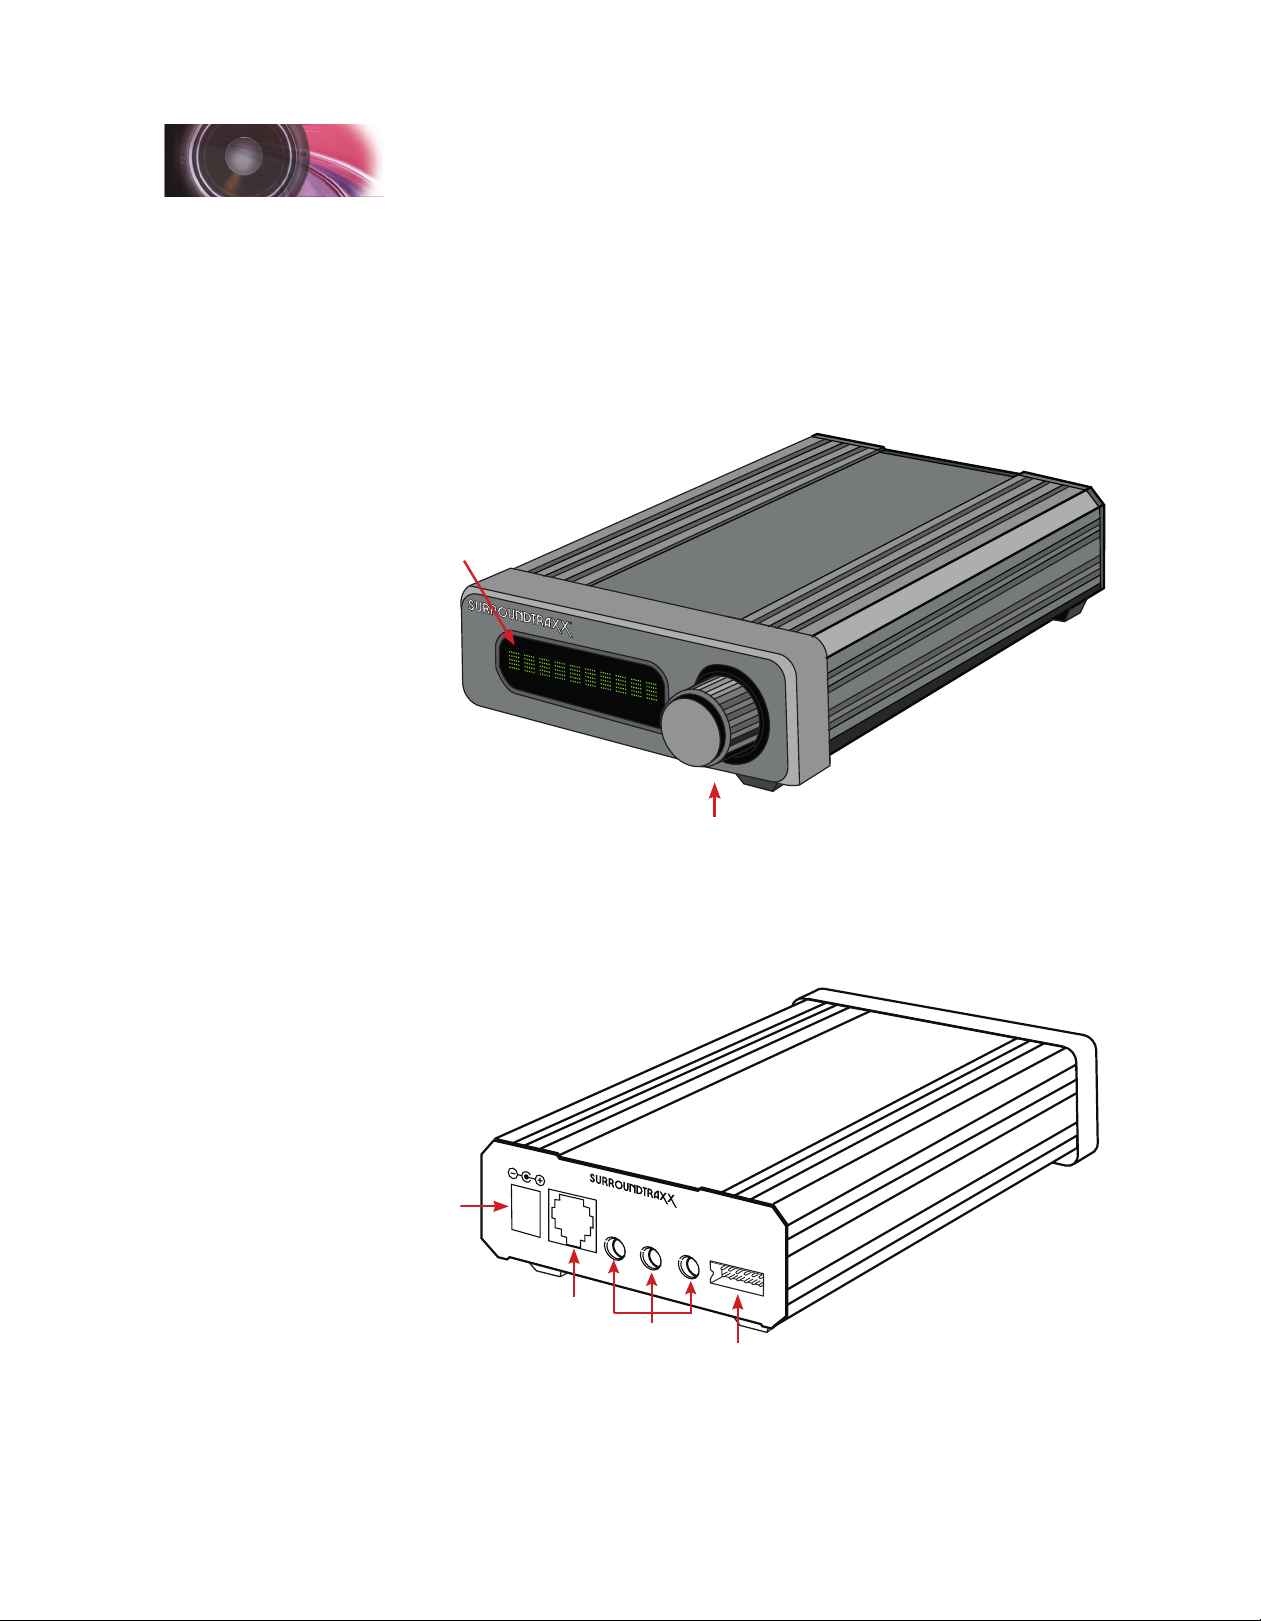
Product Orientation
On the front of your SurroundTraxx system you will notice a 10-digit LED
display and a control knob that you can both push in or turn. This control
knob is how you will access the different menu options you will explore in
later sections of this manual. The display shows both what we call System
Monitor Mode (the default mode when SurroundTraxx is powered up and
operating) as well as the different menus and selections.
LED Display
®
Control Knob
On the back of your SurroundTraxx system you will see the different outputs
for wiring everything needed to make it work. Starting from left to right is
the input for the power supply. Next, is the network cable input to connect
the SurroundTraxx system to the layout LocoNet system that is tied to your
command station, block detectors, and cab.
INPUT:
5VDC, 3A
wer
POWER
DIG ITAL SOUN D P ROCE SSOR
1/2 3/4
NETWORK
LINE LEVEL OUT
®
5/6
SOU NDT RAXX
Dur ango , CO 813 01
USA
SPEAKERS
Network
Audio Out
Speaker
Harness
Adjacent to the LocoNet input are three line level output jacks that
correspond to the six different sound channels found on SurroundTraxx.
SurroundTraxx User’s Guide Setup Guide Page 1:7
Page 13

SurroundTraxx User’s Guide Setup Guide Page 1:9
Setup Guide
These can be used to hook your SurroundTraxx system up to an external
amplier if you wish. The output labeled 5/6 can also be used to connect
to the subwoofer if you plan to use one. On the far right is the terminal for
the six speaker outputs - the 6’ long speaker harness that came with the
SurroundTraxx system plugs in here.
SurroundTraxx User’s Guide Setup Guide Page 1:8
Page 14

Setup Guide
Additional Items Needed for Operation
Depending on the operating mode you have chosen, you will need to
purchase the following items to complete your installation:
Up to six 8-ohm speakers
Optional Subwoofer
Appropriate DCC mobile decoders equipped with transponding or a
TL-1 transponder
Digitrax DCC Command Station, cabs and power boosters
Additional Speaker wire
Digitrax BDL-168 (or older BDL-162) Block Detector*
Two Digitrax RX-4s*
*Because each BDL-168 and RX-4 can only support up to eight blocks, larger
layouts may require additional detectors.
Speakers and Subwoofer
SurroundTraxx can accommodate up to 6 speakers per system. The size and
quality of these speakers are largely up to you and should be based on your
layout design and the needs you identify in the planning process. However,
we have a few helpful guidelines and some requirements to help you get the
best audio experience.
First, the speakers you choose must be passive 8-ohm speakers rated
between 5 and 25 Watts. We recommend choosing speakers with a
frequency response of at least 80 to 16,000 Hz. If you plan to use a
subwoofer, you may use smaller speakers with a frequency response of 150
to 16,000 Hz, as the subwoofer will provide the bass.
Mobile Decoders and Transponders
SurroundTraxx is a sound system designed to operate on DCC layouts.
In order to operate SurroundTraxx in transponding mode (multiple trains
in multiple sound zones) you must have DCC mobile decoders with
transponding installed in your locomotives. Alternatively, you may add
separate transponders to any DCC mobile decoder that you may already
have installed. To emphasize this point, when utilizing SurroundTraxx to
its full capabilities, you must either use decoders that come equipped
with Digitrax transponding or purchase a TL-1 transponder to add to the
locomotive. Sound decoders can also be installed in the locomotive but are
not required. Locomotives that aren’t equipped with transponders will still
run on the layout but will not be able to be dispatched or produce any sound
through your SurroundTraxx system.
DCC Command Station, Cabs and Boosters
SurroundTraxx requires a Digitrax LocoNet-equipped command station
in order to operate in any of its different modes of operation. At this time
SurroundTraxx cannot be used with a non-LocoNet command station and
cab.
SurroundTraxx User’s Guide Setup Guide Page 1:9
Page 15

SurroundTraxx User’s Guide Setup Guide Page 1:11
Setup Guide
Additional Speaker Wire
SurroundTraxx comes with a wire harness that includes 6’ sections of
speaker wire for each sound channel output. If your layout requires more
wire you can add additional wire to the end of the harness.
BDL-168 Block Detectors
To achieve the effect of sound traveling with your train as it traverses your
layout, you must use Digitrax BDL-162 or BDL-168 block detectors. One
BDL-168 will provide detection for eight blocks. Therefore, if your layout
has more than eight blocks, you will need more than one BDL-168. When
setting up your BDL-168(s) for use with SurroundTraxx, the blocks should
be arranged in sequence such as 0,2,4,6,8,10,12 per the Digitrax BDL-168
instructions. If you only plan on using single channel mode the BDL-168 is
not required.
Digitrax RX-4s
Digitrax RX-4s are required in conjunction with BDL-168s. Each RX-4
supplies four blocks on your layout. If you have eight blocks you will need
two RX-4s for your layout.
SurroundTraxx User’s Guide Setup Guide Page 1:10
Page 16

Setup Guide
Planning the Installation
Installation Overview
With a little careful planning, SurroundTraxx will add a spectacular audio
experience to your layout. This manual will guide you through the process,
from the initial planning stages to nal system conguration. Installation
involves these major steps:
Plan your layout
Dene your track plan
Create a schematic
Divide and wire your layout into blocks
Dene your sound zones
Identify speaker locations
Verify the detection is working
Plan Your Layout
By the time you begin planning for sound, you’ve probably already given a
lot of thought to the other elements of your layout. In this section and those
that follow, we’ll present some of the considerations involved in preparing for
SurroundTraxx sound.
Naturally, the extent of planning required varies by the complexity of
the layout and its stage of completion when you begin installation of
SurroundTraxx. We encourage you to enjoy the planning stages, taking time
to consider the multiple factors in play.
If you are adding SurroundTraxx to a layout that is otherwise complete,
you may nd it helpful to take a test drive in transponder-free mode before
nalizing the sound zones. See the SurroundTraxx Quick Start Guide for
information on testing transponder-free mode.
When deciding how to wire your layout the rst factor is choosing which
operating mode you would like to implement on your layout. This may
change the set up and wiring of your layout. For instance if you wish to use
SurroundTraxx in Transponder-free mode then you will wire the layout just
as you would for any basic DCC layout. In other words, you wouldn’t need
to divide the layout into blocks or add any of the transponding equipment
offered by Digitrax. If, on the other hand you wish to use either 6-channel
or 5-channel with a subwoofer mode, you will need to take into account two
factors in the general wiring of your layout. The rst of these factors is how
many block detectors you need, and the second is how many sound zones
you plan on having.
The table on the following page lists some general size guidelines for a
sound zone on your layout. As a reminder a sound zone and a block are not
the same thing as a sound zone can encompass multiple blocks within one
sound zone. If you intend to use single channel mode you can disregard this
table, as the entire layout would be one sound zone.
SurroundTraxx User’s Guide Setup Guide Page 1:11
Page 17
SurroundTraxx User’s Guide Setup Guide Page 1:13
Setup Guide
SurroundTraxx Sound Zone Sizes
Layout Size
Tabletop Layouts (4’x8’)
Small Layouts
Medium Layouts
Large Layouts
Sound Zone Size
2’ to 3’ between speakers
4’ between speakers
6’ between speakers
8’ between speakers
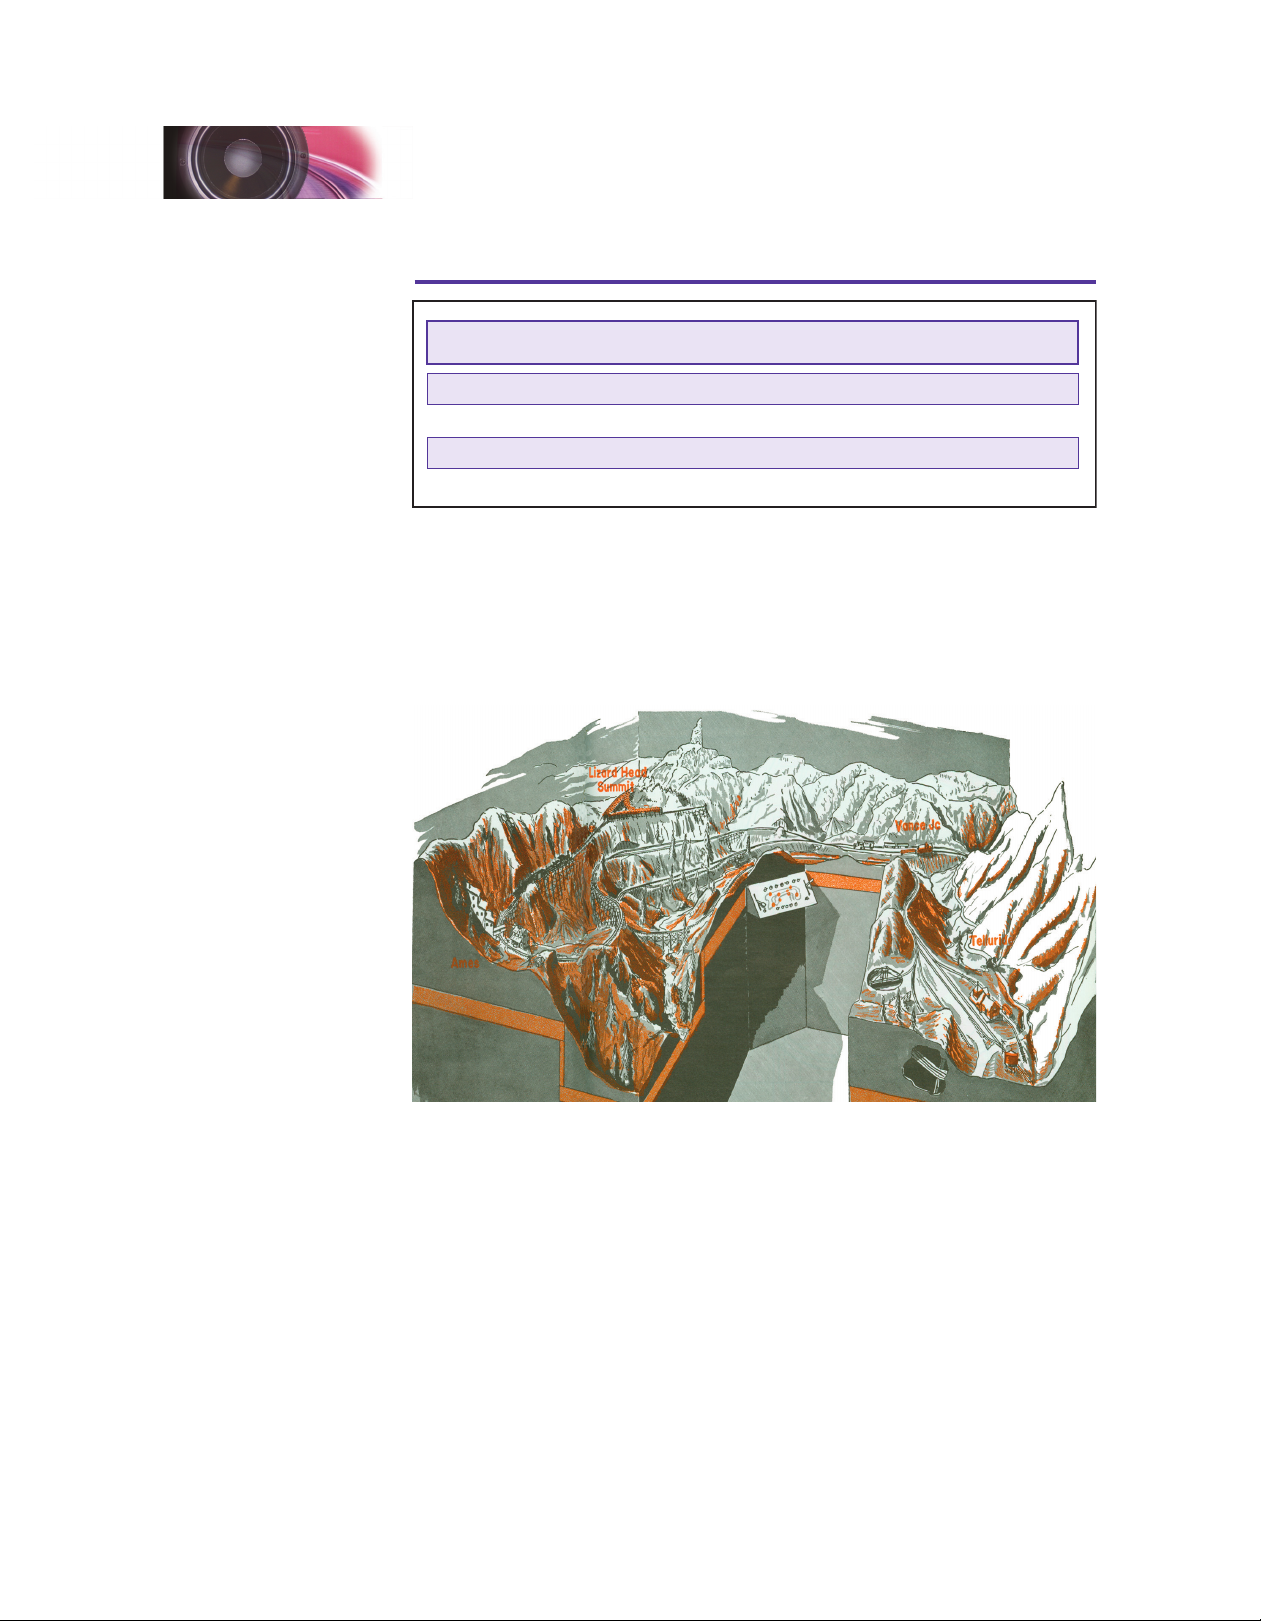
Now we'll examine these points in greater detail and apply them to the
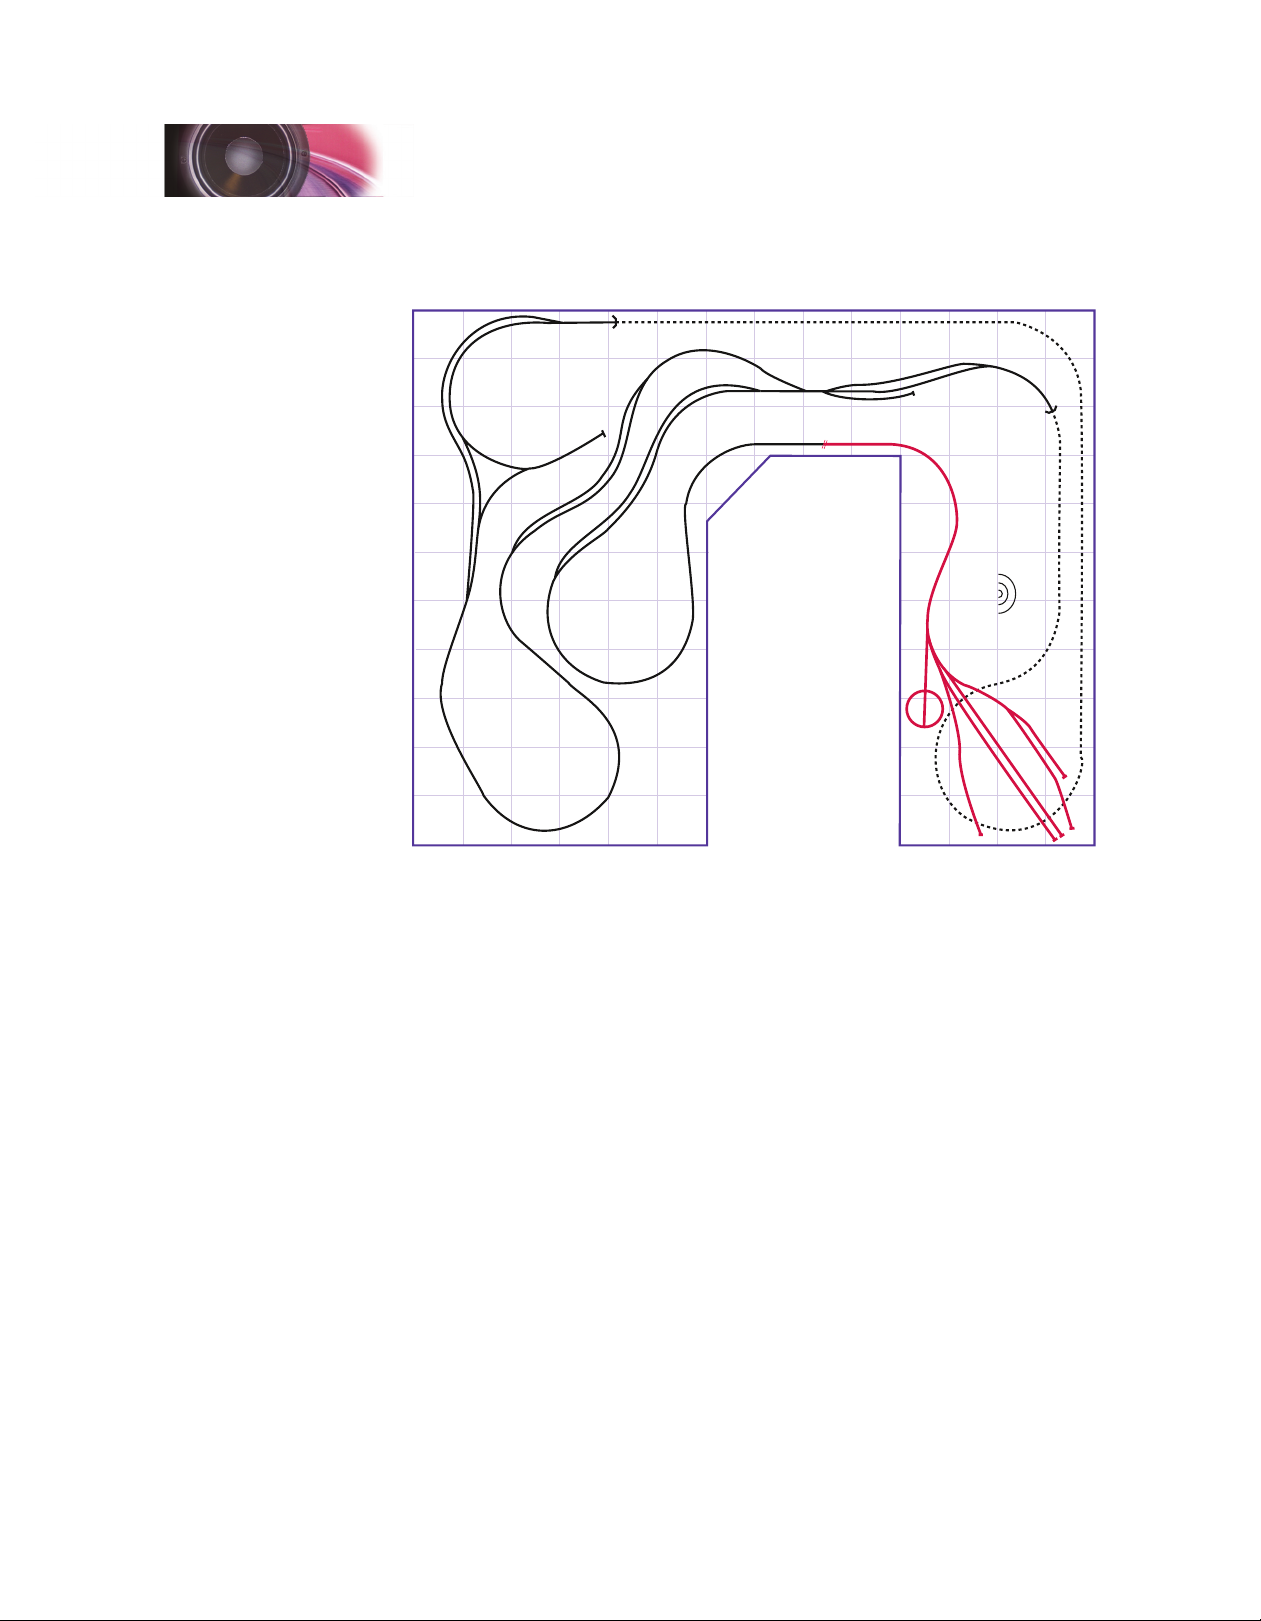
example layout shown below – the Rio Grande Southern Railroad.
Used by permission, Kalmbach Publishing Co.
The Track Plan
If you are adding SurroundTraxx to an existing layout, you likely already
have a track plan in one form or another. Otherwise, the track plan is your
rst opportunity to begin planning for sound. The track plan is a scale
drawing of your layout, reecting its geographical realities: each curve, loop,
straightaway, etc. It is a helpful tool in identifying challenges and potential
tricky spots such as reverse loops and wyes.
SurroundTraxx User’s Guide Setup Guide Page 1:12
Page 18

Lizard
Head
Summit
Ames
Ophir Loop
Palisade
Silver Falls
Telluride
Vance Jct.
Lizard Head
Summit
Ophir Loop
Telluride
Palisade
Silver Falls
Vance Jct.
Setup Guide
The example track plan above denes a layout for the Rio Grande Southern
Railroad. We chose this layout because it showcases an 11' x 14' area which
would be a common bedroom or basement-style layout.
You may wish to indicate on the track plan any elements of your layout
that you’d like to complement with ambient sound effects. Ambient sound
effects would include adding echo and/or reverb to tunnels, canyons or other
features that may benet from these special effects. See page 2:26 for more
information about ambient sound effects.
You’ll want to revisit your track plan after creating a schematic and
determining the block boundaries, as these resources together are a great
help in dening the sound zones.
Drawing the Schematic
Unlike a track plan, the schematic omits the geographical proportions of the
layout, symbolically representing track elements such as sidings, wyes, and
roundhouses.
SurroundTraxx User’s Guide Setup Guide Page 1:13
Page 19
SurroundTraxx User’s Guide Setup Guide Page 1:15
Setup Guide
For the purpose of the SurroundTraxx setup, a detailed electrical schematic
is not required, but a basic schematic is an important step in separating the
layout into blocks, which is a prerequisite to dening your sound zones. The
example schematic refers to the same layout as the Rio Grande Southern
track plan presented on the previous pages. Notice that this is a much
simplied view, disregarding the curves and loops indicated on the track plan.
The schematic helps you assess the factors that affect the block divisions.
For example, you wouldn’t want to place a block boundary in the middle of
a siding. Instead, the boundary should occur at one end of the siding or the
other. Likewise, a wye or yard should usually be conned to a single block.
Even if you’re not using block detection with signaling devices, it’s helpful to
plan your blocks as if signaling were part of the picture. This example shows
the same schematic separated into blocks and wired to the block detectors.
Palisade
Silver Falls
Block 8
BDL 168
Vance Jct.
Block 0
Block 2
Block 4
Block 6
To Command
Station
Lizard Head
Summit
To SurroundTraxx
Ophir Loop
Telluride
Block 12
Block 14
Block 10
Transponding Blocks
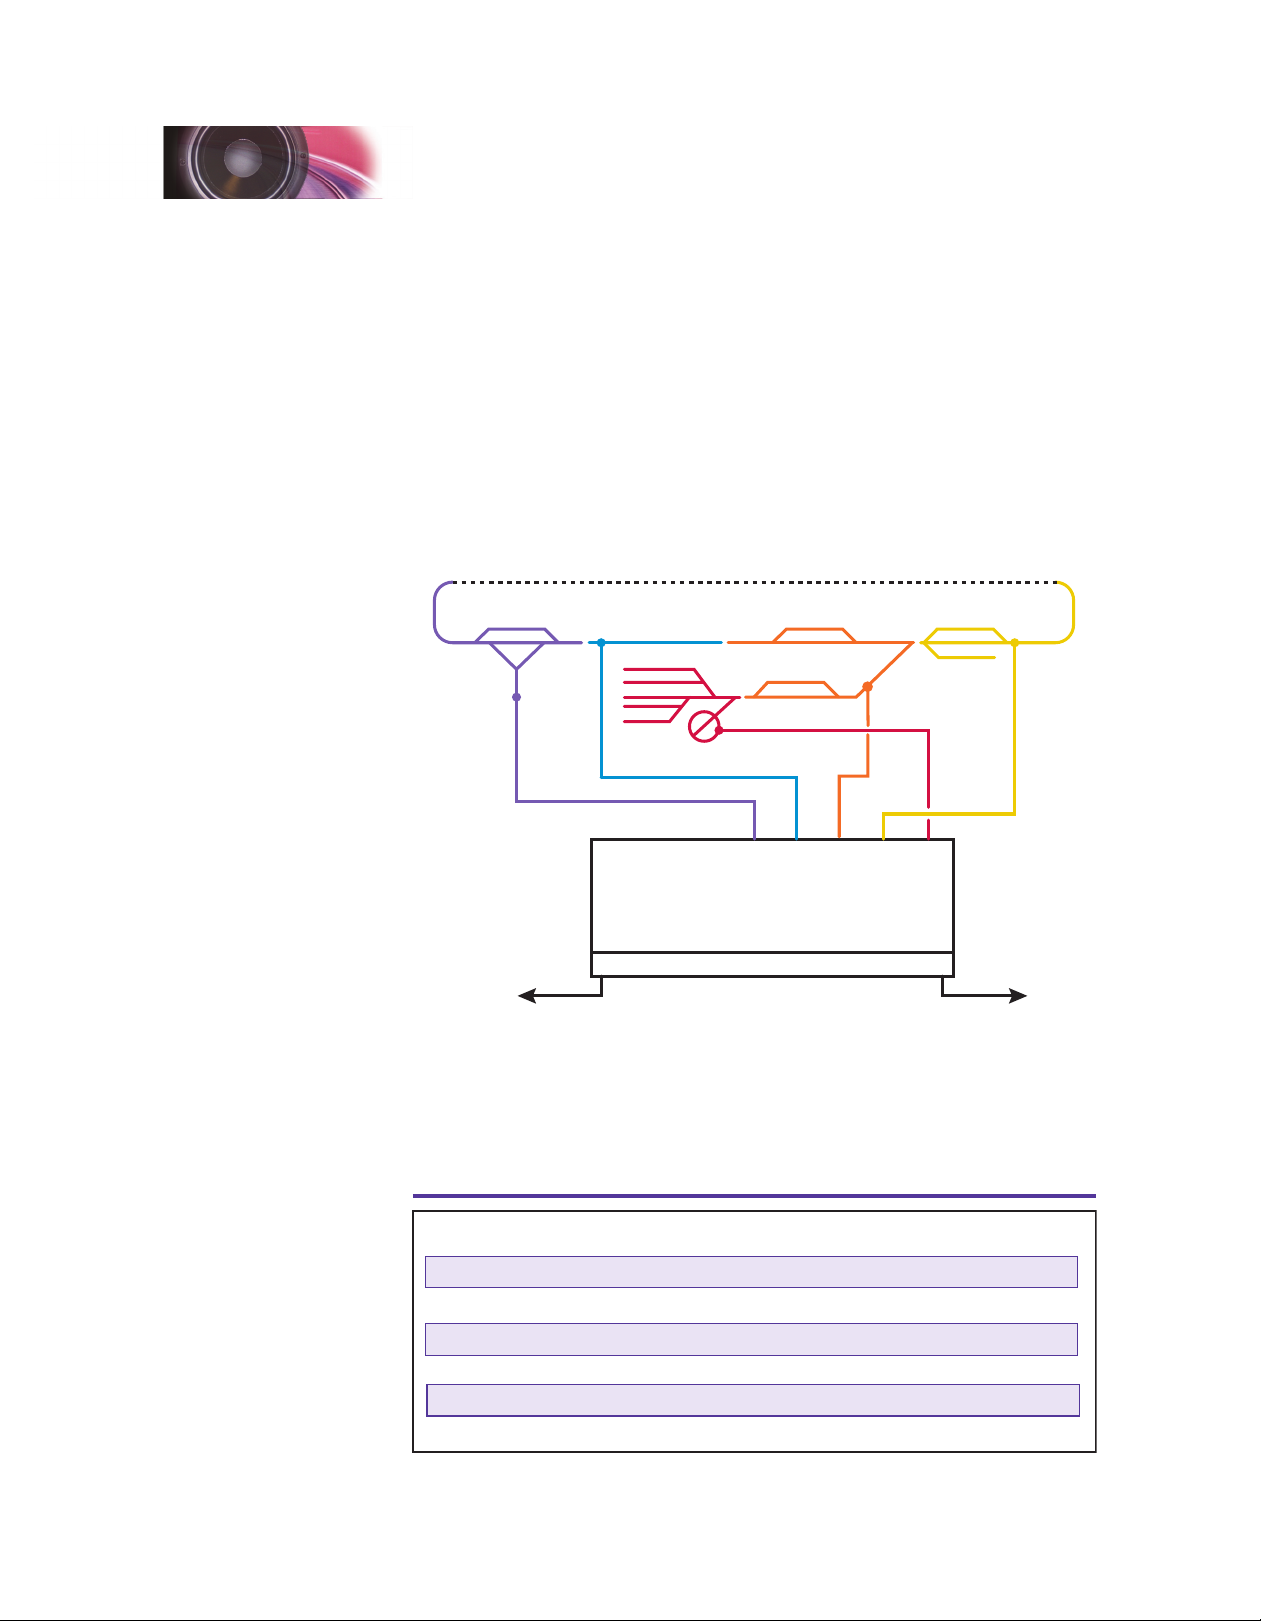
If you nd later on that your dened block boundaries aren’t perfect, it’s
usually fairly simple to adjust them. As shown above, we separated the
schematic into blocks, the colors corresponding to the speaker wire output
color and sound zone based on the SurroundTraxx default values for each
sound zone and transponding blocks which are shown on the table below.
SurroundTraxx Sound Zones (default setting)
Sound Zone Speaker Wire Color Transponding Block(s)
1 Red 0
2 Yellow 2
3 Orange 4
4 Blue 6
5 Purple 8
6 Green 10
SurroundTraxx User’s Guide Setup Guide Page 1:14
Page 20
Lizard
Head
Summit
Ames
Ophir Loop
Palisade
Silver Falls
Zone 1
Telluride
Vance Jct.
Setup Guide
The next step is to determine the best speaker location within each of the
zones.
The rst sound zone on the layout would be the Telluride yard. This zone is
shown in red on the track plan above. To determine the best speaker location
measure the halfway point between the end of the Telluride Yard and the
block divider. This location will help make the sound noticeable regardless of
the activity in and about the yard.
The second sound zone will cover Vance Junction. When installing the block
detector for this section you may want to have the block start just inside the
hidden staging loop so that the sound dispatches as the locomotive exits the
hidden staging area shown in yellow. The speaker would sound best, in this
case, right around the siding at Vance Junction.
SurroundTraxx User’s Guide Setup Guide Page 1:15
Page 21
SurroundTraxx User’s Guide Setup Guide Page 1:17
Lizard
Head
Summit
Ames
Ophir Loop
Palisade
Silver Falls
Zone 1
Telluride
Zone 2
Vance Jct.
Lizard
Head
Summit
Ames
Ophir Loop
Zone 3
Palisade
Silver Falls
Zone 1
Telluride
Zone 2
Vance Jct.
Setup Guide
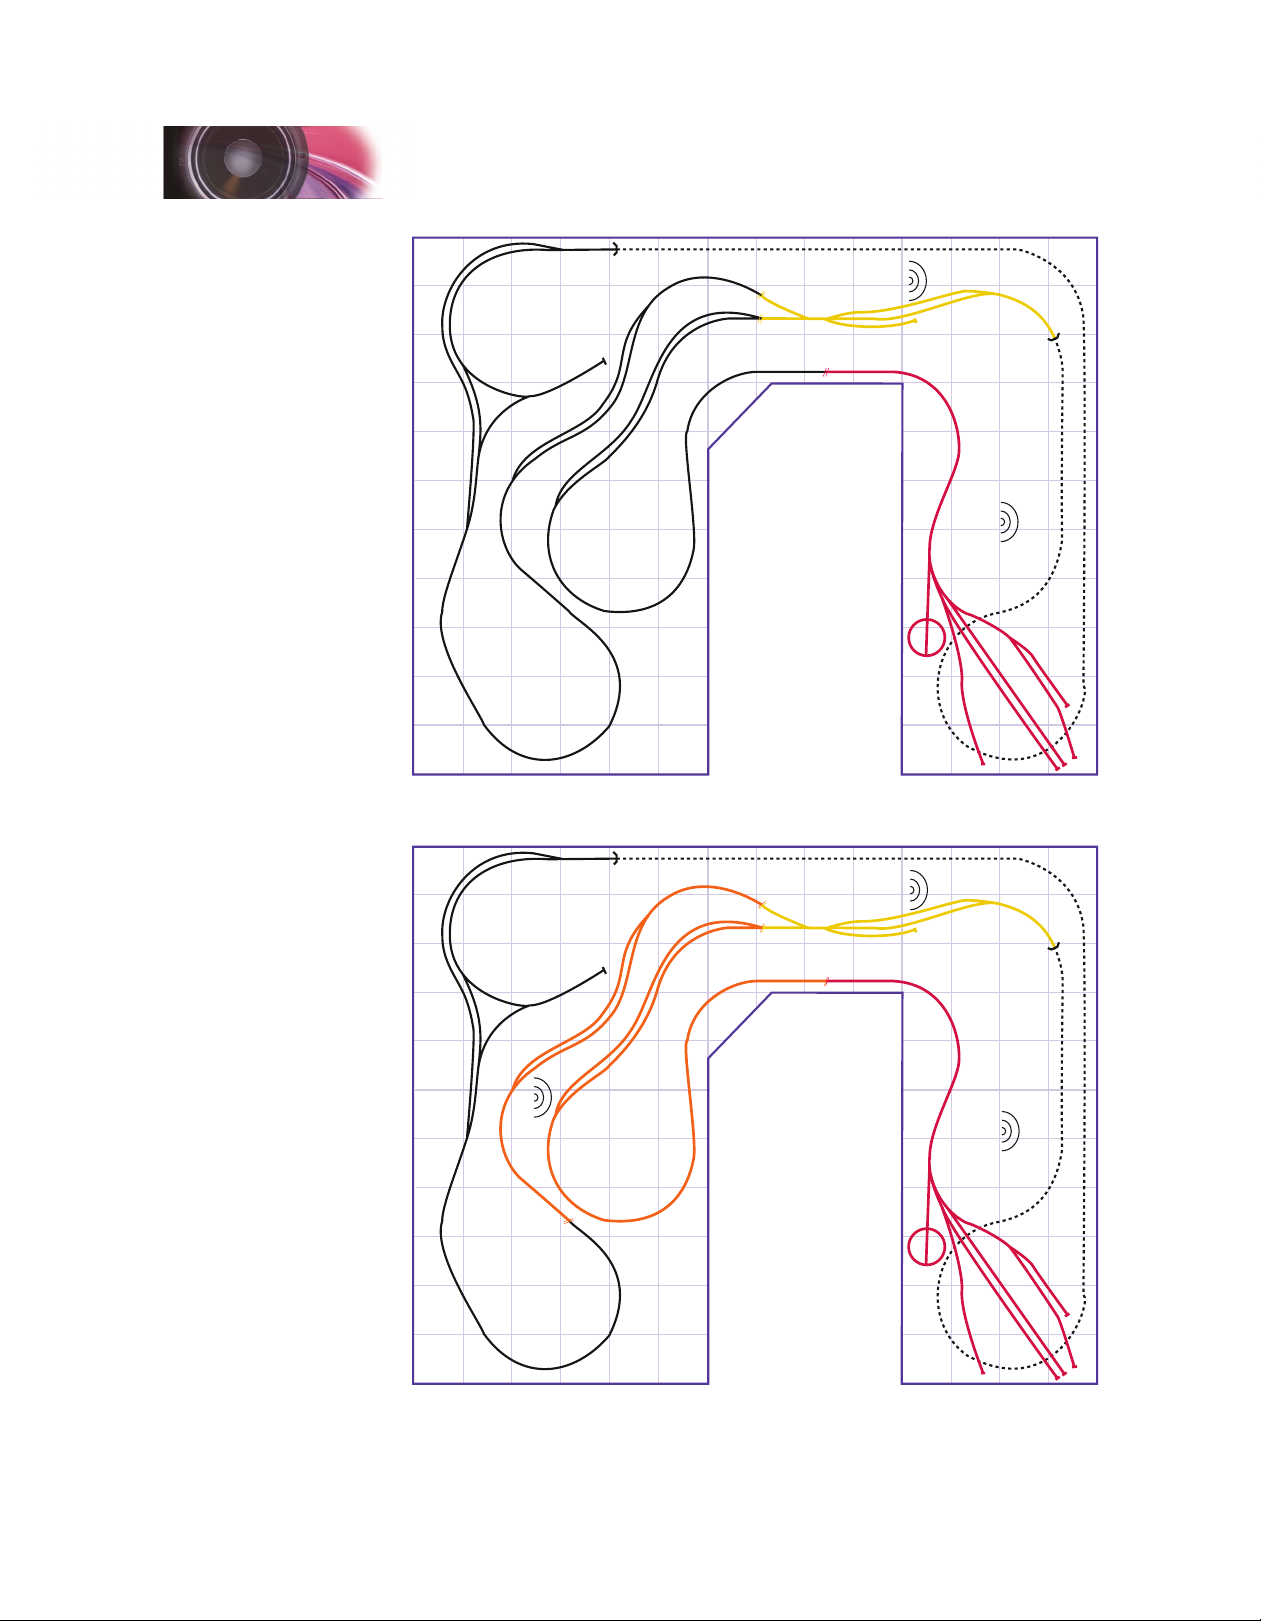
Next, we’ll assign the rest of the Telluride branch and Silver Falls to Zone 3
(shown in orange), picking up part of the main line near Palisade.
The next best location for the speaker would be somewhere between
Palisade (blue) and Silver Falls towards the far left switches on the siding.
SurroundTraxx User’s Guide Setup Guide Page 1:16
Page 22
Lizard
Head
Summit
Zone 4
Ames
Ophir Loop
Zone 3
Palisade
Silver Falls
Zone 1
Telluride
Zone 2
Vance Jct.
Lizard
Head
Summit
Zone 5
Zone 4
Ames
Ophir Loop
Zone 3
Palisade
Silver Falls
Zone 1
Telluride
Zone 2
Vance Jct.
Setup Guide
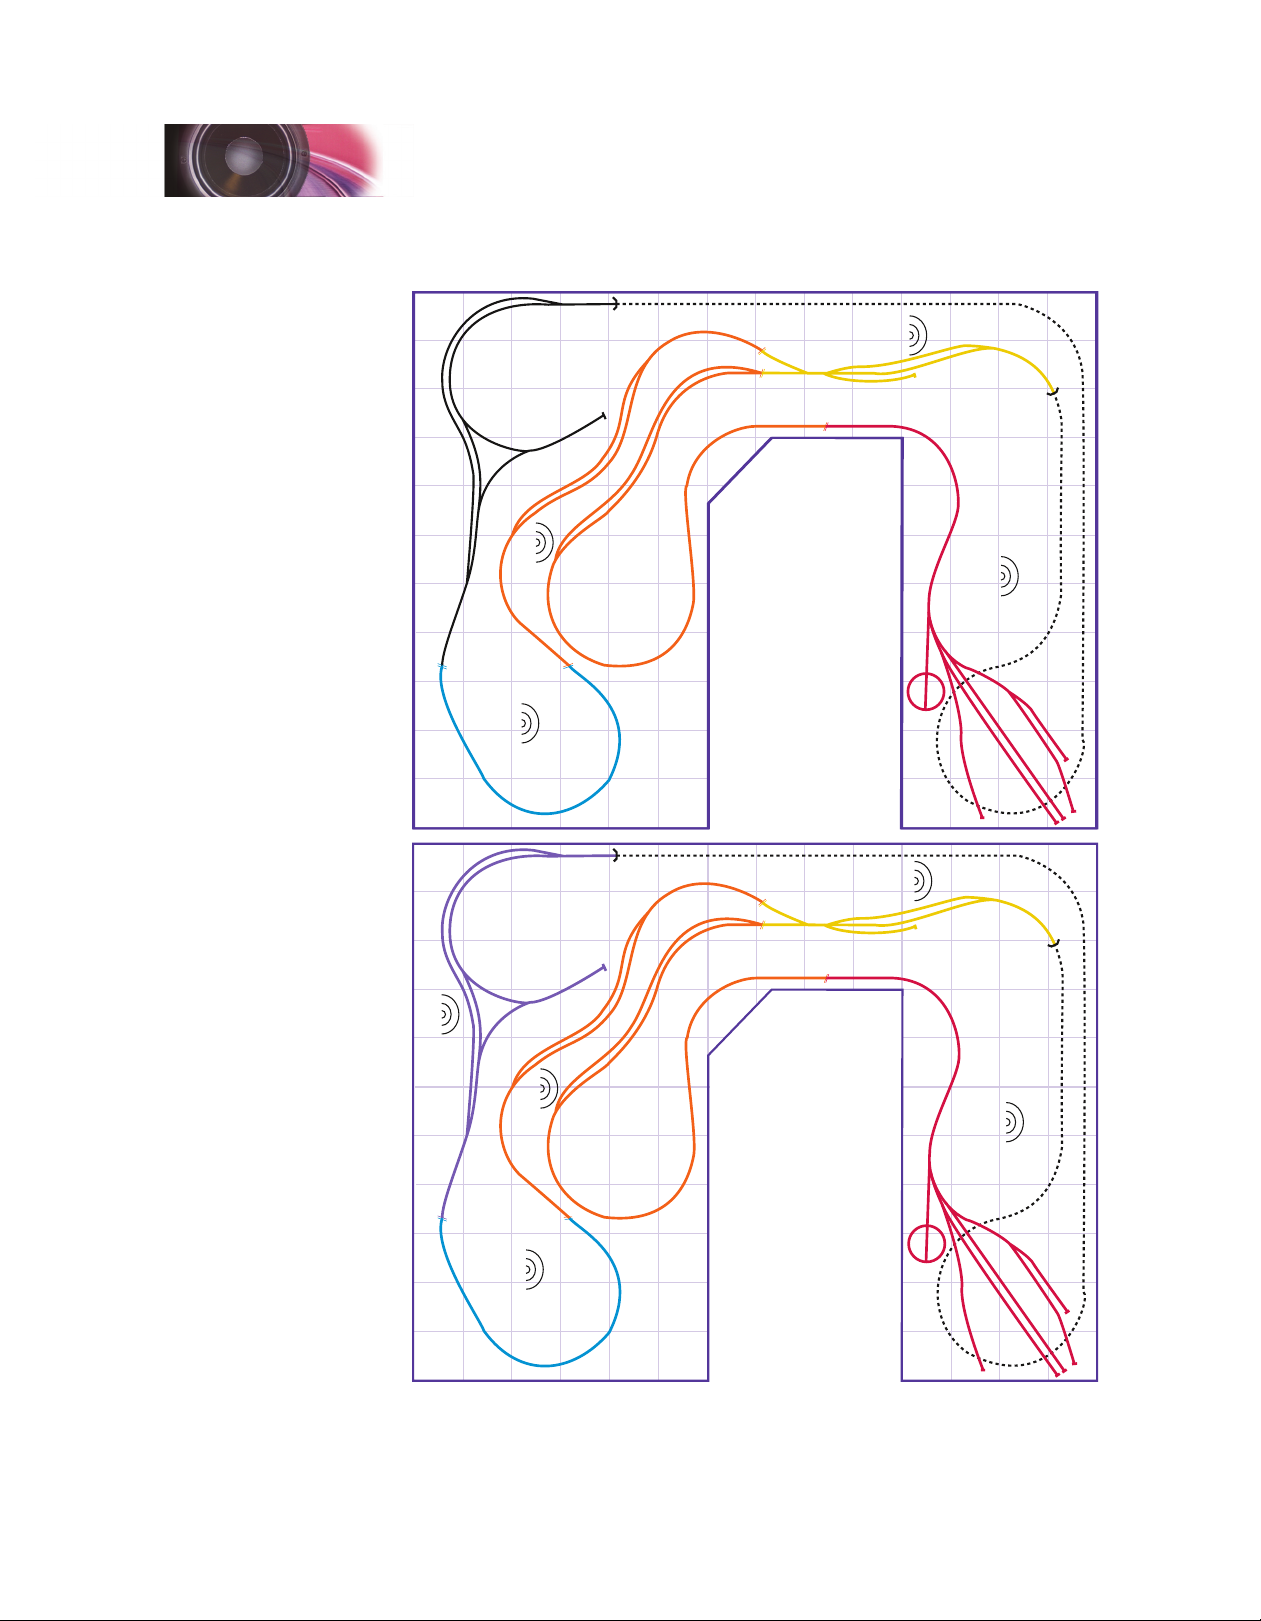
Zone 4 then circles the Ophir Loop. The speaker would t nicely between the
upper and lower parts of the Ophir loop.
Finally, Zone 5, shown in purple, takes in the Lizard Head Summit area. We
will place the speaker right in the center of the pass behind the wye.
SurroundTraxx User’s Guide Setup Guide Page 1:17
Page 23

SurroundTraxx User’s Guide Setup Guide Page 1:19
Setup Guide
Again, we might want to set the block boundary slightly in the hidden track so
that the sound fades away as the locomotive disappears.
When installing speakers you can conceal them in the benchwork, inside
larger buildings or building facades, or behind greenery. You could also
mount them in your ceiling or wall. If your layout incorporates mountainous
terrain, you can also build speaker compartments into hillsides. Because
some speakers are easier to conceal than others, this should also be a
consideration as you shop for speakers.
Wherever you decide to conceal the speakers, plan for easy access later in
case of a loose speaker wire, failed speaker, or another maintenance issue.
Ideally, the subwoofer should be mounted on the oor. This provides optimal
low-frequency response without causing vibration within the benchwork and
scenery.
Note: It is also important to remember that sound doesn’t care about scenic
dividers. Keep in mind that if you are using a divider between sections of
your layout it must also be an acoustic barrier if you wish to avoid the sound
being heard in the other section. Not doing so can result in undesirable
effects such as a “ghost train.”
Hopefully, you now have an idea of how to determine the number of sound
zones you need and their general locations. This will now help you to
determine which operating mode best suits your needs.
Verify that the Detection Equipment Works
With the planning process complete, you can begin installation of the block
detectors and transponders. You will need to refer to the manuals provided
with your Digitrax equipment for information on wiring these items. For
SurroundTraxx to operate properly in transponding mode, transponding
must be fully operational. Therefore, it is highly recommended that you rst
verify that transponding is working before you attempt to install and use
SurroundTraxx in transponding mode.
Before proceeding, review the following checklist and verify that:
1. When you turn on the command station the layout has track power
2. When you select a locomotive you are able to run it throughout your
entire layout
3. When track power is supplied to the locomotive, the headlight should
icker dimly, indicating the decoder is in transponding mode
4. When operating the locomotive in transponding mode hitting the “Find”
command button on your cab reads back the correct block in which your
locomotive is traveling
5. If the Find command button is left on and it crosses into a different block
a new Zone ID is given
If any of these conditions are not met please double check your layout
wiring and the appropriate Digitrax manuals before proceeding to install
your SurroundTraxx sound system.
SurroundTraxx User’s Guide Setup Guide Page 1:18
Page 24

Setup Guide
This process should be repeated for all your transponder-equipped
locomotives. If, at any point, the display shows a blank zone number, or the
zone number is incorrect, then transponding is not working properly.
Once transponding is working, SurroundTraxx will be ready to use
transponding mode.
SurroundTraxx User’s Guide Setup Guide Page 1:19
Page 25

SurroundTraxx User’s Guide Setup Guide Page 1:21
Setup Guide
Install the SurroundTraxx System
Install SurroundTraxx
By the time you’re ready to install SurroundTraxx, you’ve invested a great
deal of time and effort in your layout. You have constructed the benchwork,
laid out track, and integrated the block detection equipment – not to
mention scenery. Having successfully completed these steps, you’ll nd the
SurroundTraxx installation straightforward.
SurroundTraxx Wiring
The back panel of SurroundTraxx provides connections for the 5 Volt power
supply, a network connection to the block detector and DCC system, external
audio devices (i.e. a subwoofer and/or external amplier), and the speakers
for each sound zone.
Wiring Guidelines
Because improper wiring may damage the system, please observe these
important guidelines:
Always power off SurroundTraxx before connecting or disconnecting
wires and cables.
Do not connect SurroundTraxx to any power supply other than the one
supplied. Doing so will damage the unit.
If you need to extend the wire length for an audio channel by splicing in
new speaker wire, be sure to insulate each splice with heat-shrink tubing
before powering on the system.
Be sure to insulate the end of each wire of any unused color pair in the
wiring harness.
Do not connect a speaker wire to any wire of a different color.
Do not exceed a 4-ohm load with each output.
Only one speaker is recommended for each output.
Wiring SurroundTraxx
The network cable supplied with SurroundTraxx connects the NETWORK
input on the SurroundTraxx system to the block detector’s LocoNet output.
(The network cable, sometimes referred to as 'LocoNet cable' resembles a
telephone cord.) DO NOT plug this cable into non-LocoNet equipped DCC
systems! Plug one end into the receptacle marked NETWORK and the
other end into the receptacle on the command station. This will be marked
"LOCONET" (It does not matter whether you connect to the 'A' or the 'B'
receptacle).
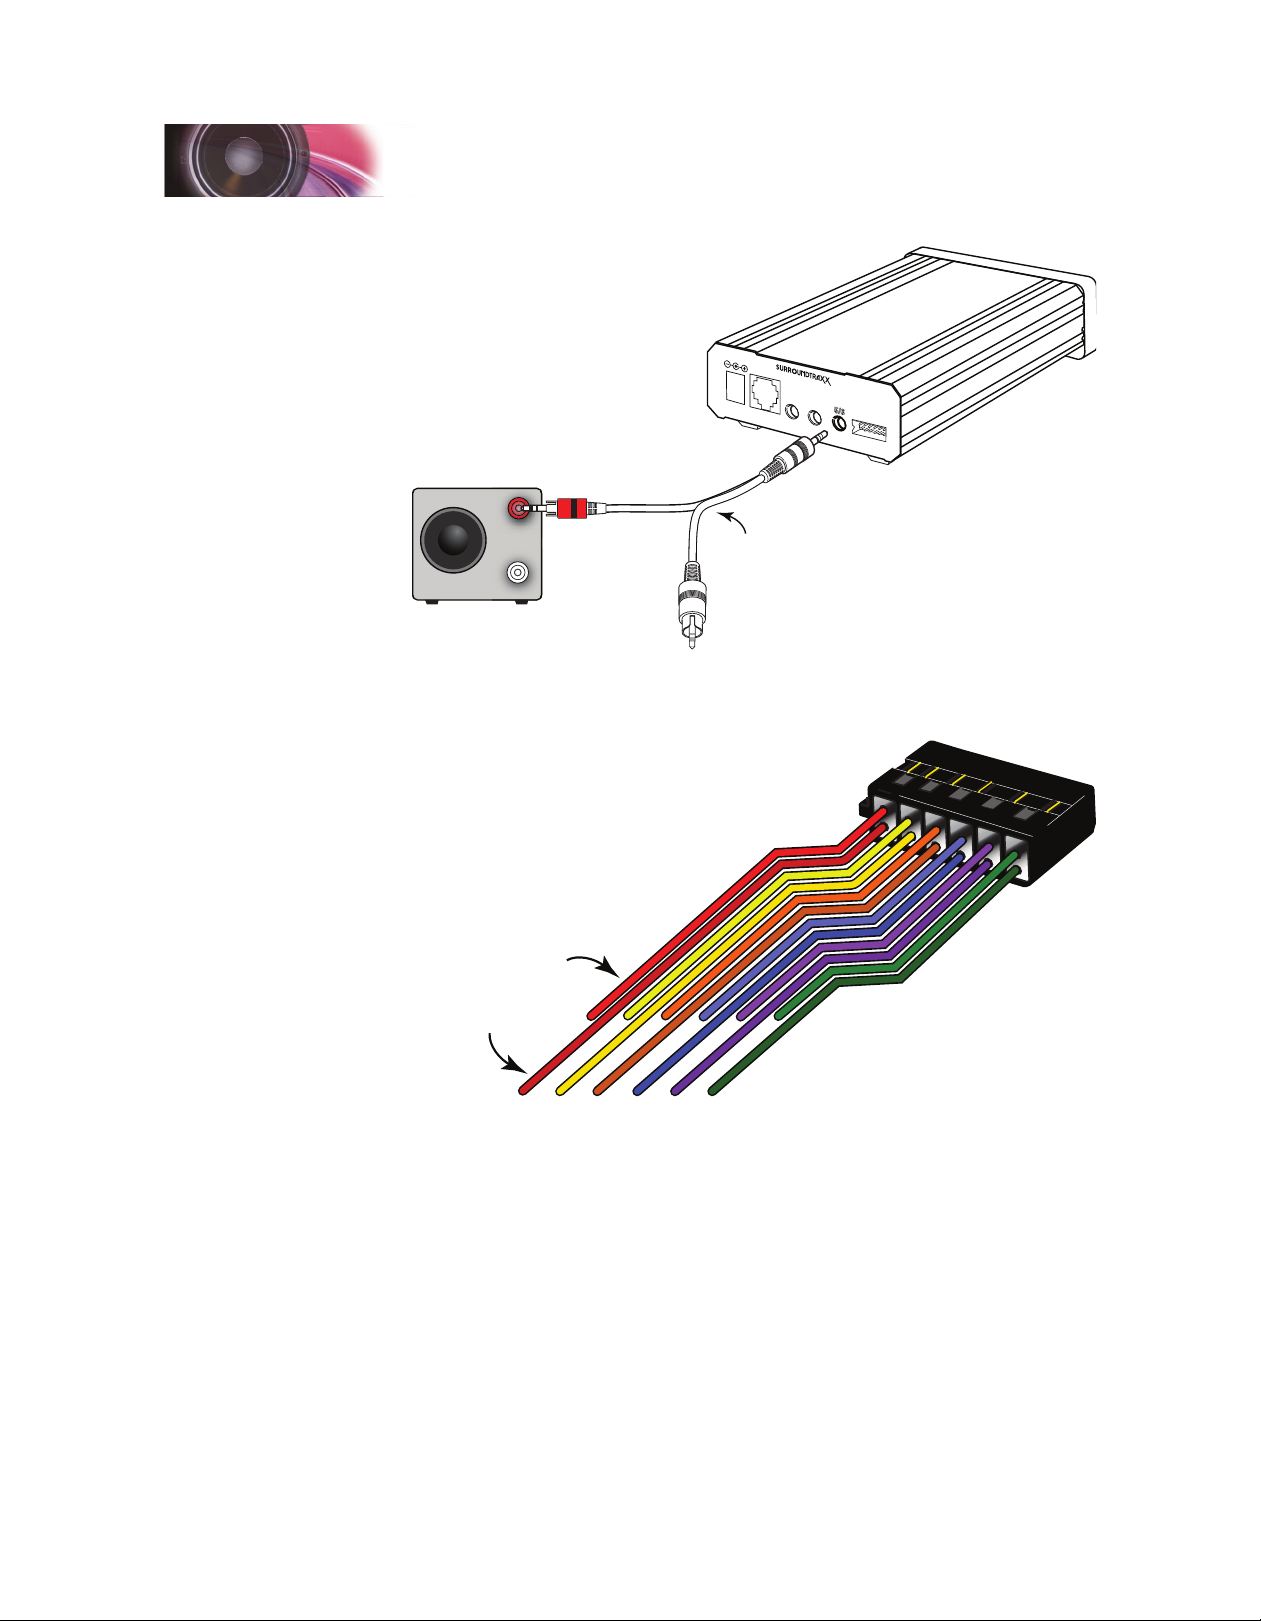
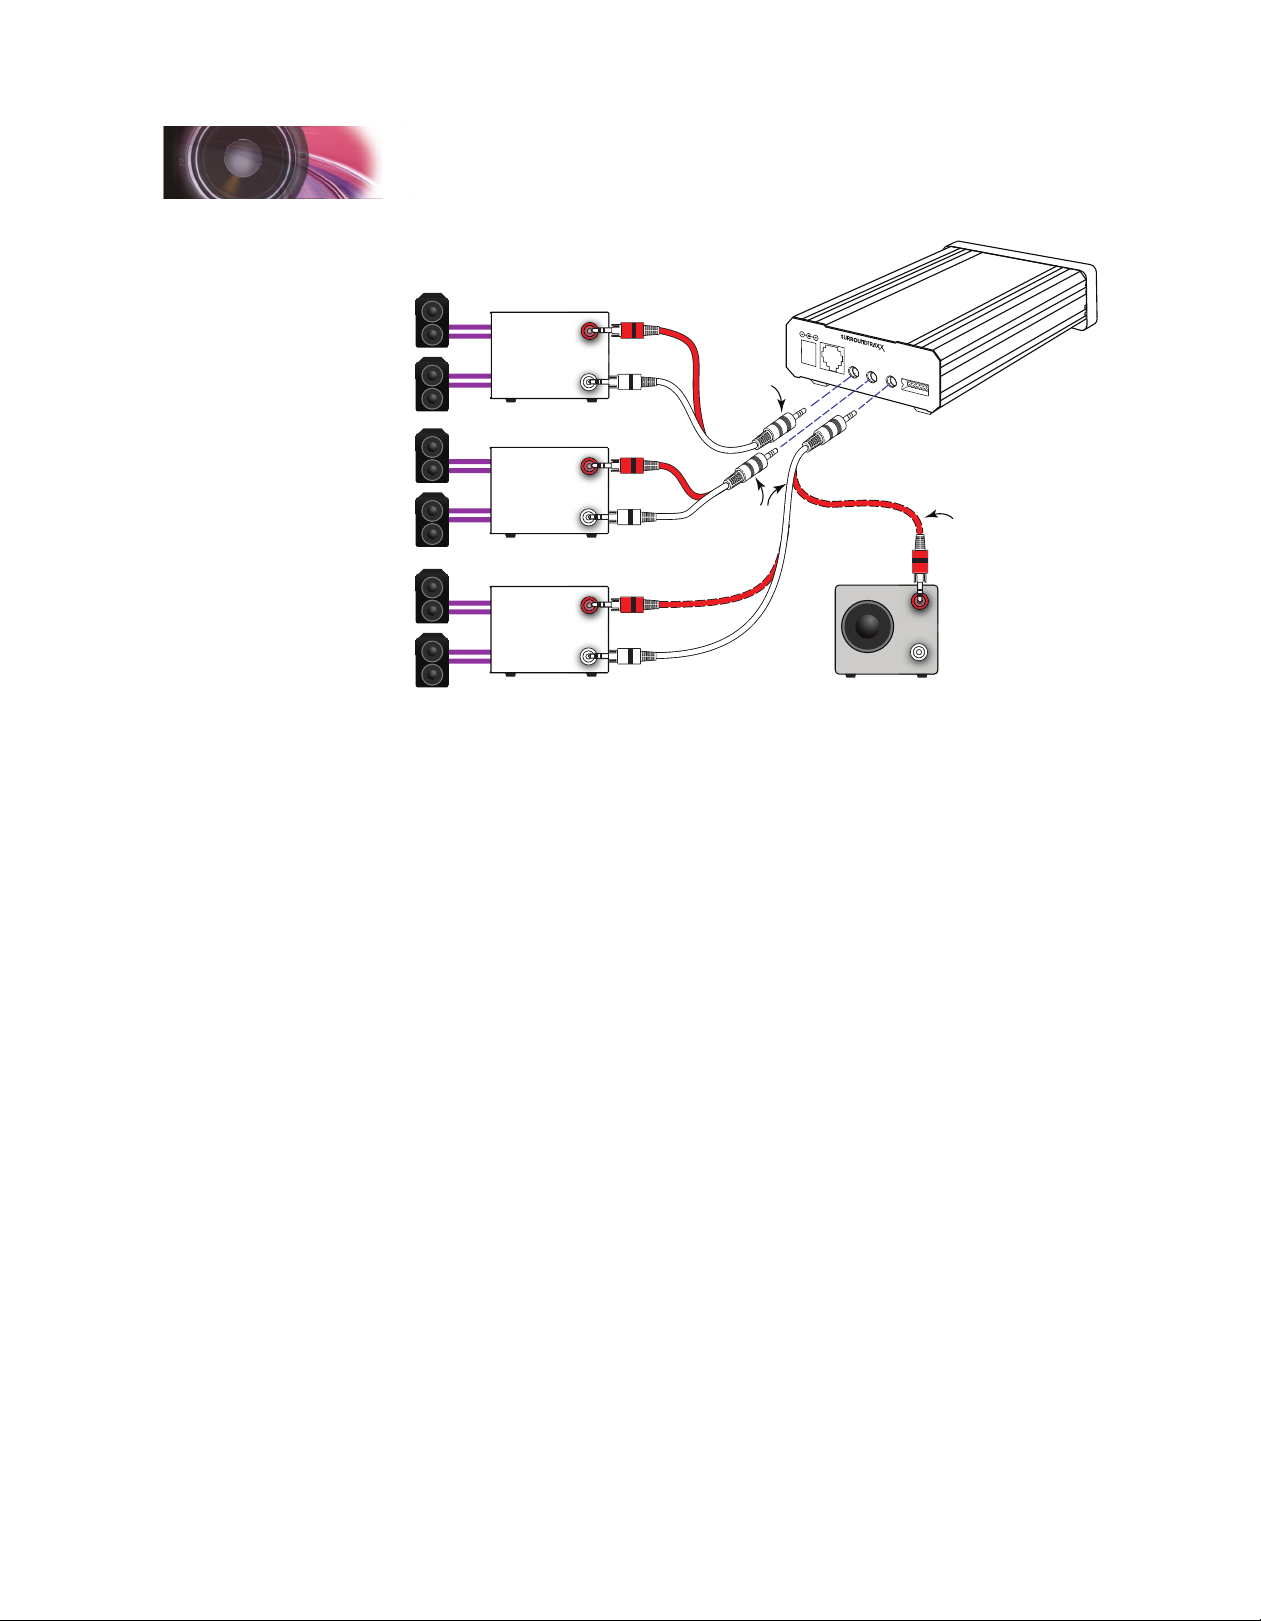
If you plan to use a subwoofer, connect the 5/6 line out jack to the subwoofer
as shown below, using a Y cable that adapts a stereo mini plug to two male
RCA plugs (Not Included). SurroundTraxx mixes the low frequencies of
channels 1–5 to channel 6 when one of the subwoofer modes is selected
(page 1:3).
SurroundTraxx User’s Guide Setup Guide Page 1:20
Page 26
Setup Guide
INPUT:
5VDC, 3A
DIGITA L S OUND PRO CESS OR
®
SOUN DTRA XX
1/2 3/4
Subwoofer
Right
Left
POWER NETWORK SPEAKERSLINE LEVEL OUT
2. Insert Right (RED)
RCA plug into
subwoofer right input.
In
1/8” mini-plug to RCA
In
3. Leave Left
(WHITE) RCA plug
unconnected.
Wrap in electrical
tape to prevent
short circuits.
Y-Adapter (not included)
Connect the 6-channel wiring harness to the SPEAKERS output, then wire
each pair of like-colored wires to a 4 or 8-ohm speaker. The end of any
unused wire should be insulated.
Duran go, CO 8 130 1
USA
5/6
1. Insert mini-plug
into Jack “5/6”.
Speaker (+)
Speaker (-)
VIOLET
GREEN
Channel 1
RED
Channel 2
Channel 3
YELLOW
Channel 4
ORANGE
Channel 5
BLUE
Channel 6
Depending on the length of the wire that runs between SurroundTraxx
and your speakers, the wiring harness may need to be extended; splice
additional speaker wire to individual channels as needed. To avoid confusion
in maintenance, use 26 gauge wire that matches the color of the pair you are
extending. Be sure to insulate the spliced area with heat-shrink tubing.
When truly enormous sound is in order, you can connect the LINE LEVEL
OUT jacks to a more powerful external amplier. The wiring for each of these
jacks is similar to the subwoofer diagram below, adapting a stereo mini plug
to separate channels as appropriate for the amplier.
SurroundTraxx User’s Guide Setup Guide Page 1:21
Page 27
SurroundTraxx User’s Guide Setup Guide Page 1:23
Setup Guide
Amplier 3
Right
Left
Right
In
In
In
mini-plug to
Y-Adapter
included)
1/8”
RCA
(not
INPUT:
5VDC, 3A
DIGITAL SO UND PROC ESSO R
1/2 3/4 5/6
POWER NETWORK SPEAKERSLINE LEVEL OUT
®
SOUND TRA XX
Durang o, C O 81 301
USA
Amplier 2
1/8” mini-plug
to RCA
Y-Adapter (not
included)
Right
Left
In
In
Optional
Subwoofer
connection
Subwoofer
Amplier 1
Left
Right
Left
In
In
In
When you are using an external amplier for all system sounds, the speaker
wiring harness is not needed.
Finally, connect the 5VDC power supply included with SurroundTraxx to the
POWER input. The power supply then plugs into a standard 120V to 220V
household outlet.
Your nal installation should resemble the master diagram on the following
page.
SurroundTraxx User’s Guide Setup Guide Page 1:22
Page 28

5V Power Supply
Setup Guide
INPUT:
5VDC, 3A
DIGI TAL S OUND PRO CESS OR
POWER NETWORK SPEAKERSLINE LEVEL OUT
To Network
Subwoofer
Right
In
Left
In
Leave ‘Left’ RCA
jack disconnected.
Wrap in electrical
tape to prevent
short circuit.
1/2 3/4 5/6
®
SOUN DTRA XX
Dura ngo, CO 8130 1
USA
Channel 1 Channel 2 Channel 3 Channel 4 Channel 5 Channel 6:
Only wired to
a speaker if a
subwoofer is
not used
SurroundTraxx User’s Guide Setup Guide Page 1:23
Page 29

Configuration Guide
Configuring the System
What's Next
Now that you have wired your layout and SurroundTraxx system you will
need to complete the following items described on this checklist before
SurroundTraxx is able to properly make sound throughout your layout.
r Add a Locomotive into the Roundhouse
SurroundTraxx is shipped with the Roundhouse empty. To learn more
about entering your locomotive roster into the Roundhouse please refer
to page 2:4 of the Conguration Guide.
r Set Your Sound Zone IDs to the Block Detector IDs
Setting up the Sound Zones to the corresponding block detectors allow
SurroundTraxx to match the sound with the locomotive’s correct location
(not necessary in Single Channel Mode). To learn how to set up your
Sound Zone to match your Block Detector IDs please refer to page 2:27.
r Set Up the Preferred Operating Mode for Your Layout
As explained earlier, SurroundTraxx can be used in several different
types of operating modes. To set up the desired operating mode, please
refer to page 2:28 of the Conguration Guide.
r Dispatch a Locomotive
As discussed in the “How It Works” portion of this section (page 1:1),
we learned that SurroundTraxx dispatches a locomotive and produces
the sound that specically matches that locomotive to the sounds and
settings you select. SurroundTraxx will not produce any noise for a
locomotive unless it is dispatched. To learn the different ways to dispatch
a locomotive refer to page 3:3 of the Operations Guide.
While the items on above checklist must be met for the system to produce
any sound, the subjects listed below are additional features you may wish to
adjust to obtain the best results from your SurroundTraxx system.
r Set Up Ambient Effects and Adjust Sound Zone Volumes
SurroundTraxx allows you to set up many cool effects such as echo
and reverb, as well as customize each Sound Zone to have different
volume levels. To learn more about this refer to the Audio section of the
Conguration Guide found on page 2:26.
r Customize the Locomotive Sounds
SurroundTraxx defaults easily to a steam or diesel locomotive when you
enter a locomotive in the Roundhouse Menu. You may however wish to
customize the sounds from these defaults to the bells, whistles, exhaust
chuffs or prime movers that match your prototypical locomotive. Follow
the directions in the Edit locomotive section within the Roundhouse. This
is found on page 2:7 of the Conguration Guide.
r Adjust the System Preferences
To adjust other settings within SurroundTraxx that relate to overall
operation and the system display, please refer to page 2:28 of the
Conguration Guide.
SurroundTraxx User’s Guide Configuration Guide Page 2:1
Page 30

SurroundTraxx User’s Guide Configuration Guide Page 2:3
Configuration Guide
The following section of this manual will explain how to access and use
the menus found within your SurroundTraxx system. As explained in the
SurroundTraxx Setup Guide, some of these menu options must be congured
before your system will produce any audio at all.
Menu Overview and Navigation
Once power is supplied to the SurroundTraxx system, you will be able to see
the system 'boot' and perform a few software tests. Once the system has
completed the tests it will default to System Monitor Mode and is ready for
you to either make adjustments through the different menu options or begin
to use the system to provide audio throughout your layout.
As part of your SurroundTraxx system, there are six main menus to select,
through which you make all the necessary adjustments. They are:
• Roundhouse
• Audio
• Dispatcher
• Zone IDs
• System
• Diagnostic
Within each main menu, there are additional submenus.
To access the menus simply push the control knob in once. You will see the
rst menu option in the display: ROUNDHOUSE. Turn the knob to the right to
display the next menu option, AUDIO. Continuing to turn the knob to the right
will advance through the different menu options.
Turning the knob to the left will return to the previous menu option.
Scroll
Forward
Select
If you should make an error in your menu selection and wish to exit without
making any changes, simply continue to turn the knob to the right until you
see BACK, then EXIT. From a submenu, selecting BACK will return you to
the previous menu page, while EXIT from any menu will take you back to
System Monitor Mode.
Scroll
Back
Once you have pushed the knob to select a menu you will be able to enter
any submenus that may exist and make adjustments. If you are making a
SurroundTraxx User’s Guide Configuration Guide Page 2:2
Page 31

Configuration Guide
numerical selection, for example, entering in a four-digit locomotive address,
pushing the knob in will cause the far left digit to ash. This indicates the
number to be changed. Turn the knob to change the value and push the knob
to select it. The next number to the right will now ash and so on, moving
from left to right until all the adjustments have been made. Pushing the knob
in before changing the value in the ashing digit will move it over to the next
digit. If you nd a sub menu you desire to not change simply turn the knob to
the right to move to the next option.
System Monitor Mode
When you are not actively working within the menus, SurroundTraxx operates
in System Monitor mode, which provides visual status indicators for the six
audio channels. This is the most common mode during normal operation, and
SurroundTraxx automatically exits the menus to System Monitor mode after
several seconds of inactivity.
The central feature of System Monitor mode is a six-channel volume units
(VU) meter as shown below. The VU meter shows the volume level of each
channel; the more pixels displayed for a given channel, the higher the sound
level. When at least one, but not all, of the locomotives are muted, the letter
V appears at the far left of the display.
Mute
1 2 3 4 5 6
Icon
When the entire system is muted, the word –MUTE– appears on the display.
See page 2:30 for more information on the mute function.
Audio clipping is a condition in which the level of one or more channels
exceeds the system’s capability. Because clipping is a form of waveform
distortion, it can negatively impact the sound quality of the affected channels.
An exclamation mark (!) to the left of the VU meter indicates a clipping
condition; when this occurs, you may adjust the sound mixer parameters to
resolve the problem. See page 2:12 for details.
A network activity indicator at the far right side of the display appears each
time a valid network packet is received. Both this indicator (in the shape of a
starburst) and the clipping indicator are shown below.
-48 -24 -12 -6 -3 0
Clip
VU Level (dB)
Network
Activity
SurroundTraxx User’s Guide Configuration Guide Page 2:3
Page 32

SurroundTraxx User’s Guide Configuration Guide Page 2:5
Configuration Guide
Adjusting the System Volume
In System Monitor mode, you may rotate the control knob to adjust the
overall system volume. Note that you can also adjust the volume of each
channel individually; when you adjust the master volume, the levels of all
channels increase or decrease proportionally. As you adjust the master
volume, the word VOL: appears on the display, and a vertical bar indicates
the master volume level.
The Roundhouse Menu
The Roundhouse Menu is the rst menu option displayed and allows you to
set up and customize each of your locomotives with the appropriate sound
le. The Roundhouse can store up to 99 locomotives in its internal memory.
The Roundhouse Menu in SurroundTraxx allows you to:
• Add Locomotives into the database
• Edit Locomotives stored in the roundhouse
• Copy Locomotives from the database
• Erase Locomotives
Matching the Sounds to Your Models
SurroundTraxx includes an extensive library of locomotive sounds; the sound
selection and control registers allow you to apply the correct sounds to each
model and make each one truly unique. Once you have selected the type of
locomotive (steam or diesel) the values for each sound feature can be found
in the tables in the next few pages. If you do not know the correct sounds for
your model, the SoundTraxx website contains a plethora of information about
selecting prime movers, airhorns, whistles and other prototype characteristics
(www.soundtraxx.com).
To access the ROUNDHOUSE menu, push and release the control knob. The
ROUNDHOUSE menu is the rst one displayed; push and release the control
knob again to select it. The complete Roundhouse menu tree can be found in
the Appendix A.
LIST LOCOS: Viewing the Locomotive Roster
As you add more locomotives, you may nd it helpful to occasionally add or
delete them from your roster. If you get lost along the way, viewing the roster
of locomotives can be helpful. When you enter the Roundhouse menu, the
rst function presented is LIST LOCOS. This function provides a list of the
locomotives in the database with their decoder addresses. Push the control
knob to select this function.
SurroundTraxx User’s Guide Configuration Guide Page 2:4
Page 33

Configuration Guide
Rotating the knob will now scroll through the roster. Push the knob again to
exit the list or simply wait for the timeout period to expire.
When the database contains no locomotives, the message ROUNDHOUSE
IS EMPTY will scroll across the display. This is the default when the unit is
new from the factory.
If you are running a locomotive on the layout that is not listed in the
locomotive roster, it will not be able to be dispatched. The locomotive will
run, but it will be silent until it is added to the roster.
ADD LOCO: Adding a Locomotive to the Roundhouse
The Add Loco function is where you will enter new locomotives into the
roster. Add Loco is the second function in the Roundhouse menu.
It is from this menu that you will begin to set up the individual characteristics
of the engine being added to the database, including whether it is a steam
or diesel locomotive, the engine's address, and a great number of sound
adjustments.
To add a simple steam locomotive to the Roundhouse:
The display will now read: ADDR: 0003. This is the default address.
SurroundTraxx User’s Guide Configuration Guide Page 2:5
Page 34

SurroundTraxx User’s Guide Configuration Guide Page 2:7
Configuration Guide
Enter the address of your locomotive. The address is a four-digit value (0001
to 9999) that should match the address set in your mobile decoder. You will
set each digit from left to right. The 0 farthest to the left should be ashing,
indicating that this is the digit to be changed. Turn the control knob clockwise
until it displays the desired number (0 through 9) and push the control knob to
select it. The next digit will now ash, indicating it is the next to be entered.
Select the desired digit for all four places.
Note: SurroundTraxx doesn't distinguish between short and long
addresses.
SurroundTraxx will ask you to save this locomotive. Select Y if you wish to
save and N if you do not wish to save this to the roundhouse.
The display now returns to the ADD LOCO function; you may add another
locomotive, or edit this locomotive with the Edit Loco menu. The default
settings for a 'Steam' engine are shown below.
Default Steam Settings
Sound Feature Default Selection
Chuff Light Steam
Whistle 3-Chime
Bell Steam Bell 1
Airpump Single Phase
Coupler Modern Knuckle Draft Gear
If you wish to add a diesel locomotive to the Roundhouse, from the TYPE
prompt, turn the knob until the display reads TYPE: DSL. Push the knob in to
make the selection and enter the address.
The default settings for a 'Diesel' engine are shown on the next page.
SurroundTraxx User’s Guide Configuration Guide Page 2:6
Page 35

Configuration Guide
Default Diesel Settings
Sound Feature Default Selection
Prime Mover EMD 567 1st Generation
Airhorn Wabco E2
Bell EMD Bell
Diesel Air Compressor Manual
Coupler Modern Knuckle Draft Gear
Automatic RPM Notching ON
Keep in mind that once you have selected either Steam or Diesel, you will not
be able to switch to the other. For example, if you select locomotive 4163 as
a steam engine, you will not be able to now edit this as a diesel locomotive.
You must delete this address and start over if you've selected the wrong
engine TYPE for this road number.
EDIT LOCO: Customizing the Locomotive
Once you have a Steam or Diesel locomotive in your roundhouse, you can
customize the sounds and features using the Edit Loco menu. EDIT LOCO is
the third function in the Roundhouse menu. The Edit Locomotive settings in
the Roundhouse allow you to:
Select the appropriate prototype sound les for exhausts, whistles, bells,
and other sound effects.
Adjust the relative volume levels of various locomotive sounds.
Control the amount of echo/reverb applied to a given sound function.
Adjust a locomotive’s scale speed.
Lock CVs to prevent changes.
Adjust a locomotive's function mapping
You may adjust these settings either from EDIT LOCO (in the Roundhouse
menu) or in most cases from a DCC cab using operations mode
programming, with locomotive dispatched and the CV Lock OFF (Page 3:6
contains a complete list of CVs that can be changed in this manner).
1. From System Monitor mode, push and release the control knob. The
display reads ROUNDHOUSE; push and release the control knob again
to select it. The display will read LIST LOCOS.
2. Turn the control knob until it reads EDIT LOCO. Push the control knob
to select this option. Turn the control knob until the desired locomotive
address is displayed and push the control knob to select it for editing.
SurroundTraxx User’s Guide Configuration Guide Page 2:7
Page 36

SurroundTraxx User’s Guide Configuration Guide Page 2:9
Configuration Guide
3. The display will read VOLUME and the current setting for this locomotive.
Turn the control knob clockwise until the display reads EX SEL: 0
(Exhaust Select). Push the control knob to select this option.
4. Turn the control knob until the number displayed matches the one you've
chosen from the table below and select it with the control knob.
SurroundTraxx Exhaust Values
Steam Diesel
Description Value Description Value
Light Steam 1 0 EMD 567 0
Light Steam 2 1 EMD 645 Turbo 1
Medium Steam 1 2 EMD 710 Turbo 2
Heavy Steam 1 3 Alco 244 3
Heavy Steam 2 4 Alco 251 V12 4
Medium Steam 2 5 GE FDL 16 5
Medium Steam 3 6 GE Gevo 12 6
Light Logging 7 Fairbanks Morse 7
Baldwin 8
Railbus 9
(The item show in BOLD font indicates the default setting.)
5. After selecting the exhaust, turn the knob until the display reads WH
SEL:000 (Whistle/Horn selection). Push the control knob to select this
option. Choose the horn or whistle by turning the control knob until it
matches your choice in the appropriate table(s).
SurroundTraxx Horn Values
Description Value Description Value
Wabco E2 0 Holden M3H 12
Wabco A2 1 Holden K5H 13
Leslie A200 2 RGS Goose 14
Leslie S3LR 3 Aooogah Horn 15
Leslie S5T 4 Car Horn 16
Nathan K3L 5 Leslie A125 17
Nathan K5LA 6 A200/A125 Combo 18
Nathan M3 7 Leslie RS5T 19
Nathan M5 8 Leslie S2M 20
Nathan P3 9 Leslie S3L 21
Nathan P5 (Early) 10 Nathan P5A 22
Nathan P5 (Modern) 11 Hancock Air Whistle 23
SurroundTraxx User’s Guide Configuration Guide Page 2:8
Page 37

Configuration Guide
Keep in mind when choosing the horn or whistle, that this is one of the most
important items you will choose. Unless you are determined to choose the
'correct' horn or whistle, we recommend that you choose the one that simply
sounds best to you.
SurroundTraxx Whistle Values
Description Value Description Value
B&O 3 Chime 0 Nathan 5 Chime Road Mix 20
D&RGW C-19 Yard Mix 1 N&W Class A 1218 21
C-19 Road Mix 2 Logging Peanut 22
C&S 74 Yard Mix 3 PRR Banshee 23
C&S 74 Road Mix 4 Reading 6 Chime 24
C&S 801 5 Santa Fe Freight 25
Frisco 1522 6 SP GS-4 4449 26
GBL 40 7 UP Big Boy 4018 27
K-27 463 8 USRA 6 Chime 28
K-36 487 9 Climax 29
K-36 488 10 West Side Shay 12 30
K-36 489 11 West Side Shay 14 31
K36 489 Sticky Chime 12 Crosby 3 Chime 32
K-37 497 13 Tweetsie 33
Lehigh Valley 14 Lunkenheimer 3 Chime 34
LMS Black 5 Class 15 N&W Class J 611 35
LMS Brittania Class 16 SP 6 Chime 36
LNER 17 Southern Single Chime 37
LNER A4 Class 18 Southern 3 Chime 38
Nathan 5 Chime Yard Mix 19 SP Airhorn 39
6. The next item to customize for your model is the bell. Once you've made
your horn/whistle selection, turn the knob until the display reads BL SEL:
00 (Bell Selection). Again, push the control knob to select this option,
then turn the knob to choose the bell using the table on the next page.
SurroundTraxx User’s Guide Configuration Guide Page 2:9
Page 38

SurroundTraxx User’s Guide Configuration Guide Page 2:11
Configuration Guide
SurroundTraxx Bell Values
Steam Diesel
Description Value Description Value
Steam Bell 1 0 Alco Diesel 8
Steam Bell 2 1 EMD Diesel 9
Steam Bell 3 2 Fairbanks - Morse 10
Steam Bell 4 3 Electronic - Modern 11
Steam Bell 5 4
Steam Bell 6 5
Steam Bell 7 6
Steam Bell 8 7
7. After selecting the bell, turn the knob until the display reads BLRATE: 00,
where you can choose how fast or slow you want the bell to ring. You
may adjust this from 0 to 15, where 0 is the fastest ring rate (air ringer)
and 15 sets it to a hand rung bell.
8. After selecting the Bell Ring Rate, turn the knob to display AP SEL: 0.
SurroundTraxx offers several airpumps and compressors for selection.
SurroundTraxx Compressor Values
Steam Diesel
Description Value Description Value
Single Phase 0 Diesel Air Compressor 0
Cross Compound 1 Modern GE Air Compressor 1
Poorly Maintained
Cross Compound 2
SP Cab Forward 3
Shay Style Cross Compound 4
Vacuum Pump 5
9. Once you've selected the appropriate airpump, turn the knob until
the display reads CP SEL: 0 (Coupler Select). SurroundTraxx comes
equipped with three common forms of draft gear couplers to use as a
sound function. The values and selections are listed below.
SurroundTraxx Coupler Values
Coupler Value
Link and Pin 0
Early Draft Gear 1
Late Draft Gear
2
SurroundTraxx User’s Guide Configuration Guide Page 2:10
Page 39

Configuration Guide
10. After you've selected the coupler, turn the control knob until the
display reads DYNO:0. The dynamo (generator) is available for steam
locomotives and can be changed using the control knob, choosing your
preference from the table below.
SurroundTraxx Dynamo Values
Dynamo Value
Medium Dynamo 0
Light Dynamo 1
Light Logging Dynamo 2
Heavy Dynamo 3
11. Once you've selected the desired value for the dynamo of your choice,
turn the knob to advance the display until it reads BLWR: 0. Like the
dynamo, the blower is only used for steam locomotives. The blower can
be changed using the control knob and the table below to make your
selection.
SurroundTraxx Blower Values
Dynamo Value
Heavy Smokebox Blower 0
Light Smokebox Blower 1 1
Light Smokebox Blower 2
Medium Smokebox Blower 3
Light Logging Smokebox Blower 4
Since these nal two individual sound selections (dynamo and blower) are
only used for steam locomotives, if you inadvertently select these options
when you are programming a diesel locomotive, it will accept the entry, but it
will not effect any change in the sound.
Sound Mixer Parameters
Now that you have set up the actual sound les for your locomotive, you
will need to set up the preferred volumes and FX mixer parameters. This
will allow you to balance each of the sound levels against each other.
For example, the bell is usually quite a bit quieter than the exhaust, but
the whistle or air horn should be louder than the exhaust in most cases.
Therefore, you may want to set the whistle or air horn to the highest volume
of all of them (say 225 for example) and then set the other sound effects
against that volume. So in this example the bell may be set to a value of
SurroundTraxx User’s Guide Configuration Guide Page 2:11
Page 40

SurroundTraxx User’s Guide Configuration Guide Page 2:13
Configuration Guide
around 70 while the exhaust is comparable to the whistle so it would be set
to a value around 200. To adjust the sound level for a particular effect, set the
corresponding volume to a value between 0 (mute) and 255 (100% volume).
In the EDIT LOCO submenu of the ROUNDHOUSE select the road number
you were just editing and turn the knob to the right. You will see the master
volume rst and can begin setting up each of the volume settings as listed on
the table below. The description in the table is identical to how they appear
on your SurroundTraxx display. For example WH MIX : 000 is the whistle
volume level.
SurroundTraxx Sound Mixer Parameters
Mix Description Range
VOLUME Master Volume 0 to 255
WH MIX Whistle (Horn) Volume 0 to 255
BL MIX Volume 0 to 255
EX MIX Exhaust Volume 0 to 255
AP MIX Air pump (Compressor) Volume 0 to 255
DY MIX Dynamo (Dynamic Brake) Volume 0 to 255
S6 MIX Steam Blower (Radiator Fan) 0 to 255
S7 MIX Rod Clank (Reserved) 0 to 255
S8 MIX Steam Release (Reserved) 0 to 255
Note: Names inside ( ) indicate Diesel sound eects.
A certain level of prudence is needed when adjusting the mixer levels to
avoid the condition known as ‘clipping’ or ‘limiting’, which occurs when the
sum of two or more signals exceeds the capacity of the output channel. As its
name implies, clipping results in the lopping off of the sound signal peaks and
manifests itself as distortion accompanied with a level of clicking or popping
sounds. The System Monitor mode helps to identify clipping as it occurs.
To avoid a clipping condition, consider which sounds are likely to be played at
the same time and take care to ensure that their corresponding mixer levels
are not set too high.
You may wish to make the FX Bus Mixer adjustments at the same time, since
they affect the same individual sound effects and are located adjacent to one
another in the menu - see below.
FX Bus Mixer Parameters
The FX Bus Mixer Parameters dictate the level sent to the echo/reverb sound
effect feature for each of the effects in the table that follows. When adjusting
these parameters, use care to keep the various levels realistic in relation
to each other. For example, you would generally want the echo and reverb
effects to affect a whistle more than a bell.
SurroundTraxx User’s Guide Configuration Guide Page 2:12
Page 41
FX Bus Mixer Parameters
Configuration Guide
Mix Description Range
WH FX Whistle FX Bus Send Level 0 to 255
BL FX Bell FX Bus Send Level 0 to 255
EX FX Exhaust FX Bus Send Level 0 to 255
AP FX Air pump (Compressor) FX Bus Send Level 0 to 255
DY FX Dynamo (Dynamic brake) FX Bus Send Level 0 to 255
S6 FX Steam Blower (Radiator Fan) FX Bus Send Level 0 to 255
S7 FX Rod Clank (Reserved) FX Bus Send Level 0 to 255
S8 FX Steam Release (Reserved) FX Bus Send Level 0 to 255
Note: Names inside ( ) indicate diesel sound effects.
For example, if you wish to simulate a deep canyon echo in one of the
sound zones, you would likely want the echo effect to be most dominant in
the whistle but still noticeable in the exhaust chuff. In real life, you probably
wouldn’t notice much of an echo in the other sounds so you would leave
values set to 0. Set the whistle to a high value of around 175, and set the
exhaust to a lesser value of around 85. It is important to remember that
you must also set up the echo effect in the sound zone as well, not just the
locomotive or there will not be any echo effect. Please refer to the Audio
menu section of the Conguration Guide for more information on this.
Conguring the Sound Features
Next we will adjust the different sound congurations within the locomotive.
This section is where you can change a steam locomotive from a traditional
rod engine to an articulated exhaust or adjust things like the diesel notching
rate, and steam exhaust chuff rate. The Menus used for conguring the
sound under EDIT locomotive are as follows: Sound Conguration 1 (SND1),
Sound Conguration 2 (SND2), and Exhaust Control (EX CTL).
Sound Conguration 1
Sound Conguration 1 (SND1) has different characteristics depending on if
your locomotive is steam or diesel.
Steam
Sound Conguration 1 will allow you to select single or dual airpumps
and to set the exhaust cadence of a simple articulated locomotive. This
is also where you'll determine the Slip Rate for the steam engine. When
the articulated mode is enabled, the exhaust sound will have chuffchuff-pause rhythm simulating two cylinder sets that are out of sync with
each other. Note: Compound articulated locomotives should be set up
as conventional rod engines. Compound articulated engines are easily
identied by noting that the front set of steam cylinders are much larger
than the rear set.
SurroundTraxx User’s Guide Configuration Guide Page 2:13
Page 42

SurroundTraxx User’s Guide Configuration Guide Page 2:15
Configuration Guide
You can also set a variable wheel slip rate that causes the two sets of
exhaust chuffs to go in and out of sync with each other as if one set of
drivers were continuously 'slipping'. It is also useful for generating a
double-header sound effect.
Use the table to select between a steam engine type, slip rate, and
airpump type. Select the value from the table.
Sound Configuration 1 - Steam
Exhaust Mode and Airpump Selection
Exhaust Mode Wheel Slip Rate Airpump Sound Channel Value
Coventional Rod Engine None Single Airpump 0
Coventional Rod Engine None Dual Airpump 1
Articulated Engine None Single Airpump 64
Articulated Engine None Dual Airpump 65
Articulated Engine Slow Single Airpump 80
Articulated Engine Slow Dual Airpump 81
Articulated Engine Medium Single Airpump 96
Articulated Engine Medium Dual Airpump 97
Articulated Engine Fast Single Airpump 112
Articulated Engine Fast Dual Airpump 113
Diesel
If you have a diesel locomotive SND1 will allow you to have the diesel air
compressor and cooling fans either turn on and off with a function key,
or turn on automatically. This becomes useful if your cab either doesn’t
support fourteen functions, or if you would prefer to use manual notching
and need to have F9 and F10 free for RPM+ and RPM-.
Sound Channel 1 - Diesel
Air Compressor and Cooling Fan Values
Air Compressor Cooling Fan Value
Manual Manual 0
Automatic Manual 1
Manual Automatic 2
Automatic Automatic 3
Sound Conguration 2
Sound Conguration 2 (SND2) allows you to enable the Quiet Mode
Timeout for the model. When Sound Conguration 2 is set to zero,
SurroundTraxx User’s Guide Configuration Guide Page 2:14
Page 43

Configuration Guide
sounds will come on a few seconds after the locomotive is dispatched.
A value between 1 and 255 will direct the sounds to become active
only when the locomotive is addressed. When the locomotive has been
stopped and all functions have been turned off, the sound effects will turn
off automatically by the time elapsed as set by this setting.
The Timeout Period equals the Value selected times 0.25 - therefore
if you wish to have a 15 second timeout period, divide 15 by 0.25 to
arrive at a value of 60, which you will then choose as the value in Sound
Channel 2. Once this value is selected, it will take 15 seconds after the
locomotive has stopped and all functions have been turned off, for the
sound effects to go silent.
Exhaust Control
The Exhaust Control menu item has different characteristics depending
on your selection of a steam or diesel engine. Exhaust Control (EX CTL)
allows you to set up the auto exhaust chuff rate on a steam locomotive
and the notching rate on a diesel locomotive.
Auto Exhaust Rate (Steam)
Auto-Exhaust automatically generates an exhaust chuff rate proportional
to the throttle setting. Since every locomotive is different, EX CTL is used
to match up the Auto-Exhaust rate to the locomotive speed and may be
loaded with any value between 0 and 255. Higher values will yield faster
chuff rates for a given throttle setting.
There are several ways you can determine this value. The easiest may
in fact, just be to adjust the rate while your engine is moving at a typical
speed. You can also compute a rate by using the following formula:
SPD
Value = 115.9 X ——— X Gear Ratio
DIA
SPD is the locomotive’s top speed in scale miles-per-hour at full throttle
and DIA is the locomotive’s driver wheel diameter in scale inches.
Gear Ratio is the gear ratio for shays and other geared engines. For
conventional steam engines, use a Gear Ratio = 1. The driver diameter
can be easily measured with a scale ruler but remember to convert the
measurement to scale inches.
If you don’t know your locomotive’s top speed, you can also estimate it
and still get pretty good results. A good rule of thumb is to use 45 MPH
for freight locomotives and 70 MPH for passenger engines. You can
enter a value from 0-255, whereby 0 = no chuff and 255 = fastest chuff.
Automatic Notching (Diesel)
Setting EX CTL (Exhaust Control) between 1 and 15 enables Automatic
Engine Notching Mode. Automatic notching causes the engine RPMs to
change in proportion to the throttle setting. Pressing emergency stop will
cause the engine to shut down.
SurroundTraxx User’s Guide Configuration Guide Page 2:15
Page 44

SurroundTraxx User’s Guide Configuration Guide Page 2:17
Configuration Guide
The value sets the number of speed-steps per engine notch. With a
setting of one, the engine speed will increase one notch for each speedstep. When the engine sound reaches notch 8, no further increases will
take place. For example, with a setting of seven (default), the engine
notch will increase one notch for every seven speed-steps and the
engine will reach full power at speed step 48.
By varying this value the sensitivity of the engine sound to the throttle is
changed. If you operate on a small layout or are having trouble keeping
the engine sound synchronized to the locomotive speed, you might want
to use larger values (12-15) to keep the engine from becoming “over
throttled”.
Manual Notching (Diesel)
As the name implies, manual notching allows you to control the engine RPMs
manually and independently of the throttle setting. Manual notching allows
for more prototypical operating scenarios such as having a heavy train slowly
climb a grade while the engines are laboring at full power.
To use manual notching, set EX CTL to 0. The engine RPMs will now
increase by one notch each time Function 5 is pressed. Similarly, the RPMs
can be decreased using Function 6. Unlike automatic notching, pressing
emergency stop will reduce the engine speed to idle. Once the engine is
idling you can shut it off by pressing Function 10.
Engine Interlock
The Engine Interlock feature works with manual notching and helps avoid
embarrassing moments like accidentally shutting off a prime mover while
cresting a grade!
When enabled, the Engine Interlock prevents the diesel engine from being
shut off unless the locomotive is stopped. Similarly, the locomotive will not
respond to the throttle unless the locomotive has rst been started up.
To enable the Engine Interlock and Manual Notching, set EX CTL to a value
of 16.
Dynamic Brake Override Control
While the dynamic brakes are applied, prototype practice usually requires the
diesel engine speed to be lowered to an idle. Some railroads modied their
locomotives so the engine was set to mid-speed (notch 4) when the dynamic
brakes were on. This was to provide increased power to the cooling fans. A
few locomotives have also been reported to run at full power whenever the
dynamic brakes were on.
SurroundTraxx exhaust control allows you to replicate this with its dynamic
brake override feature. When enabled, turning on the dynamic brake function
(F4) will cause the diesel RPMs to change automatically as the dynamics
“engage”. When the dynamic brakes are turned off, the engine will return to
its previous speed.
SurroundTraxx User’s Guide Configuration Guide Page 2:16
Page 45

Configuration Guide
To activate the dynamic brake override, rst determine a baseline setting for
the Exhaust Control Setting based on the engine control mode you plan to
use (0 or 16 for Manual Notching, 1-15 for Automatic Notching) then refer to
the table and add the indicated value to that setting.
SurroundTraxx Dynamic Brake Override Control
Override Mode EX CTL Value
Disabled Add 0
Engine Speed = Notch 1 Add 64
Engine Speed = Notch 4 Add 128
Engine Speed = Notch 8 Add 192
Example:
We want to use automatic notching with one notch every seven speeds.
From the section under “Exhaust Control,” we determine the setting to be 7.
To use the dynamic brake override so the engine drops to an idle (notch 1)
whenever the dynamics are on, look at the table and see that this equals a
value of 64. Add this to your baseline value of 7. Thus, you will set EX CTL
to:
EX CTL = 7 + 64 = 71
Matching the Speed and Acceleration to the Sound
The next step in editing is to adjust the sound so it matches the speed the
locomotive is traveling, along with the acceleration and deceleration of the
locomotive. The maximum speed setting will also come into play when
adjusting the Fader setting on your SurroundTraxx unit. More on this can be
found in this section on page 2:25. For SurroundTraxx the maximum speed of
the locomotive is the speed of the locomotive at full speed in scale miles per
hour.
To set up the Max speed, acceleration and deceleration follow the simple
directions below:
1. From System Monitor mode, push and release the control knob. The
display reads ROUNDHOUSE; push and release the control knob again
to select it.
2. Turn the control knob until it reads EDIT LOCO. Push the control knob
to select this option. Turn the control knob until the desired locomotive
address is displayed and push the control knob to select it for editing.
3. Turn the control knob clockwise until the display reads MAXSPD: 000
(Maximum Speed Select). Push the control knob to select and enter the
maximum speed in scale miles per hour so that SurroundTraxx is able to
assess the Fader rate that we have set. SurroundTraxx uses an internal
equation to determine the fader rate based on this setting and model's
scale top speed. This will ensure that the effect of the sound traveling
SurroundTraxx User’s Guide Configuration Guide Page 2:17
Page 46

SurroundTraxx User’s Guide Configuration Guide Page 2:19
Configuration Guide
between speakers stays with the model as it travels between zones.
4. Once you've nished entering the scale mph, turn the knob until the
display shows ACCEL: 000 (Acceleration Rate). Select this with the
control knob and enter the acceleration rate as set in CV 3 of the mobile
decoder. CV 3 sets the baseline momentum to simulate the train’s
acceleration due to train weight, and sets how fast your locomotive will
respond to increases to throttle settings.
5. Turn the knob again until the display shows BRAKE:000 (Braking Rate).
Select this and enter the braking rate as set in CV 4 of your mobile
decoder. CV 4 sets the braking rate and controls how quickly the train will
respond to decreases in throttle settings.
It is important to make sure the values in CVs 3 and 4 of the mobile
decoder and those in your SurroundTraxx unit match, or the sound can
be 'ahead' or 'behind' the model if momentum isn’t taken into account.
Both CVs can be programmed with values between 0 and 255, with
255 corresponding to the slowest acceleration and braking rate. Lower
settings will yield a more responsive locomotive, which is useful for
switching or passenger consists. When both CVs are set to 0, the
locomotive will respond nearly instantly to any throttle changes. A setting
of 255, on the other hand, will require several minutes for a locomotive to
reach full speed from a standing stop.
Function Mapping
Function mapping allows SurroundTraxx to be recongured so that sound
effects and function outputs can respond to a different function key input.
This is especially useful for users who have throttles with less then thirteen
function keys. You can pick and choose what functions you can control
instead of being restricted to an arbitrary assignment
There are fourteen function-mapping settings. They are used to assign
output control to function keys F0(f) through F12 respectively. The default
function mapping for steam locomotives is listed below:
Steam Function Mapping Table
Control CV
Function Key
F0 (f)
F0 (r)
F1
F2
F3
F4
F5
F6
F7
F8
F9
F10
F11
F12
Bold Numbers indicate default settings.
Reserved
Reserved
Whistle
Bell
Reserved
1
33
34
35
36
37
38
39
40
41
42
43
44
45
46
2
1
2
1
2
1
2
8
4
8
4
4
8
8
4
1
1
1
1
X
Reserved
32
16
32
16
32
16
32
16
4
2
4
2
4
2
4
2
X
X
Dynamo
64
64
64
64
8
8
8
8
1
1
1
128
128
128
128
16
16
16
16
Short Whistle
2
2
2
1
1
1
Hiss
Reserved
Reserved
MUTE
Reserved
Reserved
32
64
128
64
128
32
32
64
32
64
4
8
4
8
4
8
2
4
2
4
2
4
128
128
X
X
X
64
16
32
32
16
32
16
16
8
16
8
16
8
128
64
128
64
128
32
64
32
64
32
64
Coupler
128
128
128
SurroundTraxx User’s Guide Configuration Guide Page 2:18
Page 47

Configuration Guide
Function 1: Bell
Function 2: Whistle
Function 3: Short Whistle
Function 4: Hiss/Steam Release
Function 5: Dynamo
Function 8: Mute
Function 12: Coupler Clank
The default function mapping for diesel locomotives is listed below:
Diesel Function Mapping Table
Control CV
Function Key
F0 (f)
F0 (r)
F1
F2
F3
F4
F5
F6
F7
F8
F9
F10
F11
F12
Bold Numbers indicate default settings.
Reserved
Reserved
HORN
BELL
Reserved
1
33
34
35
36
37
38
39
40
41
42
43
44
45
46
2
1
2
1
2
1
2
8
4
8
4
8
4
8
4
1
1
1
1
X
Reserved
32
16
32
16
32
16
32
16
4
2
4
2
4
2
4
2
X
X
Dynamic Brale
128
64
128
64
128
64
128
64
16
8
16
8
16
8
16
8
2
1
2
1
2
1
1
1
1
Short Horn
32
32
32
32
4
4
4
2
2
2
(RPM -)
64
64
64
64
8
8
8
4
4
4
(RPM +)
128
128
128
128
16
16
16
8
8
8
Reserved
Mute
X
X
X
32
32
32
16
16
16
64
64
64
32
32
32
Fans
Compressor
128
128
128
64
128
64
128
64
128
Coupler
Function 1: Bell
Function 2: Horn
Function 3: Short Horn
Function 4: Dynamic Brake
Function 5: RPM Function 6: RPM +
Function 8: Mute
Function 10: Compressor
Function 11: Fans
Function 12: Coupler
Each function output has a value between 0 and 255. The charts show
the corresponding values for each CV or menu item as it is selected. For
example, if you want to turn on the bell and horn at the same time with
Function 2, start by looking at the Diesel Function Mapping Table. Locate F2
on the chart. Follow across the chart until it intersects with the horn and the
bell. To turn on both, add the values in those columns together to arrive at a
value of 12. Now set F1 to a value of 0 so that it no longer activates the bell.
This frees up F1 to be used for some other function.
Function Swap for Cabs with Eight or Fewer Function Keys
If your DCC cab has a limited number of function keys, you may nd it difcult
to access some of the SurroundTraxx functions that are activated on higher
function numbers. Using the CV 30 Menu option (found under the EDIT
SurroundTraxx User’s Guide Configuration Guide Page 2:19
Page 48

SurroundTraxx User’s Guide Configuration Guide Page 2:21
Configuration Guide
LOCO menu) will allow you to swap functions 5, 6, 7, and 8 with functions 9,
10, 11, and 12. This allows you to move functions up or down based on the
functionality of your cab. For example, the Coupler sound effect is activated
by default on Function 12. If your cab has only eight functions, you may wish
to employ the Function Swap and move the Coupler to Function 8.
To enable the Function Swap, enter the Roundhouse menu, then select EDIT
LOCO. Turn the control knob until you reach CV 30. Select this by pushing
the control knob and simply set this to a value of 4.
CV 30 also enables the Lock ID that is set in this menu. This allows you to
'lock' your settings so that you (or someone else!) can't inadvertently change
your settings after you have painstakingly set up your roster.
CV 30
CV 30 Function Mapping and Lock Values
Function Mapping Lock Enable Value
Default Disabled 0
Default Enabled 1
Function Swap Disabled 4
Function Swap Enabled 5
Setting the Lock ID
Once you have made the adjustments to your locomotive you can choose
to lock it. First you must enable the lock feature by setting CV 30 as shown
in the chart above. Once you have enabled the lock feature you can LOCK
the settings by selecting a value of 0 thru 9 in the LOCK KEY option. The
settings will be locked until the same value is entered in the LOCK ID option.
For example If you want to lock your newly congured locomotive you would
set LOCK KEY to value of 8. To then change a feature, you would unlock
it by setting the LOCK ID to a value of 8. Remember, this feature locks
out changes in the settings from being accidentally changed in Ops Mode
Programming. You may still edit the locomotive in the Roundhouse.
CV 29
To set up CV 29, turn the control knob until the display reads CV 29:002.
Select this and enter same value that you currently have set in CV 29 of
your mobile decoder. This will allow SurroundTraxx to match the same
congurations such as speed steps (14, 28, 128).
Now that we have gone through and reviewed all of the features of the EDIT
menu in the ROUNDHOUSE let’s look at setting up an example locomotive.
SurroundTraxx User’s Guide Configuration Guide Page 2:20
Page 49

Configuration Guide
A Diesel Conguration Example
Let’s add an AC4400CW locomotive to our roster. Its road number is 4387
and it has a Nathan M3 airhorn.
1. From System Monitor mode, push and release the control knob. The
display reads ROUNDHOUSE; push and release the control knob again
to select it.
2. Turn the control knob clockwise until the display reads ADD LOCO. Push
and release the knob to select it.
3. The display will now read TYPE: STM. Turn the knob clockwise until the
display reads TYPE: DIESEL. Push the control knob to select.
4. Locomotive address 0003 will appear, with the zero furthest to the left
ashing. Turn the control knob until the zero is replaced by the number 4
and push in the knob to select it as the rst digit of the new address.
Then turn the knob until the number 3 shows as the second digit in the
display, and so on until the number 4387 has been selected.
5. Push the control knob to save this into the roster.
6. You will be prompted to conrm (Y or N) and the display now returns to
the ADD LOCO function; turn the control knob clockwise until the display
reads EDIT LOCO. Push the control knob to select this option.
7. The display will now indicate EDIT: followed by a ashing locomotive
address. Only the locomotive numbers stored in your roster will be
available. Turn the control knob clockwise to locate locomotive 4361 and
push to select it for editing.
8. The display will read VOLUME and the current setting for this locomotive,
which will be the default diesel value until we change it. (For the
purposes of our example, we'll skip volume until we have made our
other changes.) Turn the control knob clockwise (several turns) until the
display reads EX SEL: 0 (Exhaust Select). Push the control knob to
select this.
9. Since our locomotive is an AC4400CW, we'll want to change the default
prime mover to a General Electric FDL-16 prime mover (The SoundTraxx
website has a great deal of helpful information regarding selection of
appropriate sounds for your model). Using table in the "Editing the
Locomotive" section of the Conguration Guide, turn the control knob to
match the value displayed (5) for a General Electric FDL-16 prime mover
SurroundTraxx User’s Guide Configuration Guide Page 2:21
Page 50

SurroundTraxx User’s Guide Configuration Guide Page 2:23
Configuration Guide
and push the control knob to select. You should now see:
Conrm your selection by pressing the knob. The display will read "Save
OK!".
10. From here, to select our Nathan M3 airhorn, turn the knob one position
so that the display reads WH SEL: 000. Push the control knob to select
this. According to the table in the "Editing the Locomotive" section of
the Conguration Guide, choosing the Nathan M3 requires a value of
7. Bypass the rst two zeros by pressing in the knob twice and turn the
knob until the last digit reads 7.
Conrm your selection by pressing the knob. The display will read "Save
OK!".
11. For the purposes of this example, let's select a different bell. From the
WH SEL: 007 display, turn the knob one position so that the display
reads BL SEL: 9 (Bell Select). Push the control knob to select this. For
this example, let's select the Electronic Modern Diesel Bell. If you follow
the table in the "Editing the Locomotive" section of the Conguration
Guide, we need to enter a value of 11. Turn the control knob until the
rst digit is 1, and press the knob to enter this as the value for the rst
position. Turn the knob to advance to the section digit, press the knob
and turn until the display reads BL SEL: 11.
Conrm your selection by pressing the knob. The display will read "Save
OK!".
12. The default bell ring rate is set to 7. This can be set from 0-15, with 0
being the fastest and 15 being the slowest. From the BL SEL: 11 display,
turn the control knob until the display reads BLRATE: 07. Push the knob
to select and push once again to move the second digit. Turn the knob
until the display reads BLRATE: 05, to speed up the ring rate a little.
Conrm your selection by pressing the knob. The display will read "Save
OK!".
13. Since you are conguring a modern General Electric prime mover, let's
change the default compressor to the Modern GE Compressor. From
the BLRATE: 05 display, turn the control knob until you see the display
read AP: 0. Following the table in the Conguration Guide section titled
SurroundTraxx User’s Guide Configuration Guide Page 2:22
Page 51

Configuration Guide
"Editing the Locomotive", select the Modern GE Air Compressor by
pushing the knob and turning it until the display reads AP: 1.
Push the control knob to select this. The display will read "Save OK!".
14. Turn the control knob clockwise until the display reads SND1:000. Press
the knob to select this. Sound Conguration 1 (SND1) provides the
ability to select whether your Air Compressor and Cooling Fan comes on
automatically or with a function key. Let's set this engine up so that they
both come on and off automatically. Looking at the table provided in the
"Editing the Locomotive" section, press the knob twice to advance to the
third digit, turn the control knob until the display reads SND1: 003 and
push the control knob to select. The display will read "Save OK!".
This example is by no means a complete list of possible adjustments, but it
should help you familiarize yourself with some of the options available and
how the menu selections work. There are many other adjustments that can
be made, including Sound Conguration 2 (SND2), which allows you adjust
the automatic RPMs of the diesel engine to more closely match your engine's
movements. See page for information on this adjustment.
Copying Settings from an Existing Locomotive
To save time when adding multiple locomotives with similar congurations,
SurroundTraxx also offers a Copy Loco function, which applies the settings
from an existing locomotive to the new one you are adding. Copy Loco is the
fourth option on the Roundhouse menu.
1. From System Monitor mode, push and release the control knob. The
display reads ROUNDHOUSE; push and release the control knob again
to select it.
2. Turn the control knob clockwise until the display reads COPY LOCO, and
push and release the knob to select it.
3. The display now reads FROM: 0000. This is the 'source' locomotive.
Enter the address of the locomotive whose settings you wish to copy to a
new locomotive address. When you are nished entering in this address,
the display will advance to TO: 0000.
SurroundTraxx User’s Guide Configuration Guide Page 2:23
Page 52

SurroundTraxx User’s Guide Configuration Guide Page 2:25
Configuration Guide
4. Enter the destination address, the new locomotive address that you wish
to copy these settings to. Make sure to use a new, unused address.
You will be prompted to save this setting. Once you have conrmed your
selection, you can then make additional adjustments using the Edit Loco
function.
Erasing a Locomotive
The Erase Loco function removes a locomotive from the database. Erase
Loco is the fth option on the Roundhouse menu. Please note there is no
undo or oops for this action. Once a locomotive is erased from the database
you must recreate it to use it again. SurroundTraxx will ask you to conrm
that you wish to delete before doing so.
From System Monitor mode, push and release the control knob to rst
display ROUNDHOUSE, then push and release the knob again to select it.
Turn the control knob clockwise until the display reads ERASE LOCO, and
push and release the knob to select it.
The rst address stored in your roster will appear with its decoder address.
Rotating the knob will now scroll through the roster. Once the address you
wish to erase appears in the display, push to select it. You will be asked to
conrm your action. Push the knob again to erase this locomotive. LOCO
ERASED! will appear in the display.
When the database contains no locomotives, the message ROUNDHOUSE
IS EMPTY will scroll across the display. This is the default when the unit is
new from the factory.
SurroundTraxx User’s Guide Configuration Guide Page 2:24
Page 53

Configuration Guide
The Audio Menu
The settings on the Audio Menu affect all sounds on a given channel (or in
other words, sounds sent to a given speaker. Within the Audio Menu, you will
be able to select (for each channel) the volume setting, the fade rate (to allow
smooth transitions when the sound switches from speaker to speaker), and
ambient effects (such as echo and reverb).
When you select the AUDIO menu, SurroundTraxx prompts for the audio
channel (Sound Zone 1 through 6) that you want to adjust. To enter the
Audio Menu from System Monitor mode, push the control knob and rotate it
clockwise until AUDIO is displayed.
Push the control knob in to select - the display will now prompt you for the
Sound Zone/Sound Channel you wish to edit.
Once you have selected a channel, the system prompts you to set the rst of
several adjustments - the channel VOLUME level. The range for the volume
setting of each sound zone is 0 to 255, where 0 means the sound is muted
and 255 is maximum volume (100%).
Fader Settings
FADER, the second option on the AUDIO menu, species the baseline
dynamic fader speed (in tenths of seconds). As a dispatched locomotive
moves between Sound Zones, SurroundTraxx will automatically fade the
sound from the last Sound Zone to the new one. In addition, SurroundTraxx
will compensate for the speed of the locomotive such that the locomotive
always travels the same distance while the fade executes. This helps the
speakers create a sense of location for the locomotive as it moves.
Conguring the Fader is a two part process. Once the Fader rate for each
Sound Zone is set, you will want to match the speed and acceleration of
your locomotive to the sound to complete this conguration. See page 2:17,
Roundhouse, Edit Loco.
This can be set to a value between 0 and 9999. The Fader controls the
amount of time the sound mixer takes to go from 0% to 100% output when
a locomotive is moving at 1 mph. Longer blocks typically require a higher
setting. Keep in mind that the sound mixer’s dynamic faders are speedsensitive and are also affected by the speed setting for each locomotive.
There are several ways to determine the FADER setting. First, you
can simply set the FADER value to a setting pleasing to your ear. We
recommend a setting between 100 and 1000. If it is set too high, the sound
volume will take a long time to rise and the train may exit the block before the
sound reaches its maximum level, resulting in a subdued sound level.
The second method is more precise and assumes the speaker is placed
midpoint of the sound zone. With this method, sound will reach maximum
value, when the train reaches the center of the sound zone. The system will
automatically compensate for faster or slower moving locomotives.
SurroundTraxx User’s Guide Configuration Guide Page 2:25
Page 54

SurroundTraxx User’s Guide Configuration Guide Page 2:27
Configuration Guide
First measure the average length (D) of the sound zone in (actual) inches.
Then set the FADER value using the following formula:
FADER = D x R
--------
3.52
where R = Ratio of Scale (i.e., 87.1 for HO, 160 for N Scale, etc.)
You can use the following simplied formulas for each of the popular scales:
For Z Scale, FADER = D x 62.5
For N Scale, FADER = D x 45.5
For HO Scale, FADER = D x 24.8
For S Scale, FADER = D x 18.2
For O Scale, FADER = D x 13.6
The third method simply picks a distance (D), in inches, from the edge of
the sound zone where you want the sound to reach maximum volume.
Again, the system will automatically compensate for faster or slower moving
locomotives. Once you have determined D, use the following formula to nd
the correct FADER value.
FADER = D x R
--------
1.76
where R = Ratio of Scale (i.e., 87.1 for HO, 160 for N Scale, etc.)
You can use the following simplied formulas for each of the popular scales:
For Z Scale, FADER = D x 125
For N Scale, FADER = D x 90.9
For HO Scale, FADER = D x 49.6
For S Scale, FADER = D x 36.4
For O Scale, FADER = D x 27.2
1. From System Monitor mode, push the control knob to display
ROUNDHOUSE. Turn the control knob until the display reads AUDIO.
Push the control knob to select the Audio menu.
2. The rst display will read SND ZONE: 1. Push the control knob to select
and turn the control knob until it reads FADER: 0001. Set the Fader rate
for this sound zone.
3. Turn the control knob until the display reads BACK. Select this by
pushing the control knob. Now turn the control knob clockwise until the
display reads SND ZONE: 2. Repeat this process, setting the Fade rate
for each sound zone.
Ambient Effects
The AUDIO menu offers echo and reverberation options that you can use to
produce ambient effects within a given sound zone. For example, you might
use echo for realistic sound within a canyon or reverb for a tunnel.
SurroundTraxx User’s Guide Configuration Guide Page 2:26
Page 55

Configuration Guide
As you work with these settings, you’ll almost certainly identify other ways
they can complement your layout. Test drive different settings to discover
what works!
To set an ambient effect:
1. From System Monitor mode, push the control knob to display
ROUNDHOUSE. Turn the control knob until the display reads AUDIO.
Push the control knob to select the Audio menu.
2. The display will next read SND ZONE: 1. Turn the knob to choose the
desired sound zone and push the control knob to make the selection.
3. Turn the control knob until the display shows ECHO: 0. Push the control
knob to select this option and turn it to set the new value. Push the knob
again to nalize your selection.
Note: The echo and reverb settings have no effect on locomotive sounds for
which the FX bus mixer is set to 0. Refer to page 2:13 for information on the
available FX bus parameters.
0 Echo/reverb is off
1 Light reverb
2 Medium reverb
3 Heavy reverb
4 Light echo
5 Medium echo
6 Heavy echo
7 User-adjustable
When you select ECHO option 7, three additional settings apply.
Be forewarned: Adjusting the reverb effects can easily result in strange
or unpleasant results! We recommend you take your time and experiment
cautiously to produce the effect that best complements the sound zone.
E LEV: The echo output level between 0 and 100% (0-255). This
determines the amount of echo that is mixed back with the original
audio signal. This may be set to any value between 0 (minimum)
and 255 (maximum).
E DLY: The echo delay between 0 and 255 seconds (0-255). It may be set
anywhere between 0 (zero delay) to 255 (maximum delay). A longer
delay time corresponds to a greater distance between the sound
source and the reecting surfaces and will generally result in an
increased level of echo.
E FB: The echo feedback level between 0 and 100% (0-255). This
species the percentage of the echo output that is mixed back
into its input and creates the effect of multiple sound reections
each diminishing in amplitude over time. This may be set to any
value between 0 and 255 where 0 = no feedback and 255 = 100%
feedback.
SurroundTraxx User’s Guide Configuration Guide Page 2:27
Page 56

SurroundTraxx User’s Guide Configuration Guide Page 2:29
Configuration Guide
The Zone ID Menu
You will use the ZONE IDS menu to assign block detector addresses to the
six SurroundTraxx sound zones. While typical setup may involve one sound
zone per each detection block, remember that you may also assign multiple
detection blocks to any one sound zone.
Assigning Detection Blocks to Sound Zones
When you enter the ZONE IDS menu SurroundTraxx prompts you to select
the sound zone you are dening. Rotate the control knob to the desired zone,
then push and release the control knob to make the selection.
Next, enter the address of the block at which this sound zone starts. This is
the same address by which the block detector identies the block; if needed,
refer to the notes you made while conguring block detection.
The END ID must be the same or numerically higher than the BEG ID based
on the number of detection blocks that make up this sound zone.
If you specify an End ID that is lower than the Beginning ID, SurroundTraxx
resets it to match the beginning ID. For example if the beginning ID is set to
10 but the end ID is set to 6, SurroundTraxx will automatically change the
End ID to 10. Always double-check your beginning and ending IDs.
To set your Sound Zones:
1. Push and release the control knob. The display will now read
ROUNDHOUSE. Turn the control knob until the display reads ZONE
IDS. Push and release the control knob again to select it.
2. The display will now read ZONE: 1. Push the control knob to select
Sound Zone 1.
3. The display will now read BEG ID: 000. Set BEG ID to the lowest
transponding zone in the Sound Zone. Push the control knob to retain
this setting.
3. The display will now read END ID: 000. Turn the control knob to set this
to the highest transponding zone in the Sound Zone, remembering that
your Sound Zone may include multiple transponding blocks.
Once the display reads the correct zone number, push the control knob
to select.
4. Verify that BEG ID and END ID are set to the correct values. Always
verify both the beginning and ending Zone IDs after setting them.
Note: The FIND key can be used to quickly determine the transponding zone
number for a given section of track.
The System Menu
On the SYSTEM menu you will adjust system-wide settings such as the
operating mode and display brightness. You can also select the types of
messages that will appear on the SurroundTraxx display, control the behavior
of the MUTE function, and set the Auto Dispatch and User Interface timers.
SurroundTraxx User’s Guide Configuration Guide Page 2:28
Page 57

Configuration Guide
System Settings
The SurroundTraxx System settings allow you to:
Select the Operating Mode
Change the brightness of the display
Select types of messages to be displayed
Control the behavior of the MUTE function
Set the Auto Dispatch and User Interface Timers
Set up the BDL-168s
Map the FIND command to a function key
SurroundTraxx Operating Modes
As discussed earlier, a single SurroundTraxx unit can operate in single-
channel mode, six-channel mode, or ve-channel mode with a subwoofer.
You can also add multiple SurroundTraxx units to larger layouts if you want to
expand on these options.
SurroundTraxx Operating Mode Settings
Mode Description
0 Single-Channel (Transponder-Free) Mode (factory default)
1 Six-Channel Mode
2 Five-Channel Mode, Subwoofer Filter=40Hz
3 Five-Channel Mode, Subwoofer Filter=50Hz
4 Five-Channel Mode, Subwoofer Filter=60Hz
5 Five-Channel Mode, Subwoofer Filter=70Hz
6 Five-Channel Mode, Subwoofer Filter=80Hz
7 Five-Channel Mode, Subwoofer Filter=90Hz
8 Five-Channel Mode, Subwoofer Filter=100Hz
9 Five-Channel Mode, Subwoofer Filter=110Hz
10 Five-Channel Mode, Subwoofer Filter=120Hz
11 Five-Channel Mode, Subwoofer Filter=130Hz
12 Five-Channel Mode, Subwoofer Filter=140Hz
13 Five-Channel Mode, Subwoofer Filter=150Hz
14 Five-Channel Mode, Subwoofer Filter=160Hz
15 Five-Channel Mode, Subwoofer Filter=170Hz
16 Five-Channel Mode, Subwoofer Filter=180Hz
17 Five-Channel Mode, Subwoofer Filter=190Hz
18 Five-Channel Mode, Subwoofer Filter=200Hz
SurroundTraxx User’s Guide Configuration Guide Page 2:29
Page 58

SurroundTraxx User’s Guide Configuration Guide Page 2:31
Configuration Guide
Push and release the control knob, then turn the knob until SYSTEM is
displayed. Push the control knob again to select the System Menu. MODE is
the rst option on the SYSTEM menu. To change the operating mode, push
and release the control knob, then select the mode setting that best ts your
layout and selected speaker system. If you are using a subwoofer, check its
specications to determine its capabilities and see the preceding table for
available MODE settings.
Mute Level
The MUTE option controls the behavior of the mute function (F8). Available
settings are described below.
SurroundTraxx Mute Settings
Mode Name Description
0 Local Mute Whenever any dispatched locomotive's mute function is on,
only the sounds for that particular locomotive will be muted.
1 Global Mute All sounds, including other locomotives, are muted whenever
any dispatched locomotive's mute function is on.
Brightness
The BRIGHTNESS option sets the brightness of the LED display to improve
readability under different ambient lighting conditions. Valid settings are 1
(dimmest) to 6 (brightest).
System Messages
The SurroundTraxx display can report three different classes of messages
which generally indicate an event or a change in status. When enabled, these
messages momentarily interrupt the normal System Monitor mode displays
as events occur. They are:
• Control Messages: These report changes in locomotive function state,
speed, direction and CV programming events.
• Zone Manager Messages: These messages report when locomotives
enter or leave a sound zone.
• Auto Dispatcher Messages: Auto Dispatcher Messages report when
locomotives are dispatched or retired.
.
The message lter lets you selectively enable and disable each type of
message, which can be helpful during system setup and operation.
SurroundTraxx User’s Guide Configuration Guide Page 2:30
Page 59

SoundTraxx Message Filter
Configuration Guide
Control Zone Dispatch CV Value
OFF OFF OFF 0
ON OFF OFF 1
ON ON OFF 2
ON ON ON 3
OFF ON OFF 4
OFF ON ON 5
OFF OFF ON 6
Auto Dispatch Timer
The AD TMR setting determines the amount of time (in seconds) that the
Auto Dispatcher will hold a locomotive in an AD Slot before retiring it from
its assigned sound channel. You can set an auto-dispatch time from 0 to
99 seconds. A setting of 0 disables the feature, keeping the locomotive
dispatched until it is manually removed or power is turned off. The default
value is 10 seconds. The Auto Dispatcher is fully explained in the Auto
Dispatching section beginning on page 3:1.
User Interface Timer
The UI TMR setting controls the amount of time in seconds (default is 10
seconds) that any menu option is displayed before the system automatically
exits to System Monitor mode when there is no user activity (in other words,
when you are not navigating the menus or making any adjustments).
A setting of 0 disables the menu timeout. You will need to manually select the
BACK or EXIT options to change to a different menu. This is useful for new
users who need to refer to the user manual frequently, or when monitoring
one of the DIAGNOSTIC displays. Settings from 5 to 60 cause an automatic
exit after the specied time has elapsed with no activity. (A value of 15 would
take 15 seconds to time out.) Settings from 1 to 4 results in a minimum 5
second timeout.
BDL Set-up/Support
Currently, SurroundTraxx is compatible with Digitrax BDL-168 and BDL-162
transponding block detectors. The block detectors are typically set up using
Digitrax DT-300, DT-400 or DT-401 throttles. If you do not have one of these
throttles, or are not using a Digitrax command station, SurroundTraxx' BDL
Set-up feature will allow you to congure your block detector's address and
ops switches. To proceed, you must rst put the BDL-168(162) block detector
into programming mode. Please refer to your BDL owner's manual for details
on this procedure.
Note: If a BDL's address or settings are changed while a locomotive is
SurroundTraxx User’s Guide Configuration Guide Page 2:31
Page 60

SurroundTraxx User’s Guide Configuration Guide Page 2:33
Configuration Guide
dispatched, SurroundTraxx may no longer work correctly and will require the
power to by cycled off and back on to restore proper operation. Therefore,
you should only change the BDL setting when no locomotives have been
dispatched.
Once you have the block detector you wish to congure in programming
mode, navigate to the BDL Set-up Menu as follows:
1. From System Monitor mode, push the control knob to display
ROUNDHOUSE. Turn the control knob until the display reads SYSTEM.
Push the control knob to select the System menu.
2. Turn the control knob until the display shows BDL SETUP and push it to
conrm the selection.
3. To rst choice in the BDL Setup is ADDRESS. Push the knob to select
this option and then enter the new address. SurroundTraxx will ask you
to conrm the address. Select Y (yes) and push the knob to conrm.
4. To set THE BDL-168's Ops Switch, turn the knob until the display reads
OP SWITCH.
Push the control knob to select this option and then select the ops
switch number you wish to change. Push the control knob again and
rotate the knob to display either THROWN or CLOSED (whichever is
desired) and push to select. SurroundTraxx will ask you to conrm your
selection - push the knob to conrm or turn the knob to respond no (N).
To determine which switches need to be thrown or closed, please refer to
the BDL-168 owner's manual.
OR OR
5. When the address or ops switch has been set, SurroundTraxx'
display will momentarily show "SUCCESS". Please note that this
simply indicates that the data was successfully transmitted over the
LocoNet and you may see this message even if the BDL-168 is not in
programming mode.
6. Change the BDL-168 mode from programming back to operation.
SurroundTraxx User’s Guide Configuration Guide Page 2:32
Page 61

Configuration Guide
FIND Button Function Mapping
A locomotive can be dispatched either by entering a new block or through
the use of the FIND button available on select DCC cabs. If you don’t have
a cab equipped with a FIND button you can map the FIND command to any
function key between F0 and F12. This will allow any DCC cab the ability to
dispatch a locomotive before the locomotive physically moves. This setting
is a global command, meaning that the function key chosen will be the same
for all locomotives in the roundhouse. The assignment of the FIND button
doesn’t take away the capability of performing the other function the key was
otherwise assigned to. For example if we map the FIND command to F0,
the headlight will still turn on and off when the button is pressed but the rst
time the button is pressed the locomotive sound les will be dispatched to
SurroundTraxx. The default is turned off.
To map the FIND command to a Function key:
Push and release the control knob, then turn the knob until SYSTEM is
displayed. Push the control knob again to select the System Menu. Turn
the control knob until the display reads FIND. Push and release the control
knob to select this. The rst display will read F0. Turn the control knob until
it indicates the Function key you wish to map the Find command to and push
the control knob to select that Function key. If you intend to use the FIND
key on your cab, you should turn this feature OFF.
SurroundTraxx Diagnostic Features
The DIAGNOSTIC menu provides feedback on important aspects of
SurroundTraxx system operation. If you experience issues with your audio
installation, these diagnostic tools can help you to pinpoint the source of any
potential issues on your layout.
DCC Status
This menu option provides the status of the DCC signal and is intended
primarily for SoundTraxx support personnel.
SurroundTraxx DCC Status Indicator
Message Description
PCKT: Shows the number of DCC packets received since power-up.
ERR: Shows the number of DCC packet errors detected since power-up.
Turning the knob displays the monitored parameters.
While the DCC Status feature will occasionally indicate errors during normal
operation, excessive packet errors can prevent SurroundTraxx from receiving
SurroundTraxx User’s Guide Configuration Guide Page 2:33
Page 62

Configuration Guide
DCC commands. If you are seeing frequent packet errors, double-check the
wiring and block detector conguration. Push and release the control knob to
return to the DCC STATUS menu.
Network
The NETWORK option provides the status of the network signal provided by
the LocoNet connection.
SurroundTraxx Network Status Indicator
Message Description
PCKT: Shows the number of DCC packets received since power-up.
ERR: Shows the number of DCC packet errors detected since power-up.
As with DCC communication, you may occasionally notice packet errors
when viewing the network status. However, frequent packet errors likely
indicate a wiring issue or a problem with the LocoNet. Push and release the
control knob to return to the NETWORK menu option.
AD Status
The AD STATUS function shows the status of each of the six auto-dispatcher
slots. (For an overview of SurroundTraxx dispatching, see page 3:1.)
With AD STATUS visible on the display, push and release the control knob to
select this function, rotating the knob to move through the auto-dispatch slots.
SurroundTraxx indicates AD status in the format S:LLLL TTT, where S
represents the AD Slot, LLLL represents the locomotive, and TTT represents
the number of seconds before the locomotive is retired (i.e., loses its
assignment to the slot). For example, if locomotive 3387 were dispatched to
slot 1, and if 45 seconds remained before locomotive 3387 was retired, the
display would read as follows:
The following table presents other possible AD status values.
SurroundTraxx AD Status Values
Message Description
OFF The AD slot has been disabled..
EMPTY The slot is available, but no locomotive is currently assigned.
LCK The AD is locked, meaning a locomotive has been manually assigned
to this slot. The slot is unavailable for auto-dispatch.
SurroundTraxx User’s Guide Configuration Guide Page 2:34 SurroundTraxx User’s Guide Operations Guide Page 2:35
Page 63

Configuration Guide
When you have nished viewing AD status, push and release the control
knob return to the AD STATUS menu.
Mixer
The MIXER option displays the state of the dynamic mixer faders for
each zone and locomotive, allowing you to observe the mixer sound level
adjustments in real time as locomotives change from zone to zone.
Turn the control knob to view the state of each sound zone (1 through 6). The
mixer fader appears as a bar graph similar to the VU meter, with the leftmost
bar corresponding to locomotive 1.
Note: When using a subwoofer it becomes channel 6.
When you have nished viewing the Mixer, push and release the control knob
return to the MIXER menu.
System Reset
When you select this option, SurroundTraxx resets all system, zone, and
audio channel settings to the factory default. The locomotive roundhouse
database is left intact.
The system prompts you to conrm the reset operation by selection either Y
(yes) or N (no).
Purge Roundhouse
Select this option to permanently delete all Roundhouse data only. The rest
of the system settings will remain intact.
The system prompts you to conrm the PURGE RH operation by selection
either Y (yes) or N (no).
To effect a complete factory reset, you must preform both the system reset
and purge operation.
Page 64

Operations Guide
The Operations Guide section of the manual will assist you in using features
that deal with the general operation of SurroundTraxx. This section will
explain the Dispatcher menu of SurroundTraxx, operation of SurroundTraxx
from your cab and Operations mode programming via your DCC cab,
should you decide to make adjustments “on-the-y”. Before using the
Operations Guide section of this manual it is important to rst congure your
SurroundTraxx unit and make sure that the conditions that were itemized on
the checklist found on page 2:1 are met - otherwise, SurroundTraxx may not
operate as expected.
Automatic Dispatcher Settings
Now that you've set up some locomotives in the Roundhouse, you need to
dispatch them in order to start making sound. Then you're ready to really
have some fun!
A single SurroundTraxx system can generate sounds for up to six
locomotives at a time. Before a locomotive can make any sound, its settings
must rst be loaded into one of six available Auto Dispatch Slots, or AD Slots.
The process of loading these AD Slots is called dispatching.
SurroundTraxx can dispatch a locomotive when all of the following are true:
• The locomotive address exists in the SurroundTraxx database
• The locomotive has entered one of the dened sound zones
• An empty AD Slot is available
By default, SurroundTraxx will automatically assign locomotives to the next
available AD Slot in the order the locomotives are detected.
Once a locomotive has been dispatched, SurroundTraxx will begin generating
sounds for that engine based on the settings loaded from the Roundhouse.
Once all six AD Slots have been assigned, no further dispatching can take
place until a locomotive is retired or removed from an AD Slot. A locomotive
can be retired when one of two conditions occur.
1. Drive the locomotive into a block that is outside of any dened sound
zones.
-or-
2. Bring the locomotive to a stop and turn all functions off.
These conditions must persist for the time period set by the Auto-Dispatch
Timer (typically 10 seconds) before the locomotive is removed from its AD
Slot. Once the locomotive is retired, the corresponding sounds will be turned
off and the AD Slot is available for use by the next unassigned locomotive to
enter a sound zone.
The AD TMR (Auto Dispatch Timer) located in the SYSTEM menu allows
you to set a system-wide timer that delays retirement of locomotives from
AD Slots for up to 255 seconds (real time). This prevents the system from
prematurely retiring locomotives, such as when the block detector loses
SurroundTraxx User’s Guide Operations Guide Page 3:1
Page 65

SurroundTraxx User’s Guide Operations Guide Page 3:3
Operations Guide
detection due to dirty track. You might also use it to extend a sound zone
slightly beyond the block boundary. See page 2:28. Note: The factory default
for the Auto-Dispatch Timer is 10 seconds. To keep a locomotive assigned to
an AD Slot without changing this setting, you can leave a function turned on,
such as the headlight.
It is also possible to manually assign a locomotive to an AD Slot, meaning
that locomotive will never be retired until you manually change the slot
assignment. This is useful when you want to feature a particular locomotive
on the layout during an entire operating session that might otherwise lose its
dispatch slot. For example, you may want keep the sound of a yard switcher
present all the time even when it is standing idle on a siding. Note that the
manual assignment ties the locomotive to an AD Slot and not to any one
sound zone; SurroundTraxx continues to pan the locomotive's sound to the
particular sound zone it occupies.
It is important to understand that manually assigning a locomotive to an
AD Slot does not dispatch the locomotive. It only reserves the spot for the
locomotive. The actual dispatching of the locomotive is done as described in
the Dispatching section. Once a locomotive is manually dispatched, however,
it will remain dispatched until it is removed from the slot.
Changing an AD Slot to a manual setting can have some side effects. First,
if the slot has been assigned to a locomotive and then slot assignment is
changed, SurroundTraxx will automatically retire the rst locomotive even if it
is currently running.
If a locomotive is set to a new slot but was already in another slot,
SurroundTraxx will retire the prior slot. For example, locomotive 3 is
dispatched to slot 1, and locomotive 4 is dispatched to slot 2. If slot 1 is set
to locomotive 5, locomotive 3 will retire. If slot 1 is then set to locomotive 4,
locomotive 4 will be retired from slot 2.
The AD Slots may also be individually turned off. This is useful if you want to
limit the number of locomotives producing sound to some number less than
six.
The AD Status diagnostic feature provides the current dispatch status of each
AD Slot. (For more information please see page 2:33)
To Change Auto Dispatcher Settings
Push and release the control knob, then turn it until the display reads
DISPATCHER. Select this by pushing the control knob.
SurroundTraxx will prompt you for the mode setting for AD Slot 1. To select
a different AD Slot, rotate the control knob until the AD Slot you desire is
displayed and then push and release the knob.
The table below details the available values for each AD Slot.
To select one of these values, rotate the control knob then push and release
the knob to save it. You may also rotate the knob to the BACK or EXIT
SurroundTraxx User’s Guide Operations Guide Page 3:2
Page 66

Operations Guide
commands to leave this menu level.
SurroundTraxx AD Mode Settings
Value
AUTO
OFF
1 - 9999
Description
Auto Dispatcher Slot is enabled
Auto Dispatcher Slot is disabled
The slot is manually assigned to a locomotive address. All locomotive
addresses in the database are available for selection.
Dispatching a Locomotive
Dispatching works differently in Transponding and Transponding-Free modes.
Dispatching in Transponding Mode
To dispatch a locomotive, simply drive it into a block that is assigned to any
one of the Sound Zones.
Alternatively, you can dispatch a locomotive by simply pressing the FIND key
on your cab. Note that in this case, the locomotive will only be dispatched if it
is occupying a section of track that has previously been assigned to a Sound
Zone.
If your cab does not have a FIND key, you can use a function key in its place
via SurroundTraxx's FIND function feature. In this manner, whenever you
toggle the assigned function key, SurroundTraxx will automatically send a
nd command to the block detectors via the LocoNet.
The FIND function is set in the SYSTEM menu (see page 2:33). Locomotives
may then be dispatched by toggling the FIND function.
To retire a locomotive in Transponding mode, you can either:
Bring the locomotive to a full stop (speed step 0) and turn off all the functions
a time period as dened by the Auto-Dispatch timer setting.
-or-
Drive the locomotive into a block that is outside any of the dened Sound
Zones (a staging yard perhaps).
Dispatching in Transponder-Free Mode
In Transponder-Free mode, a locomotive will be dispatched when
SurroundTraxx receives a DCC packet containing a locomotive address
stored in the Roundhouse and either a speed step other than zero or an
active function.
SurroundTraxx User’s Guide Operations Guide Page 3:3
Page 67

SurroundTraxx User’s Guide Operations Guide Page 3:5
Operations Guide
Therefore to dispatch an engine in Transponder-Free mode, simply select the
address of the locomotive you wish to dispatch on your DCC cab. Now either
increase the throttle or turn on any function.
To retire a locomotive in Transponder-Free mode, bring the locomotive to
a full stop (speed step 0) and turn off all the functions for a time period as
dened by the Auto-Dispatch timer setting.
Function Control and General Operation
Once a locomotive has been dispatched, certain sounds such as the diesel
exhaust or steam chuff will respond automatically to changes of the throttle.
Other sound functions may be turned on and off by simply pressing the
corresponding function key on your cab.
For example, you are operating your locomotive and you come up on a grade
crossing on your layout and want to blow the appropriate crossing whistle
signal. Simply turn on your bell by pushing the Function 1 key, then press
the Function 2 key two times for the 2 long blasts, followed by the Function 3
key one time for the short toot and ending with the Function 2 key - holding
it down until your locomotive has occupied the entire road crossing. This
kind of interaction not only makes the experience more real but it also adds
interest and fun to the operating session!
The table below lists all the default sound functions for newly created steam
and diesel locomotives. Just like any SoundTraxx decoder, functions can be
remapped to different sounds, see page 2:18 of the Conguration Guide. In
the meantime, you should be able run your locomotive and use the function
keys on your controller to activate the following functions.
Default Function Lists
Function Key Steam Diesel
F1 Bell Bell
F2 Whistle Air Horn
F3 Short Whistle Short Horn
F4 Steam Release Dynamic Brake
F5 Dynamo RPM -
F6 Reserved RPM +
F8 Mute Mute
F12 Coupler Coupler
* Note: To use the RPM+ and RPM- functions, engine control must rst be set
to manual notching. See page 2:16.
Remember when trying to use these functions, that the locomotive must
rst be set up in the roundhouse and dispatched or there else there will be
no response! The simple steam and diesel engine(s) that you added to the
Roundhouse roster on page 2:5, are sufcient to get you started.
This manual does not cover in detail how to select a locomotive or activate a
function key. Since the actual cab itself is not part of the SurroundTraxx unit
SurroundTraxx User’s Guide Operations Guide Page 3:4
Page 68

Operations Guide
and they can vary quite a bit depending on the operating cab of your choice,
please consult the manual that came with the cab and command station for
more details on its general operation.
Operations Mode Programming
SurroundTraxx can be congured using either the User Interface and menus
or through Operations Mode (Mainline Programming) CV programming.
Operations Mode programming works well for adjusting things on the y such
as the individual sound volumes, the chuff rate, diesel notching rate, or the
bell ring rate. The CV list and default values can be found on the following
pages.
It is important to know a few things about Operations Mode programming
before attempting to do so: First, the CV change sent to SurroundTraxx will
also be sent to the motor decoder in your locomotive. This could cause
changes in its operating characteristics if the same CV being changed also
changes a feature in the motor decoder. You can use the CV Lock feature
to prevent changes (see below). Second, SurroundTraxx will only save CV
settings for a particular locomotive only when that locomotive is dispatched.
In other words, a locomotive that you want to program in Operations Mode
programming must a) exist in the Roundhouse and b) be currently dispatched
from the Roundhouse into one of the 6 AD Slots.
With Operations Mode programming, you can change virtually any locomotive
setting except for its address or the type of locomotive - i.e., steam or diesel.
These two settings must be changed in the Roundhouse Menu. It is also
important to remember that SurroundTraxx doesn’t distinguish between long
and short addresses but your mobile decoder will, so changing a value in
CV 29, 17 or 18 in Operations Mode programming is not recommended as it
could effect the address of your locomotive.
The procedure for programming SurroundTraxx with Operations Mode
programming is basically the same one as you would follow to program a
decoder. The particular details for accessing Operations Mode programming
will vary based on your cab and command station. Please refer to your DCC
system's user guides for further information.
CV Locking
SurroundTraxx has a CV Locking feature that prevents CVs from being
inadvertently changed with Operations Mode programming. There are two
situations where this is useful. The rst is to simply prevent inexperienced
operators from accidentally reprogramming your locomotive settings.
The second is when you need to program a CV in your motor decoder
that is also shared with SurroundTraxx but whose function is altogether
different (manufacturer unique). In this scenario, you would rst program
SurroundTraxx, then enable CV locking, and nally, program the motor
decoder. Some motor decoders also have a CV Lock feature in which case
SurroundTraxx User’s Guide Operations Guide Page 3:5
Page 69

Operations Guide
you could rst lock the decoder, then program SurroundTraxx.
Remember that the CV Locking feature must be enabled explicitly for each
locomotive in the Roundhouse. Once the CV Lock is enabled, you must
disable it in order to make additional changes to the locomotive settings.
Please refer to page 2:20 for more information on activating the CV Lock
feature.
SurroundTraxx CV Default List
CV # CV Description Default Value
CV 1 Primary Address 0
CV 3 Acceleration Rate 0
CV 4 Braking Rate 0
CV 11 Interpacket Timer 0
CV 12 Reserved 0
CV 15 CV Unlock Code 0
CV 16 CV Lock Code 0
CV17,18 Extended Address 0
CV 29 Conguration Byte 1 2
CV 30 Reset/Lock/Function Swap 0
CV 33 F0 (f) Output Control 1
CV 34 F0 (r) Output Control 2
CV 35 Function 1 Control 8
CV 36 Function2 Control 4
CV 37 Function 3 Control 16
CV 38 Function 4 Control 32
CV 39 Function 5 Control 8
CV 40 Function 6 Control 0
CV 41 Function 7 Control 0
CV 42 Function 8 Control 32
CV 43 Function 9 Control 0
CV 44 Function 10 Control 0
CV 45 Function 11 Control 0
CV 46 Function 12 Control 0
CV 112 Sound Conguration 1 0
CV 113 Quiet Mode Control 0
CV 114 Bell Control Register 7
CV 115 Whistle/ Airhorn Select 0
CV 116 Steam Exhaust Chuff Rate 80
CV 116 Diesel Exhaust Control 7
CV 118 Maximum Loco Speed 80
CV 119 CV Bank Select 0
CV 128 Locomotive Master Volume 255
CV 129 Whistle/ Airhorn Volume 128
CV 130 Bell Volume 64
CV 131 Exhaust Volume 128
CV 132 Air Compressor Volume 25
CV 133 Dynamo Volume (Steam Only) 28
CV 134 Blower Volume (Steam Only) 12
SurroundTraxx User’s Guide Operations Guide Page 3:6 SurroundTraxx User’s Guide Page 3:7
Page 70

Operations Guide
CV 135 Coupler Volume 64
CV 136 Steam Hiss Volume ( Steam Only 92
Diesel Only Volume Controls
CV 132 Air Compressor 64
CV 133 Dynamic Brake 48
CV 134 Fans Volume 70
CV169 FX Mixer Channel 0 Send Level 0
CV 170 FX Mixer Channel 1 Send Level 0
CV 171 FX Mixer Channel 2 Send Level 0
CV 172 FX Mixer Channel 3 Send Level 0
CV 173 FX Mixer Channel 4 Send Level 0
CV 174 FX Mixer Channel 5 Send Level 0
CV 175 FX Mixer Channel 6 Send Level 0
CV 176 FX Mixer Channel 7 Send Level 0
CV 226 Steam engine Type Select 0
CV 226 Diesel Prime Mover Select 0
CV 227 Bell Select (Steam) 0
CV 227 Bell Select (Diesel) 9
CV 228 Air Pump/Compressor Select 0
CV 229 Coupler Select 2
CV 230 Dynamo Select 0
CV 231 Blower Select 0
Page 71

Troubleshooting Guide
Troubleshooting the SurroundTraxx System
The Troubleshooting Guide consists of the following:
• Frequently asked questions
• SurroundTraxx Warranty information
• How to contact SoundTraxx for technical support
You may also refer to the section in the Conguration Guide which covers the
Diagnostic Menu. More information can be found on page 2:32.
Frequently Asked Questions
The question and answer section below will help you in resolving some of the
common issues you may encounter.
The locomotive responds to DCC commands, but there is no sound.
Verify that SurroundTraxx is cabled according to the instructions beginning on
page 1:20, and the system has power applied. Check the speaker wiring to
each speaker in use. Also note that you must add locomotives to the system
Roundhouse before SurroundTraxx will provide locomotive sounds. For more
information on adding locomotives, see the section beginning on page 2:5.
Verify transponding is working correctly (page 1:18).
Verify Zone IDs have been set correctly and match the address of your block
detectors.
SurroundTraxx does not report zone changes as the locomotives move
between detection blocks.
Be sure that the LocoNet cable is connected to the Digitrax BDL-168 or
BDL-162 (page 1:10). Also verify that the Digitrax equipment is properly
congured as discussed in the manufacturer’s documentation and page 2:31.
Make sure the rails are properly powered and isolated in each zone.
Verify that the Zone Manager Messages option is enabled (page 2:31).
A locomotive loses its ADP Slot unexpectedly. The slot may be taken by
another locomotive that enters a zone while the ADP Slot is unassigned.
If the locomotive loses network communication due to dirty track or other
factors, it may be retired from the slot. You can increase the AD Timer
setting to keep a locomotive dispatched for longer time periods and reduce
sensitivity to dirty track.
Echo and reverb effects don’t seem to be working.
Verify that the appropriate FX bus mixer parameters are set. See pages 2:12
and 2:26.
SurroundTraxx User’s Guide Troubleshooting Guide Page 4:1
Page 72

SurroundTraxx User’s Guide Troubleshooting Guide Page 4:3
Troubleshooting Guide
Can I load my own sound les into SurroundTraxx?
No, SurroundTraxx comes with an extensive sound library that allows you to
fully customize your locomotives. Inside this library are over 1,000 different
sound combinations of horns/whistles, bells, compressors, couplers, and
prime movers/exhaust chuffs.
How do I congure the locomotives?
SurroundTraxx has an internal database called the Roundhouse. You will
congure, customize and store the settings for each locomotive here. You
will then assign these settings to the same address as your locomotive’s
mobile decoder. This will ensure that SurroundTraxx dispatches the sounds
for that locomotive at the same time that you run your model.
How are the locomotives assigned to a consist?
Locomotives stored inside SurroundTraxx don’t get assigned to a consist
like mobile decoders. However, if you run a set of locomotives together
SurroundTraxx will dispatch each one as they are selected so they will make
sound at the same time. Up to six locomotives can make sound at once.
Is the Roundhouse the ONLY way to congure the locomotives?
No, the locomotive can also be congured using Ops mode programming.
See page 3:5.
Is any power drawn from the track power while SurroundTraxx is in
operation?
No, SurroundTraxx has its own external power supply and does not affect
your track voltage outputs.
Will SurroundTraxx affect my onboard decoders?
No, SurroundTraxx doesn’t send any signals through the rail on you layout. It
instead receives the same information that’s going to your track, so it will not
affect any decoders installed on your layout. Only your command station will
send DCC packets to your decoders.
Can I run a locomotive with an onboard decoder at the same time as
SurroundTraxx? Can I congure my onboard sound decoders to work
with SurroundTraxx?
Yes, SurroundTraxx will work at the same time as an onboard decoder
without affecting it. The two can be used in conjunction by adjusting
individual volumes on both SurroundTraxx and any SoundTraxx Tsunami
Digital Sound Decoder. That can create an interesting effect; for example
turning the volume of the horn and bell up in the sound decoder, down in
SurroundTraxx, while adding volume to the low frequency sounds, such as a
diesel prime mover in SurroundTraxx in order to take advantage of the larger
speakers.
The seventh train on the layout has no sound.
SurroundTraxx supports simultaneous sound for up to six locomotives.
SurroundTraxx User’s Guide Troubleshooting Guide Page 4:2
Page 73

Troubleshooting Guide
If there are six locomotives on the layout, and locomotive seven is
dispatched will another locomotive drop off so locomotive seven can
have sound? Or will I have to manually dispatch it?
SurroundTraxx can have up to six locomotives dispatched at a time. If a
seventh locomotive is running though the layout, SurroundTraxx will not
dispatch it until one of the other six locomotives is retired. At that time
SurroundTraxx will dispatch the seventh locomotive. A good way to make
sure your favorite locomotive always has sound is to manually dispatch it
which reserves one of the six slots strictly for that locomotive.
How many locomotives can be stored in the SurroundTraxx memory
base at a time?
The Roundhouse in SurroundTraxx can hold up to 99 locomotives at a time.
You can also delete and add locomotives as you choose, making it easy to
add a visiting piece of equipment to your pike.
Will SurroundTraxx play sound for more than one locomotive in a
sound zone at the same time?
Yes, SurroundTraxx tracks each locomotive around the layout, therefore it will
produce sound for each of the six locomotives regardless of if they are all in
the same zone or spread throughout the layout. This can make some really
cool effects as trains pass each other on the main.
Can I have more than six sound zones?
There are only six sound zones available per SurroundTraxx system. If more
then six sound zones are desired then the addition of another SurroundTraxx
system is required.
Is there a limit to the number of SurroundTraxx systems I can link
together?
No, you may, however, want to have more than one subwoofer if you get
beyond two SurroundTraxx systems in a layout.
Is I have more than one SurroundTraxx system, can I move the
Roundhouse information from one system to another?
No, you will have to manually enter the settings into each system.
SurroundTraxx User’s Guide Troubleshooting Guide Page 4:3
Page 74

Troubleshooting Guide
Warranty Information
Each SurroundTraxx unit is tested thoroughly before it is shipped and
warranted to be in good working order and free of manufacturing defects.
However, in the event that a mistake does occur during installation,
SoundTraxx will cover the repair under our 90-Day ‘Safety-Net’ Service
Warranty. For details of the warranty and return procedure, please visit the
Support section of our website at the address below.
http://www.soundtraxx.com/support.htm
Contacting SoundTraxx Technical Support
SoundTraxx prides itself on providing the very best in Customer Service and
Support. Should you need assistance with your SurroundTraxx system,
begin by contacting our technical support department via e-mail at
support@soundtraxx.com.
SurroundTraxx User’s Guide Troubleshooting Guide Page 4:4 SurroundTraxx User’s Guide Appendix A Page A:1
Page 75

Appendix A
Appendix A is a complete menu tree for SurroundTraxx. This is a helpful
quick reference to locate where a certain sub-menu is located without going
through the entire manual. This page shows the six main menus. Pages
A:2 to A3 show the complete Roundhouse menu tree. Page A:4 shows the
compliant Audio menu tree. Page A:5 shows the complete Dispatcher menu
tree. Page A:6 shows the entire Zone IDs menu tree. Finally pages A:7 to
A:8 show the system Diagnostic menu tree.
SurroundTraxx Menu Tree
ROUNDHOUSE
AUDIO
DISPATCHER
ZONE IDS
SYSTEM
DIAGNOSTIC
Page 76

SurroundTraxx User’s Guide Troubleshooting Guide Page A:3
Appendix A
SurroundTraxx Menu Tree
ROUNDHOUSE LIST LOCOS 1: 0000
2: 0000
3: 0000
Etc.
ADD LOCO TYPE: STM
DSL
ADDR: 0000 SAVE? Y
N
EXIT (i.e. cancel the save)
EDIT LOCO EDIT: 0000 VOLUME: 255 SAVE OK!
WH MIX:128
WH FX:000
BL MIX: 064
BL FX:000
EX MIX:128
EX FX:000
AP MIX:025
AP FX:000
DY MIX:028
DY FX:000
S6 MIX:012
S6 FX:000
S7 MIX:064
S7 FX:000
S8 MIX:000
S8 FX:000
EX SEL:000
WH SEL:000
BL SEL: 00
BLRATE: 00
AP SEL: 0
CP SEL:000
DYNO:000
BLWR:000
SND1:000
SND2:000
EX CTL:000
MAXSPD:000
ACCEL:000
BRAKE:000
CONADD:000
FGRP1:000
FGRP2:000
CACCEL:000
CBRAKE:000
CV 29:002
(If you
select the
wrong
loco at this
point, wait
for monitor
mode)
(appears for
any modied
setting)
CONTINUED ON NEXT PAGE
SurroundTraxx User’s Guide Troubleshooting Guide Page A:2
Page 77

Appendix A
CONTINUED FROM PREVIOUS PAGE
CV 30:0
FF MAP:001
FR MAP:002
F1 MAP:008
F2 MAP:004
F3 MAP:016
F4 MAP:008
F5 MAP:032
F6 MAP:064
F7 MAP:000
F8 MAP:032
F9 MAP:000
F10 MAP:064
F11 MAP:032
F12 MAP:128
PKT TM:000
LOCK KEY:0
LOCK ID:0
BACK
EXIT
BACK
EXIT
COPY LOCO FROM: 0000
TO: 0000 SAVE? Y
N
EXIT
ERASE LOCO ERASE: 0000 ERASE? Y
N
BACK
EXIT
BACK
EXIT
CONTINUED ON NEXT PAGE
SurroundTraxx User’s Guide Troubleshooting Guide Page A:3
Page 78

SurroundTraxx User’s Guide Page A:5
Appendix A
CONTINUED FROM PREVIOUS PAGE
AUDIO SND ZONE:1 CH VOL:192 SAVE OK!
FADER:0001
ECHO: 0
E LEV: 000
E DLY: 000
E FB: 000
BACK
EXIT
SND ZONE:2 CH VOL:192
FADER:0001
ECHO: 0
E LEV: 000
E DLY: 000
E FB: 000
BACK
EXIT
SND ZONE:3 CH VOL:192
FADER:0001
ECHO: 0
E LEV: 000
E DLY: 000
E FB: 000
BACK
EXIT
SND ZONE:4 CH VOL:192
FADER:0001
ECHO: 0
E LEV: 000
E DLY: 000
E FB: 000
BACK
EXIT
SND ZONE:5 CH VOL:192
FADER:0001
ECHO: 0
E LEV: 000
E DLY: 000
E FB: 000
BACK
EXIT
SND ZONE:6 CH VOL:192
FADER:0001
ECHO: 0
E LEV: 000
E DLY: 000
E FB: 000
BACK
EXIT
BACK
EXIT
CONTINUED ON NEXT PAGE
(appears for any
modied setting)
SurroundTraxx User’s Guide Page A:4
Page 79

Appendix A
CONTINUED FROM PREVIOUS PAGE
DISPATCHER LOCO1:AUTO AUTO
0000 (locomotive address)
OFF
LOCO2:AUTO AUTO
0000 (locomotive address)
OFF
LOCO3:AUTO AUTO
0000 (locomotive address)
OFF
LOCO4:AUTO AUTO
0000 (locomotive address)
OFF
LOCO5:AUTO AUTO
0000 (locomotive address)
OFF
LOCO6:AUTO AUTO
0000 (locomotive address)
OFF
BACK
EXIT
CONTINUED ON NEXT PAGE
SurroundTraxx User’s Guide Page A:5
Page 80

SurroundTraxx User’s Guide Page A:7
Appendix A
CONTINUED FROM PREVIOUS PAGE
ZONE IDS ZONE:1 BEG ID:000
END ID:000
BACK
EXIT
ZONE:2 BEG ID:000
END ID:000
BACK
EXIT
ZONE:3 BEG ID:000
END ID:000
BACK
EXIT
ZONE:4 BEG ID:000
END ID:000
BACK
EXIT
ZONE:5 BEG ID:000
END ID:000
BACK
EXIT
ZONE:6 BEG ID:000
END ID:000
BACK
EXIT
BACK
EXIT
CONTINUED ON NEXT PAGE
SurroundTraxx User’s Guide Page A:6
Page 81

Appendix A
CONTINUED FROM PREVIOUS PAGE
SYSTEM MODE:01 (Max 12) SAVE OK!
MUTE: LOCAL
GLOBAL
BRIGHT:0 (max 5)
MSG:0 (max 9)
AD TMR:010
UI TMR:15 (max 60 seconds)
BDL SETUP ADDRESS
OP SWITCH
BACK
EXIT
FIND: OFF
F0
F1
F2
F3
F4
F5
F6
F7
F8
F9
F10
F11
BACK
EXIT
(appears for any
modied setting)
CONTINUED ON NEXT PAGE
SurroundTraxx User’s Guide Page A:7
Page 82

SurroundTraxx User’s Guide Page B:1
Appendix A
CONTINUED FROM PREVIOUS PAGE
DIAGNOSTIC DCC STATUS PCKT 0
ERR 0
NETWORK PCKT 0
ERR 0
ADP STATUS 1: EMPTY (or locomotive address)
2: EMPTY (or locomotive address)
3: EMPTY (or locomotive address)
4: EMPTY (or locomotive address)
5: EMPTY (or locomotive address)
6: EMPTY (or locomotive address)
MIXER ZN1 ……
ZN2 ……
ZN3 ……
ZN4 ……
ZN5 ……
ZN6 ……
SYS RESET CONFIRM? N
Y
PURGE CONFIRM? N
Y
BACK
EXIT
EXIT
SurroundTraxx User’s Guide Page A:8
Page 83

Appendix B
More Sample Layouts: The Cherry Picked Railroad
Track plan used with permission from Kalmbach Publishing Co.
A 7' by 9' Layout
Zone 3
Girder Bridge
Zone 4
Pershing
Here, we have made ve sound zones and
used a subwoofer. The small size
of the layout makes it possible to have as
many as six zones or as few as three, but
more speakers means more sound! There is no
need to have sound zones dedicated to hidden staging tracks and yards.
Zone 5
Classication
Yard
Port Sussex
Zone 1
To High-level
Staging
Zone 2
SurroundTraxx User’s Guide Page B:1
Page 84

Appendix B
More Sample Layouts: The Maine Central Railroad
Track plan used with permission from Kalmbach Publishing Co.
Salt Marsh
Zone 4
Innsmouth
Zone 5
An 8' by 9' Layout
Quarry Point
Zone 3
Tidal Bay
Zone 2
Waldenboro
Zone 1
In this example we've created ve sound zones and used a subwoofer, with speakers
installed on each of the peninsulas of the layout and two in back. The subwoofer
would be placed underneath the peninsula of the layout to give a central location for
the bass.
SurroundTraxx User’s Guide Appendix B Page B:2 SurroundTraxx User’s Guide Appendix C Page 1
Page 85

Appendix C
License Agreement
License Agreement
Please read carefully this license agreement before opening the package which contains
the SurroundTraxx System. Breaking the seal on the package indicates your acceptance
of these license terms. If you have received the SurroundTraxx System in an opened
package, then use of the product indicates your acceptance of the agreement. If you do
not agree with the terms, you should return the package unopened to the dealer from
whom you received the package within thirty (30) days and your money will be refunded.
SoundTraxx Software License Agreement
SoundTraxx provides the computer Software/Firmware embedded within the
SurroundTraxx System and any modications, updates, revisions or enhancements
received by you from SoundTraxx or its dealers and licenses its use within the terms set
below:
A. You are granted a nonexclusive, nontransferable license to use the Software/Firmware
included with your SurroundTraxx sound system only with the SurroundTraxx sound
system hardware that you purchased.
B. Title and ownership of the Software/Firmware, Sound Recordings, Documentation and
accompanying materials, if any, and all associated intellectual property rights remain with
SoundTraxx.
C. The structure, organization, and code of the Software/Firmware are the valuable
properties of SoundTraxx. You may not make copies of the Hardware, Software/
Firmware, code, or any portions thereof. You are not to modify, adapt, translate, reverse
engineer, de-compile, disassemble or create derivative works based on the Hardware or
Software/Firmware.
D. Unauthorized copying of the Software/Firmware or Documentation, or failure to comply
with the above restrictions, will result in automatic termination of this Agreement. This
Agreement does not grant you any intellectual property rights.
Page 86

©2011 Throttle Up! Corp.
DCC
®
New Dimensions in Digital Sound Technology
210 Rock Point Drive Durango, CO 81301
(970) 259-0690 Fax: (970) 259-0691 Email: Sales@soundtraxx.com
All Rights Reserved.
COMPATIBLE WITH
THE NMRA DCC STANDARDS
AND RECOMMENDED
PRACTICES
 Loading...