

Page 1
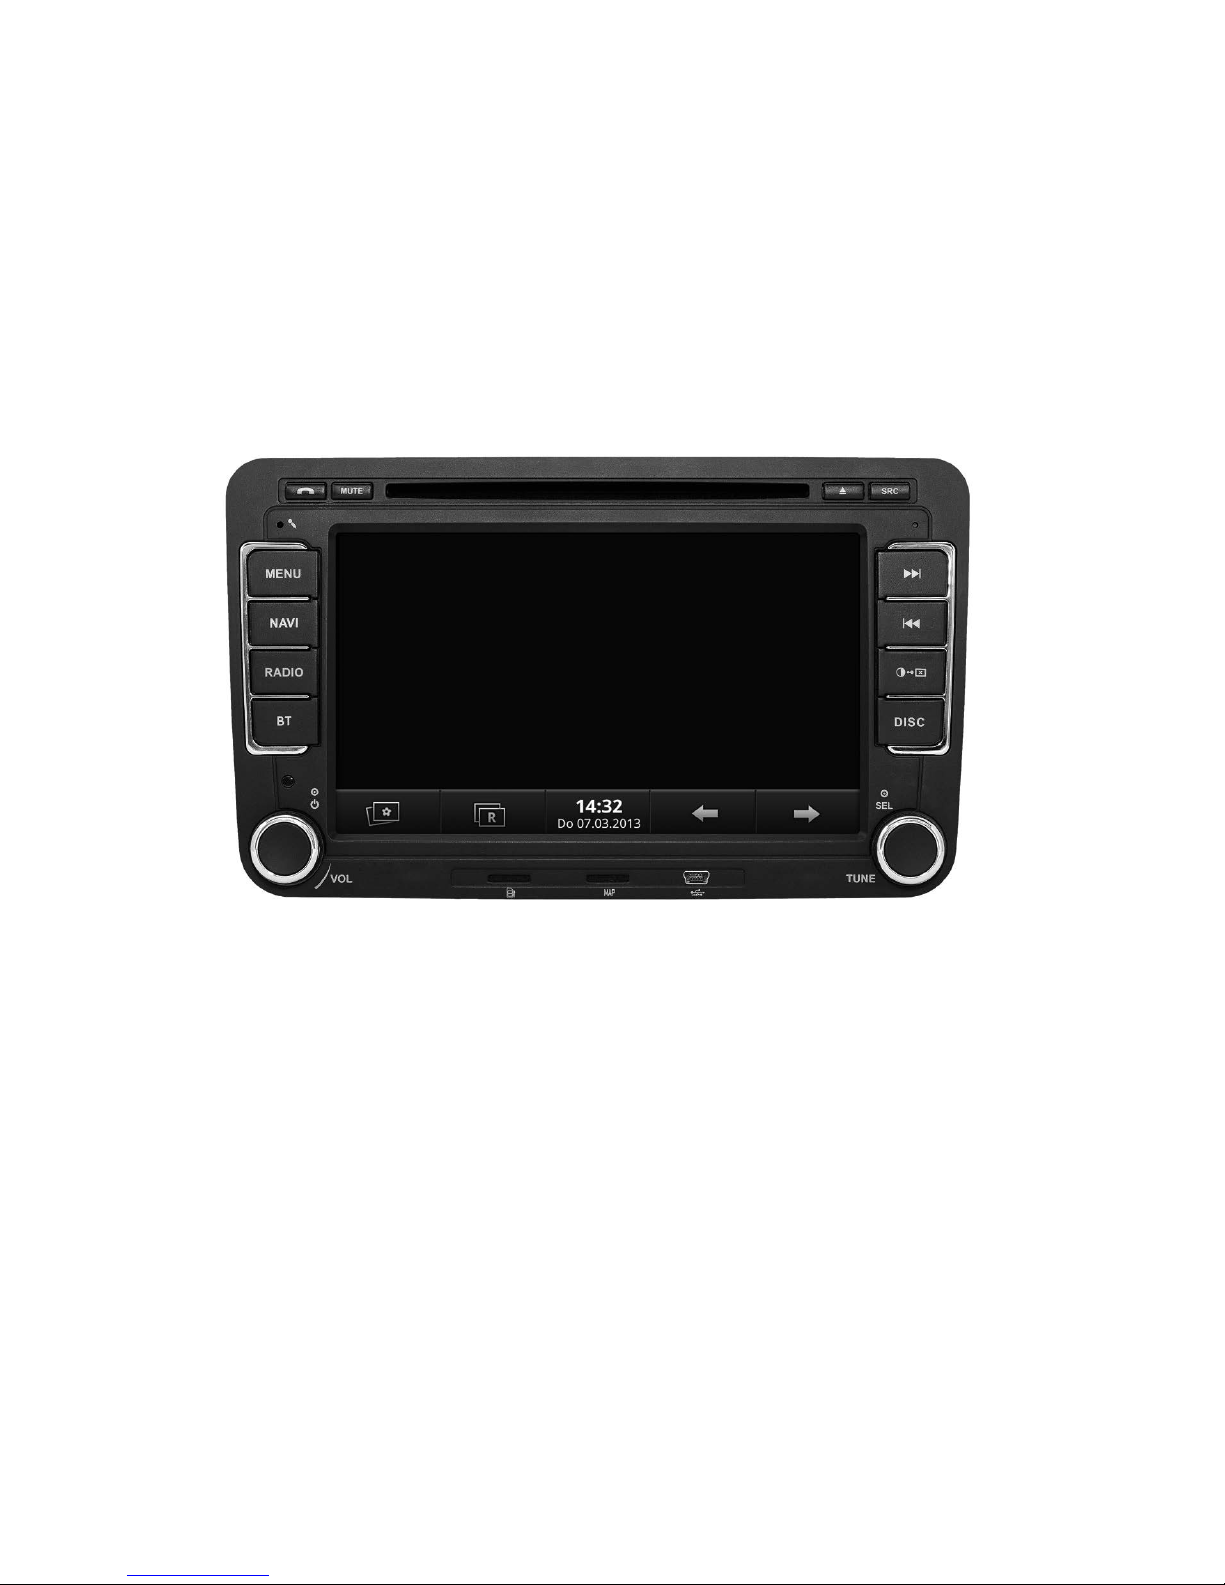
Radio-Navigation system
USER MANUAL
Page 2
EN - 3
Safety Precautions
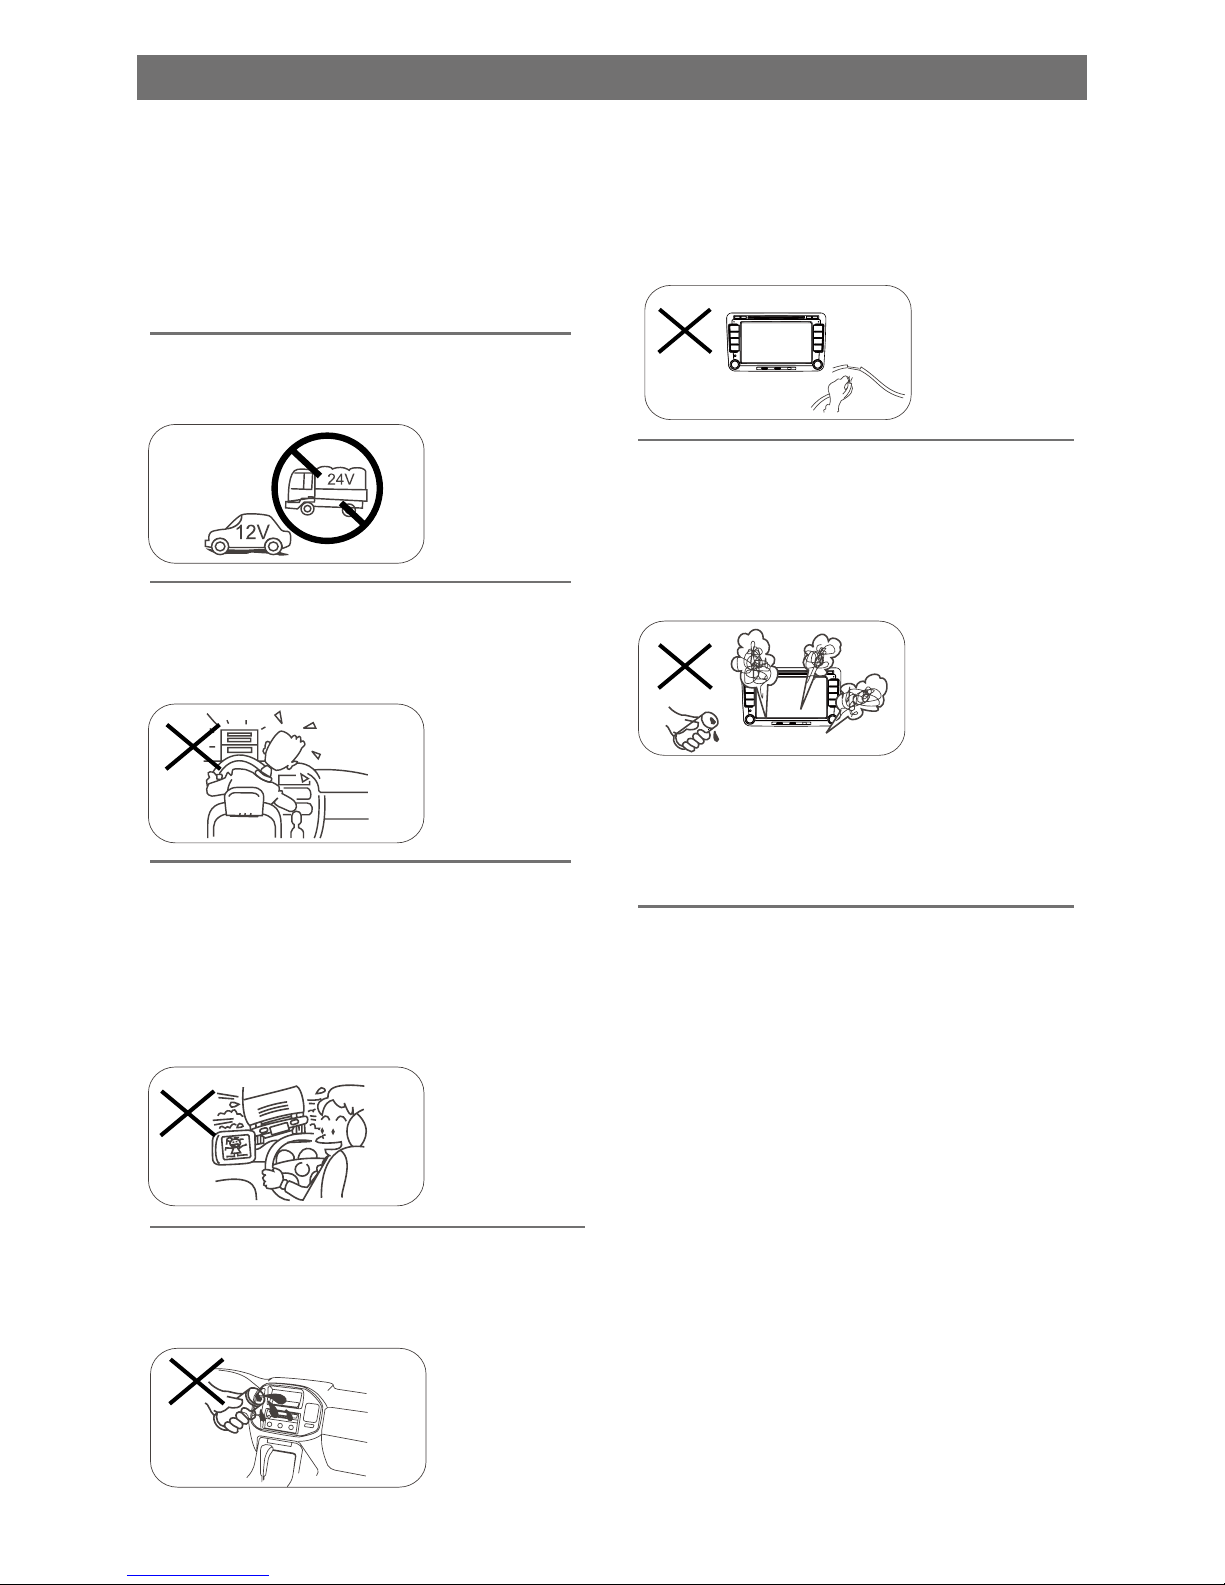
Never expose this unit, amplifier, and
speakers to moisture or water for
preventing electric sparks or res.
Please don't change the fuse on
the power cord without professional
guidance, using improper fuse may
cause damage to this unit or even cause
re.
Please power off this unit at once and
send it back to the after-sales service
center or the dealer /distributor you
purchased from if one of the following
symptoms is found:
(a). Water or other objects enters the
unit;
(b). Smoking;
(c). Peculiar smell.
Only connect the unit to a 12-volt power
supply with negative grounding.
Never install this unit where the
operation & condition for safety driving
is restrained.
Never use the video display function
in the front when driving to prevent the
violation of laws & regulations and also
to reduce the risk of trafc accident
except using for rear view video
camera.
MUTE
OK
Thank you for purchasing this product.
Please read through these operating
instructions so you will know how to
operate your model properly. After you
have finished reading the instructions,
keep this manual in a safe place for
future reference.
To ensure safe driving, please adjust
the volume to a safe and comfort level
in case of emergency situations.
Page 3

EN - 4
1. Never disassemble or adjust the unit without any professional guide.
For details, please consult any professional car shop / dealer for inquiry.
2. If the front panel or TFT monitor is squalid, please use a clean silicone cloth and neutral
detergent to wipe off the spot. Using a rough cloth and non-neutral detergent such as alcohol
for cleaning may result in scratching or decoloration to the applicant.
3. If any abnormal behavior of the unit is found, please refer to trouble shooting guide of this
manual. If no relevant information is found,please press the [RESET] key on the front panel to
resume factory default.
4. If you have parked the car in hot or cold weather for a long time, please wait until the
temperature in the car becomes normal before operating the unit.
5. Using in-car heater in low temperature environment may result in beads coagulate inside the
unit, DO NOT use the unit in this situation, eject the disc and wipe off the bead on the disc. If
the unit still doesn't work after a few hours, please contact with after-sales service center.
6. No erce impact to the LCD monitor when it is in open position for preventing the damage to
any mechanisms inside.
7. To prevent the damage to the screen, avoid touching it with sharp objects.
8. To provide a clear demonstration and an alternative for easy understanding to the operation of
this unit, graphic illustrations areused.
However, these illustrations are some different from the actual images displayed on the screen.
9. Operate the unit correctly according to this manual to prevent unnecessary problem. The
guarantee won't be valid if the problem is caused by inappropriate operation.
Precautions
Page 4

EN - 5
Contents
Safety Precautions ...................................3
Precautions ...............................................4
Contents ....................................................5
Before using ..............................................6
Front Panel .............................................6
Basic operations.......................................7
Power On/Off .........................................7
Open SOURCE MENU ...........................7
Playing source selection .........................7
Set Date /Time ........................................7
Radio mode ...............................................8
Select radio as playing source ................8
Select one radio band .............................8
Tune........................................................8
Preset station ..........................................8
Local Seeking .........................................9
EQ Selection ...........................................9
RDS Basics ............................................9
Adjust RDS Settings ...............................9
PLAY ........................................................10
Load Disc ..............................................10
Eject the Disc ........................................10
Touch Screen Controls .........................10
Connect USB Device ............................10
Remove the USB Device ......................10
Insert SD/MMC Card ............................10
Remove the SD/MMC Card ..................10
Play/Pause............................................11
Previous/Next .......................................11
Fast Forward/Backward ........................11
Search for a Folder ...............................11
Repeat ..................................................11
Repeat A-B ...........................................12
Random Play ........................................12
Select Audio Mode................................12
Select Subtitle Language ......................12
Change View Angle ..............................12
Rotate Pictures .....................................13
Zoom.....................................................13
Bluetooth mode ......................................14
Pair the Bluetooth-enabled devices ......14
Disconnect Bluetooth device ................14
Make a call............................................14
Receive call ..........................................15
Switch Phone Call to the Mobile ...........15
Adjust Bluetooth Settings......................15
Select iPod as playing source...............16
Play .......................................................16
DAB mode ...............................................17
Select DAB as playing source ..............17
Select one DAB band ...........................17
Tune......................................................17
Preset scan ..........................................17
Auto store .............................................17
Manual store .........................................18
Delete stored services ..........................18
Recall the stored services.....................18
PTY Search ..........................................18
L-BAND ON/OFF ..................................18
Service Link ..........................................18
Adjust sound ..........................................19
Adjust volume .......................................19
Mute ......................................................19
Select preset equalizer .........................19
Adjust fader/balance .............................19
SETUP......................................................20
Display System .....................................20
Adjust Video Settings............................20
Adjust General Settings ........................20
Adjust Time Settings .............................21
Adjust Sound Settings ..........................21
Adjust Language Settings .....................21
Adjust Bluetooth Settings......................21
Adjust DVD Rating ................................22
Adjust Volume Settings.........................22
Other modes ...........................................23
Listen to other devices ..........................23
Reset ....................................................23
Remove the unit....................................23
Replace fuse .........................................23
GPS ......................................................23
User-Dened Wallpaper .......................24
Specications .........................................25
Region code .........................................26
Cautions of disc using...........................26
Troubleshooting .....................................27
Warning ................................................27
No power ..............................................27
No sound ..............................................27
Disc does not play ................................27
No image ..............................................27
Image ashes or distorted ....................27
Noise in broadcasts ..............................27
Preset stations lost ...............................27
Fuse is broken ......................................28
About Bluetooth device .........................28
Appendix .................................................29
Page 5
EN - 6
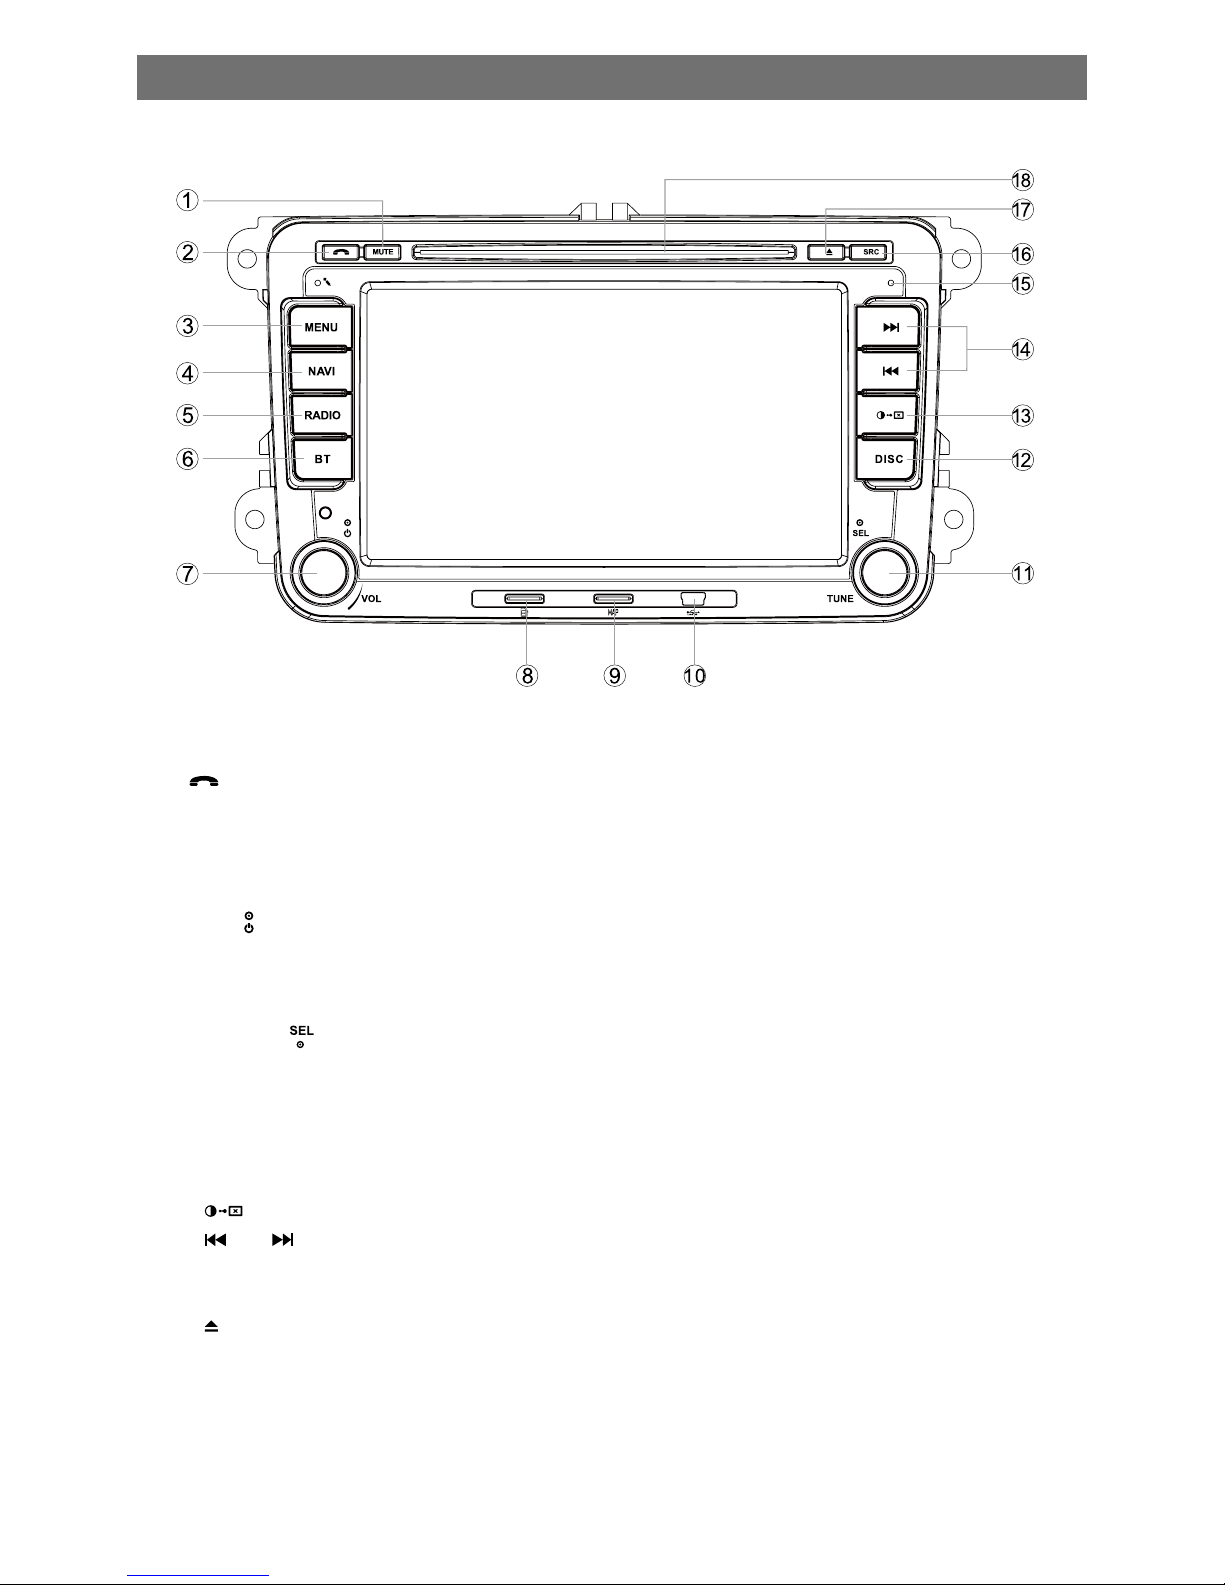
Front Panel
1. [MUTE] Key: Cut off the sound.
2. [ ] Key: Receive the call / Terminate the call / Call out
3. [MENU] Key: Enter main menu
4. [NAVI] Key: Switch to navigation mode.
5. [RADIO] Key: Switch to Radio mode / Select band.
6. [BT] Key: Switch to Bluetooth mode.
7. [VOL/
]: Adjust volume (rotate) / Turn on or off the unit (press)
8. MicroSD card slot
9. Map card slot
10. Mini-USB connector
11. [ TUNE / ] Knob:Radio mode: Tune for radio station
CD/MP3 mode: Skip to the previous or next title, chapter or
track(rotate) ; Play/Pause(press)
Selecting/Setting menu: Select option(rotate); Confirm an entry or
selection(press)
12. [DISC] Key: Switch to disc mode
13. [ ] Key: Adjust screen brightness
14. [ ] / [ ]: Auto tuning / Fast playback
15. Reset: Load the original setting
16. [SRC]: Select work mode.
17. [ ] Key: Eject disc
18. Disc slot
Before using
Notice:
The graphic in this manual is for reference only, and may be different from that in real unit.
Reference to real unit is suggested.
Page 6
EN - 7
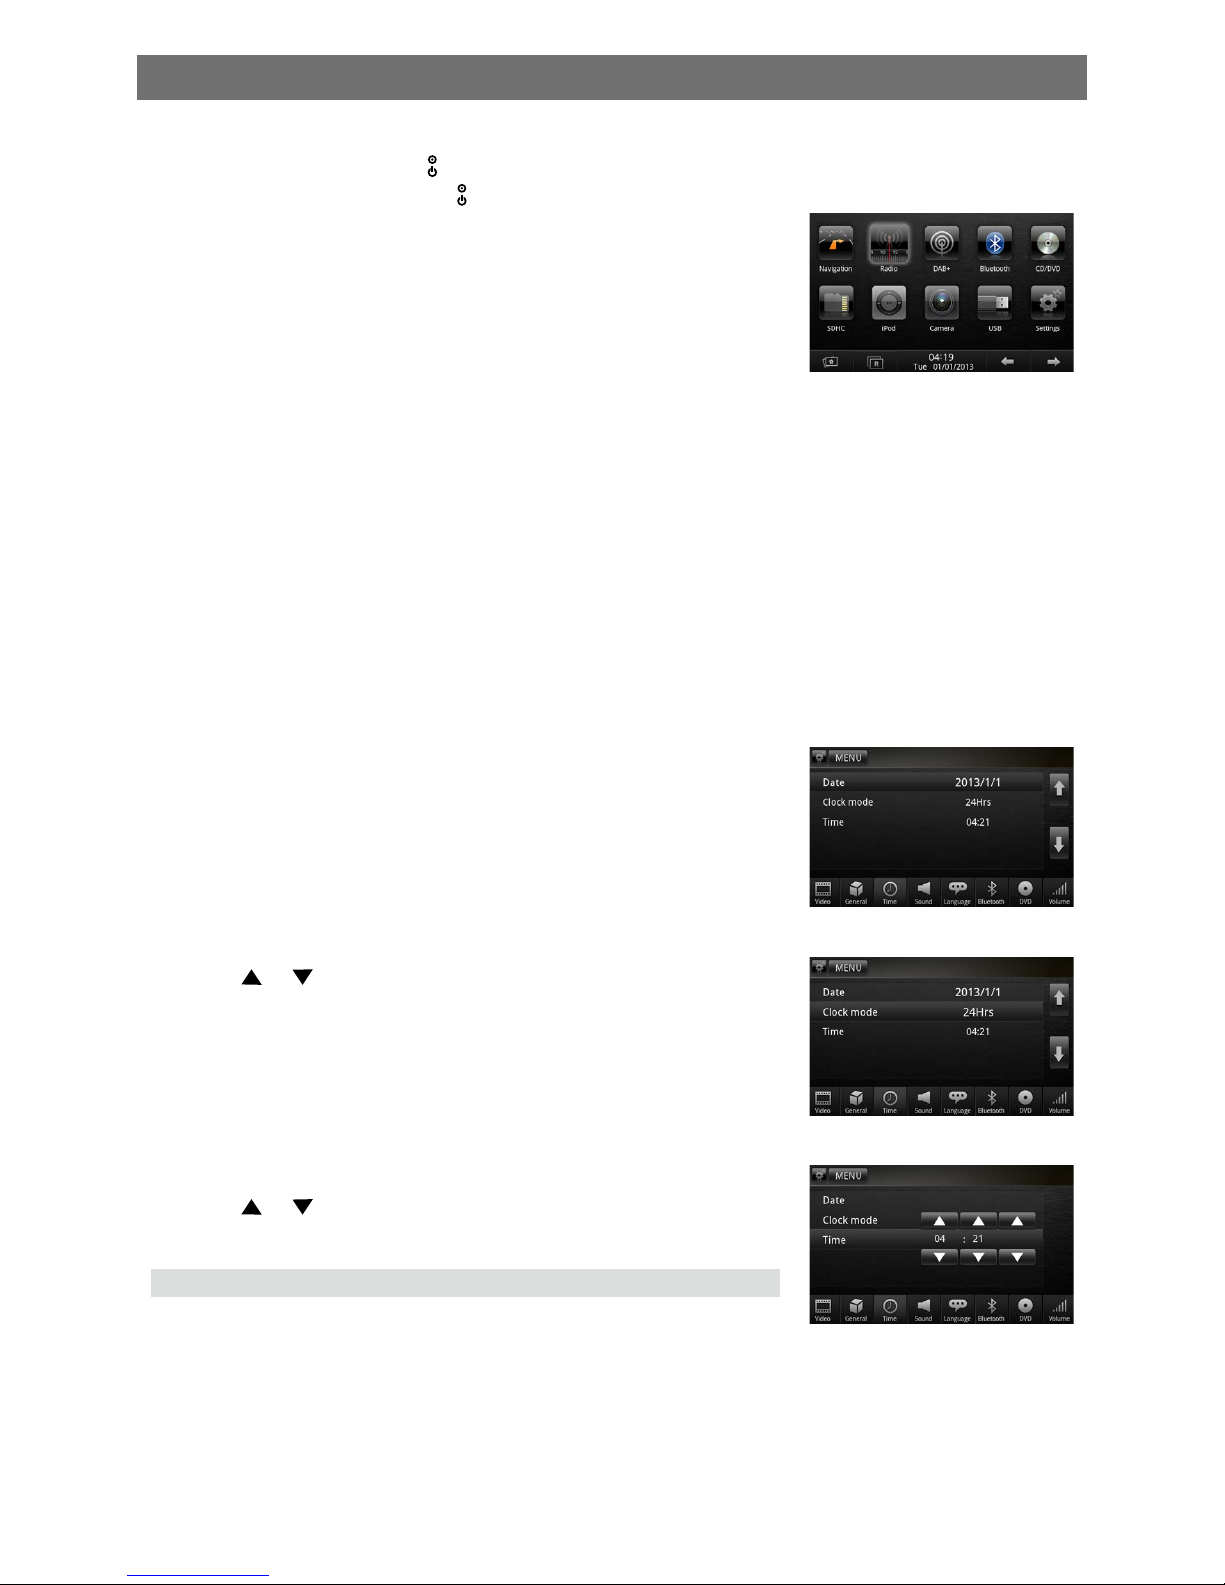
Power On/Off
Turn on: Press button [
VOL/ ]
on the front panel.
Turn off: When on, press [
VOL/ ]
button on the front panel.
Open SOURCE MENU
Press the [MENU] button on the front panel or touch the top left
corner of the screen to open the SOURCE MENU.
Playing source selection
Open the SOURCE MENU, and then touch the source you desired.
Or press the [SRC] button on the front panel repeatedly to select desired source.
Note:
Playing source selection means selecting work mode, such as DVD mode, Radio mode, Bluetooth
mode, etc.
Basic operations
Set Date /Time
1. Touch [Settings] on the SOURCE MENU.
2. Touch [Time].
The date/time setup menu is displayed.
Set date
1. Touch [Date].
2. Touch the date informationon on the screen.
A submenu is displayed.
3. Touch
or to set year, month and day.
Set clock mode
1. Touch [Clock mode].
2. Touch [12Hrs] or [24Hrs] to switch clock mode.
Set time
1. Touch [Time].
2. Touch the time on the screen, a submenu is displayed.
3. Touch or to set hour and minute.
Tip:
When date/time is set, touch the upper left corner of screen to exit.
Page 7
EN - 8
Select radio as playing source
Press [RADIO] button on the front panel or select [Radio] on the SOURCE MENU.
Select one radio band
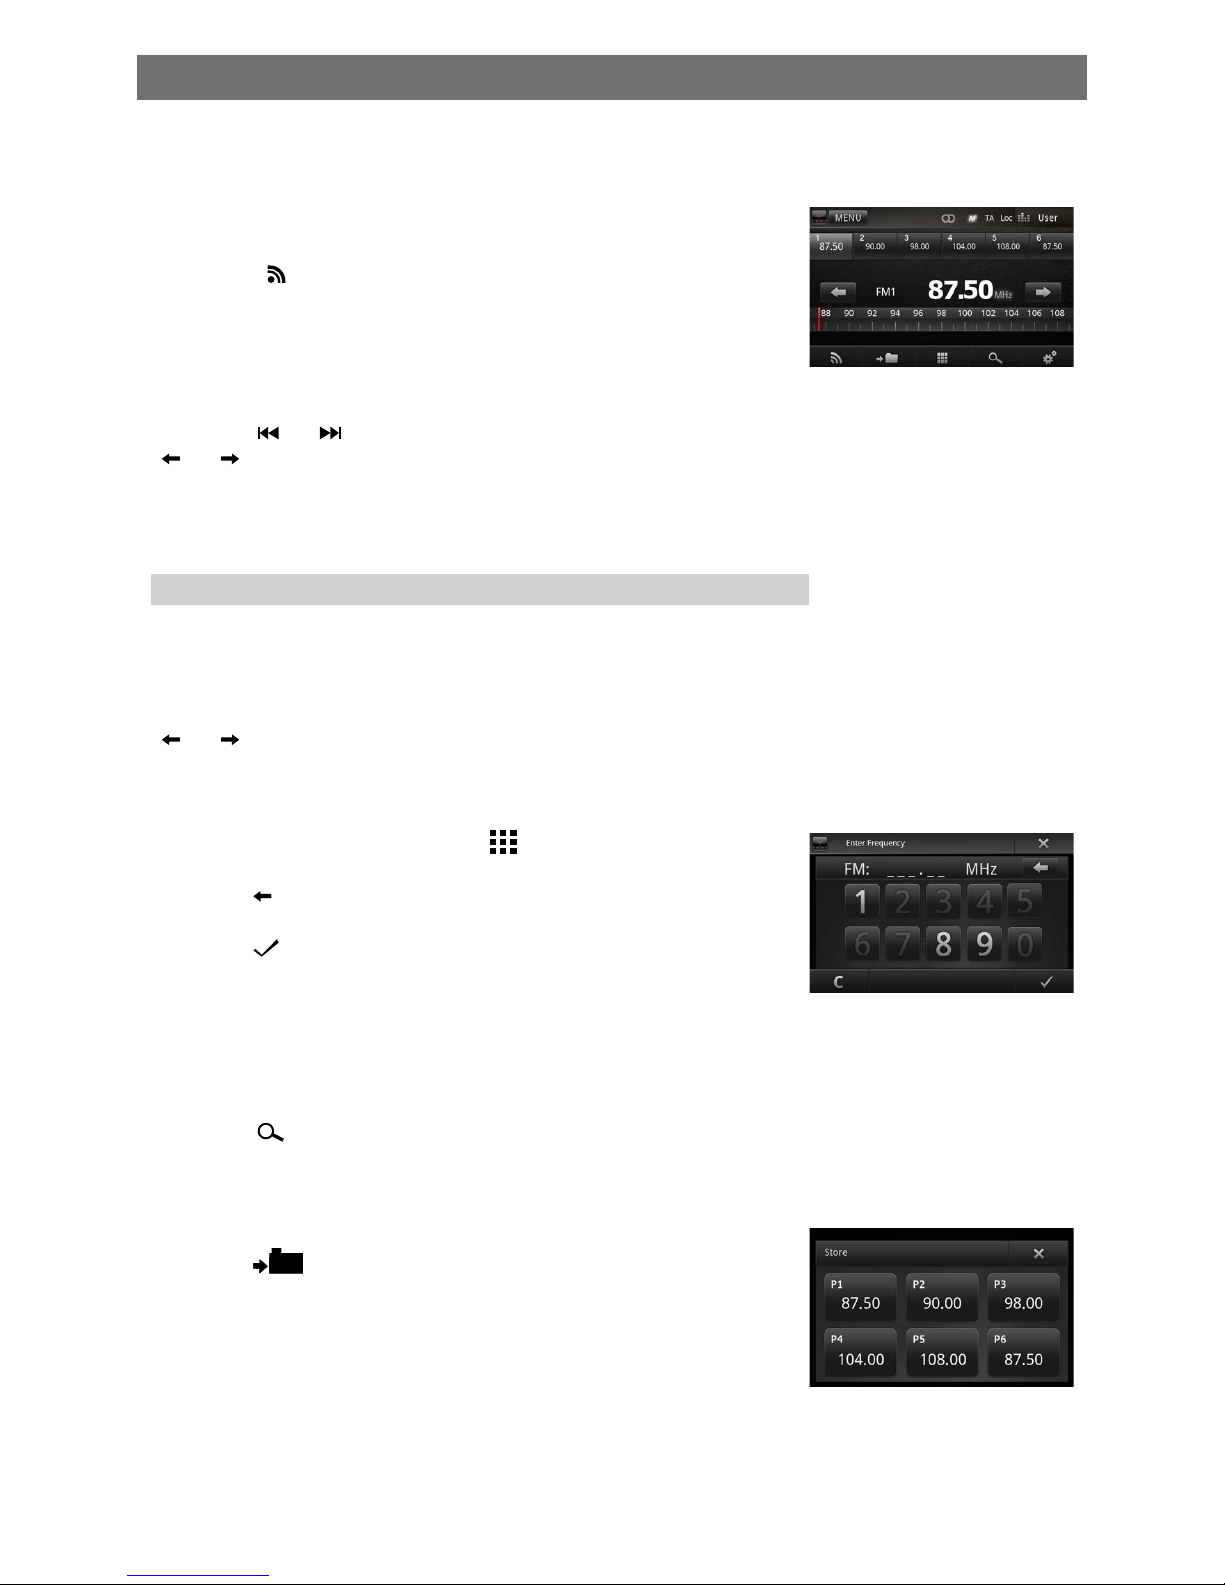
Touch the [ ] icon on the user interface to select one radio band
among FM1, FM2, FM3, AM1 and AM2.
Tune
Auto tuning
Press the [ ] / [ ] button on the front panel or hold
[ ] / [ ] icon on the user interface more than 1 second to
seek a higher / lower station.
To stop searching, repeat the operation above or press other
keys having radio functions.
Note:
When a station is received, searching stops and the station is played.
Manual tuning
Method 1:
During manual tuning, the frequency will be changed in steps.
Rotate the [SEL] knob on the front panel or touch the
[ ] / [ ] icon on the user interface to tune in a higher / lower
station.
Method 2:
1. Touch the numeric keypad icon [
]. Numeric keyboard
is displayed, touch number to input frequency.
2. Touch [
] to delete the input number step by step.
3. Touch [ C ] to clear all of the input numbers.
4. Touch [ ] to enter.
Preset station
The unit has 5 bands, such as FM1, FM2, FM3, AM1, AM2, and Each band can store 6 stations;
hence the unit can store 30 stations in total.
Search stations automatically
Press the [ ] icon on the user interface to search the 6 strongest stations in current band and
store them in memory.
Manual store
1. Tune to a station.
2. Touch [
].
3. Touch one of the channels P1 to P6 to save the selected band.
Tune to a preset station
1. Enter [Radio] mode.
2. Select band.
3. Touch one of the preset channels (1 to 6) on the upper side of the screen.
Radio mode
Page 8
EN - 9
Local Seeking
Touch the [LOC] icon and choose the Radio Local or Distance.
When the [LOC] icon turns bright, only stations with sufcient signal strength will be detected.
EQ Selection
Press the [ ] icon to enter the EQ setup.
RDS Basics
RDS service availability varies with areas. Please understand if RDS service is not available in
you area, the following service is not available.
AF Mode
AF (Alternative Frequency): When the radio signal strength is poor, enabling the AF function will
allow the unit to automatically search another station with the same PI (program identication) as
the current station but with stronger signal strength.
At Radio mode, touch [AF] on the top of screen to turn on/off AF function.
When AF mode is turned on, the AF indicator will turns bright.
TA Mode
Some RDS FM stations periodically provide trafc information.
TP (Trafc Program Identication)
This station can broadcast trafc information.
TA (Trafc Announcements Identication)
Radio announcements on trafc conditions or EON station.
At Radio mode, touch [TA] on the top of screen to turn on/off TA function.
When TA mode is turned on, the TA indicator will turns bright.
When traffic announcement is received, the unit will temporarily switch to the tuner mode
(regardless of the current mode) and begin broadcasting the announcement at TA volume level.
After the trafc announcement is over, it will return to the previous mode and volume level. When
TA is turned on, SEEK, SCAN, AMS function can only be received or saved when trafc program
identication (TP) code is received.
EON default is on.
Adjust RDS Settings
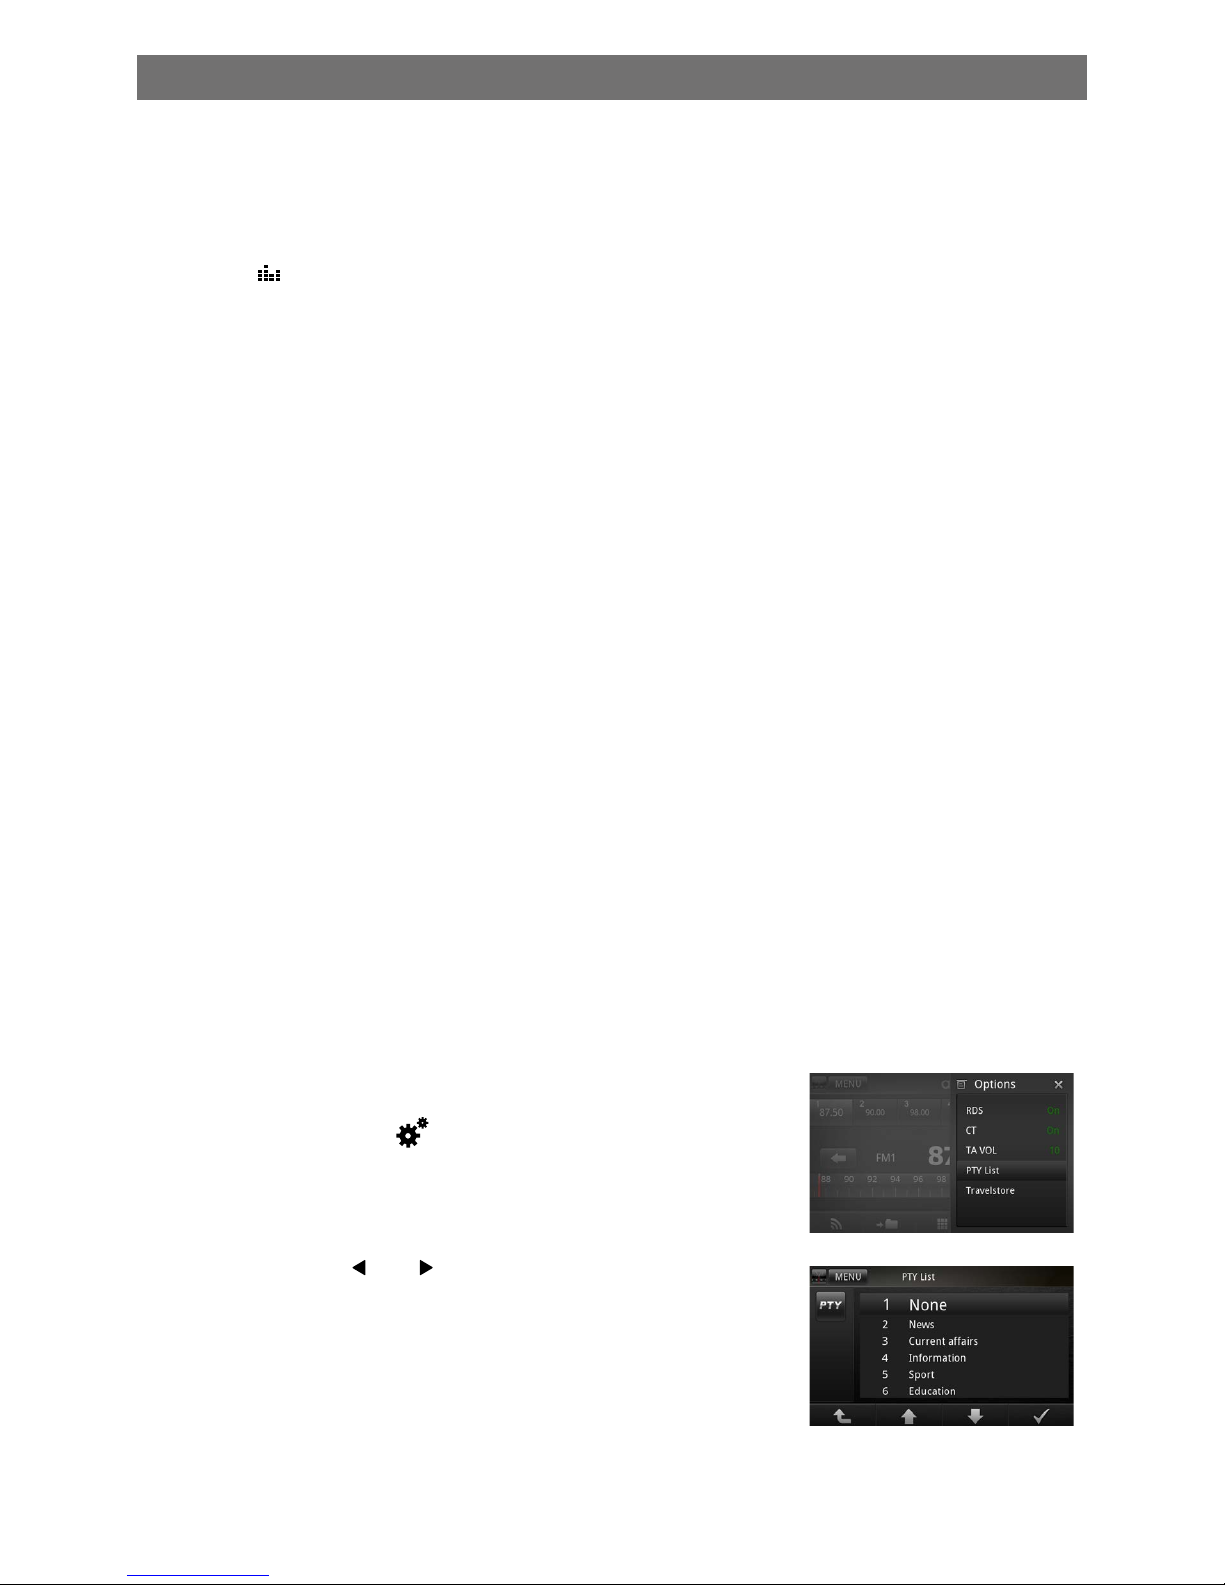
1. In Radio menu, touch [ ] icon.
The option menu is displayed.
2. Touch on the selected option to change the setting.
∙ [RDS]: to turn on or off “RDS” function.
∙ [CT]: to turn on or off “Clock Time” synchronization function.
∙ [TA VOL]: Touch [
] or [ ] to to adjust trafc announcement
volume.
∙ [PTY List]: to set paring code.
∙ [Travelstore]: auto search and store stations.
Radio mode
Page 9
EN - 10
Load Disc
You can play video, audio or images stored on the following discs:
• DVD Video, DVD-R, DVD-RW
• VCD
• Audio CD, CD-R, CD-RW
Note:
Ensure that the disc contains playable content.
Eject the Disc
Press the [ ] key to eject the disc. When the disc is ejected, the unit switches to the previous
source.
Touch Screen Controls
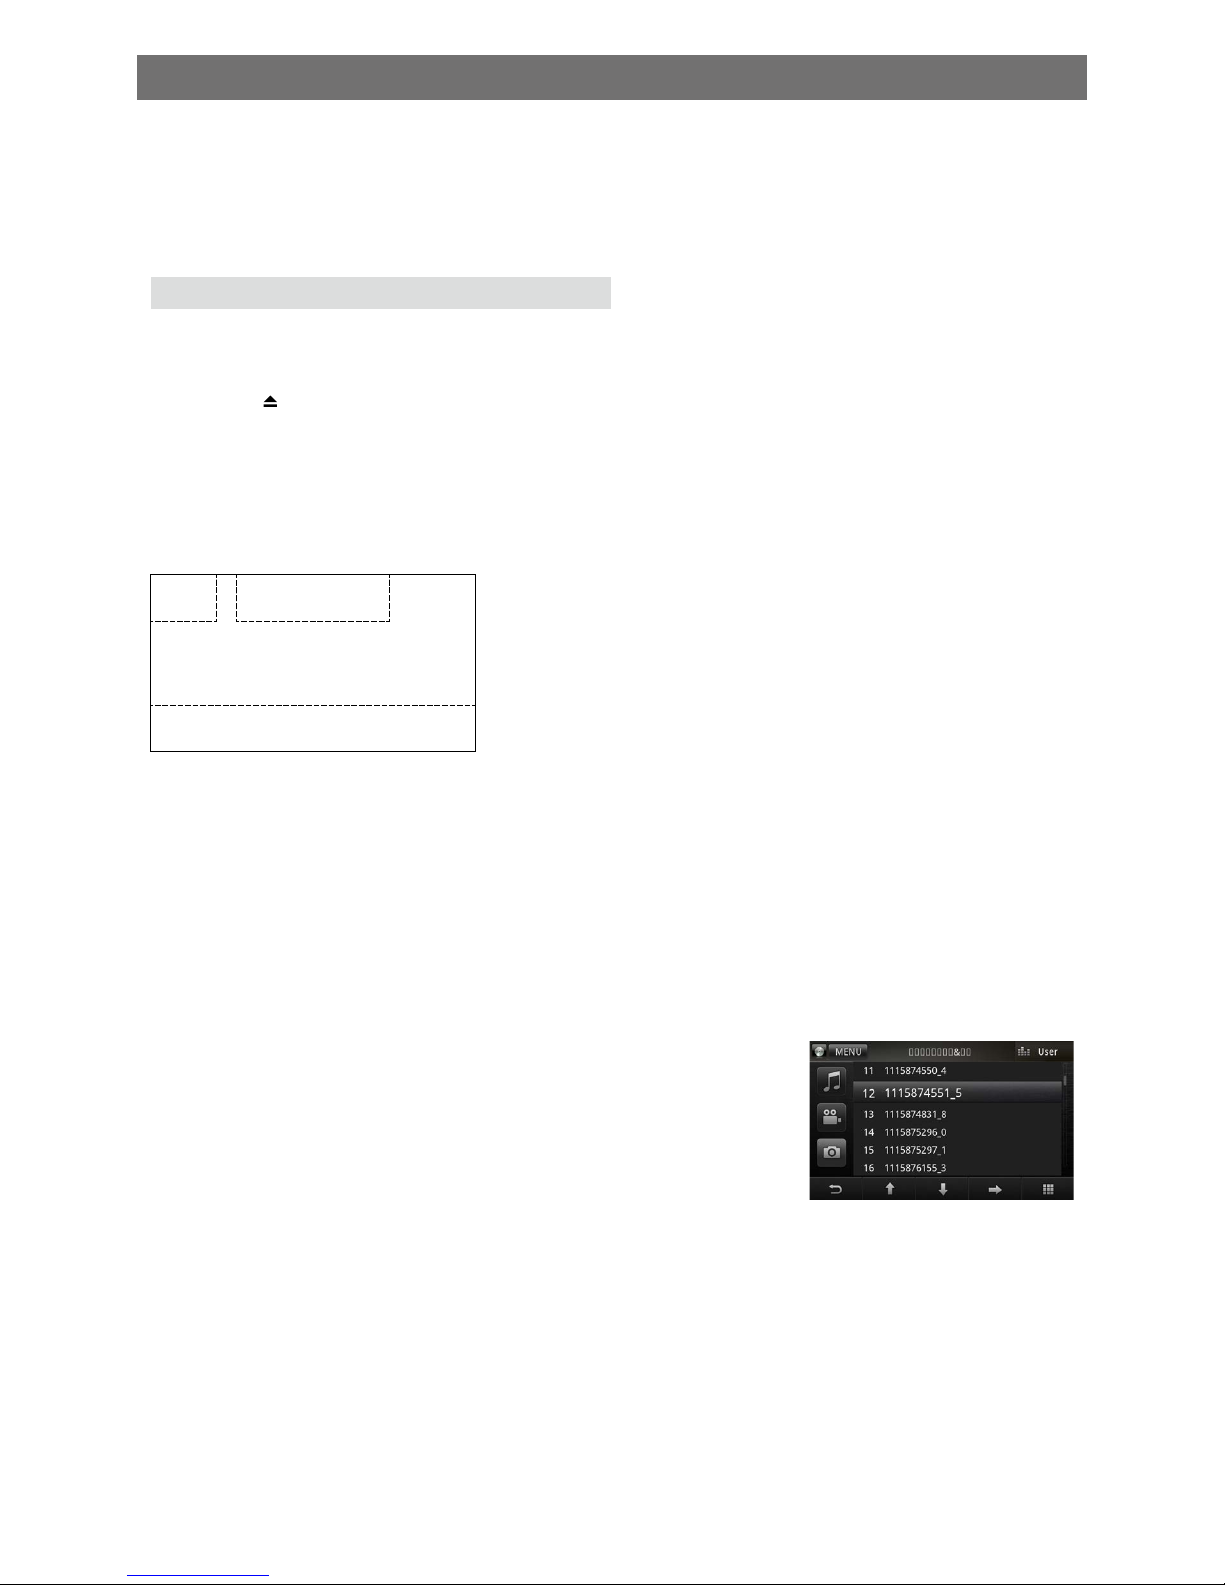
The touch key areas for DVD playback are outlined below:
B
C
A
A: Return the main menu
B: Play the video and display playback information
C: Display onscreen control menu
Connect USB Device
1. Insert the small end of the USB cable to the Mini-USB socket on the bottom of the front panel.
2. Connect the other end of the cable to your USB device.
Remove the USB Device
1. Select other source on the main menu.
2. Remove the USB device.
Insert SD/MMC Card
Insert the MicroSD card into the MicroSD card slot on the
bottom of the front panel. Play starts automatically.
Remove the SD/MMC Card
1. Select other source on the main menu.
2. Press the card unit you hear a click sound.
3. Remove the card.
PLAY
Page 10
EN - 11
Play/Pause
1. Once a disc, USB or SD/MMC card is inserted, play starts
automatically.
For DVD movie, if a menu appears, touch the enter of the screen
to show control buttons. Then press [ ] to start play.
2. To pause, touch [ ].
To resume play, touch [ ] again.
Previous/Next
Press [ ] / [ ] key on the front panel or on the screen to skip to previous/next track/chapter.
Fast Forward/Backward
Press and hold the [ ] / [ ] key on the front panel or touch [ ] / [ ] key on the screen
repeatedly to playback fast forward/backward.
Search for a Folder
For video les
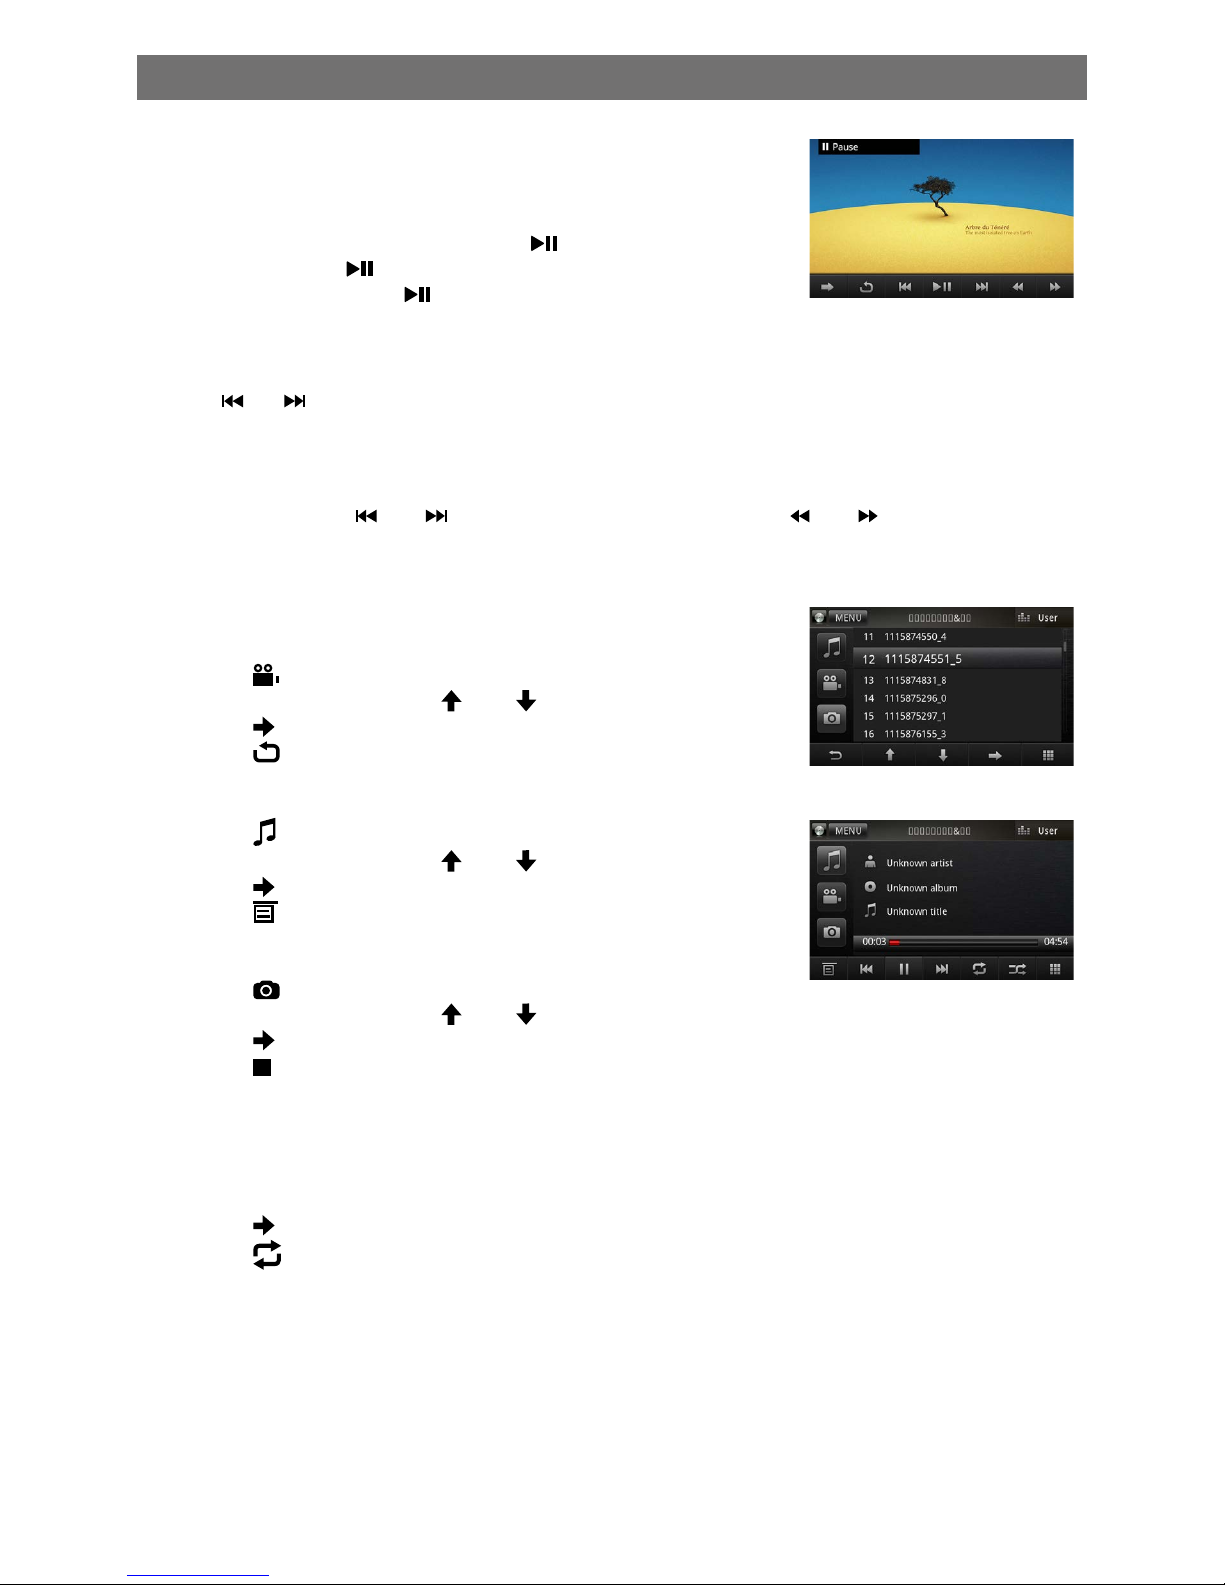
1. Touch [
] to display all available video folders.
2. Select a folder, then touch [
] or [ ] to select a le.
3. Touch [
] to start play.
4. Touch [ ] to stop play and resume to previous menu.
For audio les
1. Touch [
] to display all available audio folders.
2. Select a folder, then touch [
] or [ ] to select a le.
3. Touch [
] to start play.
4. Touch [ ] to stop play and resume to previous menu.
For picture les
1. Touch [
] to display all available picture folders.
2. Select a folder, then touch [
] or [ ] to select a picture.
3. Touch [
] to view the picture.
4. Touch [
] to resume to previous menu.
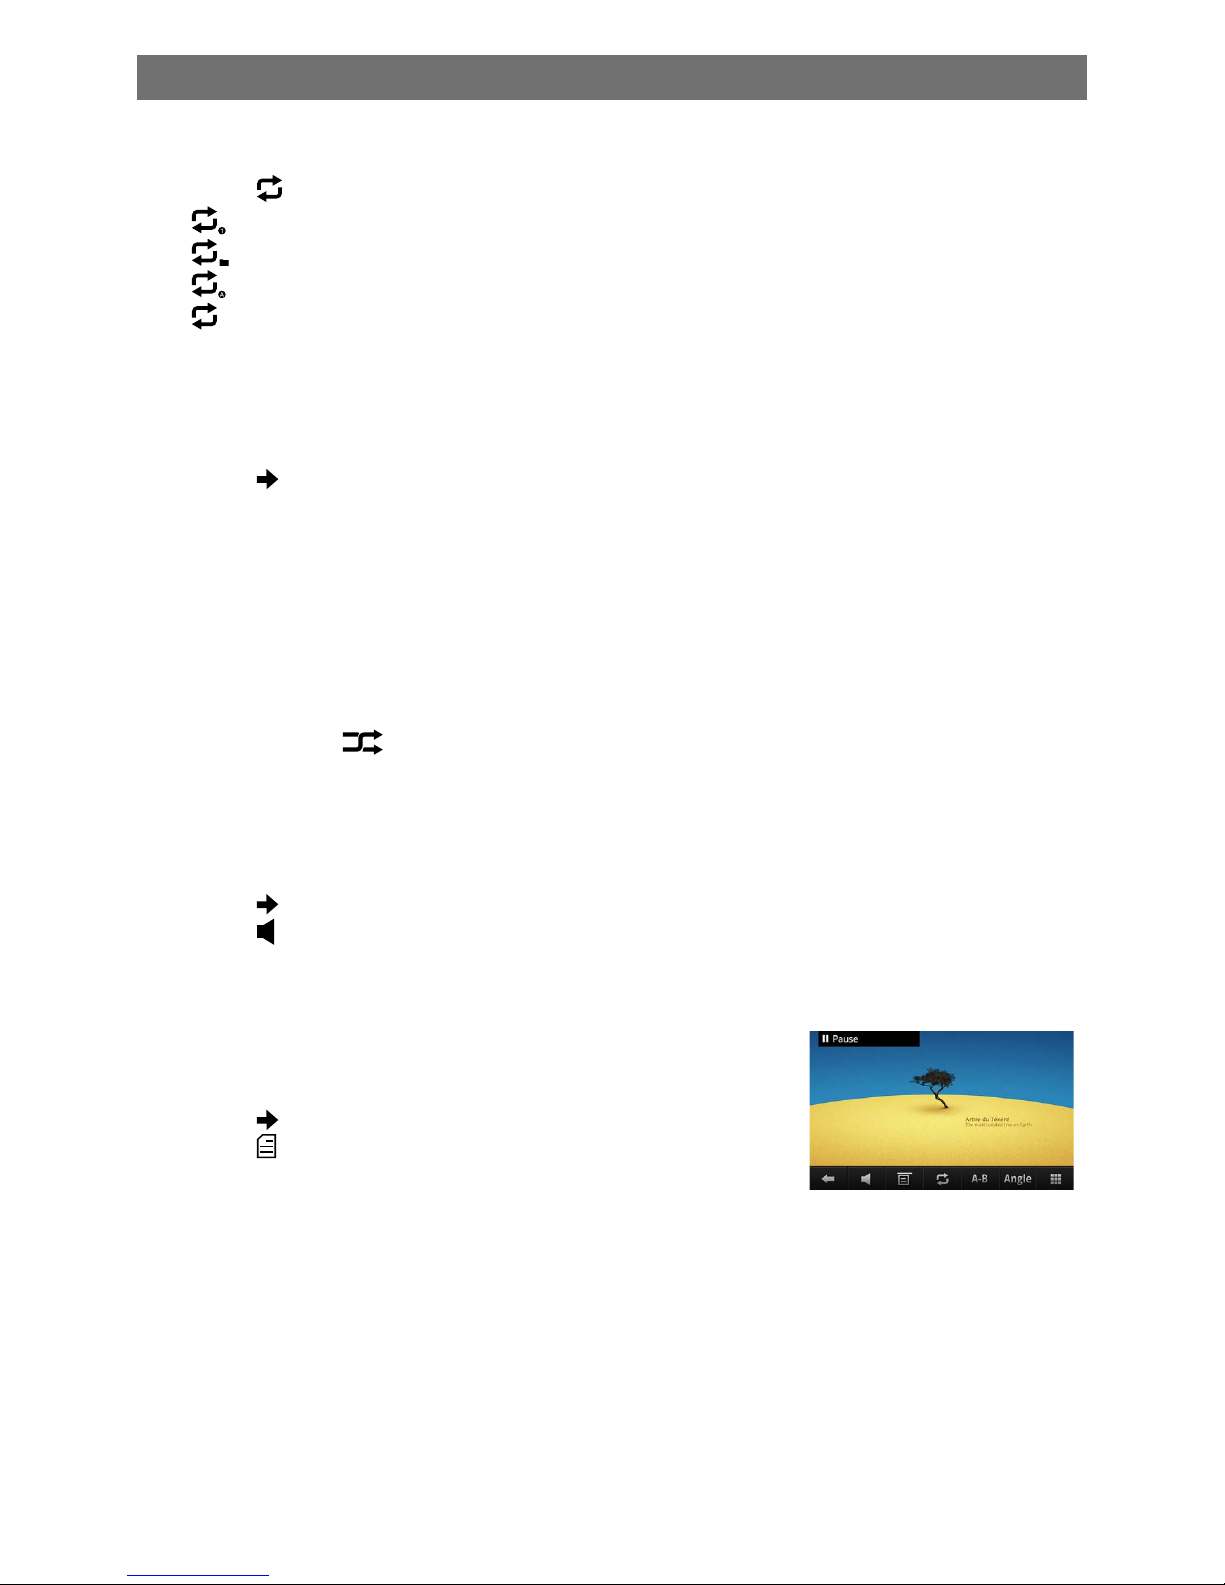
Repeat
For DVD/VCD movie disc:
1. Touch bottom half of the screen to display menu on the screen, if necessary.
2. Touch [
] to display the 2nd menu.
3. Touch [
] to select:
DVD
Repeat chapter: play the current chapter repeatedly.
Repeat title: play all chapters in the title repeatedly..
Repeat off: cancel repeat play.
VCD
Repeat single: play the current single repeatedly.
Repeat all: play all in the all repeatedly.
Repeat off: cancel repeat play.
PLAY
(DVD)
(CD/MP3)
Page 11
EN - 12
For CD/MP3/WMA les:
1. Touch anywhere except the upper left corner to display menu on the screen, if necessary.
2. Touch [
] to select:
[
]: Play the current chapter repeatedly.
[
]: Play all the tracks in the folder repeatedly.
[
]: Play all the tracks repeatedly.
[
]: Cancel repeat play
Repeat A-B
You can repeat a specic of video le (repeat A-B).
1. Touch bottom half of the screen to display control menu, if necessary.
2. Touch [ ] to display the 2nd menu, if necessary.
3. Touch [ A-B ] repeatedly to mark:
Repeat A-: the start of the section to repeat.
Repeat A-B: the end of the section to repeat.
The selected section plays repeatedly.
4. To exit A-B repeat mode, touch A-B repeatedly, [Repeat A-B off] is displayed.
Random Play
You can play audio tracks/les in random order.
During play, touch [
] button on the screen to turn random play on or off.
Select Audio Mode
When you play VCDs, you can select an audio mode (R/L/Stereo).
1. During play, touch bottom half of the screen to display menu on the screen, if necessary.
2. Touch [ ] to display the 2nd menu.
Touch [
] repeatedly until the audio mode is selected.
Select Subtitle Language
For DVD or Divx discs that contain two or more subtitle languages.
1. During play, touch bottom half of the screen to display menu on
the screen, if necessary.
2. Touch [ ] to display the 2nd menu.
3. Touch [
] repeatedly to select a language.
The selected language is displayed.
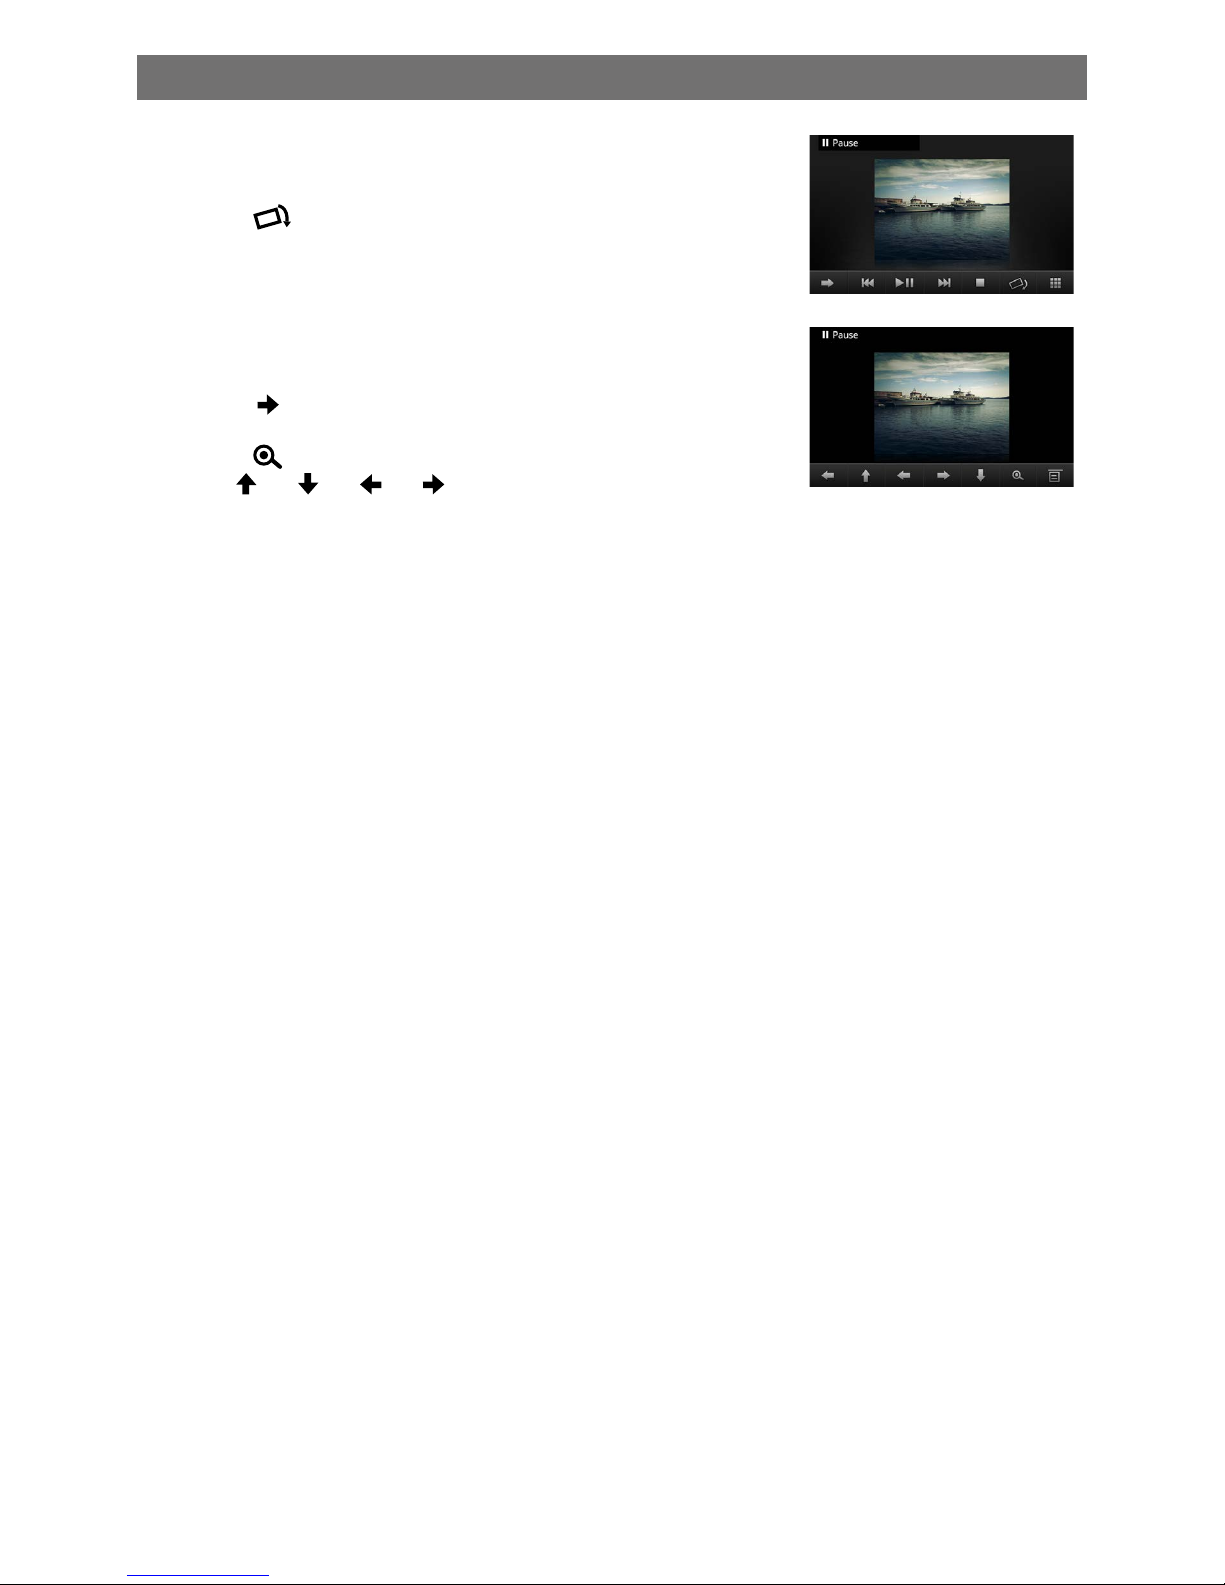
Change View Angle
Some DVDs contain alternate scenes,such as scenes recorded from different
camera angles.For such DVDs,you can select from the available alternate scenes.
1. During play, touch bottom half of the screen to display control bar, if necessary.
2. Touch [ ANGLE ] on the screen.
The view angle is changed.
PLAY
Page 12
EN - 13
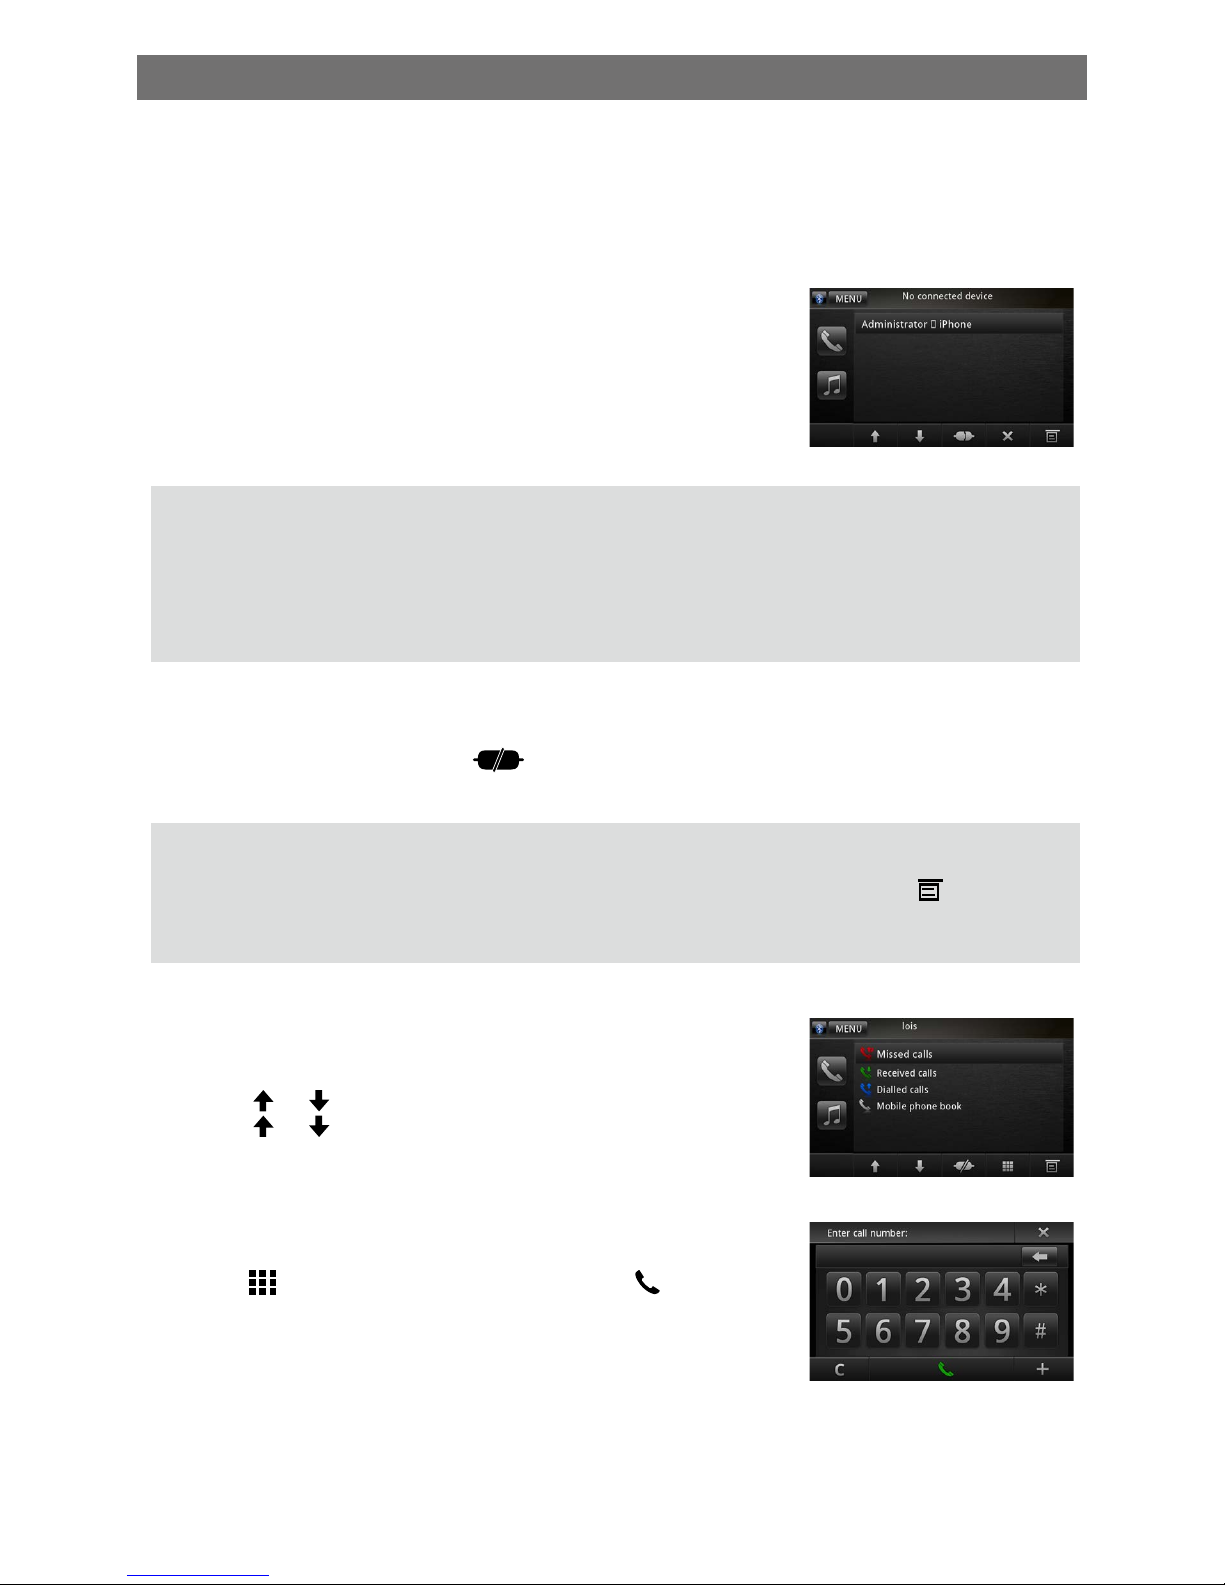
Rotate Pictures
1. When you view pictures,touch bottom half of the screen to
display menu on the screen, if necessary.
2. Touch [
] repeatedly to rotate the picture.
Zoom
You can zoom in pictures for a close view.
1. When you view pictures, touch bottom half of the screen to
display menu on the screen, if necessary.
2. Touch [ ] on the bottom left of the screen to display the 2nd
menu, if necessary.
3. Touch [
] repeatedly to zoom in the picture.
4. Use [
], [ ], [ ], [ ] keys to pan through the enlarged
picture.
PLAY
Page 13
EN - 14
You can make or receive phone calls with Bluetooth-enabled phones through the unit. You can
also listen to music from a Bluetooth-enabled device.
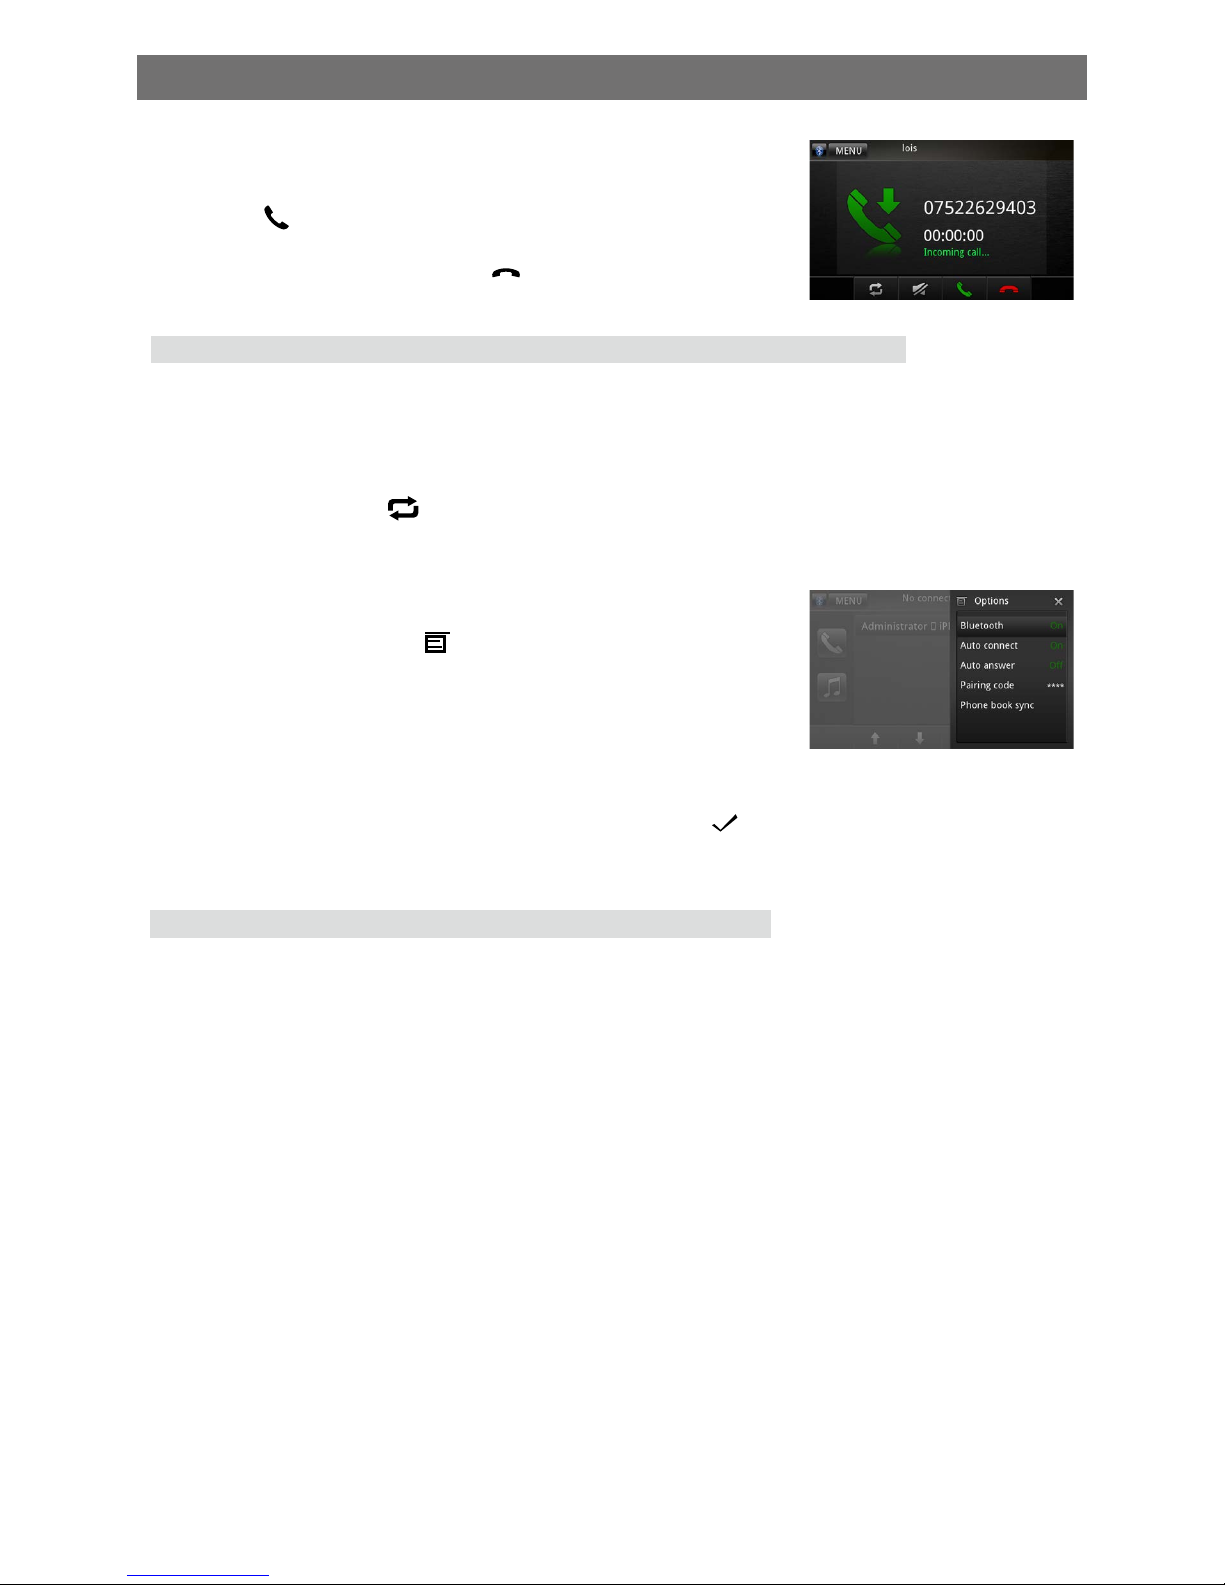
Pair the Bluetooth-enabled devices
To connect your Bluetooth device to the unit, you need to pair the device to the unit. Pairing needs
only to be done once. You can pair up to 5 devices.
1. Turn on the Bluetooth function on the device.
2. Search for Bluetooth device with the device.
3. Select model name in the pairing list.
4. Enter default password“0000”.
If pairing succeeds, phone call record is displayed.
Tip:
• The operational range between this unit and a Bluetooth device is approximately 10 meters (30
feet).
• Before you connect a Bluetooth device to this unit,familiarize yourself with the Bluetooth
capabilities of the device.
• Compatibility with all Bluetooth device is not guaranteed.
• Any obstacle between this unit and a Bluetooth device can reduce the operational range.
• Keep this unit away from any other electronic device that may cause interference.
Disconnect Bluetooth device
To disconnect one device, touch [ ].
Tip
• The device will also be disconnected when the device is moved beyond the operational range.
• If you want to reconnect the device to the unit, place it within the operational range.
• If you do not want to reconnect the device to the unit automatically, touch [
], then touch
[ Auto connect ] until [ Off ] appears after [ Auto connect ]. For details, see the “Adjust Bluetooth
settings” section.
Make a call
1. Select [Bluetooth] in the home menu.
2. Pair the phone with the unit.
3. Touch [
], [ ] to select the paired phone, touch it to select.
4. Touch [
], [ ] to search for phone number from the following
list:
∙ [Missed calls]
∙ [Received calls]
∙ [Dialed calls]
∙ [Mobile phone book]
Or touch [
] to dial number directly, then touch [ ] to dial.
Bluetooth mode
Page 14
EN - 15
Receive call
By default,all incoming calls are received automaticaly.
1. If there is incoming call, [Incoming call...] ashed on the screen.
Touch [
] to receive the call, and speak into the Bluetooth
microphone.
2. When conversation ends, touch [
](red) to terminate the call.
Tip
∙ You can select to receive calls manually by set [Auto answer] to [Off] status.
Switch Phone Call to the Mobile
If you do not want your passenger to hear your incoming call,you can switch the
call to the mobile.
1. During talking, touch [
].
The voice is transferred from the unit’s loudspeaker to the mobile phone.
Adjust Bluetooth Settings
1. In Bluetooth menu,touch [ ].
The option menu is displayed.
2. Touch on the selected option to change the setting.
∙ [Bluetooth]: to turn on or off “Bluetooth” function.
∙ [Auto Connect]: to turn on or off “Auto connect” function.
∙ [Auto Answer]: to turn on or off “Auto answer” function.
∙ [Pairing Code]: to set paring code.
∙ [Phone Book Sync]: to synchronize phone book, touch [ ] on the sub-menu popped out.
Tip
∙ You can also adjust Bluetooth settings in the “Settings”menu.
Bluetooth mode
Page 15
EN - 16
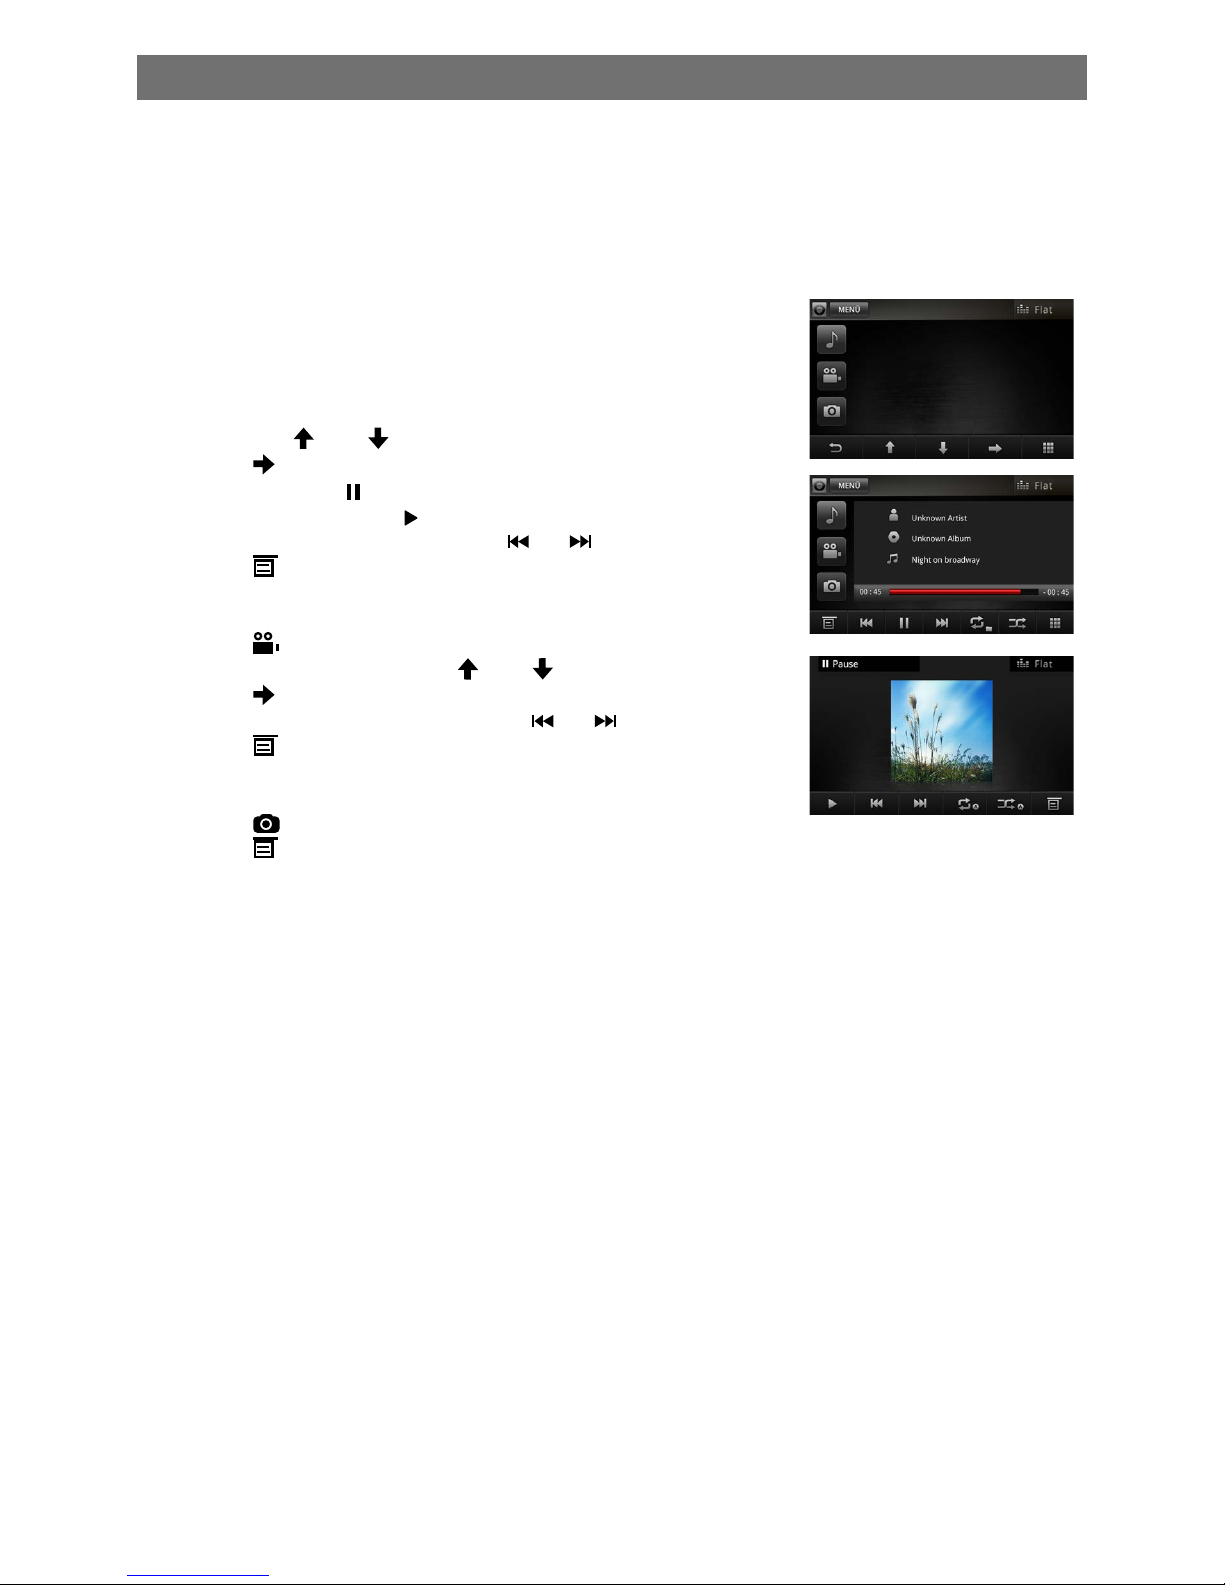
Select iPod as playing source
Turn on the unit’s power, and connect an iPod to the unit via an iPod cable, the unit will load the
iPod automatically. (Refer to <Appendix> )
Play
On the iPod main menu, operate the iPod via touch panel.
For audio les
1. When the music root menu appears on the screen,
touch an option (such as PlayLists, Artists...),
then touch [
] or [ ] to select a le.
2. Touch [
] to play the selected le.
3. To pause, touch [ ].
To resume play, touch [ ].
4. Skip to previous/next track, press [ ] / [ ] key.
5. Touch [ ] to stop and return to the root menu.
For video les
1. Touch [
] to display video folders root.
2. Touch an option, then touch [
] or [ ] to select a le.
3. Touch [
] to start play.
4. Skip to previous/next chapter, press [ ] / [ ] key.
5. Touch [ ] to stop and return to the root menu.
For picture les
1. Touch [ ], then operate on your iPod.
2. Touch [ ] to return to the root menu.
iPod
Page 16
EN - 17
DAB mode
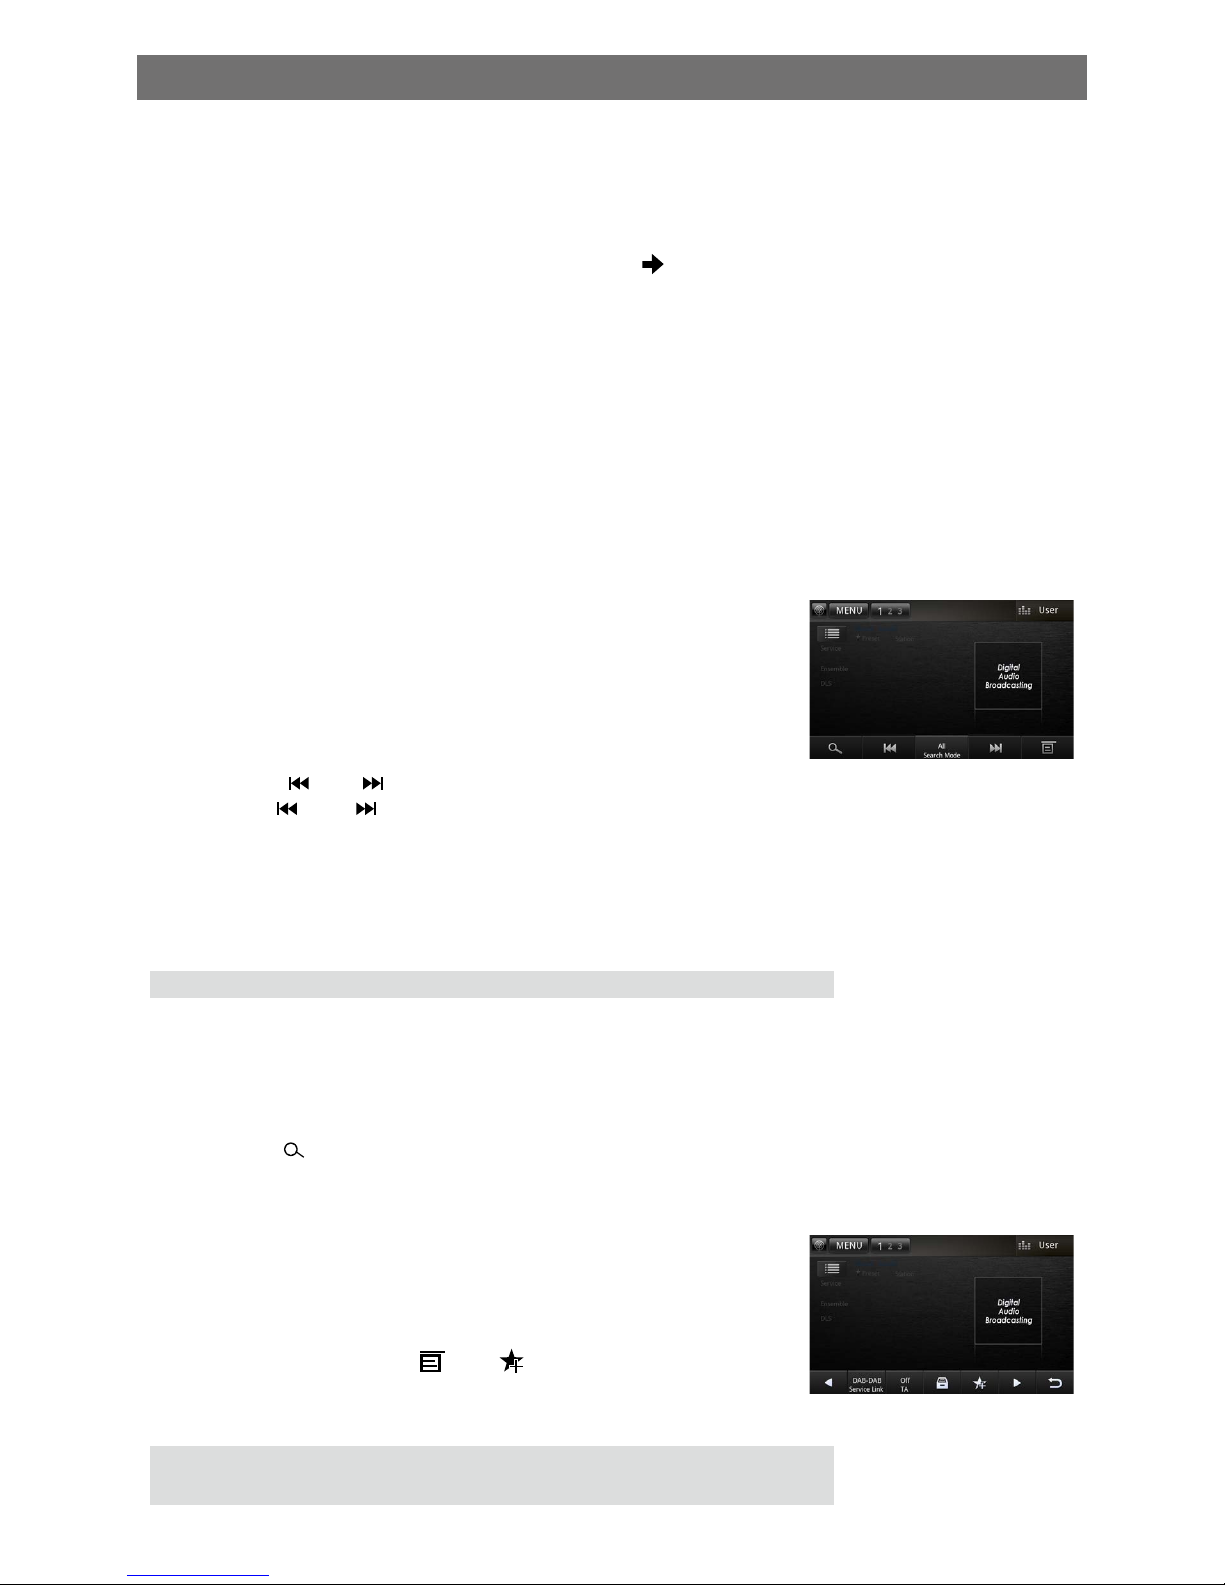
Select DAB as playing source
1. Press the [MENU] key on the front panel or touch the top left corner of the screen to open the
SOURCE MENU.
2. Select [DAB+] on the main menu to enter DAB mode.
If DAB is not on the current source menu, touch [ ] button on the bottom of the screen.
* When playing, touch the bottom half of screen to show operation bar.
Select one DAB band
Touch the [ 1 2 3 ] button on top left of the screen to select one radio band among DAB1, DAB2
and DAB3.
Tune
There are four search mode. You can touch the middle of operation bar to select search mode
from followings:
1. Preset Search
Search preset service one by one.
2. Current Search
Service Search in the current Ensemble.
3. Manual Search
During manual tuning, the frequency will be changed in steps.
Touch the [ ] or [ ] button on the operation bar to tune in a higher / lower station.
Hold the [ ] or [ ] button on the operation bar for more than 2 seconds to seek a higher /
lower station.
To stop searching, repeat the operation above or press other buttons having radio functions.
4. ALL Search
Service Search for all stored by Station search.
Note:
When a station is received, searching stops and the station is played.
Preset scan
Preset scan receives the stations stored in preset memory in order. This function is useful when
searching for a desired station in memory.
1. Press the [ ] button on the operation bar.
2. When a desired station is tuned in, press the same position to continue receiving that station.
Auto store
Only stations with sufcient signal strength will be detected and
stored in the memory.
To start automatic station search, touch following buttons on the
operation bar in sequence: [
] -> [ ] -> [OK] .
To stop auto store, press other buttons having radio functions.
Notes:
1. After auto store, the previous stored stations will be overwritten.
2. The unit has 3 bands, such as DAB1, DAB2 and DAB3.
Page 17
EN - 18
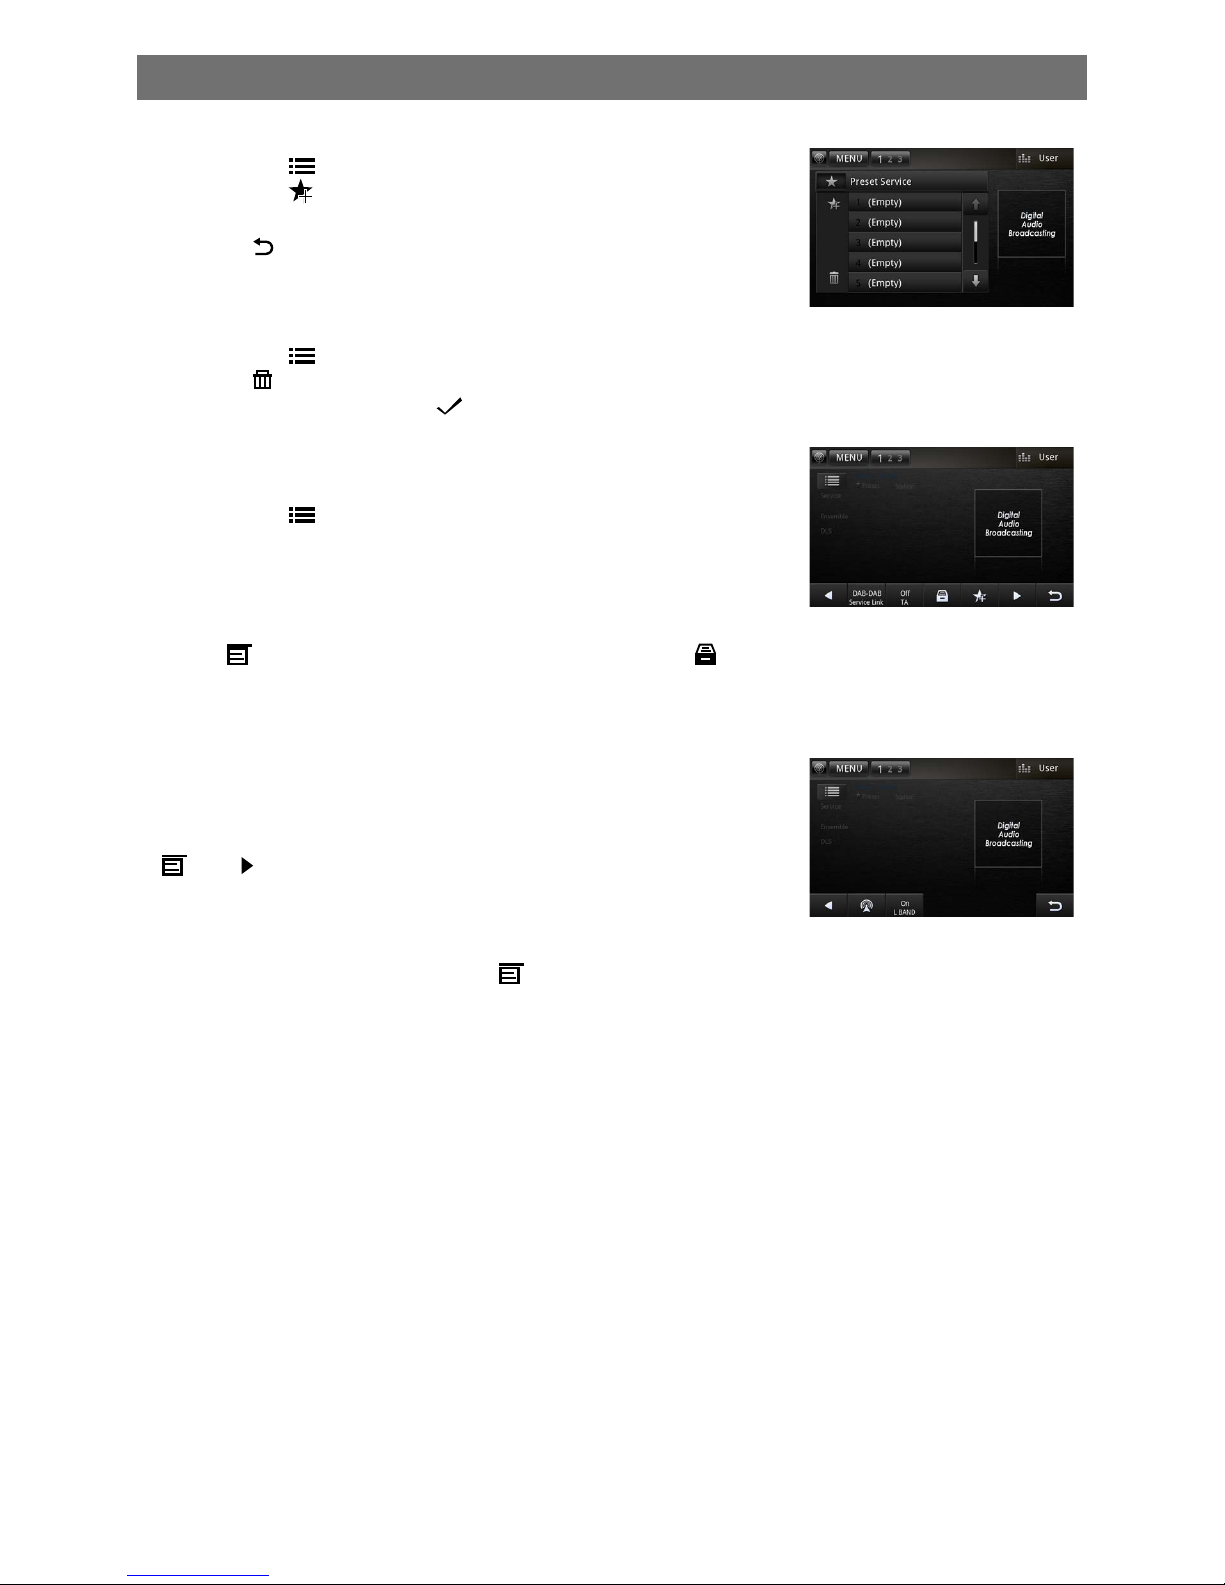
Manual store
1. Touch the [ ] button to show list menu.
2. Touch the [
] button to enter store preset service menu.
3. Select a position to store current service.
4. Touch [
] to exit.
Delete stored services
1. Touch the [ ] button to show list menu.
2 Touch [ ] to enter the delete menu.
3. Select services and touch [
] to delete.
Recall the stored services
1. Touch the [ ] button to show list menu.
2. Touch to select a preset service.
PTY Search
Touch [ ] button on the operation bar, and then touch [ ] to show PTY type.
Drag up/down to scroll, and touch to select.
Touch [Seek] to seek a channel within the selected category.
L-BAND ON/OFF
To turn on L-BAND function, touch following buttons on the
operation bar in sequence:
[ ] -> [ ] -> [L Band] -> [OK] .
Service Link
To select Service Link mode, touch [ ] button on the operation bar, then touch [Service Link]
to choose “DAB-DAB”, “DAB-RDS”, “DAB-ALL” or “Off”.
DAB mode
Page 18
EN - 19
Adjust volume
To adjust volume, rotate the volume knob on the front panel.
Mute
When playback, press the [MUTE] button, the sound is cut off.
To resume sound, press the button again.
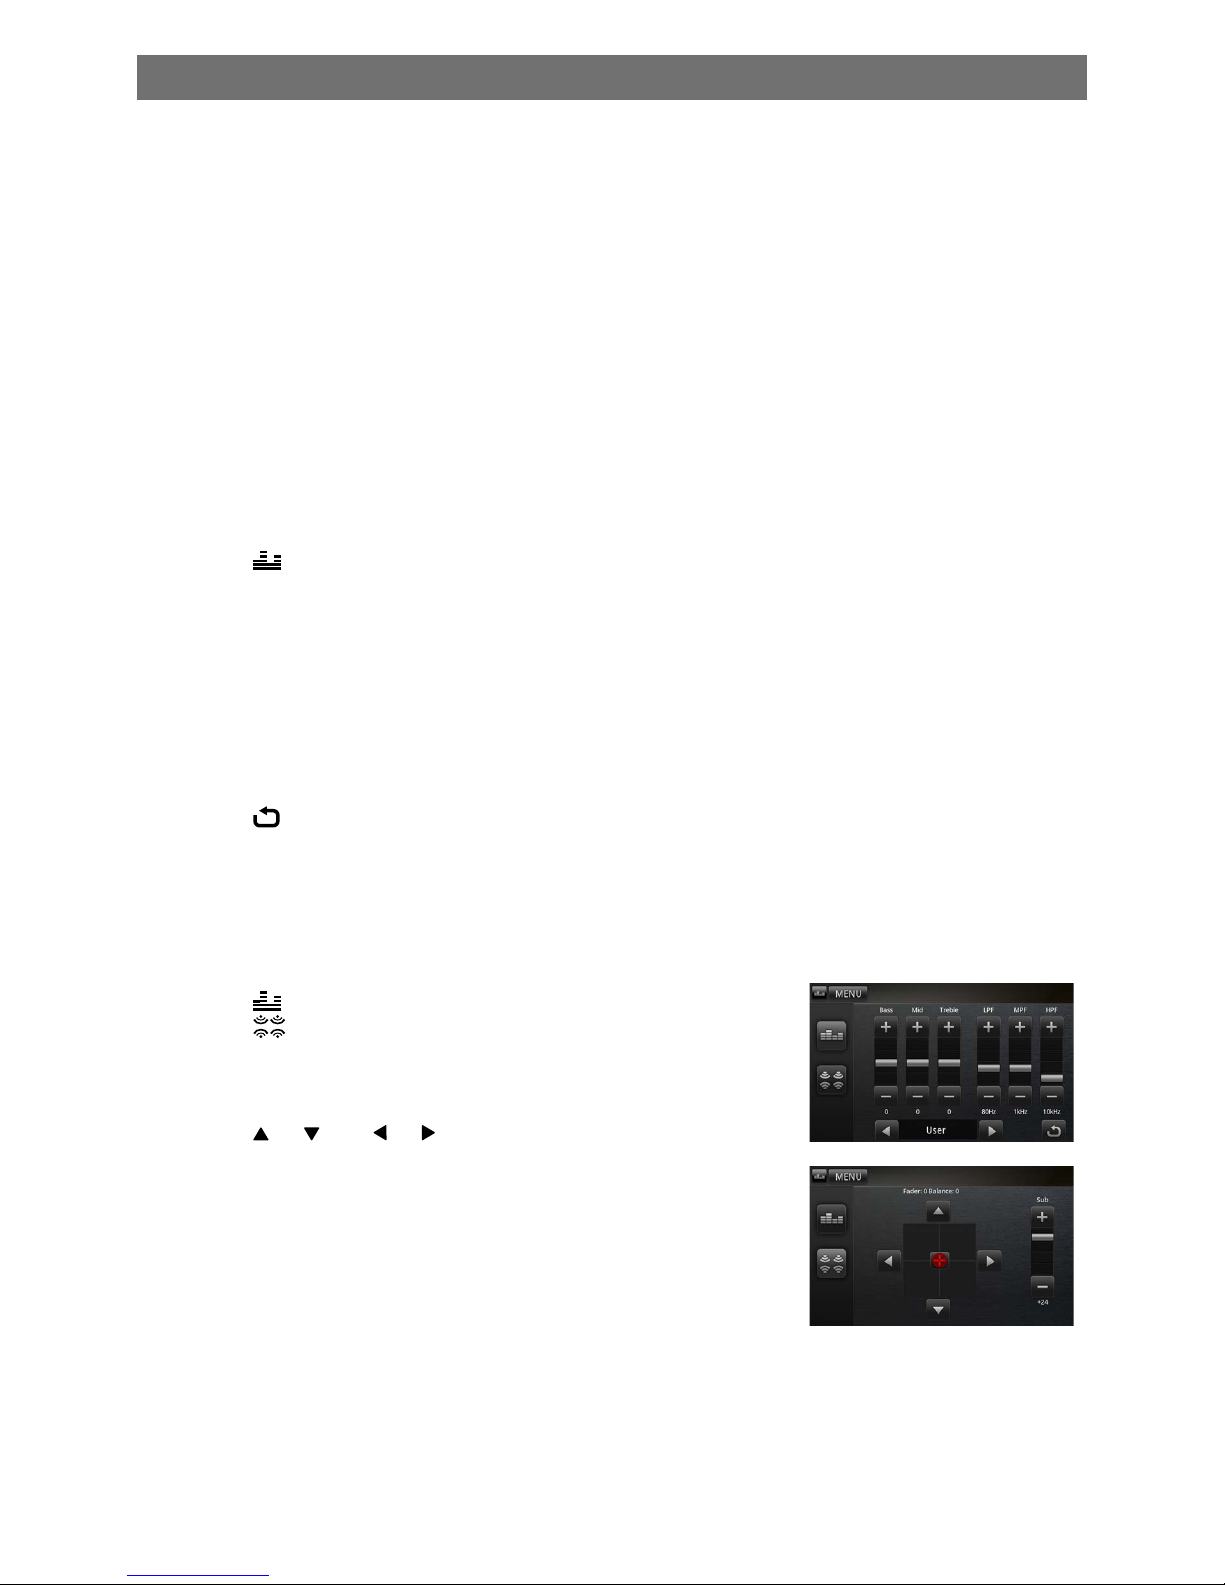
Select preset equalizer
You can select preset equalizer:
∙ [User] ∙ [Jazz]
∙ [Techno] ∙ [Optimal]
∙ [Rock] ∙ [Flat]
∙ [Classic] ∙ [Pop]
1. Touch [ ] on the screen.
The current Equalizer setting is displayed.
2. Touch [ + ] or [ - ] to select an EQ.
3. Touch [ + ] or [ - ] to adjust belowsettings:
∙ [Bass] bass range: -14 to +14
∙ [Mid] middle range: -14 to +14
∙ [Treble]treble range: -14 to +14
∙ [LPH]low pass lter range: 60, 80, 100, 200
∙ [MPF]middle pass lter range: 0.5K, 1K, 1.5K, 2.5K
∙ [HPF]high pass lter rang: 10K, 12.5K, 15K, 17.5K
4. Touch [ ] to restore the above settings into default settings.
5. Touch the upper left corner of the screen to exit.
Adjust fader/balance
You can also adjust the front and rear speaker balance, the left and right speaker balance,and
subwoofer settings.
1. Touch [ ] on the screen.
2. Touch [
].
Below options are displayed:
3. Touch [ + ] or [ - ] to select subwoofer volume.
∙ [Sub] subwoofer volume: 0 to 24.
4. Touch [
], [ ] or [ ], [ ] to adjust fader/balance value.
∙ [Fade] fader range: - 24 to +24 (F=front range, R=rear range)
∙ [Balance] balance range: -24 to +24 (L=left range, R=rear range)
5. Touch the upper left corner of the screen to exit.
Adjust sound
Page 19
EN - 20
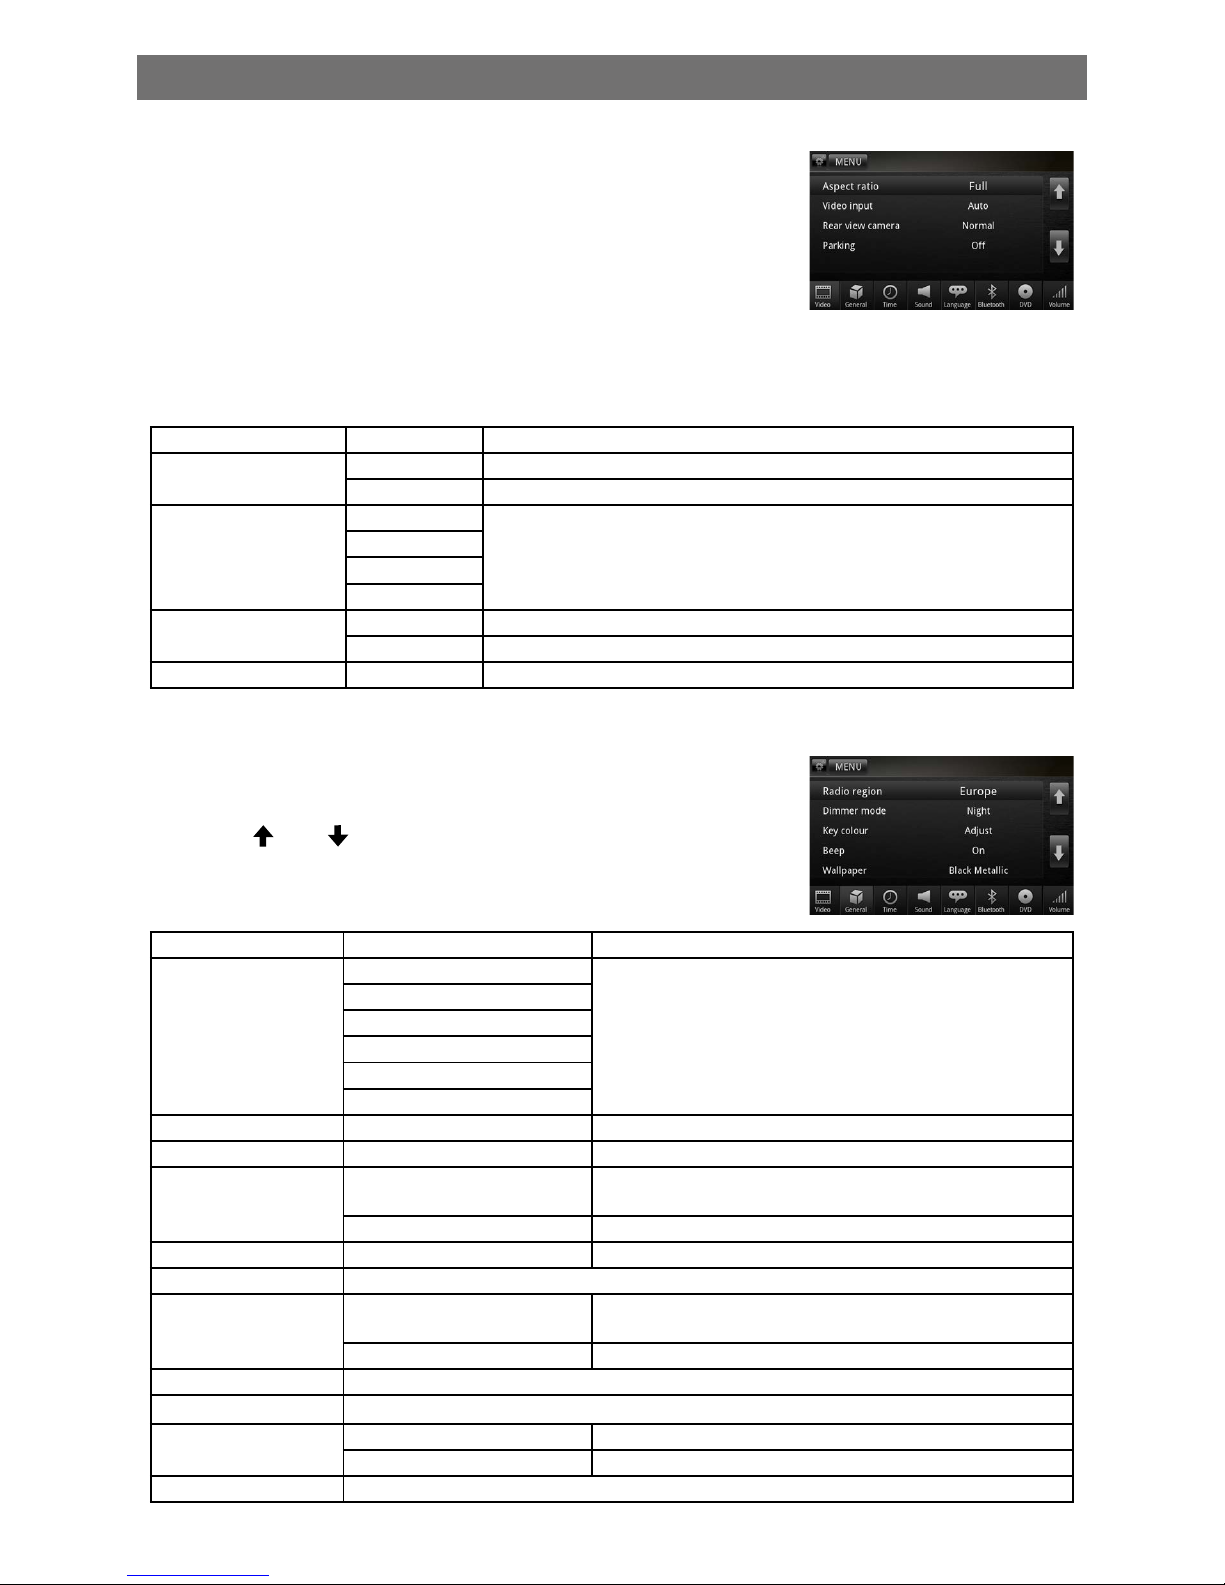
SETUP
Display System
1. Touch the upper left corner to display main menu.
2. Touch [Settings].
The settings menu is displayed.
Adjust Video Settings
1. Touch [Video].
2. Touch an option repeatedly to select:
3. Touch the upper left corner of the screen to exit.
Video settings Options Description
Aspect ratio
Full For widescreen display
Normal For normal display
Video input
Auto
Select Video input format.
NTSC
PAL
SECAM
Rear view camera
Normal When you drive in reverse, the rear view displayed in normally.
Mirror When you drive in reverse, the rear view is displayed inmirror.
Parking ON/OFF You can set the parking on or off.
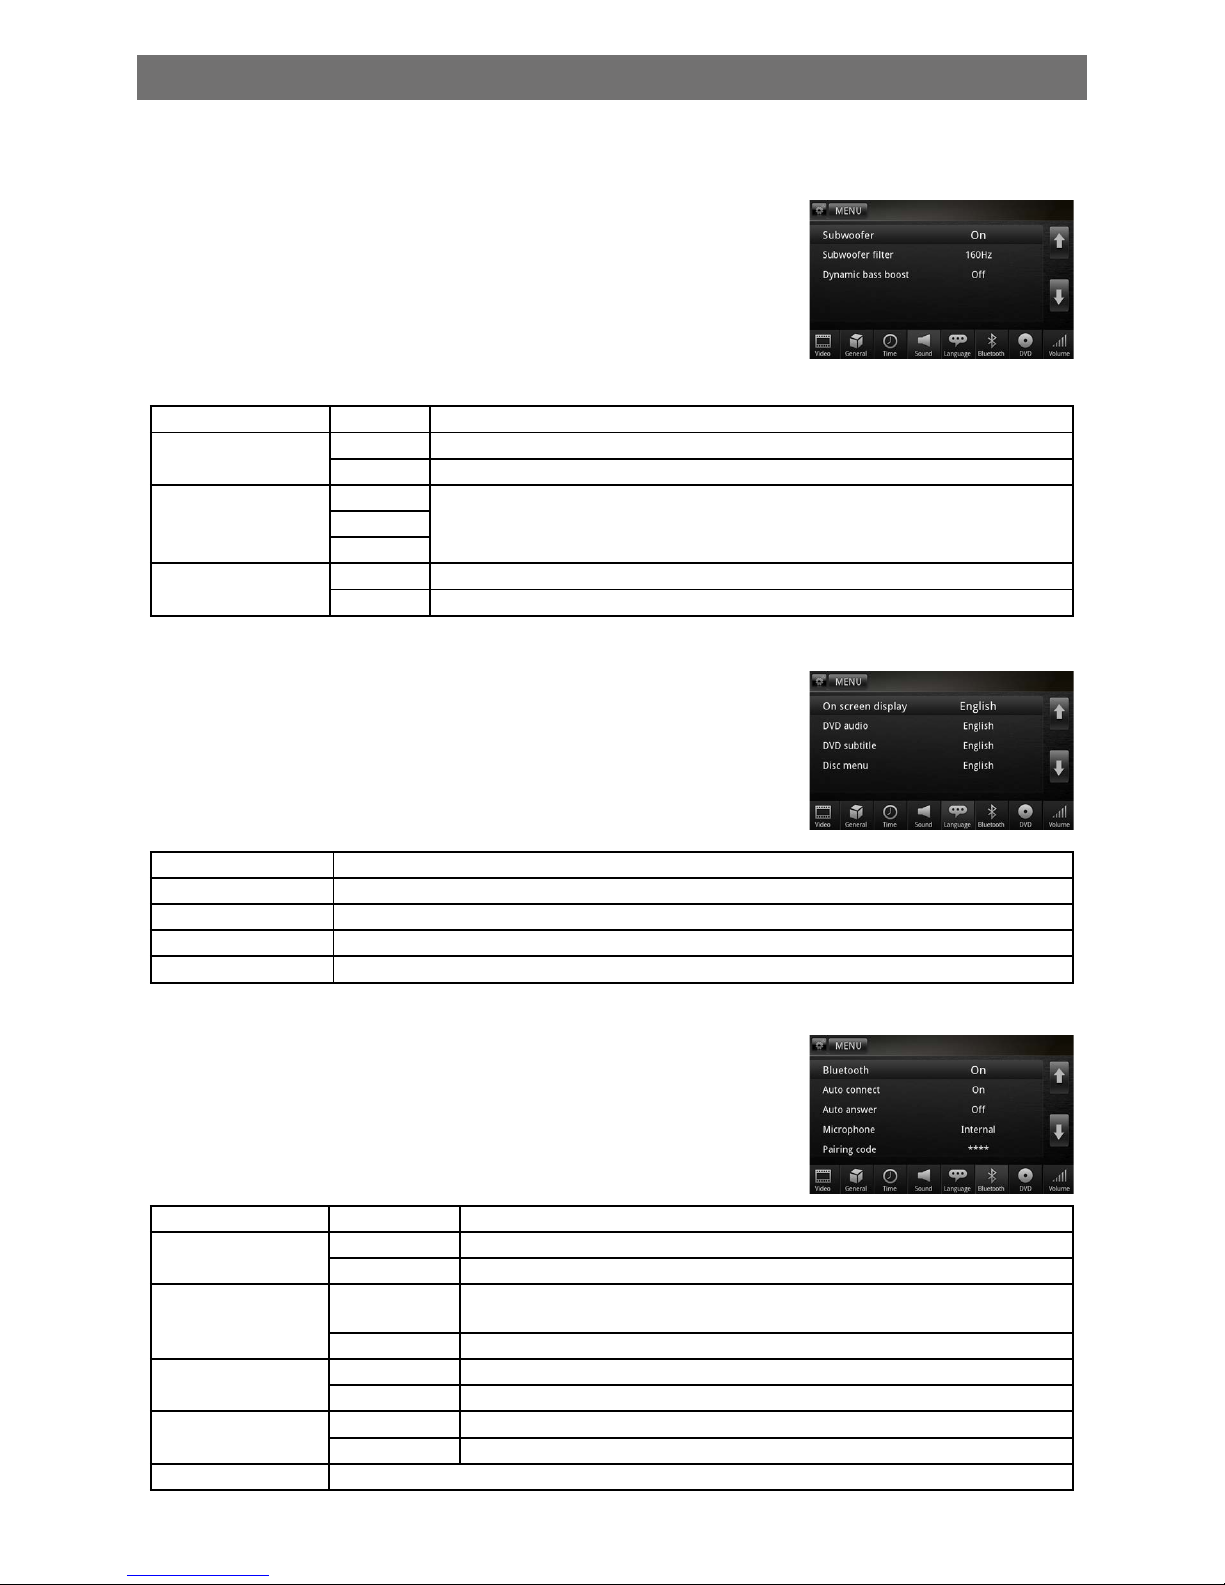
Adjust General Settings
1. Touch [General], if necessary.
2. Touch [
] or [ ] to highlight a setting.
3. Touch on the option to display/select an option.
4. Touch the upper left corner of the screen to exit sub-menu.
General settings Options Description
Radio region
USA
Select one that matches your location.
Asia
Japan
Europe
Europe (LW)
OIRT
Dimmer mode Night/Dark/Normal/Bright You can select the dimmer mode.
Key colour Adjust You can select the key colour.
Beep
On
Turn on the beep sound. Each time you press a button,
the unit beeps.
Off Turn off the beep sound.
Wallpaper 1/2/3/4/5/User Dened You can select the fond wall paper.
Calibration Calibrate the touch screen.
Screen Saver
On
Turn on the screen saver. If no operation for several
minutes, the unit will enter standby mode.
Off Turn off the screen saver.
ScrSaver Time Select screen saver time.
OS/MPU/MCU/MPEG Software version number.
Climate Display
On Display the aircondition information of the car.
Off Hide the aircondition information.
Load factory Reset the unit.
Page 20
EN - 21
Adjust Time Settings
Please referrence for <Basic operations>.
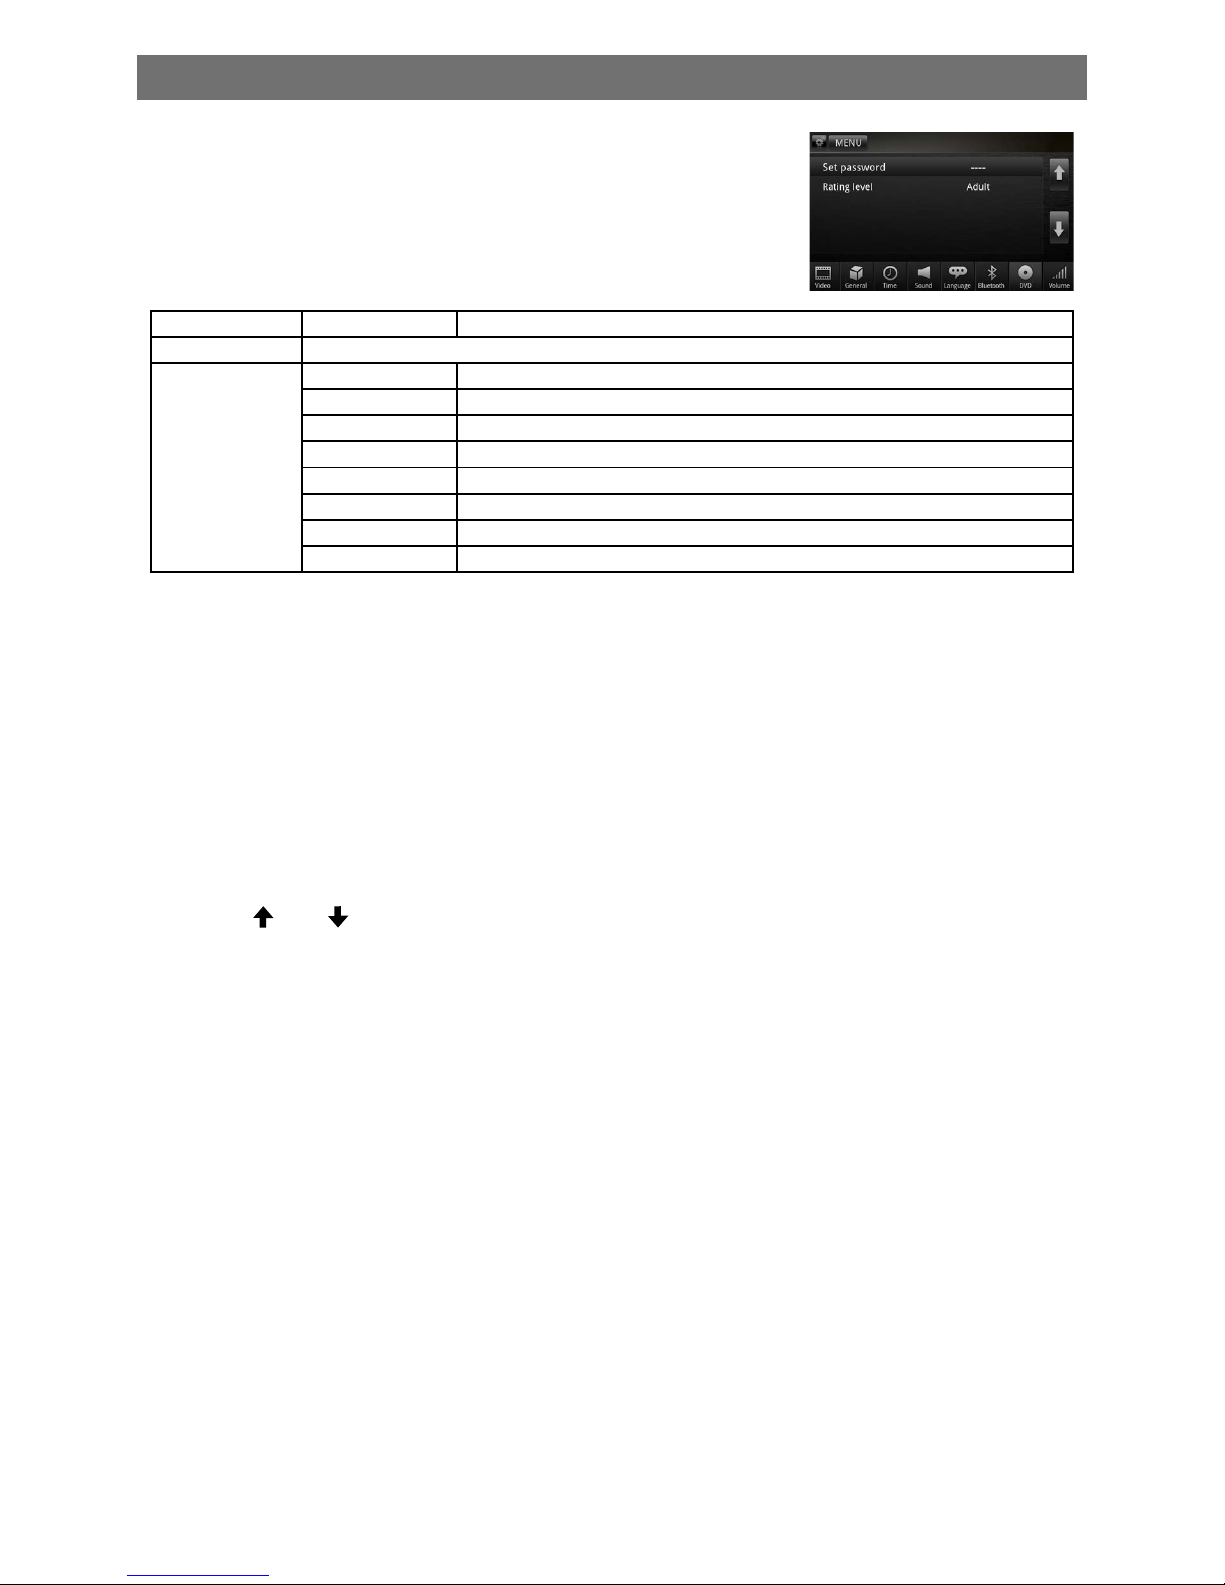
Adjust Sound Settings
1. Touch [Sound].
2. Touch an option repeatedly to select:
3. Touch the upper left corner of the screen to exit.
Sound settings Options Description
Subwoofer
On Turn on the subwoofer.
Off Turn off the subwoofer
Subwoofer lter
80Hz
Select subwoofer lter criteria.120Hz
160Hz
Dynamic bass boost
On The dynamic Bass Boost functions is on.
Off The loudness function is off.
Adjust Language Settings
1. Touch [Language].
2. Touch an option repeatedly to select.
3. Touch the upper left corner of the screen to exit.
Language settings Description
On screen display Select on-screen display language.
DVD audio Select DVD audio language. Options available are depends on DVD disc.
DVD subtitle Select DVD subtitle language. Options available are depends on DVD disc.
Disc menu Select DVD menu language. Options available are depends on DVD disc.
Adjust Bluetooth Settings
1. Touch [Bluetooth].
2. Touch an option repeatedly to select.
3. Touch the upper left corner of the screen to exit.
Bluetooth settings Options Description
Bluetooth
On Turn on the Bluetooth function.
Off Turn off the Bluetooth function.
Auto connect
On
If the pre-paired device is within the effective range, the unit re-coonects
to pre-paired device automatically.
Off Need to re-connect manually.
Auto answer
On Answer paired phone call automatically.
Off Answer phone call manually.
Microphone
Internal Use internal microphone
External Use external microphone (need to be connected)
Pairing code Set the password for pairing the unit with other Bluetooth device.
SETUP
Page 21
EN - 22
Adjust DVD Rating
1. Touch [DVD rating].
2. Touch an option repeatedly to select.
3. Touch the upper left corner of the screen to exit.
DVD rating Options Description
Set password Set password to restrict the play of discs. The supper password is 4321.
Rating level
Kid safe Acceptable for children.
G Acceptable for general viewers.
PG Parental guidance suggested.
PG-13 Unsuitable for children under age 13.
PG-R Recommend parents to restrict children under 17 to view.
R Restricted recommend parents to guide children under 17 to view.
NC-17 Unsuitable for children under age 17.
Adult Acceptable for adults only.
Adjust Volume Settings
You can set different volume for different modes.
1. Touch [Volume].
The volume setting sub-menu is displayed.
2. Touch on a source.
∙ [DVD] ∙ [DAB]
∙ [F-USB] ∙ [AV-IN]
∙ [SDHC] ∙ [DVB-T]
∙ [Radio] ∙ [Navigation]
∙ [Bluetooth] ∙ [R-iPod]]
3. Touch [
] or [ ] to assign value: 0 to 12.
When switches to the source,the volume increases automatically.
4. Touch the upper left corner of the screen to exit.
SETUP
Page 22
EN - 23
Listen to other devices
You can connect an external audio/video device to the unit.
1. Connect the car audio to the device with the supplied AV cable.
2. Touch the upper left corner to display the main menu.
3. Select [AV-IN].
4. Operated the connected the device(see the instructions manual of the device).
Tip
If you connected the system to other audio device through the REAR OUT L/R connectot(see
“Connect wires” section), touch [AV-IN] to listen to that device.
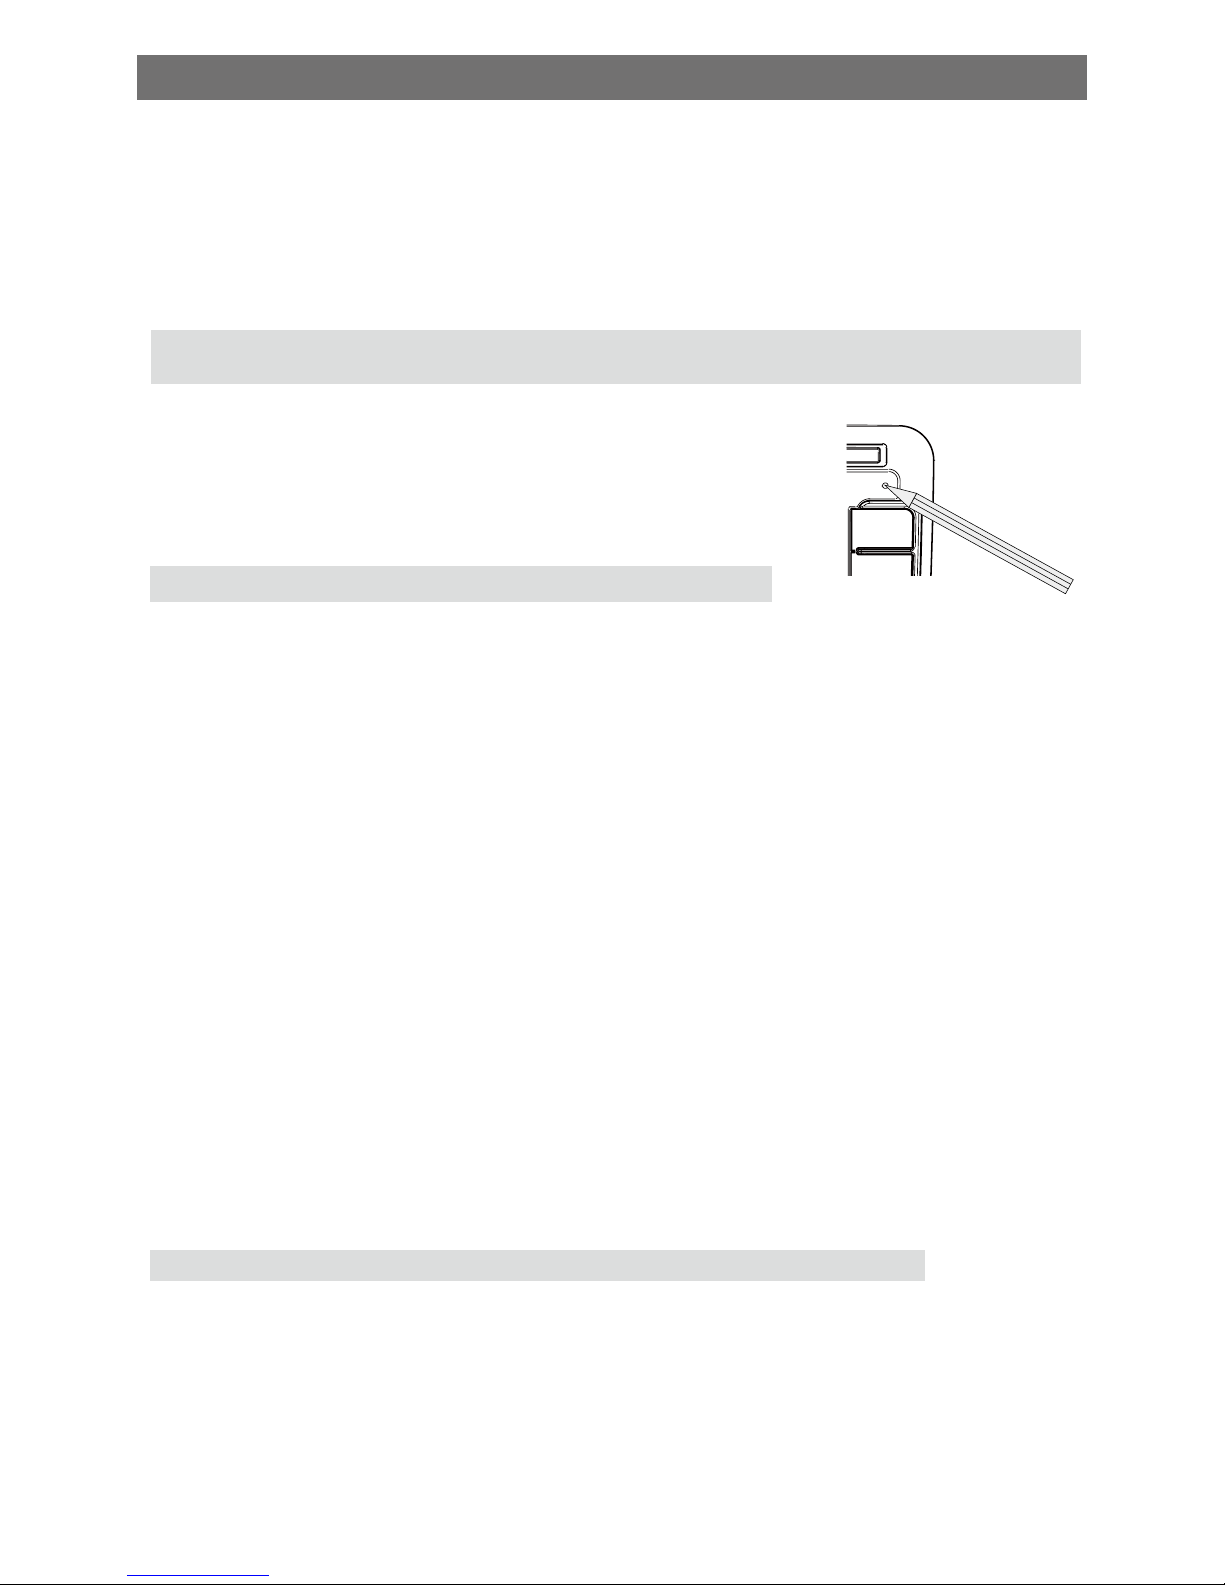
Reset
When the unit hangs up, you can reset it.
Press RESET with a ball-point pen or similar tool.
Tip
When the unit is reset, all the settings remain unchanged.
Remove the unit
To repair ,replace fuse ,or replace the unit with another car audio,remove it from
the dashboard.
1. Take off the trim plate.
2. Screw off the four screws on the left/right side of the unit.
3. Pull the unit out from the dashboard.
Replace fuse
If there is no power,the fuse may be damaged and need to be replaced.
1. Take out the unit from dashbpard.
2. Check the electric connection.
3. Buy a fuse that matches the voltage of the damaged fuse.
4. Replace the fuse.
GPS
1. Touch the upper left corner to display home menu.
2. Touch [Navigation], the navigation menu is display in a few seconds.
3. Refer to the map manual to operate the navigation tool.
Tip:
You can press [NAVI] button on the front panel to enter/exit the navigation system.
Other modes
Reset
Page 23
EN - 24
User-Dened Wallpaper
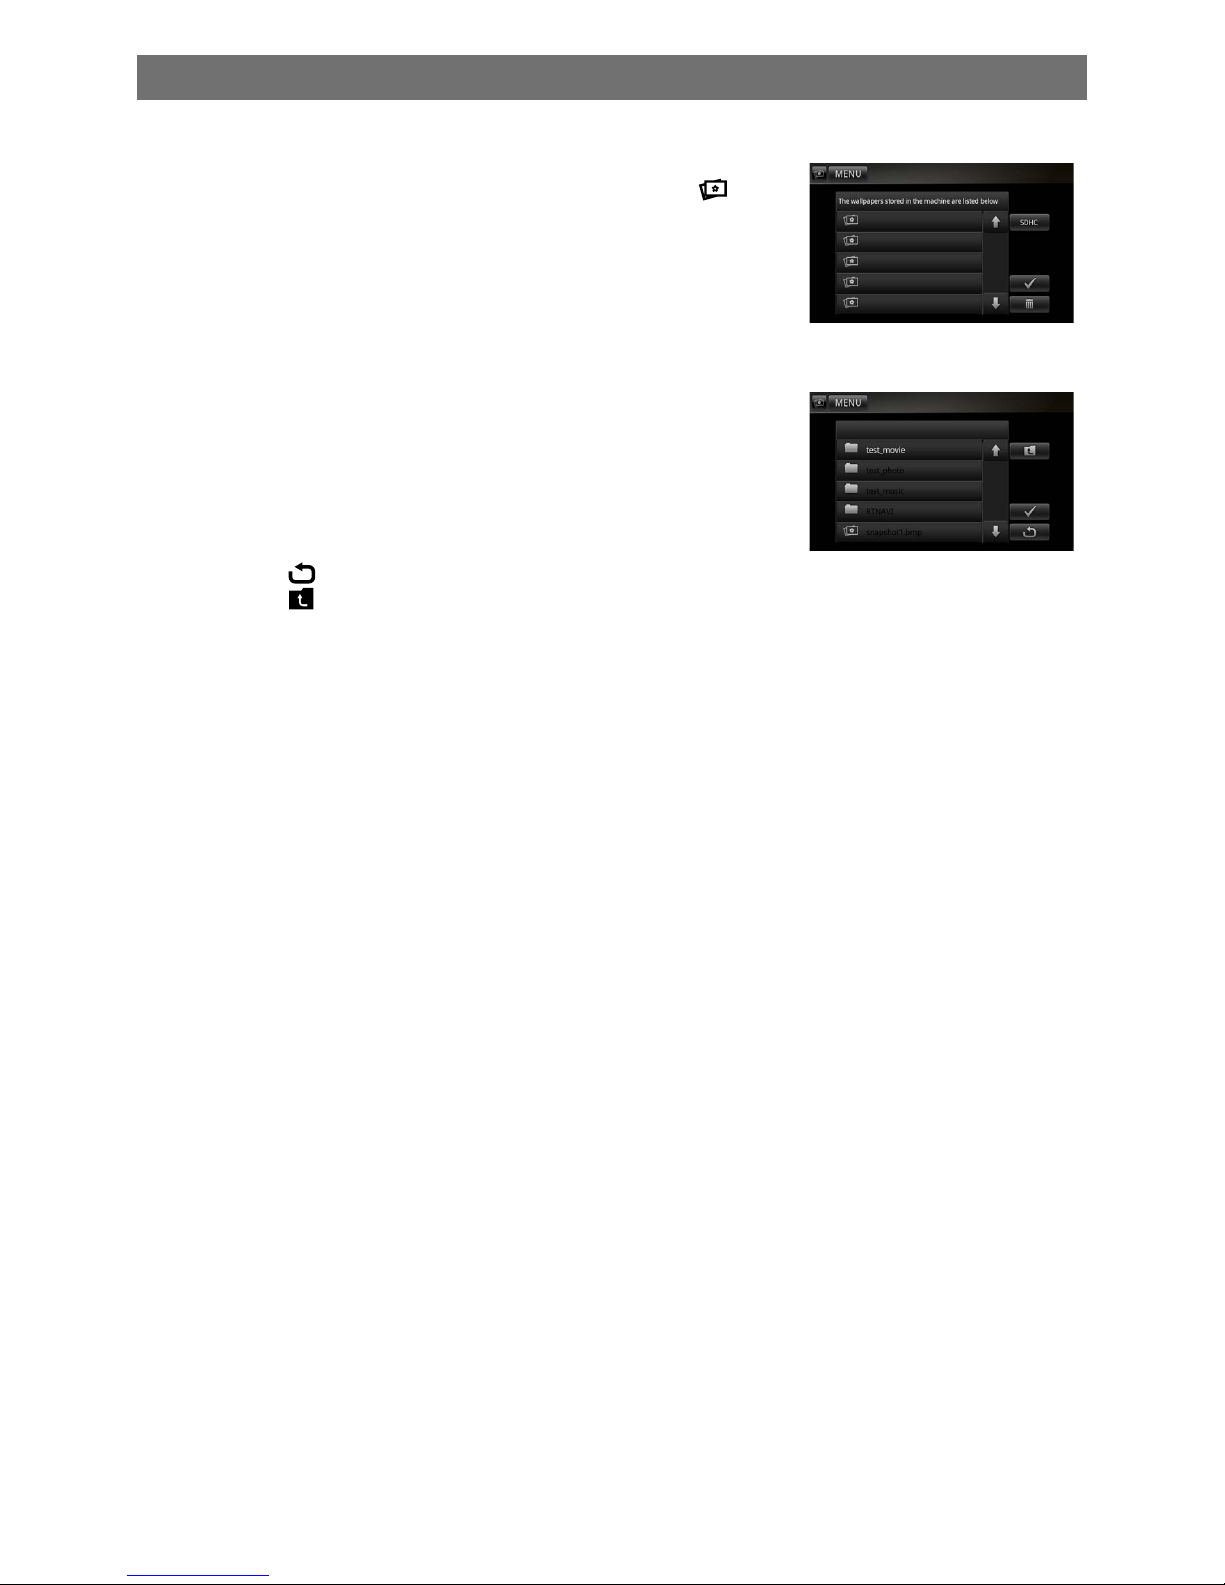
1. Entry
Select Setting mode on the Source menu, touch [
] on
the bottom left of the main menu. Or select [wallpaper] in the
General setting, then touch the downwards button of the listed
submenu until you find [user defined], touch it to enter userdened wallpaper management.
2. Load picture from SD Card and use it as wallpaper
If you insert the SD Card with pictures in it after your entry, you
may have to wait several seconds for the SD Card reading.
Otherwise you may use it directly.
To Select a picture in SD Card, you should touch “ SDHC”
button first, then the directories and the files will be listed. If
you select a directory and then touch “√” button , you will enter
the directory. If you select a picture and then touch “√” button,
the picture will be loaded into the flash and used as current
wallpaper at the same time.
Touch the [
] button to go back to view the pictures in ash.
Touch the [
] button at the right side of the screen to go back
to the upper directory.
3. Use or delete pictures in ash
After the 1st step, you can see the pictures in ash listed out,
you can preview them by select one of them, then touch the “√”
button to use it as wallpaper.
You can also delete pictures in ash which you are not currently
using. Select one and touch the garbage box button.
Other modes
Page 24

EN - 25
Geneal
Reference Supply Voltage .................................................................... 12V(DC)
Operating Voltage Range ........................................................10.8 - 16.0V(DC)
Max Operating Current .................................................................................15A
Grounding System .................................................... Car Battery Negative Pole
Dimensions(WXHXD) ............................................................ 178X100X173mm
Weight(main unit) ...................................................................................... 2.5kg
FM
Signal Noise Ratio ................................................................................ ≥55dB
Residual Noise Sensitivity(S/N=30dB) ................................................ 18dBμV
Frequency Response(±3dB) ....................................................20Hz~12.5KHz
Station Seeking Level .................................................................... 20~28dBμV
Distortion .............................................................................................. ≤1.0%
Stereo Separation(1KHz) .....................................................................≥25dB
Antenna Impedance ...................................................................................75Ω
AM
Residual Noise Sensitivity (S/N=20dB) ............................................... 30dBμV
Selectivity (±9KHz) ............................................................................... ≥35dB
LCD
Screen size ............................................................................. 6.2 inches(16:9)
Display resolution ........................................................................800X480dots
Contrast radio ............................................................................................. 400
Brightness......................................................................................... 280cd/m2
DVD Player
Signal / Noise Ratio ..................................................................................80dB
Dynamic Range ........................................................................................80dB
Distortion(line out) ................................................................................ ≤0.1%
Frequency Response(±3dB) .......................................................20Hz~20KHz
Maximum Output Power ........................................................................4×45W
Load Impedance ...........................................................................................4Ω
AUX IN
Distortion .............................................................................................. ≤0.5%
Frequency Response(±3dB) .......................................................20Hz~20KHz
Audio Input Level ....................................................................................1Vrms
Audio
Audio Output Impedance ......................................................................... 10KΩ
Audio Output Level .................................................................................2Vrms
Video
Normal Video Input Level(CVBS) .......................................................1.0±0.2V
Video Input Impedance...............................................................................75Ω
Video Output Impedance ............................................................................75Ω
Video Output Level .............................................................................1.0±0.2V
Environment
Operating Temperature .............................................................-10°C ~ +60°C
Storing Temperature..................................................................-20°C ~ +70°C
Operating Humidity ..................................................................... 45%~80%RH
Storing Humidity ......................................................................... 30%~90%RH
Notice:
When the unit is operated extremely, such as operated with maximum power output for a long
time, or the temperature is over 70°C, it will enter heat protection mode, the volume will be lower
automatically. This is normal.
Specications
Page 25

EN - 26
Supported formats:
·USB or memory le format:FAT16,FAT32
·Mp3 bit rate(date rate):32-320 Kbps and variable bit rate
·WMA v9 or earlier
·Directory nesting up to a maximum of 8 levels
·Number of albums/folders:maximum 99
·Number of tracks/titles:maximum 999
·ID3 tag v2.0 or later
·File name in Unicode UTF8(maximum length:128 bytes)
Unsupported formates:
·Empty albums:an empty album is an album that does not contain MP3/WMA
les,and is not be shown in the display.
·Unsupported le formats are skipped.For example,Word documents(.doc) or
Mp3 les with extension.dlf are ignored and not played.
·AAC,WMV,PCM audio les
·DRM protected WMA les(.wav,.m4a,.m4p,.mp4,.aac)
·WMA les in Lossless format
Supported MP3 disc format:
·ISO9660,Joliet
·Maximum title number:512(depending on le name length)
·Maximum album number:255
·Supported sampling frequencies:32kHz,44.1kHz,48kHz
·Supported Bit-rates:32-320Kbps and variable bit rate
Supported video formats:
·DVD
·MP4
·Xvid
This unit supports only the following iPod/iPhone models:
· iPod touch (2nd and 4th generation)
· iPod classic
· iPod nano (2nd, 3rd, 4th, 5th and 6th generation)
· iPhone 4S
· iPhone 4
· iPhone 3GS
· iPhone 3G
Region code
According to DVD sale region, the whole world is divided into six regions. A DVD disc can be
played back only when its region code is compatible with that of the player in use.
Region 1: USA, Canada, East Pacic Ocean Islands;
Region 2: Japan, West Europe, North Europe, Egypt, South Africa, Middle East;
Region 3: Taiwan of China, Hong Kong of China, South Korea, Thailand, Indonesia, South East
Asia;
Region 4: Australia, New Zealand, Mid & south America, South Pacic Ocean Islands/Oceania;
Region 5: Russia, Mongolia, India, Middle Asia, East Europe, North Korea, North Africa, North
West Asia;
Region 6: Chinese Mainland.
Cautions of disc using
1) DO NOT use irregular shaped disc
2) Disc Cleaning
Use a dry, soft cloth to wipe the disc from center to edge, only neutral detergent can be used.
3) When playing a new disc
New disc may have some rough spots around the inner and outer edges. If such a disc is used,
remove these rough spots with a pencil or ball-point pen, etc.
Specications
Page 26

EN - 27
Warning
Never remove the casing of this apparatus.
To keep the warranty valid, never try to repair the system yourself.
If you encounter problems when using this apparatus, check the following points before requesting
service. If the problem remains unsolved, please contact your dealer.
No power
∙ Car engine has not been started. Start the car engne.
∙ Connections is incorrect.
∙ Fuse has been damaged. Replace fuse.
No sound
∙ Volume is too low. Adjust volume.
∙ Speaker connections is incorrect.
Disc does not play
∙ Disc is upside down. Ensure the printed side is upwards.
∙ Disc is dirty. Clean the disc with a clean,soft,lint-free cloth. Wipe the disc outwards
from the center.
∙ Disc is defective. Try another disc.
∙ Incompatible disc is used. Try another disc.
∙ Disc rating exceeds the restrict setting. Change the rating settings to lower one.
∙ Disc region code is not compatible with the unit. Use disc with proper region code.
No image
∙ Parking brake wire connection is incorrect. Check the parking wiring.
Image ashes or distorted
∙ Video DVD settings do not match with the DVD. Adjust video DVD settings.
∙ Video connection is improper. Check the connections.
Noise in broadcasts
∙ Signals are too weak. Select other stations with stronger signals.
∙ Check the connection of the car antenna.
∙ Change broadcast from stereo to mono.
Preset stations lost
∙ Battery cable is not correctly connected. Connect the battery cable to the terminal
that is always live.
Troubleshooting
Page 27

EN - 28
Fuse is broken
∙ The Fuse type is incorrect. Replace it with a 15A fuse.
∙ Speaker wire or power wire is grounded.
Check the connections.
About Bluetooth device
Music playback is unavailable on the system even after successful Bluetooth connection.
∙ The device cannot be used with the sstem to play music.
The audio quality is poor after connection with a Bluetooth-enabled device.
∙ The Bluetooth reception is poor. Move the device closer to the system or remove any
obstacle between the device and the system.
Cannot connect with the system.
∙ The device does not support the proles required for the system.
∙ The Bluetooth function of the device is not enabled. Refer to the user manual of the
device for how to enable the function.
∙ The system is not in the pairing mode.
∙ The system is already connected with another Bluetooth-enabled device. Disconnect
that device or all other connected devices and then try again.
The paired mobile phone connects and disconnects constantly.
∙ The Bluetooth reception is poor. Move the mobile phone closer to the system or
remove any obstacle between the mobile phone and the system.
∙ Some mobile phones may connect and disconnect constantly when you make or end
calls. This does not indicate any malfunction of the system.
∙ For some mobile phones, the Bluetooth connection may be deactivated automatically
as a power-saving feature. This does not indicate any malfunction of the system.
Troubleshooting
Page 28
EN - 29
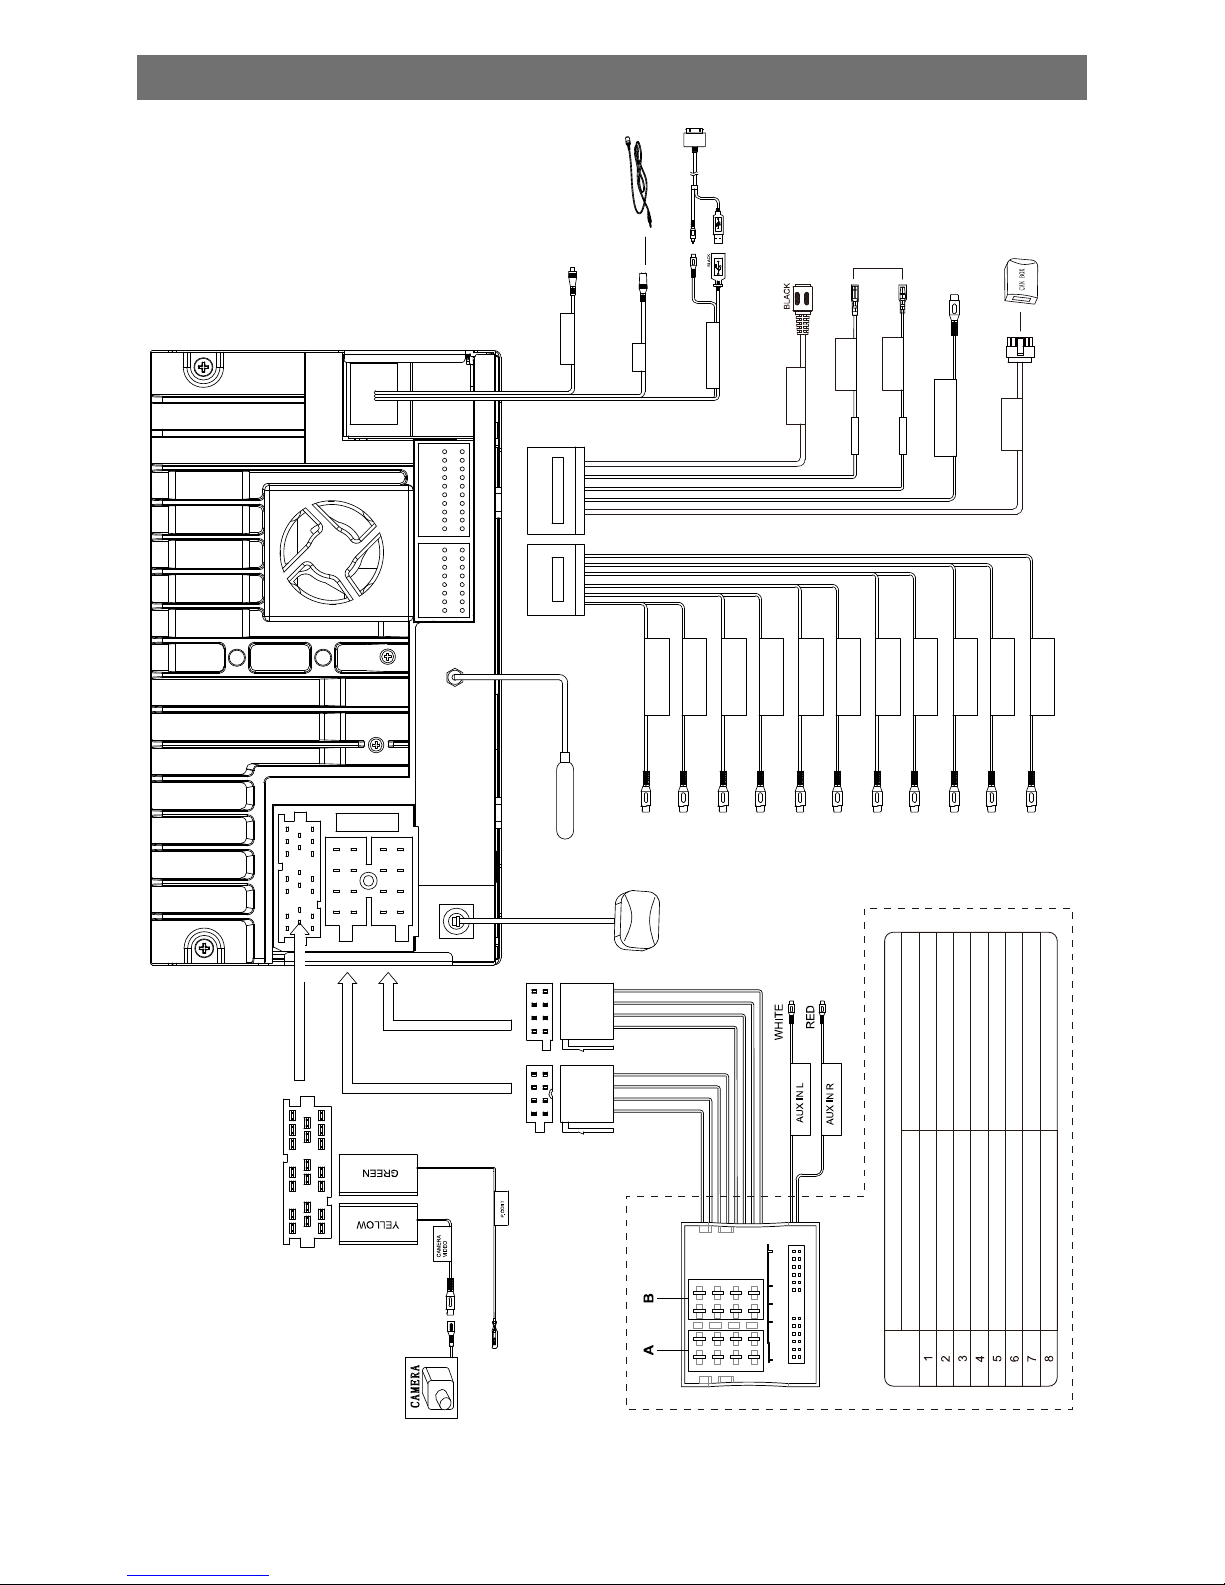
Appendix
P.CONT(TO AMPLIFIER)
YELLOW
BLUE/WHITE
AUX IN VIDEO
YELLOW
REAR
VIDEO OUT 1
YELLOW
AUX IN L
WHITE
AUX IN R
RED
REAR OUT L
WHITE
REAR OUT R
RED
REAR L
WHITE
REAR R
RED
FRONT L
WHITE
FRONT R
RED
SUB.W
BROWN
Rear right (+) / Purple
Rear right (-) / Purple with black stripe
Front right / Gray
Front right (-) / Gray with black stripe
Front left (+) / White
Tele-mute / Brown
NC
CAN-L / Brown with black stripe
NC
CAN-H / Orange with white stripe
Front left (-) / White with black stripe
ACC+ / Red
Rear left (+) / Green
Ground / Black
Battery 12V(+) / Yellow
Rear left (-) / Green with black stripe
Function
Connector A Connector B
PIN NO.
DVB-T BUS
CAN BOX
VIDEO OUT 2
YELLOW
KEY ACC
CTL ACC
Connector
1 2
3 4
5 6
7 8
1 2
3 4
5 6
7 8
IPOD/IPHONE
To IPOD/IPHONE
BLACK
RADIO ANT
BLACK
MIC
MIC LINE
WHITE
To ANTENNA
Camera Power Supply
DAB Antenna
NAVI Antenna
 Loading...