

Page 1

T E C H N O L O G I E S
Owner’s Manual and
Installation Guide
LW1.1100D
LW1.1700D
LW1.2600D
Page 2

CONGRATULATIONS!
You now own a Limited Edition LIL’WONDER Amplifier, the product of an uncompromising
design and engineering philosophy.
To maximize the performance of your system, we recommend that you thoroughly acquaint
yourself with its capabilities and features. Please retain this manual and you sales receipt
for future reference.
Soundstream amplifiers are the result of American innovation and the highest quality control
standards. When properly installed, they will provide you with many years of listening
pleasure. Should your amplifier ever need service or replacement due to theft, please record
the following information which will help protect your investment.
Serial #
Dealer’s Name
Date of Purchase
Installation Shop
Installation Date
C A U T I O N !
Prolonged listening at extremely high levels may result in hearing loss. Even though your
new Soundstream Limited Edition LIL’WONDER Amplifier, sounds better than anything
you’ve heard, exercise caution to prevent hearing damage.
2
Page 3

FEATURES
Mono-Block Class D Amplifier
Total Harmonic Distortion:0.5%
Frequency Response: 15-150Hz
Signal to Noise Ratio: 105dB
Damping Factor: >250
Input Sensitivity 100mV - 8V
50-150Hz,12dB Low Pass Fiter
45Hz, 0-18dB Bass Boost
180° Phase Switch
Midnight Black Finish w/ Brushed Accents
Remote Gain Control
Master/Slave Operation
Pre-amp Outputs
3
Page 4
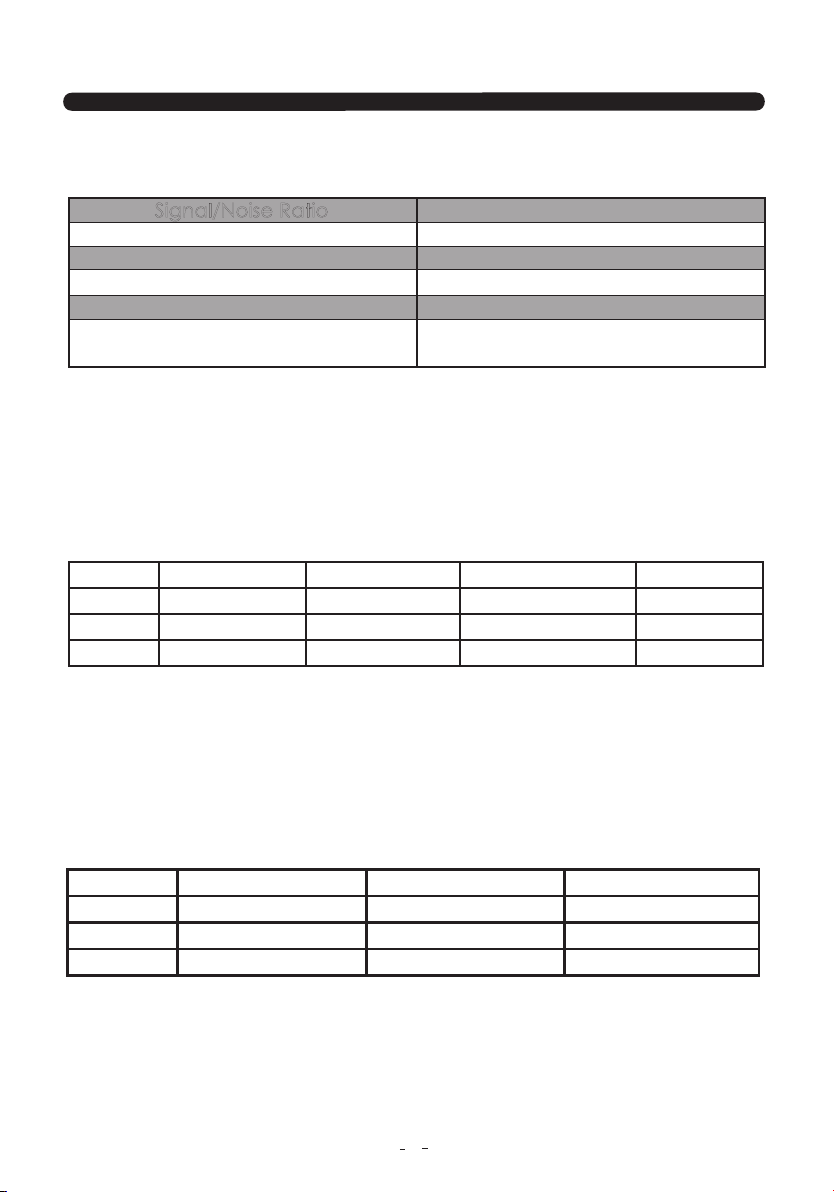
SPECIFICATIONS
Signal/Noise Ratio
>105dB
Frequency Response 15Hz-150Hz
THD
LPF
Input Voltage Range
High Impedance RCA/LINE
Level Input Impedance
0.50%
50Hz -150Hz,12dB
11-16 Volts DC
30K Ohms
POWER RATINGS & FUSE
MODEL
LW1.1100D
LW1.1700D
LW1.2600D
4 ohm
600W
700W
1000W
2 ohm
900W
1200W
1800W
1 ohm
1100W
1700W
2600W
FUSE
35A X 3
40A X 4
250A
DIMENSIONS
MODEL
LW1.1100D
LW1.1700D
LW1.2600D
Length
390mm
450mm
580mm
4
Width
205mm
205mm
205mm
Height
60mm
60mm
60mm
Page 5

TOOLS/PARTS FOR INSTALLATION
NOTE: TOOLS ARE NOT SUPPLIED
Small flat blade screwdriver phillips screwdriver (#2 or medium sized),
Wire cutters, Wire strippers, - #6 round head screws, and 1 - #8 sheet metal
screw (or nut, bolt flat washer, start washer) (see detail) 2 Ring connectors
(large enough to accommodate your method of grounding) In-line fuse or
Grommets (Sized to work with the power wire you plan to use in your
installation) Tube of silicone seal.
Protection Circuitry
The amplifier protection circuitry will disable the amplifier if the inputs are
overloaded, short-circuited or extremely high temperature conditions are detected.
When the protection mode is in operation, the LED indicator on the front panel will
be illuminated , indicating the amplifier has gone into a self-preservation mode.
If you observe that the protection LED is lit, please check the system carefully to
determine what has caused the protection circuit to engage. The amplifier can be
reset by turning the remote power off and then on again. If the amplifier shuts down
due to a thermal overload condition, please allow it to cool down before powering
up. If the amplifier shuts down because of an input overload or short circuit, be sure
to repair these conditions before attempting to power up the amplifier again.
5
Page 6

Electrical Wiring
All LIL’WONDER Amplifiers are equipped with easy top access screw terminals .
These terminals are nickel-plated in order to ensure excellent electrical contact
and to resist corrosion.
When making electrical connections to the amplifier, please observe the following :
Use at least 4 gauge or heavier wire for power and ground connections.
Wire the amplifier directly to the car battery. Make sure there is circuit protection
(Such as a fuse) on the positive power lead, within 18 inches of the battery.
For the ground connection, use the shortest possible wire to a good chassis ground
point.
Wire the Remote connection to the remote turn-on lead of your equalizer or head unit.
In some cases this may be the power antenna lead of the head unit.
Remote Subwoofer Level Control
The LIL’WONDER Amplifiers are equipped with a dashboard mount remote
subwoofer level control. Run the supplied dashboard remote control from the
front panel of your amplifier. By turning the level knob clockwise, you will
increase the output of low frequencies.
Fuses
Fuses protect both the amplifier and the electrical system of your vehicle from faulty
conditions . If you must replace the fuse in your LIL’WONDER Amplifier, use a
fuse of exactly the same type and rating. A different type or rating may resuit in
damage or cause a fire.
Mounting the Amplifier
Mark the location for the mounting screw holes by positioning the amplifier where you
wish to install it and use a scribe (or one of the mounting screws) inserted in each
mounting hole to mark the mounting surface. If the mounting surface is carpeted,
measure the hole centers and mark with a felt tip pen.
Drill pilot holes in the mounting surface for the mounting screws and insert the
mounting screws into these holes. Tighten them securely.
Note: Before beginning your installation, be sure to take note of any wires, lines or
other devices in your vehicle which may be located behind any mounting surface.
6
Page 7

PANEL LAYOUT
LW1.1100D
LEFT VIEW
RIGHT VIEW
Line Out
L
R
L
R
Level
Min Max
10Hz 40Hz
Input Sensitivity
.1V-2V 2V-8V
Filter
Subsonic
Input
Line Input
Bass
Low Pass
Boost PHASE
Filter
50Hz 150Hz 0 +18dB
Bridged
Mode
Master Slave
0 180
DATALINK
BATT+ REMOTE GND
REMOTE
CONTROL
PROTECTION
LW1.1700D
LEFT VIEW
RIGHT VIEW
SPEAKER
Line Input
Line Out
L
R
L
R
SPEAKER
Subsonic
Input
Level
Min Max
10Hz 40Hz
Input Sensitivity
.1V-2V 2V-8V
FUSES
Filter
FUSES
Low Pass
Filter
50Hz 150Hz 0 +18dB
Bridged
Mode
Master Slave
POWER CONNECTIONS
Bass
Boost PHASE
0 180
DATALINK
BATT+ REMOTE GND
POWER CONNECTIONS
REMOTE
CONTROL
PROTECTION
7
Page 8

PANEL LAYOUT
LW1.2600D
LEFT VIEW
RIGHT VIEW
Line Out
L
R
L
R
Filter
Level
Min Max
10Hz 40Hz
Input Sensitivity
.1V-2V 2V-8V
Subsonic
Input
Line Input
Bass
Low Pass
Boost PHASE
Filter
50Hz 150Hz 0 +18dB
Bridged
Mode
Master Slave
DATALINK
0 180
REMOTE
CONTROL
PROTECTION
SPEAKER
POWER CONNECTIONS
Class D Monoblock Amplifier Installation Wiring
LW1.1100D/LW1.1700D/LW1.2600D
Low Level Inputs
Subsonic
0 180
Input
Level
L
Min Max
R
PROTECTION
REMOTE
CONTROL
Filter
10Hz 40Hz
Input Sensitivity
.1V-2V 2V-8V
Line Input
Line Out
L
R
R
Subsonic
Bass
Low Pass
Input
Line Input
Line Out
L
R
L
R
Level
Min Max
Input Sensitivity
.1V-2V 2V-8V
10Hz 40Hz
Filter
Filter
50Hz 150Hz 0 +18dB
Bridged
Mode
Master Slave
Boost PHASE
DATALINK
Bass
Low Pass
Boost PHASE
Filter
50Hz 150Hz 0 +18dB
Bridged
Mode
Master Slave
0 180
DATALINK
REMOTE
CONTROL
PROTECTION
min
Power
max
8
Page 9

Class D Monoblock Amplifier Installation Wiring
LW1.1100D/LW1.1700D
BATT+ REMOTE GND
SPEAKER
SPEAKER
FUSES
LW1.1700D
has four fuses
here
FUSES
LW1.1700D
has four fuses
here
POWER CONNECTIONS
BATT+ REMOTE GND
POWER CONNECTIONS
9
Page 10

Class D Monoblock Amplifier Installation Wiring
LW1.2600D
SPEAKER
SPEAKER
POWER CONNECTIONS
POWER CONNECTIONS
10
Page 11

Bridging Two LW1.1100D/LW1.1700D/LW1.2600D Amplifiers
Line Out
L
R
Line Out
L
R
L
L
R
R
Line Input
L
R
Filter
Level
Min Max
10Hz 40Hz
Input Sensitivity
.1V-2V 2V-8V
Subsonic
Input
Filter
Level
Min Max
10Hz 40Hz
Input Sensitivity
.1V-2V 2V-8V
Subsonic
Input
Line Input
Bass
Low Pass
Boost PHASE
Filter
50Hz 150Hz 0 +18dB
Bridged
Mode
Master Slave
Bass
Low Pass
Boost PHASE
Filter
50Hz 150Hz 0 +18dB
Bridged
Mode
Master Slave
DATALINK
DATALINK
0 180
0 180
REMOTE
CONTROL
REMOTE
CONTROL
PROTECTION
Power
min Max
PROTECTION
11
Page 12

Bridging Two LW1.1100D/LW1.1700D Amplifiers
BATT+ REMOTE GND
SPEAKER
SPEAKER
FUSES
LW1.1700D
has four fuses
here
FUSES
POWER CONNECTIONS
BATT+ REMOTE GND
POWER CONNECTIONS
12
Page 13

Bridging Two LW1.2600D Amplifiers
SPEAKER
SPEAKER
POWER CONNECTIONS
POWER CONNECTIONS
13
Page 14

TROUBLE SHOOTING
NO SOUND
Is the LED lit?
YES
NO
Check Power and Remote turn-on
wire for voltage. Make sure Ground
wire is secure.
STILL NO SOUND
See your Authorize Sound Stream Dealer.
SOUND IN ONE CHANNEL ONLY
Reverse left and right speakers by unplugging the speaker connector. turning
it over and plugging it back in.
SOUND IS NOW IN
OPPOSITE CHANNEL
Reverse RCA inputs
SAME CHANNEL
Problem is in the speaker of
speaker wire of the silent channel
SOUND IS NOW IN
OPPOSITE CHANNEL
Reverse RCAs at head unit
SAME CHANNEL
Problem is in the Amplifier, See your
local Authorized Dealer
SOUND IS NOW IN
OPPOSITE CHANNEL
Problem is in the head unit
SAME CHANNEL
Problem is in the RCA cables
or before the amplifier
RPOTECTION CIRCUIT
Short Circuit Protection engaged: The amplifier will turn off and try to come back on
immediately. The amplifier will cycle like this indefinitely, with “blips” of sound each time
If this is the case, check your speakers and wiring for low impedance and short circuits.
Thermal Protection engaged: The amplifier will turn off and several minutes later will come
back on. In this case, ensure that there is nothing blocking the normal convective airflow of
the amplifier. No obstruction n should be within 2.4” of the amplifier on all sides.
NOTE: Low battery voltage will cause the amplifier to run warmer and possibly
damage the amplifier.
14
Page 15

Caution:
Please do not plug in or unplug RCA
Plugs to the amplifier inputs while
the amplifier is turned on. Doing
so is potentially harmful to the amplifier
by allowing RF(radio frequencies)
into the amplifier, causing
instability, during the brief period while
the RCA shield is not connected, and the
hot is connected. Only plug in or unplug
RCA plugs with the amplifier off as
Standard practice with all audio equipment.
 Loading...