

Page 1

SOUNDSTRENvl@
r
E C H &’ 0 L
..-.__
___
_
0.G
I
,E
S
Granite
II
0.2
POWER
AMPLIFIER
Page 2

Mixed Mono Capable so you can simultaneously drive a stereo and mono
load (satellites and subwoofer).
2 Ohm Drive Ability - The Granite amplifiers are designed to drive loads
down to 2 Ohms stereo and 4 Ohms bridged.
Built-in Staggered Asymmetrical Crossover - Built in 2-way electronic
crossover is designed to send either high or low pass information to the
110.2. Outputs are included to drive another amplifier with either high or low
pass information.
Bass EQ - Adjustable bass equalization circuit allows you to boost bass by as
much as +9 dB at 45 Hz. A built in subsonic filter protects speakers
(defeatable).
Drive Delay Muted Turn-on/off Circuit - A unique circuit which completely
eliminates any amplifier-related turn-on/off noises.
Flexible Input Sensitivity - accepts input voltages from 100 mV to 2.5 V.
which permits maximum output from amplifier with virtually any source unit.
“Balancing Act” Input Topology for added immunity to ground loops caused
by component and vehicle electrical system interaction.
WARRANTY
Your Granite amplifier comes with a limited warranty. Refer to the enclosed
warranty card for length of warranty and conditions.
SPECIFICATIONS
POWER OUTPUT
Power info Power info
4
Ohms
55wx2
THD:
SIN Ratio:
Damping:
Input Sensitivity:
Dimensions:
Bass EQ:
<O.l%,
20
Hz
r90
dB
>200
100 mV - 2.5 V
8-112”
x
8-3/16”
0 - +9 dB boost at 45 Hz
2 Ohms
80~x2
-
20
kHz
x
2-3/16”
Bridged Power info
4 Ohms
160~x1
at rated power into 4 ohms
Page 3
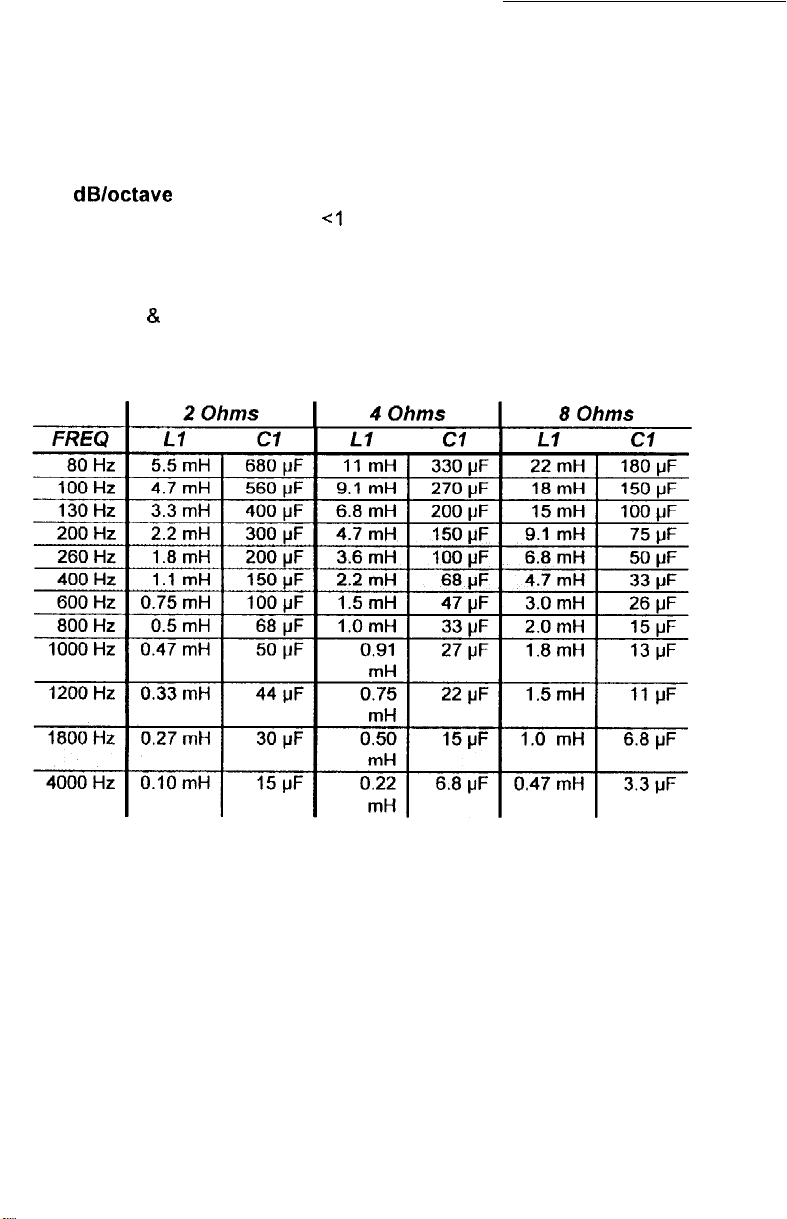
12 dB/octave Passive Crossover Chart
Key:
XXX LOW 8 HIGH PASS DIAGRAMS XXX
L = high quality (DCR ~1 Ohm) inductor/coil
C = non-polarized 50 V (or greater) capacitor
Page 4

WIRING
You will need the following tools for the wiring of the amplifier:
.
Phillips or slotted screw driver
.
wire strippers
l
wire crimpers
When baring the wires for connection to the amplifier, remove
l/2”
of the insulation. For the speaker leads, use the supplied
3/8”
l/4”
to
insulated female crimp connectors and slide the connector onto the
terminal on the amplifier. One the power, ground, and remote
connections, loosen the screws on the terminal block, slide the bared
wire into the connector, and tighten the screw. Determine form the
chart below the minimum gauge power and ground wire required.
sure to fuse the amplifier positive power lead within
up to 10’
12 gauge or larger
IO
18”
of the battery.
up to 20’
gauge or larger
Be
A. Carefully run the audio and remote turn-on cables to the
amplifier.
B. Connect the speakers as shown in “Speaker Wiring
Configurations.” Use at least 16 gauge speaker wire, preferably a
flexible multi-strand cable, such as Soundstream Speaker 120 or
Speaker 160.
C. Carefully run the positive power cable from the battery to a
fuse or circuit breaker and then to the amplifier. Connect the lead
to the battery via either a fuse or a circuit breaker within 18 inches of
the battery, Leave the fuse out or the circuit breaker off until the
installation is otherwise finished. If the circuit breaker cannot be shut
off manually, do not make the final power connection to it. See below
for recommended fuse ratings to be used.
Amplifier Fuse
25 amp automotive
Battery Fuse/Circuit Breaker
30 amp
D. Run a ground cable for the amplifier and securely connect it to a
solid chassis ground on the vehicle. The ground cable should be the
same gauge as the power cable.
E. Double check each and every connection!
Page 5

TROUBLESHOOTING
PROBLEM
No sound and LEDs are not lit
Repeatedly blown amp fuse or
frequent activation of thermal
shut-off
CAUSE
no power or ground at amp
no remote turn-on signal
blown fuse near battery
blown power supply fuse
(accessible through access
cover on bottom of amp)
speaker or leads may be shorted
verify adequate cooling of the
amplifier
speaker load may be less than 2
Ohms
Page 6

F. Re-connect the fuse or circuit breaker. Power up the system
and the red LED should be lit. There may be a 2 -3 second delay from
the time that the source unit is turned onto the time that the LED on the
amp lights. This is normal. Once the amplifier power LED is on and
the source unit is playing, you should have sound coming from the
speakers.
Wiring Tips
.
Use grommets when running cables through any metal or sharp
plastic to prevent accidental shorting or shearing.
.
Be certain that the cables don’t interfere with normal operation of
the vehicle’s high current circuits and vehicle management
systems (engine computers, relays, etc.).
LEVEL SETTING
The input levels are adjusted by means of a stereo level control
located next to the input connectors. When the amplifier is operated in
the mono/bridged mode, only the right channel input is active.
A. Turn the input level control on the amp to a minimum position (fully
counter-clockwise).
B. Set source unit volume to approximately 314 of full volume.
C. While playing dynamic source material, slowly increase the
amplifier’s input level until a near maximum undistorted level is heard in
the system.
D. If you are using the amplifier to drive subwoofers, you may want to
use the bass boost circuit. First, engage the switch on the bottom of
the amplifier, secondly, slowly adjust the level on the front panel to
your preference.
PROTECTION CIRCUITS
Your Granite amplifier is protected against both overheating and short
circuits by means of the following circuits:
A main power supply fuse
A fail-safe thermal protection circuit activating at
Over-current Channel Circuit Breakers
Short-circuit shutdown
85OC
Page 7

AMPLIFIER LOCATION AND MOUNTING
The Soundstream Granite 110.2 amplifier employs highly efficient
circuitry and a unique ChassisinkTM design to maintain lower operating
temperatures.
fastened to the vehicle, away from moisture, stray or moving objects,
and major electrical components (electrical motors, fuel pumps, etc.).
To provide adequate ventilation, mount the amplifier so that there are
at least two inches of freely-circulating air above and to the sides of it.
Before mounting the amplifier, make certain the amplifier is configured
correctly for your system.
BRIDGING/MONO
If used in dedicated mono, set the switch to the mono setting and
follow the wiring diagram below.
If used in Mixed Mono, set the switch to the stereo position and follow
the wiring diagram below.
XXX DIAGRAMS XXX
BASS EQUALIZATION
If the Granite 110.2 is being used to drive a subwoofer, you may want
to activate the subwoofer equalization circuit by throwing the switch to
the “XXX” position. Activating the circuit also engages a subsonic filter
at 45 Hz. The subsonic filter is designed to remove the very low
frequency bass information that may damage subwoofers.
When
mounting the amplifier, it should be securely
CROSSOVER SETTINGS
The Granite 110.2 can be configured to operate full range (for a set of
satellite speakers or coaxials), low pass (for subwoofers), or high pass
(for satellites or coaxials while another amp driving the subwoofers).
XXX DIAGRAMS XXX
A. Using the amplifier as a template, mark the mounting
surface.
B. Remove the amplifier and drill the holes.
C. Mount the amplifier to the surface using the provided
hardware.
Page 8

PASSIVE AND ELECTRONIC CROSSOVERS
Your Granite amplifier is capable of driving a complete subwoofer and
satellite system in the Mixed Mono configuration. However, for the
lowest distortion and the maximum output and sound quality, we
recommend you use electronic crossovers and multiple channels of
amplification. The Granite 110.2 amplifier incorporates an electronic
crossover with outputs. This amplifier, in conjunction with another
amplifier, will competently drive an entire bi-amplified system.
If you plan to use the Granite 110.2 in the Mixed Mono configuration, it
is important to use the appropriate passive crossovers. Below are
charts for 6 and 12 dB/octave crossovers.
6 dB/octave Passive Crossover Chart
Key:
XXX LOW 81 HIGH PASS DIAGRAMS XXX
L = high quality (DCR ~1 Ohm) inductor/coil
C = non-polarized 50 V (or greater) capacitor
FREQ
I
1
L C
2 Ohms
I
4 Ohms
L
8 Ohms
I
C
L
C
Page 9

OWNER’S MANUAL
&
INSTALLATION GUIDE
CONGRATULATIONS
You now own the Soundstream Granite 110.2 Amplifier, the result of a unique
design and engineering philosophy.
To maximize the performance of your system, we recommend that you
thoroughly acquaint yourself with its capabilities and features. Please retain
this manual and your sales and installation receipts for future reference
Soundstream amplifiers are the result of American craftsmanship and the
highest quality control standards, and when properly installed, should provide
you with many years of listening pleasure. Should your amplifier ever need
service or replacement due to theft, please record the following information
which will help protect your investment.
Serial #
Dealer’s Name
Date of Purchase
Installation Shop
Installation Date
CAUTION!
Prolonged listening at high levels may
your new Soundstream amplifier sounds better than anything you’ve ever
heard, exercise caution to prevent hearing damage.
result
in hearing loss.
Even though
DESIGN FEATURES
Handcrafted in the U.S.A. with mil-spec glass epoxy circuit boards, low-loss
connections, gold plated input connectors, and metal film resistors.
Darlington High Current Discrete Output Topology - Soundstream’s
“overbuilding” of the output section incorporates Darlington output devices
sandwiched between the circuit board and the heat sink in a design called
Chassisink’”
to ensure cool, efficient amplifier operation.
 Loading...