

Page 1

D200
DUAL MONAURAL
AMFUFIER
DlOO
STEREO AMPLIFIER
CLASS-A-50
CLASS
A AMPLIFIER
CLASS-A-40
CLASS
A AMPLIFIER
D60
STEREO AMPLIFIER
OWNER’S MANUAL
Page 2
lwner’s
,200,
Manual for SOUNDSTREAM
D 7 00,
D60,
CLASS-A-50 & CLASS-A-40
mpiifiers
lank
you for purchasing a Soundstream amplifier.
u
now own one of the finest amplifiers available, a precision
mponent capable of audiophile-quality performance.
INTENTS
ring Diagram
sign Features
!tallation
D
Power Indicator
jut
Level Adjustment
ltection
dging the Amps to Mono
rvice
...................................................
ecifications
dress &Phone
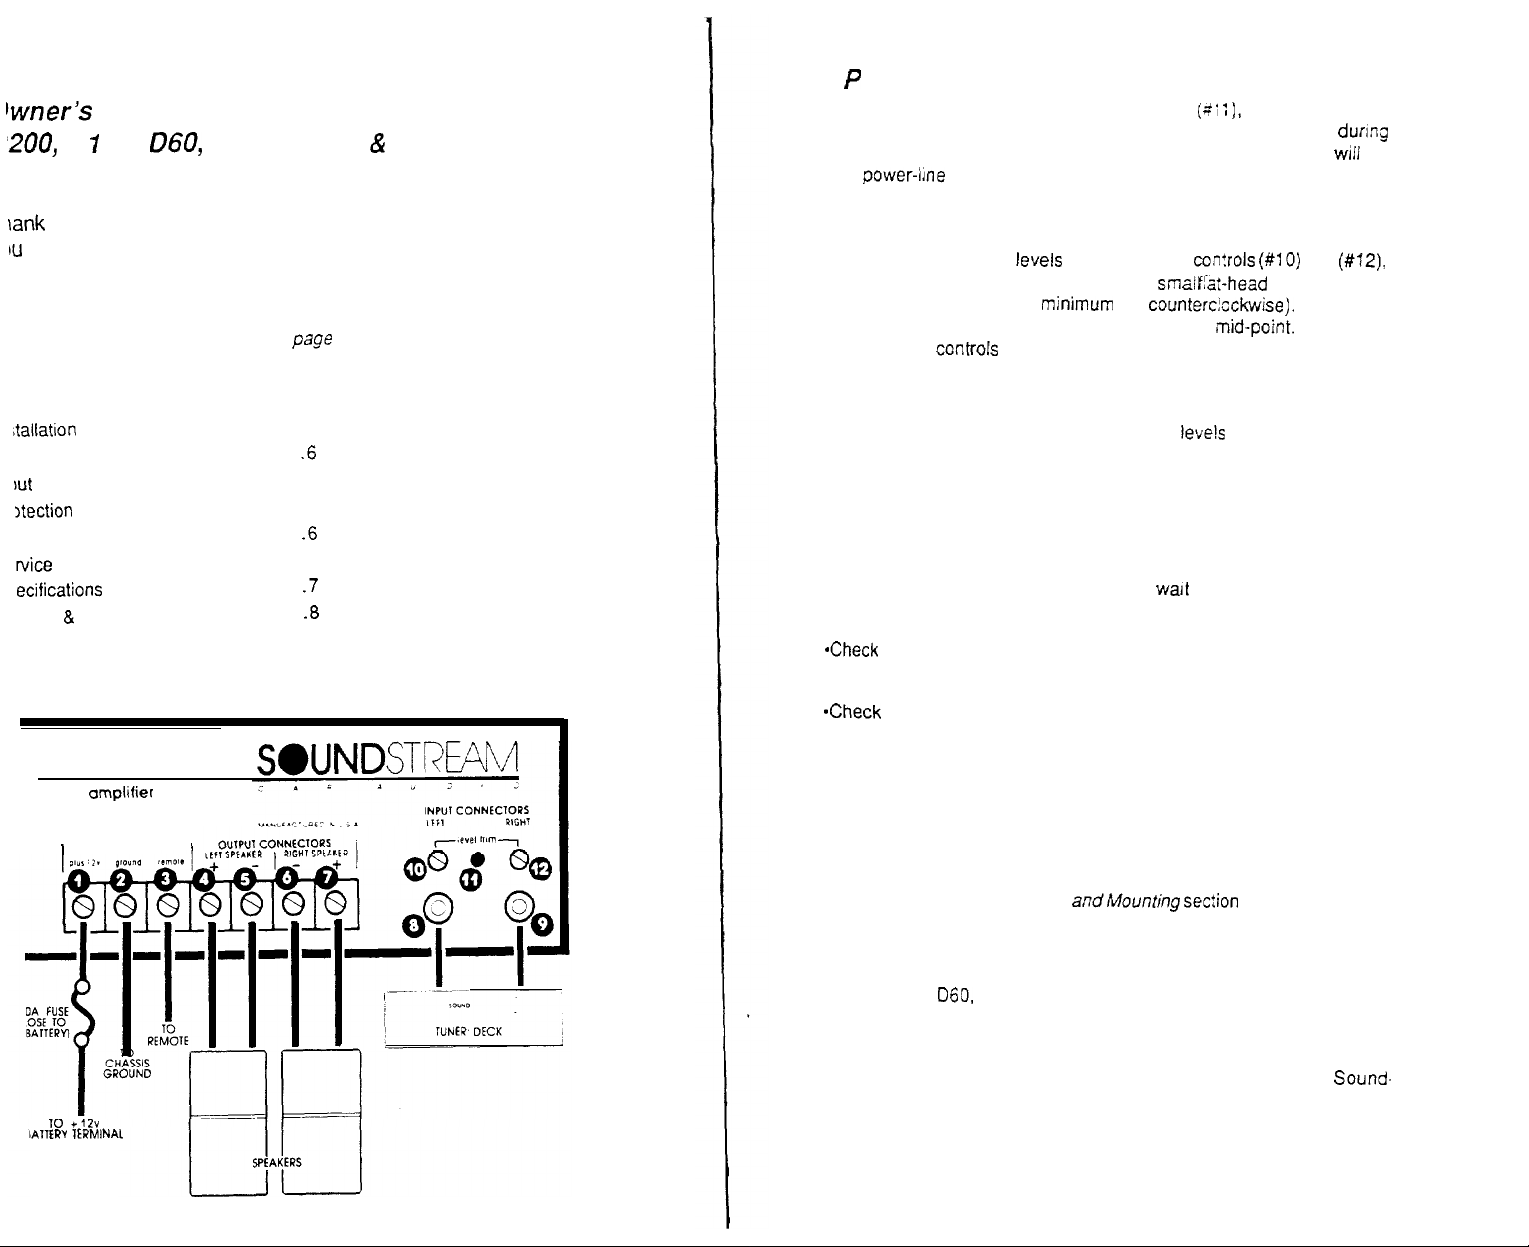
RING DIAGRAM
......................................
.....................................
...........................................
.............................
...........................
Circuits
..................................
........................................
..................................
...................
page
2
3
3-5
.6
6
6
.6
7
.7
.8
LED P 0 WER INDICATOR
Your amplifier (except D60) is equipped with an LED (+i
power is applied to the amplifier. Since power should be disconnected
installation, these LED should be dark until you are finrsned. The LED
either the power-lrne fuse or the internal fuse is blown.
: ),
which glows when
will
dunng
go out if
INPUT LEVEL ADJUSTMENT
Left- and right-channel input fevels are adjusted by
spectively. These controls can be turned with a
by turning both level controls to
on, and set the volume control on your tuner/deck a! its mid-pair& Advance the
amplifier input level
and both channels are in balance.
NOTE: With many tuner/decks, the radio output level is significantly different than
the tape output level. Check both sources, and set
outputs (usually the tape).
controfs
mM-num
until you have reached a comfortable listening level
(full
con?rols
(HO) and
sm-11 ‘I-’
Qi IJal-head
counterclcckwise).
leve!s
screwdriver. Begin
using the lesser of the
(#12),
re-
Turn the system
PROTECTION CIRCUITS
Your amplifier is protected against both overheating and short circuits.
If your amplifier shuts down, turn off the system, wait for a few minutes, and turn
the system on again. If the amplifier does not come on again:
Check
the loudspeaker wires for
ity checker.
*Check
the LED indicator. If it is out, check the fuse in the power line;
if that fuse is blown, replace it with another fuse of identical type and
value and try again.
shorts
using
an
ohmmeter or continu-
power amplifier
,
POWER CONNECTORS
1”
*tzv
IAllERV 1ERMlNAL
*If the power line fuse is not blown, check the internal fuse. If blown,
replace with the identical type and value. If the fuse blows again, call
/
your Soundstream Dealer for service.
If the
inadequate ventilation. (See Location andMounting
amplifier continually shuts down because of overheating, the unit may have
section
on Page 3).
BRIDGING THE AMP TO MONO
The D-200,0100,
deliver high
end of this manual for power ratings.)
Bridging requires a simple internal adjustment. Consult your authorized
stream dealer if you wish to bridge your amplifier.
D60.
Class-A-50 and Class-A-40 amplifiers can be bridged to
power into a single channel. (Refer to the Specifications listing at the
Sound-
3
Page 3

It’s
a good idea to bench test your system before mounting the components. If
you have a
1 Z-volt
power source, you can connect and test all the components
outside the car. Or you can connect them inside the car before screwing them
down. Either way, connect the components exactly as you intend to in the final
installation; make all power connections last; test the system: then disconnect all
power until the final installation is complete.
WIRING
Determine how your car’s wiring is laid out, and run your wires in the same locations when possible. Many passageways, wire-hooks, and strain relief devices
already exist in your car; take advantage of them. Keep all wiring inside the car.
Good standard audio practice suggests keeping signal wires short and away
from power lines. Wires can be run under carpet. If you drill a new passage
-
hole through metal, make sure no burrs remain to scrape the wire; use grommets
as needed.
All wires should be hidden: an exposed wire can inadvertently be
pulled, causing disconnection or shorting. Wires should never be under tension
or subject to moisture. Use cable ties to bundle excess wire.
POWER WIRES
NOTE: Your amplifier can only be operated from a
12-VOLT
NEGATIVE
GROUND electrical system. If your car was produced before 1970 or if you
have any doubts, make sure of the type of electrical system you have before
making any connections.
For power wiring, use 1 O-gauge wire or larger.
larger wire. The PLUS 12 Vterminal
(tyl
in the wiring diagram) should be con-
Smaller gauge numbers denote
nected directly to the positive terminal of your car battery terminal. An in-line
fuse should be placed as close as possible to the battery terminal. If you have
more than one amplifier, each amplifier should be separately fused. Use the
following fuse values:
. . . . . . .
D-200
D-l 00
Class-A-50
Class-A-40
. . . . . . . . . . . . . . . . . . . 15ampere
D-60
.._....... 30-ampere
. . . . . . . . . . . . . . .
..20_ampere
. . . . . . ...20-ampere
. . . . . . . . .
15-ampere
Some tuner/decks use preamp output connectors other than RCA jacks, in
which case you will need a specral cabie or adaptor
atiailable
from your dealer.
if your tuner/deck has speaker outputs and no preamp outputs, you can use the
speaker outputs. Wire RCA-type plugs to the ends of your tuner/deck’s output
wires, making sure that you maintain consistent polarity in all channels.
If you have an equalizer or low-level crossover network(s) for bi- or tri-amping,
these components will be inserted between your tuner:deck and your
ampiifier(s}. Refer to the manuals for these components for further details.
OUTPUT CONNECTIONS
Use high-quality loudspeaker cable for best results; use
l&gauge
cable
as a mmimum size. Connect your left channel loudspeaker(s) to the
LEk-TSPEAKER+
and LEFTSPEAKER- terminals
j#4
and
#5);
connect your
right channel loudspeaker(sj to the RIGHTSPEAKER+ and
RIGHTSPEAKER- terminals
The terminals on
jour
loudspeakers are marked for polarity, and loudspeaker
(#7
and
$6).
wire is coded by color or by markings on the jacket. Be sure to connect the left
and right channels with the same polarity. Loudspeaker manufacturers are not
consistent in their polarity markings, so if you have icudspeakers of different
types connected to the same amplifier terminal, verify correct polarity by ear.
The correct polarity produces the most bass; incorrect polarity produces less
bass and a strangely dislocated sound image on mono material.
lfyou
have more
than
one amplifier: for each amplifier and its loudspeakers, the
left and right channels must always be wired with the same polarity. But from
one amplifier to the next, correct polarity may be the same, or it may be reversed. This is because of differences in amplifier design, the nature of crossover filters, and other factors. Again, experiment and verify the correct polarity
by ear.
REMOTE POWER-ON CONNECTION
If your tuner/deck has a remote power-on control wire or terminal, connect it to
the REMOTEterminal
line, so small wire
(#3)
on your amplifier. This is a control line, not a power
(18-20
gauge) is acceptable.
The GROUND terminal
(#2)
should be connected directly to the automobile
chassis with lo-gauge wire or larger. Make this wire as short as possible to
prevent noise in the system. A nearby bolt can serve as a ground terminal.
Make sure that the wire contacts bare metal, not coated metal or paint.
INPUTCONNECTIONS
Inputs to the amplifier attach by means of standard RCA-type jacks. The
Sound-
stream amplifiers achieve a level of performance at which cable and connector
quality is significant: the jacks on your amplifier are gold plated, and we recommend premium gold-plated plugs and high-quality shielded cable.
Connect your left channel signal source to the INPUT
right-channel signal source to the
INPUTRlGHTjack (#9).
LEFTjack (#8),
and your
In most cases, the signal source will be the preamp output jacks of a tuner/deck.
If your tuner/deck has no remote power-on control lapeled as such, but has a
power antenna control, it may be possible to wire the power antenna control to
the REMOTE terminal.
If your tuner/deck has neither a remote power-on control wire nor a usable
power antenna control, it will be necessary either to connect the REMOTE
terminal to a +12-volt source which is switched by the ignition key, or to connect
the REMOTE terminal to a constant +I 2-volt source
!hrough
an on-off switch
you install in a location accessible to the driver.
Do not connect the REMOTE terminal directly to a constant +12-volt line without
a switch; this would keep the amplifier on at all times and drain your battery
when the motor is off.
5
Page 4

DESIGN FEATURES
Only premium parts are used in ycur
resistors, gold-plated input connectors, and immersrble sealed potentiometers.
Each output device is individually rated at 125 watts. The case is equipped with
generous heat sinks, and thermal protection is provided.
able to match any tuner/deck -the amplifier can even be used as a power
booster.
Ail gain devices are biased by regulated active current sources, so that even
frequency performance is unaffected by supply-line noise and temperature
lions. There is no current limiting, and the amplifiers will drive fully reactive loads.
Soundstream amplifiers can be bridged to deliver high power into a single channel.
The D200 features dual-monaural construction, with
supplies. The Class-A-50 & Class-A-40 operate in pure Class A mode for the
ultimate in sonic transparency. And despite their
Soundstream amplifiers are elegantly simple in design.
Soundstream
amplifier, such as metal-film
Input sensitivity
fully
independent power
technologicat
sophistication, the
is adjust-
low-
fluctua-
INSTALLATION
Proper installation and adjustment will reward you with reliable operation and
optimum performance. Automotive sound system installations can be tricky, especially for first-timers.
fessional installer who has the tools and more Importantly, the experience to
do the job right. If you decide to install your equipment yourself, we hope that
this manual will serve as a helpful guide.
LOCATION &MOUNTING
The first step in installation is thorough planning. Choose the location for your
amplifier carefully. The amplifier should be located in either the passenger
compartment or the trunk, never in the engine compartment or in any outside
location exposed to dirt and moisture. Adequate ventilation is important; allow
enough space so that air can circulate around the heat sinks. If the amplifier is
mounted vertically, mounting the heat sink fins vertically will optimize heat
dissipation.
The Class-A-50 & Class-A-40 in particular tend to run hot because of Class A
operation. This is no cause for concern provided that ventilation is adequate.
Make sure that the installed amplifier will not interfere with normal operation of
the car. For example, if you locate the amplifier under a front seat, make sure
that it does not interfere with seat adjustment, that it
repositioning the seat, and that the seat does not press on the amplifier when
occupied. If you install the amplifier in your trunk, make sure that it is not an
obstruction.
It is best not to locate the amplifier near your antenna, because the switching
power supply can interfere with AM reception.
For
this reason, you may want to consider using a pro-
will
not be exposed by
SERWCE
your Sounbs::eam ampiii:er 1s protected sy
warranty
Should
d;recl!y.
return
your unit in the shortest possible time
SPEClFlCATlONS
THD
IHF
Damping
Power output
Dimensions
statement
any probiem occur.
DO NOT
authorization number. This
I3200
Dual channel 100
Bridged Mono
Dl
00
Dual channel 50
Bridged Mono
Class-A-50
Dual channel 25
Bridqed Mono
Class-A-40
Dual channel 16
Bridged Mono
D60
Dual channel30
Bridged Mono
0200
DlOO
Class-A-50
Class-A-40
D60
supplied with
contact your
send
your amplifier to Soundstream
Less
at
Greater than 1
Greater
watts continuous per ch
120 watts continuous
240 watts continuous
watts continuous per ch into 4
60 watts continuous per ch into 2 ohms, 20 Hz - 20
120 watts
wa!?s continuous
45 watts continuous
90
watts continuous per ch
25 watts
60 watts continuous
wafts continuous per ch
45 watts continuous
80 watts continuous
2’/,,”
21/,6(1 x 7” x 61,~”
25/>,‘% x
2%
25,::” x
this
manual.
WI/I
facilitate
than 0.19;. 20 Hz - 29
full
rated
po’>der
than 200
continuous into 4 ohms, 20 H Z 20
watts continuous
continuous
x7”x
11y’
7” x 6’
”
x
7” x
6‘,,,”
7” x
4’;,”
a
limIted b*(Zr:anty. ?ease
Gealer.
or you
$T:ay ccn!act,Sounds:!eam
repa,rs
;tHz.
into 4
Oh75
COdB
4 ohms, 20 Hz 20kHz
into
ch into 2 ohms, 20 Hz
per
4 ohms 20 Hz -20 kHz
into
chms.
4 ohms,
,”
into
ch into 2
per
4 ohms,
into
4 ohms,
Into
ch into 2
per
4 ohms,
into
into
4 ohms.
perch into 2
into 4 ohms,
per ch
read
wlthout flrSt obtamlng
and
W/I
allOW
US t0
-
-
20 HZ 20
20 Hz
ohms,
20 Hz
20 Hz
ohms,
20 Hz
20 Hz
ohms,
20 Hz
kHz
-
kHz
20 kHz
-
20 Hz
- 20
20 kHz
-
20
kHz
-
20 Hz - 20
20
kHz
-
20
kHz
-
20 Hz - 20
20 kHz
-
!:e
return
-
20
a
kHz
kHz
kHz
kHz
kHz
Your amplifier should be mounted firmly to your car’s interior with the four
screws/washers provided. Use your amplifier as a template for making pencil-
marks where you intend to drill. (Do not operate your drill through these mount-
ing holes.)
 Loading...