

Soundstream VRN-74HB Operation Instructions Manual
UNDSTREAM
Mobile
Multimedia
Entertainment
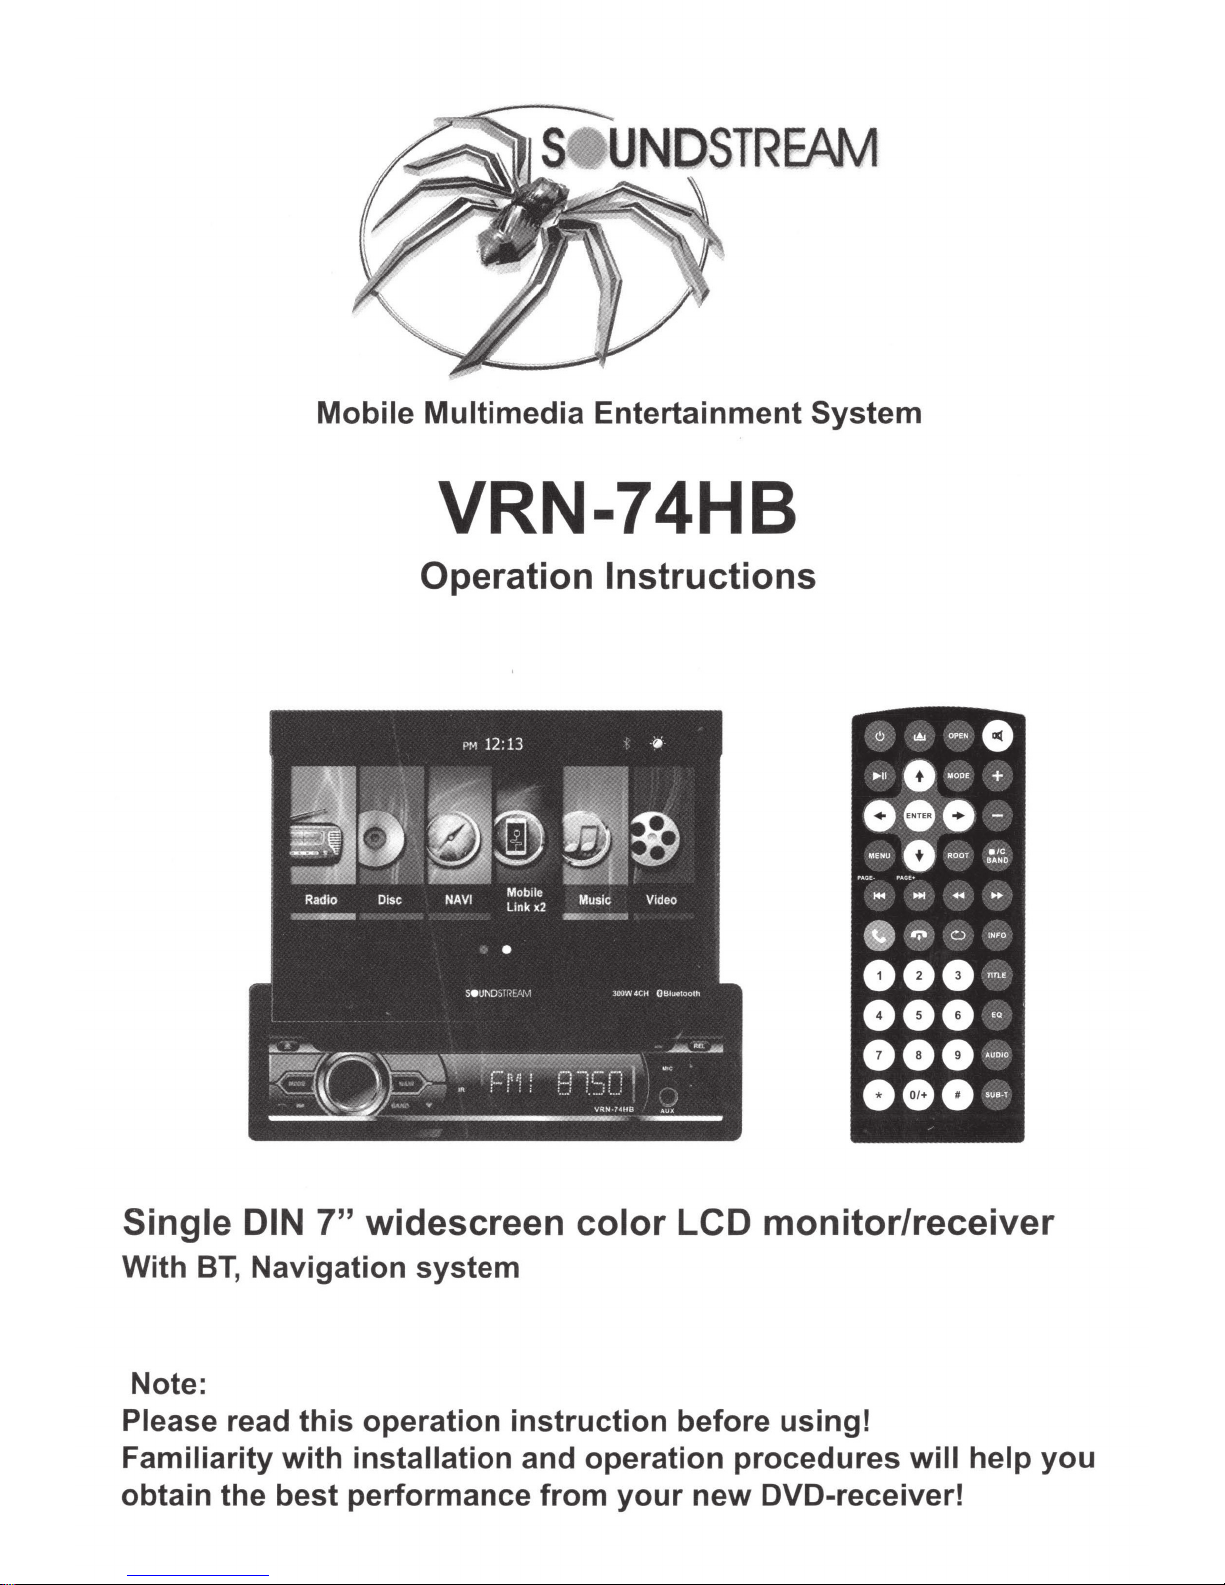
VRN-74HB
Operation
Instructions
System
Single DIN
With
Note:
Please read
Familiarity
obtain
BT,
Navigation
the
7"
this
with
best
widescreen
operation
installation
performance
system
instruction
and
from
color
operation
your
LCD
before
new
monitor/receiver
using!
procedures
DVD-receiver!
will
help
you

CONTENTS
General
information .......................................................................... 1
Safety notice ..................................................................................... 2
Accessories ........................................................................................ 3
Remote
control
operation ............................................................... 4
Panel picture function ...................................................................... 6
Main menu operation instruction ................................................... 7
Setup menu ........................................................................................ 9
Swc-steering
Wheel Control
Setting ...........................................
12
Radio Operation .............................................................................. 12
Media
Media
Playing-video/disc
Playing-audio/disc
Form
Form
Playing ................................. 13
Playin
.................................. 14
Music Playing Menu ....................................................................... 15
Bluetooth
Operation Menu ........................................................... 16
Bluetooth Dialing
Bluetooth
Phone Book .................................................................. 18
............................................................................ 17
Picture Menu .................................................................................... 19
Trouble
shooting .............................................................................
Map User
Instruction
..................................................................... 24
21

GENERAL INFORMATION
Model No.
General
features
TFT screen
SD
VRN-74HB
Motorized
Pixel
and
FM/AM two BAND Radio
DVD
fully compatible
MPEG4/JPEG/WMA
Built-in Navigation
Front USB
Rear view camera
300W
Steering
AV
Input &AV output
Rotary audio control
Built-in Bluetooth
800*480pixel
64GB
7"
LCD Screen
Angle Adjustment
&
SD
reader support
4ch
I
Speaker
wheel control
with A2DP function
with DVDNCD/CD/MP3/
output
w/ High Definition
800*480
USB
Power supply
Max
Output
Working Temperature
2.0
DC 12.00 voltage
300W
4ch
I
Speaker output
-20°C-70°C
Size 96.5*170.5*144mm
Weight About 1.92kg
Compatible
Media
Picture JPG/BMP/GIF/PNG
Disc
Audio
Video
v
-YES
X
-NO
file
file
CD/CD-R/CD-RW/DVD/DVD-R/DVD+R/
APE-Monkey's/FLAC/MP2-MPEG/MP3/0GG-Voebis/AAC/M4AIWAV-PCM
.A
VI
MP4
MPG
RM
RMVB
MPEG/AC-3
MPEG/AAC
MPEG/AAC
AAC AVC
MPEG/AC-3
AAC AVC
Cooker
Cooker
Cooker
MPEG-4
AVC
MPEG-4 Visual
MPEG-1/2
ReaiVideol
Rea1Video3
Rea1Video3
DVD-RW/DVD+RW
..;
X
..;
X
..;
X
X
..;
..;
1
SAFTY NOTICE
Please
operating this unit.
{9
Do not connect it to 24V power
be damaged.
0
else
or
0
else
or
&
program or operate the device when you are driving, to avoid
accidents
To ensure safety and operate the device
0
qualified personnel
the device without authorization, to avoid damage and accidents.
read and understand the following
suitable
The device
Please
will
it
Without the guide
it may damage the device or cause fire.
Please follow the traffic laws
(excluding
is
use genuine discs, instead of incompatible
damage the device or shorten the service
passengers watching through rear monitor).
to install the device. do not
for 12V power supply
supply
qualified personnel,
of
and regulations and do not watch
safety information before
(requires grounding).
trucks or buses, or
in
and poor discs,
life.
do not
normally, please ask
disassemble
replace
else
the fuse,
or repair
it
will
Please contact
not put the device
Do
{9
electric
The
{9
transmission component. Do not pull,
force or impact the TFT screen to avoid damaging the device.
Do
0
directly. please convert with the dedicated end
company.
When
0
unit from the vents to avoid short circuit and damaging the device.
Safety
For the safety of you and others, do not watch programs or operate
{9
the device when you are driving.
shock, damage and fire due to short circuit.
mechanical
not insert the audio plug
install the unit, prevent
Statement
local car audio distributor for
moist environment or water, to avoid
in
drive part of the monitor uses automatic precision
push or rotate the device by
the vehicle into the master unit
of
metal objects
prohibited by the laws
is
It
details.
cable
falling
provided by our
into the master
and
regulations.
The backing monitor function
0
we are not responsible for any accidents occurred during backing.
should
2
be used as auxiliary
means.
ACCESSORIES · .
Please
parts
in
get any
User's
note that when you buy this unit, you can find
the gift box. And
of
it.
Unit
Manual/Warranty
VRN-74HB
if
not,
Card
please
don't hesitate to contact
Remote
EX-MIC/GPS
GPS
Antenna sticker
all the
Control
Antenna/
following
us
to
I
t
___
..,.
__
,
__
....
-·-------·
------·-....--~..,..-
Trim Ring/Touch
Mounting
Mounting Sleeve
__
Strap/Release
Pen
Key/
Cable
BoiUScrews/Rubble Pillar
3
REMOTE CONTROL OPERATION
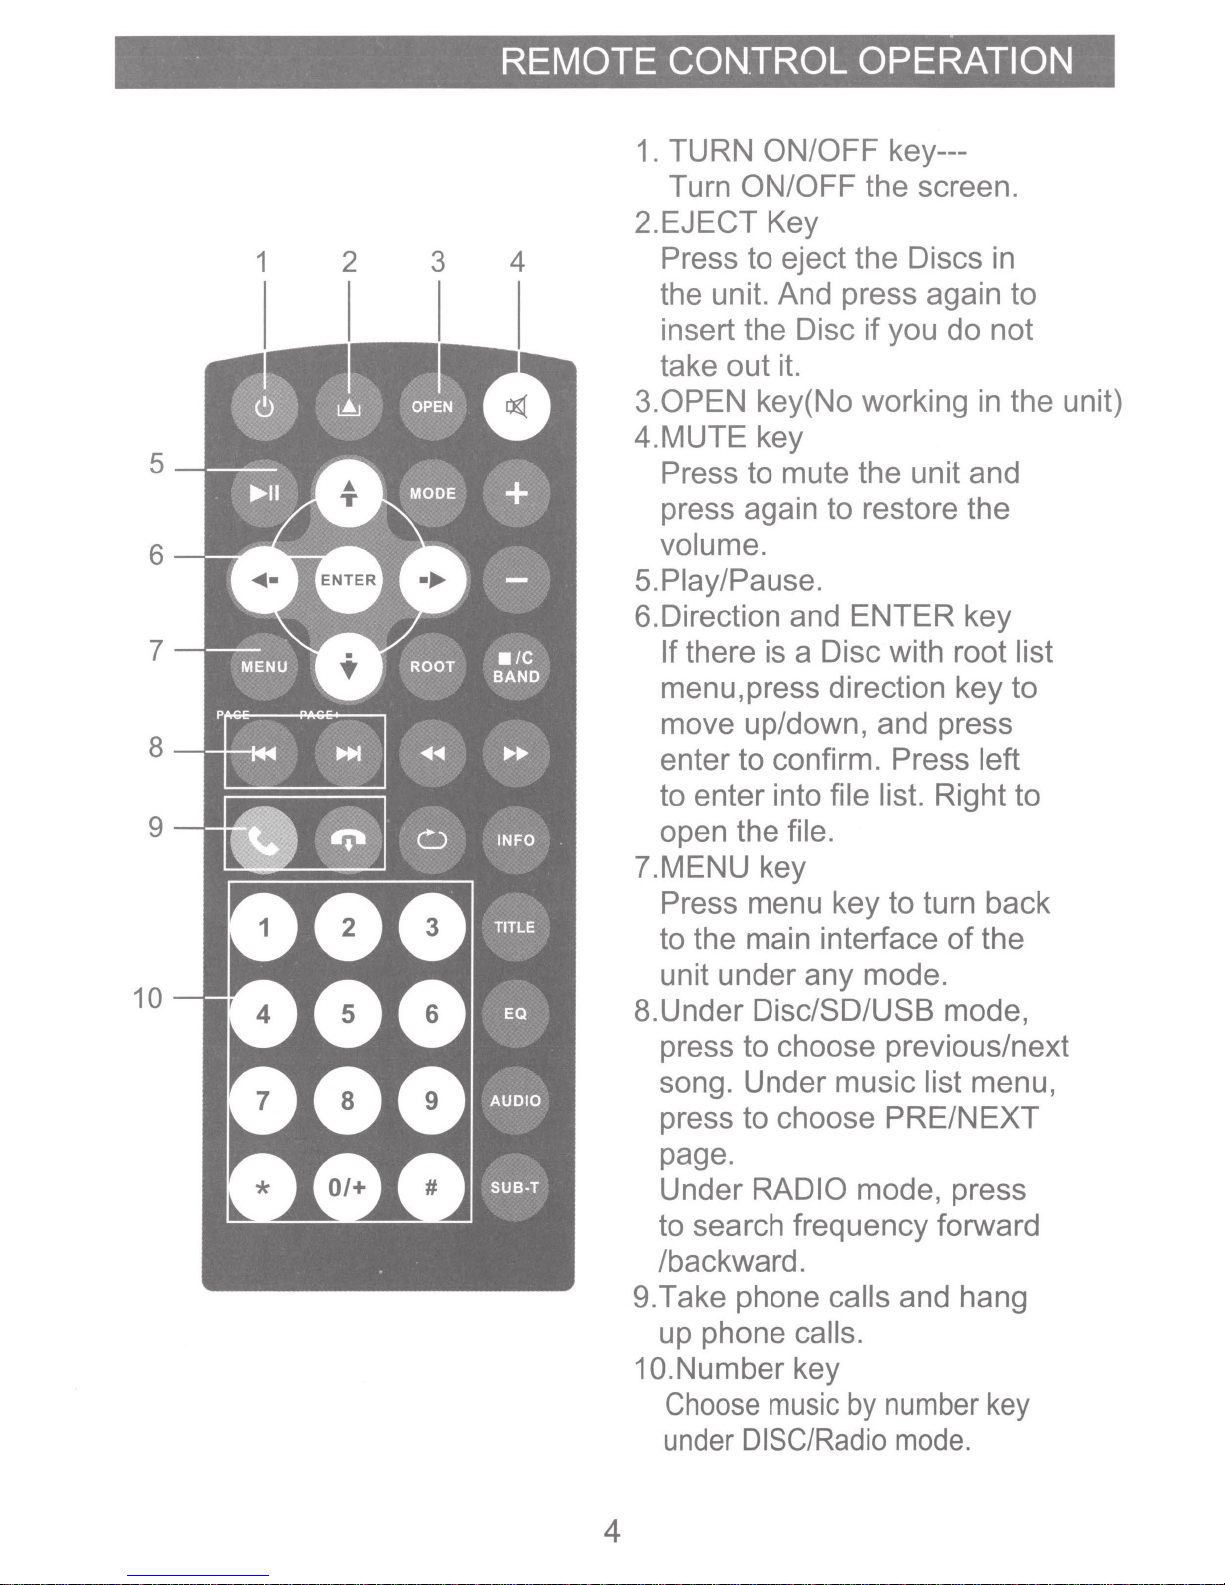
1.
TURN ON/OFF key--Turn ON/OFF the screen.
2.EJECT Key
5
6
7
8
9
1 2 3
4
Press to eject the Discs in
the unit. And press again to
insert the Disc
if
you do not
take out it.
3.0PEN
key(No working
in
4.MUTE key
Press to mute the unit and
press again to restore the
volume.
5.Piay/Pause.
6.Direction and ENTER key
If
there is a Disc with root list
menu, press direction key to
move up/down, and press
enter to confirm. Press left
to enter into file list. Right to
open the file.
the unit)
10
?.MENU key
Press menu key to turn back
to the main interface
of
the
unit under any mode.
8.Under Disc/SD/USB mode,
press to choose previous/next
song. Under music list menu,
press to choose PRE/NEXT
page.
Under RADIO mode, press
to search frequency forward
/backward.
9.Take phone calls and hang
up phone calls.
1 O.Number key
Choose
under
music
by
DISC/Radio
number
mode.
key
4
REMOTE CONTROL OPERATION
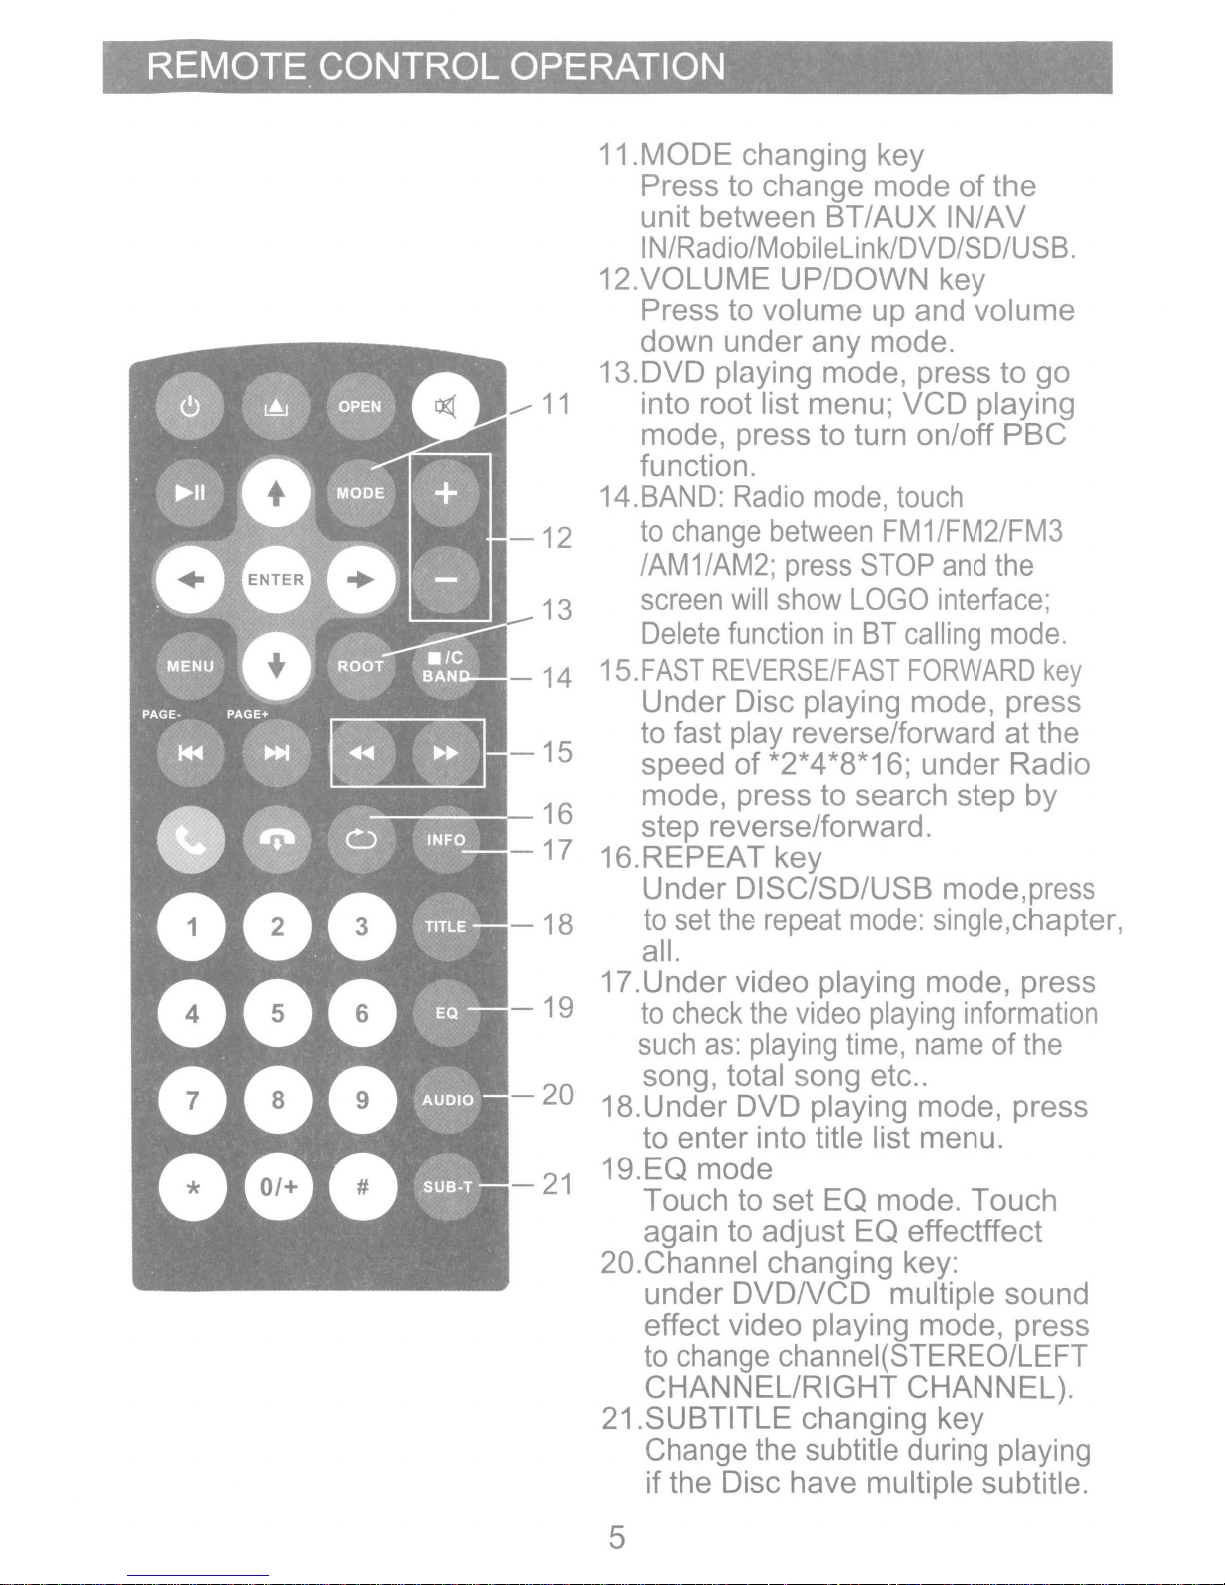
11.MODE changing key
Press to change mode
unit between BT/AUX IN/AV
IN/Radio/Mobilelink/DVD/SD/USB.
12.VOLUME UP/DOWN key
Press to volume up and volume
down under any mode.
13.DVD playing mode, press to
into root list menu;
mode, press to turn on/off
function.
14.BAND:
to
12
13
change
/AM1/AM2;
screen
Delete function
Radio
between
press
will
show
mode,
STOP
LOGO
in
BT
of
the
go
VCD
touch
FM1/FM2/FM3
calling
playing
PBC
and
the
interface;
mode.
14
15.FAST
Under
15
21
to fast play reverse/forward at the
speed
mode, press to search step
step reverse/forward.
16.REPEAT key
Under DISC/SO/USB mode,press
to
all.
17.Under video playing mode, press
to
such
song, total song etc
18.Under DVD playing mode, press
to enter into title list menu.
19.EQ mode
Touch to
again to adjust EQ effectffect
20.Channel changing key:
under DVD/VCD multiple sound
effect video playing mode, press
to change channei(STEREO/LEFT
CHANNEL/RIGHT CHANNEL).
21.SUBTITLE changing key
Change the subtitle during playing
if
REVERSE/FAST
Disc playing mode, press
of
*2*4*8*16; under Radio
set
the
repeat
check
the Disc have multiple subtitle.
as:
the
video
playing
set
EQ mode. Touch
time,
FORWARD
mode:
playing
name
..
single,chapter,
information
key
by
of the
5
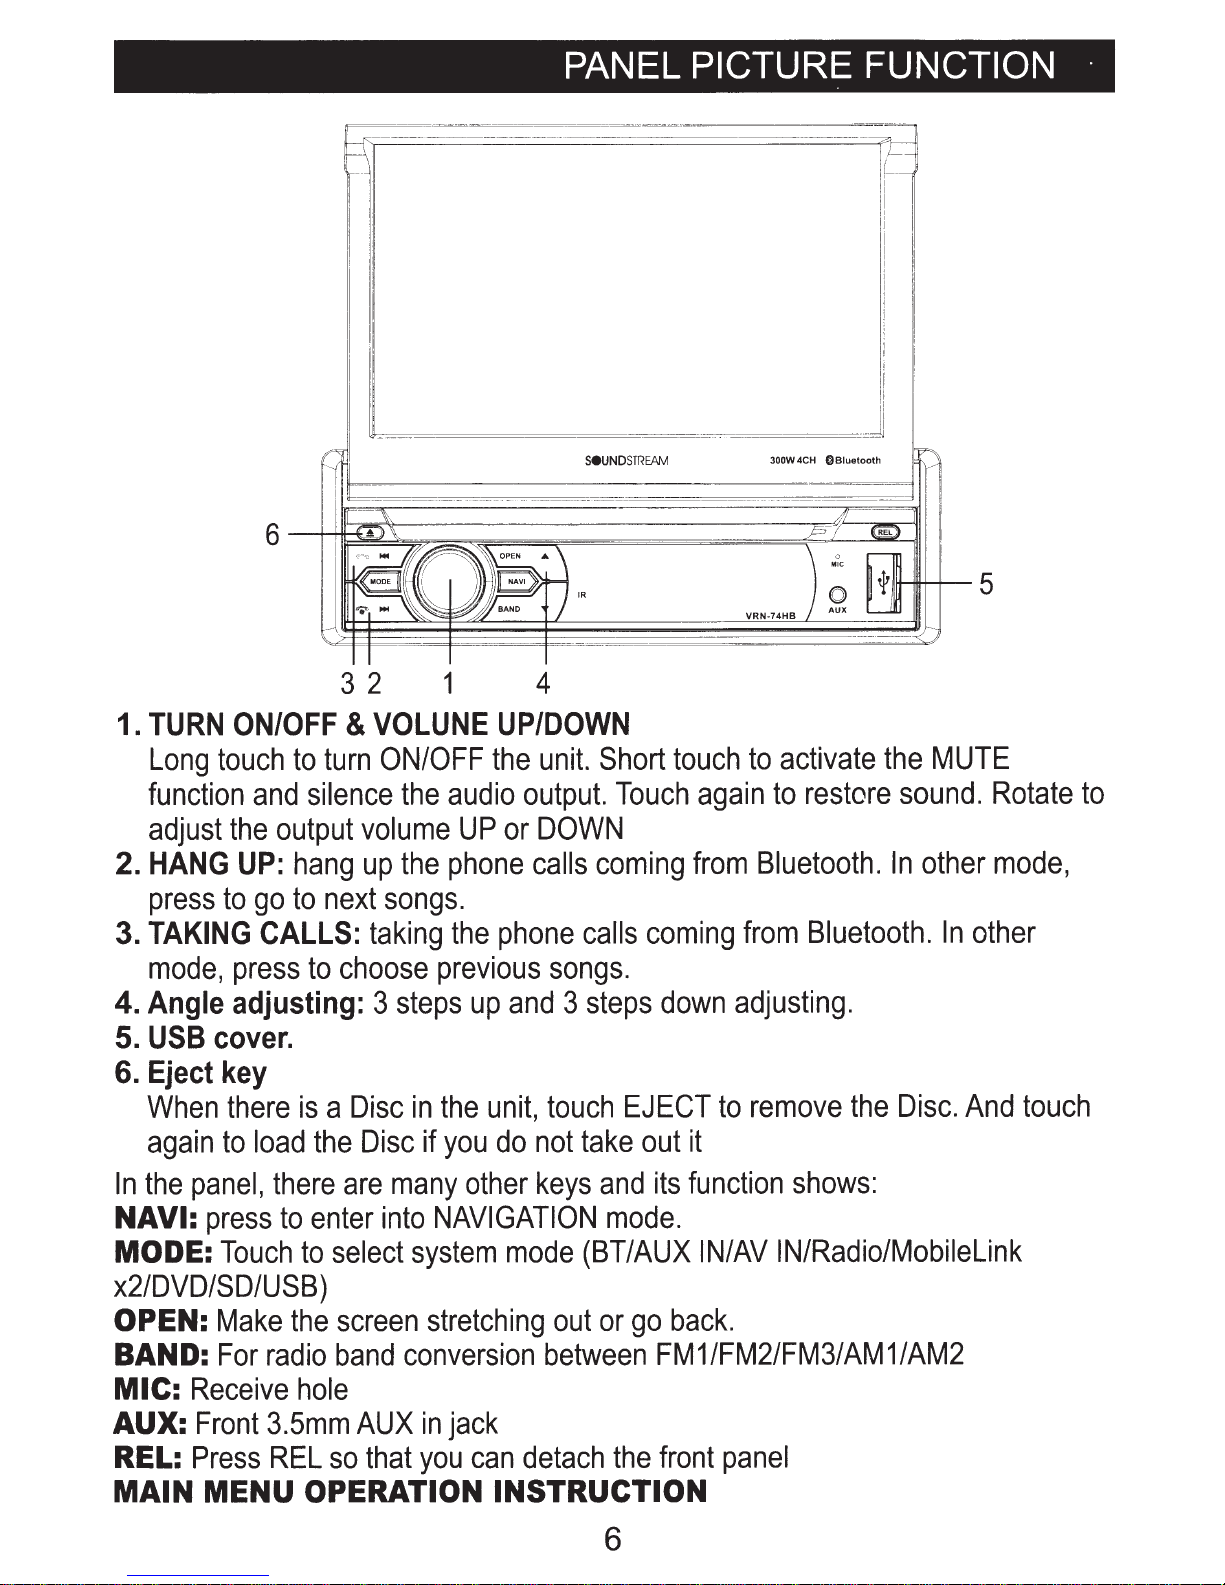
PANEL PICTURE FUNCTION ·
I!
_J
300W4CH
SeUNDSTRE.AM
VRN-74HB
0Biuetooth
3 2 1 4
1.
TURN
Long
function
adjust
2.
HANG
press
3.
TAKING
mode,
ON/OFF & VOLUNE
touch
the
to
press
to
and
output
UP:
hang
go
to
CALLS:
turn
ON/OFF
silence
volume
up
next
taking
to
choose
4. Angle adjusting: 3
5.
USB
6.
Eject
When
again
In
the
NAVI:
MODE:
cover.
key
there
to
load
panel,
press
Touch
is a Disc
the
there
to
are
enter
to
select
Disc
the
the
audio
UP
the
phone
songs.
the
previous
steps
many
into
up
in
the
unit,
if
you
other
NAVIGATION
system
UP/DOWN
unit.
output.
or
DOWN
calls
phone
Short
Touch
coming
calls
songs.
and 3 steps
do
touch
not
keys
EJECT
take
and
mode.
mode
(BT/AUX
touch
again
from
coming
down
to
out
it
its
function
IN/AV
to
activate
to
restore
Bluetooth.
from
Bluetooth.
the
sound.
In
other
adjusting.
remove
the
Disc.
shows:
IN/Radio/Mobilelink
MUTE
Rotate
mode,
In
other
And
to
touch
x2/DVD/SD/USB)
OPEN:
BAND:
MIC:
AUX:
REL:
Make
For
radio
Receive
Front
Press
3.5mm
REL
the
hole
screen
band
AUX
so
that
conversion
MAIN MENU OPERATION INSTRUCTION
stretching
in
jack
you
can
detach
out
or
go
between
the
6
back.
FM1/FM2/FM3/AM1/AM2
front
panel
MAIN
MENU OPERATION INSTRUCTION
63
2
7 8 9
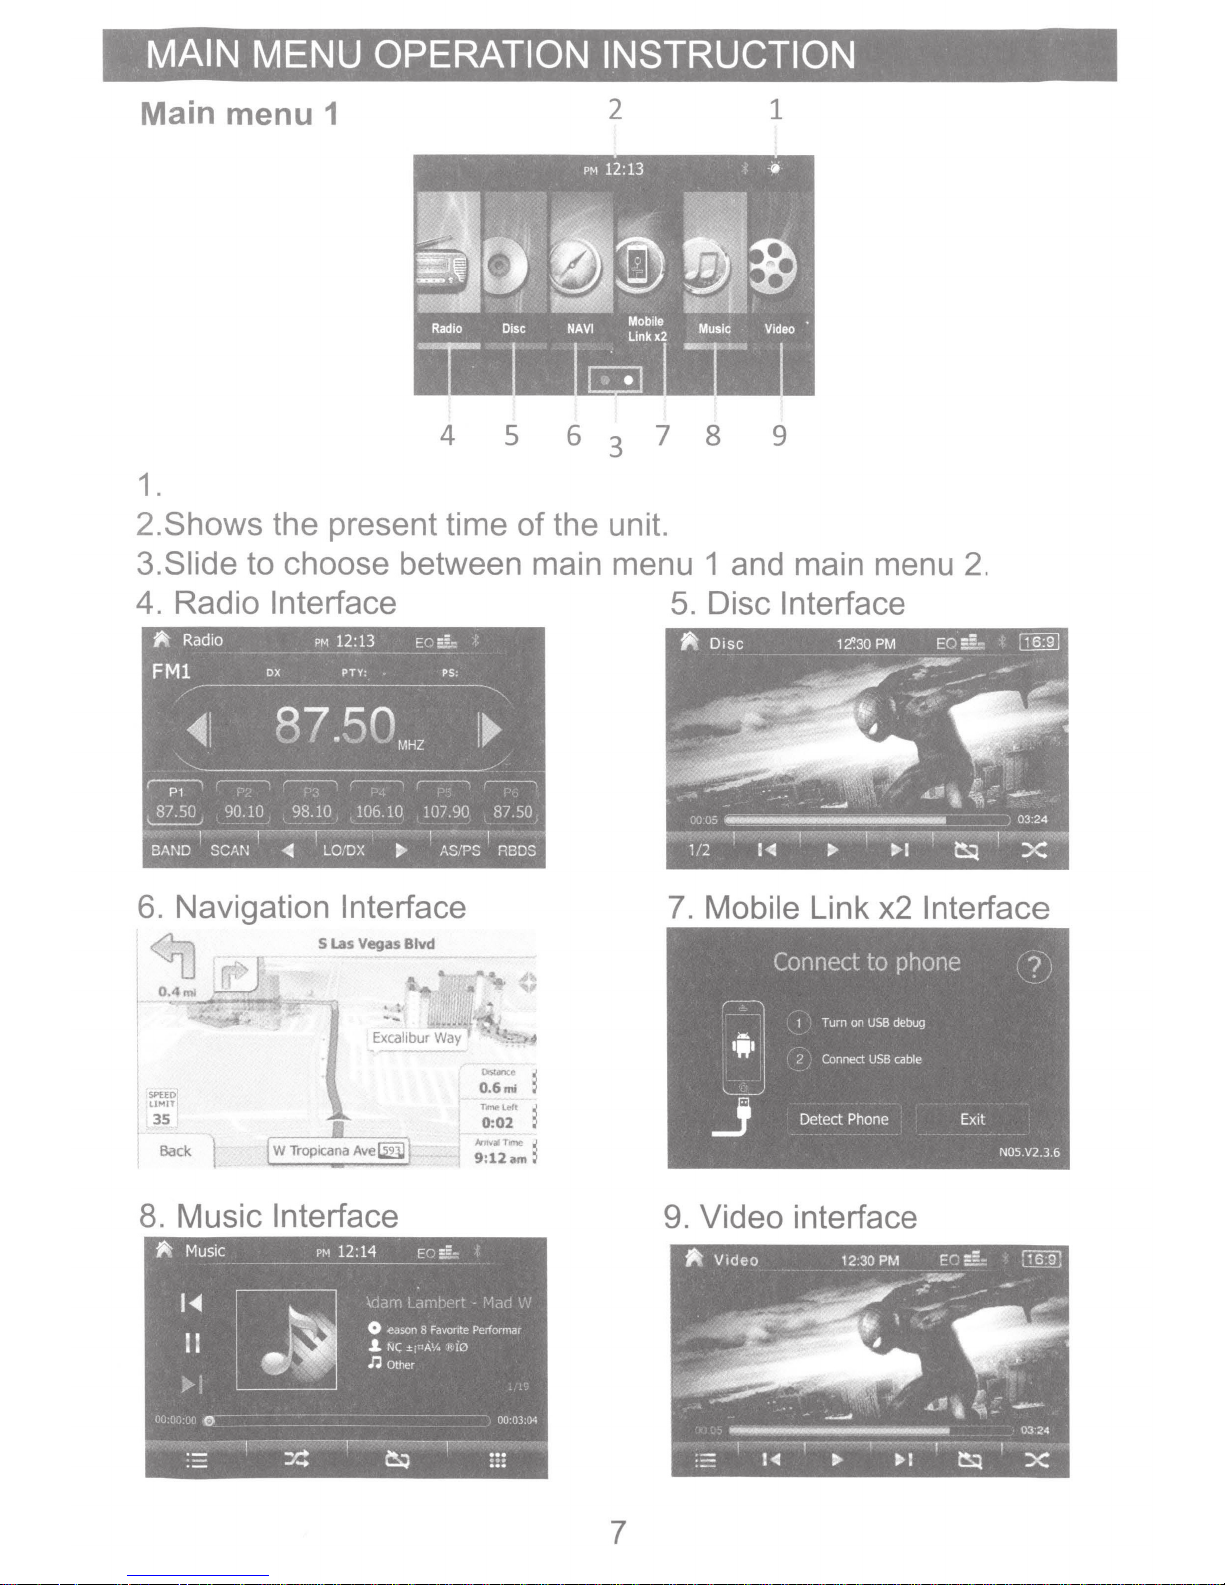
Main
menu
1
4 5
1 .
2.Shows the present time of the unit.
3.Siide
4. Radio
to choose between main menu 1 and main menu
Interface
5.
Disc
1
2.
Interface
I
I
1
8.
SPELl>
UMJT
35
Back
l
Music
Interface
"""""'•
0.6mi
~~t
0:02
~
;;
~
;;
7.
Mobile
9.
Video interface
Link
x2
Interface
7
MAIN MENU OPERATION INSTRUCTION
Main
menu
2
10
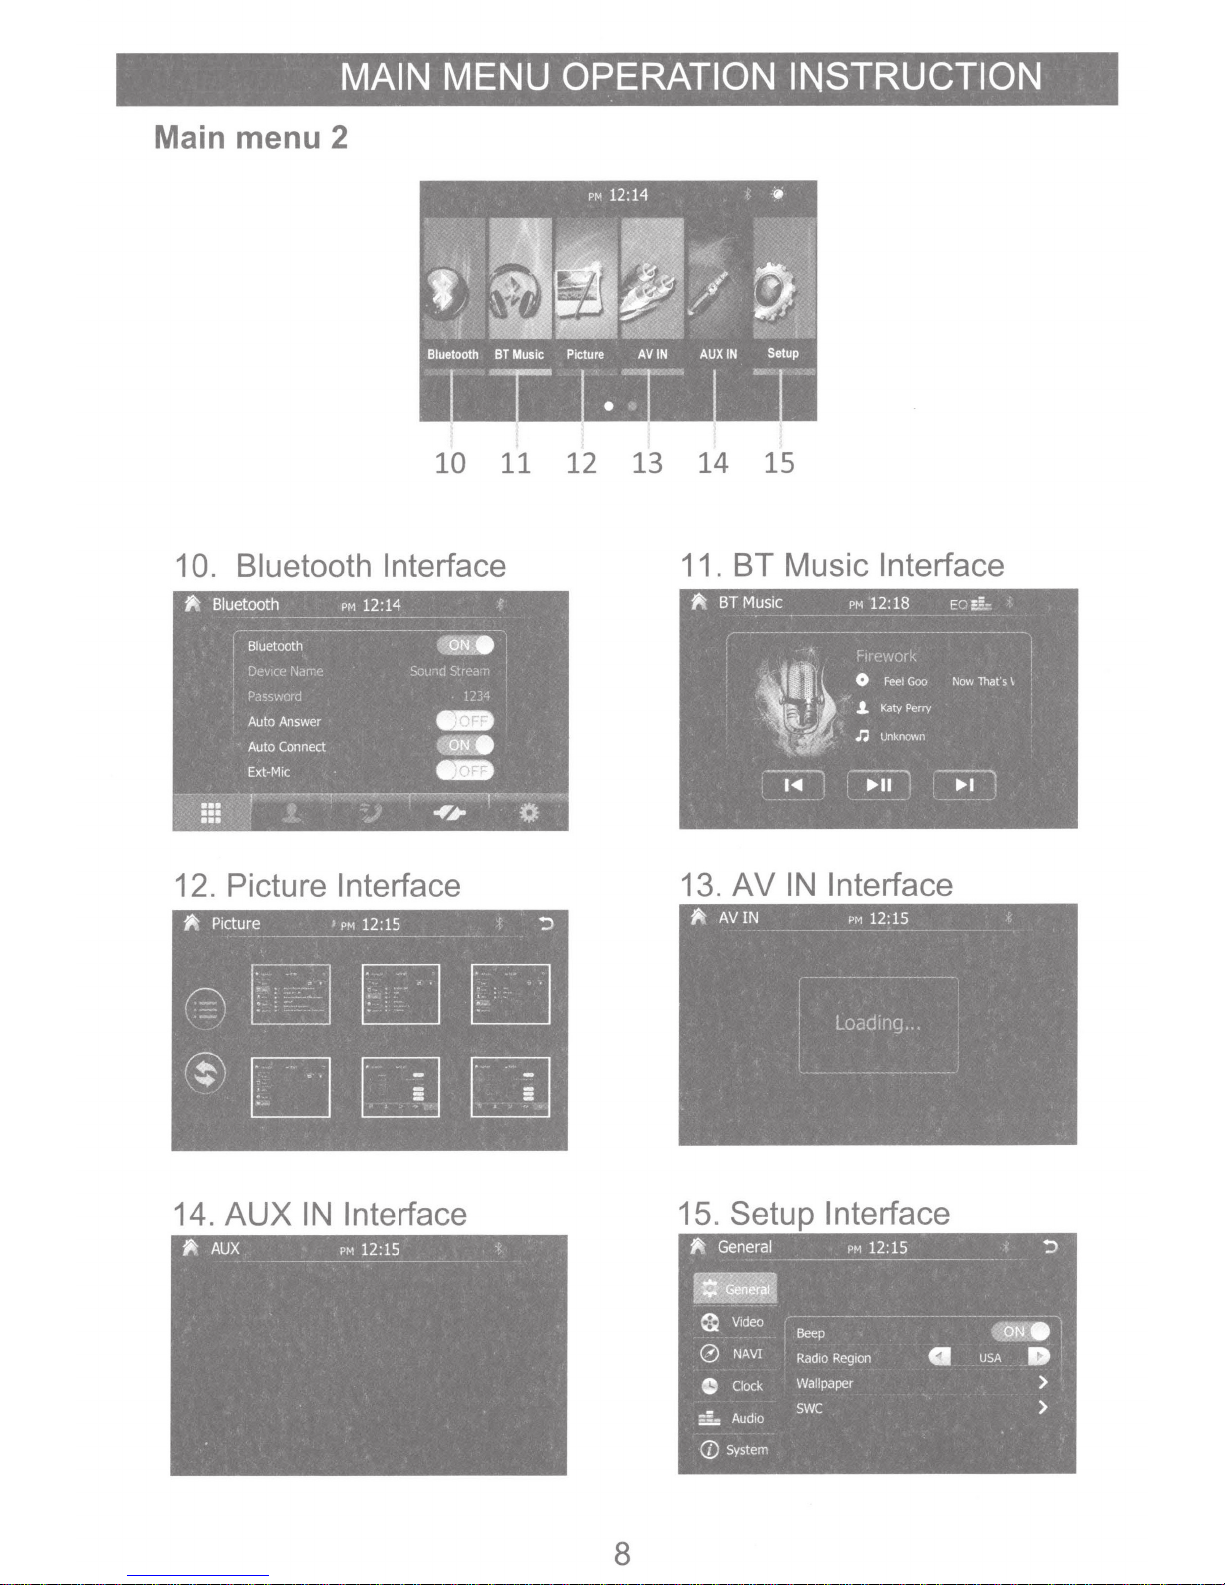
10. Bluetooth Interface
11
12
13 14
15
11. BT Music Interface
BT
itt
Music
_l\
~lli:
PM
'"I'
0
.1.
n
12:18
Feel
Katy Perry
Unknown
Goo
EC:.§.,
Now
That's\
12. Picture Interface
itt Picture
( _
··_\
~~
~
L_j
oDJDJ
14. AUX
1
PM
12:15
LJ
~o
IN
Interface
~'
1<1111
13.
AV
IN
.
:-·-··
II>
II
Interface
II>
I
8

SETUP MENU . ·
There
GENERAL
are five menu in setup:
SETUP-Menu
1
1
1.Setup function area:
Video setup,
2.Subsidiary function area: Press to see the
a.Beep
b.Touch to choose radio
sound: ON/OFF.
Other
General
setup.
field
setup,
between.
Clock
2
a
b
c
d
setup, Audio setup,
general
setup items.
c.
Touch
the system.
d.Press to
CLOCK
a.Touch to turn on
b.Touch to turn on
to
set
wallpaper
enter
into steering
SETUP -Menu 2
or
or
turn
turn
as
you
want
wheel control
off
the camera mirroring function.
off
the reverse camera function.
from the 5
settings.
wallpapers
a
b
c
d
storage
of
c.
Press to adjust the backlight:1
d.Touch to set up the level
to
10.
of
the DVD. Default
9
password is
000000.
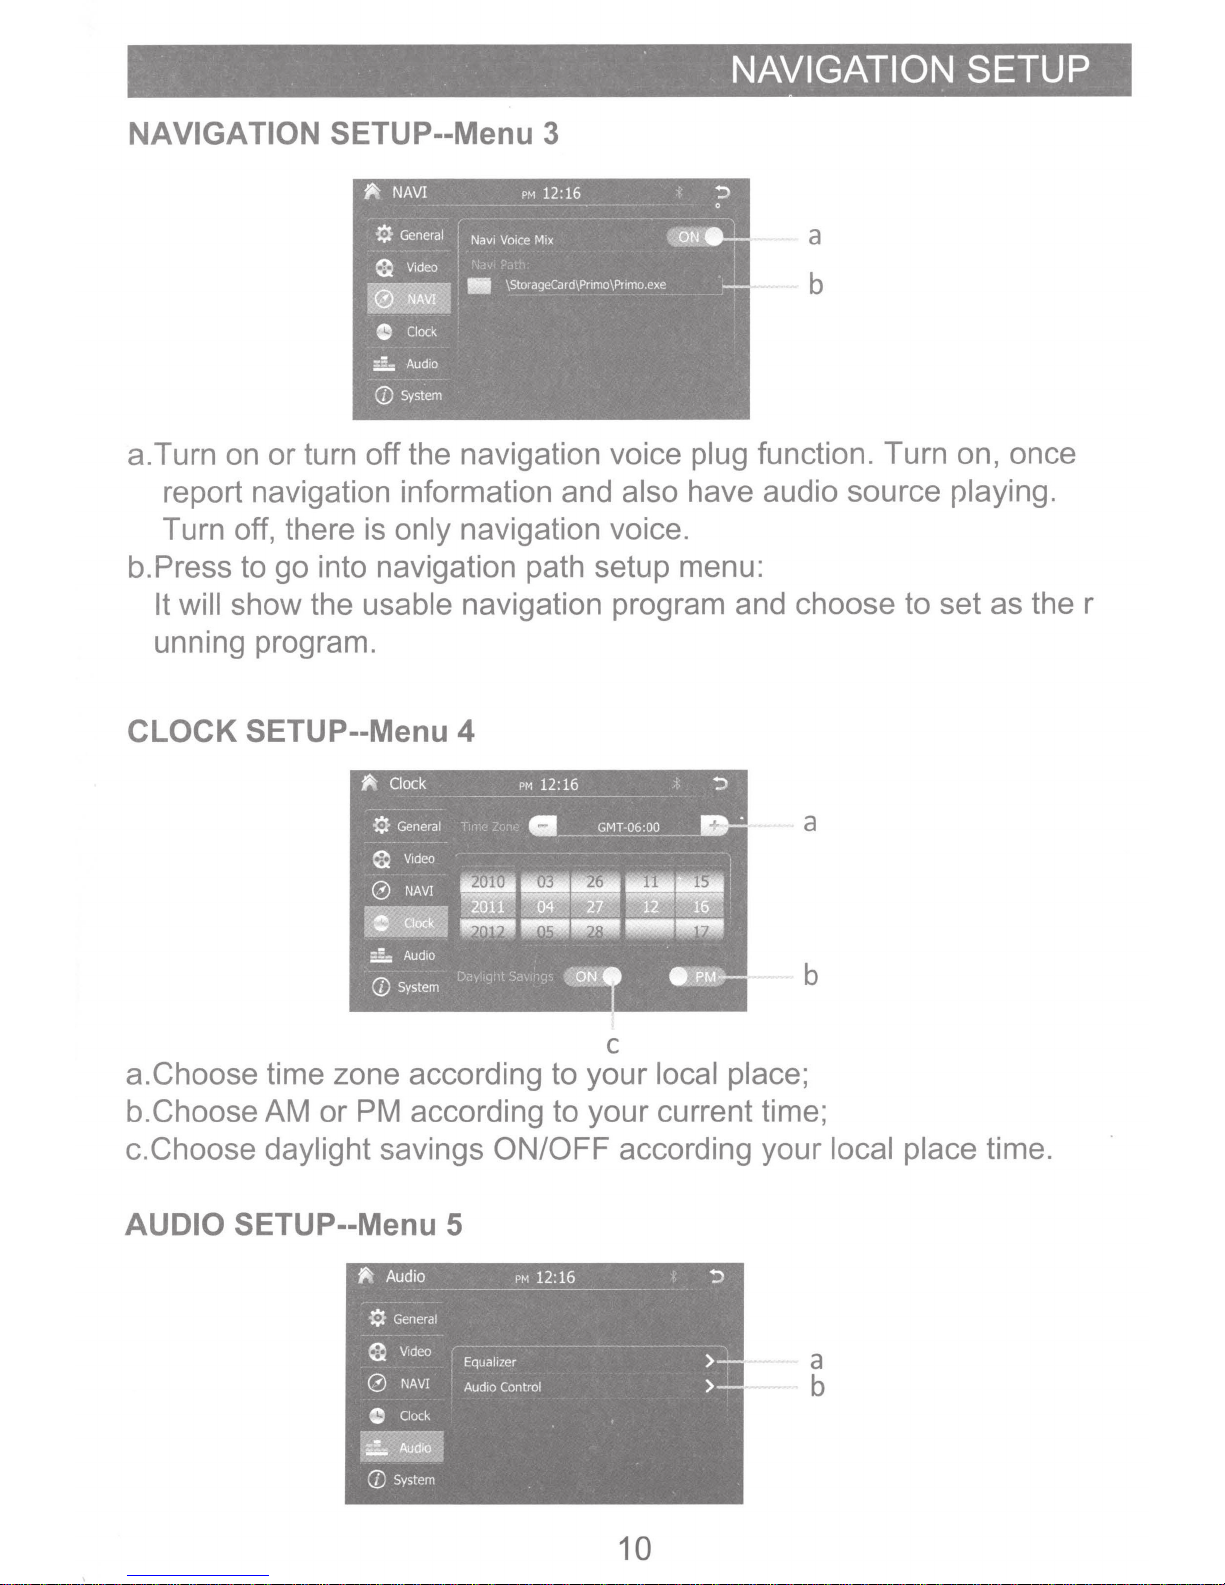
NAVIGATION SETUP--Menu 3
NAVIGATION SETUP
a
b
a.Turn on or turn
report navigation information and also have audio source !')laying.
Turn off, there is only navigation voice.
b.Press to go into navigation path setup menu:
It will show the usable navigation program and choose to set as the r
unn1ng
CLOCK
program.
SETUP--Menu 4
off
the navigation voice plug function. Turn on, once
a
b
a.Choose time zone according to your local place;
b.Choose AM
c.Choose daylight savings ON/OFF according your local place time.
AUDIO SETUP--Menu 5
or
PM
according to your current time;
c
- a
b
10
'
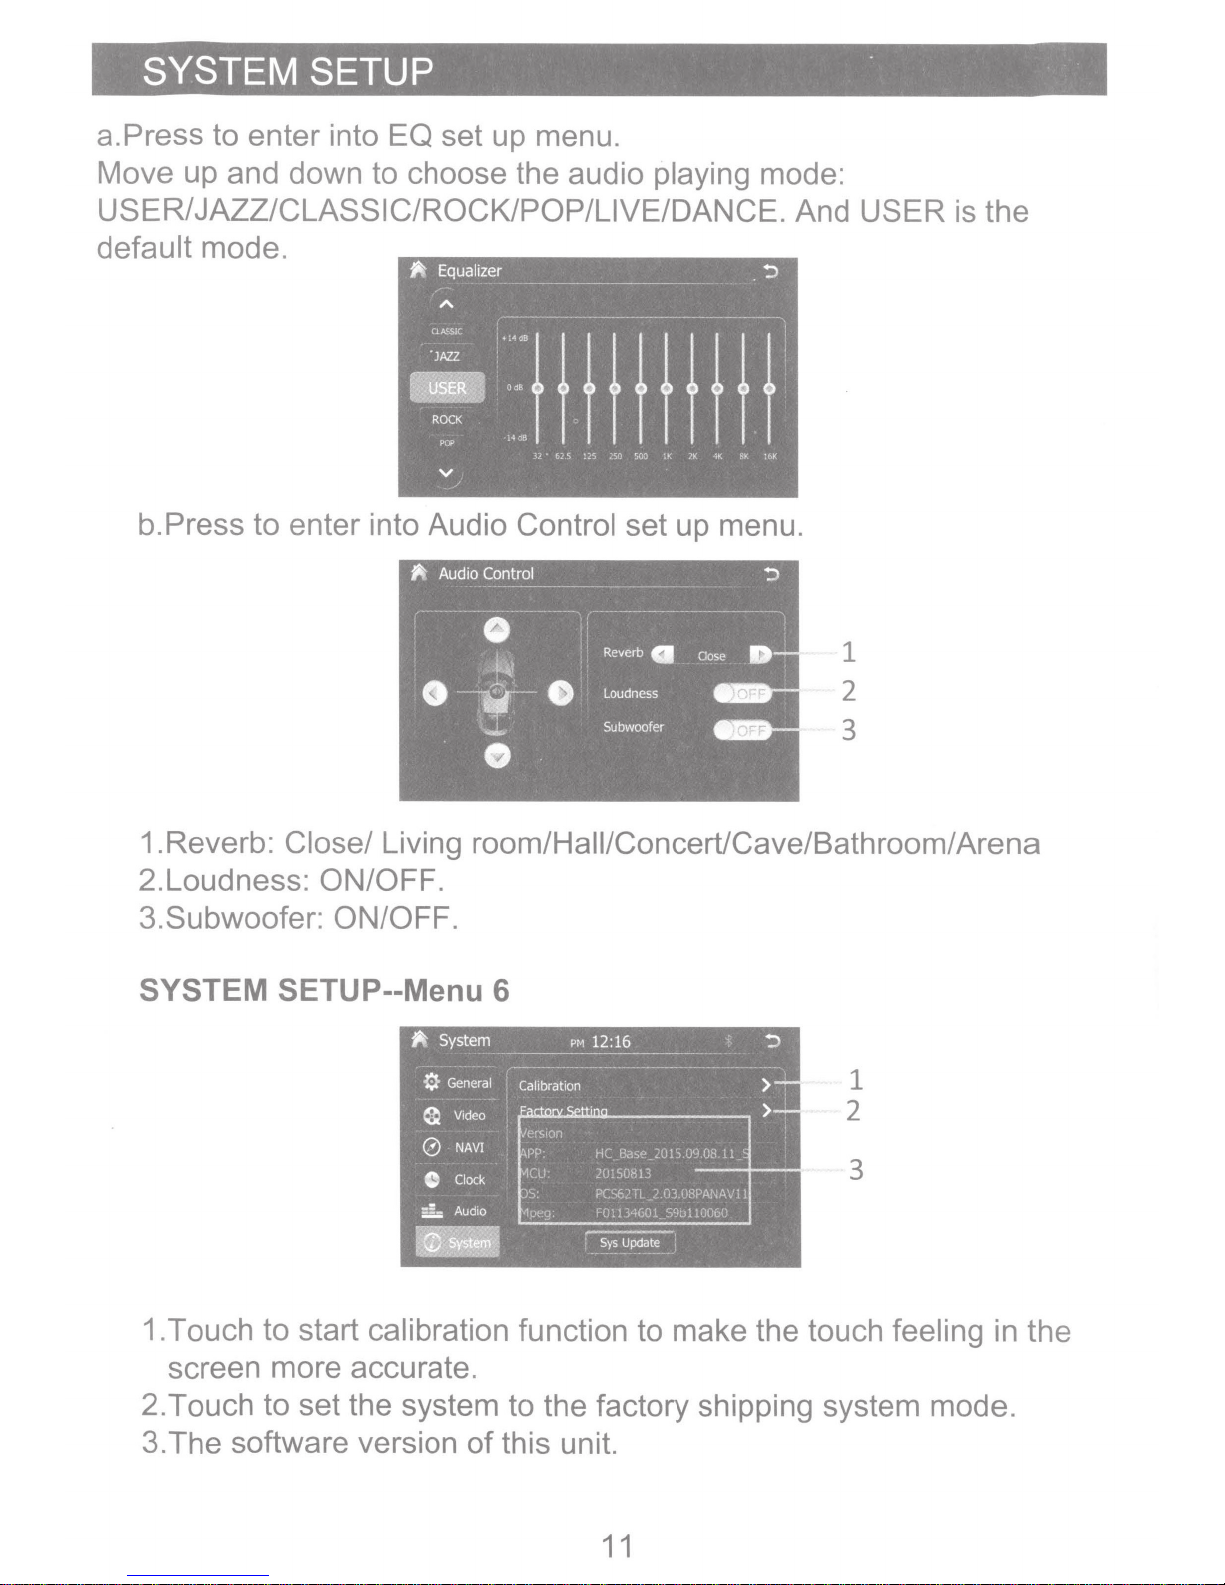
SYSTEM SETUP
a.Press to enter into EQ set up menu.
-
Move up and down to choose the audio
playing
mode:
USER/JAZZ/CLASSIC/ROCK/POP/LIVE/DANCE.
default
b.
mode.
Press to enter into Audio
Control
set up menu.
And USER
1
2
3
is
the
1.Reverb: Close/
2.Loudness:
ON/OFF.
3.Subwoofer:
Living room/Hall/Concert/Cave/Bathroom/Arena
ON/OFF.
SYSTEM SETUP--Menu 6
1
\/e'SJ,)fl
APP
•1CLI
~
1p.-g
HC
Bay•
_201
,::{1150N13
PC~6.'11
?
lull)
03
~COl
SOt!
Ocl
i1
"8PA:,AV
11
1
S9~)11•Jt;6
_'
-
1.Touch to start calibration function to make the touch
2
3
feeling
in the
screen more accurate.
2.Touch to set the system to the factory shipping system mode.
3.The software version
of
this unit.
11
· SWC-STEERING WHEEL CONTROL SETTING
.
POWER button as an
the
Set
1.Press to enter into
2.Press
You can see the reminder
3.Setting successfully. Will
POWER
Picture 1
Picture 3
SWC
button in the unit, then press key in your steering
example.
menu Picture
the unit like
in
Picture
show
like
1.
wheel.
Picture 2. Press OK.
3.
Picture 2
This is set by
SWC2/SWC3 too.lt will
are setting
RADIO OPERATION
SWC1,
SWC1.
if
4
7 8 9
you cannot finish
erase memory
if
1
10 12 13
11
button pairing, you can use
all
you press
SWC2/3
during you
2
3
5
6
12

MEDIA PLAYING-VIDEO/DISC FORM PLAYING
1.Shows
the present mode. Press to turn back to the main menu.
2.EQ: Can press to set the audio effect.
3.PTY: Program type; PS:
Program service.
4.Short press to search backward.
5.Short press to search forward.
6.Radio frequency saving area: can save 18 frequencies and can only
show 6
in
a page, slide it to see the rest.
?.Band changing: Click to change between FM1/FM2/FM3/AM1/AM2
8.Search the frequencies, play the searched one for
5S
and go on to
search next one and repeat this.
9.Long press to move backward
1
O.Long
press to move forward
11.LO/DX: Touch to select Local
12.Change between
13. RBDS:
Touch to enter
AS
and
RBDS
PS.
in
step.
in
step.
or
Distant broadcasting frequencies.
setup menu. You can choose the
program type you
MEDIA PLAYING-VIDEO/DISC
like to
listen:
news, sport, lnfo,etc.
FORM
PLAYING
a
1
2
3
1.Function Area: show the process and time
This bar
will
disappear in a while, and
click
function bar again. Touch the bar to set the playing time.
a.
Click to adjust:4:3/16:9
2.Ciick
to show the information of present video.
of
the present video.
this area to show this
3.Function bar same as audio playing menu.
NOTE: When properly installed, DVD video cannot be displayed unless
the parking brake is applied.
vehicle is moving, the screen displays the following warning.
If
you attempt to
13
play
a
D
VD
while the
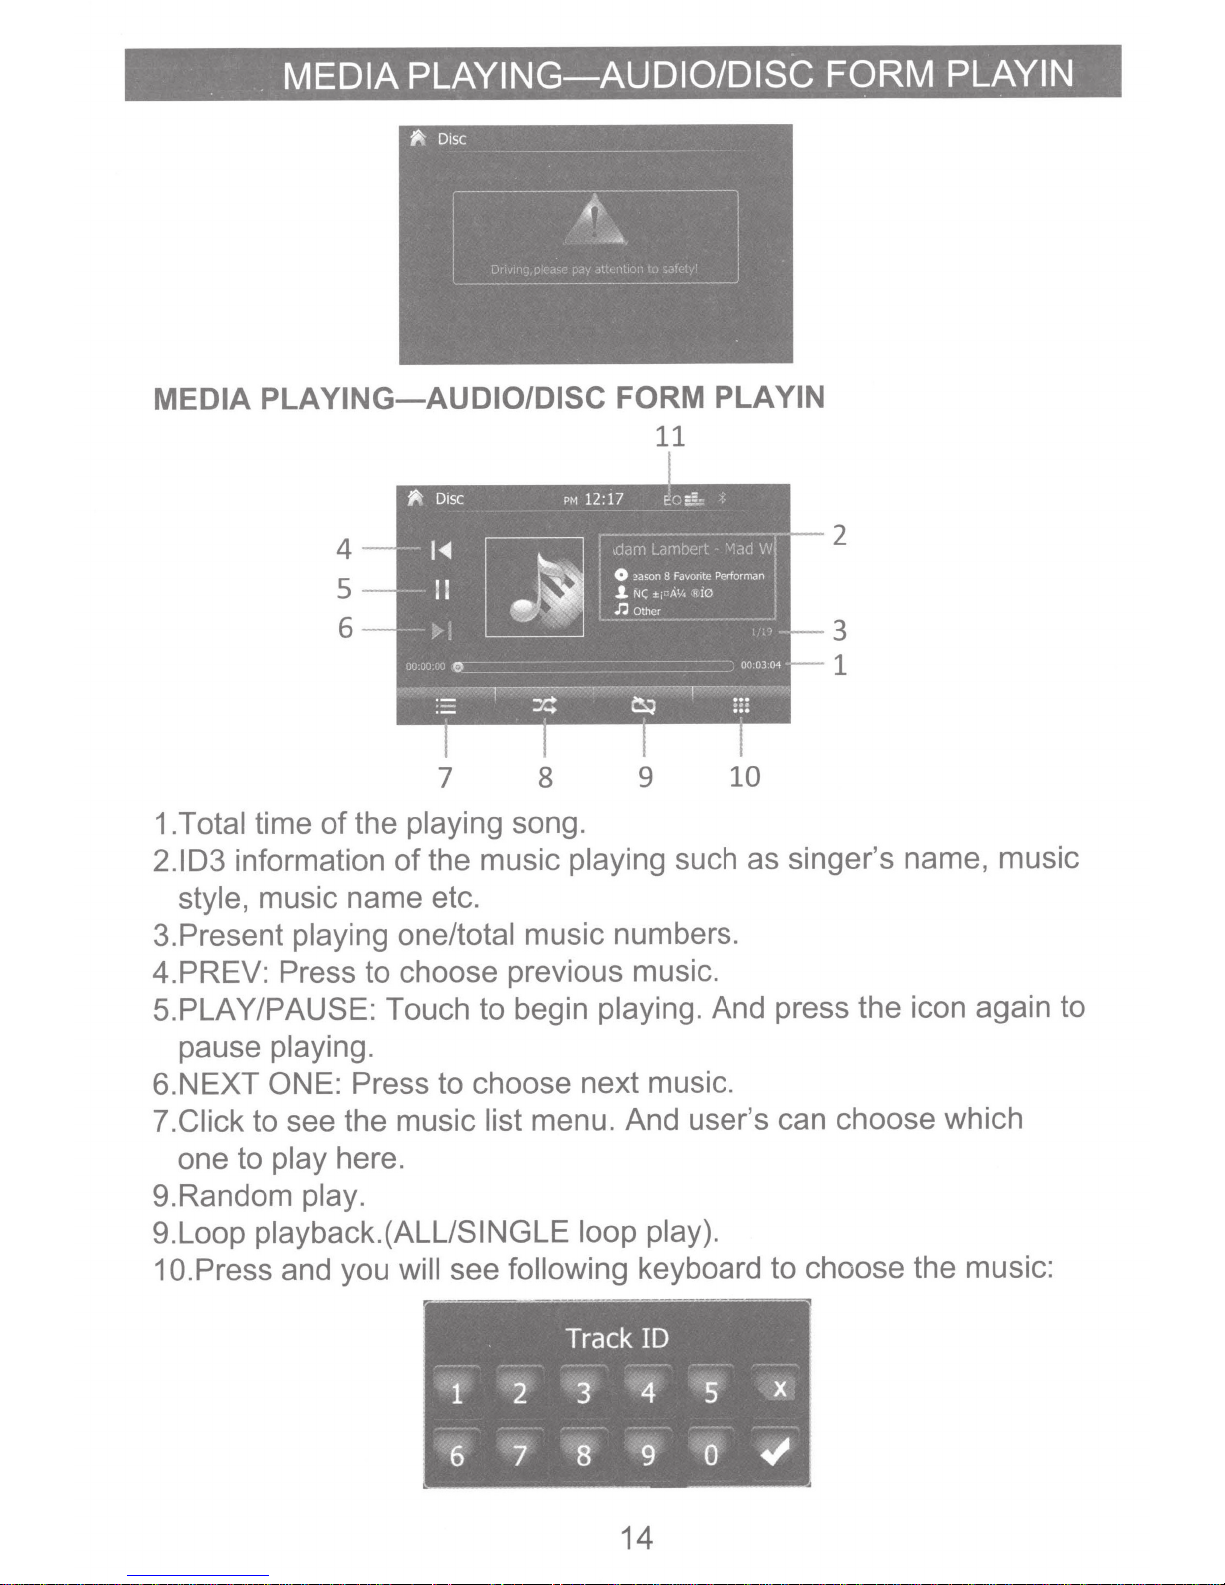
MEDIA PLAYING-AUDIO/DISC FORM PLAYIN
MEDIA
PLAYING-AUDIO/DISC
4
5
6
7
1.Total
time
2.103 information
style,
music name etc.
of
the music
of
playing
the
3.Present playing one/total
4.PREV: Press
to choose previous music.
FORM
11
8
9
song.
playing
such as singer's name, music
music numbers.
PLAYIN
2
3
1
10
5.PLAY/PAUSE: Touch to begin
pause
6.NEXT
?.Click
one to
9.Random
9.Loop
1 O.Press
playing.
ONE: Press
to see the music list
play
here.
play.
playback.(ALL/SINGLE loop play).
and you will
playing.
And press the icon again to
to choose next music.
menu. And user's can choose which
see following keyboard to choose the music:
14
 Loading...