

Soundstream VR-750NB, VR-750NBT Owner's Manual
SeUNDSTREAM
VR-750NB VR-750NBT
OWNER'S MANUAL
Car Multimedia System
lnteq
~m
liJ
--
SINGLE DIN A/V SOURCE
UNIT
so
W/7" FLIP-UP LCD
AVIN

TABLE OF CONTENTS
FEATURES
FRONT PANEL
REMOTE CONTROL
MAIN MENU
RADIO MODE
DVD MODE
SO
CARD MODE
USB MODE
PHOTO MODE
BLU ETOOTH MODE
iPod MODE
................................................................................................
............................................................................................
....................................................................................
...............................................................................................
............................................................................................
................................................................................................
........................................................................................
................................................................................................
............................................................................................
....................................................................................
.................................................................................................
3
4
7
11
13
14
17
20
21
22
28
TV MODE ..................................................................................................... 32
VI
NA
AV
MODE
IN
MODE
DIM MODE
SETTINGS MODE
SAFETY INSTRUCTIONS
INCLUDED PARTS
...............................................................................................
..............................................................................................
................................................................................................
........................................................................................
..............................................................................
.....................................................................................
UNIT INSTALLATION AND REMOVAL
WIRE CONNECTION
WIRING DIAGRAM
SPECIFICATIONS
TROUBLESHOOTING
DISC NOTES
...............................................................................................
....................................................................................
.......................................................................................
................................... · .....................................................
...................................................................................
............................................................
34
36
36
37
40
41
.42
47
49
50
51
54
2
FEATURES
•
7"
Digital
• 800x480 High Definition Screen Resolution
Motorized
•
•
Theft
• Playback
• Complete
• Blue Tooth V2.1
• 32GB USB2.0
• Front Panel 3.Smm
• Accepts
• Accepts
• Accepts Axxess
• 4-Channel 2V Pre-Amp
• Variable 2V Subwoofer
A/V
•
• Rear
• 52x4
•
18FM/12AM
• Selectable Region
• Custom
12/24
•
• NTSC/PAL
• Built-in Analog
TFT-LCD
Angle
Deterrent
from
Integration
GPS
ATSC
Outputs
View
Camera
MOSFEET
& Preset
Hour
Auto
In-Dash Touch Screen
Adjustment
Detachable Panel
DVDR/RW & CDR/RW,
of
&
A2DP
&
SO
Readers
AUX
Navigation
Digital
for
Station
Clock
TV
ASWC
Powered Speaker Level
Selection
TV
OEM Steering Wheel Control Interface
RCA
Output
Multiple
Input
Memory
FM/
AM
EQ
Settings
Tuner (select models)
& Last Angle
iPod by Touch Screen Control (IC-3 cable sold separetly)
for
Wireless MP3 Playback
for
A/V
Input
Module
Tuner DTV-3
Audio
Component
w/
Trigger
Frequency Stepping
MP3,
NAVIBOX-2, Powered by Navteq
Outputs
w/
Memory
of
MP3, MP4, DivX, &
FLAC,
Low-Pass Crossover
MP4, DivX, &
Integration
Outputs
AVI
AVI
Bluetooth Features
Work
•
• Noise
• Contact List Transferred
• Caller
• Recent Calls
• A2DP
with
Most
& Echo Cancellation
ID
Shows Name and
& Talk Time
for
Wireless MP3 Playback
Bluetooth Enabled Phones
for
Easy
Access Dialing
Number
Logs
from
Contacts List
3
Front
Panel
J
""".·J
r
.
~
.....
'
~·
~
.. · ·
..
.r
..
··
~
--.~
..
·
··
·
L-
.-
..
~.
'"·
/
·
·.
l;_;
MIC
!iO
l
..
...
~
.
..
-
......
,
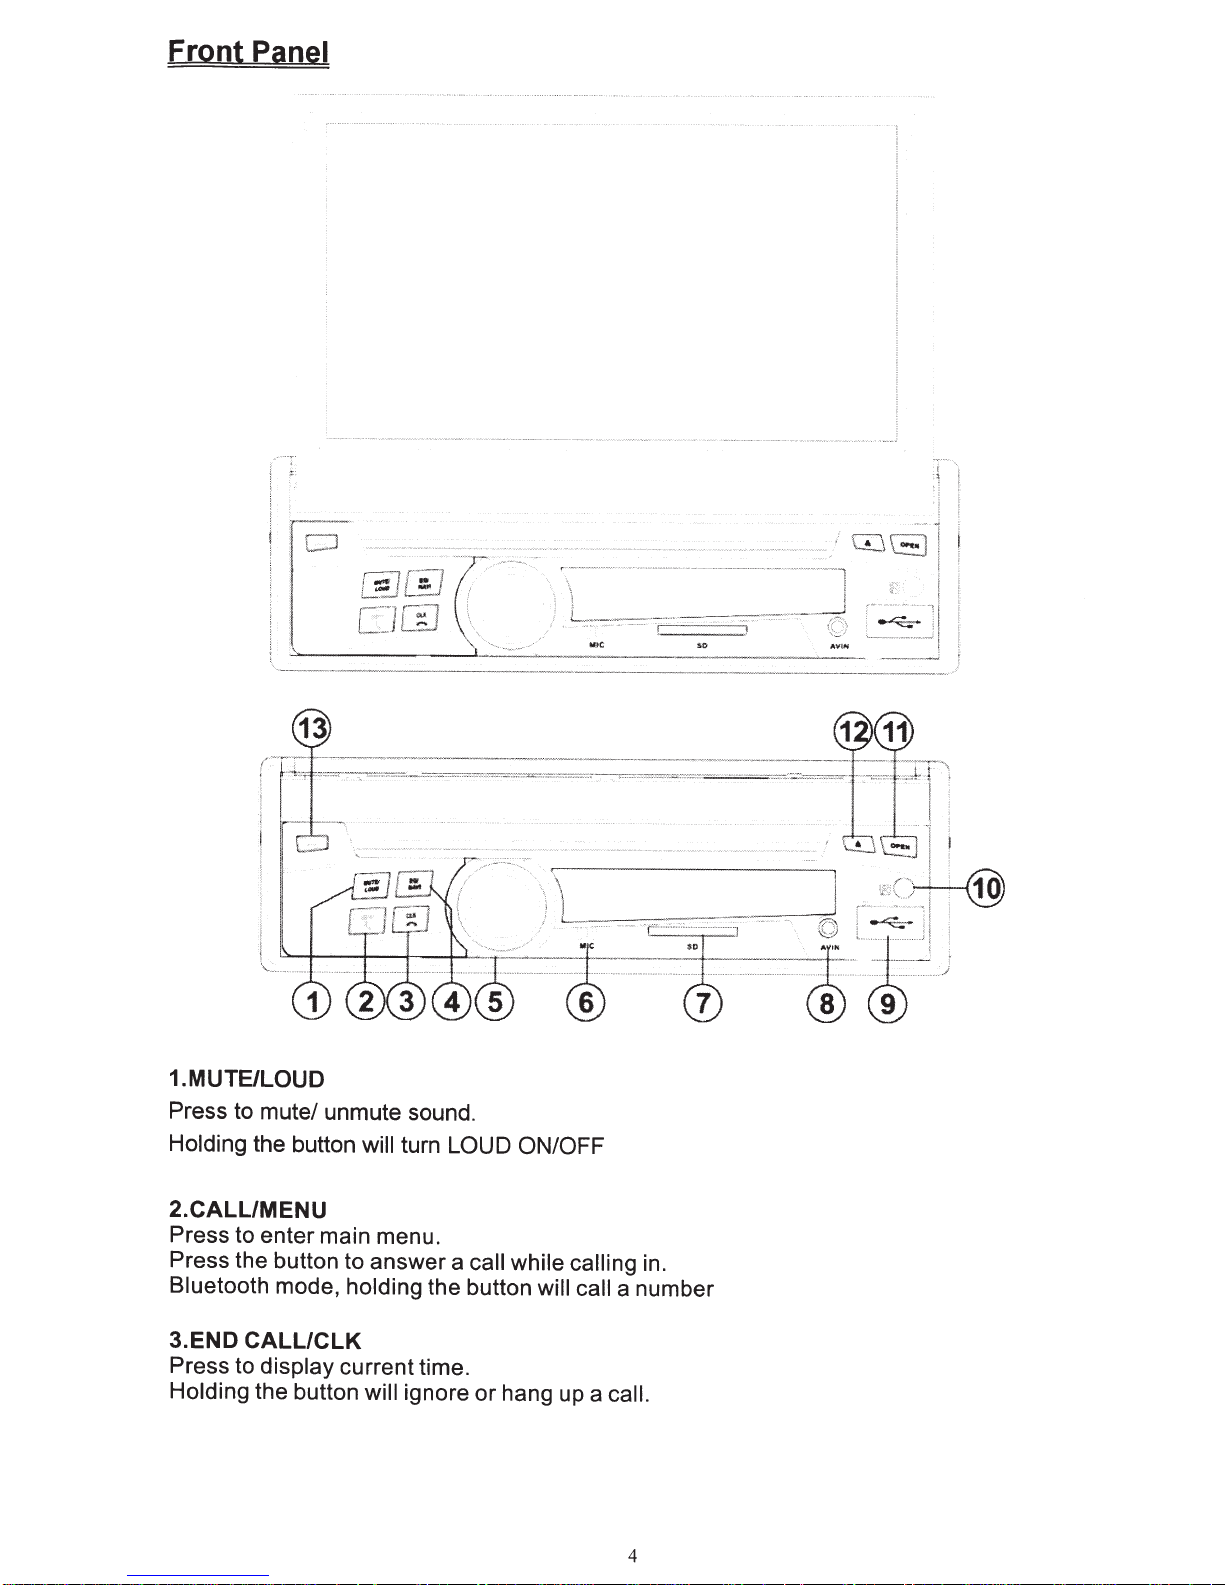
1.MUTE/LOUD
Press to mute/ unmute sound.
Holding
the button
will
turn
LOUD ON/OFF
2.CALL/MENU
Press to enter main menu.
Press the button to answer a
Bluetooth
3.END
Press to display
Holding
mode,
holding
CALL/CLK
current time.
the button
the button
will
ignore or hang
call while calling
will call
up
a
a number
call.
in.
4

4.EQ/NAVI
Press to enter/exit
Holding
USER-
5.
VOL/POWER/SRC
Rotate the button
When ACC
When the unit is on, press to switch between different sources
6.MIC
Microphone for use with
7.SD
The unit
connected.
8.
AV
Connect an
audio/video system.
the button
POP-
is on, press to turn the unit
CARD SLOT
will
be switched to the SD
IN
Jack
external
NAVI
will
adjust the EQ setting as
CLASSIC-
clockwise
Bluetooth hands free
AN
mode.
ROCK-
I
anticlockwise
device to this
JAZZ-
CARD
following:
USER
to increase
ON, holding
calling.
Source automatically
jack
to
watch/listen
I
the button
decrease the
to the device through
volume
will turn
..
when an SO
off
the
unit
CARD
your
is
car
9.USB
The unit
10.
Receives remote infrared receiver
11.
When unit power off, press to turn unit on and the monitor
to the
When unit power on, press
position; Press it again, the monitor
12.
Press to open
will
be switched to
Remote Sensor
OPEN
last angle
position.
EJECT
I
close
USB Source automatically
signals.
it,
the monitor will
will
turn downward and completely
the monitor to eject the disc.
spread out and turn around to the
when a
13.REL
Press to
release
the
detachable panel.
USB
is connected.
will spread out and turn around
last angle
retract in.
5
14.RESET
Remove the detachable panel to gain access to the RESRT button.
Press and hold this button for 3 sec to switch back to all the original factory settings.
Keep in mind this will erase all your preset radio stations and any EQ settings you may
have made and saved.
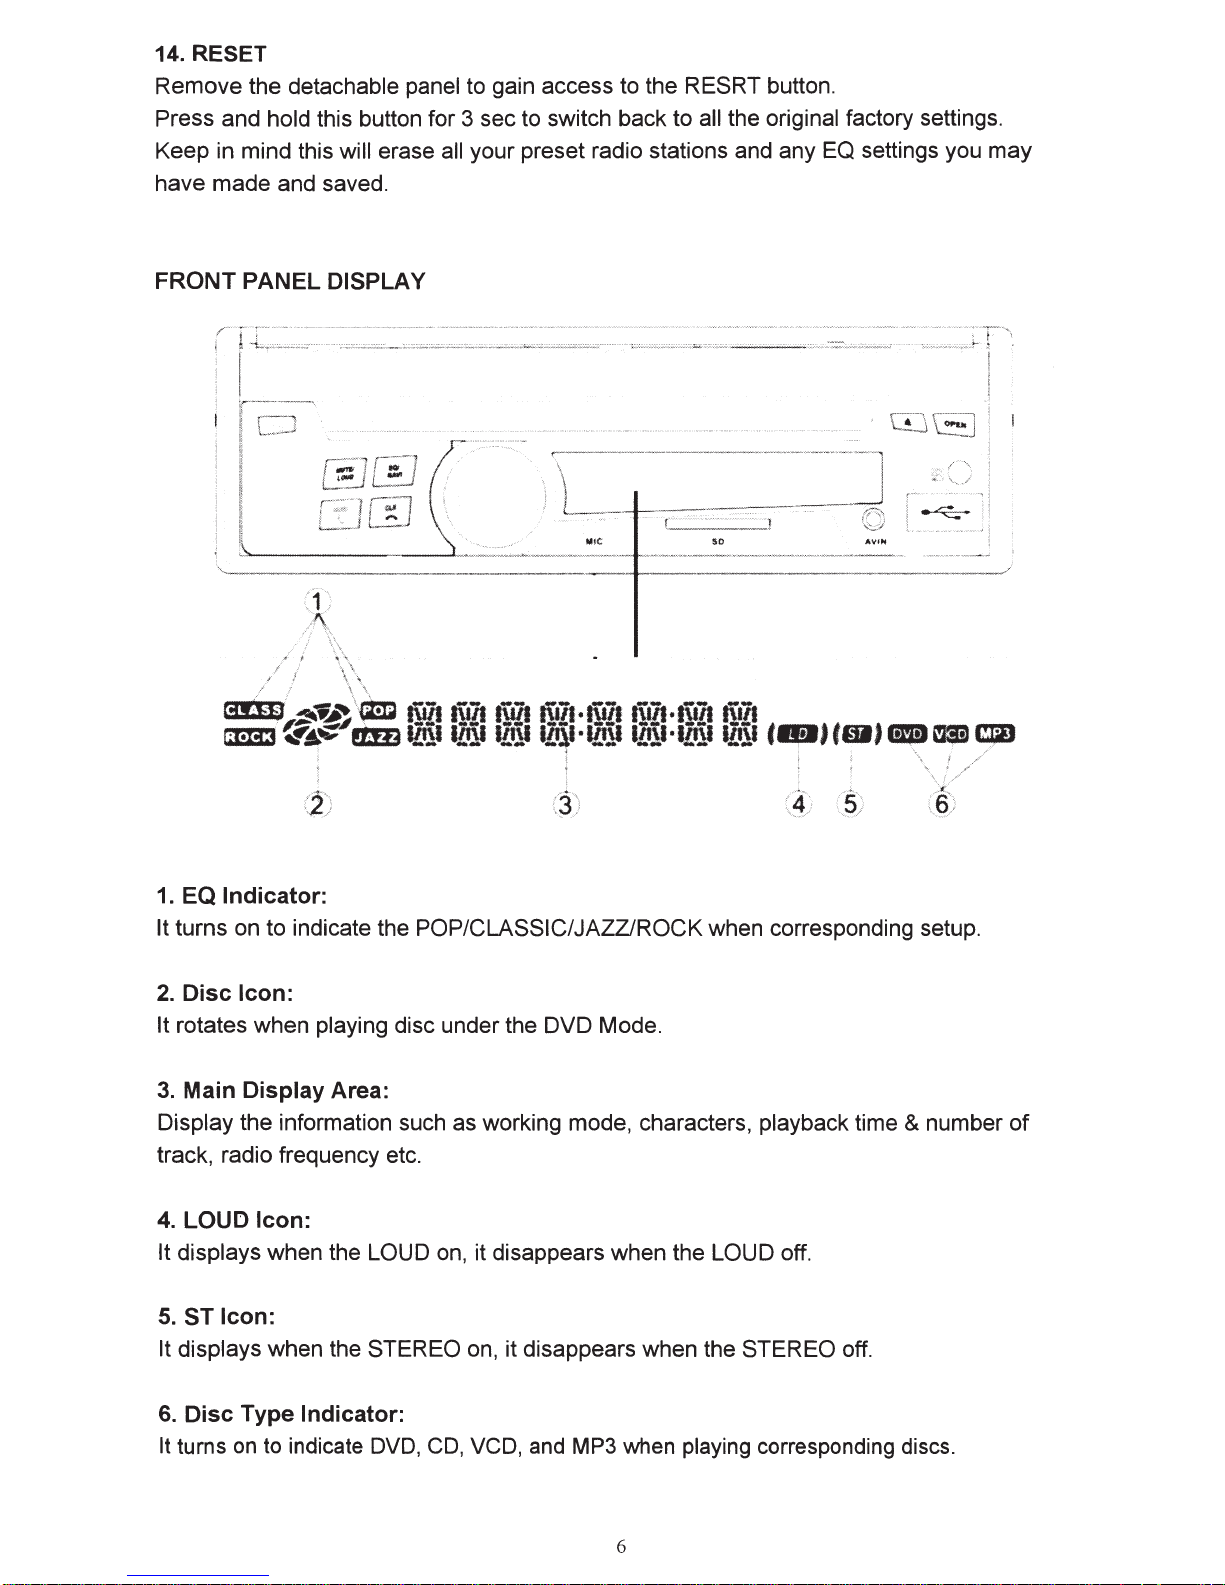
FRONT
PANEL
1
,,...,
/ \ "\
)'.
/
DISPLAY
\.
'\
:3_
M!C
SO
1.
EQ
Indicator:
It turns on to indicate the POP/CLASSIC/JAZZ/ROCK when corresponding setup.
2.
Disc
Icon:
It rotates when playing disc under the DVD Mode.
3.
Main
Display
Area:
Display the information such as working mode, characters, playback time & number
track, radio frequency etc.
4. LOUD
Icon:
It displays when the LOUD on, it disappears when the LOUD off.
5.
ST
Icon:
It displays when the STEREO on, it disappears when the STEREO off.
6.
Disc
It turns
Type
on
Indicator:
to
indicate
DVD,
CD,
VCD,
and
MP3 when playing corresponding discs.
of
6
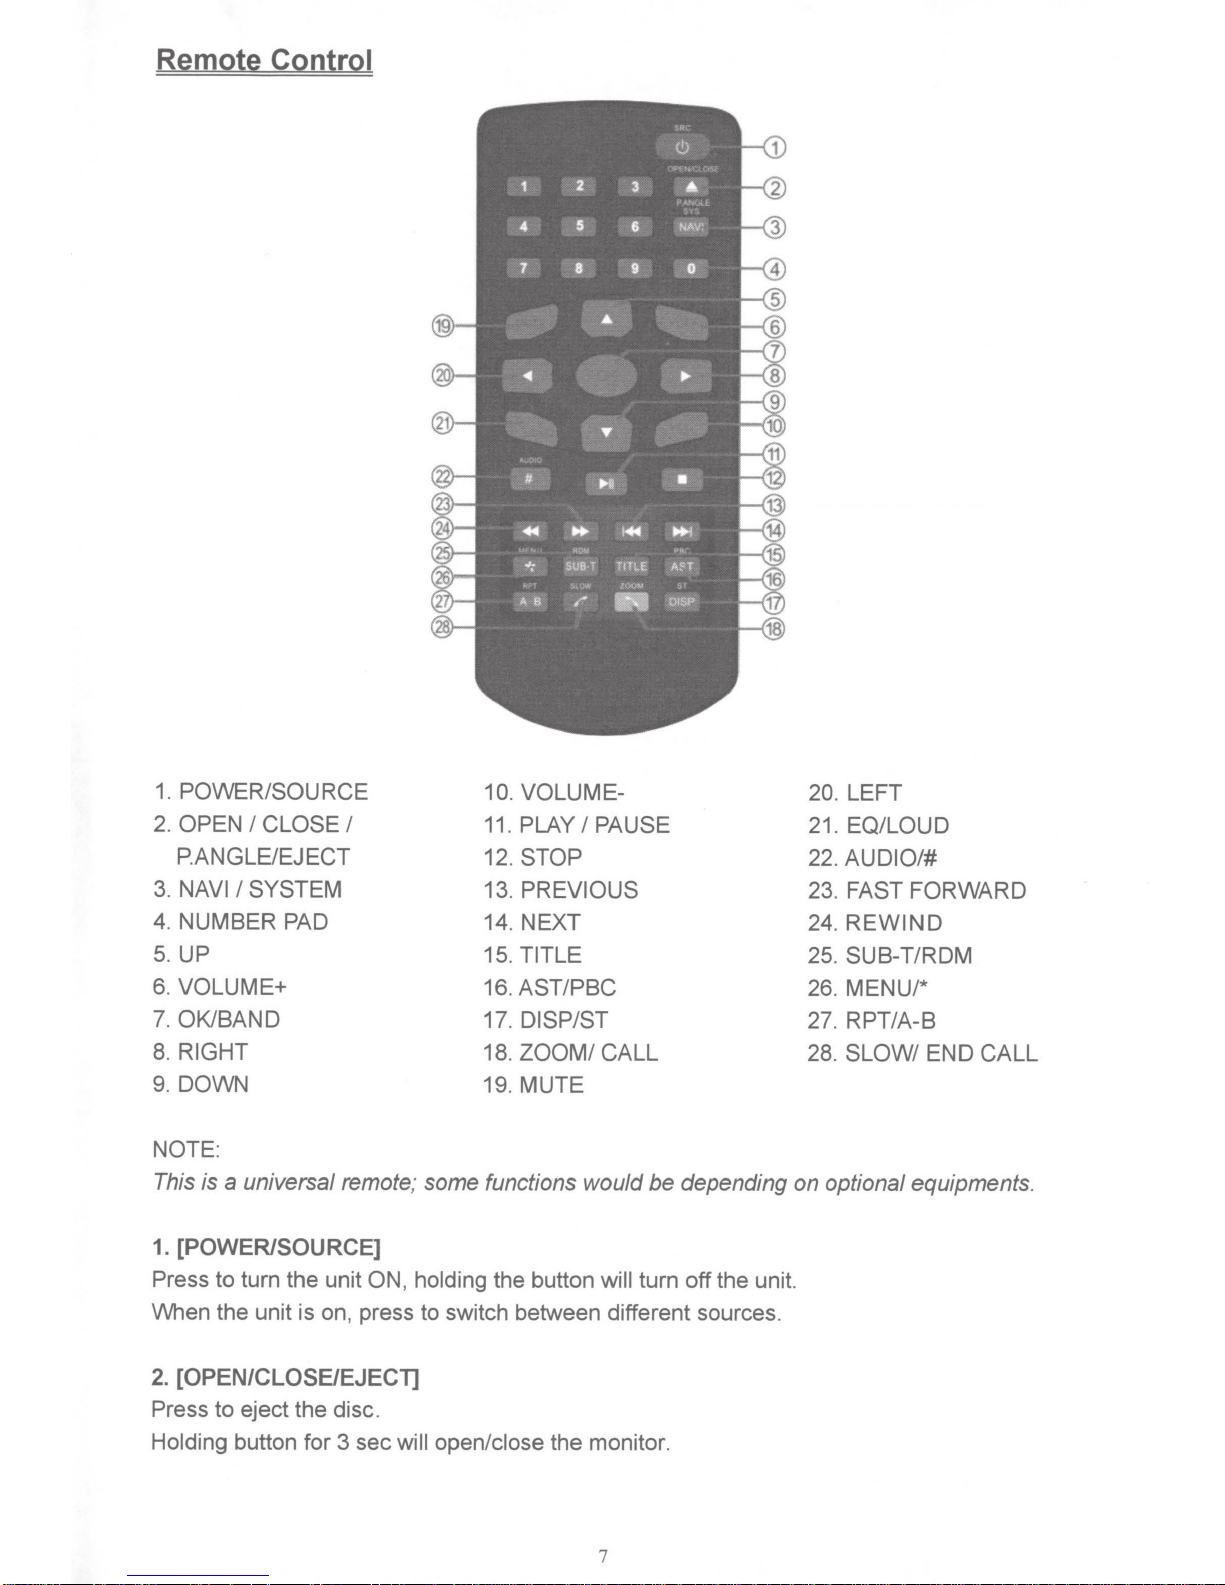
Remote Control
1.
POWER/SOURCE 10. VOLUME- 20.
2.
OPEN
P.ANGLE/EJ
3. NAVI
4. NUMBER
5.
UP
6.
VOLUME+
7.
OK/BAND
8.
RIGHT
9. DOWN 19. MUTE
NOTE:
This is
I
CLOSE
I
SYSTEM
PAD
a
universal remote; some functions would
I
ECT 12. STOP 22.
11.
PLAY
13.
14. NEXT 24.
15.
TITLE
16.
AST/PBC
17.
DISP/ST
18.
ZOOM/
I
PAUSE
PREVIOUS
CALL
be
depending on optional equipments.
1. [POWER/SOURCE)
Press
When the unit is on, press to switch between different sources.
to turn the unit
ON, holding
the button
will turn
off
the unit.
LEFT
21.
EQ/LOUD
AUDIO/#
23. FAST FORWARD
REWIND
25. SUB-T/RDM
26. MENU/*
27.
RPT/A-8
28.
SLOW/
END
CALL
2.
[OPEN/CLOSE/EJECT]
Press
Holding
to eject the disc.
button for 3 sec
will open/close
the monitor.
7
3.
[NA
VI/SYSTEM]
Press to quickly enter
Holding button for 3 sec will enter I exit the Settings Mode.
4.
[NUMBERS
Radio Mode, press buttons
store current radio frequency to the preset station.
DVD Mode, When playing DVD, VCD, CD, MP3, press buttons
track, press the [OK] button to confirm.
TV
Mode, press buttons
Bluetooth Mode, press buttons
5.
[A]
I
8.
DVD Mode and System Parameters Setup, press the [v] I
upward
leftward
Radio Mode, press the [
buttons for 3 sec will seek the next available channel by decreasing
frequency; seeking will stop by pressing any button. Press the
I downward to select an item. Press the [
I rightward to select item.
[>] I
0-9]
9.
I exit the Navi mode.
1-6
0-9
to choose the channel and press the [OK] button to confirm.
0-9
[v] I 20. [<]
Direction
<]
I [>] buttons to switch the stored stations. Holding the [
to select a preset station, Holding button for 3 sec will
0-9
to input the number of
to input phone numbers.
Keys
[A]
buttons to move the cursor
<]
I [>] buttons to move the cursor
<]
I increasing the tuning
[v] I
[A]
buttons to decrease
I increase the frequency manually.
TV
Mode, Holding
[A]
I [v] buttons to select the stored channel upward I downward. (Optional tuner required)
Bluetooth Mode,
and setup page. Press the [
item.
NAVI Mode, press the
the[<]
press[<]
[v] I
I[>] buttons for 3 sec will tune channels automatically. Press the
I[>] buttons to switch between dialing page, phonebook, music
<]
I [>] buttons to move the cursor leftward I rightward to select
[A]
buttons to decrease I increase the brightness of the screen.
I [>]
6.
[VOL+]
Press to increase I decrease the volume.
Holding the button will keep increasing/decreasing the volume.
7.
[OK/BAND]
DVD Mode, press to confirm the selection.
Radio
FM1-
TV
Mode, press to switch the
NTSCHolding will switch the TV system area as follows:
USA-
Bluetooth Mode, press the button to turn on/off selected item.
11. [PLAY/PAUSE]
DVD Mode, press to pause or resume playback.
/10.
Mod.e,
FM2-
PAUBG -
CCIR
[VOL-]
press to switch the wave band as follows:
FM3-
-ITALY-
AM1-
PAUl -PAUDK-
AM2-
AUS-
FM1
TV
audio as follows:
NZ-
NTSC
USA
8
12.
[STOP]
DVD Mode, when
in
DVDNCD/CD
playback, press the button once to stop playback,
press the [Play/Pause] button agian to resume playback. Press the button twice to reset
playback, press the [Play/Pause] button to start the playback from the beginning
of
disc.
MP3 disc playback, press the button to stop the playback, press the [Play/Pause] button to
start the playback from the beginning
13.
[PREVIOUS]
/14.
[NEXT]
DVD Mode, press to go to the pervious
15. [TITLE]
of
track.
I
next chapter, track or song.
DVD Mode, press to enter the title menu when playing DVD disc.
Bluetooth Mode, press to enter the next page of phone number list in phonebook.
16. [AST/PBC]
DVD Mode, press to switch the
Radio Mode, press to review stored stations;
program the 6 strongest stations available into the presets
PBC
function
on
I
off when playing VCD
disc.
holding the button for 3 sec will automatically
in
the each wave band.
TV Mode, automatically seek the stations available.
17.
[DISP/ST]
Main menu, press
to
set the background by default picture
DVD Mode, press to display current playback information.
Bluetooth Mode, press to return to the previous page.
18.
[ZOOM/CALL]
DVD Mode, press to zoom the picture display when playing DVD, VCD
disc. Each press
changes speed from 2x to 3x to 4x to 3x to 2x then back to normal play.
Bluetooth Mode, press to
19. [MUTE]
call
a number or to receive a
cell phone call.
Press to switch mute sound; press it again to resume to the previous volume level.
21. [LOUD/EQ]
Press to adjust the
USER -
POP-
Holding for 3 sec
EQ
setting as following:
CLASSIC
will
switch the
-
ROCK-
"LOU
JAZZ-
0"
function
USER
ON
I
OFF.
22.
[AUDIO]
DVD Mode, press to change dialogue language when playing DVD disc; Press to select
different audio channels when playing
Bluetooth Mode, press to input the symbol
VCD, CD disc.
#.
9
23/24.
DVD
2x
to normal
[FAST
Mode, press to fast forward
to Bx to 20x then back to
4x
to
FORWARD/REWIND]
playback.
rewind at
I
normal play.
speed. Each press changes speed from
2x
Press the [PLAY/PAUSE]
25. [SUBT/RDM]
DVD
ing
Mode, press to change the subtitle language when playing DVD disc. Hold
for
3
will activevate random play
sec
function.
26. [MENU]/*
DVD Mode, press to return to the boot menu when
Bluetooth Mode, press to input the symbol*.
[RPT/A-8]
27.
press it again to set point 8, the
DVD Mode, press to set point
points A to
VCD, CD,
playing.
When
B.
press it again to repeat
playing
A,
DVD, MP3, press it again to stop repeating. When
all tracks.
Holding
playing DVD disc.
player will
the button for 3 sec
button to resume
repeat from
playing
repeat
will
[SLOW/END CALL]
28.
DVD Mode, press for slow
Each press changes speed from 1/2x to 1/4x to 1/Bx to 1/16x then back to normal play.
Bluetooth Mode, press to ignore or hang up a
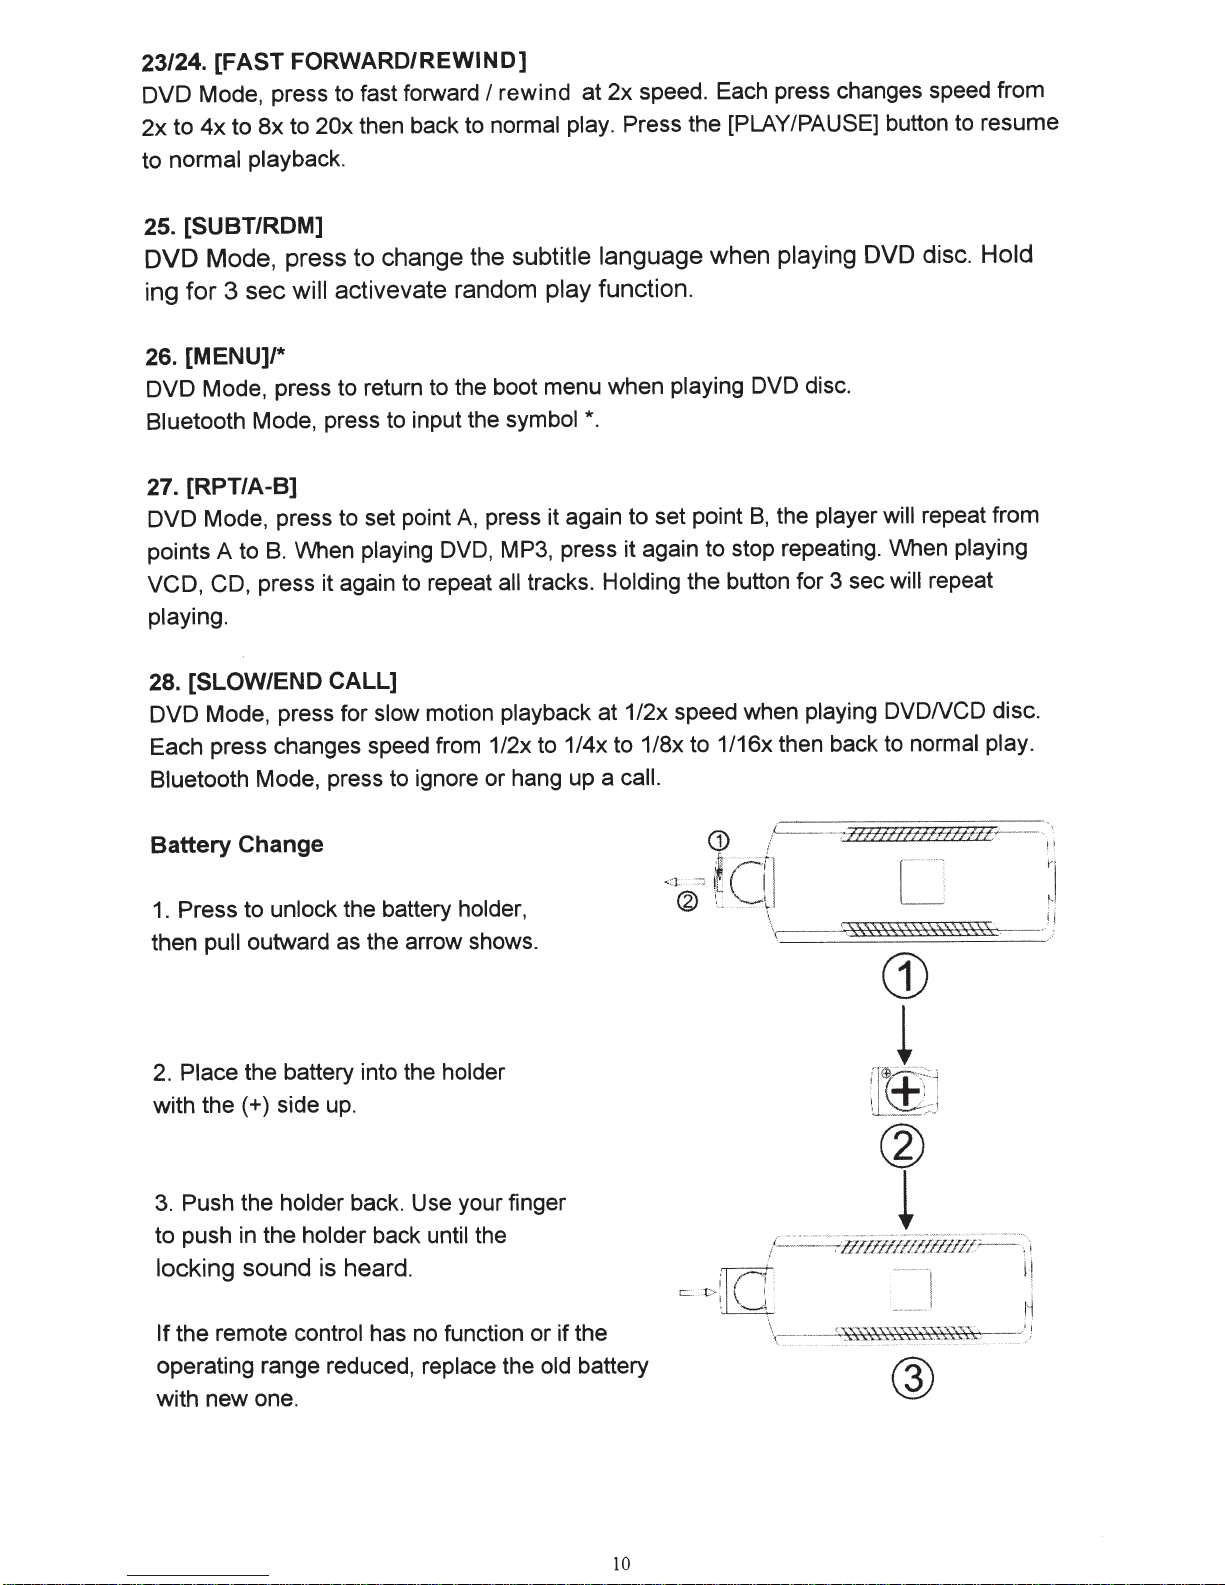
Battery
1.
then
2.
with
3.
to push in the
locking
Change
Press to
outward as the arrow shows.
pull
Place
Push the
the battery into the
the(+)
sound
unlock
side up.
holder
holder
is
the battery
back. Use your finger
heard.
motion playback at 1/2x speed when
call.
holder,
holder
back until the
playing
DVDNCD
disc.
the remote
If
operating range reduced, replace the
with new one.
control has no function or if the
old
battery
10
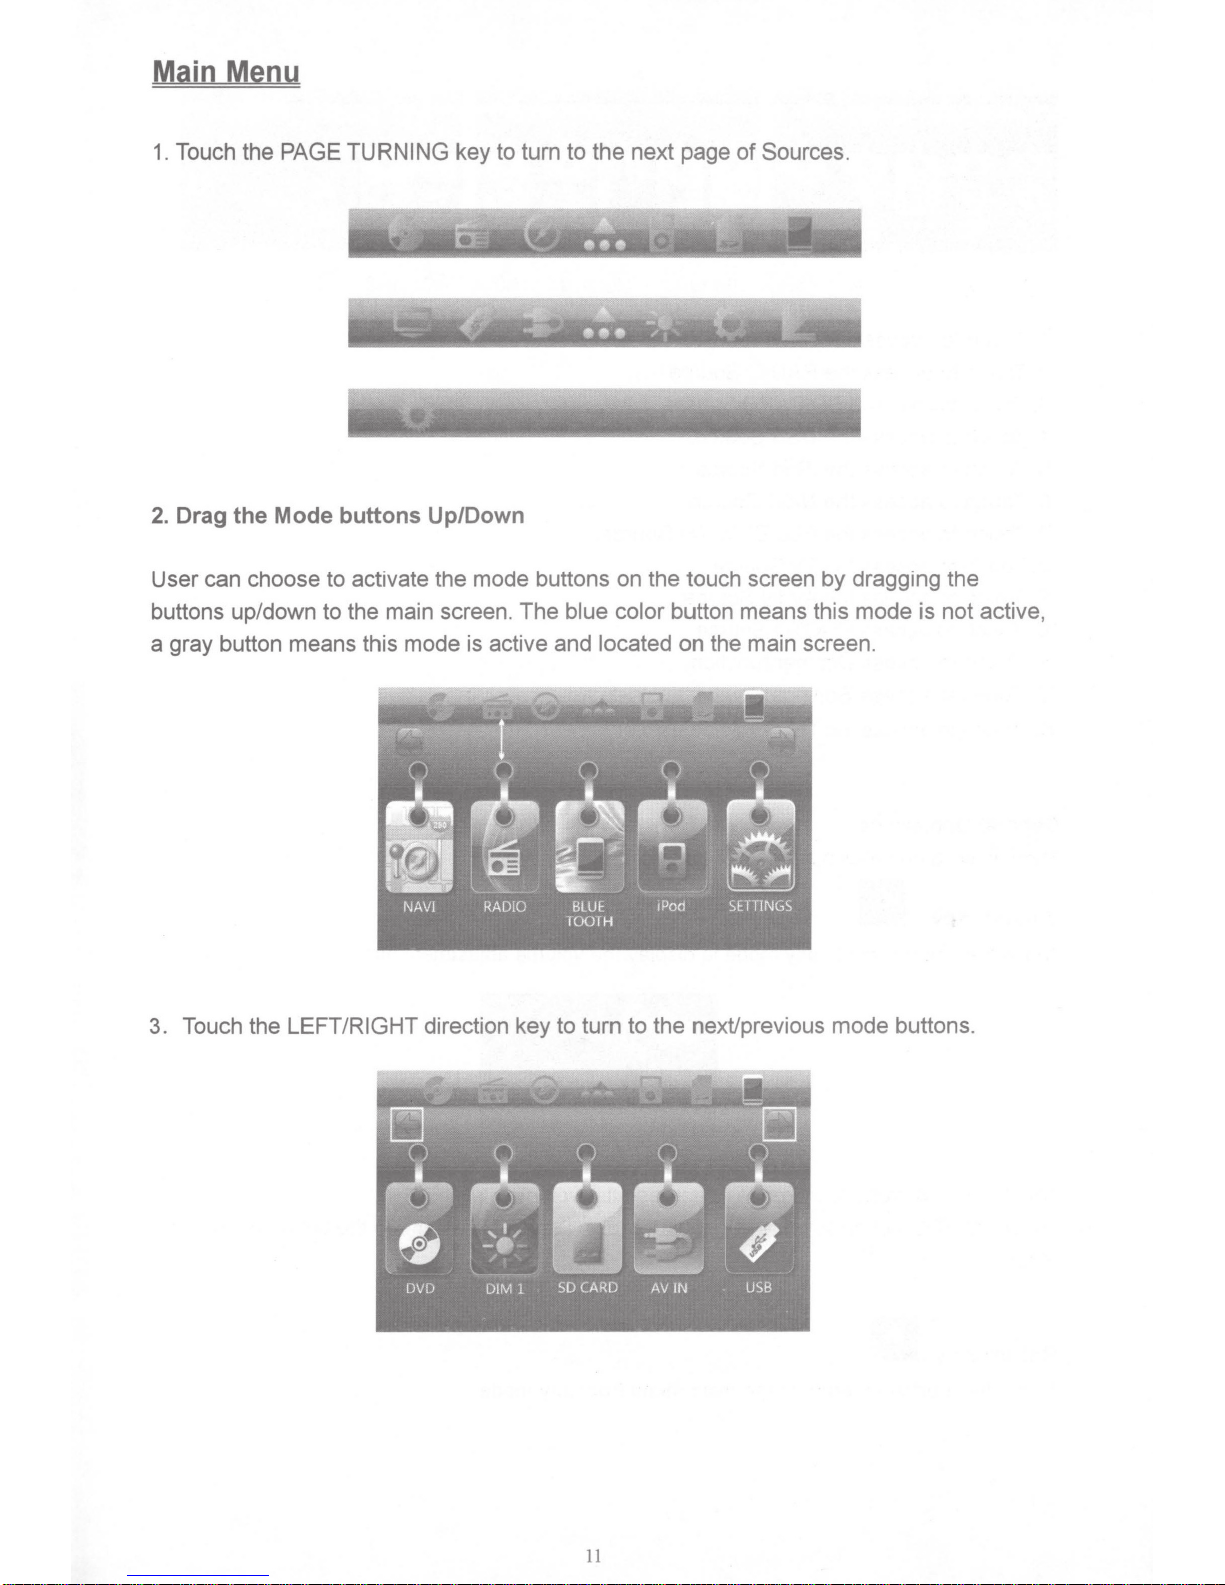
Main Menu
1.
Touch the PAGE TURNING key to turn
2.
Drag the Mode buttons Up/Down
User can choose to activate the mode buttons on the touch screen by dragging the
buttons up/down to the main screen. The blue color button means this mode is not active,
a gray button means this mode is active and located on the main screen.
to
the next page
of
Sources.
3. Touch the LEFT/RIGHT direction key
to
turn
11
to
the next/previous mode buttons.
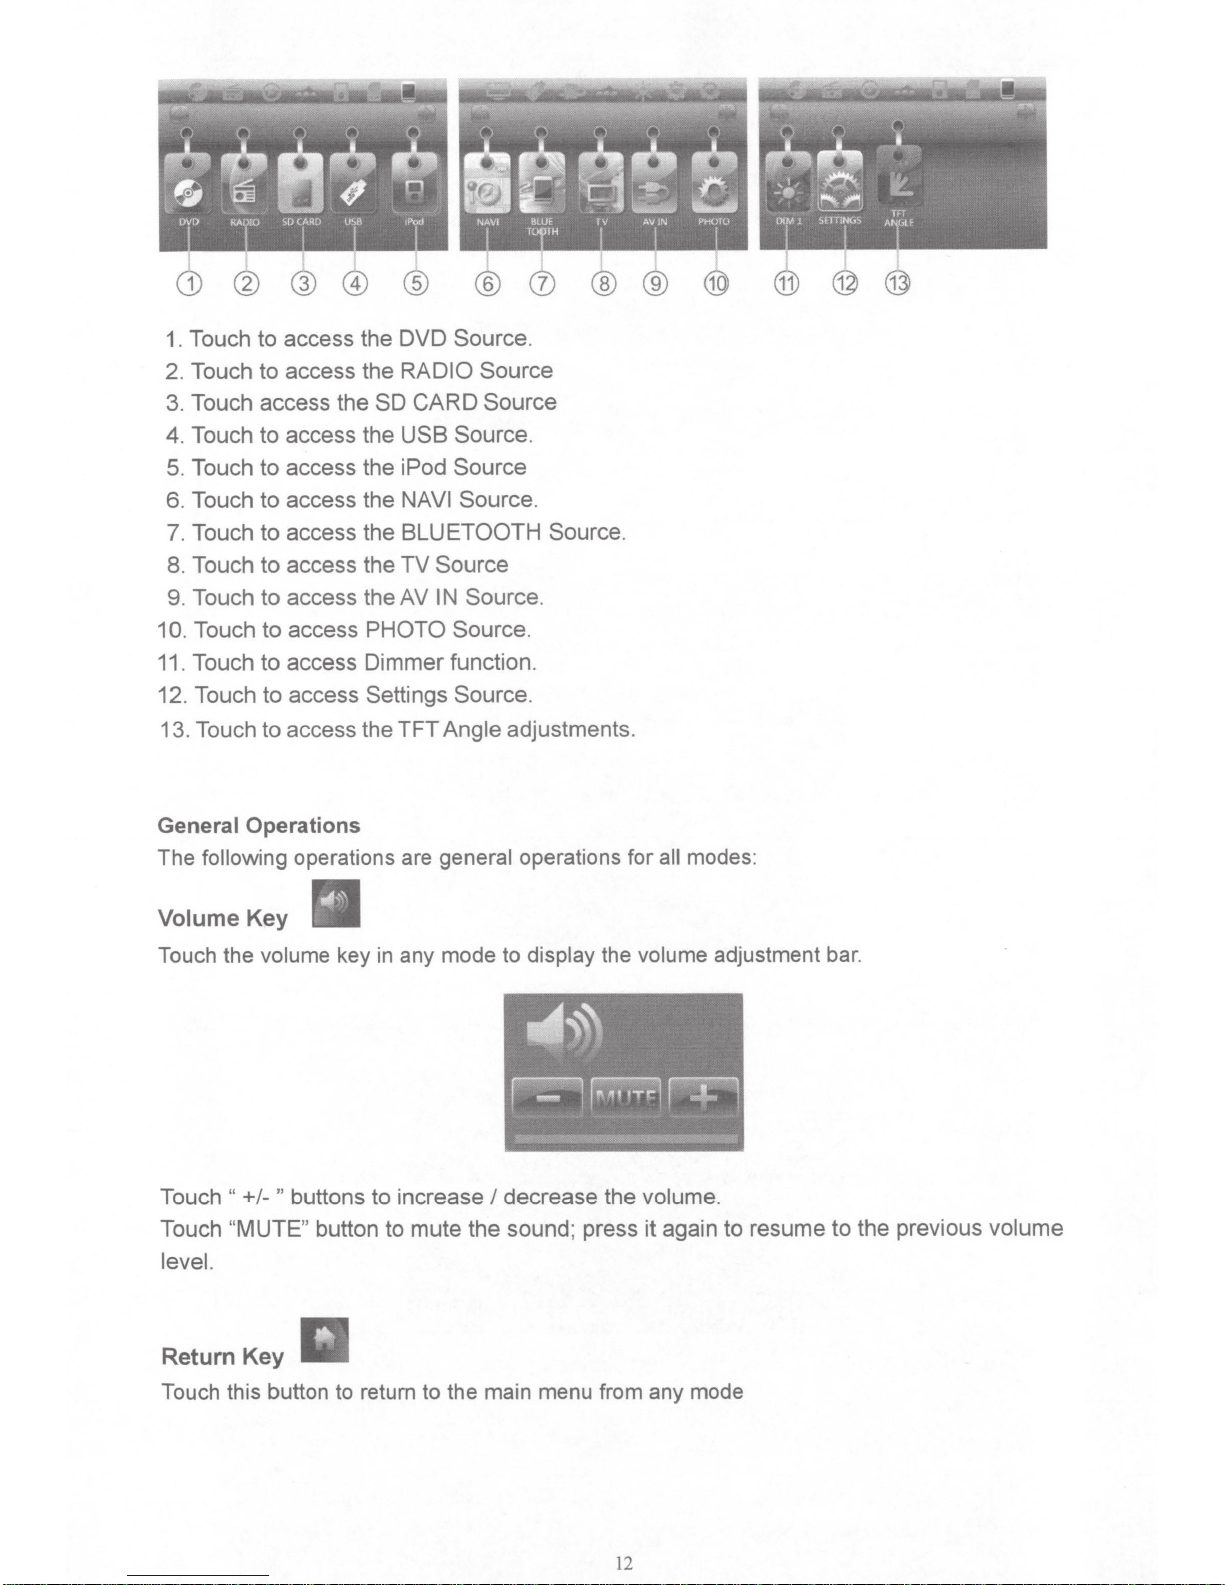
Touch to access the DVD Source.
1.
2. Touch to access the
SO
3. Touch access
the
4. Touch to access the
RADIO
CARD
USB Source.
Source
Source
5. Touch to access the iPod Source
Source.
6. Touch to access the
7. Touch to access the
8. Touch to access the
access the
9. Touch
Touch to access
.
10
Touch to access Dimmer function.
11.
to
NAVI
BLUETOOTH
Source
TV
Source.
IN
AV
PHOTO Source.
12. Touch to access Settings Source.
13. Touch to access the TFT Angle
adjustments.
Source.
General
The
Operations
following
operations are
general
operations for
modes:
all
Volume Key
Touch the
Touch
Touch
"
MUTE
"
volume
"
+/-
key
buttons to increase
decrease the
I
any mode to
in
" button to mute the sound; press
display
the volume
volume.
it
adjustment bar.
again to resume to the previous
level.
Return Key
Touch this button to return to the main menu from any mode
volume
12
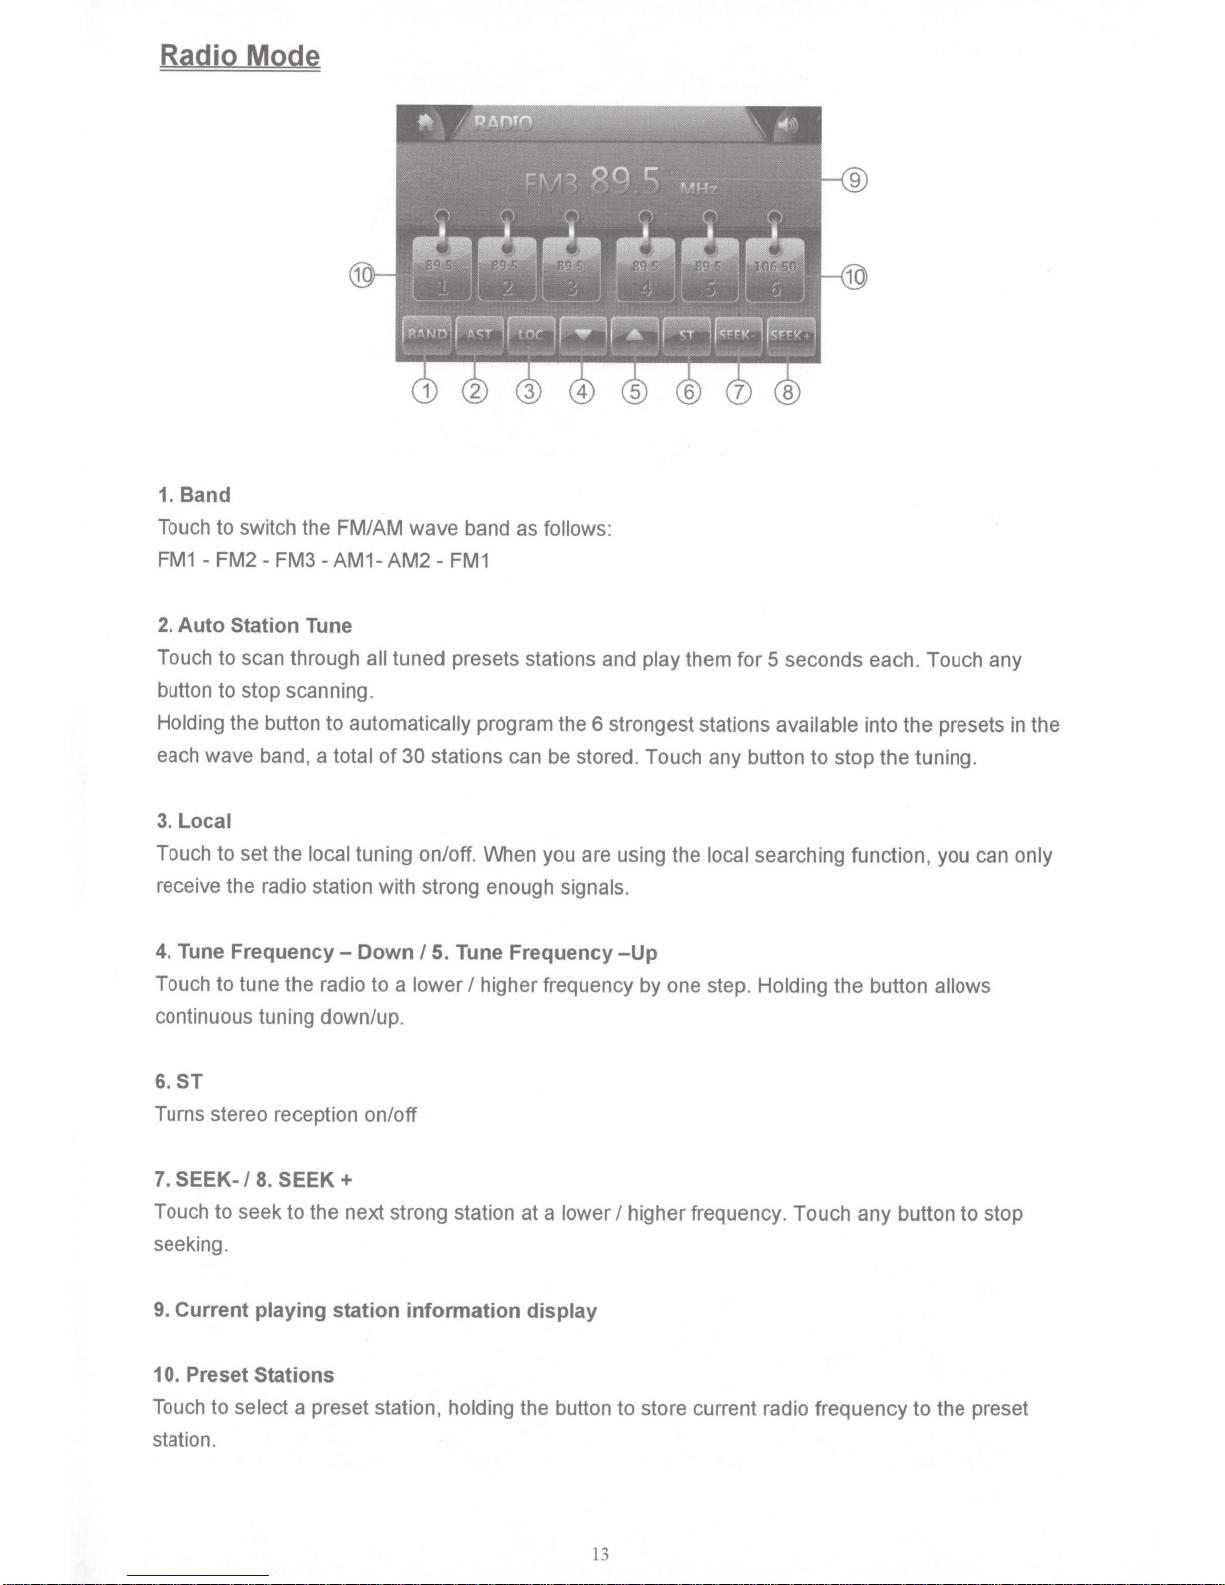
Radio Mode
1. Band
Touch to switch the FM/AM wave band as
FM1-FM2-FM3-AM1-AM2-FM1
2.
Auto
Station
Touch to scan through
button to stop scanning.
Holding the button to
each wave band, a
Tune
all
automatically
total
tuned presets stations and
program the 6 strongest stations
of
30 stations can be stored. Touch any button to stop the tuning.
follows:
play
them for 5 seconds each. Touch any
available
into the presets
in
the
3.
Local
Touch to set the
receive the radio station with strong enough
4.
Tune
Frequency-
Touch to tune the radio to a
continuous tuning down/up.
6.ST
Turns stereo reception on/off
7.
SEEK-/
Touch to seek to the next strong station at a
seeking.
9. Current
10.
Preset Stations
Touch to select a preset station,
station.
local
8.
SEEK+
playing
tuning on/off. When you are using the
Down
station information
I
5.
Tune Frequency
lower
I
higher frequency by one step.
holding
display
the button to store current radio frequency to the preset
signals.
-Up
lower
I
local
searching function, you can
Holding
higher frequency. Touch any button to stop
the button
allows
only
13
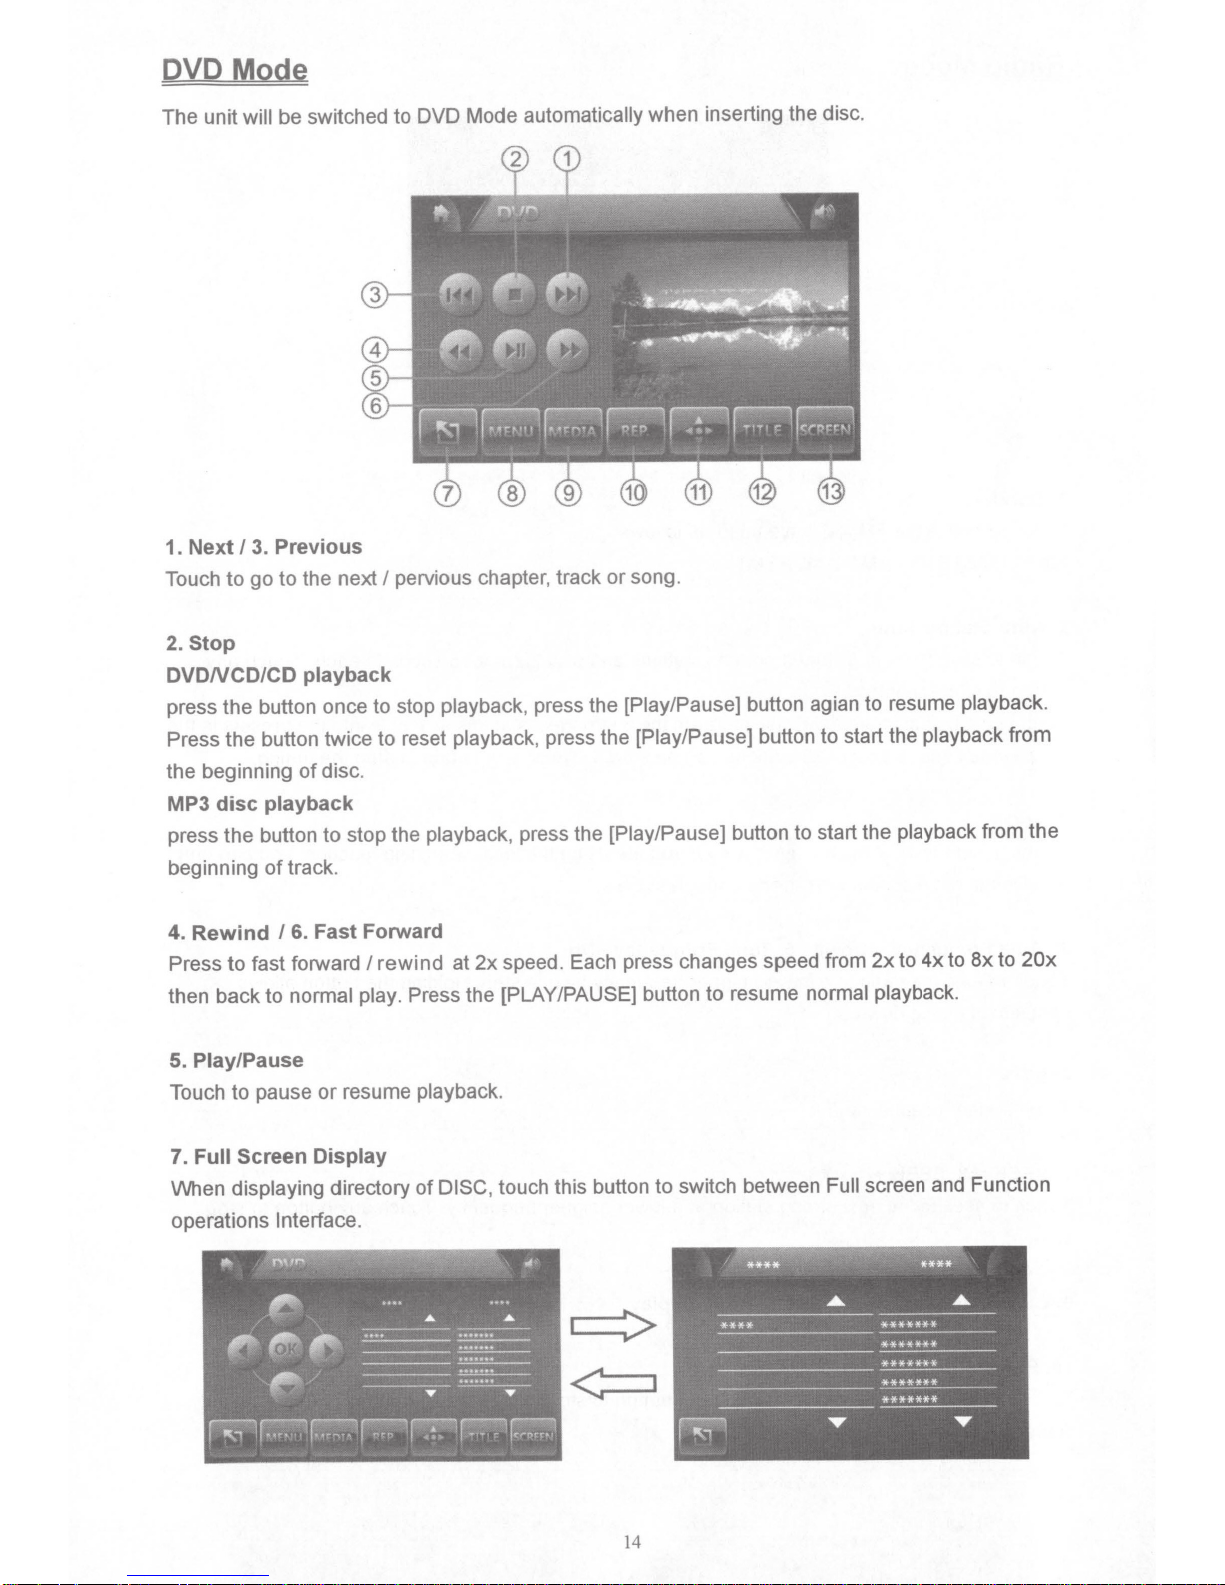
DVD Mode
The unit will be switched to DVD Mode
3. Previous
Stop
to
I
go
to the next
playback
disc.
of
pervious chapter, track or song.
I
1. Next
Touch
2.
DVDNCD/CD
press the button once to stop playback, press the [Play/Pause] button agian to resume playback.
Press the button twice to reset playback, press the [Play/Pause] button to start the playback from
the beginning
automatically
when inserting the disc.
MP3 disc playback
button to stop the playback, press the [Play/Pause] button to start the playback from the
the
press
track.
beginning
of
6. Fast Forward
Rewind
4.
Press to fast forward
back
then
Play/Pause
5.
Touch to pause
I
rewind
I
normal play. Press the [PLAY/PAUSE] button to resume normal playback.
to
resume playback.
or
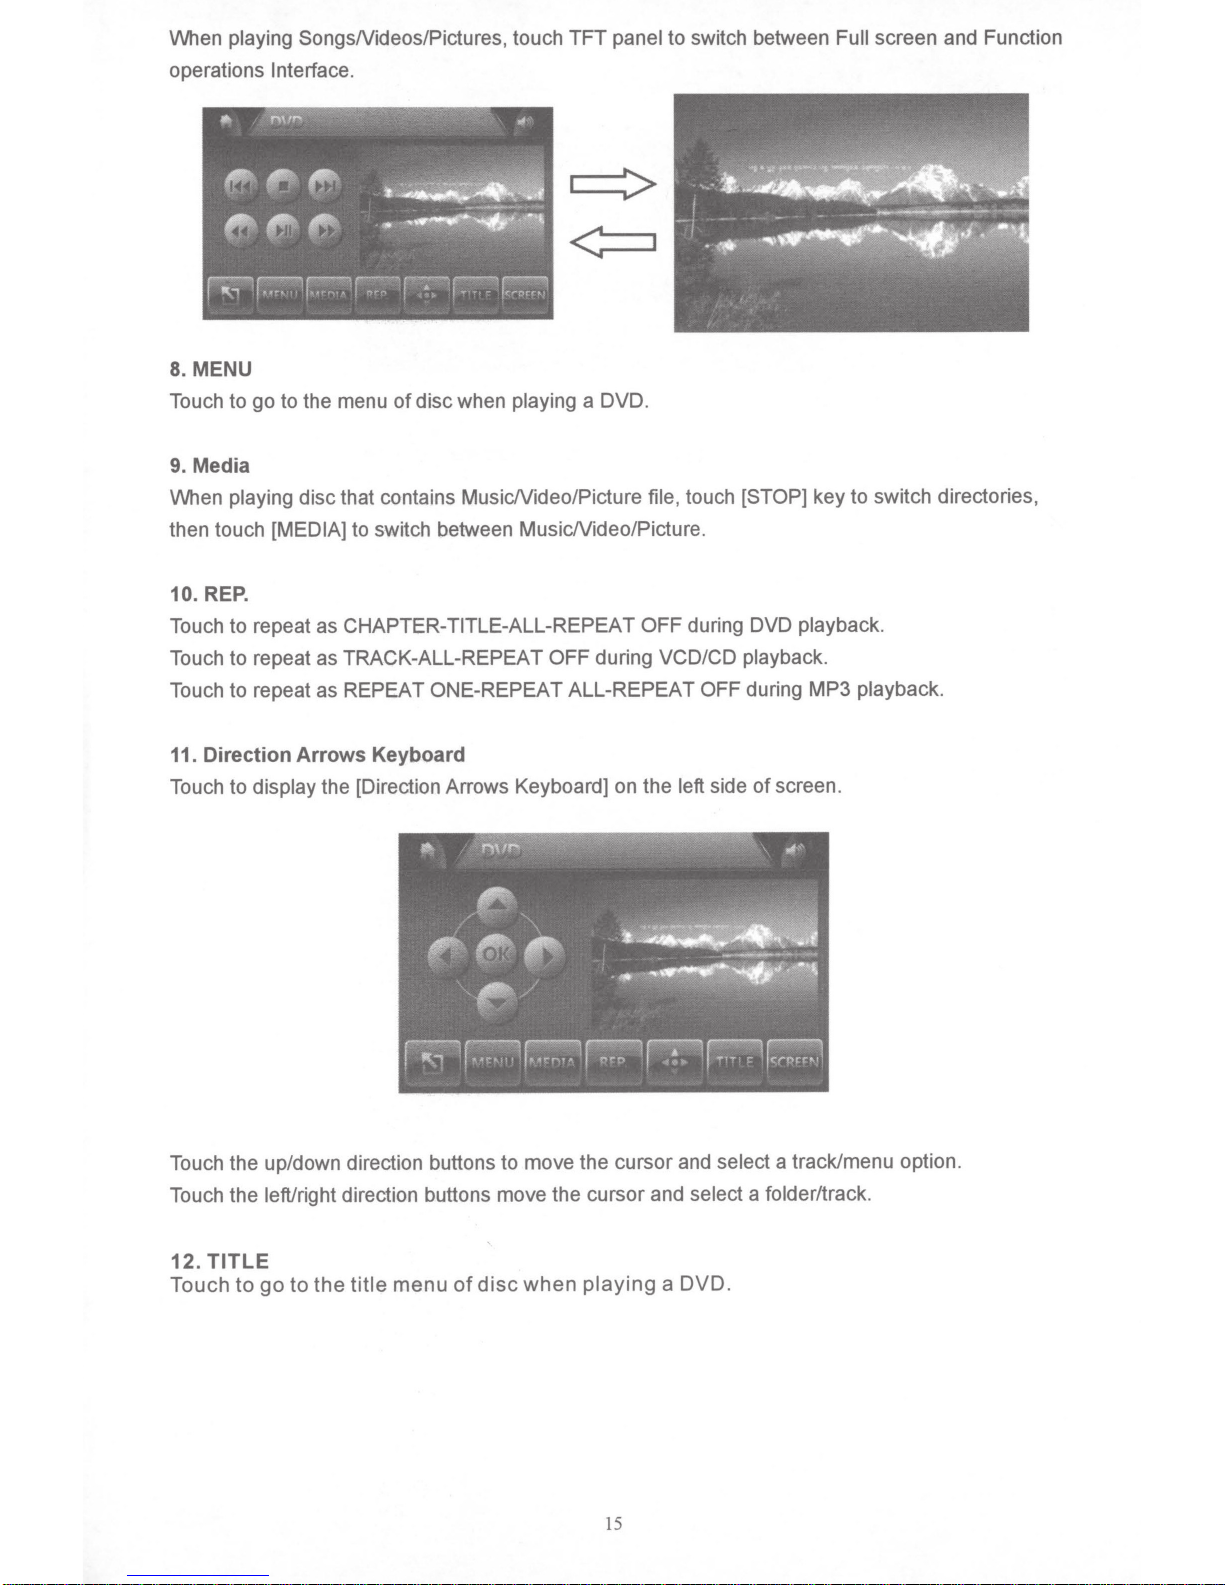
7. Full Screen Display
When displaying directory
operations Interface.
of
2x
at
DISC,
speed . Each press changes speed from
touch this button to switch between
Full
20x
to
8x
to
4x
to
2x
screen and Function
14
to switch between
panel
playing
OFF during
TFT
a DVD.
touch
file,
during DVD
OFF
VCD/CD playback.
When
playing
operations
8. MENU
Touch to go to the menu
9. Media
playing
When
then touch
REP.
10.
SongsNideos/Pictures, touch
Interface.
disc when
of
disc that contains MusicNideo/Picture
[MEDIA]
to switch between MusicNideo/Picture.
Touch to repeat as CHAPTER-TITLE-ALL-REPEAT
Touch to repeat as TRACK-ALL-REPEAT
Touch to repeat as REPEAT ONE-REPEAT ALL-REPEAT OFF
[STOP]
key to switch directories,
playback.
during MP3
screen and Function
Full
playback.
11. Direction Arrows Keyboard
of
side
Touch to
display
the [Direction Arrows Keyboard] on the
left
Touch the up/down direction buttons to move the cursor and select
Touch the left/right direction buttons move the cursor and
select a
12. TITLE
DVD.
Touch
to
go
to
the
title
menu
of
disc
when
playing
a
screen.
a track/menu option.
folder/track.
15
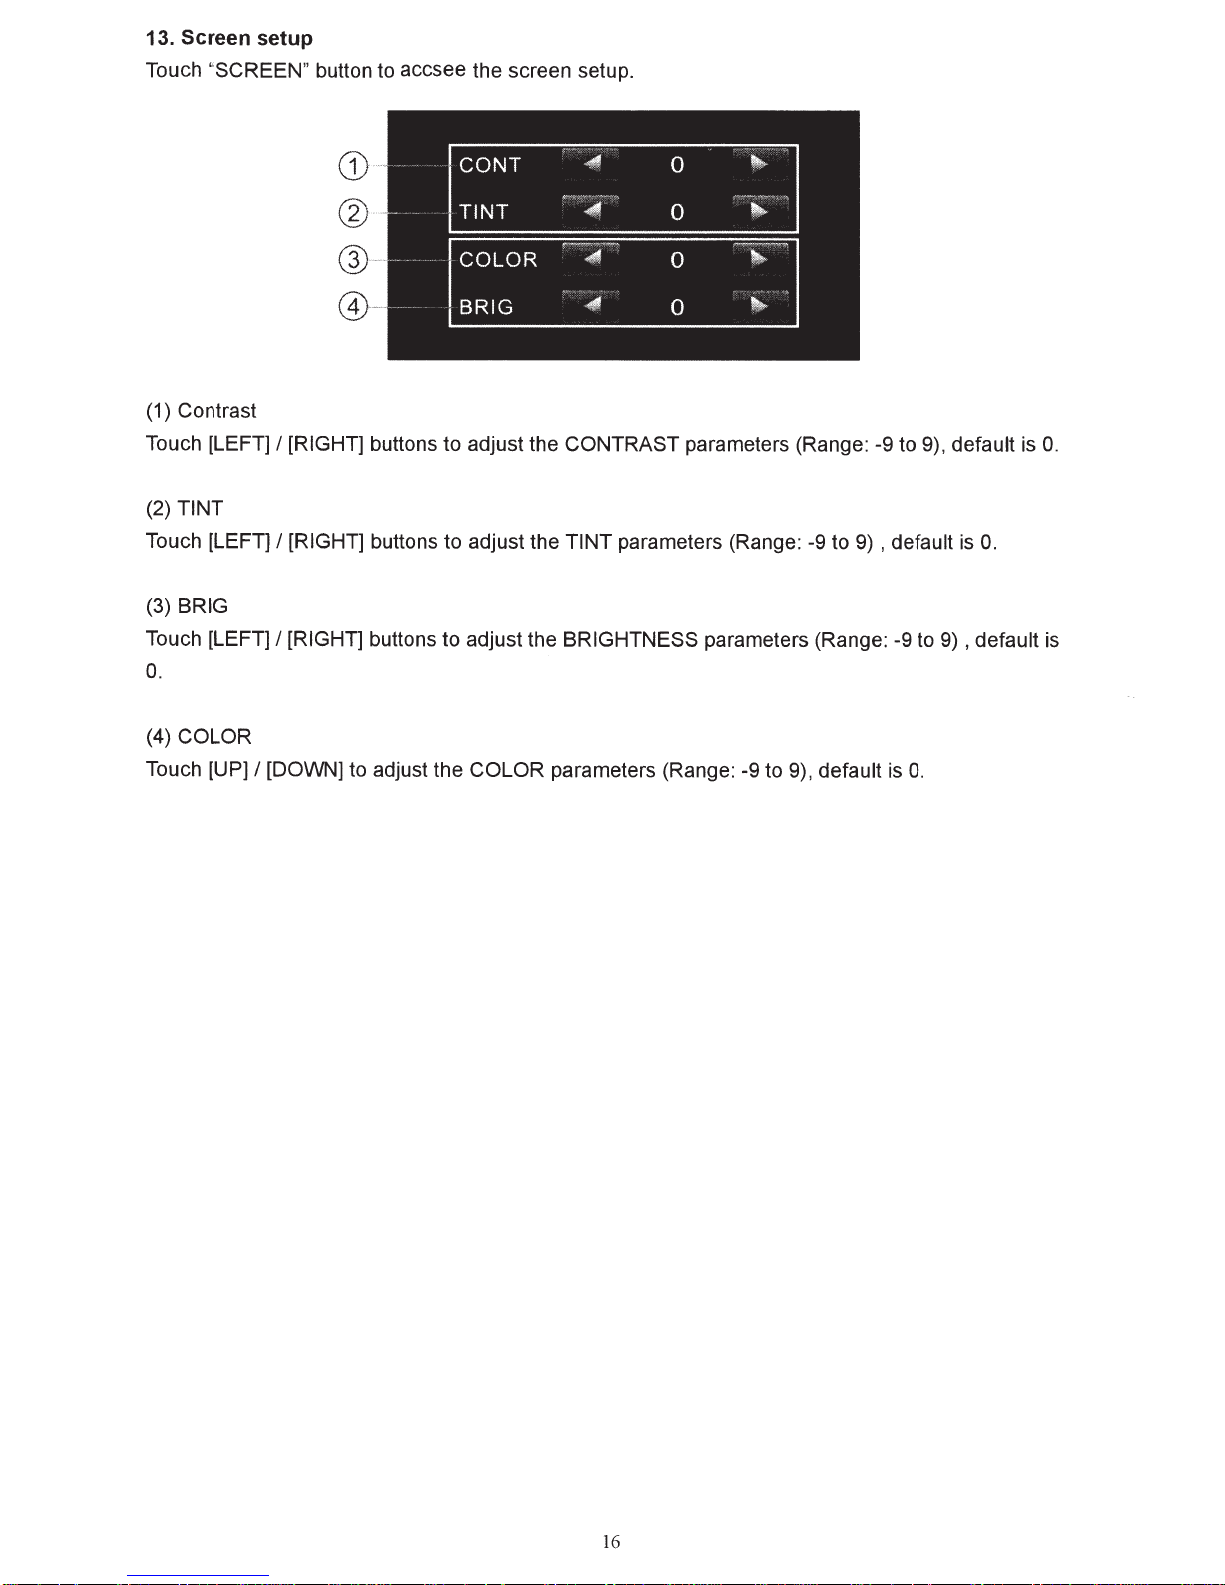
13. Screen setup
Touch "SCREEN" button to accsee the screen setup.
(1) Contrast
Touch [LEFT] I [RIGHT] buttons to adjust the CONTRAST parameters (Range: -9 to 9), default is
(2) TINT
Touch [LEFT] I [RIGHT] buttons to adjust the TINT parameters (Range:
-9
to
9)
, default
is
0.
(3) BRIG
Touch [LEFT] I [RIGHT] buttons to adjust the BRIGHTNESS parameters (Range: -9 to
9)
, default
0.
0.
is
(4) COLOR
Touch [UP] I [DOWN] to adjust the COLOR parameters (Range: -9 to 9), default
is
0.
16
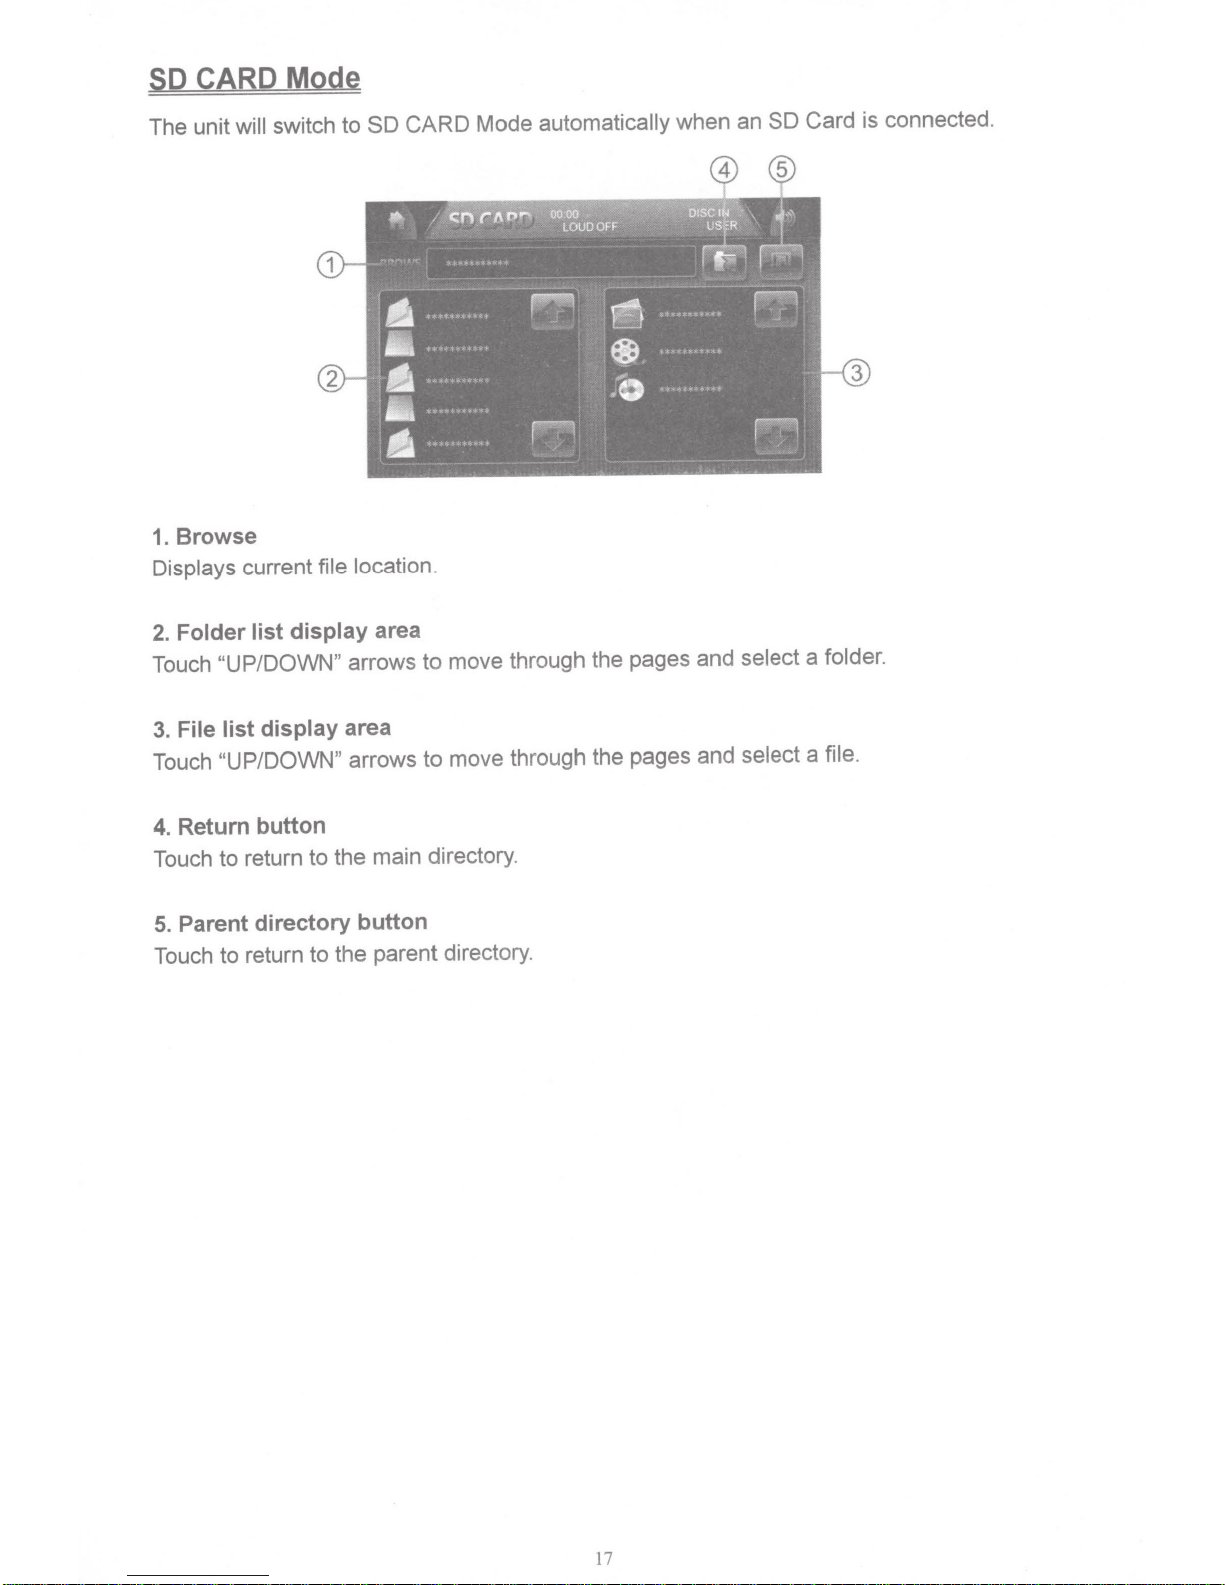
CARD Mode
SD
CARD
SO
switch
The unit
1.
Displays current file location.
2.
Touch "UP/DOWN"
will
Browse
Folder list display area
to
arrows
Card
SO
@
an
®
Mode
move through the pages and select a folder.
to
automatically
when
is connected.
File list display area
3.
Touch
4.
Touch
5.
Touch
"UP/DOWN"
Return button
return to the main directory.
to
Parent directory button
return to the parent directory.
to
arrows
move through the pages and select a file.
to
17
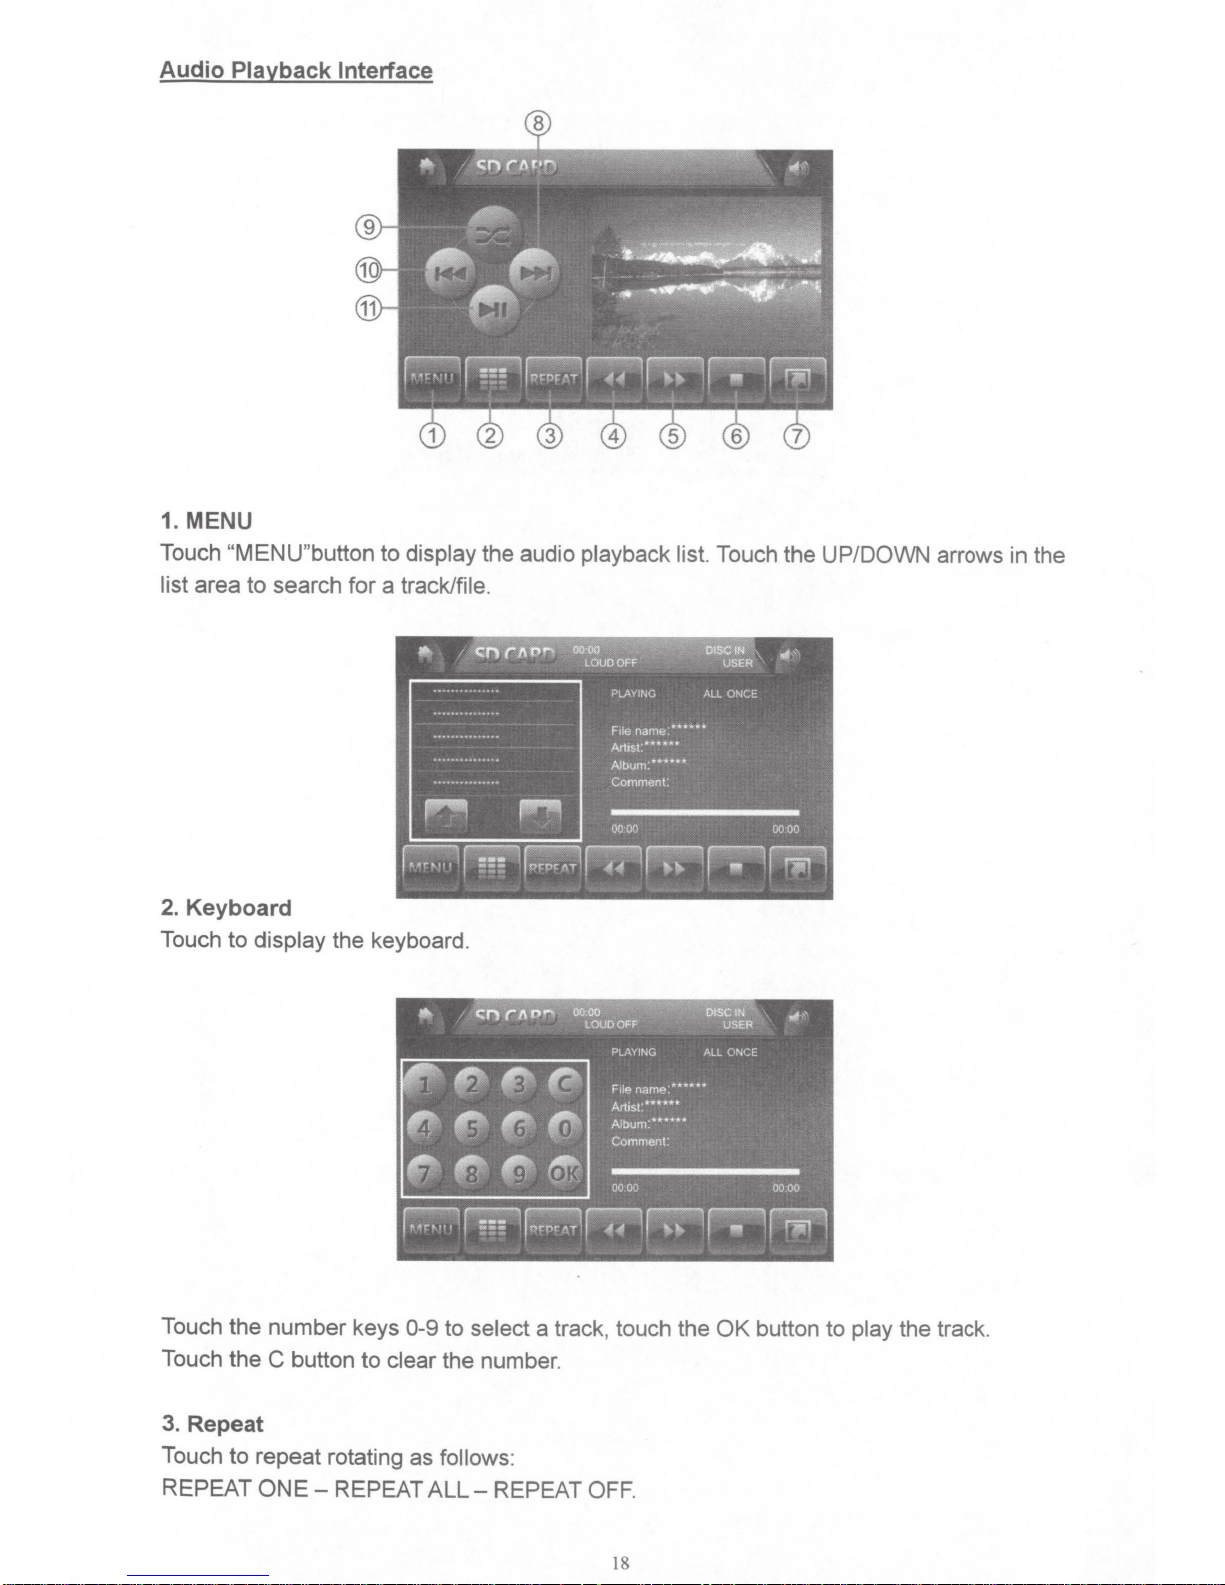
Audio Playback
Interface
1. MENU
Touch "MENU"button
list
area
to
search
for
to
display
a track/file.
the audio playback list.
Touch the UP/DOWN arrows in the
2.
Keyboard
Touch
Touch
Touch
to
the
the
3. Repeat
Touch
to
REPEAT
display
number
C
the
button
keyboard.
keys
0-9
to
select
to
clear the number.
repeat rotating as follows:
ONE-
REPEAT
ALL-
REPEAT
a track, touch the
OFF.
OK
button
to
play
the track.
18
 Loading...